sew-n-tell
HOW TO DO SHIT
Navigate using tag list or search bar. Contact me on my main if you want something taken down
127 posts
Don't wanna be here? Send us removal request.
Last Seen Blogs

luwumucidor
Untitled
he1chouarts
call me Heich
general-jazz
2024
🃏
🗣️: Fr-En-Rus-Ar-Sp

poetic-habits
Inspire your soul

theonlysavage20
theonlySavage
Text
you can make him, if you want to
6K notes
·
View notes
Note
Hey I found a tutorial for reinforcing knitting to prevent holes! Hope you have a lovely day :)
https://youtu.be/4fKKLOUNOHU
Thank you for sharing.
Ooh, I love Sally Pointer's video's! I highly recommend her channel if you're interested in prehistoric fibre crafts (focused on Europe, as far as I can tell).
How to 'Run a Heel'. Reinforcing knitting before it needs darning (Sally Pointer):
youtube
452 notes
·
View notes
Video
Repairing holes in knitting
57K notes
·
View notes
Photo
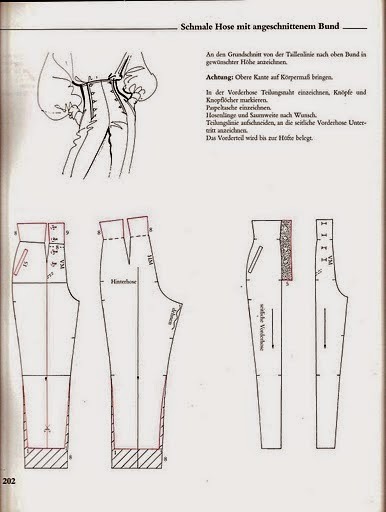


Systemschnitt 1
53 notes
·
View notes
Photo

Horn Pattern Collection 2 by KamuiCosplay
88 notes
·
View notes
Photo


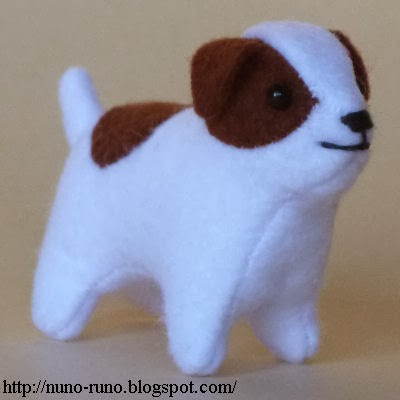
Zafara Plush Pattern :) by Matuska on Patreon
31 notes
·
View notes
Photo


Cheeky the Lemur by CityMuttFursuit
7 notes
·
View notes
Text
Wig Tangle Prevention with Silicone Spray Tutorial
Hello everyone!
This is a tutorial to show how to prevent tangles on long wigs from happening, by spraying the wig with some silicone lubricant. It won’t be perfect, as in, you’ll still get tangles, but it’ll help keep your wig smooth, make any tangles you do get easier to remove, and will help prevent the fibers from gripping each other and tangling in the first place. This is especially good on Arda wigs, which are notorious for tangling due to the fibers being somewhat “grippy.” As such, the two example wigs I use are both Arda Ferraris, one that was left mostly in the style it came in and one that was heavily recurled after treating.
This’ll likely get a big long, so under a cut it goes.
Keep reading
958 notes
·
View notes
Photo
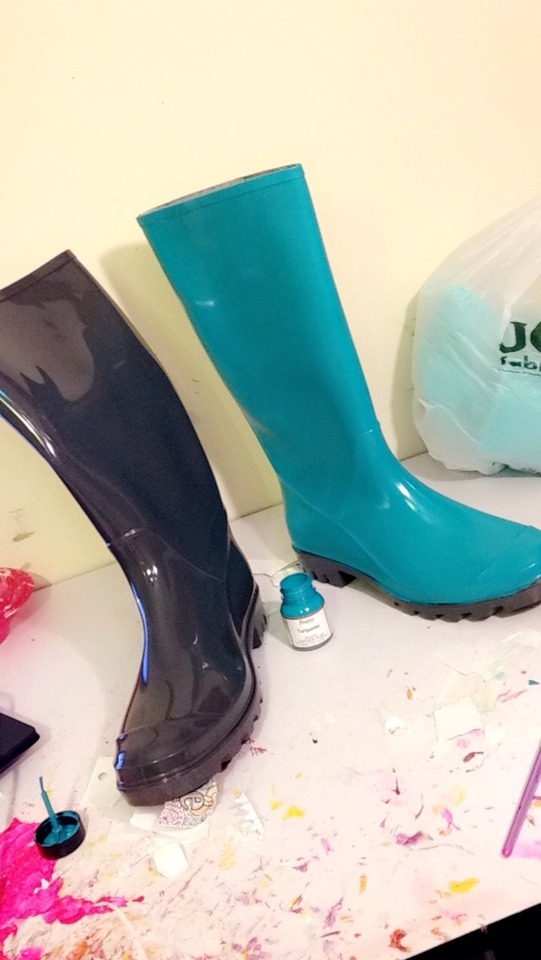

ATTENTION COSPLAYERS:
I would like to make the paint brand “Angelus” known. It is a special paint that is for leather, faux leather, rubber, and similar surfaces.
This is literally the best paint you can buy if you love a pair of shoes, but they aren’t in the right color for your character.
This stuff coats VERY well AND the coats of paint bend with your shoes. This means no cracking!!
In the photos above I took black rain boots and painted them with Angelus Turquoise. As you can see, they don’t look black any more! It’s so good!
I managed to paint two boots with a little one ounce bottle of the paint, and I still have a third of the bottle left over!
The paint dries very fast, so you can put layer on top of layer on top of layer without it streaking.
You can get the paint on Amazon and it comes in every color!
I just really wanted to make this known!! :D This stuff is amazing!
159K notes
·
View notes
Text
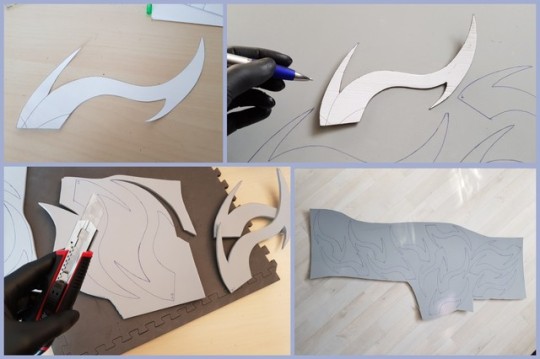
Aaravos Horns (Tutorial)

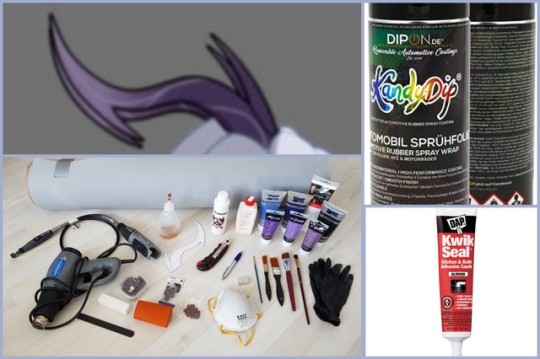


⭐ #LuTorialAaravos ⭐
◇◇◇
⇨ pic 1: cover of Aaravos Tutorial “The Horns”
⇨ pic 2: material overview
⇨ pic 3: pattern/painting and cutting (material: paper, EVA foam 0,5cm, Cutter, desk pad, ballpen or similar) copy the shape of the horn from a original print of the series or simply outline it freehand. (Please note: be careful about the size of the horn, it appears to be rather large in the original series, but you have to consider the size of your head as well. Test it with a test piece first)
Copy the pattern 6 times from the one side then 6 times from the other side. Later the according sides will be glued together. Try cutting along the lines neatly with the cutter. Be careful to keep the blade erect so there won’t be weird edges. (Please note: you can also use thicker foam and make fewer layers! Important is that the quality of the foam is “high density”)
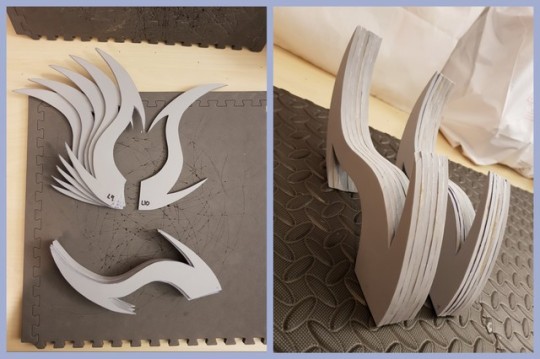
⇨ pic 4: gluing (material: contact glue solvent-free for EVA foam, desk pad) you have 2 times 6 pieces per horn. Glue them layer for layer together, smooth down the glue layer with a rest piece of EVA foam to make it really thin (please note: let the glue dry until it doesn’t stick to your finger when you touch it, it will glue together better like this and immediately. Be careful to press it together as neat as possible)
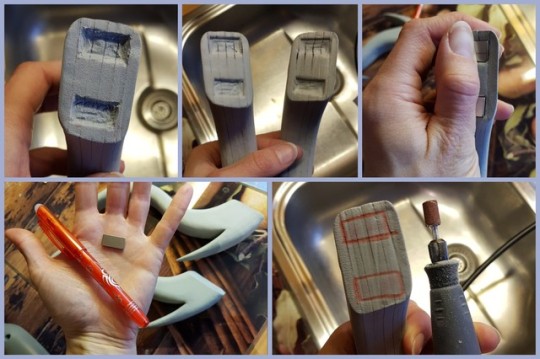
⇨ pic 5: grinding and sanding (material: Dremel + abrasive sleeves grain size 180 big & small, sandpaper grain size 180, accurate file, respirator mask!!!) Now grind the angular horn in a more roundish form. Everyone must look for themselves how roundish you want it to be and how you like it best. Use the big abrasive sleeve (standard size) for the raw grinding and the small one for the smaller edges. (Please note: please DON’T grind with the abrasive sleeves completely into the edges. It doesn’t fit and you may mess up the opposite side.) Use sandpaper to smooth down the surface. Use the file on the edges then smooth them down with sandpaper as well.
⇨ pic 6: adjusting & heating (material: heat gun, knife, desk pad) Now you adjust the horns to your head so that they fit. With an even rim on the underside the horns will protrude askew from your head, which wouldn’t look right on Aaravos. Therefore you have to taper them (Like you see in the picture). Preferably you adjust them to your own head, so you have the ideal fit for the horns. It’s best done with a little bit of visual estimating and trying. (Please note: don’t crop too much at once, approach cautiously!) Now you can heat the horns with the heating gun to seal the foam. The surface will become a bit more glossy and even smoother once it’s sealed. (Please note: be careful when heating, don’t burn yourself or roast the material, you just need to heat it up shortly. Once it turns glossy it’s already good to work with.)
⇨ pic 7: magnets (material: 8 flat magnets, contact glue, Dremel with the small abrasive sleeve, respirator mask!!!) Mark the places where you want the magnets to be on the underside of the horns (two per horn) and dremel inside the marked form the notch into the material about the size of the thickness of the magnet so that it fits in completely. Use the edge of the abrasive sleeve for grinding into the foam, but be careful. If the magnet fits you can heaten up the notch as well and press the magnet immediately into the still warm foam. The passform is optimized now! Wait until everything cooled down and glue the magnet into the notch. Therefore smear some thin layer of glue onto one side of the magnet and one thin layer of glue into the notch (don’t forget the edges). Let this dry and press the magnets again into the notch. (Please note: be careful that the magnets don’t bang together too harshly, because they may break)
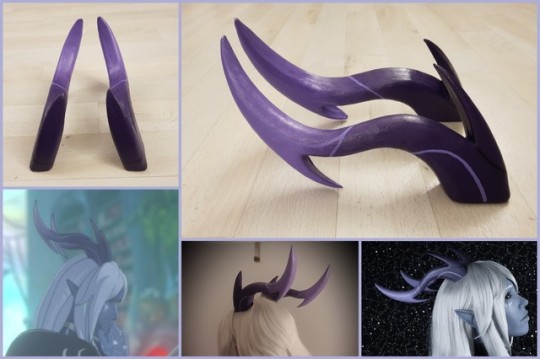
⇨ pic 8: primer, paint, finish!(material: KwikSeal, Flexbond, Acylic paint, liquid Latex (thick), different brushes, desk pad, KandyDip Clear matt + respirator mask!!!) 1.smooth the messy edges and nooks (especially where seams are to be seen) with kwikseal 2. Use flexbond as a primer and brush it onto the surface. Let it dry and repeat until you have about 3-4 layers. (Please note: the flexbond can be applied smoother when you dilute it with some(!)water) 3. Brush the violet base colour onto the horns (colour is mixed with the colours violet, grey, black, light blue + a little but of the liquid latex) 4. The gradient (in this case done with different kind of brushes, acrylic paint (mix of lilac, creme-white, light blue) always look if the gradient looks smooth. It’s rather tricky to do this with brushes and prepare to invest a lot of work and time into it. Keep a glass of water next to you, to dilute the gradient and so get better results in the end and to keep the acrylic-latex-mix smooth. Start with the lightest part at the tip of the horns. Then mix sine of the light colour with a tad bit of the base colour bit by bit and work it into each other with every stroke until the gradient looks smooth. Do this repeatedly until you reach the nuance of the base colour. You have to try out a bit, but you can always correct mistakes easily, so take your time until you’re please with the result. 5. Last but not least paint the light lines Aaravos has on his horns with a small brush. Look at an original screenshot or pattern to understand how they curl around his horns. Use the light lilac colour and mix some more creme-white into it, to make them a bit lighter than the gradients lightest colour. (Please note: draw removable lines for example with a heat-removable ink pen onto the horn first, before you apply the paint, then it’s easier.) 6. When everything dried, use KandyDip clear matt for the finish. Only use this outside or in well-ventilated rooms. Spray about 3-4 layers on it . (Please note: VERY IMPORTANT! No matter what kind you use kwikseal, flexbond, acrylic paint or KandyDip, EACH layer HAS TO dry completely before applying the next layer!)
⇨ pic 9: apply finished horns with magnets to the wig. Simply connect the magnets from the inner side of the wig with the magnets of the horns on the outer side of the wig at the place you want them to stay.
⇨ pic 10: list of shops! You find everything you need there!
773 notes
·
View notes
Photo
Super lightweight horns!
You can find this foam in a roll at Wal-Mart.
1. Trace the patterns 3 times For each horn in the foam.
2. Cut them and glue them together. You can use the spray glue or the same I use to cover the horns which in my case is barge cement.
3. Give the shape you want. I used sissor and to add more details a wood burner tool.
4. Once you have your shape cover is in barge cement or contact cement and let it dry for a while.
5. Paint it and you are done!
My page: Facebook.com/m.cosplay
269 notes
·
View notes
Text
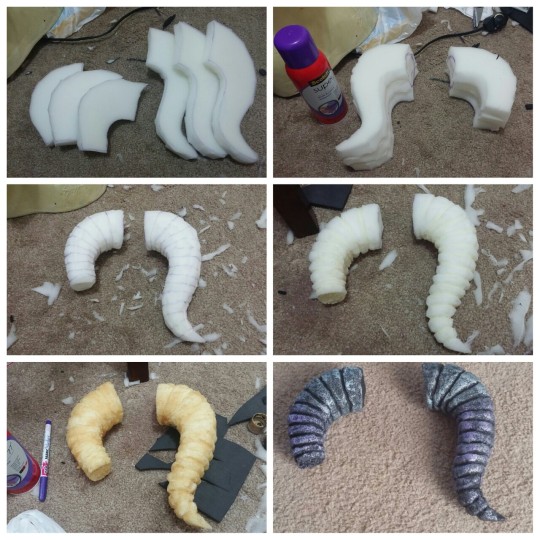
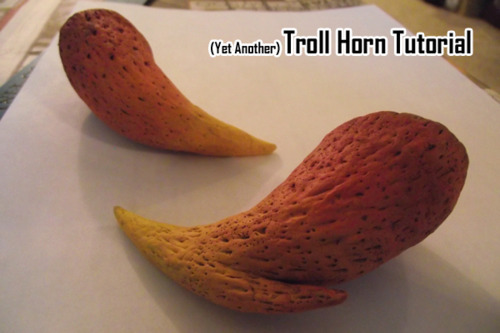
Semi-Realistic Troll Horn Tutorial
I know there are a kajillion of horn tutorials out there already, but I ended up using a method to make my horns that I haven’t seen written about yet. So just in case you guys are curious, here’s how I made my troll horns.
(Tons of pictures ahead, apologies in advance.)
FIRST! Please read the entire tutorial before running out and buying supplies - a lot of the stuff I used can be swapped with other things that you may happen to already have lying around your house. Save your money for other stuff!
For supplies, I used the following things:
Unpictured supplies include large snaps (the kind used in clothing), scraps of Wonderflex (any rigid material will do), hot glue, and a cheap wire cat brush.
The basic method I used to make my horns was this: I used the polyurethane expanding foam to carve out a base for my horns, then covered them in foil and Paperclay. After texturing the clay, I let them air-dry and painted them with acrylic paints. To attach them to my wig I used the snaps, Wonderflex, and hot glue.
(Also, this tutorial is sort of pieced together from pictures I took while making two sets of horns. Just in case you’re wondering why Mindfang’s horns suddenly change into Kanaya’s and vice versa.)
Part 1: Creating the Foam Base
Polyurethane expanding foam is awesome stuff to use when you need a lightweight, carve-able base for sculpting things. It’s usually sold in the insulation department of home improvement stores like Lowes or Home Depot. For my horns I used Fill & Seal, which was $3 per can.
First, protect your working area with parchment paper or wax paper. (In a pinch I suppose you could use newspaper, but the foam will stick to that. You’ll be carving off a good portion of the foam anyway though.) Attach the nozzle to the can and dispense some foam onto the parchment paper, creating some roughly horn-sized lumps. I have no idea how to clean the nozzle once foam has been through it, so I just kept making foam lumps until the can was empty. For me, it was about 7 or 8 medium-sized foam lumps per can. Keep the extras in case you screw up, or give them to friends who are also making horns. Let the lumps cure overnight, or at least for several hours.

Next, peel the foam off of the parchment paper and check to make sure you don’t have any humongous voids. If you don’t, then you’re good to go!
If you need to take a break, now is a good time. I unfortunately discovered that if you start carving the foam and leave it alone for a few hours, it will shrink and distort slightly (maybe about a 10-20% size change). It’s probably a good idea to set aside enough time to sculpt your foam bases and cover them in clay all in one sitting.
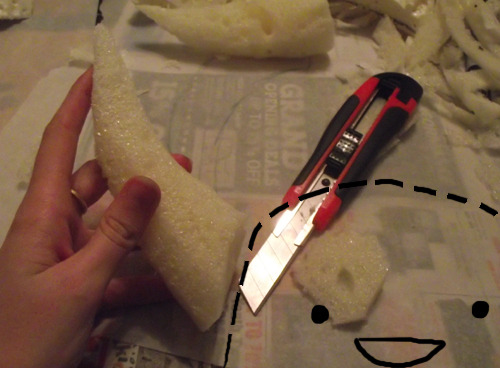
To sculpt the horns, I used a box cutter. The foam is fairly soft and flexible, so the box cutter slides through it really easily! The more blade of the box cutter you expose, the wider your cutting surface will be and the easier it will be to knock off large sections of foam. To remind myself of the general shape I wanted, I used a sharpie marker to trace an outline on the foam.
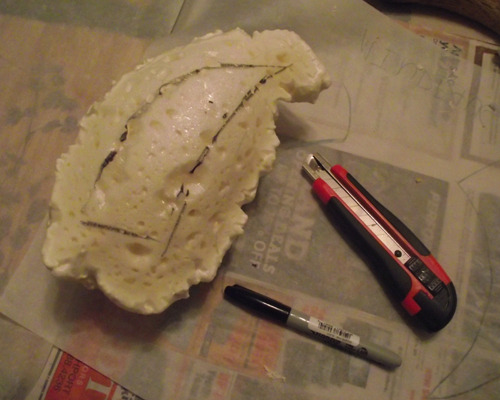
Here are the horns after I made the basic shaping cuts.

Knock off the edges and continue to sculpt them into the proper shape. Make sure you frequently compare the horns to each other to maintain symmetry.

Knock off part of the base of the horn so that it will be able to sit on your head properly. I had a mirror nearby and was holding these horns up to my head a LOT during the sculpting process to make sure I had the proper angulation and size.
In the end, you should get something like this!
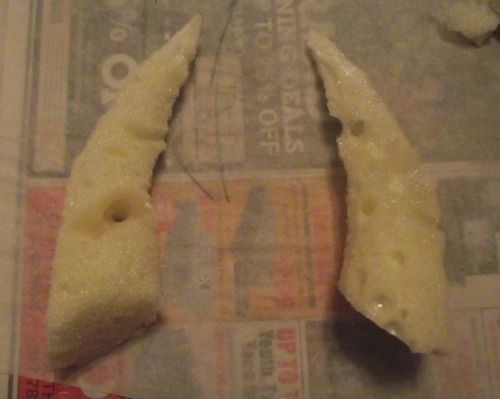
You’ve probably noticed that the foam can get a lot of big air bubbles in it. If there are any large air bubbles in your horns at this point, you can tear up smaller scraps of the foam and shove them in the voids.
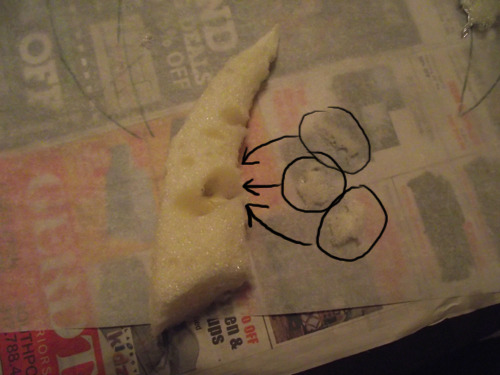
Part 2: Covering the Base
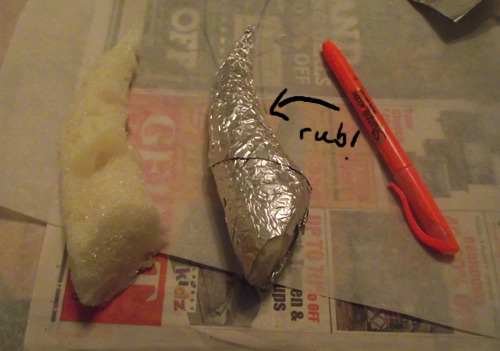
Cover the horn in tin foil. It doesn’t need to be a gigantic piece - I used a square whose diagonal width was slightly wider than the length of my horn. Make sure the piece of foil doesn’t develop small tears when you’re taking it off the roll, otherwise it’ll be a pain in the ass when you’re burnishing it.

Find something hard to burnish the foil with. I used the barrel of a highlighter and rubbed it over the foil to adapt it to the surface of the foam.
After I had covered and burnished both horns, I hacked off the end of one and added some copper wire to serve as a skeleton for Mindfang’s weird little claw thing. Note that for her other horn (which will have a hook on the end), I didn’t do anything. It’s up to you to choose which parts of your horns you want to use a wire base for, if at all.
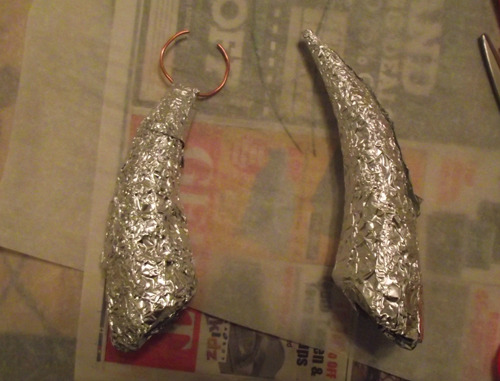
Next, get out your clay and begin coating your horns with it. (I highly suggest Paperclay - it is an air-dry clay that dries light and strong. Not all air-dry clays are the same! Stay away from Crayola brand Air Dry Clay, it is extremely dense and crumbly and pretty awful for this project.) If you don’t have a rolling pin to thin out the clay, the Fill & Seal can makes a great substitute. Keep a dish of water nearby so you can use it to blend the seams in your clay.

Sculpt whatever weird things you need on the ends of the horns, and be sure to blend the seams in with water.

The horns are now fully coated! Hooray! At this point the clay was too malleable for my liking and it kept squishing around in my hands every time I picked up the horns, so I let them dry for an hour or so before starting to add texture to them. The Paperclay dries pretty slowly, so you can afford to take a short break.

Part 3: Texturing the Horns
For this part, I was lazy and didn’t want to take a series of pictures, so you get a video of me rambling on about cow horns and shit for seven minutes. Enjoy!
After you’ve textured the horns, let them air dry overnight. (I’d like to point out that this is why I suggest a water-based clay instead of a polymer clay like Sculpey that requires baking in an oven. I have no idea what’ll happen if you stick polyurethane foam in the oven - it might catch fire or release some horrible death gas. Just use a clay that hardens via air exposure, please. ;_;)
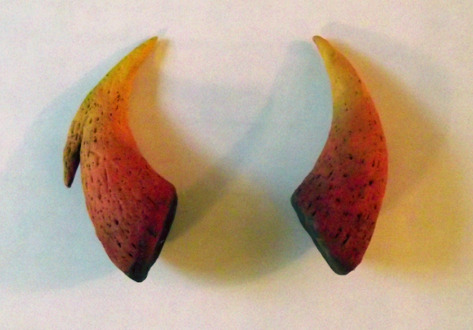
Part 4: Painting the Horns
(My apologies - this section is kind of light on pictures because of camera issues.)
To paint the horns, I mixed up four colors using acrylic paint: dark brown, red, orange, and yellow. The dark brown goes on first as the base coat. Make sure you get the brown into all of the little nooks and crannies you created, but don’t just glop paint on either. If you lay on the paint too thickly, you’ll fill in all the little pores you worked so hard to create in the previous step! Let the base coat dry. When you add the lighter colors later, the brown will only show through in the recessed areas of your horns.
Next: using a small, short brush, begin painting on the yellow, orange, and red. (Technically, the trolls’ horns don’t have any red in them, but I like to add a little bit near the base of the horns anyway to give them a bit wider of a color range.) I used a technique called drybrushing to blend from one color to the next. Basically, you load only the tip of the brush with paint and dab it on your palette a few times to take off any excess paint. The paint should be applied to the horns using a brisk tapping motion rather than a series of long strokes. If your brush is appropriately loaded, the paint should be dry within seconds of its application.

When you’re done, you should have something like this!
Part 5: Attaching the Horns
The cool thing about these horns is that they’re extremely light, so you don’t have to do a whole lot of work to attach them to your head! However, the following method requires that you wear a wig - apologies to those of you who want to use your real hair for troll cosplay.
To attach the horns to my wig, I cut out a circular base out of Wonderflex that was about as twice the diameter of my horns. (Wonderflex is a pretty nifty thermoplastic that you can mold with a blowdryer. You can buy some here, but it’s really not worth getting just for some troll horns. I just had a lot of scraps lying around. Any stiff material will probably work, even cardboard from a cereal box.) To make it easier for my fingers to get to the snaps, I cut out two C-shaped divets out of either side of each circle and rounded the resulting sharp edges.
Next, glue some large snaps (approximately ¼") to the base of your horns. With both pieces snapped together, add a dollop of glue to the free side of the snaps and press the base up against the snaps. This way the snap pieces on the horn and the snap pieces on the base will line up perfectly! Once the glue has cooled, carefully pry the snaps apart. If something separates where it shouldn’t, just peel the excess hot glue off and try again.

To attach the horns to your wig, simply sandwich the wefts of the wig between the snaps on your horns, and press the base and the horn together. Positioning the horns can get a little tricky, but once you’ve got them attached to the wig they’re not really going anywhere unless you want them to. This is what the inside of your wig should look like when the horns are in place.
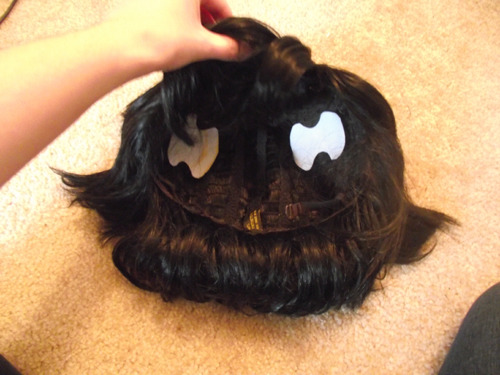
And voila! You get lightweight horns with no bothersome headband, and if you need the wig for something else all you have to do is unsnap the horns.

Happy trolling! >:3
Edit: A lot of people have asked me if the snap attachment method will work for larger horns, and I don’t know! Here is the best advice I can give for large horns until I actually have the opportunity to make a pair myself.
Edit 2: I have made a pair of Tavros horns! Here is a video I made about how to attach them. I ended up using a method that didn’t use snaps, but it still results in the horns being removable and no headband showing on the outside of the wig.
4K notes
·
View notes
Text
Water-based Troll Makeup Tutorial
I haven’t seen water-based makeup discussed very well in a lot of the troll makeup tutorials I’ve found circulating around the internet, so I figured I’d give it a go!
Below the cut you’ll find some pros and cons of water-based makeup, tips on applying it, and how to turn these things…

…into something you can easily slap on your face at a con.
Keep reading
1K notes
·
View notes
Text
Hey so uh I was working on cosplay today and I found something that might help some other people out?
Whenever I bind for a crossplay, I’m always really concerned about strapping the gals down as much as possible to make sure I don’t get some sort of boob shelf, but because of the fat in that area and the fact I don’t have very well developed chest muscles, I always get ugly little armpit bulges too. (Right now I’m using a sports bra + wide ace bandage, but I own a binder shirt too and I run into the same problem when I wear it. Armpit fat too bomb)
But if you pad a little bit in your armpit area, you can smooth that line out! I’m sure someone else has figured this out before, but I’ve been cosplaying for a couple years and I hadn’t heard anything about this so I figured I would share.
Keep reading
88 notes
·
View notes