#12-24mm f/2.8G
Video
Wrong Answer by Matthias Weinberger
Via Flickr:
Strobist info: SB900 into Softbox from the upper right, bare SB800 behind the Model pointed at the ceiling, bare SB26 behind the Model pointing down and forwards, bare SB600 on the floor in front of the Model pointing slightly upwards. Triggered with CLS. Making Of Video
#Nikon#D700#Nikkor#12-24mm f/2.8G#Model#Woman#Natalie#Fashion#Beauty#Aufzug#Lift#Elevator#Capture One 5#Strobist#Speedlight#Softbox#CLS#Wideangle#topf25#flickr
1 note
·
View note
Text
The Perfect Shot - Sunset Beach Photography with Premium Equipment
Capturing the Magic: Introduction to Sunset Beach Photography
There's something magical about sunset beach photography. With the warm tones of the sun sinking behind the horizon, the calmness of the sea and the beach, and the possibility of capturing stunning silhouettes and reflections, it's a favorite subject for photographers.
But how do you capture that magic?
Here are a few tips:
Timing: First and foremost, timing is everything. Be at the beach at least an hour before sunset to scope out the best spots.
Equipment: Bring the right equipment, including a wide-angle lens, a tripod, and a remote shutter release.
Composition: Pay attention to the composition of your shot. Use the rule of thirds to balance the foreground, middle ground, and background.
Exposure: Experiment with different exposures to capture the best mood. Use slow shutter speeds for long exposures or fast shutter speeds for action shots.
Filters: Explore different filters to enhance the mood and colors in your shot. A polarizing filter can deepen the blues in the sky and water, while a neutral density filter can allow for longer exposures.
Patience: Lastly, be patient and keep shooting. As the light changes, so does the mood and colors in your shots. Don't be afraid to experiment and try new things.
With a little bit of patience and the right equipment, you can capture the magic of a sunset beach photograph. So grab your camera and hit the beach!
Choosing the Right Equipment: Cameras, Lenses, and Filters
Choosing the right equipment is crucial for capturing the perfect shot of a sunset at the beach. The right camera, lens, and filter can make all the difference in the quality and sharpness of your photograph. Here are some tips for selecting the right equipment:
Cameras
When selecting a camera, look for one that has high resolution, low light capabilities, and a quick shutter speed. A camera with a full-frame sensor will capture more detail and produce higher-quality images than a camera with a smaller sensor. Consider a camera with a fast autofocus system, especially if you plan on shooting action shots of waves or surfers. Some great options for beach photography are the Sony A7R IV, Canon EOS R5, and Nikon Z7 II.
Lenses
The type of lens you choose will depend on the type of shot you want to capture. For beach photography, a wide-angle lens with a low aperture is ideal for capturing a sweeping view of the beach and the sky. A zoom lens with a long focal length is useful for capturing surfers or boats in the distance. A fisheye lens is great for capturing unique, distorted perspectives. Some top lens choices for beach photography are the Canon EF 16-35mm f/2.8L III USM, Nikon AF-S NIKKOR 14-24mm f/2.8G ED, and Sony FE 12-24mm f/4 G.
Filters
Filters can enhance the colors and contrasts in your sunset beach photos. A polarizing filter will reduce reflections and glare on the water and sky, making the colors more vibrant. A neutral density filter can be used to slow down the shutter speed, allowing you to capture the motion of waves or clouds. Graduated filters can help balance the exposure between the bright sky and darker foreground. Some popular filter brands are B+W, Tiffen, and Lee Filters.
Overall, selecting the right equipment is crucial to capturing stunning sunset beach photos. Investing in high-quality cameras, lenses, and filters will pay off in the long run, allowing you to capture breathtaking moments for years to come.
Mastering the Technique: Tips for Perfecting Your Shots
While having premium equipment is important, it's not enough to take that perfect sunset beach photo. Knowing and mastering the right techniques is essential. Here are some tips to help you capture the perfect shot:
1. Use the Right Settings
Before clicking that shutter button, ensure that your camera settings are adjusted correctly. Try using manual mode and set your aperture to a small f-number (e.g. f/5.6) for a shallow depth of field. Use a slow shutter speed (e.g. 1/30 second) to create a blurred effect on the waves or a fast shutter speed (e.g. 1/500 second) to freeze the waves in action. Lastly, adjust your ISO settings to match the lighting conditions.
2. Utilize Composition Techniques
Composition plays a huge part in photography, especially in landscape and sunset photos. Use the rule of thirds by placing your main subject at intersecting points on the grid. Incorporate leading lines to draw the viewer's eye towards your subject, creating depth and dimension. Also, try shooting from a low angle or incorporating foreground elements for added interest.
3. Timing is Key
Sunsets are fleeting moments, so timing is crucial. Check the local weather forecast and arrive at least an hour before sunset to scout out the perfect location. Take test shots as the sun is setting to adjust your settings and composition. Once you've found the perfect moment, click that shutter button and capture the moment.
4. Experiment with Different Lenses
By using different lenses, you can create different effects in your photos. A wide-angle lens can capture the whole horizon and allow for more foreground elements. A telephoto lens can capture the details of the sun and create a compressed effect. Experiment with different lenses to find the right one for the shot you want to take.
5. Practice, Practice, Practice
The more you practice, the better you become. Take the time to learn your camera and experiment with different techniques. Practice taking photos during different times of the day with varying lighting conditions. By continuously practicing, you'll be able to master the technique and capture that perfect sunset beach photo.
Setting the Scene: Finding the Best Locations and Timing
Location is Everything
To capture the perfect sunset photo, it's important to choose the right location. You should first consider the type of setting you want for your photograph - do you want to capture the sun setting over the ocean, behind a mountain range or over a city skyline? Choose a location that is known for its picturesque sunsets such as popular beaches, mountains, and cityscapes. You may also want to research places to avoid the crowds and ensure you have a clear view of the sunset.
Timing is Key
Timing is everything, and this is true when it comes to sunset photography. The best light for a sunset photo is just before the sun dips below the horizon, and after the sun has set, the sky can become too dark for optimal photo conditions. Plan to arrive at your location well in advance so that you can set up your equipment and make any necessary adjustments to your camera settings. In general, arrive at the location about an hour before sunset to allow for ample preparation and experimentation with your camera.
Research Weather Conditions
Weather conditions can make or break the perfect sunset photo. Check the weather forecast before you set out to your location as rainy, cloudy or overcast conditions can affect the quality of your photo. A clear sky with just a few clouds can add texture and interest to your sunset photos. Keep in mind that the last light of day tends to be warmer than the first light of day, so you may want to choose a location that faces west to get the best exposure.
Consider the Composition
Pay attention to the composition of your shot. Take a moment to decide what elements you want to include in your photo, such as foreground elements like rocks or trees, or background elements like buildings or mountains. Use the rule of thirds to create a balanced and visually pleasing composition by positioning the horizon line in the upper or lower third of the photo. Additionally, you may need to adjust the focal length of your lens to isolate the subject and create an impactful composition.
In summary, to capture the perfect sunset photo, you'll need to find the best location, choose the right timing, pay attention to weather conditions and consider the composition of your shot. With these factors in mind, you'll be able to create stunning and impactful photos that capture the beauty of a sunset.
Editing Your Photos: Enhancing the Beauty of Sunset Beach
Adjusting the Exposure and Contrast
Editing your photos is essential to bringing out the best in your sunset beach photography. When you use premium equipment to shoot your photos, you have the advantage of capturing high-quality images that are rich in detail, colors, and tones. However, you may need to adjust the exposure and contrast to make your photos look even better.
To do this, you can use editing software like Adobe Photoshop or Lightroom. You can increase the exposure to brighten up the photo and bring out the details in the shadows. You can also adjust the contrast to increase the difference between the light and dark areas of the photo. This will make the colors and details pop, creating a more vibrant and dynamic image.
Enhancing the Colors and Saturation
Sunset beach photography is all about capturing the beautiful colors of the setting sun. While premium equipment can capture a lot of the natural colors, editing can enhance them even further.
In editing software, you can increase the saturation of the photo to make the colors more vibrant and intense. You can also adjust the white balance to bring out the natural warm tones of the sunset. This will make your photo look more alive and dynamic while still maintaining its beautiful natural look.
Cropping and Framing
Cropping and framing your photos is another way to enhance the beauty of sunset beach photography. You can use the rule of thirds to compose your photo, making sure that the horizon line is placed at one-third or two-thirds of the way up or down the photo.
You can also crop your photo to remove any unwanted elements, allowing your main subject to stand out. This can make your photo look more balanced and focused. Additionally, you can add frames to your photo to give it a professional and polished look.
Editing your photos is essential to creating stunning sunset beach photography. With premium equipment and editing software, you can bring out the best in your photos by adjusting the exposure and contrast, enhancing the colors and saturation, and cropping and framing your photo. By following these tips and techniques, you can take your sunset beach photography to the next level and create beautiful, memorable images that capture the magic of the setting sun.
For many photographers, capturing the perfect sunset beach photo is the ultimate goal. The natural beauty of a sunset combined with the serene atmosphere of a beach creates the perfect backdrop for a picture-perfect moment. Here, we have curated a collection of breathtaking sunset beach photos to inspire your next photo shoot.
1. "Golden Hour" by John Smith
This photo perfectly captures the warm glow of "golden hour" - the time just before sunset when the light is soft and warm. The colors of the sky and the water blend seamlessly together, creating a peaceful and serene scene.
2. "Beach Bliss" by Sarah Jones
The contrast of the bright orange sun against the deep blue ocean in "Beach Bliss" creates a stunning visual impact. The silhouettes of the palm trees add a tropical touch, making this photo a perfect representation of a dreamy beach paradise.
3. "Seaside Serenity" by Michael Lee
The soft pink and purple hues in "Seaside Serenity" create a calming and tranquil atmosphere. The lone figure in the distance adds a sense of peace and solitude, making this photo a perfect representation of the serenity found at the beach.
4. "Sunset Reflections" by Emily Davis
The mirror-like reflection of the sunset in "Sunset Reflections" is truly breathtaking. The texture of the sand and the shimmering waves add depth and interest to the composition, making it a striking and memorable photo.
5. "Fiery Sunset" by Alex Kim
The bold and vibrant colors of the sunset in "Fiery Sunset" create a dramatic and dynamic scene. The silhouette of the lone surfer adds a sense of action and adventure, making this photo perfect for those seeking to capture the excitement of beach life.
These stunning sunset beach photos capture the essence of what makes the beach such a beloved and popular subject for photographers. With premium equipment and a keen eye for detail, you too can capture the perfect shot.
Conclusion: Tips for Taking Your Sunset Beach Photography to the Next Level.
Now that you have the premium equipment and have learned the basics of sunset beach photography, it's time to take your skills to the next level. Here are a few tips to help you capture even more stunning sunset beach photos:
1. Use a tripod
Using a tripod will help eliminate any camera shake and allow you to take longer exposures. This will help you capture those beautiful, silky smooth water shots.
2. Change your perspective
Don't be afraid to change up your angle and change your perspective. Take photos from different heights, and move around to find the perfect shot.
3. Experiment with filters
Filters can make a huge difference in your sunset beach photography. Try using a polarizing filter to reduce reflections and enhance colors, or an ND filter to allow for longer exposures.
4. Incorporate people into your shots
Adding people can provide a sense of scale and add interest to your sunset beach photos. Silhouettes of people can look particularly stunning against a colorful sunset.
5. Keep an eye on the weather
The weather can make or break your sunset beach photography. Keep an eye on the forecast and plan accordingly. Clouds and storms can create dramatic and beautiful skies, while clear skies can provide vibrant colors.
By following these tips, you'll be well on your way to capturing stunning and memorable sunset beach photos. Remember to keep practicing and have fun!
If you're looking for even more exciting excursions in Bangkok and want to capture the city's hidden gems through the lens, check out Fancy Excursions in Bangkok – Uncovering the City’s Hidden Gems Through the Lens.
Read the full article
0 notes
Photo


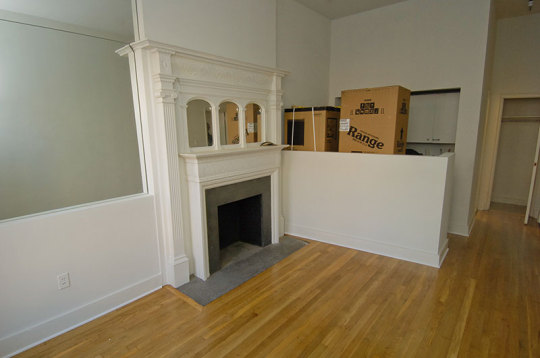
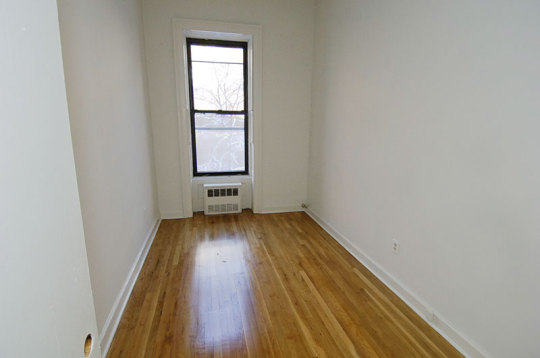
MOVING
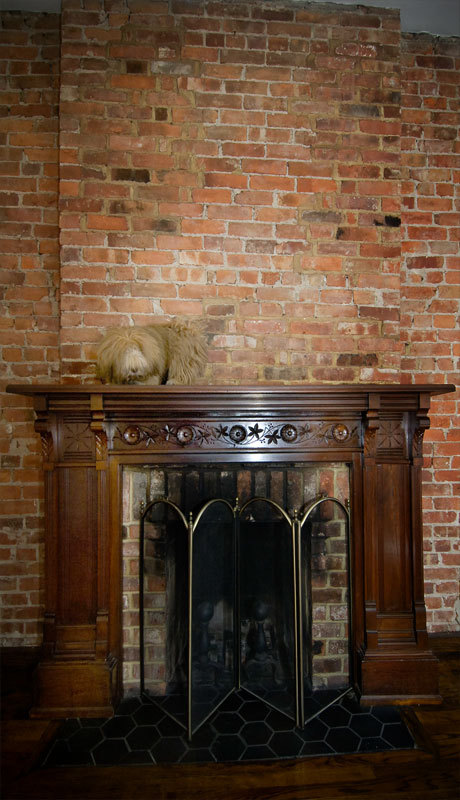
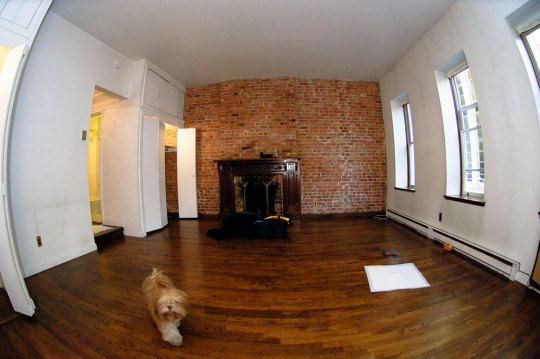
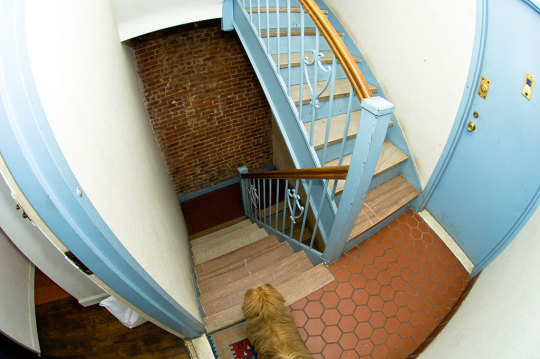
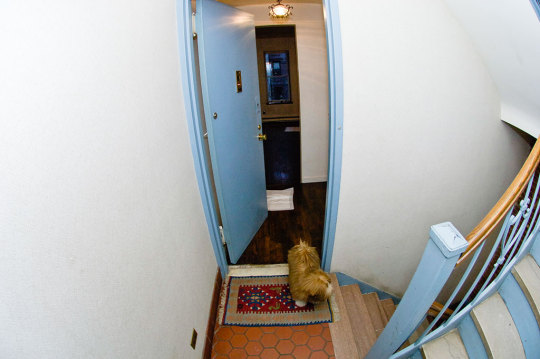
Charley moves from his old home into his new one 16 years ago today, December 22, 2005, Upper West Side, Manhattan, NYC
Charley packs up his belongings and moves from West 70th Street to West 89th Street, December 9 – 22, 2005. He lived on West 70th for four months. He lived on West 89th for 14 years before moving to Brooklyn in 2019.
Individual photo captions:
“Real hilarious. Now put me down.” December 21, 2005
“No stockings?” December 21, 2005
Charley takes a break from packing, December 13, 2005
Charley makes his final inspection, December 22, 2005
Charley cleans the floor, December 22, 2005
Charley on guard, December 22, 2005
Charley waits to hand over the apartment keys, December 22, 2005
Charley’s new home, December 9, 2005
Charley’s new home, December 9, 2005
Charley’s new home (bedroom), December 9, 2005
Nikon D2X | Nikkor 12-24mm f/4G | Nikkor 10.5mm f/2.8G ED
#charley lhasa#lhasa apso#dog#puppy#moving#cl051209#cl051213#cl051221#cl051222#upper west side#manhattan#nyc#nikond2x#digital#lightroom
2 notes
·
View notes
Text
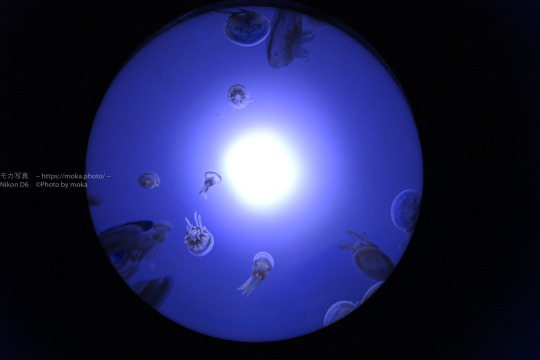
【水族館撮影】ユラユラ、クラゲを撮ろう!!
ブログを更新しました!!
【水族館撮影】ユラユラ、クラゲを撮ろう!!
サンシャイン水族館��クラゲを撮ろう!
12月に入って・・・最初に撮影に出かけるはずだった、、、水族館。
11月から続く仕事のバタバタ。おかげさまで、水族館への撮影も行くことができず(泣)
今日の写真は、過去写真の蔵出しです♪
カメラ:Nikon D6AF-S NIKKOR 14-24mm f/2.8G ED
カメラ:Nikon D6AF-S NIKKOR 14-24mm f/2.8G ED
クラゲを少し引いたアングルで撮ってみよう!
普段の水族館撮影の時は、マイクロレンズ(マクロレンズ)をつけて撮影することが多く、
水槽や被写体のクラゲに、これでもかと言うくらいに近寄って撮ることが多いのですが、、
今回は、超広角レンズ付けていることをあり少し水槽から離れて引きのサングルでクラゲを撮影してみました…
View On WordPress
0 notes
Photo

青空に映える霧氷 冬の赤城山です。気軽に雪山歩くには良い場所ですよね🗻 . 今日から4連休+夏季休暇ですが、やっぱりお出かけできる雰囲気ではないので家でゴロゴロしております🏠 . 2014年12月 Camera : Nikon D800 Lens : AF-S NIKKOR 14-24mm f/2.8G ED (赤城山) https://www.instagram.com/p/CC-r0-6J3Lj/?igshid=6ajoag1sjpwv
0 notes
Photo

Used Nikon AF-S NIKKOR 14-24mm f/2.8G ED Lens (EX) (625167986)

Used Nikon AF-S NIKKOR 14-24mm f/2.8G ED Lens
The widest of Nikon's f/2.8 zooms, the AF-S NIKKOR 14-24mm f/2.8G ED presents a flexib..
Price: $1,299.95
https://ift.tt/2N2qHEB August 12, 2019 at 07:17AM
0 notes
Text
Structure Research
Simon Kennedy

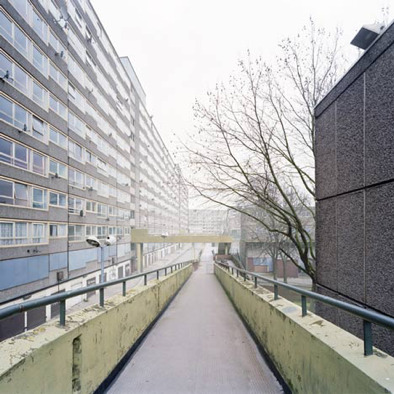
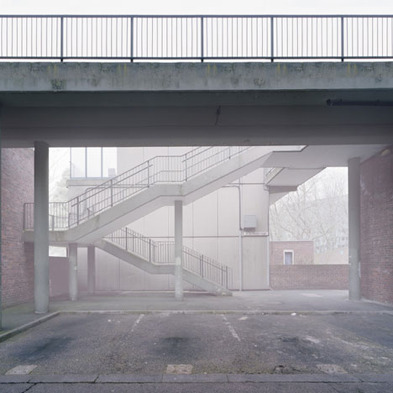
Simon Kennedy’s architectural photography is amazing in showing us not only the function of the structure but the environment it exists in. His study of Heygate estate especially interests me, due to Kennedy’s use of the plain/gloomy light to bring out the character of the area the structure exists in. In fact, he took a risk in using this kind of diffused/overblown light, but due to this project having taken place over the course of many months, I suspect his final images may be multiple exposures together.
https://www.dezeen.com/2010/12/01/heygate-abstracted-by-simon-kennedy/
Nick Guttridge
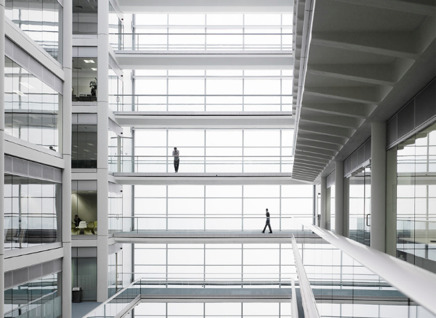
I really enjoy Guttridges style, it’s very clean and modern. In fact, when I look at his work I get a very surreal feeling but not in an obvious or over-bearing way. He seems to have an intense focus when it comes to his leading lines, encouraging the viewer to explore the complex image. I like the fact that in some images Guttridge left in people, as the architecture would not exist without peoples influence and are often built for people.
http://www.nickguttridge.com/lifestyle-travel
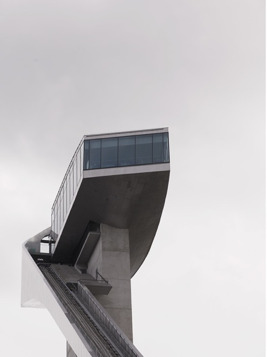
Bas Prince
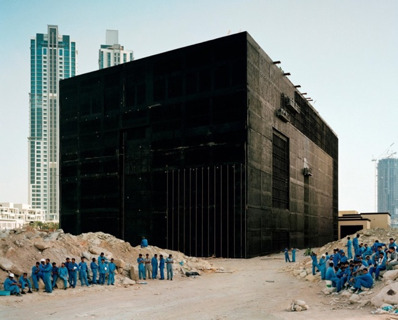
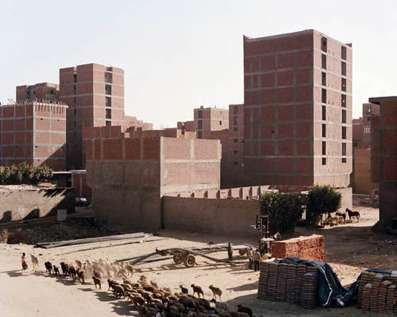
When looking at Bas Prince’s work, I always see landscapes. He truly focuses on the big picture, and really isolates structures within amazingly interesting landscapes and makes them even more interesting and very imposing buildings. I also love his simplistic approach when it comes to geometry, maybe it’s just the subject matter we see above but the simple block buildings are really dominating in the image and steal all the focus of me, the viewer.
http://www.bldgblog.com/tag/bas-princen/
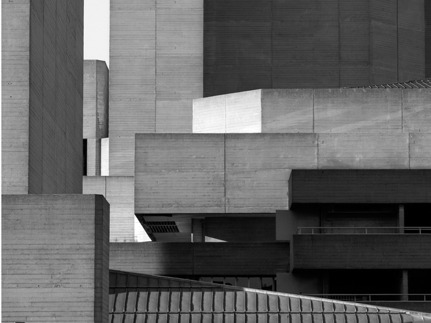
Ralph Graf
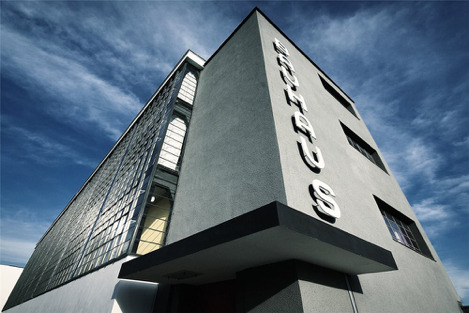
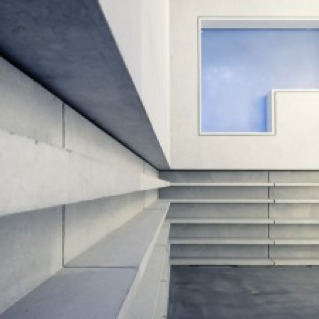
Ralphs Graf’s work in the Bauhaus School of Art is fantastic. He has truly stayed true to the modernistic style of the building and its artistic history in Germany. The square windows, plain colours and hard lines are all captured in such a way that really shows the anti-traditionalist manner of the building.
https://www.dodho.com/bauhaus-ralph-graf/
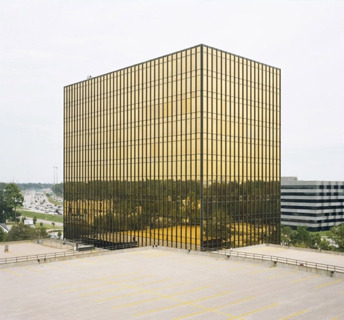
Julius Shulman
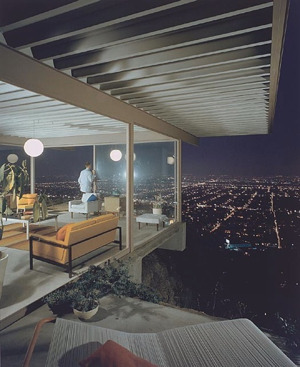
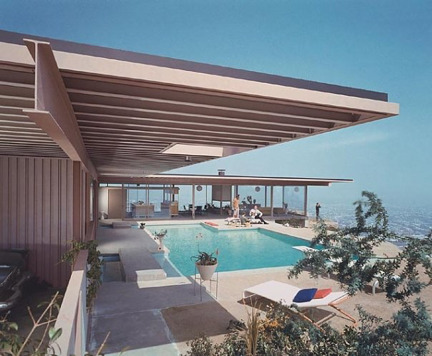
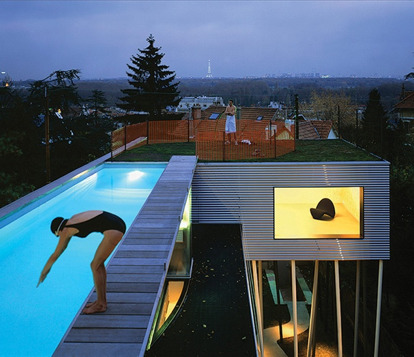
Shulman’s work really shows the lifestyles that come along with some structures. I enjoy the fact that his subject matter in these images are really appealing, expensive structures that accommodate wealthy people, it’s rare in a world driven by sad scenes and dramatic imagery (which I also enjoy). I think the purpose of the building must have been import for him, as he usually shows a valuable asset to the home (pool, view, etc.) and the people enjoying them. I love the stylization of the images to, they almost feel like a movie set or something from a James Bond movie.
https://www.archdaily.com/29457/julius-schulman-1910-2009
Distortion
Distortion in photography can be understood as being an optical illusion or effect is produced as a result of various techniques or processes, where the straight lines in an image appear curved or distorted. The overall effect is that the resulting images appear deformed or radically misshapen or twisted, though the range of effects, and indeed the strength varies depending on which lens is used or which position the camera is placed in, relative to the subject. Within photography, distortion falls into two distinct groups: perspective distortion, and optical distortion. Distinguishing between the various forms and processes of distortion is important, as each effect has a distinctive look, and also a distinctive process which is carried out to achieve it.
Optical Distortions

Optical distortion refers to any instance where the distortion results from a lens error, as no lens can completely prevent distortion, given the shape of the lens itself. There are three types of optical distortion; barrel, pincushion and moustache distortion.
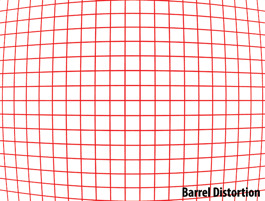

hese images show Barrel Distortion. This type is commonly seen on wide-angle lenses where lines appear curved inwards, reminiscent of the convex shape of a barrel. It results from an image where the field of view of the lens is wider than the image sensor, essentially squeezing the image. Barrel distortion occurs with the majority of wide-angle lenses, as well as with zoom lenses with short focal lengths, though the degree of the distortion is mostly dependent on the distance between the camera and subject.
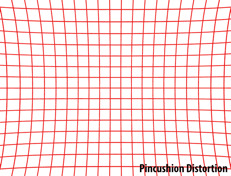

These images show Pincushion Distortion. This is the opposite of barrel distortion, as the lines appear to curve outwards. This results from the lens’ field of view being than the size of the image sensor, and so the image appears stretched. Pincushion distortion occurs primarily with telephoto lenses or zoom lenses, as image magnification in the photo becomes greater towards the edges of the frame. As with barrel distortion, pincushion distortion is also difficult to prevent through changing lens, and can be fixed simply in post-production.
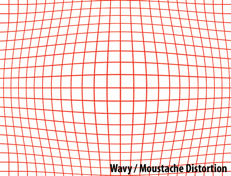

These images show Moustache Distortion. This form is harder to spot, showing a bend towards the centre of the image, as the lines curve both inwards and outwards. Due to this, it is also referred to as ‘complex distortion’. This form is much more difficult to deal with, both in prevention and remedy, as it cannot be dealt with in the same way that the two other optical forms can. If this is attempted, the curves will become much more exaggerated towards the edges or centre respectively, thus specialised software must be used to fix this distortion.
This form of distortion is the most common, resulting even from the human eye. Perspective distortion occurs when an object is situated too close to the camera, as the proximity causes the image to distort when trying to represent the three dimensional proportion of the object in 2D. As such, this is not caused by a lens error, and can be prevented through test shots and varying the composition of your image’s subjects. Although many lenses claim to reduce this effect, they merely force you to change position, altering your image from that on the left, to the image on the right.

Although all distortions can be used deliberately to produce a creative effect, the use of curvilinear lenses is arguably the most recognisable. Whereas Rectilinear Lenses produce a natural effect with straight lines stretched towards the edges of the frame, curvilinear or fish-eye lenses result in a highly distorted image where the lines are unnaturally curved.
Fixing Distortion
There are many ways to fix distortion in your images. Given the wide variety of methods it is useful to categorise them based on the point in your shoot that you use them.
Pre Production
As mentioned, particular lens is advised to avoid particular forms of distortion. For example, To reduce barrel distortion, specific lenses can be used, such as the Nikon 14-24mm f/2.8G, which aids distortion reduction, however it is important to note that this impacts negatively on the weight of this and other wide-angle lenses. Another example of useful lens for reducing distortion is a tilt-shift lens. This lenses optics can be tilted and shifted in relation to the image sensor. Tilt shift lenses also have the ability to swivel, changing the cameras perspective but keeping you unchanged, which reduces distortion. Research into the best lenses for your project should always be undertaken well in advance in order to save time and effort wasted on fixing distortion problems in post production.
Mid Production
The easiest way to reduce distortion during your shoot would simply be to change position. You may be too close to your subject, making features appear big and domineering in the frame, and vice versa. This is particularly important when doing architectural photography, because a change in the scale can result in your subject appearing unfamiliar, which can result in the purpose of your shoot being ruined.
Post Production
Distortion can also be corrected in post-production, using software such as Adobe Photoshop or Lightroom. One tool you can use on Photoshop to correct distortion is the adaptive wide angle tool. This can be found in the filter menu. Using the tool in auto mode you can manually draw lines down your image where you see the edges of a structure becoming distorted. As you click the tool corrects any curved lines, removing the distortion.
Idea
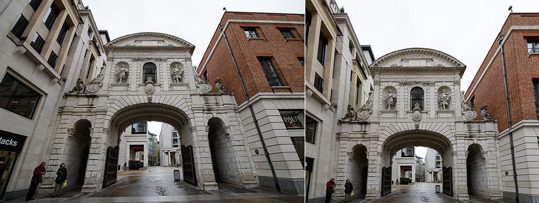
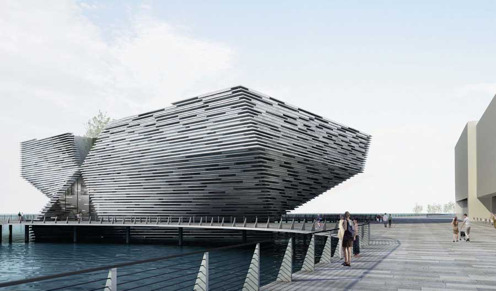
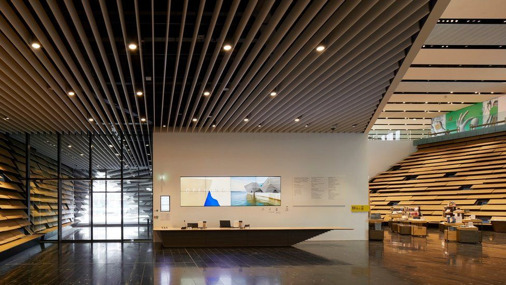
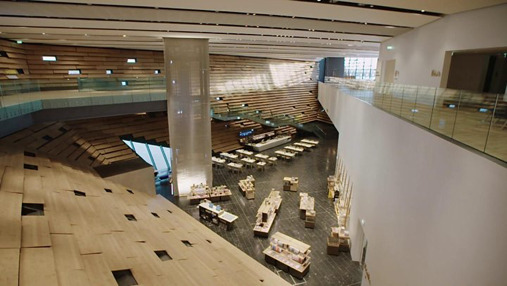
The V & A museum in Dundee is a very interesting building from many different angles, almost resembling a beached wale or some sort of ship. According to the construction company “bam”, the museum is effectively two separate three storey buildings, joined at roof level. Surrounding Scottish cliffs were the inspiration for the outer walls. The curves are formed from a series of concrete panels, each a different profile, inset with lighter coloured pre cast concrete slabs. I think this would be a great building to shoot as we have an amazing building in its entirety to photograph but also many opportunities to get close in detail shots. The contact number is 01382 411611. I plan on shooting this at time different times. The golden hour and the blue hour. I think sunlight could bounce of this building in a very interesting way but I also think the imposing shape and the fact that it is basically a docked building could make the blue hour work even more. A return train ticket to Dundee is around £24.
I have emailed asking about access building am waiting for a reply, if I don’t get that I will call and if access if restricted then I’m going to go with the college building itself. It’s easy to get access to, the structure has a lot of elements too it and is genuinely a nice building. Also I know I wont get knocked back from shooting there and I’m getting tired of emailing/phoning places for no result.
https://www.e-architect.co.uk/dundee/v-a-dundee
https://www.bbc.co.uk/news/uk-scotland-tayside-central-45432993
https://www.bbc.co.uk/news/uk-scotland-tayside-central-45432993
https://www.bbc.co.uk/news/uk-scotland-tayside-central-45432993
Structure Evaluation
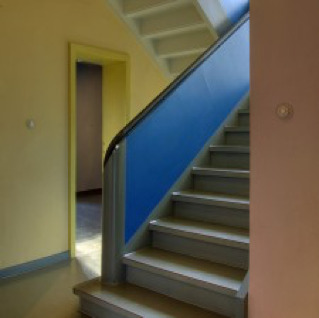
In this brief we were tasked with capturing five images of architecture. 3 of these shots were exteriors, two included controlled perspectives and one included the complete building, followed by 2 interior shots.
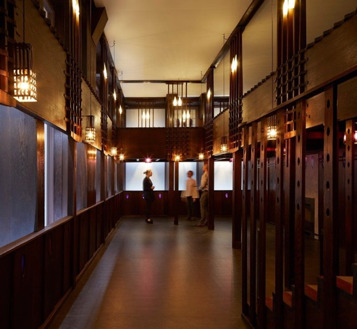
The building that I chose to capture was the City of Glasgow Cathedral Street Campus building. I chose this setting for my shots because I knew I would benefit from a building which was not only architecturally interesting and significant, but which I could gain complete access to. A number of other buildings I had considered were very restricted in what you were able to capture, or didn’t permit photographs at all. I also knew this building pretty well and knew that there were a lot of photographic opportunities there.
Staring with the wide angle exterior shot, I found this to be the hardest of my set of images to complete as it was very difficult to find an angle that would fit the whole building in and look good at the same time. I was using a 18-55mm lens because it gave me the widest angle I could get. I tried to capture my image further down the street to get a better angle, but there were a lot of distractions like bins, lampposts and bus shelters. Cars would also zoom past a lot and obstructed the frame, making it look cluttered at times. I considered doing a longer exposure to get the trails of the car lights in but this to me was a bit unnecessary and I wanted to capture the building during it’s time of use - the early afternoon. I edited my image very simply, removing a few people who stepped in my frame and some bins but very little was done. The perspective control was simply done on Bridge, using the transform tool to auto adjust the perspective control, I used this for all my images but used different settings each time.
I then moved onto to focus on my exterior detail shots. The college building has very interesting shapes and lines, with a certain uniformity to it all so I focused on that. The first wider angle image shows this with a semitropical grid towering down and windows peaking out behind them, I chose to show this because the modernism is really striking and when I first saw the building it gave me a futuristic and very scary feeling but as I grew to know it, it became far more comfortable and I realised it was just a place for structured creativity. I think the building really screams that, and I hope it comes across through my images. The second exterior detail shot was again captured using the lines of the building but this time I wanted to show more of the curvature on the block architecture and how shadows get stuck in very interesting places due to the building’s nature. I really enjoy the light in this image, everything subtle and you can see a lot of individual tones in the layers of glass and metals, and it almost doesn’t look like the same building.
The interior shots were very tricky, the college has a lot of opportunities for great photos but when spoiled for choice I wanted to get the most original shots possible to stand out. One thing I certainly wanted to include in these images were the students, lecturers and/or staff members. This is to convey that this building is vibrant, and filled with individuals that all play a role in the function of the buildings purpose. I thought getting a low angle shot from the top of the main stair case would achieve this as it is the busiest place for people and the leading lines that you can see with the balconies going all the way up is very interesting. I wish I spent a bit more time with this shot and waited for a better moment, although I think some people in this image convey my point, others just make it look busy, they are really standing/walking in positions. For my final interior shot I definitely wanted to get the City of Glasgow sign in, as in my view this is the most iconic aspect of the building and I knew the celling windows would give me a good view of it. Those windows can form excellent shadows at the right time, with the right weather and I wish I had come back again to see if could get anything better with that, but I do enjoy this image. I think the window gives the image more depth and the lines and grids make this photo a perfect fit with the others.
I enjoyed this project more than I thought I would and learned that taking photographs of buildings and architecture is a lot harder than I originally thought. If I were to do this again I’d definitely spend more time with the building and look for a lot more angles. I also think investing in a extremely wider fixed lens would be a good idea.
0 notes
Text
CES 2019 | Nikon Unveils The New Nikkor Z Ultra-Wide-Angle Zoom Lens & Filmmaker’s Kit
As you’ve come to expect, CES 2019 is continuing it’s trend of bringing more excitement to the photography & videography world. Starting with Nikon and it’s unveiling of the new Nikkor Z 14-30mm f/4 S Ultra-Wide-Angle zoom lens, the world’s first full-frame 14mm filter-attachable lens as well as a complete Filmmaker’s Kit.
The NIKKOR Z 14-30mm f/4 S, is the first ultra-wide zoom lens to take advantage of the amazing capabilities of the next generation Nikon Z Mount. This newest S-Line NIKKOR lens is a popular focal length for landscape, travel, event and architecture photographers, offering a combination of performance and portability that’s only possible with Nikon’s revolutionary new Z Mount.
Featuring a new optical design, the compact and lightweight NIKKOR Z 14-30mm f/4 S delivers the high level of optical performance that still and video creators expect from the NIKKOR name. By utilizing the larger diameter and technological benefits of the Z Mount, Nikon was able to design an ultra-wide-angle lens that delivers superior optical performance and maximizes the potential of high pixel-count digital cameras such as the 45.7-megapixel Nikon Z 7. Additionally, the design features a nearly flat front lens element, making the NIKKOR Z 14-30mm the world’s first filter-attachable ultra-wide-angle zoom lens covering a focal length from 14mm. I’m personally pretty excited to try this out with my existing Polarizer and Graduated Filter kits from Lee.
Nikon Inc. has also announced the Nikon Z 6 Filmmaker’s Kit. Featuring a selection of popular video equipment for the Z 6, the kit allows video creators to take full advantage of the Z 6’s industry-leading video features. Included accessories such as the Atomos Ninja V 4K HDR 5” Monitor Recorder and MOZA Air 2 3-Axis Hand-Held Gimbal Stabilizer make the new Filmmaker’s Kit an enticing value for those ready to explore the Nikon Z 6’s stellar video capture and multimedia potential.
“The NIKKOR Z 14-30mm lens demonstrates the optical superiority of the Z system, taking advantage of the newest high-performance lens technologies while maximizing compactness and portability,” said Jay Vannatter, Executive Vice President, Nikon Inc. “The Nikon Z series is a powerfully capable camera system for all types of video production, and with the Z 6 Filmmaker’s Kit, we’re giving videographers and content creators the gear they need to begin capturing high-quality videos with the most compelling hybrid camera on the market.”
The NIKKOR Z 14-30mm f/4 S: An Exceptional Combination of Portability and Performance
The new 14-30mm lens was designed for photo and video shooters looking for a sharp ultra-wide zoom lens with which to seek out gorgeous landscapes or cityscapes on their next travel adventure, and is an excellent choice for capturing interiors, architecture or events. It’s a lens for those who need to pack light without sacrificing image quality – an ultra-wide-angle lens that delivers portability and performance that pushes the boundaries of what is optically possible in a lens of its size.
Lightweight and Ultra-Portable: At just 3.5-inches long when retracted, and weighing only 485g/1.07lbs, the NIKKOR Z 14-30mm f/4 S is approximately 28.6% lighter and 32% shorter than the popular AF-S NIKKOR 16-35mm f/4G ED VR, and approximately 51.5% lighter and 35% shorter than the tried-and-true AF-S NIKKOR 14-24mm f/2.8G ED for the F mount.
Uncompromising Optics: Featuring a new optical formula that utilizes four Extra-Low Dispersion (ED) elements and four aspherical elements, the 14-30mm f/4 offers unparalleled control of distortion and chromatic aberration. Additionally, the use of Nikon’s anti-reflective Nano Crystal Coat effectively reduces ghosting and flare, delivering clearer images that maintain contrast in challenging lighting situations.
Filter Attachable: For the first time on a 14mm FX-format (full-frame) lens*, photographers will be able to attach various types of screw-on filters (82mm) to the front of this ultra-wide-angle lens, infinitely expanding the creative possibilities of the NIKKOR Z 14-30mm f/4 S for landscape and cityscape photographers, videographers and more.
Stepping Motor Technology: Featuring the latest Nikon Stepping Motor (STM) technology, the new lens provides smooth, fast and quiet AF performance—ideal for photographers shooting in sensitive environments, as well as videographers who must avoid focus noise in productions.
Control Ring: As with the rest of the S-Line of NIKKOR Z lenses, the 14-30mm f/4 includes a customizable control ring that can be assigned to manual focusing, exposure compensation or aperture control depending on personal preference or shooting situation, maintaining different custom settings when in photo and video mode.
Fully Compatible with In-Camera 5-Axis VR: To help ensure the sharpest possible images and most stable video, the new NIKKOR Z 14-30mm f/4 S is fully compatible with the in-body 5-axis VR found in the Nikon Z 6 and Z 7, providing up to 5 stops* of image stabilization without adding to the size or weight of the lens itself.
Optimized Video Performance: In addition to the speedy and near-silent stepping motor technology and customizable control ring, the lens reduces focus breathing, preventing the angle of view from changing unintentionally when adjusting focus.
Reliability: The NIKKOR Z 14-30mm f/4 S is designed with consideration to dust and drip resistance, and features a fluorine coat that effectively repels dust, water droplets, grease and dirt.
The New Nikon Z 6 Filmmaker’s Kit
For users who are looking to take full advantage of the Nikon Z 6’s industry-leading video capabilities, this powerfully cinematic camera is now available as part of a new Filmmaker’s Kit. The bundle includes a range of equipment that helps users unlock the Z 6’s advanced video features and powerful potential.
The kit includes: a Nikon Z 6 camera, NIKKOR Z 24-70mm f/4 S lens, Mount Adapter FTZ, Atomos Ninja V 4K HDR 5” Monitor Recorder, Rode VideoMic Pro+, MOZA Air 2 3-Axis Hand-Held Gimbal Stabilizer, an additional EN-EL15b battery, a coiled HDMI cable, 12-month Vimeo Pro membership, and The Art of Making Music Videos Nikon School online course featuring Nikon Ambassador Chris Hershman.
The Z 6 ushers in a new era in high-quality video capture for Nikon shooters. The camera’s fast and accurate autofocus, full-frame 4K/30p recording with full-pixel readout, zebra stripes, timecode and focus peaking offer users a professional-grade shooting experience. With the Z 6 Filmmaker’s Kit, users can access the advanced video features, like 10-bit HDMI output and N-Log video recording, while capturing gimbal-smooth video and crystal-clear audio. The kit provides filmmakers, vloggers and YouTubers with all the equipment they need to begin capturing high-quality 4K footage right away.
Price and Availability
The NIKKOR Z 14-30mm f/4 S lens will be available in the spring for a suggested retail price (SRP) of $1,299.95*
The Nikon Z 6 Filmmaker’s Kit will available in late January for a suggested retail price (SRP) of $3,999.95*
For more information on either of these new products, as well as the latest Nikon products including the new Nikon Z Mount System, please visit www.nikonusa.com.
NIKKOR Z 14-30mm f/4 S Product Specifications;
Mount Type – Nikon Z mount
Focal Length Range – 14-30mm
Zoom Ratio – 2.1x
Maximum Aperture – f/4
Minimum Aperture – f/22
Format – FX
Maximum Angle of View (DX-format) – 90°
Minimum Angle of View (DX-format) – 50°
Maximum Angle of View (FX-format) – 114°
Minimum Angle of View (FX-format) – 72°
Maximum Reproduction Ratio – 0.16x
Lens Elements – 14
Lens Groups – 12
Compatible Format(s) – FX/DX
Diaphragm Blades – 7 (rounded)
Distance Information – Visible in EVF with manual focusing
Nano Crystal Coat – Yes
ED Glass Elements – 4
Aspherical Elements – 4
Fluorine Coat – Yes
Super Integrated Coating – Yes
Autofocus – Yes
AF Actuator – STM
Internal Focusing – Yes
Minimum Focus Distance – 11 in. (0.28 m) from focal plane at all zoom positions
E-type – Yes
Filter Size – 82mm
Accepts Filter Type – Screw in
Approx. Dimensions (Diameter x Length) – “Approx. 3.5 in. (89 mm) x 3.3 in. (85 mm) Distance from camera lens mount flange when lens is retracted based on CIPA guidelines”
Approx. Weight – “Approx. 17.1 oz. (485g) Based on CIPA guidelines”
from SLR Lounge https://www.slrlounge.com/ces-2019-nikon-unveils-new-ultra-wide-angle-zoom-lens-filmmakers-kit/
via IFTTT
0 notes
Video
Lost by Takahiro Yamamoto
Via Flickr:
I'm sure it would take a while until I reached my apartment without getting lost. この建物に住んでいたとしたら、自分の部屋に迷わずに帰れるようになるまで、ずいぶんと時間がかかるだろうと想像した。でかい。 この日は東京夜間写真部で開催する、初のグループ写真展のキックオフイベントでした。情報も解禁となりました。下記、写真展の概要です。 東京夜間写真部グループ展2018 night view emotion 会場:アメリカ橋ギャラリー(ABG) 〒150-0022 東京都渋谷区恵比寿南1−22−3 会期:2018年3月21日(水・祝)~3月26日(月) 時間:12:00~20:00 ※ 初日は13:00より。最終日は18:00まで Facebookイベントページ www.facebook.com/events/557233977964057/ Photo Data 勝どき / Kachidoki, Tokyo AF-S NIKKOR 14-24mm f/2.8G ED
0 notes
Text
Aurora Aperture: new rear mount filters for extreme wide-angle lenses
The new Kickstarter campaign for the PowerND family of high quality fixed neutral density (ND) filters from Aurora Aperture is almost finished, but the company continues to surprise backers.
There is a growing interest in Neutral Density filters for both photography and video, and companies continue to introduce new products, some of them extending the light reduction capability usually available. One such example is the recently announced PowerND family of filters from Aurora Aperture, which consists of three ratings: the common ND64 (6 stops), the not so common ND4000 (12 stops), and the “over the top”, if we can call it, ND65000 (16 stops).
It’s an interesting evolution that expands, especially considering the higher values, the realm of what is possible to achieve in photography, where these filters make more sense. Video shooters will be happy with the more common values of ND8 (3 stops) and ND64, sometimes up to ND500 (9 stops), while some may even consider variable ND filters, which can be adjusted from anything to ND8 to ND500 and beyond.
Photographers, on the other hand, will go to extremes, a trend that explains why companies are creating products that make the Lee Big Stopper, which was a reference for extra light reduction at 10 stops, seem “normal”. Even Lee felt the need to create a Super Stopper, which goes all the way up to 15 stops.
Now Aurora Aperture takes the ND experience one stop further, with the ND65000 (16 stops) announced as part of the Kickstarter campaign launched in April and about to end this May. The crowdfunding project, with a $5,000 goal, has pledged close to $30,000 from over 200 backers, with still 11 days to go. The support received made it possible for Aurora Aperture to add stretch goals to the project.
One of the additions to the campaign extends the initial use of the Aurora CR filters beyond the initial Canon EF 11-24mm F4L USM. The Aurora CR is an industry first: a small rear mount filter using Gorilla Glass for the Canon EF 11-24mm F4L USM. Users of extreme wide-angle lenses have a problem with filters, as they need filters with an extremely large diameter, up to 186mm, for their lenses. These lenses usually have a filter adapter on the back of the lens, the problem being that there is not much, in terms of offer.
The Aurora CR format filter mounts in the rear of the lens, making it much easier to carry and lower in cost. Other Canon lenses that Aurora CR format filter can be used in are the EF 8-15mm f/4L Fisheye, EF 11-24mm F4L USM, EF 14mm f/2.8L US, EF 15mm f/2.8 Fisheye, EF 16-35mm f/2.8L USM, and EF 17-40mm f/4L USM. The company announced recently the addition of the Irix Canon mount lens support with the Aurora CR filters. A slightly modified CNC milled adapter is being developed for the Irix 15mm f/2.4 and it will be compatible with the Aurora CR filters. A slightly modified CNC milled adapter is being developed for the Irix 15mm f/2.4 and it will be compatible with the Aurora CR filters.
Aurora Aperture says that the Aurora CR filters may also be compatible with the newly announced Irix 11mm f/4, and adds that “we are also exploring possibility of adding rear mount adapter to the Nikon F mount. It is too early to tell how this will be implemented and we will not have the Nikon F mount adapter ready before this Kickstarter project is over. We will keep you posted when we have major progress.”
Back to the PowerND family funded through Kickstarter, it will be available in four different formats: circular filters from 37mm to 95mm, 100 x 100mm square filters compatible with popular square filter adapters, 150mm circular filters with an adapter for the Nikon AF-S 14-24mm f/2.8G ED lens, and the already mentioned Aurora CR format, an industry first, a rear mount glass filter for extreme wide-angle lenses.
The 6 stop filter is typically used in low light conditions such as during sunrise or sunset for sub-second shutter speed. The 12 stop filter can slow down shutter speed to minutes in dusk and dawn conditions. The 16 stop filter can do magic on a bright day, allowing photographers to expose up to several minutes or more.
The ND4000 and ND65000 have distinct advantages in having more stops than the typical ND1000 or ND32000. They allow users to avoid diffraction softening by enabling users to avoid very small aperture settings or alternatively allowing for longer exposures. In the case of the PowerND 4000 that means two more stops than the typical ND1000 and for the Power ND65000 there’s one additional stop.
“We introduced a variable ND family last year and it was embraced by photographers and videographers worldwide,” said Jinfu Chen, founder and CEO of Aurora Aperture Inc. “the fixed ND family we introduce today is much more powerful in terms of light reduction capability and offers even better optical performance, along with more formats for different camera lenses.”
Designed in California by Aurora Aperture, the Aurora PowerND filters employ up to 128 layers of double sided nano coating in order to, says trhe company, achieve color accuracy and powerful light reduction capability. Hydrophobic and oleophobic coating is applied to filter surface with PFPE coating. The end result is that water droplet on the filter surface can maintain a static contact angle of 110 degrees, one of the best in the industry.
The Aurora PowerND family is now available through Kickstarter and to dealers and direct orders in August 2017. List price starts at US$42 and varies depending on filter format and size.
The post Aurora Aperture: new rear mount filters for extreme wide-angle lenses appeared first on ProVideo Coalition.
First Found At: Aurora Aperture: new rear mount filters for extreme wide-angle lenses
0 notes
Text
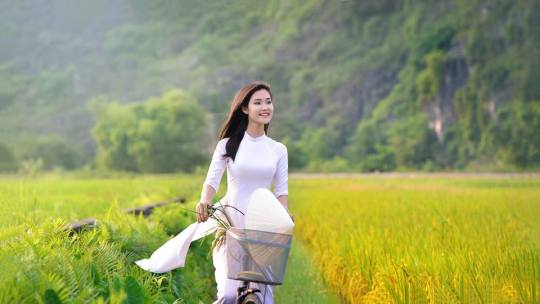
Góc nhìn của máy ảnh (Phần 2)
Góc nhìn và trường nhìn phụ thuộc vào độ dài tiêu cự và kích thước cảm biến. Một vấn đề xuất hiện tại góc nhìn rộng nhất của ống kính là ảnh sẽ bị méo. Để khắc phục tình trạng này, chúng ta có thể dùng phần mềm chuyên chỉnh sửa ảnh (Đọc thêm bài viết “Méo hình và cách khắc phục”). Hiểu được bản chất và vai trò của góc nhìn, chúng ta có thể vận dụng vào việc lựa chọn ống kính cho từng trường hợp chụp ảnh.
Trong trường hợp này, bạn sẽ cần phải nắm bắt được phạm vi lớn của cảnh để chuyển tải đến người xem một không gian rộng lớn. Do đó, bạn phải cần một ống kính có góc nhìn rộng với tiêu cự ngắn. Một ống kính góc rộng với độ dài tiêu cự nhỏ hơn 25mm trên APS-C là một lựa chọn được khuyến khích. Ống kính có thể dùng cho mục đích chụp phong cảnh, kiến trúc, cảnh quang đường phố có thể kể đến: Canon EF 16-35MM F/2.8L II USM, Nikkor 12-24MM F/4 G IF-ED, Sony 10-18mm f/4 OSS, Sigma AF 8-16mm f/4.5-5.6 DC HSM…
Đây là thể loại nhiếp ảnh rất linh động và phức tạp vì người chụp luôn luôn phải di chuyển nhanh chóng theo đối tượng. Bạn cần một ống kính với tiêu cự thay đổi, cho phép linh hoạt hơn so với khi bạn đang chụp chân dung trong một studio, nơi bạn có thời gian để thay đổi ống kính. Nếu chỉ thích sử dụng ống kính prime và có điều kiện, bạn có thể mang theo hai thân máy với ống kính tiêu cự khác nhau trên mỗi camera. Một ống kính gắn vào máy ảnh sẽ cho tiêu cự 23mm và máy kia sẽ có tiêu cự từ 80mm đến 200mm. Danh sách các ống kính phù hợp để chụp ảnh sự kiện, đường phố là: Canon EF-S 18-135mm f/3.5-5.6 IS, Nikkor AF-S DX 18-105mm f/3.5-5.6G ED VR, Leica Elmarit-M 28 mm f / 2.8 ASPH …
Bạn thường cần phải tập trung sự chú ý của người xem vào nơi hành động cụ thể đang diễn ra. Nó tạo ra nhận thức rằng bạn đang ở gần các hành động trong khi thực tế, bạn có thể chụp từ một khoảng cách xa so với chủ thể. Một ống kính 70-200mm hoặc 70-300mm là lý tưởng trong tình huống này. Tránh xa các ống kính siêu zoom như các ống kính 18mm-200mm. Trong khi bạn có thể tránh việc phải thay đổi ống kính, ảnh của bạn sẽ bị nhiễu và bạn sẽ hy sinh chất lượng quá nhiều cho sự tiện lợi. Để chụp ảnh hành động, thể thao trong nhà nên dung các ống kính: Canon EF 70-200mm f/2.8L IS II USM, Sony FE 70-200mm f/4.0 G OSS, Nikkor AF-S 70-200mm 1:2.8G ED VR II…
Các môn thể thao như bóng đá, ô tô đua,…đòi hỏi ống kính có chiều dài tiêu cự lớn. Các khoảnh khắc như tàu lượn trên không, cú sút phạt thủng lưới hay xe máy ôm cua, với những ống kính thích hợp bạn có thể bắt dính nó một cách dễ dàng. Tùy vào ngân sách, bạn có thể mua một ống kính có chiều dài tiêu cự từ 100mm đến 600mm hoặc ống kính 70mm - 300mm zoom để chụp linh hoạt hơn. Các ống kính dùng để chụp ảnh thám hiểm, thể thao ngoài trời là Tamron 150-600mm f/5-6.3, Nikkor AF-S 600mm f/4E FL ED VR, Sony 70-300mm F/4.5-5.6 G SSM, Olympus 70-300mm f/4-5.6 Zuiko ED…
Tất cả các loại ống kính macro có sẵn với độ dài tiêu cự khác nhau đều hữu ích tùy thuộc vào đối tượng bạn định chụp. Nhưng khi chụp hình các loại côn trùng nhỏ như bướm, ong, ruồi… bạn nên sử dụng ống kính có độ dài tiêu cự 60mm vì nó đảm bảo rằng đối tượng sẽ không phát hiện ra bạn và bay ra khỏi khung hình. Danh sách các ống kính phù hợp với chụp ảnh macro/sản phẩm bao gồm: Nikkor AF-S 60mm f/2.8G ED, Canon EF-S 60mm f/2.8 Macro USM, Sigma 105mm f/2.8 EX DG OS HSM, Laowa STF 105mm F2.0, Tamron SP 90mm f/2.8 Di VC USD…
"QC" Dịch vụ quay video chuyên nghiệp, quay phim sự kiện, quay video clip, quay phim HD, tất cả các dịch vụ về quay phim…
Hotline + Viber + Zalo: 0972.123.018 (Cameraman)
Mẫu tham khảo : www.heytv.vn
Facebook : https://vi-vn.facebook.com/rophistudio/
Trang Chủ : https://seotukhoa.com.vn/
1 note
·
View note
Text
#gallery-0-6 { margin: auto; } #gallery-0-6 .gallery-item { float: left; margin-top: 10px; text-align: center; width: 33%; } #gallery-0-6 img { border: 2px solid #cfcfcf; } #gallery-0-6 .gallery-caption { margin-left: 0; } /* see gallery_shortcode() in wp-includes/media.php */
Alicia Onieva – Iniciación
Marta Pico Ripoll – Iniciación
Miguel Arranz – Intermedio
Francisco Javier Navas – Iniciación
Rocío Fuillerat Serrano – Intermedio
Juan Alberto Rodriguez Villena
Pablo Javier F – Intermedio
Antonia
Ángel
Inma
Magda
Puri
Maria Bel
Maria Bel
Antònia
Antònia
Juana
Juana
Eli
Eli
Sandra
Sandra
Sandra
Eli
Josep
Josep
Josep
Josep
Josep
Josep
Josep
Josep
Josep
Vicente
Vicente
Vicente
Vicente
Anna Boczkowska
Josep Tarrago
Magdalena Cerdà
Mariana Jatab
Eva Palmer
Anna Boczkowska
Josep Tarrago
Magdalena Cerdà
Mariana Jatab
Andreu Bió
Puri Martínez
Josep
Mariana
Andreu
Puri
Magdalena
Magdalena Cerdà
Andreu Bió
Mariana Jatab
Purificación Martínez
Social Media
Building
Startup
Library
Clock
Smile
Students
Working
Student
Work Space
Sunset
View
Mobile
Runner
[amz_corss_sell asin=”B00WUI60YU”] Nikon 14-24mm f/2.8G ED AF-S Nikkor Wide Angle Zoom Lens
0 notes
Text
CES 2019 | Nikon Unveils The New Nikkor Z Ultra-Wide-Angle Zoom Lens & Filmmaker’s Kit
As you’ve come to expect, CES 2019 is continuing it’s trend of bringing more excitement to the photography & videography world. Starting with Nikon and it’s unveiling of the new Nikkor Z 14-30mm f/4 S Ultra-Wide-Angle zoom lens, the world’s first full-frame 14mm filter-attachable lens as well as a complete Filmmaker’s Kit.
The NIKKOR Z 14-30mm f/4 S, is the first ultra-wide zoom lens to take advantage of the amazing capabilities of the next generation Nikon Z Mount. This newest S-Line NIKKOR lens is a popular focal length for landscape, travel, event and architecture photographers, offering a combination of performance and portability that’s only possible with Nikon’s revolutionary new Z Mount.
Featuring a new optical design, the compact and lightweight NIKKOR Z 14-30mm f/4 S delivers the high level of optical performance that still and video creators expect from the NIKKOR name. By utilizing the larger diameter and technological benefits of the Z Mount, Nikon was able to design an ultra-wide-angle lens that delivers superior optical performance and maximizes the potential of high pixel-count digital cameras such as the 45.7-megapixel Nikon Z 7. Additionally, the design features a nearly flat front lens element, making the NIKKOR Z 14-30mm the world’s first filter-attachable ultra-wide-angle zoom lens covering a focal length from 14mm. I’m personally pretty excited to try this out with my existing Polarizer and Graduated Filter kits from Lee.
Nikon Inc. has also announced the Nikon Z 6 Filmmaker’s Kit. Featuring a selection of popular video equipment for the Z 6, the kit allows video creators to take full advantage of the Z 6’s industry-leading video features. Included accessories such as the Atomos Ninja V 4K HDR 5” Monitor Recorder and MOZA Air 2 3-Axis Hand-Held Gimbal Stabilizer make the new Filmmaker’s Kit an enticing value for those ready to explore the Nikon Z 6’s stellar video capture and multimedia potential.
“The NIKKOR Z 14-30mm lens demonstrates the optical superiority of the Z system, taking advantage of the newest high-performance lens technologies while maximizing compactness and portability,” said Jay Vannatter, Executive Vice President, Nikon Inc. “The Nikon Z series is a powerfully capable camera system for all types of video production, and with the Z 6 Filmmaker’s Kit, we’re giving videographers and content creators the gear they need to begin capturing high-quality videos with the most compelling hybrid camera on the market.”
The NIKKOR Z 14-30mm f/4 S: An Exceptional Combination of Portability and Performance
The new 14-30mm lens was designed for photo and video shooters looking for a sharp ultra-wide zoom lens with which to seek out gorgeous landscapes or cityscapes on their next travel adventure, and is an excellent choice for capturing interiors, architecture or events. It’s a lens for those who need to pack light without sacrificing image quality – an ultra-wide-angle lens that delivers portability and performance that pushes the boundaries of what is optically possible in a lens of its size.
Lightweight and Ultra-Portable: At just 3.5-inches long when retracted, and weighing only 485g/1.07lbs, the NIKKOR Z 14-30mm f/4 S is approximately 28.6% lighter and 32% shorter than the popular AF-S NIKKOR 16-35mm f/4G ED VR, and approximately 51.5% lighter and 35% shorter than the tried-and-true AF-S NIKKOR 14-24mm f/2.8G ED for the F mount.
Uncompromising Optics: Featuring a new optical formula that utilizes four Extra-Low Dispersion (ED) elements and four aspherical elements, the 14-30mm f/4 offers unparalleled control of distortion and chromatic aberration. Additionally, the use of Nikon’s anti-reflective Nano Crystal Coat effectively reduces ghosting and flare, delivering clearer images that maintain contrast in challenging lighting situations.
Filter Attachable: For the first time on a 14mm FX-format (full-frame) lens*, photographers will be able to attach various types of screw-on filters (82mm) to the front of this ultra-wide-angle lens, infinitely expanding the creative possibilities of the NIKKOR Z 14-30mm f/4 S for landscape and cityscape photographers, videographers and more.
Stepping Motor Technology: Featuring the latest Nikon Stepping Motor (STM) technology, the new lens provides smooth, fast and quiet AF performance—ideal for photographers shooting in sensitive environments, as well as videographers who must avoid focus noise in productions.
Control Ring: As with the rest of the S-Line of NIKKOR Z lenses, the 14-30mm f/4 includes a customizable control ring that can be assigned to manual focusing, exposure compensation or aperture control depending on personal preference or shooting situation, maintaining different custom settings when in photo and video mode.
Fully Compatible with In-Camera 5-Axis VR: To help ensure the sharpest possible images and most stable video, the new NIKKOR Z 14-30mm f/4 S is fully compatible with the in-body 5-axis VR found in the Nikon Z 6 and Z 7, providing up to 5 stops* of image stabilization without adding to the size or weight of the lens itself.
Optimized Video Performance: In addition to the speedy and near-silent stepping motor technology and customizable control ring, the lens reduces focus breathing, preventing the angle of view from changing unintentionally when adjusting focus.
Reliability: The NIKKOR Z 14-30mm f/4 S is designed with consideration to dust and drip resistance, and features a fluorine coat that effectively repels dust, water droplets, grease and dirt.
The New Nikon Z 6 Filmmaker’s Kit
For users who are looking to take full advantage of the Nikon Z 6’s industry-leading video capabilities, this powerfully cinematic camera is now available as part of a new Filmmaker’s Kit. The bundle includes a range of equipment that helps users unlock the Z 6’s advanced video features and powerful potential.
The kit includes: a Nikon Z 6 camera, NIKKOR Z 24-70mm f/4 S lens, Mount Adapter FTZ, Atomos Ninja V 4K HDR 5” Monitor Recorder, Rode VideoMic Pro+, MOZA Air 2 3-Axis Hand-Held Gimbal Stabilizer, an additional EN-EL15b battery, a coiled HDMI cable, 12-month Vimeo Pro membership, and The Art of Making Music Videos Nikon School online course featuring Nikon Ambassador Chris Hershman.
The Z 6 ushers in a new era in high-quality video capture for Nikon shooters. The camera’s fast and accurate autofocus, full-frame 4K/30p recording with full-pixel readout, zebra stripes, timecode and focus peaking offer users a professional-grade shooting experience. With the Z 6 Filmmaker’s Kit, users can access the advanced video features, like 10-bit HDMI output and N-Log video recording, while capturing gimbal-smooth video and crystal-clear audio. The kit provides filmmakers, vloggers and YouTubers with all the equipment they need to begin capturing high-quality 4K footage right away.
Price and Availability
The NIKKOR Z 14-30mm f/4 S lens will be available in the spring for a suggested retail price (SRP) of $1,299.95*
The Nikon Z 6 Filmmaker’s Kit will available in late January for a suggested retail price (SRP) of $3,999.95*
For more information on either of these new products, as well as the latest Nikon products including the new Nikon Z Mount System, please visit www.nikonusa.com.
NIKKOR Z 14-30mm f/4 S Product Specifications;
Mount Type – Nikon Z mount
Focal Length Range – 14-30mm
Zoom Ratio – 2.1x
Maximum Aperture – f/4
Minimum Aperture – f/22
Format – FX
Maximum Angle of View (DX-format) – 90°
Minimum Angle of View (DX-format) – 50°
Maximum Angle of View (FX-format) – 114°
Minimum Angle of View (FX-format) – 72°
Maximum Reproduction Ratio – 0.16x
Lens Elements – 14
Lens Groups – 12
Compatible Format(s) – FX/DX
Diaphragm Blades – 7 (rounded)
Distance Information – Visible in EVF with manual focusing
Nano Crystal Coat – Yes
ED Glass Elements – 4
Aspherical Elements – 4
Fluorine Coat – Yes
Super Integrated Coating – Yes
Autofocus – Yes
AF Actuator – STM
Internal Focusing – Yes
Minimum Focus Distance – 11 in. (0.28 m) from focal plane at all zoom positions
E-type – Yes
Filter Size – 82mm
Accepts Filter Type – Screw in
Approx. Dimensions (Diameter x Length) – “Approx. 3.5 in. (89 mm) x 3.3 in. (85 mm) Distance from camera lens mount flange when lens is retracted based on CIPA guidelines”
Approx. Weight – “Approx. 17.1 oz. (485g) Based on CIPA guidelines”
from SLR Lounge http://bit.ly/2RA7lZR
via IFTTT
0 notes
Video
The First Composition by Takahiro Yamamoto
Via Flickr:
I took photos there for the first time in 2010. This is almost the same composition though the first one was taken in the late evening. I captured every angle of this bridge since then and am satisfied what I have had so far. So I only snap this view when I came close to it these days. この場所を初めて撮ったのは2010年9月のこと。当時、写真共有サイトなどでは、このループはここからの構図しか見たことがなかった。 2度目に訪れたのは、その年の12月。夜、撮影をしていたら、近所に住んでいるというカナダ人が、僕に声をかけてきた。なんでも、東京に来たら景色が一番いい所に住みたいと思い、このループのすぐ近くに住んでいるという。 彼は僕に、「冒険しよう」と言った(本当は「冒険」という言葉は使っていないし、もっと長いやり取りがあったのだが、ウェブではいろいろ面倒だから説明しない)。 「ここは俺の庭だ」と豪語する彼は寒空の下、キンキンに冷えた缶ビールを僕にすすめてくれ、2人で並んで「王冠」の光を眺めた。僕はお礼に彼にタバコをすすめた。 彼は写真家ではなかった。あなたが声をかけてくれたおかげで、ここでいろいろな写真が撮れました。お礼を言ってこれまでに撮った写真を見せたいと思えど、彼に会ったはその時が最初で最後。彼は今、どうしているのだろう。 2017年最後の日に、そんなことを思い出しながら記念の写真。 港区海岸 / Kaigan, Minato, Tokyo AF-S NIKKOR 14-24mm f/2.8G ED
0 notes
Last Seen Blogs

upfromthedown
strange 'cause it feels the same.

extraterrestrialinsect-blog
Blue Beetle at your service!

buggoboots
Le

mablystore
Mably Store

acasamebel
Без названия