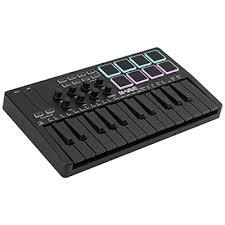
#Bluetooth MIDI controllers
Text
Unleashing Creative Freedom: Exploring Bluetooth Audio Production Tools in the Modern Studio
Hey there, music makers! In today’s digital playground, producers are constantly wielding new sonic sculpting tools. While the core principles of creating infectious tunes remain timeless, the way we translate those ideas into reality is ever-evolving. One noteworthy trend making waves in the studio is the rise of Bluetooth connectivity.
We all know the convenience of a tangle-free workspace.…
View On WordPress
#bluetooth#Bluetooth audio production#Bluetooth DJ controllers#Bluetooth MIDI controllers#Bluetooth mixers#Bluetooth speakers#electronics#headphones#latency in Bluetooth audio#music production tools#music production workflow#tech#technology#wireless music production
0 notes
Video
youtube
Lekato BLUE TOOTH MIDI Keyboard Unboxing & Extensive Demo & TIPS and TRI...
#youtube#bluetooth midi#midi controller#blue tooth midi controller#lekato#unboxing musical instruments
0 notes
Text
Using the accelerometer on the PineTime smartwatch as a MIDI controller...cool shit
26 notes
·
View notes
Text
April 2023
Die elektronische Blockflöte, Teil 1
Ich habe nicht viele besondere Fähigkeiten auf der Welt, und eine davon ist Blockflöte spielen, so richtig gut, beinahe semi-professionell. (Nur damit man mir das auch glaubt, ich bin der Blockflötist ohne Haare.) Leider ist es eine Fähigkeit, mit der man nur sehr sehr selten angeben kann, so wie Jonglieren, deshalb erwähne ich es fast nie. Damit ist es jetzt vorbei, denn seit einer Woche besitze ich eine elektronische Blockflöte, die zudem knallrot ist.
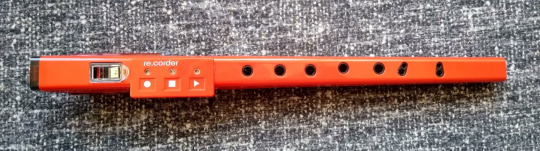
Der re.corder von Artinoise ist meines Wissens die erste Blockflöte, die erstens komplett akustisch funktioniert (also mit Bohrung, Labium und Luftsäule), aber außerdem komplett digital. Dazu steckt man ein kleines Plastikding auf die Schneidekante (im Bild: das transparente Ding zwischen Mundende und Tasten). Damit verstummt das Instrument. Dann installiert man eine App aufs Handy. Dann koppelt man App und Flöte via Bluetooth. Und ab dann kommen die Töne aus dem Handy. Die Flöte hat Sensoren für alle Löcher und für den Atem, und schickt all das ans Handy (und zwar verwandelt es sich in einen MIDI-Controller).
Rein digitale Blasinstrumente gibt es schon länger (z.B. den eCorder oder Rolands Aerophone), aber sie sind deutlich teurer als der re.corder und können nicht zusätzlich akustisch spielen. Der re.corder ist wie eine elektrische Zahnbürste, wenn der Akku alle ist, kann man immer noch ohne Strom weitermachen. Man kann ihn übrigens auch ohne Atem spielen, oder als eine Art seltsames Klavier verwenden, falls man das möchte.
Für mich besteht der wesentliche Vorteil der elektronischen Blockflöte in der Option, mit Kopfhörern zu spielen. Im Jahr 2016 hat der Kopfhörer mich zurück zum Klavierspielen gebracht. Jetzt erhoffe ich mir ähnliches für Blasinstrumente. Mit einer Blockflöte zu improvisieren ist eine sehr angenehme Nebentätigkeit, zum Beispiel bei Zoom-Meetings (bei abgeschalteter Kamera). Seit ich den Hund habe, geht das nicht mehr, weil er die Obertöne nicht gut findet. Der re.corder dagegen ist ihm egal.
Zurück zur Praxis: Die spezielle re.corder-App funktioniert zunächst einwandfrei. Die Bluetooth-Paarung hat wie immer ein paar Haken, aber nicht viele. Und innerhalb von Sekunden kann ich nicht nur Blockflöte aus dem Handy spielen, sondern auch Klarinette, Saxophone und Oboe. Und Trompete! Mein Kindheitstraum, ein kleiner Trompeter zu werden, wird endlich wahr. Außerdem Orgel, was eine interessante Geräusch-Bild-Schere erzeugt. Hier eine kurze Vorführung mit Blockflöte, Oboe, Trompete, Orgel; für dieses Lied habe ich die Klavierbegleitung vorher auf dem elektronischen Keyboard eingespielt und dort aufgezeichnet. Leider ist mein Pianist nicht besonders kompetent. Er kann nicht mal den Takt halten.
Mir wird sehr schnell klar, dass die elektronische Blockflöte nicht einfach nur eine Version des alten akustischen Instruments ist, sondern etwas völlig Neues. Ich spiele viel leichter, mit ganz sanften Fingerbewegungen, und säuselndem Atem, ein bisschen wie Blockflöte mit Servolenkung. Andererseits kann man die gerade nicht benötigten Finger nicht einfach irgendwo hinlegen, sondern muss sie weit weg von den Sensoren halten. Der Ansatz muss deutlich präziser sein als bei der grobschlächtigen Blockflöte. Wenn man eine Weile mit dem re.corder übt, dann kommt man hinterher nicht mehr besonders gut mit der akustischen Flöte klar. Es ist eben ein völlig anderes Instrument. Und natürlich kann man beim re.corder alle Parameter der Sensoren verstellen. Den Fingersatz auch. Den Stimmumfang auch. Bisher verstehe ich nur einen Bruchteil dieser Funktionalität. Noch ein Vorteil: Der Re.corder ist nie verstimmt, und wenn doch, dann kommt er durch Neustart wieder mit sich und der Welt ins Reine.
Die Handy-App ist natürlich nur der erste Schritt ins elektronische Blockflötenuniversum. Als nächstes wird das Ding mit dem Macbook gepaart, und dann kann es ganze Orchesterstücke einspielen. So wie hier vom Blockflötenprofi James Howard Young demonstriert. Oder einfach alles, was sich digitalisieren lässt. Ich könnte das Heulen meines Hundes auf der Blockflöte imitieren.
Stay tuned!
(Aleks Scholz)
15 notes
·
View notes
Text
Progress is finally being made on the chest mounted macropad/soundboard.
Will be completely customizable, uses Arduino Bluetooth keyboard library, so you can do basically anything, even making it into a midi controller.

10 notes
·
View notes
Text
Best midi keyboards 2022
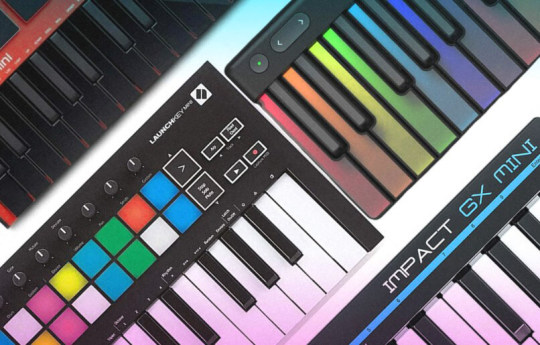
A MIDI controller keyboard is an essential piece of equipment in any studio. The best MIDI controllers can take your recordings to a whole new level. If you're not sure where to start, we've got all the information you need right here.
USB-based MIDI controllers offer an easy and convenient way to play and record software instruments with your computer. They can be plugged directly into your PC or laptop via USB, or in some cases they can operate wirelessly over Bluetooth. This makes them a central performance hub for your studio, allowing you to play and record software instruments with ease. Some MIDI controllers also double up as a control interface for hardware synths, making them an essential piece of kit for any producer or musician.
There are a variety of different MIDI keyboards to choose from, depending on your needs. You can go for a smaller, more portable model that fits comfortably in a laptop bag, or you can go all out with a full-sized 88-note keyboard with weighted keys. The most important factors to consider include the number of keys (some models have 88 keys, while others have fewer), the type of action (weighted keys or not), and whether or not you need additional features such as knobs, pads, buttons and faders.
When shopping for a MIDI keyboard, it's important to consider what you need in order to make the best purchase. You can get a cheap model for less than $100 if you look around, but if you're looking for a higher quality option with more features, you'll likely have to spend a bit more. In general, MIDI keyboards that cost more tend to be more rugged and able to stand up to travel. So, if you're looking for something to take on the road with you, it might be worth spending a bit more.
Finding the right one for you can be a daunting task. With so many options available, it can be hard to know where to start. Our price comparison widgets have found the best deals online right now, so you can be sure you're getting the best possible price. If you need more guidance, head to the buying advice section at the bottom of the page. There, you'll find tips and advice on how to find the perfect product for your needs.
The list of the best midi keyboards - our choice
- Nektar SE25 MIDI keyboard
- Novation Launchkey Mini Mk3 MIDI keyboard
- Akai MPK Mini Mk3
- IK Multimedia iRig Keys 2 Mini
- Native Instruments Komplete Kontrol M32
- Korg microKEY2 Air-25
- M-Audio Oxygen 49 MKV
- Novation Launchkey 37 Mk3
- Arturia Keystep 37
- Native Instruments Komplete Kontrol A25
- IK Multimedia iRig Keys I/O 49
- Nektar Impact LX88+ MIDI keyboard
- Arturia Keystep Pro
- Arturia KeyLab 49 MkII MIDI keyboard
- Novation 49 SL MkIII
- Native Instruments Komplete Kontrol S61 MkII
- Roland A-88MKII
- ROLI Lumi Keys Studio Edition
- M-Audio Keystation 88 MK3
- M-Audio Oxygen MKV 61
- Nektar Impact GX Mini
- CME XKey 25
- Nektar Impact GX49/61
- M-Audio Keystation 49/61 MK3
- NI Komplete Kontrol A49
- Keith McMillen QuNexus
- Alesis V61
- Nectar SE49
- Roli Seaboard
MDI keyboard selection criteria
The best piano replacements don't have to strictly follow the 88 weighted key rule. There are many great pianos that don't follow this rule, and can still produce beautiful music. So, don't be afraid to choose a different type of piano if it speaks to you. Ultimately, the best piano for you is the one that you feel most comfortable playing and that makes you happy.
What are we looking for:
- High build quality;
- Soft touch keys;
- Pitch-bend and modwheel;
- Velocity/pressure sensitivity.
Choosing a MIDI keyboard can be a difficult process, especially if you don’t know what to look for. There are a few important factors you need to consider, such as the build quality and playability of the keyboard. This list is short due to those factors, but it will ensure that any recommendation we make will feel well-built and playable. You won’t regret your purchase if you take these factors into consideration.
When it comes to MIDI controllers, there are a few different things you'll need to decide on before making a purchase. The first decision is the keybed size- some controllers come in miniature 25-key sizes, while others are full sized with 88 keys. Aside from the number of keys, the controllers are essentially the same.
The following parameters will need to be guided subjectively at your own discretion:
- Number of Keys. The number of keys on a keyboard can affect its price and bulkiness. More keys mean a higher price and more bulk, which might be unnecessary if you’re not playing classical pieces. 49 keys are good enough for synthesizer-focused players, whereas 61 keys are a good amount for keyboardists who need;
- Key Type. Synth-action keys are the most common type of keys found on digital pianos. They are generally more lightweight and responsive than weighted keys, but still provide a sense of resistance that is often desired in piano playing. Weighted keys, on the other hand, offer a heavier touch that can be more advantageous for certain types of music. Semi-weighted keys are a rarer option that falls somewhere in between the two, offering players the best of both worlds in terms of responsiveness and resistance;
- Number of Controls. It's good to have knobs and buttons for assigning software functions with MIDI Learn, but most of us don't need a full digital mixing board. If we did, we'd be buying something else. Knowing what you need is key. If you don't need the controls, you can get the same keybed on the Nektar SE49, which is a stripped-down version of the Nektar GX49. Knowing what you need is key to getting the right product;
- Number of Controls. It's good to have knobs and buttons for assigning software functions with MIDI Learn, but most of us don't need a full digital mixing board. If we did, we'd be buying something else. Knowing what you need is key. If you don't need the controls, you can get the same keybed on the Nektar SE49, which is a stripped-down version of the Nektar GX49. Knowing what you need is key to getting the right product;
- Aftertouch is one of the most unique and expressive features on a keyboard. Unlike typical pressure sensitivity, aftertouch continues to detect how hard you’re pushing down until you let go. This can be used to add extra layers of expressivity to your performances on instruments like organs, where aftertouch can be assigned to control the rotary speaker speed;
- 5-Pin MIDI Support. If you're using a MIDI controller that doesn't have a MIDI port, you can use a USB MIDI interface to send MIDI signals through a traditional 5-pin MIDI cable. However, this can be inconvenient because USB ports are limited on laptops. Here's an example of how to connect a USB MIDI controller to legacy hardware: USB MIDI Keyboard -> Computer -> USB MIDI Interface -> 5-Pin MIDI Cable -> Legacy Hardware. Although it's possible to use USB MIDI controllers without a MIDI port, it's not as straightforward;
- Pads. Pads are an important part of a keyboard, but they are not a necessary component. They are essentially larger buttons, which can be helpful for playing on a main keyboard. Finger drumming is a popular activity, but I find that keyboard-drumming is more precise. Your own experience may vary;
- Pedal Support. When looking for a keyboard, it's important to consider whether or not the model has a pedal jack. Not all keyboards have this feature, particularly the smaller, portable 25-key models. However, it's always better to be safe than sorry, so it's best to make sure that the model you're interested in includes pedal support. This can be either through a proprietary jack or otherwise;
- Software Support. MIDI controllers that are designed to integrate well with specific software can be a great option for musicians who want the best possible experience with their music-making tools. By choosing a controller that is specifically tailored to work well with your software, you can eliminate many of the compatibility issues that can arise when using different programs. This can lead to a smoother, more efficient workflow and help you get the most out of your music-making.
Best MIDI-keyboards reviews
1. Nektar SE25 MIDI keyboard

Compatibility: PC, Mac
No of Keys: 25
Key size: Mini
Key type: Velocity-sensitive
Controls: 6 function keys; assignable PB1 & PB2 buttons for pitch bend, transpose, volume, pan & track; assignable ‘Part Two’ button for octave, MIDI channel, transpose, layer & latch; S button for sustain & modulation
Connectivity: Micro USB port, sustain pedal input
Power: USB
Software: Bitwig 8-Track
Dimensions (mm): 335 x 100 x 2
Weight (kg): 0.4
A MIDI controller keyboard can be an essential item if you're always making music on the go. The Nektar SE25 proves that features and playability don't need to be sacrificed for the sake of size and portability. This MIDI controller is small enough to fit in a laptop bag, but it still has 25 keys with full-size velocity and aftertouch. There's also a 4-way joystick for pitch and mod control, as well as buttons, knobs, and faders for even more control over your sound. Plus, the SE25 is USB powered, so you can just plug it into your laptop or computer and start making music right away.
If you're looking for a small MIDI keyboard and don't want to break the bank, Nektar's new SE25 is well worth considering. It's not the cheapest option out there, but it offers good value for money, and we found it to be thoroughly impressive during testing. It's a simple, compact product, but it does everything you need it to do - no more, no less.
2. Novation Launchkey Mini Mk3 MIDI keyboard
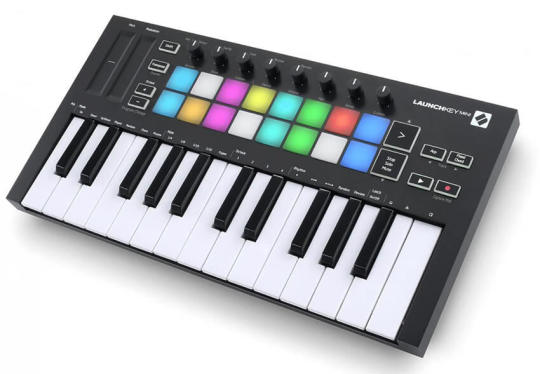
Compatibility: PC, Mac, iOS
No of Keys: 25
Key size: Mini
Key type: velocity-sensitive
Controls: Octave shift, Transpose, Pitch and Modulation strips, 16 velocity-sensitive backlit RGB launch pads, 8 rotary encoders, 10 function buttons
Connectivity: USB B port, 3.5mm TRS Type A MIDI out, Sustain Pedal input
Power: USB
Software: Ableton Live Lite, two months of Splice Sounds, AAS Session Bundle, Softube Time & Tone, Spitfire Audio LABS Expressive Strings, Klevgrand DAW Cassette and R0Verb, XLN Audio Addictive Keys, membership of Novation Sound Collective
Dimensions (mm): 330 x 172 x 40
Weight (kg): 0.69
The Launchkey Mini Mk3 is a powerful pocket-sized controller that is packed with features. Many of these features were missing from the previous version, including pitch bend and modulation touchstrips, a hardware MIDI out on a TRS jack, an incredibly flexible and versatile arpeggiator, a chord memory feature, and a great software bundle.
The Launchkey Mini Mk3 is a great keyboard controller for Live users, but it doesn't work perfectly with every DAW. If you're looking for the best solution at this price point, the Launchkey Mini Mk3 is definitely the way to go.
The Launchkey Mini MK3 is a great choice for a small, velocity-sensitive MIDI keyboard. It has an impressive range of connectivity options, making it perfect for traveling or using in a variety of settings.
3. Akai MPK Mini Mk3

Compatibility: Mac/PC/iOS
No of Keys: 25
Key size: Mini
Key type: velocity-sensitive
Controls: Eight assignable encoders, eight MPC pads, full transport controls, 4-way joystick
Connectivity: USB
Power: Bus-powered
Software: MPC Beats, Bassline, Tubesynth, Electric, Hybrid 3, Mini Grand, Velvet
Dimensions (mm): 32 x 18 x 4 cm
Weight (kg): 750g
The Akai MPK Mini Mk3 is a great MIDI keyboard for most people, particularly those looking for a quick and easy way to add melodies, basslines and simple chords to their projects. It's small and easy to use, with a ton of features that make it perfect for musicians of all levels.
The MPK Mini MK3 is much more than just a keyboard. It also has eight encoder knobs which can be easily mapped to any parameter of your DAW, and eight full-sized MPC style drum pads. This makes it an ideal controller for studio use or live performances.
At its heart, the Nano studio is a portable production powerhouse. Its small size makes it easy to transport, while its wealth of features and functions make it a valuable addition to any studio setup. Whether you need to record vocals, guitars, or other instruments, the Nano studio has you covered. Plus, its intuitive controls make it easy to use, even for beginners. So if you're looking for a versatile and portable recording solution, the Nano studio is definitely worth considering.
4. IK Multimedia iRig Keys 2 Mini

Compatibility: Mac/PC
No of Keys: 25
Key size: Mini
Key type: Velocity sensitive
Controls: Volume, Octave up/down buttons, Program up/down buttons, Setup button, assignable data push encoder, 4+4 assignable knobs, Modulation
Connectivity: MIDI in/out, micro-USB, 1/8" headphones output
Power: USB
Software: iOS SampleTank, Syntronik Pro-V Cubasis LE. Mac/PC: SampleTank 4 SE plus one of your choice from seven titles
Dimensions (mm): 32 x 14 x 5 cm
Weight (kg): 0.58kg
The Keys 2 Mini 25 is a small and affordable keyboard that has 25 mini keys. It is one of the smallest and cheapest models in the iRig Keys range, which also features keyboards with 37 mini keys and Pro (37 full-sized key) options. Mini 2 25 is small enough to place on any desktop, and it is sturdy enough to stay in place. It also features direct connectivity to iOS devices.
The keyboard has a variety of controls that you can use to customize your sound. These include the standard controls such as volume and pitch, as well as more advanced options like MIDI assignments and editing. The keyboard also has a set of program buttons, assignable rotaries, and a data knob to give you easy access to all of its features.
The keyboard is solid and well-sprung, although it may not be the player's dream come true. There are no dedicated pitch-bend or modulation dials, but if this is important to you, there are workarounds that you can explore deeper with Edit Mode.
The Irig Keys 2 is a great keyboard controller that is a bit on the expensive side. This offers many of the same features at a smaller size and for less money. Plus, it comes with a decent software bundle.
5. Native Instruments Komplete Kontrol M32
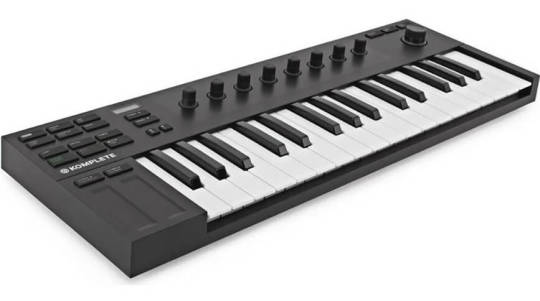
Compatibility: PC, Mac
No of Keys: 32
Key size: Mini
Key type: Velocity-sensitive
Controls: Eight touch-sensitive control knobs, two touch strips, four-directional push encoder
Connectivity: USB
Power: USB
Size: 47.5 x 16.7 x 0.5cm
Weight (kg): 1.45kg
The Komplete Kontrol A-Series is a USB 2.0 bus-powered keyboard that manages to squeeze 32 mini keys and the full complement of Komplete Kontrol controls into its tiny frame. It delivers almost the same functionality as the Komplete Kontrol S-Series (see below), making it an excellent mobile option for producers on the go.
The Komplete Kontrol M32 replaced the pitch and modulation controls with a pair of short touch strips. Also, the controller is equipped with 8 capacitive knobs, a 4d encoder, as well as numerous buttons that are incomparable in their tactile sensations. All this provides a high comfort of control, working with the operating Maschine, as well as using the interface of your DAW.
The OLED display and Smart Play features from the A-Series are also in place on the B-Series, allowing you to scale snap, chord trigger and arpeggiate with ease. As a regular MIDI controller keyboard, it also works with any other software.
The mini keys were the only downside to this keyboard for us. We found that we could live with them after some getting used to them, so if you can live with them too, this is the best portable and affordable MIDI keyboard you can buy.
6. Korg microKEY2 Air-25
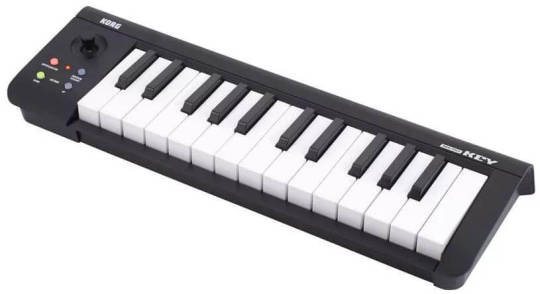
Compatibility: PC, Mac, iOS
No of Keys: 25
Key size: Mini
Key type: Velocity-sensitive
Controls:Joystick, Arpeggiator button, Sustain/TAP button, Octave Shift buttons
Connectivity: USB, Bluetooth
Power: USB or batteries
Size: 39.5 x 13.1 x 0.52cm
Weight (kg): 0.67kg
The line of microKey 2 Air midi keyboards is represented by 4 models depending on the number of notes: 25, 37, 49 and 61. Each works via Bluetooth communication. Power is supplied via AA batteries or via USB.
If you're looking for a MIDI controller keyboard that's easy to set up and operate, the microKey 2 Air 25 is a great option. It may not have as many bells and whistles as some of its rivals, but it delivers on the basics, and plays far better than many other keyboards in its class.
7. M-Audio Oxygen 49 MKV

Compatibility: Mac/PC
No of Keys: 49
Key size: Full-sized
Key type: Velocity sensitive
Controls: 8 velocity-sensitive trigger pads, 8 assignable knobs, 9 assignable faders, transport buttons
Connectivity: USB, sustain pedal
Power: USB
Software: Ableton Live Lite, MPC Beats, Skoove and Melodics instrument learning, Air Hybrid 3 and Mini Grand instruments
Dimensions (mm): 81 x 24 x 9 cm
Weight (kg): 2.9kg
The Oxygen 49 MIDI keyboard controller is a lower-priced alternative to the M-Audio Pro 49. It has a 3-segment LED display, instead of the OLED display on the Pro, and it has 8 back-lit red pads instead of 16 multi-coloured ones. However, it still provides access to 16 sound sources from the front panel when programming.
The Oxygen 49 lacks a dedicated MIDI out port, but it does have other features that make it stand out from the crowd. These functions are mostly triggered via soft keys and via 'secondary modes' from the keybed itself.
Read the full article
4 notes
·
View notes
Text
Android 13 — Info you need before release.
Google released Android 13 beta 3 in June, and we just got Android 13 beta 4 in July.
Beta 3 gave us new taskbar support and multi-window mode which are better optimized for bigger screens, Beta 4 came with stability improvements.
In no time, we will get a stable release.
These are the new features coming to Android 13.

Android 13 features
3D experience – Google is working on providing you with a 3D experience with paired audio and android devices.
Bluetooth LE Audio — Latest Bluetooth version support requires less power, multi-device support, and reduced stuttering. This is present in Android 13.
Photo Picker — This privacy-friendly feature lets users choose whether to share a specific photo to an app or to the whole gallery. This way, apps can only access the file which you want.
Nearby Wi-Fi device permission— This NEARBY_WIFI_DEVICES feature allows apps to access Wi-Fi access points, which limits the data shared with an external app.
Material You app theming— Android 12 supports wallpaper based theming for Google apps only, Android 13 extends this to third-party apps too.
Copied text — This feature lets users edit the copied text before it gets saved, just like the screenshot feature. If you have copied a hyperlink, a pop-up comes to open it in Chrome.
New QR code scanner— We already know Android 13 comes with a feature that adds a QR scanner in quick style settings. Another option will add a scanner to the lock screen.
Tap-To-Transfer — Android 13 might be adding a “Media Tap-to-Transfer” option, which would allow the user to tap their phone to some other device to transfer media playback to it. This is still unclear how this will work.
Separate media access — Apps will have to request access to your media files separately. This includes photos, videos, and audio files.
Adjustable Flashlight — [Esper](https://blog.esper.io/android-13-flashlight-brightness-control/) has found commands in the developer beta that suggest Android 13 will let you control the brightness of the flashlight, rather than simply turning it on and off. This feature was already present on iOS.
App Archive— Google announced a new feature that will allow apps to be installed in an archived form, which will reduce storage usage and use the files when they are needed.
Notification permission on the first launch — This feature will let you deny notification permission on the first launch.
MIDI 2.0 support — Android 13 will also add support for MIDI 2.0 devices.
Auto clipboard history deletion — Android 13 will be able to auto-delete your clipboard history.
Android 13 release date?
If you are familiar with Android 12’s rollout, you can guess when Android 13 will get released.
After releasing Android 13 beta 4 Google described the release as weeks away. So it looks like Android 13 will release in August 2022.
This article was originally published on fosspage.
2 notes
·
View notes
Text
How To Use iPhone Switch Control

This article explains deeply what is iPhone switch control and how to use iPhone switch control.
Our smartphones have long ceased to be more useful than just texting, calling, and listening to music. Now they are an extension of our lives on our computers. Compared to older phones, iPhones and their equivalents have also become more affordable for those with physical problems.
One feature that is often overlooked on the iOs is the iPhone Switch Control, which makes it easier for users to navigate their devices. But what exactly is iPhone Switch Control and how do you use it? Let's see.
iPhone Switch Control is an accessibility feature in iOS 14 that allows people with limited mobility to fully utilize their devices using ability switches and other adaptive devices. When Apple makes iPhone more affordable, it helps make iPhone the best, and Switch Control is a very robust feature.
Items on the screen are highlighted sequentially and can be activated by tapping, moving your head in front of the selfie camera, or pressing adaptive buttons. You can also use point scanning and gestures such as pinch to zoom. You can even use multiple switches. Here's How to Use iPhone Switch Control.
Using Switch Control on iPhone and iPad
Switch Control comes with a wide range of features and offers full customization so you can customize all the essentials. Before we get into the customization aspect, let's get the basics out of the way first!
What is Switch Control on iPhone and iPad?
iPhone Switch Control is designed to let you control your iPhone and iPad with one or more buttons. To be more precise, it changes the gestures used to control your iOS/iPadOS device.
People with limited mobility can use Switch Control on their iPhone or iPad using ability switches and other adaptive devices. It highlights items sequentially on the screen, allowing you to perform actions by tapping, moving your head, using adaptive accessories, or even smiling.
Notably, Switch Control also supports point scanning and custom gestures. It allows you to adjust the time, keep the duration and customize the menu for a more personalized experience.
Using custom options, you can perform various actions such as selecting and dragging items, activating Siri, calling the control center, and much more. Long story short, Switch Control ensures that limited mobility doesn't stop you from getting the most out of your iPhone and iPad.
Enable Switch Control on iPhone and iPad
- Launch the Settings app on your iPhone or iPad.
- Scroll down and tap Accessibility.
- Then select Switch Control.
- Then turn on the switch next to Switch Control. You may receive a pop-up asking you to confirm the action. Tap 'OK' to confirm and activate the function.
Note: If you want to disable Switch Control, follow the steps above and this time disables the switch. You can also triple-click the Home button or Power button to disable Switch Control on your iPhone or iPad.
Add a new switch
Switch Control allows you to add different types of switches that you can use to control your device. Make sure to assign a key to the Select Item action so Switch Control can work properly.
- Open the Settings app on your iOS or iPad OS device and go to 'Accessibility -> Switch Control'.
- Now tap on Switches.
- Then tap Add New Switch.
- Then select a switch source:
- External: This allows you to activate your external switch. External switches "maybe Bluetooth, MIDI or Made for iPhone/iPad Assistive Switch Control devices".
- Screen: This allows you to choose Full Screen so that you can use Switch Control by tapping anywhere on your iPhone screen. Select Fullscreen and then choose the desired switching action.
- Camera: Select this to use Switch Control by moving your head left or right. After selecting Left/Right Head Gesture, you have the option to choose the desired key action, which can be scanner or system related.
- Back Tap: With iOS 14 or later, you can perform certain actions such as activate Siri, activate Dictation, or adjust the volume by tapping the back of your iPhone two or three times. Moreover, you can also use this super-handy gesture to enhance the functionality of Switch Control. For example, you can use this gesture to start/stop scanning and open the scanner menu.
- Select the desired shift action. You then have the option to choose Long press to set up a long-press action.
Removing a Switch from iPhone Switch Control
If you don't want to use a particular switch anymore, you can easily remove it from Switch Control.
- Open the Settings app on your iOS or iPadOS device and go to "Accessibility -> Switch Control".
- Now tap on Switches.
- Then swipe left on the switch you want to remove. And then tap Delete.
Create a new recipe
Interestingly, you can also create a new recipe, a series of complex actions, which you can temporarily assign to switches. Recipes come in handy when performing a variety of tasks, such as activating controls in games and even turning pages in the Books app. In addition, you can also include various gestures as part of a recipe.
- Launch the Settings app on your iPhone or iPad and go to Accessibility -> Switch Control.
- Now tap Recipes.
- Then tap Create New Recipe. Then give it a suitable name, assign it an option, and adjust the timeout.
Change the scan style
Based on your convenience, you can customize the scan style so that you can adjust how you move items on the screen. While automatic scanning is the default, you can opt for manual scanning if you want more control.
- On your iPhone or iPad, open the Settings app -> Accessibility -> Switch Control.
- Touch Scan Style and select your preferred style. We explain below what each scan style does:
Auto Scan: This allows you to automatically move the focus after a specified amount of time.
Manual scan: Requires one switch to move focus and a second switch to activate items.
One key step scanning: Also requires a key to be toggled to move focus. Note that if you don't take any action within a certain amount of time, the item with focus will be activated automatically.
How to adjust the shift operation time?
- On your iPhone or iPad, open the Settings app -> Accessibility -> Switch Control.
- Now scroll down to the Weather section. Then you can choose from five options:
Auto Scan Time: This allows you to adjust the auto scan time for Switch Control. In other words, it allows you to change how long it takes Switch Control to scan items automatically. Select it and use the +/- button to adjust the tempo.
Pause on the first item: this allows you to set how long the automatic scan waits after the entry is pressed. Depending on your needs, you can increase/decrease the time with the +/- button.
Loops: This allows you to hide the cursor after visiting each item on the screen a certain number of times.
Move Repeat: This allows you to determine the delay before moving to the next or previous item is repeated while a button is held down. It also has +/- buttons that allow you to adjust the tempo.
Long press: A long press allows you to add another action to a switch that is activated when you press and hold the switch for longer than indicated. Not only can you choose the length of the long press, but also pause the Switch Control scan by long-pressing an enabled button.
How to Customize the Key Operation Tap Behavior
You can also customize your touch behavior for a more personalized experience
- On your iPhone or iPad, open the Settings app -> Accessibility -> Switch Control.
- Now select the Touch Behavior option.
- You then have three options to choose from:
Default: Choose this to display the Switch Control scanner menu.
Auto tap: Causes the Select action to tap the screen automatically unless pressed twice to display the scanner menu.
Always Tap: Allows the 'Select Action' to immediately choose the item in focus instead of displaying the scanner menu.
Please note that the 'Always tap' feature only applies to item mode. Specifically, the Always Tap behavior is reset to defaults in the Guide Cursor and Head Tracking modes.
How to adjust the hover item after tapping
- On your iPhone or iPad, open the Settings app -> Accessibility -> Switch Control.
- Now after tapping on Focused Item, tap.
- Then you have two options to choose from:
First item: Select it to let Switch Control scan the first item.
Current Item: Choose this to let Switch Control manage the current item.
Customize keyboard for switch control
- On your iPhone or iPad, open the Settings app -> Accessibility -> Switch Control.
- Now scroll down to the 'Keyboard' section. Then toggle the switches for "Scan Same Key after Tap" and "Extended Predictions" based on your preference.
How to adjust the switch stabilization for switch control?
Switch Stabilization lets you adjust the latency and skip a retry to improve the Accessibility Checker.
- On your iPhone or iPad, open the Settings app -> Accessibility -> Switch Control.
- Now scroll down to Shift Stabilization. You can then choose to adjust the retention time and try to skip again.
Hold Time: This refers to the length of time your input device must be held before pressure is recognized. Please note that the waiting time must be shorter than the automatic call time to use the double-feed press. You can adjust the duration with the +/- buttons.
Repeat: is the duration that multiple input pressures are treated as a single input. Remember that the replay skip time must be shorter than the auto-tap time to use a double-enter key. You can adjust the duration with the +/- buttons.
How to Adjust the Switch Control Slider
- On your iPhone or iPad, open the Settings app -> Accessibility -> Switch Control.
- Now scroll down to the 'Scan Point' section and choose Gliding Cursor.
- Then there are three options to choose from, and below we explain what they all do. You can use the +/- button to adjust the speed of the slider.
Single: In single mode, you can make a vertical and a horizontal selection. It is generally faster for larger selection targets.
Sophisticated: Fine-tuned mode lets you fine-tune your targeting in any direction, with a second sweep within the range of your original selection.
Precision: Ads a low-speed final sweep for more accurate aiming.
Using head tracking
Using the camera on your iPhone and iPad, the 'Head Tracking' feature tracks the movement of your head to control a pointer on the screen. In addition, it also tracks your facial expressions to perform actions.
Remember that you can only use Head Tracking on iPhone/iPad with a TrueDepth front camera. The TrueDepth camera is available on iPhone X and later, 12-inch iPad Pro (3rd and 4th generation), and 11-inch iPad Pro (1st and 2nd generation).
- On your iPhone or iPad, open the Settings app -> Accessibility -> Switch Control.
- Now scroll down to the 'Point Scanning' section and choose Head Tracking.
- Then turn on Head Tracking, then you can customize the head tracking actions, choose the tracking mode and adjust the pointer speed.
Refinement of head tracking actions
Smile: This allows you to choose an action to perform when you smile and show your teeth.
Open Mouth: This allows you to choose an action to take when opening your mouth.
Tongue Out: This allows you to select an action to perform when you stick out your tongue while your lips are closed.
Raise Eyebrow: This allows you to choose an action to perform when you raise your eyebrows.
Fine-tune main tracking mode
Tracking mode allows you to customize how the pointer moves.
With Face: Once selected, you can point your face directly to a position on the screen to move the pointer to that location.
When looking at the edges of the screen: Select this option to aim your face at an edge of the screen and move the pointer in that direction. By rotating directly on the screen, you can keep the pointer still.
Relative head: Choose to move the pointer with your head wherever you are. It's worth noting that if you move faster, the pointer moves faster.
Turn sound effects on/off
iPhone Switch Control also offers cool sound effects that you can turn on or off as you wish.
- On your iPhone or iPad, open the Settings app -> Accessibility -> Switch Control.
- Now toggle the switch next to Sound effects on/off.
How to customize the switch voice control
Assistive Control also gives you the flexibility you want to adjust speech. For example, you can choose a preferred voice and even adjust the speaking rate.
- On your iPhone or iPad, open the Settings app -> Accessibility -> Switch Control.
- Now scroll down to the 'Audio' section and select the 'Speech' option.
- Then set the switch to Speech. Then you can choose the desired voice, adjust the speaking rate and enable/disable the options 'Speak Item Attributes' and 'Pause while speaking'.
Customize Switch Control Menu Items
Another feature worth mentioning is the ability to customize menu items. It allows you to customize not only gestures, settings, but also media controls so that you have full control while performing various actions.
- On your iPhone or iPad, launch the Settings app -> Accessibility -> Switch Control.
- Now scroll down and choose Menu Items.
- Then there are five menu items for you to choose from Top Level, Gestures, Device, Settings, and Media Controls. Select your favorite menu item and adjust the order in which you want them to appear.
Enable/disable group items
iPhone Switch Control also allows you to group items for faster navigation. However, you can choose to enable or disable it on your terms.
- On your iPhone or iPad, open the Settings app -> Accessibility -> Switch Control.
- Now toggle the Group Items toggle on/off based on your preference.
Toggle large cursor on/off?
While the large cursor looks better and makes navigation a bit more convenient, you can disable it if you don't find it useful.
- On your iPhone or iPad, open the Settings app -> Accessibility -> Switch Control.
- Now scroll down to the "Visual" section and turn off the "Large cursor" switch.
How to adjust the color of the switch control cursor
Probably the coolest thing about iPhone Switch Control is the ability to customize the cursor color. So, if you want the cursor to look nice (or if you're colorblind), pick the color you want for it.
- On your iPhone or iPad, open the Settings app -> Accessibility -> Switch Control.
- Now scroll down to the 'Visual' section and select Cursor Color.
- Then choose a preferred color for the cursor.
Create new iPhone switch control gestures
Gestures simplify performing specific tasks. So always make sure to come up with helpful gestures that will help you get the job done faster.
- On your iPhone or iPad, open the Settings app -> Accessibility -> Switch Control.
- Now scroll down and choose Saved Gestures.
- Then click Create New Gesture.
- Then tap or swipe to make a stylish custom gesture. Note that a sequence of gestures is counted as one gesture for multiple taps. Let's say you draw 'O' followed by two 'I's, then you have to draw 'OII' every time you want to trigger the action associated with that gesture. After making the desired gesture, tap Save.
Now you can activate your custom gestures in Actions -> Gestures -> Saved.
Enable/Disable Side Button Confirmation
You can use iPhone Switch Control to confirm payments with Face ID or when you need to double-click the side button to confirm the purchase.
- On your iPhone or iPad, open the Settings app -> Accessibility -> Switch Control.
- Now scroll down and toggle the switch next to Confirm with switch control on.
- Then tap Continue and double-click the side button to confirm.
Enable and Customize Switch Control on iPhone iOS and iPadOS
That is a lot! As I mentioned above, iPhone Switch Control is a very useful accessibility feature designed for people with limited mobility. The best thing about this feature is the wide range of customization options. So you can adapt all the essential aspects to your needs. In addition, it allows you to customize the appearance of the menu and cursor items, which may be useful to some.
Recently, we covered some articles related to accessibility, enabling and using Magnifier, Screen Curtain, Sound Recognition, and Accessibility Shortcut. Make sure to check them out if you haven't already taken full advantage of these equally useful features.
Conclusion iPhone Switch Control
In the latest iOS updates, Apple has made its devices more user-friendly for those who have trouble performing basic operations with their devices. One of the best examples of this is iPhone Switch Control, which allows users to manage their iPhones much better than ever before. The methods mentioned above should help you to use Switch Control on your iPhone.
Read the full article
#howto#howtoturnoffswitchcontrolwheniphoneislocked#iPhone#iphoneswitchcontrol#iphoneswitchcontrolautoclicker
0 notes
Text

Best MIDI Keyboards for you
In the dynamic world of music production, MIDI keyboards stand as pivotal instruments, connecting the tactile feel of keyboard play to the limitless possibilities of digital sound. These versatile devices serve not just as input tools but as creative partners, enabling composers and producers to navigate the digital soundscape with ease and precision.
One of the standout features of exceptional MIDI keyboards is their adaptability to various styles and skill levels. From the aspiring bedroom producer to the professional studio wizard, there's a MIDI keyboard tailored to every need. The inclusion of octave shift buttons, mod wheels, and pitch bend provides additional expressive capabilities, allowing for nuanced performances that breathe life into digital sounds.
Connectivity is another vital component of the best MIDI keyboards. With options ranging from traditional MIDI Out to USB and even Bluetooth wireless connections, these devices ensure seamless integration with a range of hardware and software. This connectivity not only simplifies the setup process but also expands the potential for musical exploration, linking keyboards to synthesizers, drum machines, and computer-based DAWs in a cohesive production environment.
Innovation in MIDI keyboard design also extends to software offerings. Many leading models come bundled with generous software packages, including virtual instruments, DAWs, and plugin effects. This not only provides immediate value and accessibility to high-quality production tools but also encourages experimentation with new sounds and techniques, enriching the creative process.
Finally, the physical design and build quality of MIDI keyboards have seen significant advancements. Rugged yet lightweight builds are now common, ensuring durability for both studio and live performance settings. Ergonomically placed controls and backlit pads not only enhance usability but also add to the aesthetic appeal, making these keyboards as visually engaging as they are functionally.
In conclusion, the best MIDI keyboards are those that fuse responsive playability with expansive control, seamless integration, and compelling design. These instruments are not merely accessories but essential conduits for musical expression, enabling producers to delve deeper into the art of sound creation.
#https://www.tumblr.com/briansandstorm/741352702271946752/best-midi-keyboards#electronic music#midi#keyboard#music producer
0 notes
Video
youtube
Your ENTIRE GUITAR RIG (with a WIRELESS FOOTSWITCH) - Mooer Prime P2
Jan 2, 2024
In this video, we are going over the Prime P2 by Mooer, which can be your entire guitar rig, and the only pedal you need, which can be controled with a wireless footswitch.
You get 50+ amps, 25+ cabs, 50+ fx, a drum machine, a looper, a tuner, it has stereo output, bluetooth, midi control, third party IRs, a cloud for downloading and uploading patches.
It's crazy how much this tiny pedal can do.
Many thanks to Mooer for sending this over for review for the channel (not paid).
0 notes
Text
Excellence of the Roland VR-09: A Comprehensive Review
When it comes to digital pianos, the Roland VR-09 stands out as a remarkable choice for musicians seeking a versatile and high-performance instrument. In this review, we will delve into the key aspects of the Roland VR-09, exploring its design, features, performance, and more.

Design and Build Quality
The Roland VR-09 boasts a sleek and ergonomic design that combines style with functionality. Its lightweight and compact build make it an ideal choice for both stage and studio use. The durable construction ensures longevity, making it a reliable companion for musicians on the go.
Performance and Sound Quality
One of the standout features of the VR-09 is its exceptional performance capabilities. Powered by Roland's renowned SuperNATURAL sound engine, this digital piano delivers authentic and expressive tones. From realistic piano sounds to vintage electric pianos and classic organ tones, the VR-09 covers a wide range of musical styles with finesse.
Features and Functions
Equipped with a rich set of features, the Roland VR-09 caters to the needs of diverse musicians. It includes a wide variety of sounds, including electric pianos, organs, and synthesizers, providing a versatile palette for creative expression. The intuitive control layout allows for easy access to different functions, making it a user-friendly instrument for musicians of all levels.
User-Friendly Interface
Navigating through the features of the VR-09 is a breeze, thanks to its user-friendly interface. The intuitive control panel and LCD display simplify the process of selecting and customizing sounds, making it easy for musicians to focus on their performance without getting bogged down by complex settings.
Connectivity Options
The VR-09 offers a range of connectivity options, making it a versatile tool for various musical setups. With standard MIDI, USB, and audio outputs, this digital piano seamlessly integrates with other instruments and recording equipment. It also features Bluetooth connectivity, enhancing its compatibility with smartphones and tablets.
Portability
Musicians on the move will appreciate the VR-09's portability. Weighing in at a manageable size and featuring a built-in speaker system, this digital piano is ready to hit the stage or studio without the need for additional amplification. The convenience of portability makes it an excellent choice for gigging musicians and performers.
youtube
Pros and Cons
Pros:
Authentic and expressive sound quality
Versatile range of tones and instruments
User-friendly interface
Lightweight and portable design
Cons:
Limited polyphony compared to some high-end models
Basic onboard effects
Conclusion
In conclusion, the Roland VR-09 stands as a testament to Roland's commitment to delivering high-quality and versatile instruments. Its impressive sound engine, user-friendly interface, and portability make it a top choice for musicians across various genres. Whether you're a seasoned professional or a budding musician, the Roland VR-09 is worth considering for its exceptional performance and features.
With its combination of outstanding sound quality, user-friendly design, and portability, the Roland VR-09 proves to be a valuable addition to any musician's toolkit.
0 notes
Text
Vyz: System Audio
MacOS does not allow applications access to system audio directly. However system audio can be indirectly accessed if you have a virtual audio device / driver installed. Below is an example of using Vyz with system audio + headphones using BlackHole Audio Driver by existential audio.
Disclaimer: This is just an example work around and is not guaranteed to work as expected or at all. Be sure to check the full guide including caveats and tips below before trying any steps yourself and try at your own risk.
1. Get BlackHole: https://existential.audio/blackhole/
Follow instructions for download and installation
Consider donating if you enjoy their product. You can find a link to custom donation amount within their installation link.
BlackHole 2ch version should work
2. Open "Audio MIDI Setup"
The easiest way to find it is to search for it using Spotlight
This is a MacOS application to manage audio device setup (MIDI = Musical Instrument Digital Interface)
Once opened you should see "BlackHole 2ch" in the listed devices if installed correctly

3. Create a new Multi-Output Device
Make sure both BlackHole and your Bluetooth Headphones are selected.
Note: bluetooth headphones need to be connected to be visible in Audio MIDI Setup
You may find it helpful to rename the device to something meaningful. In this example we rename it to "BH + Bluetooth".

4. Set the new device as your audio output
You can use the tray as shown here or go to Sound in the System Preferences UI.

5. In Vyz Audio Settings, select the BlackHole virtual device as your selected audio source
Not the multi-output device just created
This setting is found under the main audio source mode selection
You should also select "System: Advanced" as the mode if planning to use and test immediately

6. Play some audio!
If everything is set up correctly you should see the visualizer reflect the system audio.
Setup Checklist:
Virtual Audio Driver installed (should be visible under sound output devices and in Audio MIDI Setup)
Multi-output Device created with both virtual device and actual output target selected
Multi-output Device selected as audio output
Virtual audio device selected in Vyz as target under "Advanced | Select Audio Source" and "System: Advanced" selected as the audio source mode.
Caveats and Tips
Vyz does not own or develop BlackHole. Download, install, and configure software at your own risk.
When using a multi-ouput audio device, MacOS does not allow volume control (because it doesn't "know" what device your trying to control).
Tip: To control volume, one way is to switch to your actual output (in this example, the bluetooth headphones), change the volume, and switch back to the multi-output device. Alternatively if using headphones with integrated volume controls those should still work.
Tip: While this example uses BlackHole and Bluetooth Headphones, the basic idea could work for other virtual audio devices and destination outputs (e.g. bluetooth / built-in speaker outputs).
Tip: If you have multiple headphones you can add them all to one multi-output device to keep things simple. This will just output to all added headphones that are connected (which is usually one).
Tip: If you use system audio for speakers and headphones create separate output devices for the two categories or you will have audio play out of your speakers and headphones at the same time.
0 notes
Text
Kawai DG30 | Digital Grand Piano Review | RHIII Action, Bluetooth MIDI, Onkyo Audio System
youtube
Finally, an affordable digital grand piano from Kawai. If there was one glaring hole in Kawai’s otherwise strong digital piano lineup, it was without question a digital baby grand piano that didn’t totally break the bank like previous models like the CP1.
And the fact is, there’s a real demand for products like this - just look at the success of Roland’s GP line. Kawai has finally answered the bell and plugged this hole with the brand new Kawai DG30.
That means it’s time for a review. We’re going to jump right into our dissection of this new instrument to see if it matches expectations and how it measures up to other options in the market. Be sure to check out the accompanying video as well for an even more in-depth analysis and some playing examples.
Kawai DG30 Digital Grand Piano - General Overview
Why is this a Big Deal?
We first heard about the new DG30 back during NAMM 2020. We, and many other dealers, have been begging Kawai for something like this for years, so naturally, we were very excited to see to learn that the DG30 was on the way.
We knew there was going to be a serious market for this piano, and given Kawai’s track record, we were sure they would be able to produce an excellent instrument for this category.
First Impressions of the Specs Sheet
When we finally got our hands on the specifications sheet we were in all honesty a little bit underwhelmed. The specs sheet just didn’t have the wow fact of a Kawai NOVUS 10 or NOVUS 5 for example.
Now that we’ve finally had a chance to play one and disregard some of our previous expectations, the overwhelming consensus is that this is a very satisfying piano to play that also happenns to look great.
Attractive Cabinet
And this shouldn’t be a surprise as the DG30 is essentially a Kawai CN39 in the piano cabinet of a small grand piano - the same sound engine, speakers, keyboard action, etc. The CN39 is a wonderful instrument in its own right, so despite our lack of initial enthusiasm for fancy new specs, we’re perfectly fine with Kawai’s choice here.
With that out of the way, let’s dive into the piano sound.
Kawai DG30 - Piano Sound
Digital Grand Piano - 4 Speaker System With 2x 20-watt Amps from Onkyo
4 Speaker System With 2x 20 Watt Amps from Onkyo
To start, the DG30 has a pair of 20-watt amplifiers for a total of 40 watts of power, coming at the player through a 4 speaker system. There are two main speakers aimed at the floor, and two tweeters for some of the higher frequencies.
Onkyo Audio Technologies was a big contributor here as the speaker/amp configuration was designed in concert with them, and they have supplied the signal processing technology.
Progressive Harmonic Imaging Sound Engine
It features the Progressive Harmonic Imaging (PHI) sound chip with 88-key stereo sampling, which as mentioned, is the same version found in the CN39, as well as the CA49. The focus of this sample set is the beautifully recorded Shigeru Kawai SK-EX concert grand piano.
Progressive Harmonic Imaging Sound Engine
The 88-key stereo sampling is significant as it means each and every note of the SKEX was recorded individually as opposed to only recording one in every four or five notes and stretching the sample. Individual note sampling produces a far more accurate tone.
Other Sounds
There are 355 built-in sounds, and the vast majority of these are high-quality. The acoustic pianos and vintage electric pianos are definitely the highlights.
That said, Kawai always has nice church organs and as a result, their digital pianos have been quite popular with the worship community for many years. The Kawai DG30 would make for a fine digital piano for a Church looking for a versatile digital piano that happens to look like an acoustic baby grand.
OLED Display User Interface
Navigating the controls is the same as on the CN39 as well, with an easy-to-use control panel with an OLED display located on the cheek block.
256 Note Polyphony
The polyphony is a strong 256 notes which might sound like overkill, but it will be important to some as you can have 16 MIDI tracks going in at once on this thing.
A large polyphony count like this also ensures that even if you’re layering and adding effects, the polyphony is never going to get strained.
Virtual Technician
The Kawai DG30 is also equipped with Kawai’s Virtual Technician feature, which gives the player access to 19 editable sound-related parameters.
If that’s too intimidating, there are several Smart Presets that give you specific combinations of the parameters pre-determined by Kawai. Check out the video for some examples of this, as well as some playing examples of the different grand piano sounds.
Cabinet Resonance
Some final observations related to sound; despite the sound specs lining up exactly with the CN39, we are noticing an effect the cabinet seems to be having on the sound, namely, there’s some real cabinet resonance coming through. This isn’t in the marketing literature, but we’re definitely picking up on it.
On to the piano action.
Kawai DG30 - Piano Action
Responsive Hammer III Key Action
Responsive Hammer III Key Action
The Kawai DG30 is equipped with Kawai’s Responsive Hammer III action. Though they’ve kept the name the same, this is the latest, upgraded version of the RHIII.
This action is known for being one of the best plastic key actions available and features grade-weighted hammers, ivory touch white key surfaces, let-off simulation, triple sensor key detection, and counterweights.
The dynamic output is very accurate, as is the weighting. The texture on the key surfaces offers a nice balance between grip and glide, and the white keys are rounded for ease of piano playing experience.
The Best Plastic Key Action Available?
There’s not much more one could really ask for with this action - it’s responsive, offers the player a ton of control, and the repetition speed is good. In fact, many people consider the RHIII to be the best plastic action currently on the market.
Roland’s PHA4 often gets considered as well, but it doesn’t have the counterweights or the repetition speed that the RHIII does.
You need to jump to a wood-based action for a real upgrade from here, but to keep the price down on the DG30, Kawai elected for this action as opposed to the wood-based Grand Feel Compact.
Kawai DG30 - Connectivity
Connector Ports
Let’s start with the physical connector ports. The Kawai DG30 has both 1/4” stereo line inputs and line outputs. This is really important because if you’re looking for the aesthetics of a baby grand piano for a venue, such as a restaurant or other performance space, but would like something maintenance-free, the DG30 is going to be a great choice.
1/4” stereo line outputs ensure you can connect the DG30 to an amp or external speaker system for more power than what the 40-watt amps can muster.
After that, we’ve got dual headphone jacks, as well as USB Type A and B connectors.
Bluetooth MIDI & Bluetooth Audio
The Kawai DG30 also has Bluetooth MIDI and Bluetooth Audio. Bluetooth MIDI means you can connect to Smart devices to access apps like Kawai’s Sound Museum apps and playback recordings, while Bluetooth Audio means you can stream music directly through the DG30’s sound system.
This makes the DG30 a wonderful piano for entertaining - who won’t be impressed hearing high-quality audio coming from your grand piano at your next party?
Kawai DG30 - Features
Internal Recorder
The Kawai DG30 is a strong internal song recorder that can record both WAV and MP3 files, and you can save up to 16-Track standard MIDI recordings to a flash drive.
This might not be the most relevant feature to the average DG30 buyer, but it’s a nice perk that carries over from the CN39.
Metronome & Other Functions
In terms of other features, the DG30 has pretty much everything else you’d expect, such as a metronome, transpose, built-in rhythms, and a built-in lesson function. There’s a variety of built-in lesson books too such as Alfred Lesson Songs, Czerny, Chopin, and more.
Kawai DG30 - High-End Cabinet
Genuine Polyester
Now to the cabinet. Kawai went all the way here by using genuine polyester for the Ebony Polish finish, as they do with their acoustic grand pianos. This is worth noting because not every piano company uses real polyester for their ebony polish finishes, and instead, often takes a much less durable approach.
Polyester does make the instrument heavier, but two people would still be able to move it, so keep that in mind if you’re a restaurant owner looking to spice up your establishment.
Full Appointments
Rounding out the cabinet is an attractive key cover, music rest, and a 2-position top board for an even more aesthetic effect.
Grand Feel Pedal System
Lastly, we have to mention that the DG30 is using Kawai’s Grand Feel Pedal System with half-pedal support, which is something pianists just love. Kawai has applied three different spring pressures to the three pedals - Damper, Sostenuto, and Soft- mimicking the exact feel of a grand piano pedal system.
Closing Thoughts
Thank you for sticking with us at Merriam Music Blogs and Articles through this review of the DG30. We’re thrilled that Kawai has added this to their lineup. The Kawai DG30 is going to compete really nicely against Roland's GP-607, and in fact, we have a comparison video between the two that you can check out here.
The Kawai DG30 is a competitively priced, musical, and perhaps most importantly, beautiful digital grand piano from Kawai ready for a variety of settings. And with Kawai’s great reputation and warranty coverage, you can feel confident going with the DG30 rather than some no-name branded digital piano from a big box store.
The post Kawai DG30 | Digital Grand Piano Review | RHIII Action, Bluetooth MIDI, Onkyo Audio System first appeared on Merriam Pianos
2359 Bristol Cir #200, Oakville, ON L6H 6P8
merriammusic.com
(905) 829–2020
0 notes
Text
Music Tech Blog Post #11
As a musician, midi instruments have always fascinated me , whether it was an Akai Midi Keyboard, or even an electric guitar Midi controller. The way you can have one instrument and play it to make it sound like a totally different instrument is amazing to me. So when researching for Midi Instruments I wanted to find something really cool that would stand out to me. For me that was the Roland Aerophone AE-01 Mini Digital Wind Instrument. The Roland Aerophone is a woodwind Midi Instrument that has a similar look to a soprano saxophone, which is amazing to me because I am a saxophone player. With this instrument there are also a lot of presets that can make you sound like various instruments. For example with the Roland Aerophone you can sound like a violin, flute or a synth. It also features an app to help beginners learn how to notate or even play music, Overall it has 6 different preset sounds that you can use, and it also comes with its own reverb effect. It can also connect through Bluetooth which is really helpful if you either forgot a USB adapter or even if you want to quickly record something and don’t want to go through the hassle of trying to find a USB adapter. However you do need a USB adapter to recharge the battery of the Aerophone. Overall this Midi instrument is really cool, with a bunch of really cool and unique sounds and presets that make it seem fun and exciting to work with. It is also very intuitive and makes it easy for beginners of an instrument to quickly adapt to its play style.
Citations
Roland Aerophone AE-01 mini Digital Wind Instrument. Sweetwater. (n.d.). Retrieved March 9, 2023, from https://www.sweetwater.com/store/detail/AE01m--roland-aerophone-ae-01-mini-digital-wind-instrument
1 note
·
View note
Text
How to Choose the Best Digital Piano
In many ways, the piano is the fundamental instrument in the development of contemporary harmony. It’s all there in front of you, literally laid out in black and white. Whether you play piano already or are just starting out, the best digital piano reviews offer much more than just convenience. In this guide, we will show you the reasons why. By the time you’re done, you’ll have all the information you need to choose the best digital piano for your playing needs and aspirations.

For this round-up, I’m looking at the best digital pianos that can deliver the physical experience and playability that piano players need without the bulk of a mock-acoustic piano. This is not about furniture, this is about making music in our studio or performing with a piano on stage.
So while we’re talking about weighted keys, lots of octaves, and a good physical presence that would fit well in a studio and live performance setting, we also need them to be relatively portable with good controls and versatility.
SOUND
This might seem obvious, but sound is the most important factor when considering buying an instrument. A digital piano seeks to mimic the sound of an acoustic piano as closely as possible. This sound is achieved by using layers of recordings and digital modeling algorithms to recreate the organic acoustic elements of a piano's tone.
When shopping for a digital piano, pay attention to the number of samples or voices, the audio processing unit or memory size https://pianoshub.com and the type and number of speakers.
Cheaper keyboards generally have a wider variety of instrument sounds, like strings, organs, guitars, and more. But, the acoustic quality of the piano tones on these instruments is often worse than a more expensive digital piano with a smaller sound library.
COMPATIBILITY
Some digital pianos have USB, Bluetooth, or Midi compatibility. These are included so that producers and recording artists can record directly into a digital audio workstation (DAW).
For most students, compatibility is not a major deciding factor. But if you're interested in composing or songwriting, make sure the instrument supports the connection type that matches your DAW and computer.
1 note
·
View note
Last Seen Blogs

boundangrybear
Drawn to the Dark Side

moon-breee
Say Your Grace

nonbinaryaubrey
"You can do it!!"

cosyabbi
CosyAbbi

filmgifs
filmgifs