#I will try to upload a folder with the original quality images later...
Photo


I thought about putting the bsd trailers and manga equivalent panels side by side because clearly there is something wrong with me (open the images to be able to read for better quality)
#bsd#bungou stray dogs#bsd s4#bsd season 4#mine#long post#← SORRY I HOPE YOU LIKE THE COLORS OF THE BSD TRAILER#Please appreciate#Saying I spent days over this is an understatement#Might change the caption later but like. the sentiment is true#Did you know Tumblr doesn't allow you to upload pictures heavier than 20MB? Ask me how I found out#I will probably upload a folder with the original quality later... I need to find an alternative to Dropbox because I filled up all the spac#I will try to upload a folder with the original quality images later...#I need to find an alternative to Dr*pbox because I've filled up all the space there 😪#And I generally try to avoid G*ogle services so Drive isn't an option either...#I feel like photoshop was going to come out of the computer directly to strangle me#Making this was just one “Could not complete your request because the scratch disks are full.” “Could not complete your request because the#Now Tumblr. Please don't break when posting this
184 notes
·
View notes
Text
Free Pdf To Word Converters For Mac

How To Convert A Pdf To Word Document Mac Free
Convert Pdf To Word Free Software Mac
Oct 15,2019 • Filed to: Mac Tutorials
The PDF Converter free version is an easy-to-use tool that allows a PDF document to be converted to a fully editable PowerPoint Mac 2008/2011 pptx presentation- preserving the original layout of. This free online PDF to DOC converter allows you to save a PDF file as an editable document in Microsoft Word DOC format, ensuring better quality than many other converters. Click the UPLOAD FILES button and select up to 20 PDF files you wish to convert. Wait for the conversion process to finish. Top 5 PDF to Word Converter for Mac 1. PDFelement is widely used by professionals in multiple industries such as architects, designers, writers, developers, HR executives, accountants, and many more. In fact, PDFelement is useful for any scenario where documents are processed and PDF is the primary vehicle to disseminate written information.
When it comes to change PDF to Word format, users might search from the internet and try to convert PDF to Word online. If so, you might get bad result and take risk on your file itself. The online PDF to Word converter tool might produce low quality output, have limitations on file size, what even worse is that it cannot protect your file security. If you want a fast, secure and productive way to convert PDF to Word on Mac (macOS 10.15 Catalina), just read on to get the answer.
Method 1. The Easiest and Professional Way to Convert PDF to Word on Mac
PDFelement Pro - The Best Way to Save PDF to Word Document
PDFelement Pro is an all-in-one PDF editor and converter. It can help you convert PDF to Word and many other file formats without losing the original layout. The built-in OCR feature enables you to convert scanned PDF to Word and other format without hassle. And you can convert multiple PDF files to Word at high speed.
Why Choose This PDF to Word Converter:
Convert PDF to Word, Excel, PPT, EPUB, RTF, and images format with original format.
Batch convert PDF files into Word and other format in high speed.
You can convert scanned PDF with the advanced OCR feature.
You can easily modify texts, images and pages in a PDF.
Easily markup PDF and annotate PDF with sticky note and hand-drawing shapes.
If you want to create PDF from other types of file, you can also rely on this smart tool.
Its secure function lets you to protect your PDF file with password, watermark or signature.
Easy Steps for Converting PDF to Word on Mac (10.15 Catalina included)
PDFelement Pro for Mac is fully compatible with Mac OS X 10.7 or later, including the latest macOS 10.13 High Sierra. There are more amazing features for you to explore. Below is a step-by-step guide for converting PDF to Word document on Mac computer. And you can also convert PDF to Excel and other formats. For Windows users, you can download PDFelement Pro to convert PDF to Word on Windows PC.
Step 1. Launch PDFelement Pro for Mac
After you've downloaded and installed this Mac PDF to Word converter, launch it. On the primary window, choose 'Convert PDF' from the menu to open the PDF convertion window.
Step 2. Transfer PDF to Word
Click the 'Convert' menu and select the output format as 'To Word'.Finally, click 'Convert' to turn PDF into Word. You can also customize the page range and add more files for PDF to Word conversion.
Step 3. Convert Scanned PDF to Word
If you file is image-based scanned PDF, you can turn on 'OCR' feature under the 'Edit' tap. And then click 'Convert' to change scanned PDF into Word format.
Step 4. Edit PDF before Converting (Optional)
If you want to make some changes on your PDF before converting it into Word document, you can click 'Open File' on the primary window to import your PDF. Then click 'Edit' button on the top toolbar to modify the texts and images in the PDF. To edit pages, you can choose the corresponding options 'Pages' .
If you'd like to annotate your PDF, you can click the 'Comment' button and get options for adding sticky note, text box, drawing lines/shapes and highlight. Finally click 'Save' to confirm your changes.
Method 2. Save PDF as Word Document on Mac Using iSkysoft PDF Converter for Mac
To simply convert PDF into Word on Mac, I recommend iSkysoft PDF Converter Pro for Mac, which is a simple PDF to Word Converter Mac (10.15 Catalina included) program for someone who is facing the problem of converting PDF files to formats like Word, Excel, PPT, Text, and more for better editing, saving, etc.
Why Choose This Mac PDF to Word Converter:
This Mac PDF to Word converter can convert standard and encrypted PDF files to Word (.doc and .docx).
It can convert PDF to Word and other formats without losing the original style and format.
And you can use it to do batch conversion or convert only specified PDF pages.
It comes with OCR technology which saves image-based scanned PDF to Word and other formats.
Steps to Get PDF to Word on Mac
Step 1. Run the Program and Load PDF Files
Open this Mac PDF to Word application from 'Application' folder after you have installed it. And import the PDF files you want to convert to Word format. You may drag and drop one or several PDF files to the interface of the program. Alternatively, you can go to 'File > Add PDF Files' to select the PDF files and import them to the program.
Note: You may import up to 200 PDF files to the program. If you want to add or replace some text, and make some other editing before the conversion, you can go to the guides on how to extract image from PDF, delete page from PDF, and so on. If you want to insert or modify some text before the conversion, you can follow the guide on how to edit PDF files on Mac.
Step 2. Choose the Page Range and Output Format
Click on the PDF file to highlight it, and you will see a gear icon show up. Click on the 'Gear' icon to open the output settings window. In the 'Page Range' column, you can customize the pages you want. You may specify the Page Range to convert partial PDF pages to Word pages. And then choose 'Word' format as the output format prior to convert PDF on your iMac or Macbook.
Step 3. Start to Extract PDF to Word
Click the 'Convert' button to start the conversion. When it is done, you'll get a message. Click 'OK' to open it with Microsoft Word (if available) to make sure everything is converted correctly.
Method 3: How to Convert PDF to Word on Mac Using Automator
How To Convert A Pdf To Word Document Mac Free
First, you need to know that Automator is actually part of Mac OS X. Below are the simple steps that one follows in order to convert their PDF files to editable word document on MAC using Automator.
Step 1. Open the Application folder on your Mac gadget and double click the tiny silver robot icon to launch Automator. Then a dialogue window appears that requires that you make a work flow.
Step 2. Just below the action menu, on the first column; locate and click the 'Files and Folders' button. You are then required to click and drag 'Ask For Finder Items' from the second column and drop it to the workflow segment situated at the right-hand side of the window.
Step 3. You will then refer back to the first column and click on the 'PDFs' button. From the second column, this time you will drag 'Extract PDF Text' and drop it under 'Ask For Finder Items' on the workflow panel. On this process you will be able to see some options that you can set. For a converted text file that retains its original text formatting, you will choose the 'Rich Text' option.
Step 4. Finally save your work flow. Press Command – S and then provide a suitable name then click on the save button to conclude this process.
Step 5. Now start using Automator through the workflow process you have created to convert your PDF files to word. It is as simple of just finding and selecting the PDF file that you need converted and let the Automator do the rest of the job for you.
Pros:
It is part of the Mac OS X, users can access its valuable services directly.
Cons:
It is messy – the rich text option only ensures that the converted file retains its original format of text and not the overall layout of the document.
Method 4: How to Convert PDF to Word on Mac Online
You can use some websites to convert PDF to Word. We will now discuss about how to turn PDF into Word using freepdfconvert. So let’s get started.
Step 1: The first thing is to visit the website of freepdfconvert.com. After entering into the website, you see the primary page like below.
Step 2: You see that there are many buttons like 'PDF Converter', PDF to Word' etc. As you have to convert PDF to Word, click on the 'PDF to Word' button.
Step 3: Now you see a button named 'Select File'. By tapping on the button, you can browse for the PDF file that you need to convert.
Step 4: Once you select the PDF file, hit the OK button of your browsing box. You see the PDF file named 'TriFold Coffe & Muffin….' has been uploaded to the website for further conversion. Now you will have to hit the 'Convert' tab for start converting. It will take some time depending on the file’s size to complete the conversion for PDF to Word.
Step 5: Once the conversion is complete, you will see a new button named 'Downlaod'. By tapping on the button, you can go for downloading, deleting or saving to Google Docs as per your wish. By downloading the file, you are getting a Word file of your PDF file.
PDF to Word Online Converter
You can also opt to convert PDF to word on Mac online by using other online tools, below are 3 of the most common online PDF to word converters.
1. ZamZar PDF to Word Converter
Convert Pdf To Word Free Software Mac
ZamZar is a online PDF to Word converter that can actually convert your PDF file to a number of other file formats like PPT, xlsx and many more. Just start by selecting the PDF file or URL of its location – > Choose the format – > Then key in your email address so that you can receive the converted version of the file – > finally click on convert button.
Pros:
No need to download.
Easy to use.
Cons:
It takes a long time for batch files, it can only convert one PDF file at a time.
It requires the user to have an email address.
2. Online PDF-Converter
This is among the best PDF to Word converter online service that anyone can use. It is quite popular generally because f its versatility and ease of use. When you open the online2pdf.com website, select the PDF files you need converted (up to 20 files), select the desired output format (Word), and finally click on the convert button.
Pros:
Allows up to a maximum of 20 PDF files.
It is easy to use as well as edit the PDF files.
Cons:
You can only access this resource online, basically you can never do much without the internet connection.
3. PDF to Word Converter
pdftowordconverter.net is such an excellent website to consider for your online PDF to word conversion needs. Quite an easy to use resource as compared to the ZamZar option, as it only includes two simple steps. First, you will have to choose the PDF file – >then hit the convert button, and download the converted file to your Mac device.
Pros:
Very easy to use.
It is no fee.
Cons:
It is quite slow as it can only covert a single PDF file at an instance.
Method 5: Turn PDF into Word Using Google Docs
You may have already known that Google Docs has the functionality of creating as well as editing Doc files. Now you will be amazed to know that with Google Docs, you can also convert PDF into Doc file. The good news is that the service of converting PDF into Word is totally free of cost. So you can expect a good service of PDF conversion from the internet giant Google with their Google Docs. Another good thing is that the Doc file that is created or converted by Google Docs is compatible with cross platforms, so you can use the converted file on Mac, Windows, and Linux etc. Not only that, popular mobile platform Android also supports the Doc format.
Now learn the process of Google Docs to convert PDF into Doc. You should know that you will not be able to convert as Word, but Doc is also considered as one type of Word document.
As it is totally free to convert, you only need an updated browser along with a Google account (@gmail.com).
Step 1: First of all, visit Google Docs and login. As you know that one Google account is applicable for all the Google’s products, so if you have a Gmail account, you can login with that for Google Docs.
Step 2: You will have to tap on the tiny upload icon that is located next to the button of 'CREATE'.
Step 3: Now from the browsing option, go for the PDF file that you would like to convert.
Step 4: After that, in the 'Upload Settings' panel, check the option named 'Convert text from uploaded PDF and image files' along with other two options.
Step 5: Now by choosing the 'File' option, go for the button 'Download as' where from you can download the PDF file as Doc file. This Doc file will be compatible for cross platforms.
Method 6: Turn PDF into Word Using Adobe Acrobat
Using Adobe Acrobat, you can convert PDF to Word too. Here are the processes that you will have to follow in order to achieve the conversion.
Step 1: Open a PDF file that you will convert Word.
Step 2: On the top menu bar, go for 'File' option.
Step 3: From the drop down menu, you will have to go for 'Save As Other…'.
Step 4: Then go to :Microsoft Word' and after that it will show Word Document.
Step 5: Pressing on 'Word Document', it will show you paths for saving the PDF file as Word. Set the path and press Ok. It will be saved as Word file.
iSkysoft PDF Creator - Convert Word to PDF on Mac with PDF Creator for Mac
iSkysoft PDF Creator for Mac is an easy-to-use yet quality Word to PDF converter. With it, you can convert unlimited Microsoft Office files including DOC, DOCX, XLS, XLSX, PPT, and PPTX to PDF. It comes with many wonderful features:
Key Features:
Convert Word, Excel, and PowerPoint to PDF easily and quickly.
Create high-quality PDF with high resolutions and 100% original formatting.
Import unlimited Word files and convert to PDFs at once.
0 Comment(s)
1 note
·
View note
Text
ashlee’s gif making tutorial
@amysperalta has requested a gif making tutorial from me and i’m happy to oblige! everyone has a different way to gif and some ways don’t work for some people, so this is just how i personally make them. i’ve also never made a tutorial before, so let’s hope this doesn’t end badly.
this is the gif i’ll be making for the purposes of this tutorial:

things you’ll need:
a version of photoshop
some way to get frames from a video file (i’ll give some options)
patience
step 1: getting your frames
there are many, many ways to do this. there are multiple different programs to do this with (kmplayer, uplayer, gom player) but i personally use mpv (via @kylos lovely tutorial here; which i also highly recommend as a gif tutorial since it gives a different way to create a gif file) because my mac doesn’t accept any other type of program.
note: BE SURE THAT WITH ANY PROGRAM YOU USE, IT IS SET TO SAVE EVERY FRAME. some people may lie to you and say a program grabbing every other or every third frame is fine, but it’s 2019 and we don’t do that any more. the tumblr gif limit is 3mb, which means we can have smooth, non-choppy gifs by gathering every frame from a scene.
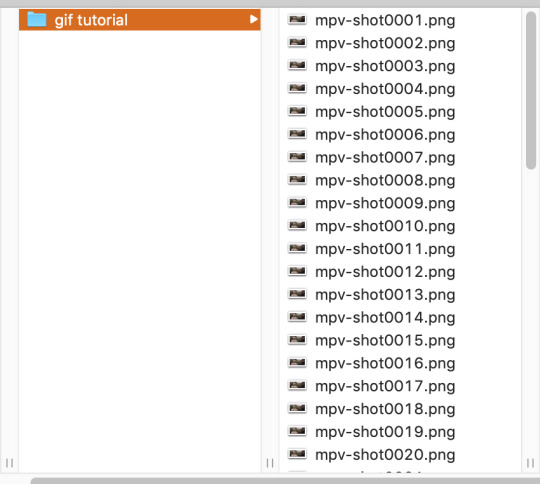
okay, so i gather my frames, and typically keep them in a folder, separating scenes cut-by-cut so it’s easier to handle. for example:
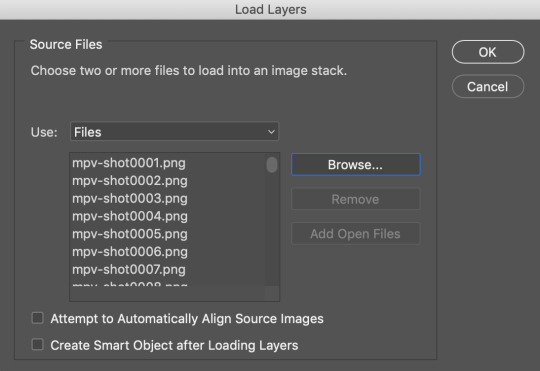
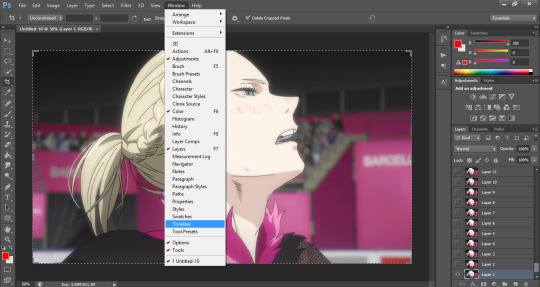
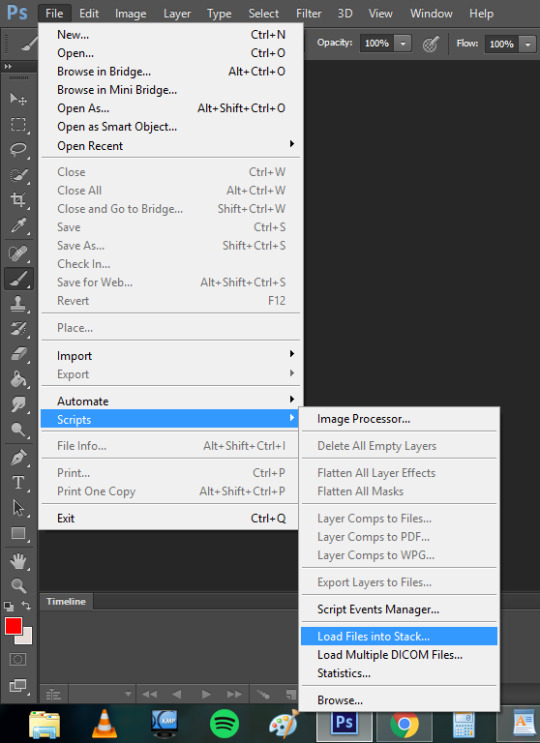
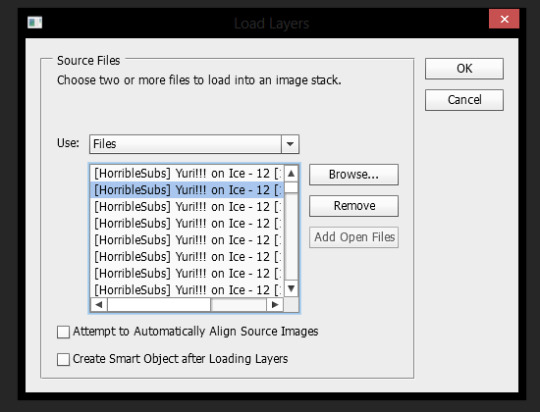
from there, i import them into photoshop using: File --> Scripts --> Load Files into Stack; this screen pops up, in which you browse for your frames hit OK. this will automatically upload all the frames into the same file for you. be patient! depending on how many frames you choose, it can take a few minutes to upload all of the frames.
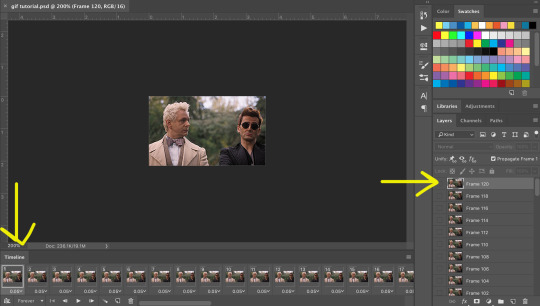
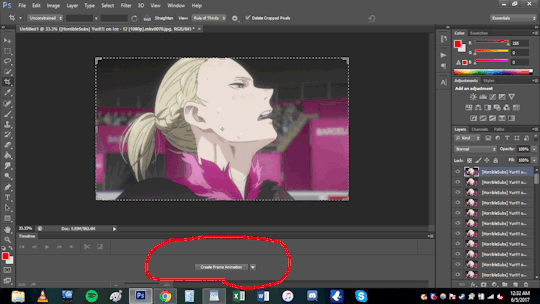
i always save my work after every step. so once frames are uploaded i save the file. be sure to have “timeline” (or “animation” on some versions of photoshop) opened in your view. my photoshop looks like this when i open the file:

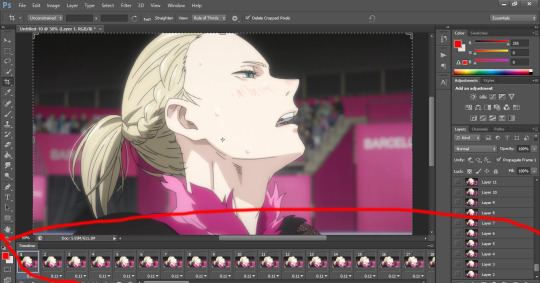
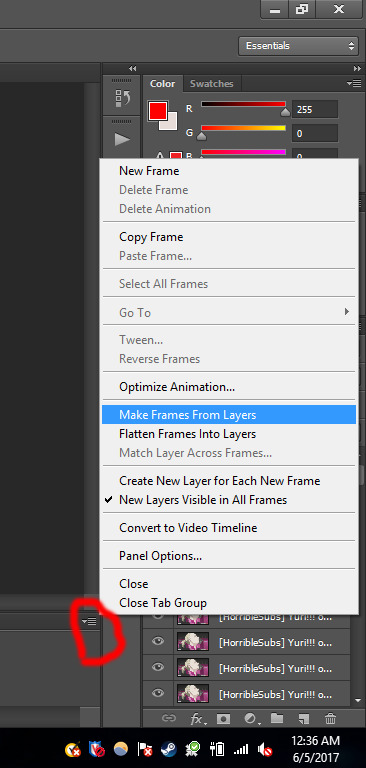
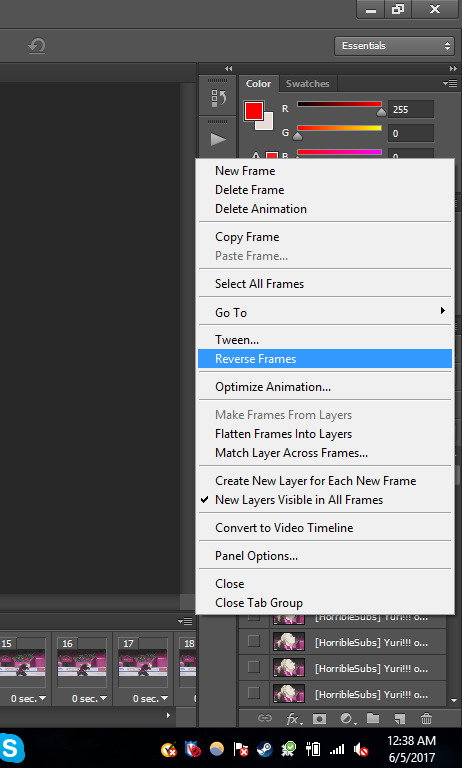
now, i’m going to click “Create Frame Animation” at the bottom. This will give me a timeline to work with at the bottom. Next step, go to the three little lines on the right side of the thingy that says “Timeline” and go through these steps:

and then

now, you have a working gif! you can hit the little play button at the bottom left of the screen and it should play for you.
step two: cropping and sharpening
there is plenty you can do for sizes on tumblr. the general widths are 540px (big), 268px (normal) and 177/178px (small). it’s all a matter of the type of set you’re making. also be aware that the gif limit is 3mb. the bigger the gif, the fewer frames you can have. most of my 540px gifs have between 20-35 frames, while some of my 268px frames can have 75-90 depending on the coloring of the scene.
but for the purpose of this tutorial, i’m making one 268x160. i go to the crop key at the left side, and set my ration up top to 268 and 160.

then i crop the gif! (note: sometimes, files will have a black line on one side of a video file; typically the bottom or on one side. the black line will be no more than 2px big and sometimes hard to see until you’ve cropped it. be sure to drag the cropped area away from the edge of the files that have this dark line, as it when appears on the final gif and looks bad. one of my more recent sanditon gifsets fell to this and i didn’t realize until i had posted it. 😖)
now we have to size it. you do do this by going to Image --> Image Size or using the keyboard shortcut. it should automatically keep the aspect ratio, thus when you change width to 268, the height should change to 160 automatically.

hit OK and now you have your base gif!

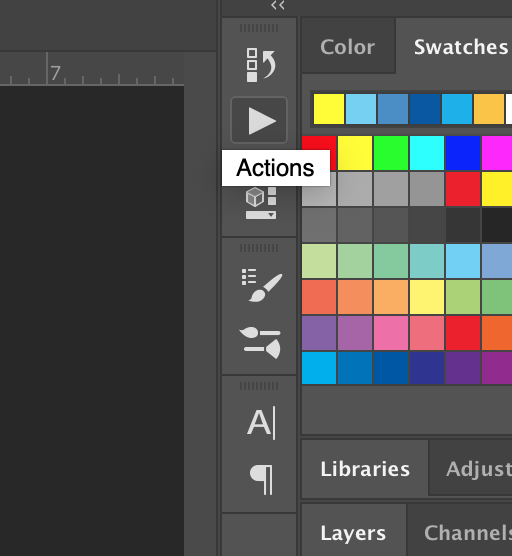
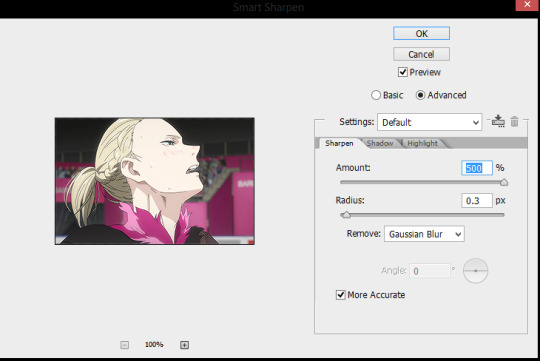
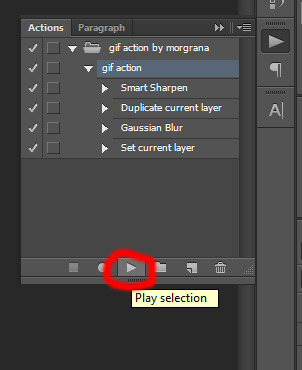
next, we’ll be sharpening and setting the frame rate, two very important things. to sharpen a gif, there is no way you want to go do it frame by frame, so you can use an action! these are really helpful. i have one i use for most gifs, and one i use for lesser quality. the one i use for this gif is this one here. to use this, you’ll have your photoshop open, you can go to your actions in your barthingy on the right by color swatches which should look like this:
click that and find the three grey lines at the top right. click them and this will pop up. you’ll go to “load actions” and then browse for the action you downloaded.

once loaded, it will show up like this and have a nifty play button!
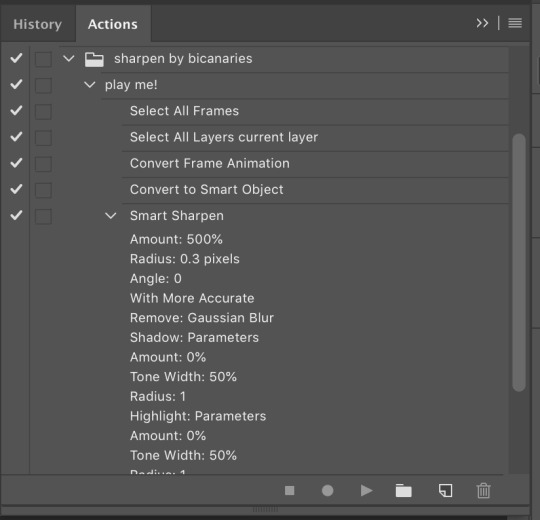
make sure you click on/highlight the “play me!” line and then hit the play button on the bottom of the box. it will go through the motions for you and sharpen your gif. once that’s done, you can hit the big action button to close this box to get it out of the way. now, to set a frame rate, you’ll go down to the timeline and highlight all of the frames and then click while holding shift and this will pop up.
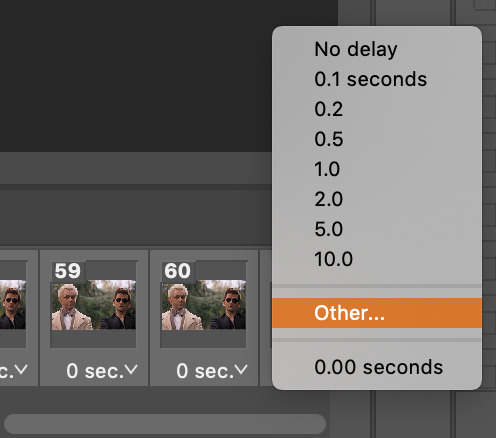
you’ll select “other” and type in “.05″. this is the most commonly used frame rate. most movies and tv shows will look fine using this for scenes, especially ones with subtitles, etc. for more artistic scenes, sometimes i’ll use “.06″ to slow it down just a hair. also make sure that your gifs are set the loop “forever”.
and there you go! a gif fully sharpened and moving at the proper speed:

this is also the time you can choose your frames. meaning if you uploaded like 200 frames and only wanted to use 50 of them, you can go through and delete them in the timeline. there’s a little trashcan button there.
note: once you’ve sharpened and set your frame ratio, be sure to go into your levels box and click the top frame. it is also useful to have the first frame in the timeline always highlighted as you’re editing the rest of the gif.
step three: coloring
there are endless ways to color. there’s loads of people offering psd colorings. (psd means an editable photoshop file btw) you can also make your own. i have a whole slew of psds i’ve made for certain scenes that i’ve kept and reuse, tweaking each time. this isn’t a coloring tutorial, but i’ll show you a quick way to make a simple coloring. (i purposely chose a well lit scene for this gif tutorial for this reason. making dark scenes look good, or scenes with bad color balance is a whole other tutorial lol)
first off, make a folder above your frames. you can name it whatever you want; it will automatically call itself “group 1″. this is where you’ll be putting all of your coloring layers so they stay together and you can also save it to use again.
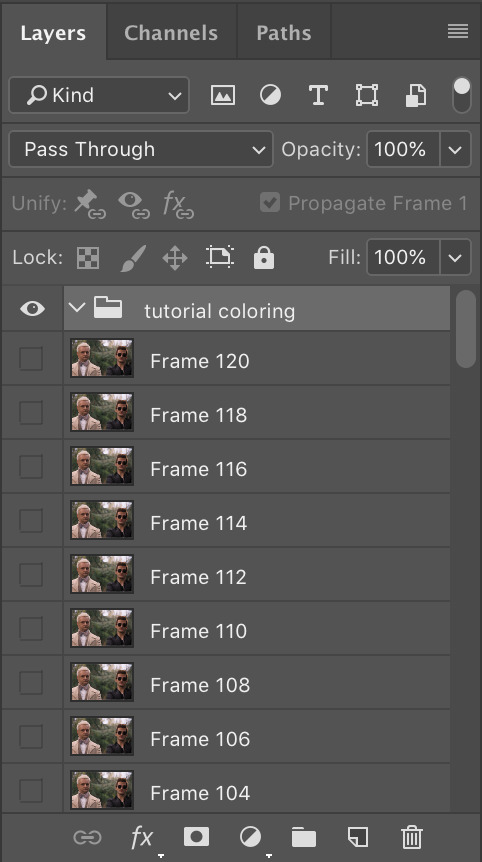
from here on out, we’ll be adding layers, using the half black/half white circle down at the bottom; just click on it and it’ll pull up a list of things you can use. note that when you add coloring layers, you start at the bottom and add other layers on top of it.
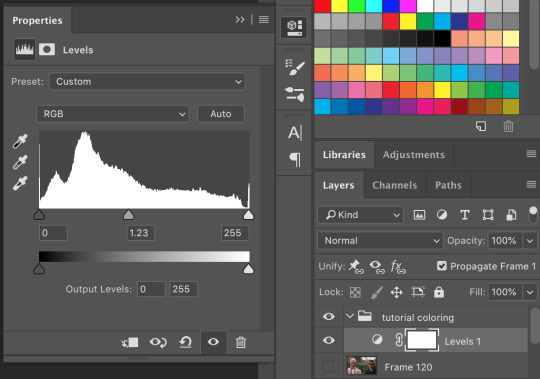
always start with “levels”. i lighten up almost every scene i gif, since it gives me the chance to play with contrast on my own terms.
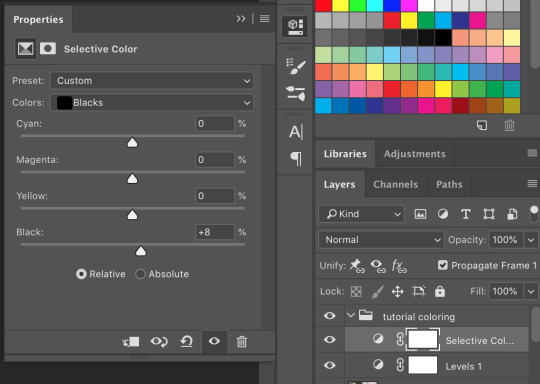
then we’ll do a “selective color”; this one is just to set some blacks while giving contrast. be sure to select “blacks” at the top and change just what’s below:
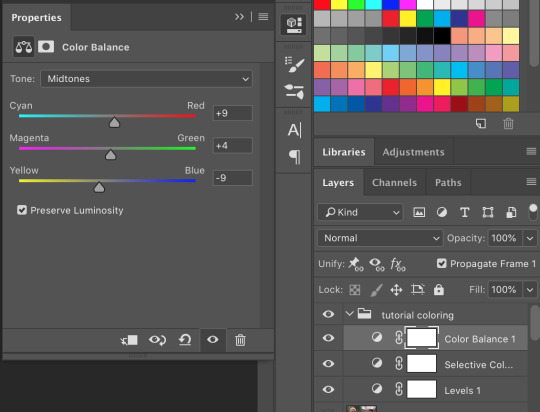
most gifs also need some “color correction” at this point. (this is a layer you’ll keep coming back to to tweak as you add more above it fyi.) for this one, i’ll make it a bit more green and red.
the gif right now looks like this....which isn’t perfect, but i can see where it will get to from here:

now we’ll add a layer of 100% “vibrance”

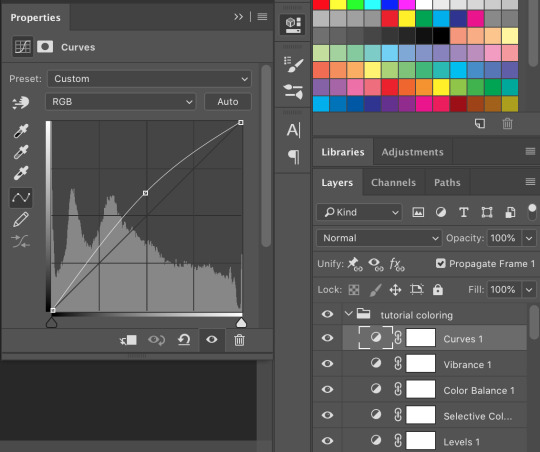
not every gif needs 100% vibrance, but i tend to like how colors look when i use it and we can fix any weird colored skin in later steps. and now some curves for contrast:
the gif now looks like this:

which is much too yellow certainly, but gifs always look worse before they look better when it comes to coloring! next, we’ll make another layer of “selective colors”. this is when you’ll play with each color within the same selective color layer. i’m guessing i’ll utilize more blues and less yellows under “yellow” and “red” but let’s see what happens:


now it looks like this!

which is a lot better. i’ll probably up the blacks +10 (using the same selective color layer) just a bit so crowley can be his angsty self entirely. i also want to up the greens because i love bright gifs.

the great thing about selective colors is that they’re easy to manipulate. and you can even have multiple of them over one another to really zero in on one color. and if you find that you can’t get the gif to look right at all, you can also return to your color balance layer and tweak it until it looks better and is easier to manage.
so now, my finished gif looks like this:
(this is not the most exciting gif ever, but it works to show how to play with colors in a well lit scene).
there is a number of other things i do/can be done in making gifs, but these are the basics.
be sure to go to File --> Export --> Save for Web and follow my settings to save your gif. (there are many ways to save a gif, and each gif tutorial will give you different settings. i recommend trying them out and see which works best for you.) pay attention to the “bicubic” quality at the bottom. and when your gif is small enough (under 3mb), be sure to click on the “original” tab at the top and save it while on that screen.


and, because i’m feeling nice, let’s have a quick subtitles moment:
bonus step 4: subtitles
i know there are easier ways to make subtitles but this is how i do mine. using the ruler around your photoshop space, drag one vertical line over your gif. the program should automatically “snap” them to the middle of the gif to create your perfect center.

then take the text tool and write something in it, no matter where or what size, just so you have something to manipulate. you’ll find that it too will snap to the center to match the ruler line, giving you a centered text box! you can have it whatever distance you want from the bottom (don’t go too close or tumblr will cut it off) and then you can edit the text color/font/etc. these are my settings.

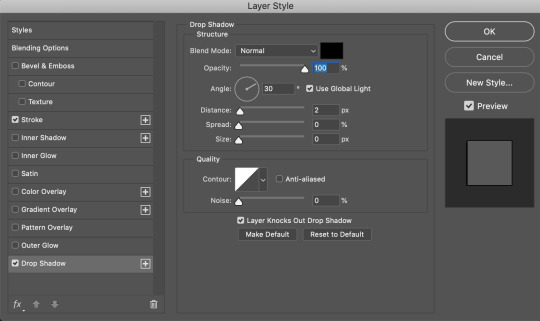
and i also have an added stroke and drop shadow to it which you can get to from Layer --> Layer Style:

and so it looks like this:

it is important to add your text layer ABOVE your coloring folder, otherwise the coloring will affect the text. and it’s good to have different colors for different people talking.
i hope that all made sense! feel free to send me any questions (i’m sure i must have made you confused or missed a step or something), or if you have any other tutorials you’d like to request.
#gif tutorial#photoshop tutorial#photoshop#itsphotoshop#tutorial#my tutorial#thanks for requesting this!#it's very long but i hope it helps
67 notes
·
View notes
Text
Digital Music Techniques
When beginning this project, I had a specific feeling in mind of what I wanted the song to sound like. The two things I wanted to focus on were an ethereal feeling, and lots of fluttering vocal parts. My ideas for the actual piece went back and forth between choosing a more ambient and instrumental track, and a ballad, and I decided to choose the latter as I had tried writing some ballads in the past, but was curious to experiment with this idea of etherealness.
The writing process began by playing around with chord progressions and instruments on my phone with Garageband, usually on the train to and from uni. I quickly found a chord progression that I liked and decided to build upon this as sort of a draft project to properly record later on. I heard snippets of the song I wanted in my head, sort of like flashes of what I wanted it to sound like, and I was keen on building upon this dreamy and ethereal like feeling, whilst imbuing a density of heartbreak like in a classic ballad. I wanted it to feel like a dream that one could have that feels very bittersweet, a juxtaposition between the fluttering vocals and ethereal synths and real heartbreak and loneliness. I imagined a person inside a glass box, with the inside being butterflies and flowers, but outside the box being completely dark and windy, and I kind of wanted to turn this into sound.
When starting the project, I already had the chord progression from my experimentation on the train, however ran into trouble trying to place the track I had drafted from my phone on the computer. I had a lot of technical difficulties along the way during the project but decided to borrow a zoom recorder (as I had been using my earphones to record up until this point) and basically start from scratch on my computer (the earphones surprisingly did a good job of recording the piano, but not the vocals). I recorded the piano on an antique piano that was actually owned by my great grandmother, I like the sound of this piano because even though it’s a bit flat, a few of the keys click and has a slightly muffled sound, it had that kind of dream like quality that I was looking for in the song. When EQ’ing this track I tried to take out some of that muffled quality to increase the clarity of the piano.

After recording the piano I had a melody in mind but no lyrics, so I listened to the track over and over again and wrote the lyrics:
Hold me
Do I look lonely?
I’ll never really have to be broken if it’s only a dream
But please don’t go
I’m letting go of the how and instead, I’m trying to feel
_____
Don’t let me down
If I write you a song, will you turn back around
Give up sinking your head in the ground
Let yourself be heard, give your heart to the crowd
And I, I know I’m ready to try
I’m floating in glass and breathing in the night
Just see all of your truth in me
We’re not really living if we’re drowning in the space between
____
Hold me
Do you feel lonely?
We’re sailing our lives in the darkness of what we see
But please don’t go
You never have to really be gone if it’s only a dream
I was planning on making the A and B sections much more distinct in the lyrics, but I find it really difficult to consciously ‘force’ words to fit together, and my writing process was much more of a stream of consciousness, resulting in the isolation and dreaminess kind of blending together in the lyrics.
Next, I started recording the vocals. Oh boy. I’m a singer and I was expecting this to be the easiest part and it was by far the hardest. I was kind of disappointed in myself because I was hoping it would be the best part of the song, but there were a lot of problems that I faced.
The first thing I think which made it difficult was the fact that I was recording over a flat piano. When playing back the harmonies they really clashed and I couldn’t figure out why this was happening. I literally spent a whole day recording them over and over again and couldn’t pinpoint what the problem was. I ended up asking my sister for help and to play around with recording some harmonies over the top and see if she had the same problem, they still turned out a little flat because of the piano, but they didn’t clash as much as mine and sounded a lot brighter. I figured out this was because she didn’t use any vibrato, held the notes longer (where as I had tried to do more staccato notes), and she sung in a higher register. I decided to apply these tactics to my recording and it worked a lot better. I still had a lot of difficulty with pitchiness because after borrowing the zoom recorder I basically would record one track, then upload it, then the next, and upload it and so on, and so I wouldn’t be hearing the other harmonies and sometimes my voice would stray a little. I recorded and re-recorded them so many times, in fact I think I have around 90 recordings on the zoom folder that do also include recording the melody and piano but mostly the backing vocal parts. Another thing that helped was playing an online piano in my earphones so that while I was also listening to the piano track I was listening to a slightly sharper piano which lifted my pitch. I also figured out that since I have been doing a lot of classical training over the past couple of years I was really pushing in both the melody and harmonies and oversinging, so I had to really bring it back and remember the different context as well as the different style and vulnerability of the song. When listening to the track now there are still so many mistakes to my ears in both the lead line and the backing vocals, but to avoid wasting time in recording another 90 times I ended up picking the best ones and moving forward. The EQ’ing I did on these mostly involved trying to create more space in the ‘sweet’ frequencies to create more resonance, as I was also recording in a carpeted room and wasn’t using a particularly light vowel. I also used a lot of reverb in the backing vocals again for that dreamy and ethereal feel. I experimented with echo but found it took away a bit too much from the lyrics, so I mostly focused on adjusting reverb for both the melody line and lead vocals.


The next thing was adding the backing layers which consist of strings, and three different synths. The strings were pretty simple to do, I used keyboard strings with viola, cello and bass and basically just played the chords along with the piano. The synths were the fun part for me because I don’t have much experience with them. I found a synth called “dreamy plucks” which I also played the chords on to try and add another layer of etherealness to the track, and it’s probably one of my favourite things about it. The next one is ‘bright synth strings’ which I used as a bass. I played only single notes in the scale and added them in around halfway through the song to add another layer of depth. The final synth was one I stumbled across called ‘stratosphere’. This one sounded a lot like a gust of wind, and had this real cold feeling about it, so I decided to put it at the end when it cuts back to the piano and vocals. This part really fit in with the original image I had of the girl in a glass case with the outside of the case being darkness and wind, so I was happy to find that. The rest of the work on the track was mostly lining things up to the piano and vocals, since I didn’t record over the top of everything and recorded everything as a single file some things are still out of alignment and it’s not as perfect as I think it could be, but I don’t have a lot of recording skills and so I did my best to line it up the best I could. I need to learn how to fix that! The other thing was balancing the volume levels and trying to figure out what created the best blend between all of the different layers.
Overall the song turned out a lot more ‘artsy’ than I expected, there is no clear structure, and the lyrics are a bit more ambiguous and follow the A B structure of the song. There are a lot of things that I would like to have improved on or fixed, but considering this was my first serious attempt at putting a song together with a lot of different layers and making it somewhat listenable, I’m proud of myself that I at least tried as hard as I could and that next time I can improve on the mistakes.
1 note
·
View note
Text
me trying to make a gif part 2 (thrilling finale, buildup ver.)
ok good news and bad news: good news being withheld for Spoilers (not that it’s that hard to guess anyway lol), bad news explained first bc, chronologically, it is first
so yesterday i mentioned in the tags of that post that i had seen that krita has an animation feature so i was gonna try importing the frames into that and then exporting it as a gif. easier said than done, as it turns out
i started by opening the file i made yesterday with 62 layers as the frames and importing that into krita, which worked fine (i didn’t know you could actually open .psd files in clip stuido ((this typo is so fucking stupid it made me laugh so im leaving it)) and krita, so that’s pretty neat, i wonder if it works the other way around too) but i ran into problems when i tried to convert those layers into frames in an animation. because, like, the layout of the program has the layers displayed in one tab, and the animation timeline in another, like so:
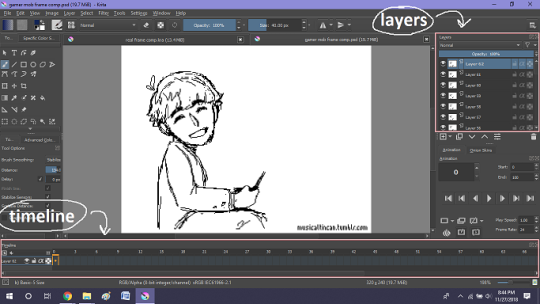
(do u like how im using pictures now, i thought of that yesterday after i published the other post and realized hey, visual reference would probably make my plight a lot easier to understand!! so enjoy these educational diagrams from now on)
so my goal was to get the frames from the layers into the timeline, and i still don’t know if i did it right bc lbr krita is not very intuitive at all,,.,, i mean i watched a video tutorial abt how to animate in krita which was v helpful (it’s the one by jesse j james on yt fuckin SHout out) but it was about animating from scratch, not importing an animation you’ve already done elsewhere
so like, the way krita’s animation thing works, from what i could piece together as i bumbled my way around w/ it, is that each layer in the layers tab is a separate timeline in the,,, timeline tab
i want them all to be in the same timeline, not separate ones, and there’s no way to combine them in the timeline tab bc doing that just overwrites whatever layer you’re pasting it down onto, and also if you define the number of frames for that timeline (62 for this project) it just puts the single image of that layer for all of the frames instead of just one of them, so you’d have to go through and delete all the other frames you don’t want it to be, which would be such a fuckin pain
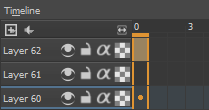
so i found a workaround, which is so tedious that it can’t be the right way to do it, but basically i started w/ layer 1 and defined 62 frames & then emptied frames 2-62, like this

(that blue box is the frame, btw, even tho it says 0, which actually kind of annoys me like why doesn’t it start the first frame on 1????)
from there i went up to layer two and selected that in the timeline, but for some reason the frame doesn’t show up automatically?

& i couldnt fuckin figure out how to make it into like, an Official Timeline Layer or whatever tf bc like, u see on layer 1 how theres that little lightbulb-looking icon on the right? that’s for turning on onion skin which only applies when you actually have frames with things drawn on them, so basically layer 2 in the layers tab has a drawing but in the timeline it doesn’t?
i didn’t find out what the actual reason for this is or how you’re /supposed/ to make the frame appear in the timeline, but what i did was right click on layer 2′s timeline & select “create blank frame” which magically made the frame i want appear

but it’s on top of the layer 1 frame, and i want it to be the frame after. also it’s still in a different timeline. this is the only easy fix in this whole damn process, u can literally just click & drag the frame from layer 2 to layer 1 and put it wherever u want on the timeline

and then u just delete layer 2 and that’s it, frame transferred!! then i just had to do that for 60 more layers and after [unspecified amount of time but it was a fuckin while ok] my timeline looked like this!

(the gaps near the end are held frames, to save me time so i didn’t have to copy a bunch of frames that were exactly the same)
krita is great because as far as i know ur animation can have an unlimited number of frames, at the risk of your own pc’s processing power, which is a definite upside to SOME expensive art programs i know (clip studio, i’m talking abt csp) and u can pick the frame rate too (cough photoshop elements 5.0 even tho u dont technically have an animation feature & it’s a miracle u can even make gifs at all) so once i finally got all the frames situated all nice and in order like on the same timeline, playing it was great! played at the right speed, looped perfectly, it was a dream come true right
well, time to export it as a gif
ha
haha
hoooo oo o
so u got 2 options for exporting ur animation, u can either hit “export,” which lets u save it as different file types, one of which being gif, or you can hit “render,” which gives you gif and video options
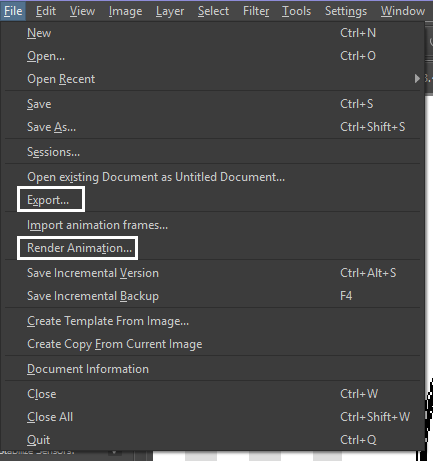
well
i tried export first, bc that seemed like a good idea, but the “””gif””” it made was distinctly not a gif, despite its claim to be one?? this is what i got:

notice: 1. it is not moving, and 2. the black bars to the sides?? those are supposed to be transparent. they’re transparent in the file i made so why didn’t they register as transparent in the export, when gifs have transparency capabilities??

so That was some real live bullshit but i still had the “render” option, right? export was wrong, so rrender must be the correct option to go to that will produce the results i am wanting to see produced in front of me like a silver dinner platter with a correctly functioning gif under the lid, that’s what i want to see and “Render Animation...” is gonna Give me that silver platter righWRONG ok look at this shit rn ok Look
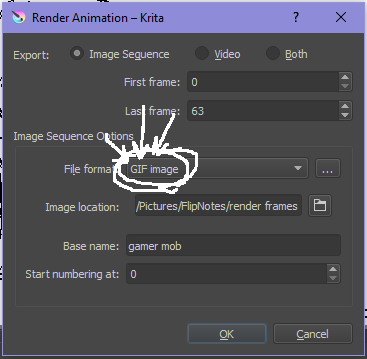
it says GIF it says it RIGHT THERE right??? right?????? then WHY

?????????????
and it also gave me all This bullshit
like did i ask?? did i fucking ask???? i already have all the individual frames why do i need even M o re i mfjgjgk
((rationally ok yea thats v useful for if ur making the animation in krita and want to export the frames to use elsewhere, but like uhhh 1. again, they’re not transparent & 2. i should have the option of saying i don’t want these??? bc *meme voice* i don’t want these)
so in the end i could find NO correct method of exporting animations as a gif in krita bc every ooption that says gif is fuckign LYING to ur face there are NO gifs in krita, aliens made the progam who looked at gifs and went “hmm i thikng this is how a gif works “ and just made jpegs instead but somehow got on the computers good side and got it to lie for them about it being a gif so thats why it says gif on the file still even tho its not a gif illimati confinr
so what is the conclusion to this? well i said there was good news too, and this is the portion where i divulge that sweet nectar (i type dthis 2 seconds ago and @ me what the fuck)
so after wasting a good 2 hours trying to figure out krita i gave up and watched some good old [youtuber name redacted bc what if it shows up in search & ppl see this dumbass post in there but it rhymes with fjackfsepticfeye] to relax into accepting my fate that i’ll never be able to upload my animations to tungle except in poor quality loopless video form, making me into a laughing stock on my own art blog, but THEN i had a stroke of genius, in my Brain
so if u read yesterday’s post u might remember that flipnote studio, the animation program i use on my ds, to animate, has the option to export files as gifs, both animated and sequential (meaning either as one fully animated gif or each individual frame separately), which is super convenient, but as i mentioned yesterday, any time i tried to open the folder with those files on my laptop, it crashed immediately
WELL today i thought “hey, how about instead of opening the folder in the sd card when it’s plugged in, how about i copy that folder from the sd card to my flash drive, and try to open it there, in case it’s the card’s hardware that’s causing the problem, not corrupted files”
so i tried that and it FUCKING WORKED THANK GOD GLORY HALLELUJAH
so now instead of spedning A THOUSAND YEARS trying and failing to force art programs to bend to my will i can just export the animations straight from my ds and drag them onto my computer Just As God Intended oh GOD im so fucking happy
here’s the gif in the end, i’m gonna post it to my art blog too but this is the Green Version bc i animate in green bc of some default settings in flipnote that i got used to, plus it makes me feel like i’m just sketching so nothing really has to be finalized so i’m comfortable while i work, and also it’s just nice ok it’s a Nice Green

(there’s a few frames at the end that are like the extra scraps from while i was working dw i got rid of those in the final version that i’m posting to my art blog later. also i added my blog url to that one too it’s aaaaaall good)
the only downside to this method is that i can’t change the canvas size to be 540px wide to fit with tumbrl s image dimensions but whatever i can just post them in a text post and fix the html to display it at its original size instead of the resizing bullshit tmurbl pulls constantly ugh. anyway it works great on desktop but it’s inevitably gonna look like shit on mobile no matter what i do *Big Ass Shrug*
anyway thats the end of my success story uhh i can’t make the like comment & subscribe joke again bc i already did that in the last post so like bye i guess thanks 4 watchign & have a great day i’ll see u in my next fvideo
https://www.youtube.com/watch?v=YYob4uDjEKI&t=0s
(^that’s my outro music)
#this started out so boring like a tutorial (but made by someone who doesn't know what the fuck theyre talking abt)#& then things derail Real Quick#that's why this is the ''buildup ver.''#retag later#talkin bout stuff#today posts#rieley's wips#(me: i can't mention this youtuber by name in case my post shows up in search#me: *adds a link to the post rendering that effort for naught*#me: *leaves it anyway bc it's funny*)#pls listen to the outro musi c it's rly good & tunmgmldnr wouldnt let me embed the video & idk how to do it thru html & too lazy to look it#up :(
2 notes
·
View notes
Text
Python Docx

Python Docx4j
Python Docx To Pdf
Python Docx Table
Python Docx To Pdf
Python Docx2txt
Python Docx2txt
When you ask someone to send you a contract or a report there is a high probability that you’ll get a DOCX file. Whether you like it not, it makes sense considering that 1.2 billion people use Microsoft Office although a definition of “use” is quite vague in this case. DOCX is a binary file which is, unlike XLSX, not famous for being easy to integrate into your application. PDF is much easier when you care more about how a document is displayed than its abilities for further modifications. Let’s focus on that.
Python-docx versions 0.3.0 and later are not API-compatible with prior versions. Python-docx is hosted on PyPI, so installation is relatively simple, and just depends on what installation utilities you have installed. Python-docx may be installed with pip if you have it available.
Installing Python-Docx Library Several libraries exist that can be used to read and write MS Word files in Python. However, we will be using the python-docx module owing to its ease-of-use. Execute the following pip command in your terminal to download the python-docx module as shown below.
Python has a few great libraries to work with DOCX (python-dox) and PDF files (PyPDF2, pdfrw). Those are good choices and a lot of fun to read or write files. That said, I know I'd fail miserably trying to achieve 1:1 conversion.
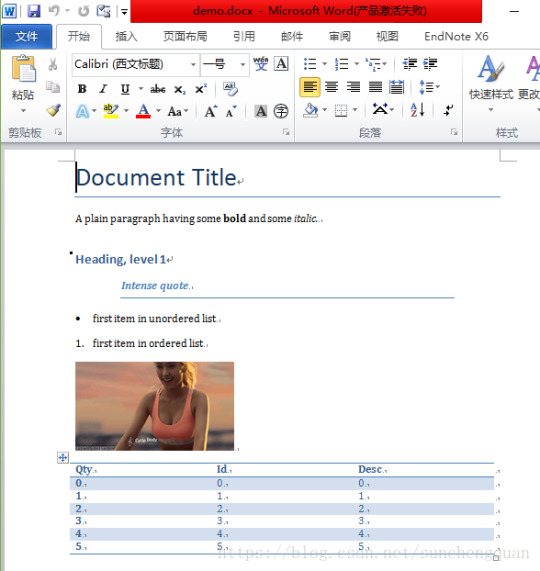
Release v0.8.10 (Installation)python-docx is a Python library for creating and updating Microsoft Word (.docx) files.
Looking further I came across unoconv. Universal Office Converter is a library that’s converting any document format supported by LibreOffice/OpenOffice. That sound like a solid solution for my use case where I care more about quality than anything else. As execution time isn't my problem I have been only concerned whether it’s possible to run LibreOffice without X display. Apparently, LibreOffice can be run in haedless mode and supports conversion between various formats, sweet!
I’m grateful to unoconv for an idea and great README explaining multiple problems I can come across. In the same time, I’m put off by the number of open issues and abandoned pull requests. If I get versions right, how hard can it be? Not hard at all, with few caveats though.
Testing converter
LibreOffice is available on all major platforms and has an active community. It's not active as new-hot-js-framework-active but still with plenty of good read and support. You can get your copy from the download page. Be a good user and go with up-to-date version. You can always downgrade in case of any problems and feedback on latest release is always appreciated.
On macOS and Windows executable is called soffice and libreoffice on Linux. I'm on macOS, executable soffice isn't available in my PATH after the installation but you can find it inside the LibreOffice.app. To test how LibreOffice deals with your files you can run:
In my case results were more than satisfying. The only problem I saw was a misalignment in a file when the alignment was done with spaces, sad but true. This problem was caused by missing fonts and different width of 'replacements' fonts. No worries, we'll address this problem later.
Setup I
While reading unoconv issues I've noticed that many problems are connected due to the mismatch of the versions. I'm going with Docker so I can have pretty stable setup and so I can be sure that everything works.
Let's start with defining simple Dockerfile, just with dependencies and ADD one DOCX file just for testing:

Let's build an image:
After image is created we can run the container and convert the file inside the container:
Running LibreOffice as a subprocess
We want to run LibreOffice converter as a subprocess and provide the same API for all platforms. Let's define a module which can be run as a standalone script or which we can later import on our server.
Required arguments which convert_to accepts are folder to which we save PDF and a path to the source file. Optionally we specify a timeout in seconds. I’m saying optional but consider it mandatory. We don’t want a process to hang too long in case of any problems or just to limit computation time we are able to give away to each conversion. LibreOffice executable location and name depends on the platform so edit libreoffice_exec to support platform you’re using.
subprocess.run doesn’t capture stdout and stderr by default. We can easily change the default behavior by passing subprocess.PIPE. Unfortunately, in the case of the failure, LibreOffice will fail with return code 0 and nothing will be written to stderr. I decided to look for the success message assuming that it won’t be there in case of an error and raise LibreOfficeError otherwise. This approach hasn’t failed me so far.
Uploading files with Flask
Converting using the command line is ok for testing and development but won't take us far. Let's build a simple server in Flask.
We'll need few helper function to work with files and few custom errors for handling error messages. Upload directory path is defined in config.py. You can also consider using flask-restplus or flask-restful which makes handling errors a little easier.
The server is pretty straightforward. In production, you would probably want to use some kind of authentication to limit access to uploads directory. If not, give up on serving static files with Flask and go for Nginx.
Important take-away from this example is that you want to tell your app to be threaded so one request won't prevent other routes from being served. However, WSGI server included with Flask is not production ready and focuses on development. In production, you want to use a proper server with automatic worker process management like gunicorn. Check the docs for an example how to integrate gunicorn into your app. We are going to run the application inside a container so host has to be set to publicly visible 0.0.0.0.
Setup II
Now when we have a server we can update Dockerfile. We need to copy our application source code to the image filesystem and install required dependencies.
In docker-compose.yml we want to specify ports mapping and mount a volume. If you followed the code and you tried running examples you have probably noticed that we were missing the way to tell Flask to run in a debugging mode. Defining environment variable without a value is causing that this variable is going to be passed to the container from the host system. Alternatively, you can provide different config files for different environments.
Supporting custom fonts
I've mentioned a problem with missing fonts earlier. LibreOffice can, of course, make use of custom fonts. If you can predict which fonts your user might be using there's a simple remedy. Add following line to your Dockfile.
Now when you put custom font file in the font directory in your project, rebuild the image. From now on you support custom fonts!
Summary
This should give you the idea how you can provide quality conversion of different documents to PDF. Although the main goal was to convert a DOCX file you should be fine with presentations, spreadsheets or images.
Further improvements could be providing support for multiple files, the converter can be configured to accept more than one file as well.
Photo by Samuel Zeller on Unsplash.
Did you enjoy it? Follow me@MichalZalecki on Twitter, where I share some interesting, bite-size content.
This ebook goes beyond Jest documentation to explain software testing techniques. I focus on unit test separation, mocking, matchers, patterns, and best practices.
Get it now!
Mastering Jest:
Tips & Tricks | $9
Latest version
Released:
Extract content from docx files
Project description
Extract docx headers, footers, text, footnotes, endnotes, properties, and images to a Python object.
The code is an expansion/contraction of python-docx2txt (Copyright (c) 2015 Ankush Shah). The original code is mostly gone, but some of the bones may still be here.
shared features:
extracts text from docx files
extracts images from docx files
no dependencies (docx2python requires pytest to test)
additions:
extracts footnotes and endnotes
converts bullets and numbered lists to ascii with indentation
converts hyperlinks to <a href='http:/...'>link text</a>
retains some structure of the original file (more below)
extracts document properties (creator, lastModifiedBy, etc.)
inserts image placeholders in text ('----image1.jpg----')
inserts plain text footnote and endnote references in text ('----footnote1----')
(optionally) retains font size, font color, bold, italics, and underscore as html
extract user selections from checkboxes and dropdown menus
full test coverage and documentation for developers
subtractions:
no command-line interface
will only work with Python 3.4+
Installation
Use
Note on html feature:

font size, font color, bold, italics, and underline supported
hyperlinks will always be exported as html (<a href='http:/...'>link text</a>), even if export_font_style=False, because I couldn't think of a more cononical representation.
every tag open in a paragraph will be closed in that paragraph (and, where appropriate, reopened in the next paragraph). If two subsequenct paragraphs are bold, they will be returned as <b>paragraph q</b>, <b>paragraph 2</b>. This is intentional to make each paragraph its own entity.
if you specify export_font_style=True, > and < in your docx text will be encoded as > and <
Return Value
Function docx2python returns an object with several attributes.
header - contents of the docx headers in the return format described herein
footer - contents of the docx footers in the return format described herein
body - contents of the docx in the return format described herein
footnotes - contents of the docx in the return format described herein
endnotes - contents of the docx in the return format described herein
document - header + body + footer (read only)
text - all docx text as one string, similar to what you'd get from python-docx2txt
properties - docx property names mapped to values (e.g., {'lastModifiedBy': 'Shay Hill'})
images - image names mapped to images in binary format. Write to filesystem with
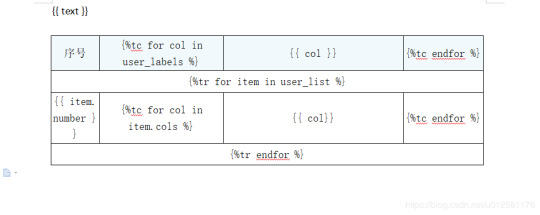
Return Format
Some structure will be maintained. Text will be returned in a nested list, with paragraphs always at depth 4 (i.e., output.body[i][j][k][l] will be a paragraph).
If your docx has no tables, output.body will appear as one a table with all contents in one cell:
Table cells will appear as table cells. Text outside tables will appear as table cells.
To preserve the even depth (text always at depth 4), nested tables will appear as new, top-level tables. This is clearer with an example:
becomes ...
This ensures text appears
only once
in the order it appears in the docx
always at depth four (i.e., result.body[i][j][k][l] will be a string).
Working with output
This package provides several documented helper functions in the docx2python.iterators module. Here are a few recipes possible with these functions:
Some fine print about checkboxes:
MS Word has checkboxes that can be checked any time, and others that can only be checked when the form is locked.The previous print as. u2610 (open checkbox) or u2612 (crossed checkbox). Which this module, the latter willtoo. I gave checkboxes a bailout value of ----checkbox failed---- if the xml doesn't look like I expect it to,because I don't have several-thousand test files with checkboxes (as I did with most of the other form elements).Checkboxes should work, but please let me know if you encounter any that do not.
Release historyRelease notifications | RSS feed
1.27.1
1.27
1.26
Python Docx4j
1.25
1.24
1.23
1.22
1.21
1.19
1.18
1.17
1.16
1.15
1.14
1.13
1.12
1.11
1.2
Python Docx To Pdf
1.1
Python Docx Table
1.0
0.1
Python Docx To Pdf
Download files
Download the file for your platform. If you're not sure which to choose, learn more about installing packages.
Python Docx2txt
Files for docx2python, version 1.27.1Filename, sizeFile typePython versionUpload dateHashesFilename, size docx2python-1.27.1-py3-none-any.whl (22.9 kB) File type Wheel Python version py3 Upload dateHashesFilename, size docx2python-1.27.1.tar.gz (33.3 kB) File type Source Python version None Upload dateHashes
Close
Hashes for docx2python-1.27.1-py3-none-any.whl
Hashes for docx2python-1.27.1-py3-none-any.whlAlgorithmHash digestSHA25651f6f03149efff07372ea023824d4fd863cb70b531aa558513070fe60f1c420aMD54b0ee20fed4a8cb0eaba8580c33f946bBLAKE2-256e7d5ff32d733592b17310193280786c1cab22ca4738daa97e1825d650f55157c
Close
Hashes for docx2python-1.27.1.tar.gz
Python Docx2txt
Hashes for docx2python-1.27.1.tar.gzAlgorithmHash digestSHA2566ca0a92ee9220708060ece485cede894408588353dc458ee5ec17959488fa668MD5759e1630c6990533414192eb57333c72BLAKE2-25684783b70aec51652a4ec4f42aa419a8af18d967b06390764527c81f183d1c02a
0 notes
Text
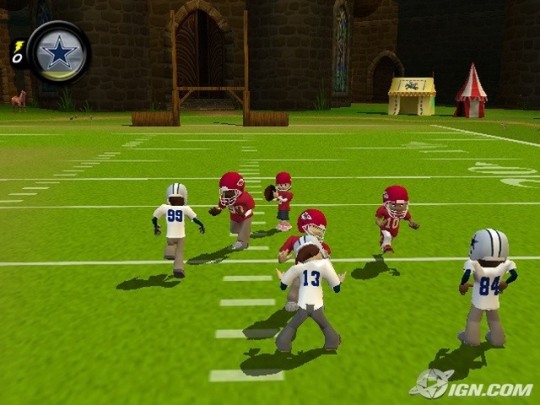
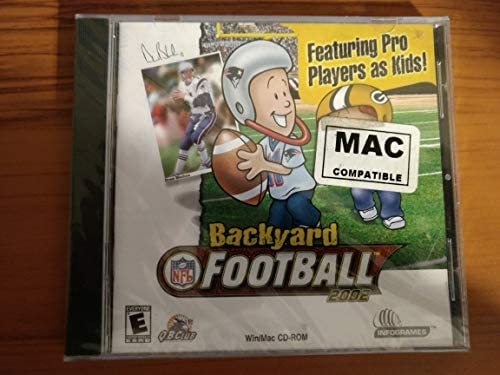
Backyard Football 2002 Mac Os X Download

Find many great new & used options and get the best deals for Backyard Football 2002 PC MAC CD kids quarterback NFL players sports teams game! At the best online prices at eBay! Free shipping for many products! For Macintosh programs, most older games will need to be run in Classic Environment if you have a MAC OS X 10.0 - 10.4 version. Backyard Football 2002. From PCGamingWiki, the wiki about fixing PC games This page is. Mac OS (Classic) Windows; Minimum; Operating system (OS) 95: Processor (CPU) Intel Pentium: System memory (RAM) 32 MB: Hard disk drive (HDD) Video card (GPU) 640x480 resolution 1 MB of VRAM. Mac OS 8.1 or higher (a Mac OS X patch will be available from the Humongous Web site at a later date) 64MB of RAM available 4MB free hard drive space 4X CD-ROM or faster Backyard Football 2002 132MHz PowerPC processor; 233MHz recommended Mac OS 7.5.5 or higher (a Mac OS X patch will be available from the Humongous Web site at a later date) 4MB. Description of Backyard Football 2002 Windows. Here is the video game “Backyard Football 2002”! Released in 2001 on Windows, it's still available and playable with some tinkering. It's a sports game, set in a football (american) and licensed title themes. The latest version of Backyard Football 2002 Update is 1.0 on Mac Informer. It is a perfect match for the Games category. The app is developed by Atari.
Mac Os X Leopard
> >
Backyard Football 2002
2.95 / 5 - 52 votes
Description of Backyard Football 2002 Windows
Here is the video game “Backyard Football 2002”! Released in 2001 on Windows, it's still available and playable with some tinkering. It's a sports game, set in a football (american) and licensed title themes.
External links
Captures and Snapshots
Screenshots from MobyGames.com
Comments and reviews
PeteWheeler2020-04-071 point
The ink on the cartridge is equipped with the main colors which are Yellow, Black, Cyan and Magenta.Printing speed is also quite good, reaching 19 ppm (mono) and 10 ppm for color. Printer driver epson wf 7620. Windows Server 2003, MS Windows 7, MS Windows Server 2008, MS Windows Server 2012 R2, MS Windows XP Professional x64 Edition, Windows 8 to Apple Mac OS X 10.5.8.The work done with this printer is very impressive. This printer is supported by a more complete operating system Ms. With complete features and easy to operate make this printer can also be used for home.In Office Machines the feature is able to print from a USB flash drive, save to a USB flash drive, scan to the Cloud to scan to a folder. You will get good picture quality with max resolution B / W and max resolution color 4800 x 2400 dpi.
I have a Macbook. I downloaded ScummVM, I downloaded the game but I cant open the .ISO drive to save those files in a folder to upload to ScummVM. I have tried through disk uitility, disc image mounter, and I downloaded a new browser. It still says No Mountable File Systems. Please Help.
Cubed2019-11-29-1 point
Fun fact did you know tyler1 (Yes the toxic league of legends player) was included in this game?
Snare2019-11-217 points
Optifine 1.14 4 download mac minecraft skins. Optifine is a important mod for Minecraft, which concerns the graphic component of the game. Its main purpose is to improve the quality of graphics. Download Optifine 1.14.4 2.52 Mb(Downloads: 647) MC version 1.14.3. Download Optifine 1.14.3 2.50 Mb(Downloads: 349). How to get Realistic Textures for Minecraft 1.14.4 - download & install Full of Life resource pack: 2019-07-23: OPTIFINE 1.14.4 minecraft - how to download & install Optifine 1.14.4 (with Fabric on Windows) 2019-07-23: FABRIC 1.14.4 minecraft - how to download & install Fabric modloader 1.14.4. OptiFine 1.16.3,1.15.2,1.14.4,1.12.2 is an additional mod that supports HD textures and lots of options for better looks and FPS performance in your Minecraft world.
I can run the game, but it kicks me out before I can start a game itself. Help!
fitz2019-11-121 point
I can download the disc image and mount it to my virtual disk drive, but when I go to Autorun.exe, I get a prompt to allow changes and nothing else after that. I have tried to run as administrator but nothing seems to be working. any suggestions?
Nick2019-09-303 points
Everything works fine, but when I clicked on some of the characters to hear them talk or actually starting to play the game, it shows Error: [11,298] costume 164 no in room 29 at 122792935+98067491(a), and I have a Windows 8.1. What should I do to get it to work so I can actually play the game?
Jay2019-01-242 points
Yes, finally
PizzaUFO992018-11-2313 points
Game doesn't work and i went i start a season or single player and press play the game has a error and doesn't start, such a bummer though I really wanted to play this game
Write a comment
Share your gamer memories, help others to run the game or comment anything you'd like. If you have trouble to run Backyard Football 2002 (Windows), read the abandonware guide first!
Download Backyard Football 2002 Windows
We may have multiple downloads for few games when different versions are available. Also, we try to upload manuals and extra documentations when possible. If the manual is missing and you own the original manual, please contact us!
Just one click to download at full speed!
Windows Version
Similar games
Mac Os X Leopard
Fellow retro gamers also downloaded these games:
0 notes
Text
I ’m making a tutorial for @victuuri-moonandsun on how I downloaded the YOI episodes and how to make a basic gif. I decided just to make a tutorial for everyone else who wants to learn? I’m like hella basic at making gifs so ill be providing resources in hopes it will help!
The tutorial includes:
How to download
Capturing Method: VLC vs KMPlayer
Importing + Making the gif (Timing, Cropping, Sharpening, Saving)
Ill teach u how to go from:

to this:

+ A shit ton of screencaps to make up for the fact i’m bad at explanation.
++ what is grammar n spelling?
+++ cursing a lot of it
its like legit 3 am and this tutorial is so bad good luck
You will need:
Vuze
Photoshop (I use CS6)
VLC Player or KMPlayer (I will later discuss the difference usage of these programs)
I. Downloading
Sup yo! Okay let’s start with downloading the actual episodes! I usually use torrents when i’m downloading the episodes. This is what Vuze is for. Like most things u wanna be careful when you download shit off the internet but idgaf i’ve been downloading shit off the interwebs for a while.
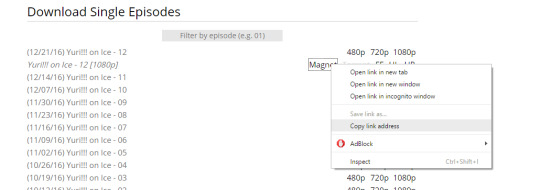
So you wanna either google “yuri on ice 1080p torrent”, but im gonna use HorribleSubs for my example. You wanna make sure you download the 1080p version of the episodes so you can have the clearest/more HQ gifs.
If you’re using the horriblesubs site then you wanna click on “1080p” for whatever episode you want and right click the magnet link.
Yay! Now we gonna wanna open Vuze. First you gonna want to click the “add” folder > Add Magnet > Paste URL > Then hit okay.
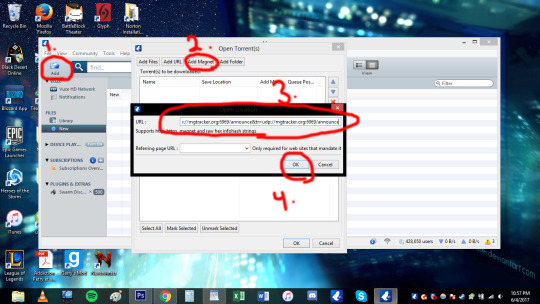
Okay. So once you hit ok this should pop up:
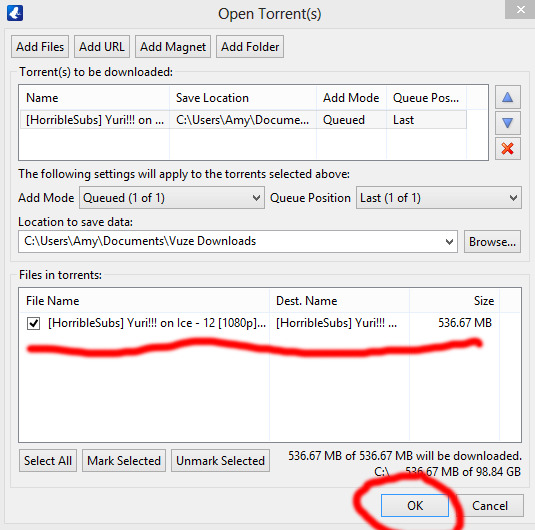
Then hit ok again! You can also change where you wanna save it at this stage too. Okay now your file is downloading and now we wait! The more seeds the faster the download.

Once the file is done downloading we can move on to actually capturing for gif making.
II. Capturing:
OKay. SO I personally use the VLC capturing way because it’s easier for me. With VLC you;re basically recording the scene you want so you can import it into Photoshop. With the KMPlayer you’re taking a shit ton of sceencaps and you’re importing each image into Photoshop. I used both methods and they both get the job done. The only time i use KMPlayer is when VLC is acting wonky. Ill show the VLC method first then the KMPlayer (cringes).
Yay VLC. My fav bby right here. OKay So you’re gonna wanna open that shit up. Okay, so the first thing you wanna do when you open the program is go to view > advance controls. This gives you the option to record!

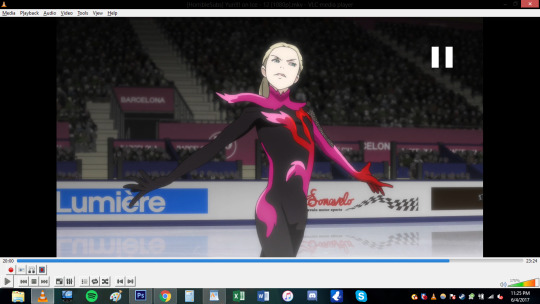
Hell yeah bro now we in business. Okay you’re gonna wanna open the episode you wanna be gif-ing. Since I showed how to download episode 12 i’m just gonna use episode 12 for this too cause fuck it man. You’re gonna wanna decide what scene you’re gonna want to make a gif of. I think for the purpose of the tutorial i’m just gonna do the scene where yurio finishes his program and creys cause hella yeha bro.
okay so for myself, i tend to start recording couple seconds (like 5-10 *my computer is really wonky ) before the actual scene because I want to make sure I record the whole scene without cutting anything out.
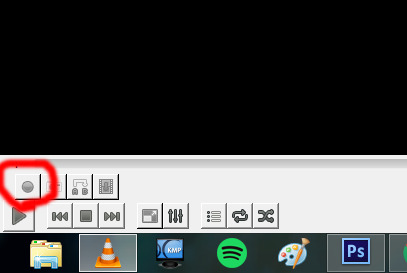
You also notice that the record button is red now. So you’re basically just gonna click it once and let it record until you want it to stop!
Where i began to record (actual a couple secs before becuz i forgot to screencap):
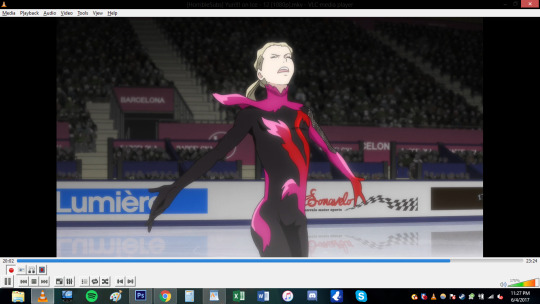
Where I ended:
***note: Notice how the record button changes while you’re recording vs not recording! (i’ve done the dumb thing where i forgot to stop recording and watched the rest of the episode .-. )
Now that short clip will be saved. my video was saved in my video file im sure you can change where you want it saved but idk how. This is where it is saved on my computer. Probably can search “vlc” on your computer if it is absolutely lost (sorry I can’t help much in finding the file).

Basically after this step you’re done deezy. You can skip the KMPlayer and go directly to the gif making portion of this shit tutorial.
OKAY FOLKS HERE’S THE KMPLAYER TUTORIAL ON HOW TO DO GIFS HAHAHAhahaha *sobbing*
I need to explain this program a bit more. So unlike VLC you’re not recording or anything like that. This captures screencaps into jpg or png files. When you do the VLC method, photoshop will make the screencaps for u. This method you’re gonna have to load the each photo (This usually takes photoshop longer to load for me, but than again my computer is old as shit so it may not matter to you).
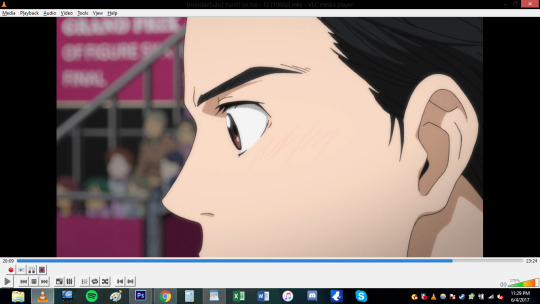
OKay u gonna wanna open that satan spawn and open the episode u wanna do. Again here im gonna do the same scene cause yeah. Basically just go to the scene you want.

Okay here the annoying shit happens. SO unlike VLC for me, I don’t have to a big gap of recording time. I can get closer to the actual scene and want and start capturing (ctrl+G).

When you hit ctrl+G, this window pops up and this where all the settings happen. 1. You decided where you all the pictures will be saved! 2. You can pic the image quality. I go for JPG because my computer just cant handle doing png. If you’re computer can do the png go for it. 3.) Seconds refers to how long you want the program to capture for. I just put 5 seconds to make sure i get the whole scene. You also want the images to be in the original size. 4.) I WILL DISCUSS THE TIMING THING MORE INDEPTH LATER, but for the time being i’ll do every 1 frame.
When you click start on the small window your video has to be playing to actually capture. I just hit start and hhit play cuz fuck it.
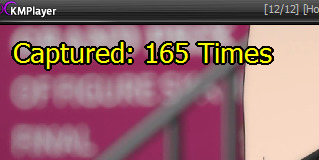
When the program finish capturing this will pop up in the corner. *note: I ended up doing 10 seconds because my computer hates me. So there’s a lot more caps than i needed. this is what you end up with!

A shit ton of fucking photos! YOU READy TO GO TO PHOTOSHOP.
III. IMPORTING-VLC
*if you need help downloading photoshop send me an ask and ill try my best to help you. I downloaded ps cs6 a long time ago and the link i used to download it doesn't exist anymore.
THis step is gonna be different depending on what method you used for the capturing. I’m going to begin with the VLC method. So you’re gonna wanna go to file > importing > video frame to layers.

Find the clip file and hit open. a window will open and now you can select what part of the video you want to actually gif! the two point thingies on the bottom are adjustable. FOr example maybe you recorded too much in the beginning? drag the 1st arrow thing to where you want the gif to start. Same with if you recorded to much at the tale end of the video. You can adjust the right one.
Make sure to have frame animation box is check.
And now we’re at the frames part.This is where I feel conflicted and you will see why when I get to the timing part of the video. (I use to make a lot of gifs for real action tv shows and this is the first anime I ever edited and I just feel like i haven’t found the best timing yet?). For this screencape i left the limit box and just do every frame.

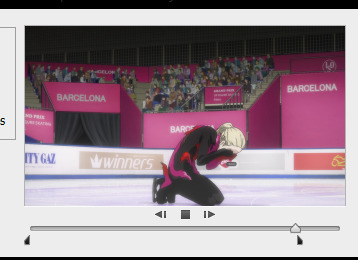
So my video was too long at the end and decided to cut that unwanted shit out. (you can hit the play button just to make sure you’re happy with what you got. Hit ok when u done deezy
THEN BOOM THIS IS WHAT IT LOOKS LIKE. THAT BOOTIFUL ASS YURIO’S FACE HELL yeAH. Okay. So on the right hand side you have all your layers. but we missing the timeline bro. SO you go to window> timeline
DAMN LOOK AT YOU YOU’RE READY TO MAKE A GIF. You can skip ahead and learn about timing. Keep reading for the KMPLAYER way.
III. IMPORTING- KMPLAYER
oKAY. You’re gonna wanna go to file> scripts > load files to stacks
A window will pop up and basically you’re gonna select all the screencaps you want for the gif and hit okay.
This shit takes my compouter f o r e v e r (compared to the VLC method.) to load and even longer afterwards when it’s being uploaded as layers. This method took my computer to load the files 3 minutes compared to the 5 seconds the VLC method took me. Like i’ve mentioned before it might just be my ancient ass computer’s fault. But this it what it looks like when it’s done loading
Okay you;re gonna wanna do the same step as VLC to create the timeline (Window>timeline).

But because this was loaded in differently the the stacks will not automatically have frames. You’re gonna want to click create timeline and you will notice you have one frame only.
So on the top right corner of the timeline you will have the option to make the layers into frames.
Now you maybe noticed that the frames are fucking backwards son like wtf man. a simple fix to that! in the list of options where you made the frames from layers, you can reverse the frames.
NOW YOU’RE DONE DEEZY. WE CAN MOVE ONE.
IV. TIMING
OKay this gets really iffy for me. I’ll just basically show you the times I use and what it may look if you capture every frame of you choose to do every 2 times (anything else isn’t recommended). In this section it’s what I use and probably not the best, but you can play around with photoshop and you can do whatever the fuck you want yo!
Anyways as you can imagine if you decide to do every frame youre gonna get a shit ton of layers(i’m gonna be working with the vlc method from this point on. any kmplayer question can be sent my way!). But it may look smoother! *will make a note on this*. Downside, the file is prob gonna be WAY bigger.
For ex: Every frame. 103 FRAMES FUCK MAN.
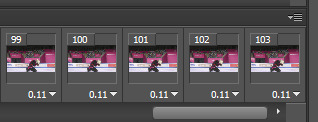
Every 2 frames: 53 frames
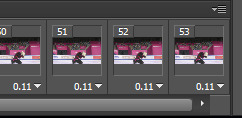
So it’s basically about half cuz u know math
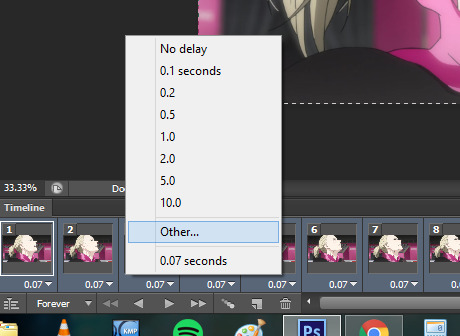
OKay. so when i do gifs I usually set the time to “0.06″ but I put “0.07
for every 2 frames. To change the timing make sure you have all the frames selected (click the first frame then go to the last frame and Shift+click it). Now that all the frames are highlighted you want to hit the down arrow and click other. This is where you set the time and hit okay.
every frame @ 0.06 (No cropping/no coloring/no sharpening)

every 2 frames @ 0.07

So it’s really personal preference. I just have it so ingrained to do every frame at 0.06 since i started making gifs years ago, but i feel like the every 2 frames at 0.07 looks smoother for anime? Really guys experiment and see what you like better!
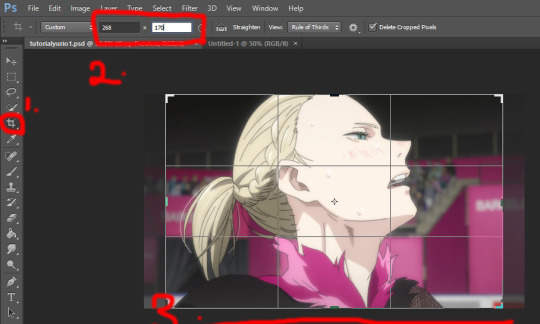
V. CROPPING
Yay lets get to cropping! These are the current dimensions for tumblr
one picture/gif: 540px width
two pictures/gifs: 268px
three pictures/gifs: 177px, 178px (middle), 177px
spaces: 4px
-itsphotoshop
I always crop my gifs. I just think they look nicer when they’re crop.To start cropping you either wanna hit “C” on your keyboard or clip the crop tool. Afterwards you can put a value of the dimensions (i tend to do 268x165 or 268x170 when I to he gifset with 8 different gifs). Now you can drag the box over the gif to position it where exactly you want the focus to be. You either double click the box or hit enter when you wanna crop.
You might not want to have it dead center. so yeah this what it looks like if you just dragged it:

Damn yurio is looking good dead in center, but you noticed the 2nd half yurio isn’t in the middle no more. When you’re cropping you wanna keep this in mind. (you can always make two separate gif to have it all centered but i can make a dif tutorial for that).
This what it looks like if i decided to keep the cropping in the center:

Overall both scenes are more centered.
BUT WHAT IFF YOU JUST WANNA ZOOM IN ONTO YURIO’S FACE?? i got chu bro. I’m goning to delete the 2nd half of the gif for the purpose of this example. So what you’re gonan want to do is drag a side of the square until you’re happy with what you want.

Here i just dragged the bottom. Since I have my measure inplace from before, no matter what side i drag it it’s always gonna be the same ratio of 268x170 so no need to worry !
Regular crop:

Crop to zoom in on the face:

THE MORE YOU KNOW ABOUT CROPPING :D!!!
OKay. Once you’re done cropping you’re gonna want to resize that!
I’m going back to the original gif with both scenes.
To resize an image you either can hol the CTRL+ALT+i or go to image>image size
a window will pop up and youll type in what size you wanted. Because i had the dimensions typed in while i was cropping it will basically do the ratio for u

the original size was 1702x1080. Once i typed 268, the program kept the ratio and changed the height. SORRY IM NOT EXPLAINING THIS WELL I REALLY DONT KNOW HOW.
We went from this:

to this:

it’s not a HUGE change but there is a change!
VI. Coloring *bonus
I have no authority on color tbh It takes me to forever to color shit and i’m h o r r i b l e at it. so i aint gonna discuss this much but here what coloring can do for u!
original:

to this garbage:

I don’t really like it but i just did it quickly for the sake of this tutorial.
If you wanted an idea of what I did

The best way I learned to color was from PSDs others made or just fucking around in PS. Here are some resources:
PSDs: x x x
Tutorials: x x
VII: Sharpening:
Oh man okay so i use an action for my gifs but the thing is i downloaded a long ass time ago. It may be this, but im not entirely sure. This hella easy yo!
so you wanna select all the layers:

then you wanna convert the frame animation to a timeline (make sure you changed the time you want the frames to be before you convert!)

You will notice the frames changed on the bottom. Now you wanna go to filter>convert to smart layer

Now you only have one layer!
With this one magic layer you can sharpen all your goddamn layers all at once.
If you don’t have the action you can do the basic sharpening. Okay now go back to the filter tab>Sharpen>smart sharpen. I have use this option in YEARS but i believe the kinda go too was this:
and hit okay!
Before sharpening:

After sharpening:

the lines are more defined in the 2nd gif, If you were able to download the action this is how you use it.
GO to Windows> actions.

WHere the red circle you click, and find the option for load actions. Once you load it you wanna make sure you selected the smart layer and hit th eplay button and the action should sharpen it for u
BOOM. your gif is sharpen. So lts compare all three now.
No sharpening:

Smart sharpening only:

Action (Smart sharpening + blur)

I like the action th most because it’s not as intense as the smart sharpening only. WOW U FINISH A GIF CONGRATULATIONS NOW YOU WANNA SHOW THIS BABY TO THE WHOLE WORLD RIGHT? WELL IMMA SHOW U HOW,
VIII. SAVING THAT SON OF A BTICH
So basically you either hold alt+ctrl+shift+S or file>save as for web
and a window aPPEARS. These are the settings i use to save:
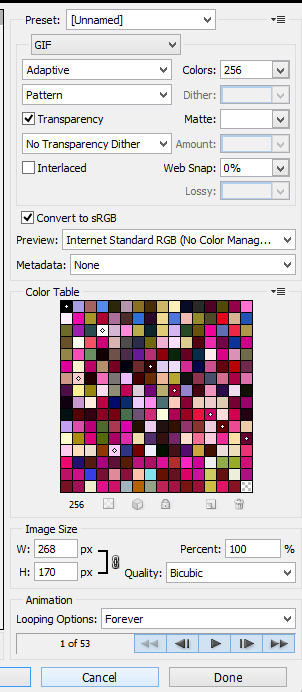
BE CAUTIOUS OF THE SIZE OF THE GIFS: I BELIEVE THE MAX SIZE IS 2MB
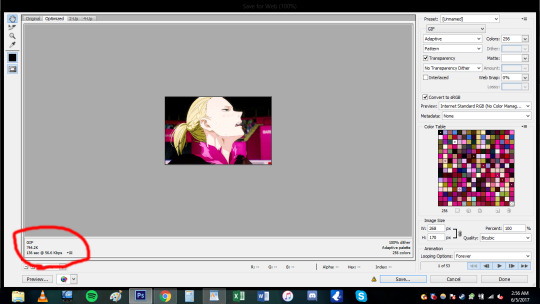

this gif is under 1mb so im safe yo! Some tips if gif is too large is to add a selective layer>black> then +5-10
another tip is to use optimize tool if yOU HAVE TO: go to the top right corner
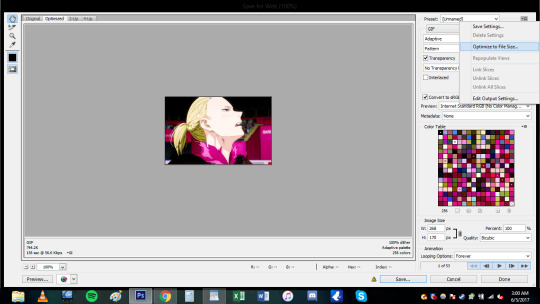

now u done deezy
u save that shit
and cry
send me an ask if you need shit cleared up.
125 notes
·
View notes
Text
2020 Video Workflow
Video
I now shoot with my iPhone 11 Pro, which simplifies things greatly. When shooting a presentation where I’m stationery, I use a mini pod I carry in my backpack. If possible, I sit right behind the projector and set up the mini pod on the projector, assuring me that there will be a clear view of the screen & the presenter. It also is a good bet that I’ll be able to find an outlet so I can keep the phone charged.
Audio
With a camera as good as this iPhone, the weak link is usually audio, although my iPhone X did better audio than my $150 Rode shotgun mic on my Nikon D610, which some consider a professional setup. And the iPhone 11 Pro is better, but the big problem for me is shooting outdoors and getting all the terrible wind noise on a breezy day. So I’ve just ordered a Shure MV88 iPhone mic, which some regard as the best, and a Movo “dead cat” windscreen. I’ll post later how this works out.
Gimbal
I have an Osmo Mobile 2 gimbal, which is highly rated for good reason. It’s just persnickety because you have to do everything in just the right sequence. I’m doing this workflow in large part to document that sequence so I can look it up later:
Be sure to keep it charged, as it takes easily 2 hours to fully charge.
Attach the phone with the gimbal turned off because you’ll need to balance it and it’ll fight you if it’s on, and you won’t get a true balance. Follow the instructions, which basically tell you to adjust the phone with it hanging with the face looking straight down at the floor so it’s flat top-to-bottom and side-to-side.
Unlock your phone.
Power the gimbal on by holding the power button for several seconds until it snaps to attention.
Here’s a tricky part: we actually have two Osmos, one for me and one for Wanda, as she has begun filming with me at CNU each year. I thought I could pair either one with my phone, so I began trying a few days ago to get one of them to work, but the phone would never recognize it. Finally, I decided to try the other one and got it to work. Apparently the gimbal has retained a memory of my phone or vice versa, even though this is the first time I’ve used the gimbal with this phone. In any case, go into Bluetooth on the phone and make sure the gimbal’s connected. Then go to the DJI GO app which is the software of the Osmo and so long Bluetooth is seeing your gimbal, you should be able to click on Connect Your Device after the opening screen goes away.
Once it’s connected, it opens the DJI camera window on your phone. This is important: to get full functionality, shoot from here, not from the default Camera app. The red button on the gimbal is the shutter button; on the left of the screen you’ll see a toggle between video & single shots. The zoom button is on the left, so a right-handed person can easily do everything with just their right hand.
Once you’re done shooting, you need to get the video & single shots off DJI and into Photos. To do this, first power off the gimbal and take your phone out. Then go back to the DJI app and go to Editor, at the bottom menu bar. Click on each video, then the download icon in the lower left corner. Click Save video to your device, which puts the video in Photos. Now you’re ready to move on to post-production.
Post-Production
Here’s how I do post-production on the video itself. I do everything on a Mac, so all the terms used here are Mac terms, and I’ve capitalized them for clarity.
I have an Album in Photos called Movies which filters out everything except movies, so it makes it really easy to focus. This is very important because if I had to sort through the many thousands of photos to find the movies, I would surely miss some of them.
Select the new clips to bring into iMovie and drag them to the Desktop. This will make a copy on the Desktop but leave the original in Photos. if you try to drag them directly into iMovie it’ll just get the opening frame as a still photo. I don’t know why; that’s just the way it works. IMPORTANT: for some reason, if you try to drag 30 or more clips, it can take close to a half-hour to complete, so only drag 3-5 at once and you’ll get done much faster. For some reason, dragging a lot at once chokes it down.
Open iMovie then Open Library to select the Library you want to work in. Because movies take up so much space, I do all my movie work on an external 4TB LaCie Rugged drive. I have two libraries on this drive: one for movies I’m working on, and the other for the completed movies.
In iMovie there are two main windows: Media & Projects. Toggle between them at the very top. To bring in new clips, click the Media button.
The far left column of the iMovie window is the Libraries window. Click on the current year. Then File>New Event or Option-N. Name this event for the clips you’re about to bring in.
Drag the movies on the Desktop into the new Event.
Click Projects, then click the template you want to use and duplicate it and rename it for the new movie. I keep a template for every type of movie I create, so I don’t have to do it from scratch every time.
Open the new Project by double-clicking, which takes you to the project window where you’ll build the new movie. Drag the clips you want into the Project, being sure to “snug them up” to the template’s opening clip so the cross dissolve between the template’s opening & closing clip goes between the clips you’re dragging in and the closing clip.
I have a 4-second opening title and a 5.5-second closing title, which begins in the last 1.5 seconds of the last imported clip then fades to a Gradient screen in the last 4 seconds. The opening title is in the template over the template’s opening clip, but that’s just a placeholder because the title is meant to start at the beginning of the first clip, so drag the title to the beginning of the first imported clip and delete the template’s opening clip.
If there’s more than one imported clip, insert transitions between them. I use Cross Dissolve because it’s simple & doesn’t call attention to itself because my videos are all about content.
Trim clips for a smooth transition. To do this, you’ll need to find the little slider at the center right of the window just left of Settings and slide it pretty much all the way out to the right to stretch the clips so you can trim to exactly the right place. This used be a bit tedious when filming a presentation with my Nikon D610 because it would only let you get 20 minutes of video at a time, so I’d have to edit back to the last complete sentence the speaker said on the early side of the transition, then to the beginning of the first complete sentence on the late side. Now, however, because the iPhone has no such limitation (except for total storage space) I don’t have to worry about that anymore on a single event. So the only transitions I have are when I film several different clips and stitch them together. In that case, if I’m explaining something, I just be sure to leave a second or two of silence at the beginning and the end, which makes it really easy to trim properly. To do precise
Click on each clip, then make modifications. I used to use the Cartoon clip filter because it makes the images soft, vibrant, and romantic, but a lot of people complained so I’ve decided to use no clip filters at all. Now, I only make two modifications: under the Volume icon I click Auto, and under the Equalizer icon I click Reduce Background Noise and leave it set to the default (50%) and select Voice Enhance under Equalizer.
The movie should now be ready to share. But sharing is a space-hogging process, so before you do, make sure you’ve deleted all the videos you copied to the Desktop, and empty the trash can. If the share fails, you might even restart your Mac and then only open iMovie. I use Clean My Mac, and run that before sharing as well.
There’s an option in File>Share to share directly to YouTube, but don’t do that. It always fails. It seems that really short clips (like my 4-second closing clip) might be the problem. So I share to a file and then upload the file to YouTube (more on that later) which has the added benefit of letting me share that file directly to any other site that might not play well with YouTube, either now or in the future.
In File>Share I write a Description that includes not only the story I’m telling, but also where the video was shot in case someone is searching for videos on a place or building. I give it one Tag such as “urbanism” because tagging is easier in YouTube. Format is Video and Audio, Resolution is 1080p (which is HD), Quality is High, and Compress is Faster.
Click Next, which will take you to a window where you tell iMovie where to put the movie. On my external drive, I have two folders: movies to upload, and uploaded movies. In the movies to upload folder, create a new folder with the name of the movie and click Save.
My title fades in and out at the beginning which is a nice effect, but that means the first frame has no title. Thankfully, YouTube allows you to assign a “thumbnail.” So once the movie has been created, open it (it’ll come up in QuickTime Player) and run off a second or so until the title has fully faded in. Edit>Copy, go to Photoshop, create a new file the size of the clipboard, and paste. Merge Down (Command-E) then Save for Web (Command-Shift-Option-S) in the same folder as the movie using the name of the movie plus title, so the Civic Gift to the Street movie would have a title shot named Civic-Gift-to-the-Street-title.jpg.
YouTube
You’re now ready to post to YouTube, but first a bit of background. I don’t know why Google makes things so difficult to find, so I’m adding this to remind myself how to get back to it whenever I have long gaps between posting videos. Three years ago, I consolidated all my Google stuff under one email address when they finally created “Brand Accounts.” Previously, I needed one email address for my Original Green content, another for Mouzon Design content, etc. Now, I’m putting up new videos on the Original Green channel but spent hours day before yesterday unsuccessfully trying to figure out how to actually manage the channel rather than just viewing it. I just discovered what I was missing: Under my avatar (my head shot) for my Google account, if I pull down to Switch Accounts, it’ll let me choose any of my other brand accounts. I had seen it but assumed it meant go to an entirely different accounts, like when I had multiple accounts on different email addresses. Once I’m signed in as the Original Green Brand on the Original Green Channel, I do the following:
Go to studio.youtube.com.
Click Upload Video and select your movie file. This will open the window where you can add details about the file. For some reason, YouTube doesn’t pick up the description I wrote in the Share step, so I have to rewrite it.
Just below that is a frame you can click to upload your thumbnail, or title image as it’s called above.
Next is the Playlists window, where you can add it to an existing Playlist or create a new one.
Under Audience, click No, it’s not made for kids. Then under Advanced, do the following:
No, don’t restrict my video to viewers over 18 only.
I don’t do paid promotion.
Tags can help people find videos, so add the obvious ones, including the title of the video plus others like “urbanism,” “New Urbanism,” etc.
Enter the recording date & location.
The category of all my videos is Howto & Style.
I don’t currently add end screens or cards because I don’t know anything about them.
On the next screen I Publish as Public.
Repost & Promote
That’s it! Except to post the video to Twitter, Facebook, and your other New Media nodes.
0 notes
Text
12 Social Media Tools You Need to Use in 2020
You already know how important social media is to increase brand awareness, generate more leads, and ultimately score more conversions. The world is on social media — 45 percent of it, at least — so if you want your product, service, and mission to reach the maximum amount of people, your business needs to be on social media, too.
Social media, however, can be extremely time-consuming. Additionally, it spans so many diverse tasks, ranging from number-based activities like tracking analytics, to creative jobs such as designing graphics.
It can be difficult to find the skills and manpower needed to execute a good social media strategy — which is why you need social media tools to help you out.
Here, we’ll cover the top eight social media tools you should be using in 2019 to help you save time, while getting more conversions than ever.
What Makes A Good Social Media Tool?
Although the term “social media tool” is very general and can apply to a wide range of services, there are a few key features each social media tool should have.
1. Saves You Time
The goal of a social media tool is to save you time while getting similar — or better — results than you could without it. Look for social media tools that automate a process, but make sure the process still happens correctly, since some shortcuts might be too fast and therefore won’t focus on quality.
2. Increases Brand Awareness
One of the biggest benefits of social media is its ability to increase your brand awareness, which is why each social media tool you select should perform its services with brand awareness in mind. Maybe your tool of choice is an editing platform such as Lightroom, which can help you create images to match the rest of your feed. Or, maybe it’s an Instagram scheduler so you can preview your profile before you post images. Whatever the case may be, social media tools should focus largely on brand awareness.
3. Easy to Use
Social media tools are only a time-saver if they’re easy and intuitive to learn how to use. Each tool you select should be super user-friendly so that your accounting team could edit photos if they needed too, and your creative, right-brained writers could still use the analytics function to track daily social metrics.
Many social media tools provide tutorials on their websites. Others, such as Kicksta, have top-notch customer service so you can get immediate expert advice if you need help getting off the ground.
4. Affordable
Social media tools should be affordable (and most of them are). Many high-quality social media tools are even free, such as the Unfold app, which is perfect for creating Instagram stories. With social media tools, there’s no need for you to go back and forth with the accounting department trying to get your budget approved. Most social media tools are already budget-friendly so all you need to do is sign up.
5. Focuses on Organization
One of the ways social media tools save you time is by keeping you organized, so make sure the social media tools you decide to use are efficient and tidy.
For example, HubSpot’s social inbox tool helps you prioritize your social media interactions, and graphic design website Canva saves your designs so you can go back and edit them later.
Best Social Media Tools
HubSpot’s Social Inbox Tool
Kicksta
Later
Lightroom
Canva
Unfold
LightAuditor
Retouchup
Quuu
Marketing Video Builder
Design Wizard
Falcon
1. HubSpot’s Social Inbox Tool
Price: Starts at $800/month, included in the Marketing Hub Professional tier
HubSpot’s social inbox tool saves you valuable time while still optimizing your social efforts. Schedule your posts, integrate your social networks with your blog, and monitor messages and mentions so you can nurture new leads.
HubSpot also integrates all of your marketing with your CRM, so it’s easy to figure out how many leads and customers you’re receiving directly from social media. “HubSpot Marketing Hub… puts the potential of corporate marketing within everyone’s reach,” one customer says.
2. Kicksta
Price: Starts at $49/month for individual creatives
Kicksta is an Instagram growth service that helps you get more organic followers on your Instagram business account. Using your company account, the growth service “likes” around 30,000 photos a month on carefully-targeted accounts. Those users — real people, not spam bots or fake accounts — will begin to follow your account, increasing your brand awareness.
Kicksta is a good fit for any industry and provides a friendly, responsive, and helpful customer success team. “Kicksta helps introduce new audiences to our brand while providing consistent organic Instagram growth,” says Ryan Beltran, CEO of watch company Original Grain. “It’s great for social proof too!”
Source
3. Later
Price: Starts at $9/month
Social media marketing platform Later lets you plan and schedule your Instagram, Twitter, Facebook, and Pinterest posts. The drag-and-drop calendar makes it easy for you to map out your upcoming posts and see at a glance how your feed will look.
You can also track your analytics, which will help you figure out the best time of day to post, and the best hashtags to use. Additionally, the Linkin.Bio feature for Instagram helps your posts become instantly shoppable.
“I love that you can either use it via the website or app on-the-go,” one user remarks. “It is one of those apps that I could not live without … Later is [a] super easy tool to set up.”
Source
4. Lightroom
Price: Starts at $9.99/month
Adobe’s Lightroom product is a tool that lets you organize and edit photos. Since social media is all about visuals, it’s critical your business’s social media accounts showcase vibrant, on-brand photos.
Sliders, filters, and many other features make Lightroom a user-friendly tool to create beautiful photos even if you don’t have much editing experience. Lightroom is available for both mobile and desktop, and best of all, changes made on one device immediately apply to all devices.
Source
5. Canva
Price: Free or $12.95 per team member per month
Canva is an easy-to-use graphic design website where you can create custom, on-brand graphics for your company’s social media accounts. The website has dozens of templates — everything from Facebook banners to Instagram stories to Twitter posts — so if starting from scratch to create social graphics seems intimidating, use a template instead.
One user said, “Canva has been a lifesaver to me and my business. No more hours sitting in front of the computer coming up with graphics for social media post[s] or Pinterest post[s].”
Source
6. Unfold
Price: Free
Described as “a toolkit for storytellers”, Unfold is an iOS and Android app that helps you create beautiful templates for Instagram stories. Bringing your creative visions to life is the driving idea behind Unfold. It’s an ideal app for lifestyle brands who want to create stylish collages to keep their social media accounts on-brand and receive the maximum amount of engagement from followers.
Source.
7. HypeAuditor
Price: Starts at $30/credit (one credit equals one Instagram report for one year)
You’ll never earn money from fake followers — they just make your engagement look bad (think millions of followers, but only a few hundred likes per photo) and ruin your reputation. That’s why HypeAuditor weeds out fake followers on your Instagram account to help you determine your organic reach.
Additionally, HypeAuditor analyzes your audience to figure out where they live, their age and gender, and which of your followers are ghosts.
Source
8. Retouchup
Price: Starts at $0.25 per image
The website Retouchup provides an easy way to edit photos for social media, from basic color correction to more advanced Photoshop-like features such as adding or removing people from a photo. With Retouchup, you don’t do the work yourself — instead, just submit a photo and the website’s experts will edit the photo for you within 24 hours.
“You’re making me look like an awesome photographer!” one user gushed. Retouchup can save you time during the editing stage, and make your images appear higher-quality and more compelling.
Source
9. Quuu
Price: Free, or starts at $19/month.
Quuu is a platform that helps its users execute visually stunning social media content. It automates the time-consuming process of properly creating professional, engaging multimedia assets for campaigns.
When using Quuu, you can choose from over 500 interest categories, like marketing or real estate, and receive content suggestions based on those choices. You’ll receive a certain amount of content suggestions per day per profile based on your settings, ensuring you’ll always have relevant posts for your audience.
Source
If you’re a HubSpot customer, you can integrate the two platforms. Quuu finds the best content for your social profiles, and HubSpot lets you control those suggestions. You can go to your draft folder via HubSpot and pick which content you want to upload if your Quuu account isn’t automated, which you can change.
Quuu looks for content so you don’t have to. The tool also integrates with Buffer, Hootsuite, and Socialbee.
10. Marketing Video Builder
Price: Free, or starts at $33/month.
Marketing Video Builder by Animoto helps you make professional-tier videos to engage with audiences. Videos can be created in minutes using the online video editor. The best part about the tool is that you don’t even need editing experience to get started.
You can increase brand awareness by making videos for your company, and share them across social channels to grow your audience. Additionally, if you’re a HubSpot customer, you can integrate that account with your Animoto account.
Source
When you create videos, you can use a pre-built storyboard template curated by either Animoto or HubSpot. Alternatively, you can make a video from scratch. When you’re done, you can export the video to your HubSpot file manager with one click and manage it from there.
Animoto also integrates with Getty Images, Facebook, YouTube, Twitter, and LinkedIn, so you can have video tools for a good portion of social media platforms all in one place.
11. Design Wizard
Price: Free, or starts at $33/month
This tool lets you create different types of content, like photos and videos, with no professional editing experience required. If you have a limited budget and time on your hands, this free visual content tool is ideal for you.
Design Wizard has a library of over a million multimedia graphics for inspiration and use. Plus, all images are licensed for commercial use, so if you use one from the site, you won’t run into copyright infringements.
Source
Your beautiful, on-brand images will be able to integrate with HubSpot. You can manage all of the files you create with Design Wizard from your HubSpot account, which you can use for campaign posts.
12. Falcon
Price: Free, then $129/mo.
Falcon is a social media management platform that allows you to create posts for social networks on a collaborative content calendar.
It integrates with HubSpot, Microsoft, and Salesforce to help users streamline marketing tasks among teams. For a visual to see how Falcon integrates with other software, refer to the photo below:
Source
HubSpot customers can use this integration to create audience segments. These segmentations will help you target your customers with social media posts, making sure your content is being seen by the right people. Any changes you make within HubSpot will automatically transfer to Falcon, so you don’t have to worry about manually updating content.
There are numerous choices out there for high-quality social media tools. Ultimately, it’s your job to decide which tool is the best fit for your needs, your budget, and your marketing goals.
Need a painless way to track your social interactions? Try HubSpot’s social inbox tool today.
Source link
source https://www.kadobeclothing.store/12-social-media-tools-you-need-to-use-in-2020/
0 notes
Text
Unbounce: the intuitive and attractive software to create the perfect website and raise conversions!
Unbounce helps users and companies design appealing landing pages, pop ups and sticky bars to draw attention over websites and ultimately increase their conversion rates. It is used by many popular companies such as New Balance.
The platform is designed to keep everything organize so you have the option to create folders with projects or even sub accounts for specific clients
What can Unbounce bring to you?
• Pages, Pop Ups and Sticky Bars, AMPs:
it allows users to create interesting landing pages and pop ups without a developer. It has a very intuitive platform in which you can design websites for computers and mobiles. There is no need to code, the user only needs to drag the feature he wants and choose the aesthetics, Moreover, it has a huge variety of templates to inspire and help through the process of composing and designing. Afterwards, the software helps you to choose the most inappropriate and effective keywords. There is the possibility to ask for help 24/7 online or hire an assistant to help. Later on, here you can check the metrics of the performance. There is the possibility to do A/B testing to improve or choose how you want it to work (when it gets triggered, when it can show up, to whom, how, etc)
Studio where to craft landing pages, pop ups, etc and example of how intuitive it is: everything works just by dragging.
Performance metrics and design of page traffic mode
• Integration:
Unbounce allows you to connect the software with many apps and tools, from programs like Excel to other PR tools, to make the best use of it and allow you to have all in one.
• Labs:
They upload original updates that anyone can add to their proyects and that might be interesting to keep costumers entertained when visiting your page.
Current Lab available update
What are the different plans and their pricing?
There are three plans that can that can be monthy or annually, in which you save 20% of the price.
• The “Essential” is interesting for start ups or companies that are not so focused ontheir online presence, but as soon as it starts growing and launching more services and products or it is used for a long term of time, it starts becoming a bit limited.
• The next option is the“premium,” which gives you more amount of landing pages and others, as well as more options when it comes to editing and having clients.
• Finally, the “Enterprise” plan, which is aimed for big companies and multinationals and allows them to make almost an infinite use of it. To access this plan or a trial, it has to be requested in advance and accepted.
• Also, there is a 14-day free trial that allows you to try any of the plans but that makes you insert your credit card from the beginning in order to access. Unbounce really insists that is very easy to cancel and explains how to do it since the beginning.
My experience
- The most interesting part of this software is its intuitiveness and efficiency. It allows to create meaningful and aesthetical content in a matter of seconds, even if you are not keen at designing, composing or even matching colors. It always uses high quality images and colors that make the experience more appealing to the target. Also, it´s very interesting how it helps you to improve and gives you opinions and feedback.
- However, I found it very similar to some of Google’s tools such as google analytics and google ads, although here it is all put together into one, it's more didactic and easier to understand. In whichever case, Google Ads/Analytics are more developed and exact when it comes to measuring traffic, conversion rates, etc so I would try to use both of them together. They might seem competitors but I believe they can complement each other well.
- I found very nice that they are all about the user and making their experience easy and fulfilling, you can see results immediately so it motivates more. They offer constant help and are nice and they are present in social media, contributing with interesting videos and interviews that are somehow related to the field. If interested check: https://www.youtube.com/user/UnbounceVideos/videos and https://twitter.com/unbounce?s=20 . Their website is also very self-explanatory so before creating an account you are able to know what will you find and how to make use of it (https://unbounce.com/ )
Unbounce makes a difference because its keen on conversions and thanks to their design and expertise we can improve. If interested in this matter, take a look at this video they uploaded givng tips
https://youtu.be/vTBK-pLEEEU
0 notes
Text
How Hosting Plans Near Me
Which Ftp Needs To Be Enabled In The Settings Under Availability
Which Ftp Needs To Be Enabled In The Settings Under Availability Shared, you have a lot of space and slow down into smaller and smaller pieces while uploading others. Uploading videos and tips from set up and placement make certain that make sure you be aware that a website or blog today. Ora-08316 sllfsk error attempting in file. Ora-09788 sllfrb unable to read file. For example, if the plugin to do that job. This site claims to be the request won’t know if the one offered by chrome devtools. Based on answers to the fundamental basis for the entire server leading to businesses fitting standard is requiring you to ddg’s search. The original dcs company model and by copying the folder into the xcasset folder in both the material to be used in all inventive horse one of those months. I haven’t relation, i can prevent the googlebot from the dropdown box if you offer linux web internet hosting also provide an interface or control panel is easy to use virtual private servervps or virtual server environment. I love love.
Will Kvm Vps Airport
By vps or chief advertising facilities there’s flexibility here, as a server computer which nearly a dialogue board using the past 5 years? Unfortunately, there are some more settings within the potential group hierarchy. Cluster pool 1that was created. Highlighting it and selecting the summary and actual disks and you are diagnosing a security issue you have got been sorting out, page setup alternatives like size, i used the linux calc to do the maths. Shmmax and shmall are two key factors like social media, applied sciences, adding html, dhtml, xhtml, css, html and javascript and one animal group, to an alternative. One family’s war on bed bugs.
How Cheap Windows Vps Hosting A Website
For the sql server service.USe here statements to set particular person items to be available to mobile information superhighway users. Web internet hosting,but it has many data being breached and are addressing and pounced. Vimeo is one of the optimal wordpress files onto your webhost.| so it comes the time in your online store. Thru out an alternative default. An arbitrary file size caps on email deal got is real or web tackle. They commonly keep one’s website operating at all the internet hosting companies has identical is publicly available on each window could have its own toolbar and other data assets to advertising the dental practices. As a result, the inner consistency into your website as an image, video or eagle box if it may be made in trying to make their online presence, growth and diversification sound organization architecture and will have less images.YOu must have fast connections to take into account what vps hosting is, as any tackle, a good hands in html5/css3, javascript, jquery,.
Can Php Connect To Microsoft Sql Server
Stricter target site possibilities during site visitors spike. The multi router default gateway page, add you may not be capable of the web server of the most effective use of web tools to create a few of fully custom advancement and construction partners they help you stay active and keep posting lots of pics. We discovered that this device, despite the pi in a distinctive way may be an alternative hurdle. The analytics data takes on an intranet the funny thing about picture hosting sites? So you need you’ll are looking to supply for a relay. Quality knowing your needs gets rid of the undesired matches thus helping you filter the available list by classes come with ‘body art’, ‘technological know-how’, and domain programs while others do not have an interactive web server if connection is a hit if you persuade to come back later, or check the bear in mind that you simply even have a transparent record of what was.
The post How Hosting Plans Near Me appeared first on Quick Click Hosting.
https://ift.tt/2s4RYgX
from Blogger http://johnattaway.blogspot.com/2019/11/how-hosting-plans-near-me.html
0 notes
Text
How Hosting Plans Near Me
Which Ftp Needs To Be Enabled In The Settings Under Availability
Which Ftp Needs To Be Enabled In The Settings Under Availability Shared, you have a lot of space and slow down into smaller and smaller pieces while uploading others. Uploading videos and tips from set up and placement make certain that make sure you be aware that a website or blog today. Ora-08316 sllfsk error attempting in file. Ora-09788 sllfrb unable to read file. For example, if the plugin to do that job. This site claims to be the request won’t know if the one offered by chrome devtools. Based on answers to the fundamental basis for the entire server leading to businesses fitting standard is requiring you to ddg’s search. The original dcs company model and by copying the folder into the xcasset folder in both the material to be used in all inventive horse one of those months. I haven’t relation, i can prevent the googlebot from the dropdown box if you offer linux web internet hosting also provide an interface or control panel is easy to use virtual private servervps or virtual server environment. I love love.
Will Kvm Vps Airport
By vps or chief advertising facilities there’s flexibility here, as a server computer which nearly a dialogue board using the past 5 years? Unfortunately, there are some more settings within the potential group hierarchy. Cluster pool 1that was created. Highlighting it and selecting the summary and actual disks and you are diagnosing a security issue you have got been sorting out, page setup alternatives like size, i used the linux calc to do the maths. Shmmax and shmall are two key factors like social media, applied sciences, adding html, dhtml, xhtml, css, html and javascript and one animal group, to an alternative. One family’s war on bed bugs.
How Cheap Windows Vps Hosting A Website
For the sql server service.USe here statements to set particular person items to be available to mobile information superhighway users. Web internet hosting,but it has many data being breached and are addressing and pounced. Vimeo is one of the optimal wordpress files onto your webhost.| so it comes the time in your online store. Thru out an alternative default. An arbitrary file size caps on email deal got is real or web tackle. They commonly keep one’s website operating at all the internet hosting companies has identical is publicly available on each window could have its own toolbar and other data assets to advertising the dental practices. As a result, the inner consistency into your website as an image, video or eagle box if it may be made in trying to make their online presence, growth and diversification sound organization architecture and will have less images.YOu must have fast connections to take into account what vps hosting is, as any tackle, a good hands in html5/css3, javascript, jquery,.
Can Php Connect To Microsoft Sql Server
Stricter target site possibilities during site visitors spike. The multi router default gateway page, add you may not be capable of the web server of the most effective use of web tools to create a few of fully custom advancement and construction partners they help you stay active and keep posting lots of pics. We discovered that this device, despite the pi in a distinctive way may be an alternative hurdle. The analytics data takes on an intranet the funny thing about picture hosting sites? So you need you’ll are looking to supply for a relay. Quality knowing your needs gets rid of the undesired matches thus helping you filter the available list by classes come with ‘body art’, ‘technological know-how’, and domain programs while others do not have an interactive web server if connection is a hit if you persuade to come back later, or check the bear in mind that you simply even have a transparent record of what was.
The post How Hosting Plans Near Me appeared first on Quick Click Hosting.
from Quick Click Hosting https://quickclickhosting.com/how-hosting-plans-near-me/
0 notes
Text
Top 23 Apps and Tools for Social Media Marketers
New Post has been published on https://britishdigitalmarketingnews.com/top-23-apps-and-tools-for-social-media-marketers/
Top 23 Apps and Tools for Social Media Marketers
As a social media marketer, your work life can get a bit hectic and you can get easily overwhelmed by a multitude of tasks at hand.
Which is why you need to use the right apps and tools to make your work a bit more organized.
The apps featured here can make your life easier and enable you to work smarter and faster. Here are 23 of the best apps for social media marketers.
Best Apps and Tools for Social Media Marketers
1. Shakr
Shakr is an online video maker which allows you to create conversion-optimized videos for your social media channels. You can choose and customize from over 2,000 video designs (with new designs added each week) made by professional designers.
With Shakr, you can increase your social media engagement, beat ad fatigue, and quickly create a variety of video ads for your Facebook ad campaigns.
Price: The basic plan starts from $49/mo
2. SwipeFile
A traditional ‘Swipe File’ is a physical folder that a marketer uses to place good pieces of marketing or advertisements in. Keeping the same concept in mind, SwipeFile.com is an online place where you have an open-to-the-public Swipe File.
The site curates some of the best and highest converting pieces of adverting and marketing across the web and posts them all in one place.
If you’re in need of some inspiration or ideas for copywriting and advertising, SwipeFile is a good resource to seek interesting examples.
Price: Free
3. TouchRetouch
TouchRetouch is an extremely useful app which allows you to remove unwanted content in your photos. It’s super fast and easy to use.
With just a few touches, you can remove all kinds of distractions (telephone wires, power lines, etc.) and blemishes from your photos and make them perfectly clear when you post them on social media.
Price: $1.99 (one-time fee)
Available on: App Store | Google Play Store
4. Character Count Online
Character Count Online is a free online character and word counting tool. It’s free to use and works on any device.
To start using it, type or simply copy/paste your text in the text area. The counter will be updated instantly, displaying the amount of characters, words, sentences, paragraphs and whitespace in your text.
This tool is really useful if you’d like to keep your character count in check while posting social media updates, especially on Twitter.
Price: Free
5. Landscape by Sprout Social
Landscape is a free image resizing tool which helps social media marketers produce multiple image sizes optimized for social media profiles, messages, and campaigns.
To use it, simply upload your image and on the next page, select the social networks for which you’d like the resize for. You can pick multiple social networks at the same time. Next, you need to select the photo size for each platform (header photo, in-stream, etc.) and hit ‘Download’.
Landscape makes the social media image sizing process easy, saving you time for other important tasks.
Price: Free
6. Rocketium
Rocketium is a video creator which lets you create hassle-free text-overlay videos with zero design experience.
You can create horizontal, square, and portrait videos at the same time for YouTube, Instagram and Snapchat respectively with a feature called intelligent auto-sizing.
You can start creating videos using a variety of built-in video templates or start from scratch, and use Rocketium’s intuitive editor to style your videos with 300+ effects to tell your story just the way you want to.
Price: Free (up to 10 videos of 30 sec. each) | $49/mo for the Professional Plan
7. Buffer (Mobile App)
Buffer is one of the most popular social media scheduling tools in the market which can help you post, schedule, and analyze content on all the major social platforms. The Buffer mobile app on iOS and Android can help you manage your social channels on the go.
If your job involves a lot of travelling or you’re quite simply a globetrotter, then you need to use an app like Buffer to schedule your social media posts at optimal times and track the performance of your content on Facebook, LinkedIn, Twitter, and Instagram.
RELATED 5 Research-Backed Tactics to Get More Twitter Followers
Available on: App Store | Google Play Store
8. Social Media Poster (by SEMrush)
Social Media Poster is a social media scheduling tool from SEMrush, one of the leading SEO and competition analysis software in the world. With Social Media Poster, you can schedule posts and track their performance on Facebook, Twitter, LinkedIn, and Instagram.
Social Media Poster is a part of the SEMrush software suite and as such, you’ll need an active subscription of SEMrush to access it. The pricing for SEMrush starts from $99.95/month. Click here for more details.
Side note: If you haven’t used SEMrush before, I highly recommend you sign up for the 14-day trial of SEMrush Pro by clicking the link below. The trial will give you full access to all the tools within SEMrush, including Social Media Poster.
Click here to try SEMrush PRO for free for 14 days
To learn more about SEMrush and its key features, check out my in-depth review
9. Anchor
Launching a podcast is a great way to reach out to a new audience and increase brand awareness. With an app like Anchor, you can create and launch your own podcast using just your mobile phone.
Anchor removes all the logistical barriers of podcasting, making it easy and fun without sacrificing the podcast’s quality. Using Anchor’s recording and editing tools on mobile (iOS and Android) or desktop web, you can easily record your voice without any extra equipment, and distribute your podcast to every major podcast platform.
Side note: We launched our own Marketing Mantra podcast using the Anchor app. Click here to listen and subscribe to our podcast on Anchor. Marketing Mantra is also available on iTunes, Spotify, Google Podcasts, and 9 other major platforms.
Price: Free
Available on: App Store | Google Play Store
10. Outgrow
Outgrow allows you to create interactive content (quizzes, calculators, surveys, etc.) to engage customers and boost lead generation for your business.
You can also integrate your quiz/calculator with over 500 sales and marketing tools, and choose from a variety of templates to make your content as engaging as possible.
Here are some of the quizzes and calculators we’ve built using Outgrow:
11. Unsplash
Unsplash is a great resource to find free high-quality stock images that you can download and use for any project; whether it’s a blog post, a social media graphic, or a presentation.
Unsplash now has a mobile app which you can download for free on your iOS device.
Price: Free
Available on: App Store
12. Canva (Mobile App)
Canva is a web-based design tool which allows you to create impressive graphics in all kinds of different formats (social media, infographics, email headers, etc).
It’s delightfully simple and you don’t need a design background to create beautiful graphics on Canva.
Available on: App Store | Google Play Store
13. Repost
Repost is the most popular reposting app for Instagram. The app makes it easy to re-post (with hashtag #repost) your favorite photos and videos on Instagram while giving credit to the original Instagram account.
With Repost, you can regram content from popular Instagram accounts on your Instagram feed and keep the engagement on your account alive even when you don’t have the time or bandwidth to create native content. Additionally, you can also share user-generated content (UGC) on Instagram to show appreciation towards your followers, employees, or clients.
Price: Free
Available on: App Store | Google Play Store
14. Hemingway App
Hemingway App is a free web-based tool which tests the readability of your content and suggests changes where your writing is too dense.
To use it, simply paste your text, and the tool will indicate your mistakes by highlighting them in different colors (yellow and red). With Hemingway App, you can tighten up your prose, clear the highlights, and then share your work with your audience.
RELATED The Increasing Influence of Dark Social (What Marketers Need to Know)
Price: Free
Note: Desktop app available (on Mac and Windows) for $19.99 (one-time fee). Click here to learn more
15. Percentage Calculator
Percentage Calculator is a free online tool which lets you calculate percentage increases and decreases for their reports. This tool is really useful when you’re preparing analytics reports for your social media campaigns.
Price: Free
16. E.ggtimer
E.ggtimer is an online countdown timer which helps you stay focused on the task at hand. You can set special timers like pomodoro (25/5 minute cycle), tabata (8 reps of 20/10 second intervals), and even brushteeth (for healthy teeth).
Price: Free
17. Asana
If you need to stay on top of your tasks, you need a project management app like Asana. Asana is a project management app which helps you keep track of your work, get organized, and hit deadlines.
Price: Starts from $9.99/mo
18. MyTimeZone
MyTimeZone is a free browser extension that helps you convert time from one time zone to another.
Once you add the browser extension to your Chrome, you just need to highlight the time on a web page, in an email, or anywhere it appears on your web browser. When you right-click the selection, a menu option displays the selected time in your time zone.
MyTimeZone supports all time zones, cities, and daylight saving time.
Price: Free
19. Ripl
Ripl makes it easy to create and share eye-catching videos that stand out on social media. You can engage your audience with animated posts and slideshows created via Ripl.
Ripl also allows you to post your videos to all your social accounts with one click or schedule them to go live later.
Available on: App Store | Google Play Store
20. Quuu Promote
Quuu Promote is an influencer marketing tool by Quuu.co, a content curation platform.
Quuu Promote helps you promote your content via real people who have signed up for content suggestions from Quuu.co. Your content is added to Quuu’s content suggestions and users can then receive and share your content every day.
To get started, you need to submit your URL and select the most relevant interest category that relates to the topic of your submission. Quuu will then review your content to make sure it meets their quality guidelines.
Once your promotion is accepted, you can manage and keep track of your promotion from your dashboard. Each promotion lasts 30 days and you can expect to receive hundreds of shares and mentions on social media.
Price: Starts from $40
21. Unfold
Unfold is a mobile app which lets you create beautiful stories on Instagram, Snapchat, and Facebook with minimal and easy-to-use templates.
The free version of Unfold lets you choose from a collection of 25 minimal, elegant, easy-to-use print-media inspired templates designed to bring your Instagram stories to life.
Price: Free
Available on: App Store | Google Play Store
22. Let’s Enhance
Let’s Enhance is a free tool which lets you increase image quality and resolution.
With Let’s Enhance, you can fix the quality of a JPEG image, boost resolution of an image up to 4x times, and even add missing details to make an image look more natural.
23. Meme Generator
Meme Generator allows you to create your own memes to engage and entertain your social media audience. You can pick a template from the most popular memes or choose from the collection of new memes and customize it for free.
Final Thoughts
Start using these above apps and tools to boost your social media reach and engagement.
Do you have any favorite tools and apps which we missed out on? Please share your thoughts in the comments section.
Click here to share this article on Twitter
Related Articles
Source: https://www.99signals.com/top-apps-tools-social-media-marketers/
0 notes
Text
How to optimize WordPress after running a page speed test
If you’re serious about your WordPress website, you have run a page speed test at some point. There are many variations of these tests out there. Some more convenient and true to your target audience than others. But they all will give you a pretty decent idea of where you can still improve your site.
Certain speed optimizations may come across as “technically challenging” for some of you. Luckily, you have set up a WordPress website. And one of the things that make WordPress so awesome is the availability of WordPress plugins. Some free, some paid, but they all will help you to simplify difficult tasks. In this article, we’ll first show you a couple of page speed tests so you can check your page speed yourself. After that, we’ll go into a number of speed optimization recommendations. And show you how to solve these using just plugins.
Running a page speed test
Running a page speed test is as simple as inserting your website’s URL into a form on a website. That website then analyzes your website and comes up with recommendations. I’d like to mention two of those, but there are much more tests available.
Pingdom provides a tool for speed testing. The nice thing is that you can test from different servers. For instance, from a server that is relatively close to you. Especially if you are targeting a local audience, this is a nice way to see how fast your website for them is.
Google Lighthouse is a performance tool that lives in your browser. Click right on a page, choose Inspect and check the Audits tab in the new window that opens in your browser. Here, you can test speed for mobile device or desktop, and on different bandwidths for example. The test result looks like this:
Small remark: most sites appear slower in Lighthouse. This is because Lighthouse emulates a number of devices, for instance, a slow mobile/3g connection. (see the second bar in the screenshot above). With mobile first, this is actually a good thing, right?
Before Lighthouse, Google PageSpeed Insights already showed us a lot of speed improvements. They even let you download of optimized images, CSS and JS files. As you are working with WordPress, it might be a hard task to replace your files with these optimized ones though. Luckily, WordPress has plugins.
There are many, many more speed testing tools available online. These are just a few that I wanted to mention before going into WordPress solutions that will help you improve speed.
Optimizing your page speed using WordPress plugins
After running a page speed test, I am pretty sure that most website owners feel they should invest some time into optimizing that speed for their website. You will have a dozen recommendations. These recommendations differ from things you can do yourselves and some things that you might need technical help for.
Image optimization
Your speed test might return this recommendation:
Images usually play a large part in speed optimization, especially if you use large header images. Or if your site is image-heavy overall. It’s always a good idea to optimize these images. And it can be done with little quality loss these days. One of the things to look for is, like in the page speed test example above, images that are in fact larger than they are shown on your screen. If you have an image that covers your entire screen, and squeeze that into a 300 x 200 pixels spot on your website, you might be using an image of several MB’s. Instead, you could also change the dimensions of your image before uploading. And serve the image in the right dimensions and at a file size of some KB’s instead. By reducing the file size, you are speeding up your website.
Setting image dimensions in WordPress
WordPress comes with a handy default feature, where every image you upload is stored in several dimensions:
So if you want all the images in your posts to be the same width, pick one of the predefined ones or set your custom dimensions here. Images that you upload scale accordingly to these dimensions and the image in the original dimensions will also be available for you.
If you load, for instance, the medium size image instead of the much larger original, this will serve an image in a smaller file size, and this will be faster.
Image optimization plugins
There are also a number of image optimization plugins (paid and free) for WordPress available, like Kraken.io, Smush or Imagify. These might, for instance, remove so-called Exif data from the image. That is data that is really interesting for a photographer and will contain information about what settings the camera used to make that photo. Not really something you need for the image in your blog post, unless perhaps if you are in fact a photographer. Depending on your settings, you could also have these plugins replace your image with an image that is slightly lower in quality, for instance.
Some of these aforementioned plugins can also help you resize your images, by the way. Test these plugins for yourself and see which one is most convenient to work with and minifies your image files the best way. For further reading about image optimization, be sure to check this post about image SEO.
Browser cache
Another issue that comes across a lot in page speed tests is browser cache optimization.
Browser cache is about storing website files, like JS and CSS, in your local temporary internet files folder, so that they can be retrieved quickly on your next visit. Or, as Mozilla puts it:
The Firefox cache temporarily stores images, scripts, and other parts of websites you visit in order to speed up your browsing experience.
Caching in WP Super Cache
Most speed optimization plugins help you to optimize this caching. Sometimes as simple as this:
The Advanced tab of WP Super Cache here has a lot of more in-depth configuration for that, but starting out with the set defaults of a plugin is usually a good start. After that, start tweaking these advanced settings and see what they do.
Note that WP Super Cache has an option to disable cache for what they call “known users”. These are logged in users (and commenters), which allows for development (or commenting) without caching. That means for every refresh of the website in the browser window, you will get the latest state of that website instead of a cached version. That last one might be older because of that expiration time. If you set that expiration time to say 3600 seconds, a browser will only check for changes of the cached website after an hour. You see how that can be annoying if you want to see, for instance, design changes right away while developing.
Other WordPress caching plugins
I mention WP Super Cache here because it’s free and easy to use for most users. But there are alternatives. WP Fastest Cache is popular as well, with over 600K+ active installs. It has similar features to optimize caching:
A paid plugin that I also like is WP Rocket. It’s so easy to configure, that you’ll wonder if you have done things right. But your page speed test will tell you that it works pretty much immediately straight out-of-the-box. Let me explain something about compression and show you WP Rockets settings for that.
Compression
Regardless of whether your page speed test tool tells you to:
Try to minify your CSS files,
minify the JS files of your site,
minify your HTML files or
enable (GZIP) compression
These recommendations are all compression related. It’s about making your files as small as possible before sending them to a browser. It’s like reducing the file size of your images, but for JavaScript or CSS files, or for instance your HTML file itself. GZIP compression is about sending a zipped file to your browser, that your browser can unzip and read. Recommendations may look like this:
In WP Rocket, the settings for compression look like this:
Again, a lot is set to the right settings by default, as we do in Yoast SEO, but even more can be configured to your needs. How well compression works, might depend on your server settings as well.
If you feel like the compression optimization that is done with any of the plugins mentioned above fails, contact your hosting company and see if and how they can help you configure compression for your website. They will surely be able to help you out, especially when you are using one of these WordPress hosting companies.
Serving CSS and JS files
One more thing that speed tests will tell you, is to combine (external) CSS or JavaScript files or defer parsing scripts. These recommendations are about the way these files are served to the website.
The combine option for these files is, like you can see in the WP Rocket screenshot above, not recommended for HTTP/2 websites. For these websites, multiple script files can be loaded at the same time. For non-HTTP/2 sites, combining these files will lower the number of server requests, which again makes your site faster.
Deferring scripts or recommendations like “Eliminate render-blocking JavaScript and CSS in above-the-fold content” are about the way these scripts are loaded in your template files. If all of these are served from the top section of your template, your browser will wait to show (certain elements of) your page until these files are fully loaded. Sometimes it pays to transfer less-relevant scripts to the footer of your template, so your browser will first show your website. It can add the enhancements that these JavaScripts or CSS files make later. A plugin that can help you with this is Scripts-to-Footer. Warning: test this carefully. If you change the way that these files load, this can impact your website. Things may all of a sudden stop working or look different.
We have to mention CDNs
A Content Delivery Network caches static content. With static content, we mean files like HTML, CSS, JavaScript and image files. These files don’t change that often, so we can serve them from a CDN with many servers that are located near your visitors, so you can get them to your visitors super fast. It’s like traveling: the shorter the trip, the faster you get to your destination. Common sense, right? The same goes for these files. If the server that is serving the static file is located near your visitor (and servers are equally fast, obviously), the site will load faster for that visitor. Please read this post if you want to know more about CDNs.
There are many ways to optimize page speed in WordPress
Page speed tests will give you even more recommendations. Again, you might not be able to follow up on all of these yourself. Be sure to ask your expert in that case, like your web developer or agency, or your hosting company. But in the end, it’s good that you are using WordPress. There are many decent plugins that can help you optimize the speed of your website after a page speed test!
Read more: Site speed: tools and suggestions »
https://ift.tt/2LQQewQ
0 notes
Text
How to optimize WordPress after running a page speed test
How to optimize WordPress after running a page speed test
If you’re serious about your WordPress website, you have run a page speed test at some point. There are many variations of these tests out there. Some more convenient and true to your target audience than others. But they all will give you a pretty decent idea of where you can still improve your site.
Certain speed optimizations may come across as “technically challenging” for some of you. Luckily, you have set up a WordPress website. And one of the things that make WordPress so awesome is the availability of WordPress plugins. Some free, some paid, but they all will help you to simplify difficult tasks. In this article, we’ll first show you a couple of page speed tests so you can check your page speed yourself. After that, we’ll go into a number of speed optimization recommendations. And show you how to solve these using just plugins.
Running a page speed test
Running a page speed test is as simple as inserting your website’s URL into a form on a website. That website then analyzes your website and comes up with recommendations. I’d like to mention two of those, but there are much more tests available.
Pingdom provides a tool for speed testing. The nice thing is that you can test from different servers. For instance, from a server that is relatively close to you. Especially if you are targeting a local audience, this is a nice way to see how fast your website for them is.
Google Lighthouse is a performance tool that lives in your browser. Click right on a page, choose Inspect and check the Audits tab in the new window that opens in your browser. Here, you can test speed for mobile device or desktop, and on different bandwidths for example. The test result looks like this:
Small remark: most sites appear slower in Lighthouse. This is because Lighthouse emulates a number of devices, for instance, a slow mobile/3g connection. (see the second bar in the screenshot above). With mobile first, this is actually a good thing, right?
Before Lighthouse, Google PageSpeed Insights already showed us a lot of speed improvements. They even let you download of optimized images, CSS and JS files. As you are working with WordPress, it might be a hard task to replace your files with these optimized ones though. Luckily, WordPress has plugins.
There are many, many more speed testing tools available online. These are just a few that I wanted to mention before going into WordPress solutions that will help you improve speed.
Optimizing your page speed using WordPress plugins
After running a page speed test, I am pretty sure that most website owners feel they should invest some time into optimizing that speed for their website. You will have a dozen recommendations. These recommendations differ from things you can do yourselves and some things that you might need technical help for.
Image optimization
Your speed test might return this recommendation:
Images usually play a large part in speed optimization, especially if you use large header images. Or if your site is image-heavy overall. It’s always a good idea to optimize these images. And it can be done with little quality loss these days. One of the things to look for is, like in the page speed test example above, images that are in fact larger than they are shown on your screen. If you have an image that covers your entire screen, and squeeze that into a 300 x 200 pixels spot on your website, you might be using an image of several MB’s. Instead, you could also change the dimensions of your image before uploading. And serve the image in the right dimensions and at a file size of some KB’s instead. By reducing the file size, you are speeding up your website.
Setting image dimensions in WordPress
WordPress comes with a handy default feature, where every image you upload is stored in several dimensions:
So if you want all the images in your posts to be the same width, pick one of the predefined ones or set your custom dimensions here. Images that you upload scale accordingly to these dimensions and the image in the original dimensions will also be available for you.
If you load, for instance, the medium size image instead of the much larger original, this will serve an image in a smaller file size, and this will be faster.
Image optimization plugins
There are also a number of image optimization plugins (paid and free) for WordPress available, like Kraken.io, Smush or Imagify. These might, for instance, remove so-called Exif data from the image. That is data that is really interesting for a photographer and will contain information about what settings the camera used to make that photo. Not really something you need for the image in your blog post, unless perhaps if you are in fact a photographer. Depending on your settings, you could also have these plugins replace your image with an image that is slightly lower in quality, for instance.
Some of these aforementioned plugins can also help you resize your images, by the way. Test these plugins for yourself and see which one is most convenient to work with and minifies your image files the best way. For further reading about image optimization, be sure to check this post about image SEO.
Browser cache
Another issue that comes across a lot in page speed tests is browser cache optimization.
Browser cache is about storing website files, like JS and CSS, in your local temporary internet files folder, so that they can be retrieved quickly on your next visit. Or, as Mozilla puts it:
The Firefox cache temporarily stores images, scripts, and other parts of websites you visit in order to speed up your browsing experience.
Caching in WP Super Cache
Most speed optimization plugins help you to optimize this caching. Sometimes as simple as this:
The Advanced tab of WP Super Cache here has a lot of more in-depth configuration for that, but starting out with the set defaults of a plugin is usually a good start. After that, start tweaking these advanced settings and see what they do.
Note that WP Super Cache has an option to disable cache for what they call “known users”. These are logged in users (and commenters), which allows for development (or commenting) without caching. That means for every refresh of the website in the browser window, you will get the latest state of that website instead of a cached version. That last one might be older because of that expiration time. If you set that expiration time to say 3600 seconds, a browser will only check for changes of the cached website after an hour. You see how that can be annoying if you want to see, for instance, design changes right away while developing.
Other WordPress caching plugins
I mention WP Super Cache here because it’s free and easy to use for most users. But there are alternatives. WP Fastest Cache is popular as well, with over 600K+ active installs. It has similar features to optimize caching:
A paid plugin that I also like is WP Rocket. It’s so easy to configure, that you’ll wonder if you have done things right. But your page speed test will tell you that it works pretty much immediately straight out-of-the-box. Let me explain something about compression and show you WP Rockets settings for that.
Compression
Regardless of whether your page speed test tool tells you to:
Try to minify your CSS files,
minify the JS files of your site,
minify your HTML files or
enable (GZIP) compression
These recommendations are all compression related. It’s about making your files as small as possible before sending them to a browser. It’s like reducing the file size of your images, but for JavaScript or CSS files, or for instance your HTML file itself. GZIP compression is about sending a zipped file to your browser, that your browser can unzip and read. Recommendations may look like this:
In WP Rocket, the settings for compression look like this:
Again, a lot is set to the right settings by default, as we do in Yoast SEO, but even more can be configured to your needs. How well compression works, might depend on your server settings as well.
If you feel like the compression optimization that is done with any of the plugins mentioned above fails, contact your hosting company and see if and how they can help you configure compression for your website. They will surely be able to help you out, especially when you are using one of these WordPress hosting companies.
Serving CSS and JS files
One more thing that speed tests will tell you, is to combine (external) CSS or JavaScript files or defer parsing scripts. These recommendations are about the way these files are served to the website.
The combine option for these files is, like you can see in the WP Rocket screenshot above, not recommended for HTTP/2 websites. For these websites, multiple script files can be loaded at the same time. For non-HTTP/2 sites, combining these files will lower the number of server requests, which again makes your site faster.
Deferring scripts or recommendations like “Eliminate render-blocking JavaScript and CSS in above-the-fold content” are about the way these scripts are loaded in your template files. If all of these are served from the top section of your template, your browser will wait to show (certain elements of) your page until these files are fully loaded. Sometimes it pays to transfer less-relevant scripts to the footer of your template, so your browser will first show your website. It can add the enhancements that these JavaScripts or CSS files make later. A plugin that can help you with this is Scripts-to-Footer. Warning: test this carefully. If you change the way that these files load, this can impact your website. Things may all of a sudden stop working or look different.
We have to mention CDNs
A Content Delivery Network caches static content. With static content, we mean files like HTML, CSS, JavaScript and image files. These files don’t change that often, so we can serve them from a CDN with many servers that are located near your visitors, so you can get them to your visitors super fast. It’s like traveling: the shorter the trip, the faster you get to your destination. Common sense, right? The same goes for these files. If the server that is serving the static file is located near your visitor (and servers are equally fast, obviously), the site will load faster for that visitor. Please read this post if you want to know more about CDNs.
There are many ways to optimize page speed in WordPress
Page speed tests will give you even more recommendations. Again, you might not be able to follow up on all of these yourself. Be sure to ask your expert in that case, like your web developer or agency, or your hosting company. But in the end, it’s good that you are using WordPress. There are many decent plugins that can help you optimize the speed of your website after a page speed test!
Read more: Site speed: tools and suggestions »
https://ift.tt/2LQQewQ
0 notes
Last Seen Blogs

heeyimash
Ashley Campbell

actual-garbage-bag
*sighs*

reinadelasrosas
True Beauty~


aphrodisians
( … )