#also the brush tool setting?? how you can alter it base on your need / preference? chef's kiss
Text
you know what paint tool sai has the best blending tool or whatever in all art programs. i've yet to use a program that is as good as paint tool sai's
#the real og#also the brush tool setting?? how you can alter it base on your need / preference? chef's kiss#sure editing your brush can be intimidating at first but once you get the hang of it your golden#Also its line tool thing? huge help!#I'll admit that it's pretty limited on some aspects but it's still a good art program!#For it's price too it's not too bad! Cheaper compared to others that you have to pay also it's a one time payment#Unless you decide to get the updated version but they rarely release a new one lol#Also!! Their website where you purchase it is *endearingly* retro lol it looks like it got stuck somewhere in the 90s or early 2000s#And they just didn't bother to update it? Ux/ui desiger who?#When i first went to it inthought it was fake and i was gonna get scammed but thankfully it wasnt lol#paint tool sai#Pts
2 notes
·
View notes
Text
Making Normal Channels in GIMP (with njob)
Hello everyone! I was explaining how to do this in the Sims of History discord server and realized how much of this process I learned through trial and error. There isn’t really a good step-by-step tutorial about how to do this in GIMP, only in Photoshop (at least no text-based tutorials). While I use both Photoshop and GIMP for various things, I prefer to make my normal channels in GIMP. This tutorial will walk you through the process and hopefully demystify normal channels in GIMP.
Normal channels (bump maps) add additional depth beyond your mesh, which is useful for things like folds, painted on pockets, and buttons.
This tutorial is particularly for how to make Create-a-Sim items, not objects, but a lot of steps should be transferable.
You will need (all free programs):
GIMP
njob
Sims4Studio and/or CAS Tools

First, open your diffuse texture in GIMP. I often try to use the light/base texture rather than one I have colored already, but if you have already colored it and didn’t save a base, don’t worry, it doesn’t make much of a difference. Don’t use an image which has a pattern applied to it, as that will create a bump on the pattern and appear like applique or something along those lines (unless that is your goal).
I recommend doing this step after you have tested your diffuse texture image and mesh (if applicable) in the game. If you have any last minute changes to either of these, you will probably need to re-do your normal from scratch.
If your image is in layers for recoloring, or not, choose to flatten the image. Transparency isn’t helpful in making normal channels, so get rid of it so you won’t have to worry about it later.
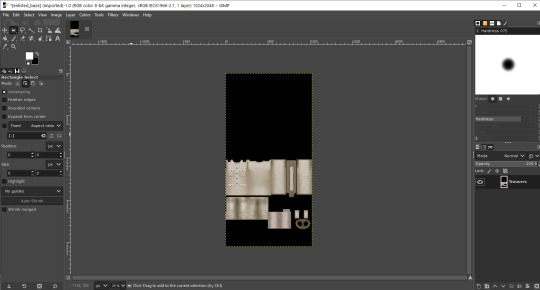
Once you have flattened it, the background usually turns either black or white. It doesn’t really matter which one, it won’t make much of a difference in njob.
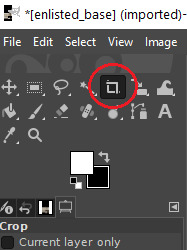
Now, select the crop tool. You can see the current dimensions of the image in the “aspect ratio” box. For a CAS items, the original will be 1024:2048, which is 1 x 2. We will need to crop the image into a 1 x 1, or perfect square.
To have your normal channel as high quality as possible, you should use 1024:1024. This will work for clothing items like full body outfits, tops, bottoms, gloves, socks, and tights (basically anything mapped in this bottom portion of the UV map). For all of these items, you must use a square and cannot crop it to be smaller. For shoes, this means a very large blank area.
For accessory items like jewelry and hats, the cropping is different. For instance, a hat would be 512:256. If you are unsure of the dimensions to use, export the normal channel on the maxis item and copy its dimensions. The following instructions will assume you are making a clothing item and not an accessory item.
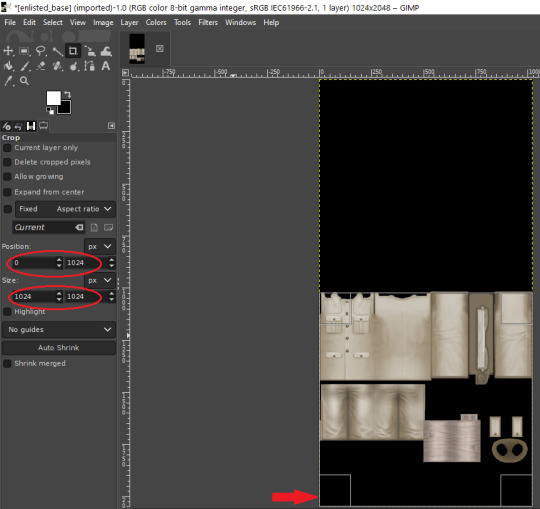
Click anywhere on the image while you have the crop tool active, then adjust your dimensions in the box to the left. You can manually type it in or drag the box and follow the size in the box as you drag.
The box should be perfectly aligned with the bottom and have no space below. If you have space below, just drag it as far to the bottom as you can. GIMP will stop you from dragging it outside of your current dimensions. If a little is sticking out at the top, that is okay. Nothing can be mapped outside of the 1024:1024 dimensions, so it is probably just bleed over or space filler that you are cropping off.
Press “Enter” on your keyboard to complete the crop.

Optional Step: If you desire, you may want to decrease the brightness and increase the contrast on your image so there will be more for njob to pick up. If you already have a lot of contrast, you may not need to do this.
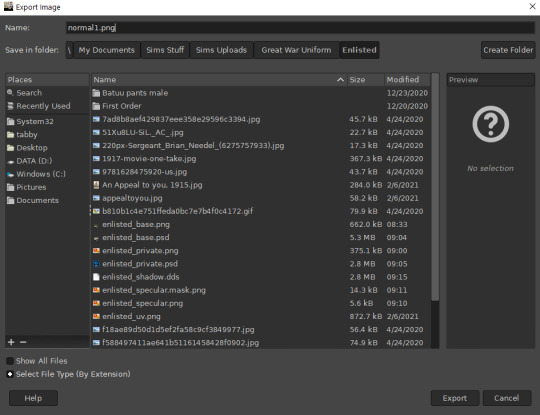
Next, export your image as a PNG or BMP. Be sure to not overwrite your original diffuse texture.
You can now close GIMP, though you will need to open it again later.
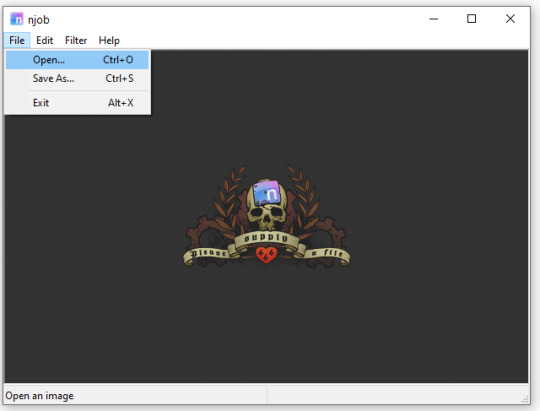
Open njob, then your saved, cropped image.
Maximize your screen so you can see what you’re doing.

Go to Filter > Diffusemap > Heightmap and select that option.
The screen will pause to load for a bit before opening up a new box.

Your image will convert to black and white and may look a bit strange. The first step is to change your “Course Detail” setting to the lowest (or close to the lowest) setting and your “Fine Detail” to the highest setting. I generally play around with the “Mid Detail” and “Scale” until I get what I want. Try to have what you want to be visible stand out, while folds should be soft and fuzzy but still somewhat distinguishable.
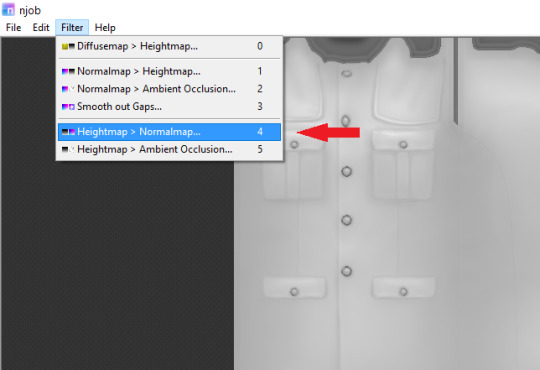
Once you have what you need, click OK and go to Filter > Heightmap > Normalmap

There are two settings, “Scale” and “Blur Radius.” Neither of them have “ideal” settings, so you will need to adjust as you need. “Scale” controls the depth of the contrast and “Blur Radius” impacts the softness of the image. If your edges are too harsh, your normal map may look odd in game.
You will probably also have lines in areas in no texture. This is normal, and I will go over how to remove those later.
Once you are satisfied with how things look, save the image as a bitmap.
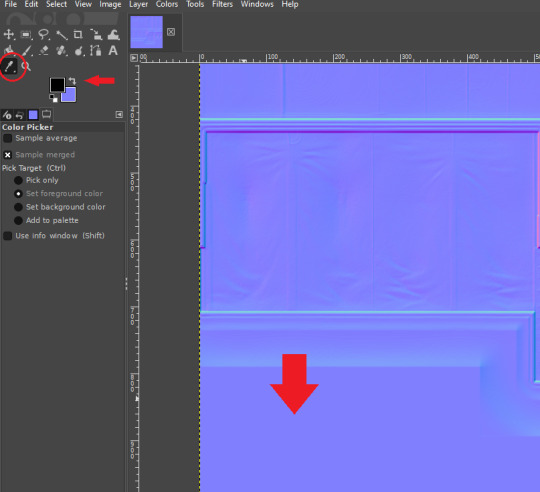
Now, open your bitmap image in GIMP. It is time to clean up the image and get rid of the artifacts. Unfortunately, unlike a specular, a normal map doesn’t have a mask to prevent bleed over onto skin or other textures. The unused areas need to be a midrange, solid grey. It is easier to edit at this step before you create your transparency.
Select a midrange blue color from one of the blank areas with your color selector and make it your background color by using the arrow button between the foreground and background colors.
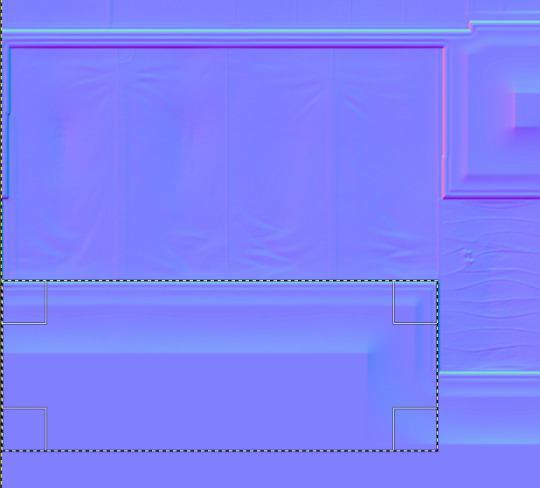
Select the areas that should be blank and delete them, which will replace the lines with a solid blue color. This would be areas around the neck, wrists and ankles, and also places like the filler beneath skirts and tops that doesn’t need texturing. Be sure to select the odd lines around the image, which are usually a bright teal or hot pink color. Those can be very visible.
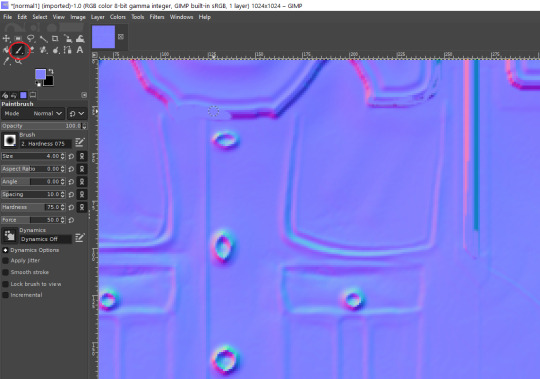
Sometimes, you may need to take your paintbrush and clean up the artifacts if they are in curved or very small areas. If anything looks too sharp, you can also use the smudge brush to smooth it out (very lightly). But don’t move anything around too much.
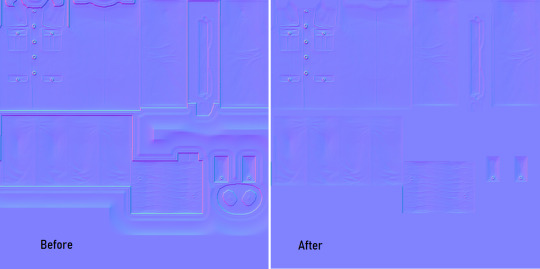
Once you have cleaned up your image, export it again as a bitmap. This is just so you can go back to it if you make a mistake later or need to modify it. Usually I save it as a new image, but you can overwrite the old one if you are feeling confident.
I have to point out that sometimes you can get away with not cleaning the artifacts from your image. But I have had too many issues with it in the past to skip this step.
Now it is time to make the normal map. Finally!

In the layers area, right click on your single layer and add an alpha channel to it. There is also a small button at the bottom you can use to add an alpha channel. You will need this transparency for the next step.
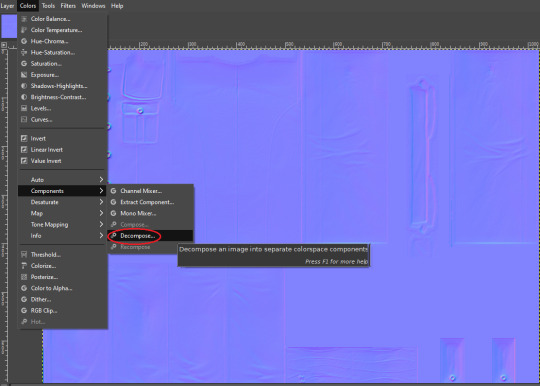
Next, go to Colors > Components > Decompose.

A small box will open up. Change your color model from RGB to RGBA to enable the alpha channel as a separate channel (layer).

Now, a new image will open that is your bitmap but greyscale. You will see four layers on the side called red, green, blue and alpha.
Select the red layer and click CTRL + A on your keyboard to select the entire layer. Then, click CTRL + C to copy the layer. (If you don’t have a keyboard, you can do “Select all” and “Copy” but this takes longer).
Now, go to your layer named alpha and press CTRL + V (paste) and CTRL + H (to anchor the layer). Now, you have replaced the alpha channel with the red channel.
Next, go to the green layer and select and copy it. Paste and anchor it into the red and blue layers, just as you did before with the red layer and alpha layer.

Your image won’t look too much different right now, it will just look like the green alpha channel rather than the visible red alpha channel when you opened it. Go back to the top bar and choose Colors > Components > Recompose. This will alter your original image, so the one you have open in layers will stay open. Go back up to the top and select the original image to go back to it, or close your layered image.

Now, your image should have changed from mostly blue to a transparent, mid-range gray with only a few elements visible. This is how it is supposed to look. If you don’t have transparency or it looks very different, then you probably messed up somewhere. Generally, I find it easier to go back to the original cleaned up bitmap (that you saved for future use) and start from scratch rather than trying to figure out where I messed up. That is usually faster.
Next, export your single-layer image as a PNG or DDS file (your preference). You will need a DDS plugin to save DDS files.
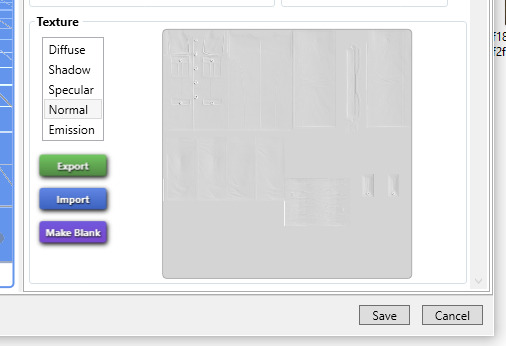
Open your item in Sims4Studio and import your new image file in the normal texture category. You will see a small preview in the box, which will probably show more details than you were able to see in GIMP. If it looks correct, save it and go to check it in game or in CASTools (which has a feature for previewing bumpmaps that can help you check for alignment problems). CASTools can be particularly useful if your computer doesn’t open the Sims quickly and you want to preview multiple bumpmaps. The only issue with CASTools is that it doesn’t really look much like it will look in game.
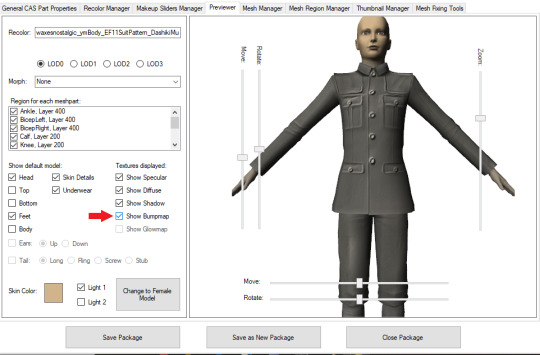
In CASTools. You have to select to see the bumpmap in the Previewer tab.
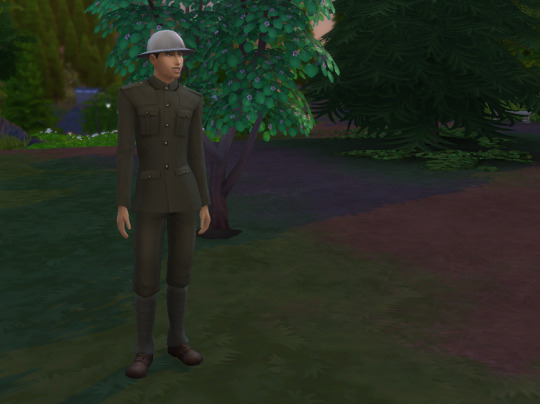
In game.
As I have only been making normal channels for a few months now, it’s possible I have missed some things, so if you know an easier or better way let me know and I can update the tutorial. I hope this is useful to you!
93 notes
·
View notes
Note
What is your step by step drawing process like, if you don't mind my asking?
I'll just use Sunstealer as an example since he's the most recent thing I did. Under the cut because this is horridly long. You wanted step by step, I’ll give you step by step.
That is a threat.
And every step of the way I use a sharp pen with high pressure sensitivity and a sharp eraser with high pressure sensitivity, unless stated otherwise.
1. Alright, sketch first of all. I pick a whatever color, set a folder to multiply, and add layers in it. I start with the face/helm and take moderate care with making it look decent.
2. From there I sketch the rest of the the pic, preferably very loosely. I aim to not lift the stylus from the pad very much and instead just SCRIBBLE lines into the vague shape I'm after.
3. Set the sketch folder’s opacity real damn low, like somewhere under 10%, create a new folder, set it to multiply, and this is where the horrid amount of layers and layer folders I use comes in. But, you can see I actually did a second sketch of the arms (and legs, though that isn’t visible here) ‘cause I couldn’t make them look right based on my initial sketch.
4. On top of my second sketch I draw the rest of the clean lines. The lines were drawn with this purplish color, btw. I use something akin to it pretty often in my lineart.

5. After all that I use the Auto Select tool to select everything outside my lineart, e.g. everything I don’t want to have color. I then invert the selection and lay down my flats. At this point I used the gold as my base color, but then added separate folders for each following color, clipping them to the gold base layer below. In the case of black, its folder has a whole bunch of layers while I tried to figure out what parts to color black. With layers for the different parts, I can just click them on and off to see what things look like with or without them.
6. Okay, now to the meat of things. I use a correction layer (hue/saturation/luminosity in this case) to change the base gold to a far darker color that I can easily edit later without losing my initial color choice, and create a new layer on top of all my colors, set it on multiply, and in this case used a sort of peachy color to add my first shadows on top of the whole entire picture. At this point the exact colors in use don’t matter one bit, though, as long as you see what you’re doing.
7. I create a second multiply layer on top of the last one, and go over the whole thing again, adding deeper shadows, this time using bright red. But again, color doesn’t matter yet. I like contrast too, so you can see some areas turn almost black.
8. Shinies! We add our first Add (Glow) layer (that can be named differently in other programs, in SAI it was just “Luminosity”). Once again, color doesn’t matter, just as long as you see what you’re doing, but I was working with about the same peach I used on my first multiply layer. And how I add the shines is basically just color the glow over the whole area, then use the eraser in sweeping and circling motions to remove parts of it. I don’t treat each plate/portion separated by lines individually, because then you’ll just end up with mismatched areas that don’t communicate with each other at all and just fight. (Remember to erase the shine from over your shadows too. Auto Selecting the shadows and erasing the glow from the selected area is a good trick.)
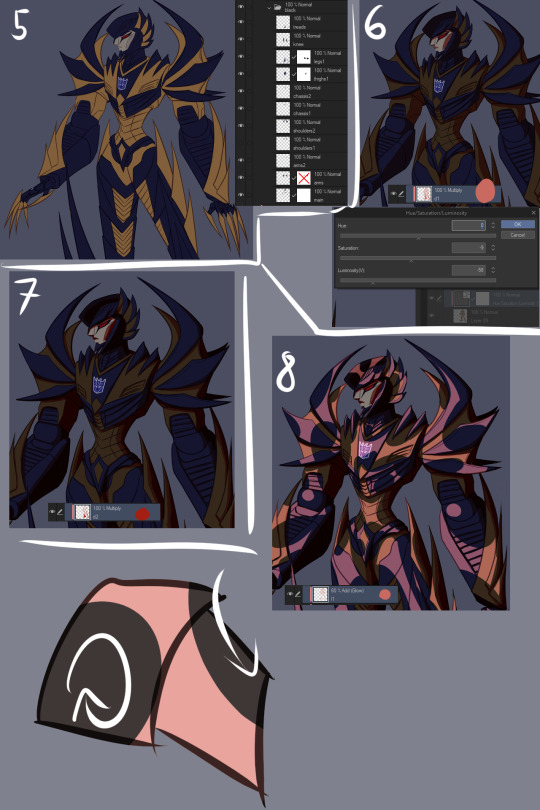
9. More shinies! This time we want it to show up as a bit lighter/brighter than our previous shiny. Using a brighter color or higher opacity does the trick. I do the same thing of coloring large areas and erasing shapes out of them afterwards, but this time I make it argue with my first glow layer a bit. Some overlap is good, but I also want them to live their own lives. (I included a view of the second glow layer alone, but I worked with both glow layers visible.)
10. We now have two multiply layers and two glow layers. What we also have, is a base color (gold) and separate folders for every subsequent color (black, face, insignia in this case. And optic, but let’s not touch that yet). We now copy our two multiply layers and two glow layers, and move copies of them into each folder (sans optic) and clip them to the base layer in that folder. We move copies of the multiply and glow layers right over our base layer too, below our other color folders. (I deleted the glow layers from the “face” folder because I don’t want the face to be as shiny, and the multiply layers from the “insignia” folder because there’s actually no shadow over the insignia.) We can make our original multiply and glow layers invisible so they’re not messing things up, and what we should have is... The same exact thing as in step 9. Wow.
11. Now we actually make it look good! Though let’s just color the optic while we’re at it so it’s not all empty. Anyway, this is the stage where we really start to think about color and opacity. I want a neutral lighting to showcase his colors best, so let’s see how we get that. The thing we’ll just do is use Tonal Correction > Hue/Saturation/Luminosity to change our multiply and glow layers one by one, starting from our first multiply layer. I turn the other multiply and glow layers off so I can see what I’m doing and and tweak the colors until I get something that doesn’t scream “interesting lighting”, because I want neutral lighting.

12. Then I go through all of the layers one by one and do the same thing to each of them. The reason I have them each on separate layers is exactly this, that I can affect all of the drawing’s colors individually and make them look just as I want to and always have the option of just going back and easily editing things. I also add a glow layer to the face, but with a brush rather than a pen so I get a softer look, buuut then add a second glow layer with a low opacity to add just a little bit of sharp light in there. And now we have a thing! But it looks pretty flat, doesn’t it? We don’t want that.

13. First of all, let’s add some soft glow to the gold. New glow layer below our multiply and other glow layers, choosing a soft color to accentuate the gold, and then using either a brush or airbrush we add just a bit of color in there. Arrows point to the spots where I added it, because we want the effect to be subtle and easy to miss.
14. We can do better than that, though. Let’s add a multiply layer and do the same thing, adding juuuust hints of darker color here and there. It adds a touch more depth, but again, we want it to be easy to miss.
15. Let’s have a look at the black, next. You may have noticed I turned off the second glow layer on it entirely, and that’s because it was decided that the black shouldn’t be as shiny as the gold. We still want to add some life to it though, and because Sunstealer’s black tints towards blue, let’s make some blue happen by adding a glow layer, and again, very softly with a brush or airbrush, add just hints of color in there.
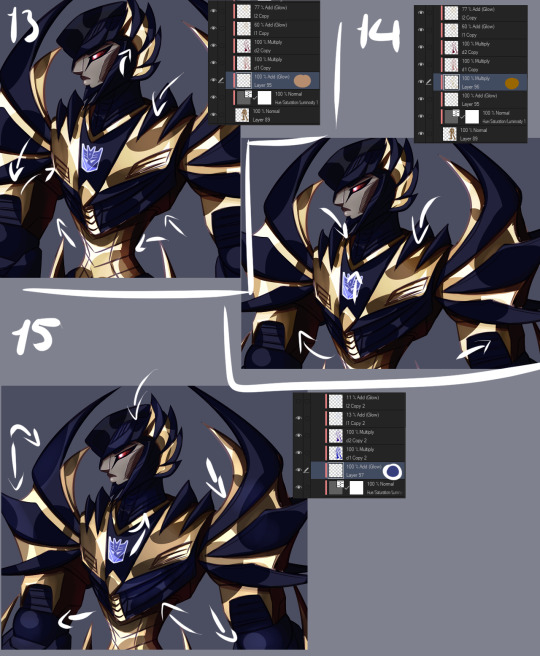
16. It still doesn’t really good though, does it? It’s pretty boring and lifeless despite our efforts. More layers, then! Some fucking edges, this time. A glow layer above all of our existing layers and folders to affect all of them (except optic, ‘cause optic doesn’t need it), take good ol’ bright white, turn the opacity down a bit, and add sharp light to the edges. Like, all the edges that are touched by light. Seams, everything. We want this motherfucker to shine.
17. Okay, now do the same, except this time on the shadows. The layer is on lower opacity and I didn’t use white but desaturated blue instead. Just add a bit of reflected light in there.
18. Slowly getting there, but let’s do a couple more things. First of all, warm color. Basically, I just like to slap a random color on top of the whole damn thing when I’m finishing a drawing, using either a color, a glow, or a normal layer, depending which one gets me the best results that time. Or, all three, if that’s what I feel like. This time I used a color layer with briiiiiight neon orange. I switched the layer to normal and opacity to 100% so you can see where it’s actually applied, which is, again, on top of all the layers. A pretty large area, but even on 100% opacity with a normal layer you can see it’s pretty transparent. If I had wanted to do a more interesting lighting, I would’ve left it more visible and maybe added another similar layer in a different color, but I wanted neutral lighting so we leave it as just a tiny, tiny hint in there.

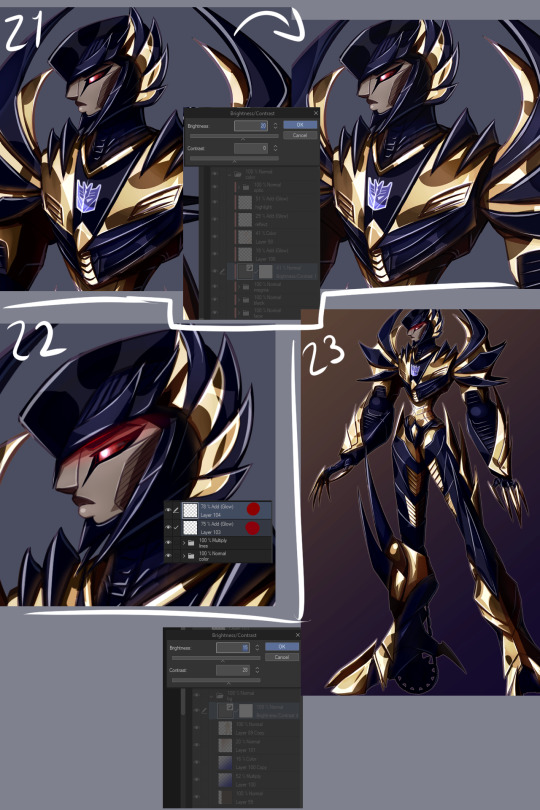
19. Still not done. Colors reflect other colors, so let’s make that happen on the black and have it reflect our gold some.
20. Almost there. What are we missing? Color correction, that’s what. I didn’t do much of it for this piece, but with some I really play around with correction layers and layers set to overlay and whatnot. But let’s see what we have here. First of all, there’s one brightness/contrast correction layer affecting the gold only, increasing the contrast so things look a bit brighter.
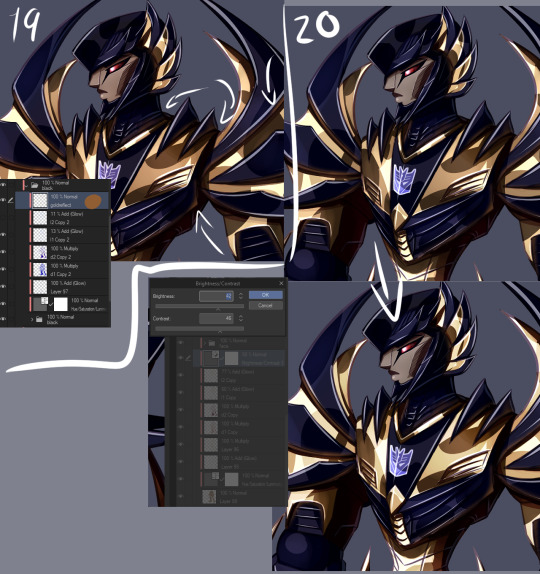
21. There’s also a second brightness/contrast correction layer, this one simply increasing the brightness a bit. It’s mostly for the sake of the black, because I wanted to make it look a bit more blue by making it lighter, but it worked to make the whole image a little brighter along with it. Aside from the optic, that’s still on top of everything else. But like said, how many corrective layers I have going on depends entirely on what I’m doing. In some cases I can have around a dozen in effect, not all of them always affecting the entire image, but split around to do their thing on different layers.
22. But speaking of the optic! It glows, so let’s make it glow with two layers on top of both of the “color” and “lines” folders. One layer is for the blurred red glow, the second is for the sharply reflected light.
23. And for things like these I like a simple background, which I generally do by just using a couple of gradients and altering their color to whatever looks decent. I also often add an outline to the entire character in pieces like this to make the character pop a bit more, by just copying my base color layer and performing gaussian blur on it.
WHEEZE. That’s that, though. Finished product can be viewed here.
Oh, and ctrl+shift and tap will jump you straight to the layer you tapped on. Makes moving between layers and finding the damn layer you wanted to edit a hell of a lot easier.
Annnnnd obsessively naming layers and layer folders so you can tell what the heck they actually are when you have way, way many layers to work with.
*thumbs up*
#asks#anonymous#is that step by step enough#i might've forgotten to mention some layers because there is A Bunch even just for the colors#but i tried to be thorough#but yeah non destructive editing and editability#that's how we get to some overachieving layer counts but make sure we can always go back and always have control
9 notes
·
View notes
Photo
ASSET ASSIGNMENT - DIORAMA
My task for this month was to create a diorama environment. I have never created an environment before, so I had to do things a little differently to what I’m used to.
My overall plan was to get this successfully displayed in real-time, in marmoset toolbag. I like marmoset because you can export your scenes into unreal engine if desired.
I went with a more agile development approach as opposed to a heavily structured one.
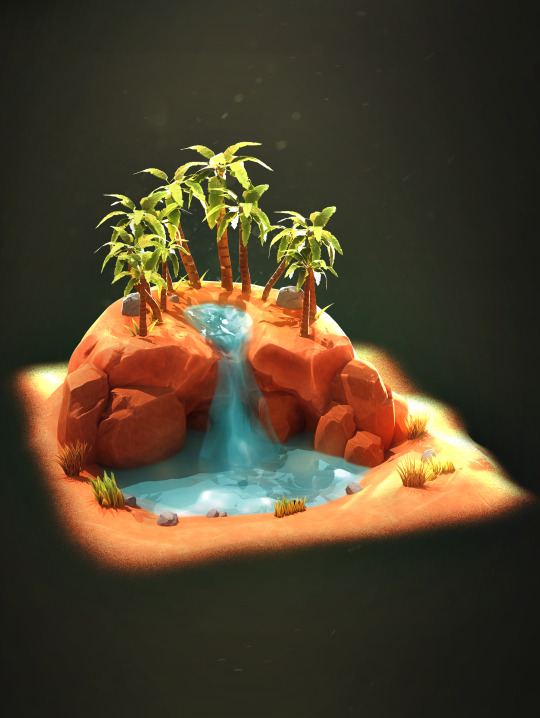
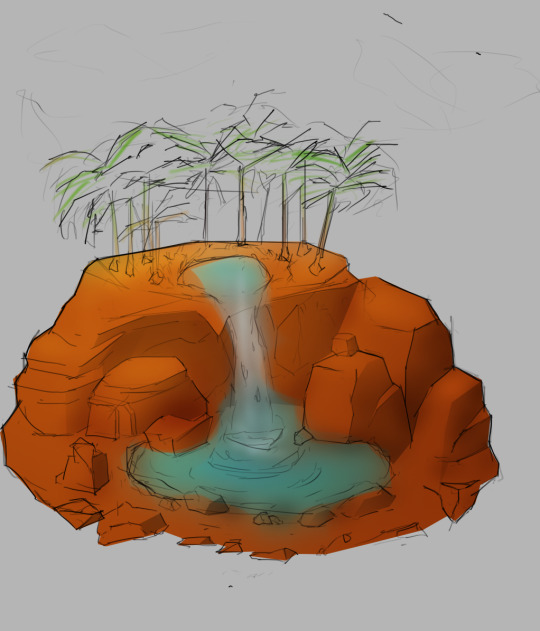
My diorama theme is an oasis. As a kid, I always remembered characters in the desert hallucinating an oasis when they’re on the brink of insanity. I find those really cool so I decided to make my own.
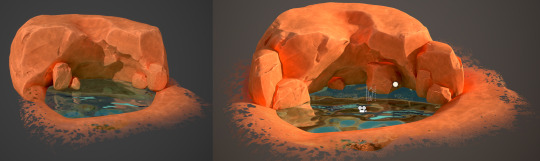
Concept/Blockout Stage

I originally drew some really rough and dirty concepts just to plot down the ideas in my mind. This would be the equivalent to my silhouette stage, seeing which shape I preferred.
As opposed to drawing entirely different shapes, I decided to iterate on an initial design.
1 - A floating small oasis with a pond and trees around it. Ommari said it looked like a piece of poo and I could see that too so I changed it.
2 - The shape of the oasis base was change to make it look less like a floating island.
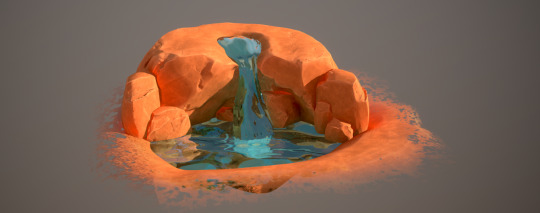
3 - The pond in the oasis was turned into a waterfall instead of being on full land.
4 - I liked the idea of a waterfall so decided to expand on this, instead of it leaving into nothing, I created a second floor, for the waterfall to expand into a bigger pond.
After my rough concept was complete, I tried drawing a detailed concept, but I struggled getting the forms down as my rough concept was too vague as to its structure. This is when I decided to create my block out. I had no intention of it looking nice, I just wanted to project my idea in a 3D space to assist me in the placement of my polished assets as well as assist me in drawing my polished concept.

Modelling and Development Stage
After I did my blockout and progressed on my polished concept, I could finally plan out what I needed to make. From the concept I knew I needed
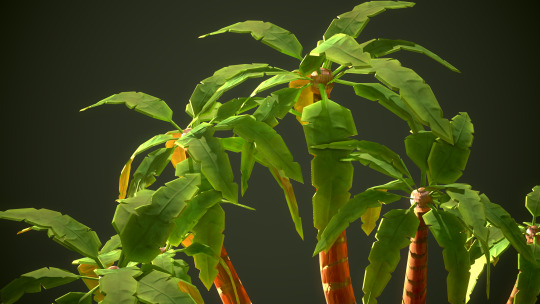
Trees(multiple variants)
Rocks(multiple variants)
Water(pond)
Waterfall
Small plants(multiple variants)
It doesn’t seem like a lot but it would be a lot of rocks. Fortunately I knew I could save time by rotating rocks into certain positions and scaling them so they look different. Making rocks themselves too wasn’t really difficult. This also applied to the trees. The water however, will be the biggest challenge as I have never even explored the idea of real-time water.
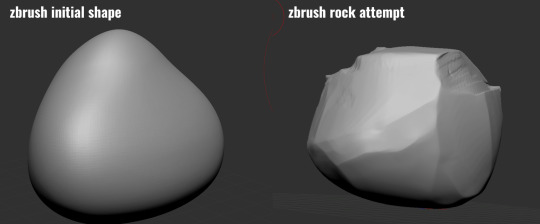
I started with a simple rock to get the terrain workflow down. I used zbrush to sculpt a sphere into a rock shape. I made use out of the TRIM brush and MALLET brush.
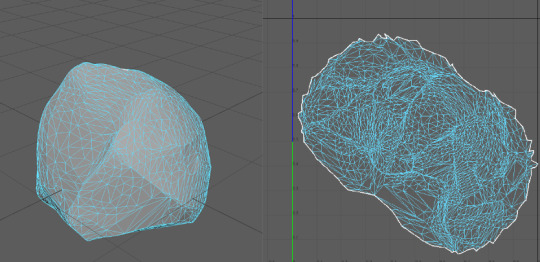
I then decimated the rock to have a lower polycount and uved it in maya. I just used spherical project and then unfolded it and optimised it., then I scaled it to fill out the most of the UV.
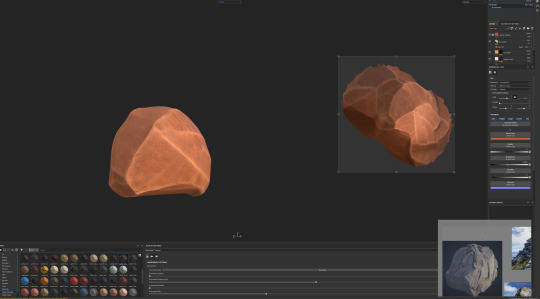
After this, I went into substance painter to texture my rock, I used smart materials to save time. Originally my rock had a more realistic and gritty texture but I decided to change it into something more stylised.

I used the smart material “leather stylised” and changed the colours to resemble desert terrain. I liked how it turned out so I saved my modifications as a new smart material so I could just drag and drop every time I had a new object to texture.
I made 2 more rocks. I wanted to see if the rocks could be combined from being separate into one big structure relatively seamlessly. I decided to test this in marmoset, see if I can get it looking how I wanted.

This was test 1. I used 2 rocks for this and scaled up one of them. I think the two small rocks looks decent. However I needed to make separate meshes for larger rocks as the sharpness loss was apparent on the big rock.
The process was the same for all rocks really, sculpt > decimate > uv > bake > smart material. The only difference was when I had to model the big ground base. I used my blockout as a reference in zbrush.

Disclaimer: The varying aesthetics in my rendered screenshots are me switching between high performance mode and high graphics mode in marmoset. Unless stated otherwise.

For the water, I simply created a flat plane with a blue albedo texture. I then created a height and normal map.

I used these maps to create the water depth effect.
Pictured Below: Raw Albedo > Height and Normal Map applied > Refraction Transparency mode enabled.

I made some modifications and additions to my design, re-using the rock assets and rotating them to make them unique.
I tried creating a waterfall, I imported my scene into maya then made a plane then soft selected and stretched the corners to my desired placements.

I then applied the same water material to the waterfall as a test. I don’t think it looks good enough so I’ll work on it later on.
For the trees, I use the maya spline tool to create a curved cylinder as the based. I then created the

I created the grass using small planes shaped to the shape of grass. I also recycled those assets to use in the grass bushes and cloned them using MASH commands. I used the grass as a final touch to add more detail and variety to the roots of the trees.
Final Changes
Eventually I decided to make the switch from Marmoset toolbag 3 to marmoset toolbag 4. This means that my whole lighting setup was altered and I had to re do it. However it gave me the opportunity to dabble in ray tracing lighting mixed with real time. Certain problems like the rocks being heavily illuminated were fixed, I also was able to create a different type of lighting setup. I also changed the opacity settings of the water. My new setup up highlights my model in a better and clear way in my opinion. I also did some minor scaling changes and rock placement changes.

3 notes
·
View notes
Text
Dwelling Of Graphics Design
Make Compelling Design. I'm the proprietor and lead inventive driver and designer at AXIS visible. To depart your photos in RGB mode when despatched to the printer will delay your job. The design of the system—the relationships among all of these parts—is where the designer brings biggest worth.
With its content-rich atmosphere and skilled graphic design, photograph-enhancing and website design software, you might have all the things you have to specific your model and creativity with infinite possibilities. So I looked at a hundred+ job posts to determine what expertise they want a graphic designer to have.
As a result of graphics is the part, which appeals the viewer probably the most, many corporations, spend an enormous amount on graphic design, packaging design as well as brochure design. This contains business cards, Fb promotion graphics, Facebook page graphics, Youtube Page graphics, web site banner adverts and nearly most other print graphics too (flyers or print banners).
Be sure that your designer gives you an ai or psd file so that should it's essential to replace or reverse our your colors you could have a supply file. The reasons are infinite, some people prefer to outsource their work with a view to spend more free time, others will not be certified to do the work and subsequently outsource the work to professionals.
https://en.wikipedia.org/wiki/Birmingham at the moment are keen to flourish their career as a graphic designer. Exporting your mission is the simplest factor in Jeta emblem designer crack. It is best to rent a graphic designer to do this job additionally. You should use this very half in your graphic design to entice the viewers or impress your purchasers.
The increasing attractiveness of graphic and web designing has made it one of the quickest growing and lucrative professions on this planet right now. Most designers use a hybrid course of that combines traditional and computer-based mostly applied sciences. You may edit your logo recordsdata in Illustrator or any other Emblem designing software.
In thoughtful with the requirement of this trade, quite a lot of skilled school of graphic design have been established in different components of the world. There are totally different strategies of doing graphic designing that varies from web web page layouts to display screen printing.
Graphic Designing is among the most profitable and fulfilling jobs today. I have noticed designs that belie the economical makes an attempt of shoppers wishing to save cash however create extraordinarily amateurish renditions; to essentially the most subtle and thought upsetting displays.
On your personal blog graphics, observe the identical technique: Decide one dominant coloration (ideally, the same as your website shade) and use it in every single place. Premium clipart pictures, fonts, effects, overlays and frames make your creations stand out from the crowd.
A business designer will use this analysis to develop detailed product descriptions involving colour, value, and form, as well as size, supplies used, and safety. 1. Use good stock photographs, add text and a colour tint. A very good designer will work with your ideas and meld them into one thing sleek and skilled.
I'm actually keen on learning from the best of those on-line, and hope that myself and or my mate as well - can work with you to be taught and grow a talent within the designing area. With this program you could have the choice of ether utilizing your personal photographs or choosing clip art from the huge library of pictures bundled in with the package.
So long as the criteria set down by the shopper is met, there's nothing to cease a graphic designer from having free reign with a web site to make sure it seems to be the perfect it probably can. As well as a designer can assist you focus the vision you have for your small business.
Job vacancies for knowledgeable graphic designers have been rising. This perspective could be conveyed by the graphics, copy, and multimedia presentation of the knowledge, products and services you provide. The writer is a highly skilled and an skilled Content author who publishes for Business Growth.
Graphic designers have to be familiar with desktop publishing tools such as Frame Maker, Acrobat Alternate, Photoshop or PageMaker. A game designer is concerned in each step of the design process, a graphic designer is much more specialized and concerned in only these areas relevant to the graphic designer.
Daily is a treat when you are a graphic designer working for a graphic design company. They educate you the basics of graphic designing, shade and in-depth typography which are very much essential and essential for a newbie to know. Silhouettes are an effective way to create impression within your designs.
Get durable window tinting options from Designers Graphics that won't solely protect your privateness however will even maintain your car comparatively cooler and keep harmful UV rays out. Like different fantastic arts fields, within the graphic design world it's hard for people to find and keep a gradual job.
They work carefully with UX (user experience) designers (who decide how the app works) and UI developers (who write code to make it work). Encompassing all of these standards will improve your brand as the appropriate designer can be employed. Designers who work with an company are surrounded by fellow designers who're prepared to assist and information them.
Graphic designers create visual ideas, utilizing computer software program or by hand, to communicate ideas that encourage, inform, and captivate consumers. In addition they put together promotional shows, packaging, and advertising brochures for services and products, and design particular person logos for products and businesses.
Half of the freelancers would maintain steady jobs in both a computer graphics firm or employed in some laptop related group.These small companies can not afford to pay the fees demanded by large design firms. While It is vital to have (or at least be working on) a consistent colour palette to your weblog, you possibly can work sure colours into your pictures that can seemingly improve the number of shares your posts generate.
If you're a gifted graphics designer, you'll be able to even earn cash with IMVU. Oftentimes businesses will be part of professional networks and or business itemizing guides which offer them a "internet portal" on their community. The pc software applications used by laptop graphics designers assist them create interactive web platforms, computer animation, product packaging, books, magazines, and a wide range of different products.
There might be many alternative purchasers with many alternative requirements that means that a graphic designer will hardly ever get bored as they're engaged on something new and interesting at frequent intervals. If you're a graphic designer, we also encourage you to debate your helpful concepts and tips for business novices from the remarks under.
An entry-level Graphic Designer with less than 5 years of experience can expect to earn a median whole compensation of C$38,000 based mostly on 1,341 salaries offered by anonymous users. Graphic Design: A History (third edition) contains over 500 new photos, a new chapter on present developments in digital design and an expanded introduction.
Research reveals people spend extra time on a nicely designed web web page than on a low quality net page. So, it is easy to alter the size of image whereas sustaining similar decision and high quality of emblem whether they have to be printed on business cards or on banners of firm.
best logo design services iconiceyes Birmingham, West Midlands in America have a terrific duty on their shoulders. Solution: If the graphics have been created in Microsoft Word or PowerPoint, open them within the software program and edit the text. These are the rewarding benefits of hiring a graphic designer for your corporation which you shouldn't in all probability skip because your on-line presence is at stake right here.
The graphics tablet however is much more correct when drawing photographs on screen and you can even trace over pictures on paper to make the picture on display screen look extra lifelike and artistic. It's for the professional graphics designer and it price fairly a bit.
Poster and theatre designer, lithographer, painter and creator of typefaces, Cassandre, one of many biggest commercial artists of this century. There is no telling what shapes, vectors, and brushes you'll need in your graphics projects. Graphic design services could sum up your total company and you wish to make sure that you are represented properly.
Placing graphics in your promotional convention bag that match the events venue will make sure that you keep away from making your organization look cheesy or ill-prepared for the market phase. 2. Offering related data that the person is looking for- Just a beautiful website with informative house page is a trick a few of the net designers use to attract guests.
1 note
·
View note
Text
MEANINGLESS DISORDER IS TO BE CHALLENGED NOT FEARED. WE CAN BE OVERWHELMED OR WE CAN BE EMBOLDENED.
If we reduce everything to information do we lose the aesthetics, empathy and much more in life? What do you think?
To understand my current perspective and create the desire within you to pursue your personalized & positively balanced, productive quest for understending is to imagine what what isn’t possible by being easily done yet not in fact impossible - the sentence explaining all conspiracies as well as what I’ll be explaining through the example of a chip - which isn’t one of the conspiracies at all.
Imagine if we all got chipped, for the sake of mutual understanding imagine it like a tiny memory card inserted, let’s say behind your ear which works because it connects, duplicates then mimmics each neuron and then replaces it by removing the original with the technological components also within it.
Imagine that the heart keeps our body and mind alive and the chip our brain.
Now imagine that chip contains the whole of information from the main central computer which had collected all of searches and statistics along with the feedback itself in a matter of seconds upon laying your eyes on the person, home etc as well is still providing the same procedures and updating everyone each decided period of time.
Would you want to live in a world which now defines you insane/and/or questionable because you googled dick cheese around your friends for a joke and tried to understand sexual preferences as a kid? Nobody would. But that would be inside the mind of the person who would lay their eyes upon you a.k.a. it would get the information from the chip on another and that person would get your information just the same.
Do we then lose the aesthetics, empathy and much more in life?
Okay, I am definitely writing this particular chunk of sentences to also signify I no longer give a shit about privacy because the groups of supertechs could come at me at any given moment, disrupt my algorithms to make my content visible to less users and there really isn’t much I can do as an average citizen with some interesting hobbies so therefore a couple of people from my hometown judging me for actively pursuing my interests in a way I choose really doesn’t even come to me as a negative thing anymore because there’s far more going on which I want to focus on and direct my maximum positive potential and impact on.
Now that that is out of the way,
That transhumanistic viewpoint(the chip example) is what I chose because I’ve read too much about it, seen too many films which lead to more research and read too many insights but today that example of the chip is just a prolonged and complicated version where the chip is the computer, the phone, the laptop and the human can find out information just not fast and easily or without extensive technical literacy and trial and error.
That is why this cybernetic connection was implemented with the assistance and constructive creativity of the groups of supertechs for the agendas long as the existance itself. I can write about this in another post extensively.
What matters to me more than my own privacy and social justice within my own experience is a positive change I can contribute by sharing not the information I am learning but the way I work my mind and actions around it because throughout the past year I have come to terms with the exceptional components I was once scared to share.
Today, I am conscious of my voice and more so confident in it’s validity because I see no negatively directed energy consciously or unconsciously motioned my way as anything which could ever be stronger than God, no weapons forged against me prosperous and no truth which I speak less legitimate than somebody’s illusion of theirs despite them percieving it as truth.
I now resonate with the ideals which bring in no obligations for accusations to prove what is already truth as well as no pointed fingers but rather everyday courses of action from healed individuals of own controlled mindsets because keeping a positive vibration is in fact what should matter right when you wake up, while you are brushing your teeth, making lunch, going to school, work etc. what matters is to use the internet, web and social media consciously as well as choosing what you want to think about and what gets to hurt you and keep you stagnant.
This simple piece of text is made with the intent to serve it’s purpose on it’s own.
It isn’t done so that at a certain point in the future when there’s plenty of them as well as other endeavors it’s author gets money, status, recognition, fame, etc, nor is it the goal of any of my visionary creative endeavors.
I had made enough of regretful decisions in my life to innerstand, understand and overstand as well as define the emotion of it without words necessarily that I must use the remaining time of mine on Earth for the greater good.
It is fortunate for us to be alive at a time where doing something as simple as writing a micro-blog post can offer some people a chance to start controlling their thoughts in hopes of maintaining a safe space.
What I had gathered from merely a couple of videos on youtube in which Jaron Lanier ( computer philosophy writer, considered the funding father of virtual reality, visual artist, was in the first company which sold VR goggles, was in Atari, worked on apps for internet 2, visiting scholar at Silicon graphics, works at Microsoft research since 2009 as thhe interdisciplinary scientist etc) is speaking about the contents of his book “you are not a gadget” as well as information since the digital age took place was more than enough for me to try and find the appropriate place to channel it constructively.
I decided to use the notes I make along the way as I watch the videos and read the material as a tool I can shape into something for those who aren’t necessarily willing to sit and watch youtube videos all day long, clean their house and listen to them, drive and audio it or perhaps even read the books ( which I want to highlight still ARE much-MUCH greater sources for everything I will ever be speaking on because through the information I share I am still secluding a paragraph to explain how I choose to deal with the information instead of turning it as a weapon for my own stagnancy and misguided lack of faith.)
It is still the biggest tragedy to me to see this cybernetic connection we share done in the utmost negative way and the knowing it hadn’t even started to take place at it’s maximum potential is truly what could be terrifying to a point of episodic daily nausea if only us and in this case myself were to base our mental states upon people and actions which are outside of our control.
The computer can send information to another bundle of information in a set of bits and it is analyzing them mathematically and, yes - it does not matter to a computer what the information says.
”Meaningless disorder is to be challenged and not fear because we can choose to be overwhelmed or emboldened.”
The strength from within is omnipresent and the fear of failure, lack of constructive impact or whatever the individual might use to shape their own low vibrational perspective for not making an active shift in their own life -are all illusions because the purpose of the negativity is to achieve sustainability of itself as it is. That is why it is important to understand you either sink towards the end of your life or swim towards it because as you can see the finish line is the same yet the pathaways different.
It may be easier to keep the sinking mindset yet it isn’t even remotely as joyful, courageous, rewarding, fruitful, positive, needed and surprisingly positively influential to those around you (as well as much, more I can write about) than the swimming.
In this life you can choose to think finishing highschool and pursuing a degree, finding and maintaining a job with or without a carreer, finding, accepting, returning as well as nurturing and maintaining love, travelling and friendships are the peak you need and want yet the sinking mindset still bears the low vibrational tendency to show up uninvited and subtle as it hides within outcomes you learned how to disregard positively and label it swimming.
Whatever you choose, the information presented remains existant and true.
Anytime two people connect to the internet is universally financed by a third party who believes they can use behavioralist techniques to manipulate the first two people without them undestanding whats up.
In regards to the talks by Jaron Lanier -
the WE is the global cyber net in which those who built it, are making the most money off it as well as keeping it existant are somehow above the circumstances and the average citizen are still modern day workers to keep it going and developing into whatever the purpose of the behavioralist techniques really is while it is disquised as solely statistics to better consumerism and the user experience.
“We’ve created a society based on universal trickery and deception and therefore developed an already flawed society into a universal community of individuals who do not believe election votes, routinely expect to be bullied one way or another and made to feel terrible. That is the society which does not believe in truth anymore.”
we're all connected, from seemingly all perspectives.
A manmade connection would be computers which had done another interconnection and way back in 1938,
a man by the name of Burrhus Frederic Skinner decided to present an idea of treating computers as a tool to remove individuality and by experiments
alter the human nature by getting them to change by the reward/punishment stimuli a.k.a. positive/negative feedback loop(social experience) and the negative ones are more common actually because of that feedback loop between the dopamine hits. The person contributes their motion, eye movements and facial expressions to the statistics.
The experiment is a human version of keeping a rat in a box and providing it some food when it pulls down the tiny lever inside that box .
The cybernetics are naturally a negativity machine. The likes, comments, the interaction people get on social media is what provides them the small dopamine hits which keep them using it in the ways which highlight education last.
Skinner was about using digital networks to transcent idiosincracy(a mode of behaviour or way of thought peculiar to an individual!) He was the first there to have something to say about peoples “weird and felatious ideas about freedom) the first time it crossed paths with computing was through Norbert Weiner who was the first generation contribute when the ideas for altering started.
He was the first who started changing others’ perceptions on how the computers are being percieved. The idea is to use a computer to make it into much more than it is,as well asmuch more complicate and Weiner coined the term for it from the Greeks which is the now famous “cybernetics”)
(BOOK RECOMMENDATION: WEINER : NETWORKING COMPS)
DEFINITION OF CYBERNETICS BY CAMBRIDGE DICTIONARY:
the scientific study of how information is communicated in machines and electronic devices, comparing this with how information
is communicated in the brain and nervous system / Too often a simplistic cybernetic control model underpins performance measurement systems.
-cybernetics was trumpeted as a universal science of government that would help to guide the social organization necessary for modernization.
DEFINITION OF CYBERNETICS BY DICTIONARY.COM:
the study of human control functions and of mechanical and electronic systems designed to replace them, involving the application of statistical
mechanics to communication engineering.
What if you have a computer watching a human being, his moves, looks etc and then what if that computer provided stimulus. Couldn’t this computer gradually become an automated behavioralist who controls the person?
This is a human use of human being and if everybody has these computers with themselves always then these little computers can measure everything about those people, who they talk to, what they search, their locations, and in return give them some sort of reward/feedback - texts, sounds, art etc. but what we neglected is the radios connecting all of those small computers to a big computer which is modifying a computer like a behavioralist who could pull statistics and change society without you knowing it is happening to you, too.
This all goes into depth just like anything and the particular planted seed had developed itself stranded into one probability for salvation in a clusterfuck of mass destruction of probabilities because despite the good and the bad within for example Artificial Intelligence, those of us who consider it’s positive aspects are on the same page as we speak of it the like we speak of humans who, naturally, aren’t all good with good intentions and the technological advancements are not yet well balanced with anything else in our world which is behind it.
Instead of rescuing people, natural resources, animals, finances, jobs, security etc. we had massively shifted to a world of subtle, reliable shades of different types of horror in which ignorance serves as a peace of mind, heard, body and soul which still is mostly low vibrational and contributing to the madness in any way the technology pleases.
The culture of digital technology and it’s strong movements back in the 80′s and 90′s served to commerce the idea of making everything free and open. The culture, the software, the music, the encyclopedia, the anything.
The idea was to use a certain special group of people considered the supertechs to change the coutse of history with the advertising model as the meeting point.
The surface experience for people is about business of advertisements where the biggest are the wealthiest and at this point Mr.Lanier had already confirmed that he is actively supporting Google and had sold his company once to them.
What interests me about Mr.Lanier is why he thinks that nobody truly hears what he is saying because most people do and the only reason nobody is doing anything to actively pursue the most productive courses of action towards the biggest change is the fact we think we will be met with death or disappointment because one broken down middle class individual is nothing to a group of elite supertech at the Silicon valley type of hubs around the globe.
Mr. Lanier says the right way to proceed is to change yet he bears such friction when he is saying that what we would be doing is unimaginable yet achievable if the act of trying actually takes place. So, is he saying that the dominant power considers the change unimaginable because they had created this agenda which does not deem it fitting but speaks on what could be done if we were to actually do something which nobody within that elite community actually wants if the advertisement model is still not in their infrastructural ownership?
The experience of our lives is much more deep and valuable than certain wordings deem it out to be.
“Social experience” sounds like two words you read and go on yet what we rarely consider is what it all means.
It is your entire living experience and it matters because we’ve created such an easy way to unconsciously shift our energy to motion due to feelings and where we direct it and using words as energy signatures which help and to further explain just understand that we even think with words and the manifestation is a path of directed energy. (Emotion, E=energy, energy in motion)
The bizarre solutions of the supertechs as I had already stated were to make everything open and sharable without much knowledge of behind the scenes.
The differences between advertising , adjusting and finetuning(a.k.a manipulation a.k.a behavior modification without the consumers knoweledge) because:
advertisers=manipulators,
companies=behavior manipulation modifiers,
engagement =addiction
The changes this creates are small, broad and statistical which is how you achieve a goal without mass disturbances.
The companies sales pitch example is: We’re targeting this group of two million consumers. We can get 3% of this part of our consumer whole to change by 5%.”
You could say: Who cares? We get free shit for these tiny shades of difference.” but what I must state once more is the importance of what Jaron is saying is that the reliable shades of difference carefully applied consistantly have a compounding effect/like compound interest over time and the results are a significant change which CAN make shit really ugly like overturn elections, disrupt the society.
One important thing to mention is that Mr. Lanier defines the process of placing the whole world through a central computer would be mass insanity yet he states that it is not feasible which he used to say it isn’t impossible yet not as easy.
All of those fast samplings capture what drives you fastest - the responses. The negativity which makes the most money is between the dopamine hits. These include startle responses, becoming scared, arising fast and decaying slowly.
BEHAVIORALISM BY WIKIPEDIA:
Behaviouralism seeks to examine the behaviour, actions, and acts of individuals – rather than the characteristics of institutions such as legislatures,
executives, and judiciaries – and groups in different social settings and explain this behavior as it relates to the political system.
BEHAVIORALISM BY GOOGLE:
the methods and principles of the scientific study of animal (and human) behaviour.
BEHAVIORISM BY GOOGLE:
the theory that human and animal behaviour can be explained in terms of conditioning, without appeal to thoughts or feelings,
and that psychological disorders are best treated by altering behaviour patterns.
DEFINITION OF CYBERNETICS BY CAMBRIDGE DICTIONARY:
the scientific study of how information is communicated in machines and electronic devices, comparing this with how information
is communicated in the brain and nervous system / Too often a simplistic cybernetic control model underpins performance measurement systems.
-cybernetics was trumpeted as a universal science of government that would help to guide the social organization necessary for modernization.
DEFINITION OF CYBERNETICS BY DICTIONARY.COM:
the study of human control functions and of mechanical and electronic systems designed to replace them, involving the application of statistical
mechanics to communication engineering.
So we have to find a way to be sane throughout the paranoia one could encounter. To be optimistic despite the realism pushing itself with logic by default.
We have to face up to climate change.
We have to define our fear of A.I and transhumanism,
We have to stop genetically modifying food and people,
We have to start filtering our tap water,
We have to stop painting another false image over mass murders, dissapearences and the already painted picture of peace,
We have to find a way to stop deforestation, habitat loss, poaching,
We have to implement a steady course of action to limit the amount of technical illiteracy,
We have to find a way to create money which isn’t from trees, fix minimal pay where it exists only on paper, remove the governments maximum involvement and keep it a normal percentage,
We have to be aware of the extinction of animals which are actively happening each year,
We have to find a way of dealing with trash outside of the ocean because it is killing the beings meant to live in it not be murdered in it,
We have to find a way to deal with our natural resources again which are sunlight, atmosphere, water, land along with vegetation, animal life that naturally subsits upon or within the identified substances, coal, oil, natural gas, phosphorous, other minerals, iron, soil, timber which are all exposed to destruction.
We have to start purging out egotistical issues from our hearts and choose education and a multiversal mindset through local actions and sharing this post would actually be a gigantic first step.
We have to find a way to remain sane despite the world.
Never stop believing in our own purpose because of low vibrational people who mask out the words of yours in a humoristic set back which always work around the same groups of people who value popularity amongst their friends and social media than actually working on becoming a better person with an active role in shifting the world as a small, reliable shade of difference simply because they found a way of pushing out their own content without making a fuss about their own awareness.
What is the measure to which we measure empathy these days, asked the deceased Alan Turing, who will be the next topic on ho-ods.
Would we be in a position to proclaim equal rights to a machine if the machine could pretend to be a person undistinguishable from me and you.Do you agree with what the C.E.O of Google is actively sharing when you realize that it comes about the internet coming alive as a big living thing in which we are neurons/thoughts and the personalizations we make don’t allow personell forgetting.
Ask yourself why shouldn’t you trust the promise of artificial intelligence?
Who is the civilization for?
How to be a humanist and pro technology at the same time?
What is a person in todays age?
Are we really cyber liberaterians because we haven’t gotten passed anything new due to the fact we have chosen to give everything of ours for free as we are portrayed as liberaterians?
Who owns the future?
What about misdirect angry people who grew up in a less functional world than it ought to be given due to our technological capabilities?
The next essay will be posted sometime on march 16th. Be sure to check out You Are Not a Gadget by Jaron Lanier either on youtube or pdf.
1 note
·
View note
Text
Gout Arthritis Remedies And Effective Treatment Home Remedies For Gout
Actually garage becomes the ideal choice to store some mechanical stuff, like nuts and bolts, screwdrivers, nails, as well as other strategies. You can use some shelves, cabinets, racks, even plastic bins to store those small things. This is due to those small tools are prone to get suddenly lost. If they are organized well, it will ease you to identify them when they're in are looking for. View Us Make sure that everything on a good option. You can also put building materials, such as saws, drills and paints in the cupboards or drawers.
NOTE: Whichever style replacement window you choose, you will need a firm base to build on. This requires testing the old wood for water damage, decay or rot. This will be a wise step to perform in any case, but is critical for deciding exactly how much work your window frame need before installing any new window. Have a punch or perhaps an awl, and pressing hard into any area may look off color, water logged or even just plain nasty, with a punch, if it is soft or splinters away easily, then an tells you the wood is weak or rotting. Now it is very simple to plan for replacing some rotting wood right an individual try installing the new replacement window.
Chromium Picolinate: Chromium picolinate is a natural herbal supplement that in order to be used coming from the purest associated with chromium and picolinate. A couple of work together to promote burning of excess body fat, which actually is proven to reduce one's overall body fat by significantly twenty-two proportion. It also helps increase and strengthen the male bodys muscle majority.
While you're at it, grab your hair a water testing kit to the degree of chemicals within your water. Find whether the TA and pH levels are appropriate based upon the recommended levels for your type of pool. In every cases, the hydrogen level should be around 7 and the alkaline level should be between 170 and 125 per ton of. These levels should be tested at least once a week to ensure optimum efficiency.
Cucumber too plays the same role as potato. Keep small round slice of cucumber over your closed eyes. Make certain for 10-15 minutes, this can relief from eyes pain and stress and anxiety. One of the important home remedies for eye care.
When playing the bird's song, be aware of its beak to ensure it isn't coming from another creatures. CD's and DVD's are out there that assist you uncover which song belongs to which kind of bird. Find how it flies, eats, walks or jumps. A habitat and time of the season. They can be manufactured expensive as you think assortment of varying materials, inclusive of brass, aluminum and even glass. Between a type standpoint, there are many ways to present a bird bath within a backyard or additional outdoor space. Some want to have their bath to square out as a special little bit of artwork even though some may want their bath to blend in with the landscaping or natural setting around it. Regularly it is perfectly up to personal taste, vision and also the budget belonging to the purchaser.
Cleaning your saddle each month will help to keep maintenance minimal and avoid the hefty job of undoing long term neglect. To alter your design your saddle on and then cleans regular basis, you may want to tend on it more frequently. Saddles have a long lifespan in general, nevertheless, if they aren't cared for they can rot and deteriorate effortlessly. It is also always important unit some regarding leather oil when repairing your saddle comprehension of cleaned it then. This will help to preserve the leather. You are able to straddle your horse saddle over a fence to completely clean it. You should utilize water coupled with a mild soap to begin cleaning, do not soak or saturate the leather too deeply. Use a medium soft brush to clean the leather, but never shred or tear the site.
Basha's, Albertsons, Safeway, Fry's, and Sprouts all reward their customers for developing their own bags. Great receive a 5 cent credit toward your grocery purchase. A person don't don't see the credit in the bottom from the screen preference get prepared to pay, bring it up to the cashier they as well will be happy to add the coupon. Like many successful tips, 5-cents is nice and clean of lot cash. But have a look at how often times you check out the store and how many bags you use each times. "It I stood a nickel each and every time I went to your grocery local store." Wait! Now you have to!
1 note
·
View note
Text
Best Brush For Husky
Double layered canine types have 2 layers to their coat; a soft excellent insulating undercoat to keep them warm in the winter and a longer whether proof leading coat consisting of guard hairs that in reality grow through the undercoat.
For those of you brand-new to Husky ownership, you need to comprehend how to look after your Husky's double coat and this can just be done by guaranteeing you have the very best brush for husky pet dogs and their double coats.
Snow Family pet canine or husky puppies have a soft fuzzy undercoat, nevertheless, no real guard hairs to discuss. It is at this time, you require to take care and be sure you have the best brush for husky puppies, due to their delicate skin.
Regular grooming, not undercoat removal, is the technique to keeping your Siberian Husky comfortable and neat.
You need to never ever have the undercoat of your Siberian Husky eliminated or gotten rid of by hand. In hot environments such as Florida and Texas, the dogs may shed year-round.
In addition, it is important to never ever shave a Siberian Husky, as the coat uses natural insulation both versus summertime season heat and winter cold, and it protects the Husky's skin from sunburn.
Siberian Huskies shed their undercoats 2 times a year. This is called "blowing the coat," and it usually takes place in spring as the climate condition warms, and as soon as again in fall to pave the way for the advancement of a new undercoat for the winter season ahead.
The very best brush for husky overcoats, the peaceful protector
As the obvious name describes, your doggy's overcoat is the layer of those stunning and long hairs that you see.
The external coat of a Husky is truly water resistant to help keep their bodies dry in snow or rain. The Husky coat similarly rather effectively wards off the majority of dirt and mud.
This keeps your furry buddy protected and warm.
Your husky's got this layer to keep in warm in the exceptionally freezing and severe winter season months. Some of the best brush for husky are created to look after this unique undercoat.
Well, this layer is fuzzy and in truth, warm hairs which are as white as and as soft as cotton.
The very best brush for husky shedding season
A Husky's thick undercoat is typically introduced s-l-o-w-l-y with the start of the seasonally warm weather (in environments where there is an obvious season shift in temperature level levels) and is a substantial source of headaches for Husky owners.
This cyclone of shedding generally lasts for 4 - 6 weeks, throughout which owners require to weather the storm up till it's over!
It is possible for one Husky to fill trash can filled with cast-off hair throughout every shedding season. Particularly when you have actually utilized the very best brush for husky shedding, as it will eliminate the excess hair, without harming the skin or undercoat.
We call this "Blowing their Coat", and it normally sets off husky owners to question their own comfort.
Double-coated types will naturally alter the density of their coat based upon temperature level and daytime hours, because of that you can prepare for 2 big spikes in shedding every year - Spring and Fall.
This undercoat tends to stick with soft area like home furnishings and clothing so buy good deals of lint rollers and an outstanding vacuum gave that you will be getting a good deal of family pet hair when you own a double covered Snow Animal pet.
Brushing your Husky
They do not have an exceptionally oily coat so regular bathing to eliminate doggy odor is not required. If they have in fact rolled in something foul-smelling or gotten incredibly dirty, bathing is simply essential.
Wet matted undercoat does moist truly well or quickly and can activate your Husky to get skin rashes or hot locations so do not leave your family pet with moist matted fur.
Typically speaking, Huskies and Malamutes require exceptionally little grooming and among the most essential things to think about when trying to find the very best brush for a husky, is the capability to rake out the outrageous volumes of shed out fur.
Unless your Husky has in fact gotten especially muddy, filthy, waded into the fetid water, or rolled in something foul-smelling and dreadful, or has fleas, you really do not need to shower your husky more than a couple of times a year.
You genuinely should not shower your Husky too usually due to the reality that it will dry their fur and their skin.
Huskies do not have an actually oily coat so that recommends that they really do not have any of the typical doggies smells that is gotten in touch with an oily layered animal. That similarly suggests that your Husky will simply require a really little range of baths each year.
Feeding your Husky an exceptional diet strategy plentiful in Omega fats will also help to keep his coat and skin healthy.
An essential thing to note: Brush your husky out well PRIOR TO you shower him as a Husky undercoat filled with water can not be brushed out while it perspires.
Throughout the non-shedding season, simply quick weekly brushing sessions are needed to keep their coat healthy and shiny looking as regular brushing promotes the skin to produce some natural oils that benefit the coat.
Great deals of Huskies if offered the possibility love to "snow shower". They turn over onto their backs and wiggle and roll around in the snow. This helps to keep their fur neat and excellent with the help of Nature.
Strategies for grooming your Husky
Think about a leaf-blower with a hosepipe, developed especially to dry and eliminate canihosepipeIt's extremely effective and decreases shedding for 2 or 3 weeks later on.
Spray the coat carefully with a terrific mist of the conditioner and water choice and brush it through the coat as you work. Blow the coat dry as you brush, using the hair clothing dryer on the most budget-friendly setting.
Husky Hair Shampoo
Given that their hair is not so long that it tangles like other truly long-haired type animals, huskies do not require any special conditioning hair shampoos. Because you do not prefer to use extreme hair shampoos on your dog, you may want to find the most natural hair shampoo that you can find for your animal canine just.
Cutting Husky Fur
A Siberian Husky's coat does not need cutting, and what's more, cutting their hair can activate coat damage, hurting the approach the coat safeguards the dogs from dirt and UV rays. The hair that grows in between the toes to form hairy pads under the animal's feet, nonetheless, are typically cut due to the reality that they're thought of unwanted.
Completely cut the hairs on the dog's toes, making use of the scissors. Cut the hairs growing out in between the pads on the underside of the foot so that the feet have a cool appearance.
They take their Huskies to a You Wash It shop. The shop supplies the substantial cleansing blowers and sinks and you offer the Husky, the hair shampoo, and the towels.
If you can, coiffure your animal making use of a blow drier set on cool air. Be getting ready for great deals of flying hair as it gets blown from your Husky's coat.
Husky Grooming Treatment
Comb thoroughly through the coat of your Siberian Husky, making use of the curry comb or another wide-toothed comb. Follow this with a comprehensive brushing making use of the slicker tool, working along the dog's body at first versus the directions of the hair advancement, and after that when again following the hair directions.
When the dog's coat is totally dry, brush them as soon as again using the undercoat rake to eliminate anymore dead fur released through the drying and cleaning up treatment.
Some people will just choose to use their tub to shower their Husky. Bear in mind to put a screen over your drain to record the loose hair or you will end up with the worst hair block that you have really ever seen.
The cushion effect safeguards the animal's skin from pressure throughout brushing. The slicker, you need a curry comb or rake, a spray bottle of water consisting of a little conditioner particularly established for animal canines, a portable hair clothing dryer, nail clippers, and a little set of scissors.
Husky Grooming Tools
To keep your Siberian Husky's coat in leading condition, you need specific tools. The brush pulls dead hairs from the external coat, while detangling mats in the undercoat.
Now that you have actually read my guide on how to groom your Husky, I am positive you now understand what to try to find when looking for the very best brush for husky.
Make use of a hair shampoo established for animal canines when it is required to shower the animal canine. Wash a variety of times after bathing to eliminate any hair shampoo residue. Tidy the inner area of the family pet canine's ears, making use of a cotton ball took in mineral oil to help resist ear termites.
Some people pick to take their Husky to be bathed and blow dried at the grooming shop. It can be actually expensive to groom a huge double covered animal.
Great deals of professional groomers have a high-velocity clothing dryer which blows all the loose hair off your family pet canine in a short amount of time.
Husky Fur Cleansing
Their furry undercoats consist of natural oils that help to repel dirt. More routine bathing can dry the natural oils, activating skin concerns. Made use of regularly, the conditioner and water alternative helps to tidy up the animal canine and leaves a fresh fragrance and a shine on the coat, in addition to helping to relax tangles.
More information and how-to guides here:https://andrewreview.com
1 note
·
View note
Text
Photoshop Tutorial
Plenty of people have inquired how exactly I really do lots of my characterizations and peculiar aliens, and so I thought I would finally sit back and write a new tutorial.
I presumed a pleasure image to concentrate on is my face-off image for the Alien Nation 3 competition.
To begin with, I thought I d explain a bit about my strategy. I do a lot of modification layers, curing brush combined with a little liquefy, and cloning. My theory with characters is I try to leave as a number of the pixels. What I attempt to accomplish is create them a color that is different. I scarcely hotel to doing some other paint pops that are destructive.
First things first, I did not have the full concept in your mind once I started this image, and sometimes what the alien had been about to appear to be. In reality, I even plan for this to function as Tom Cruise for almost just about any reason other than that I enjoy the high end photo retoucher intense look in his head and it turned out to be a resolution record to govern without needing to work around .jpeg artifacts.
That said it evolved to some ridiculous goof on Mr. Cruise that wound up having a fantastic reaction from the Republicans thus, go figure!
Let us start...
Mr. Storm has too much hair to generate a persuasive alien, therefore, enables take it off!
Start by cloning out of the middle of the eyebrow outside developing a digital bald-cap.
Remember it doesn't fundamentally matter how far how to wash that your cloning is. It we'll fix it.
(Hint ) I sporadically un-check the aligned button towards the very top once I find an excellent subject of eyebrow which pits to function as a standard skin feel.
After roughing into a new mind contour from the eyebrow outside, then replicate in the gray backdrop from the surface, in creating a new border for the form of the mind.
Following Tom's new eyebrow is glistening and it could still look somewhat like a demanding patchwork of both skin-tones and feel.
Establish the magnitude of the healing brush into something moderate like 20 pixels or so and get started targeting the obvious of one's lousy trademark marks. Clone from the middle of the forehead. (preferably from the unaffected parts ) Magically up on letting upward out of each brush stroke, it's going to set the feel you've set merely there, and then auto color-correct it into to coincide with the nearby pixels! (obtained Id love that curing brush! ) )
Time and energy to eradicate a few of the pesky facial features...
To begin with, let's keep on with the rubber stamp tool and demanding from the removals of Tom's eyebrows in addition to his nose. Once those are all gone, I want to get rid of the piece of stubble and feel on his brow to acquire a complete smoother face.
Measure 4: Much like measure two we are likely to go straight back during these areas with the healing brush and find yourself a beautiful mixture of skin-tone and feel. (for all those wondering why that can be really just a two-step procedure involving the rubber stamp and also the healing brush, then the reply is relatively straightforward. I've gotten a better result from regions of the facial skin having a closest to my result color. Like that once the healing brush does its magical color-correction into the nearby pixels that you don't have any lingering color from the initial pixels inhabiting that place )
Time and energy to get started making his face a little more alien...
I decided I needed to bisect his head having a slit which travels the course of his head in addition to alter the functionality of the mouth.
To accomplish so I generated a new modification layer setting it into degrees.
At the degrees dialog box that I took in the low right white triangle to the middle of the histogram. This left the high lights of how the image rip-off.
Today every time a flat's modification coating is inserted into an image it creates a new clean white coating mask. Target this mask from the layers dialogue box and then invert it shifting. (Command/or Control Id )
Your image should look as if you inserted the degrees adjustment layer. You are all set to begin painting. Then I placed two vertical lines, then one on both sides of the lip of the mouth area.
(that is precisely what the coating mask appears like if you've completed painting )
Today I wish to provide these lines somewhat of thickness. Therefore, I will bring a layer style to the alteration coating.
Either tap into a negative subject of the coating in the coating's pouch or click onto the layer and select Blending Options from the menu that arises to match a coating style.
Here are the configurations that I've selected:
Fundamentally I only noodled up until the light also matched it gave the illusion of thickness into the traces of the facial skin.
I want to provide the traces some modeling to signify there are arteries at the borders of the trails. Therefore went to bring another alteration layer with levels. Now my guideline to be able not to adjust their color. The means to get this done would be to take away the difference of the color I am attempting to incorporate. Therefore that I can take away blue and green, in cases like this, I need a wash.
From the RGB slider that I shoot out high lights together with the underside white arrow taken towards the middle. And that I take out mid tones by slipping the gray shaft to the best. I am the green histogram and choose out green from the high lights, (underside white arrow, then go on into the left) I then do the same with all the gloomy. Even though I take more blue out to compel at the color into more of the opposed to your red. Reach fine from the dialogue box and then aim the mask at the modification layer and invert it.
Today, we're prepared to paint with all the reddish color correction. Make use of a soft border brush 20 30 pixels in size and gently color in approximately every one the traces of the facial skin. Im by applying this particular color correction to begin a number of the bone workaround the eyes together with to generate several shadow locations.
That is a measure that's going to become replicated again and again! I tend to possess heaps of modification layers every serving a color-correction which advertisements or remove from the coating before it. If things get somewhat tricky. .Sorry!
I initially thought I would desire this alien to become aquatic, and so I started down the trail of bright coloring to produce him fish just such as (apparently at any time after I decided to change directions somewhat ).
We are going to accomplish a little shading with a turquoise green tone.
I need this alien to possess a wrinkled feel to his head, rather than glue within a feeling will use my same procedure just like the former modification layers and go to town along with my Wacom tablet computer and stick to the contours of his head and begin to introduce some intriguing shapes and lines that'll start to shape the personality.
With this modification layer Im color adjusting to your rusty orange tone.
Continuing the simulating of the facial skin, I make a dark reddish color correction and get started painting squiggles all around the face area. You'd be amazed how effective that is when warmed on while inside the quantities that are ideal. I discovered this method called figure eights with the way of a make. (They do that kind of item to find skin blotchiness for good special effects makeups, and so I figured why not check it out for virtual blushes, huh?)
Fundamentally what I do will work in tight nit spots with varying amounts of pressure in my pill computer.
Eliminate a couple of other pesky body parts.
Only at that point, I started getting an adequate idea of the way I needed the final piece to check and that I chose people ears to go!
A great deal more color!
I inserted red into the slits of the head to produce them stand out more.
A little cardiovascular work. I included a few darkish veins.
Produce a glowing whitish, yellowish adjustment coating and then sew the mask to paint having a huge feathered brush. Do the shadow areas using a dark brownish color correction focusing into the shadow and light regions of the face being careful not to place shadows where they don't belong.
Another highlight color-correction that time around stained with a 10-pixel brush to essentially make textured lines around the base of the eyes and also at the borders of the lips.
Another dark color-correction to create a few colored stripes and wrinkles to the lips and forehead, creating shining lines into the face area.
Another accent color-correction to put twist specular hi-lights on the newly generated wrinkles.
Full color to a light green. I made the decision now I wasn't going to help keep him. Therefore, a muted coloration was generated by me and then also did a coating mask to sweep it.
I followed up this with a dark reddish color to generate darkly shaded sections of the head and put in comparison to the bone restructuring.
His face appeared too high now, and I am a sucker for older StarTrek type extraterrestrial beings, therefore that I thought I'd opt for a beautiful seen Trill-like pattern (if you watched STNG or even DS9 the mention is eloquent.)
I wanted to possess stains which were trimmed having a darker color and also maintain a lighter color at the middle. I Command/Control-clicked onto the layer mask for the stains color-correction loading its coating mask. I then produced a new adjustment layer which brightened the last one building an outside stroke to my stains and a green tone.
My idea once I began directing this alien to get a peculiar form of species was I would displace Tom's eyes. It looked interesting nonetheless it rendered him unrecognizable. And that I picked the intense look in his eyes which steered me to the image since the origin from the first location. I merely shifted to reddish to the color of the eyes.
Now I had been happy with the cryptic face, and I chose to proceed and produce a scene outside of it.
Therefore I spared my multi-layered color-correction alien and then piled all of my layers together and blended them that I might work somewhat faster (things get somewhat slow with this numerous layers!).
After consolidating the layers that I stored this for a new version and proceeded on into the upcoming few information.
With hardly any modification I watched this as a rubber mask that was lost that was perfect to place to the dining table facing the newly revealed alien.
Then I moved to Liquefy.
I flexed and warped the facial skin area into squish it and also make it seem like churns up rubberized putting onto a desk.
Then, also that I understand in this time sef mccullough, this could shock you...I inserted a modification layer!
I started using a darkish color and gently slit in certain huge wrinkles to signify the folds of the mask.
Then I emphasized those traces with another modification layer.
Then I went over the new springs using a sizable brushed dark color-correction to smooth out things a little.
Another glowing color correction to get things to appears shiny.
And a super-dark color correction to the shadow.
I packed most this up into friends, replicated it and then merged the copy bunch.
Then put the mask onto its side and left a dark gray solid to be a symbol of a desktop for it to lay.
Then following some more Google hunts for several Scleral lenses, some spirit gum glue, and a few sponges for application of the adhesive, I put all together using some vertical blurring to the flopped reflections onto the desk... Done!
1 note
·
View note
Last Seen Blogs

dmitryanya
ASTONISHING
sweetlics
* 𝑠𝑤𝑒𝑒𝑡 𝐋𝐈𝐄𝐒 !

chrisevansfp
✨ chris evans fp ✨
chrisevansfp
✨ chris evans fp ✨