#and i had to do a bunch of video file converting because my gif program didn't like the taste of these videos for some reason
Photo

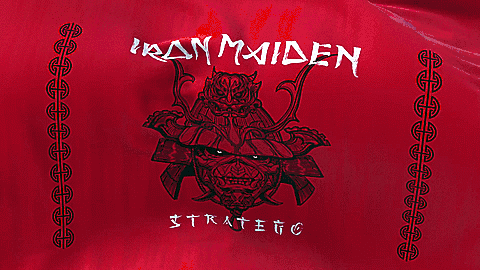

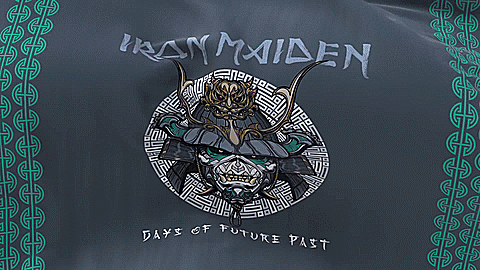


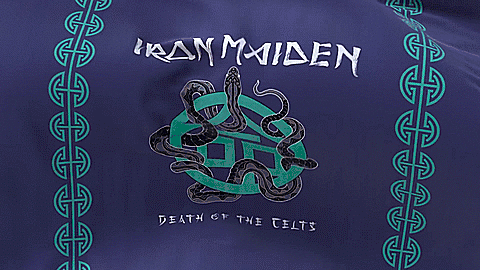

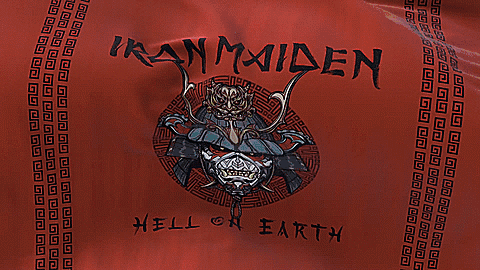
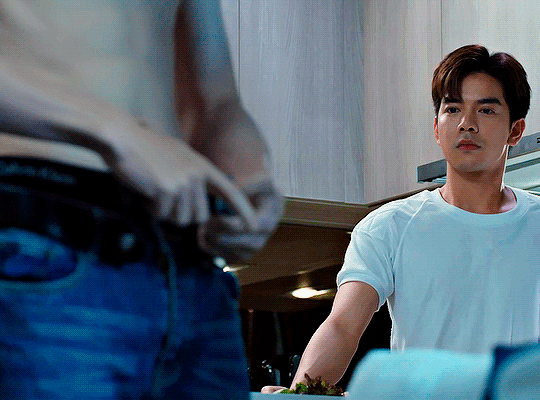
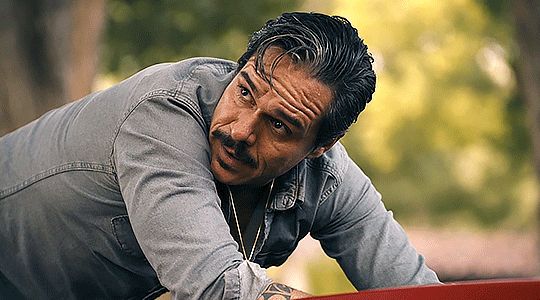
#iron maiden#senjutsu#stratego#lost in a lost world#days of future past#the time machine#darkest hour#death of the celts#the parchment#hell on earth#2021#i have been wanting to make a set like this since these FIRST CAME OUT#this also took a lot longer to do than it seems like it should have#i needed them to loop forever like they do in the videos#and i had to do a bunch of video file converting because my gif program didn't like the taste of these videos for some reason#and then because it takes a certain about of time to get around to where it loops#some of them had too many frames and i didn't want to lower the frame count because then the animation would look choppy#so i had to make gifs over the tumblr size limit and then compress the gifs further while also trying to keep the quality#and then i had to remove some frames ANYWAY#but i MANAGED and i'm happy with the way they turned out#i also wish the writing on the wall had one but it doesn't#so it will forever feel like an incomplete set#and it's literally an incomplete set as far as the tumblr photoset limit goes#anyway these exist now
25 notes
·
View notes
Note
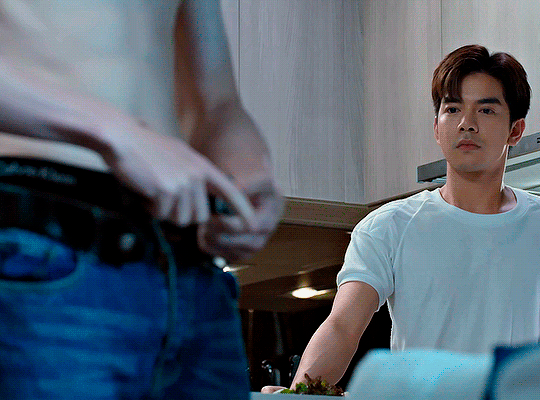
love love LOVE your The Sign gifsets. im still a newbie in giffing lmao and your gifs are like reaaally pretty so i was wondering how you do your gifs? i really like how it's sharp and the colors pop up beautifully (only if you don't mind sharing ofcc <333)
bun this is the kindest thing you could have said to me, thank you so much <3 i wanted to write down my giffing process for a while in case anyone would find anything in it helpful, so thanks for giving me a push!
guzhu-furen's photoshop gifmaking process (kinda oriented on saving up time)
from

to
1. Downloading a video. i prefer to download video files instead of making screen recordings because the latter usually leaves watermarks/captions and makes image quality lower. i will not be linking the downloading websites themselves directly, but they are all easy to find through search engines if you know what to search for! i download ql dramas from:
youtube:
if the video you need is above 1080p quality, search for youtube4kdownloader
if the video is age restricted, search for 9xbuddy
both these websites work for normal videos too!
mkvdrama usually has 1080p episodes of most asian dramas.
dramacool also has downloading options in case the show is not available on other websites!
2. Screencapping (i learned it through this tutorial)
i screencap using KMPlayer. here is the installer i used, but you can find versions of this program on various websites and torrents too! install the program and proceed.
screencapping steps: open KMPlayer > press "CTRL + G" to summon the Frame Extraction window > set identical settings to these:
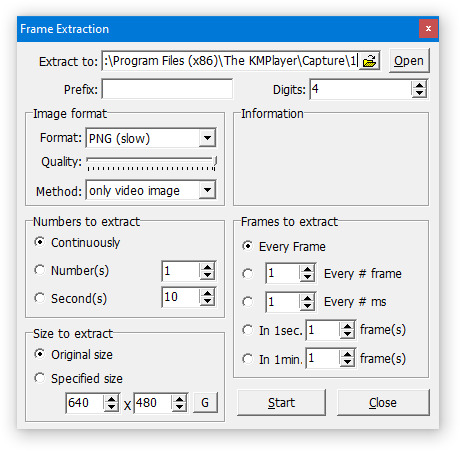
note which computer folder the screencaps will go to (it has a label "Extract to") > go to that folder on your computer and create a bunch of numbered folders there, for example ten folders named from 1 to 10, these would be our separate folders for ten gifs > write "1" or a name of another numbered folder after the backslash in "Extract to" bar in kmplayer > go the timestamp that will be the beginning of your gif in KMPlayer > press "Start" in the Frame Extraction window and press play on the video > when the moment you need to gif is over, press pause on the video and press "Stop" in the Frame Extraction window. great, you now have your folder of screencaps!
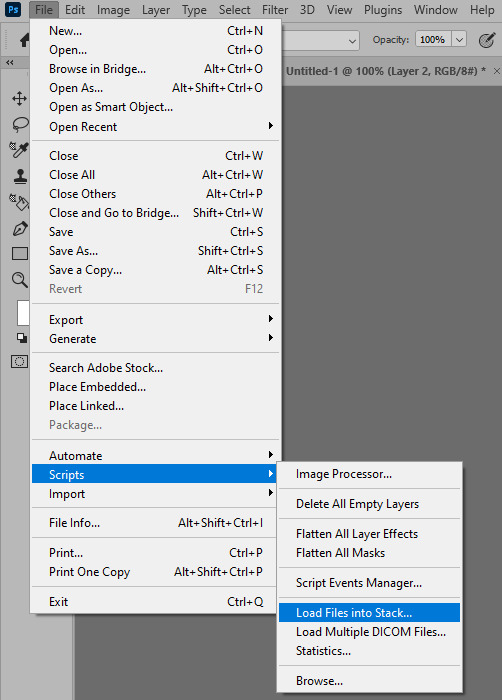
3. Importing screencaps to Photoshop
i use Adobe Photoshop 2023, but had used Adobe Photoshop CS5 for a long time before that, so you can use any version you have or find! it's available on various websites and torrents.
open Photoshop > Scripts > Load Files into Stack > press Browse in the "Load Layers" window that was opened
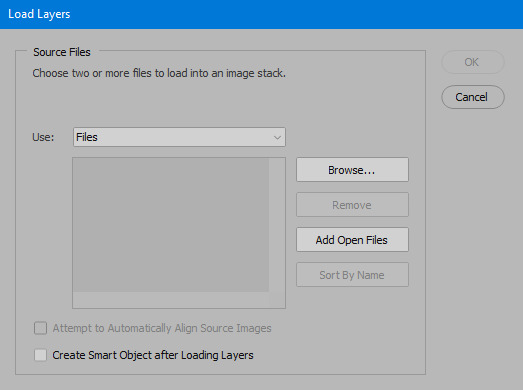
open your screencaps folder (and pin the KMPlayer Capture folder for faster future access) > pick the screencaps you want for your gif by clicking on the first one, and then clicking on the finishing one while pressing Shift on the keyboard > click OK and let them load for some time! i have 65 screencaps loading at the moment
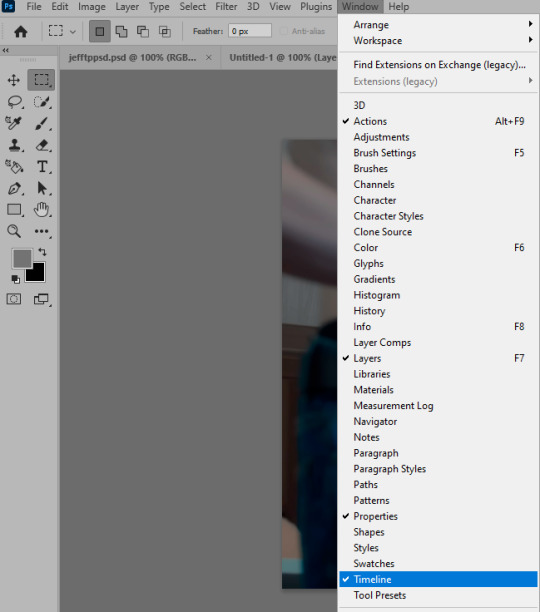
when the screencaps finish loading go to Window > press Timeline > press Create Video Timeline in the opened sidebar > press three dots that will say "Convert to frame animation"


4. Sizing & making the base of a gif
next part will be automatic. i use actions for almost everything from this moment. download the basic action pack here and my additional action pack that we will need here. load them in your photoshop actions window (Actions > Load Actions).
play the Script action to create frames.
now onto sizing your gif. these are tumblr's width dimensions for 3 types of gifs
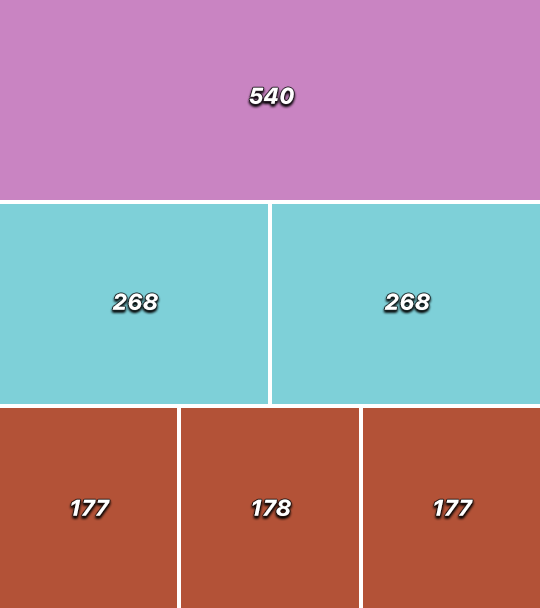
my gifs are usually 540 px in width and 640, 400 or 345 px in height. i added a 400 px action (Sizing 400) in the action pack, you can use it! or you can follow the steps by hand:
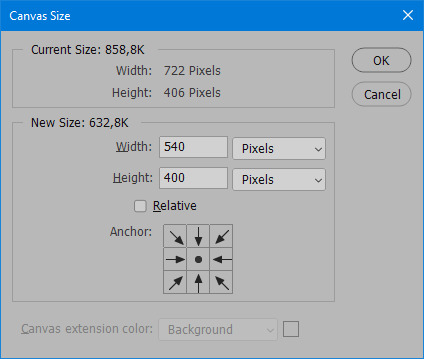
Image > Image Size > put in the height you want and add 4-6 pixels there (mine will be 406 for a 400 px high gif) > OK

now we need to crop the gif for it to fit tumblr's dimensions:
Image > Canvas Size > change Width to 540 (or 268 or 177) and take away the 4-6 pixels that we left in the previous step in Height
when you figure out which gif dimensions work best for you, record an action and use it to save up time!
after sizing use the action Smart Object. now we have the base of our gif!

you can move your gif left or right if you want! i will be doing this because i would like to show more hips in the gif.
press Ctrl + T > move the layer however you need (not in height though) > press Enter to save
i moved it to the right and my gif looks like this now:
5. Sharpening (i use Tan's sharpening settings explained here)
i added two sharpening actions in the pack, they are called Sharpen Spicy and Sharpen Spicy 12. you can use one of them or you can sharpen your gif by hand, i will explain how to do it below.
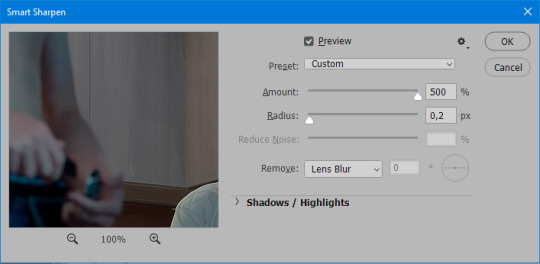
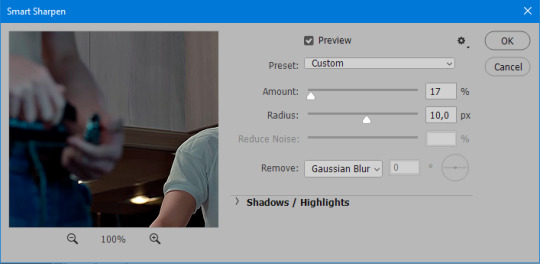
Filter > Sharpen > Smart Sharpen > 500% amount, 0,2 px radius > OK
Filter > Sharpen > Smart Sharpen > 17% amount, 10,0 px radius > OK (you can change 17% to lesser or bigger, depending how intense you want your sharpening to look. i use 17% for 4k footage and 12% for 1080 px or less videos)
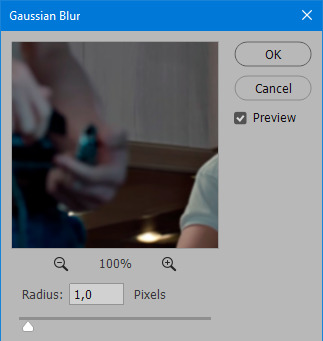
to smooth the sharpening a bit i use Gaussian Blur (this is optional, you can leave the sharpening as it is if you want your gif to be sharper).
Filter > Blur > Gaussian Blur > Radius 1,0 pixels > OK
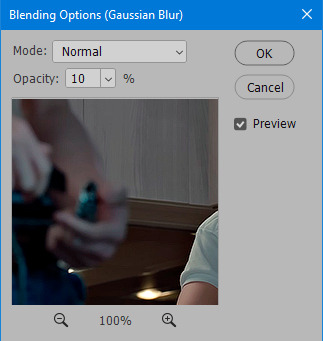
now change blending intensity to let only a bit of the blurring effect stay (you need to change this by hand if you used the sharpening action also).
press Blending Options (the highlighted place) twice > change Opacity to 10%

this is what my gifs looks like with sharpening now!

6. Colouring (i learned how to colour the way i do through this tutorial)
to make it easier for you to learn i will share my blank colouring file. i created it to save as much time while giffing as possible, so whenever i need to colour a gif i simply duplicate all the blank adjustment layers to the base of my every gif and start colouring! once you figure out which adjustment layers work for you best, i recommend creating a blank colouring file too to save time.
if you want to go the easy way, open my colouring file and duplicate selected layers to your gif file by Layer > Duplicate Layer > insert gif's document name

if you want to learn by hand, create the adjustment layers that i will be naming in the process on your own, you can find them all in Layer > New Adjustment Layer
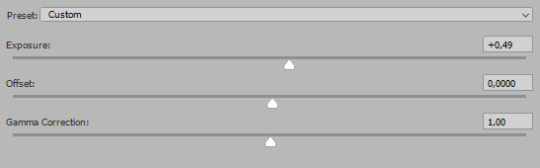
now we will use adjustment layers for our colouring from the bottom to the top! first, Exposure layer to add a bit of light to the gif. i don't always use Exposure because sometimes shots are bright enough on their own. i will, however, use it here. don't use it on your gif too much, because in the next few steps we will also be brightening the gif with other adjustment layers. i added +0,49:
next, Hue/Saturation layer. i use it in gifs with neon lighting to color correct overly bright colours. for example if your characters are standing in neon pink, you might want to lessen Saturation in Magentas and Reds to make the final gif less pixelated, and etc. i will not use Hue/Saturation on this gif, cause it doesn't need it.
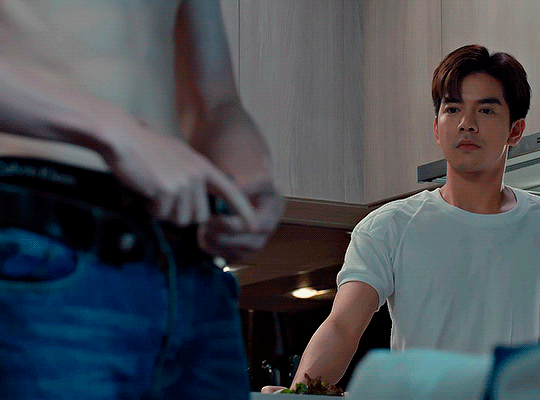
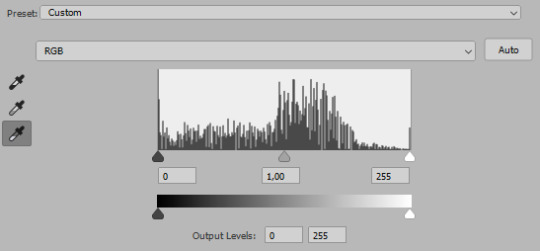
proceed to the layer Levels. this layer usually does most of my colouring. click on the lowest white dropper in your Levels window:
now choose a light place on your gif and click on it with the white dropper. it works especially well if you use the white dropper on the lightened parts of face skin. you can play around by choosing different bright spots and seeing what works best. here is the spot i chose and the resulting colouring:


this is too light, so now we need to balance it out with the black dropper:

choose one of the darkest places this time and click it with black dropper! once again, you can play around and click different spot to see what works best. i will be clicking the highlighted spot and you can see what my gif will look like with this Levels settings
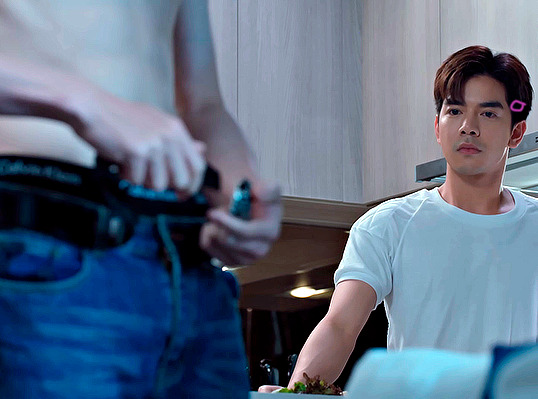

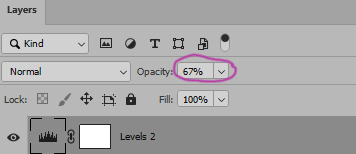
as you can see, darkest places became darker and other colours were corrected a bit! now, this is still too bright, so i will be decreasing the opacity of Levels layer from 100% to a smaller number:
i will have to continue in another post because tumblr only allows 30 pictures per one post in the new editor now and i'd like to explain everything in visuals. click to continue
77 notes
·
View notes
Photo

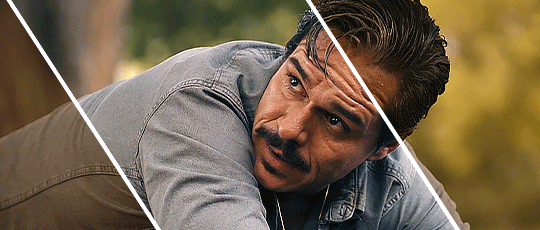
For the anon who asked if I had a tutorial on how I make gifs! I made one that covers just about everything about my gif-making process 💖
A summary of things included in this tutorial:
How to rip videos from nearly everywhere
How to make a basic gif using videos
How to slow down a gif
How to color gifs

Stuff you need:
Windows 10 (for the built-in screen-recording program*) / Xbox Game Bar
Photoshop CS6 or higher
VLC Media Player
PC/laptop
*I like to use the Xbox game bar because it's straightforward and doesn't require any technical shit to make it work. It's plug and play! But if you don't have this, here are some alternatives:
OBS Studio - used for streaming and screen recording, free and open source! lots of tutorials on Youtube for beginners
VLC Media Player - all purpose media player and Youtube video-ripper, also free and open source
You’re gonna have to look elsewhere for OBS and VLC tutorials but they're not terribly hard to get used to. It's just gonna take a little extra work to make gifs that way.
I. Get a video of the thing you want to gif
High quality vids make high quality gifs so I like to source them directly from HD/Bluray digital copies as much as possible. This is how I do it 90% of the time:
1. Open the source video in my media player (I use VLC)
2. Open the Xbox Game Bar
3. Record a short clip from the source vid
I prefer to do this because it's easier to work on a short clip with a small file size in Photoshop.
If I can't download the videos, I rely on screen-recording from wherever it's available (Youtube, Streamable, Twitter, Instagram, etc.). Any video that can play in a browser is fair game.
How to use the Xbox Game Bar to record your screen
you don't need a microsoft or xbox account to use it
can record videos from media players and almost any video that plays in a web browser (not sure if this works with Netflix on a browser though)
How to use VLC Media Player to rip videos directly from Youtube
doesn't always work but it allows you to find the exact address of a Youtube vid and save it on your PC like you would with pictures
most videos aren't high quality when ripped like this but when I got nothing else to rip from, I can't be choosy ¯\_(ツ)_/¯
II. Make a standard gif file
youtube
1. Open PS. Drag/drop your video in PS. The 'Timeline' window should appear on your workspace. If it doesn’t, go to Window > check 'Timeline' near the bottom of the menu
2. Make a new file with the usual tumblr dimensions (Width: 540px for 1 column posts/ 268-268px for 2/ 177-178-177px for 3, Height: up to you)
3. Drag and drop the vid in the new file then close the video file.
4. On your new file in the Timeline window, click on 'Create Video Timeline'
5. In the Layers window, right-click on the video layer and select 'Convert to Smart Object'
6. Resize the video.
7. You can move the start/end bars on the Timeline so it only includes the part of the clip you want to gif. Skip this step for now if you plan to change the speed of your gif.
8. Save your new file. You don't have to keep the PSD and source video in the same folder but I recommend you do.
III. Adjust the speed
youtube
1. Double click exactly on the thumbnail graphic of the video layer--not the layer name or the gray area around it! It should open a new window with 'Layer 1.psb' as the filename.
2. Right-click on this video's Timeline. It should show a small tab that allows you to change the speed of your gif. 60-70% gives it a noticeable slow-mo effect.
3. Since we slowed the clip down, we have to lengthen it. Drag the arrow at end of it all the way to the right until the you can't extend it further.
4. Press ctrl + s to save the changes in 'Layer 1.psb' and then close that window for now.
5. Go back to your main file (LALO 01.psd in my example) and adjust the length of the clip on this Timeline like you did on 'Layer 1.psb'.
6. Readjust the start/end bars on the Timeline so they line up with the part you want to gif.
III. Make it pretty
youtube
There is one effect that makes a gif instantly prettier and that is Smart Sharpen. Look for 'Filter' on the top menus. Click on the video layer, click on Filter > Sharpen > Smart Sharpen.
If the scene you clipped is well-lit and if you are not doing anything fancy, this might be all you need to do. But if not, you can find every tool for color adjustment in the Layers window:

These are the ones I use often:
For adjusting brightness/contrast: Levels and Selective Color
For color correction: Color Balance, Selective Color, Photo Filter and Vibrance
For cleaning up artifacts and reducing noise in nighttime/dark scenes: I use Selective Color and turn up the black anywhere from +5 to +15
IV. Save the gif
youtube
I usually do a bunch of tweaks here and there before I save the final gif. I go back to adjust the speed, to recolor or change the length of the gif, whatever I feel needs retouching.
1. Press Alt + Shift + Ctrl + S all at the same time or click File > Export > Save For Web.
2. I use these settings:
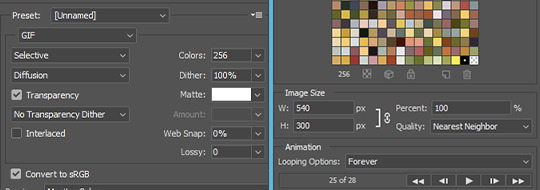
3. Check that the file size doesn't exceed 10mb
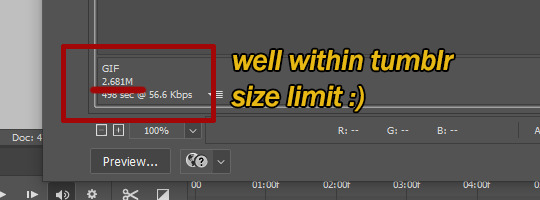
4. Click ‘Save’. And we’re done!

#my gifs#photoshop#photoshop tutorial#gif tutorial#tutorials#might as well tag this#better call saul#breaking bad#brba bcs gifs#my tutorials
210 notes
·
View notes
Last Seen Blogs
jadethe2nd
Jade's stuff

menkawata
menkawata


ao3feed-bnha-rarepair
AO3 Feed BNHA Rare Pair
mrsdobrik
Mrs. Dobrik