#how to create an optical illusion in adobe illustrator
Text
youtube
#cover designer#how to create b&w letters#how to create block letters#how to create a font logo#how to create letter logo#s optical illusion tutorial adobe illustrator#adobe illustrator optical illusion tutorial#optical illusion adobe illustrator#how to create an optical illusion in adobe illustrator#op art tutorial illustrator#how to create optical illusions in illustrator#optical illusion in illustrator#how to make optical illusions in illustrator#s#blend tool tutorial#adobe illustrator#blend tool in illustrator#how to use blend tool in illustrator#3d type in adobe illustrator#Youtube
2 notes
·
View notes
Video
youtube
Optical Illusion 3D Logo Design Tutorial: Abstract Geometric Shapes in Adobe illustrator.
Learn how to create an Optical Illusion 3D Logo Design using Abstract Geometric Shapes in Adobe Illustrator 🤩 This tutorial is perfect for graphic designers and anyone interested in logo design! Join me as I walk you through the step-by-step process of creating this stunning logo design.
#logo#logodesign#logodesigner#logomaker#logomaster#freelogomakingapp#kavucreative#adobeillustraor#illustrator#vectorart#vector
2 notes
·
View notes
Text
Top Graphic Design Institute: Dehradun
Explore a Diverse Range of Graphic Designing Courses at Leading Institute in dreamzone Dehradun
The best graphic designing institute in Dreamzone Dehradun will focus on providing candidates with all the skills required to create a design. This process will include ideation, digital application and rending of the design. Graphic Design course also gives candidates a chance to work with various applications from scratch. Through the program, you will learn about the essential aspects of Graphic Design for web and print media. You will also learn the creative aspect of the subject vehemently. You can create Vector based artwork and image composition and manipulation. The enrolled candidates will also get an opportunity to work with real-time projects to help them enhance their design skills.
Basic of Design and Graphics
Graphic design is the art of creating exciting visual content using computer software to communicate messages that inform, inspire, and meet the target audience’s attention. The graphic design program combines art and technology to communicate ideas by using a variety of design elements to achieve artistic or decorative effects with the help of interactive media. By using the visual structure and page layout methods, designers use typography and pictures to meet users’ specific needs and focus on the logic of displaying elements in interactive designs, to optimize the user experience. The core graphic design principles are Contrast, proportion, Rhythm, color, Visual Hierarchy, and Proximity.
Process to Create a Design:
Research about the project
Planning
Dealing with multiple ideas
Time management
Attention to detail
Types of Graphic Design:
Brand Identity Design
Marketing & Advertising Design
User Interface Design
Product Design
Publication Design
Packaging Design
Typeface Design
Motion Graphic Design
Illustration Design
Learning objectives of Graphic Design Course in Dreamzone Dehradun
The learning outcomes for this course are as follows:
All the essential elements and concepts involved in the design
Knowing about the aspects of print advertising
Learning about imagery and visualization techniques
Getting know-how about typography, color theory and its scope, importance, and applications
Learning about retouching and image editing
Designing the layouts for brochures and magazines
Understanding grid systems and layouts
Learning how to use raster and vector graphics
Graphic Design Course Modules
Graphic design training classes in Dreamzone Dehradun, combine creativity with technology to teach students in a clear and effective way. Below are the curriculum followed during the training:
Introduction
Basics of Graphic Designing
Web Designing
G-Codes
M-Codes
Design process
Color models
Understanding resolution
Types of Image formats
Typograph
Overview of popular software used
Designing of brand identities
Animation and 3D images
Color balancing
Elements of Graphic Design are:
Shape
Color
Space
Form
Line
Value
Texture
Graphic Design Software Tools:
Adobe Photoshop
Adobe InDesign
CorelDraw Graphics Suite
Adobe Illustrator
Inkscape
Sketch
Affinity Designer
Xara Designer Pro X
Gravit Designer
Photoscape
Jobs for Graphic Designers in Dehradun:
Graphic Artist
Digital Illustrator
Art Director
Creative Director
Package Designer
Visual Image Developer
Visual Journalist
Logo Designer
Broadcast Designer
Interface Designer
Web Designer
Multimedia Developer
Flash Designer
Layout Artists
Photoshop Artists
Top Graphic Design Trends in 2024 are:
3D Design
Emoji Design
Optical Illusion Design
Nature-Inspired Design
3D Typography Design
Cartoon Illustrations in Design
Voxel Art Design
Monochrome & Duotone Design
0 notes
Text
How to Create Optical Illusion 3D Striped Shape in Adobe Illustrator

How awesome is this optical illusion 3D ring that I created in Illustrator? It looks like it’s jumping out of the screen, doesn’t it? In this video, I will show you how to create this 3D ring using simple shapes and the 3D Revolve Effect. You will also learn how to create and use custom symbols in Illustrator, which will make your work more creative and faster. This is a cool and easy tutorial that anyone can do. Watch this video and reblog it!
Watch Now
0 notes
Text
EVALUATION
This project was like a roller coaster. There was a lot of unutilised ideas but using mind maps, research aesthetic inspiration and peer feedback, I came to an conclusion.
I started off by doing workshops were I learnt how to use different tools in Adobe Illustrator,Photoshop and After Effect. I learned how to create 3D vases in Adobe Illustrator, create gifs using different tools, such as the mask tool in Adobe photoshop and created 3D bubble text in Abode illustrator using the blend tool. Most of these workshops were easy to produce but they only became more easier once I picked the topic for my FMP.
The topic for my FMP was ‘The world is not real’. This topic stood out to me because I feel like it seeps into the topic of dissociation. This is because when certain people with dissociative disorder, dissociate from the world they feel like things around them are not real, like they are seeing the world as lifeless and foggy, which I want to portray through my FMP.
For my FMP I sketch out a few ideas. Then I thought the best way to portray this would be using the content aware videos I made earlier on in the unit. I created these content awarded videos using Adobe Photoshop, After Effects and Premier Pro. The process of making this was long and some of the PNG sequences did not content aware, so I had to delete some of the video files. In order for it to look like a cctv footage I added glitches too my video and turned the image black and white in Adobe After Effects. The video turned out the way how I wanted them too and I don’t think I would change anything.
However, I felt like the video alone was not enough for my FMP, so I decided to created an awkward and weird atmosphere using objects. I took inspiration from backrooms. This is because I want the viewers to feel like they have walked into a alternate reality. I wanted to create a waiting room that feels out of place. The objects that I included in this waiting room is a backwards handle mug, a off cut piece of carpet, two small chairs, a framed picture, a tall table and a out of place shadow.
The process of making these objects was quite easy. The only problem I had was the shadow. Getting the correct measurements to match the chair was really hard. So, instead I decided to just trace a students shadow in the studio on a 10 pieces of A3 paper, which ended matched the chair perfectly .
I researched artists such as Cornelia Parker for shadow inspiration and looked at how she uses material and makes them appear as human shadows. Also, I research other artist that specialised in optical illusions for inspiration. It was hard to find an artist surround the object for my FMP because a lot of the artists that I looked at was not doing the same type of objects as me. However, I did find an chair optical illusion artist called Jean Beuchet. His chair tricks the human brain into perceiving the person on the chair is small, by having the base of the chair far away from the leg. The research that I did helped me to produce and interesting instillation for my FMP.
Overall, I enjoyed producing everything for my FMP. However, in the future I will try to manage my time better by created a better week plan. Also I would try to experiment more with my physical art.
0 notes
Text
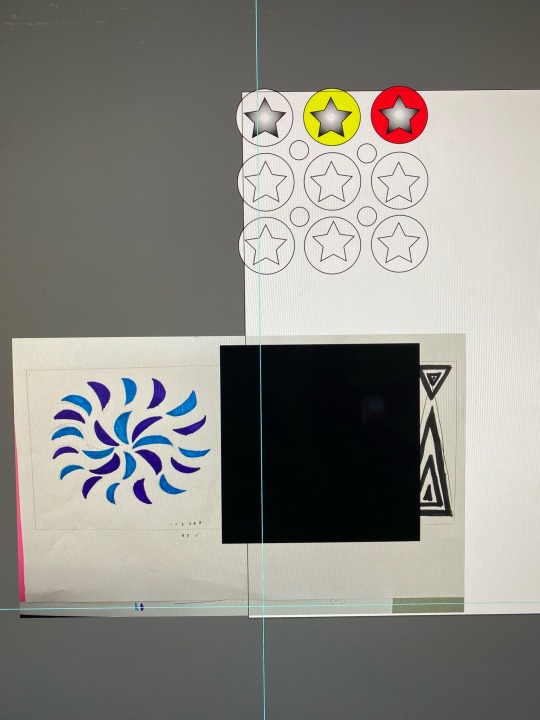
Graphic design workshop


In the first workshop today we had to create a simple pattern from what we already had from movement. I focused on my fire painting, my cloudy painting and my pose and motion studies. I couldn’t use a few of the designs as they were too detailed so I simplified my favourite ones. I was basing my pieces of optical illusions.
I decided to make the first one as it had more votes but in hindsight i would have preferred to do the triangle pattern.

In the second workshop we learned how to use adobe illustrator to create more patterns. I had a bit of difficulty using it but made some interesting visuals.


4 notes
·
View notes
Photo
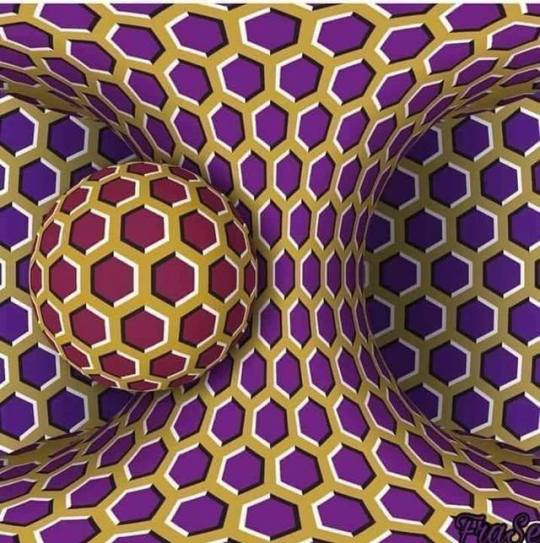
“This still image was created by Yamamoto, a Japanese neurology professor, and he told the instructions below,” the original post reads. “If it’s not moving, or just moving a little, you are healthy and have slept well. If it’s moving slowly, you are a bit stressed or tired. If it’s moving continuously, you are over-stressed and might have mental problems.”
But here's the thing: that's all fake. The image was really created by Yurii Perepadia, a 50-year-old designer from Oleksandriya in Ukraine. He drew it in 2016 and it took him about two hours to complete. And most importantly, he says the image has nothing to do with how stressed you're feeling. -- “I drew this optical illusion in Adobe Illustrator on September 26, 2016,” he writes. “To create it, I used the effect of Akiyoshi Kitaoka. This is a white and black stroke on a coloured background… which sets in motion the focus of vision and it seems to a person that the details of the image are moving.”
30 notes
·
View notes
Video
youtube
Use Optical Illusions to Create a Unique 3D Arrow Logo in Adobe illustrator with @KAVUCREATIVE
"Unleash the Power of Optical Illusions: Design Your Own 3D Arrow Logo" ✨🎯 Step into a world where illusions come alive and dive into the realm of mesmerizing 3D arrow logos! 🌈✍️ In this tutorial, we'll reveal the secrets behind incorporating optical illusions into your designs. Discover how to wield geometric shapes, play with perspectives, and create an arrow logo that defies expectations. 🌀🖌️ Unleash your creative prowess as we guide you through each enchanting step, unlocking a new dimension of design possibilities. Join us on this journey and let your imagination soar! 🚀🎨💥
1 note
·
View note
Text
New video - Photoshop Daily Creative Challenge - Custom Brush on @YouTubeNew video – Photoshop Daily...
New video - Photoshop Daily Creative Challenge - Custom Brush on @YouTube
New video – Photoshop Daily Creative Challenge – Custom Brush on @YouTube
Via Adobe Creative Cloud
Challenge: Create an optical illusion illustration using custom brushes.
Get the starter file here: https://bit.ly/psdcc6-21-7
Join your host each morning at 9:00am PT to learn how to approach each challenge using Photoshop. Complete 9 challenges by Friday, July 2nd and you’ll be on your way to sharpening your skills. Get your questions answered, see what the community…
View On WordPress
from hip hop news source https://ift.tt/2UTIiEB
via what is social marketing
0 notes
Text
New video - Photoshop Daily Creative Challenge - Custom Brush on @YouTube
New video – Photoshop Daily Creative Challenge – Custom Brush on @YouTube
Via Adobe Creative Cloud
Challenge: Create an optical illusion illustration using custom brushes.
Get the starter file here: https://bit.ly/psdcc6-21-7
Join your host each morning at 9:00am PT to learn how to approach each challenge using Photoshop. Complete 9 challenges by Friday, July 2nd and you’ll be on your way to sharpening your skills. Get your questions answered, see what the community…
youtube
View On WordPress
0 notes
Photo

Op Art in Adobe Illustrator. Tutorial link : https://www.vividesigning.com/2020/06/how-to-create-op-art-in-adobe.html #vividesigning #adobeillustrator #graphicdesign #opticalart #opart #opticalillusion #optical #visualart #visual #illusion #illusioneffect #adobeeffects #vectorart #artwork #artist #artistoninstagram #artoftheday #postoftheday #illustratorart #art #abstractart #GraphicDesignersGroup #graphicdesigner #IAClub #designer #indianartist #3d #3deffect https://www.instagram.com/p/CA8ck-rjGGl/?igshid=1rbyxxworf8l
#vividesigning#adobeillustrator#graphicdesign#opticalart#opart#opticalillusion#optical#visualart#visual#illusion#illusioneffect#adobeeffects#vectorart#artwork#artist#artistoninstagram#artoftheday#postoftheday#illustratorart#art#abstractart#graphicdesignersgroup#graphicdesigner#iaclub#designer#indianartist#3d#3deffect
0 notes
Text
New video - Photoshop Daily Creative Challenge - Custom Brush on @YouTubeNew video – Photoshop Daily...
New video – Photoshop Daily Creative Challenge – Custom Brush on @YouTubeNew video – Photoshop Daily…
New video – Photoshop Daily Creative Challenge – Custom Brush on @YouTube
New video – Photoshop Daily Creative Challenge – Custom Brush on @YouTube
Via Adobe Creative Cloud
Challenge: Create an optical illusion illustration using custom brushes.Get the starter file here: https://bit.ly/psdcc6-21-7Join your host each morning at 9:00am PT to learn how to approach each challenge using Photoshop.…
View On WordPress
0 notes
Text
How to Add a Glowing Photo Effect to a Portrait in Photoshop
What You'll Be Creating
With Photoshop actions, you can create your own Photoshop filters to use with a single click on any image. In this tutorial, I'll show you how to create a Photoshop portrait action to add a glowing effect to a photo. This photo effect can be later applied to other photos as well! Follow me to learn how to create this cool Photoshop effect of a glowing pattern on the skin.
The effect we'll be working on here is based on African tribal makeup. Rather than being only a decoration, it has a deep meaning in the cultures that created it. The pattern may mark a person as a member of a specific tribe, show their status in the tribe, or have a special religious meaning. By creating a glowing effect for this makeup, we're going to accentuate its significance.
If you're interested in tribal-inspired effects like this one, you may also like the work of our author Kaylan Michael:
Photo Collage
How to Create a 3D Floral Collage in Adobe Photoshop & Lightroom
Kaylan Michael
Photo Collage
How to Create a Vintage Photo Collage in Adobe Photoshop & Lightroom
Kaylan Michael
Patterns
How to Create a Tribal African Inspired Pattern in Adobe Illustrator
Kaylan Michael
This tutorial was inspired by Evgeniya Osipova's rendition of Raquel Trave's character.
Follow along with this tutorial over on our Envato Tuts+ YouTube Channel:
How to Add a Glowing Photo Effect to a Portrait in Photoshop
Step 1
Open your photo. It's best to use a dark-skinned model for better contrast. I used this one.
Make sure that your image is on the Background layer. If not, go to Layer > New > Background from Layer.
Create a New Layer and paint the areas that you want to make glow. You can also select them with a tool of your choice and fill the selection with color. Name this layer mask 1.
Step 2
Create another layer. This time, select the eyes of the model. This way, we will be able to keep them bright, but not glowing. Name this layer mask 2.
Step 3
Click under the layer to deselect them. Then open the Actions panel and create a New Action. Give it a name. From now on, everything you do in Photoshop will be recorded.
Step 4
Go to Image > Image Size and round the top value. This will allow us to use a similar size for every photo that this Photoshop action will be applied to.
Step 5
Hide both masks. Hold Control and click the thumbnail of mask 1 to make a selection out of its contents. Go to Select > Inverse, and add an Exposure adjustment.
Step 6
Lower the Exposure to darken everything except the selection.
Step 7
Let's brighten the eyes now. Take the selection from mask 2 and click the mask of the adjustment layer. Then go to Edit > Fill and fill the selection with black to reveal the eyes. Deselect.
Step 8
Take the selection from mask 1 and create a New Layer. Go to Edit > Fill and fill it with white. Deselect. Name this layer white.
Step 9
Duplicate the white layer by pressing Control-J, and go to Filter > Blur > Gaussian Blur. Adjust the strength of the blur to create a subtle glow.
Step 10
Duplicate the layer and add a Hue/Saturation adjustment to it. Clip it and check Colorize. Change the color to a highly saturated red.
Step 11
Change the Blend Mode to Color. Now the skin looks as if it's glowing from the inside as well.
Step 12
Duplicate the white layer. Go to Filter > Blur > Gaussian Blur and add a little blur, to create a concentrated glow.
Step 13
To make this effect subtler, add a Layer Mask to it. Select it, and then go to Filter > Render > Clouds.
Step 14
Duplicate the white layer. Go to Filter > Blur > Motion Blur. Create a strong blur that makes an optical illusion of a shining effect. Change the Blend Mode to Soft Light.
Step 15
Make the effect subtler by adding a Layer Mask with Clouds.
Step 16
Duplicate the original background layer and drag it to the top. Go to Select > Color Range and select Highlights.
Step 17
Hide the layer and add a Curves adjustment. Change its Blend Mode to Overlay and drag the curve to accentuate the highlights that could have been lost by the darkening of the whole picture.
Step 18
Let's add a yellow glow now. Duplicate the white layer and double click the original to access its Layer Style panel. Check Outer Glow and change its Blend Mode to Vivid Light. Adjust the settings to add a concentrated glow.
Step 19
To make the glow more variable, go to Blending Options and drag the lower black marker to the right. Hold Alt to split it for a more gradual effect. By dragging this marker, you remove the effect from the darkest parts of the photo. You can adjust the intensity of this effect by changing the Opacity of the whole layer.
Step 20
Duplicate this layer and make the glow wider. Experiment with the settings to keep the effect eye-catching, yet still natural.
Step 21
Duplicate the layer once more to strengthen the glow if you want. Change the Blend Mode of the glow to Normal and create a more visible glow with it.
Step 22
Now that we've achieved our desired effect, click Stop Recording.
If you want to apply the same effect to other photos now, it's very simple. Just paint the masks, selecting the eyes and the pattern, and click Play. Everything you did earlier will be done to these new photos, and you just have to wait for the end result to appear.
Photoshop Actions With Photo Art Effects
Photoshop Glowing Photo Effect
If you want to add other cool effects to your photos, you can save a lot of time by using Photoshop actions created by experts on Envato Elements. For example, this complex action turns your photo into a greyscale artwork with glowing elements. Just think how long it would take to create something similar on your own! But since it's an action, you just have to click Play.
Photoshop Glowing Photo Effect
Photoshop Storm Photo Effect
This Photoshop action adds a raging storm to your photo, with lightning and extreme color correction. Despite it being so automatic, the effect is very realistic and powerful. You can create an amazing poster this way in a matter of seconds!
Photoshop Storm Photo Effect
Photoshop Magical Light Photo Effect
If you want to turn your photo into art, this Photoshop action will be perfect for you. It adds unique magical effects, changing the colors, adding textures, and modifying the lighting. It's hard to believe that it can all be done with a single click!
Photoshop Magical Light Photo Effect
Photoshop Glowing Eyes Photo Effect
But there are also simpler, more specific actions like this one. It changes the eye color, offering a few different effects. For example, you can make the eyes glow, or make them shiny black.
Photoshop Glowing Eyes Photo Effect
Now you know how to create a Photoshop action with a glowing photo effect. If you're interested in photo manipulations, you may also like these tutorials:
Fan Art
How to Create a Black Panther Movie-Inspired Photo Manipulation in Photoshop
Melody Nieves
Photo Manipulation
How to Create an Egyptian Goddess Manipulation in Adobe Photoshop
Melody Nieves
Photo Manipulation
How to Create an 80s-Inspired Double Exposure Manipulation in Adobe Photoshop
Melody Nieves
Photo Manipulation
Make a Trendy Double Exposure Effect in Adobe Photoshop
Yulia Sokolova
from Envato Tuts+ Design & Illustration http://bit.ly/2VBABBB via http://www.webmasterforum.ws/rankwyz-discount-code-2015-coupons/
0 notes
Text
New video - Illustrator Daily Creative Challenge - Optical Illusion on @YouTube
New video – Illustrator Daily Creative Challenge – Optical Illusion on @YouTube
Via Adobe Creative Cloud
Challenge: Create an optical illusion using the Blend Tool and 3D shapes.
Get the starter file here: http://bit.ly/aidcc2-1-6
Join your host each morning at 11:30am PT to learn how to approach each challenge using Illustrator. Complete 9 challenges by Friday, February 12th and you’ll be on your way to sharpening your skills. Get your questions answered, see what the…
youtube
View On WordPress
0 notes
Text
personal statement
My main interest in art began with my interest in visual mediums, such as graphics and illustration. My love for illustration and reading graphic novels lead me to discover my enjoyment for film; specifically the book 'Signal to Noise' by Gaiman and McKean. This graphic novel shows a filmmaker who is dying and is trying to complete his film before he dies, which ends up being a film that only the reader will witness. This graphic novel ties in the visual aspects of both film and illustration with the pleasing layout patterns that films follow, and gritty and textured drawings that tie the narrative together.
I love to use my humour in and outside of my work. I am currently in an 'illusion band' called ULCER. My bandmate and I create a façade that we are producing music but we have yet to release a song. Even without a song, we have made an album and singles with covers with the hopes that we might finally, one day, release a song. We describe our music to be 80's pop-synth-rap with undertones of Russian classical music, and as of now we have only planned our future gigs to take place in Portland (Weymouth, not Oregon).
I think that I am benefitting a lot from the foundation course I am doing at AUB. Having started in the art and design side of the course, I was using more hands-on techniques to creating pieces of art which is something that I enjoy a lot. I had decided to pursue film for my pathway because it was something that I was not too familiar working with, and I am always looking for new techniques to learn in different forms of art. One thing that interests me the most about film is the technical side to it; I understand how useful it is to be able to use Photoshop and other Adobe software to a professional level, as it has helped me a lot to be able to make high quality pieces of art.
I have a specialist interest in sound and sound design. My understanding of sound is that it is not just about what you hear, but about what you can feel from it. Vibrations from sounds and the repetitive nature of music have helped people around me begin to overcome their disabilities which is where my interest in sound design started. I have also grown up playing and listening to different genres of music.
A composer who interests me the most is Basinski. Before discovering Basinski, I had thought that music and sounds were very controlled; after listening to his "Disintegration Loops" I had realised that sound was something quite abstract and that it could not be controlled.
I am also fascinated by "The McGurk effect"- an audio and optical illusion that causes someone to hear a different sound when the visual component of the sequence is changed. In the McGurk effect, the visual parts of the sequence will always dominate over the audio part of it in our brains.
I am really interested in taking this course so that I can learn more specialised skills, and how to incorporate the sound aspects to visuals that I will create. Coming from a multicultural background, I am always keen to meet new people who share the same enthusiasm for the subject as me and to also show my enjoyment for sound and film. I will also bring an aspect of humour and a willingness to collaborate with other people on the course.
0 notes
Text
What did you do this week?
Today, we’ve looked up to program called Adobe Illustrator, which is a program similar to Photoshop, but offers you different options much more interface in my opinion. We were task to experiment and create random shapes using “Op Art” techniques.
What did you learn?
I have learned interesting facts about “Op art” and how it’s used to create an optical illusion.
How do you feel about the work you have produced?
In fact, this was my first experience using this program, so I do not feel as confident as if I was familiar with it, It was just the first lesson though, I will get better next time. the more time I spend using it the better I get.
What is left do?
As it was just disposable task, I am not sure what is there left to do.
How could you add to this /what extra work or research could you do?
My favourite YouTube tutorials are always pretty helpful and educative in terms of this section.
0 notes
Last Seen Blogs

vernagomez-blog
Gutter Cleaning
lovergirlfeetandtoes
Feet And Toes
anthropoplexy
Anthropoplexy

thunderingguardian
thundering god