#howtorepair
Photo
Building and fixing! Books to help you . Coming to the Annapolis Royal farmers market both Friday night - June 3rd and the Saturday morning market at market square. See you there. #farmersmarkets #maregoldbookstore #booksaboutwood #nonfictionbooks #instructionbook #bookstagram #buildingbooks #buildingfurniture #homeblacksmith #howtorepair #stonework #workingwithwood #tablesaw #benlaw #woodlandcraft #booksatfarmersmarket #makingwoodenspoons https://www.instagram.com/p/CeTMqyfOYEa/?igshid=NGJjMDIxMWI=
#farmersmarkets#maregoldbookstore#booksaboutwood#nonfictionbooks#instructionbook#bookstagram#buildingbooks#buildingfurniture#homeblacksmith#howtorepair#stonework#workingwithwood#tablesaw#benlaw#woodlandcraft#booksatfarmersmarket#makingwoodenspoons
0 notes
Text
Full video link https://youtu.be/SVsISd2ZXeY
NO AIR Nebulizer Machine | portable Nebulizer | shorts
#khempurrepair #howtorepaire
#nebulizer #nebulizerrepair
0 notes
Video
How to replace Allen Bradley PanelView 550 Repair Kit? Learn how to repair a broken 2711-B5 K5 HMI. It's expensive to replace a new machine, so why not replace the parts if you can solve the problem by replacing the parts? This short repair video will save you time, money, and frustration! Plus you get to learn some cool stuff!
More detail:
https://www.youtube.com/watch?v=QfzTXanoa3s
#touchscreen #keypad #lcd #display #plasticcase #vicpas #housing #allenbradley #repair #replacement #howtorepair #panelview550
1 note
·
View note
Photo

There are some basic How to(s) that we should be learning in preparation for real life situations, i.e How To Hustle and Win. • #supremeunderstanding #supremedesignpublishing #howtohustleandwin #howtoprovide #howtosecure #howtoprepare #howtoplan #howtostructure #howtogrowfood #howtoteach #howtorepair #howtonavigate https://www.instagram.com/p/CW_PjBPLNR1/?utm_medium=tumblr
#supremeunderstanding#supremedesignpublishing#howtohustleandwin#howtoprovide#howtosecure#howtoprepare#howtoplan#howtostructure#howtogrowfood#howtoteach#howtorepair#howtonavigate
0 notes
Photo
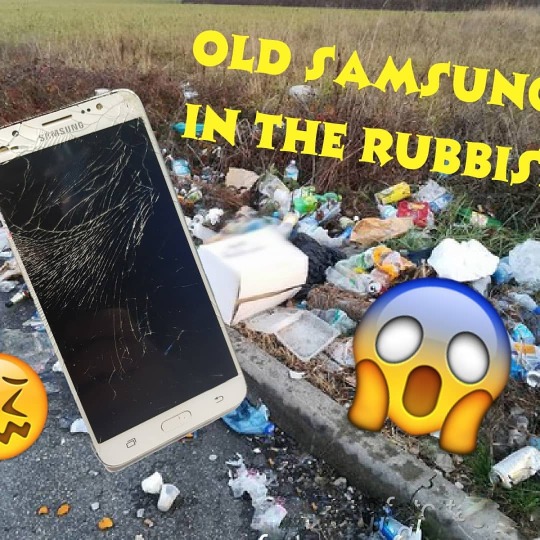
https://youtu.be/yxHvI0VCvJk #restoration #howtorepair #Samsung Restore Old Samsung J7 2016 found in the garbage ⚡️⚡️⚡️⚡️⚡️⚡️⚡️⚡️⚡️⚡️⚡️⚡️⚡️⚡️⚡️⚡️⚡️⚡️⚡️⚡️⚡️⚡️⚡️⚡️⚡️⚡️⚡️⚡️⚡️ Se vi interessano gli argomenti trattati e non volete perdere i nuovi video 👉 iscrivetevi al canale 👉 commentate 👉 mettete "mi piace" ai video 👉 condividete i video con i vostri amici !!! *****SOCIAL MEDIA LINKS***** instagram 👉 https://www.instagram.com/trickandtest/ Pagina Facebook 👉 https://www.facebook.com/trickandtest Gruppo Facebook di supporto e assistenza 👉 https://www.facebook.com/groups/689986638496456/ per collaborazioni 👉 [email protected] https://www.instagram.com/p/CCOMsdiqyco/?igshid=zr2vxeyr7pyn
0 notes
Video
youtube
How to Repair Quick Pot MultiCooker Not Working Heating
0 notes
Text
How to Repair Scratched Leather
If you have got any scratched leather product and cannot understand how to get it fixed, we request you not to worry any more. Because, today we are here to present you with a fabulous guideline of repairing the scratched leather products. You are humbly recommended to stick to the end. Otherwise, your experiment will turn into a nightmare. Here we go!
CLEANING
At first, you must clean the scratched area to remove the seen or unseen grime and dirt. For this, you can adopt either ‘Leather colorant kit’ or ‘Leather repair touch up kit’. In case, you’re using the second one, we recommend you not to use airbrush rather a sponge in the rest of the steps.
TRIMMING
Then, trim the loose fibers of the scratched area using a pair of scissors. Remember that only the lengthy fibers are to be trimmed. Be careful so that no cut or puncture is caused to the leather.
APPLYING
Once the trimming is done, apply some leather binder on the affected area. For better application, you should have a quality sponge. Dive the sponge into or wet it with the binder and rub it directly over the damaged area. Apply at least 8 to 10 layer of binder and before every fresh application let the previous one dry properly.
SANDING
In this phase, you are to have a piece of sandpaper. Rub it lightly all over the area where you have applied binder a while ago. Make sure that no residue is left. This will create an even and smooth surface.
APPLYING FILLER
Next, apply some heavy filler on the sanded area with a palette knife. After a single application, you should wait for half an hour to let the filler to be dried up. If you feel like a single filling isn’t sufficient then apply some more and wait for the same duration.
SANDING
Again, it’s time to do the sanding. Sand the filler properly with 1200-grit sandpaper. After sanding, wipe the area down using the alcohol cleaner, otherwise, your application of color will be a failure.
APPLYING COLORANT
Now, this is time to apply the first layer of colorant. For this, at first, wet a sponge with some colorant and rub it over the scratched area. Once a thin layer of the colorant is created, sand the area, and again re-apply the colorant.
SPRAYING COLORANT
After that, apply layers of colorant to hide the repair and level it with the surroundings. In case of your using of colorant kit, adopt a airbrush for spraying. On the contrary, adopt a sponge, if you have been using complete leather repair kit.
FINISHING
Next, apply lacquer in three layers at least using a airbrush or sponge. This will make the repairing flexible and robust. Finally, apply the leather finish. Remember that there must be a sufficient gap between the two applies.
FINAL WORDS
Although the entire procedure seems to be a bit complex yet it’s not. Before reaching any conclusion you should adopt the procedure at least once. We guarantee you won’t be dissatisfied. In case, you are highly disinterested in following literally any procedure but at the same time want the scratches repaired, we strongly recommend you to consult TMpatchupfor a mind-blowing solution.
https://tmpatchup.com/collections
0 notes
Video
youtube
Restore smartphone VIVO | Restoration Destroyed Phone ( HowToRepair )
0 notes
Video
Xbox one's with NO video issues can be solved at TDR. Send in your broken xbox one today and don't worry we got it. We have the best tools and most experience. To learn how to repair xbox ones follow our YouTube channel. #repairtech #learntorepair #howtorepair #tdr #xboxonerepair #troubleshootxbox #xboxtips #xboxonenovideo #brooklyn #nyc #miami #xbox #xboxone #fixxbox #repairxbox #youtube https://www.instagram.com/p/BmUbRjZHLdQ/?utm_source=ig_tumblr_share&igshid=1l67952u0ufan
#repairtech#learntorepair#howtorepair#tdr#xboxonerepair#troubleshootxbox#xboxtips#xboxonenovideo#brooklyn#nyc#miami#xbox#xboxone#fixxbox#repairxbox#youtube
0 notes
Text
New video link https://youtu.be/SVsISd2ZXeY
NO AIR Nebulizer Machine | portable Nebulizer | Nebulizer repair
#khempurrepair #howtorepaire
#nebulizer #nebulizerrepair

0 notes
Text
New video link https://youtu.be/vzQGD9djcZo
Steplizer Best AC BUZZER | stabilizer voltage problem | how to repair stabilizer at home
#khempurrepair #voltagestabilizersetting
#stabilizerrepairing #voltagestabilizer
#voltmeter #volt_meter
#stabilizer #howtorepair
#repairing #repair
0 notes
Text
New video link https://youtu.be/vzQGD9djcZo
Steplizer Best AC BUZZER | stabilizer voltage problem | how to repair stabilizer at home
#khempurrepair #voltagestabilizersetting
#stabilizerrepairing #voltagestabilizer
#voltmeter #volt_meter
#stabilizer #howtorepair
#repairing #repair

0 notes
Text
How to Repair a Tear in Leather?
Are the wear and tear on your expensive leather objects bothering you? If yes, why not try fixing them and bring back life in to them? You will be able to do that very easily by just following some simple guides that we have written in detail below. You will be able to repair tear of not only leather couches, but of jackets, car interiors, other leather clothing and as well as other leather objects.
Step 1: Getting tools ready: If the tear of your leather is no less than the size of a genuine cricket ball or if it way too nasty to look at, get yourself one of the best and well renowned leather repair kit.
Step 2: Prepare the damaged area: Using a pair of sharp scissors trim the uneven edges of the tear that has been making your leather look ugly. Sharper and clean edges will result in the repair to look professional.
Step 3: Inset sub-patch: The leather kit that you have chosen will definitely contain tweezers and a sub patch. Insert that sub-patch into the tear that you are repairing with the help pf the tweezers.
Step 4: Securing the sub-patch: After you have inserted the sub-patch behind the leather tear. Using a leather glue, you will need to secure the patch into place. To do so, apply glue beneath the leather edges that has been trimmed previously. And then stick the leather edges to the patch. Press the leather after the glue has been applied and allow the glue to dry.
Step 5: Application of leather filler: You will need to fill in the gap in the leather after inserting the sub patch. So leather fillers are applied to fill in the gap and make it even with rest of the leather. Thin layers of the filler are applied onto the gap until the tear repair has been blended in well with the rest of the leather. Make sure that it each layer has dried down before you apply the next. To make the drying process quick, use the help of a hair dryer.
Step 6: Apply colorant: After the leather filler has dried down completely, color needs to be applied. Take a small amount of the colorant on a sponge and then apply it to the damaged area you have repaired. Apply the colorant multiple times until it has caused the repair area to get concealed and blended with the rest of the leather.
Step 7: Apply leather finish: After the colorant has dried down and the repair is no longer noticeable. The leather finish is that final step that you need to complete. Using a sponge, apply leather finish onto the damaged area. Apply multiple layers until the repair seems completely blended in with the rest of the leather. Also, allow each layer to dry after you apply before applying the next one.
Final verdicts:
To sum up, sending damaged leather objects to repair centers is truly tiresome and not cost effective. By just following some easy and simple steps you will be able to repair the objects at home to ensure a long lasting repair effect.
https://tmpatchup.com/collections
0 notes
Video
youtube
rizzle app se paise kaise kamaye rizzle app payment proof #KUMARSHAILENDRA #rizzleapp #rizzle #Kumarshailendra #Kumarshailendr #tecnicalkumar 😱TODAY'S AMAZON OFFERS😱 https://amzn.to/33tqBwf 1. MY MIC BOYA M1 https://amzn.to/35BpH3k 2. MY GREEN SCREEN https://amzn.to/3mcoSUu 3. MY TRYPOD STAND https://amzn.to/2Zvkwhy 4. MY LIGHTNING STAND https://amzn.to/2Fi6Yzi 5. MY MOBILE PHONE https://amzn.to/3kiXwuh 6. MY LAPTOP https://amzn.to/33FdJTZ friends if you want talk to me personally so don't forget to follow me on Instagram... https://ift.tt/3kfQfve FRIEND HERE ARE SOME IMPORTANT VIDEO 1. WHATSAPP SE PAISE KAISE KAMAYE https://youtu.be/i2OIob2gj6U 2. GAMEZOP SE PAISE KAISE KAMAYE https://youtu.be/Ub-YfbzQ3ss 3. PAIDERA PAYMENT PROOF https://youtu.be/JeQYX9BwQug 4. ROZDHAN SE PAISE KAISE KAMAYE https://youtu.be/F-0PwNAGn5w 5. MAL91 SE PAISE KAISE KAMAYE https://youtu.be/ngNmfOqtUu8 Rizzle, Rizzle app Se Paise Kaise Kamaye, Best Earning Source, earn money from rizzle app, app se paise kaise kamaye, bina monetized Ke Paise Kaise Kamaye, earn Money Without Monetized, Earn Money Online In 2020, rizle app, rizel app, rizzel rizzle app se paise kaise kamaye, rizzle app se paise kaise kamaye 2020, rizzle app se paise kaise kamaye referral code, rizzle app se paise kaise kamaye telugu rizzle app se paise kaise kamaye, how to use rizzle app, rizzle app monetization enable kaise karen, abhay Singh Rathore banna, rizzle app, rizzle app payment proof, rizzle app review, abhay singh rathoer banna, earn money from rizzle app, rizzle app monetization, rizzle app earnig tips, rizzle app referral code rizzle app se paise kaise kamaye, rizzle app review, drizzle app, rizzle app se earning kese karen, rizzle app se paise kamane ka asan tarika, online app money earn, online money app 2019, best mobile app for earning money in india, best earning app for india, best earning app 2020, best earning app 2020 in bangladesh, rizzle app hack, how to use rizzle app, rizzle app use kaise karen hindi, gott technical, rizzle app earnig, rizzle app earnig tips, rizzle app drums, rizzle Rizzle app Payment Proof | How to earn Rizzle app | #rizzle | rizzle app se paisa kaise kamaye ?, rizzle app se paise kaise kamaye, earn money from rizzle app, rizzle app, rizzle app se paisa kaise kamaye ?, How to earn Rizzle app, Rizzle app Payment Proof, rizzle app se paise kamane ka asan tarika, rizzle app se earning kese karen, rizzle app use kaise karen hindi, rizzle app earnig tips, rizzle app review, best earning app 2020 in bangladesh, best earning app for india Rizzle app per मेरी earnings कितनी है, rizzle app se kamai paisa, earn money from rizzle app 2020, abhay singh Rathore banna, rizzle app, Rizzle app monetization on my channel, rizzle app per monetization enable kaise karen, rizzle app se paise kaise kamaye, rizzle app monetization, rizzle app per channel Banakar paisa kaise kamae, rizzle app ko use kaise karen 2020, use rizzle app, rizzle app payment proof, how to rizzle app, rizzle monetization on rizzle app payment proof, rizzle app payment proof tamil, rizzle app payment proof telugu, rizzle app payment proof malayalam Rizzle, Rizzle app Se Paise Kaise Kamaye, Best Earning Source, earn money from rizzle app, app se paise kaise kamaye, bina monetized Ke Paise Kaise Kamaye, earn Money Without Monetized, Earn Money Online In 2020, rizle app, rizel app, rizzel rizzle app, rizzle app se paise kaise kamaye, rizzle app earning, rizzle app short videos, rizzle app earning proof, rizzle app referral code, rizzle app payment proof rizzle app review, rizzle app se paise kaise kamaye, rizzle app payment proof, how to earn rizzle app, rizzle app se, rizzle app se earning kaise karen, rizzle app monetization, rizzle app money, how to earning money from rizzle app, how to earning money form 360 finess rizzle, 360 fitness rizzle app, 360 fitness se paise kaise kamaye, rizzle app founder, rizzle app tutorial, rizzle app me followers kaise badhaye, how to increase followers on rizzle app, gott technical Rizzle app se kya hota hai, paise kaise kamaye, rizzle app short vidro, refer karke paise kaise kamaye #Howtomake #Howtotrack #Howtorepair #Howtoget #Howtostart #Howtouse #Howtogo #Howtosafe #Howtorecover #Aajkitajakhabarkyahai. #Aajkikhabar #Kyakhabarhai #Kamkibate #Karanekatarika #Kyahai #Kaisehotahai #Kaisehoga #Kyahotahai #Kaisejaye #Kaisekhaye #Janekatarikakyahai #Aanekatarikakyahai #Kaisehoga #Kaisehotahai Dhnyavad aap sabhi ko hardik aabhar Kumar shailendra #Kumarshailendra #postmortem #postmortemhouse #maut #dathwarant #क्याहोगाजब #कैसेहोगाअब #क्युहोताहै #कहाहोगा #कबहोगा #कैसेकियाजाताहै #आजकीताजाखबर #आजकासमाचार #ऑनलाईनकैसेकमाए #पैसाकैसेकमाए #पैसाकमानेकातरीका #पैसाकैसेबनायाजाये #पैसाकमानेकेतरीके #पैसाकैसेलायाजाये #ऑनलाइनकैसेकमाए #कैसेआये #कैसेजाये #क्यातरीकाहै #जॉबकीसूचना #जॉबकीतलास #पोस्टमार्टमरिपोर्ट #पोस्टमार्टमहाउस by KUMAR SHAILENDRA
0 notes
Last Seen Blogs

17june7inches
luckyguy

onlymewhenimwith-tay
Too Busy Dancing

spacegenderwitch
"There's no more rules here."

elarafritzenwalden
ELARA FRITZENWALDEN

theartfuldodgerbodger
Slowly Descending Into Madness