#png was too big a file size to upload so i had to run this through the jpeg shredder
Text
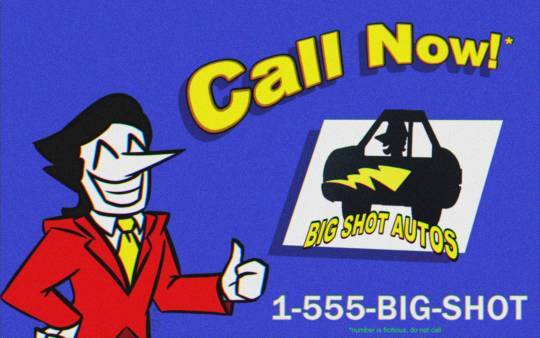
A year ago I was inspired to make something that captured the exact aesthetic of a vintage, degraded VHS recording from the 90s, and I think I'm pleased with what I attempted.
#deltarune#spamton#spamton g spamton#big shot spamton#my drawings#the only reason this was wip for a year was because i didn't know what to do for the logo#ended up just stealing the cungadero crossing sign#i don't think i'll put this amount of filters and effort into anything ever again#look at him. smug asshole.#he really does look like that guy in commercials that suddenly disappeared one day and nobody knows what happened to him#png was too big a file size to upload so i had to run this through the jpeg shredder#now some of the text is probably illegible but i guess that makes it authentic
202 notes
·
View notes
Text
Version 438
youtube
windows
zip
exe
macOS
app
linux
tar.gz
Hey, this causes errors if you are running from source and using PyQt5 (PySide2 is fine)! All the releases above are PySide2, so they are ok! I will fix this for next week, so if you are source+QtPy5, please hold off for now.
I had a great week overhauling the media viewer's image rendering. Zooming and navigation should be a lot smoother now!
image tiles
tl;dr: the media viewer now zooms and navigates with less lag and flicker
Zooming in a long way, particularly for large images, has been pretty hellish for as long as the program has existed. Historically, the client drew the whole image in memory at the zoom you desired so it could quickly show you the bit it needed on screen. Of course this meant zooming in to 400% on anything above 4k was suddenly taking a very long time to set up and eating a lot of memory to do it. As images have naturally grown over time, the problem has occurred more often and was starting to affect other systems.
My plan to fix this has been to break the image into tiles that then render on demand. The parts of the image off-screen are never drawn, saving CPU and memory and allowing arbitrary zoom. This is a significantly more complicated idea, and rewriting the whole rendering pipeline was always expected to be a multi-week 'big job'. I originally planned to just optimise and tweak the secondary systems and add in some sanity brakes this week, but I ran a couple of small tiling tests and realised if I went bonkers it would be possible to hack in a prototype. So I did!
In the media viewer, images now draw in tiles. It works a little like a browseable satellite map, where when you zoom in and pan about you see squares of data fading in (except in hydrus they appear instantly). You should now be able to zoom in as far as you like on an image pretty quick and you won't have any sudden memory needs.
Furthermore, I have written a cache for these image tiles. This saves CPU when revisiting different images or zooms, so when you flick back and forth between two normal things, it should now be instant! It still takes 20-200ms to view or zoom most images the first time, but going back to that view or zoom within a minute or so should be really smooth. The cache starts at a healthy 256MB this week. I think that will cover most users very well (in screen real estate, it works out to about 35 x 1080p worth of tiles), but you can alter it under the settings at options->speed and memory.
And I did some misc work improving the rendering pre-fetch logic when you browse in the media viewer. Huge files won't stomp all over the image renderer cache any more, which should make browsing through a series of giant images far less jank. If you are feeling advanced, you can now edit the prefetch timing and distance settings too, also under options->speed and memory.
I am really pleased with this week's work, but there are some drawbacks: I did it quick, so I cannot promise it is good. The most obvious bug already is that at around 200-500% zoom you start to see tiling artifacts. I know what causes this (interpolation algorithms not getting full pixel neighbour data from my simple tesselating tiles) and have a plan to fix it (adding a tile border pre-resize, and then cropping). There is also an issue when the 'virtual' image exceeds about 32,000x32,000, so I hacked a zoom block for that. There may be some weird files that render with other stitching artifacts or bad tile data. Note also that hydrus's 'Animation' renderer (the soundless fallback if you do not have mpv support) does NOT use tiling yet, so it still sucks at zooming! Please let me know how you get on!
If you have a steam-powered GPU or a machine with only 4GB of ram, you might like to wait for 439 so I can address any surprise bugs or performance issues.
PTR and account permissions
The PTR is changing how its accounts work. The shared public account is transforming to a 'read-only' account that can only download, so if you want to upload, you'll be going to manage services to auto-create your own privileged account. This is being done to improve janitor workflow for the various petitions, which were all being merged together because of the shared account. With the recent network updates, it will soon be easier for janitors to send simple messages back to these individual accounts, like 'that proposed sibling was not approved because...'.
Unfortunately, various permission and account-management code has not been tested much until now, so as the PTR guys have been trying this stuff out, I have been working to improve bad notifications and workflows. This week I rounded out account permissions testing with uploading. Hydrus no longer tries to upload content the current account does not have permission for, and if you end up in that situation, popup messages now tell you what is going on. It also catches if your account is currently 'unsynced', with instructions to fix.
Similarly, under 'manage siblings/parents', you can now see and edit all tag repositories (previously, they were hidden if you currently had no permission), but you get a label telling you if you don't have permission.
full list
media viewer:
I have hacked in tile-based image rendering for the media viewer. this has always been planned as a larger, longer-term job, but the problem of large images is only getting worse, so I decided to just slam out a prototype in a week. if you have a steam-powered GPU or 4GB ram, you might like to wait until next week to update so I can iron out any surprise bugs or performance problems
images are now cut into tiles that are rendered on demand, so whenever the image is zoomed larger than the media viewer window, only those tiles currently in view have CPU and memory spent on resizing and storage. as you pan around, new tiles are rendered as needed, and old discarded. this makes zooming in super fast and low memory, even for large images!
although I am happy with this, and overall we are talking a huge improvement on previous performance, it is ugly fast code. it may fail for some unusual files. it slices and blits bitmaps around your video memory much faster than before, so some odd GPUs may also have problems. I haven't seen any alignment artifacts (1-pixel thick missing columns or rows), but some images may produce them. more apparent are some pretty ugly tile artifacts that show up between 200% and 500% zoom (interpolation algorithms, which rely on neighbour pixels, are missing border data with my simple system). I will consider how best to implement more complicated but stitch-correct overlapping tiles in future
futhermore, a new 'image tile' cache is added. you can customise size and timeout under _options->speed and memory_ like for images and thumbnails. this is a dedicated cache for remembering image resize computation across images and zooms. once you have seen both situations once, flicking back and forth between two images or zoom levels is now generally always instant! this new cache starts at a healthy default of 256MB. let's see how that amount works out IRL--I think it will be plenty
I tuned the image renderer cache--it no longer caches huge images that eat more than 25% its total size--meaning these images only hang around as long as you are looking at them--and the prefetch call that pre-renders several files previous/next to the current image no longer occurs on images that would eat more than 10% the cache size. this should greatly reduce weird flicker and other lag when browsing through a series of mega-images (which before would stomp through the cache in quick succession, barging each other out of the way and wasting a bunch of CPU). in real world terms, this basically means that with an image cache of 200MB, you should have slower individual image performance but much better overall performance looking at images with more than about 5k resolution. the dreaded 14,000x12,000 png will still bonk you on the head to do the first render, but it won't try to uselessly prefetch or flush the whole cache any more
if you are currently looking at a static image, neighbour prefetch now only starts once the image is rendered, giving the task in front of you a bit more CPU time
new options for prefetch delay and previous/next distance are added to 'speed and memory'
note this does not yet apply to the old hydrus animation renderer. that still sucks at high zoom!
another future step here is to expand prefetch to tiles so the first view of the 'next' media is instant, but let's let all this breathe for a bit. if you get bugs, let me know!
due to a Qt issue, I am stopping zoom-in events that would make the 'virtual' size of the image greater than 32,000x32,000
.
account permission improvements:
to group sibling and parent petitions by uploader (and thus help janitor workflow), the PTR is moving to a system where the public account is download-only and accounts that can upload content are auto-generated in manage services. this code has not been tested much before, and it revealed some very bad reporting and handling of current permissions. I move this forward this week:
if your repository account is currently unsynced from a serious previous error, any attempt to upload pending data will result in a little popup and the upload being abandoned
manage tag siblings and parents will now show service tabs even if the account for those services does not seem currently able to upload tags or siblngs
if your repository account is currently unsynced from a serious previous error, this is now noted in red text in manage siblings and manage parents
if your repository account does not have sibling/parent upload permission, this is now noted in red text in manage siblings and manage parents. you will be able to pend and petition siblings and parents ok
if your repository account does not have mapping/sibling/parent upload permission of the right kind, your client will no longer attempt to upload these content types, and if there is pending count for one of these types, a popup will note this on an upload attempt
.
the rest:
added https://github.com/NO-ob/LoliSnatcher_Droid to the Client API help!
improved some error handling, reporting, and recovery when importing serialised pngs. specific error info is now written to the log as well
fixed a secondary error when dropping non-list, non-downloader pngs on Lain's easy downloader import window, and fixed a 'no interesting objects' reporting test when dropping multiple pngs
added a 'cache report mode' to help debug image and thumb caching issues
refactored the media viewer code to a new 'canvas' submodule
improved the error reporting when a thumbnail cannot be generated for a file being imported
fixed an error in zoom center calculation when a change zoom event was sent in the split-second during media viewer initialisation
I think I fixed an issue where pages could sometimes not automatically move on from 'loading initial files' statusbar text when initialising the session
the requirements.txt now specifies 'requests' 2.23.0 exactly, as newer versions seemed to be giving odd urllib3 attribute binding errors (seems maybe a session thread safety thing) when recovering from connection failures. this should update the macOS build as well as anyone running from source who wants to re-run the requirements.txt. I hacked in a catch for this error case anyway, just a manual retry like a normal connection error, we'll see how it goes (issue #665)
patched an unusual file import bug for a flash file with an inverted bounding box that resulted in negative reported resolution. flash now takes absolute values for width and height
next week
Back to multiple local file services. Mostly more backend cleanup and prepping File Import Options and the Client API for talking to multiple locations.
0 notes
Text
Positive Celebrity review: What the show 13 Reasons Why taught us.
Positive Celebrity review: What the show 13 Reasons Why taught us. And my personal story.


Positive Celebrity review: 9/10
“Sometimes we have thoughts that even we don’t understand. Thoughts that aren’t even true—that aren’t really how we feel—but they’re running through our heads anyway because they’re interesting to think about.”
― Jay Asher, Thirteen Reasons Why
I was quiet when my father’s abuse ensued for years. That is one reason I’ve been irritated with critics and their thoughts on 13 Reasons Why. It’s more than just a Netflix original, the show is meant to teach, pain, reality, hidden emotions, bullying, crime, love, and relationships, especially, how badly people like Bryce want to change but are so confused they have no idea how to change for the better.
13 Reasons Why shares emotions that maybe you have never felt. Or maybe your the jock reading this right now who recently pushed someone into a locker.
Most importantly, the show takes a stand on “me too,” showing that even men are a part of this group. In fact, many women out there either falsely accuse men of rape (because they can) and get away with fake police reports.
Just because you didn’t live it, does it mean it’s not happening?
Truthfully, it’s not easy to talk about abuse at school or at home. Further, if we look back far enough my dad has spit on me for “being a tomboy,” and not “classy” enough to show off to his Romanian friends.
Maybe you think having a mop shoved up your ass is “going too far,” for a series, but it’s not and let’s talk about why it’s not going “too far.”

Let’s start off by a quick introduction to the show, Hannah Baker was one of the main characters in the show 13 Reasons Why and she is the one who left those tapes that lead her friends, her abusers, and those who loved her to the truth.
Ruby Rose: ‘Dreamt Big’ when she felt ‘so small.’
With that in mind, we now know that she takes each of the viewers through a whirlwind of truths, explaining the reasons why she gave up on life, shared secrets that not even I could live with, it wouldn’t be easy, in fact, it is never easy to share those open wounds with family or friends.
What did the show 13 Reasons Why teach us?
The show is based on fictional high school characters, and the series shows it’s viewers many issues that are relatable. Everything…everything from fallouts with friends, love, bullying, isolation, most importantly, the fact that it could happen to anyone.
Many can relate to using a smile to mask the pain we feel because life can be cruel at times.
Of equal importance, actions always have consequences, even the smallest actions we take, we will eventually pay the piper, much like Justin, Bryce, Clay, and the rest of the crew.
In addition, the show 13 Reasons why teaches us that there are definitely two sides to every pancake, confusing us, who told the truth, who has all the pieces of the puzzle, lastly, who to trust and who to fear.
Beyond physical abuse, the show 13 Reasons Why taught us that words are powerful. Most importantly, you cannot take back communication, it’s the one thing that cannot be reversed.
The huge impact words can have on others, don’t believe everything you hear because sometimes, it’s far from the truth, trust actions, not words.
Selena Gomez talks her show 13 Reasons Why, Disney & Rehab!
The show 13 Reasons Why takes us through each of our favorite characters, including the antagonist, giving us a feel for what happens inside the mind of someone who “rapes,” yet has no idea why they are so “fucked up,” as Bryce had mentioned in his recordings through different ways of expressing his emotions and truthful apology.
Throughout all of this, it taught us that communication is key and we should always listen to those willing to talk about the problems they face, as we all have a different trek in life.
Maybe you’re wondering how Hannah Baker committing suicide is a lesson for us to learn.
Let’s look at this way, Hannah’s first struggle, it was blunt, graphic even for some viewers. I don’t know about you but I have felt like Hannah Baker before, I was bullied in school for looking like a “little man,” and hanging out with the guys because they were my “bros,” and girls were overdramatic.
In fact, my home life was so dramatic, I didn’t need any of that other stuff in my life. The show related to me on many levels, including “me too,” I sure as hell would have stood up with the rest of those students had it been a real assembly taking place in my life.
Of equal importance, Hannah’s choice created such a ripple effect. Let’s throw down an example.
What if I had successfully killed myself in 2012 after I put my dad away in jail for taking a can opener to my head and punching my mom?
She likely would have ended her life as well, and the rest of the family would have suffered but because I was strong because the universe put something inside of me to never give up again, we are okay, we are happy, we are healing, which means one thing for anyone who can relate to home abuse.
It hurts, it’s temporary and you will take it as long as you decide but the moment you make the choice to put “the monster,” haunting you away, you will find peace, further proving that our trials are temporary and suicide irreversible forever, you can’t take it back and people you never even knew loved you, well, they’ll suffer.
It’s safe to assume many of you reading this have either been able to relate to abuse or know someone who has been abused at home or at school, or hell, even work because it doesn’t just “go away,” after you graduate.
This baggage, those fears, they all follow you through life. Most importantly, life is full of bullies who never grew up and there’s always one person you can think of at work or college that seems to have no love in their heart.
There is always one, no matter what job you take or what state you move to in order to “reset,” life.
That’s just another important fact of life that the show 13 Reasons Why taught us. Life is hard, life is blunt, life goes by fast so why waste it hurting others?
Hannah Baker’s struggle was a lesson, a cry for help that eventually leads to her death, which created that ripple from friends she didn’t personally know to teachers and parents.
The whole community mourned over her death.
Honestly, bluntly, the show 13 Reasons Why taught us endless things about life. Including the fact that every person (including you) have their own trials, barriers that slow us down or sadness deep down in our hearts, over something that happened years ago.
Backstories exist in every single living person on this planet. Painful ones because there is not one person immune to pain, not even “celebrities.”
“You don’t know what goes on in anyone’s life but your own. And when you mess with one part of a person’s life, you’re not messing with just that part. Unfortunately, you can’t be that precise and selective. When you mess with one part of a person’s life, you’re messing with their entire life. Everything. . . affects everything.”
― Jay Asher
For instance, Beliebers, you all know about Justin Bieber and his post about his past, present, and hopes for the future. But you likely thought “oh he’s rich, he must be so happy.” Well, so was Bryce and he came from a broken family. Now that’s a stretch because J-dawg has never raped anyone or bullied anyone to the point of taking their life.
We have all hurt someone, you are not excluded even if you’re reading this right now and thinking “not me,” false.
Beyond watching the show 13 Reasons Why, shouldn’t it be common sense to be kind, to spread love and to put a stop to any bullying we may see at school, work or even the most unexpected places like standing in line with someone who is racist and treating employees like shit due to their race or age.
The Last Letter to someone I loved, the devilish truth.
Critics are wrong to take the negative side and say “there is nothing good about the show.” In fact, they likely are in a lot of denial about life. They likely either never felt those emotions or maybe they were the ones doing the bullying, you just never know.
As a person who runs a positive niche, I am not afraid to say I used to bully someone, the reason being my dad bullied me, such a cause and effect, don’t you agree?
Fortunately, when I turned about 22, I apologized to anyone I thought I may have hurt and their response was beyond comforting, creating a friendship that should have existed than not just because I said sorry, the bullying never should have happened but when you get called a man at school and then go home and think the worst possible things about yourself confirmed from your own father’s mouth, it hurts.
Also, the show 13 Reasons Why gave us the perfect example of “different situations cause people to handle them in different ways.”
For example, you obviously know at this point I am part of the “me too,” movement and I didn’t give up but Hannah Baker did and so have so many other people in our real-world lives, whether it be rape, drugs or pure depression.
We all handle those treks so differently, our pain tolerances are different from the rest of the world.

However, regardless of the situation, we must always remember to be a friend because you truly never know what someone might be going through in their life. Further, not one friend of mine during middle school or high school knew about my home life but now I ask myself “what if they did at that time, not now but at that time.”
Research has shown that most people who bully are often dealing with their own battles at home, in their personal life. Justin is a prime example of abusive home life and it’s cause and effect on his external world.
He vented his anger on others at school, don’t be so quick to label someone unless you attempt to talk to them, seriously, just befriend them, give them a real reason to trust you and show that you care by being kind, you could not only save their life but trickle left behind had they not had a friend like you to come and help them out in more ways than you can possibly imagine.
With that in mind, it’s also important to remember that even though they are being abused it does not legitimize their toxic behavior, instead it will help you better understand, putting you in a place to help.
Lastly, do not be a bystander. Unfortunately, I’ve seen more fights uploaded in our new spawning generation than someone who has the guts to stop a fight they are witnessing.
Bluntly put, put your fucking phone down and do something about it, you can watch UFC if you really wanna see a fight go down.
People are wrong to say that the show had no lesson or no room for further seasons. Film and TV is about creating beauty, it’s about putting ourselves in front of that camera, vulnerable as ever and sharing with the world a story they may relate with and carry with them for life.
In my case, filming heals. It’s all about getting those emotions on the little or big screen.
To expand, the show 13 Reasons Why taught us to be a better version of ourselves than we were yesterday.
That my friends is called a successful show and we feel it deserves a 4th season, which is seemingly set up perfectly on the last episode of the show 13 Reasons Why, season 3.
Suicide should never be an option for a situation that is temporary.
If you are struggling, or know someone is struggling, remember you can always call and talk to someone who can help, further, you can approach someone and just be a friend. You never know whose lives you might save by being a friend.
The show attempts to stress these lessons and we’re not sure that many are looking at the creative side of the show rather than “that was too bloody.”
youtube
Maybe, just maybe it needed to be that way to wake someone up, such as a bully, possibly…
Maybe it was “too much,” for you but for someone else, it might wake them up and help them realize “holy sh*t I’m acting horrible and it’s time to change.”
Ditch The Label shared reasons why suicide is not an option.
Because no matter how lonely you feel. You are not alone. We are here and you matter.
Because you have a bright future which may not seem so clear, but trust us – it’s there even if you can’t see it right now.
Because there are people who care about you deeply – don’t end your story early.
Because you could save somebody else’s life with what you are going through now, somebody who in years to come, feels everything you are feeling now and only the words ‘me too’ could ever reach them. Be there to say those words.
Because help is available and millions of people all over the world have felt how your feeling and still recovered.
Because no matter how it comes across in the show, it is not glamorous or mysterious, it’s devastating to those around you
Because you are enough and deserve to be here.
National Suicide Prevention Lifeline is there to help and you can contact them by phone (Call 1-800-273-8255) or even chat.
There are so many options to seek help, if you feel that low and not comfortable talking on the phone, remember, there is also texting available.
Be strong, be kind, pick someone up off the floor and stand as an example to those around you, they will notice your love and it will spread.
If by chance you haven’t had the chance to binge-watch the show 13 Reasons Why then consider it. Maybe it isn’t your favorite genre but it’s a show that can teach you something powerful.
In fact, each of us will take something from the show, and it will likely be different for each person who takes the time to watch, listen and learn.
Have you ever been a victim? Feel free to share your story in the comments below.
Have you helped someone before?
Then, it’s your time to sound off because you never know who reads the comments, that alone can change a person’s life.
The positive vibes constantly flow, stay up-to-date by subscribing to our positive celebrity newsletter or follow us on social media.
13 Reasons Why | Justin Prentice Reads Your Letter | Netflix
youtube
The story I kept a secret.
Here I stand, listening to these letters, they hurt my heart because I too can relate. In the year of 2010, I was skating with a “Mormon,” guy.
He would sit outside with me and eventually made me feel as though I could trust him. One night at about 9 P.M., he showed up to my friend’s house where I was living at the time (my dad’s abuse was too much, so by the grace of this friend and their family I moved in) he asked me to come sit with him.
I was happy, said sure and told my friend’s parents I was going to walk my mom’s fur baby.
We walked the neighborhood but he said to me “over here is a shortcut through to the park.”
We got there and he forced himself on me, the words clear as day, “you’re going to be number 99,” followed by him sticking his fingers in where they were not welcome saying “you’re so tight.”
I felt like if I fought, I would end up dead, so I didn’t, I let it happen. And when he was done got home, took a shower, and laid in my bed crying. I never did report the mother fucker.
But the above is a picture of him was a picture of him (see still fearful) and hopefully, someone, somewhere in Utah will see this so I can go forward years later.
Walking back he knew I was upset and stated: “if you tell anyone your best friend will be next.”
I loved her, so there were only a handful of people who ended up knowing.
Lastly, at the end of the day, I would have never guessed this person I trusted would turn around and violate me.
As a virgin, I was absolutely destroyed inside and out.
You are not alone, thank you to the cast and crew of 13 Reasons Why for helping me heal, for showing the world what happens, for being genuine and turning this passion project into utter healing for many of us who watch the show.
To end, Christopher, you know what you did, I don’t know where you are, or what you’re doing, or even your last name. But I hope that one day all the people you hurt before me, heal.


The post Positive Celebrity review: What the show 13 Reasons Why taught us. appeared first on Positive Celebrity News and Gossip.
No related posts.
from WordPress https://positivecelebrity.news/2019/09/04/positive-celebrity-review-what-the-show-13-reasons-why-taught-us/
0 notes
Text
How to make Tiny Planets [and Panoramas]
Make fancy looking things without going broke buying Creative Cloud.
By now, you’ve probably seen a lot of those fancy looking panoramas, 3D photospheres, or images that look like Tiny Planets / a Super Mario Galaxy level / King Kai’s Planet.
The way this is done is similar to how NVIDIA Ansel creates 360 pictures, but isn’t automated (yet…).
You’ll need:
Microsoft Research’s Image Composite Editor (ICE)
A first-person camera
You’ll want:
Image Editing Software (Paint.NET or FastStone Image Viewer are my go-to)
Access to a Dedicated Capture Mode – OR – the ability to use Time-stop, No HUD, No First Person Player Model, FOV control, and Free cam/No Clip.
Game and Camera Setup
Have a look through your library, and find a game where you’ve got access to a First-Person camera. While any FPS will work here, many other games have these hidden away as a debug camera. For instance, XCOM2 and ABZU have these, despite not being first-person games. Third-Person cameras won’t work with this method, since the “pivot point” of the camera is out in the scene, rather than at the “lens” of the camera.
If a game has a dedicated Capture Mode (Mad Max , Shadow Warrior 2, or anything that has NVIDIA Ansel), use this.
If the game doesn’t have a dedicated capture mode, see if you can make one with the console (Things like Noclip, Time-stop, Disabling HUD), using GeDoSaTo to get rid of HUD items or great big things that say “PAUSED” in the middle of the screen, or using Cheat Engine to take control of the camera when I shouldn’t. I tend to check things like DeadEndThrills or PCGamingWiki for an idea of what I’ve got available to work with.
If the game doesn’t have either of these, don’t worry! This process will still work, you’ll just have a few extra steps (These are covered in the Tips section).
Image quality is the highest priority when making these things. We’re not trying to be playable, we’re after capturing the mood of the environment. That said, I tend to turn off post-processing effects that add things like dirt or scratches to the lens, such as the psuedo Bokeh effect in XCOM2, but that’s up to you.
On FOV and Capture Resolution: Wider angles will make the capturing process *much* faster at the expensive of image quality, but tighter FOV will give you more environmental detail (Most games don’t include Perspective Distortion, so it’s like cruddy version of supersampling that won’t turn your GPU into molten slag). Our software can do Gigapixel resolution panoramas if you’ve got the RAM (and ability to open the final image), but for most games, you’ll have massively diminishing returns for FOVs below 80. You may also note that I didn’t mention the resolution of your screenshots. While this is normally a big deal in screenshots, higher resolutions have diminishing returns when you’re making panoramas this way. Worry about getting the smallest object you care about in the scene looking good, rather than trying to force as many pixels as you can into each shot. Feel free to use GeDoSaTo to capture at 16K if you want, but it probably won’t be worth the effort / fire hazard.
Capture Method
With your scene all set up, start taking screenshots in all directions. I like to start at the horizon, do a 360 degree (Azimuth, in Spherical Coordinates) sweep, capturing about every 45 degrees for an FOV of 90 (i.e. take a shot, look at the objects at the edge of the screen, move the camera so those are now in the middle, take another shot.). Once I’m back to the start, change the elevation (Altitude, in Spherical Coordinates), and repeat this process until you’ve got a screenshot of every single direction. If you’re not sure that you’ve got a shot, take an extra one. The more photos, the better (provided your scene isn’t moving).

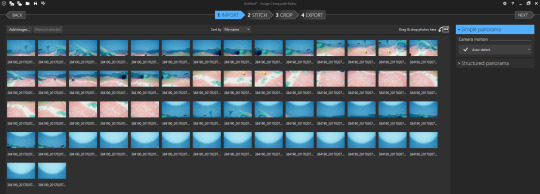
Stitching
When you’re reasonably satisfied that you’ve got everything, quit the game and look at the collection of screenshots you’ve got. Open Image Composite Editor (ICE), and drag-and-drop them into the main window. Once you’ve got them all in there, check that Camera Motion is set to AutoDetect, then click Next.
This will start the stitching process, where ICE does some quick optical object recognition, and finds a way to overlap as many of the images as it can. This can take a while, so go have a nice cuppa tea, a Bex, and a lie down (Don’t worry, it never takes more than 3 minutes on my machine, even with a few hundred images).
Projection
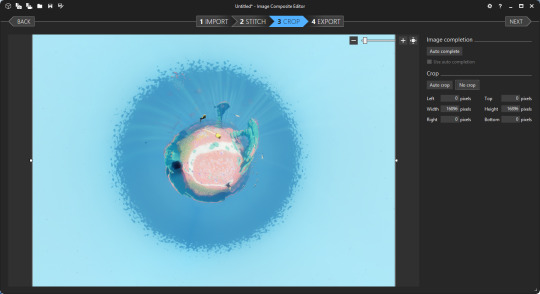
When the stitching is complete, you should see something like this:
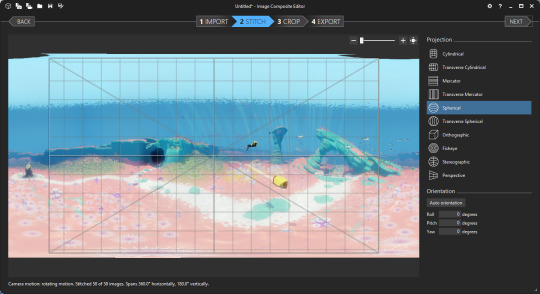
The Spans 360 degree Horizontally and 180 degree Vertically underneath tells you that ICE was able to find enough information in all directions to recreate the entire scene.
Now comes the most important part: Choose a projection.
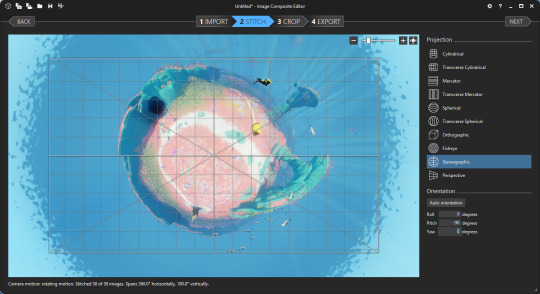
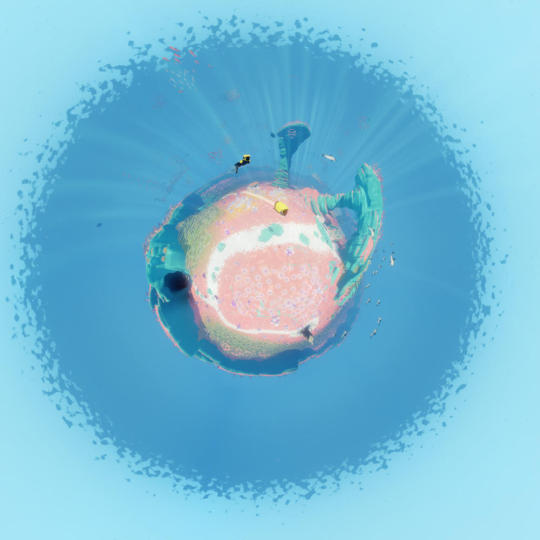
To Make a Planet: we select Stereographic, and set the Orientation to:
Roll 0 Degrees
Pitch -90 Degrees
Yaw 0 Degrees
If this works, you should have a little planet! You can adjust the shape of this using the mouse, but I tend just rotate the scene instead so I don’t introduce additional distortions.
[Alternatively, if you just want a fancy panorama like you see of GTA V or The Witcher 3 on Steam Community with several hundred likes: try another projection then just crop out the area you want. Easy Peasy Lemon Squeezy! YOUR WINNER!]
Cropping
So, you’ve got your pretty pretty all set up, now it’s time to get it into a saveable format. Select Crop from u the top, and after the panorama is projected, you’ll have your scene again. Looking at the Width and Height, you’ll probably notice that the full image is a mite over 15000x15000 pixels. That’s great and all, but a lot of programs will flat out refuse to deal with files this big. Also, there’s probably a lot of extra space around the interesting parts that you’ll want gone, or maybe missing bits of the sky if you didn’t get Zenith. If you’ve followed the guide and only rotated the planet scene, the middle of the planet will be the centre of the image, making auto-centering and cropping super easy. Here, a 10000x10000 pixel crop looks good to me, but this is down to personal taste. My general advice is to see if 7500x7500 will contain everything of interest to your scene. Once you’re happy with the crop, hit Next and move on to Export.

File Formats
I do two exports here. The first is a high quality PNG at 100% scale copy of the scene. I’ll then make a 95-100 Quality JPEG with a Width and Height between 4500-5500 pixels. This is to keep the image size under the 8MB that Steam requires, and to prevent Steam from throwing up additional errors (I’ve had a lot of problems getting it to accept images above 30 megapixels, but your experience may differ).

Alternatively, use a good image editor to downsample the PNG to something under 30 megapixels and below 8MB. I really like FastStone Image Editor for this, the Crop board is excellent.
Sharing
Upload your JPEG to the Steam Community Hub / Flickr / Imgur / Tumblr /, give it a name, and feel the glow of adding something beautiful to this world.
Or just print it out and throw it out the window at a passing dog. That works too.
Troubleshooting
Sometimes ICE will get confused by a scene and fail to project properly. In this case, you can try importing the bare minimum number of images, as something in the scene might have moved or asset reuse in the game will have caused a problem. If this fails again, I often just recapture the scene.
ICE comes with a very basic Autocomplete function for filling in gaps in panoramas. If you notice Grey holes (or if the Autocrop button doesn’t select the whole image), these are missing bits. If they’re not in your scene when you crop at the end, you can ignore them, but otherwise you can try the (quite computationally intensive) Autocomplete system. This will produce variable results, but can work in a pinch. Otherwise, load up a dedicated image editor (Paint.NET or GIMP if you’re broke like me) and clean up the errors in that.
Tips
Everything ICE does, Adobe’s Creative Cloud can do. But ICE is free, extremely easy to use, doesn’t require an internet connection, and can run on any version of Windows newer than XP.
Get Steam to screenshot in PNG, and use these instead of the default JPEGs. Since ICE accepts PNGs as inputs, you can cut out bad parts of the inputs and leave them transparent.
The general rule of thumb: avoid scenes where you’ll have big objects 30 degrees above the horizon. Buildings or Mountains will distort like crazy, and you’ll have this weird bulbous mass that can look very weird. Sometimes trees will look ok though, so experiment and you should get a good idea.
The closer an object is to the camera, the greater the distortion. If you want an object to look relatively normal (Say, a car or a person), try to keep it at least 5 meters from the camera and within 15 degrees of the horizon. However, distortion on people can look *really good* if you’ve got a good eye for composition (See this GTAV shot by a very clever peep).
Another rule of thumb is try to avoid putting anything too interesting directly underneath the camera. Keep this part of the scene relatively boring and go for more eye-catching detail around the horizon. If you’ve got something like a highlighted path in your scene, capturing the scene directly on top of the path doesn’t look as nice as being a few meters away.
Some games will have HUDs that you can’t turn off. In this case, crop out the HUD before stitching, and just take your screenshots a little closer together. Same goes for games with really strong Vignetting that can’t be disabled at all (Looking at you, Mass Effect 2).
There will be games where you’ve got no access to anything that makes capturing a scene easy (The Long Dark is my favourite example. There’s no console, subtle vignetting, no pause, and the player’s breathing makes little clouds in the middle of the screen). In these cases, I do my best to try and capture as quickly as possible. Things like moving clouds and horrible animals coming to gnaw on my guts will mostly be dealt with by ICE, or can be photoshopped out later. Or use it to turn one deer into a distributed herd. Up to you!
This technique will work in the real world, too. Camera + Tripod + the ability to edit out shadows = Good Times.
Worried about Perspective Distortion making everything look weird? ICE should be able to compensate for it in almost all cases, unless you’ve somehow turned your camera into a Duck eye. I’ve done a real-world shot with a 14mm fisheye lens, and ended up with a panorama that had no noticeable perspective effects on it with ICE.
Don’t worry about needing a powerful PC. I used to do this on my first gen i7 with 8GB of RAM and an ATi 5870 (“ Top of the line in ’09! ”), and got the same quality as I get with my NVIDIA GTX 1070 and 32GB of RAM. Image projection, stitching, and editing can be computationally intensive, but if you can run Steam on Windows, you can make pretties.
Example Materials
Here’s a link to the source materials I used to make this. You’ll notice there’s a hole at the top of the scene, but the Autocorrect can fix it for you if you want to use that. Try playing with a few projections to see how these things work without stressing about the capture process, but most of all, have fun trying this stuff!

10 notes
·
View notes
Text
The Best New Pinterest Marketing Strategies Working Today
One of the most powerful and effective social media channels you can be on today is Pinterest. It also happens to be the channel that drives some of the most curiosity.
We’re often asked:
How are brands and businesses succeeding on Pinterest today?
And how can you follow their playbooks to make waves yourself?
We were eager to get to the bottom of the Pinterest strategies that are working today, so we’ve done the research and added our findings here. We go deep on all things Pinterest marketing in this blog post. Join us as we explain the latest strategies, best content tips, and newest distribution tactics to help you get results on Pinterest and drive more engagement and clicks.
There are lots of people getting amazing results on Pinterest. We want you to be among them!
What makes Pinterest marketing so great
Did you know: Pinterest is the top social network for product discovery?
Did you know: More than half of Pinterest users have accessed Pinterest in a store while they’re shopping?
There might be a reason why these stats sound a bit new. Pinterest seems to fly under-the-radar when it comes to social media chatter. Instagram, Facebook, and Twitter steal headlines. Meanwhile, Pinterest keeps chugging away … 270 million active users, 280 million, 290 million …
One of the questions we get asked most often is what strategies are working on Pinterest?
Or, put another way …
I’ve heard Pinterest is great. But I don’t understand how!
We were curious ourselves to find out the specific strategies that drive engagement and ROI on Pinterest. We want to put them to use for our Buffer Pinterest profiles and to share them with you so you can do great things on Pinterest.
First, let’s set the scene by talking about one of the biggest topics on Pinterest: demographics.
Yes, it’s true that Pinterest’s demographics are uniquely weighted in comparison with other social networks. We ran through social media stats and facts in episode number 150 of the podcast. Here’s what we shared about Pinterest …
In the U.S.
41% of women who are online use Pinterest. Meanwhile
16% of online men use Pinterest
And in terms of age breakdown, the majority of Pinterest users fall between 18
34% of 18-29 year olds use Pinterest and
34% of 30-49 year olds use Pinterest
So while the specific demographics skew female and a bit older than other social networks, there’s another lens that’s worth taking a look through.
Pinterest is the number one platform for product discovery.
If you sell a product, Pinterest is a place for you.
This is due to a number of factors. Pinterest, along with Instagram, is an incredible visual marketing platform, and products lend themselves well to visuals. Pinterest has e-commerce tools built into the platform, too, for shopping and learning more about products.
And Pinterest is incredibly well indexed for search both in the Pinterest app and on Google.
So with this background and encouragement in mind … we have some tips from some of the top marketers and direct-to-consumer brands on Pinterest that you can apply to your Pinterest strategy today.
The 7 best Pinterest tips and strategies that are working today
1. Make a 6- to 15-second video.
Brands have been posting video to Pinterest for a couple years now, so we’ve had the chance to see the trends and pull the data. According to Pinterest, the best videos are the shortest ones. The sweet spot is 6- to 15-second videos.
Example of a Pinterest video (via)
Along with length, there are a couple of other things to watch for to make sure your video gets views.
First, don’t rely on audio to get your message across. Just like we’ve seen on Facebook, Instagram, and Twitter, a lot of social media users browse their feeds with the sound off. If you’re using a video on Pinterest, be sure to have the visuals speak for themselves, or use captions or text overlay to explain your message.
Once you’ve uploaded your video, be sure to pick a strong cover image to show up in the feed. Remember: your video will be competing with the beauty and vivacity of a screen full of Pinterest visuals. It needs to be good!
Make sure the visual is on-message. Pinterest uses the cover image to help show your video to the right audience.
Pinterest says that the best videos are storytelling videos and how-tos. Hunter, a rain gear brand, saw a 30% increase in branded searches when they used Pinterest video for a launch. It works!
2. Optimize your Pinterest ads with the Pinterest Tag
You have the Facebook pixel installed, right?
You’re using Twitter’s, too?
Well If you’re serious about making Pinterest ads work, then you’ll want to get the Pinterest Tag installed also.
Just like the other social network trackers, the Pinterest Tag allows you to follow the behavior of people who click from one of your Pinterest ads and come to your website. You can see how they navigate through your website and whether or not they convert.
The best brands are using this data just like you would with your Facebook, Instagram, and Twitter data — you can use it to measure the performance and ROI of your ads and improve your targeting for the future ads you run.
While you’re at it, be sure to install Enhanced Match also. With the Pinterest Tag you can track the conversion of most of your audience; and with Enhanced Match, you have the chance to capture even more — like situations when cookies aren’t present.
And just like with other social ads, to get the best returns on your ad spend, you want to think holistically about the entire customer journey.
In short, you want the message of the ad to match the message of the landing page.
On Pinterest, you can achieve this with the descriptions you write for your pins … but an even better place is in the text overlay of the image. Text overlay is simply the text that you put into the design of your image, whether you’re creating it in Canva, Photoshop, Sketch, or elsewhere.
Sample ad on Pinterest with text overlay
Oh, and this might go without saying in 2019 … but be sure that your landing page is mobile-friendly! Especially when you’re running ads for mobile and tablets.
3. Break out that calendar. Seasonal moments are among the best times for brands on Pinterest.
Pinterest is one of the go-to places for planning, so the network sees an especially sharp uptick in usage around big moments. Say, a Super Bowl party or Thanksgiving or New Year’s … these calendar spots are opportunities for you to get in front of an even bigger audience and to maximize your reach and resources.
Pinterest has a downloadable“possibilities planner” that covers a bunch of these seasonal moments.
Upcoming dates and events on the Pinterest content calendar for 2019 (via)
The guide is great because it doesn’t just give you a single date for each moment. It tells you when Pinners start saving Pins, often months ahead of the specific date.
For instance, here are the moments that begin around July:
Back to School
Back to college
the holidays
And if you want to catch Black Friday vibes, better hurry. Those moments began in June!
4. Get the basics right.
To refresh, here are the technical specs for exactly what size, shape, and style to use for your Pinterest creative. Your Pinterest content will do best if it’s optimized for Pinterest.
The ideal aspect ratio for a Pin is 2:3.
This means a tall image, for instance a 1000-pixel-by-1500-pixel image. To calculate aspect ratio, you should be able to divide the width by two and the height by three and end up with the same answer. For instance, in our 1,000-by-1,500 example, the division would have got us to 500.
The max file size is 10 megabytes in a JPG or PNG format.
You get 100 characters for a pin title
You get 500 characters for the pin description.
It’s important to note: the first 50-60 characters of the description are likely to show up in the feed. Use that space wisely!
And while it might not be named specifically in the Pinterest guidelines, you can upload animated GIFs to Pinterest for some added zest, humor, or engagement.
Switching gears to video, here are the sizes and shapes of ideal Pinterest video:
a maximum length of a 15 minutes
a minimum length of 4 seconds. (Remember from earlier that the best-performing length is somewhere between 6 and 15 seconds.)
The file itself can be an .mp4 or a .mov but the size must be less than 2 GBs
A couple of different shapes work best — basically, just not wide, landscape videos. We’ll get to those in a second. Pinterest recommends square videos — a 1:1 aspect ratio — or vertical video at a 2:3 aspect ratio or a 9:16 aspect ratio.
5. Try max-width video ads .. plus all the other new ad types that Pinterest has to offer
Pinterest has a couple different ways that video can show up in the feed. There’s the standard-width video — these are the ones we just discussed, where they can be either square or vertical.
There’s also what’s called max-width video. And wow, these are eye-catching. They span the width of two columns in the Pinterest grid. Here’s where you can really embrace your widescreen — Pinterest allows the horizontal, widescreen videos for this format, as well as square videos. No vertical video.
These videos can be great ads for launches or new releases. One of our favorite examples of this was from the movie The House With a Clock In Its Walls, which used the max-width video ads as part of its launch campaign.
We’re big proponents of trying out the latest ad types whenever social networks release something. So definitely give max-width ads a spin.
Also, check out Pinterest carousel ads. You can create carousels that are organic or paid, and these feature two to five images, either at a square or vertical size.
For a special nudge toward giving Pinterest ads a try, we found this stat from Carnival Cruise’s Pinterest campaigns: They saw 31% lower costs per click on Pinterest than on other platforms.
6. Use the right hashtags
Pinners use hashtags to find trending topics and to index and search the site. Unlike other networks, Pinterest hashtags aren’t necessarily funny or tongue-in-cheek — they’re best used when they’re descriptive and specific.
You can use up to 20 hashtags in your description, and if you’re stuck on what to use, Autocomplete is a great way to find the right hashtags to add. To check Pinterest’s Autocomplete, simply go to the Pinterest search bar and start typing. Whatever Pinterest suggests is likely to be a high-volume keyword.
7. Check out the latest Pin Trends report to see what’s working right now
Every month, Pinterest publishes the latest data-backed findings of what’s popular on Pinterest right now. They just released their July report. You can find all the previous months and coming months at their website.
These reports get super specific. Here’s a sampling of what Pinterest shared in July:
Searches for“bubble waffles” are up 55 percent year-over-year
Searches for pastel yellow interiors are up 73 percent year-over-year
Searches for bracelet handbags are up 150 percent
Pinterest groups these findings into categories about food, fashion, home, and lifestyle. Additionally, they share specific insights for regions like Australia, France, the UK, Canada, and more. For instance, in the U.S. in July, searches for jalapeno frozen margaritas are up 139%. Who knew!
Proceed with caution: Joining group boards
The way this one works is that you find a board that’s really popular, and you reach out that board to see if they’d be interested in having you contribute. Of course, you’ll want to choose a board that fits your niche and that you sincerely want to contribute useful, meaningful content.
Where this strategy has gone off the rails is when it’s been used as an inauthentic growth tactic. Pinterest is wise to this and has issued statements about the right and wrong ways to post.
The result is that, in general, group boards have been receiving less exposure in the feed than content from personal boards.
So if you find a group board that’s firmly in your brand’s wheelhouse, by all means jump on in and contribute. But if you’re only in it for the views and clicks, then we suggest trying out any of these other strategies that we’ve named instead.
How to say hello to us
We would all love to say hello to you on social media – especially Twitter!
Heather-Mae on Twitter
Dave on Twitter
Thanks for listening! Feel free to connect with our team at Buffer on Twitter, Buffer on Facebook, our Podcast homepage, or with the hashtag #bufferpodcast.
Enjoy the show? It’d mean the world to us if you’d be up for giving us a rating and review on iTunes!
—
About The Science of Social Media podcast
The Science of Social Media is your weekly sandbox for social media stories, insights, experimentation, and inspiration. Every Monday (and sometimes more) we share the most cutting-edge social media marketing tactics from brands and influencers in every industry. If you’re a social media team of one, business owner, marketer, or someone simply interested in social media marketing, you’re sure to find something useful in each and every episode. It’s our hope that you’ll join our 27,000+ weekly iTunes listeners and rock your social media channels as a result!
The Science of Social Media is proudly made by the Buffer team. Feel free to get in touch with us for any thoughts, ideas, or feedback.
Thank The Best New Pinterest Marketing Strategies Working Today for first publishing this post.
0 notes
Text
Increase Your Landing Page Speed (By Stealing Our Homework)
If you’ve read Unbounce’s 2019 Page Speed Report (and you really should), then you already know why speed is so important this year. Slow-loading landing pages have always been an obstacle to higher conversions, and now Google is punishing poor mobile load times in its search rankings. To be successful in 2019, we—marketers—need to be thinking fast. But are we?
To find out, we polled almost 400 marketers on their attitudes around page speed and asked what (if anything) they were doing to get faster.
Just 56% of marketers are happy with their mobile load times, according to the 2019 Page Speed Report.
Almost three of every four respondents said they had taken steps to improve their page speeds over the last year, and that’s pretty good. Alarmingly, though, only half of marketers we surveyed are satisfied with their load times on mobile.
So most marketers are trying to get faster, but many aren’t where they want to be. Which begs the question: what are people doing to speed up their landing page load times?
Computer, enhance!
Only 39% of marketers have bothered to find out how fast their pages are actually loading. Not great.
Here, we start to see why marketers are somewhat pessimistic about their page speed progress. Just over half have optimized their landing page images—ostensibly one of the simplest ways to speed up your load times—and even fewer have done any of the real technical-sounding things they need to get faster. (I mean, fair, they sound pretty boring to us, too.)
Here’s a doozy, though: just one in three marketers have run a website speed test to find out whether their load times are impacting their conversions. That’s the easiest one!
And hey, we get it. Marketers are being asked to do more than ever before, often with fewer resources. If you’re a small team (or a single person, the smallest of the teams), you might feel you don’t have the time or expertise to meaningfully improve your page speed.
But I’ve gone and done the hard work for you—me, a film school graduate who, until recently, believed that his Apple computer was impervious to viruses. (Hoo boy, it is not.) I’ve spent hours talking to Unbounce developers, reading how-to guides, and generally just bombarding my brain with the most dull, technical page speed information I could get ahold of. (Apologies to said developers.) And if I can get my head around it, there’s no excuse for the rest of you.
Below, I’ve simplified some of the most effective ways to increase your landing page loading times in a guide. For each fix, I’ve indicated the technical difficulty and the estimated time it’ll take, so you know exactly what you’re getting yourself in to. Use the table of contents below to jump to what’s relevant to you, or go ahead and do it all in order.
Jump to a Landing Page Speed Fix
How to Check Your Landing Page Speed
Run a Google Speed Test (5 Minutes)
Try the Unbounce Landing Page Analyzer (5 Minutes)
Improve Your Landing Page Speed: Easy Fixes
Reduce Your Page Content (15 Minutes)
Optimize Your Images (30 Minutes)
Host Your Videos Elsewhere (30 Minutes)
Audit Your Hosting Solution (30 Minutes)
Implement a CDN (30 Minutes)
Improve Your Landing Page Speed: Intermediate Fixes
Minify HTML, JS, and CSS (15 Minutes)
Enable Browser Caching (15 Minutes)
Set Up GZIP Compression (15 Minutes)
Kill Needless Scripts and Plugins (30 Minutes)
Convert Images to Sprites (30 Minutes)
Improve Your Landing Page Speed: Hard Fixes
Remove Render-Blocking JS and CSS (45 Minutes)
Start Hand-Coding with AMP
Final note: If you’ve built your page with Unbounce, you can skip a lot of this stuff—we make many speed fixes on the back-end automatically. In this post, look for the ‘Building Pages in Unbounce?‘ callout boxes to see if a given fix is something you need to implement.
Look for these callout boxes throughout this post to get Unbounce-specific tips and learn how we automatically optimize your landing pages to make them load super fast.
How to Check Your Landing Page Speed
First things first.
Before you throw on your hard hat and start hitting things with a hammer (both figuratively and literally), it’s important to have some idea of what’s working—and what’s not—on your landing page. That means running a speed audit.
It’s important to point out that, regardless of which speed test you use, you don’t want to get too hung up on your score. Achieving a perfect score is not always technically possible (and it might not even be desirable). Instead, use your results as a general guideline to improve page speed and implement the fixes that make sense for you.
Okay—let’s test them pages.
Run a Google Speed Test
Difficulty: Easy / Estimated Time: 5 Minutes
There are a bunch of great tools for testing your page speed, but why not start with the big dog itself? Google’s PageSpeed Insights is an awesome way to do a quick performance check-up with at-a-glance recommendations. (Ryan Engley, Unbounce’s VP of Product Marketing, explains how to interpret and act on your PageSpeed Insights results in this must-read blog post.) Then there’s Lighthouse, a newer tool from Google that provides a comprehensive analysis of your how your page presents to end users.
You’ll also want to run your page through Google’s Test My Site tool, which will check your speed from a mobile perspective.
Clicking on individual results in PageSpeed Insights will reveal your problematic page elements.
Running a Google speed test should only take a couple of minutes, and the results will help you identify some of the top opportunities to boost your landing page load times.
Try the Unbounce Landing Page Analyzer
Difficulty: Easy / Estimated Time: 5 Minutes
Running a speed test with Google should be your top priority, but PageSpeed Insights doesn’t give results tailored to landing pages. For that, you’ll want to run your page through the Unbounce Landing Page Analyzer, which not only provides feedback on page performance but includes a bunch of advice on creating more effective campaigns and kicking your conversions into overdrive.
Unbounce’s Landing Page Analyzer provides feedback on page speed, but also actionable advice on things like SEO, message match, and mobile-friendliness.
Building Pages in Unbounce? Then you’ll definitely want to give our Landing Page Analyzer a shot. Get best-practice recommendations for conversion optimization and see how your landing pages stack up against others in your industry.
Improve Your Landing Page Speed: Easy Fixes
With your results from both Google and Unbounce, you’ll be well-equipped to move onto the actual work of making your page perform better. It’s time to pick up that hammer.
These fixes should be simple enough for anyone to tackle, regardless of their technical expertise.
Reduce Your Page Content
Difficulty: Easy / Estimated Time: 15 Minutes
We’ve marked this as an easy opportunity to increase your page speed, but it probably won’t feel like that when you start thinking about which elements on your page you can junk. Marketers love big hero shots, beautiful supporting imagery, and fun, animated explainer videos. But how much of that content is actually helping you drive conversions?
Visual content accounts for a huge portion of the size of an average web page—images account for over 20% of web page weight, as pointed out by Kinsta—and each element creates an HTTP request. That’s when your visitor’s browser pings your web server to request the files that make up the elements of your page. Too many calls can be a serious drag on your load time, so one of the simplest ways to improve your page speed is cutting down the number of elements you include.
Look at each piece of content on your page critically, then ask yourself: “Does this spark joy?” “Does this increase conversions?” If you don’t think there are pieces you can toss, try running an A/B test with a slimmed-down version of the page. The results might surprise you.
Bottom line: stick to the fundamentals of good landing page design and try to keep the number of elements (and thus HTTP requests) to a minimum.
Building Pages in Unbounce? We recommend that you keep things pretty lean, but we’d never remove content from your landing page. (Must resist… desire… to do best practices…) This is one optimization that you’ll have to tackle on your own.
Optimize Your Images
Difficulty: Easy / Estimated Time: 30 Minutes
Once you’ve trimmed some elements from your page, you’ll want to optimize the content that made the cut. Poor image optimization is the most common reason for slow page loads, especially for mobile visitors. Fortunately, it’s also one of the easiest issues to fix.
These are some quick tips for shrinking your images and improving your page speed. The goal here should be getting images at least under 800kb, but the smaller we can make them, the better.
Resize your images
It’s easy to chuck a larger image onto your page and rely on your content management system (CMS) to compress it to the appropriate size, but it’ll still be loading at least some of those extra pixels on the back end, and your visitors are going to feel it in the load. When you add an image, make sure it’s the same dimensions that your page will be rendering it.*
*This doesn’t necessarily apply to Unbounce’s retina image support—read up on that here.
Choose the right file type
Most people don’t think too much about the format of the image they’re uploading, but it can have a dramatic effect on page performance. The file types you’re probably most familiar with are JPEG and PNG—and, yes, there are differences.
JPEG is a ‘lossy’ format, which means it’ll lose some data during compression. That typically gives you a smaller file, but it can come at the expense of visual fidelity. Generally, images with significant color variation (say, photographs) perform better as JPEGs, and any dip in quality can usually go undetected.
PNG is ‘lossless,’ so the image’s appearance won’t change when resized, but it tends to make for larger files if there’s significant color variation. PNG is ideal for simple images with defined shapes, like those with text. Saving PNGs in 8-bit (rather than 24-bit, which has a broader color palette) can help shave off some extra bites.
Here are some optimization tips for JPEG and PNG (and GIF, that villain) from Google itself.
Use compression tools
Before your weigh-in, it’s good to run images through a final round of compression. There are plenty of image compression tools on WordPress, as well as some free, standalone ones like TinyPNG. These shrinky gizmos offer a simple way to cut down your image sizes without braving the cursed labyrinth that is Adobe’s export settings. (Hey, I’m a words guy.)
Your takeaways here are:
Ensure your image dimensions match how they’ll actually be displayed
Use JPEG when a slight dip in visual fidelity isn’t the end of the world (like photography), but PNG when it is (images with text and sharp lines)
Compress images to keep the file size as tiny as possible
If you want to take a deeper dive into image optimization, we recommend that you check out this post from Search Engine Land, which goes into detail on making images smaller while keeping them beautiful.
Building Pages in Unbounce? We’ve got you covered. Unbounce’s Auto Image Optimizer shrinks your images as soon as they’re uploaded so you can focus on making the best landing page possible.
Host Your Videos Elsewhere
Difficulty: Easy / Estimated Time: 30 Minutes
Why carry something yourself when you can make someone else carry it for you? That’s my motto for landing pages and life, and it’s why I’m no longer welcome on Unbounce’s company hiking trips.
Hosting videos on your own domain can be great for SEO purposes, but that’s not usually our goal with landing pages. We want everything to load in a flash and give our visitors the best chance to convert. Depending on your hosting solution, though, your videos might be slowing down your page speed, suffering from playback issues, and taking up an uncomfortable amount of server space.
Done properly, transferring videos to a third-party platform can shed some extra load time and help your pages render faster. Consider moving video content to Wistia, YouTube, or Vimeo, then using a light embed technique so that your videos only load heavier playback elements when your visitors actually click on them.
Building Pages in Unbounce? As a disclaimer: Using light embed codes with Unbounce (or any custom code, for that matter) will require some technical knowledge to implement and could, in rare cases, cause issues. Check out this Unbounce community post for more information.
Audit Your Hosting Solution
Difficulty: Easy / Estimated Time: 30 Minutes
Loading speed isn’t just determined by what’s on your landing page. Your web host also has a major influence in how quickly your page rolls out to potential customers.
There are three common models for web hosting:
Shared hosting
Generally the most affordable solution, shared hosting is when your website is hosted alongside other sites on a single web server. Everyone draws from common resources (like storage space and processing power), which means—you guessed it—you need to share.
Virtual private server (VPS) hosting
This is essentially a mix of both shared and dedicated hosting. With VPS, your website still shares server space with others, but you’ll have dedicated resources that no one else can dip into. The result is more power and flexibility, but it tends to come with a higher price tag.
Dedicated hosting
For those who’ve had a traumatic roommate experience (who hasn’t?), dedicated hosting means your website has the server all to itself. More resources, no sharing. That’s great if you’re heavy on digital content and get a ton of traffic, but dedicated hosting is also the most expensive option and requires the technical know-how to set up and maintain your server.
Low-volume websites can generally get by with the cost-effective shared solution, but once your traffic starts to rise, you might not be getting enough juice from your web host to deliver content quickly—and that’s when load times start to suffer. (Give this post from Search Engine Journal a read for a more comprehensive explanation.)
It’s also important to note that the whereabouts of your web server can have a significant impact on your page speed. If you’re not using a content delivery network (CDN; more on this below), you’ll want to make sure that traffic from foreign countries isn’t encountering too much latency.
Think your hosting solution might be impacting your page speed? Run your site through a server speed test like this one from Bitcatcha, and use WebPageTest or Pingdom to see how your quickly your landing page loads in other countries. Depending on the results, you might decide it’s time to upgrade your hosting plan (or change web hosts altogether).
Building Pages in Unbounce? You don’t have to worry about this one—Unbounce’s global hosting solution boasts 99.95% uptime and ensures that your landing pages always have the necessary resources to load super fast.
Implement a CDN
Difficulty: Easy / Estimated Time: 30 Minutes
When your landing page gets a visitor, their web browser pings your server to get the content necessary to build out the page. Simple, right? Everyone downloads your website information from the same place, regardless of their location around the world. Well, that’s usually fine if the visitor is in or close to the country that your web server is located, but when they’re halfway around the globe, chances are they’re going to encounter some latency.
To avoid that, you should look into deploying a CDN, which caches your website across a network of data centers and proxy servers all over the planet. Say your own server is in the United States and someone from Lithuania is trying to visit your landing page. Instead of downloading your content from across the Atlantic, that visitor can pull a cached version from a server nearby.
Setting your website up with a CDN is pretty straightforward and—depending on your traffic—generally affordable. Here’s a list of some popular CDN providers from Mashable.
Building Pages in Unbounce? We’ve got five global data centers supporting the Unbounce CDN, which means your landing pages will load in a flash regardless of where they’re being accessed from.
Improve Your Landing Page Speed: Intermediate Fixes
These next speed fixes are a little trickier, but they should be manageable for marketers with a little technical know-how. Still, a mistake here could mean actual damage to your landing page.
Our recommendation? Do some research, make a backup, and—if you can—consult briefly with a developer on your team. It never hurts to have an experienced colleague to turn to if you get in over your head.
Building Pages in Unbounce? We talk a lot about WordPress through this next section. If you’re using our plugin to publish Unbounce landing pages to a WordPress domain, some of these recommended speed fixes can actually cause technical issues. Don’t hesitate to reach out to us for clarification if you’re ever unsure.
Minify HTML, CSS, and JS
Difficulty: Intermediate / Estimated Time: 15 Minutes
All those lines of HTML, CSS, and JS code that make up your landing page? They’re packed with spaces, line breaks, and other bits of formatting that make it more legible and easier for us to interpret, but each makes your load time just an eensy bit slower—and the web browsers your visitors are using to render your page don’t particularly need them.
With minification, the goal is to cut out all of that extra junk and condense your code so that browsers can read it faster. Here’s an example snippet of Javascript code from Wikipedia:
var array = [];
for (var i = 0; i < 20; i++) {
array[i] = i;
}
After minifying, that code would look something like this:
for(var a=[i=0];++i<20;a[i]=i);
There are plenty of free online tools that will do this for your landing page, like Minify Code, as well as a bunch of WordPress plugins. Be sure to check out this post from Elegant Themes, which is an awesome resource that dives into the many options at your disposal.
Building Pages in Unbounce? Do we minify? We practically invented minifying. (Editor’s note: We did not.) Unbounce compresses all of your code automatically, making your landing page as slim as can be. No coding your pages from scratch and no minifying that code in the background? We’re making this too easy for you.
Enable Browser Caching
Difficulty: Intermediate / Estimated Time: 15 Minutes
The goal with any landing page should be getting prospects to convert the first time they visit, but the reality is that not everyone will. Sometimes, visitors will need some time to think about it: they’ll bounce, do more research, check out some competitors, then come back to your original offer. Browser caching ensures that when they return, your page will load even faster—and that’ll make them more likely to convert.
Not sure if you’ve already got caching enabled? Before you start, run a quick caching check using a tool like this one from GiftOfSpeed.
If your site is built on WordPress, enabling caching is as easy as adding a plugin.* (WordPress is almost too easy, huh?) Check out this list of caching plugins, most of which include quick instructions for getting set up.
*If you’re publishing Unbounce pages to a WordPress domain, these caching recommendations could create big problems. Check with us first.
For those not on WordPress, enabling browser caching on your own is pretty simple if you’re willing to get your hands dirty. For example, on Apache web servers, it comes down to inserting a little bit of code into the .htaccess file on your web host or server:
<IfModule mod_expires.c>
ExpiresActive On
ExpiresByType image/jpg “access 1 year”
ExpiresByType image/jpeg “access 1 year”
ExpiresByType image/gif “access 1 year”
ExpiresByType image/png “access 1 year”
ExpiresByType text/css “access 1 month”
ExpiresByType text/html “access 1 month”
ExpiresByType application/pdf “access 1 month”
ExpiresByType text/x-javascript “access 1 month”
ExpiresByType application/x-shockwave-flash “access 1 month”
ExpiresByType image/x-icon “access 1 year”
ExpiresDefault “access 1 month”
</IfModule>
This article from Varvy provides a great how-to, as does this one from WinningWP (which discusses enabling browser caching from a WordPress perspective but is applicable more broadly).
If all of this makes you nervous, there’s likely a simpler method for you to set up browser caching. Most web hosts will enable caching for you if you ask. Depending on your hosting solution, it might be as easy as making a phone call. (Although, now that I think about it, that might be more daunting for some of us.)
Building Pages in Unbounce? Seven-day browser caching is enabled on all Unbounce-built landing pages, so this is a speed fix you can comfortably skip. Maybe use this free time to treat yourself to some self-care? You’ve earned it.
Set Up GZIP Compression
Difficulty: Intermediate / Estimated Time: 15 Minutes
When a visitor reaches your landing page, their browser pings your web server to request the files that make up the page and the server transmits them back. Naturally, that process moves faster if the information being sent is compressed to be as small as possible. Here’s where GZIP compression comes in.
(You’ll want to check to see if GZIP compression is already enabled before you get started.)
As with browser caching, the difficulty of setting up GZIP compression is going to be determined by how your website was built. If you use WordPress, you’re in luck: many WordPress plugins will enable GZIP compression for you almost automatically. If you don’t use WordPress, well, we’re headed back into your server.
This article from GTmetrix provides a quick overview of the importance of GZIP compression and how to enable it. With Apache web servers, you’ll need to add this chunk of code to your .htaccess file.
<IfModule mod_deflate.c>
# Compress HTML, CSS, JavaScript, Text, XML and fonts
AddOutputFilterByType DEFLATE application/javascript
AddOutputFilterByType DEFLATE application/rss+xml
AddOutputFilterByType DEFLATE application/vnd.ms-fontobject
AddOutputFilterByType DEFLATE application/x-font
AddOutputFilterByType DEFLATE application/x-font-opentype
AddOutputFilterByType DEFLATE application/x-font-otf
AddOutputFilterByType DEFLATE application/x-font-truetype
AddOutputFilterByType DEFLATE application/x-font-ttf
AddOutputFilterByType DEFLATE application/x-javascript
AddOutputFilterByType DEFLATE application/xhtml+xml
AddOutputFilterByType DEFLATE application/xml
AddOutputFilterByType DEFLATE font/opentype
AddOutputFilterByType DEFLATE font/otf
AddOutputFilterByType DEFLATE font/ttf
AddOutputFilterByType DEFLATE image/svg+xml
AddOutputFilterByType DEFLATE image/x-icon
AddOutputFilterByType DEFLATE text/css
AddOutputFilterByType DEFLATE text/html
AddOutputFilterByType DEFLATE text/javascript
AddOutputFilterByType DEFLATE text/plain
AddOutputFilterByType DEFLATE text/xml
# Remove browser bugs (only needed for really old browsers)
BrowserMatch ^Mozilla/4 gzip-only-text/html
BrowserMatch ^Mozilla/4\.0[678] no-gzip
BrowserMatch \bMSIE !no-gzip !gzip-only-text/html
Header append Vary User-Agent
</IfModule>
And again, if this is beyond your comfort zone, your web host will probably help you set up GZIP compression if you ask nicely.
Building Pages in Unbounce? You don’t have to ask us nicely, because we’ve already done it. All Unbounce landing pages are automatically compressed during data transfer. (But be nice to us anyway, alright?)
Kill Needless Scripts and Plugins
Difficulty: Intermediate / Estimated Time: 30 Minutes
WordPress is wonderful in its simplicity. As we’ve seen throughout this article, page speed fixes that might require a front-end developer on a static website can often be achieved by simply installing a WordPress plugin. Want to enable browser caching? Boom, W3 Total Cache.* Need to minify your scripts? Pow, Autoptomize.* Developer, shmeveloper.
But because it’s so easy to add functionality through plugins, WordPress websites have a habit of collecting a lot of them—along with all the of the bits and bites of code that make them work. Those add up.
Take a look at the scripts and plugins you’ve added to your website and decide whether they’re essential to your visitor experience. If they’re not, junking them could help cut some extra seconds off of your load time. (And guess what? There’s a plugin for that.) You can also disable plugins one at a time, then retest your page speed to determine which ones are problematic.
*If you’re publishing Unbounce pages to a WordPress domain, these plugins in particular might start a fire.
Building Pages in Unbounce? This is more of WordPress fix, but it also applies to Unbounce customers that have inserted a bunch of custom scripts onto their landing pages. Learn how the Unbounce Script Manager helps you keep things tidy.
Convert Images to Sprites
Difficulty: Intermediate / Estimated Time: 30 Minutes
If your landing page includes a series of similar-sized images (say, for a client logo bar), you can shorten your load time by combining them into an image sprite, then use CSS to display specific chunks of that sprite at a time. This post from WebFX provides a great step-by-step guide for creating CSS sprites.
Joining smaller images into a larger file might seem counterintuitive, but again, the idea here is to reduce the number of HTTP requests on your page and ultimately make it faster. Each individual image requires its own call—combining images into a single CSS sprite means your page only needs to make one.
Building Pages in Unbounce? We don’t build CSS sprites for you, but you can certainly use them on your Unbounce-built landing pages. Check out our documentation on custom JS and CSS with Unbounce.
Improve Your Landing Page Speed: Hard Fixes
We’re into the scary stuff now.
These are fixes you should absolutely not attempt unless you know what you’re doing or you’ve consulted extensively with a front-end developer. (We even had one of the Unbounce devs fact-check this article, and we’ve never felt smaller.) Proceed with caution.
Remove Render-Blocking JS and CSS
Difficulty: Hard / Estimated Time: 45 Minutes
Those CSS and JS scripts that make your landing page beautiful and enable cool, dynamic functionality? They could be one of the major reasons that your page is loading so slowly. (Bad news for my flashing, neon visitor counter.)
When a web browser runs into CSS or JS in the head of your document, it’ll wait to download and process that content before continuing to render your page’s HTML. That might sound like a good thing from a user experience perspective—after all, we want people to see our landing page as it was intended—but it actually means that visitors can be left waiting on a blank screen while everything loads in the background.
To avoid this, we need to implement techniques for preventing render-blocking CSS and JS on our landing page. (Refer back to your Google PageSpeed Insights results to check if any scripts are slowing down your page load.)
Reduce render-blocking CSS
There are a couple of ways that we can neutralize render-blocking CSS. One option is to defer all CSS until after the HTML has loaded. That’ll certainly improve page speed, but it will also present non-styled content when the visitor first reaches our page. Not ideal.
The other, more preferable option is to defer most style rules until the HTML has been rendered, but inline the CSS necessary to correctly display content above the fold within the HTML. That way, visitors will see the properly-styled content as soon as they hit the page while the rest will load out of view. Pretty sneaky. This is a great tutorial using a real-life example from codeburst.io.
Another page speed opportunity for you here is combining your CSS files. By moving your style rules from several files to just one (or maybe two, tops), you can reduce the number of times that visitors need to ping your web server and improve your landing page load time. Here’s a good resource from GiftOfSpeed on combining and compressing you CSS scripts.
Eliminate render-blocking JS
Like CSS, JS scripts can prevent your landing page from rendering as quickly as you might like. We can avoid that by deploying the defer and async attributes. The former tells the browser to wait until your HTML is rendered before it begins pulling in JS scripts, while the latter asks that JS be downloaded simultaneously without interrupting the HTML download.
An important note is that not all JS scripts are equal: some are critical to the rendering of your page and need to be addressed right out of the gate, so they’ll have to stay at the top. Dareboost does a good job of explaining how to distinguish between critical and non-critical JS, as well as how to implement deferred and asynchronous loading.
Building Pages in Unbounce? Unbounce optimizes for most Google PageSpeed Insights recommendations, including the removal of render-blocking elements. That means you can skip this one.
Start Hand-Coding with AMP
Difficulty: Very Hard / Estimated Time: ∞ Hours
Alright, “∞ hours” is an overstatement, but implementing AMP is no small task. Developed by Google, the AMP project is an entirely new framework with which to build your web pages. The goal? Dramatically improve page speed, especially for mobile users.
AMP is made up of three core components: AMP HTML, AMP JS, and AMP Cache. That means you’ll need to learn new markup, as well as understand the framework well enough to get your landing pages validated and make sure they actually work.
We won’t get into the nitty-gritty of building with AMP here, but the AMP website has a bunch of resources (including tutorials) to help you get started.
Building Pages in Unbounce? No hand-coding AMP pages for you—Unbounce makes it easy to drag and drop together AMP experiences. Choose one of our AMP-optimized templates, load your content, get validated, and start publishing lightning-fast landing pages right away.
Improving your landing page speed can sound intimidating, but even small tweaks will make a big difference for your load times. Tackle the easy stuff first, then move onto more challenging fixes as you get comfortable. And above all, keep testing: seeing your improved speed results after each undertaking will give you the confidence and motivation to move forward.
Or, you know, just build with Unbounce. We automatically handle most of the speed fixes listed (or at least makes them super easy), which saves a ton of time. That means you can focus on what matters: getting more conversions and improving ROI.
from Digital https://unbounce.com/landing-pages/increase-landing-page-speed/
via http://www.rssmix.com/
0 notes
Text
Increase Your Landing Page Speed (By Stealing Our Homework)
If you’ve read Unbounce’s 2019 Page Speed Report (and you really should), then you already know why speed is so important this year. Slow-loading landing pages have always been an obstacle to higher conversions, and now Google is punishing poor mobile load times in its search rankings. To be successful in 2019, we—marketers—need to be thinking fast. But are we?
To find out, we polled almost 400 marketers on their attitudes around page speed and asked what (if anything) they were doing to get faster.
Just 56% of marketers are happy with their mobile load times, according to the 2019 Page Speed Report.
Almost three of every four respondents said they had taken steps to improve their page speeds over the last year, and that’s pretty good. Alarmingly, though, only half of marketers we surveyed are satisfied with their load times on mobile.
So most marketers are trying to get faster, but many aren’t where they want to be. Which begs the question: what are people doing to speed up their landing page load times?
Computer, enhance!
Only 39% of marketers have bothered to find out how fast their pages are actually loading. Not great.
Here, we start to see why marketers are somewhat pessimistic about their page speed progress. Just over half have optimized their landing page images—ostensibly one of the simplest ways to speed up your load times—and even fewer have done any of the real technical-sounding things they need to get faster. (I mean, fair, they sound pretty boring to us, too.)
Here’s a doozy, though: just one in three marketers have run a website speed test to find out whether their load times are impacting their conversions. That’s the easiest one!
And hey, we get it. Marketers are being asked to do more than ever before, often with fewer resources. If you’re a small team (or a single person, the smallest of the teams), you might feel you don’t have the time or expertise to meaningfully improve your page speed.
But I’ve gone and done the hard work for you—me, a film school graduate who, until recently, believed that his Apple computer was impervious to viruses. (Hoo boy, it is not.) I’ve spent hours talking to Unbounce developers, reading how-to guides, and generally just bombarding my brain with the most dull, technical page speed information I could get ahold of. (Apologies to said developers.) And if I can get my head around it, there’s no excuse for the rest of you.
Below, I’ve simplified some of the most effective ways to increase your landing page loading times in a guide. For each fix, I’ve indicated the technical difficulty and the estimated time it’ll take, so you know exactly what you’re getting yourself in to. Use the table of contents below to jump to what’s relevant to you, or go ahead and do it all in order.
Jump to a Landing Page Speed Fix
How to Check Your Landing Page Speed
Run a Google Speed Test (5 Minutes)
Try the Unbounce Landing Page Analyzer (5 Minutes)
Improve Your Landing Page Speed: Easy Fixes
Reduce Your Page Content (15 Minutes)
Optimize Your Images (30 Minutes)
Host Your Videos Elsewhere (30 Minutes)
Audit Your Hosting Solution (30 Minutes)
Implement a CDN (30 Minutes)
Improve Your Landing Page Speed: Intermediate Fixes
Minify HTML, JS, and CSS (15 Minutes)
Enable Browser Caching (15 Minutes)
Set Up GZIP Compression (15 Minutes)
Kill Needless Scripts and Plugins (30 Minutes)
Convert Images to Sprites (30 Minutes)
Improve Your Landing Page Speed: Hard Fixes
Remove Render-Blocking JS and CSS (45 Minutes)
Start Hand-Coding with AMP
Final note: If you’ve built your page with Unbounce, you can skip a lot of this stuff—we make many speed fixes on the back-end automatically. In this post, look for the ‘Building Pages in Unbounce?‘ callout boxes to see if a given fix is something you need to implement.
Look for these callout boxes throughout this post to get Unbounce-specific tips and learn how we automatically optimize your landing pages to make them load super fast.
How to Check Your Landing Page Speed
First things first.
Before you throw on your hard hat and start hitting things with a hammer (both figuratively and literally), it’s important to have some idea of what’s working—and what’s not—on your landing page. That means running a speed audit.
It’s important to point out that, regardless of which speed test you use, you don’t want to get too hung up on your score. Achieving a perfect score is not always technically possible (and it might not even be desirable). Instead, use your results as a general guideline to improve page speed and implement the fixes that make sense for you.
Okay—let’s test them pages.
Run a Google Speed Test
Difficulty: Easy / Estimated Time: 5 Minutes
There are a bunch of great tools for testing your page speed, but why not start with the big dog itself? Google’s PageSpeed Insights is an awesome way to do a quick performance check-up with at-a-glance recommendations. (Ryan Engley, Unbounce’s VP of Product Marketing, explains how to interpret and act on your PageSpeed Insights results in this must-read blog post.) Then there’s Lighthouse, a newer tool from Google that provides a comprehensive analysis of your how your page presents to end users.
You’ll also want to run your page through Google’s Test My Site tool, which will check your speed from a mobile perspective.
Clicking on individual results in PageSpeed Insights will reveal your problematic page elements.
Running a Google speed test should only take a couple of minutes, and the results will help you identify some of the top opportunities to boost your landing page load times.
Try the Unbounce Landing Page Analyzer
Difficulty: Easy / Estimated Time: 5 Minutes
Running a speed test with Google should be your top priority, but PageSpeed Insights doesn’t give results tailored to landing pages. For that, you’ll want to run your page through the Unbounce Landing Page Analyzer, which not only provides feedback on page performance but includes a bunch of advice on creating more effective campaigns and kicking your conversions into overdrive.
Unbounce’s Landing Page Analyzer provides feedback on page speed, but also actionable advice on things like SEO, message match, and mobile-friendliness.
Building Pages in Unbounce? Then you’ll definitely want to give our Landing Page Analyzer a shot. Get best-practice recommendations for conversion optimization and see how your landing pages stack up against others in your industry.
Improve Your Landing Page Speed: Easy Fixes
With your results from both Google and Unbounce, you’ll be well-equipped to move onto the actual work of making your page perform better. It’s time to pick up that hammer.
These fixes should be simple enough for anyone to tackle, regardless of their technical expertise.
Reduce Your Page Content
Difficulty: Easy / Estimated Time: 15 Minutes
We’ve marked this as an easy opportunity to increase your page speed, but it probably won’t feel like that when you start thinking about which elements on your page you can junk. Marketers love big hero shots, beautiful supporting imagery, and fun, animated explainer videos. But how much of that content is actually helping you drive conversions?
Visual content accounts for a huge portion of the size of an average web page—images account for over 20% of web page weight, as pointed out by Kinsta—and each element creates an HTTP request. That’s when your visitor’s browser pings your web server to request the files that make up the elements of your page. Too many calls can be a serious drag on your load time, so one of the simplest ways to improve your page speed is cutting down the number of elements you include.
Look at each piece of content on your page critically, then ask yourself: “Does this spark joy?” “Does this increase conversions?” If you don’t think there are pieces you can toss, try running an A/B test with a slimmed-down version of the page. The results might surprise you.
Bottom line: stick to the fundamentals of good landing page design and try to keep the number of elements (and thus HTTP requests) to a minimum.
Building Pages in Unbounce? We recommend that you keep things pretty lean, but we’d never remove content from your landing page. (Must resist… desire… to do best practices…) This is one optimization that you’ll have to tackle on your own.
Optimize Your Images
Difficulty: Easy / Estimated Time: 30 Minutes
Once you’ve trimmed some elements from your page, you’ll want to optimize the content that made the cut. Poor image optimization is the most common reason for slow page loads, especially for mobile visitors. Fortunately, it’s also one of the easiest issues to fix.
These are some quick tips for shrinking your images and improving your page speed. The goal here should be getting images at least under 800kb, but the smaller we can make them, the better.
Resize your images
It’s easy to chuck a larger image onto your page and rely on your content management system (CMS) to compress it to the appropriate size, but it’ll still be loading at least some of those extra pixels on the back end, and your visitors are going to feel it in the load. When you add an image, make sure it’s the same dimensions that your page will be rendering it.*
*This doesn’t necessarily apply to Unbounce’s retina image support—read up on that here.
Choose the right file type
Most people don’t think too much about the format of the image they’re uploading, but it can have a dramatic effect on page performance. The file types you’re probably most familiar with are JPEG and PNG—and, yes, there are differences.
JPEG is a ‘lossy’ format, which means it’ll lose some data during compression. That typically gives you a smaller file, but it can come at the expense of visual fidelity. Generally, images with significant color variation (say, photographs) perform better as JPEGs, and any dip in quality can usually go undetected.
PNG is ‘lossless,’ so the image’s appearance won’t change when resized, but it tends to make for larger files if there’s significant color variation. PNG is ideal for simple images with defined shapes, like those with text. Saving PNGs in 8-bit (rather than 24-bit, which has a broader color palette) can help shave off some extra bites.
Here are some optimization tips for JPEG and PNG (and GIF, that villain) from Google itself.
Use compression tools
Before your weigh-in, it’s good to run images through a final round of compression. There are plenty of image compression tools on WordPress, as well as some free, standalone ones like TinyPNG. These shrinky gizmos offer a simple way to cut down your image sizes without braving the cursed labyrinth that is Adobe’s export settings. (Hey, I’m a words guy.)
Your takeaways here are:
Ensure your image dimensions match how they’ll actually be displayed
Use JPEG when a slight dip in visual fidelity isn’t the end of the world (like photography), but PNG when it is (images with text and sharp lines)
Compress images to keep the file size as tiny as possible
If you want to take a deeper dive into image optimization, we recommend that you check out this post from Search Engine Land, which goes into detail on making images smaller while keeping them beautiful.
Building Pages in Unbounce? We’ve got you covered. Unbounce’s Auto Image Optimizer shrinks your images as soon as they’re uploaded so you can focus on making the best landing page possible.
Host Your Videos Elsewhere
Difficulty: Easy / Estimated Time: 30 Minutes
Why carry something yourself when you can make someone else carry it for you? That’s my motto for landing pages and life, and it’s why I’m no longer welcome on Unbounce’s company hiking trips.
Hosting videos on your own domain can be great for SEO purposes, but that’s not usually our goal with landing pages. We want everything to load in a flash and give our visitors the best chance to convert. Depending on your hosting solution, though, your videos might be slowing down your page speed, suffering from playback issues, and taking up an uncomfortable amount of server space.
Done properly, transferring videos to a third-party platform can shed some extra load time and help your pages render faster. Consider moving video content to Wistia, YouTube, or Vimeo, then using a light embed technique so that your videos only load heavier playback elements when your visitors actually click on them.
Building Pages in Unbounce? As a disclaimer: Using light embed codes with Unbounce (or any custom code, for that matter) will require some technical knowledge to implement and could, in rare cases, cause issues. Check out this Unbounce community post for more information.
Audit Your Hosting Solution
Difficulty: Easy / Estimated Time: 30 Minutes
Loading speed isn’t just determined by what’s on your landing page. Your web host also has a major influence in how quickly your page rolls out to potential customers.
There are three common models for web hosting:
Shared hosting
Generally the most affordable solution, shared hosting is when your website is hosted alongside other sites on a single web server. Everyone draws from common resources (like storage space and processing power), which means—you guessed it—you need to share.
Virtual private server (VPS) hosting
This is essentially a mix of both shared and dedicated hosting. With VPS, your website still shares server space with others, but you’ll have dedicated resources that no one else can dip into. The result is more power and flexibility, but it tends to come with a higher price tag.
Dedicated hosting
For those who’ve had a traumatic roommate experience (who hasn’t?), dedicated hosting means your website has the server all to itself. More resources, no sharing. That’s great if you’re heavy on digital content and get a ton of traffic, but dedicated hosting is also the most expensive option and requires the technical know-how to set up and maintain your server.
Low-volume websites can generally get by with the cost-effective shared solution, but once your traffic starts to rise, you might not be getting enough juice from your web host to deliver content quickly—and that’s when load times start to suffer. (Give this post from Search Engine Journal a read for a more comprehensive explanation.)
It’s also important to note that the whereabouts of your web server can have a significant impact on your page speed. If you’re not using a content delivery network (CDN; more on this below), you’ll want to make sure that traffic from foreign countries isn’t encountering too much latency.
Think your hosting solution might be impacting your page speed? Run your site through a server speed test like this one from Bitcatcha, and use WebPageTest or Pingdom to see how your quickly your landing page loads in other countries. Depending on the results, you might decide it’s time to upgrade your hosting plan (or change web hosts altogether).
Building Pages in Unbounce? You don’t have to worry about this one—Unbounce’s global hosting solution boasts 99.95% uptime and ensures that your landing pages always have the necessary resources to load super fast.
Implement a CDN
Difficulty: Easy / Estimated Time: 30 Minutes
When your landing page gets a visitor, their web browser pings your server to get the content necessary to build out the page. Simple, right? Everyone downloads your website information from the same place, regardless of their location around the world. Well, that’s usually fine if the visitor is in or close to the country that your web server is located, but when they’re halfway around the globe, chances are they’re going to encounter some latency.
To avoid that, you should look into deploying a CDN, which caches your website across a network of data centers and proxy servers all over the planet. Say your own server is in the United States and someone from Lithuania is trying to visit your landing page. Instead of downloading your content from across the Atlantic, that visitor can pull a cached version from a server nearby.
Setting your website up with a CDN is pretty straightforward and—depending on your traffic—generally affordable. Here’s a list of some popular CDN providers from Mashable.
Building Pages in Unbounce? We’ve got five global data centers supporting the Unbounce CDN, which means your landing pages will load in a flash regardless of where they’re being accessed from.
Improve Your Landing Page Speed: Intermediate Fixes
These next speed fixes are a little trickier, but they should be manageable for marketers with a little technical know-how. Still, a mistake here could mean actual damage to your landing page.
Our recommendation? Do some research, make a backup, and—if you can—consult briefly with a developer on your team. It never hurts to have an experienced colleague to turn to if you get in over your head.
Building Pages in Unbounce? We talk a lot about WordPress through this next section. If you’re using our plugin to publish Unbounce landing pages to a WordPress domain, some of these recommended speed fixes can actually cause technical issues. Don’t hesitate to reach out to us for clarification if you’re ever unsure.
Minify HTML, CSS, and JS
Difficulty: Intermediate / Estimated Time: 15 Minutes
All those lines of HTML, CSS, and JS code that make up your landing page? They’re packed with spaces, line breaks, and other bits of formatting that make it more legible and easier for us to interpret, but each makes your load time just an eensy bit slower—and the web browsers your visitors are using to render your page don’t particularly need them.
With minification, the goal is to cut out all of that extra junk and condense your code so that browsers can read it faster. Here’s an example snippet of Javascript code from Wikipedia:
var array = [];
for (var i = 0; i < 20; i++) {
array[i] = i;
}
After minifying, that code would look something like this:
for(var a=[i=0];++i<20;a[i]=i);
There are plenty of free online tools that will do this for your landing page, like Minify Code, as well as a bunch of WordPress plugins. Be sure to check out this post from Elegant Themes, which is an awesome resource that dives into the many options at your disposal.
Building Pages in Unbounce? Do we minify? We practically invented minifying. (Editor’s note: We did not.) Unbounce compresses all of your code automatically, making your landing page as slim as can be. No coding your pages from scratch and no minifying that code in the background? We’re making this too easy for you.
Enable Browser Caching
Difficulty: Intermediate / Estimated Time: 15 Minutes
The goal with any landing page should be getting prospects to convert the first time they visit, but the reality is that not everyone will. Sometimes, visitors will need some time to think about it: they’ll bounce, do more research, check out some competitors, then come back to your original offer. Browser caching ensures that when they return, your page will load even faster—and that’ll make them more likely to convert.
Not sure if you’ve already got caching enabled? Before you start, run a quick caching check using a tool like this one from GiftOfSpeed.
If your site is built on WordPress, enabling caching is as easy as adding a plugin.* (WordPress is almost too easy, huh?) Check out this list of caching plugins, most of which include quick instructions for getting set up.
*If you’re publishing Unbounce pages to a WordPress domain, these caching recommendations could create big problems. Check with us first.
For those not on WordPress, enabling browser caching on your own is pretty simple if you’re willing to get your hands dirty. For example, on Apache web servers, it comes down to inserting a little bit of code into the .htaccess file on your web host or server:
<IfModule mod_expires.c>
ExpiresActive On
ExpiresByType image/jpg “access 1 year”
ExpiresByType image/jpeg “access 1 year”
ExpiresByType image/gif “access 1 year”
ExpiresByType image/png “access 1 year”
ExpiresByType text/css “access 1 month”
ExpiresByType text/html “access 1 month”
ExpiresByType application/pdf “access 1 month”
ExpiresByType text/x-javascript “access 1 month”
ExpiresByType application/x-shockwave-flash “access 1 month”
ExpiresByType image/x-icon “access 1 year”
ExpiresDefault “access 1 month”
</IfModule>
This article from Varvy provides a great how-to, as does this one from WinningWP (which discusses enabling browser caching from a WordPress perspective but is applicable more broadly).
If all of this makes you nervous, there’s likely a simpler method for you to set up browser caching. Most web hosts will enable caching for you if you ask. Depending on your hosting solution, it might be as easy as making a phone call. (Although, now that I think about it, that might be more daunting for some of us.)
Building Pages in Unbounce? Seven-day browser caching is enabled on all Unbounce-built landing pages, so this is a speed fix you can comfortably skip. Maybe use this free time to treat yourself to some self-care? You’ve earned it.
Set Up GZIP Compression
Difficulty: Intermediate / Estimated Time: 15 Minutes
When a visitor reaches your landing page, their browser pings your web server to request the files that make up the page and the server transmits them back. Naturally, that process moves faster if the information being sent is compressed to be as small as possible. Here’s where GZIP compression comes in.
(You’ll want to check to see if GZIP compression is already enabled before you get started.)
As with browser caching, the difficulty of setting up GZIP compression is going to be determined by how your website was built. If you use WordPress, you’re in luck: many WordPress plugins will enable GZIP compression for you almost automatically. If you don’t use WordPress, well, we’re headed back into your server.
This article from GTmetrix provides a quick overview of the importance of GZIP compression and how to enable it. With Apache web servers, you’ll need to add this chunk of code to your .htaccess file.
<IfModule mod_deflate.c>
# Compress HTML, CSS, JavaScript, Text, XML and fonts
AddOutputFilterByType DEFLATE application/javascript
AddOutputFilterByType DEFLATE application/rss+xml
AddOutputFilterByType DEFLATE application/vnd.ms-fontobject
AddOutputFilterByType DEFLATE application/x-font
AddOutputFilterByType DEFLATE application/x-font-opentype
AddOutputFilterByType DEFLATE application/x-font-otf
AddOutputFilterByType DEFLATE application/x-font-truetype
AddOutputFilterByType DEFLATE application/x-font-ttf
AddOutputFilterByType DEFLATE application/x-javascript
AddOutputFilterByType DEFLATE application/xhtml+xml
AddOutputFilterByType DEFLATE application/xml
AddOutputFilterByType DEFLATE font/opentype
AddOutputFilterByType DEFLATE font/otf
AddOutputFilterByType DEFLATE font/ttf
AddOutputFilterByType DEFLATE image/svg+xml
AddOutputFilterByType DEFLATE image/x-icon
AddOutputFilterByType DEFLATE text/css
AddOutputFilterByType DEFLATE text/html
AddOutputFilterByType DEFLATE text/javascript
AddOutputFilterByType DEFLATE text/plain
AddOutputFilterByType DEFLATE text/xml
# Remove browser bugs (only needed for really old browsers)
BrowserMatch ^Mozilla/4 gzip-only-text/html
BrowserMatch ^Mozilla/4\.0[678] no-gzip
BrowserMatch \bMSIE !no-gzip !gzip-only-text/html
Header append Vary User-Agent
</IfModule>
And again, if this is beyond your comfort zone, your web host will probably help you set up GZIP compression if you ask nicely.
Building Pages in Unbounce? You don’t have to ask us nicely, because we’ve already done it. All Unbounce landing pages are automatically compressed during data transfer. (But be nice to us anyway, alright?)
Kill Needless Scripts and Plugins
Difficulty: Intermediate / Estimated Time: 30 Minutes
WordPress is wonderful in its simplicity. As we’ve seen throughout this article, page speed fixes that might require a front-end developer on a static website can often be achieved by simply installing a WordPress plugin. Want to enable browser caching? Boom, W3 Total Cache.* Need to minify your scripts? Pow, Autoptomize.* Developer, shmeveloper.
But because it’s so easy to add functionality through plugins, WordPress websites have a habit of collecting a lot of them—along with all the of the bits and bites of code that make them work. Those add up.
Take a look at the scripts and plugins you’ve added to your website and decide whether they’re essential to your visitor experience. If they’re not, junking them could help cut some extra seconds off of your load time. (And guess what? There’s a plugin for that.) You can also disable plugins one at a time, then retest your page speed to determine which ones are problematic.
*If you’re publishing Unbounce pages to a WordPress domain, these plugins in particular might start a fire.
Building Pages in Unbounce? This is more of WordPress fix, but it also applies to Unbounce customers that have inserted a bunch of custom scripts onto their landing pages. Learn how the Unbounce Script Manager helps you keep things tidy.
Convert Images to Sprites
Difficulty: Intermediate / Estimated Time: 30 Minutes
If your landing page includes a series of similar-sized images (say, for a client logo bar), you can shorten your load time by combining them into an image sprite, then use CSS to display specific chunks of that sprite at a time. This post from WebFX provides a great step-by-step guide for creating CSS sprites.
Joining smaller images into a larger file might seem counterintuitive, but again, the idea here is to reduce the number of HTTP requests on your page and ultimately make it faster. Each individual image requires its own call—combining images into a single CSS sprite means your page only needs to make one.
Building Pages in Unbounce? We don’t build CSS sprites for you, but you can certainly use them on your Unbounce-built landing pages. Check out our documentation on custom JS and CSS with Unbounce.
Improve Your Landing Page Speed: Hard Fixes
We’re into the scary stuff now.
These are fixes you should absolutely not attempt unless you know what you’re doing or you’ve consulted extensively with a front-end developer. (We even had one of the Unbounce devs fact-check this article, and we’ve never felt smaller.) Proceed with caution.
Remove Render-Blocking JS and CSS
Difficulty: Hard / Estimated Time: 45 Minutes
Those CSS and JS scripts that make your landing page beautiful and enable cool, dynamic functionality? They could be one of the major reasons that your page is loading so slowly. (Bad news for my flashing, neon visitor counter.)
When a web browser runs into CSS or JS in the head of your document, it’ll wait to download and process that content before continuing to render your page’s HTML. That might sound like a good thing from a user experience perspective—after all, we want people to see our landing page as it was intended—but it actually means that visitors can be left waiting on a blank screen while everything loads in the background.
To avoid this, we need to implement techniques for preventing render-blocking CSS and JS on our landing page. (Refer back to your Google PageSpeed Insights results to check if any scripts are slowing down your page load.)
Reduce render-blocking CSS
There are a couple of ways that we can neutralize render-blocking CSS. One option is to defer all CSS until after the HTML has loaded. That’ll certainly improve page speed, but it will also present non-styled content when the visitor first reaches our page. Not ideal.
The other, more preferable option is to defer most style rules until the HTML has been rendered, but inline the CSS necessary to correctly display content above the fold within the HTML. That way, visitors will see the properly-styled content as soon as they hit the page while the rest will load out of view. Pretty sneaky. This is a great tutorial using a real-life example from codeburst.io.
Another page speed opportunity for you here is combining your CSS files. By moving your style rules from several files to just one (or maybe two, tops), you can reduce the number of times that visitors need to ping your web server and improve your landing page load time. Here’s a good resource from GiftOfSpeed on combining and compressing you CSS scripts.
Eliminate render-blocking JS
Like CSS, JS scripts can prevent your landing page from rendering as quickly as you might like. We can avoid that by deploying the defer and async attributes. The former tells the browser to wait until your HTML is rendered before it begins pulling in JS scripts, while the latter asks that JS be downloaded simultaneously without interrupting the HTML download.
An important note is that not all JS scripts are equal: some are critical to the rendering of your page and need to be addressed right out of the gate, so they’ll have to stay at the top. Dareboost does a good job of explaining how to distinguish between critical and non-critical JS, as well as how to implement deferred and asynchronous loading.
Building Pages in Unbounce? Unbounce optimizes for most Google PageSpeed Insights recommendations, including the removal of render-blocking elements. That means you can skip this one.
Start Hand-Coding with AMP
Difficulty: Very Hard / Estimated Time: ∞ Hours
Alright, “∞ hours” is an overstatement, but implementing AMP is no small task. Developed by Google, the AMP project is an entirely new framework with which to build your web pages. The goal? Dramatically improve page speed, especially for mobile users.
AMP is made up of three core components: AMP HTML, AMP JS, and AMP Cache. That means you’ll need to learn new markup, as well as understand the framework well enough to get your landing pages validated and make sure they actually work.
We won’t get into the nitty-gritty of building with AMP here, but the AMP website has a bunch of resources (including tutorials) to help you get started.
Building Pages in Unbounce? No hand-coding AMP pages for you—Unbounce makes it easy to drag and drop together AMP experiences. Choose one of our AMP-optimized templates, load your content, get validated, and start publishing lightning-fast landing pages right away.
Improving your landing page speed can sound intimidating, but even small tweaks will make a big difference for your load times. Tackle the easy stuff first, then move onto more challenging fixes as you get comfortable. And above all, keep testing: seeing your improved speed results after each undertaking will give you the confidence and motivation to move forward.
Or, you know, just build with Unbounce. We automatically handle most of the speed fixes listed (or at least makes them super easy), which saves a ton of time. That means you can focus on what matters: getting more conversions and improving ROI.
from Marketing https://unbounce.com/landing-pages/increase-landing-page-speed/
via http://www.rssmix.com/
0 notes
Text
Increase Your Landing Page Speed (By Stealing Our Homework)
If you’ve read Unbounce’s 2019 Page Speed Report (and you really should), then you already know why speed is so important this year. Slow-loading landing pages have always been an obstacle to higher conversions, and now Google is punishing poor mobile load times in its search rankings. To be successful in 2019, we—marketers—need to be thinking fast. But are we?
To find out, we polled almost 400 marketers on their attitudes around page speed and asked what (if anything) they were doing to get faster.
Just 56% of marketers are happy with their mobile load times, according to the 2019 Page Speed Report.
Almost three of every four respondents said they had taken steps to improve their page speeds over the last year, and that’s pretty good. Alarmingly, though, only half of marketers we surveyed are satisfied with their load times on mobile.
So most marketers are trying to get faster, but many aren’t where they want to be. Which begs the question: what are people doing to speed up their landing page load times?
Computer, enhance!
Only 39% of marketers have bothered to find out how fast their pages are actually loading. Not great.
Here, we start to see why marketers are somewhat pessimistic about their page speed progress. Just over half have optimized their landing page images—ostensibly one of the simplest ways to speed up your load times—and even fewer have done any of the real technical-sounding things they need to get faster. (I mean, fair, they sound pretty boring to us, too.)
Here’s a doozy, though: just one in three marketers have run a website speed test to find out whether their load times are impacting their conversions. That’s the easiest one!
And hey, we get it. Marketers are being asked to do more than ever before, often with fewer resources. If you’re a small team (or a single person, the smallest of the teams), you might feel you don’t have the time or expertise to meaningfully improve your page speed.
But I’ve gone and done the hard work for you—me, a film school graduate who, until recently, believed that his Apple computer was impervious to viruses. (Hoo boy, it is not.) I’ve spent hours talking to Unbounce developers, reading how-to guides, and generally just bombarding my brain with the most dull, technical page speed information I could get ahold of. (Apologies to said developers.) And if I can get my head around it, there’s no excuse for the rest of you.
Below, I’ve simplified some of the most effective ways to increase your landing page loading times in a guide. For each fix, I’ve indicated the technical difficulty and the estimated time it’ll take, so you know exactly what you’re getting yourself in to. Use the table of contents below to jump to what’s relevant to you, or go ahead and do it all in order.
Jump to a Landing Page Speed Fix
How to Check Your Landing Page Speed
Run a Google Speed Test (5 Minutes)
Try the Unbounce Landing Page Analyzer (5 Minutes)
Improve Your Landing Page Speed: Easy Fixes
Reduce Your Page Content (15 Minutes)
Optimize Your Images (30 Minutes)
Host Your Videos Elsewhere (30 Minutes)
Audit Your Hosting Solution (30 Minutes)
Implement a CDN (30 Minutes)
Improve Your Landing Page Speed: Intermediate Fixes
Minify HTML, JS, and CSS (15 Minutes)
Enable Browser Caching (15 Minutes)
Set Up GZIP Compression (15 Minutes)
Kill Needless Scripts and Plugins (30 Minutes)
Convert Images to Sprites (30 Minutes)
Improve Your Landing Page Speed: Hard Fixes
Remove Render-Blocking JS and CSS (45 Minutes)
Start Hand-Coding with AMP
Final note: If you’ve built your page with Unbounce, you can skip a lot of this stuff—we make many speed fixes on the back-end automatically. In this post, look for the ‘Building Pages in Unbounce?‘ callout boxes to see if a given fix is something you need to implement.
Look for these callout boxes throughout this post to get Unbounce-specific tips and learn how we automatically optimize your landing pages to make them load super fast.
How to Check Your Landing Page Speed
First things first.
Before you throw on your hard hat and start hitting things with a hammer (both figuratively and literally), it’s important to have some idea of what’s working—and what’s not—on your landing page. That means running a speed audit.
It’s important to point out that, regardless of which speed test you use, you don’t want to get too hung up on your score. Achieving a perfect score is not always technically possible (and it might not even be desirable). Instead, use your results as a general guideline to improve page speed and implement the fixes that make sense for you.
Okay—let’s test them pages.
Run a Google Speed Test
Difficulty: Easy / Estimated Time: 5 Minutes
There are a bunch of great tools for testing your page speed, but why not start with the big dog itself? Google’s PageSpeed Insights is an awesome way to do a quick performance check-up with at-a-glance recommendations. (Ryan Engley, Unbounce’s VP of Product Marketing, explains how to interpret and act on your PageSpeed Insights results in this must-read blog post.) Then there’s Lighthouse, a newer tool from Google that provides a comprehensive analysis of your how your page presents to end users.
You’ll also want to run your page through Google’s Test My Site tool, which will check your speed from a mobile perspective.
Clicking on individual results in PageSpeed Insights will reveal your problematic page elements.
Running a Google speed test should only take a couple of minutes, and the results will help you identify some of the top opportunities to boost your landing page load times.
Try the Unbounce Landing Page Analyzer
Difficulty: Easy / Estimated Time: 5 Minutes
Running a speed test with Google should be your top priority, but PageSpeed Insights doesn’t give results tailored to landing pages. For that, you’ll want to run your page through the Unbounce Landing Page Analyzer, which not only provides feedback on page performance but includes a bunch of advice on creating more effective campaigns and kicking your conversions into overdrive.
Unbounce’s Landing Page Analyzer provides feedback on page speed, but also actionable advice on things like SEO, message match, and mobile-friendliness.
Building Pages in Unbounce? Then you’ll definitely want to give our Landing Page Analyzer a shot. Get best-practice recommendations for conversion optimization and see how your landing pages stack up against others in your industry.
Improve Your Landing Page Speed: Easy Fixes
With your results from both Google and Unbounce, you’ll be well-equipped to move onto the actual work of making your page perform better. It’s time to pick up that hammer.
These fixes should be simple enough for anyone to tackle, regardless of their technical expertise.
Reduce Your Page Content
Difficulty: Easy / Estimated Time: 15 Minutes
We’ve marked this as an easy opportunity to increase your page speed, but it probably won’t feel like that when you start thinking about which elements on your page you can junk. Marketers love big hero shots, beautiful supporting imagery, and fun, animated explainer videos. But how much of that content is actually helping you drive conversions?
Visual content accounts for a huge portion of the size of an average web page—images account for over 20% of web page weight, as pointed out by Kinsta—and each element creates an HTTP request. That’s when your visitor’s browser pings your web server to request the files that make up the elements of your page. Too many calls can be a serious drag on your load time, so one of the simplest ways to improve your page speed is cutting down the number of elements you include.
Look at each piece of content on your page critically, then ask yourself: “Does this spark joy?” “Does this increase conversions?” If you don’t think there are pieces you can toss, try running an A/B test with a slimmed-down version of the page. The results might surprise you.
Bottom line: stick to the fundamentals of good landing page design and try to keep the number of elements (and thus HTTP requests) to a minimum.
Building Pages in Unbounce? We recommend that you keep things pretty lean, but we’d never remove content from your landing page. (Must resist… desire… to do best practices…) This is one optimization that you’ll have to tackle on your own.
Optimize Your Images
Difficulty: Easy / Estimated Time: 30 Minutes
Once you’ve trimmed some elements from your page, you’ll want to optimize the content that made the cut. Poor image optimization is the most common reason for slow page loads, especially for mobile visitors. Fortunately, it’s also one of the easiest issues to fix.
These are some quick tips for shrinking your images and improving your page speed. The goal here should be getting images at least under 800kb, but the smaller we can make them, the better.
Resize your images
It’s easy to chuck a larger image onto your page and rely on your content management system (CMS) to compress it to the appropriate size, but it’ll still be loading at least some of those extra pixels on the back end, and your visitors are going to feel it in the load. When you add an image, make sure it’s the same dimensions that your page will be rendering it.*
*This doesn’t necessarily apply to Unbounce’s retina image support—read up on that here.
Choose the right file type
Most people don’t think too much about the format of the image they’re uploading, but it can have a dramatic effect on page performance. The file types you’re probably most familiar with are JPEG and PNG—and, yes, there are differences.
JPEG is a ‘lossy’ format, which means it’ll lose some data during compression. That typically gives you a smaller file, but it can come at the expense of visual fidelity. Generally, images with significant color variation (say, photographs) perform better as JPEGs, and any dip in quality can usually go undetected.
PNG is ‘lossless,’ so the image’s appearance won’t change when resized, but it tends to make for larger files if there’s significant color variation. PNG is ideal for simple images with defined shapes, like those with text. Saving PNGs in 8-bit (rather than 24-bit, which has a broader color palette) can help shave off some extra bites.
Here are some optimization tips for JPEG and PNG (and GIF, that villain) from Google itself.
Use compression tools
Before your weigh-in, it’s good to run images through a final round of compression. There are plenty of image compression tools on WordPress, as well as some free, standalone ones like TinyPNG. These shrinky gizmos offer a simple way to cut down your image sizes without braving the cursed labyrinth that is Adobe’s export settings. (Hey, I’m a words guy.)
Your takeaways here are:
Ensure your image dimensions match how they’ll actually be displayed
Use JPEG when a slight dip in visual fidelity isn’t the end of the world (like photography), but PNG when it is (images with text and sharp lines)
Compress images to keep the file size as tiny as possible
If you want to take a deeper dive into image optimization, we recommend that you check out this post from Search Engine Land, which goes into detail on making images smaller while keeping them beautiful.
Building Pages in Unbounce? We’ve got you covered. Unbounce’s Auto Image Optimizer shrinks your images as soon as they’re uploaded so you can focus on making the best landing page possible.
Host Your Videos Elsewhere
Difficulty: Easy / Estimated Time: 30 Minutes
Why carry something yourself when you can make someone else carry it for you? That’s my motto for landing pages and life, and it’s why I’m no longer welcome on Unbounce’s company hiking trips.
Hosting videos on your own domain can be great for SEO purposes, but that’s not usually our goal with landing pages. We want everything to load in a flash and give our visitors the best chance to convert. Depending on your hosting solution, though, your videos might be slowing down your page speed, suffering from playback issues, and taking up an uncomfortable amount of server space.
Done properly, transferring videos to a third-party platform can shed some extra load time and help your pages render faster. Consider moving video content to Wistia, YouTube, or Vimeo, then using a light embed technique so that your videos only load heavier playback elements when your visitors actually click on them.
Building Pages in Unbounce? As a disclaimer: Using light embed codes with Unbounce (or any custom code, for that matter) will require some technical knowledge to implement and could, in rare cases, cause issues. Check out this Unbounce community post for more information.
Audit Your Hosting Solution
Difficulty: Easy / Estimated Time: 30 Minutes
Loading speed isn’t just determined by what’s on your landing page. Your web host also has a major influence in how quickly your page rolls out to potential customers.
There are three common models for web hosting:
Shared hosting
Generally the most affordable solution, shared hosting is when your website is hosted alongside other sites on a single web server. Everyone draws from common resources (like storage space and processing power), which means—you guessed it—you need to share.
Virtual private server (VPS) hosting
This is essentially a mix of both shared and dedicated hosting. With VPS, your website still shares server space with others, but you’ll have dedicated resources that no one else can dip into. The result is more power and flexibility, but it tends to come with a higher price tag.
Dedicated hosting
For those who’ve had a traumatic roommate experience (who hasn’t?), dedicated hosting means your website has the server all to itself. More resources, no sharing. That’s great if you’re heavy on digital content and get a ton of traffic, but dedicated hosting is also the most expensive option and requires the technical know-how to set up and maintain your server.
Low-volume websites can generally get by with the cost-effective shared solution, but once your traffic starts to rise, you might not be getting enough juice from your web host to deliver content quickly—and that’s when load times start to suffer. (Give this post from Search Engine Journal a read for a more comprehensive explanation.)
It’s also important to note that the whereabouts of your web server can have a significant impact on your page speed. If you’re not using a content delivery network (CDN; more on this below), you’ll want to make sure that traffic from foreign countries isn’t encountering too much latency.
Think your hosting solution might be impacting your page speed? Run your site through a server speed test like this one from Bitcatcha, and use WebPageTest or Pingdom to see how your quickly your landing page loads in other countries. Depending on the results, you might decide it’s time to upgrade your hosting plan (or change web hosts altogether).
Building Pages in Unbounce? You don’t have to worry about this one—Unbounce’s global hosting solution boasts 99.95% uptime and ensures that your landing pages always have the necessary resources to load super fast.
Implement a CDN
Difficulty: Easy / Estimated Time: 30 Minutes
When your landing page gets a visitor, their web browser pings your server to get the content necessary to build out the page. Simple, right? Everyone downloads your website information from the same place, regardless of their location around the world. Well, that’s usually fine if the visitor is in or close to the country that your web server is located, but when they’re halfway around the globe, chances are they’re going to encounter some latency.
To avoid that, you should look into deploying a CDN, which caches your website across a network of data centers and proxy servers all over the planet. Say your own server is in the United States and someone from Lithuania is trying to visit your landing page. Instead of downloading your content from across the Atlantic, that visitor can pull a cached version from a server nearby.
Setting your website up with a CDN is pretty straightforward and—depending on your traffic—generally affordable. Here’s a list of some popular CDN providers from Mashable.
Building Pages in Unbounce? We’ve got five global data centers supporting the Unbounce CDN, which means your landing pages will load in a flash regardless of where they’re being accessed from.
Improve Your Landing Page Speed: Intermediate Fixes
These next speed fixes are a little trickier, but they should be manageable for marketers with a little technical know-how. Still, a mistake here could mean actual damage to your landing page.
Our recommendation? Do some research, make a backup, and—if you can—consult briefly with a developer on your team. It never hurts to have an experienced colleague to turn to if you get in over your head.
Building Pages in Unbounce? We talk a lot about WordPress through this next section. If you’re using our plugin to publish Unbounce landing pages to a WordPress domain, some of these recommended speed fixes can actually cause technical issues. Don’t hesitate to reach out to us for clarification if you’re ever unsure.
Minify HTML, CSS, and JS
Difficulty: Intermediate / Estimated Time: 15 Minutes
All those lines of HTML, CSS, and JS code that make up your landing page? They’re packed with spaces, line breaks, and other bits of formatting that make it more legible and easier for us to interpret, but each makes your load time just an eensy bit slower—and the web browsers your visitors are using to render your page don’t particularly need them.
With minification, the goal is to cut out all of that extra junk and condense your code so that browsers can read it faster. Here’s an example snippet of Javascript code from Wikipedia:
var array = [];
for (var i = 0; i < 20; i++) {
array[i] = i;
}
After minifying, that code would look something like this:
for(var a=[i=0];++i<20;a[i]=i);
There are plenty of free online tools that will do this for your landing page, like Minify Code, as well as a bunch of WordPress plugins. Be sure to check out this post from Elegant Themes, which is an awesome resource that dives into the many options at your disposal.
Building Pages in Unbounce? Do we minify? We practically invented minifying. (Editor’s note: We did not.) Unbounce compresses all of your code automatically, making your landing page as slim as can be. No coding your pages from scratch and no minifying that code in the background? We’re making this too easy for you.
Enable Browser Caching
Difficulty: Intermediate / Estimated Time: 15 Minutes
The goal with any landing page should be getting prospects to convert the first time they visit, but the reality is that not everyone will. Sometimes, visitors will need some time to think about it: they’ll bounce, do more research, check out some competitors, then come back to your original offer. Browser caching ensures that when they return, your page will load even faster—and that’ll make them more likely to convert.
Not sure if you’ve already got caching enabled? Before you start, run a quick caching check using a tool like this one from GiftOfSpeed.
If your site is built on WordPress, enabling caching is as easy as adding a plugin.* (WordPress is almost too easy, huh?) Check out this list of caching plugins, most of which include quick instructions for getting set up.
*If you’re publishing Unbounce pages to a WordPress domain, these caching recommendations could create big problems. Check with us first.
For those not on WordPress, enabling browser caching on your own is pretty simple if you’re willing to get your hands dirty. For example, on Apache web servers, it comes down to inserting a little bit of code into the .htaccess file on your web host or server:
<IfModule mod_expires.c>
ExpiresActive On
ExpiresByType image/jpg “access 1 year”
ExpiresByType image/jpeg “access 1 year”
ExpiresByType image/gif “access 1 year”
ExpiresByType image/png “access 1 year”
ExpiresByType text/css “access 1 month”
ExpiresByType text/html “access 1 month”
ExpiresByType application/pdf “access 1 month”
ExpiresByType text/x-javascript “access 1 month”
ExpiresByType application/x-shockwave-flash “access 1 month”
ExpiresByType image/x-icon “access 1 year”
ExpiresDefault “access 1 month”
</IfModule>
This article from Varvy provides a great how-to, as does this one from WinningWP (which discusses enabling browser caching from a WordPress perspective but is applicable more broadly).
If all of this makes you nervous, there’s likely a simpler method for you to set up browser caching. Most web hosts will enable caching for you if you ask. Depending on your hosting solution, it might be as easy as making a phone call. (Although, now that I think about it, that might be more daunting for some of us.)
Building Pages in Unbounce? Seven-day browser caching is enabled on all Unbounce-built landing pages, so this is a speed fix you can comfortably skip. Maybe use this free time to treat yourself to some self-care? You’ve earned it.
Set Up GZIP Compression
Difficulty: Intermediate / Estimated Time: 15 Minutes
When a visitor reaches your landing page, their browser pings your web server to request the files that make up the page and the server transmits them back. Naturally, that process moves faster if the information being sent is compressed to be as small as possible. Here’s where GZIP compression comes in.
(You’ll want to check to see if GZIP compression is already enabled before you get started.)
As with browser caching, the difficulty of setting up GZIP compression is going to be determined by how your website was built. If you use WordPress, you’re in luck: many WordPress plugins will enable GZIP compression for you almost automatically. If you don’t use WordPress, well, we’re headed back into your server.
This article from GTmetrix provides a quick overview of the importance of GZIP compression and how to enable it. With Apache web servers, you’ll need to add this chunk of code to your .htaccess file.
<IfModule mod_deflate.c>
# Compress HTML, CSS, JavaScript, Text, XML and fonts
AddOutputFilterByType DEFLATE application/javascript
AddOutputFilterByType DEFLATE application/rss+xml
AddOutputFilterByType DEFLATE application/vnd.ms-fontobject
AddOutputFilterByType DEFLATE application/x-font
AddOutputFilterByType DEFLATE application/x-font-opentype
AddOutputFilterByType DEFLATE application/x-font-otf
AddOutputFilterByType DEFLATE application/x-font-truetype
AddOutputFilterByType DEFLATE application/x-font-ttf
AddOutputFilterByType DEFLATE application/x-javascript
AddOutputFilterByType DEFLATE application/xhtml+xml
AddOutputFilterByType DEFLATE application/xml
AddOutputFilterByType DEFLATE font/opentype
AddOutputFilterByType DEFLATE font/otf
AddOutputFilterByType DEFLATE font/ttf
AddOutputFilterByType DEFLATE image/svg+xml
AddOutputFilterByType DEFLATE image/x-icon
AddOutputFilterByType DEFLATE text/css
AddOutputFilterByType DEFLATE text/html
AddOutputFilterByType DEFLATE text/javascript
AddOutputFilterByType DEFLATE text/plain
AddOutputFilterByType DEFLATE text/xml
# Remove browser bugs (only needed for really old browsers)
BrowserMatch ^Mozilla/4 gzip-only-text/html
BrowserMatch ^Mozilla/4\.0[678] no-gzip
BrowserMatch \bMSIE !no-gzip !gzip-only-text/html
Header append Vary User-Agent
</IfModule>
And again, if this is beyond your comfort zone, your web host will probably help you set up GZIP compression if you ask nicely.
Building Pages in Unbounce? You don’t have to ask us nicely, because we’ve already done it. All Unbounce landing pages are automatically compressed during data transfer. (But be nice to us anyway, alright?)
Kill Needless Scripts and Plugins
Difficulty: Intermediate / Estimated Time: 30 Minutes
WordPress is wonderful in its simplicity. As we’ve seen throughout this article, page speed fixes that might require a front-end developer on a static website can often be achieved by simply installing a WordPress plugin. Want to enable browser caching? Boom, W3 Total Cache.* Need to minify your scripts? Pow, Autoptomize.* Developer, shmeveloper.
But because it’s so easy to add functionality through plugins, WordPress websites have a habit of collecting a lot of them—along with all the of the bits and bites of code that make them work. Those add up.
Take a look at the scripts and plugins you’ve added to your website and decide whether they’re essential to your visitor experience. If they’re not, junking them could help cut some extra seconds off of your load time. (And guess what? There’s a plugin for that.) You can also disable plugins one at a time, then retest your page speed to determine which ones are problematic.
*If you’re publishing Unbounce pages to a WordPress domain, these plugins in particular might start a fire.
Building Pages in Unbounce? This is more of WordPress fix, but it also applies to Unbounce customers that have inserted a bunch of custom scripts onto their landing pages. Learn how the Unbounce Script Manager helps you keep things tidy.
Convert Images to Sprites
Difficulty: Intermediate / Estimated Time: 30 Minutes
If your landing page includes a series of similar-sized images (say, for a client logo bar), you can shorten your load time by combining them into an image sprite, then use CSS to display specific chunks of that sprite at a time. This post from WebFX provides a great step-by-step guide for creating CSS sprites.
Joining smaller images into a larger file might seem counterintuitive, but again, the idea here is to reduce the number of HTTP requests on your page and ultimately make it faster. Each individual image requires its own call—combining images into a single CSS sprite means your page only needs to make one.
Building Pages in Unbounce? We don’t build CSS sprites for you, but you can certainly use them on your Unbounce-built landing pages. Check out our documentation on custom JS and CSS with Unbounce.
Improve Your Landing Page Speed: Hard Fixes
We’re into the scary stuff now.
These are fixes you should absolutely not attempt unless you know what you’re doing or you’ve consulted extensively with a front-end developer. (We even had one of the Unbounce devs fact-check this article, and we’ve never felt smaller.) Proceed with caution.
Remove Render-Blocking JS and CSS
Difficulty: Hard / Estimated Time: 45 Minutes
Those CSS and JS scripts that make your landing page beautiful and enable cool, dynamic functionality? They could be one of the major reasons that your page is loading so slowly. (Bad news for my flashing, neon visitor counter.)
When a web browser runs into CSS or JS in the head of your document, it’ll wait to download and process that content before continuing to render your page’s HTML. That might sound like a good thing from a user experience perspective—after all, we want people to see our landing page as it was intended—but it actually means that visitors can be left waiting on a blank screen while everything loads in the background.
To avoid this, we need to implement techniques for preventing render-blocking CSS and JS on our landing page. (Refer back to your Google PageSpeed Insights results to check if any scripts are slowing down your page load.)
Reduce render-blocking CSS
There are a couple of ways that we can neutralize render-blocking CSS. One option is to defer all CSS until after the HTML has loaded. That’ll certainly improve page speed, but it will also present non-styled content when the visitor first reaches our page. Not ideal.
The other, more preferable option is to defer most style rules until the HTML has been rendered, but inline the CSS necessary to correctly display content above the fold within the HTML. That way, visitors will see the properly-styled content as soon as they hit the page while the rest will load out of view. Pretty sneaky. This is a great tutorial using a real-life example from codeburst.io.
Another page speed opportunity for you here is combining your CSS files. By moving your style rules from several files to just one (or maybe two, tops), you can reduce the number of times that visitors need to ping your web server and improve your landing page load time. Here’s a good resource from GiftOfSpeed on combining and compressing you CSS scripts.
Eliminate render-blocking JS
Like CSS, JS scripts can prevent your landing page from rendering as quickly as you might like. We can avoid that by deploying the defer and async attributes. The former tells the browser to wait until your HTML is rendered before it begins pulling in JS scripts, while the latter asks that JS be downloaded simultaneously without interrupting the HTML download.
An important note is that not all JS scripts are equal: some are critical to the rendering of your page and need to be addressed right out of the gate, so they’ll have to stay at the top. Dareboost does a good job of explaining how to distinguish between critical and non-critical JS, as well as how to implement deferred and asynchronous loading.
Building Pages in Unbounce? Unbounce optimizes for most Google PageSpeed Insights recommendations, including the removal of render-blocking elements. That means you can skip this one.
Start Hand-Coding with AMP
Difficulty: Very Hard / Estimated Time: ∞ Hours
Alright, “∞ hours” is an overstatement, but implementing AMP is no small task. Developed by Google, the AMP project is an entirely new framework with which to build your web pages. The goal? Dramatically improve page speed, especially for mobile users.
AMP is made up of three core components: AMP HTML, AMP JS, and AMP Cache. That means you’ll need to learn new markup, as well as understand the framework well enough to get your landing pages validated and make sure they actually work.
We won’t get into the nitty-gritty of building with AMP here, but the AMP website has a bunch of resources (including tutorials) to help you get started.
Building Pages in Unbounce? No hand-coding AMP pages for you—Unbounce makes it easy to drag and drop together AMP experiences. Choose one of our AMP-optimized templates, load your content, get validated, and start publishing lightning-fast landing pages right away.
Improving your landing page speed can sound intimidating, but even small tweaks will make a big difference for your load times. Tackle the easy stuff first, then move onto more challenging fixes as you get comfortable. And above all, keep testing: seeing your improved speed results after each undertaking will give you the confidence and motivation to move forward.
Or, you know, just build with Unbounce. We automatically handle most of the speed fixes listed (or at least makes them super easy), which saves a ton of time. That means you can focus on what matters: getting more conversions and improving ROI.
Increase Your Landing Page Speed (By Stealing Our Homework) published first on https://nickpontemrktg.wordpress.com/
0 notes
Text
Increase Your Landing Page Speed (By Stealing Our Homework)
If you’ve read Unbounce’s 2019 Page Speed Report (and you really should), then you already know why speed is so important this year. Slow-loading landing pages have always been an obstacle to higher conversions, and now Google is punishing poor mobile load times in its search rankings. To be successful in 2019, we—marketers—need to be thinking fast. But are we?
To find out, we polled almost 400 marketers on their attitudes around page speed and asked what (if anything) they were doing to get faster.
Just 56% of marketers are happy with their mobile load times, according to the 2019 Page Speed Report.
Almost three of every four respondents said they had taken steps to improve their page speeds over the last year, and that’s pretty good. Alarmingly, though, only half of marketers we surveyed are satisfied with their load times on mobile.
So most marketers are trying to get faster, but many aren’t where they want to be. Which begs the question: what are people doing to speed up their landing page load times?
Computer, enhance!
Only 39% of marketers have bothered to find out how fast their pages are actually loading. Not great.
Here, we start to see why marketers are somewhat pessimistic about their page speed progress. Just over half have optimized their landing page images—ostensibly one of the simplest ways to speed up your load times—and even fewer have done any of the real technical-sounding things they need to get faster. (I mean, fair, they sound pretty boring to us, too.)
Here’s a doozy, though: just one in three marketers have run a website speed test to find out whether their load times are impacting their conversions. That’s the easiest one!
And hey, we get it. Marketers are being asked to do more than ever before, often with fewer resources. If you’re a small team (or a single person, the smallest of the teams), you might feel you don’t have the time or expertise to meaningfully improve your page speed.
But I’ve gone and done the hard work for you—me, a film school graduate who, until recently, believed that his Apple computer was impervious to viruses. (Hoo boy, it is not.) I’ve spent hours talking to Unbounce developers, reading how-to guides, and generally just bombarding my brain with the most dull, technical page speed information I could get ahold of. (Apologies to said developers.) And if I can get my head around it, there’s no excuse for the rest of you.
Below, I’ve simplified some of the most effective ways to increase your landing page loading times in a guide. For each fix, I’ve indicated the technical difficulty and the estimated time it’ll take, so you know exactly what you’re getting yourself in to. Use the table of contents below to jump to what’s relevant to you, or go ahead and do it all in order.
Jump to a Landing Page Speed Fix
How to Check Your Landing Page Speed
Run a Google Speed Test (5 Minutes)
Try the Unbounce Landing Page Analyzer (5 Minutes)
Improve Your Landing Page Speed: Easy Fixes
Reduce Your Page Content (15 Minutes)
Optimize Your Images (30 Minutes)
Host Your Videos Elsewhere (30 Minutes)
Audit Your Hosting Solution (30 Minutes)
Implement a CDN (30 Minutes)
Improve Your Landing Page Speed: Intermediate Fixes
Minify HTML, JS, and CSS (15 Minutes)
Enable Browser Caching (15 Minutes)
Set Up GZIP Compression (15 Minutes)
Kill Needless Scripts and Plugins (30 Minutes)
Convert Images to Sprites (30 Minutes)
Improve Your Landing Page Speed: Hard Fixes
Remove Render-Blocking JS and CSS (45 Minutes)
Start Hand-Coding with AMP
Final note: If you’ve built your page with Unbounce, you can skip a lot of this stuff—we make many speed fixes on the back-end automatically. In this post, look for the ‘Building Pages in Unbounce?‘ callout boxes to see if a given fix is something you need to implement.
Look for these callout boxes throughout this post to get Unbounce-specific tips and learn how we automatically optimize your landing pages to make them load super fast.
How to Check Your Landing Page Speed
First things first.
Before you throw on your hard hat and start hitting things with a hammer (both figuratively and literally), it’s important to have some idea of what’s working—and what’s not—on your landing page. That means running a speed audit.
It’s important to point out that, regardless of which speed test you use, you don’t want to get too hung up on your score. Achieving a perfect score is not always technically possible (and it might not even be desirable). Instead, use your results as a general guideline to improve page speed and implement the fixes that make sense for you.
Okay—let’s test them pages.
Run a Google Speed Test
Difficulty: Easy / Estimated Time: 5 Minutes
There are a bunch of great tools for testing your page speed, but why not start with the big dog itself? Google’s PageSpeed Insights is an awesome way to do a quick performance check-up with at-a-glance recommendations. (Ryan Engley, Unbounce’s VP of Product Marketing, explains how to interpret and act on your PageSpeed Insights results in this must-read blog post.) Then there’s Lighthouse, a newer tool from Google that provides a comprehensive analysis of your how your page presents to end users.
You’ll also want to run your page through Google’s Test My Site tool, which will check your speed from a mobile perspective.
Clicking on individual results in PageSpeed Insights will reveal your problematic page elements.
Running a Google speed test should only take a couple of minutes, and the results will help you identify some of the top opportunities to boost your landing page load times.
Try the Unbounce Landing Page Analyzer
Difficulty: Easy / Estimated Time: 5 Minutes
Running a speed test with Google should be your top priority, but PageSpeed Insights doesn’t give results tailored to landing pages. For that, you’ll want to run your page through the Unbounce Landing Page Analyzer, which not only provides feedback on page performance but includes a bunch of advice on creating more effective campaigns and kicking your conversions into overdrive.
Unbounce’s Landing Page Analyzer provides feedback on page speed, but also actionable advice on things like SEO, message match, and mobile-friendliness.
Building Pages in Unbounce? Then you’ll definitely want to give our Landing Page Analyzer a shot. Get best-practice recommendations for conversion optimization and see how your landing pages stack up against others in your industry.
Improve Your Landing Page Speed: Easy Fixes
With your results from both Google and Unbounce, you’ll be well-equipped to move onto the actual work of making your page perform better. It’s time to pick up that hammer.
These fixes should be simple enough for anyone to tackle, regardless of their technical expertise.
Reduce Your Page Content
Difficulty: Easy / Estimated Time: 15 Minutes
We’ve marked this as an easy opportunity to increase your page speed, but it probably won’t feel like that when you start thinking about which elements on your page you can junk. Marketers love big hero shots, beautiful supporting imagery, and fun, animated explainer videos. But how much of that content is actually helping you drive conversions?
Visual content accounts for a huge portion of the size of an average web page—images account for over 20% of web page weight, as pointed out by Kinsta—and each element creates an HTTP request. That’s when your visitor’s browser pings your web server to request the files that make up the elements of your page. Too many calls can be a serious drag on your load time, so one of the simplest ways to improve your page speed is cutting down the number of elements you include.
Look at each piece of content on your page critically, then ask yourself: “Does this spark joy?” “Does this increase conversions?” If you don’t think there are pieces you can toss, try running an A/B test with a slimmed-down version of the page. The results might surprise you.
Bottom line: stick to the fundamentals of good landing page design and try to keep the number of elements (and thus HTTP requests) to a minimum.
Building Pages in Unbounce? We recommend that you keep things pretty lean, but we’d never remove content from your landing page. (Must resist… desire… to do best practices…) This is one optimization that you’ll have to tackle on your own.
Optimize Your Images
Difficulty: Easy / Estimated Time: 30 Minutes
Once you’ve trimmed some elements from your page, you’ll want to optimize the content that made the cut. Poor image optimization is the most common reason for slow page loads, especially for mobile visitors. Fortunately, it’s also one of the easiest issues to fix.
These are some quick tips for shrinking your images and improving your page speed. The goal here should be getting images at least under 800kb, but the smaller we can make them, the better.
Resize your images
It’s easy to chuck a larger image onto your page and rely on your content management system (CMS) to compress it to the appropriate size, but it’ll still be loading at least some of those extra pixels on the back end, and your visitors are going to feel it in the load. When you add an image, make sure it’s the same dimensions that your page will be rendering it.*
*This doesn’t necessarily apply to Unbounce’s retina image support—read up on that here.
Choose the right file type
Most people don’t think too much about the format of the image they’re uploading, but it can have a dramatic effect on page performance. The file types you’re probably most familiar with are JPEG and PNG—and, yes, there are differences.
JPEG is a ‘lossy’ format, which means it’ll lose some data during compression. That typically gives you a smaller file, but it can come at the expense of visual fidelity. Generally, images with significant color variation (say, photographs) perform better as JPEGs, and any dip in quality can usually go undetected.
PNG is ‘lossless,’ so the image’s appearance won’t change when resized, but it tends to make for larger files if there’s significant color variation. PNG is ideal for simple images with defined shapes, like those with text. Saving PNGs in 8-bit (rather than 24-bit, which has a broader color palette) can help shave off some extra bites.
Here are some optimization tips for JPEG and PNG (and GIF, that villain) from Google itself.
Use compression tools
Before your weigh-in, it’s good to run images through a final round of compression. There are plenty of image compression tools on WordPress, as well as some free, standalone ones like TinyPNG. These shrinky gizmos offer a simple way to cut down your image sizes without braving the cursed labyrinth that is Adobe’s export settings. (Hey, I’m a words guy.)
Your takeaways here are:
Ensure your image dimensions match how they’ll actually be displayed
Use JPEG when a slight dip in visual fidelity isn’t the end of the world (like photography), but PNG when it is (images with text and sharp lines)
Compress images to keep the file size as tiny as possible
If you want to take a deeper dive into image optimization, we recommend that you check out this post from Search Engine Land, which goes into detail on making images smaller while keeping them beautiful.
Building Pages in Unbounce? We’ve got you covered. Unbounce’s Auto Image Optimizer shrinks your images as soon as they’re uploaded so you can focus on making the best landing page possible.
Host Your Videos Elsewhere
Difficulty: Easy / Estimated Time: 30 Minutes
Why carry something yourself when you can make someone else carry it for you? That’s my motto for landing pages and life, and it’s why I’m no longer welcome on Unbounce’s company hiking trips.
Hosting videos on your own domain can be great for SEO purposes, but that’s not usually our goal with landing pages. We want everything to load in a flash and give our visitors the best chance to convert. Depending on your hosting solution, though, your videos might be slowing down your page speed, suffering from playback issues, and taking up an uncomfortable amount of server space.
Done properly, transferring videos to a third-party platform can shed some extra load time and help your pages render faster. Consider moving video content to Wistia, YouTube, or Vimeo, then using a light embed technique so that your videos only load heavier playback elements when your visitors actually click on them.
Building Pages in Unbounce? As a disclaimer: Using light embed codes with Unbounce (or any custom code, for that matter) will require some technical knowledge to implement and could, in rare cases, cause issues. Check out this Unbounce community post for more information.
Audit Your Hosting Solution
Difficulty: Easy / Estimated Time: 30 Minutes
Loading speed isn’t just determined by what’s on your landing page. Your web host also has a major influence in how quickly your page rolls out to potential customers.
There are three common models for web hosting:
Shared hosting
Generally the most affordable solution, shared hosting is when your website is hosted alongside other sites on a single web server. Everyone draws from common resources (like storage space and processing power), which means—you guessed it—you need to share.
Virtual private server (VPS) hosting
This is essentially a mix of both shared and dedicated hosting. With VPS, your website still shares server space with others, but you’ll have dedicated resources that no one else can dip into. The result is more power and flexibility, but it tends to come with a higher price tag.
Dedicated hosting
For those who’ve had a traumatic roommate experience (who hasn’t?), dedicated hosting means your website has the server all to itself. More resources, no sharing. That’s great if you’re heavy on digital content and get a ton of traffic, but dedicated hosting is also the most expensive option and requires the technical know-how to set up and maintain your server.
Low-volume websites can generally get by with the cost-effective shared solution, but once your traffic starts to rise, you might not be getting enough juice from your web host to deliver content quickly—and that’s when load times start to suffer. (Give this post from Search Engine Journal a read for a more comprehensive explanation.)
It’s also important to note that the whereabouts of your web server can have a significant impact on your page speed. If you’re not using a content delivery network (CDN; more on this below), you’ll want to make sure that traffic from foreign countries isn’t encountering too much latency.
Think your hosting solution might be impacting your page speed? Run your site through a server speed test like this one from Bitcatcha, and use WebPageTest or Pingdom to see how your quickly your landing page loads in other countries. Depending on the results, you might decide it’s time to upgrade your hosting plan (or change web hosts altogether).
Building Pages in Unbounce? You don’t have to worry about this one—Unbounce’s global hosting solution boasts 99.95% uptime and ensures that your landing pages always have the necessary resources to load super fast.
Implement a CDN
Difficulty: Easy / Estimated Time: 30 Minutes
When your landing page gets a visitor, their web browser pings your server to get the content necessary to build out the page. Simple, right? Everyone downloads your website information from the same place, regardless of their location around the world. Well, that’s usually fine if the visitor is in or close to the country that your web server is located, but when they’re halfway around the globe, chances are they’re going to encounter some latency.
To avoid that, you should look into deploying a CDN, which caches your website across a network of data centers and proxy servers all over the planet. Say your own server is in the United States and someone from Lithuania is trying to visit your landing page. Instead of downloading your content from across the Atlantic, that visitor can pull a cached version from a server nearby.
Setting your website up with a CDN is pretty straightforward and—depending on your traffic—generally affordable. Here’s a list of some popular CDN providers from Mashable.
Building Pages in Unbounce? We’ve got five global data centers supporting the Unbounce CDN, which means your landing pages will load in a flash regardless of where they’re being accessed from.
Improve Your Landing Page Speed: Intermediate Fixes
These next speed fixes are a little trickier, but they should be manageable for marketers with a little technical know-how. Still, a mistake here could mean actual damage to your landing page.
Our recommendation? Do some research, make a backup, and—if you can—consult briefly with a developer on your team. It never hurts to have an experienced colleague to turn to if you get in over your head.
Building Pages in Unbounce? We talk a lot about WordPress through this next section. If you’re using our plugin to publish Unbounce landing pages to a WordPress domain, some of these recommended speed fixes can actually cause technical issues. Don’t hesitate to reach out to us for clarification if you’re ever unsure.
Minify HTML, CSS, and JS
Difficulty: Intermediate / Estimated Time: 15 Minutes
All those lines of HTML, CSS, and JS code that make up your landing page? They’re packed with spaces, line breaks, and other bits of formatting that make it more legible and easier for us to interpret, but each makes your load time just an eensy bit slower—and the web browsers your visitors are using to render your page don’t particularly need them.
With minification, the goal is to cut out all of that extra junk and condense your code so that browsers can read it faster. Here’s an example snippet of Javascript code from Wikipedia:
var array = [];
for (var i = 0; i < 20; i++) {
array[i] = i;
}
After minifying, that code would look something like this:
for(var a=[i=0];++i<20;a[i]=i);
There are plenty of free online tools that will do this for your landing page, like Minify Code, as well as a bunch of WordPress plugins. Be sure to check out this post from Elegant Themes, which is an awesome resource that dives into the many options at your disposal.
Building Pages in Unbounce? Do we minify? We practically invented minifying. (Editor’s note: We did not.) Unbounce compresses all of your code automatically, making your landing page as slim as can be. No coding your pages from scratch and no minifying that code in the background? We’re making this too easy for you.
Enable Browser Caching
Difficulty: Intermediate / Estimated Time: 15 Minutes
The goal with any landing page should be getting prospects to convert the first time they visit, but the reality is that not everyone will. Sometimes, visitors will need some time to think about it: they’ll bounce, do more research, check out some competitors, then come back to your original offer. Browser caching ensures that when they return, your page will load even faster—and that’ll make them more likely to convert.
Not sure if you’ve already got caching enabled? Before you start, run a quick caching check using a tool like this one from GiftOfSpeed.
If your site is built on WordPress, enabling caching is as easy as adding a plugin.* (WordPress is almost too easy, huh?) Check out this list of caching plugins, most of which include quick instructions for getting set up.
*If you’re publishing Unbounce pages to a WordPress domain, these caching recommendations could create big problems. Check with us first.
For those not on WordPress, enabling browser caching on your own is pretty simple if you’re willing to get your hands dirty. For example, on Apache web servers, it comes down to inserting a little bit of code into the .htaccess file on your web host or server:
<IfModule mod_expires.c>
ExpiresActive On
ExpiresByType image/jpg “access 1 year”
ExpiresByType image/jpeg “access 1 year”
ExpiresByType image/gif “access 1 year”
ExpiresByType image/png “access 1 year”
ExpiresByType text/css “access 1 month”
ExpiresByType text/html “access 1 month”
ExpiresByType application/pdf “access 1 month”
ExpiresByType text/x-javascript “access 1 month”
ExpiresByType application/x-shockwave-flash “access 1 month”
ExpiresByType image/x-icon “access 1 year”
ExpiresDefault “access 1 month”
</IfModule>
This article from Varvy provides a great how-to, as does this one from WinningWP (which discusses enabling browser caching from a WordPress perspective but is applicable more broadly).
If all of this makes you nervous, there’s likely a simpler method for you to set up browser caching. Most web hosts will enable caching for you if you ask. Depending on your hosting solution, it might be as easy as making a phone call. (Although, now that I think about it, that might be more daunting for some of us.)
Building Pages in Unbounce? Seven-day browser caching is enabled on all Unbounce-built landing pages, so this is a speed fix you can comfortably skip. Maybe use this free time to treat yourself to some self-care? You’ve earned it.
Set Up GZIP Compression
Difficulty: Intermediate / Estimated Time: 15 Minutes
When a visitor reaches your landing page, their browser pings your web server to request the files that make up the page and the server transmits them back. Naturally, that process moves faster if the information being sent is compressed to be as small as possible. Here’s where GZIP compression comes in.
(You’ll want to check to see if GZIP compression is already enabled before you get started.)
As with browser caching, the difficulty of setting up GZIP compression is going to be determined by how your website was built. If you use WordPress, you’re in luck: many WordPress plugins will enable GZIP compression for you almost automatically. If you don’t use WordPress, well, we’re headed back into your server.
This article from GTmetrix provides a quick overview of the importance of GZIP compression and how to enable it. With Apache web servers, you’ll need to add this chunk of code to your .htaccess file.
<IfModule mod_deflate.c>
# Compress HTML, CSS, JavaScript, Text, XML and fonts
AddOutputFilterByType DEFLATE application/javascript
AddOutputFilterByType DEFLATE application/rss+xml
AddOutputFilterByType DEFLATE application/vnd.ms-fontobject
AddOutputFilterByType DEFLATE application/x-font
AddOutputFilterByType DEFLATE application/x-font-opentype
AddOutputFilterByType DEFLATE application/x-font-otf
AddOutputFilterByType DEFLATE application/x-font-truetype
AddOutputFilterByType DEFLATE application/x-font-ttf
AddOutputFilterByType DEFLATE application/x-javascript
AddOutputFilterByType DEFLATE application/xhtml+xml
AddOutputFilterByType DEFLATE application/xml
AddOutputFilterByType DEFLATE font/opentype
AddOutputFilterByType DEFLATE font/otf
AddOutputFilterByType DEFLATE font/ttf
AddOutputFilterByType DEFLATE image/svg+xml
AddOutputFilterByType DEFLATE image/x-icon
AddOutputFilterByType DEFLATE text/css
AddOutputFilterByType DEFLATE text/html
AddOutputFilterByType DEFLATE text/javascript
AddOutputFilterByType DEFLATE text/plain
AddOutputFilterByType DEFLATE text/xml
# Remove browser bugs (only needed for really old browsers)
BrowserMatch ^Mozilla/4 gzip-only-text/html
BrowserMatch ^Mozilla/4\.0[678] no-gzip
BrowserMatch \bMSIE !no-gzip !gzip-only-text/html
Header append Vary User-Agent
</IfModule>
And again, if this is beyond your comfort zone, your web host will probably help you set up GZIP compression if you ask nicely.
Building Pages in Unbounce? You don’t have to ask us nicely, because we’ve already done it. All Unbounce landing pages are automatically compressed during data transfer. (But be nice to us anyway, alright?)
Kill Needless Scripts and Plugins
Difficulty: Intermediate / Estimated Time: 30 Minutes
WordPress is wonderful in its simplicity. As we’ve seen throughout this article, page speed fixes that might require a front-end developer on a static website can often be achieved by simply installing a WordPress plugin. Want to enable browser caching? Boom, W3 Total Cache.* Need to minify your scripts? Pow, Autoptomize.* Developer, shmeveloper.
But because it’s so easy to add functionality through plugins, WordPress websites have a habit of collecting a lot of them—along with all the of the bits and bites of code that make them work. Those add up.
Take a look at the scripts and plugins you’ve added to your website and decide whether they’re essential to your visitor experience. If they’re not, junking them could help cut some extra seconds off of your load time. (And guess what? There’s a plugin for that.) You can also disable plugins one at a time, then retest your page speed to determine which ones are problematic.
*If you’re publishing Unbounce pages to a WordPress domain, these plugins in particular might start a fire.
Building Pages in Unbounce? This is more of WordPress fix, but it also applies to Unbounce customers that have inserted a bunch of custom scripts onto their landing pages. Learn how the Unbounce Script Manager helps you keep things tidy.
Convert Images to Sprites
Difficulty: Intermediate / Estimated Time: 30 Minutes
If your landing page includes a series of similar-sized images (say, for a client logo bar), you can shorten your load time by combining them into an image sprite, then use CSS to display specific chunks of that sprite at a time. This post from WebFX provides a great step-by-step guide for creating CSS sprites.
Joining smaller images into a larger file might seem counterintuitive, but again, the idea here is to reduce the number of HTTP requests on your page and ultimately make it faster. Each individual image requires its own call—combining images into a single CSS sprite means your page only needs to make one.
Building Pages in Unbounce? We don’t build CSS sprites for you, but you can certainly use them on your Unbounce-built landing pages. Check out our documentation on custom JS and CSS with Unbounce.
Improve Your Landing Page Speed: Hard Fixes
We’re into the scary stuff now.
These are fixes you should absolutely not attempt unless you know what you’re doing or you’ve consulted extensively with a front-end developer. (We even had one of the Unbounce devs fact-check this article, and we’ve never felt smaller.) Proceed with caution.
Remove Render-Blocking JS and CSS
Difficulty: Hard / Estimated Time: 45 Minutes
Those CSS and JS scripts that make your landing page beautiful and enable cool, dynamic functionality? They could be one of the major reasons that your page is loading so slowly. (Bad news for my flashing, neon visitor counter.)
When a web browser runs into CSS or JS in the head of your document, it’ll wait to download and process that content before continuing to render your page’s HTML. That might sound like a good thing from a user experience perspective—after all, we want people to see our landing page as it was intended—but it actually means that visitors can be left waiting on a blank screen while everything loads in the background.
To avoid this, we need to implement techniques for preventing render-blocking CSS and JS on our landing page. (Refer back to your Google PageSpeed Insights results to check if any scripts are slowing down your page load.)
Reduce render-blocking CSS
There are a couple of ways that we can neutralize render-blocking CSS. One option is to defer all CSS until after the HTML has loaded. That’ll certainly improve page speed, but it will also present non-styled content when the visitor first reaches our page. Not ideal.
The other, more preferable option is to defer most style rules until the HTML has been rendered, but inline the CSS necessary to correctly display content above the fold within the HTML. That way, visitors will see the properly-styled content as soon as they hit the page while the rest will load out of view. Pretty sneaky. This is a great tutorial using a real-life example from codeburst.io.
Another page speed opportunity for you here is combining your CSS files. By moving your style rules from several files to just one (or maybe two, tops), you can reduce the number of times that visitors need to ping your web server and improve your landing page load time. Here’s a good resource from GiftOfSpeed on combining and compressing you CSS scripts.
Eliminate render-blocking JS
Like CSS, JS scripts can prevent your landing page from rendering as quickly as you might like. We can avoid that by deploying the defer and async attributes. The former tells the browser to wait until your HTML is rendered before it begins pulling in JS scripts, while the latter asks that JS be downloaded simultaneously without interrupting the HTML download.
An important note is that not all JS scripts are equal: some are critical to the rendering of your page and need to be addressed right out of the gate, so they’ll have to stay at the top. Dareboost does a good job of explaining how to distinguish between critical and non-critical JS, as well as how to implement deferred and asynchronous loading.
Building Pages in Unbounce? Unbounce optimizes for most Google PageSpeed Insights recommendations, including the removal of render-blocking elements. That means you can skip this one.
Start Hand-Coding with AMP
Difficulty: Very Hard / Estimated Time: ∞ Hours
Alright, “∞ hours” is an overstatement, but implementing AMP is no small task. Developed by Google, the AMP project is an entirely new framework with which to build your web pages. The goal? Dramatically improve page speed, especially for mobile users.
AMP is made up of three core components: AMP HTML, AMP JS, and AMP Cache. That means you’ll need to learn new markup, as well as understand the framework well enough to get your landing pages validated and make sure they actually work.
We won’t get into the nitty-gritty of building with AMP here, but the AMP website has a bunch of resources (including tutorials) to help you get started.
Building Pages in Unbounce? No hand-coding AMP pages for you—Unbounce makes it easy to drag and drop together AMP experiences. Choose one of our AMP-optimized templates, load your content, get validated, and start publishing lightning-fast landing pages right away.
Improving your landing page speed can sound intimidating, but even small tweaks will make a big difference for your load times. Tackle the easy stuff first, then move onto more challenging fixes as you get comfortable. And above all, keep testing: seeing your improved speed results after each undertaking will give you the confidence and motivation to move forward.
Or, you know, just build with Unbounce. We automatically handle most of the speed fixes listed (or at least makes them super easy), which saves a ton of time. That means you can focus on what matters: getting more conversions and improving ROI.
from Marketing https://unbounce.com/landing-pages/increase-landing-page-speed/
via http://www.rssmix.com/
0 notes
Text
Increase Your Landing Page Speed (By Stealing Our Homework)
If you’ve read Unbounce’s 2019 Page Speed Report (and you really should), then you already know why speed is so important this year. Slow-loading landing pages have always been an obstacle to higher conversions, and now Google is punishing poor mobile load times in its search rankings. To be successful in 2019, we—marketers—need to be thinking fast. But are we?
To find out, we polled almost 400 marketers on their attitudes around page speed and asked what (if anything) they were doing to get faster.
Just 56% of marketers are happy with their mobile load times, according to the 2019 Page Speed Report.
Almost three of every four respondents said they had taken steps to improve their page speeds over the last year, and that’s pretty good. Alarmingly, though, only half of marketers we surveyed are satisfied with their load times on mobile.
So most marketers are trying to get faster, but many aren’t where they want to be. Which begs the question: what are people doing to speed up their landing page load times?
Computer, enhance!
Only 39% of marketers have bothered to find out how fast their pages are actually loading. Not great.
Here, we start to see why marketers are somewhat pessimistic about their page speed progress. Just over half have optimized their landing page images—ostensibly one of the simplest ways to speed up your load times—and even fewer have done any of the real technical-sounding things they need to get faster. (I mean, fair, they sound pretty boring to us, too.)
Here’s a doozy, though: just one in three marketers have run a website speed test to find out whether their load times are impacting their conversions. That’s the easiest one!
And hey, we get it. Marketers are being asked to do more than ever before, often with fewer resources. If you’re a small team (or a single person, the smallest of the teams), you might feel you don’t have the time or expertise to meaningfully improve your page speed.
But I’ve gone and done the hard work for you—me, a film school graduate who, until recently, believed that his Apple computer was impervious to viruses. (Hoo boy, it is not.) I’ve spent hours talking to Unbounce developers, reading how-to guides, and generally just bombarding my brain with the most dull, technical page speed information I could get ahold of. (Apologies to said developers.) And if I can get my head around it, there’s no excuse for the rest of you.
Below, I’ve simplified some of the most effective ways to increase your landing page loading times in a guide. For each fix, I’ve indicated the technical difficulty and the estimated time it’ll take, so you know exactly what you’re getting yourself in to. Use the table of contents below to jump to what’s relevant to you, or go ahead and do it all in order.
Jump to a Landing Page Speed Fix
How to Check Your Landing Page Speed
Run a Google Speed Test (5 Minutes)
Try the Unbounce Landing Page Analyzer (5 Minutes)
Improve Your Landing Page Speed: Easy Fixes
Reduce Your Page Content (15 Minutes)
Optimize Your Images (30 Minutes)
Host Your Videos Elsewhere (30 Minutes)
Audit Your Hosting Solution (30 Minutes)
Implement a CDN (30 Minutes)
Improve Your Landing Page Speed: Intermediate Fixes
Minify HTML, JS, and CSS (15 Minutes)
Enable Browser Caching (15 Minutes)
Set Up GZIP Compression (15 Minutes)
Kill Needless Scripts and Plugins (30 Minutes)
Convert Images to Sprites (30 Minutes)
Improve Your Landing Page Speed: Hard Fixes
Remove Render-Blocking JS and CSS (45 Minutes)
Start Hand-Coding with AMP
Final note: If you’ve built your page with Unbounce, you can skip a lot of this stuff—we make many speed fixes on the back-end automatically. In this post, look for the ‘Building Pages in Unbounce?‘ callout boxes to see if a given fix is something you need to implement.
Look for these callout boxes throughout this post to get Unbounce-specific tips and learn how we automatically optimize your landing pages to make them load super fast.
How to Check Your Landing Page Speed
First things first.
Before you throw on your hard hat and start hitting things with a hammer (both figuratively and literally), it’s important to have some idea of what’s working—and what’s not—on your landing page. That means running a speed audit.
It’s important to point out that, regardless of which speed test you use, you don’t want to get too hung up on your score. Achieving a perfect score is not always technically possible (and it might not even be desirable). Instead, use your results as a general guideline to improve page speed and implement the fixes that make sense for you.
Okay—let’s test them pages.
Run a Google Speed Test
Difficulty: Easy / Estimated Time: 5 Minutes
There are a bunch of great tools for testing your page speed, but why not start with the big dog itself? Google’s PageSpeed Insights is an awesome way to do a quick performance check-up with at-a-glance recommendations. (Ryan Engley, Unbounce’s VP of Product Marketing, explains how to interpret and act on your PageSpeed Insights results in this must-read blog post.) Then there’s Lighthouse, a newer tool from Google that provides a comprehensive analysis of your how your page presents to end users.
You’ll also want to run your page through Google’s Test My Site tool, which will check your speed from a mobile perspective.
Clicking on individual results in PageSpeed Insights will reveal your problematic page elements.
Running a Google speed test should only take a couple of minutes, and the results will help you identify some of the top opportunities to boost your landing page load times.
Try the Unbounce Landing Page Analyzer
Difficulty: Easy / Estimated Time: 5 Minutes
Running a speed test with Google should be your top priority, but PageSpeed Insights doesn’t give results tailored to landing pages. For that, you’ll want to run your page through the Unbounce Landing Page Analyzer, which not only provides feedback on page performance but includes a bunch of advice on creating more effective campaigns and kicking your conversions into overdrive.
Unbounce’s Landing Page Analyzer provides feedback on page speed, but also actionable advice on things like SEO, message match, and mobile-friendliness.
Building Pages in Unbounce? Then you’ll definitely want to give our Landing Page Analyzer a shot. Get best-practice recommendations for conversion optimization and see how your landing pages stack up against others in your industry.
Improve Your Landing Page Speed: Easy Fixes
With your results from both Google and Unbounce, you’ll be well-equipped to move onto the actual work of making your page perform better. It’s time to pick up that hammer.
These fixes should be simple enough for anyone to tackle, regardless of their technical expertise.
Reduce Your Page Content
Difficulty: Easy / Estimated Time: 15 Minutes
We’ve marked this as an easy opportunity to increase your page speed, but it probably won’t feel like that when you start thinking about which elements on your page you can junk. Marketers love big hero shots, beautiful supporting imagery, and fun, animated explainer videos. But how much of that content is actually helping you drive conversions?
Visual content accounts for a huge portion of the size of an average web page—images account for over 20% of web page weight, as pointed out by Kinsta—and each element creates an HTTP request. That’s when your visitor’s browser pings your web server to request the files that make up the elements of your page. Too many calls can be a serious drag on your load time, so one of the simplest ways to improve your page speed is cutting down the number of elements you include.
Look at each piece of content on your page critically, then ask yourself: “Does this spark joy?” “Does this increase conversions?” If you don’t think there are pieces you can toss, try running an A/B test with a slimmed-down version of the page. The results might surprise you.
Bottom line: stick to the fundamentals of good landing page design and try to keep the number of elements (and thus HTTP requests) to a minimum.
Building Pages in Unbounce? We recommend that you keep things pretty lean, but we’d never remove content from your landing page. (Must resist… desire… to do best practices…) This is one optimization that you’ll have to tackle on your own.
Optimize Your Images
Difficulty: Easy / Estimated Time: 30 Minutes
Once you’ve trimmed some elements from your page, you’ll want to optimize the content that made the cut. Poor image optimization is the most common reason for slow page loads, especially for mobile visitors. Fortunately, it’s also one of the easiest issues to fix.
These are some quick tips for shrinking your images and improving your page speed. The goal here should be getting images at least under 800kb, but the smaller we can make them, the better.
Resize your images
It’s easy to chuck a larger image onto your page and rely on your content management system (CMS) to compress it to the appropriate size, but it’ll still be loading at least some of those extra pixels on the back end, and your visitors are going to feel it in the load. When you add an image, make sure it’s the same dimensions that your page will be rendering it.*
*This doesn’t necessarily apply to Unbounce’s retina image support—read up on that here.
Choose the right file type
Most people don’t think too much about the format of the image they’re uploading, but it can have a dramatic effect on page performance. The file types you’re probably most familiar with are JPEG and PNG—and, yes, there are differences.
JPEG is a ‘lossy’ format, which means it’ll lose some data during compression. That typically gives you a smaller file, but it can come at the expense of visual fidelity. Generally, images with significant color variation (say, photographs) perform better as JPEGs, and any dip in quality can usually go undetected.
PNG is ‘lossless,’ so the image’s appearance won’t change when resized, but it tends to make for larger files if there’s significant color variation. PNG is ideal for simple images with defined shapes, like those with text. Saving PNGs in 8-bit (rather than 24-bit, which has a broader color palette) can help shave off some extra bites.
Here are some optimization tips for JPEG and PNG (and GIF, that villain) from Google itself.
Use compression tools
Before your weigh-in, it’s good to run images through a final round of compression. There are plenty of image compression tools on WordPress, as well as some free, standalone ones like TinyPNG. These shrinky gizmos offer a simple way to cut down your image sizes without braving the cursed labyrinth that is Adobe’s export settings. (Hey, I’m a words guy.)
Your takeaways here are:
Ensure your image dimensions match how they’ll actually be displayed
Use JPEG when a slight dip in visual fidelity isn’t the end of the world (like photography), but PNG when it is (images with text and sharp lines)
Compress images to keep the file size as tiny as possible
If you want to take a deeper dive into image optimization, we recommend that you check out this post from Search Engine Land, which goes into detail on making images smaller while keeping them beautiful.
Building Pages in Unbounce? We’ve got you covered. Unbounce’s Auto Image Optimizer shrinks your images as soon as they’re uploaded so you can focus on making the best landing page possible.
Host Your Videos Elsewhere
Difficulty: Easy / Estimated Time: 30 Minutes
Why carry something yourself when you can make someone else carry it for you? That’s my motto for landing pages and life, and it’s why I’m no longer welcome on Unbounce’s company hiking trips.
Hosting videos on your own domain can be great for SEO purposes, but that’s not usually our goal with landing pages. We want everything to load in a flash and give our visitors the best chance to convert. Depending on your hosting solution, though, your videos might be slowing down your page speed, suffering from playback issues, and taking up an uncomfortable amount of server space.
Done properly, transferring videos to a third-party platform can shed some extra load time and help your pages render faster. Consider moving video content to Wistia, YouTube, or Vimeo, then using a light embed technique so that your videos only load heavier playback elements when your visitors actually click on them.
Building Pages in Unbounce? As a disclaimer: Using light embed codes with Unbounce (or any custom code, for that matter) will require some technical knowledge to implement and could, in rare cases, cause issues. Check out this Unbounce community post for more information.
Audit Your Hosting Solution
Difficulty: Easy / Estimated Time: 30 Minutes
Loading speed isn’t just determined by what’s on your landing page. Your web host also has a major influence in how quickly your page rolls out to potential customers.
There are three common models for web hosting:
Shared hosting
Generally the most affordable solution, shared hosting is when your website is hosted alongside other sites on a single web server. Everyone draws from common resources (like storage space and processing power), which means—you guessed it—you need to share.
Virtual private server (VPS) hosting
This is essentially a mix of both shared and dedicated hosting. With VPS, your website still shares server space with others, but you’ll have dedicated resources that no one else can dip into. The result is more power and flexibility, but it tends to come with a higher price tag.
Dedicated hosting
For those who’ve had a traumatic roommate experience (who hasn’t?), dedicated hosting means your website has the server all to itself. More resources, no sharing. That’s great if you’re heavy on digital content and get a ton of traffic, but dedicated hosting is also the most expensive option and requires the technical know-how to set up and maintain your server.
Low-volume websites can generally get by with the cost-effective shared solution, but once your traffic starts to rise, you might not be getting enough juice from your web host to deliver content quickly—and that’s when load times start to suffer. (Give this post from Search Engine Journal a read for a more comprehensive explanation.)
It’s also important to note that the whereabouts of your web server can have a significant impact on your page speed. If you’re not using a content delivery network (CDN; more on this below), you’ll want to make sure that traffic from foreign countries isn’t encountering too much latency.
Think your hosting solution might be impacting your page speed? Run your site through a server speed test like this one from Bitcatcha, and use WebPageTest or Pingdom to see how your quickly your landing page loads in other countries. Depending on the results, you might decide it’s time to upgrade your hosting plan (or change web hosts altogether).
Building Pages in Unbounce? You don’t have to worry about this one—Unbounce’s global hosting solution boasts 99.95% uptime and ensures that your landing pages always have the necessary resources to load super fast.
Implement a CDN
Difficulty: Easy / Estimated Time: 30 Minutes
When your landing page gets a visitor, their web browser pings your server to get the content necessary to build out the page. Simple, right? Everyone downloads your website information from the same place, regardless of their location around the world. Well, that’s usually fine if the visitor is in or close to the country that your web server is located, but when they’re halfway around the globe, chances are they’re going to encounter some latency.
To avoid that, you should look into deploying a CDN, which caches your website across a network of data centers and proxy servers all over the planet. Say your own server is in the United States and someone from Lithuania is trying to visit your landing page. Instead of downloading your content from across the Atlantic, that visitor can pull a cached version from a server nearby.
Setting your website up with a CDN is pretty straightforward and—depending on your traffic—generally affordable. Here’s a list of some popular CDN providers from Mashable.
Building Pages in Unbounce? We’ve got five global data centers supporting the Unbounce CDN, which means your landing pages will load in a flash regardless of where they’re being accessed from.
Improve Your Landing Page Speed: Intermediate Fixes
These next speed fixes are a little trickier, but they should be manageable for marketers with a little technical know-how. Still, a mistake here could mean actual damage to your landing page.
Our recommendation? Do some research, make a backup, and—if you can—consult briefly with a developer on your team. It never hurts to have an experienced colleague to turn to if you get in over your head.
Building Pages in Unbounce? We talk a lot about WordPress through this next section. If you’re using our plugin to publish Unbounce landing pages to a WordPress domain, some of these recommended speed fixes can actually cause technical issues. Don’t hesitate to reach out to us for clarification if you’re ever unsure.
Minify HTML, CSS, and JS
Difficulty: Intermediate / Estimated Time: 15 Minutes
All those lines of HTML, CSS, and JS code that make up your landing page? They’re packed with spaces, line breaks, and other bits of formatting that make it more legible and easier for us to interpret, but each makes your load time just an eensy bit slower—and the web browsers your visitors are using to render your page don’t particularly need them.
With minification, the goal is to cut out all of that extra junk and condense your code so that browsers can read it faster. Here’s an example snippet of Javascript code from Wikipedia:
var array = [];
for (var i = 0; i < 20; i++) {
array[i] = i;
}
After minifying, that code would look something like this:
for(var a=[i=0];++i<20;a[i]=i);
There are plenty of free online tools that will do this for your landing page, like Minify Code, as well as a bunch of WordPress plugins. Be sure to check out this post from Elegant Themes, which is an awesome resource that dives into the many options at your disposal.
Building Pages in Unbounce? Do we minify? We practically invented minifying. (Editor’s note: We did not.) Unbounce compresses all of your code automatically, making your landing page as slim as can be. No coding your pages from scratch and no minifying that code in the background? We’re making this too easy for you.
Enable Browser Caching
Difficulty: Intermediate / Estimated Time: 15 Minutes
The goal with any landing page should be getting prospects to convert the first time they visit, but the reality is that not everyone will. Sometimes, visitors will need some time to think about it: they’ll bounce, do more research, check out some competitors, then come back to your original offer. Browser caching ensures that when they return, your page will load even faster—and that’ll make them more likely to convert.
Not sure if you’ve already got caching enabled? Before you start, run a quick caching check using a tool like this one from GiftOfSpeed.
If your site is built on WordPress, enabling caching is as easy as adding a plugin.* (WordPress is almost too easy, huh?) Check out this list of caching plugins, most of which include quick instructions for getting set up.
*If you’re publishing Unbounce pages to a WordPress domain, these caching recommendations could create big problems. Check with us first.
For those not on WordPress, enabling browser caching on your own is pretty simple if you’re willing to get your hands dirty. For example, on Apache web servers, it comes down to inserting a little bit of code into the .htaccess file on your web host or server:
<IfModule mod_expires.c>
ExpiresActive On
ExpiresByType image/jpg “access 1 year”
ExpiresByType image/jpeg “access 1 year”
ExpiresByType image/gif “access 1 year”
ExpiresByType image/png “access 1 year”
ExpiresByType text/css “access 1 month”
ExpiresByType text/html “access 1 month”
ExpiresByType application/pdf “access 1 month”
ExpiresByType text/x-javascript “access 1 month”
ExpiresByType application/x-shockwave-flash “access 1 month”
ExpiresByType image/x-icon “access 1 year”
ExpiresDefault “access 1 month”
</IfModule>
This article from Varvy provides a great how-to, as does this one from WinningWP (which discusses enabling browser caching from a WordPress perspective but is applicable more broadly).
If all of this makes you nervous, there’s likely a simpler method for you to set up browser caching. Most web hosts will enable caching for you if you ask. Depending on your hosting solution, it might be as easy as making a phone call. (Although, now that I think about it, that might be more daunting for some of us.)
Building Pages in Unbounce? Seven-day browser caching is enabled on all Unbounce-built landing pages, so this is a speed fix you can comfortably skip. Maybe use this free time to treat yourself to some self-care? You’ve earned it.
Set Up GZIP Compression
Difficulty: Intermediate / Estimated Time: 15 Minutes
When a visitor reaches your landing page, their browser pings your web server to request the files that make up the page and the server transmits them back. Naturally, that process moves faster if the information being sent is compressed to be as small as possible. Here’s where GZIP compression comes in.
(You’ll want to check to see if GZIP compression is already enabled before you get started.)
As with browser caching, the difficulty of setting up GZIP compression is going to be determined by how your website was built. If you use WordPress, you’re in luck: many WordPress plugins will enable GZIP compression for you almost automatically. If you don’t use WordPress, well, we’re headed back into your server.
This article from GTmetrix provides a quick overview of the importance of GZIP compression and how to enable it. With Apache web servers, you’ll need to add this chunk of code to your .htaccess file.
<IfModule mod_deflate.c>
# Compress HTML, CSS, JavaScript, Text, XML and fonts
AddOutputFilterByType DEFLATE application/javascript
AddOutputFilterByType DEFLATE application/rss+xml
AddOutputFilterByType DEFLATE application/vnd.ms-fontobject
AddOutputFilterByType DEFLATE application/x-font
AddOutputFilterByType DEFLATE application/x-font-opentype
AddOutputFilterByType DEFLATE application/x-font-otf
AddOutputFilterByType DEFLATE application/x-font-truetype
AddOutputFilterByType DEFLATE application/x-font-ttf
AddOutputFilterByType DEFLATE application/x-javascript
AddOutputFilterByType DEFLATE application/xhtml+xml
AddOutputFilterByType DEFLATE application/xml
AddOutputFilterByType DEFLATE font/opentype
AddOutputFilterByType DEFLATE font/otf
AddOutputFilterByType DEFLATE font/ttf
AddOutputFilterByType DEFLATE image/svg+xml
AddOutputFilterByType DEFLATE image/x-icon
AddOutputFilterByType DEFLATE text/css
AddOutputFilterByType DEFLATE text/html
AddOutputFilterByType DEFLATE text/javascript
AddOutputFilterByType DEFLATE text/plain
AddOutputFilterByType DEFLATE text/xml
# Remove browser bugs (only needed for really old browsers)
BrowserMatch ^Mozilla/4 gzip-only-text/html
BrowserMatch ^Mozilla/4\.0[678] no-gzip
BrowserMatch \bMSIE !no-gzip !gzip-only-text/html
Header append Vary User-Agent
</IfModule>
And again, if this is beyond your comfort zone, your web host will probably help you set up GZIP compression if you ask nicely.
Building Pages in Unbounce? You don’t have to ask us nicely, because we’ve already done it. All Unbounce landing pages are automatically compressed during data transfer. (But be nice to us anyway, alright?)
Kill Needless Scripts and Plugins
Difficulty: Intermediate / Estimated Time: 30 Minutes
WordPress is wonderful in its simplicity. As we’ve seen throughout this article, page speed fixes that might require a front-end developer on a static website can often be achieved by simply installing a WordPress plugin. Want to enable browser caching? Boom, W3 Total Cache.* Need to minify your scripts? Pow, Autoptomize.* Developer, shmeveloper.
But because it’s so easy to add functionality through plugins, WordPress websites have a habit of collecting a lot of them—along with all the of the bits and bites of code that make them work. Those add up.
Take a look at the scripts and plugins you’ve added to your website and decide whether they’re essential to your visitor experience. If they’re not, junking them could help cut some extra seconds off of your load time. (And guess what? There’s a plugin for that.) You can also disable plugins one at a time, then retest your page speed to determine which ones are problematic.
*If you’re publishing Unbounce pages to a WordPress domain, these plugins in particular might start a fire.
Building Pages in Unbounce? This is more of WordPress fix, but it also applies to Unbounce customers that have inserted a bunch of custom scripts onto their landing pages. Learn how the Unbounce Script Manager helps you keep things tidy.
Convert Images to Sprites
Difficulty: Intermediate / Estimated Time: 30 Minutes
If your landing page includes a series of similar-sized images (say, for a client logo bar), you can shorten your load time by combining them into an image sprite, then use CSS to display specific chunks of that sprite at a time. This post from WebFX provides a great step-by-step guide for creating CSS sprites.
Joining smaller images into a larger file might seem counterintuitive, but again, the idea here is to reduce the number of HTTP requests on your page and ultimately make it faster. Each individual image requires its own call—combining images into a single CSS sprite means your page only needs to make one.
Building Pages in Unbounce? We don’t build CSS sprites for you, but you can certainly use them on your Unbounce-built landing pages. Check out our documentation on custom JS and CSS with Unbounce.
Improve Your Landing Page Speed: Hard Fixes
We’re into the scary stuff now.
These are fixes you should absolutely not attempt unless you know what you’re doing or you’ve consulted extensively with a front-end developer. (We even had one of the Unbounce devs fact-check this article, and we’ve never felt smaller.) Proceed with caution.
Remove Render-Blocking JS and CSS
Difficulty: Hard / Estimated Time: 45 Minutes
Those CSS and JS scripts that make your landing page beautiful and enable cool, dynamic functionality? They could be one of the major reasons that your page is loading so slowly. (Bad news for my flashing, neon visitor counter.)
When a web browser runs into CSS or JS in the head of your document, it’ll wait to download and process that content before continuing to render your page’s HTML. That might sound like a good thing from a user experience perspective—after all, we want people to see our landing page as it was intended—but it actually means that visitors can be left waiting on a blank screen while everything loads in the background.
To avoid this, we need to implement techniques for preventing render-blocking CSS and JS on our landing page. (Refer back to your Google PageSpeed Insights results to check if any scripts are slowing down your page load.)
Reduce render-blocking CSS
There are a couple of ways that we can neutralize render-blocking CSS. One option is to defer all CSS until after the HTML has loaded. That’ll certainly improve page speed, but it will also present non-styled content when the visitor first reaches our page. Not ideal.
The other, more preferable option is to defer most style rules until the HTML has been rendered, but inline the CSS necessary to correctly display content above the fold within the HTML. That way, visitors will see the properly-styled content as soon as they hit the page while the rest will load out of view. Pretty sneaky. This is a great tutorial using a real-life example from codeburst.io.
Another page speed opportunity for you here is combining your CSS files. By moving your style rules from several files to just one (or maybe two, tops), you can reduce the number of times that visitors need to ping your web server and improve your landing page load time. Here’s a good resource from GiftOfSpeed on combining and compressing you CSS scripts.
Eliminate render-blocking JS
Like CSS, JS scripts can prevent your landing page from rendering as quickly as you might like. We can avoid that by deploying the defer and async attributes. The former tells the browser to wait until your HTML is rendered before it begins pulling in JS scripts, while the latter asks that JS be downloaded simultaneously without interrupting the HTML download.
An important note is that not all JS scripts are equal: some are critical to the rendering of your page and need to be addressed right out of the gate, so they’ll have to stay at the top. Dareboost does a good job of explaining how to distinguish between critical and non-critical JS, as well as how to implement deferred and asynchronous loading.
Building Pages in Unbounce? Unbounce optimizes for most Google PageSpeed Insights recommendations, including the removal of render-blocking elements. That means you can skip this one.
Start Hand-Coding with AMP
Difficulty: Very Hard / Estimated Time: ∞ Hours
Alright, “∞ hours” is an overstatement, but implementing AMP is no small task. Developed by Google, the AMP project is an entirely new framework with which to build your web pages. The goal? Dramatically improve page speed, especially for mobile users.
AMP is made up of three core components: AMP HTML, AMP JS, and AMP Cache. That means you’ll need to learn new markup, as well as understand the framework well enough to get your landing pages validated and make sure they actually work.
We won’t get into the nitty-gritty of building with AMP here, but the AMP website has a bunch of resources (including tutorials) to help you get started.
Building Pages in Unbounce? No hand-coding AMP pages for you—Unbounce makes it easy to drag and drop together AMP experiences. Choose one of our AMP-optimized templates, load your content, get validated, and start publishing lightning-fast landing pages right away.
Improving your landing page speed can sound intimidating, but even small tweaks will make a big difference for your load times. Tackle the easy stuff first, then move onto more challenging fixes as you get comfortable. And above all, keep testing: seeing your improved speed results after each undertaking will give you the confidence and motivation to move forward.
Or, you know, just build with Unbounce. We automatically handle most of the speed fixes listed (or at least makes them super easy), which saves a ton of time. That means you can focus on what matters: getting more conversions and improving ROI.
Increase Your Landing Page Speed (By Stealing Our Homework) published first on http://nickpontemktg.blogspot.com/
0 notes
Text
Increase Your Landing Page Speed (By Stealing Our Homework)
If you’ve read Unbounce’s 2019 Page Speed Report (and you really should), then you already know why speed is so important this year. Slow-loading landing pages have always been an obstacle to higher conversions, and now Google is punishing poor mobile load times in its search rankings. To be successful in 2019, we—marketers—need to be thinking fast. But are we?
To find out, we polled almost 400 marketers on their attitudes around page speed and asked what (if anything) they were doing to get faster.
Just 56% of marketers are happy with their mobile load times, according to the 2019 Page Speed Report.
Almost three of every four respondents said they had taken steps to improve their page speeds over the last year, and that’s pretty good. Alarmingly, though, only half of marketers we surveyed are satisfied with their load times on mobile.
So most marketers are trying to get faster, but many aren’t where they want to be. Which begs the question: what are people doing to speed up their landing page load times?
Computer, enhance!
Only 39% of marketers have bothered to find out how fast their pages are actually loading. Not great.
Here, we start to see why marketers are somewhat pessimistic about their page speed progress. Just over half have optimized their landing page images—ostensibly one of the simplest ways to speed up your load times—and even fewer have done any of the real technical-sounding things they need to get faster. (I mean, fair, they sound pretty boring to us, too.)
Here’s a doozy, though: just one in three marketers have run a website speed test to find out whether their load times are impacting their conversions. That’s the easiest one!
And hey, we get it. Marketers are being asked to do more than ever before, often with fewer resources. If you’re a small team (or a single person, the smallest of the teams), you might feel you don’t have the time or expertise to meaningfully improve your page speed.
But I’ve gone and done the hard work for you—me, a film school graduate who, until recently, believed that his Apple computer was impervious to viruses. (Hoo boy, it is not.) I’ve spent hours talking to Unbounce developers, reading how-to guides, and generally just bombarding my brain with the most dull, technical page speed information I could get ahold of. (Apologies to said developers.) And if I can get my head around it, there’s no excuse for the rest of you.
Below, I’ve simplified some of the most effective ways to increase your landing page loading times in a guide. For each fix, I’ve indicated the technical difficulty and the estimated time it’ll take, so you know exactly what you’re getting yourself in to. Use the table of contents below to jump to what’s relevant to you, or go ahead and do it all in order.
Jump to a Landing Page Speed Fix
How to Check Your Landing Page Speed
Run a Google Speed Test (5 Minutes)
Try the Unbounce Landing Page Analyzer (5 Minutes)
Improve Your Landing Page Speed: Easy Fixes
Reduce Your Page Content (15 Minutes)
Optimize Your Images (30 Minutes)
Host Your Videos Elsewhere (30 Minutes)
Audit Your Hosting Solution (30 Minutes)
Implement a CDN (30 Minutes)
Improve Your Landing Page Speed: Intermediate Fixes
Minify HTML, JS, and CSS (15 Minutes)
Enable Browser Caching (15 Minutes)
Set Up GZIP Compression (15 Minutes)
Kill Needless Scripts and Plugins (30 Minutes)
Convert Images to Sprites (30 Minutes)
Improve Your Landing Page Speed: Hard Fixes
Remove Render-Blocking JS and CSS (45 Minutes)
Start Hand-Coding with AMP
Final note: If you’ve built your page with Unbounce, you can skip a lot of this stuff—we make many speed fixes on the back-end automatically. In this post, look for the ‘Building Pages in Unbounce?‘ callout boxes to see if a given fix is something you need to implement.
Look for these callout boxes throughout this post to get Unbounce-specific tips and learn how we automatically optimize your landing pages to make them load super fast.
How to Check Your Landing Page Speed
First things first.
Before you throw on your hard hat and start hitting things with a hammer (both figuratively and literally), it’s important to have some idea of what’s working—and what’s not—on your landing page. That means running a speed audit.
It’s important to point out that, regardless of which speed test you use, you don’t want to get too hung up on your score. Achieving a perfect score is not always technically possible (and it might not even be desirable). Instead, use your results as a general guideline to improve page speed and implement the fixes that make sense for you.
Okay—let’s test them pages.
Run a Google Speed Test
Difficulty: Easy / Estimated Time: 5 Minutes
There are a bunch of great tools for testing your page speed, but why not start with the big dog itself? Google’s PageSpeed Insights is an awesome way to do a quick performance check-up with at-a-glance recommendations. (Ryan Engley, Unbounce’s VP of Product Marketing, explains how to interpret and act on your PageSpeed Insights results in this must-read blog post.) Then there’s Lighthouse, a newer tool from Google that provides a comprehensive analysis of your how your page presents to end users.
You’ll also want to run your page through Google’s Test My Site tool, which will check your speed from a mobile perspective.
Clicking on individual results in PageSpeed Insights will reveal your problematic page elements.
Running a Google speed test should only take a couple of minutes, and the results will help you identify some of the top opportunities to boost your landing page load times.
Try the Unbounce Landing Page Analyzer
Difficulty: Easy / Estimated Time: 5 Minutes
Running a speed test with Google should be your top priority, but PageSpeed Insights doesn’t give results tailored to landing pages. For that, you’ll want to run your page through the Unbounce Landing Page Analyzer, which not only provides feedback on page performance but includes a bunch of advice on creating more effective campaigns and kicking your conversions into overdrive.
Unbounce’s Landing Page Analyzer provides feedback on page speed, but also actionable advice on things like SEO, message match, and mobile-friendliness.
Building Pages in Unbounce? Then you’ll definitely want to give our Landing Page Analyzer a shot. Get best-practice recommendations for conversion optimization and see how your landing pages stack up against others in your industry.
Improve Your Landing Page Speed: Easy Fixes
With your results from both Google and Unbounce, you’ll be well-equipped to move onto the actual work of making your page perform better. It’s time to pick up that hammer.
These fixes should be simple enough for anyone to tackle, regardless of their technical expertise.
Reduce Your Page Content
Difficulty: Easy / Estimated Time: 15 Minutes
We’ve marked this as an easy opportunity to increase your page speed, but it probably won’t feel like that when you start thinking about which elements on your page you can junk. Marketers love big hero shots, beautiful supporting imagery, and fun, animated explainer videos. But how much of that content is actually helping you drive conversions?
Visual content accounts for a huge portion of the size of an average web page—images account for over 20% of web page weight, as pointed out by Kinsta—and each element creates an HTTP request. That’s when your visitor’s browser pings your web server to request the files that make up the elements of your page. Too many calls can be a serious drag on your load time, so one of the simplest ways to improve your page speed is cutting down the number of elements you include.
Look at each piece of content on your page critically, then ask yourself: “Does this spark joy?” “Does this increase conversions?” If you don’t think there are pieces you can toss, try running an A/B test with a slimmed-down version of the page. The results might surprise you.
Bottom line: stick to the fundamentals of good landing page design and try to keep the number of elements (and thus HTTP requests) to a minimum.
Building Pages in Unbounce? We recommend that you keep things pretty lean, but we’d never remove content from your landing page. (Must resist… desire… to do best practices…) This is one optimization that you’ll have to tackle on your own.
Optimize Your Images
Difficulty: Easy / Estimated Time: 30 Minutes
Once you’ve trimmed some elements from your page, you’ll want to optimize the content that made the cut. Poor image optimization is the most common reason for slow page loads, especially for mobile visitors. Fortunately, it’s also one of the easiest issues to fix.
These are some quick tips for shrinking your images and improving your page speed. The goal here should be getting images at least under 800kb, but the smaller we can make them, the better.
Resize your images
It’s easy to chuck a larger image onto your page and rely on your content management system (CMS) to compress it to the appropriate size, but it’ll still be loading at least some of those extra pixels on the back end, and your visitors are going to feel it in the load. When you add an image, make sure it’s the same dimensions that your page will be rendering it.*
*This doesn’t necessarily apply to Unbounce’s retina image support—read up on that here.
Choose the right file type
Most people don’t think too much about the format of the image they’re uploading, but it can have a dramatic effect on page performance. The file types you’re probably most familiar with are JPEG and PNG—and, yes, there are differences.
JPEG is a ‘lossy’ format, which means it’ll lose some data during compression. That typically gives you a smaller file, but it can come at the expense of visual fidelity. Generally, images with significant color variation (say, photographs) perform better as JPEGs, and any dip in quality can usually go undetected.
PNG is ‘lossless,’ so the image’s appearance won’t change when resized, but it tends to make for larger files if there’s significant color variation. PNG is ideal for simple images with defined shapes, like those with text. Saving PNGs in 8-bit (rather than 24-bit, which has a broader color palette) can help shave off some extra bites.
Here are some optimization tips for JPEG and PNG (and GIF, that villain) from Google itself.
Use compression tools
Before your weigh-in, it’s good to run images through a final round of compression. There are plenty of image compression tools on WordPress, as well as some free, standalone ones like TinyPNG. These shrinky gizmos offer a simple way to cut down your image sizes without braving the cursed labyrinth that is Adobe’s export settings. (Hey, I’m a words guy.)
Your takeaways here are:
Ensure your image dimensions match how they’ll actually be displayed
Use JPEG when a slight dip in visual fidelity isn’t the end of the world (like photography), but PNG when it is (images with text and sharp lines)
Compress images to keep the file size as tiny as possible
If you want to take a deeper dive into image optimization, we recommend that you check out this post from Search Engine Land, which goes into detail on making images smaller while keeping them beautiful.
Building Pages in Unbounce? We’ve got you covered. Unbounce’s Auto Image Optimizer shrinks your images as soon as they’re uploaded so you can focus on making the best landing page possible.
Host Your Videos Elsewhere
Difficulty: Easy / Estimated Time: 30 Minutes
Why carry something yourself when you can make someone else carry it for you? That’s my motto for landing pages and life, and it’s why I’m no longer welcome on Unbounce’s company hiking trips.
Hosting videos on your own domain can be great for SEO purposes, but that’s not usually our goal with landing pages. We want everything to load in a flash and give our visitors the best chance to convert. Depending on your hosting solution, though, your videos might be slowing down your page speed, suffering from playback issues, and taking up an uncomfortable amount of server space.
Done properly, transferring videos to a third-party platform can shed some extra load time and help your pages render faster. Consider moving video content to Wistia, YouTube, or Vimeo, then using a light embed technique so that your videos only load heavier playback elements when your visitors actually click on them.
Building Pages in Unbounce? As a disclaimer: Using light embed codes with Unbounce (or any custom code, for that matter) will require some technical knowledge to implement and could, in rare cases, cause issues. Check out this Unbounce community post for more information.
Audit Your Hosting Solution
Difficulty: Easy / Estimated Time: 30 Minutes
Loading speed isn’t just determined by what’s on your landing page. Your web host also has a major influence in how quickly your page rolls out to potential customers.
There are three common models for web hosting:
Shared hosting
Generally the most affordable solution, shared hosting is when your website is hosted alongside other sites on a single web server. Everyone draws from common resources (like storage space and processing power), which means—you guessed it—you need to share.
Virtual private server (VPS) hosting
This is essentially a mix of both shared and dedicated hosting. With VPS, your website still shares server space with others, but you’ll have dedicated resources that no one else can dip into. The result is more power and flexibility, but it tends to come with a higher price tag.
Dedicated hosting
For those who’ve had a traumatic roommate experience (who hasn’t?), dedicated hosting means your website has the server all to itself. More resources, no sharing. That’s great if you’re heavy on digital content and get a ton of traffic, but dedicated hosting is also the most expensive option and requires the technical know-how to set up and maintain your server.
Low-volume websites can generally get by with the cost-effective shared solution, but once your traffic starts to rise, you might not be getting enough juice from your web host to deliver content quickly—and that’s when load times start to suffer. (Give this post from Search Engine Journal a read for a more comprehensive explanation.)
It’s also important to note that the whereabouts of your web server can have a significant impact on your page speed. If you’re not using a content delivery network (CDN; more on this below), you’ll want to make sure that traffic from foreign countries isn’t encountering too much latency.
Think your hosting solution might be impacting your page speed? Run your site through a server speed test like this one from Bitcatcha, and use WebPageTest or Pingdom to see how your quickly your landing page loads in other countries. Depending on the results, you might decide it’s time to upgrade your hosting plan (or change web hosts altogether).
Building Pages in Unbounce? You don’t have to worry about this one—Unbounce’s global hosting solution boasts 99.95% uptime and ensures that your landing pages always have the necessary resources to load super fast.
Implement a CDN
Difficulty: Easy / Estimated Time: 30 Minutes
When your landing page gets a visitor, their web browser pings your server to get the content necessary to build out the page. Simple, right? Everyone downloads your website information from the same place, regardless of their location around the world. Well, that’s usually fine if the visitor is in or close to the country that your web server is located, but when they’re halfway around the globe, chances are they’re going to encounter some latency.
To avoid that, you should look into deploying a CDN, which caches your website across a network of data centers and proxy servers all over the planet. Say your own server is in the United States and someone from Lithuania is trying to visit your landing page. Instead of downloading your content from across the Atlantic, that visitor can pull a cached version from a server nearby.
Setting your website up with a CDN is pretty straightforward and—depending on your traffic—generally affordable. Here’s a list of some popular CDN providers from Mashable.
Building Pages in Unbounce? We’ve got five global data centers supporting the Unbounce CDN, which means your landing pages will load in a flash regardless of where they’re being accessed from.
Improve Your Landing Page Speed: Intermediate Fixes
These next speed fixes are a little trickier, but they should be manageable for marketers with a little technical know-how. Still, a mistake here could mean actual damage to your landing page.
Our recommendation? Do some research, make a backup, and—if you can—consult briefly with a developer on your team. It never hurts to have an experienced colleague to turn to if you get in over your head.
Building Pages in Unbounce? We talk a lot about WordPress through this next section. If you’re using our plugin to publish Unbounce landing pages to a WordPress domain, some of these recommended speed fixes can actually cause technical issues. Don’t hesitate to reach out to us for clarification if you’re ever unsure.
Minify HTML, CSS, and JS
Difficulty: Intermediate / Estimated Time: 15 Minutes
All those lines of HTML, CSS, and JS code that make up your landing page? They’re packed with spaces, line breaks, and other bits of formatting that make it more legible and easier for us to interpret, but each makes your load time just an eensy bit slower—and the web browsers your visitors are using to render your page don’t particularly need them.
With minification, the goal is to cut out all of that extra junk and condense your code so that browsers can read it faster. Here’s an example snippet of Javascript code from Wikipedia:
var array = [];
for (var i = 0; i < 20; i++) {
array[i] = i;
}
After minifying, that code would look something like this:
for(var a=[i=0];++i<20;a[i]=i);
There are plenty of free online tools that will do this for your landing page, like Minify Code, as well as a bunch of WordPress plugins. Be sure to check out this post from Elegant Themes, which is an awesome resource that dives into the many options at your disposal.
Building Pages in Unbounce? Do we minify? We practically invented minifying. (Editor’s note: We did not.) Unbounce compresses all of your code automatically, making your landing page as slim as can be. No coding your pages from scratch and no minifying that code in the background? We’re making this too easy for you.
Enable Browser Caching
Difficulty: Intermediate / Estimated Time: 15 Minutes
The goal with any landing page should be getting prospects to convert the first time they visit, but the reality is that not everyone will. Sometimes, visitors will need some time to think about it: they’ll bounce, do more research, check out some competitors, then come back to your original offer. Browser caching ensures that when they return, your page will load even faster—and that’ll make them more likely to convert.
Not sure if you’ve already got caching enabled? Before you start, run a quick caching check using a tool like this one from GiftOfSpeed.
If your site is built on WordPress, enabling caching is as easy as adding a plugin.* (WordPress is almost too easy, huh?) Check out this list of caching plugins, most of which include quick instructions for getting set up.
*If you’re publishing Unbounce pages to a WordPress domain, these caching recommendations could create big problems. Check with us first.
For those not on WordPress, enabling browser caching on your own is pretty simple if you’re willing to get your hands dirty. For example, on Apache web servers, it comes down to inserting a little bit of code into the .htaccess file on your web host or server:
<IfModule mod_expires.c>
ExpiresActive On
ExpiresByType image/jpg “access 1 year”
ExpiresByType image/jpeg “access 1 year”
ExpiresByType image/gif “access 1 year”
ExpiresByType image/png “access 1 year”
ExpiresByType text/css “access 1 month”
ExpiresByType text/html “access 1 month”
ExpiresByType application/pdf “access 1 month”
ExpiresByType text/x-javascript “access 1 month”
ExpiresByType application/x-shockwave-flash “access 1 month”
ExpiresByType image/x-icon “access 1 year”
ExpiresDefault “access 1 month”
</IfModule>
This article from Varvy provides a great how-to, as does this one from WinningWP (which discusses enabling browser caching from a WordPress perspective but is applicable more broadly).
If all of this makes you nervous, there’s likely a simpler method for you to set up browser caching. Most web hosts will enable caching for you if you ask. Depending on your hosting solution, it might be as easy as making a phone call. (Although, now that I think about it, that might be more daunting for some of us.)
Building Pages in Unbounce? Seven-day browser caching is enabled on all Unbounce-built landing pages, so this is a speed fix you can comfortably skip. Maybe use this free time to treat yourself to some self-care? You’ve earned it.
Set Up GZIP Compression
Difficulty: Intermediate / Estimated Time: 15 Minutes
When a visitor reaches your landing page, their browser pings your web server to request the files that make up the page and the server transmits them back. Naturally, that process moves faster if the information being sent is compressed to be as small as possible. Here’s where GZIP compression comes in.
(You’ll want to check to see if GZIP compression is already enabled before you get started.)
As with browser caching, the difficulty of setting up GZIP compression is going to be determined by how your website was built. If you use WordPress, you’re in luck: many WordPress plugins will enable GZIP compression for you almost automatically. If you don’t use WordPress, well, we’re headed back into your server.
This article from GTmetrix provides a quick overview of the importance of GZIP compression and how to enable it. With Apache web servers, you’ll need to add this chunk of code to your .htaccess file.
<IfModule mod_deflate.c>
# Compress HTML, CSS, JavaScript, Text, XML and fonts
AddOutputFilterByType DEFLATE application/javascript
AddOutputFilterByType DEFLATE application/rss+xml
AddOutputFilterByType DEFLATE application/vnd.ms-fontobject
AddOutputFilterByType DEFLATE application/x-font
AddOutputFilterByType DEFLATE application/x-font-opentype
AddOutputFilterByType DEFLATE application/x-font-otf
AddOutputFilterByType DEFLATE application/x-font-truetype
AddOutputFilterByType DEFLATE application/x-font-ttf
AddOutputFilterByType DEFLATE application/x-javascript
AddOutputFilterByType DEFLATE application/xhtml+xml
AddOutputFilterByType DEFLATE application/xml
AddOutputFilterByType DEFLATE font/opentype
AddOutputFilterByType DEFLATE font/otf
AddOutputFilterByType DEFLATE font/ttf
AddOutputFilterByType DEFLATE image/svg+xml
AddOutputFilterByType DEFLATE image/x-icon
AddOutputFilterByType DEFLATE text/css
AddOutputFilterByType DEFLATE text/html
AddOutputFilterByType DEFLATE text/javascript
AddOutputFilterByType DEFLATE text/plain
AddOutputFilterByType DEFLATE text/xml
# Remove browser bugs (only needed for really old browsers)
BrowserMatch ^Mozilla/4 gzip-only-text/html
BrowserMatch ^Mozilla/4\.0[678] no-gzip
BrowserMatch \bMSIE !no-gzip !gzip-only-text/html
Header append Vary User-Agent
</IfModule>
And again, if this is beyond your comfort zone, your web host will probably help you set up GZIP compression if you ask nicely.
Building Pages in Unbounce? You don’t have to ask us nicely, because we’ve already done it. All Unbounce landing pages are automatically compressed during data transfer. (But be nice to us anyway, alright?)
Kill Needless Scripts and Plugins
Difficulty: Intermediate / Estimated Time: 30 Minutes
WordPress is wonderful in its simplicity. As we’ve seen throughout this article, page speed fixes that might require a front-end developer on a static website can often be achieved by simply installing a WordPress plugin. Want to enable browser caching? Boom, W3 Total Cache.* Need to minify your scripts? Pow, Autoptomize.* Developer, shmeveloper.
But because it’s so easy to add functionality through plugins, WordPress websites have a habit of collecting a lot of them—along with all the of the bits and bites of code that make them work. Those add up.
Take a look at the scripts and plugins you’ve added to your website and decide whether they’re essential to your visitor experience. If they’re not, junking them could help cut some extra seconds off of your load time. (And guess what? There’s a plugin for that.) You can also disable plugins one at a time, then retest your page speed to determine which ones are problematic.
*If you’re publishing Unbounce pages to a WordPress domain, these plugins in particular might start a fire.
Building Pages in Unbounce? This is more of WordPress fix, but it also applies to Unbounce customers that have inserted a bunch of custom scripts onto their landing pages. Learn how the Unbounce Script Manager helps you keep things tidy.
Convert Images to Sprites
Difficulty: Intermediate / Estimated Time: 30 Minutes
If your landing page includes a series of similar-sized images (say, for a client logo bar), you can shorten your load time by combining them into an image sprite, then use CSS to display specific chunks of that sprite at a time. This post from WebFX provides a great step-by-step guide for creating CSS sprites.
Joining smaller images into a larger file might seem counterintuitive, but again, the idea here is to reduce the number of HTTP requests on your page and ultimately make it faster. Each individual image requires its own call—combining images into a single CSS sprite means your page only needs to make one.
Building Pages in Unbounce? We don’t build CSS sprites for you, but you can certainly use them on your Unbounce-built landing pages. Check out our documentation on custom JS and CSS with Unbounce.
Improve Your Landing Page Speed: Hard Fixes
We’re into the scary stuff now.
These are fixes you should absolutely not attempt unless you know what you’re doing or you’ve consulted extensively with a front-end developer. (We even had one of the Unbounce devs fact-check this article, and we’ve never felt smaller.) Proceed with caution.
Remove Render-Blocking JS and CSS
Difficulty: Hard / Estimated Time: 45 Minutes
Those CSS and JS scripts that make your landing page beautiful and enable cool, dynamic functionality? They could be one of the major reasons that your page is loading so slowly. (Bad news for my flashing, neon visitor counter.)
When a web browser runs into CSS or JS in the head of your document, it’ll wait to download and process that content before continuing to render your page’s HTML. That might sound like a good thing from a user experience perspective—after all, we want people to see our landing page as it was intended—but it actually means that visitors can be left waiting on a blank screen while everything loads in the background.
To avoid this, we need to implement techniques for preventing render-blocking CSS and JS on our landing page. (Refer back to your Google PageSpeed Insights results to check if any scripts are slowing down your page load.)
Reduce render-blocking CSS
There are a couple of ways that we can neutralize render-blocking CSS. One option is to defer all CSS until after the HTML has loaded. That’ll certainly improve page speed, but it will also present non-styled content when the visitor first reaches our page. Not ideal.
The other, more preferable option is to defer most style rules until the HTML has been rendered, but inline the CSS necessary to correctly display content above the fold within the HTML. That way, visitors will see the properly-styled content as soon as they hit the page while the rest will load out of view. Pretty sneaky. This is a great tutorial using a real-life example from codeburst.io.
Another page speed opportunity for you here is combining your CSS files. By moving your style rules from several files to just one (or maybe two, tops), you can reduce the number of times that visitors need to ping your web server and improve your landing page load time. Here’s a good resource from GiftOfSpeed on combining and compressing you CSS scripts.
Eliminate render-blocking JS
Like CSS, JS scripts can prevent your landing page from rendering as quickly as you might like. We can avoid that by deploying the defer and async attributes. The former tells the browser to wait until your HTML is rendered before it begins pulling in JS scripts, while the latter asks that JS be downloaded simultaneously without interrupting the HTML download.
An important note is that not all JS scripts are equal: some are critical to the rendering of your page and need to be addressed right out of the gate, so they’ll have to stay at the top. Dareboost does a good job of explaining how to distinguish between critical and non-critical JS, as well as how to implement deferred and asynchronous loading.
Building Pages in Unbounce? Unbounce optimizes for most Google PageSpeed Insights recommendations, including the removal of render-blocking elements. That means you can skip this one.
Start Hand-Coding with AMP
Difficulty: Very Hard / Estimated Time: ∞ Hours
Alright, “∞ hours” is an overstatement, but implementing AMP is no small task. Developed by Google, the AMP project is an entirely new framework with which to build your web pages. The goal? Dramatically improve page speed, especially for mobile users.
AMP is made up of three core components: AMP HTML, AMP JS, and AMP Cache. That means you’ll need to learn new markup, as well as understand the framework well enough to get your landing pages validated and make sure they actually work.
We won’t get into the nitty-gritty of building with AMP here, but the AMP website has a bunch of resources (including tutorials) to help you get started.
Building Pages in Unbounce? No hand-coding AMP pages for you—Unbounce makes it easy to drag and drop together AMP experiences. Choose one of our AMP-optimized templates, load your content, get validated, and start publishing lightning-fast landing pages right away.
Improving your landing page speed can sound intimidating, but even small tweaks will make a big difference for your load times. Tackle the easy stuff first, then move onto more challenging fixes as you get comfortable. And above all, keep testing: seeing your improved speed results after each undertaking will give you the confidence and motivation to move forward.
Or, you know, just build with Unbounce. We automatically handle most of the speed fixes listed (or at least makes them super easy), which saves a ton of time. That means you can focus on what matters: getting more conversions and improving ROI.
0 notes
Text
Increase Your Landing Page Speed (By Stealing Our Homework)
If you’ve read Unbounce’s 2019 Page Speed Report (and you really should), then you already know why speed is so important this year. Slow-loading landing pages have always been an obstacle to higher conversions, and now Google is punishing poor mobile load times in its search rankings. To be successful in 2019, we—marketers—need to be thinking fast. But are we?
To find out, we polled almost 400 marketers on their attitudes around page speed and asked what (if anything) they were doing to get faster.
Just 56% of marketers are happy with their mobile load times, according to the 2019 Page Speed Report.
Almost three of every four respondents said they had taken steps to improve their page speeds over the last year, and that’s pretty good. Alarmingly, though, only half of marketers we surveyed are satisfied with their load times on mobile.
So most marketers are trying to get faster, but many aren’t where they want to be. Which begs the question: what are people doing to speed up their landing page load times?
Computer, enhance!
Only 39% of marketers have bothered to find out how fast their pages are actually loading. Not great.
Here, we start to see why marketers are somewhat pessimistic about their page speed progress. Just over half have optimized their landing page images—ostensibly one of the simplest ways to speed up your load times—and even fewer have done any of the real technical-sounding things they need to get faster. (I mean, fair, they sound pretty boring to us, too.)
Here’s a doozy, though: just one in three marketers have run a website speed test to find out whether their load times are impacting their conversions. That’s the easiest one!
And hey, we get it. Marketers are being asked to do more than ever before, often with fewer resources. If you’re a small team (or a single person, the smallest of the teams), you might feel you don’t have the time or expertise to meaningfully improve your page speed.
But I’ve gone and done the hard work for you—me, a film school graduate who, until recently, believed that his Apple computer was impervious to viruses. (Hoo boy, it is not.) I’ve spent hours talking to Unbounce developers, reading how-to guides, and generally just bombarding my brain with the most dull, technical page speed information I could get ahold of. (Apologies to said developers.) And if I can get my head around it, there’s no excuse for the rest of you.
Below, I’ve simplified some of the most effective ways to increase your landing page loading times in a guide. For each fix, I’ve indicated the technical difficulty and the estimated time it’ll take, so you know exactly what you’re getting yourself in to. Use the table of contents below to jump to what’s relevant to you, or go ahead and do it all in order.
Jump to a Landing Page Speed Fix
How to Check Your Landing Page Speed
Run a Google Speed Test (5 Minutes)
Try the Unbounce Landing Page Analyzer (5 Minutes)
Improve Your Landing Page Speed: Easy Fixes
Reduce Your Page Content (15 Minutes)
Optimize Your Images (30 Minutes)
Host Your Videos Elsewhere (30 Minutes)
Audit Your Hosting Solution (30 Minutes)
Implement a CDN (30 Minutes)
Improve Your Landing Page Speed: Intermediate Fixes
Minify HTML, JS, and CSS (15 Minutes)
Enable Browser Caching (15 Minutes)
Set Up GZIP Compression (15 Minutes)
Kill Needless Scripts and Plugins (30 Minutes)
Convert Images to Sprites (30 Minutes)
Improve Your Landing Page Speed: Hard Fixes
Remove Render-Blocking JS and CSS (45 Minutes)
Start Hand-Coding with AMP
Final note: If you’ve built your page with Unbounce, you can skip a lot of this stuff—we make many speed fixes on the back-end automatically. In this post, look for the ‘Building Pages in Unbounce?‘ callout boxes to see if a given fix is something you need to implement.
Look for these callout boxes throughout this post to get Unbounce-specific tips and learn how we automatically optimize your landing pages to make them load super fast.
How to Check Your Landing Page Speed
First things first.
Before you throw on your hard hat and start hitting things with a hammer (both figuratively and literally), it’s important to have some idea of what’s working—and what’s not—on your landing page. That means running a speed audit.
It’s important to point out that, regardless of which speed test you use, you don’t want to get too hung up on your score. Achieving a perfect score is not always technically possible (and it might not even be desirable). Instead, use your results as a general guideline to improve page speed and implement the fixes that make sense for you.
Okay—let’s test them pages.
Run a Google Speed Test
Difficulty: Easy / Estimated Time: 5 Minutes
There are a bunch of great tools for testing your page speed, but why not start with the big dog itself? Google’s PageSpeed Insights is an awesome way to do a quick performance check-up with at-a-glance recommendations. (Ryan Engley, Unbounce’s VP of Product Marketing, explains how to interpret and act on your PageSpeed Insights results in this must-read blog post.) Then there’s Lighthouse, a newer tool from Google that provides a comprehensive analysis of your how your page presents to end users.
You’ll also want to run your page through Google’s Test My Site tool, which will check your speed from a mobile perspective.
Clicking on individual results in PageSpeed Insights will reveal your problematic page elements.
Running a Google speed test should only take a couple of minutes, and the results will help you identify some of the top opportunities to boost your landing page load times.
Try the Unbounce Landing Page Analyzer
Difficulty: Easy / Estimated Time: 5 Minutes
Running a speed test with Google should be your top priority, but PageSpeed Insights doesn’t give results tailored to landing pages. For that, you’ll want to run your page through the Unbounce Landing Page Analyzer, which not only provides feedback on page performance but includes a bunch of advice on creating more effective campaigns and kicking your conversions into overdrive.
Unbounce’s Landing Page Analyzer provides feedback on page speed, but also actionable advice on things like SEO, message match, and mobile-friendliness.
Building Pages in Unbounce? Then you’ll definitely want to give our Landing Page Analyzer a shot. Get best-practice recommendations for conversion optimization and see how your landing pages stack up against others in your industry.
Improve Your Landing Page Speed: Easy Fixes
With your results from both Google and Unbounce, you’ll be well-equipped to move onto the actual work of making your page perform better. It’s time to pick up that hammer.
These fixes should be simple enough for anyone to tackle, regardless of their technical expertise.
Reduce Your Page Content
Difficulty: Easy / Estimated Time: 15 Minutes
We’ve marked this as an easy opportunity to increase your page speed, but it probably won’t feel like that when you start thinking about which elements on your page you can junk. Marketers love big hero shots, beautiful supporting imagery, and fun, animated explainer videos. But how much of that content is actually helping you drive conversions?
Visual content accounts for a huge portion of the size of an average web page—images account for over 20% of web page weight, as pointed out by Kinsta—and each element creates an HTTP request. That’s when your visitor’s browser pings your web server to request the files that make up the elements of your page. Too many calls can be a serious drag on your load time, so one of the simplest ways to improve your page speed is cutting down the number of elements you include.
Look at each piece of content on your page critically, then ask yourself: “Does this spark joy?” “Does this increase conversions?” If you don’t think there are pieces you can toss, try running an A/B test with a slimmed-down version of the page. The results might surprise you.
Bottom line: stick to the fundamentals of good landing page design and try to keep the number of elements (and thus HTTP requests) to a minimum.
Building Pages in Unbounce? We recommend that you keep things pretty lean, but we’d never remove content from your landing page. (Must resist… desire… to do best practices…) This is one optimization that you’ll have to tackle on your own.
Optimize Your Images
Difficulty: Easy / Estimated Time: 30 Minutes
Once you’ve trimmed some elements from your page, you’ll want to optimize the content that made the cut. Poor image optimization is the most common reason for slow page loads, especially for mobile visitors. Fortunately, it’s also one of the easiest issues to fix.
These are some quick tips for shrinking your images and improving your page speed. The goal here should be getting images at least under 800kb, but the smaller we can make them, the better.
Resize your images
It’s easy to chuck a larger image onto your page and rely on your content management system (CMS) to compress it to the appropriate size, but it’ll still be loading at least some of those extra pixels on the back end, and your visitors are going to feel it in the load. When you add an image, make sure it’s the same dimensions that your page will be rendering it.*
*This doesn’t necessarily apply to Unbounce’s retina image support—read up on that here.
Choose the right file type
Most people don’t think too much about the format of the image they’re uploading, but it can have a dramatic effect on page performance. The file types you’re probably most familiar with are JPEG and PNG—and, yes, there are differences.
JPEG is a ‘lossy’ format, which means it’ll lose some data during compression. That typically gives you a smaller file, but it can come at the expense of visual fidelity. Generally, images with significant color variation (say, photographs) perform better as JPEGs, and any dip in quality can usually go undetected.
PNG is ‘lossless,’ so the image’s appearance won’t change when resized, but it tends to make for larger files if there’s significant color variation. PNG is ideal for simple images with defined shapes, like those with text. Saving PNGs in 8-bit (rather than 24-bit, which has a broader color palette) can help shave off some extra bites.
Here are some optimization tips for JPEG and PNG (and GIF, that villain) from Google itself.
Use compression tools
Before your weigh-in, it’s good to run images through a final round of compression. There are plenty of image compression tools on WordPress, as well as some free, standalone ones like TinyPNG. These shrinky gizmos offer a simple way to cut down your image sizes without braving the cursed labyrinth that is Adobe’s export settings. (Hey, I’m a words guy.)
Your takeaways here are:
Ensure your image dimensions match how they’ll actually be displayed
Use JPEG when a slight dip in visual fidelity isn’t the end of the world (like photography), but PNG when it is (images with text and sharp lines)
Compress images to keep the file size as tiny as possible
If you want to take a deeper dive into image optimization, we recommend that you check out this post from Search Engine Land, which goes into detail on making images smaller while keeping them beautiful.
Building Pages in Unbounce? We’ve got you covered. Unbounce’s Auto Image Optimizer shrinks your images as soon as they’re uploaded so you can focus on making the best landing page possible.
Host Your Videos Elsewhere
Difficulty: Easy / Estimated Time: 30 Minutes
Why carry something yourself when you can make someone else carry it for you? That’s my motto for landing pages and life, and it’s why I’m no longer welcome on Unbounce’s company hiking trips.
Hosting videos on your own domain can be great for SEO purposes, but that’s not usually our goal with landing pages. We want everything to load in a flash and give our visitors the best chance to convert. Depending on your hosting solution, though, your videos might be slowing down your page speed, suffering from playback issues, and taking up an uncomfortable amount of server space.
Done properly, transferring videos to a third-party platform can shed some extra load time and help your pages render faster. Consider moving video content to Wistia, YouTube, or Vimeo, then using a light embed technique so that your videos only load heavier playback elements when your visitors actually click on them.
Building Pages in Unbounce? As a disclaimer: Using light embed codes with Unbounce (or any custom code, for that matter) will require some technical knowledge to implement and could, in rare cases, cause issues. Check out this Unbounce community post for more information.
Audit Your Hosting Solution
Difficulty: Easy / Estimated Time: 30 Minutes
Loading speed isn’t just determined by what’s on your landing page. Your web host also has a major influence in how quickly your page rolls out to potential customers.
There are three common models for web hosting:
Shared hosting
Generally the most affordable solution, shared hosting is when your website is hosted alongside other sites on a single web server. Everyone draws from common resources (like storage space and processing power), which means—you guessed it—you need to share.
Virtual private server (VPS) hosting
This is essentially a mix of both shared and dedicated hosting. With VPS, your website still shares server space with others, but you’ll have dedicated resources that no one else can dip into. The result is more power and flexibility, but it tends to come with a higher price tag.
Dedicated hosting
For those who’ve had a traumatic roommate experience (who hasn’t?), dedicated hosting means your website has the server all to itself. More resources, no sharing. That’s great if you’re heavy on digital content and get a ton of traffic, but dedicated hosting is also the most expensive option and requires the technical know-how to set up and maintain your server.
Low-volume websites can generally get by with the cost-effective shared solution, but once your traffic starts to rise, you might not be getting enough juice from your web host to deliver content quickly—and that’s when load times start to suffer. (Give this post from Search Engine Journal a read for a more comprehensive explanation.)
It’s also important to note that the whereabouts of your web server can have a significant impact on your page speed. If you’re not using a content delivery network (CDN; more on this below), you’ll want to make sure that traffic from foreign countries isn’t encountering too much latency.
Think your hosting solution might be impacting your page speed? Run your site through a server speed test like this one from Bitcatcha, and use WebPageTest or Pingdom to see how your quickly your landing page loads in other countries. Depending on the results, you might decide it’s time to upgrade your hosting plan (or change web hosts altogether).
Building Pages in Unbounce? You don’t have to worry about this one—Unbounce’s global hosting solution boasts 99.95% uptime and ensures that your landing pages always have the necessary resources to load super fast.
Implement a CDN
Difficulty: Easy / Estimated Time: 30 Minutes
When your landing page gets a visitor, their web browser pings your server to get the content necessary to build out the page. Simple, right? Everyone downloads your website information from the same place, regardless of their location around the world. Well, that’s usually fine if the visitor is in or close to the country that your web server is located, but when they’re halfway around the globe, chances are they’re going to encounter some latency.
To avoid that, you should look into deploying a CDN, which caches your website across a network of data centers and proxy servers all over the planet. Say your own server is in the United States and someone from Lithuania is trying to visit your landing page. Instead of downloading your content from across the Atlantic, that visitor can pull a cached version from a server nearby.
Setting your website up with a CDN is pretty straightforward and—depending on your traffic—generally affordable. Here’s a list of some popular CDN providers from Mashable.
Building Pages in Unbounce? We’ve got five global data centers supporting the Unbounce CDN, which means your landing pages will load in a flash regardless of where they’re being accessed from.
Improve Your Landing Page Speed: Intermediate Fixes
These next speed fixes are a little trickier, but they should be manageable for marketers with a little technical know-how. Still, a mistake here could mean actual damage to your landing page.
Our recommendation? Do some research, make a backup, and—if you can—consult briefly with a developer on your team. It never hurts to have an experienced colleague to turn to if you get in over your head.
Building Pages in Unbounce? We talk a lot about WordPress through this next section. If you’re using our plugin to publish Unbounce landing pages to a WordPress domain, some of these recommended speed fixes can actually cause technical issues. Don’t hesitate to reach out to us for clarification if you’re ever unsure.
Minify HTML, CSS, and JS
Difficulty: Intermediate / Estimated Time: 15 Minutes
All those lines of HTML, CSS, and JS code that make up your landing page? They’re packed with spaces, line breaks, and other bits of formatting that make it more legible and easier for us to interpret, but each makes your load time just an eensy bit slower—and the web browsers your visitors are using to render your page don’t particularly need them.
With minification, the goal is to cut out all of that extra junk and condense your code so that browsers can read it faster. Here’s an example snippet of Javascript code from Wikipedia:
var array = [];
for (var i = 0; i < 20; i++) {
array[i] = i;
}
After minifying, that code would look something like this:
for(var a=[i=0];++i<20;a[i]=i);
There are plenty of free online tools that will do this for your landing page, like Minify Code, as well as a bunch of WordPress plugins. Be sure to check out this post from Elegant Themes, which is an awesome resource that dives into the many options at your disposal.
Building Pages in Unbounce? Do we minify? We practically invented minifying. (Editor’s note: We did not.) Unbounce compresses all of your code automatically, making your landing page as slim as can be. No coding your pages from scratch and no minifying that code in the background? We’re making this too easy for you.
Enable Browser Caching
Difficulty: Intermediate / Estimated Time: 15 Minutes
The goal with any landing page should be getting prospects to convert the first time they visit, but the reality is that not everyone will. Sometimes, visitors will need some time to think about it: they’ll bounce, do more research, check out some competitors, then come back to your original offer. Browser caching ensures that when they return, your page will load even faster—and that’ll make them more likely to convert.
Not sure if you’ve already got caching enabled? Before you start, run a quick caching check using a tool like this one from GiftOfSpeed.
If your site is built on WordPress, enabling caching is as easy as adding a plugin.* (WordPress is almost too easy, huh?) Check out this list of caching plugins, most of which include quick instructions for getting set up.
*If you’re publishing Unbounce pages to a WordPress domain, these caching recommendations could create big problems. Check with us first.
For those not on WordPress, enabling browser caching on your own is pretty simple if you’re willing to get your hands dirty. For example, on Apache web servers, it comes down to inserting a little bit of code into the .htaccess file on your web host or server:
<IfModule mod_expires.c>
ExpiresActive On
ExpiresByType image/jpg “access 1 year”
ExpiresByType image/jpeg “access 1 year”
ExpiresByType image/gif “access 1 year”
ExpiresByType image/png “access 1 year”
ExpiresByType text/css “access 1 month”
ExpiresByType text/html “access 1 month”
ExpiresByType application/pdf “access 1 month”
ExpiresByType text/x-javascript “access 1 month”
ExpiresByType application/x-shockwave-flash “access 1 month”
ExpiresByType image/x-icon “access 1 year”
ExpiresDefault “access 1 month”
</IfModule>
This article from Varvy provides a great how-to, as does this one from WinningWP (which discusses enabling browser caching from a WordPress perspective but is applicable more broadly).
If all of this makes you nervous, there’s likely a simpler method for you to set up browser caching. Most web hosts will enable caching for you if you ask. Depending on your hosting solution, it might be as easy as making a phone call. (Although, now that I think about it, that might be more daunting for some of us.)
Building Pages in Unbounce? Seven-day browser caching is enabled on all Unbounce-built landing pages, so this is a speed fix you can comfortably skip. Maybe use this free time to treat yourself to some self-care? You’ve earned it.
Set Up GZIP Compression
Difficulty: Intermediate / Estimated Time: 15 Minutes
When a visitor reaches your landing page, their browser pings your web server to request the files that make up the page and the server transmits them back. Naturally, that process moves faster if the information being sent is compressed to be as small as possible. Here’s where GZIP compression comes in.
(You’ll want to check to see if GZIP compression is already enabled before you get started.)
As with browser caching, the difficulty of setting up GZIP compression is going to be determined by how your website was built. If you use WordPress, you’re in luck: many WordPress plugins will enable GZIP compression for you almost automatically. If you don’t use WordPress, well, we’re headed back into your server.
This article from GTmetrix provides a quick overview of the importance of GZIP compression and how to enable it. With Apache web servers, you’ll need to add this chunk of code to your .htaccess file.
<IfModule mod_deflate.c>
# Compress HTML, CSS, JavaScript, Text, XML and fonts
AddOutputFilterByType DEFLATE application/javascript
AddOutputFilterByType DEFLATE application/rss+xml
AddOutputFilterByType DEFLATE application/vnd.ms-fontobject
AddOutputFilterByType DEFLATE application/x-font
AddOutputFilterByType DEFLATE application/x-font-opentype
AddOutputFilterByType DEFLATE application/x-font-otf
AddOutputFilterByType DEFLATE application/x-font-truetype
AddOutputFilterByType DEFLATE application/x-font-ttf
AddOutputFilterByType DEFLATE application/x-javascript
AddOutputFilterByType DEFLATE application/xhtml+xml
AddOutputFilterByType DEFLATE application/xml
AddOutputFilterByType DEFLATE font/opentype
AddOutputFilterByType DEFLATE font/otf
AddOutputFilterByType DEFLATE font/ttf
AddOutputFilterByType DEFLATE image/svg+xml
AddOutputFilterByType DEFLATE image/x-icon
AddOutputFilterByType DEFLATE text/css
AddOutputFilterByType DEFLATE text/html
AddOutputFilterByType DEFLATE text/javascript
AddOutputFilterByType DEFLATE text/plain
AddOutputFilterByType DEFLATE text/xml
# Remove browser bugs (only needed for really old browsers)
BrowserMatch ^Mozilla/4 gzip-only-text/html
BrowserMatch ^Mozilla/4\.0[678] no-gzip
BrowserMatch \bMSIE !no-gzip !gzip-only-text/html
Header append Vary User-Agent
</IfModule>
And again, if this is beyond your comfort zone, your web host will probably help you set up GZIP compression if you ask nicely.
Building Pages in Unbounce? You don’t have to ask us nicely, because we’ve already done it. All Unbounce landing pages are automatically compressed during data transfer. (But be nice to us anyway, alright?)
Kill Needless Scripts and Plugins
Difficulty: Intermediate / Estimated Time: 30 Minutes
WordPress is wonderful in its simplicity. As we’ve seen throughout this article, page speed fixes that might require a front-end developer on a static website can often be achieved by simply installing a WordPress plugin. Want to enable browser caching? Boom, W3 Total Cache.* Need to minify your scripts? Pow, Autoptomize.* Developer, shmeveloper.
But because it’s so easy to add functionality through plugins, WordPress websites have a habit of collecting a lot of them—along with all the of the bits and bites of code that make them work. Those add up.
Take a look at the scripts and plugins you’ve added to your website and decide whether they’re essential to your visitor experience. If they’re not, junking them could help cut some extra seconds off of your load time. (And guess what? There’s a plugin for that.) You can also disable plugins one at a time, then retest your page speed to determine which ones are problematic.
*If you’re publishing Unbounce pages to a WordPress domain, these plugins in particular might start a fire.
Building Pages in Unbounce? This is more of WordPress fix, but it also applies to Unbounce customers that have inserted a bunch of custom scripts onto their landing pages. Learn how the Unbounce Script Manager helps you keep things tidy.
Convert Images to Sprites
Difficulty: Intermediate / Estimated Time: 30 Minutes
If your landing page includes a series of similar-sized images (say, for a client logo bar), you can shorten your load time by combining them into an image sprite, then use CSS to display specific chunks of that sprite at a time. This post from WebFX provides a great step-by-step guide for creating CSS sprites.
Joining smaller images into a larger file might seem counterintuitive, but again, the idea here is to reduce the number of HTTP requests on your page and ultimately make it faster. Each individual image requires its own call—combining images into a single CSS sprite means your page only needs to make one.
Building Pages in Unbounce? We don’t build CSS sprites for you, but you can certainly use them on your Unbounce-built landing pages. Check out our documentation on custom JS and CSS with Unbounce.
Improve Your Landing Page Speed: Hard Fixes
We’re into the scary stuff now.
These are fixes you should absolutely not attempt unless you know what you’re doing or you’ve consulted extensively with a front-end developer. (We even had one of the Unbounce devs fact-check this article, and we’ve never felt smaller.) Proceed with caution.
Remove Render-Blocking JS and CSS
Difficulty: Hard / Estimated Time: 45 Minutes
Those CSS and JS scripts that make your landing page beautiful and enable cool, dynamic functionality? They could be one of the major reasons that your page is loading so slowly. (Bad news for my flashing, neon visitor counter.)
When a web browser runs into CSS or JS in the head of your document, it’ll wait to download and process that content before continuing to render your page’s HTML. That might sound like a good thing from a user experience perspective—after all, we want people to see our landing page as it was intended—but it actually means that visitors can be left waiting on a blank screen while everything loads in the background.
To avoid this, we need to implement techniques for preventing render-blocking CSS and JS on our landing page. (Refer back to your Google PageSpeed Insights results to check if any scripts are slowing down your page load.)
Reduce render-blocking CSS
There are a couple of ways that we can neutralize render-blocking CSS. One option is to defer all CSS until after the HTML has loaded. That’ll certainly improve page speed, but it will also present non-styled content when the visitor first reaches our page. Not ideal.
The other, more preferable option is to defer most style rules until the HTML has been rendered, but inline the CSS necessary to correctly display content above the fold within the HTML. That way, visitors will see the properly-styled content as soon as they hit the page while the rest will load out of view. Pretty sneaky. This is a great tutorial using a real-life example from codeburst.io.
Another page speed opportunity for you here is combining your CSS files. By moving your style rules from several files to just one (or maybe two, tops), you can reduce the number of times that visitors need to ping your web server and improve your landing page load time. Here’s a good resource from GiftOfSpeed on combining and compressing you CSS scripts.
Eliminate render-blocking JS
Like CSS, JS scripts can prevent your landing page from rendering as quickly as you might like. We can avoid that by deploying the defer and async attributes. The former tells the browser to wait until your HTML is rendered before it begins pulling in JS scripts, while the latter asks that JS be downloaded simultaneously without interrupting the HTML download.
An important note is that not all JS scripts are equal: some are critical to the rendering of your page and need to be addressed right out of the gate, so they’ll have to stay at the top. Dareboost does a good job of explaining how to distinguish between critical and non-critical JS, as well as how to implement deferred and asynchronous loading.
Building Pages in Unbounce? Unbounce optimizes for most Google PageSpeed Insights recommendations, including the removal of render-blocking elements. That means you can skip this one.
Start Hand-Coding with AMP
Difficulty: Very Hard / Estimated Time: ∞ Hours
Alright, “∞ hours” is an overstatement, but implementing AMP is no small task. Developed by Google, the AMP project is an entirely new framework with which to build your web pages. The goal? Dramatically improve page speed, especially for mobile users.
AMP is made up of three core components: AMP HTML, AMP JS, and AMP Cache. That means you’ll need to learn new markup, as well as understand the framework well enough to get your landing pages validated and make sure they actually work.
We won’t get into the nitty-gritty of building with AMP here, but the AMP website has a bunch of resources (including tutorials) to help you get started.
https://fast.wistia.net/embed/iframe/rlrb8f534y?autoPlay=true
https://fast.wistia.net/assets/external/E-v1.js
https://fast.wistia.net/assets/external/E-v1.js
Building Pages in Unbounce? No hand-coding AMP pages for you—Unbounce makes it easy to drag and drop together AMP experiences. Choose one of our AMP-optimized templates, load your content, get validated, and start publishing lightning-fast landing pages right away.
Improving your landing page speed can sound intimidating, but even small tweaks will make a big difference for your load times. Tackle the easy stuff first, then move onto more challenging fixes as you get comfortable. And above all, keep testing: seeing your improved speed results after each undertaking will give you the confidence and motivation to move forward.
Or, you know, just build with Unbounce. We automatically handle most of the speed fixes listed (or at least makes them super easy), which saves a ton of time. That means you can focus on what matters: getting more conversions and improving ROI.
https://fast.wistia.com/static/concat/iframe-api-v1.js
Increase Your Landing Page Speed (By Stealing Our Homework) syndicated from https://unbounce.com
0 notes
Text
Increase Your Landing Page Speed (By Stealing Our Homework)
If you’ve read Unbounce’s 2019 Page Speed Report (and you really should), then you already know why speed is so important this year. Slow-loading landing pages have always been an obstacle to higher conversions, and now Google is punishing poor mobile load times in its search rankings. To be successful in 2019, we—marketers—need to be thinking fast. But are we?
To find out, we polled almost 400 marketers on their attitudes around page speed and asked what (if anything) they were doing to get faster.
Just 56% of marketers are happy with their mobile load times, according to the 2019 Page Speed Report.
Almost three of every four respondents said they had taken steps to improve their page speeds over the last year, and that’s pretty good. Alarmingly, though, only half of marketers we surveyed are satisfied with their load times on mobile.
So most marketers are trying to get faster, but many aren’t where they want to be. Which begs the question: what are people doing to speed up their landing page load times?
Computer, enhance!
Only 39% of marketers have bothered to find out how fast their pages are actually loading. Not great.
Here, we start to see why marketers are somewhat pessimistic about their page speed progress. Just over half have optimized their landing page images—ostensibly one of the simplest ways to speed up your load times—and even fewer have done any of the real technical-sounding things they need to get faster. (I mean, fair, they sound pretty boring to us, too.)
Here’s a doozy, though: just one in three marketers have run a website speed test to find out whether their load times are impacting their conversions. That’s the easiest one!
And hey, we get it. Marketers are being asked to do more than ever before, often with fewer resources. If you’re a small team (or a single person, the smallest of the teams), you might feel you don’t have the time or expertise to meaningfully improve your page speed.
But I’ve gone and done the hard work for you—me, a film school graduate who, until recently, believed that his Apple computer was impervious to viruses. (Hoo boy, it is not.) I’ve spent hours talking to Unbounce developers, reading how-to guides, and generally just bombarding my brain with the most dull, technical page speed information I could get ahold of. (Apologies to said developers.) And if I can get my head around it, there’s no excuse for the rest of you.
Below, I’ve simplified some of the most effective ways to increase your landing page loading times in a guide. For each fix, I’ve indicated the technical difficulty and the estimated time it’ll take, so you know exactly what you’re getting yourself in to. Use the table of contents below to jump to what’s relevant to you, or go ahead and do it all in order.
Jump to a Landing Page Speed Fix
How to Check Your Landing Page Speed
Run a Google Speed Test (5 Minutes)
Try the Unbounce Landing Page Analyzer (5 Minutes)
Improve Your Landing Page Speed: Easy Fixes
Reduce Your Page Content (15 Minutes)
Optimize Your Images (30 Minutes)
Host Your Videos Elsewhere (30 Minutes)
Audit Your Hosting Solution (30 Minutes)
Implement a CDN (30 Minutes)
Improve Your Landing Page Speed: Intermediate Fixes
Minify HTML, JS, and CSS (15 Minutes)
Enable Browser Caching (15 Minutes)
Set Up GZIP Compression (15 Minutes)
Kill Needless Scripts and Plugins (30 Minutes)
Convert Images to Sprites (30 Minutes)
Improve Your Landing Page Speed: Hard Fixes
Remove Render-Blocking JS and CSS (45 Minutes)
Start Hand-Coding with AMP
Final note: If you’ve built your page with Unbounce, you can skip a lot of this stuff—we make many speed fixes on the back-end automatically. In this post, look for the ‘Building Pages in Unbounce?‘ callout boxes to see if a given fix is something you need to implement.
Look for these callout boxes throughout this post to get Unbounce-specific tips and learn how we automatically optimize your landing pages to make them load super fast.
How to Check Your Landing Page Speed
First things first.
Before you throw on your hard hat and start hitting things with a hammer (both figuratively and literally), it’s important to have some idea of what’s working—and what’s not—on your landing page. That means running a speed audit.
It’s important to point out that, regardless of which speed test you use, you don’t want to get too hung up on your score. Achieving a perfect score is not always technically possible (and it might not even be desirable). Instead, use your results as a general guideline to improve page speed and implement the fixes that make sense for you.
Okay—let’s test them pages.
Run a Google Speed Test
Difficulty: Easy / Estimated Time: 5 Minutes
There are a bunch of great tools for testing your page speed, but why not start with the big dog itself? Google’s PageSpeed Insights is an awesome way to do a quick performance check-up with at-a-glance recommendations. (Ryan Engley, Unbounce’s VP of Product Marketing, explains how to interpret and act on your PageSpeed Insights results in this must-read blog post.) Then there’s Lighthouse, a newer tool from Google that provides a comprehensive analysis of your how your page presents to end users.
You’ll also want to run your page through Google’s Test My Site tool, which will check your speed from a mobile perspective.
Clicking on individual results in PageSpeed Insights will reveal your problematic page elements.
Running a Google speed test should only take a couple of minutes, and the results will help you identify some of the top opportunities to boost your landing page load times.
Try the Unbounce Landing Page Analyzer
Difficulty: Easy / Estimated Time: 5 Minutes
Running a speed test with Google should be your top priority, but PageSpeed Insights doesn’t give results tailored to landing pages. For that, you’ll want to run your page through the Unbounce Landing Page Analyzer, which not only provides feedback on page performance but includes a bunch of advice on creating more effective campaigns and kicking your conversions into overdrive.
Unbounce’s Landing Page Analyzer provides feedback on page speed, but also actionable advice on things like SEO, message match, and mobile-friendliness.
Building Pages in Unbounce? Then you’ll definitely want to give our Landing Page Analyzer a shot. Get best-practice recommendations for conversion optimization and see how your landing pages stack up against others in your industry.
Improve Your Landing Page Speed: Easy Fixes
With your results from both Google and Unbounce, you’ll be well-equipped to move onto the actual work of making your page perform better. It’s time to pick up that hammer.
These fixes should be simple enough for anyone to tackle, regardless of their technical expertise.
Reduce Your Page Content
Difficulty: Easy / Estimated Time: 15 Minutes
We’ve marked this as an easy opportunity to increase your page speed, but it probably won’t feel like that when you start thinking about which elements on your page you can junk. Marketers love big hero shots, beautiful supporting imagery, and fun, animated explainer videos. But how much of that content is actually helping you drive conversions?
Visual content accounts for a huge portion of the size of an average web page—images account for over 20% of web page weight, as pointed out by Kinsta—and each element creates an HTTP request. That’s when your visitor’s browser pings your web server to request the files that make up the elements of your page. Too many calls can be a serious drag on your load time, so one of the simplest ways to improve your page speed is cutting down the number of elements you include.
Look at each piece of content on your page critically, then ask yourself: “Does this spark joy?” “Does this increase conversions?” If you don’t think there are pieces you can toss, try running an A/B test with a slimmed-down version of the page. The results might surprise you.
Bottom line: stick to the fundamentals of good landing page design and try to keep the number of elements (and thus HTTP requests) to a minimum.
Building Pages in Unbounce? We recommend that you keep things pretty lean, but we’d never remove content from your landing page. (Must resist… desire… to do best practices…) This is one optimization that you’ll have to tackle on your own.
Optimize Your Images
Difficulty: Easy / Estimated Time: 30 Minutes
Once you’ve trimmed some elements from your page, you’ll want to optimize the content that made the cut. Poor image optimization is the most common reason for slow page loads, especially for mobile visitors. Fortunately, it’s also one of the easiest issues to fix.
These are some quick tips for shrinking your images and improving your page speed. The goal here should be getting images at least under 800kb, but the smaller we can make them, the better.
Resize your images
It’s easy to chuck a larger image onto your page and rely on your content management system (CMS) to compress it to the appropriate size, but it’ll still be loading at least some of those extra pixels on the back end, and your visitors are going to feel it in the load. When you add an image, make sure it’s the same dimensions that your page will be rendering it.*
*This doesn’t necessarily apply to Unbounce’s retina image support—read up on that here.
Choose the right file type
Most people don’t think too much about the format of the image they’re uploading, but it can have a dramatic effect on page performance. The file types you’re probably most familiar with are JPEG and PNG—and, yes, there are differences.
JPEG is a ‘lossy’ format, which means it’ll lose some data during compression. That typically gives you a smaller file, but it can come at the expense of visual fidelity. Generally, images with significant color variation (say, photographs) perform better as JPEGs, and any dip in quality can usually go undetected.
PNG is ‘lossless,’ so the image’s appearance won’t change when resized, but it tends to make for larger files if there’s significant color variation. PNG is ideal for simple images with defined shapes, like those with text. Saving PNGs in 8-bit (rather than 24-bit, which has a broader color palette) can help shave off some extra bites.
Here are some optimization tips for JPEG and PNG (and GIF, that villain) from Google itself.
Use compression tools
Before your weigh-in, it’s good to run images through a final round of compression. There are plenty of image compression tools on WordPress, as well as some free, standalone ones like TinyPNG. These shrinky gizmos offer a simple way to cut down your image sizes without braving the cursed labyrinth that is Adobe’s export settings. (Hey, I’m a words guy.)
Your takeaways here are:
Ensure your image dimensions match how they’ll actually be displayed
Use JPEG when a slight dip in visual fidelity isn’t the end of the world (like photography), but PNG when it is (images with text and sharp lines)
Compress images to keep the file size as tiny as possible
If you want to take a deeper dive into image optimization, we recommend that you check out this post from Search Engine Land, which goes into detail on making images smaller while keeping them beautiful.
Building Pages in Unbounce? We’ve got you covered. Unbounce’s Auto Image Optimizer shrinks your images as soon as they’re uploaded so you can focus on making the best landing page possible.
Host Your Videos Elsewhere
Difficulty: Easy / Estimated Time: 30 Minutes
Why carry something yourself when you can make someone else carry it for you? That’s my motto for landing pages and life, and it’s why I’m no longer welcome on Unbounce’s company hiking trips.
Hosting videos on your own domain can be great for SEO purposes, but that’s not usually our goal with landing pages. We want everything to load in a flash and give our visitors the best chance to convert. Depending on your hosting solution, though, your videos might be slowing down your page speed, suffering from playback issues, and taking up an uncomfortable amount of server space.
Done properly, transferring videos to a third-party platform can shed some extra load time and help your pages render faster. Consider moving video content to Wistia, YouTube, or Vimeo, then using a light embed technique so that your videos only load heavier playback elements when your visitors actually click on them.
Building Pages in Unbounce? As a disclaimer: Using light embed codes with Unbounce (or any custom code, for that matter) will require some technical knowledge to implement and could, in rare cases, cause issues. Check out this Unbounce community post for more information.
Audit Your Hosting Solution
Difficulty: Easy / Estimated Time: 30 Minutes
Loading speed isn’t just determined by what’s on your landing page. Your web host also has a major influence in how quickly your page rolls out to potential customers.
There are three common models for web hosting:
Shared hosting
Generally the most affordable solution, shared hosting is when your website is hosted alongside other sites on a single web server. Everyone draws from common resources (like storage space and processing power), which means—you guessed it—you need to share.
Virtual private server (VPS) hosting
This is essentially a mix of both shared and dedicated hosting. With VPS, your website still shares server space with others, but you’ll have dedicated resources that no one else can dip into. The result is more power and flexibility, but it tends to come with a higher price tag.
Dedicated hosting
For those who’ve had a traumatic roommate experience (who hasn’t?), dedicated hosting means your website has the server all to itself. More resources, no sharing. That’s great if you’re heavy on digital content and get a ton of traffic, but dedicated hosting is also the most expensive option and requires the technical know-how to set up and maintain your server.
Low-volume websites can generally get by with the cost-effective shared solution, but once your traffic starts to rise, you might not be getting enough juice from your web host to deliver content quickly—and that’s when load times start to suffer. (Give this post from Search Engine Journal a read for a more comprehensive explanation.)
It’s also important to note that the whereabouts of your web server can have a significant impact on your page speed. If you’re not using a content delivery network (CDN; more on this below), you’ll want to make sure that traffic from foreign countries isn’t encountering too much latency.
Think your hosting solution might be impacting your page speed? Run your site through a server speed test like this one from Bitcatcha, and use WebPageTest or Pingdom to see how your quickly your landing page loads in other countries. Depending on the results, you might decide it’s time to upgrade your hosting plan (or change web hosts altogether).
Building Pages in Unbounce? You don’t have to worry about this one—Unbounce’s global hosting solution boasts 99.95% uptime and ensures that your landing pages always have the necessary resources to load super fast.
Implement a CDN
Difficulty: Easy / Estimated Time: 30 Minutes
When your landing page gets a visitor, their web browser pings your server to get the content necessary to build out the page. Simple, right? Everyone downloads your website information from the same place, regardless of their location around the world. Well, that’s usually fine if the visitor is in or close to the country that your web server is located, but when they’re halfway around the globe, chances are they’re going to encounter some latency.
To avoid that, you should look into deploying a CDN, which caches your website across a network of data centers and proxy servers all over the planet. Say your own server is in the United States and someone from Lithuania is trying to visit your landing page. Instead of downloading your content from across the Atlantic, that visitor can pull a cached version from a server nearby.
Setting your website up with a CDN is pretty straightforward and—depending on your traffic—generally affordable. Here’s a list of some popular CDN providers from Mashable.
Building Pages in Unbounce? We’ve got five global data centers supporting the Unbounce CDN, which means your landing pages will load in a flash regardless of where they’re being accessed from.
Improve Your Landing Page Speed: Intermediate Fixes
These next speed fixes are a little trickier, but they should be manageable for marketers with a little technical know-how. Still, a mistake here could mean actual damage to your landing page.
Our recommendation? Do some research, make a backup, and—if you can—consult briefly with a developer on your team. It never hurts to have an experienced colleague to turn to if you get in over your head.
Building Pages in Unbounce? We talk a lot about WordPress through this next section. If you’re using our plugin to publish Unbounce landing pages to a WordPress domain, some of these recommended speed fixes can actually cause technical issues. Don’t hesitate to reach out to us for clarification if you’re ever unsure.
Minify HTML, CSS, and JS
Difficulty: Intermediate / Estimated Time: 15 Minutes
All those lines of HTML, CSS, and JS code that make up your landing page? They’re packed with spaces, line breaks, and other bits of formatting that make it more legible and easier for us to interpret, but each makes your load time just an eensy bit slower—and the web browsers your visitors are using to render your page don’t particularly need them.
With minification, the goal is to cut out all of that extra junk and condense your code so that browsers can read it faster. Here’s an example snippet of Javascript code from Wikipedia:
var array = [];
for (var i = 0; i < 20; i++) {
array[i] = i;
}
After minifying, that code would look something like this:
for(var a=[i=0];++i<20;a[i]=i);
There are plenty of free online tools that will do this for your landing page, like Minify Code, as well as a bunch of WordPress plugins. Be sure to check out this post from Elegant Themes, which is an awesome resource that dives into the many options at your disposal.
Building Pages in Unbounce? Do we minify? We practically invented minifying. (Editor’s note: We did not.) Unbounce compresses all of your code automatically, making your landing page as slim as can be. No coding your pages from scratch and no minifying that code in the background? We’re making this too easy for you.
Enable Browser Caching
Difficulty: Intermediate / Estimated Time: 15 Minutes
The goal with any landing page should be getting prospects to convert the first time they visit, but the reality is that not everyone will. Sometimes, visitors will need some time to think about it: they’ll bounce, do more research, check out some competitors, then come back to your original offer. Browser caching ensures that when they return, your page will load even faster—and that’ll make them more likely to convert.
Not sure if you’ve already got caching enabled? Before you start, run a quick caching check using a tool like this one from GiftOfSpeed.
If your site is built on WordPress, enabling caching is as easy as adding a plugin.* (WordPress is almost too easy, huh?) Check out this list of caching plugins, most of which include quick instructions for getting set up.
*If you’re publishing Unbounce pages to a WordPress domain, these caching recommendations could create big problems. Check with us first.
For those not on WordPress, enabling browser caching on your own is pretty simple if you’re willing to get your hands dirty. For example, on Apache web servers, it comes down to inserting a little bit of code into the .htaccess file on your web host or server:
<IfModule mod_expires.c>
ExpiresActive On
ExpiresByType image/jpg “access 1 year”
ExpiresByType image/jpeg “access 1 year”
ExpiresByType image/gif “access 1 year”
ExpiresByType image/png “access 1 year”
ExpiresByType text/css “access 1 month”
ExpiresByType text/html “access 1 month”
ExpiresByType application/pdf “access 1 month”
ExpiresByType text/x-javascript “access 1 month”
ExpiresByType application/x-shockwave-flash “access 1 month”
ExpiresByType image/x-icon “access 1 year”
ExpiresDefault “access 1 month”
</IfModule>
This article from Varvy provides a great how-to, as does this one from WinningWP (which discusses enabling browser caching from a WordPress perspective but is applicable more broadly).
If all of this makes you nervous, there’s likely a simpler method for you to set up browser caching. Most web hosts will enable caching for you if you ask. Depending on your hosting solution, it might be as easy as making a phone call. (Although, now that I think about it, that might be more daunting for some of us.)
Building Pages in Unbounce? Seven-day browser caching is enabled on all Unbounce-built landing pages, so this is a speed fix you can comfortably skip. Maybe use this free time to treat yourself to some self-care? You’ve earned it.
Set Up GZIP Compression
Difficulty: Intermediate / Estimated Time: 15 Minutes
When a visitor reaches your landing page, their browser pings your web server to request the files that make up the page and the server transmits them back. Naturally, that process moves faster if the information being sent is compressed to be as small as possible. Here’s where GZIP compression comes in.
(You’ll want to check to see if GZIP compression is already enabled before you get started.)
As with browser caching, the difficulty of setting up GZIP compression is going to be determined by how your website was built. If you use WordPress, you’re in luck: many WordPress plugins will enable GZIP compression for you almost automatically. If you don’t use WordPress, well, we’re headed back into your server.
This article from GTmetrix provides a quick overview of the importance of GZIP compression and how to enable it. With Apache web servers, you’ll need to add this chunk of code to your .htaccess file.
<IfModule mod_deflate.c>
# Compress HTML, CSS, JavaScript, Text, XML and fonts
AddOutputFilterByType DEFLATE application/javascript
AddOutputFilterByType DEFLATE application/rss+xml
AddOutputFilterByType DEFLATE application/vnd.ms-fontobject
AddOutputFilterByType DEFLATE application/x-font
AddOutputFilterByType DEFLATE application/x-font-opentype
AddOutputFilterByType DEFLATE application/x-font-otf
AddOutputFilterByType DEFLATE application/x-font-truetype
AddOutputFilterByType DEFLATE application/x-font-ttf
AddOutputFilterByType DEFLATE application/x-javascript
AddOutputFilterByType DEFLATE application/xhtml+xml
AddOutputFilterByType DEFLATE application/xml
AddOutputFilterByType DEFLATE font/opentype
AddOutputFilterByType DEFLATE font/otf
AddOutputFilterByType DEFLATE font/ttf
AddOutputFilterByType DEFLATE image/svg+xml
AddOutputFilterByType DEFLATE image/x-icon
AddOutputFilterByType DEFLATE text/css
AddOutputFilterByType DEFLATE text/html
AddOutputFilterByType DEFLATE text/javascript
AddOutputFilterByType DEFLATE text/plain
AddOutputFilterByType DEFLATE text/xml
# Remove browser bugs (only needed for really old browsers)
BrowserMatch ^Mozilla/4 gzip-only-text/html
BrowserMatch ^Mozilla/4\.0[678] no-gzip
BrowserMatch \bMSIE !no-gzip !gzip-only-text/html
Header append Vary User-Agent
</IfModule>
And again, if this is beyond your comfort zone, your web host will probably help you set up GZIP compression if you ask nicely.
Building Pages in Unbounce? You don’t have to ask us nicely, because we’ve already done it. All Unbounce landing pages are automatically compressed during data transfer. (But be nice to us anyway, alright?)
Kill Needless Scripts and Plugins
Difficulty: Intermediate / Estimated Time: 30 Minutes
WordPress is wonderful in its simplicity. As we’ve seen throughout this article, page speed fixes that might require a front-end developer on a static website can often be achieved by simply installing a WordPress plugin. Want to enable browser caching? Boom, W3 Total Cache.* Need to minify your scripts? Pow, Autoptomize.* Developer, shmeveloper.
But because it’s so easy to add functionality through plugins, WordPress websites have a habit of collecting a lot of them—along with all the of the bits and bites of code that make them work. Those add up.
Take a look at the scripts and plugins you’ve added to your website and decide whether they’re essential to your visitor experience. If they’re not, junking them could help cut some extra seconds off of your load time. (And guess what? There’s a plugin for that.) You can also disable plugins one at a time, then retest your page speed to determine which ones are problematic.
*If you’re publishing Unbounce pages to a WordPress domain, these plugins in particular might start a fire.
Building Pages in Unbounce? This is more of WordPress fix, but it also applies to Unbounce customers that have inserted a bunch of custom scripts onto their landing pages. Learn how the Unbounce Script Manager helps you keep things tidy.
Convert Images to Sprites
Difficulty: Intermediate / Estimated Time: 30 Minutes
If your landing page includes a series of similar-sized images (say, for a client logo bar), you can shorten your load time by combining them into an image sprite, then use CSS to display specific chunks of that sprite at a time. This post from WebFX provides a great step-by-step guide for creating CSS sprites.
Joining smaller images into a larger file might seem counterintuitive, but again, the idea here is to reduce the number of HTTP requests on your page and ultimately make it faster. Each individual image requires its own call—combining images into a single CSS sprite means your page only needs to make one.
Building Pages in Unbounce? We don’t build CSS sprites for you, but you can certainly use them on your Unbounce-built landing pages. Check out our documentation on custom JS and CSS with Unbounce.
Improve Your Landing Page Speed: Hard Fixes
We’re into the scary stuff now.
These are fixes you should absolutely not attempt unless you know what you’re doing or you’ve consulted extensively with a front-end developer. (We even had one of the Unbounce devs fact-check this article, and we’ve never felt smaller.) Proceed with caution.
Remove Render-Blocking JS and CSS
Difficulty: Hard / Estimated Time: 45 Minutes
Those CSS and JS scripts that make your landing page beautiful and enable cool, dynamic functionality? They could be one of the major reasons that your page is loading so slowly. (Bad news for my flashing, neon visitor counter.)
When a web browser runs into CSS or JS in the head of your document, it’ll wait to download and process that content before continuing to render your page’s HTML. That might sound like a good thing from a user experience perspective—after all, we want people to see our landing page as it was intended—but it actually means that visitors can be left waiting on a blank screen while everything loads in the background.
To avoid this, we need to implement techniques for preventing render-blocking CSS and JS on our landing page. (Refer back to your Google PageSpeed Insights results to check if any scripts are slowing down your page load.)
Reduce render-blocking CSS
There are a couple of ways that we can neutralize render-blocking CSS. One option is to defer all CSS until after the HTML has loaded. That’ll certainly improve page speed, but it will also present non-styled content when the visitor first reaches our page. Not ideal.
The other, more preferable option is to defer most style rules until the HTML has been rendered, but inline the CSS necessary to correctly display content above the fold within the HTML. That way, visitors will see the properly-styled content as soon as they hit the page while the rest will load out of view. Pretty sneaky. This is a great tutorial using a real-life example from codeburst.io.
Another page speed opportunity for you here is combining your CSS files. By moving your style rules from several files to just one (or maybe two, tops), you can reduce the number of times that visitors need to ping your web server and improve your landing page load time. Here’s a good resource from GiftOfSpeed on combining and compressing you CSS scripts.
Eliminate render-blocking JS
Like CSS, JS scripts can prevent your landing page from rendering as quickly as you might like. We can avoid that by deploying the defer and async attributes. The former tells the browser to wait until your HTML is rendered before it begins pulling in JS scripts, while the latter asks that JS be downloaded simultaneously without interrupting the HTML download.
An important note is that not all JS scripts are equal: some are critical to the rendering of your page and need to be addressed right out of the gate, so they’ll have to stay at the top. Dareboost does a good job of explaining how to distinguish between critical and non-critical JS, as well as how to implement deferred and asynchronous loading.
Building Pages in Unbounce? Unbounce optimizes for most Google PageSpeed Insights recommendations, including the removal of render-blocking elements. That means you can skip this one.
Start Hand-Coding with AMP
Difficulty: Very Hard / Estimated Time: ∞ Hours
Alright, “∞ hours” is an overstatement, but implementing AMP is no small task. Developed by Google, the AMP project is an entirely new framework with which to build your web pages. The goal? Dramatically improve page speed, especially for mobile users.
AMP is made up of three core components: AMP HTML, AMP JS, and AMP Cache. That means you’ll need to learn new markup, as well as understand the framework well enough to get your landing pages validated and make sure they actually work.
We won’t get into the nitty-gritty of building with AMP here, but the AMP website has a bunch of resources (including tutorials) to help you get started.
Building Pages in Unbounce? No hand-coding AMP pages for you—Unbounce makes it easy to drag and drop together AMP experiences. Choose one of our AMP-optimized templates, load your content, get validated, and start publishing lightning-fast landing pages right away.
Improving your landing page speed can sound intimidating, but even small tweaks will make a big difference for your load times. Tackle the easy stuff first, then move onto more challenging fixes as you get comfortable. And above all, keep testing: seeing your improved speed results after each undertaking will give you the confidence and motivation to move forward.
Or, you know, just build with Unbounce. We automatically handle most of the speed fixes listed (or at least makes them super easy), which saves a ton of time. That means you can focus on what matters: getting more conversions and improving ROI.
from RSSMix.com Mix ID 8217493 https://unbounce.com/landing-pages/increase-landing-page-speed/
0 notes