#raspbian
Text
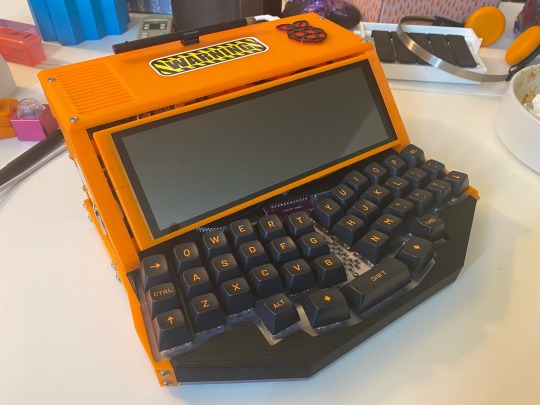
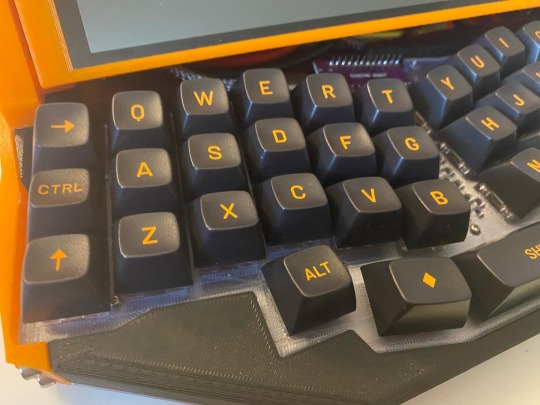
Earlier this year I built a cyberdeck from a design on Thingiverse. It has a 3D-printed case (which I decorated with stickers, plus a 3D-printed Raspberry Pi emblem), a Reviung41 keyboard, a little super-wide display, and a Raspberry Pi 4, with a power management board and a big LiPo battery. I haven’t used it a ton to be honest, but it was amazing to be able to build something like that and get it working. The result is a pretty unique portable computer, like AFAIK there’s only one other like it, and the original designer didn’t make his bright orange.
9 notes
·
View notes
Text
Adding a persistent route to Raspbian 11
June 28th, 2023
In Rasbian 11, you use dhcpcd (note the extra ‘c’ in that name). You add hooks, scripts that run after the dhcp client runs. If you read the man pages for dhcpcd, you’ll find that the hooks are located in /lib/dhcpcd/dhcpcd-hooks/. You’ll find files that start with numbers which defines the execution order woth low numbers being executed first. I added my ‘route add’ command to a file I called 70-routeadd and rebooted. Magic.
Try searching on how to add a persistent route to Raspbian 11 and you’re 99% likely to find old, wrong answers. The reason is there are several ways, some no longer really supported, to manage networking. The venerable interfaces method is deprecated, as near as I can tell, but you can still find the configuration structure and services in a brand new default installation. Network configuration has moved to DHCP even for static addresses.
There is the dhclient set of utilities, configuration files, and the service daemon for it. It won’t work either and I have no idea why its installed. I stumbled across the dhcpcd daemon looking at a list of services and finally decided its something different from dhclient. After reading the man pages, I figured it was a shot in the dark and followed it and Voila! Success.
Linux’s a mess. Networking sucks.
2 notes
·
View notes
Photo

Mon nouveau PC qui va remplacer PCWCM2 en attendant un vrai ,même si il fait très bien le taff pour l'instant ( c'est un @raspberrypi 3 ) #setup #pc #raspberry #raspberrypi #theia #théiarob #youtube #informatique #tech #technologie #diy #ordinateur #arduino #raspbian #chromium https://www.instagram.com/p/CicEBMOLs4j/?igshid=NGJjMDIxMWI=
#setup#pc#raspberry#raspberrypi#theia#théiarob#youtube#informatique#tech#technologie#diy#ordinateur#arduino#raspbian#chromium
0 notes
Text
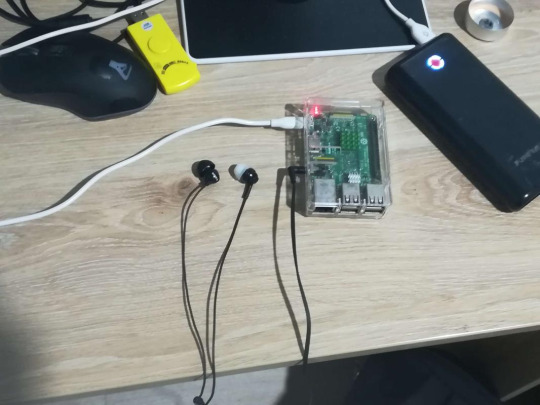
LOOK WHAT ARRIVED!
#its a raspberry pi if you cant tell#set up raspbian and ordered an ethernet switch so i can set up pi hole!#thats my final project monday before surgery
3 notes
·
View notes
Text
Raspbian causing screenflick er

#RASPBIAN CAUSING SCREENFLICK ER 1080P#
#RASPBIAN CAUSING SCREENFLICK ER DRIVERS#
#RASPBIAN CAUSING SCREENFLICK ER TV#
You are receiving this because you modified the open/close state. In the end, it is very inconsistent and I can't figure out anyĬombination of settings that will allow me to display more than 2 streams Streams where when I set it to 512 it would flash back and forth between Mawarebytes is a well known anti malware to detect root cause of malwares and prevent.
#RASPBIAN CAUSING SCREENFLICK ER 1080P#
Something did change when I set it to 1024, in that it would allow 2 1080p Performance improvements, and are untested.* Entering /opt/vc/bin/tvservice -m CEA into the command line will list all possible modes. Generally, not all possible modes are supported by a monitor. Usually, the best mode is selected automatically, but in this case, I had to overwrite it manually. *Values of gpu_mem over 512 are not recommended, will provide no The mode defines attributes such as fps, screenresolution or interlaced/progressive. Poor support for 4k displays in the RPi4, an issue with my 4K TV, or what. Only get 7 or 9 to display when trying a 3x3. I then tried a lower res substream of 704x480. However an attempt to display 4 of them would only display the original 2. Setting gpu_mem=1024 and I was able to get 2 1080p feeds to display, It would switch back and forth (like a flicker, but only displaying oneįeed at a time) between both feeds until ultimately one would go blank and Just trying to use 2 1920x1080Ĭamera feeds I could only get one to display when I had gpu_mem set to 512.
#RASPBIAN CAUSING SCREENFLICK ER DRIVERS#
You have to update the drivers for fixing this problem. Sometimes flickering occurs for not having an updated drive. Das Raspberry Pi soll 3D-Funktionalität erhalten. desktop recorder Screenflick, system utility OnyX, time manager Timelime, and memory optimizer SixtyFou 20:46 Uhr, MacNN,. The Refresh rate of the screen is a very important cause behind flickering. Von seinen Quellen bei Partnern von Microsoft will er erfahren haben.
#RASPBIAN CAUSING SCREENFLICK ER TV#
I am trying to configure a RPi4 with 4GB and a 4K TV that I recently First, you have to check the screen if it is damaged or not. In the end, it is very inconsistent and I can't figure out any combination of settings that will allow me to display more than 2 streams at 1080p or more than 7 at D1 (704x480). Something did change when I set it to 1024, in that it would allow 2 1080p streams where when I set it to 512 it would flash back and forth between the 2. Values of gpu_mem over 512 are not recommended, will provide no performance improvements, and are untested. I'm not sure if this is just poor support for 4k displays in the RPi4, an issue with my 4K TV, or what. With this resolution I can only get 7 of 9 to display when trying a 3x3 layout. As ahjcheng mentioned above I then tried setting gpu_mem=1024 and I was able to get 2 1080p feeds to display, however an attempt to display 4 of them would only display the original 2. It would switch back and forth (like a flicker, but only displaying one feed at a time) between both feeds until ultimately one would go blank and then the 2nd would display fine. Just trying to use 2 1920x1080 camera feeds I could only get one to display when I had gpu_mem set to 512. I am trying to configure a RPi4 with 4GB and a 4K TV that I recently purchased.
0 notes
Text
Apropos of nothing
If you are the techiest person in the house (and for many of you, this is not techy at all), today is a good day to build a pihole thanks to Google's new TLDs.
For the record, this straight up stopped Dad from getting computer viruses when coupled with the Ublock browser extension, so I will volunteer my time to get you set up. We will find an evening and do a Zoom call. I am serious.
Prerequisities:
Before you start, this will be way way easier if your router has a magic way to:
Set static IP addresses
Set a custom DNS server
If you can't do this, I'm not saying you're stuck, but there's some non-obvious failure modes and maybe it's time to buy a better router.

Parts:
Raspberry Pi 4B. 2GB if you just want to set and forget, 8GB if you want to do more things on this than just your pihole (Coughs in a MarioKart box) -> https://www.raspberrypi.com/products/raspberry-pi-4-model-b/
Spare USB-C charger if you don't have one already. I'm a fan of https://www.amazon.com/Argon-USB-C-Power-Supply-Switch/dp/B0919CQKQ8/ myself
A microSD card at least UHS class 3 or better. 32 is fine for just a pihole, I have a 512 in some of mine that I use for more stuff. https://www.tomshardware.com/best-picks/raspberry-pi-microsd-cards
Some method of flashing the card if you don't have one (Some come with SD to micro-SD adapters, if not a USB to SD/micro-SD adapter is about $10 off Amazon)
If you really feel like going nuts, go buy yourself an Argon case and then very very carefully never ever install the software for the fan that does nothing. The value is entirely in having a big giant brick that is self-cooling. If you want to play MarioKart, I would consider this a requirement. https://www.amazon.com/Argon-Raspberry-Aluminum-Heatsink-Supports/dp/B07WP8WC3V
Setup:
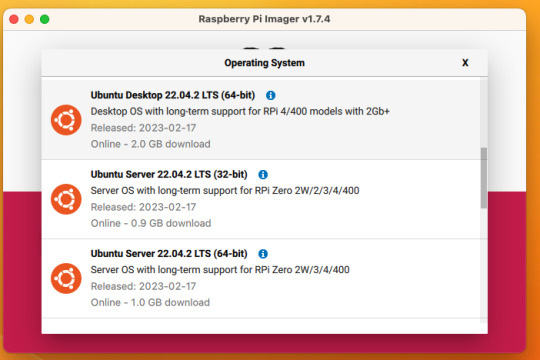
Do yourself a favor and ignore all the signs telling you to go get Raspbian and instead go grab an ISO of Ubuntu 64-bit using RPi Imager. Because Raspbian cannot be upgraded across version WHY U DO THIS
Download Rpi Imager, plug the microSD card into your computer,
Other General Purpose OS -> Ubuntu -> Ubuntu 22.04 LTS
So now you have an operating system on an SD card.
Assemble the case if you bought one, plug in the SD card, power supply, ethernet cable if you have one or mouse and (mini) HDMI cable if you don't.
If you bought that Argon case, you can just plug a keyboard (server OS means no mouse gang; In this house, we use the Command Line) and HDMI cable into the Pi. Turn it on.
Gaining access
The end state of this is that your pi is:
Connected to the internet by cable or wifi
You can SSH to it (Also not scary)
If you plugged in an ethernet cable, once it's done booting (1-2 minutes?), you should be able to ssh to "ubuntu@<the IP of the system>". Look it up in your router. It may make sense to give the static IP NOW to keep it stable.
If you've never used SSH before, I think the standard is Putty on Window or you can just open a terminal in Mac. (And if you know enough Linux to have a Linux computer, why are you reading this?)
If you didn't plug it in, and need to setup the wifi, there's magic incantations to attach it to the wifi and to be quite blunt, I forget what they are.
Your username is ubuntu, your password is ubuntu and then it will ask you to make a new password. If you know the meaning of the phrase "keypair-based access", it may make sense to run `ssh-copy-id` at this point in time.
Router settings (part 1)
Give your new Pi a static IP address, and reboot your pi (as simple as typing in `sudo reboot`).
Open a new SSH session to the pihole on the new address.
Installing pihole
Open up an SSH session and
curl -sSL https://install.pi-hole.net | bash
This is interactive. Answer the questions
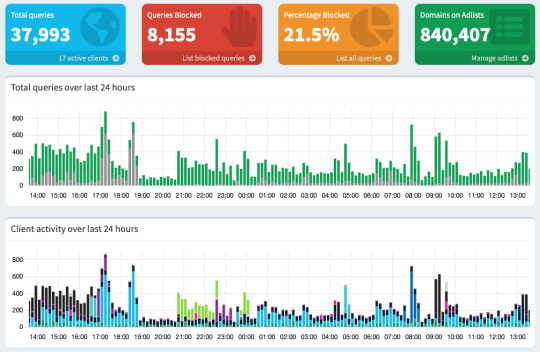
When it's done, on your other computer, navigate to <the ip>/admin
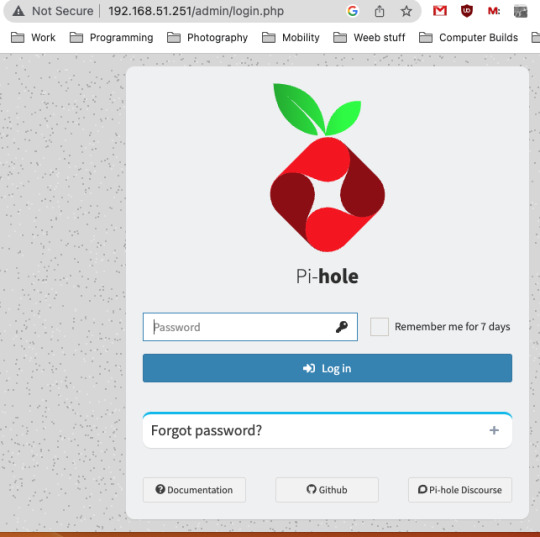
Login with the password you just set.
Router settings part 2
Give your new Pi a static IP address then point your router at that address
Set the DNS servers to the static IP
Then ensure you're blocking something. Anything.
Then do what you want to do.
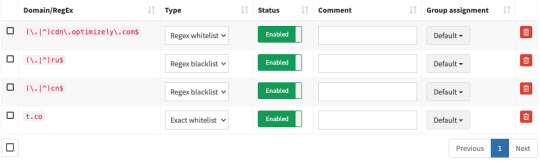
You'll probably need to whitelist some sites, blacklist some more, but the main thing is going to be "Adding more list of bad sites". Reddit has some lists.
And... enjoy.
/But seriously, there's some stuff to do for maintenance and things. I wasn't joking about the pair setup.
2K notes
·
View notes
Note
genuine q (and sorry if this is a silly q) but what does raspbian mean? :o
raspbian is the default operating system for the Raspberry Pi single board computer, and it's name is a portmanteau of Raspberry and Debian (one of the major Linux distributions).
It has nothing to do with lesbians. That was just a joke.
109 notes
·
View notes
Text
is your phone headphone jack busted? do you not want to pay for bluetooth headphones? do you have a raspberry pi collecting dust somewhere? turns out that the solution to these 3 problems is the same! :D
this world hates me and its for good reasons
i followed this guide and used a raspberry pi 3 with raspbian lite
#this was so surprisingly easy to configure#i can also put mp3s in there and ssh into it with my phone to turn it into a fucked up mp3 player#but that needs an internet connection which is a pain in the ass when you dont have a screen or a keyboard#this is so cursed im gonna walk around with this in my backpack#raspberry pi
24 notes
·
View notes
Note
What linux distro do you use?
Uhm, Windows 10? 😅 My Raspberry Pi's have Raspbian (or whatever it's called now) on them, but otherwise I don't use linux. I tried Ubuntu and Mint years ago, but I found I was spending more time fixing issues with my computer than I did actually using my computer, and I just got a bit too close to becoming a living xkcd comic. If they ever change Windows 11 so your taskbar can go on the side again I'll probably upgrade to that, but if that never happens and using Windows 10 becomes a security risk then I guess I'll give Linux another go!
13 notes
·
View notes
Text
Cutting to the "shopping list" section:
We focused on using “off the shelf” components and open-source software to develop the wireless endoscope. This significantly lowered the cost with the goal to make the device accessible for resource-constrained environments. While the technology described is applicable to a variety of rigid lens applications, we attempted to replicate the 4 mm cystoscope lens and separately a clip-on universal endoscope camera.
2.1 Hardware systems
A miniature single-board computer (SBC) module the Raspberry Pi Zero W (Raspberry Pi Foundation, Caldecote, UK) was used because of its size, its low cost (US$10) and its ability to handle high-definition (720p) video.
A 3.7-mm tube camera (model: 1001LG, Shenzhen Eastern International Corporation Limited, Shenzhen, China) was used. It delivers 1280 × 720 high-definition video using a 1/7″ colour CMOS sensor. Lens construction allows a wide (115 degree) field of view and an extended depth of field allowing object in the range of 5 to 50 mm to be in focus. Connectivity is via a USB 2.0 interface with the SBC. The camera is certified IP67 waterproof and the manufacturer is ISO 13485:2016 certified for the design and manufacturer of medical endoscope cameras.
Illumination is via 6 high luminous 0603 white colour LEDs incorporated into the tube camera. The system was powered by a 1200mAh lithium polymer battery and incorporated into a fireproof acrylonitrile butadiene styrene enclosure.
For the clip-on wireless camera module, an 18–35 mm optical zoom coupler (Ouman Medical, Jiangsu Ouman Electronic Equipment Co., ltd, Jiangsu, China) and an 8-megapixel camera module (model: IMX219, Arducam) were used.
2.2 Software systems
Open-source Linux software was used on the SBC as follows:
1. The SBC runs on the Raspbian Pi operating system Lite, a minimal image of Debian Buster [9].
2. The SBC Wi-Fi module is placed in monitor mode (“hotspot”) using RaspAP [10]. This makes wireless video transmission possible.
3. The video signal is streamed via the UV4L module of “Video 4 Linux 2” [11].
4. Lastly, the wireless video signal is viewed on a standard computer via any internet browser. Figure 2 illustrates the entire software setup.
Fig. 2:

7 notes
·
View notes
Text
A friend of mine asked me recently to detail my Linux setup, and after thinking about it for a bit, I realized that this is essentially a personality quiz for the Linux users I thought I would detail it here as well.
I no longer have a desktop computer at all. I have two older generation "gaming" laptops and three Raspberry Pis. I'm going to go through in the order I got them:
Laptop #1:
[Purchased New in 2016] Acer ROG 7th Gen i7, 16GB Ram, nVidia 1050Ti Mobile, Internal 1TB HDD, external 2TB HDD
This was originally a windows laptop when I got it back in 2016, but in 2021 I was tired of the long windows boot times on the the HDD and was much more familiar with Linux due to several years experience doing webserver admin work.
I use Ubuntu LTS as my base. It's easy, it's well supported, it's well documented, and the official repos have just about everything I could need. The only thing I've really had to add myself is the repo for i3, but we'll get to that in a bit. I also chose Ubuntu because I already had my first two Raspberry pis, and both were running Raspbian, so using a debian based kernal meant that it wouldn't be much of a change when ssh'ing into them.
That said, I've never really liked the default Ubuntu desktop. Gnome3 is slow and full of too many effects that don't look especially nice but are still heavy to execute. Instead I loaded up KDE plasma. You can download Kubuntu and have them to the setup for you, but I did it the hard way because I found out about Plasma after installing Ubuntu and didn't want to start from scratch.
My plasma desktop looks like this:
Of my two laptops, this one is in the best shape. It's the one that I usually take with me on trips. With the dedicated GPU it can do some light gaming (it did heavier gaming on windows, but due to emulation layers the performance is just a little worse these days, Linux gaming isn't perfect), the screen hinge has never been an issue, and it's on the lighter side of gaming laptops (which is not to say that it's light). For that reason, I often find myself actually using it on my lap, in airports, at people's houses, on my own couch typing this up.
For this reason, I started looking into ways to better keep my hands on the keyboard, rather than having to drift down to the track pad, which is my least favorite part of this laptop. During that research I discovered i3. If you're not familiar i3 is a Linux Desktop Environment that is entirely keyboard driven. https://i3wm.org/
To be fair, it's less of a desktop environment and more of a keyboard driven window manager, as it doesn't have a "desktop" per se. Instead when you log into it, you simply get a black status bar at the bottom of the screen. It doesn't even black out the login screen, so if you don't know what to look for, you might think the whole thing has hung. But, the big benefit of this is that the whole thing is lighting fast for a DE. It doesn't waste any resources on effects or really anything that you don't need. But it's really nice for window tiling and task switching without having to get the mouse involved. This is great for productivity (if you're into that), but it's also just convenient for working on a gaming laptop, which might be balanced such that if you take your hands off of it, it might topple off your lap.
This laptop is my primary project computer. It has all my git repos and scripts for doing things like renewing my website's ssl certs. I also run game servers on it for Minecraft. I'm probably going to spin up a Valheim server on it in the near future too. Especially now that the process has improved somewhat.
Raspberry Pi #1:
[Gifted New in 2016] Raspberry Pi 3b, 4GB RAM, 32GB SD card
This one is my oldest RPi. It's had a lot of roles through the years, including an early version of the vogon media server during initial development in 2020. It's run headless Raspbian for a good three or four years now. Currently it's configured as a web server/php scripted web crawler and a pi-hole DNS server. My router currently refuses to use it as a DNS server without bringing the whole network down, but I will on occasion manually switch devices to it when I'm running especially ad-ridden applications.
There's not too much to say about this one. It's stable, I almost never have problems with it. I frequently use it for things that I want running in the background because they'll take too long and I don't want them blocking up one of my other computers.
Laptop #2
[Gifted Used in 2020] Asus Predator 7th Gen i7, 16GB Ram, nVidia 1080 Mobile, 2 internal 256GB SSDs, External 2TB HDD
This one runs windows 10 still. I use this primarily for gaming. The screen hinge is an absolute joke, and replacing it involves replacing the entire screen bezel assembly, which I can absolutely do, but is such a pain that I haven't gotten around to it in the 3 years I've owned this laptop.
There's nothing really special about this one, other than that when both laptops are at my desk, I use a KVM switch to swap my external monitor, keyboard, and trackball between the two computers.
Raspberry Pi #2:
[Gifted New in 2020/21] Raspberry Pi 4b, 4GB Ram, 16GB SD card, 2 120GB USB Sticks, External 2TB HDD
This is my media server. I got it for Christmas 2020 (or 2021, I don't actually remember which because 2020 was a hard hard year). It runs Rasbian, the full OS, with the desktop environment disabled from booting via the command line. It runs PHP 8.2, MariaDB, Apache2, and MiniDLNA to serve the content via my Vogon Media Server.
If you can't tell from the above storage, I'm running the USB ports well past the power delivery they are rated for. The webserver and OS are on the internal storage, so functionally this just means that sometimes the media disappears. I need to build a migration script to put the contents of the two USB sticks on the external storage, as there is more than enough room, and if I can put the HDD in an enclosure with dedicated power, that will solve the issue. But that's at least a hundred dollars of expense, and since the server only has 1, maybe two users at a time, we've been limping along like this for a few years now.
Raspberry Pi #3:
[Purchased New in 2023] Raspberry Pi 4b, 8GB Ram, 16GB SD card
This is the newest Pi. Work gave me a gift card as a bonus for a project recently, so after weighing the pros and cons of getting a VR headset, I settled on setting up a retro gaming tv box. Currently it's running Batocero Linux and loaded up with classic game roms up through the PSX. Though, I would really like to use it as a tv client for the media server. I've upgraded the devices in the living room recently, and there's no longer a dedicated web browser we can use without hooking up one of our laptops. I've got a spare 128GB SD card in the office, so I'm strongly considering getting a wireless mouse and keyboard and setting it up to dual boot between Batocero (which is convenient because it can be navigated with just a controller), and Raspbian. I think I'd set Batocero as the default in Grub, and then if I want to use Raspbian I'd need to have the keyboard handy anyway.
Maybe I'll get one of those half-sized keyboards with the trackpad built in.
Speaking of controllers. I use an 8BitDo Pro 2 controller, and I've been super happy with it since purchase: https://www.8bitdo.com/pro2/
So that's the setup. I have entirely too many computers for any one person, but I included the dates when I got them to show that a number of these have been around for a long time, and that part of the reason I have so many now is that I've put a lot of time into ongoing maintenance and repurposing.
If you've read this far, I'd love to hear about your setups. You don't have to reblog this, but please tag me if you detail yours.
5 notes
·
View notes
Text
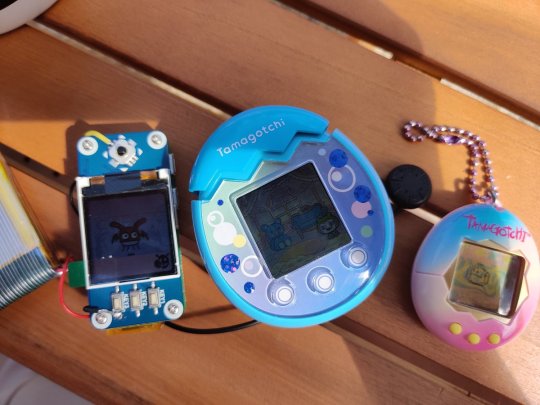
Meet Project Geminitchi, a DIY Angelgotchi & Devlilgotchi

If Bandai wont bring them back, then fans will, but completely updated for the twenty first century! LapinRose and TeamBlackSeraph on Twitter are a power couple that are bringing two beloved Tamagotchi from the 1990’s into one modern device thanks to their programing and 3D printing skills. We must say this project is rather impressive, and we’re so lucky to have such savvy members in the Tamagotchi community!
LapinRose has been collecting Tamagotchi’s on and off since they were seven when the P2 Tamagotchi Original was released. As a big fan of Gigapets and all pets in general, anything with a digital pet was adored. Virtual pets were gifted to them for good grades, a lot of the ones that were in their collection (of roughly twenty) have sadly been sold or lost. Interestingly enough LapinRose’s husbands is not a Tamagotchi collector, but more interested in the technical and programing side of it.

Why create project Geminitchi? LapinRose has also been interested in Angelgotchi and Devilgotchi and older gameplay in legacy Tamagotchi’s where your actions and care determine the outcome of the pet but in a slow paced and difficult gameplay. The Devilgotchi price point was too high for LapinRose to consider purchasing.
That itch to play it was so strong that LapinRose and husband found a java file and emulator for the Devilgotchi for a phone, and was ecstatic about the possibilities. The phone application wasn’t too practical as LapinRose would forget to take care of their Tamagotchi. From there LapinRose and husband discussed making a keychain Tamagotchi, and LapinRose’s husband explained that it could be possible with a bit of programming a Pi Zero and some parts!

TeamBlackSeraph said he would program it for LapinRose’s birthday and LapinRose was blown away at the idea. LapinRose’s husband was in charge of pogromming, and building it, where LapinRose was in charge of 3D design, precision modeling and printing. This is the first time that TeamBlackSeraph and LapinRose have collaborated together, this sounds like couple goals to us! The name Project Geminitchi was born then born out of the dual boot added and both from LapinRose and husband zodiac signs being Gemini.

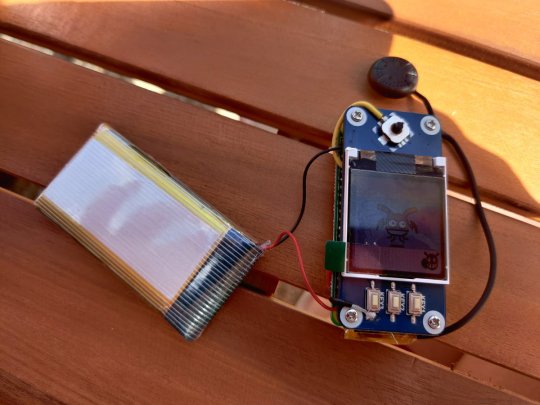
The hardware is based around a Raspberry Pi Zero, which is the first generation and can easily be found either used or cheap with a Waveshare 1.44” LCD and UPS hat. To produce sound, they’ve butchered a cheap USB sound-card dongle which in turn is soldered to a tiny speaker.
The software is based on a heavily trimmed 32bit version of Raspbian running a custom version of the FreeJ2ME emulator combined with a keyboard drive in the usual three button Tamagotchi layout. The FreeJ2ME emulator is the most important part here LapinRose explains, as the official version hosted on Github can’t produce playable frame-rates which also emulating sound.
The custom emulator comes down to the MIDI files using in Tamagotchi’s, and this one takes care of cropping the image to the screen properly as well as swapping the MIDI file playback for pre-rendered WAV variants of the corresponding sound files. The modified emulator also adds multi-button shortcuts for features Tamagotchi owners got accustom to, like muting and resetting the Tamagotchi. There is also a button shortcut to easily switch between Tamagotchi Angel & Devil.
Where does this project go from here? There really isn’t much more on the software side to do LapinRose explains. Future projects might include additional Tamagotchi porting, they even tried porting over the Tamagotchi Original programming, but weren’t too happy with the state at he moment. This project is more a hobby for them than anything else. On the hardware side of things, they’re testing batteries with different capacities to see what will work best including 1000mAh and 3000mAh batteries. Which resulted in 2 hours of continuous gameplay, and 12-13 hours of gameplay respectively.
They need to test out which fill fit in a 3D printed shell, which they anticipate to be roughly the size of the Tamagotchi Pix. What’s also really cool if that they are considering a coil to allow for wireless charging, but that would require a flat back of the case to make this happen, and would ruin the egg shaped curved design. The jury is out on this one, but imagine the possibilities? Be sure to follow the project on Instagram.
#tamapalace#tamagotchi#tmgc#tamatag#virtualpet#bandai#projectgeminitchi#project geminitchi#geminitchi#angelgotchi#tamagotchiangel#tamagotchi angel#devilgotchi#devil gotchi#deviltamagotchi#devil tamagotchi#LapinRose#TeamBlackSeraph
112 notes
·
View notes
Text
Which SBCs are best for your DIY projects
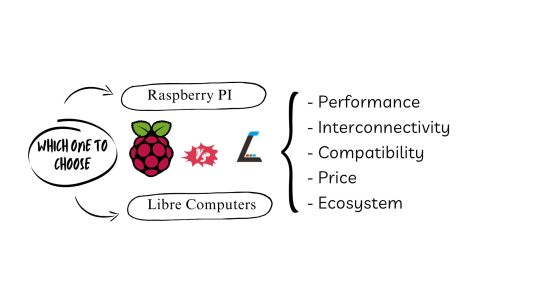
In the world of DIY electronics and embedded system projects, single-board computers (SBCs) reign supreme. Among the top contenders, the Raspberry Pi and the Libre Computer Board stand tall, each offering a unique set of features and capabilities. In this blog, we embark on a technical journey to compare these two titans, helping you make the perfect choice for your next DIY endeavour.
1. Efficiency: Raspberry Pi and Libre Computer Boards Go Head to Head
The Raspberry Pi boasts a reputation for dependability and robust performance, thanks to its Broadcom CPU. With models ranging from quad-core ARM Cortex-A53 to quad-core Cortex-A72, it's a versatile choice for a wide spectrum of applications. The Raspberry Pi 4, in particular, shines with its powerful CPU and GPU performance.
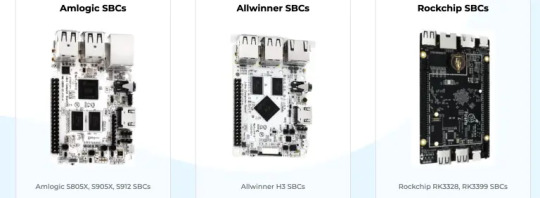
Libre Computer Boards, on the other hand, come in various models and CPU architectures, including ARM Cortex-A53 and Cortex-A72. These boards offer competitive performance and often provide more RAM options than their Raspberry Pi counterparts.
2. Capabilities of the GPU: Graphics Galore
Raspberry Pi models are equipped with Broadcom VideoCore GPUs, optimized for multimedia applications, making them perfect for video playback, gaming, and graphics-rich projects.
Libre Computer Boards offer ARM Mali GPUs in some models, delivering excellent graphics performance. What's more, certain models support GPU acceleration for machine learning tasks, making them a top choice for AI and computer vision projects.
3. Interconnectivity: Ports, Pins, and More
Raspberry Pi boards come well-connected, featuring multiple USB ports, Ethernet, HDMI, and GPIO pins. The Raspberry Pi 4 even boasts a USB-C port for charging and supports dual-monitor setups via micro HDMI ports.
Libre Computer Boards offer a similar array of connectivity options, including USB 3.0 ports, Gigabit Ethernet, and HDMI. Some models, like the Tritium H5, sweeten the deal with eMMC storage for faster data access.
4. Operating System Compatibility: The Heart of the Machine
Raspberry Pi shines with its extensive community support and an extensive library of compatible software. Raspbian (now Raspberry Pi OS) is a highly optimized Linux distribution tailored specifically for Raspberry Pi devices, offering user-friendliness ideal for beginners.
Libre Computer Boards, while capable of running various Linux-based operating systems, may have more limited community support compared to the Raspberry Pi.
5. Price Wars: Budgeting for Brilliance
Raspberry Pi remains an unbeatable value, offering affordable options like the Raspberry Pi Zero and the Raspberry Pi 3A+. Even the higher-end Raspberry Pi 4 remains budget-friendly.
Libre Computer Boards, while slightly pricier than their Raspberry Pi counterparts, often pack additional features and better hardware specs, making them a compelling choice for enthusiasts.
6. The Ecosystem and the Community: Strength in Numbers
The Raspberry Pi boasts a vast and active community, resulting in an abundance of documentation, tutorials, and third-party accessories. This makes it an excellent starting point, especially for newcomers.
While the Libre Computer Boards community is growing steadily, it may not rival the sheer size of the Raspberry Pi community. However, if you're experienced with SBCs, this might not be a deal-breaker.
7. Unique Features: Tailored to Your Needs
Raspberry Pi stands out with specialized add-ons like the Raspberry Pi Camera Module for photography and video projects and the Raspberry Pi Pico for microcontroller applications.
Some Libre Computer Boards bring unique features to the table, such as the ROC-RK3328-CC with PCIe support, allowing you to integrate custom hardware components seamlessly.
Conclusion: Finding Your Perfect SBC Match
Choosing between a Raspberry Pi and a Libre Computer Board hinges on your project requirements and your familiarity with single-board computers.
For beginners and those seeking a vast ecosystem, the Raspberry Pi is a fantastic choice. However, if you require more power and flexibility, Libre Computer Boards won't disappoint.
Consider factors like performance, GPU capabilities, connectivity, OS support, price, and community support when making your decision. Ultimately, both SBCs offer advantages and trade-offs, and your choice will depend on your project goals and expertise.
So, whether you're a Raspberry Pi enthusiast or a Libre Computer Board aficionado, the world of DIY electronics is at your fingertips. Happy tinkering!
Stay tuned for more exciting tech insights and DIY projects! Don't forget to follow us for updates and join our vibrant tech community.
#DIY projects#Libre computers#Raspberry community#Raspberry Pi#Raspberry Pi 3A#Raspberry Pi 4#Single board computers
3 notes
·
View notes
Text
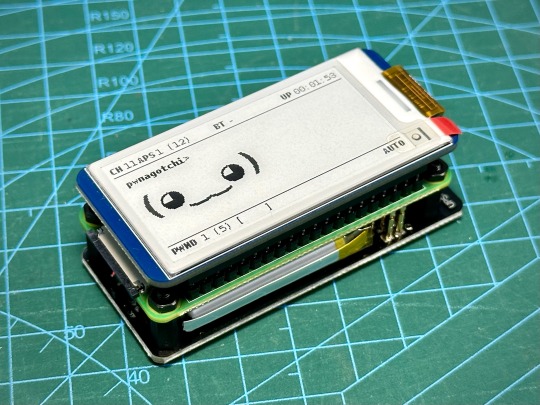
DIY: Making A Pwnagotchi

Yes, I know I am very late to the game ... LOL
I was meddling with Flipper Zero and war driving, then I came across the Pwnagotchi project. Since I already had the parts to do this lying around in my workshop, I decided to put together my own Pwnagotchi just for fun.
Started by hooking up the Waveshare 2.13" Black and White E-Ink Display to a Raspberry Pi running a fresh Raspbian image and downloaded the Waveshare demo code to test the display to make sure it's working properly, since I have not actually used it before. This is a v4 display.

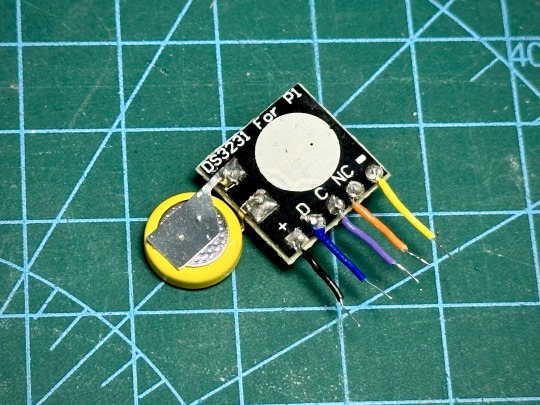
After that, I just followed all the instructions over here to put it all together, including adding a real time clock. I used the DS3231 RTC module designed for Pi, but in order to make it fit into the space between the display and the Pi board, I had to make some modifications. The female header pins on the RTC module was desoldered and short wires were soldered on. The battery also had to be desoldered and resoldered on in a new positionlike below to make the module thin enough. The module was then wrapped in wire tape for insulation. Now, we can just slot the wires into the female header pin holes of the display before we snap it onto the Pi board.
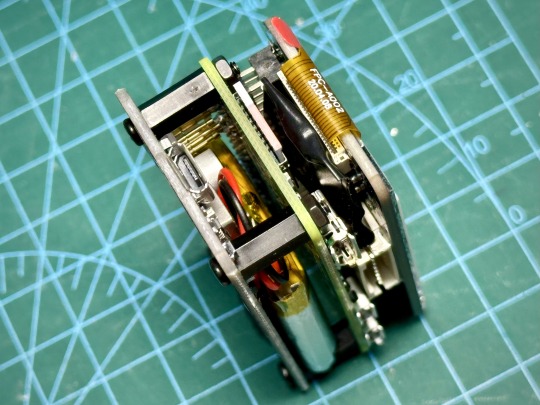
Below, you can see the RTC fits comfortably between the boards. I also attached a UPS Lite v1.2 board. Apparently, the UPS Lite board I had was a clone/knock off. It uses I2C address of 0x32 instead of 0x36 that was used in the original product, so the UPS Lite plugin in Pwnagotchi won't work. Oh well, I will just use it like a normal battery pack.

Now, for the software. The original Pwnagotchi project has not had any new updates for over 2 years, so it's kinda out of date and it doesn't support the newer Waveshare displays. Luckily for us, someone had taken the effort to fork the project and released new versions of Pwnagotchi over here. Note that this requires Raspberry Pi Zero 2 W.
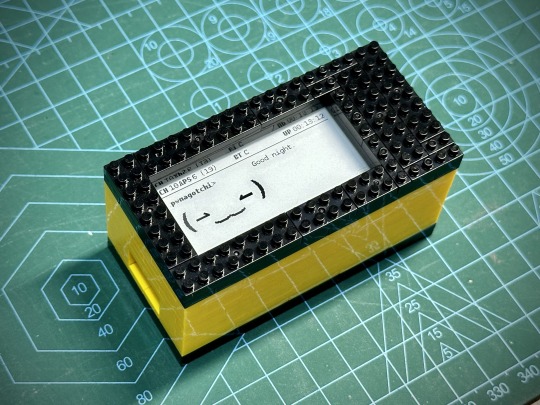
The Waveshare 2.13" E-Ink display that I had was v4, but I found that I had to set the display type to "waveshare_3" in Pwnagotchi settings for it to work properly.
Next is to 3D print a case for this, but in the mean time, I used some nano bricks to build a temporary case for it.
That's it for now. Happy hacking!
3 notes
·
View notes
Text
Today:
werk werk werk werk, bus, werk werk werk werk, bus, government, bus, werk werk werk with bus in there somewhere
content strategy suggestions for [rentier monopoly but better than the non-monopoly alternatives] company
roomba ☑
send some emails (process-nudging)
send some emails (family)
Stretch goals:
maybe rearrange a Frogpad keymap onto a Corne/crkbd key layout
switch the Raspbian Bullseye palmtop to GNOME; see how that works on a 4" touchscreen (tried: LXDE not touch-friendly, phosh fails to start)
check whether Raspbian Bookworm has fixed a certain bug narp
2 notes
·
View notes
Text
RaspberryPi 4 Basic Kit is Now Available
The Raspberry Pi 4 Kit is now available Spread the good news or refer it to your friend using our Affiliate Program and get a 5% commission on each kit sold.
Here are the Raspberry Pi 4 Kits we have in store for all of you:
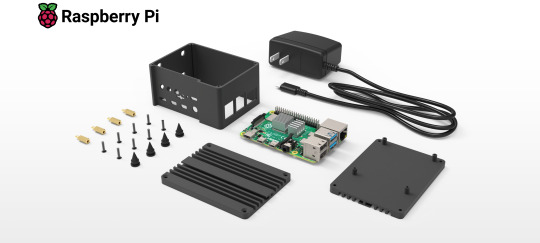
We have three variants and three different options available:
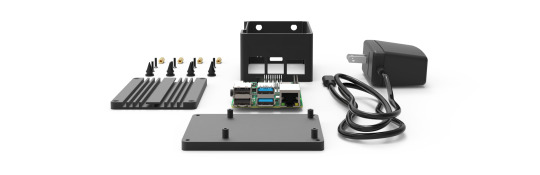
RAK Raspberry Pi 4 Kit is the latest addition to the popular Raspberry Pi series. It offers an excellent increase in processor speed, multimedia performance, memory, and connectivity over the previous generation Raspberry Pi 3 Model B+, while maintaining backward compatibility and similar power consumption.

Build your developer gateway for LoRaWAN® with the RAK Raspberry Pi 4 Kit for LoRaWAN®. It includes a Pi 4 (4 GB), a ready-to-use microSD card with Raspbian OS pre-loaded, a case, a power supply, a RAK2287 concentrator, a PiHAT for the concentrator, and a LoRa® antenna.

The Raspberry Pi 4 Model B (4 GB) is the best single-board computer for developing your IoT project and launching your first LoRaWAN® gateway.
Become a RAKwireless Affiliate and get your own Raspberry Pi 4 Basic Kit here: https://store.rakwireless.com/collections/raspberry-pi
3 notes
·
View notes
Last Seen Blogs

qianxiaowudi
浅笑 🛰️【nideqianxiao0】

queenie-official
I know that’s evil but it’s also very Chic


eat-a-bomb-ugly
please dont actually eat a bomb !!

sim-beetle
Beetle