#wasnt sure if tutorials counted lol
Note
Hi! I saw your YS remake designs and became very curious; does it have a full story? Introductions to the characters? Any fun facts? Sorry if this is weird but I love your designs !
hi anon! first off just wanna say thanks for the message! so my yansim "remake" does have a bit of story, though its not totally complete or anything. since im gonna drop a ton of lore stuff here im putting it under the cut
so to start off i changed the setting a bit from YS, while a high school setting has some pros (clubs, easier to research, uniforms so i dont have to design an outfit for everyone) the fact that this limited their age wasnt jiving with me, so most of the characters attend a yobikou, a type of school where students prepare to take university exams, many of them graduated from high school but failing the exams the first time. this setting has some benefits as well (justifiable low student count, school exams gives most characters a motivation). some of the characters are still high school students though. also i drew everyone with a school uniform but im not sure yobikos have that so i may get rid of that (still researching lol). also this takes place in the (real) city of shizuoka in japan (bc i dunno if i can make up a city in a place ive never lived in).

the yandere in question is miyako umehara, who's about 18-19 and pretty much failed her entrance exams on purpose to follow her high school crush. on the outside she seems pretty sociable and kind, but (1) does not like to be inconvenienced/things not going as she plans, (2) she can manipulate people pretty easily, and (3) only fears consequences when they "blow her cover". on top of that she's very sadistic, jealous, and possessive, but she can easily mask this.

as for the "senpai" (not sure if this term is appropriate for setting?), his name is hizashi amano and he's 19-20. hes actually quite smart but failed the entrance exam twice (because of weird circumstances i havent figured out yet lol) and is now worried that his parents are about to stop supporting him. he is not as able to mask him getting irritated easily toward other people so others have the impression he is rude, but he really isnt and is actually pretty empathetic.
i also made a male counterpart to miyako and a female counterpart to hizashi, so like in YS (sort of) you could have whatever couple. i call them counterparts bc i didnt make them exactly the same, they have some differences from the original. for their designs i was trying to go for a sort of night/day dichotomy?
the first "rival" (who is kinda supposed to be like a tutorial rival if this was a game) is hizashi's younger sister honoka amano, who is a 3rd year high school student (they can sometimes attend yobiko part time). she can be considered a rival because she is sabotaging her brother's chances at getting an s/o as revenge for something trivial probably. she's unkillable, it's probably best for miyako to get her on her side anyway.
The rest of the rivals are romantic:
momoka amari - former cooking club leader (and shes godlike at cooking), sweet caring onee-san type, unfazed by hizashi's brashness. not really the academic type, loses track of time and naps frequently.
masami kanze - aspiring actress, relates to hizashi in that she feels she is soon to lose her parents' support, uses a haughty and conceited persona to cover her insecure and fragile inner self, despite this she doesnt look down on other people and those close to her say shes actually pretty nice!
ameya kurogiri - socially awkward, shy, and low confidence exterior that melts away when talking about her interests - the occult, supernatural, and sometimes religion. has a tendency to stay home for many days in a row
minato iwatani - avid photographer, funny, gets along with others easily, but seldom serious at the right times, has a strong sense of justice. usually distractable but unmovable when fully focused (male rival bc we need that tbh)
nami tsumura - ball of energy, always expressive, mastered swimming but enthusiastic about many different sports, can never sit still, studying is very boring to her but she is trying to make an effort recently
azami mutou - grown up high school delinquent, still gets in fights often, doesnt usually follow rules, constantly looks pissed off, did not use to care about school but was recently instilled with a fear of the future, bullied in middle school
yua shimizu - nursing student, job shadowing local/school(?) nurse, so focused on studies she can seem absentminded on all else and seems clumsy because of her nervousness, but still does her best to help out
sayami sakurai - hizashi's childhood best friend, recently moved back, receptive and kind, but deeply troubled by something, her scarf was actually given to her by hizashi, likes fashion and is very pretty
noriko tamaki - high school 3rd year, student council president, heiress to family company as her older sister was deemed a failure, overachiever, can kill someone with just her gaze probably
the older sister in question is yuka tamaki, sort of like info-chan in YS, harbours great resentment for her family and therefore sister so shes willing to help out miyako if her sister has *something* be taken away from her for once. she has a very plain and unassuming look, so she can blend into crowds and eavesdrop and sneak around easily
theres still some other characters, like the equivalents to the "dlc" yandev proposed, but the only concepts i took from that was the shrine maiden and other yandere bc the other ones were just too much lol (though early on i kept the twins lmao), i also had an idea for a non romantic teacher rival that is threatening to fail either miyako or hizashi (which would be like a sort of "game over") but thats pushing the limits of unrealism that i have going on already.
BUT YEAH THIS POST IS LONG ENOUGH so that was a kind of summarized version lol. thanks for sending the ask it legitimately made my day, love talking about my ocs so feel free to ask anything else!
0 notes
Note
hola! cómo le haces para que tus icons te salgan en buena calidad?
Hi! I apologize but I cannot speak Spanish, so I am going to have to translate your ask through Google Translate. Which I know isn’t the best method, I’m sorry!
According to Google Translate, you’re saying “wave! How do you make your icons come out in good quality?”
Hopefully, that is close enough to what you’re saying and if so, first off, thank you for saying they are good quality! Secondly, I’ll walk you through my icon making process. It’s actually very simple and fast (at least IMO lol I can make an icon in like 5 minutes but I also use PS for a living so I’m pretty used to the program)
I’ll show you how to go from this random image from Lisa’s Instagram:

to this icon

FULL TUTORIAL UNDER THE CUT
First off, open Photoshop and drop in your image (I have Adobe Cloud PS 2020)
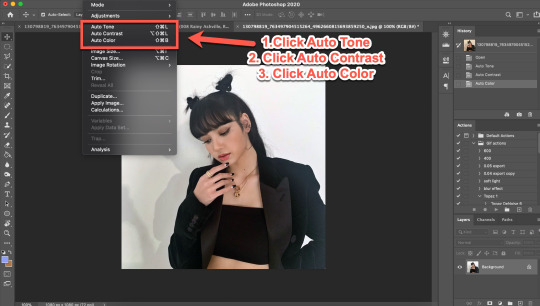
Then I want to clean up the colors of the image, because the image is too yellow, and was clearly taken in bad lighting.
1. Click Auto Tone
2. Click Auto Contrast
3. Click Auto Color
That should help give the image a much nicer, natural color, as shown below:
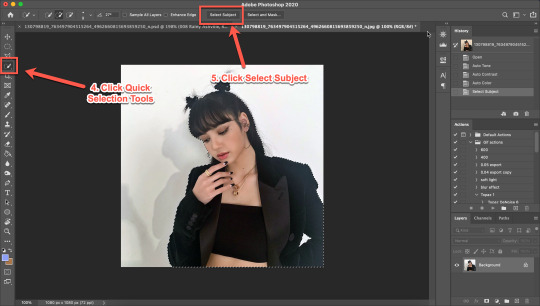
4. Select the Selection Tool
5. Click Select Subject
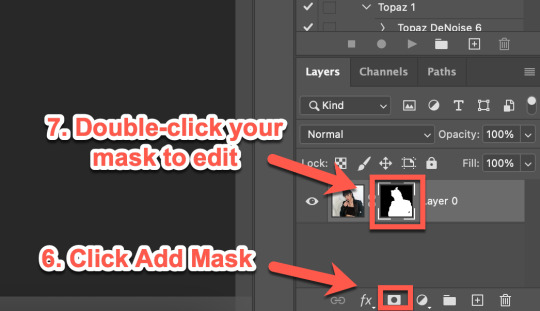
6. Click Add Mask
7. Double-click your mask to edit
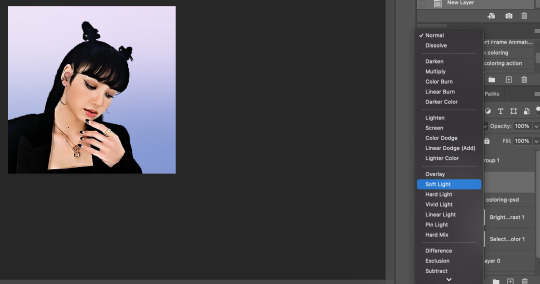
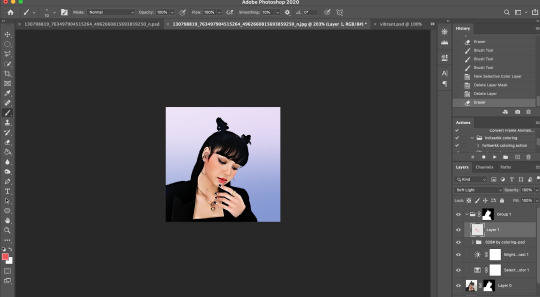
8. Click View, then select Overlay V (this will help you see where you need to clean up your image)
9. Adjust settings to the image (This part really just depends on your image. Generally, I always set the Shift Edge to -50%, as it helps take away any white fuzziness around the image. Smooth obviously smooths the edges, Contrast helps sharpen them, and Feather...feathers them....just don’t use Feather okay?)

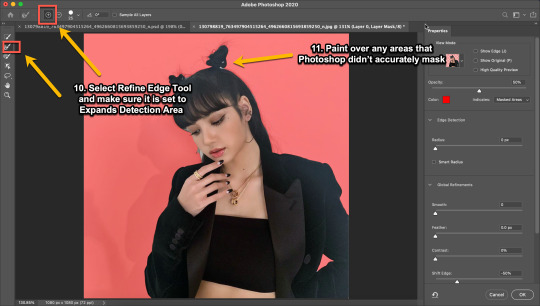
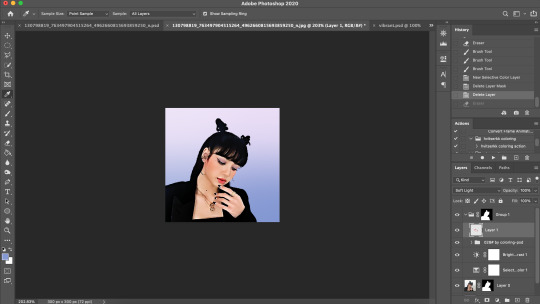
10. Select Refine Edge Tool and make sure it is set to Expands Detection Area (aka the + symbol lol)
11. Paint over any areas that Photoshop didn’t accurately mask
12. Select your mask again
13. Select your Paint Brush tool (make sure it is set to Hardness 100 and an appropriate size for your image)
14. Set your Foreground and Background colors to White and Black (Just click the little black and white boxes above them)
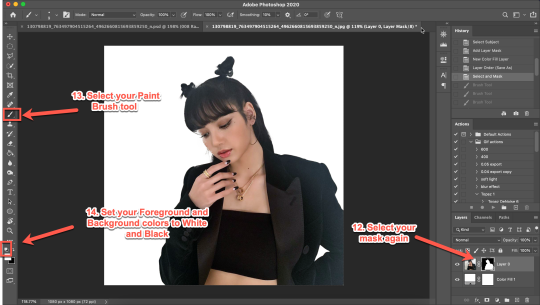
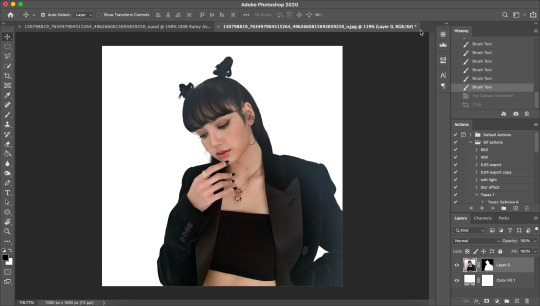
15. Using your paintbrush tool paint in (or out) details you need (In this case I just need to paint her face back in, so I use the brush tool set to white and paint where the pixels are distorted)
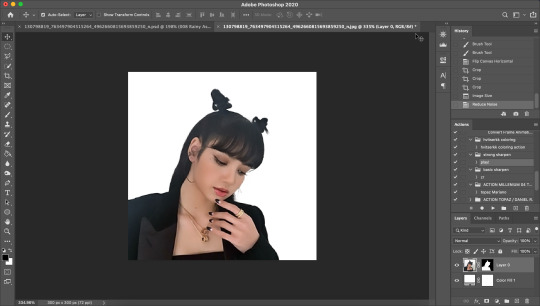
Now she is ready to be cropped and edited.
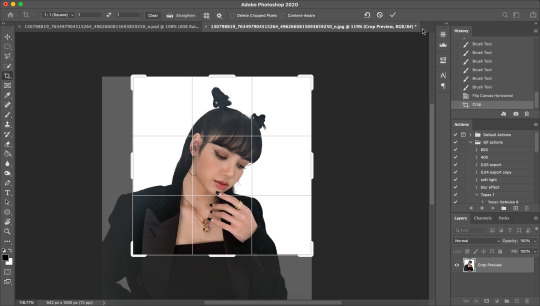
16. Flip/crop/adjust the image as desired (My best tip is to use the crop tool and put the focus of the image in the center of the grid)
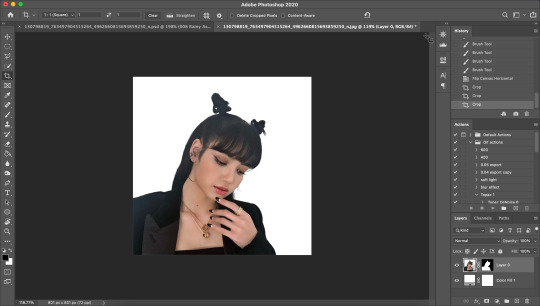
Here’s the final cropped image:
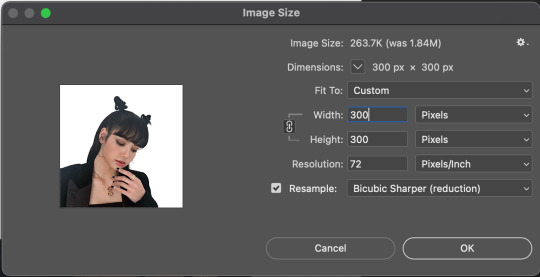
17. Click Image>Image Size
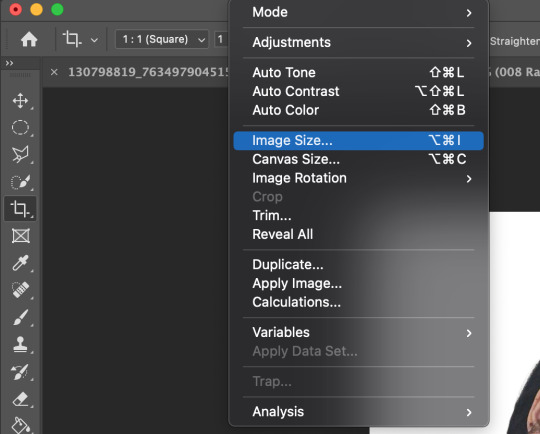
18. Set the Image Width to 300 Pixels, check Resample, and set to Bicubic Sharper (Reduction) and click OK
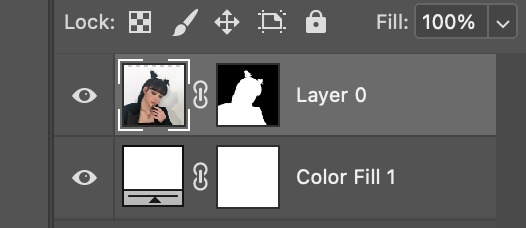
19. In your Layer Panel, select your Image, NOT your mask (nothing will happen if you edit your mask lol)
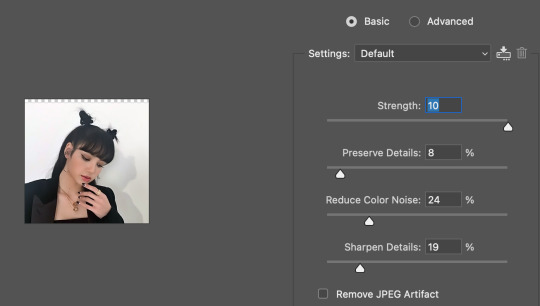
20. Click Filter>Noise>Reduce Noise...
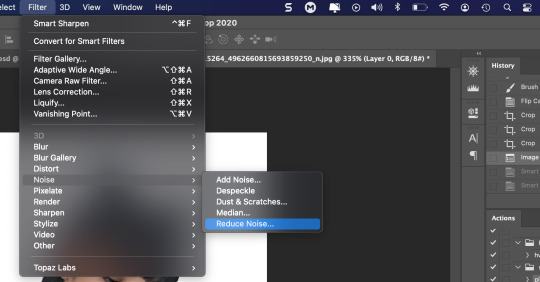
21. Adjust to the following settings (or whatever you prefer to get the image looking smooth) Click OK
Now my image is smooth and free from noise and grain, but I want her to be more in focus.
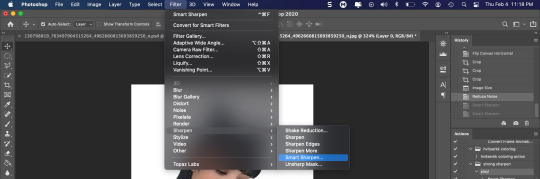
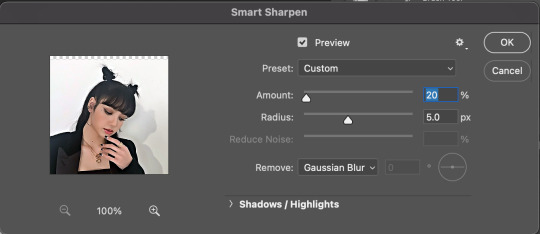
22. Click Filter>Sharpen>Smart Sharpen
23. Use the following settings
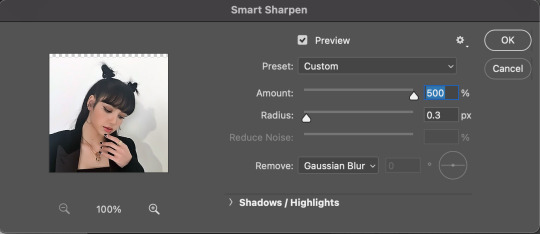
This is a basic sharpen that many editors use for gifs, edits, icons, etc, and you can just stop there for the sharpening step if you want, but I prefer my icons sharper, so I click Filter>Sharpen>Smart Sharpen again and this time, I use these settings:
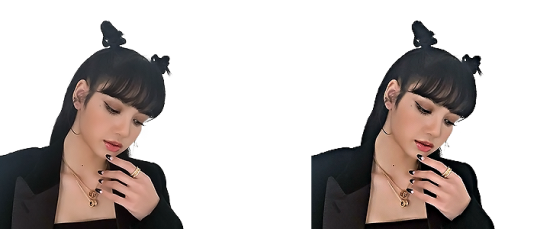
You can see the differences below. The left side has just the basic sharpen, and the one on the right has both sharpens (you can clearly see the difference)
Once you’ve sharpened as desired, we’re ready to finally get to the fun and colorful part!
24. Add a gradient bg below your image (There are tons of free ones you can download from Tumblr or Google, or you can just make your own with the a gradient layer)
This next step is optional as not all images need it, but for this image, I need to do some badly needed image adjustments
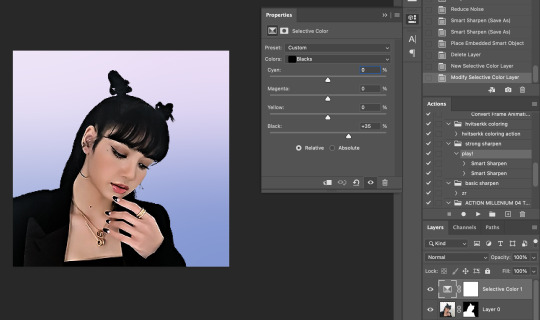
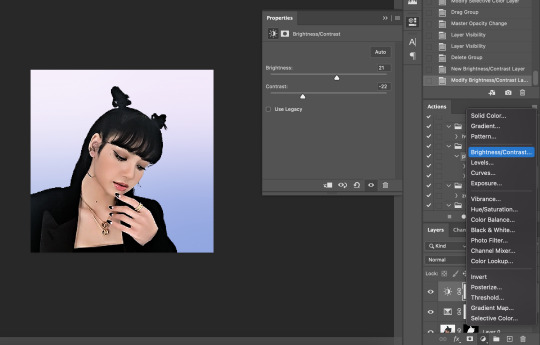
First I click the adjustment layer on my layer panel and click Selective Layer

Then I set the colors to Blacks and drag the Black to +35 to darken up the blacks on the image and give it a nicer contrast (selective colors are great, mess around with them as much as you want until you find a look you like!)
Then I make a Brightness/Contrast layer and adjust to what I feel works best for the image
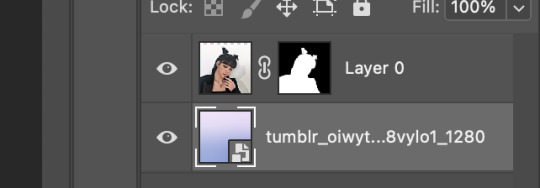
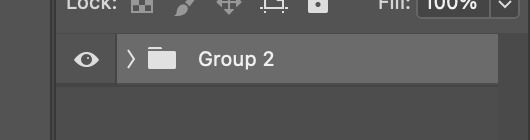
26. Create a folder (if you did the above step, select the layers and then click the folder icon, it’ll just put them in the folder)
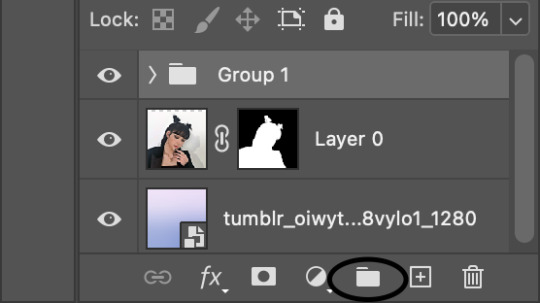
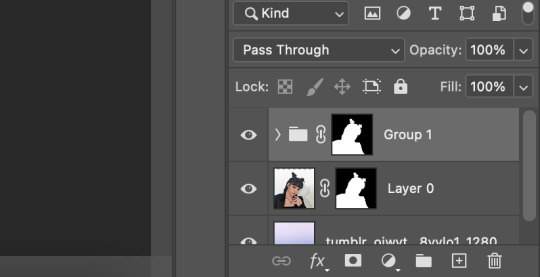
27. Holding down the alt key on Windows (or the Option key on Mac) click and drag your mask to the group layer. Now you have a folder that you can put PSDs and adjustment layers in without affecting your gradient background
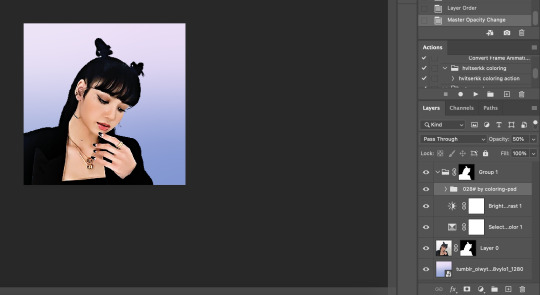
28. Drag your PSD of choice. I am using this amazing PSD that is perfect for pale photos. I set the PSD to 50% opacity and it looks like this
Now, I could stop here, but I’m extra so I want to doctor up her face a little.
29. Above your PSD folder, create a new layer and set it soft light
30. Select your brush tool again, and pick a color that will work for enhancing an area of the photo. Then paint over that area.
Lisa is already pretty pale here, so I won't paint over her skin with a nice peach color like I do sometimes in darker photos. But I will add a nice pink flush to her cheeks and her lips.
Then I will use a lilac purple to paint over her eyeshadow. This brings an element of the background onto her face.
There’s not a lot that needs to be added to this particular photo, but here’s an example of another icon without and with soft light painted layers:
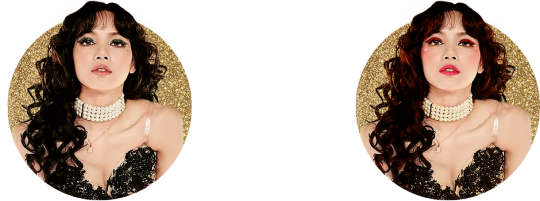
The left has no soft light painted layers, the right does. You may be thinking it looks too gaudy, but icons are tiny! Adding strong colors will help painted areas stand out. However, this is a completely optional step of course :)
31. Back to our current icon. Select all your layers, and click the folder icon again to place them all in a folder
32. Select your Elliptical Marquee tool and make a circle over your image
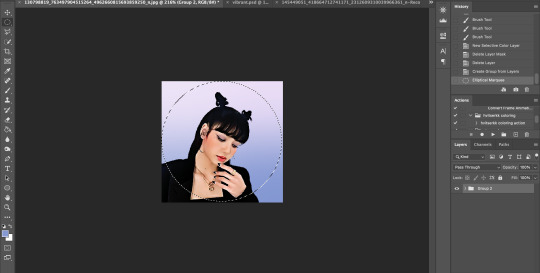
33. Click your mask button in the layers panel, and tada! You can now save out your icon and put it to use
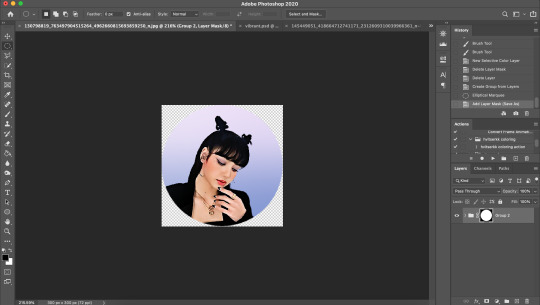
Here is the completed icon:
If you got this far, thank you for reading, and let me know if you have any questions!
#ggnet#kgirlsquad#blackpinknet#idolady#femaleidols#lisa manoban#photoshop tutorial#icon tutorial#photoshop#tutorial#icon#icons#if this type of post doesn't belong in any of the group tags just let me know and i will remove the tag#wasnt sure if tutorials counted lol#Anon#ask
99 notes
·
View notes
Last Seen Blogs

hollizart
HollieAnna D’Ercole’s Portfolio
ver-nadie-online-2021
Nadie 2021 pelicula castelano
mayaheronthorn
KitTy nation

suburbanscrimshaw
Suburban Scrimshaw