
theboynoodlet
TheBoyNoodlet
i'm kai, 3d generalist and gender diversity hire in Noodlets Studio | working on Yi's Eatery right now
13 posts
Don't wanna be here? Send us removal request.
Last Seen Blogs

maraudersandpeculiars
Untitled

reesestshirt
Thoughts From My Stupid Little Pea Brain
baratiddyappreciator
Jack Hanma Connoiseur
donutpeachh
what's that smell

kest-sound-channel
KEST Sound Channel
Text
Making Yi’s Eatery: Characters
I’m back for another update on the assets of Yi’s Eatery. This time, I got the characters in store. The characters took a back seat since we considered the environment to be more important to complete first. Also, I prefer environment s way more than characters.
Regardless, I’m actually quite satisfied with how much our characters turned out. Let’s talk you through my process!
Step 1: Zbrush
I begin creating the characters in Zbrush first. I block out the characters, then slowly sculpt my way till the finished product.


I used a block in Maya to determine the height and created a base model which I can reuse to sculpt the other characters. This helped to save a lot of time as I didn’t have to sculpt from scratch for every character.
Step 2: Maya
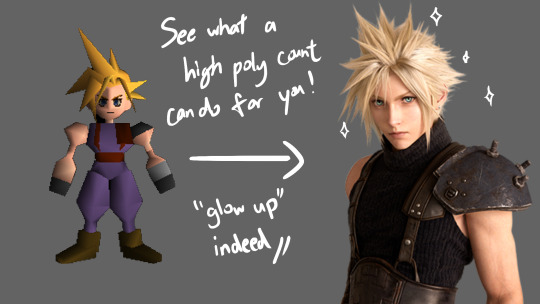
Zbrush is great but the models produced are way too high poly and will totally crash our game engine. Thus, we need to lower the poly count by bringing it to Maya to retopologise the models. An exmaple shown below:
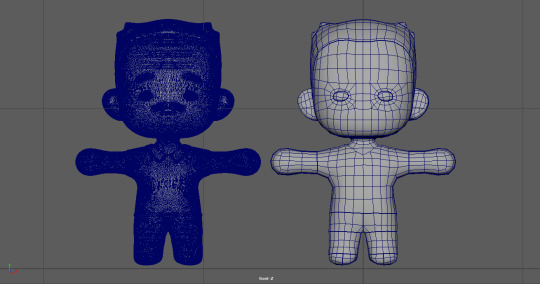

For retopology, I used the Quad Draw tool in Maya to build the faces on the high poly model.
Step 3: Rigging
Continuing in Maya with the low poly model, after UV unwrapping, it’s time to rig the model to set it up for animation. I created a simple rig myself from scratch, since there isn’t a lot of complex animations that need to be done, I could skimp on some advanced rigging techniques like twist controls in order to save time. Obviously, this meant that the animations had to be simple to compensate for the lower quality rig.

Step 4: Texturing
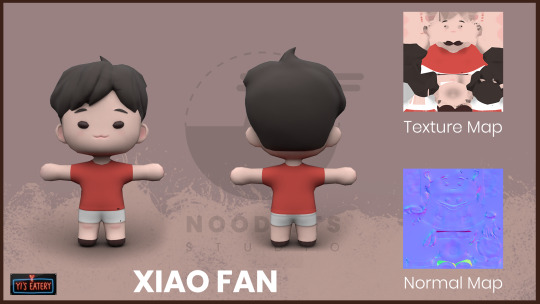
Again, I used Substance Painter for the texturing. I went with a simple flat colour scheme since we didn’t want too much detail on them. Ok to be honest, I textured first, but I wanted to showcase them fully at the last part. It’s a better ending. Anyways, introducing the Yi’s Eatery cast:
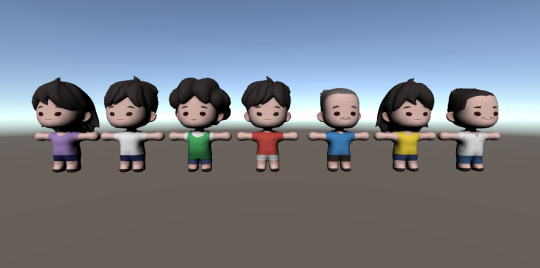
(PS: I reused models and re-textured them to create the customers that you see on the left :3)


And that’s it, somehow I feel more proud of my characters than the environment I created, but I’ve still got a lot more to learn in the ways of character creation. Till next time!
-Kai Yuan
0 notes
Text
Making Yi’s Eatery: Environment
Probably one of the bigger lessons I’ve learnt in this project is that devlogs are only feasible when you are not in a time crunch, and that is what happened these past few weeks folks.
Consider this post a mega update to all the stuff I have done these past few weeks. Development of Yi’s Eatery ends tomorrow and honestly couldn’t be more excited to finish it.
I will begin my mega update with the environment assets that I have done. As the 3D generalist, I was responsible for modelling and texturing all the props to be used in the game. My workflow remained the same throughout the project, using Maya and Zbrush to model and Substance Painter for texturing.
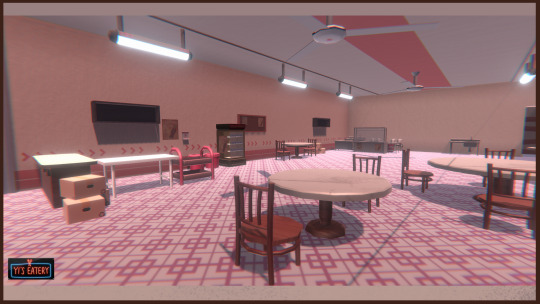
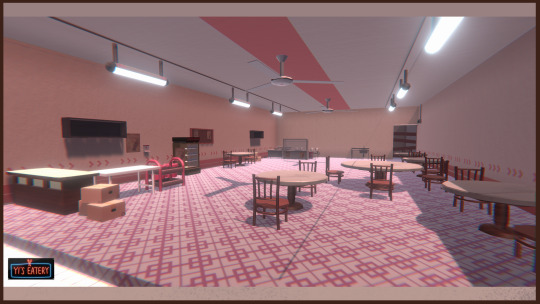
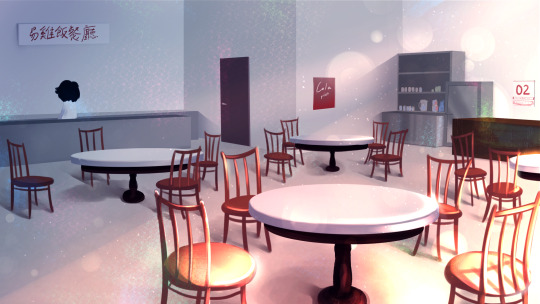
Our artist, Nicole helped to put together beauty shots of the environment to showcase the whole environment in action.
In Maya, I modelled and UV unwrapped all the required assets before mass exporting them to Unity to layout.
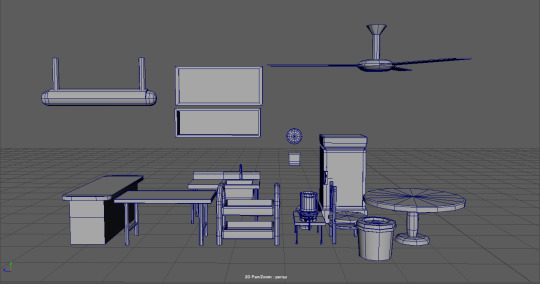
A few models of the props that was created.
After modelling it was time to texture it, I used Substance Painter because it was easier than painting it on Photoshop which would have taken a lot more time of checking back and forth.
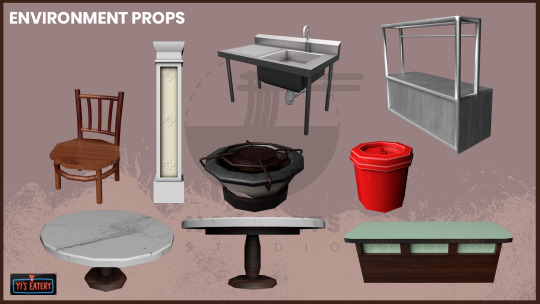
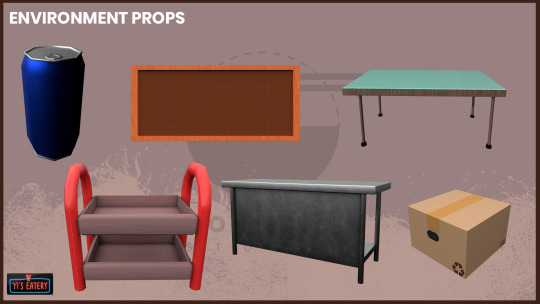
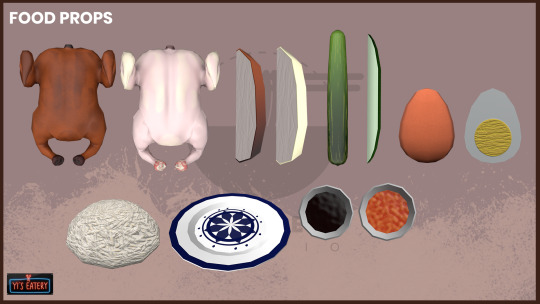
The whole chicken was probably the most interesting to create, but it was hard to texture because I wasn’t too sure at first how to maintain the style we wanted. I think in the end, I’m happy with the results and how much I was able to over the course of this project. The next update will be on the characters!
-Kai Yuan
0 notes
Text
An Amateur’s 3D Creation Tutorial
Intro
Hi, it’s Kai Yuan, your resident 3D generalist of Noodlets Studio. I’m currently writing this while having a minor cold so I’m sniffling every 5 seconds while bopping to the range of Lady Gaga to Lorde to Conan Gray, stay healthy everyone! In order to make up for my apparent lack of dev logs, I’m going to show you how I create a little stove for Yi’s Eatery. All points made here are going to be super condensed for the sake of not running this article too long.
As with all of our tutorials, we are just amateurs having fun making games and sharing our experience as amateurs with you! :D
The Process
Step 1: Preparation
Always start with a plan in mind! I say that although I always start creating 3D assets with only 2 active brain cells half the time. Either way, you should still have a plan. This means first of all, gathering references of whatever object you want to create (even if you have a concept art to work off from) and beginning to understand your object’s form. With the stove I created, I used this particular reference image.

You can already see the similarities but these similarities help to sell the object as real. The closer the form of the object is to an actual reference in real life, the more believable it is even if rendered in a non-realistic way.
Once you have enough references and you start to slowly grasp the object you want to create, you should start pinpointing the basic shapes and forms of the object. In the example of the stove, it’s easy to notice that it has a cylindrical shape. Some objects have different components (EG: A car engine) and each component may have a different shape. It’s all about analysing your object and deepening your understanding of the object you want to create.
This preparation process doesn’t take too long for most objects, since a google search and basic shape knowledge is all you need. But taking the effort to prepare will save you a lot of blank staring at your 3D software.
Step 2: Modelling
Here’s where the nitty gritty starts to happen. I will preface this by saying that I frankly can’t show you the full process because you’d be reading this till the next day. We have a Youtube video on our Noodlets Studio channel where I modelled the stove on a livestream if you’re interested. In this article, I will just mainly share the important concepts for 3D modelling using the example of the stove.
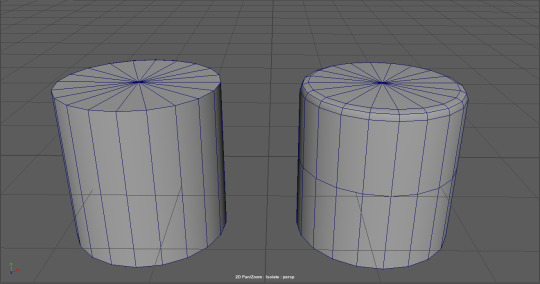
The creation of all 3D objects follows the simple process of starting with big shapes and then slowly “zooming in” and editing the 3D object with increasing detail.

The above picture illustrates this concept of going from big forms to small details. This is where the knowledge from your preparation comes in. It really helps during the start when you have to block in your big forms. In the example of the stove, I start from a single cylinder and slowly build out the shape as shown in the picture above.
A few functions I like to use (in Maya) when adding in details are the “Bevel” function and the “Insert Edge Loop/Multi-cut” function.
These functions simply revolve around adding more edges/points to manipulate, which is the basis of how you add more details in your 3D object. More points = more details.
When you are adding details to your objects, you have to be mindful you are not adding too much details. Not every corner needs to be beveled and you certainly do not need to unnecessarily cut edges if you are not going to move/extrude them. More points = more details BUT also = more computational power used to render 3D objects. The art style of your game also determines how you model your 3D objects, some require low polygon counts to achieve a cartoon look, some require higher polygon counts to achieve a realistic look. Although, most of us generally prefer the former because it’s easier to do.
Step 3: Texturing
The next step after modelling your object is to UV unwrap it. UV unwrapping is the process of creating a UV map where a 2D image can be projected onto the 3D object’s surface.

In the example above, all the faces of the cube were laid out on a 2D plane, which then a texture can be projected onto the UV map and have it reflected on the 3D cube. This is merely the simplest example of a UV map, most UV maps are more complex and require a strong understanding of shapes. For example, this is the UV map for our stove that we created.

Most 3D software allow you to do UV unwrapping of your 3D models, although, you might want to look up a few dedicated tutorials first before jumping into it. This part of 3D modelling is easily one of the most frustrating and difficult parts to understand as there is 0 creativity involved, just pure brain power. :(
Once your 3D model is fully unwrapped, now you want to actually texture it. The simplest way of doing this is to export your UV map into Photoshop or any painting software of your choice and simply paint on it. However, there are a few caveats to take note of. You cannot physically see how your painting affects your 3D model without exporting the texture out into your 3D software. Thus, editing your texture map will be a long arduous process of importing and re-exporting.
In order to circumvent this, we can use dedicated 3D texturing software like Substance Painter which lets you see how your texture is reflected on the model itself. It has the further advantage of allowing you to further enhance your texture with some neat tricks. With a normal map, it will create the illusion of details on a flat surface.
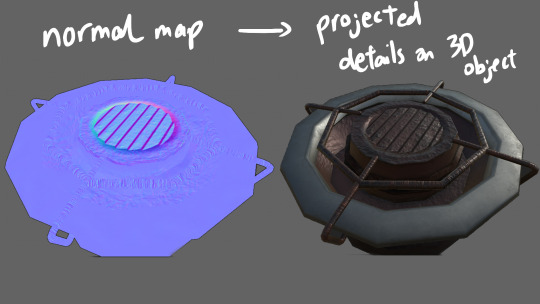
These maps can actually be hand painted in Photoshop, but everything is packaged together in a 3D texturing software like Substance Painter so it’s easier to implement all these details.
Step 4: Finalising
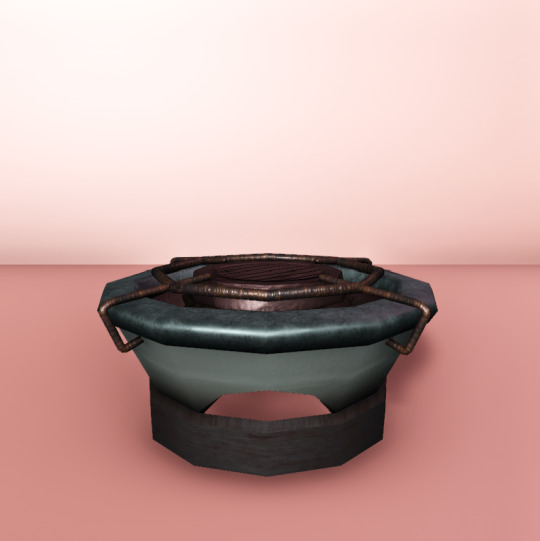
Once you got your textures ready, now it’s time to bring it all together! If you are creating a game, you would bring this into your game engine like I did. Or you could also keep it in your 3D software and render it, but that’s a whole other bag of worms.
For the video you saw on our socials, I just slammed a quick backdrop and gave it some lighting to bring out the details of the stove and the final result is as you have seen before.
That’s about it for my tutorial. I hope I have given you an insight into how 3D game objects are created, even if you are just a random passerby. For actual 3D artists out there, hopefully your eyes didn’t burn too much, I’m still trying to get better and I hope to create better 3D models in the future.
Thanks for reading this! My cold has slightly healed while writing this article, remember to stay safe out there! :D
-Kai Yuan
2 notes
·
View notes
Text
Making Yi’s Eatery: Mini-Update 1
Hello, it’s been a really long time since I have updated the blog. Things have been quite rough lately. However, the team is slowly getting its groove back. For the environment, my post will be a mini-update as I won’t be covering much of any development process or thinking behind this update.
Mini-updates will be a way for me to quickly bookmark my progress in my dev log. The next dev log will be a full update which will happen next week.
Anyways, my progress are as follows:

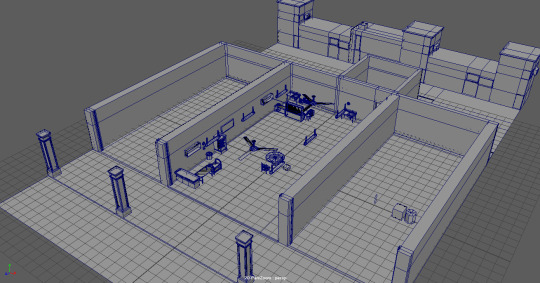
I have finished the models for the counter area, featuring an assortment of tables and racks. An important part to creating the environment of Yi’s Eatery is making sure there are enough elements in the environment to highlight the time period the game is set in. At the back, you can see the beginnings of the kitchen area coming to life.
Here’s a top down view of the current progress:
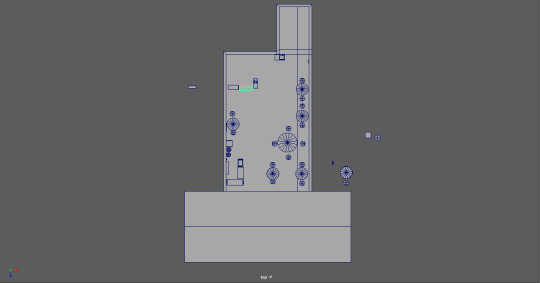
Indeed, the environment is quite scarce but I am working on speeding up the process, with the aim of finishing the modelling of the environment by Thursday with some texturing.
A regular update dev log will be posted next week to cover these changes!
2 notes
·
View notes
Text
Making Yi’s Eatery: Part 1
It’s a new series and this time, it’s going to be even longer! As mentioned in previous posts, my main focus is now directed to the 3D asset creation. I will documenting the progress of making the game environment of Yi’s Eatery bit by bit. Today, let’s talk about tables and chairs.

These props were modeled based off the concept art by our artist (check her at @thecatnoodlet), which in turn was based off of furniture from 1980s Singapore.
The table itself is quite straightforward, just by building off from a cylinder, I can easily create the table’s shape and add further details later on. The chair however, may look simple at first, but it has quite a lot of subtle shape nuances that need to be accounted for.
In the concept art, you can see how the chair legs and it’s frame are subtly curved. This was a distinct feature when looking furniture references in olden Singapore. I felt that it was important that I made sure to include these subtle curves in my chair model.
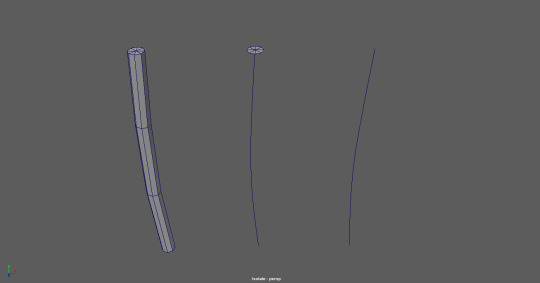
The process I took to create the chair legs was very simple. I created a bezier curve to reflect the subtle curve in the chair legs in Maya. Then, I placed a cylindrical plane on the first point of the curve. In face selection mode, I selected the faces of the planes then shift-clicked the curve and used the extrude function. This immediately creates a cylinder that extends to the end of the curve. By adding in some divisions, the cylinder will take on the shape of the curve, which is the end result you see on the left.
This method of creating shapes that conform to a curve is commonly used in creating cables.
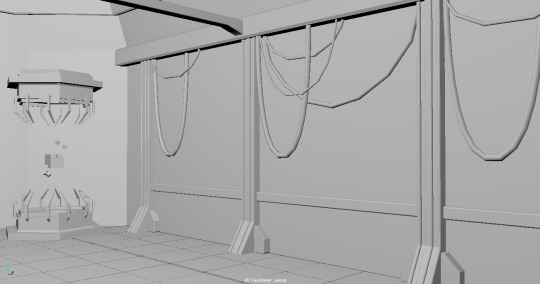
The above example is a scene I did for a little personal project. You can see that I used this method to create hanging cables/wires. In the case of Yi’s Eatery, I use it to create the chair legs.
Some tips with this methods:
Always create curves in an orthographic view.
Snap control points of the curve to a grid point, this makes it easy to snap the plane onto the control vertex of the curve later on.
Anyways, that’s it for the first part, I’ll be slowly updating the progress of “Yi’s Eatery” 3D bit by bit. :D
1 note
·
View note
Text
A Consolidation of VR Mechanics
Yi’s Eatery is almost approaching its halfway point of its development life cycle! Time really flies during game development honestly. It’s time to consolidate all the small progresses that weren’t really documented in my blog.
1. Moulding Mechanics
So in Yi’s Eatery, the chef will have to mould rice into rice balls as part of Yi Eatery’s flagship chicken rice dish! So I was responsible for coming up with the implementation of said mechanics.
What happens in the example above, is that the VR player picks up the “rice” and presses the grip button on the controller to cause it to mould. The rice has to be moulded several times to achieve the perfect ball shapes.
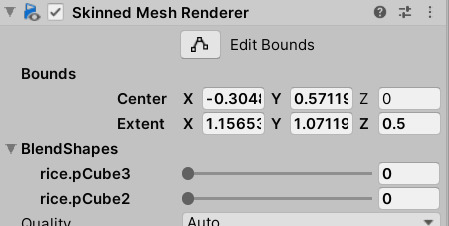
In order to implement this mechanics, I made use of blend shapes in Maya. Blend shapes is a type of deformer that allows a mesh to deform to another shape based off another mesh with the same topology. Blend shapes can be imported in Unity where it can be controlled via the Set/GetBlendShapeWeight on the Skinned Mesh Renderer component.
The only issues with the examples above is that I need to smooth out the Lerp function that deform the mesh (right now it looks instantaneous). Also, I had initially intended for the player to hold the rice with 2 hands together before they could mould it. However, the implementation for that seems complicated and has many caveats so its entirely possible we may have to go with a one-handed approach.
2. Chopping Mechanics
I’ve made a very lengthy 3 part post about the Unity XR Interaction Toolkit and how that translated into the implementation of the cutting mechanic eventually. So let me just insert the GIF here again :D
Clearly, this demo doesn’t have the...visual flair we are intending to have. However, I like to put emphasis on coming up with a clean code structure of which things can be easily added in, rather than making something just for the looks.
3. Disposal Mechanic
In Yi Eatery’s, let’s say you need to dispose of a certain ingredient, dish etc, instead of finding a trash can, we thought of an idea to let the player “eat” the item they want to dispose. A bit gross and a bit unhygienic for sure, but it makes it so you don’t have to keep walking to the trash can. You are the “trash can” :D
This mechanic was one of the easier ones to implement and it was the first VR mechanic I worked on, which was roughly around 3 weeks ago at this point. I haven’t had the chance to properly document until now.
That’s all the VR mechanics I played a part in making, I believe I did my best with the mechanics and hopefully helped eased some burden off of Krystal, who’s still our main VR programmer. The coming weeks, I will be finally working on the actual 3D assets of Yi’s Eatery. I’m excited to get started on it and making Yi’s Eatery become a reality.
1 note
·
View note
Text
Understanding the Unity XR Toolkit Interaction System: Part 3
TheGreat! I’m finally showcasing my work instead of nerding out about the complexities of the XR Toolkit. So last week, I was re-working a cutting mechanic for Yi’s Eatery. Initially, we wanted to have a dynamic cutting system like this
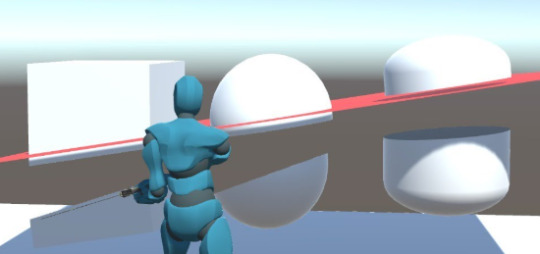
Food objects would be cut like actual physical objects. However, in the end, we felt that there was a lot of complexity to implementing such a system correctly, even with tools like Ezy Slice. It also didn’t fit our game vision so instead, we opted for a different approach.
The idea was sort of like Overcooked, where players put items on the cutting board and chop it. There will be a chop progress bar shown, when the player chops it enough times, the chopped food will spawn in place of the original food.
However, here comes the problem and this was a persisting problem that was already made known to us when working on other mechanics. This problem was crippling and seriously damaged our progress in terms of VR mechanics (you can tell I really disliked it *pulls an extremely sad face* )
Essentially, the XR toolkit hates it if any interactable is destroyed while an interactor is interacting with it, meaning selecting, activation and....even hovering. Yes, if your interactor was HOVERING over an interactable while it was destroyed. The Interaction Manager would throw up errors and your interactor would be crippled.
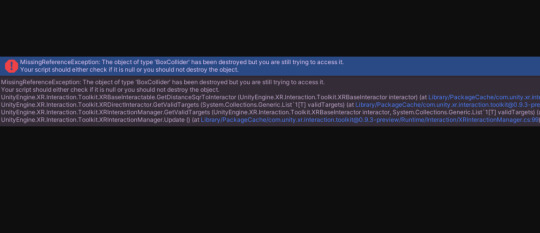
However, I finally found a fix on Github after days of agony. Honestly, a huge thanks to the user who came up with this solution, I haven’t felt so happy about my work in a long time.
The fix is to edit the XRBaseInteractable script as one of its methods was the main cause of the errors.
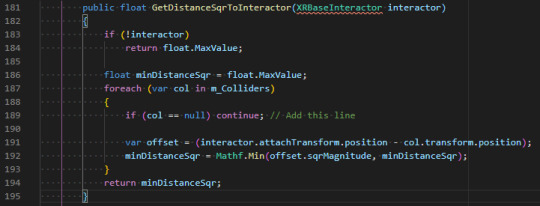
Find this method in the XRBaseInteractable script and add on the line shown above. What this line does is that it prevents destroyed objects and its colliders from running this code before it is unregistered from the list of interactable colliders. This immediately stops the demonic errors that are thrown up everytime when objects are destroyed.
Soon after, I was able to get this end result relatively quickly.

As you can see, I can destroy the original cube and spawn a new prefab representing the chopped food in its place. I’ve also made sure that the structure of the code made it easy to add on UI elements, VFX, SFX etc. Anyways, yeah, that’s the end of my 3-parter devlog. I really like doing tutorials like these, it helps me consolidate my learning, and in turn, I hope it proves to be useful for other people some day!
3 notes
·
View notes
Text
Understanding the Unity XR Toolkit Interaction System: Part 2
It’s part 2 of my “Unity XR Toolkit” devlog. In this post, I want to cover how to extend the functionalities of your Interactors and Interactables through its built-in event system and how to do so through manual code.
Each Interactable and Interactor will have a input for Interactable Events where we can define additional functionality to run based on certain states such as Hover enter/exit, Select enter/exit and activation/deactivation.
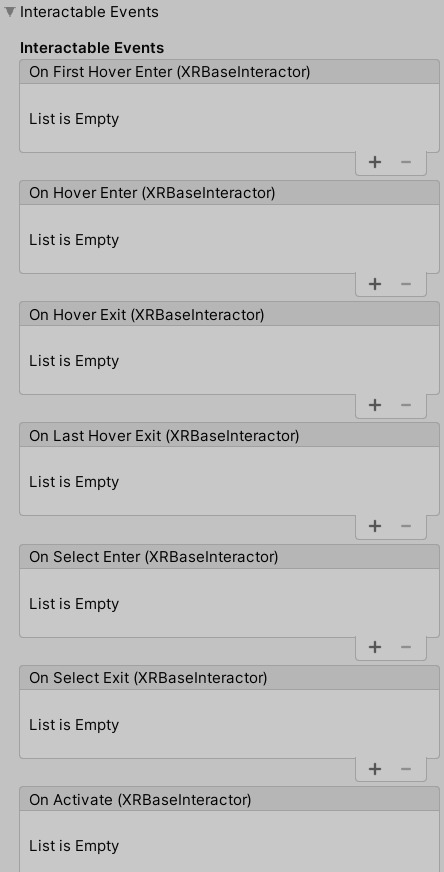
Simply add an item to the appropriate state with the “+” icon and add in a game object and reference the script with the method that provides the functionality you want.
You can also add in the events via code in your scripts as well.

Essentially what we are doing is referencing the XRGrabInteractable on this object and adding in methods (”StopAttach” and “AttachToBoard”) that are called on “onSelectEnter” of the Interactable. Be sure to declare at the of the script “using UnityEngine.XR.Interaction.Toolkit” to use the namespace so it can recognise XRGrabInteractable.
If you want a video tutorial on this, you can check out VR with Andrew’s video here:
https://www.youtube.com/watch?v=PnnHx-DVDLE
We can achieve a lot of gameplay functionality just by using the default states, however, you might feel the need to customise the code for your interactable or interactor. With a bit of understanding of how the source code works, you absolutely can. I’ll try to roughly explain how it works, but a lot of extra research on your own is needed to make it work because I personally have not tried this myself.
---------------NERDY CODING STUFF AHEAD-------------------
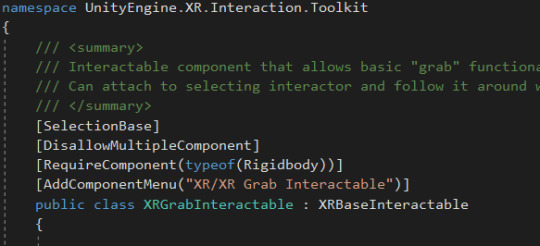
When you open the XRGrabInteractable script, you will find that it inherits from XRBaseInteractable.
(If you don’t know what is inheritance in programming, this section is probably not for you oops....)
XRBaseInteractable is an abstract class (meant to be use as a base/parent class with no intention of instantiating) which XRGrabInteractable will inherit from. BaseInteractable contains the interactable behaviours which in turn are hooked into the Interaction Manager to handle. XRGrabInteractable will inherit these behaviours and add on its own functionality, which in this case is handling the grabbing physics and calculations etc.
Interactors have a similar thing going on, where there is a “XRBaseInteractor” class where all the Interactor scripts such as “XRDirectInteractor” inherit from.
So if you want to customise your own script for Interactors and Interactables, you can simply create a script that inherits from the base script and you can add on your functionality there. Although obviously, there is a lot more that goes into it which makes it really difficult and definitely only for advacned programmers.
You can also simply edit the given scripts itself, if you are doing something that isn’t as extreme as rewriting a script for Interactors/Interactables. However, Unity will reset the script the next time you enter your project for some reason, so any edits to the source scripts should be kept light.
-------NERDY CODING STUFF ENDS-----------
From my experience, it is important to remember to begin with working around your limitations instead of going to extreme solutions immediately. It took me a lot of time to understand the Interaction System myself and in the end, many of the gameplay functions can work just by working what Unity provides us. In the next part, I will finally showcase a particular VR mechanic I’ve been working on that gave me a lot of trouble.
2 notes
·
View notes
Text
Understanding the Unity XR Toolkit Interaction System: Part 1
As I’ve covered before in previous posts, Yi’s Eatery will be developed for the Oculus Quest using the Unity game engine. In order to handle the VR interactions, we decided to use Unity’s recently released Unity XR Toolkit. It’s a relatively new plug-in so there isn’t a lot of information about it. A lot of nights were spent just researching and re-reading the documentation several times to understand the system and how to manipulate it. I wanted to share my experience from my time spent tinkering with the code to hopefully help struggling game devs out there who may be struggling with VR development :D
To better understand my post, it would be great if you watched a few videos on how to do a basic set-up of a VR scene using XR Toolkit. Check out the links below:
https://youtu.be/ndwJHpxd9Mo (VR With Andrew)
https://www.youtube.com/watch?v=gGYtahQjmWQ (Valem)
Many thanks to VR with Andrew and Valem, they make great tutorials on VR development in Unity so check them out if you are interested.
Part 1: Understanding the Interaction System.
The Interaction System has 3 core components to work.
Interactable: The object to be interacted by an Interactor.
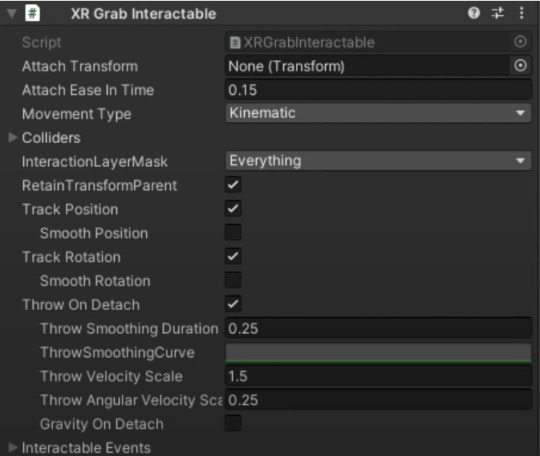
For example, we define an Interactable by adding a “XR Grab Interactable Script”. This defines the object as an Interactable where it can be interacted by the next component.
Interactor: The object interacting with Interactables.
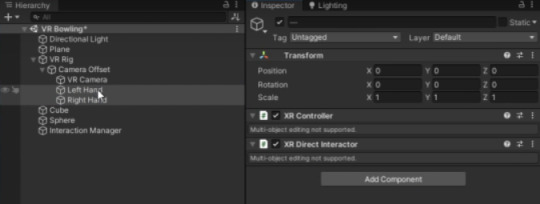
For example, we put a “XR Direct Interactor” script to the hands of the VR rig. This script defines the game object as an Interactor where it can interact with Interactables such as grabbing it and changing the Interactable in some way.
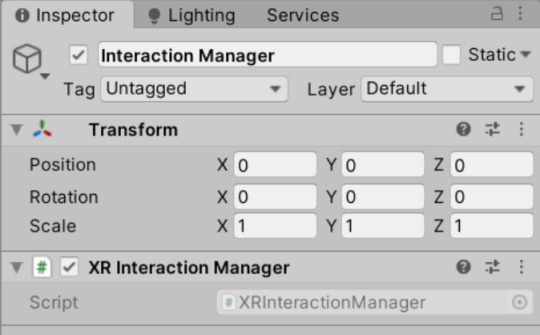
Interaction Manager: Acts as the middle man between the Interactor and Interactable to handle all interactions.
Every VR scene where interactions will have a Interaction Manager game object with the “XR Interaction Manager” script.
How these components interact with each other are shown in the diagram below.

Essentially, Interactors and Interactables have specified events with functionalities in their respective scripts. For example:
Grabbing an interactable and the object attaches to the hand.
Letting go of the interactable and the object detaches from the hand.
Hovering over an interactable/interactor and the interactable is highlighted.
These events and its functionality are specified within the script of the Interactors/Interactables and are called by the Interaction Manager when it reaches the conditions of the events. The Interaction Manager is also constantly querying for the Interactors and Interactables within the scene and returning a list of available interactors and interactables.
This overall system makes it easy to extend the base functionalities provided the XR toolkit. You can either create new events that are called on certain conditions or add on to the functionality of the certain events. I will be covering how to do that in Part 2 of this series.
1 note
·
View note
Text
How to Develop Games for Oculus Quest in Unity
Developing VR games is hard. VR brings a slew of new design considerations in games that could simply be ignored in traditional video games. One of those considerations is the VR devices that the game is being built for. Each VR device is separate and unique with its own control scheme, unlike a keyboard for example, that is the same throughout all computers.
Fortunately, game engines like Unity are trying to ease this process of building VR games to multiple VR devices. Unity possess the XR Plug-In Management package that attempts to create a system where developers can use a common “starting point” and it is able to directly translate it to all of the different VR devices.
I’m going to share how I set up Unity and its XR Plug-In Management system to build Yi’s Eatery for the Oculus Quest.
Step 1: Make sure your Unity version is 2019.3 or higher
Unity’s XR-Plugin Management only works in version 2019.3 or higher, that’s all there is to it?
Step 2: Download the Unity XR Interaction Toolkit package.

It’s a preview package that will give you access to the XR Plug-in Management.
Step 3: Install the Oculus plugin from the XR Plug-in Management

Under Project Settings -> XR Plug-in Management, you can download the various plug-ins for different VR (or even AR tech) devices. For the Oculus Quest, it builds to Android so click the Android icon and check the Oculus plug-in.
Step 4: Change Build Settings to Android

Under Build Settings, remember to change the platform to Android.
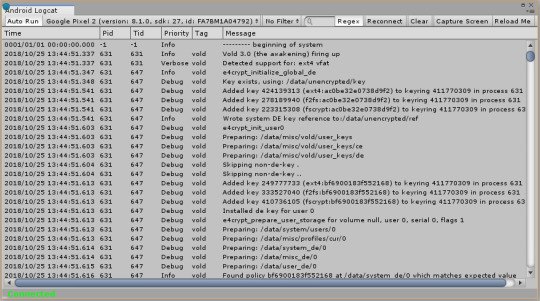
Step 5: Install Android Logcat package

Developing for Oculus Quest or untethered VR devices presents one of the biggest problems: The inability to test your game in the Unity Editor. The game has to be built directly to the device and therefore, there is no way to see the debug logs. Downloading Android Logcat will allow you to access the debug log directly from the device so this step is crucial for Oculus Quest development if you do not have access to Oculus Link which will allow the computer to treat the Quest as an Oculus Rift (a tethered VR device, allowing for testing via Unity Editor).
That’s about it!
Of course, the Oculus Quest device needs to be put in developer mode for the device to be connected to your computer but that’s just a google search away. I’m merely showing how I set up my Unity to enable me to develop Yi’s Eatery for the Quest. I am unable to have access to Oculus Link so it took me a while to figure out the alternatives. Hopefully, this would save some of you guys in the future, be it a wandering game developer, or one of my juniors in my school :D
1 note
·
View note
Text
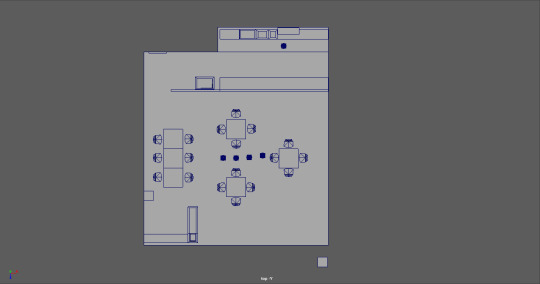
Doing an Environment Block-in: Part 3
I don’t know if greyboxing deserves 3 parts for a devlog, but whatever I guess... Anyways, I’ll be showing you the third round of updates that I did to the block-in.
Key changes here were:
Addition and readjustment of chairs
Added more generic props
Updated the storeroom
Human references really help when you are doing a block-in, especially if its for a game where players are going to be moving around in, it really helps you understand what is the actual space the player gets to work with in the game, allowing for overall better designed layouts that won’t cause a bout of hair-pulling when implementing it in Unity.

The environment is slowly ramping up! From here on, I will start to refine the block-ins and work producing the actual assets. Exciting stuff ahead!
-Kai
2 notes
·
View notes
Text
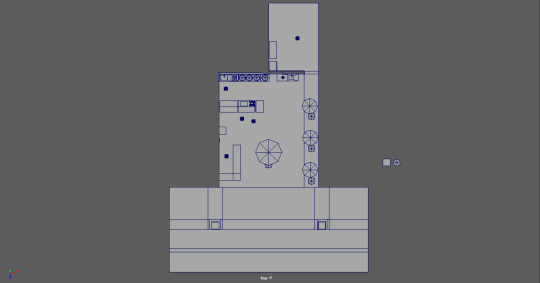
Doing an Environment Block-in: Part 2
Hello, it’s Kai again. Today I will be showing you my second pass of the block-ins, which undergone major revisions from the first. To jog everyone’s memory, I’ll show my first pass, followed by the new second pass.
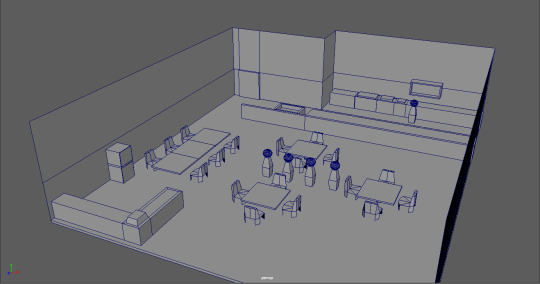
The work shown below was done on 6th May 2020

As you can see, the layout got a major revamp. The team had discussed the first pass together and after much research, we decided the overall layout did not fit our theme of 1980s Singapore eateries. We went back to the drawing board and gathered more references of eateries in Singapore or Asia for that matter around that time period to better understand it.
From there, a few key points were raised:
1980s featured smaller and quainter establishments
Kitchens were typically seen close to seating areas, and not hidden away in a back room.
Tables were commonly circular rather than rectangular
Thus, I edited the block-in to address the key points we raised. I also added a pavement and road extension as we envisioned the environment to be set in a shop house as well.
After the second pass, we start to have a better idea of how our environment will look. I am mostly done with the layout aspect at this point. From this point forward, future passes will include more additions of set dressing and props to flesh the scene.
1 note
·
View note
Text
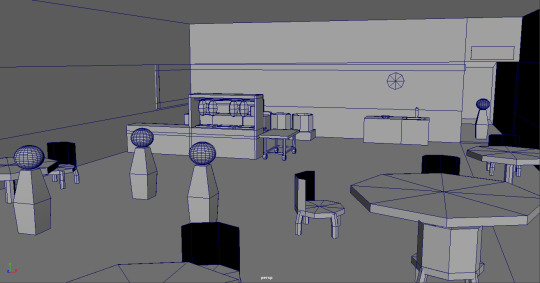
Doing an Environment Block-in: Part 1
Hi, I’m Kai Yuan (Kai if you are non-Chinese), the 3D generalist for Noodlets Studio. For my first entry in my devlog, I will be showcasing how I approach doing an environment block-in or greyboxing.
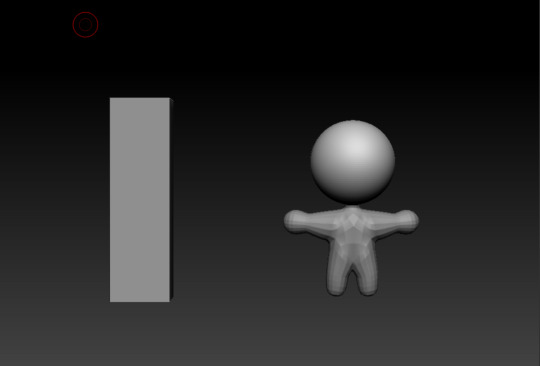
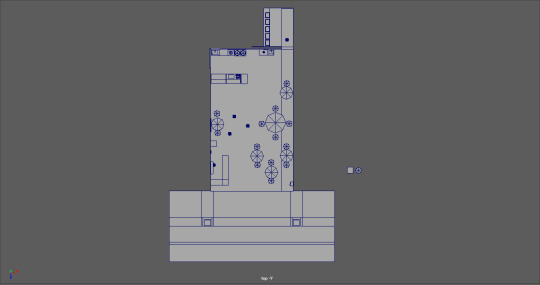
The work shown below was done on 4/27/2020

The very first block-in won’t involve any 3D modelling brain cells at all, it just requires you to layout elements as if you are a top-down level map, and extruding everything upwards. Accurate scale is a key thing to take note, with the help of my grid, I ensure that everyone element is scale according to the real-world, using human dummies as references.
The first pass of my block-in took around 30 mins, with the main focus being the layout only for my team to review. So this block-in was sent to my team to discuss and review, and I’ll show the results of our discussion in my next post where I’ll share my second pass for the block-ins :D
1 note
·
View note