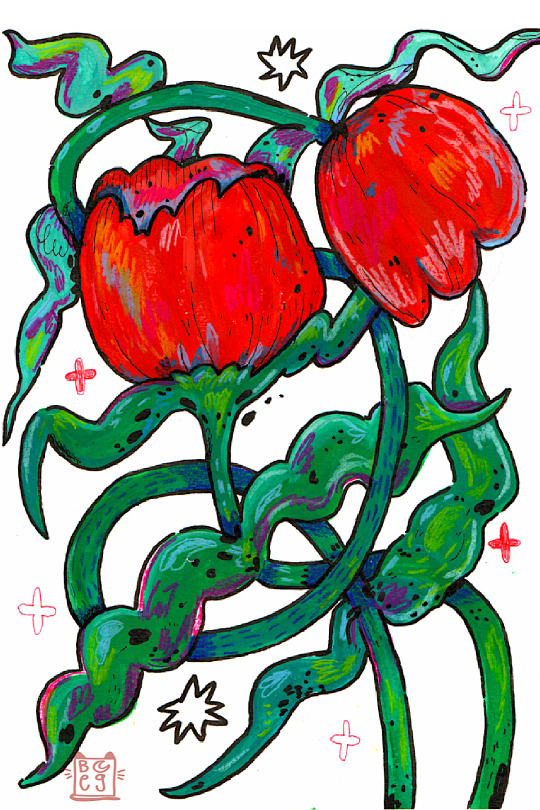
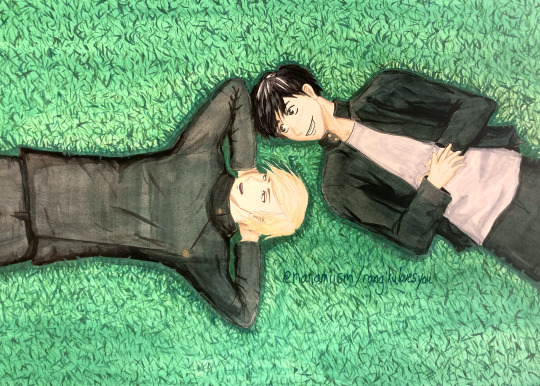
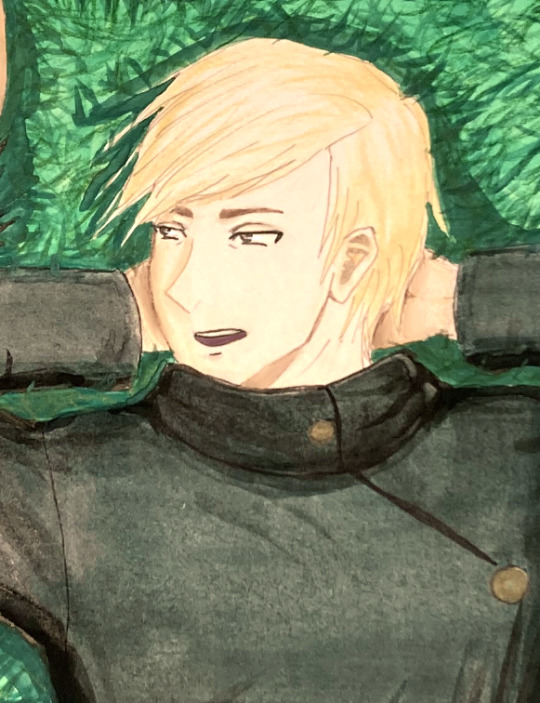
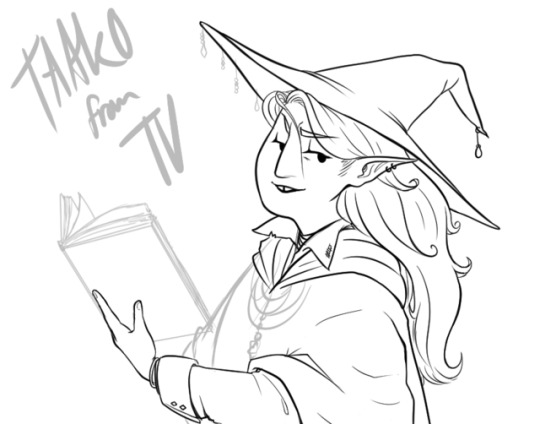
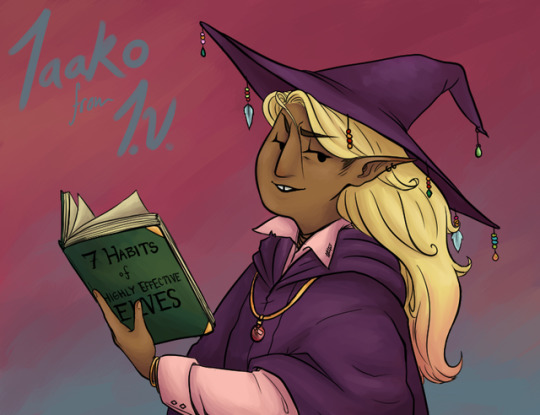
#(color pencil touched up in csp)
Photo

A while before the sequel came out, I made this as a sort of goodbye to the Director’s Cut's canon. I wasn't a huge fan of how little we got to know about that ‘Old Man Zach,’ but it would’ve been cool to learn more... Plus, I made the teeny tiny little inclusion of... (cough) Thomas surviving & becoming his wife & having a family together (cough).
Yeah, that’s the granddaughter from the DC. Since we never saw the daughter, I put my personal detective OC’s design in a few of the family photos. I’d have never made her without DP, so it fits. (That’s also the right squirrel key on the desk; I like easter eggs)
#deadly premonition#francis zach morgan#thomas maclaine#director's cut#traditional art#digital.art#(color pencil touched up in csp)#fan.art#portfolio
35 notes
·
View notes
Photo
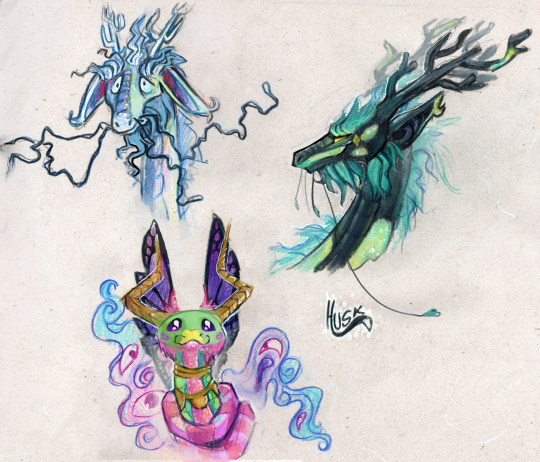
More dragons, sorry
they’re colored pencil on newsprint, then i scanne dem and touched em up a little bit in CSP.
#flight rising#flight rising dragon#Flight Rising Art#flight rising imperial#frfanart#flight rising phil#flight rising coatl#dragon#traditional art
180 notes
·
View notes
Note
omg what brushes and program do you use?
Oh I'm not sure this answer will be very usefull from amount of brushes listed. I have very few faves actually and mostly like them because they help me circumvent my perfectionism.
So right now I'm using Clip Studio Paint but I've been using Photoshop for a looooong time. Till they pissed me off too much with adobe adobeness. That's why part of my brushes are originally photoshop ones I've ported to CSP.
I mostly do linearts, like overly detailed ones, like this closeup:
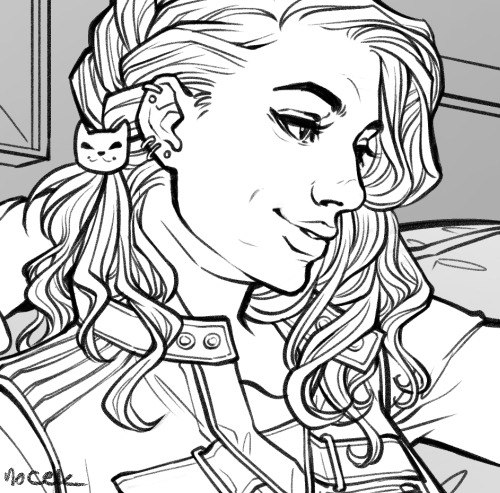
Which I used DAUB FunnyGranny2 and back in PS times (and also now sometimes) I've used Kyle's Drawing Box - Animator Pencil 2016 from Kyle Webster (now available for free with PS as far as I know? still I had bought them ages ago and just ported it to CSP, works ok)
I like those two brushes because they are slightly grainy and aren't 100% smooth which helps me not to be as precious about smoothness. Otherwise I'd be smoothing it over and over again. Also they loose a bit of opacity with lighter touch which I like :)
I also like the Belgian Comics Smoother from Kyle's Inbox. It's very smooth but has a nice shape so I use it for touchups on color flats and lettering.
As for my more recent spiderverse comics of following close up:
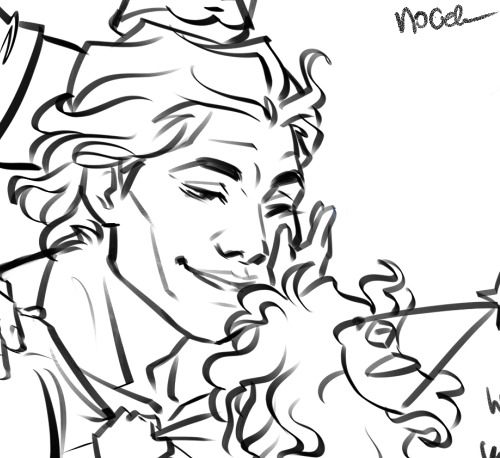
I need to make them quick so everything is on 2000x2000 canvas and is linearted with DAUB - Fluid Ink Chisel 2 set permanently on size 30 so I won't be tempted :D It may not be grainy but I like how it changes it size and opacity with pressure and how it changes it's shape with direction of line.
Besides that I mostly use flat colors (I love the Lasso Fill tool in CSP) and regular soft airbrush too add some gradients.
I don;t use them that often but I also like Mirre's markers + blender if I do some actual shading but I also use Kyle's gouaches then.
And that's about it :)
55 notes
·
View notes
Note
I love your artwork, it's so cool! I'm an amateur in art, do you have any tips? Thank you!
Thank you so much! 💕 And sure! (Have you seen my other posts as well?) It’s a bit easier when it’s more specific >< But I’ll try my best;
- Keep notes about the things you want to learn as you draw! Someone gave me a tip to have an art-goal so you know what to work on and then improve these particular things as you go, but for some reason I found it really hard to set these goals? (Am I the only one?) I kept thinking I just wanted to ‘improve’ everything, but that’s not very tangible and I can’t effectively measure whether I’ve succeeded… (it’s also not always easy to see your own improvements… at least I rarely can ><)
But when you draw and you come across these little things that make you go “hm, I wish this was easier” or “I really love this sketch I made, but I’m not sure how to go about coloring it”, anything like that— then your desires regarding your art or your process become a lot more specific, right? Write these down! What specifically would you like to improve on?
I’ve noticed for myself and many others talked about it as well that once a piece is done, it’s like you forget a lot about the process and your mind is set on a new project. (Also, yay! You were in the zone~) You can either use your current project as practice (all of them are in a sense, really) or start a new one later, research what you need (on YouTube, books, or perhaps a course from an artist you really like if you can afford it) and work on your goal!
- Also keep notes for any ideas you may have. We always think we’ll remember something and then we don’t. These sudden, often spontaneous glimpses you receive seemingly out of nowhere can be some of your best and it’s a shame if they fade back into the void. This also applies to anything that inspires you.. it can really be anything. I think I’ve said this before, but if you do this, try and organize a bit. Otherwise you’ll end up with a bunch of notes that’s more overwhelming than anything else.
You can use folders to keep images, notes, a dedicated Notion page perhaps or if you can afford it, keep an extra external SSD for this.
- Well, this also applies to research or video’s you’d like to watch. If you end up with too many tutorials or books, or they aren’t goal-oriented specific to your art desire, it may get really hard to get you started on something. If you’re like me and it’s hard to focus, I’d highly recommend taking some time to sit back, think about the thing you really want, organize and structure a way towards it and go. That way you don’t have to make all these decisions along the way— you know what to do already, it’s written right there!
- And that also applies to tools and brushes xD I know it’s really fun to download all of it because many are free and what if there’s ever a time you may need this specific texture on a brush? What if you can’t get this style that inspired you with the brushes you already have? But truth is, you don’t need them all and if you do, you’ll notice there are many you won’t even touch. And well… as you can see in my art as well, apart from the pencil ones, it doesn’t necessarily encourage consistency if that’s what you strive for. If you want to practice, most often the basic round brush will do, the less opacity or blend, the more you can practice shapes and clarity. In that case I’d stay away from the airbrush whenever possible.
- Depending on the program you use (CSP has their own), you can use these to help you with facial angles, or this if you rather prefer a basic skull. You can use the site if you can’t get the angles quite right for many things.
- For coloring I highly recommend James Gurney’s articles or book ‘color and light a guide for the realistic painter’, even if you’re not a realistic painter, it still contains most (all?) of what you need to know about color.
- A great way to experiment is to just… open a blank document and do whatever. I know it often feels like you have to draw something (preferably something good), but you can actually learn a lot by just scrabbling away. Here’s also often where you find the things you feel like you need to improve. Certain angles are especially hard for me, but I hadn't known that if I didn't try ><
Oh, I also found this site by accident and I haven't read it all, but it covers many subjects!
Hope these are helpful! 🌷
16 notes
·
View notes
Note
Hello Mieau, would you mind to give a tour of the art materials you use? xo
Yeah, sure! Let me see, here is what I mostly use:
For digital art I love to draw with Clip Studio Paint, paired with Photoshop for touch-ups and preparing files for printing. My tablet is a Wacom Intuos Pro medium. I also have an Ipad pro with a CSP subscription, that I use sometimes.
For traditional art recently I'm mostly just sketching but my favorite brand of sketchbook is definitely Maruman! The pages are very thin so it's a good reminder that a sketchbook has to be used in a lighter way, it can't be perfect. I have different sizes!
Pencil-wise I like to use Kurutoga (it's a brand of mechanical pencils that automatically rotates the nib, so you go trough them more efficiently). Basic kneaded eraser. And for book signings I use Faber Castell Polychromos (they are very hummm... "soft"?) for a nice colored under-sketch paired with some fine nib permanent black marquer!

21 notes
·
View notes
Note
Hello i was wondering if maybe you could share the brushes you use🥺
Apologies for the late response, I had to hunt down all the sources for my brushes again on 2 different programs... Some of these cost some clippy points on CSP but rn there's a login bonus for them until March 13!
CLIP STUDIO:
Sketching:
ReaganS2 pen. Costs 100cp now, but it's been really helpful in how responsive and layered it is for setting up the rough sketch.
AJ's pencil set. Very useful for warmups and figure studies IMO.
Lining:
Quibbly. It costs 50 cp but it's got the perfect texture and crunch that I love in lining, super responsive as well.
Coloring:
YN Painting Brush Set. I added some color jitter to the settings to make it more vibrant.
MYNQZO brushes. Great texture, I personally use the rougher brush the most.
ETC:
Close and fill tool without gaps. This one's just a lifesaver, very good to immediately get a base layer done. There's also other versions OP for the tool made that you should check out.
Erase to remove only protrude pen and overflow. Set your lineart to reference and it'll only paint/erase along the edges. Incredibly useful (There's also the erase along edge eraser, but I prefer the former.)
PROCREATE:
Lining:
Gesinski Ink from the default ink brushes has been my go to for years, with a touch of scattering to add texture. Lately I've been experimenting with the Ink Bleed brush as well.
Coloring:
This brush pack from roseflarea on twitter has been really good, especially love the pastel brush.
If you're willing to spend some money (like 8.50 USD or so) this ghibli inspired brushset is very good for Nature/Landscape pieces. It also includes video timelapses and tutorials. (Also compatible w PS/CSP)
Cityscape brushset by Devin Elle Kurtz on the other hand is super helpful with more urban backgrounds, it's free and compatible w CSP/PS
Devin Elle Kurtz also has a very nice foliage pack that's free as well and compatible with Procreate/PS/CSP, check it out!
16 notes
·
View notes
Text
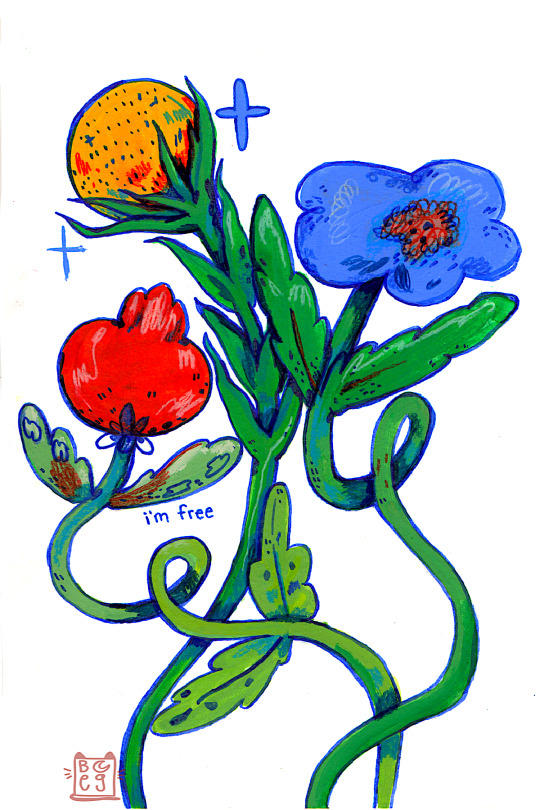


some of my favorite flower paintings.
painted with acryla gouache and colored pencil, scanned and touched up in CSP :3
(prints and original paintings are available)
#painting#acryla gouache#holbein#strawberries#strawberry art#flowers#floral art#gouache painting#floral#flower painting#mixed media#doodles#illustrator#cute illustration#gouache illustration#flower illustration#patterns#textures#fun art#whimsical#????#my art
14 notes
·
View notes
Text
ibis paint x VS procreate VS clip studio paint ios review
DISCLAIMER: i’ve been using procreate since i got my ipad in 2020 while i just picked up ibis paint x yesterday. i have been using clip studio paint for desktop since ~2016, though i mostly use the desktop version over the ios version. this review will mostly be my first impressions of ibis paint x compared to procreate and csp for ios!
PROCREATE:
at this point, procreate is probably THE industry standard for ipad drawing programs. it’s got a very minimal layout designed for use on your ipad and lots of options for touch and gesture controls.
i find that procreate feels less like drawing on a display tablet and more like just drawing on an ipad if that makes sense? display tablets have a very specific feel to them when you use them with desktop programs, and procreate doesn’t have that same feeling to me. it’s very intuitive and you can definitely tell it’s designed FOR ipad.
THE PROS:
the layout
its simple, minimalistic layout is extremely accessible for the ipad specifically and once you get used to it, becomes easy and convenient to navigate (especially if you customize the settings to your liking)
THE BRUSHES!!
good god i could sing my praises for the default brushes all day long. to this day, i use a slightly revised version of the default HB pencil brush for EVERYTHING from sketching to coloring and refining.
in addition to the default brushes, which are relatively simple to customize and adjust in the brush editor, you can also import brushes other people have made into the software. since procreate is so widely used, it’s really easy to find some nice ones online!
tilt support with apple pencil
procreate is compatible with tilt support on your apple pencil, meaning that the way your apple pencil tilts impacts the brush’s effect on the canvas! notably, i use this like a normal pencil where i will hold the brush at a low angle as i’m drawing and shading to produce a less opaque and wider line (mimicking the effect you get when you use the side of the pencil tip as opposed to the point)
THE CONS:
limited amount of layers
depending on how big your canvas is, procreate limits the amount of layers you can use to prevent overloading your ipad. while i haven’t run into any problems with this since i merge my layers as i go, it’s an important factor to consider if you tend to do big complicated pieces with lots of layers. (on an 8x10″ 300DPI canvas, you can have up to 70 layers. if you were to make the canvas bigger, that number would noticeably go down)
ipad exclusive
you can ONLY download procreate on ipads, which means that if you have an android tablet or have a display tablet that hooks up to a computer, you’re out of luck.
cmyk support is slightly glitchy
while yes procreate DOES technically support cmyk mode, it’s not as straightforward as you’d expect. if you save a cmyk document as a PSD file with the layers intact, this results in a small white border around each of your layers. not entirely sure why it does this but it’s kind of annoying :/ (i am unsure whether they fixed this in any recent ios OR procreate updates though!)
TL;DR:
procreate is an overall excellent software to pick if you have an ipad! that’s not to say it doesn’t have its flaws, but overall it’s the industry standard for a reason.
IBIS PAINT X
while i’m a new user of this program, i gotta say i do like it a lot from what i’ve seen! ibis paint has two options on the app store: Ibis Paint and Ibis Paint X.
ibis paint is the free-to-use version, in which you can either pay to unlock the brushes OR watch ads to unlock them for a certain amount of time.
ibis paint x is the paid app, but it only cost ~$10 which is honestly not bad. i splurged on this version because i do NOT have the patience to watch ads for brushes LOL
i find that ibis paint definitely feels different than procreate. there’s a nice stabilizing feel to the brushes so they aren’t wobbly in any places, but i think you can turn that off too. in my opinion, this app feels more like a desktop app on a display tablet except condensed and optimized for ipad use!
(NOT like clip studio paint, where they basically took the entire desktop app and threw it on an ipad, making it feel very cluttered)

THE PROS:
brushes galore
oh my god there are so many cool brushes that feel very distinct and different from the procreate brushes?? these feel much more like the brushes you’d find on clip studio paint or paint tool sai almost. the stabilization, like i mentioned, is very nice as well! it feels very natural and doesn’t result in too much lag in the stroke like you see sometimes in other programs. it looks like you can also customize every brush to your liking, though i have not done any experimenting with that yet!
also, when you use a brush it shows the outline of that brush on the canvas wherever you use it, much like photoshop and clip studio paint for desktop!
no layer limit! (that i’ve found yet)
while if you make a large document the app gives you a small warning pop-up claiming that larger canvases result in more lag in the app, i have yet to see that lag in action with my usual 8x10″ 300DPI canvases.
THE CONS:
no tilt support
i think this is the main reason why this app feels more like a desktop app on a display tablet for me, because all the display tablets i’ve used have not had tilt support on them. this isn’t a huge world-shattering problem though imo? it’s just something to note when comparing the two softwares
i have no idea if this app supports imported brushes
since this app isn’t as widely used as procreate, i have no idea if it supports exporting and importing custom brushes. if it does, it might be kind of hard to find good brushes for it since it’s not as notorious as other drawing softwares out there
(i’m also unsure whether it even has cmyk support too!)
TL;DR:
this app is really great for what it is! it only costs 10 bucks on the app store to unlock all the brushes, but it offers a paid subscription to unlock more features. i haven’t felt the need to upgrade though since there is already so much packed into Ibis Paint X as is.
CLIP STUDIO PAINT IOS
i honestly only use csp for ios when i have to work out the perspective of a piece because the perspective rulers are RIDICULOUS in csp. however, i figured i’d throw it in the review since i do have experience with it! (mostly on desktop tho)
csp is my go-to software when drawing on desktop now because it is so much easier to use and so much handier than photoshop for illustration, since it was designed FOR comic/manga artists and illustrators specifically.
i find i don’t usually use this app for casual sketching though because it’s essentially the same as the desktop version, just shrunk down for an ipad. this makes the screen feel very cluttered and somewhat complicated to navigate since an ipad screen is so small. (especially since i rely a lot on keyboard shortcuts when using desktop csp, but most of the time do not have my bluetooth keyboard handy for my ipad)

THE PROS:
no layer limits!
again, unlike procreate, there’s no layer limit on here! i would imagine if you made an absurdly big file and then added a ton of layers to it, the performance of the app would be impacted since it’s not the desktop app, but other than that there are no restrictions!
RIDICULOUS perspective ruler
when i learned how to use the csp perspective ruler it changed my LIFE. easily the best part of csp by far. (with the addition of other assets created by others, it can be even easier to use too!)
3d models in the app
clip studio paint has a library of free-to-use 3d models you can access from the program, and then pose or change the angle of as you see fit. you can also download more from the online store!
lots of brush options
since many people use clip studio paint for desktop, there are so many options for custom brush packs, which iirc are all compatible with ios! (my personal recommendation is frenden’s 800 brush pack for 15 dollars)
if you know how to use the desktop app, you know how to use the ios app
like i mentioned before, the ios version is essentially the same as the desktop version with a few shortcuts for easy ipad access. (EXAMPLE: if you swipe to the right on the left side of the screen, you can access a small menu of keyboard shortcuts in case you don’t have access to a bluetooth keyboard)
THE CONS:
subscription-based service
unlike its desktop app, the ios app is a subscription-based service. CSP Pro is $4.99 per month, while EX is $8.99 per month. annually, Pro is $24.99 per year while EX is $71.99 per year. (csp for desktop is a one-time payment that goes on sale for 50% off basically every month)
really cluttered
there’s so much going on in the app that it can be sort of overwhelming, esp on an ipad’s smaller screen. there’s a lot of clicking the different menus open and closed because if you keep them constantly open they take up too much space on the screen, and give you very little drawing room.
no tilt support
again, i don’t think there’s tilt control on this app either. but it doesn’t severely impact the performance or feel of anything. it’s just something to keep in mind!
TL;DR:
i personally think that if you want to use clip studio paint you’re better off getting the desktop version since that is what it was designed for and also it’s only a one-time payment that goes on sale pretty often. but if you do a lot of perspective drawing on your ipad like i do, it’s handy to have!
11 notes
·
View notes
Text
Ipad artstudio pro

Ipad artstudio pro full#
Ipad artstudio pro pro#
Ipad artstudio pro Pc#
Heard about this through an artist in my circle- young, internet freelance artists working in character and design.
Ipad artstudio pro pro#
Max Banshees's Review of Artstudio Pro Reviewed on 8/29/18 11:31 AM Goes above and beyond star star star star star I’ve also been telling/yelling everyone to try out this app on instagram, (If you want to see some of my work done on ASP, i’m soyeyoh on insta) because although it’s not advertised as well as procreate, its functions, I think are superior than procreate.again, IMO.Īnyways, thank you art studio pro. All I use is Art Studio Pro, and it’s really all you need.and it’s only a couple more $$?! Like dang. Procreate? Well, let’s just say procreate is “dead” to me now. It is a smaller version of photoshop, and it is freaking AMAZING. These are only some of the features I mentioned, but Art Studio Pro is far, far ahead of procreate in terms of customizing and editing. Art Studio Pro supports kyle webster + your custom photoshop brushes, elastify/liquify, CROPS, has screen recording (duh), unlimited layers, the ability to change the image + canvas size AFTER you created the file, and it has CLIPPING MASKS. HOWEVER- I found out this app through a twitter post a weekish ago. So, before i bought this, i was on the fence to buy this app or not because i already bought procreate, and tried other drawing apps (such as medibang, csp and a couple more) and I liked procreate best. The meh's Review of Artstudio Pro Reviewed on 8/5/18 4:13 AM Overall even as is I really enjoy using the app and have been recommending it. It would be more convenient if it were picking up colors right where my finger is or very close to it. The last thing that kind of gets annoying is the offset of the color picker. It would also be extremely cool to have 3-4 small fave icons near undo for brushes you want to switch between often. It would be so much more useful if I could import a palette there or add on the fly. The colors on the side are a fantastic idea but kind of useless as I haven’t found a way to save colors I want there. I wish it happened it the background without bringing attention to itself. I’m glad it’s there but it’s annoying for it to pop up and halt everything until it finishes. With that said my biggest annoyance has to be the auto save. I love having a familiar interface to work with. This is probably one of my fave art apps on the iPad Pro. I’ve been recommending this to all my artist friends.
Ipad artstudio pro Pc#
Any chance we pc users might get some love too? Would love to move from iPad to pc in the same environment and keep my video recording. You all have been nailing it with these updates lately. ::Jei.'s Review of Artstudio Pro Reviewed on 9/14/18 5:53 PM Nailed it! PC version? star star star star star It would be nice to use a finger to erase for example. I could not find anywhere the options to customize touch controls. Also, this doesn’t affect functionality but it would be nice to have a black interface option.
Ipad artstudio pro full#
It would be nice to be able to position little buttons for our most used actions and tools in the toolbar, at least in full screen mode where you have no access to the menu bar. Having to menu dig to deselect or transform for instance is cumbersome. This app would be amazing if it gave users a bit more control over the interface. This doesn’t occur in Procreate or CSP for example. This occurs even with no cursor offset turned on and is particularly apparent when using a brush with a tilt dynamic, such as a pencil brush. The first thing is likely a bug, but I noticed that the offset between where the Apple Pencil is placed and where the mark is made seems much more noticeable in this app compared to others. It’s just missing a few important things in my opinion. I really like this app and I could see it becoming a go-to on the iPad. KH1986's Review of Artstudio Pro Reviewed on 9/16/18 11:34 PM Really Promising star star star star star_border
1 note
·
View note
Note
OOC ask for Mun but I’m curious, what art program do you use? And if clip studio what pens do you use and what canvas size/resolution do you use? I keep on finding it so hard to format my art onto tumblr since it always comes out so blurred.

I use CSP, but mostly for end process stuff, like adding gradients and text. Otherwise, Paint Tool SAI is my main...squeeze (the logo's a lime.) I grew up on it and have been using it probably for 10+ years now! Still learning too :) but I think I’ve got a decent grasp on it as a program.
Unfortunately, this means I don't have much brush-wise on CSP that isn't the default, sorry I can't be more help there. From What I've used, the mechanical pencil tool is one of my favorites for sketching though 😄
As for your formatting issue, I know resolution may make a difference. By learning and now practicing habits, I draw in 300dpi (a bit high in comparison to most default 90-ish in programs). However, Tumblr may be blurring things because a file is too big instead of too small, so if working in high DPI, it's good to keep images 1k or under in pixels (I draw in 2k X 2k, but It’s just to have space. I tend to stick to a smaller spot and crop down to like 600/700 after everything’s done). I think 500-800 px is best for immediate dashboard viewing. (Not when clicking to pop out.) Anything bigger or smaller in my case gets just a bit fuzzy.
-- Ahem, so I'm not leaving it out though, for those that do use SAI, I will go ahead and drop some brushes below, along with usage under the cut (and if anyone knows how to convert them to CSP, let me know because I've been slowly learning the brush settings program in CSP to carry over my arsenal from SAI lol!)

Honestly, I use the marker tool for most things besides coloring (where I don't want low density), but I do use it for color blending/accents/blush(etc.), on pieces off-blog. The slider bars are always changing! Density, blending, and persistence LOL. (I rarely touch the advanced settings though).
I also rarely use the Pen/linework tools, but if anyone's interested, I added them. I enjoy really graphic (comic) styles where lines are a big focus, so I enjoy thicker lines with lots of line-weight variation. (Admittedly I'm a line-art artist versus a color expert, but I've been working on it!)
#ooc#V-munday#munday#art brushes sai#paint tool sai#marker tool is superior#I've said this on stream#And I stick to it#I should just make like 10 clones so I can stop playing with the settings everytime#but I enjoy the constant variation#feels more experimental#--embarrassing story#before I had CSP I would use Drawpile for Fonts#Copy paste the text into Sai#then manually draw the speech bubble#(( Sorry Sai2 you're severely underused. I really should upgrade. ))
53 notes
·
View notes
Note
hello! do you have any advice for switching from traditional art to digital? (i recently ran out of supplies so im relegated to my computer lol) i hope youre having a good day!
i sure do!
first off i really recommend clip studio paint, but i also recommend u wait for it to go on sale. it goes 50% off a few times a year, so imo it’s worth waiting, but it also is usually on sale for only a few days so u have to stay on top of it. they usually announce on twitter etc. the tools don’t make the artist and obviously it doesn’t Really matter what program u end up settling on, i’ve just been really pleased with CSP and i wanted to recommend it
second: nothing that u can do with digital art programs/tools is cheating and it took me way too long to really internalize + understand that. copy-pasting stuff instead of redrawing it, using symmetry rulers, using transform/ctrl+T to stretch or squash slightly off anatomy instead of starting over -- when i was first getting into digital i A. didn’t know u could do this stuff and B. felt weirdly guilty doing it once i figured it out, as if i was a worse artist for using the tools that are literally built into the software or that it was lazy or dishonest to do so. that, it turns out, is bullshit. any drawing is just a constant series of decision-making and a lot of digital tools just help u make or retract or edit those decisions faster than traditional does. it’s not better or worse, it’s just different, and it’s worth ur time to figure out which of those differences are the most convenient and useful. this stuff exists for a reason! use it! save ur wrists and ur patience and ur time!
figure out file organization early, because it’s something u don’t have to deal with irt traditional art and so it probably won’t come naturally, but it also makes ur life harder to have a desktop swarming with wip files that are all titled “kjsrhrfgdhgj.psd” or whatever. some ppl sort into folders by date; for me it works better to sort by content (i.e. i have folders for tvrn stuff, patreon stuff, different fandoms, dnd/ttrpg stuff, “misc ocs” for characters i don’t draw much and “misc fandoms” for one-off fanart that doesn’t merit its own folder, etc etc; this is what makes it easiest for me to find stuff, but ur system might end up different.) i admittedly still name my files keysmashes if it’s personal stuff rather than work/commissions, but at least it’s all sorted into a category where i can quickly find it again anyway
also, u can hybridize traditional and digital! i frequently like my traditional pencil lines better than what i can do digitally, so i often scan them in, turn them into lineart, and color digitally (here’s a tutorial on how i prep that). but even if u don’t have a scanner, a carefully taken phone photo with high contrast can still be used the same way. i tend to lay my sketchbook flat on the floor in front of a window, squat down and hold my phone as level as i can while i’m taking the pic, and then i blast it in my phone’s built in gallery editor (highlights/shadows and contrast) before sending it to myself and doing the same thing w tone curve/levels in csp. it’s not perfect, but it’s presentable, and it can be a good way to ease urself in if ur feeling frustrated w the learning curve on digital draftsmanship.
oh, and this tip is really small but it’s ended up being rly helpful for me: resist the urge to zoom in way past 100% scale view just bc u can. if there are times where u absolutely need to, sure, whatever, but there’s no point in regularly tweaking tiny things pixel by pixel at 250% zoom bc nobody who looks at ur art is gonna see that and ur just bloating ur own time spent on things and creating unnecessary stress for urself!! if 100% zoom doesn’t give u the control u want, that may just mean u need to work larger to begin with.
set up a comfortable workspace with a Good chair. look up proper posture and try to stick to it. i know we’re all gay and it sucks to sit in a chair properly but otherwise ur gonna hurt urself. take even more frequent breaks than u do when drawing traditionally! screen bad!
also, if ur tablet has a way to calibrate pressure, try that out. a lot of them are set in a way where you have to press really hard to get full line width and over time it can really seriously strain ur wrist; u can’t manually set pressure in traditional tools (besides like. using softer lead i guess lmfao) but u can with tablet pens and u should try it, bc if u can use a lighter touch overall it really goes a long way towards preventing injury in the long term.
this is all the stuff that came to mind immediately; i’m sure there are tons of basics i haven’t covered, depending on how much of a transition this is for u, but there are a lot of tutorials out there written by ppl more patient and more educationally-oriented than myself so you’d be doing a better service to urself seeking those out than if i were to try to clumsily emulate them lol. good luck + have fun!
221 notes
·
View notes
Photo

HaiNana
Watercolors, colored pencils, ink pens, touched up in CSP.
The color balance ended up being a pain in the ass but otherwise it turned out okay.
42 notes
·
View notes
Note
When you first got into art what did you start with?
Like materials? I've been drawing since I was a kid and got really accustomed to the feel of cheap materials like Roseart pencils/crayons. I have nice materials now like copics and prismacolor, but I rarely touch them--I still love how unpredictable low quality ink and lead is.
If you want some like NICE markers though, buy the tombow brand. They're like $30 per color set at craft stores, they blend/reactivate beautifully, and work better than copics (which are 3x the price 😬). Tombow also makes my favorite graphite--their hard HARD leads like 6h still make lines really easily and they don't tear paper like other hard leads. I've been using tombow since high school and haven't found a brand with better stuff, even the the expensive options don't compare.
As far as digital goes, I didn't start digital work until high school so I'm not as fluent with it as I am traditional. I used GIMP and photoshop elements for a long time and I recently picked up CSP during one of their sales. I prefer traditional, but digital has its benefits too. I just miss the scratch of paper when I work that way.
14 notes
·
View notes
Text

"I have faith in you, Mister Fjord. I'd like to think there's a great, shining destiny ahead of you." - Caduceus
Wildmother, please adopt this boy.
Done in alcohol markers, colored pencils, and paint pen, touched up in CSP.
#criticalrole#critical role fanart#critical role fan art#critical role#fjord#the mighty nein#cr2#the wildmother#caduceus clay#caduceus#quote#fanart#myart#travis willingham#uk'otoa
399 notes
·
View notes
Photo

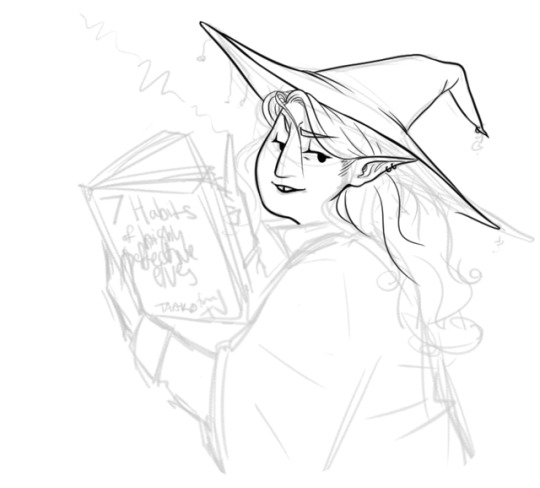
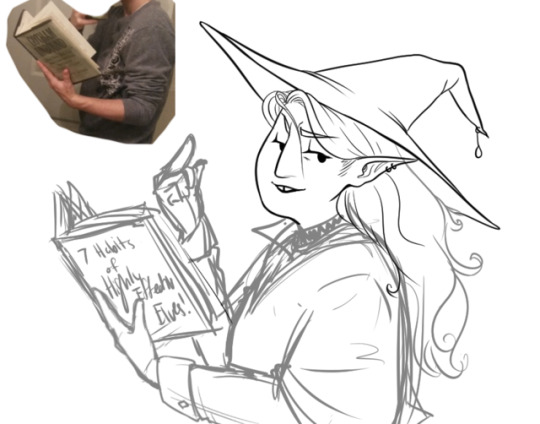


Completed piece!
I wanted to try to put something together to show how I tend to draw, so here we go! Each picture has a brief description, but I’ll explain in more detail below the cut in case anyone is interested!
{ commissions || twitter || artstation || ko-fi }
1. Digital sketching is often the worst part for me, and this one took several tries as I was getting my idea for him right. Still wasn’t really liking it at this point, but I wanted to move on. I think I just used a general pencil brush in CSP.
2. For lineart in CSP, I use the G-pen tool which gives me some pretty crisp lines with decent weight to them. I use different layers for each part I’m drawing in case I need to erase overlapping parts or move things around, but I’m really inconsistent lol.
3. Since I couldn’t find any references for the pose I needed, I took some of myself in the mirror holding a few different kinds of books until I got one that looked best. I also made a new sketch layer and cropped the canvas at the bottom.
4-5. By this point I actually had multiple sketch layers that I went though, each getting more refined so that I had a solid enough idea for the actual finished lineart. I wasn’t able to get the hand right, so I just got rid of it. I also used straight lines on the book to make sure the text on it wasn’t too wonky.
6. Usually I also color using CSP, but I haven’t been liking the results lately. So this time I tried to go back to Sai, using a custom painting brush (from here). I think painted/textured gradients are better to look at than nothing, so I got that done and filled in flat colors on distinct layers. I’m also really inconsistent with this, but as long as the sections aren’t touching/overlapping it’s all good.

7-8. I was trying to mess around with clipping and masking for the shading because I usually spend a lot of time cleaning up around my lines, but it was taking too long so I just used the selection tools around each base color so that I could use the painting brush without making a mess or accidentally blending in the colors around the edges.
4 notes
·
View notes
Note
To be honest, I'm a bit curious so I thought I'd ask; have you taken art classes or are you a self taught artist? If you've taken classes, what are those like? And if you're self taught, do you have any tips for other self taught artists? I hope this didn't come off as rude, I'm interested in the tips you might have to share! Your art is so beautiful and stunning by the way! Goals~ PS, may I call you art-senpai? Hehe I hope that's not too much!! Have a lovely day!
Hello! I’d love to answer your questions!
This will be under a cut for length!
First, Im both self-taught and have taken classes! I was self-taught in drawing the things I enjoy (manga/anime) and learning about how to us digital art programs (Sai, Photoshop and CSP specifically)! I Took professional art classes for Both Figure drawing/gesture drawing and illustration!
-For Figure Drawng/Gesture drawing, I had to commit to being in class for a little over 3 hours. In those classes, we work with live (nude) models and draw for set intervals given by the instructor. This is generally how it goes! Depending on the teacher’s way of teaching, they’ll critique either individually or as a group (there’s always variation in that ofc!) But generally you start with small quick intervals (1-3 minutes per pose –> 10 minutes per pose –> etc.) Until you can go up to as much as half an hour for a pose! (It was a bit daunting when I first started out honestly, I was so shy/////)
-For illustration, I got taught basic art approaches Color Theory/etc. and learning how to use different tools (watercolor, inks, colored pencil/etc) and some art history. In that class we were often taught a lesson and then sent home with an assignment to work on and show in class for critique. This class was also held for at least 3 hours–so the lessons were intensive.
-All in all, it helped me form a lot of fundamentals that have helped me form a lot of structure to my current art! And Usually these classes are pretty expensive BUT there are resources online that I’ll link that you can use to get the gist of figure drawing too! Here it is!
Self-taught stuff:
-I started really early…and this was basically just reference, reference, reference! I looked at how characters from my favorite series were drawn and then how artists I loved drew their own stuff! For me, I find a lot of strength and inspiration in others works!
-I know it’s different for some people…but please don’t compare yourselves to anyone!! You’re creating SOMETHING out of NOTHING and that’s amazing!!! Just keep at it!!
-Practice Practice Practice! I’d say at least dedicate an hour or so to doing some kind of art! Improvement always comes with how much effort you’re willing to put in it ;v;
If your or anyone would be interested in a more intensive advice session, I do tutoring via livestreams every now and then! Feel free to message me on tumblr! usually I work 1-on-1 (once or twice a week) for $5-$10 an hour depending on what you’d like to learn and what you’d want to get out of it!
Thank you so much for your kind words!! ////////////////Im so touched////////////
9 notes
·
View notes
Last Seen Blogs

weloveramimalek
im in love with rami malek

shinsosweet
アドラー

adesignmode
Sans titre

globebusinesscenter
Globebusinesscenter.com