#Keyframing Techniques
Text
youtube
A Deep Dive into Advanced Pathing in Green Screen by DoInk
Welcome to the Advanced Pathing Tool in Green Screen by DoInk! In this blog post, we'll unravel the intricacies of this powerful feature, allowing you to take your video editing skills to new heights. Whether you're a seasoned content creator or just starting, understanding advanced pathing opens up a world of creative possibilities.
Key Objectives:
Introduction to the Advanced Pathing Tool
Precision control for dynamic motion paths
Real-world educational examples showcasing advanced pathing
Elevating your video projects with creative pathing applications
Tips and tricks for mastering advanced pathing in Green Screen by DoInk
The Advanced Pathing Tool in Green Screen by DoInk opens up a realm of possibilities for those seeking precision and creativity in their video projects. Understanding its features and mastering the techniques presented can significantly enhance the visual impact of your content.
Embark on this journey of mastery with the Advanced Pathing Tool in Green Screen by DoInk. Share your creatively pathed videos with us, and let your imagination soar!
#Green Screen by DoInk#Advanced Pathing Tutorial#Precision Motion Paths#Keyframing Techniques#Dynamic Animation in DoInk#Elevate Your Video Editing#Creative Video Effects#In-Depth DoInk Tutorial#Visual Storytelling Enhancement#Tips for Advanced Pathing#DoInk#Do Ink#100 Day Project#100 day of school project#Best IOS App#Best edtech Apps#Youtube
0 notes
Photo
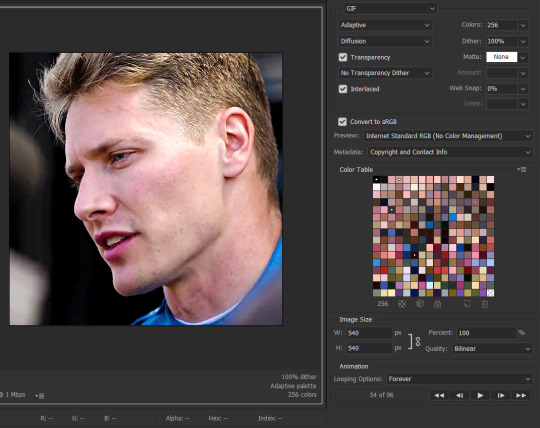
KEYFRAME TUTORIAL FOR THOSE WITH A WORKING KNOWLEDGE OF PHOTOSHOP AND GIFMAKING
This is my gif with the coloring I want it to have eventually (including the manipulated color). I changed the yellows and reds in the scene to be purple. I want the majority of the gif to be purple and cyan, but do not want it to be on her skin.
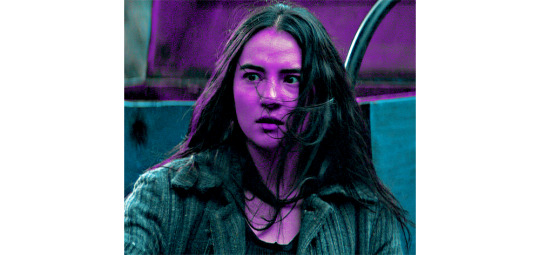
First add a layer mask to the adjustments that are creating the color you want to remove. I used several layers to create the purple coloring, so I grouped them together and added the layer mask to the group instead of having to do them individually. In this case, I erased anywhere the purple was on her skin.

She is walking away in this scene, so this layer mask alone is not enough. This is where keyframes come in.
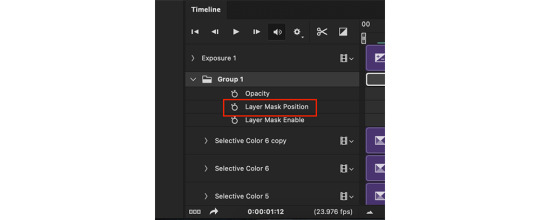
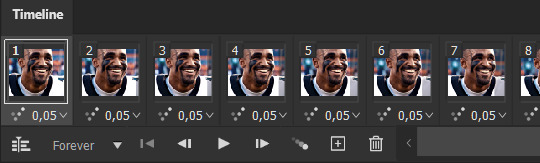
In the timeline window, scroll to the layer that your layer mask is on (or in my case, group). On the far left side, each of the layers should have an arrow which toggles a drop down menu. Click it and it will list options for Opacity, Layer Mask Position, and Layer Mask Enable. Make sure the current time indicator (small blue arrow and red vertical line in the timeline window) is positioned at 00:00:00 and then select the clock icon next to Layer Mask Position. It should place a small yellow diamond at the same place as the indicator. Each successive move of the mask will place a grey diamond at the timestamp that you move it.
CMD+click on the layer mask in the Layers window so that the area of the mask becomes outlined with a dotted line in the main workspace. Click the chain icon next to the layer mask in the Layers window to unlock the mask's movement.


The next steps are the most tedious. You have to manually move the layer mask every few frames to a new position that follows the movement of the gif. I usually zoom the timeline in so that each second is broken into six sections and pick a new layer mask position at approximately each section. If there is more rapid movement in the gif, you may have to pick new positions at more frequent intervals and vice versa.
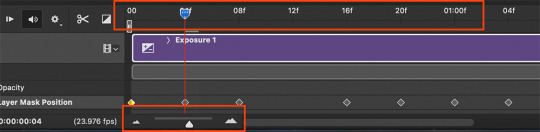
After the initial layer mask is set at the 00:00:00 point in the timeline, select the next interval that you want the layer mask to move to. Do this by moving the time indicator to your chosen point. Now with the move tool, click within the layer mask and drag it to where it needs to be to keep coverage on your desired area. The longer/more frames in the gif, the more keyframe points you will have to select. This gif was about 2.5 seconds long and I used 14 different points.


These are just a few of the keyframes I made on this gif. You can see here that the original area that I erased in the layer mask doesn't quite cover all of her skin throughout the movement. I just erase a bit more until I'm satisfied with the coverage.
Once you have mapped all the points out, deselect the mask area and click the blank space where the chain icon was to make it reappear and return the mask to a locked position.
Scrub through the gif to make sure that the mask covers everything you want and also that the keyframes make it move smoothly. Shorter intervals and minor position changes between keyframes usually keeps choppiness (this normally presents as the mask noticeably jumping to a new position) to a minimum. You should not be able to notice the mask's movement except in the way it removes color from specific areas as intended.
Export and save the gif as normal.
This is my finished result:

#userfanni#omgari#usersunny#userbells#userkraina#tuserabbie#tusergabriela#useroli#userangelic#supervalcsi#userphe#keyframes#*tutorial#tagging a couple of you who have been like ‘how tf did you make this’ on sets that i used this technique hope you dont mind#idk how coherently this reads or if it even explains it well enough but feel free to ask for clarification#there are also other keyframe tutorials on here that are written much better so check those out too if mine doesnt make sense#but yeah this is how i make my vibrant gifs that have movement in them#i'm going to make a tutorial explaining the actual coloring process too eventually#might make a part two of this explaining how to use this method for more complicated movements#like when your subject moves in multiple directions or there are multiple subjects#riah.gif#riah.txt
544 notes
·
View notes
Text
youtube
#After Effects tutorial#Social media post animation#Animation techniques#Motion graphics#Adobe After Effects#Design principles#Typography#Keyframe animation#Color theory#Engagement strategies#Digital creativity#Graphic design tutorial#Social media marketing#social media post animation after effects#motion graphics templates#adobe after effect tutorial in hindi#motion graphics#motion design#motion graphics designer#animated graphics#motion design studio#Youtube
1 note
·
View note
Note
Hi, me again!
Ty for the reply, I would love an in depth tutorial if you don't mind as i really wanna get this effect to work and I kinda work best when it's spelt out for me when learning new techniques lol :)
hey anon, no worries! here's how i used this amazing template by @danesdehaan and added a rolling effect like this (from this gifset):
this effect uses photoshop's timeline. i use cs5, for reference.
detailed tutorial under the cut :)
I. PREPARING THE TEXT
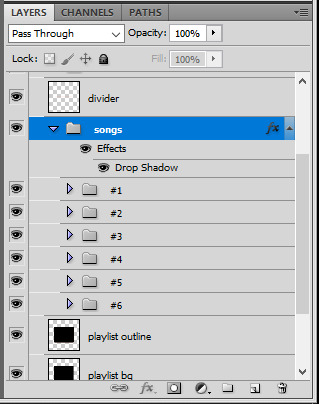
when you open the template, you should have a group called "songs" with 3 groups for each song. what you wanna do is duplicate these numbered groups until you have the amount of songs you want. for each group, use the move tool or your keyboard's arrows to move the duplicated song text layers/groups on your canvas so they're under the first three that are already there. make sure these new duplicated layers are in the "songs" group.
then type the numbers, song titles, artists, song durations, etc. it should look like that:
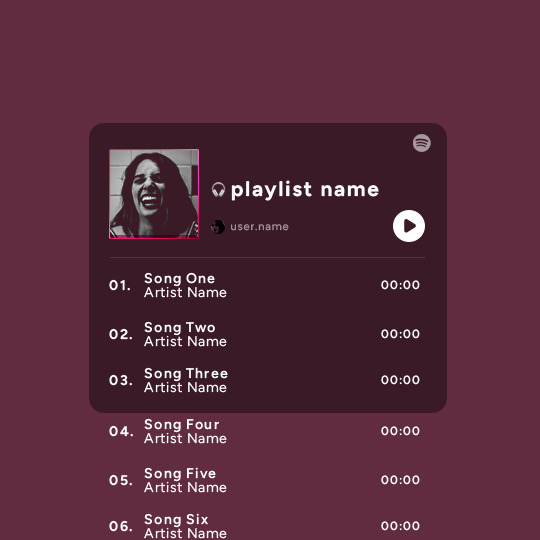
i wanted mine to have a smaller gap in between each song, so i used the arrows to move each song group closer together, and it looks like that before the animation:

II. ANIMATED EFFECT
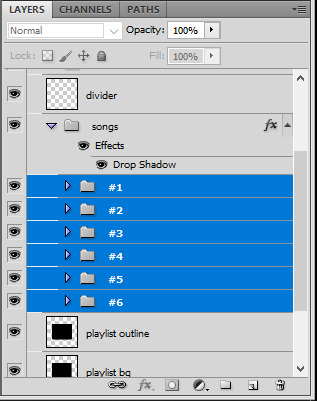
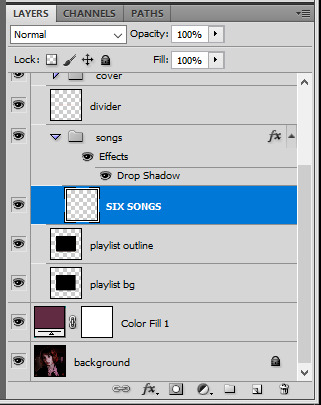
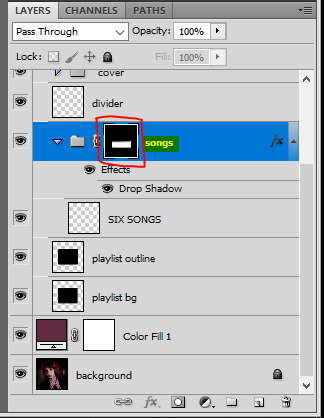
once you have typed everything, make sure there are no mistakes and that you won't need to edit anything about the songs or durations or anything like that, because you won't be able to go back. when that's done, select all of the numbered song groups and right click > Merge Layers.
that will give you one layer with all of the songs together. i've renamed mine "SIX SONGS". make sure this new merged layer is still in the "songs" group.
once that's done, you're ready for the animation. and it's pretty easy, because you only need two keyframes: one at the start of the gif, and one at the end.
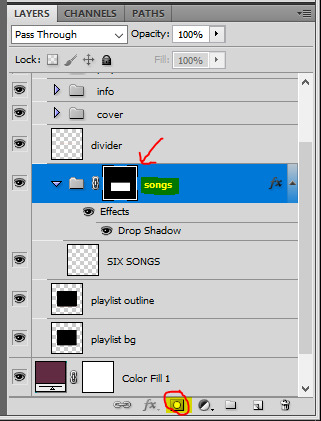
go to the start of your gif on the timeline, and toggle the position keyframe animation by clicking on the little stopwatch icon. a little yellow keyframe should appear where the cursor is, at the start of the gif:

then go to the end of the gif with the cursor. with the "SIX SONGS" layer selected, use the move tool or keyboard arrows (my preference) to move up the text until all the songs are inside the darker rectangle. once you move this layer's position, a keyframe will appear on the timeline and the animation will be created.
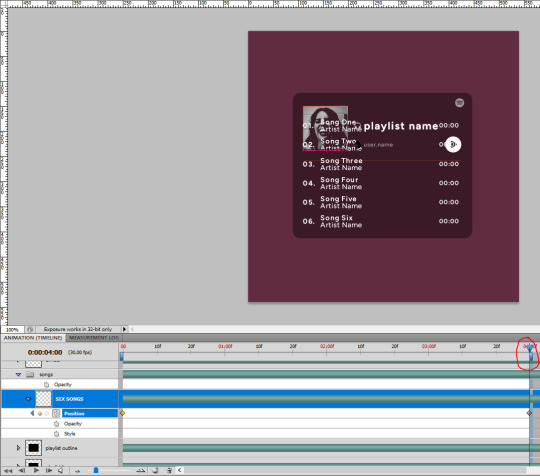
the animation now looks like this:
if you want, you can now edit the speed of the animation by moving the keyframes. the closer the two keyframes are, the faster the animation will be; the further apart the keyframes are, the slower the animation will be.
III. LAYER MASK
since we want the songs to be contained in the dark rectangle and below the line, we need to add a layer mask. i started by creating a shape of where i want the songs to be contained with the rectangular marquee tool:
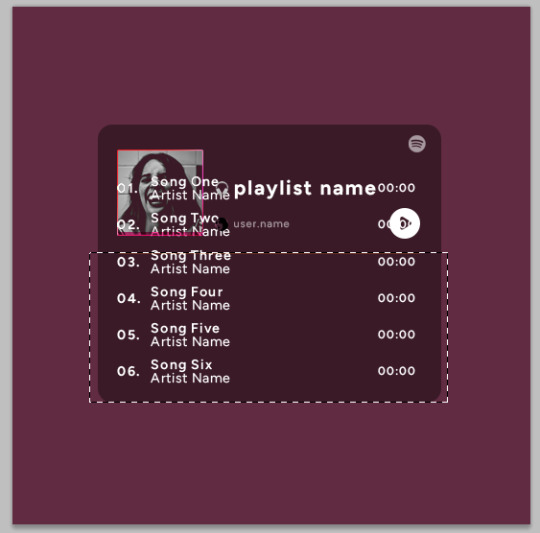
then, on the layers panel, select the "songs" group and click on the layer mask icon to create a mask with that rectangular selection.
if you play the animation after making that layer mask, it should now look like this:
if you like it that way then you are done, yay!
but if you'd like softer edges, like i have done for mine, click on the layer mask's black and white thumbnail. use the brush tool with a 0% hardness and the black color to make the edges of the mask softer. make sure you are making your brush strokes with the layer mask's thumbnail selected.

once you have brushed a bit of black with a soft rounded brush on the top and bottom of the mask, the animation should look like this:
and that's it! i hope this was clear enough :)
#alie replies#Anonymous#*ps help#photoshop#tutorial#resource#completeresources#allresources#resourcemarket#usertj#usertina#usercats#useraish#userdean#userabs#userraffa#userbuckleys#uservivaldi#userisaiah#usernorah
394 notes
·
View notes
Note
How do you make your gifs?
Hello hello! I love talking about gifmaking, so thank you for giving me the chance to ramble.
Instead of a detailed step-by-step walkthrough, I will link tutorials and resources written by the wonderful Tumblr creators on here along the way. Everyone has their method and preferences, and there’s no right or wrong way to make gifs. I’m going to share techniques and resources I picked up along the way that work best for me—they may or may not be suited to your preferences, but I hope you’ll find some helpful things here.
(Warning: screenshot/image heavy)
USEFUL TUTORIALS AND RESOURCES
Here are some tutorials and resources that I found very useful when I got back into gifmaking:
Gifmaking tutorial using video timeline by @hope-mikaelson is identical to my own process
Gifmaking and coloring tutorial by @kitty-forman, whose process is very similar to my own
Giffing 101 by @cillianmurphy, an incredibly detailed tutorial that covers everything you need, including a step-by-step guide to using HandBrake
Gifmaking and coloring tutorial with 4K HDR footage by @sith-maul, another incredibly detailed tutorial with many useful tips
Gifmaking tutorial by @jeonwonwoo, incredibly comprehensive and covers so many aspects of gifmaking from basics, sharpening, captioning, and text effects
Gifmaking/PS tips and tricks by @payidaresque
Action pack by @anyataylorjoy, the Save action is especially a true life-saver
@usergif and @clubgif are amazing source blogs with many tutorials on gifmaking, color grading, and gif effects, can’t be thankful enough for the members for their work curating and creating for these blog!
TOOLS
Adobe Photoshop CS6 or higher, any version that supports video timeline. @completeresources has many links to download Photoshop, have a look!
Photopea is a free alternative to Photoshop, but it has a slightly different UI, check out these tutorials for gifmaking with Photopea
HandBrake or any other video encoder, especially if you’re working with .MKV formats
4Kvideodownloader for downloading from YouTube, Vimeo, Instagram, etc.
OBS Studio or any other similar screen capturing software. To prevent duplicate frames in gifs that prevents your gifs from looking smooth, try to match the recording frame rate (FPS) with the source.
IMPORTING FOOTAGE AND WORKING IN VIDEO TIMELINE
I work exclusively in video timeline instead of importing video frames to layers or loading files into stack. For videos that don’t require converting/encoding using HandBrake, especially ones that are already in .MP4 format, I tend to open the video directly on Photoshop, and trim the videos around directly.
As mentioned above, this gifmaking tutorial using video timeline is exactly how I make gifs. I find it more efficient, especially if you’re making multiple gifs from the same video/the same scene with little to no change in lighting conditions You can simply slide around sections of gifs you want to save, and they will all be the same length.
Another thing also covered in the tutorial linked is the ability to change video speed in video timeline mode. Right click on the video and set the speed before proceeding with cropping/resizing. This is also very useful when you’re making blended gifs where you need the footage to have the same length.
Slowing footage down.
As mentioned in this post, changing the FPS before slowing down the gif results in smoother gifs. Doubling the frame rate before slowing down your gifs usually yields the best result.
Speeding footage up.
I love using this to speed up slow motion B-rolls to make the speed slightly more natural. It will result in nice, smooth gifs:

(B-roll footage, normal broadcast speed)
(200% speed)
Subject won’t stay in frame?
Another feature of the video timeline mode. Keyframes are your best friend. This tutorial by @kangyeosaang covers everything you need to know about panning gifs. I use this technique regularly, it’s a life-saver.
COLORING
Here are some coloring tutorials I found very useful:
Coloring tutorial by @brawn-gp beloved, their coloring style is second to none
Mega coloring tutorial by @yenvengerberg, for stylized /vibrant coloring
Understanding Channel Mixer by @zoyanazyalensky
Coloring rainbow gifs by @steveroger, which delves deep into Channel Mixer
I tend to go for neutral-saturated coloring in general, especially for minimalist gifsets with no effects (blending/isolated coloring/overlays etc.), but the possibility is endless for stylized coloring. Here’s what my adjustment layers look like for the example gifs above.
The base footage for this Charles gifset is incredibly desaturated. I started with a Curves layer to bring contrast to the gif, as well as do some color-correcting to bring the base footage to a more neutral tone. To bump contrast, I also like to add a black and white Gradient Map layer with a Soft Light blending mode at 10%-30% opacity:
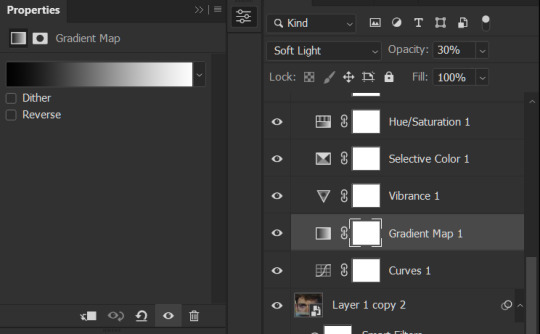
The Vibrance layer is then used to lift the saturation of the base footage, with the Selective Color, Hue/Saturation, and Channel Mixer layers to help remove the green/yellow tint to his skintone.
An underrated adjustment layer/preset in my opinion is the Color Lookup. You can layer in pre-loaded .LUT color grading presets to help speed up your process. For this gif, it’s simply a base preset Soft Warming Look to achieve a warm, pink-tinted tone.
In hindsight I feel like this gifset is too saturated, his skintone is skewing very red/pink, I could’ve bumped down the lightness of the reds with a Selective Color layer or a Hue/Saturation layer. Try to err on the side of neutral for skintones. Experiment with layer orders—there’s no right or wrong! Remember that each layer build up on the one before it.
The base footage of the Jalen gif is already quite nicely color-graded, but it’s still muddy and underexposed. As with the Charles gif, I started with a Curves layer to bring the gif to a better baseline contrast. Then I focus on brightening the gif with the Brightness/Contrast and Exposure layers.
The Hue/Saturation and Selective Color layers are to color-correct Jalen’s skin tone—it’s something I spend most of my time coloring gifs and focus a lot on, especially when color grading BIPOC skintones. Putting a Vibrance layer, upping the Vibrance and Saturation, and calling it a day would make his skintone skew very, very yellow/orange.
Focus on the reds and yellow for skintone, play around with the Saturation and Lightness sliders, use the Hue slider with caution.
It can be tricky to achieve the right skin tone when working with sports footage vs the higher quality, higher dynamic range footage of films or TV shows, but I try to keep it as close to the subject’s natural skintone as possible.
Here are some of tutorials with tips and tricks on coloring BIPOC:
How to fix orange-washed characters by @zoyanazyalensky
How to prevent pink-washing and yellow-washing by @jeonwonwoo
Coloring tutorial by @captain-hen
Changing lighting conditions?
Fret not—this is why I love working in video timeline. I’ll take this gifset as an example: it’s a deceptively difficult one to color. The footage is 720p and the sunlight shifts throughout the video, so matching across gifs was tricky.
My solution was to split the clips in sections with consistent lighting, and apply adjustment layers to the individual sections before applying general color grading layers on top of everything.
We can make use of the Fade Transition effect for sections where the lighting changes within the gif section we want to color.

(without vs with Fade on the Brightness/Contrast layer)
The difference is subtle in this example, but the brightness in the right gif is noticeably more consistent throughout. You can also add the Fade Transition effect to the beginning for a fade in, of course.
SHARPENING AND OPTIMIZING GIF QUALITY
This tutorial by @anya-chalotra covers everything you need to know about optimizing gifs for Tumblr.
Sharpening.
Sharpening is essential to making crisp gif images. Here’s another ask I answered re: my own sharpening settings and maximizing gif quality.
(base footage, unsharpened)

(color graded, unsharpened)
(color graded, sharpened)
The final gif is sharpened with Smart Sharpen, 500% at 0.3px and 10% at 10px (my standard sharpening settings).
Here are some tutorials and resources on sharpening:
Sharpening process by @anya-chalotra
Sharpening tutorial with added gaussian blur by @haleths
Sharpening action by @daenerys-stormborn
Size your gifs for Tumblr correctly.
This is essential: full width gifs are 540px wide.Two side-by-side gifs should be 268px wide. Here’s a handy post on gif size guide for Tumblr.
Incorrectly sizing your gifs will take away the quality of your gifs: undersizing your gifs will especially make them grainy, blurry, and /or pixelated, and won’t display correctly on many people’s desktop theme. Oversizing usually isn't as dramatic as undersizing, but it will make the gifset glitch when displayed, and the file size will be unnecessarily bloated.
Work with HD footage if possible.
Media fandoms (films/TV shows) are luckier than us in the sports trenches—we have to work with what we have. Broadcast footage is usually subpar: lacks contrast, pixelated, very desaturated, the list goes on. But it’s possible to still make high quality gifs from subpar footage. Here are a couple of tutorials to mask low source footage quality:
low quality video ➜ “HD” gifs tutorial by @nickoffermen
Sharpening low quality footage by @everglow-ing
(This gifset I made is from a 480p footage with horrendous lighting conditions and colors, and the end result is decent I’d say)
Save for Web (File > Export > Save for Web (Legacy) or Ctrl + Alt + Shift + S) settings.
I default to Adaptive + Diffusion but also use Adaptive + Pattern from time to time. Any combination of Adaptive or Selective + Diffusion or Pattern will give you a good result. In my experience some gifs will need the Selective color table for the colors to display correctly.
Here are my default settings:
SAVING AND EXPORTING FOR TUMBLR
Converting to frames and adjusting the gif speed.
If possible, avoid exporting your gif and reopening it to adjust the frame speed. I used to do this sometimes when I’m lazy, I have to admit, but this is where this Action as mentioned at the beginning comes in very handy. It converts all visible layer into smart object, then converts it back to frame animation.
Step-by-step:
1. Select all layers
2. Right click > Convert to Smart Object
3. Go to the Timeline menu (≡) > Convert Frames > Flatten Frames into Clips
4. Go to the Timeline menu again (≡) > Convert Frames > Convert to Frame Animation
5. In the same menu (≡), select Make Frames from Layers
6. Delete the first frame (it’s a duplicate) then set your frame speed

Now you can adjust the frame speed before exporting it (Save for Web).
Pay attention to the source framerate.
The frame delay of 0.05 s is usually the default to make gifs for TV shows and films, and it is preferred by most gifmakers. This stems from the fact that most movies and TV shows are 24 or 25 FPS. This may not be the case for all source videos: you might get 30 FPS footage, and sports or gaming footage can be 50 or 60 FPS. Gif speed also depends on the FPS of your original file. Play around with gif speed and see what feels most natural to you.
My rule of thumb is the frame delay Photoshop gives you + 0.01 s. For example, 50 FPS footage will give you 0.02 s frame delay (25 FPS gives you 0.04, 30 FPS gives you 0.03, etc.), so set it to 0.03 s. I usually err on the side of a faster frame delay for smoothness in in-game sports footage, anything else (interviews, press conferences, B-rolls) can get away with being slowed down. Again, experiment and see what you think looks best!
Keep gifs under the Tumblr file size limit (10 MB).
Cut down the number of frames. My gifs are usually around 60-70 frames for 540px full-width gifs, but depending on the coloring, sometimes you can get away with more. 268px gifs can go up to 200+ frames.
Crop your gifs. Remember to keep full-width gifs at 540px wide, but if necessary, you can crop the height. My go-to sizes are 540x540, 540x500, 540x450, and 540x400.
Amp up the contrast of your gifs. Flat colors like black cut down gif size.
The Grain filter or Noise filter, though beautiful for aesthetics or simply necessary sometimes to mask low source footage quality/pixelating, may bloat your gif size.
Play your gifs back before exporting.
Pay attention to duplicate frames or glitches, you might need to get rid of them!
Hope this is helpful! Don’t hesitate to send an Ask or DM if you need any help, I will happily answer all your questions and send over PSDs. (I’m also on Discord—just shoot me a message if you need my tag!) Happy creating :]
#tutorial#PS asks#gif tutorial#Photoshop tutorial#I guess this is more of a resource link dump than tutorial but. Hey. Why reinvent the wheel...#Sorry for the late answer I hope you see this Anon :]#completeresources#allresources#userxoames#userbarbi#usernrzr
1K notes
·
View notes
Text
He's getting way too old for this shit 😑
What can I say? I wanted to learn a new animation technique and this image popped in my brain. I definitely was making this expression too while trying to figure out keyframes lol
Hope all my fellow Chilchuck enjoyers like this one! He's certainly the most guy of all time
#dungeon meshi#delicious in dungeon#chilchuck#chilchuk tims#chilchuk dungeon meshi#animation#gif#artists on tumblr#my art#2024#beans!
22 notes
·
View notes
Text
Q&A !! With @leafenzo/aka Leah and myself, Eliza
Leah: We don't hold ourselves to a strict schedule, I will say though we are a large chunk of the way done - all basic dyed blocks (like wool, concrete, banners, etc) are already in. We're just ironing out extra features related to the dyes. Also- before it releases we will have a public playtesting period for a tad if anyone reallyyy wants it early :3 (albeit in a quite unstable form). The plan is to release it for Fabric, and for 1.20.1 through 1.20.3 for now.
Leah: teehehe chunk-of-fun :3 jfsljfkslj
Eliza: well, for the most part, the new bugs we are adding are things i just find interesting and have a good model idea for. i like making them very large, fitting into the large bug precedent set by the bees and silverfish :3 Right now the planned blorbos are the beetle, the wooly beetle, mantis, dragonfly, mint slug and silk moth! I've also made a seahorse model, but I don't think I'll end up using it in the dye mod. I might add more in the future if I'm feeling up to it.
Eliza: We have a lot of compatibility features in the works - including Suppementaries' Presents, every dyeable block in Create, Farmer's Delight's signs, and compatibility integration with Nature's Sprit as well. I've also thought about making dye compat with Another Furniture, but... that is a monumental task that I'd probably need help with/be able to streamline. We will also try and add compatibility textures to mods that autogenerate new dyed blocks - but that will have to be a case-by-case basis, and will be figured out during beta testing.
Eliza: I would love to make a tutorial at some point! - however, my process right now is very spur-of-the-moment and kinda random, haha. Maybe I'll make a post in the future if i'm feeling up to it. At the very least, I do follow some basic principles with designing my models:
Try to use clever techniques to minimize the amount of cubes used - this creates a confine that makes me get creative with what cubes i use while also optimizing the model at the same time.
Try to be as expressive as possible with cubes being used, no cube should be left untouched in the keyframes of animation.
Keep colors interesting by shifting hue a lot depending on lighting and what kind of material i want to convey (for example, if most of the model is smooth and green to blue, i'd go for green to yellow for the rougher parts)
Eliza: I would like to add some more storage blocks in the future, mainly stuff from new updates and any other random things I think of. I was thinking of making a create compatibility submod maybe, but because of the effort it takes to come up with textures its still just a thought.
Leah: If by that you mean creating mods that add new features to squashed, or compatibility fixes, of course! and that goes for our other mods too! :D We'd seriously feel honored.

Leah: For me, the hardest part was just the frustration of it, frustration at the code, the tutorial, or far more often just at myself.
Just know that it's the hardest at the beginning, but if you stick with you'll get your bearings and it will somehow start to get a bit easier.
Also, datagen! It's useful as can be but gosh did that take me a while to figure out even just the basics of how to generate a model haha.
Thank you for all the questions!! We apologize if we didn't quite get to your question, there were a lot and we tried to pick the most general ones :3
If you still have a question that wasn't answered here, be sure to join and ask it on our discord!: https://discord.gg/eJePAPE27T
#minecraft#minecraft mods#modded minecraft#mineblr#pixel art#mc#dyes#el and l's dye mod#squashed#l-tones#lithogeology#q&a
46 notes
·
View notes
Note
ik its a lot to ask so sorry if no, but can you do a thing for homestuck flash animations and techniques? (thinking specifically [S] Attempt rare and highly dangerous 5x SHOWDOWN COMBO. (page 4085))
Sure, I'd love to cover Flash animation! I intend to put out more technical posts on HTML5 animations specifically at some point in the future, too. Although, there isn't much unique to Homestuck's flashes in terms of techniques that would warrant a whole post. They're 90% just linear classic tweens.
Hussie tweened the legs from right to left and the character portraits from left to right, copy-pasting the keyframes and making the tweens' spans exponentially shorter and shorter to make the movement faster and faster.
Here's the FLA file if you'd like to take a look. Note: It can't be opened in anything older than Flash CS4.
55 notes
·
View notes
Note
How does one animate as good as you?? And what programs do you use?
WAAAAA GIGGLING PROFUSELY ADKSFDGH <333
Honestly!! I don't recommend you animate like me AJSFHDKGH I only sketch out the keyframes, then I draw the lineart of those keyframes, and just kind of... wing the in-betweens from there AFHGHJWEFGD I've always had trouble with lineart consistency when drawing out the roughs so I abandoned them entirely, but it'd probably make my animations more fluid... I dunno! I don't really bother with making sure everything is perfectly consistent (though it's fine to do that as well), most likely I see the mistakes more than everyone else, so I don't worry too hard about little details. Personally I like to find an animation I really like, slow it down, and just analyze it in order to learn more techniques. Also animation memes, that got me into animating in the first place... I should make more in the future
For GIFS and animations not synced to audio (like the one above), I use Procreate (not Procreate Dreams, just the animation feature in the normal app). For animations that ARE synced to audio (like Lagtrain), I use Flipaclip (paid version, but not the subscription, the old payments when it was just one-time purchases). For editing I switch between Alight Motion, Capcut, and Adobe After Effects depending on if I can afford the subscriptions. I also sometimes do tweening/puppeting on AM and AAE! I would love to learn how to use Live2D too.
(also, am sorry for the late reply!! but i'm back home and can draw WOO)
33 notes
·
View notes
Note
im obsessed with your art and animatics... do you have any tutorials or process posts about some techniques you use? like how you move characters separate of the backgrounds (is it just some clever tweening in vegas??) ty in advance... ;; v ;;
sure! umm this is gonna be messy sorry if anythings incoherent. ill walk u thru this segment of the pkradi hollow fight bc theres a lotta layers. heres the shot for reference

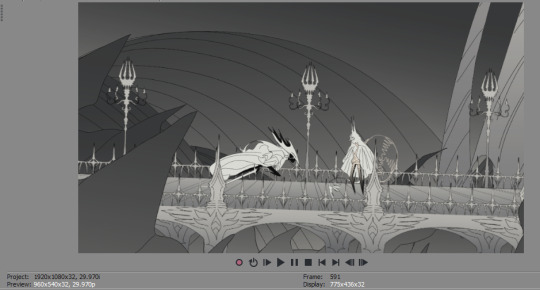
aaand heres a breakdown of the layers (called tracks in sony vegas but im just gonna keep calling them layers) from top to bottom
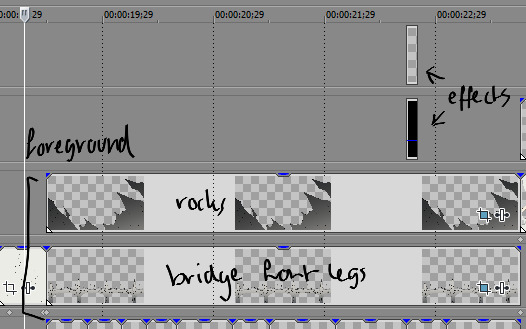
heres the foreground! where i wanna place shit that goes in front of the characters and background

heres where the characters will be placed! sandwiched between the foreground and background, they get more frames (as shown by the smaller segmented images on the timeline) opposed to set pieces which is usually just 1 image, which means we gotta approach tweening w the characters differently since there are a lot more images! ill explain that after this initial breakdown

and heeeres all the background shenanigans. not much to add here. those sure are background frames

RIGHT now to the tweening. when tweening 1 image/frame whateva you're gonna wanna use pan/crop (located on the image, that lil box with a crop around it icon), use this for stuff that only really needs 1 image, like a background. because its easier. like you could use track motion for everything i guess but pan/crops nice and easy and doesnt give me a headache she treats me nice and good

but uh yea so youll start with a little keyframe at the beginning, drag the pan/crop timeline to the end and click the little + sign to create a keyframe! then from there move the pan/crop box (the one with an F on it lmao) around and kablammo. Movement. usually with backgrounds its just a simple panning to the left or right, like how i did it for this shot! but you can do lots more like zoom and angle it etc

aand when you wanna tween across multiple images in a layer/track you're gonna head on over to your layer/track and hit that funny little track motion button aand youll be greeted with a pan/crop lookin thing except its like. for the whole layer/track instead. so the timeline is waaay bigger since it covers the whole thing. but umm yes same principle as pan/crop basically, except youll now need to insert "hold" keyframes right after your final keyframe, copy and paste a keyframe with all the positions defaulted (im gonna assume youre using 1920 x 1080 since its the standard)

like so and then right click a grey keyframe and choose "hold". this stops everything from fucking up and flying between each keyframe basically LMAOO the Hold is it waiting for your next keyframe that is Not a hold. if that makes sense. anyways yea only worry about that for track motion JUST because it works with the entire track/layer, with pan/crop you can ignore this
BUT YEAH thats my silly little sony vegas tweening guide i hope that helps!! umm i have another tutorial also so u can check that out too if youd like :D
74 notes
·
View notes
Text
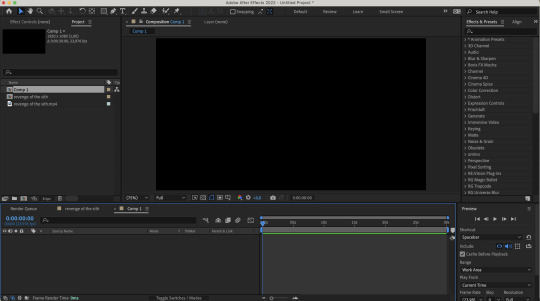
hi! i’m user ames tattooine, and i’m gonna go over how to cut footage out of a scene. i’ll talk about rotoscoping—what it is, its history, and how to mask with the rotobrush successfully. i will also briefly go over how to use the pen tool to mask in after effects.
though this is pretty comprehensive and info-heavy already, there are still things i don't go over! but it should be a guide fit for beginner-intermediate after effects users.
YOU WILL NEED:
adobe after effects (minimum version cs5 / anything released after 2010)
basic knowledge of the interface and workflow, including but not limited to: compositions/precompositions, keyframes, and how to use brush tools
time. a lot of it
patience. more of it
also, before you click "read more," please note that this is about 3000 words long. definitely recommend viewing it in your browser. with housekeeping out of the way, let's go!
WHAT IS ROTOSCOPING?
very simply put, rotoscoping is a tracing technique. physically, it’s a little like using a selection tool on video. conceptually, things are slightly different, and that’s due to how it was meant to be used—but like many artistic tools, rotoscoping was transformed by contemporary artists / editors / animators / etc to become the versatile thing it is today. for mainstream giffing and video editing purposes, it is most often used as a way to mask footage out. see:
UNDERSTANDING ROTOSCOPING
the main thing you need to understand is that rotoscoping was meant for animation. not masking, not giffing—hand-drawn animation. in its early days, animation was clunky and generally unnatural-looking; not due to stylistic decisions about motion, but because artists were mostly guessing at how a movement would be divided into frames between point A and point B of any given movement. then, in 1915, two brothers named max and dave fleischer stuck a projector to a table, attached it to a car light, and beamed that light onto a block with tracing paper attached. they’d then take the image produced onto the tracing paper, trace out the figure (in the first case, dave dancing on top of a roof in front of a white sheet), and repeat this frame by frame to eventually trace an entire scene. the animated character would be drawn over / match the traced figures, and bam, animators suddenly had a HUGE shortcut to imitating real life movement in drawn scenes. (or, more accurately, only max and dave did, at least until the patent expired lol)
WHAT DOES THIS MEAN FOR ME??
well, maybe not much if you don’t care to nerd out like i do, but it should absolutely inform the choices you make re: scene selection. dave and max used a white sheet for contrast and added a car light to their apparatus to enhance that contrast when they were tracing. if you try to rotoscope a scene that doesn’t have much contrast to it, you may not come out the other end with much success.
but remember: the tool wasn’t created so that you could cut your blorbo out of a scene, it was so that artists could trace movement for funky and weird animated characters in the 1920s. over time, and as tech advanced, people realized that if they completed half the rotoscoping process, they would have an isolated scene from the original footage. aka, they could mask out background footage. sprinkle in a little web 2.0, accessibility and increasingly easy use of tools from the mid-90s onwards (and the implementation of the rotobrush tool specifically after 2010), and we have a fascinating study of how tools can be transformed from their original use to do things that are different but equally valid. and yeah—2010. it’s mind-boggling to think about the leaps and bounds we’ve made with editing tech in the last 10-15 years alone. i digress.
ROTOSCOPE =/= ROTOBRUSH
so here’s where you might be like, jesse what the fuck are you talking about dot jpg. i’ll try to be concise: rotoscoping is the method. rotobrush is ONE of the tools you can use to rotoscope. i have a little issue about terminology that i won’t get into, but what people want to do in gifsets and video edits with the rotobrush is MASK. they are using the rotobrush to mask away footage, the same as if they used tape to cover up sections of a canvas. it’s easier, however, to think of it in the inverse—taking specific footage out, rather than snipping background away. imagine i have gingerbread dough, and i want to cut it into stars or various shapes. one thing i could do is take a knife and a stencil and physically cut out my shapes; another thing i could do is use a cookie cutter. the rotobrush tool is like a cookie cutter if it was driven by machine learning, involved way too much math and programming for personal comfort, and also was incredibly inelegant. the former method can be done using the pen tool, which is more time consuming, perhaps, but it lends itself to accuracy because it’s all done by you, the artist. i will be going over both methods.
THE ROTOBRUSH METHOD
fucking finally! we’re in after effects! first thing of note: my interface looks like this. yours, unless you also went through a sony vegas envy phase in 2015 and then modified your existing cs6 interface to be as inconvenient as possible, does not. don’t worry about it—the tools you need are located in the same place, and if ever i use a panel you can’t find, just click “window” at the top (both in mac and windows) and click what you need there.
step 1: select your footage, and be selective. and boy, do i mean be selective, or else you are in for a world of irritation. you want a scene that has naturally high contrast between your subject and your background. you want a scene that doesn’t have erratic movement, or if it does, you need to have the frame rate to support that movement. similarly, your background shouldn’t have too much movement either.
(what is erratic movement? well, let’s say your footage is 24 fps, and a character moves their arm between frame 0 and frame 12, or half a second. if the arm is moving incrementally throughout all 12 frames, or every 2 frames, that’s workable! but if you have a still image for frames 0-3 where the character’s arm is in one position, then another still image for frames 4-6 where the character’s arm is in a vastly different position—that’s erratic movement. after effects will not process that easily.)
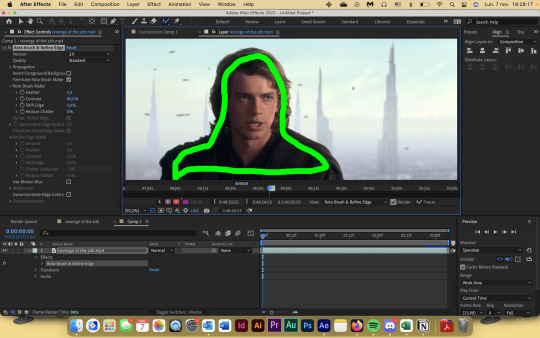
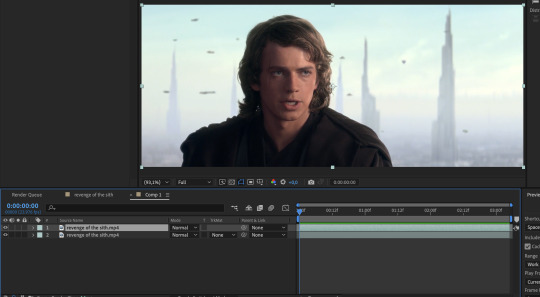
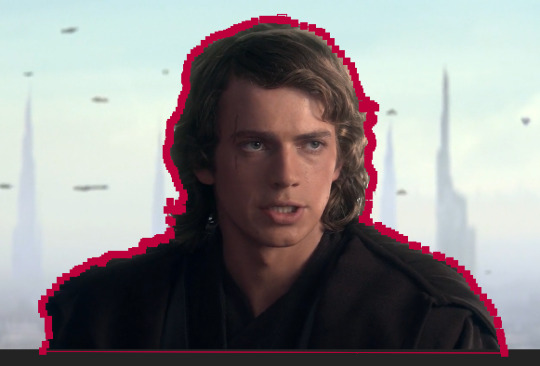
if you’re masking out footage of a human (or humans), then for your own sanity, choose a scene that doesn’t have a lot of flyaway hair. finally, you probably don’t want a scene that’s too long! for this tutorial, i’ve got this shot of my baby boy.
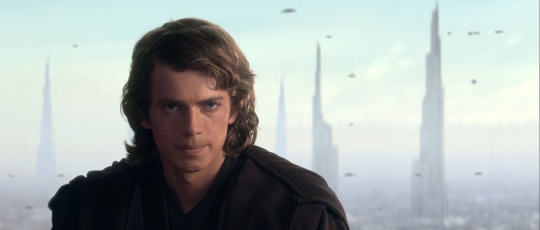
notice how he’s dressed in dark clothing against a very light background? how his hair is mostly flat to his head, and how there’s nothing really that could have erratic movement? the background is a little busy, but it doesn’t seem like anything that’ll mess up the rotobrush’s calculations. as a bonus, the subject is relatively large and details around the edges aren’t too detailed! this is the kind of footage that’ll give you an easier time.
note: when i say “calculations” btw, i really do mean calculations. the algorithm takes the brush tool set to “constant” and predicts “edges” based on things like contrast between pixels, relative position of where the brush was used, etc. this is why it can be really convenient, but also why it can be prone to error. as i said: inelegant.
step 2: isolate the scene in a separate comp, whether that be through creating a separate composition manually or just precomping your existing one. the key thing is to have workable start and end points that automatically pop up when you enter the layer so that you don’t have to wait hours for each unused frame to load. this is what i’ve got now:
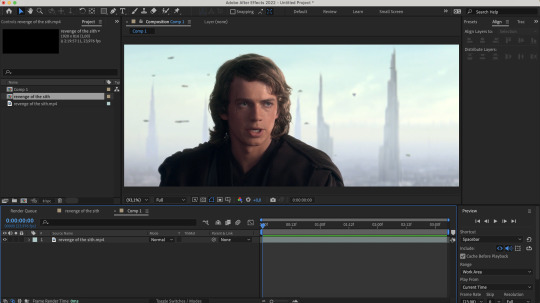
step 3: enter the layer by double clicking it in your timeline. you should see a separate panel pop up at the top here…
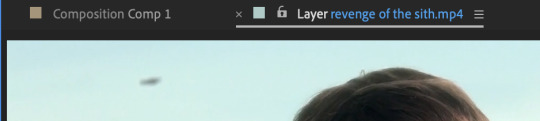
and what looks like the entirety of your footage here.

fret not! this is simply how layers work in after effects: they’re non-destructive, so you can add modify it to your heart’s content, and the original footage will not change. kind of like smart objects in photoshop, if you want a comparison. that is to say, yeah, in this layer, you DO have the entirety of your footage; in your composition, however, you’ve cut away all but 3 seconds of it. the point of step 2 will be apparent in one second when you do step 5.
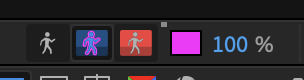
step 4: equip the rotobrush tool. that’s the blue icon here on your tool bar (turns blue when you equip it).
step 5: go to the beginning of your composition and vaguely trace the outline of your subject INSIDE the footage you want by clicking and dragging (like any other brush tool), like so:
the line doesn't have to connect, mine just does. you’ll notice that the "rotobrush and refine edge" effect is automatically applied, and if you zoom in on the timeline from step 3, you’ll also see that the start and end points of your workspace have been automatically set to fit your composition.
after you release your click-and-drag, you should see a pink outline appear around the selection.

you can change how you view your selection by hitting the buttons down here to toggle different alpha view settings. and if you didn’t know this already, alpha means transparency. i personally like switching between the pink outline and the alpha overlay setting—the former makes it easier to see the smoothness of my selection, and the latter makes it easier to see if i’m missing footage / provides a starker contrast.
step 6: refine the initial selection. if you have experience with tracking, you can think of this as a “master frame” where you’re defining the parameters that will go on to be approximated for the rest of the footage. reminder that you are manipulating an algorithm when you use this tool, so you want to feed it data! this means clicking and dragging to collect any missing footage, or holding option / alt while you click and drag to remove footage. if you see jagged lines (like around his hair here), you can make it smoother by tracing inside the subject around the area and removing footage from the outside around the area—basically, telling the algorithm that This Is Where The Edge Is And I’m Moving Around It.
step 7: click play and let footage propagate. once it’s done, it should preview and look something like this:
if you’ve done everything right so far, then your outline shouldn’t be jumping wildly around or anything—for the most part, it should stick to a good 80-90% of the footage you want! the more solid foundation you have that doesn’t need (much) fixing, the smoother the mask is going to be.
step 8: refine the “problem” frames. you can click through frame by frame and see where things go off the rails. for me, it’s anakin’s right (so my left) shoulder. basically repeat what you did in step 6 and add / take away footage as necessary to refine the edge. VERY IMPORTANT TO NOTE WHEN REFINING: the algorithm calculates edges FORWARDS. that is to say, if you make a change 2 seconds in, that change is only going to make modifications from that 2 second point onwards. it will not make a change backwards, meaning that if a problem starts to show up, you need to fix it from the root onwards and teach the algorithm that This Is Where The Edge Is. if you don’t do this, then you will end up going backwards frame by frame fixing the same mistake over and over again, and it will look wonky because you will redraw in different places. i have had students do this and spend hours in misery. be patient: work from the start and fix as you move forward frame by frame! don’t jump forwards and backwards if you can help it.
step 9: fiddle with the effect settings. now that you’ve basically gotten your mask as neat as possible, you can play with the actual effect itself. just quickly, i’ll explain what i think to be the most important things (and the other settings, you can experiment with on your own):
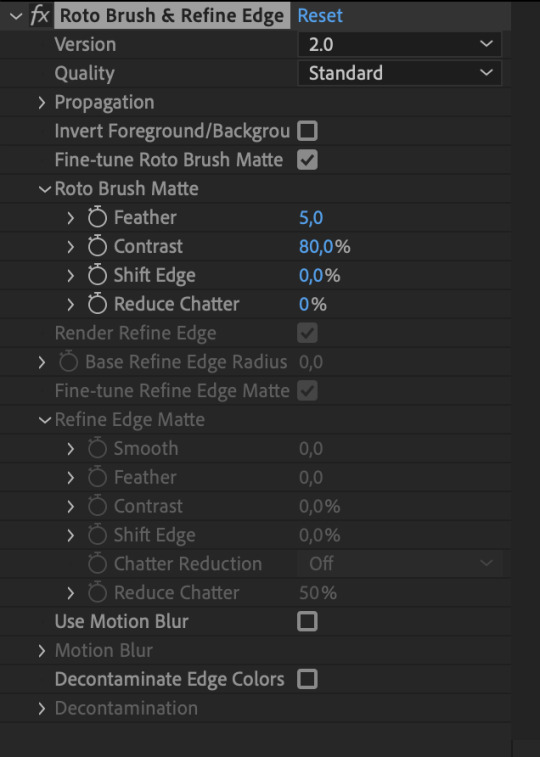
version: 2.0 is their latest and ostensibly “most improved” version from the 2020 update, though if you don’t have the hardware that can take it, you’ll end up propagating frames for Hours. version 1.0 is perfectly adequate, and at times even more efficient than 2.0. up to you!
invert foreground / background: select the footage around your subject rather than the subject itself. can be very useful!
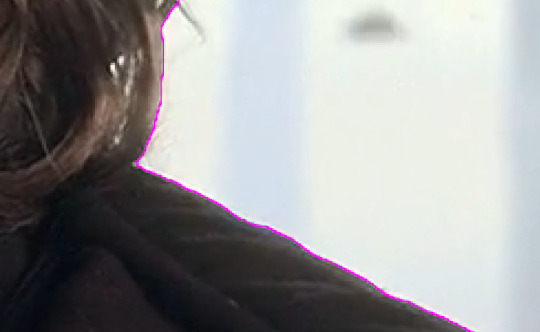
reduce chatter: chatter is the shakiness of your outline from frame to frame. when things get ugly—say, when you use the refine edge tool—is when your outline is jerking around every frame, seemingly unable to find an edge, like so (to the extreme—yours will likely be smaller twitches):
(also, this is me warning you right now. if you use the refine edge tool, you will triple your workload trying to actually refine it, and it will still look weird. if you insist on using it, be sure to work with a tiny brush size and stick as close as you can to the edge of your selection. this thing sucks and does not behave like it does in photoshop. LMAO.)
for the luke gifs, i had my feather at 10, my contrast at 90, my shift edge anywhere between 10 and 40%, and reduce chatter set to 100. these will vary greatly depending on the look you’re going for and also how neat your existing selection is. (at vague claims like this, i often hold a blinking neon sign at my students that says "REMEMBER MARSHALL MCLUHAN? THE MEDIUM IS THE MESSAGE? FORM AND CONTENT ARE INEXTRICABLY LINKED? CONSIDER THAT AND BE PURPOSEFUL IN YOUR DESIGN CHOICES PLEASE")
overall, the effects controls you see are very much like the select and mask feature in photoshop! you can play around with it and see what the other settings do, but those under roto brush matte are the main ones imo. and that’s all there is to it! you can render out your composition, or you can nest it in another composition if you’re working all in after effects, or whatever. for those who are slightly more advanced in ae: i wouldn't recommend using twixtor after masking to slow down the footage (if anything, risk the compression and add twixtor before, then render and import back and mask), but you can definitely adjust the time keyframes without impacting the quality of your selection. or you can sit and admire your genius and the power of c++.
THE PEN TOOL METHOD
this method is less a pain in the ass and more just.. very tedious. also jsyk, it works better with animated content (cartoons, anime, etc) and less so with live action just because of like, hair. i totally recommend being in a discord call with friends while you do this method because it is an absolute vibe and distracts you from how mind-numbing and boring editing actually can be lol
step 1: select your footage, and be selective. maybe not as particular as you had to be for the rotobrush method, but it should still have mostly the same elements. erratic movement isn’t so much an issue. i’m using the same scene as above for convenience.
step 2: isolate the scene in a separate comp, whether that be through creating a separate composition manually or just precomping your existing one. this is mostly for workflow reasons, but some people hate working with a lot of compositions, so it’s up to you if you want to work in the original composition with your whole footage.
step 3: duplicate the layer. you should have something like this now:
step 4: equip the pen tool, highlighted in blue here (turns blue when you equip it)!

step 5: on the top layer, create a mask around the very edges of your subject, starting from the beginning of your selected footage. you should end up with something that looks like this. i wouldn’t bother with curving your lines, just because it can be harder to move around (especially when you’re making video edits and masking out action sequences and whatnot). if you toggle the visibility off and on your bottom layer, you’ll see that you’ve masked out the rest of the footage, and everything else is transparent. woo!

NOTE: if you haven’t already, go to your preferences and make sure that this is toggled off. you want to be able to add and delete vertices at will without changing the mask path in previous frames!

step 6: hit “M” on your keyboard, or use the dropdowns on the uppermost layer to reveal the mask 1 dope sheet.
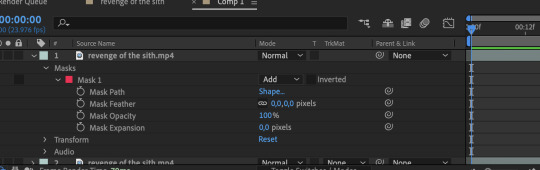
step 7: create a mask path keyframe at the first frame by clicking on the stop watch. your station should look something like this:

step 8: go forward frame by frame until the image changes. this may be by one frame, two, or sometimes three.
step 9: deselect your layer, then select it again. the mask outline should change from square vertices to circular ones.

step 10: click and drag to move the vertices so that they align with the edge of your subject again. feel free to zoom in and out as necessary! you’ll notice that keyframes are created automatically when you make changes, so don’t worry about manually inputting them.
repeat steps 8 to 10 until you’ve finished :) this is why it’s time consuming and annoying :))
bonus options: you can shift the edge of your mask by fiddling with mask expansion. mask feather will feather around your mask, and mask opacity will change the transparency of the footage outlined inside the mask. less sophisticated than the roto brush matte settings, but they work great!
annnd 3000+ words later… that’s it! that’s how you cut footage from a scene using after effects. i hope this was informative! if you have any questions, feel free to send an ask to usergif.
xo ames, signing off 🖤
130 notes
·
View notes
Text
youtube
Mastering Animation in Green Screen by DoInk Tutorial
Welcome to an exciting journey into the world of animation with Green Screen by DoInk! In this step-by-step tutorial, we'll guide you through the art of animating in the app, unlocking the creative possibilities to make your projects come alive.
#Green Screen by DoInk#Animation Tutorial#Animated Drawings#Keyframing Techniques#Layered Animation#Creative Animation Tips#Dynamic Video Effects#Elevate Your Video Projects#Visual Storytelling with Animation#Green Screen Animation Mastery#doink#do ink#greenscreen#green screen#doinktutorials#green screen tips#video editing apps#Youtube
0 notes
Text
After Effects Notes: INTRODUCTION
The Language of After Effects
Timeline:
Where you build a composition; shot or sequence by creating layers and determining timing.
Layer:
The elements that make up a composition.
Without layers, a composition is only a empty frame
unlimited amount of layers can be used
Property:
A specific setting for a specific characteristic of a layer.
each layer contains transform properties; Anchor Point, Position, Rotation, Scale and Opacity
Keyframe:
An animation setting at a specific time
between two or more keyframes on separate frames, the application can calculate precise in-between values.
Timecode:
The exact time of a given frame expressed either in hours, minutes, seconds, and frames, or as numbered frames only.
Frame rates are usually 24,25 or 30 frames per second.
Render:
Can be used as a verb; the action of writing an image or sequence of images (a video) in a format such as QuickTime Of as a noun: "My render is taking forever".
Codec and Formatic
The work codec is literally made up of "compression" and "decompression"
QuickTime and AVI are file formats that work with many codes.
Alpha Channel:
The transparency channel; the "A" in a RGBA image is standard to After Effects.
Each pixel is opaque, transparent, or somewhere in between.
The language of motion graphics and effects
Motion Graphics
The art of putting abstracted design (often including type) into motion to create delight and other emotional responses
infographics to high conceptual work
storytelling, illusion, visual effects
Visual Effects (VFZ)
Not to be confused with special effects (SFX), the digital post-production art of assembling photographed and fabricated elements to make a single shot to tell a story.
COMMON VISUAL EFFECTS: green screen, rotoscoping, motion tracking and colour matching
Green Screen:
Sometimes called colour keying or chroma key; a technique of letting colour stand in for transparency to remove all part of a background.
Rotoscoping:
Making a moving image frame by frame
Sometimes accompanied by "paint", cloning and touching up a frame.
Motion Track:
Also known as matching moving; precise evaluation of a scene or object to augment or replace it.
Colour Correction:
Digital enhancement of the colour look of images to focus the viewer's attention and emotional response.
Compositing:
The art and science of combining elements from disparate sources in a single image (still or moving); the compositor does this.
3 notes
·
View notes
Note
How many FPS do you animate on? Does it fluctuate between songs orrrr?
28 FPS always by default. Never been a fan of the standard 24, but 30 can sometimes feel too awkwardly smooth/fast for how I animate. Every animation board I have done should be 28 FPS unless it's super duper old.
A lot of movements I animate in 2's, AKA one key frame, & then an additional frame, then on to the next keyframe. So technically 14 FPS. This technique is generally standard in animation. If it's fast movement sometimes I'll do a few frames in 1's.
But I mean, really rough boards that aren't fleshed out... sometimes there's large keyframes, making it look chunky and low in FPS. Every file though is in 28 no matter what.
#* manages to respond to a simple q with like 3 paragraphs *#some people like 30 or 32#but cartoon show standard is almost always 24#or theyll often say 12 bc they animate in 2's#you didnt ask for all this sorry lmao
24 notes
·
View notes
Text
Mastering Trim Paths in After Effects: A Guide to Dynamic Shape Animations
Learn to create dynamic animations with After Effects' Trim Paths feature, perfect for smooth shape reveals and versatile motion graphics.


Animating Trim Paths in After Effects is a powerful technique used to create dynamic and visually appealing animations, especially with vector-based shapes and paths. Trim Paths essentially allows you to animate the start and end points of a shape's path, giving you control over how it reveals or hides over time.
Here's why it's amazing to use:
Controlled Reveals and Hides: Trim Paths enables you to animate the drawing of shapes, making it perfect for creating effects like drawing outlines, revealing text or logos, or creating intricate animations where shapes appear or disappear dynamically.
Versatility: You can use Trim Paths with a wide range of shapes, including basic shapes like circles and rectangles, as well as custom vector shapes created with tools like the Pen Tool. This versatility allows for endless creative possibilities.
Smooth Animations: It provides smooth and precise control over the animation of paths, allowing you to create fluid and seamless transitions between different shapes or states.
Layered Animations: You can apply Trim Paths to individual shape layers or masks within a layer, allowing for complex animations with multiple layers interacting and revealing each other.
Combining Effects: Trim Paths can be combined with other After Effects effects and techniques, such as keyframe animation, expressions, masks, and effects like Stroke and Gradient Ramp, to create even more intricate and unique animations.
With Trim Paths, you can:
Animate Stroke End: This controls the endpoint of the path, allowing you to animate the drawing of a shape from beginning to end or vice versa.
Animate Stroke Start: Similar to End, this controls the starting point of the path, useful for animating shapes to disappear or shrink.
Offset Path Animation: You can animate the offset of the path, creating effects where shapes follow a path or move along a trajectory over time.
Complex Shape Reveals: By combining multiple Trim Paths animations, you can create complex reveals or animations where shapes morph or transform gradually.
Overall, Trim Paths in After Effects is a fundamental tool for animators and motion graphics artists, offering precise control and endless creative possibilities for animating shapes and paths.
Follow me for more exiting tips and animation insights @motionpandey
Thanks for reading ♥
#motion graphics#2d animation#after effects#learn animation#motion design#art#animation tips#artists on tumblr#tumblog#trim path
5 notes
·
View notes
Text
rewatching the motorcity 101 interstitials and im just saying.. man.. i could watch a full documentary about this show for WEEKS. i hope we can find more in depth behind the scenes about this show one day cuz i rlly the technique they used for animating the heads. but i wanna see more 3d behind the scene stuff too. maybe how the car models are moved and like, keyframes n stuff? please?? with sprinkles on top??? and a nice red cherry????? x(
#motorcity#disney xd#i know how they did the lighting MWAHAHAHAHAHAHAHAHAHAH#damn i love this show#did i mention i love this show#they were pretty smart with how they did the lighting on the characters
11 notes
·
View notes
Last Seen Blogs
veryvincible
vince
meomieo
Mạc

kamikazebum-blog
Sem título

masbahineverywhere
MAS BAH in everywhere

awkwardparade-blog
for tia