#edits tutorial
Text
GUIA COMPLETO DE COMO EDITAR FOTOS EM ALTA QUALIDADE (HQ)!
oiê, bem vindos(as)! à pedidos, estou trazendo um tutorial bem abrangente sobre como editar fotos no geral para icons, headers, etc., em alta qualidade. neste guia/tutorial trarei dicas, truques e informações gerais sobre o que é preciso para editar em hq. lembrando que o conteúdo deste guia é sobre como eu edito, a maneira que funciona comigo e meu progresso e aprendizado ao longo de quase 12 anos editando icons, ou seja, o que contém neste guia pode — e deve — ser adaptado à sua maneira e ao software de sua preferência. aproveitem e se divirtam!
nota: este tutorial está bem longo, então, se possível, veja este guia pelo pc/notebook!
O QUE VOCÊ VAI ENCONTRAR NESTE GUIA
softwares necessários com links para download;
onde e como baixar as fotos para as edits;
métodos de edição e passo a passo;
como melhorar a qualidade de uma foto;
como salvar a foto corretamente para postar;
dicas de actions e outros resources.
clique em “continuar lendo” para ver o tutorial.
1. SOFTWARE
photoshop
eu recomendo fortemente o uso do photoshop cc na versão mais recente, ou outra versão com camera raw ou filtros neurais suportada pelo seu pc ou notebook.
você também pode usar o photopea como alternativa (eu particularmente prefiro o photoshop pois acho que as edits ficam com mais qualidade). se você preferir o photopea, algumas dicas desse guia poderão não funcionar devido à falta de algumas funcionalidades que o photopea não oferece (ex: camera raw, galeria de filtros, filtros neurais e outros).
eu uso a última versão do photoshop (atualmente, a versão 25.5.1) e uso a versão paga (obrigada adobe pelo desconto de estudante!!!!!), mas vou deixar alguns links para você baixar o photoshop gratuitamente caso você não seja estudante e/ou não tenha condições para assinar um plano.
atualmente eu uso um mac mini 2014 para editar, mas sempre usei windows, então, as dicas e os links valem para os dois sistemas operacionais.
links
macos: 1, 2 & 3.
windows: 1, 2, 3 & 4.
2. BAIXANDO AS FOTOS
galerias de fotos
muitos artistas têm fansites com galerias de fotos e você pode achar facilmente digitando no google: “nome da pessoa + gallery”.
o artista que eu quero não tem galeria própria e agora? tranquilo, ainda temos galerias de fotos de famosos variados como hqdiesel, hqsource, hq-pictures e até mesmo o theplace.
em último caso você pode usar o gettyimages e usar um removedor de marca d’água ou um site como o gettyimages downloader.
instagram
para artistas estrangeiros que tenham apenas instagram e/ou não tenham fotos em galerias de imagens, eu recomendo o instagram pessoal da pessoa.
você poderá fazer o download das fotos com extensões de navegadores como o image downloader for instagram (para firefox e google chrome), ou sites como o saveig, o snapinsta ou o igdownloader.
eu recomendo baixar pela extensão do navegador, pois ela baixa a foto direto do site do instagram no computador, diferente dos sites que você precisará ir foto por foto, copiar o link e colar no site para fazer o download.
mas, caso a extensão esteja indisponível, com algum erro ou pare de funcionar, o site é uma excelente alternativa (só precisa ter mais paciência).
nos sites para baixar fotos do instagram, geralmente eles dão a opção para você escolher o tamanho da foto. você deve sempre selecionar a resolução maior da foto (acima de 1000px é o melhor).
pinterest
em casos extremos de artistas low profile, sem instagram, sem aparições públicas, sem galerias de fotos, nadica de nada, eu recorro ao pinterest.
porém, é preciso ter muito cuidado ao fazer download de fotos do pinterest, porque são muitas fotos repetidas e muitas com baixíssima resolução e qualidade.
se você for baixar fotos do pinterest, escolha a foto com maior resolução (imagens maiores que 500px já são ok para editar icons), e depois de baixar a foto, eu recomendo fazer um tratamento na foto para melhorar a qualidade dela, como vou ensinar.
3. EDITANDO
3.1 importando a foto no photoshop
apertando ctrl+o ou cmd+o uma guia vai abrir no programa, onde você vai até a pasta onde a foto foi salva. selecione a foto e clique duas vezes nela para abrir.
3.2 cortando a foto nas dimensões desejadas
muitos tutoriais de edições de icons sugerem que você copie a imagem e cole ela em um documento novo já do tamanho da sua edit, mas eu não recomendo essa opção, pois ao redimensionar a foto com a ferramenta de transformar (ctrl+t), ela dá poucas opções para manter a qualidade da foto e se você não souber o que cada opção faz, poderá perder a qualidade da imagem. então, eu sempre faço o recorte na própria foto para não alterar muito a qualidade dela.
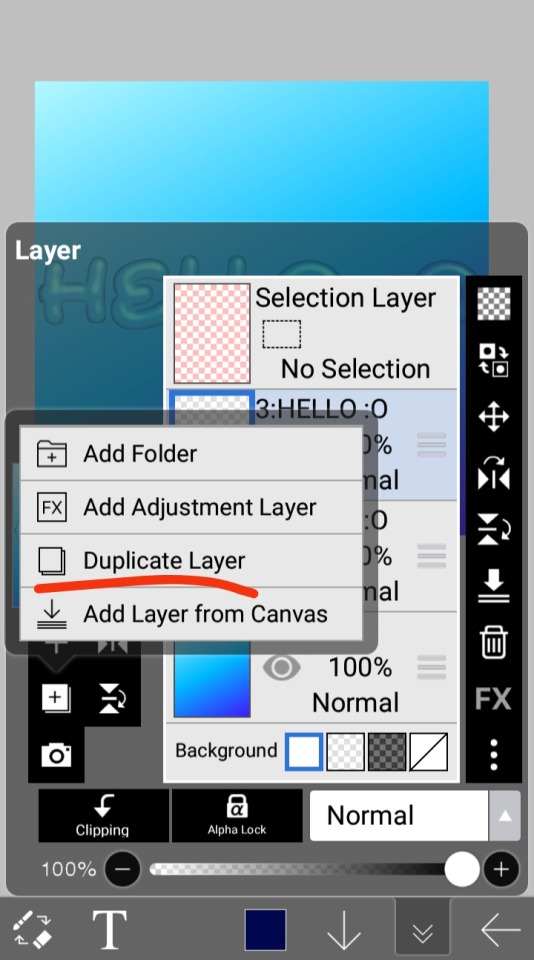
aperte a letra c no teclado para abrir o atalho da ferramenta de corte. (se o seu photoshop for alguma versão do cc, eu recomendo que você marque a opção para usar o modo clássico de corte, assim fica mais fácil e você tem um controle maior sobre a ferramenta!). para fazer essa alteração é simples, vá no ícone de engrenagem, clique e marque a opção “usar modo clássico”.
para fazer icons, você deverá cortá-lo usado dimensões quadradas, ou seja, 1x1, e para headers 15x5. você pode mudar as dimensões na caixinha da ferramenta de corte.
3.3 redimensionando a foto
nessa parte você precisará prestar atenção, pois ao redimensionar a foto, você poderá perder ou ganhar um pouco mais de qualidade na foto, e para isso você usará uma opção chamada reamostrar (ou resample se seu photoshop estiver em inglês). deixe a opção marcada para usar as definições.

3.4 explicando as definições do reamostrar e qual definição usar de acordo com o resultado que você quer
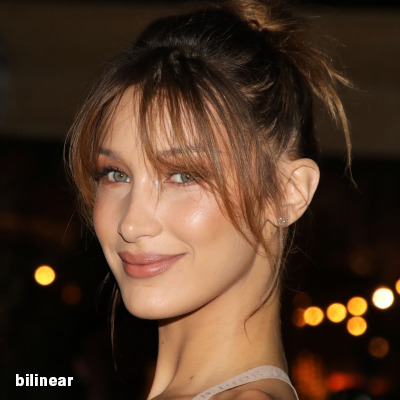


bilinear: a melhor opção para redimensionar gifs, mas para fotos não é tão bom pois dependendo da foto algumas partes ficam nítidas, outras mais suaves e se você for aplicar action de nitidez, pode ficar com um aspecto de “craquelado” com as bordas granuladas, o que eu pessoalmente acho que fica um pouco estranho.
bicúbico mais suave (ampliação): como o nome já diz, ele deixa a foto mais suave, ou seja, os pixels “craquelados” e granulados da foto ficarão mais suaves. é uma ótima opção tanto se você for aplicar actions de nitidez ou actions mais desfocadas e mais suaves.
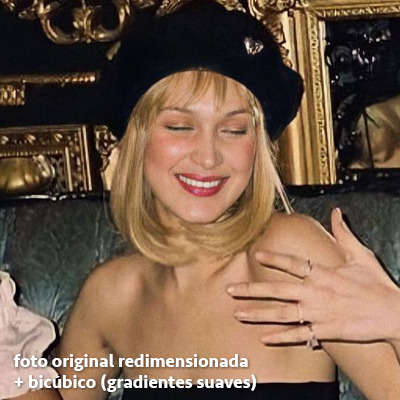
bicúbico (gradientes suaves): pode parecer a mesma coisa do bicúbico mais suave, mas esta opção além de suavizar a imagem, cria um “desfoque iluminado” nas transições das cores da foto. é a melhor opção para fotos sem muita qualidade e principalmente se você for usar actions suaves e desfocadas, sem muita nitidez.
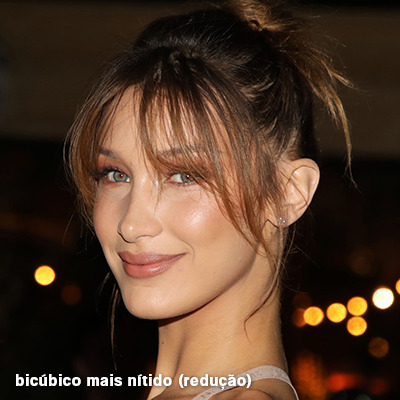
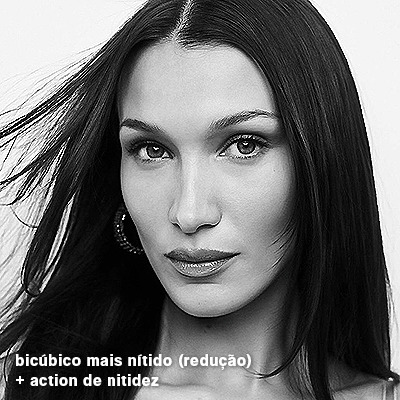
bicúbico mais nítido (redução): acentua os pixels e as arestas nítidas da foto, ou seja, essa definição redimensiona a imagem mas preserva a nitidez da foto. se você usa actions de nitidez que não tem desfoque nas configurações, essa é a melhor opção de reamostra. (mas cuidado, se sua imagem ficar muito nítida com essa definição, você precisará usar outra opção. caso contrário, quando você aplicar a action, a edit poderá ficar muito exagerada e/ou com aspecto áspero.)
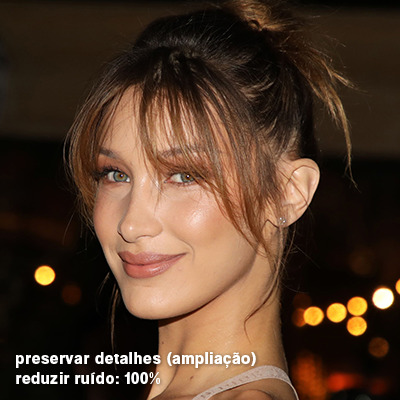
preservar detalhes (ampliação) com redução de ruído: esse em especial é ótimo para quando você precisar redimensionar uma foto para deixá-la maior sem distorcer tanto a imagem. você pode ajustar a redução de ruído para deixar a foto mais suave, sem perder muita qualidade. (obs.: essa opção não deve ser usada para redimensionar imagens muito pequenas, por exemplo de 200x200 para 400x400, ou a imagem vai ficar muito distorcida. ela deve ser usada quando a diferença de pixels não é muito grande, por exemplo, você cortou a foto e ela ficou no tamanho 370x370, aí sim você pode redimensionar para maior sem perder muito da qualidade. então você pode ir ajustando a qualidade com a porcentagem da redução de ruído).
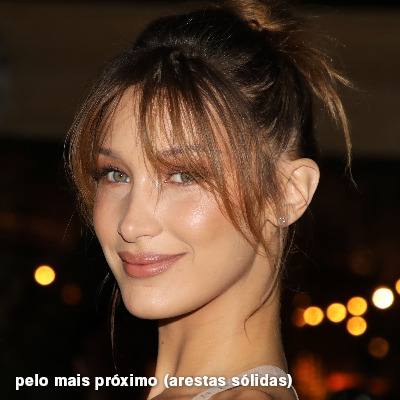
pelo mais próximo (arestas sólidas): essa é uma opção traiçoeira, pois não fica bem em quase nenhuma imagem (a menos que seja um pixel art). essa definição redimensiona a imagem e mantém os pixels nítidos, ou seja, a foto fica menor mas tudo nela que tem aspereza vai prevalecer. é muito usada para redimensionar pixel art, pois preserva as bordas ásperas. pode ocorrer de ficar boa em uma foto aleatória mas não será possível aplicar action, ou a imagem ficará exagerada.
3.5 aplicando a nitidez depois de redimensionar
depois de escolher a foto, baixar, redimensionar de acordo com o estilo da action da sua escolha, está na hora de aplicar.
eu fiz duas versões para mostrar como fica com cada tipo de action:

assim, os dois icons tem uma alta qualidade usando actions diferentes, graças a remostragem ideal para cada tipo de action :)
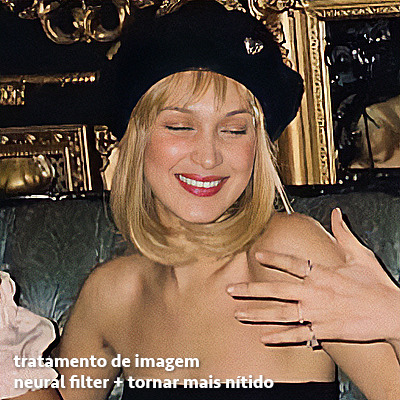
4. TRATAMENTO DE IMAGEM PARA MELHORAR A QUALIDADE
nesta parte, é muito importante que você tenha baixado uma versão do photoshop com neural filters e/ou com o camera raw, mas caso você não tenha, tudo bem também, vou ensinar como fazer uma melhoria na foto de três jeitos: com camera raw, com neural filters e com desfoques. a melhor forma vai depender de quão ruim está a qualidade da sua foto. em geral, apenas fazendo ajustes no camera raw você já tem um ótimo resultado na maioria das fotos.
camera raw
se seu photoshop tem o filtro do camera raw, ele vai estar em filtro > filtro do camera raw...
tudo que iremos fazer será na aba de “detalhe”, ali você deve dar mais atenção ao ajuste de redução de ruído, pois é ele que vai remover o ruído da imagem e melhorar a qualidade dela.
vá mexendo nas configurações de redução de ruído até que a foto fique mais suave. ajuste também o detalhe e o contraste da redução de ruído.
essa parte será mais no olhômetro mesmo, pois as configurações vão variar de foto para foto, mas eu recomendo muito você mexer também na nitidez para não deixar a foto tão desfocada, mas nada muito intenso para não interferir na action que você irá usar.
eu mexo também na redução de ruído de cores, porque dependendo da foto, algumas cores estarão saturadas ou com muito ruído. só cuidado para não colocar um número muito alto, pois esse ajuste pode tirar a saturação da sua foto e deixá-la apagada.
enfim, aqui está uma comparação da foto original com o tratamento feito com o filtro do camera raw e depois já com a action de nitidez aplicada:
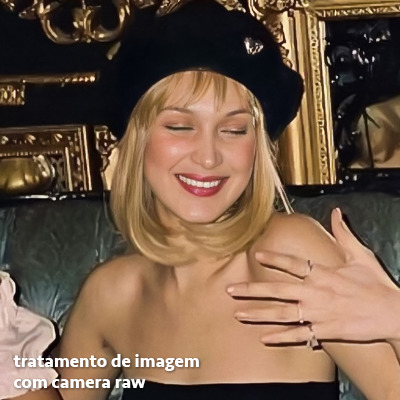
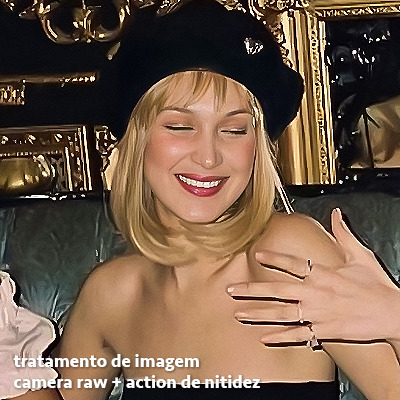
e essas foram as configurações que usei nessa foto em específico:
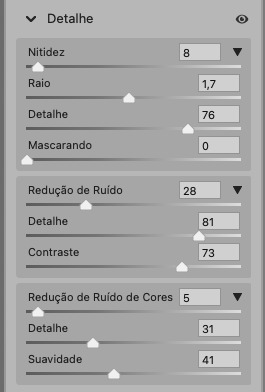
como eu disse antes, as configurações irão variar de foto para foto, a depender da qualidade de cada uma e de quão ruim a foto está, mas com essa configuração básica, você já vai conseguir melhorar algumas fotos.
neural filters
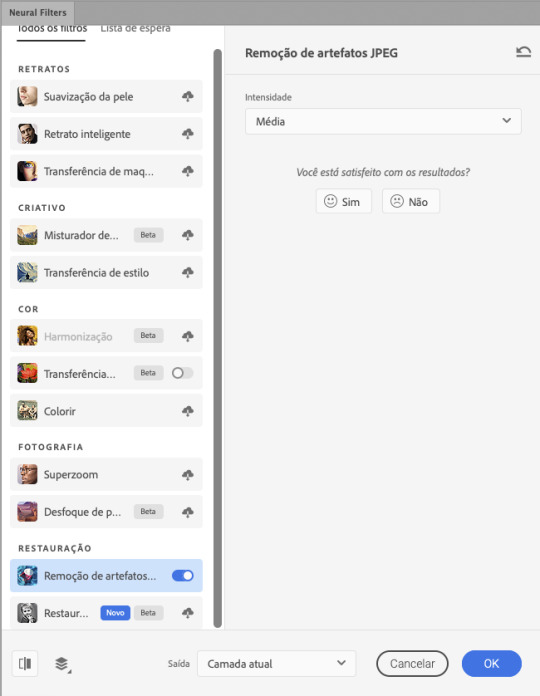
se a versão do seu photoshop vem com neural filters (ou filtros neurais), ele estará em filtro > neural filters...
irá abrir uma janela com vários filtros mas o que a gente irá usar vai estar em “restauração”, com o nome “remover artefatos jpeg”. se precisar, faça o download do filtro.
eu recomendo usar a intensidade sempre média, a menos que a foto esteja muito ruim, aí você usa a intensidade alta. mas em geral, a intensidade média ou baixa já dá conta do recado.
a saída deve sempre estar na camada atual, ou seja, na camada da foto selecionada.
assim:
e aqui está uma comparação da foto original com o tratamento feito com o neural filter e depois já com a action suave com desfoque aplicada:

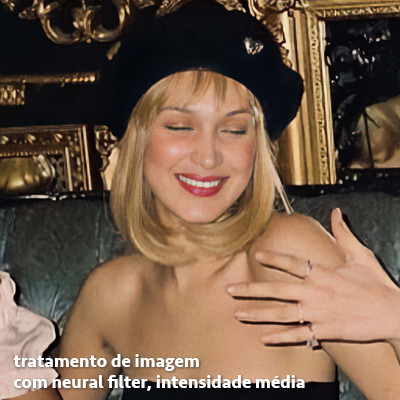

a opção do neural filter é uma ótima alternativa ao camera raw, o único contra é que ele deixa a foto com uma textura áspera, e quando você usa uma action de nitidez eles ficam muito visíveis e acaba não ficando muito legal.
porém, um bom jeito de contornar isso é adicionando ruído na foto. eu uso o efeito de granulação do camera raw para adicionar ruído no icon (você também pode adicionar o ruído em filtro > ruído > adicionar ruído..., mas eu prefiro o camera raw pois ele dá mais opções para ajustar o granulado do jeito que eu preferir).
no primeiro icon abaixo, dá para perceber a textura áspera que o neural filter deixa depois de melhorar a foto e adicionar nitidez; já no segundo icon eu mostro como eu adicionei o ruído e contornei esse defeito.

as configurações de ruído que usei no camera raw foi 12 de granulado, 35 de tamanho e 20 de aspereza.
lembrando que, se você for usar uma action de desfoque e/ou remoção de ruído, não será necessário adicionar a granulação, pois a própria action já vai suavizar a textura do neural filter (a menos que você queira adicionar o ruído, claro).
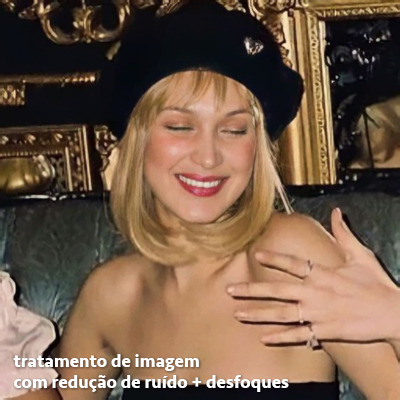
redução de ruído + desfoque
caso a sua versão do photoshop não tenha nenhuma das opções de camera raw ou neural filter, caso você use um photoshop mais antigo, photoshop portable ou prefira usar o photopea, essas alternativas podem ser úteis.
mais uma vez, irei me basear no olhômetro, de acordo com a foto e irei ajustando as configurações de acordo com o que eu quero e acho necessário.
vamos começar com a redução de ruído! ele está em filtro > ruído > reduzir ruído...
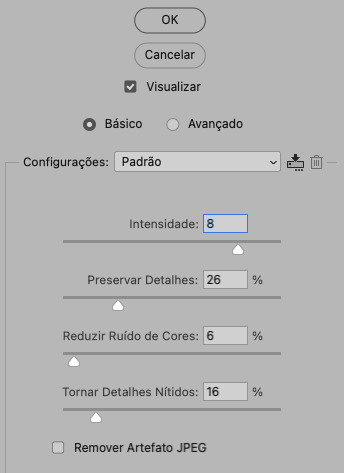
na janela de redução de ruídos você verá alguns ajustes que são: intensidade, preservar detalhes, reduzir ruído de cores e tornar detalhes nítidos e vou explicar cada um para que você possa saber ajustar eles de acordo com sua foto:
intensidade: o número de 1 a 10 irá definir a intensidade da luminescência, a intensidade do filtro e o quanto da imagem você quer preservar ou extinguir, sendo 1 o mínimo da intensidade do filtro e 10 o máximo;
preservar detalhes: o número digitado irá definir a porcentagem de detalhes a serem preservados. quanto maior o número, maiores serão os detalhes mantidos na foto, como ruídos, manchas e outras aberrações da foto;
reduzir ruído de cores: o número digitado irá definir a intensidade e reduzir o ruído cromático, ou seja, vai reduzir as aberrações cromáticas, como por exemplo, fotos que distorcem as cores. preste atenção na porcentagem inserida, pois quanto maior o número, menos saturação sua foto terá e poderá ficar com aspecto de foto envelhecida;
tornar detalhes nítidos: o número digitado vai definir a porcentagem de nitidez para restaurar pequenos detalhes da foto. quanto maior a porcentagem, maior vai ser a intensidade dos detalhes da foto. preste atenção na porcentagem inserida, pois se a intensidade da nitidez for muito alto, vai afetar a sua action, seja ela de nitidez ou de desfoque.
sendo assim, para a foto usada eu fiz estes ajustes:
obs.: se você for um usuário mais avançado do photoshop, poderá explorar a opção avançado, que possui as configurações básicas para melhorar a foto e também as configurações para remover ruído das cores primárias (vermelho, amarelo e azul) individualmente. mas, mesmo se você não for um usuário expert, eu recomendo você dar uma olhada nessa opção e explorá-la, mexendo nas configurações e ir ajustando e aprendendo, pois o resultado poderá ficar ainda melhor nos ajustes avançados.
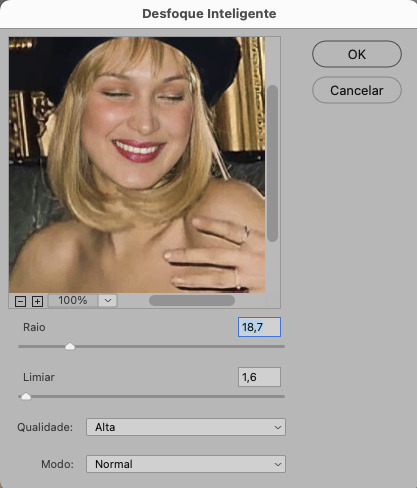
aplicado a redução de ruído, vamos partir para o desfoque! eu estarei usando o desfoque inteligente antes do desfoque de caixa. você vai achá-lo em filtro > desfoque > desfoque inteligente...
na janela que abrirá, você verá os ajustes: raio, limiar, qualidade e modo. vou explicar eles:
raio: vai determinar o tamanho da área que será considerada para o desfoque. quanto maior o número, mais detalhe serão preservados;
limiar: vai determinar a diferença dos pixels entre si antes de serem alterados pelo desfoque.quanto maior o número, maior será a área em que o desfoque será aplicado;
qualidade: vai determinar a qualidade e intensidade do desfoque. ao escolher a opção mais alta, mais partes da foto o desfoque atingirá;
modo: vai determinar o traçado das linhas de bordas que o filtro identificar. o modo normal aqui é o ideal, pois os outros modos “somente arestas” e “sobrepor arestas” irão identificar somente as bordas da imagem.
sendo assim, esses foram os ajustes:
após o desfoque inteligente, partiremos para o desfoque de caixa! ele está em filtro > desfoque > desfoque de caixa...
(você também poderá usar o desfoque gaussiano a depender da foto, mas para esta em questão, o desfoque de caixa funcionou perfeitamente)
a intensidade do desfoque de caixa, assim como do desfoque gaussiano, é medida em pixels e o mínimo é 1 pixel, e para icons é uma intensidade forte, então eu coloco o número mínimo (1, no caso) e depois de clicar em OK e aplicar o desfoque, vou em editar > atenuar desfoque de caixa... e ajusto a porcentagem de acordo com a foto. nessa foto deixei a porcentagem em 33% e ficou ótimo.
no entanto, infelizmente, por não ser o melhor método para melhorar a qualidade de uma imagem, ela ficará um pouco desfocada demais. mas podemos contornar isso usando o filtro alta frequência para devolver um pouco da nitidez e detalhes na foto. você encontrará esse filtro em filtro > outros > alta frequência...
o filtro de alta frequência, assim como os desfoques, é medido através de pixels e quanto maior o número, mais detalhes passarão despercebidos, ou seja, menos detalhes e menos nitidez sua foto terá. eu recomendo em torno de 2px se você quiser mais detalhes e em torno de 5px se você quer mais suavidade.
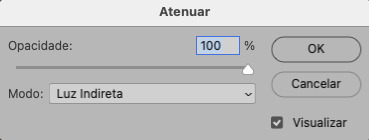
a primeira vista esse filtro parecerá estranho e distorcido, mas dará tudo certo, você só precisará mudar o modo de mesclagem. para isso vá em editar > atenuar alta frequência e mudar o modo de mesclagem para “sobrepor” ou “luz indireta” se você quiser que fique mais suave. se preferir, poderá também ajustar a opacidade para os detalhes ficarem mais ou menos intensos.
assim:
assim fica o resultado sem o filtro de alta frequência e com o filtro:

sendo assim, fica a seu critério usar o filtro ou não.
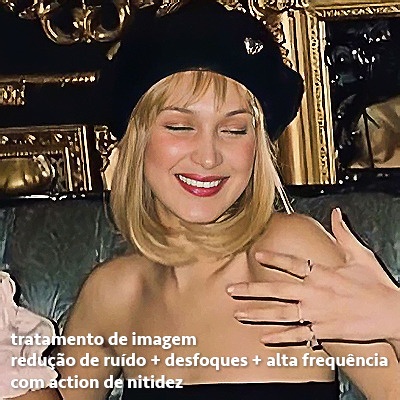
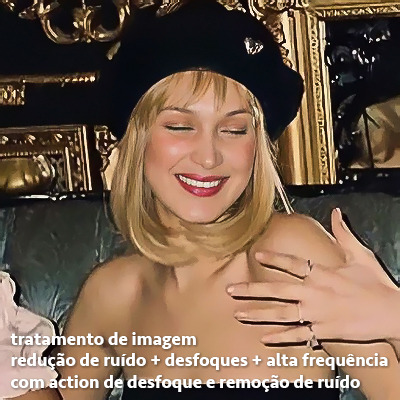
aqui está a comparação das fotos com o tratamento de redução de ruído + desfoque com e sem o uso das duas actions:
5. SALVANDO A EDIÇÃO
e chegou a melhor parte: salvar a edição para postar!
seja a edição um icon, uma header, ou qualquer outro gráfico estático (edições não animadas), a melhor opção é sempre, sempre, SEMPRE, salvar no formato PNG!
o formato jpg ou jpeg não preserva a qualidade original como o formato png preserva. então, sempre escolha esse formato ao salvar suas edições estáticas!
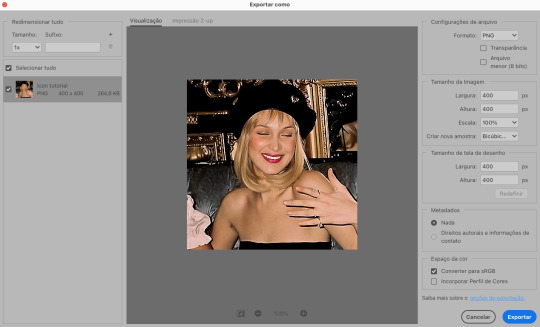
a melhor forma de salvar uma edição em alta qualidade é exportando ela. sendo assim, vá em arquivo > exportar > exportar como...
em “configuração de arquivo”, selecione o formato PNG e desmarque a opção “transparência” se sua foto não é uma imagem com fundo transparente; em “tamanho da imagem” deixe como a altura, a largura e a escola como estão, apenas mude a opção em “criar nova amostra” para BICÚBICO AUTOMÁTICO; e em “espaço da cor” marque a opção CONVERTER PARA SRGB, porque assim, independente da calibração do seu monitor, a foto ficará com as cores originais e não sofrerá alteração.
assim:
no entanto, se você tiver um pc ou notebook lento, ou apenas não tiver paciência para salvar sua edit em exportar, você pode salvar no modo normal, indo em arquivo > salvar como... OU arquivo > salvar uma cópia..., no entanto, se você for usar essa opção, não esqueça de marcar a caixinha para “incorporar o perfil de cores srbg”, essa opção geralmente fica na parte de baixo da janela que abre quando você vai salvar a edição.
6. ACTIONS & RESOURCES
para facilitar pra vocês, todos as configurações de filtros usados neste guia, estarão disponíveis para download em uma pasta de action. para fazer o download é só clicar aqui: ★. já a dupla de actions usadas (a de nitidez & a de desfoque suave) estarão disponíveis para download na lista de dicas abaixo.
dicas de actions de nitidez
– premium & gratuitas (free)
lovie potion by @loviestudio [premium]
action #26 by @harupsds [premium]
action #25 by @harupsds [free]
01 action by @harupsds [free]
cherrie by @loviestudio [free]
action #11 by @miniepsds [premium]
face action by @miniepsds [premium]
crispy by @nebulies [free]
scarlett by @l-agallerrie [free]
eight action by @peachcoloring [premium]
bubblegum by @hisources [free]
kendall by @hisources [premium]
hekate by @hisources [premium]
sharpen by @l-agallerrie [free]
#01 action by @buntterflies [free]
dicas de actions “suaves”
– premium & gratuitas (free)
teddy bear by @loviestudio [free]
action ten by @peachcoloring [premium]
caelestis by @miniepsds [premium]
fleuriste by @hisources [free]
angel by @loviestudio [free]
action #13 by @harupsds [premium]
action #12 by @harupsds [premium]
wild action by @hisources [free]
outras actions
– premium & gratuitas (free)
denoise action effect — remove o ruído das fotos sem perder muita qualidade by @loviestudio [premium]
photopea quality action — action para melhorar a qualidade da foto no photopea by @loviestudio [free]
exclusive hq actions — um conjunto com as actions que foram usadas neste tutorial by @girasois, @loviestudio [free]
denoise and sharpen actions — conjunto de actions para melhorar a qualidade da foto automativamente by heavnsent
7. BÔNUS: DICAS EXTRAS
a adobe cc learn tem muitos tutoriais que você pode dar uma olhada e aprender muito mais sobre o photoshop e outros programas da adobe!
o youtube é outra fonte incrível para você aprender edição no photoshop, lá você encontra tutorial para quase tudo de edição de fotos e muito mais! se você entende inglês, eu recomendo muito os canais piximperfect e brendan williams tutorials.
para fonte de inspirações, o tumblr é o lugar certo! se jogue nas tags para se inspirar e nos blogs de photoshop para ver muito mais tutoriais e muito mais resources.
o blog @looksgreat infelizmente não é mais atualizado, mas você ainda pode encontrar muitos tutoriais sobre quase tudo de edição, e o melhor, todos os tutoriais são em português!!
ainda recomendo outros tumblr brasileiros de resources e tutoriais: @miniepsds, @harupsds, @peachcoloring, @gmfioart, @colour-source, @l-agallerrie, @wasirauhlpsds, @hisources, @opulenceps, @sunshinepsds, e @loviestudio; e no deviantart: jungrainsoul, rockjealous, heavnsent, aureangels e rohdossantos.
8. CRÉDITOS E INFORMAÇÕES
crédito colorings
off hearts + whimsy by @miniepsds ♡
informações
antes de tudo eu gostaria de pedir desculpas pelo tamanho deste guia, mas eu quis abranger o máximo de dicas possíveis para vocês e deixar o tutorial super completinho.
em segundo lugar eu gostaria de agradecer todo o carinho de vocês, isso me motiva muito a continuar. obrigada, de coração!
enfim, é isso! minha ask estará sempre aberta para dúvidas, sugestões, pedidos e mensagens fofas (sempre com educação e respeito, claro)!
#tutorial#photoshop tutorial#tutoriais#tutorials#resources#hq tutorial#tips#useful#ptbr#adobe photoshop#photopea tutorial#tutorial tips#dicas#dicas de edição#dicas de actions#guia completo#guia#guia de edição#guia de edits#edits tutorial#edit tag#masterpost#long post#editing tips#icon tutorial#header tutorial#hq edits
66 notes
·
View notes
Text


+bonus
This Barbie is... Evan Buckley
#be nice this is my first gifset that i made using photopea#and i saw like three tutorials only lmao#evan buckley#evan buck buckley#christopher diaz#buck and chris#911 fox#911 on fox#911 abc#911 on abc#911 edit#911 edits#911edit#my edits#my gifs
3K notes
·
View notes
Text


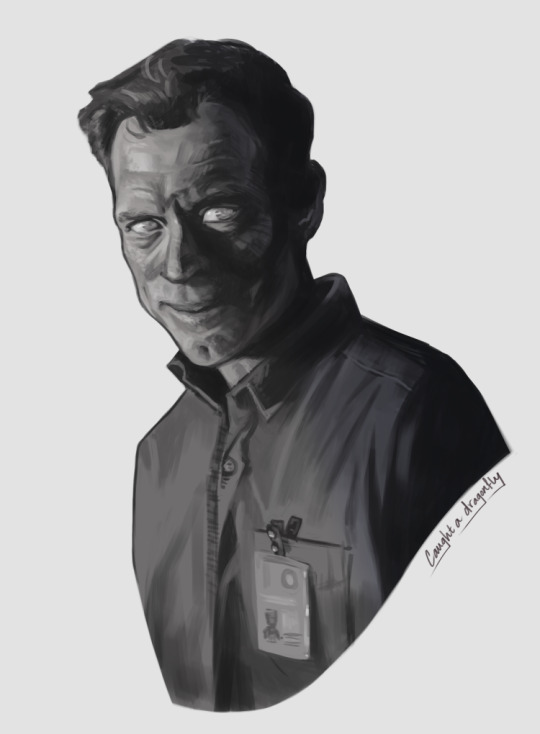
Baldur's Gate 3 - Karlach Cliffgate, The Infernal Heartthrob of the Avernus
#this is for anna and anthi my go-to karlach girlies#karlach#karlach cliffgate#bg3edit#baldur's gate 3#bg3#baldur's gate#gamingedit#videogameeedit#bg3 karlach#i cant get past the tutorial until i gif all of the companions in this good lighting#my edit
3K notes
·
View notes
Text


jagged, crystalized and pixelated tumblr banner masks!
for the 2 anons that asked!
okay to repost, just dont claim as yours. and free to use (its what they were made for, duh!)
keep in mind gifs dont mesh well with translucent colors if youd like to use these with them :0
#🌫️ i know what you dread | creations#anonymous#carrd resources#rentry resources#rentry#web graphics#rentry tutorial#rentry inspo#rentry gif#rentry decor#rentry graphics#rentry template#image masks#edit resources#editing resources
466 notes
·
View notes
Text
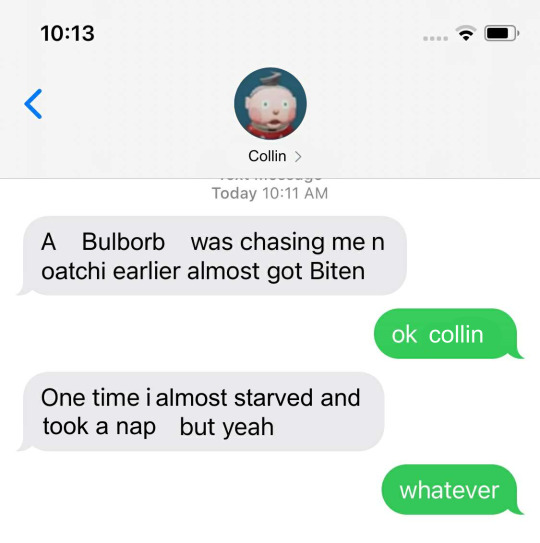
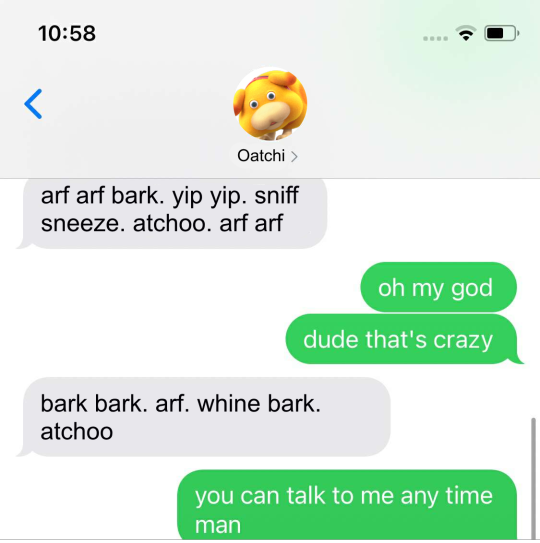
#was talking to a friend and she was talking about how she didnt like how disruptive the tutorial of the demo was#since she wanted to look at the pretty environments without the distractions#and this is what popped into my braine#ive had the gumby pokey format in my brain since the demo but i didnt know whod fit the gumby slot#sorry collin.#i personally didnt mind the tutorial (from watching a stream of the whole demo) but i can see how it could be frustrating#:) i like oatchi#edit: for further clarification im not shitting on collin. i just didnt have much other choice. collin im so so sorry.
1K notes
·
View notes
Text
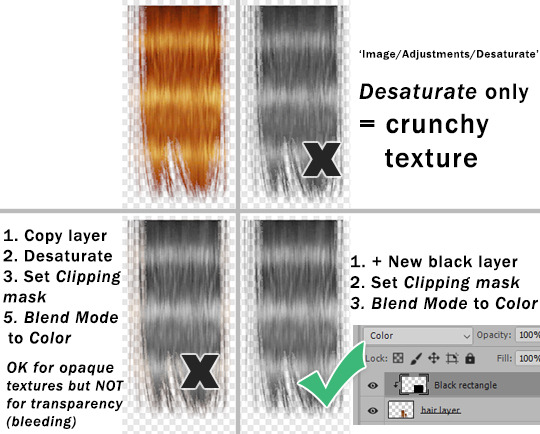
This is my response to this post by @goatskickin - a second version. That's the best way to desaturate hair texture or other stuff with alpha transparency ( thanks @paluding).
Desaturate or Hue/Saturation often makes textures crunchy.
You'll get best results if you create plain black layer and set blend mode to Color. Adjust Opacity as needed. In case of alpha stuff you also need to create Clipping mask.
When doing color actions on hair textures (or anything else) - if Hue/Saturation adjustment layer step does -83 Saturation (for example), instead you can do what I described above and set black layer Opacity to 83%.
Also, use SimPE to build textures as DXT5, do not rely on Bodyshop 'cuz it will always f*ck it up.
#sims 2#the sims 2#ts2 tutorial#I had to edit this tut cuz it wasnt suited for alpha-hair and I didnt want anybody to mess up their hair recolors because of it
317 notes
·
View notes
Text

#someone help these two idiots
#goodomensedit#goodomens2edit#good omens edit#good omens 2#aziracrow#azcrow#ineffable husbands#ineffable idiots#mine#this was inspired by someone who made gifs with text message boxes but for the life of me i can't remember who they were#and i couldn't find their tutorial#so alas#i made it up#it was v annoying making the text bubbles#bbut i think they look alright#also im unsure abt the scene choice but i couldn't think of another
609 notes
·
View notes
Text
is this anything
#hi rtc fandom please accept me as one of your own#someone has probably done this before but oh well#i've been teaching myself how to use capcut by editing the rtc slime tutorial#and come to the conclusion that i will never use capcut again#ride the cyclone#rtc#ocean o'connell rosenberg#noel gruber
174 notes
·
View notes
Text


any moment might be our last (✩ ✩ ✩)
#radskier#the witcher#thewitcheredit#jaskieredit#witcheredit#radovid#jaskier#my edit#ughmerlin#jemmablossom#userhann#userava#arthurpendragonns#userbecca#usergay#ivashkovadrian#thewitchersdaily#witchersdaily#(hope it's ok to tag!)#jaskierxradovid#thank you so much!! the original edit is so good and the tutorials were so cool and helpful!!🌻🌻🌻
170 notes
·
View notes
Text
What is going on with cutting posts?
You may have seen some posts floating around lately about the beta editor and trimming reblogs, and possibly found yourself extremely confused trying to figure out what this tangled web of editors, extensions, and add-ons even means. I’ve been on this site for years, and I still find the whole thing terribly confusing.
So this post is my effort to explain everything -- legacy vs beta, New XKit vs XKit Rewritten, editable reblogs vs trim reblogs -- everything. This also doubles as a tutorial for the various methods of cutting posts.
TL;DR
Tumblr is in the process of switching to a new post editor that some old users have opted into, while new users have been forced into it.
The old Editable Reblogs extension does not work with this new editor, requiring people to use a new extension called Trim Reblogs.
Trim Reblogs and Editable Reblogs are not compatible. If your partner uses Editable Reblogs, you cannot cut their posts properly using Trim Reblogs (unless you’re willing to do some tedious and frankly unreasonable workarounds).
The only way for everyone in the RPC to cut their posts properly and efficiently is if everyone moves to the new system and uses Trim Reblogs. Clinging to the old system with Editable Reblogs is actively creating issues for the people using the new system -- some of whom do not have a choice.
Cutting Posts
Cutting posts is the act of removing older replies on a thread when reblogging it. This goes by several other terms, including trimming replies/reblogs or any variation of that wording, but I will be referring to it as cutting posts to avoid confusion with the Trim Reblogs extension, which will be coming up a lot.
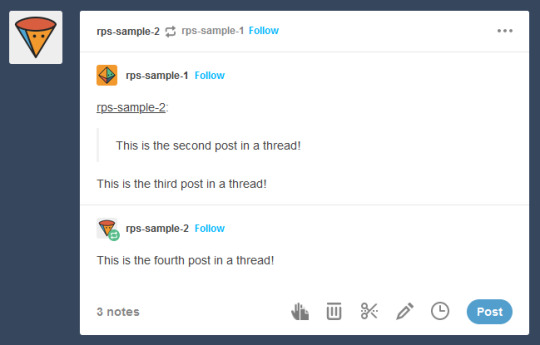
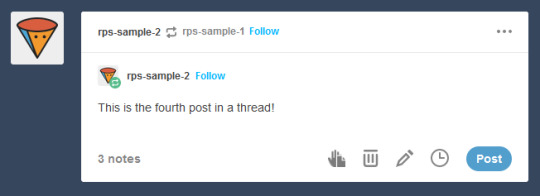
Typically, when cutting a post, you only keep your latest reply and the reply from your partner that immediately precedes it. This means that instead of a thread looking like this...

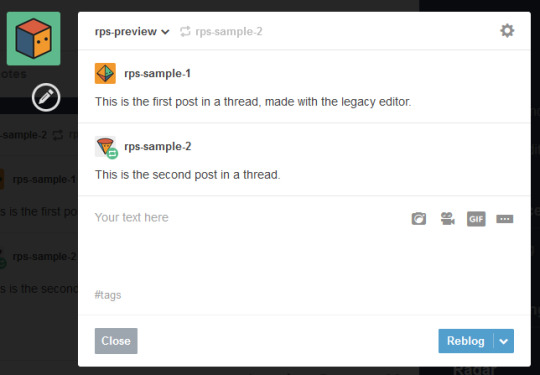
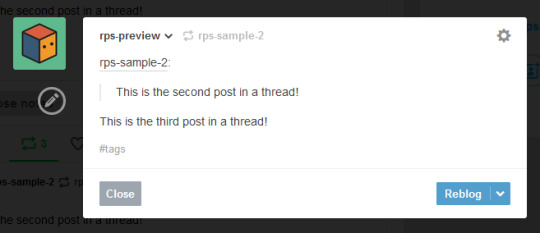
It would like this:
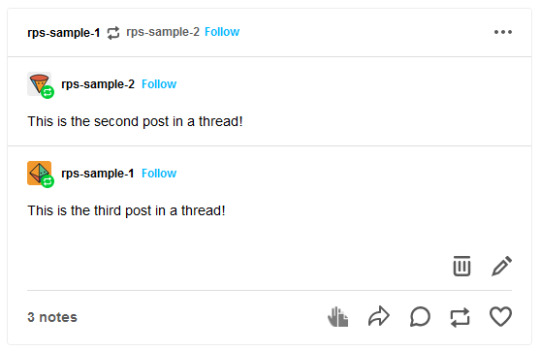
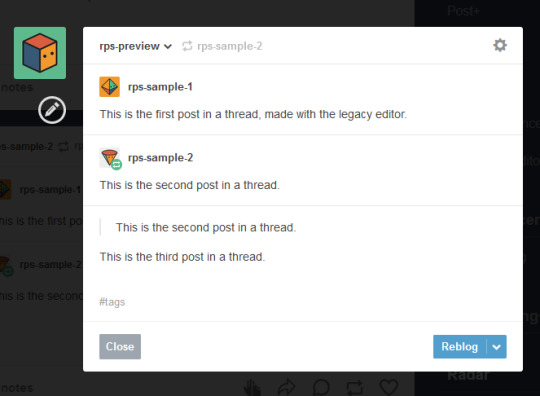
Or like this, depending on the method used:
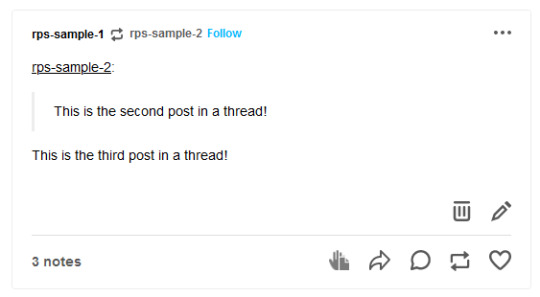
In either case, the first post is gone while the second and third post remain.
Cutting posts is done so that threads aren’t all extremely long on the dashboard. When there’s three short replies like this sample, it’s not that bad. But imagine a thread with twenty replies where each is several paragraphs long. That would require people to scroll and scroll and scroll to get past it. And since the same thread would be reblogged multiple times, your dash might become the same posts, over and over and over again, with only one new addition at the end each time.
Cutting posts is extremely common Tumblr RP etiquette. Many people won’t follow you if you don’t regularly cut replies, due to how irritating the alternative is.
Copy and Paste (Outdated)
Once upon a time, you used to be able to cut replies without any kind of extensions. Unfortunately, those days are gone.
That method worked as follows. You would go to reblog as usual...
Copy and paste the last reply, putting it in a blockquote (or using any other formatting you like, really), then add your own reply underneath.
Then you can simply hover over the older replies and click the red X in order to remove them.

And this used to work. But now, the very first post in a thread cannot be deleted -- only later reblogs can. This means that the first post will always stay above the others, no matter how far along in the thread you are.

So since cutting posts can’t be done normally, we have to rely on browser extensions. This is where things get complicated. And also where I need to explain the different editors.
Legacy vs Beta Editor
Every time you make or reblog a post, you are using Tumblr’s post editor to do so. This is the area where you type up your post, add images, etc. Tumblr has been using the same editor for several years now, and it’s called the legacy editor.
However, Tumblr has been slowly rolling out a new text editor, called the beta editor. You may remember the beta editor when it was first rolled out a couple years ago as a buggy, unstable mess -- that’s not the case anymore, and it’s no more buggy than the current editor. For text posts, it’s functionally pretty similar, and even has a few features that some of you might want, such as easy colored text and the ability to make posts non-rebloggable. (Photo and other posts are fairly different, and I know gif makers have some pretty understandable reservations and complaints about it, but I won’t be covering that here.)
Older users have the option to toggle between the legacy and beta editors at will, while new users (starting around November/December 2022) are locked into the beta editor and cannot switch back to legacy.
To check which editor you have, go to make a new text post and look in the top right corner.
If you see either of these:

You are using the legacy editor, with the option to switch between the two.
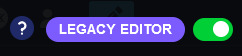
If you see this:

You are using the beta editor, with the option to switch between the two.
If you don’t see anything at all, you are using the beta editor, and cannot switch.
While the text interface of the two editors isn’t terribly different for roleplay purposes, the methods by which you need to trim reblogs are entirely different. Each requires a different extension -- specifically, a different version of XKit.
XKit
XKit is a browser extension designed to add features and functionality to Tumblr. It includes many quality of life features such as a mutual checker, better tag tracking, queue improvements, ad blocking, more detailed timestamps, and so much more. (It was preceded by a similar extension called Missing E, if you’ve been here long enough to remember that.) And among all of these many features is the ability to cut replies.
The original XKit is no longer in use, having stopped updates in 2015 and being entirely unusable now. However, a few new versions of XKit have popped up throughout the years.
New XKit & Editable Reblogs
A different team created New XKit as a successor to the original, a similar extension designed to restore many of the same features.
New XKit’s feature to cut posts is called Editable Reblogs. It works by adding a pencil button to the left of the post when you reblog.

Clicking that button will break the post’s formatting -- actually changing it to how Tumblr posts used to be formatted -- but allow it to be edited however you wish.

So in this instance, I could simply select the first reply and delete it before adding my new reply underneath.
Editable Reblogs is only available if you use the legacy editor. It does not work with the beta editor and does not even appear as an option.
XKit Rewritten & Trim Reblogs
In 2020, Tumblr began to roll out its updated dashboard, which is now permanently in effect for all users. While the new interface looks very similar, the code was actually entirely redone, and behind the scenes functions very differently from the older dashboard. As a result, some of New XKit’s features no longer work as intended -- though a few still do, such as Editable Reblogs.
In response, the New XKit team decided to similarly start from scratch and created XKit Rewritten, another iteration of the add-on with similar features once more. However, not all New XKit features are available on XKit Rewritten, and vice versa. Many people are running both extensions simultaneously to take advantage of features on both.
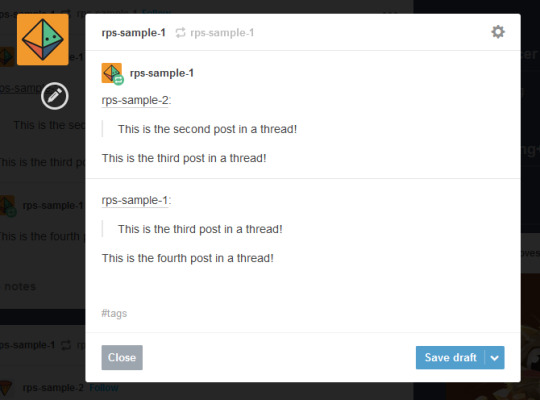
XKit Rewritten’s feature to cut posts is called Trim Reblogs, and it works completely differently than Editable Reblogs. With this, you first need to save the thread to your drafts with your reply already written.

You’ll see a scissors icon appear along the bottom of the post. Clicking that will open the trimming options, letting you select which previous reblogs to delete.
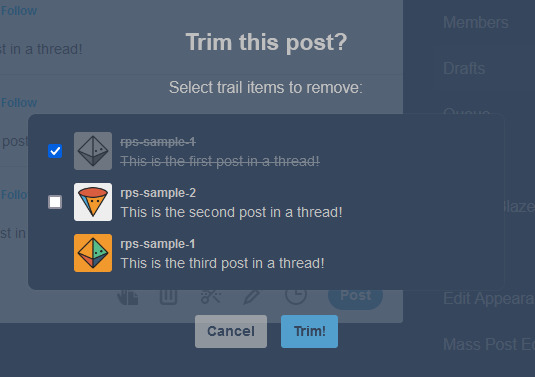
Clicking Trim will remove the selected reblogs.

You can then click post. You’ll note that this method preserves Tumblr’s formatting, as opposed to Editable Reblogs, which breaks it.
EDITED TO ADD: Apparently you don’t need to already have your reply written in your drafts anymore. You can save the post to your drafts without adding anything, use trim reblogs, then edit the post to add your reply. Either works fine.
This method does have two major issues, though. First, if the first post of a thread was created in the legacy editor, then the system gets really buggy and just doesn’t work.
This is what happened when I tried it out. Initially, it seemed to work as expected.

However, when I posted the reply, or simply refreshed my drafts, this happened.

Attempting to trim again simply caused this to repeat. There is no fix for this. This means that for this method to work, both you and your partners need to be using the beta editor.
EDITED TO ADD: You can fix this double posting by either using trim reblogs before adding your reply, or by adding your reply, using trim reblogs as intended, refreshing your drafts, editing the post, and clicking the red X to remove the first of the double postings. I have a better guide here.
The only other alternative is to move the thread to a fresh post when you reply, so that the new first post was made with the beta editor. Then you can cut future reblogs of the post using Trim Reblogs as normal.
However, the other major issue is that if your partner uses Editable Reblogs, you cannot use Trim Reblogs as intended. Let me show you why.
Say I want to reply to this post.
I’ll add my reply and save it to my drafts, as before.
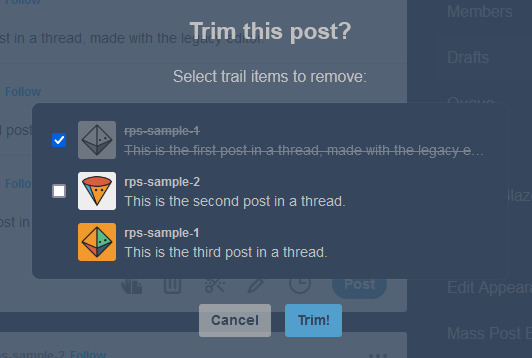
You may have spotted the issue already. The first and second replies are now “combined” so that Tumblr sees them as a single post. We want the post to be interpreted like this, so that I can remove the oldest reply while still keeping the one immediately prior to mine.

But Trim Reblogs can only see it like this.

When I go to trim reblogs, I can only remove the previous replies as an entire unit. I can’t remove just the oldest reply and keep the one immediately prior -- either it all stays or it all goes.

This is admittedly better than nothing. However, most people do want to keep their partner’s previous reply for reference, and just to have on their blog. This means a lot of people using Trim Reblogs simply don’t cut their partner’s posts at all.
You might be able to get around this issue by combining it with the outdated cut and paste method I described above. When saving to your drafts, paste your partner’s last reply above your own, using a blockquote or whatever formatting you like to separate the two.
You can then use Trim Reblogs to remove the first post, leaving only your copy pasted reply. The formatting is broken, but it’s at least workable.

However, this will only work if the very first post of the thread was made with the beta editor -- since people using Editable Reblogs have to be using the legacy editor, you’re likely to still run into issues on a lot of posts. Which can again be solved by moving the thread to a fresh post made with the beta editor, but at this point we’re stacking so many issues on top of each other that I really can’t blame you if you just don’t want to bother with any of them.
All of this brings me to...
It’s time for the RPC to collectively switch to the new system
I’ve stuck to the legacy editor myself due to the issues described above -- using Trim Reblogs when everyone else still uses Editable Reblogs is an enormous pain that I don’t want to deal with. Even as I make this post advocating for people to switch, I’m dreading actually doing it, because I know that most of my partners still use the old system and I will have nothing but headaches.
But the thing is, everyone refusing to switch is what’s creating the headaches in the first place. If we all moved to the new system together, these issues would simply disappear, and we would all be able to effortlessly cut our posts using Trim Reblogs without ever having to worry about it again.
The RPC needs to collectively make the switch, for two reasons.
First, Tumblr is going to switch everyone to beta eventually. Refusing to switch now is really just delaying the inevitable -- it’s not a question of if you’re going to be forced into the new system, but when. By switching now, you can go ahead and get used to it and start giving feedback to both Tumblr and the XKit Rewritten team if you find anything buggy or broken.
Second, as I said above, new users are locked into beta, with no option to switch back to legacy. Trim Reblogs is their only option for cutting posts -- and as long as most of their partners are using Editable Reblogs instead, they cannot cut their posts properly. Their only option is to use a series of increasingly ridiculous workarounds that most people won’t understand. The fact that it took me 1500 words just to explain everything should tell you how confusing the whole thing is -- you can’t be that surprised when a lot of people, upon realizing that they can’t cut posts without a whole lot of tedium, decide to just not bother cutting them at all. The best way for everyone to be able to cut their posts properly and efficiently is for everyone to be on the same system.
Yes, the beta editor is different. It has some weird quirks. It will be a bit of a learning curve to get used to a new system of replying to threads. But this is a change that’s going to happen eventually, and is a change that needs to happen for a lot of people to able to cut their posts properly.
(It’s also worth noting that -- assuming you still have the option to switch -- you may be able to toggle between the two systems during the adjustment period. I haven’t been able to test this yet, but I see no reason it wouldn’t work. Use Trim Reblogs whenever possible, and especially for the partners that have already made the switch. But when you get to a reply that it just won’t work for, toggle back to the legacy editor and use Editable Reblogs just for that thread. It’s a bit annoying, but it could be the middle ground needed to help people start making the switch. And once the majority of the RPC is on the new system, then this won’t be an issue anymore.)
#rph#rpt#rpc#editable reblogs#trim reblogs#*my stuff#*my tutorials#this started as a tutorial for cutting posts and led into something else lmao#beta editor
2K notes
·
View notes
Text
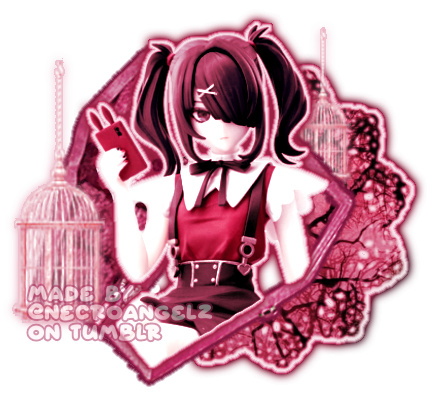
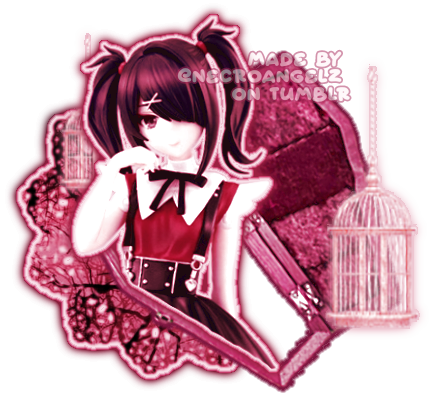
☆ ❛ STREAM ALERT !! ❜ NECROANGELZ is streaming ♡ ⁓⁓ Come watch ?
❛ i'm a mess in distress but we're still the best dressed. fearless, say yes, we don't dress to impress. ❜ —- EVE, PSYCHE & THE BLUEBEARD'S WIFE.

♡ NOW WATCHING : Needy Streamer Overload Graphics ☆ ⁓⁓ Enjoy the stream !!
—- semi-requested by @lavendergalactic
—- OH MY GOD. IF ANYONE WERE TO ASK ME WHAT GRAPHICS I HAD THE HARDEST TIME EDITING I WOULD SAY THESE GRAPHICS. THESE WERE IN THE MAKING SINCE A MONTH AGO AND I PROBABLY SPENT 10+ HOURS TOTAL ON THEM. THESE WERE SO HARD TO MAKE BUT THEY'RE NOT THAT BAD I THINK. ANYWAY I'M GOING TO CRY NOW.
—- alts under the cut.
—- "angel why is one of the graphics a different color-" we don't talk about that. (i had a hard time making it with the color palette i decided, ok. i toiled for four hours, ok. i had to change the colors or else i would die, ok.)
—- likes and reblogs are always appreciated. thank you for supporting the angelic streamer.

#🌠﹕ a wishing star 𝜗𝜚 ︵#👁️🗨️﹕ from the archives 𝜗𝜚 ︵#needy streamer overload#needy girl overdose#kangel#omgkawaiiangel#kangel nso#ame chan#ame nso#ame needy girl overdose#ame needy streamer overload#kangel needy girl overdose#kangel needy streamer overload#needy streamer overdose#needy girl overload#rentry graphics#editblr#rentry resources#rentry edit#rentry tutorial#rentry guide#rentry divider#tumblr layouts#nso icons#kangel icons#ame icons
147 notes
·
View notes
Text

BD-1 | Jedi Survivor
#thanks for all of your comments and tags on his video!!!!#so much of my attitude towards these edits is “I wish this existed but whoops guess I have to make it exist”#which is both intimidating and fun#gonna swap back to photos for a bit but gifs and alt-angle stuff will return once I have oomph to record again#might make a tutorial for photomode stuff#star wars jedi survivor#star wars jedi fallen order#jedi survivor#jedi fallen order#bd 1#star wars
240 notes
·
View notes
Text
learning after effects by. doing whatever this is, apparently
#luo binghe#svsss#scum villian self saving system#scum villains self saving system#incorrect svsss quotes#mxtx#incorrect mxtx#i just did tutorials until i figured out how to edit the curves for keyframes and then was like#'i'll figure the rest out by making a binghe edit'. first of all. you and what content.#and then this took me like. Way too many fucking hours anyway. ...i genuinely don't want to talk about it. learning programs is hard#this was not how i was supposed to be spending my free time this week. oops. learning valuable new tools can be productive.#even if it occurs through creating. this#anwyay i've been thinking about that post + illustration together ever since i saw the image for the first time
246 notes
·
View notes
Text

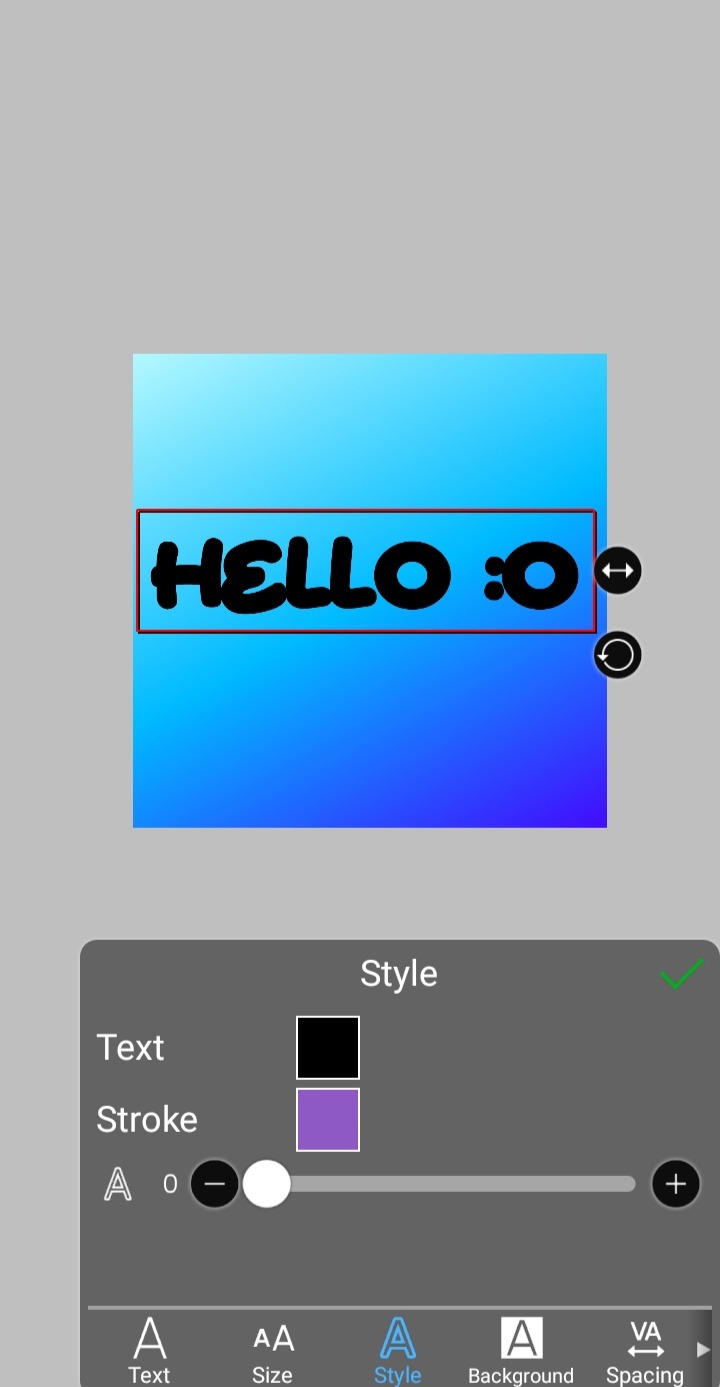
jelly text tutorial! (works with shapes as well)
what you need: ibis paint x, premium or free version doesnt matter
step 1: color
yes we're starting with color! I highly suggest using multiple colors for a prettier finish. I prefer parallel gradiation but as long as its blurry anything should look nice. pick analogous colors for the best result.

step 2: write the text or draw/import the shape.
as it says! if youre drawing it, make sure its on a new layer above the gradient! I suggest using rounder, bubblier fonts/shapes, one of my favorites to use is starborn on all uppercase. the color you use does not matter as it will be the background color in a short bit
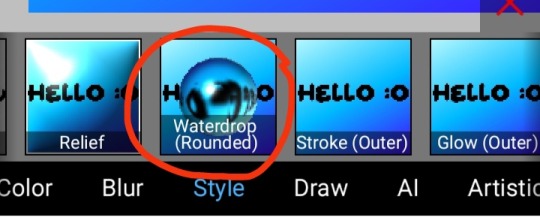
step 3, the jellificationing
this little friend called "water drop (rounded)" in effects under style is your best pal. its here to help you and make the process so much easier.
so just press it and fiddle around with it until you're happy with the result.
step 4 (optional): refracting
to help it make look more 'realistic' I tend to add another layer of the water drop. to do this I simply copy the previous one and go do the same effect on the top layer
step 4.5: tips
you need to make sure the refractive index for the second one is turned down all the way, or itll look weird, streaky, etc. make sure the highlight and highlight size settings are lower than the previous time you used this effect. and make sure the little sun symbol (the light source) is on the edge of the opposite direction of the previous time you used the effect. so if the first layer of jelliness had the light source coming from the top right, the second layer should br on the very edge of the bottom left.

step 5: begone, background
yeah, we're done with that, this will also be the big reveal of the final image

and then you just crop to fit and then save as a transparent
bam! heres the final thing!

I dont know how good I am at explaining but I hope this helped! if youre confused dont be afraid to ask!
#🌫️ i know what you dread | creations#rentry#rentry inspo#rentry resources#editing resources#editing#editing tutorial#edit tutorial#edit resources#rentry decor#rentry graphics#carrd resources#web graphics
350 notes
·
View notes
Text

Yellow Eyes
#edit: adjusted the colour version#another colouring method for the tutorial#the yellow eyes are soooo fun to do :3#azazel#yellow eyed demon#spn art#spn fanart#it was really hard to capture his likeness#and his skin texture was new for me#really need to diversify my studies in that area
320 notes
·
View notes
Text
Tips For Vtubers
Howdy there, I’m Liv and I’m a vtuber much like you, but I’ve been here the whole time so I’m here to compile stuff for you to help make your transition less scary.
To start, here’s is a post with a lot of tips for general tumblr use and here’s one for giving your blog a custom theme.
Beyond that here’s other things that aren’t mentioned but are gonna be relevant for you:
If you’re coming back to tumblr know that you can’t follow from your sideblog, if you want to follow back it will be from your main, as will your likes, replies, asks. Decide what to do with this information now before you settle into a blog.
Fully explore the settings, there's a ton of stuff hiding in there. AND do it on PC at least once, some stuff is not in the app.
Blogs have individual block lists, no idk why either. So if you want someone banned from everything you need to do that manually.
Also enable tumblr Labs! It’s got reblog graphs which are rad (my beloved orbs) And alternate dashboards, the Blog Subscriptions one is my fave because it means all you have to do is turn on notifications to get all your fave guys in one dashboard.
Contrary to popular belief there is still a porn and adult content community here, if you want to get anywhere near them you have to have age in bio or they’ll smite you. EDIT: I posted more about how to navigate lewdposting here.
Tiktok embeds don't play nice with tumblr for some reason, if you also do tiktok then just reupload your videos and link your account there underneath.
The link post type will show up for your followers but there’s a chance it won’t show up in any tags, so don’t do going live posts like that.
BUT you can straight up embed your stream into your posts! As long as you're using the New Post Editor you should see this menu:

Click the video camera, link to your twitch and bam. There it is. You can also do this with the video post type! If you're ever worried about your post format getting bonked just go through the tags and see what posts that DO make it are doing. Together we can overcome spaghetti code.
General "tumblr culture" is to not comment on posts but its not one thats set in stone, your fellow small vtuber account is probably dying for interaction so comment on posts! scream in the tags! send funny asks! Getting interaction right now is going to be a big comfort during a weird time.
Oh yeah we have ask boxes built in, no marshmallow needed.
ALSO we have pinned posts just like twitter, but as long as you want! Put your ref & socials & art tag (yes you can keep your fanart tags) & your minors DNI & a picture of your cat if you want.
OH I do suggest picking out tags for your personal content if you plan to also do reblogging, makes it easy for newcomers to find what you're doing.
#vtuber and #indie vtuber are full of fanart for the big guys. If you wanna find each other use #vtuber uprising
Okay this post is getting so long but final tip: check out custom pages. They're on the custom theme menu and they're basically mini webpages on your blog that can have their own coding. You can do Literally Whatever. Lore! Credit page! Ref sheets! I once put a choose your own adventure where you navigated by clicking specific parts of a picture on tumblr pages. I Mean Anything.
That's all for now, please add other tips if you want. And please reblog! Not just this post but other peoples too! This will all be way less of a drag if we can find each other. 💖
EDIT: One more thing, lolisho shit Does Not Fly here. They are some of the only tags that tumblr has actually shadowbanned and there is a reporting criteria for it to get taken down. It also doesn't fly on my blog! Begone!!
#vtuber#indie vtuber#vtuber uprising#envtuber#livs words#i felt like a specific to us post would b good#since we have specific stuff to worry about like going live posts n etc#also please do themes i wanna see yall go apeshit#post edit#while i doubt that tumblr has the vibes that makes people think lolisho would be welcome here#the post is starting to get big enough that its worth mentioning#resource#tutorial
1K notes
·
View notes
Last Seen Blogs
simonleclerc
simon Leclerc

captainhollycarrot
Summertime Sadness

botanicalgremlin
botanical gremlin

elistheme1
eli's theme
boomstab-papa
Too Much Orca