#my first time using photoshop lmao
Text
But look at us Luke, we're the ones left alone, holding some rich monster's pain. All of existence, built on his violence. All of space-time, humming to life with a single inviolate rule.
Give the hero something to punch.
#kate kane#duke thomas#luke fox#outsiders#dc comic edit#comic edit#dc comics#my first time using photoshop lmao#got it for free with my school adobe acc and obviously im gonna abuse it for comic editing purposes. although i skipped all the tutorials#and just fucked around so idk this isnt like impressive. couldnt find buttons for a lot of what i wanted to do but i think i was just looki#in the wrong spots. anyways yeah.#batman#panel from outsiders no 3 ofc#dont know what else i say here. this is v much the product of me procrastinating writing an essay draft#if the format is weird im sorry im on tumblr desktop which idk how to use. bc photoshop is on my computer and also i turned my phone off so#would stay off my phone and focus. which obviously worked rlly well lmao#swishy's comic edits#panelposting#not rlly but ill tag that too for personal reference. yeah#bats#anyways this issue is so funny to me. like yes lets talk about how batman is everywhere and is taking over everything and also cant die. in#a batman comic that is taking over things (notably the team name etc) from other characters#IRONY!!!!#anyways dark multiverse(? idfk) duke thomas i love you. you can kill as many versions of bruce wayne as you like <3
17 notes
·
View notes
Text
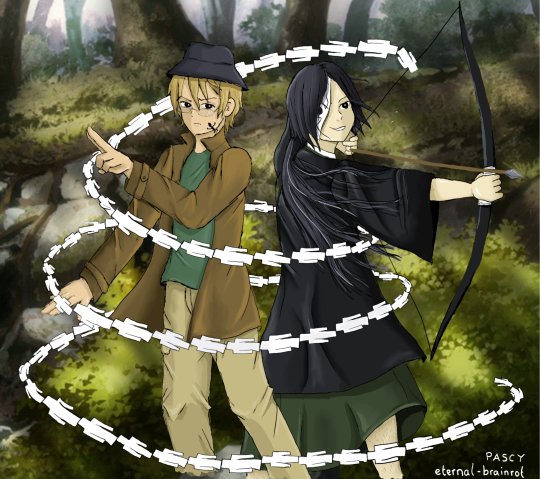
They've got each other's backs!!!!
They both look so cool and badass when they fight yokai and I'll forever be screaming about when they team up and fight yokai TOGETHER!!!
[ID: fanart of Natori and Matoba standing back to back in front of a screencap of the woods from the natsuyuu anime. Matoba aims a bow and arrow off screen whilst Natori controls paper dolls that circle around them both protectively]
#they wont leave me alone and get out of my head so i had to draw them#i tried 3 times to draw a background but it was NOT working out so i cheated and just used a background from the anime#i honestly have no idea how to draw and especially not digitally im sorry >_<#but i got given a photoshop subscription last with my uni course and am having FUN with it hehe#drawing all of natoris paper dolls took YEARS off of my life lmao#they always look SO COOL doing their exorcisms and spells and stuff asgshasfg#also i think this is the first time ive posted my fanart online???#matoba seiji#natori shuuichi#natsume yuujinchou#horrible exorcists#natsuyuu
37 notes
·
View notes
Text
i really want to make gifs of fuuta's 2nd trial mv while it's still really new. idk if i should post them if ever though... <- has never posted any of my edits of any sort and gifs. even icons
#⋯ ꒰ა starry thoughts ໒꒱ *·˚#⋯ ꒰ა milgram ໒꒱ *·˚#nah i only have like. access to canva for paid. and it's education and not even pro LMAO ty to school for providing canva education <3#yeah but i only really use canva and photopea and take a fucking long time doing anything related to editing#it's fun and a great way to pass time esp bcs i take a long time but for time efficiency... not really <//3#i'll do my homework first and then ya ^___^#i want photoshop but if you get me i don't want to YEAH. not only do i hate yeah i also don't like paying often#like ofc i do for what i need but i. barely spend my money (it helps knowing that idk how much money i even have)#idk maybe it sounds good like 'yo you don't waste money' but also it sucks idk how to handle money at all and stuff#i rmbr being so excited planning for getting ffxiv. laying out the costs and all. LMFAO ya i only really pay for xiv sub and that's it#cash shop i only have a few stuff bcs i've been there for old events and my friend (very generous. big brother guy) gifted us stuff#fuuta's voice is so good. man i keep getting distracted this went from editing to money and then ffxiv and then fuuta#UHM ANYWAYS...... anyways............. yeah i just do really simple edits. just literally changing the color and all#but you see i often like things most when it comes from me. or my friends. or if it is personalized#so i don't like taking random things! idk the process feels best when it comes from me but i also love stuff that have heart in it#and if it's yk. oh. this is for me. ig i'm just used to mostly having to do things for myself bcs i don't get it often from others </3#braindead. it is 1 pm. i will finish my homework (soon!)#i love all milgram characters. i was a bit yk to muu and kotoko but i think i understand kotoko better after studying fuuta more#and i get now ^^ it's a bit hypocritical to vote her innocent and fuuta guilty but at the same time it depends on what you value#and also did people really not expect her to. do that. hello. i saw that coming from a mile away but yeah you can't predict the future#so makes sense too! tbh im a fuuta innocent guy but i do believe guilty first trial is best but also wow the effects of guilty 1st trial#were yeah. but taste of his own medicine (real!) i just hope the others get that too. in time.#specifically muu and kotoko bcs though i love them they still iff me a bit (is that even a word)#tbh my feelings on milgram characters are complicated but i think i'm complicating it too ngl.#obsessed with mikoto though. his voice!!! his va slaying as always#tbh w kotoko it's mostly that i think she's getting ahead of herself. in a way. i think that's how to say it but i'm not sure#with muu. i think i get her but it's more of fuuta for me and i think that's why yeah? but i like muu she was one of the first that#caught my eye from b4 i watched the mvs and all!! i think it might be that she reminds me a tiny bit of myself#but in a way i'd rather not admit or something i don't like about myself that makes me like her less. curious#hi um i wrote a lot more tags but they stopped after 30 oops. i took screenshots tho <3 anyways this is a 20 minutes post BYE
2 notes
·
View notes
Text

✨ Simple Gif Colouring for Beginners ✨
I wrote up my basic gif colouring process for a friend recently, but a couple of people here mentioned they'd also find it helpful! so, as requested, this is a beginner-friendly walkthrough of the way I colour my gifs :) it's aimed at brand new gif makers with no prior experience with photoshop or photo editing.
when I first started gif making I found colouring and photoshop in general suuuper daunting, so I've tried to simplify everything here as much as possible. hopefully this will be relatively easy to follow and not too intimidating!
a couple of things to begin with:
I'm only talking about colouring here - this is not a full gif making tutorial. I've linked to some of my favourites of those here!
I personally like to make bright, 'clean' looking gifs with vibrant but natural colours, so that is the style of colouring this tutorial is geared towards. most of gif colouring is subjective and about personal taste - the only thing that I'd say is possible to get wrong is skin tones, which I talk about a lot in this guide.
as I mostly gif Thai dramas, most of the advice is geared towards colouring for East Asian/South East Asian skin tones - but the techniques should be fairly universally applicable (and here are some tutorials that talk about gif colouring for other skin tones).
I'm not an expert! I'm not claiming this is the best or the only way to colour gifs - it's just how I do it.
this post is very image-heavy. if the images aren't loading (or the gifs are running slowly or cutting/looping weirdly), then try viewing the post in its own tab (rather than on the your dash or someone's blog) and refreshing the page.
okay, full walkthrough beneath the cut!
contents:
1. intro
a. natural gif colouring goals
b. very very basic colour theory
2. super simple colouring (the essentials)
a. curves
b. selective colour (and skin tone correction)
c. hue/saturation
d. saving and reusing colouring
e. another simple colouring example
3. other adjustment layers
a. brightness/contrast
b. levels
c. vibrance
d. colour balance
e. channel mixer
4. troubleshooting
a. curves
b. saturation
5. fin!
1. intro
the colouring part of gif making can be super overwhelming, especially if (like me when I first started!) you're completely new to photoshop and/or have no experience with colour theory or photo/video editing.
if you're opening photoshop and making gifs for the first time, I highly recommend getting used to making a few basic, uncoloured gifs to begin with. just to practice, rather than post anywhere (though you can always come back and colour them later if you want) - but it'll make the rest of the process much easier if you're already beginning to get used to working in timeline mode of photoshop. give yourself a bit of time to practice and get a feel for things like how many frames you tend to like in a gif, where you like to crop them for the best loop, what kind of aspect ratio you like etc* - so that you're not trying to navigate all of that for the first time on top of everything else!
* frames: for me between 60-90 frames is ideal, but 40-120 frames is the absolute min-max I'd personally use in a normal gifset
loops: for the smoothest loops, try to avoid cutting someone off mid-movement or mid-word if possible.
aspect ratio: for full-size (540px) gifs, I tend to go for either 8:5 (slightly 'skinnier' gifs), 7:5, or 5:4 (particularly big, thick gifs lmao)
✨ natural gif colouring goals
part of what can be so daunting about starting gif making is not knowing where to start or what you want to achieve. this is definitely something that gets easier with practice - the more gifs you make, the more you'll get a feel for what kind of look you like and the more instinctively you'll know how to get there. it also helps to see if any gif makers you like have made "before and after colouring" posts - these can help with getting a sense of the kinds of changes made through gif colouring. here's one I made!
in general, I like to make my gifs bright and 'clean' looking, with vibrant but natural colours. these are the things I'm usually hoping to achieve with colouring:
brighten dark scenes
remove muddy, yellowish lighting or filters
saturate colours
correct any skin lightening filters or overexposure
make lighting and colours as consistent as possible between gifs within a single gifset, especially gifsets featuring gifs from multiple scenes/episodes/videos
this guide is focusing on natural colouring, but of course there are many cool ways to make stylised/unnaturally coloured gifs. imo you'll need to master these basics first, but if you want to learn how to do things like change the background colour of gifs or use gradients or other cool effects, then @usergif's resource directory has loads of super helpful tutorials!
✨ very very basic colour theory
[disclaimer! I don't know shit about fuck. I do not study light or art. this is just an explanation that makes sense to me exclusively for the purposes of gif making.]
the primary colours for light/digital screens are red, blue, and green. having all three colours in equal measures neutralises them (represented by the white section in the middle of the diagram).

so to neutralise a colour within a gif, you need to add more of the colour(s) that are lacking.
in practice this usually means: the scene you want to gif is very yellow! yellow is made of red and green light, so to neutralise it you need to add more blue into your gif.
it can also mean the reverse: if you desaturate the yellow tones in a gif, it will look much more blue.
looking at the colour balance sliders on photoshop can make it easier to visualise:

so making a gif more red also means making it less cyan.
removing green from a gif means adding magenta.
taking yellow out of a gif will make it more blue.
tl;dr:
neutralise yellows by adding blue (and vice versa)
neutralise reds by adding cyan (and vice versa)
neutralise green by adding magenta (and vice versa)
2. super simple colouring (the essentials)
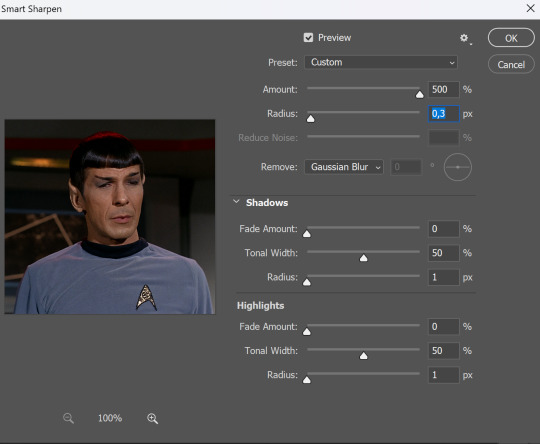
starting with a nice sharpened gif in photoshop in timeline mode. (these are the sharpening settings I use!)
some scenes are much harder to colour than others - it helps to start out practising with scenes that are bright/well-lit and that don't have harsh unnaturally coloured lights/filters on. scenes with a lot of brown/orange also tend to be harder.
I usually save a base copy of my gif before I start colouring just in case I end up hating it, or find out later that it doesn't quite fit right into a set and need to redo it etc.
so here is my base gif!

it's an okay gif, but it has a bit of a yellow tint to it that I want to reduce.
colouring is easiest to do in adjustment layers, which can be found under layer -> new adjustment layer - or for me they are here:

there are lots of different types of adjustment layers that do lots of different things - but for me the absolute essentials for colouring are curves, selective colour, and hue/saturation.
I also use brightness/contrast, levels, exposure, vibrance, colour balance, and channel mixer sometimes, depending on the gif - but I use curves, selective colour, and hue/saturation on every single gif.

✨ curves layer
the first thing I always do is a curves layer. when you first open one it will look like this:

first I usually click the ‘auto’ button, just to see what happens. sometimes it makes a big difference (it usually brightens the gif a lot) - but on this gif it didn’t do much.
if it had made the gif look nicer then I would have kept it and added a second curves layer on top to do the rest of these steps.
the next step is selecting the white and black points with the little eyedropper tools.
the bottom eyedropper lets you pick a white point for the gif. click somewhere super light on the gif to see what happens - for this gif, I clicked on the lampshade on the left. if it looks weird, I just undo it and try somewhere else - it usually takes a few goes to find something that looks good.
here's what that did to the gif:

then I pick the top eyedropper and use it to pick a black point by clicking somewhere really dark, again playing around until I find a black point that looks good.
here's what the gif looks like after picking the white and black points:

this can take some experimenting, but you can make super easy drastic changes to your gif just with this. in this case, the curves layer took out a lot of that yellowy tint.
and this is what the curves graph looks like now:

you can click and drag those lines to make further changes if you want - I usually leave them alone though. the colours of the lines indicate which colours have been changed in the gif - for example, you can see from that steep blue line on the graph that blue has been added to neutralise those yellows.
next I usually do another curves layer and just press the ‘auto’ button again to see what happens. usually it brightens the gif a bit more, which I like.
‼️if nothing is working: usually with a bit of fucking about a curves layer works well - but sometimes you can’t find a good white and black point anywhere, and instead your gif turns wacky colours and nothing looks good. this happens more often with very heavily colour tinted scenes :( the troubleshooting section at the end goes over some options, including starting with a levels layer instead.
✨ selective colour (and skin tone correction)
skin tones are made up of a mixture of yellow and red.
removing yellow (or adding blue or red) to a gif will make the skin-tones too red - and removing red (or adding cyan or yellow) to a gif will make the skin-tones too yellow.
adding blue to this gif with the curves layer took out the yellowy tint, which I wanted - but it also took the yellows out of Kim's skin tone, which I don’t want. so I need to put yellow back into the skin tones specifically - without putting it back into the rest of the gif.
selective colour layers let you select an individual colour and adjust the levels of other colours within that colour. you can change how yellow the green shades are, or how much cyan is in the blues, for example.
I need to add yellow back into the red tones to correct the skin tones on this gif. this is the case for most gifs in my experience - the vast majority of the time, unless a scene is very heavily tinted in another colour, a curves layer will add blue/remove yellow.
in the 'colors' dropdown, select the 'reds' section and drag the 'yellow' slider higher - this will add more yellow into just the red shades within the gif.

the amount of yellow you need to add back into the reds depends on how much yellow was taken out of the gif initially - I just play around with the slider until it looks right. if you're not sure, it helps to have some neutrally-coloured (not white-washed!) reference photos of the people in your gif to compare to.
here's the result. Kim's skin is a lot less pink toned and much more natural looking:

✨ hue/saturation
this adjustment layer lets you adjust the hue and saturation of the gif as a whole, and also of each colour individually.

I don't use the hue or lightness sliders unless I'm trying to do something more complicated with the colouring.
clicking the dropdown menu that says 'master' lets you edit the saturation of each colour individually. this is useful if your gif is still super tinted in one colour.
I thought the yellows on this gif were still slightly too bright, so I switched to the yellow channel and desaturated them slightly. (remember if you do this then you need to go back to selective colour and add more yellow into the red skin tones to balance out the desaturation!)
then I increased the 'master' saturation of all the colours to +5:
I usually find the right amount of saturation is somewhere between +5 and +12, but it depends on the gif.
‼️if the gif feels undersaturated, but the saturation slider isn't helping/is making the colours worse, try a vibrance layer instead.
done!

✨ saving and reusing colouring
you can copy and paste adjustment layers between gifs to make your colouring even across each of your gifs for one scene - so if you're making a set of multiple gifs of the same scene, or you think you might want to gif the same scene again in the future, you can save it as a psd so you can reuse the colouring again later.
each gif's colouring will then still need tweaking - different cameras/angles/shots of the same scene can still start out with slightly different colouring.
I recommend uploading the gifs as a draft post on tumblr so you can see what they all look like next to each other and catch any inconsistencies.
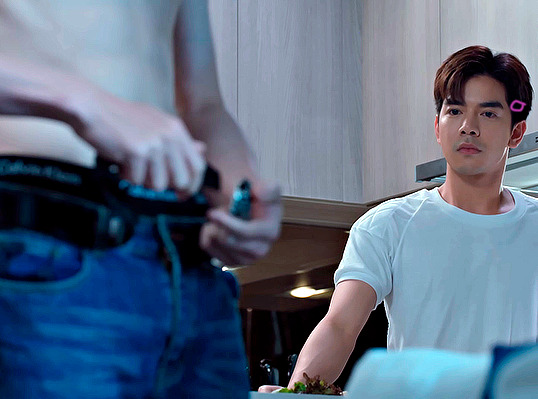
✨ another one! (speedrun!)

HI KEN!
the white point for the curves layer was in the window behind them.
the curves layer removes the muddy yellow tint, but again it makes their skin tones (especially Ken's) very red toned, which is adjusted by the selective colour layer.
3. other adjustment layers
imo many many gifs can be coloured really nicely with just those three adjustment layers, but some need different adjustments.
✨ brightness/contrast

pretty self explanatory!
I personally usually avoid using the 'brightness' slider because I rarely like the effect - I only tend to use the 'contrast' one.
the 'auto' button is sometimes useful though, especially if you’re struggling with the curves layer.
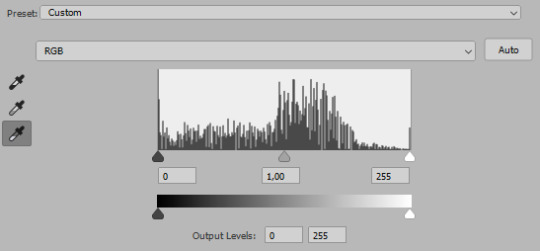
✨ levels

levels alters the white and black points of the gif, like curves - but unlike curves it doesn't also alter other colours.
use the sliders beneath the graph to alter how dark/light the gif is. you can slide the black slider further to the right to make the blacks darker, and the white slider to the left to make the whites lighter.
levels is a good place to start if your curves layer isn't working.
(I'm going to hit the image limit for this post lol so here are some screenshots of a table I made to demonstrate this rather than actual gifs. sorry!)


on both sides, I dragged the sliders up to where the big jumps are on the graph - this is usually a good place to start!
✨ vibrance
vibrance... makes the colours more vibrant. it's more subtle than saturation.
it's really helpful for gifs that feel grey. sometimes adjusting saturation just makes the greys kind of weirdly tinted, but a vibrance layer can fix that.

vibrance is much more subtle!
✨ colour balance

colour balance affects the overall balance of colours within a gif.
it's good for scenes with heavy tints.
I tend to stick to the 'midtones' dropdown, but you can also alter the colour balance within the shadows and highlights if you want.


✨ channel mixer
I avoided channel mixer for such a long time because it scared me. but it's great for scenes that are very heavily tinted in one colour.
basically, it works with the levels of red, green, and blue within a gif. you select an output colour and then play around with the levels of the colour you selected within each other colour.
kind of the reverse of selective colour?

so in the 'blue' channel, the levels of blue are at 100%, and the levels of red and green are at 0% - but you can impact how much blue is in the reds and greens and blues.
this tutorial explains it well - but imo the best way to get to grips with channel mixer is just to play around with it a bit (sorry)
(when I made this guide for my friend, I also made a slightly more complicated gif colouring walk-through that included using channel mixer. there isn't space to include it within this post, but if anyone is interested I could always upload it as an 'intermediate' gif colouring tutorial - lmk!)
4. troubleshooting
‼️curves
usually with a bit of fucking about a curves layer works well - but sometimes you can’t find a good white and black point anywhere, and instead your gif turns wacky colours and nothing looks good. this happens more often with very heavily colour tinted scenes :(
for example, with this base gif:

using many of the brightest points as a white point turn it wacky colours, like this:

yikes :(
some options for these cases:
try brightening the gif first with the 'auto' button on the curves layer or with a levels layer. having a brighter gif to start with can give you better options for picking a white point.
try finding an alternate, whiter/brighter white point. look for places the light reflects - on this gif, using the light on Porsche's cheekbone works well as the white point. it also helps to find places that would be white if the scene wasn't tinted - the lightest part of a white shirt is often a good place to start, for example.
skip the curves layer, and instead use a levels layer to alter your white/black points, and colour balance or channel mixer to balance the colours.
‼️over/undersaturation
if your gif (especially the skintones) is looking a little washed out or lifeless, it might be undersaturated. boost that saturation - or if that's not working, try a vibrance layer.
oversaturation is often easiest to spot in the mouths and ears of any people in a gif. if the mouths are looking unnaturally, vibrantly red, then you've gone too far with the saturation.
5. fin!
and done! I hope this was coherent helpful to somebody.
if there's anything that I've missed or that doesn't make sense pls feel free to shoot me an ask or a message and I'll do my best to help! I've also collated a bunch of additional reading/resources below.
happy gifmaking 🥰
✨ some links!
photoshop basics by @selenapastel
gifmaking for beginners by @hayaosmiyazaki
gifmaking guide for beginners by @saw-x
dreamy's gif tutorial by @scoupsy-remade (includes instructions on how to blur out burned-on subtitles or annoying video graphics)
beginner's guide to channel mixer by @aubrey-plaza
how to fix orange-washed characters by aubrey-plaza
colour correcting and fixing dark scenes by @kylos
does resampling matter? by usergif
how to put multiple gifs on one canvas by @fictionalheroine
watermarking using actions by @wonwooridul
resource directory by @usergif
#i got a couple of asks about this so i figured i'd type it up as a post#it's been sitting in my drafts for a while now though i'm so sorry omg.#i had to replace my laptop and it took me a while to get round to downloading photoshop on the new one#but i hope this is helpful!!#gif making#tutorial#photoshop tutorial#colouring tutorial#coloring tutorial#gif colouring#gif coloring#photoshop resources#gif tutorial#gif resources#userbunn#uservik#darcey.txt#darcey.gif#usergif
325 notes
·
View notes
Note
May I ask what scanners / equipment / software you're using in the utena art book project? I'm an artist and half the reason I rarely do traditional art is because I'm never happy with the artwork after it's scanned in. But the level of detail even in the blacks of Utena's uniform were all captured so beautifully! And even the very light colors are showing up so well! I'd love to know how you manage!
You know what's really fun? This used to be something you put in your site information section, the software and tools used! Not something that's as normal anymore, but let's give it a go, sorry it's long because I don't know what's new information and what's not! Herein: VANNA'S 'THIS IS AS SPECIFIC AS MY BREAK IS LONG' GUIDE/AIMLESS UNEDITED RAMBLE ABOUT SCANNING IMAGES
Scanning:
Modern scanners, by and large, are shit for this. The audience for scanning has narrowed to business and work from home applications that favor text OCR, speed, and efficiency over archiving and scanning of photos and other such visual media. It makes sense--there was a time when scanning your family photographs and such was a popular expected use of a scanner, but these days, the presumption is anything like that is already digital--what would you need the scanner to do that for?
The scanner I used for this project is the same one I have been using for *checks notes* a decade now. I use an Epson Perfection V500. Because it is explicitly intended to be a photo scanner, it does threebthings that at this point, you will pay a niche user premium for in a scanner: extremely high DPI (dots per inch), extremely wide color range, and true lossless raws (BMP/TIFF.) I scan low quality print media at 600dpi, high quality print media at 1200 dpi, and this artbook I scanned at 2400 dpi. This is obscene and results in files that are entire GB in size, but for my purposes and my approach, the largest, clearest, rawest copy of whatever I'm scanning is my goal. I don't rely on the scanner to do any post-processing. (At these sizes, the post-processing capacity of the scanner is rendered moot, anyway.) I will replace this scanner when it breaks by buying another identical one if I can find it. I have dropped, disassembled to clean, and abused this thing for a decade and I can't believe it still tolerates my shit. The trade off? Only a couple of my computers will run the ancient capture software right. LMAO. I spent a good week investigating scanners because of the insane Newtype project on my backburner, and the quality available to me now in a scanner is so depleted without spending over a thousand on one, that I'd probably just spin up a computer with Windows 7 on it just to use this one. That's how much of a difference the decade has made in what scanners do and why. (Enshittification attacks! Yes, there are multiple consumer computer products that have actually declined in quality over the last decade.)
Post-processing:
Photoshop. Sorry. I have been using Photoshop for literally decades now, it's the demon I know. While CSP is absolutely probably the better piece of software for most uses (art,) Photoshop is...well it's in the name. In all likelihood though, CSP can do all these things, and is a better product to give money to. I just don't know how.
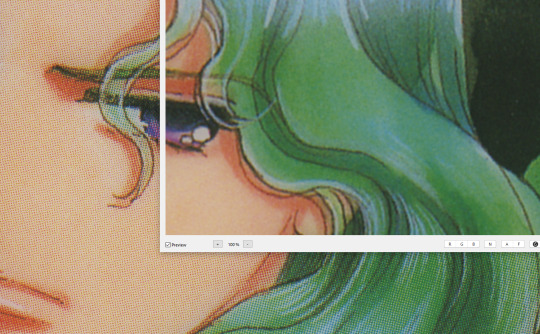
NOTENOTENOTE: Anywhere I discuss descreening and print moire I am specifically talking about how to clean up *printed media.* If you are scanning your own painting, this will not be a problem, but everything else about this advice will stand!
The first thing you do with a 2400 dpi scan of Utena and Anthy hugging? Well, you open it in Photoshop, which you may or may not have paid for. Then you use a third party developer's plug-in to Descreen the image. I use Sattva. Now this may or may not be what you want in archiving!!! If fidelity to the original scan is the point, you may pass on this part--you are trying to preserve the print screen, moire, half-tones, and other ways print media tricks the eye. If you're me, this tool helps translate the raw scan of the printed dots on the page into the smooth color image you see in person.
From there, the vast majority of your efforts will boil down to the following Photoshop tools: Levels/Curves, Color Balance, and Selective Color. Dust and Scratches, Median, Blur, and Remove Noise will also be close friends of the printed page to digital format archiver. Once you're happy with the broad strokes, you can start cropping and sizing it down to something reasonable. If you are dealing with lots of images with the same needs, like when I've scanned doujinshi pages, you can often streamline a lot of this using Photoshop Actions.
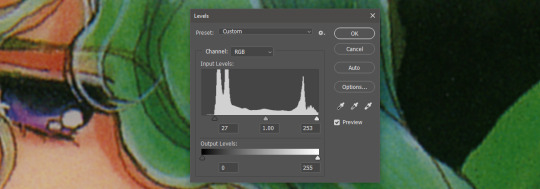
My blacks and whites are coming out so vivid this time because I do all color post-processing in Photoshop after the fact, after a descreen tool has been used to translate the dot matrix colors to solids they're intended to portray--in my experience trying to color correct for dark and light colors is a hot mess until that process is done, because Photoshop sees the full range of the dots on the image and the colors they comprise, instead of actually blending them into their intended shades. I don't correct the levels until I've descreened to some extent.
As you can see, the print pattern contains the information of the original painting, but if you try to correct the blacks and whites, you'll get a janky mess. *Then* you change the Levels:
If you've ever edited audio, then dealing with photo Levels and Curves will be familiar to you! A well cut and cleaned piece of audio will not cut off the highs and lows, but also will make sure it uses the full range available to it. Modern scanners are trying to do this all for you, so they blow out the colors and increase the brightness and contrast significantly, because solid blacks and solid whites are often the entire thing you're aiming for--document scanning, basically. This is like when audio is made so loud details at the high and low get cut off. Boo.
What I get instead is as much detail as possible, but also at a volume that needs correcting:

Cutting off the unused color ranges (in this case it's all dark), you get the best chance of capturing the original black and white range:
In some cases, I edit beyond this--for doujinshi scans, I aim for solid blacks and whites, because I need the file sizes to be normal and can't spend gigs of space on dust. For accuracy though, this is where I'd generally stop.
For scanning artwork, the major factor here that may be fucking up your game? Yep. The scanner. Modern scanners are like cheap microphones that blow out the audio, when what you want is the ancient microphone that captures your cat farting in the next room over. While you can compensate A LOT in Photoshop and bring out blacks and whites that scanners fuck up, at the end of the day, what's probably stopping you up is that you want to use your scanner for something scanners are no longer designed to do well. If you aren't crazy like me and likely to get a vintage scanner for this purpose, keep in mind that what you are looking for is specifically *a photo scanner.* These are the ones designed to capture the most range, and at the highest DPI. It will be a flatbed. Don't waste your time with anything else.
Hot tip: if you aren't scanning often, look into your local library or photo processing store. They will have access to modern scanners that specialize in the same priorities I've listed here, and many will scan to your specifications (high dpi, lossless.)
Ahem. I hope that helps, and or was interesting to someone!!!
#utena#image archiving#scanning#archiving#revolutionary girl utena#digitizing#photo scanner#art scanning
236 notes
·
View notes
Note
pleasepleaseplease recommend some danphan fics!!
Sorry these are on ff.net I was into danphan before AO3 was really A Thing. Invisobang also just completed and a whole wack of new fics are also now out for your enjoyment so I suggest taking a look there too
Lab Rat - Danny (as Phantom) is captured by his parents and vivisected in the lab. THE MOST iconic dp fic from this era of fandom and also the first dp fic I ever read which single-handedly got me into the fandom. I also recommend anything else by this author[sequel]
Pits - Danny is captured by Walker and thrown into the Pits to fight for his life. HANDS DOWN my all time favorite dp fic. I drew a bunch of fanart for it and never showed the author LMAO [sequel]
In The Way - A twisted tale of a summer spent all alone
Wondering - Danny's been captured and tortured by his parents, but he refuses to say a word until his psychiatrist starts connecting the dots. Can he risk keeping it a secret any longer?
Dreams of Light - A cute box ghost fic with a fun twist at the end
Phantom's Sketchbook - Mr. Lancer finds himself in an unparalleled situation, he has access to something which can give him incredible insight into the personal workings of Amity Park's local ghost teen hero, Danny Phantom
Masks - Lancer has had enough of his most enigmatic, frustrating student Daniel Fenton and forces him to stay in detention with him until Danny tells him The Truth. A story examining Danny's relationship with the human race. Another BIG FAVE of mine [sequel]
Darkness - Part 1 of Illuminations saga. [part 2][part 3][part 4] Maddie and Phantom are trapped in the dark and must work together to avoid dying. I don't remember much about this but I do remember it being super creepy and I bulldozed my way through all 4 parts so it must have been good lol
I'm Still Here - Danny's been locked away in a forgotten thermos, buried in the backyard for 70 years. When he's finally released, happy isn't the word he'd use to describe his new life
Real Life - A very creepy take on ghosts and the events of the show, where they're more inhuman, feral, and scary. I don't remember much about this but it's unfinished
Lopeholt - Valerie must survived the night in the third scariest place on earth. **VERY** creepy, I remember reading this in the dark and it gave me nightmares. Another top fave. I def recommend reading anything else by this author
Running to the Enemy's Arms - Danny runs away and ends up on the doorstep of the person who's dead last on his list of favorite people - Vlad. Danny/Vlad father son relationship. A fun and interesting view of what Danny's life would be like had he been the son Vlad always wanted. Incomplete but also another BIG FAVE of mine. Tolerate the first 1-2 chapters and the rest is golden
Checkmate - Vlad forces Danny to leave everything behind in order to save Jazz's life. But just when the billionaire believes to have won his chess game against his young rival, Danny makes a single unexpected move.
A Secret Uncovered - Danny's transformation is caught on tape and now the whole town knows who he is
Photoshop - Dash and Kwan find an old class picture and start having a little too much fun on Photoshop. Will someone's secret be revealed?
Chained - It starts with a fire at the Guys in White headquarters, where a vengeful Valerie stumbles across an imprisoned Danny Phantom. It starts with injustice. But what happens when justice and revenge are confused for one another? Where does a hero end, and a villain begin?
Phantom of Truth - Locked away in a secret government lab with Phantom as her subject, nothing stands between Maddie and the truth… except, perhaps, herself [Sequel]
The Soul Sepulchre - Something foul is stirring in Amity Park and it all starts in the bowels of Amity Park's Museum of Natural History
Moral Code - Moral code says to never kill or capture a specimen that you did not weaken yourself. Maddie finds Danny Phantom wounded late at night after a hard battle. After she helps him, she finds there is more to him than she ever thought possible. Mother/son bonding
Connections - Maddie knows that the Booo-merang has keyed into Danny, for whatever reason, so what's she to think when she sees it collide with Phantom? [Sequel]
Isolated - It's just a wish that's been granted with the wrong twist, but for Danny, it's a nightmare that's become reality. He's stuck as Phantom, his family's hunting him, and everyone who can help him is gone
Little Earthquakes - They say that a man is defined by what he does when he thinks nobody's looking. Does the same hold true for ghosts?
Tortured Truth - Danny's parents discover that the ghost boy is half human. Now that they've captured Danny, will he submit to torture and reveal himself, or is the revelation just the beginning of their problems? [Sequel]
Estrelas - AU. Sam's attention is captured by a lonely ghost haunting her grandmother's attic…and discovering his secrets will take everything she has.
Criteria of Life - Every living thing must follow the Laws of Life; however, Maddie wonders if Phantom can somehow follow these laws as well. The fact that he is a ghost is putting a knick in her plans, but what if Phantom can follow the Laws of Life?
#ask#danny phantom fic recs#i have soooo many danphan fics to rec but alas tumblr character limit#def recommend checking out invisobang though#it was my first year participating and i cant wait to look at everyones stuff when i have the time :0
278 notes
·
View notes
Photo
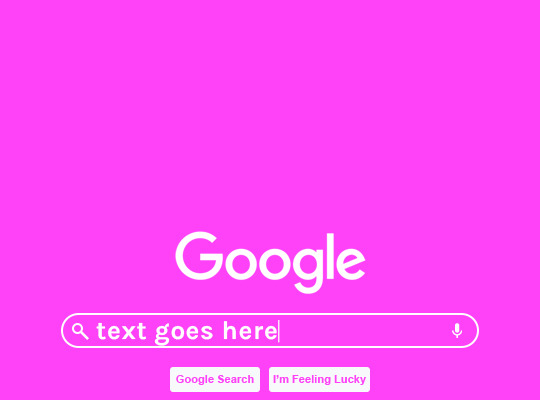
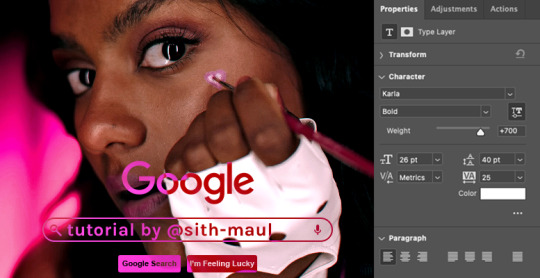
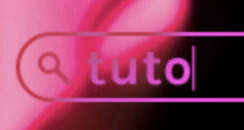
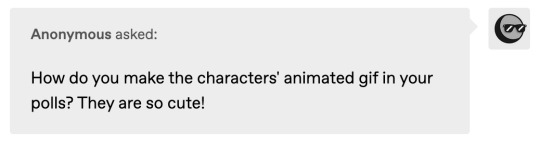
HOW TO: Make an Animated Google Search Overlay
A few people have asked how I did the effect in my pinned post and this set. So, in this tutorial, I’ll show you how to do this typing animation and give you a download to a template I made for the overlay! Disclaimer: This tutorial uses Video Timeline and assumes you have a basic understanding of gif-making in Photoshop.
PHASE 1: THE BASE GIF
I’m not going to show how I made this gif, but if you need any tips on basic gif-making, I have my full gif tutorial here. Instead, here are some tips for making a gif with this effect:
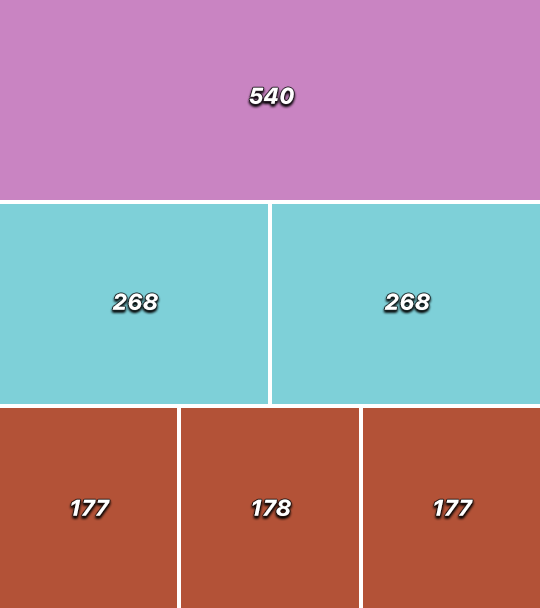
1.1 – Make your gif 540px width, especially if you’re using my template. My gif is 540x400.
1.2 – Use more frames. If you have a lot of characters in your search bar text, you’ll want to make a longer gif (i.e. one with more frames). The gif I made above was only 50-ish frames, so I doubled them and reversed the duplicates so it would play like a boomerang. That gif is a total of 98 frames 😅
1.3 – Have a “feature color” aka choose one color to make pop and make it the same as the overlay. Also, lots of contrast is especially ideal when you have an overlay set to Difference/Exclusion. (Check out the color tutorials on @usergif if you need help making your colors pop!)
PHASE 2: THE OVERLAY
2.1 – Download my template if you’re doing this layout
I made this template myself, so all I ask is that you don’t claim it as your own and that you give me proper credit if you decide to use it! Get the PSD with the transparent background here!
2.2 – Download the font Karla (optional)
The font I used for the search bar is Karla, a Google Font. It’s not THE Google Font, but I like the way it looks — which is more important to me than accuracy for this part. Here’s the Google Font link.
2.3 – Import the overlay
You can either drag the whole folder onto your gif from tab to tab or right-click the folder, select Duplicate Group, and select your gif as the destination document. Just make sure this overlay group is above your base gif!
2.4 – Set the overlay blending options
If you’re using my .psd, all the settings are already in place! If not, to get the metallic color effect, simply set the overlay to Difference:
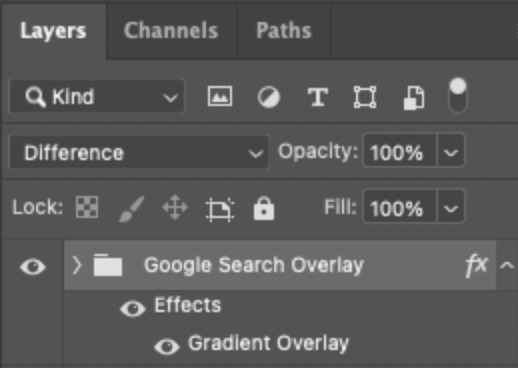
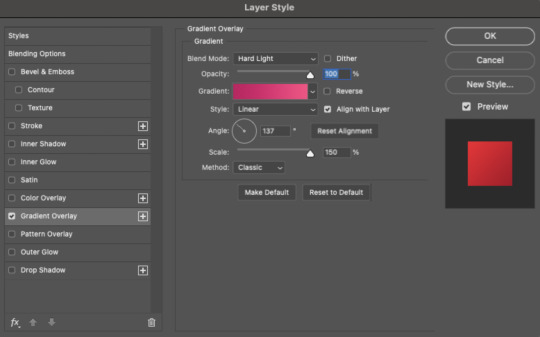
Then, add a gradient overlay that matches your base gif feature color. Here are my settings:
PHASE 3: THE TYPING ANIMATION
*Anakin Skywalker voice* This is where the tedious stuff fun begins...
3.1 – Add your full text
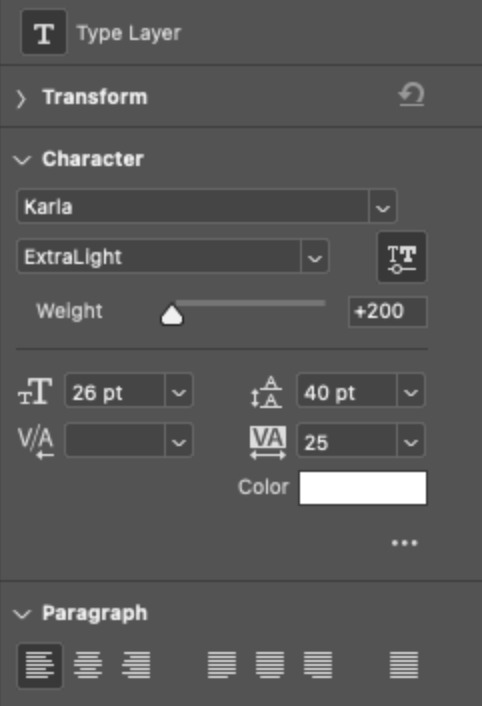
Create a text layer with the full text you want in the search bar! Here are my text settings:
— Font: Karla Bold
— Size: 26 pt
— Letter Spacing: 25
3.2 – Create a layer mask
This is how we’re going to create the typing effect without typing a new layer each time. You can add a layer mask to your text layer, use the Marquee tool to create a box around all but the first letter of your text, then fill the box with black to erase it. Now, all you can see is the first letter ‘t’
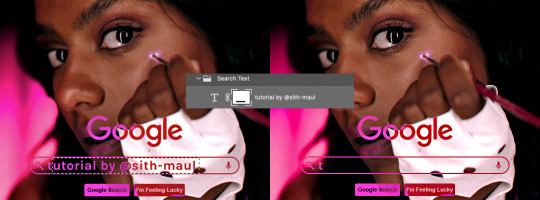
Btw the reason we wouldn’t use keyframes for something like this is because we want each letter to appear in a flash, not with a smooth, sliding reveal like a fade transition.
3.3 – UNLINK THE LAYER MASK
This is super important so you can freely move the layer mask with each letter. Just click that chain so it disappears!

3.4 – Trim the text clip SEVERAL times
When I say several times... I’m not joking lmao:

Btw, you can click these images to view them at full size and zoom! Now, this part is a little tricky for me to break down into steps, but here are some key tips:
TIP A – Trim, Move Layer Mask, Repeat
To make it as easy as possible on yourself, the best method is this:
— Start with your original text layer (pre-trim) with the layer mask only exposing 1 letter
— Move the playhead (red vertical line with the blue arrow) to the spot you want to trim (see Tip B) and click the scissor icon to split the clip
— On the copied layer, move the layer mask (white box in the layer panel) to the right to expose another letter. Make sure your layer mask is unlinked (See Step 3.3)! You can see my layer mask moving by the dotted lines in the gif below.
— Move the playhead the same amount of spaces as before and trim again: you should now have the original trimmed clip (first letter) and a second trimmed clip (second letter)
— Repeat until you’ve done all the letters AND the spaces
TIP B – Make your trimmed clips about 0.03 seconds long.
I’ve found this works well for me, especially because I’m working in Video Timeline. It reduces the amount of duplicate frames I get because, for whatever reason, Timeline pauses every 0.03 seconds (at least for me when I click the forward button).
In the section above the pink line (image below), you can see I started with my full text clip. Then, under the pink line, you can see how I used the scissor/trim tool to clip them each to a duration of 00:03.

↑ Note: That screenshot is zoomed into the Timeline 100%. The other screenshots are zoomed out which is why the clips look bigger here.
TIP C – Your text shouldn’t start at the very beginning.
Give yourself some space to let the cursor blink a few times, just like when you pause while typing on a computer. Where you start your typing animation is up to you! In the image below, you can see the first small purple block starts about 1.06 seconds into the gif:

TIP D – Backspace
I’m sure you’ve probably figured this out already, but to get the backspace effect I have in my gif, you just move the layer mask to the left to cover the letters you want to “delete.” Then once they appear “deleted,” just edit your next text layer clip with the new word you want to replace it with! (In my gif, I deleted “nik” and replaced it with “@sith-maul.”)
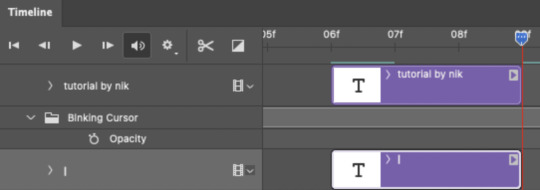
Here’s what the gif looks like without the blinking cursor animation:
Now that’s all explained, you basically do a similar thing with the blinking cursor! But no layer masks are involved :)
PHASE 4: THE TEXT CURSOR ANIMATION
4.1 – Create a text layer with just a vertical line like this one → |
I’m using the same Karla typeface as before, but thinner. Here are the settings:
— Font: Karla ExtraLight
— Size: 26 pt
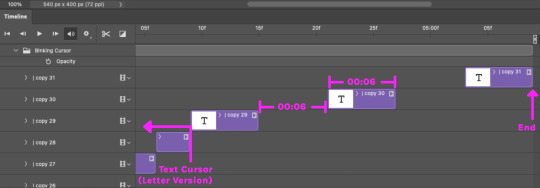
4.2 – Trim, Move, Repeat (Letter Version)
This step will be super easy because each cursor clip that follows a letter will be the exact same duration as the letters you’ve already done: 0.03 seconds long. Take a look:
For each letter you reveal, move the text cursor so it’s slightly to the right of the letter, like this:
Do this for all the letters and even the spaces!
4.3 – Trim, Move, Repeat (Blinking Version)
This type of text cursor is slightly different because:
— These clips are “slower.” The reason is that the Letter Version cursor goes too fast for the Blinking Version. So I doubled the duration of the blinking cursor to 0.06 seconds!
— There are spaces between these clips that are the same duration as the clips themselves: 0.06 seconds.
— This text cursor starts at the very beginning of the gif and continues after the text is finished “typing,” directly after the last Letter Version cursor.
Just add however many blinking cursors you want to the beginning and end of your gif, skipping over the parts where you already did the Letter Version!
Here’s how it looks in the Timeline at the beginning of my gif:

Here’s how it looks in the Timeline at the end of my gif (note: it continues directly after the last Letter Version cursor):
Here’s how the blinking cursor would look at the same speed (0.03) as the letter version:

Here’s how the blinking cursor looks at double the duration (0.06):

PHASE 5: EXPORT
That’s it!! Just convert from Timeline back to Frames and export your gif! As always, I recommend checking your frames when you convert from Video Timeline back to Frame Animation — just in case you may have gotten any duplicate frames. Again, if you want to know more about that process, my full gif tutorial is here!
And ta-da, here’s the final gif!

And that’s it! I really hope this makes sense because I’m not really sure it does 😅 But if you have any specific questions, my ask box and DMs are open! <3
Also, check out these gorgeous recreations of this effect from @steverobin (Keke Palmer set) and @jakeyp (Jake Peralta set)!
#gif tutorial#completeresources#allresources#userelio#userannalise#usershreyu#useryoshi#useralison#uservalentina#userkosmos#usernums#tuserkay#userk8#tuserabbie#uservivaldi#userstar#usersole#resource*#gfx*#google*#this tutorial is long overdue oops lol
2K notes
·
View notes
Text


*wipes tear* I can't believe my babies are finally in my TS4 game. They're all reimagined for the most part, especially Davi who I wanted to capture more of his mother's side, but still retain their general vibe/vision I had always intended for each of them. Gave Javar a beard because yes. I'm excited to start a gameplay with them — :') uni, perhaps?
s/n: also, excuse this poor edit lmao. this was my first time using gimp and I'm still not sure if I want to stick to it or continue my quest for a MacOS photoshop somewhere 🫠
#sims 4#ts4#the sims 4#sim: adonis grey#sim: maverick karras#sim: davidson grey#sim: javar johnson#group: dem boyz#davi is giving bruno mars x miguel and I'm dead
102 notes
·
View notes
Text
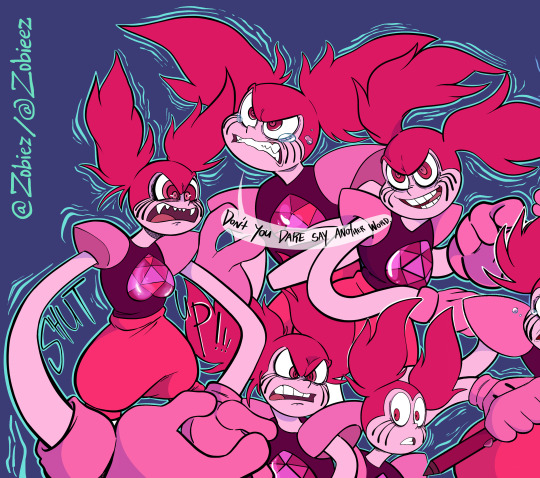


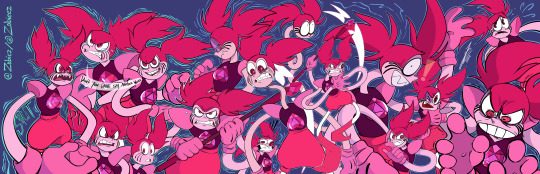
I put this off for such a long time lmao
the first Spinel dump was posted all the way back in 2020 and I started this one not long after, but then the Procreate file went untouched for a couple of years because I was preoccupied with other art projects
I didn't get to finish this one for the Steven Universe movie anniversary last year, and so the WIP file for it was just sitting there in my procreate files for a while
so I decided to finally finish this a couple of months ago
but when my iPad broke, that complicated everything lmao
so I had to export it as a Photoshop document so that I could finish it on Paint Tool SAI using my laptop
you'll notice that a few of the Spinels in this art dump look kinda different, that's because the sketches they came from are super old and my style changed a little since then
thank god I finally finished this haha :')
The first post!:
#steven universe#fanart#cartoons#su#spinel#su fanart#steven universe fanart#steven universe the movie#the steven universe movie#sutm#steven universe movie fanart#spinel fanart#SU fanart#movies#cartoon network#SU movie anniversary#art dump
185 notes
·
View notes
Note
love love LOVE your The Sign gifsets. im still a newbie in giffing lmao and your gifs are like reaaally pretty so i was wondering how you do your gifs? i really like how it's sharp and the colors pop up beautifully (only if you don't mind sharing ofcc <333)
bun this is the kindest thing you could have said to me, thank you so much <3 i wanted to write down my giffing process for a while in case anyone would find anything in it helpful, so thanks for giving me a push!
guzhu-furen's photoshop gifmaking process (kinda oriented on saving up time)
from

to
1. Downloading a video. i prefer to download video files instead of making screen recordings because the latter usually leaves watermarks/captions and makes image quality lower. i will not be linking the downloading websites themselves directly, but they are all easy to find through search engines if you know what to search for! i download ql dramas from:
youtube:
if the video you need is above 1080p quality, search for youtube4kdownloader
if the video is age restricted, search for 9xbuddy
both these websites work for normal videos too!
mkvdrama usually has 1080p episodes of most asian dramas.
dramacool also has downloading options in case the show is not available on other websites!
2. Screencapping (i learned it through this tutorial)
i screencap using KMPlayer. here is the installer i used, but you can find versions of this program on various websites and torrents too! install the program and proceed.
screencapping steps: open KMPlayer > press "CTRL + G" to summon the Frame Extraction window > set identical settings to these:
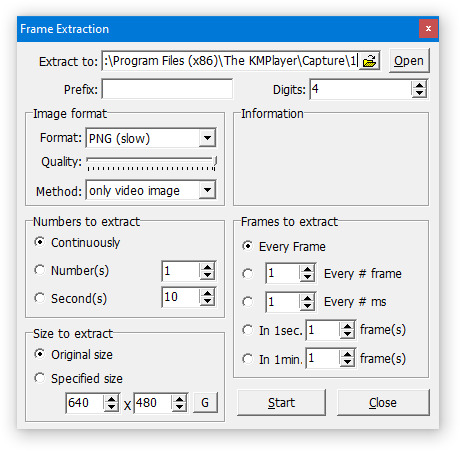
note which computer folder the screencaps will go to (it has a label "Extract to") > go to that folder on your computer and create a bunch of numbered folders there, for example ten folders named from 1 to 10, these would be our separate folders for ten gifs > write "1" or a name of another numbered folder after the backslash in "Extract to" bar in kmplayer > go the timestamp that will be the beginning of your gif in KMPlayer > press "Start" in the Frame Extraction window and press play on the video > when the moment you need to gif is over, press pause on the video and press "Stop" in the Frame Extraction window. great, you now have your folder of screencaps!
3. Importing screencaps to Photoshop
i use Adobe Photoshop 2023, but had used Adobe Photoshop CS5 for a long time before that, so you can use any version you have or find! it's available on various websites and torrents.
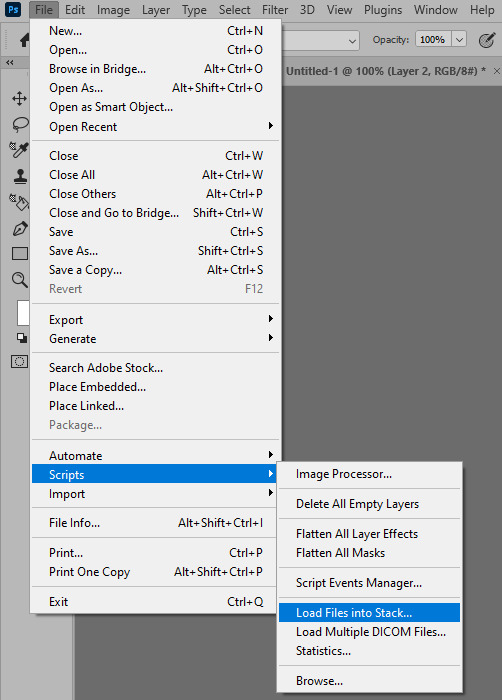
open Photoshop > Scripts > Load Files into Stack > press Browse in the "Load Layers" window that was opened
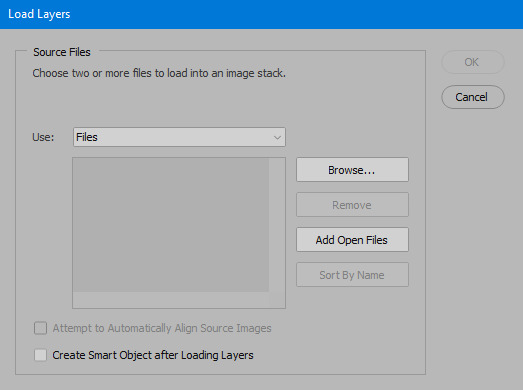
open your screencaps folder (and pin the KMPlayer Capture folder for faster future access) > pick the screencaps you want for your gif by clicking on the first one, and then clicking on the finishing one while pressing Shift on the keyboard > click OK and let them load for some time! i have 65 screencaps loading at the moment
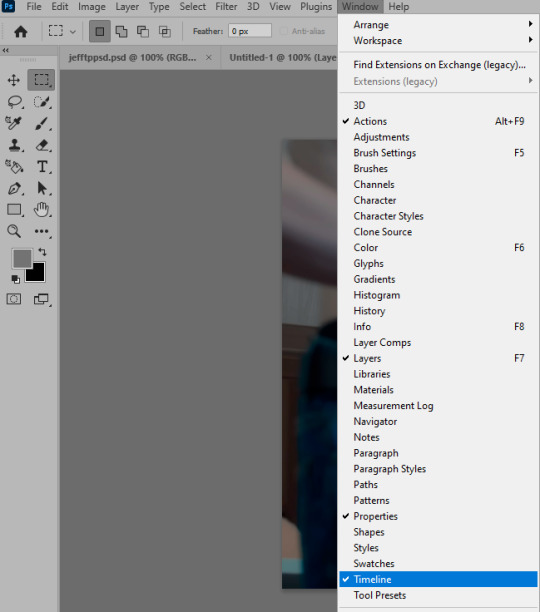
when the screencaps finish loading go to Window > press Timeline > press Create Video Timeline in the opened sidebar > press three dots that will say "Convert to frame animation"


4. Sizing & making the base of a gif
next part will be automatic. i use actions for almost everything from this moment. download the basic action pack here and my additional action pack that we will need here. load them in your photoshop actions window (Actions > Load Actions).
play the Script action to create frames.
now onto sizing your gif. these are tumblr's width dimensions for 3 types of gifs
my gifs are usually 540 px in width and 640, 400 or 345 px in height. i added a 400 px action (Sizing 400) in the action pack, you can use it! or you can follow the steps by hand:
Image > Image Size > put in the height you want and add 4-6 pixels there (mine will be 406 for a 400 px high gif) > OK

now we need to crop the gif for it to fit tumblr's dimensions:
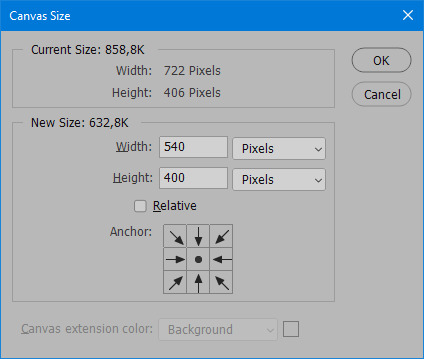
Image > Canvas Size > change Width to 540 (or 268 or 177) and take away the 4-6 pixels that we left in the previous step in Height
when you figure out which gif dimensions work best for you, record an action and use it to save up time!
after sizing use the action Smart Object. now we have the base of our gif!

you can move your gif left or right if you want! i will be doing this because i would like to show more hips in the gif.
press Ctrl + T > move the layer however you need (not in height though) > press Enter to save
i moved it to the right and my gif looks like this now:
5. Sharpening (i use Tan's sharpening settings explained here)
i added two sharpening actions in the pack, they are called Sharpen Spicy and Sharpen Spicy 12. you can use one of them or you can sharpen your gif by hand, i will explain how to do it below.
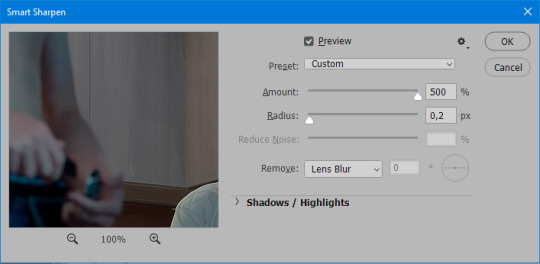
Filter > Sharpen > Smart Sharpen > 500% amount, 0,2 px radius > OK
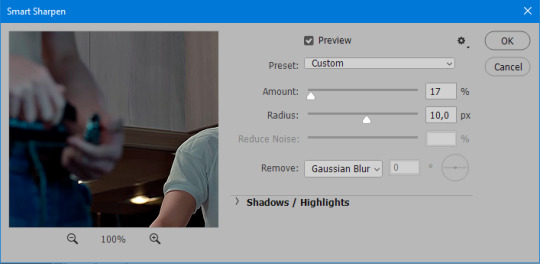
Filter > Sharpen > Smart Sharpen > 17% amount, 10,0 px radius > OK (you can change 17% to lesser or bigger, depending how intense you want your sharpening to look. i use 17% for 4k footage and 12% for 1080 px or less videos)
to smooth the sharpening a bit i use Gaussian Blur (this is optional, you can leave the sharpening as it is if you want your gif to be sharper).
Filter > Blur > Gaussian Blur > Radius 1,0 pixels > OK
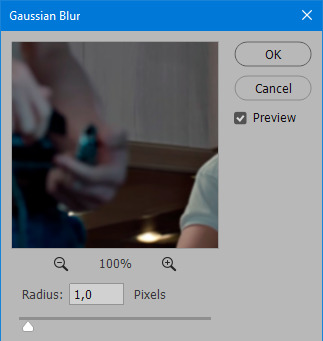
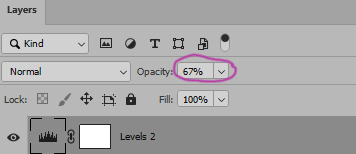
now change blending intensity to let only a bit of the blurring effect stay (you need to change this by hand if you used the sharpening action also).
press Blending Options (the highlighted place) twice > change Opacity to 10%

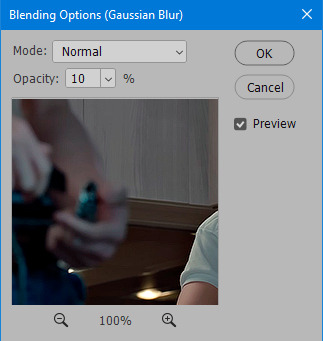
this is what my gifs looks like with sharpening now!

6. Colouring (i learned how to colour the way i do through this tutorial)
to make it easier for you to learn i will share my blank colouring file. i created it to save as much time while giffing as possible, so whenever i need to colour a gif i simply duplicate all the blank adjustment layers to the base of my every gif and start colouring! once you figure out which adjustment layers work for you best, i recommend creating a blank colouring file too to save time.
if you want to go the easy way, open my colouring file and duplicate selected layers to your gif file by Layer > Duplicate Layer > insert gif's document name

if you want to learn by hand, create the adjustment layers that i will be naming in the process on your own, you can find them all in Layer > New Adjustment Layer
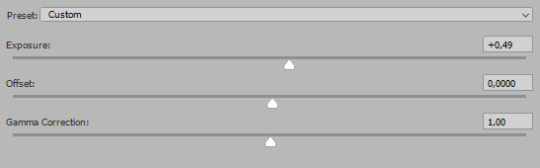
now we will use adjustment layers for our colouring from the bottom to the top! first, Exposure layer to add a bit of light to the gif. i don't always use Exposure because sometimes shots are bright enough on their own. i will, however, use it here. don't use it on your gif too much, because in the next few steps we will also be brightening the gif with other adjustment layers. i added +0,49:
next, Hue/Saturation layer. i use it in gifs with neon lighting to color correct overly bright colours. for example if your characters are standing in neon pink, you might want to lessen Saturation in Magentas and Reds to make the final gif less pixelated, and etc. i will not use Hue/Saturation on this gif, cause it doesn't need it.
proceed to the layer Levels. this layer usually does most of my colouring. click on the lowest white dropper in your Levels window:
now choose a light place on your gif and click on it with the white dropper. it works especially well if you use the white dropper on the lightened parts of face skin. you can play around by choosing different bright spots and seeing what works best. here is the spot i chose and the resulting colouring:


this is too light, so now we need to balance it out with the black dropper:

choose one of the darkest places this time and click it with black dropper! once again, you can play around and click different spot to see what works best. i will be clicking the highlighted spot and you can see what my gif will look like with this Levels settings

as you can see, darkest places became darker and other colours were corrected a bit! now, this is still too bright, so i will be decreasing the opacity of Levels layer from 100% to a smaller number:
i will have to continue in another post because tumblr only allows 30 pictures per one post in the new editor now and i'd like to explain everything in visuals. click to continue
77 notes
·
View notes
Text
youtube
A Special Announcement~ | Yu-Gi-Oh! ARC-V Tag Force Special Re-Translation Project!
I've been itching to get around to posting about this for a few months now, but wanted to wait until I'd worked on enough for it, but also had the idea to create an announcement trailer to go with it for added good measure--after recording and editing clips for a couple weeks and leveling the audio last night, heremst we are! (For some clips, I forgot to turn off the PPSSPP emulator's DevMenu option so that shows up in the top-left, buuut I didn't feel like re-recording those, lmao.)
Details worth reading below the cut here, but tl;dr work has been in progress for over a year in between things, work will continue to be in progress for a while, and the release will happen when everything's ready, but stay tuned, fun's getting started etc etc~
So, I'm sure most of us are familiar with the as-yet-unlocalized-by-Konami TFSP, the seventh and last entry in the Tag Force series on the PSP that came out early in ARC-V's run (featuring the first five series which was a cool first), as well as the current translations out there originally worked on by the guys at XenoTranslations (omarrrio and ScrewTheRules/ClickClaxer01 at GBATemp handling the card and story/etc translations, respectively) and how there are... some issues with what's out there. Everything from the DM story mode being loaded with YGOTAS references (no shade to YGOTAS and much respect to LK/Martin for his ongoing work on it still making me laugh sometimes, ofc) to the off-the-cuff edginess of 2014-2015-era internet culture and the problematic (in some cases, derogatory) language that permeated it--though to its credit, some parts do have some level of translation attempted, but taken as a whole, it can definitely turn people off from giving the game a try and seeing what it brings to the table (which is still a good amount despite the corners Konami cut here/there compared to prior TF games).
I actually did attempt a translation of my own back in 2015 (if you've been following me for a long time, you might remember it lol), tackling the GX story text starting with Judai's heart events, but eventually put it on the backburner as I focused more on my GX subbing work and beginning to finalize everything (which I'm still doing). Sometime in 2022, a friend over on NeoArkCradle (the "anonymous YGO fan" in the opening screen) was poring over the story text and patching it up the best he could to remove the references and inaccuracies with more coherent work, and after a while of seeing what he was working with in the Discord, I was a bit blown away by just how inaccurate much of it was--so alongside him, and using the better tools available since then (including some really awesome work from both nzxth2 [who did a proper re-translation of 5D's TF6 not too long ago and was kind enough to release his tools for it] and our coding helper Xan1242 who we eventually reached out to for some help), I decided to *cracks knuckles* get involved and help give everything a more accurate and professional translation, much like I do with my GX subs, working directly off the Japanese text and files. I've been taking cracks at everything in between the GX episodes I've been finalizing going back to at least last January (and I'd used my little hiatus after finalizing GX Season 2's subs to really get at some other stuff throughout the game), starting with re-translating DM's story text but also properly translating other aspects of the game, from the character names (using the original Japanese names, including those of the TF-exclusive characters, partly since Konami made a whole mess of them in English TF1-5), in-duel dialogue, pack descriptions, and more to images with Japanese text (such as localizing the in-duel cut-in onomatopoeia as you see in the video above, or other little images throughout) using some Photoshop skills I've picked up. And it's been a joint effort, as said NAC friend and I have been bouncing off how we'd like to see this go between us to stay on the same page and all, while also checking with other translators there for second/third opinions as needed.
Our plan is to release two versions of a translation--one which uses the OCG [translated] card names in Story Mode, in-duel, and other text but not in the game's card system (mainly to deal with story-relevant notes like Osiris vs Slifer with the Gods or things like not-Utopia Hope being symbolic between Yuma and Astral, akin to how I do my GX subs), and one which uses the TCG card names in everything (like how the official subs go about it). While we're mostly working with the Japanese game files due to how the Xeno team went about decoding everything, we'll be using the card-system-related files from the fixed ISO provided by FLSGaming which fixed some issues that had been present there. And Xan has helped us with a plugin that will be used to apply our translations to the system files that were hard to edit otherwise (things like the character and recipe names, as well as the pack names pulled from for the Card Description screen), but more on how that'll work once this is ready for release, lol. At some point, I'd like to also look at HDifying textures and things, but that's definitely a bonus-level thing for after the main work here is done.
SO.
Currently, Story-Mode-wise, I've gone through everything up to Yusei's events--so Dark Yugi/Kaiba/Jounouchi/Ishizu/Mai in DM, Judai/Manjoume/Asuka/Misawa/Ryou in GX, and Yusei in 5D's have been fully retranslated, though I took initial cracks at Yuma and Yuya's events to get content for this video lol (I've also been intentionally holding off on as much ZEXAL as I can until I've properly watched the whole show so I have context). I haven't tackled overworld text yet, though (like pre-duel or the tournament-related text, which is all in the same file as all the story text). I've also been handling the in-duel dialogue as I go through the character stories, so also just up to Yusei, though I did take initial cracks at Aki's, Yuma and Shark's, and Yuya and Yuzu's for the video.
Other things tackled that were sprinkled into the video, along with some other notes:
Pack names and descriptions have been retranslated, though the descriptions may see minor edits closer to release for a little variety between worlds given the different characters at the shop. Character recipe names were also retranslated, with Yugipedia's translations for them used as an occasional second opinion, though ones based on pack names had to be abbreviated in spots.
Menu text, from the Options to Help screens and stuff in between, has been retranslated, as have in-duel text strings (so, you'll see a full "Activate Effect" instead of "Activate" or "Switch to Attack/Defense Position" instead of "Switch to ATK/DEF Position", etc--also fixed the "BATTELE PHASE" graphic typo, and NAC friend created a new translation for the "Turn Change" graphic for accuracy since ENG TF1-5 made that into "Next Player's Turn").
Database stuff, such as the Sound Test, Tutorials, Duel Missions, etc., have been retranslated closer to the Japanese text; originally I retranslated the Tutorial text via hex editor, with compromises done on quite a bit of it due to the space limits, but as Xan recently updated a text extractor tool of theirs to more cleanly pull out and reinsert that text, I've been going through and fleshing out those translations more (on my commutes to/from work mostly, to be productive lol).
As mentioned, I've been localizing/translating Japanese-text images throughout the game as I come across them, like with the in-duel onomatopoeia that come up during cut-ins or images in the shop/duel/etc screens using Japanese text, to make sure the game is fully translated.
The series logos, used during the title sequence and in the Series Select screens, were updated with translated fan edits shared on Deviantart (which we'll credit in the final release) for DM and GX, while the 5D's-ARC-V logos were edited to enlarge the "Yu-Gi-Oh!" text on them that was pretty hard to see originally.
The game's original opening sequence starts on an anti-piracy message before going into the Konami logo and then a "From Yu-Gi-Oh!..." screen before the opening animation for each series logo--the original team decided to use the first image to vent their frustration at Konami for not localizing this game, and while that's valid (to some extent), we thought we'd use the opportunity to dedicate this project to Kazuki Takahashi for inspiring our love for YGO and the place it's had in our hearts for all these years.
We'll be updating the names of cards that had TCG releases after the original patch was worked on/updated by FLSG to those corresponding names.
Xan has been working on many UI fixes for us to apply with this, among them 3-line dialogue box text as is used in the ENG TF1-5 games--once implemented for TFSP, I'll be going over everything to make full use of that extra space where needed, so things might not look as they do in the video by then.
Character bios will be worked on after I've done the story stuff, though I've taken initial cracks at it for Yuma and Yuya's bios for the video, along with translating the location/affiliation names ("Domino High School," "Satellite," etc).
Currently no release date is planned, as I'm working on this between my GX-finalizing work and actual IRL work, though we'll see how later this year looks as more work gets done--but as noted in the video, all things being equal, it will be released when everything is ready. I'll try to post regular updates or rambles now that this announcement's been made, lol, but do try not to constantly check in on a release date. 🙏🏽
All that said, I think that covers just about everything I wanted to put out there with this, lol. It's been fun to work on this so far and getting to see what I've re-translated in-game is definitely neat; looking forward to us being able to release everything when ready.
Stay tuned for more; the fun's just getting started!
#yugioh#ygo#yugioh dm#GX#yugioh gx#5D's#yugioh 5ds#yugioh 5d's#ZEXAL#yugioh zexal#yugioh arc v#arc v#tag force#tag force special#tfsp#ygo tfsp#ygo tag force#yugioh tag force#my work#tfsp retranslation#project rambling#[dunno who might've caught onto my slight hinting at this in some of my GX release posts lol but hey]#also you'd be surprised at how much text is recycled from the earlier TFs and TFSP that goes unused#maybe they planned to add more and didn't but who's to say#was also a shame they cut the unique field animations but may look into seeing if it's possible to restore 'em#but woot glad to put this out there lol
83 notes
·
View notes
Text
someone sent in this ask and I spent literal hours putting together this tutorial but then it wouldn't let me post it and when I went back into my inbox the ask was gone?? good thing I copy and pasted it, so here it is in its own post
I'm not sure if this will work with programs other than photoshop, but this is how I do it. I know @shinobi-bacon has a tutorial here on how they do it which is pretty different from the way I do it, so if my tutorial is confusing maybe theirs will click with you better lmao. I stole the greenscreen idea from them anyway
SO FIRST, you want your villager on a green screen background. to do this, go to harv's island and use a custom pattern to make the walls and floors bright green. If the villager you're using has green in their design, you'll have to pick a different colour that isn't in their design, but for most villagers green is fine.
if your villager has every colour on them like pietro or stiches then rip you're gonna have to do some manual editing frame by frame. try to choose a colour that doesn't touch the edges of their silhouette too much in that case because it'll make life easier for you
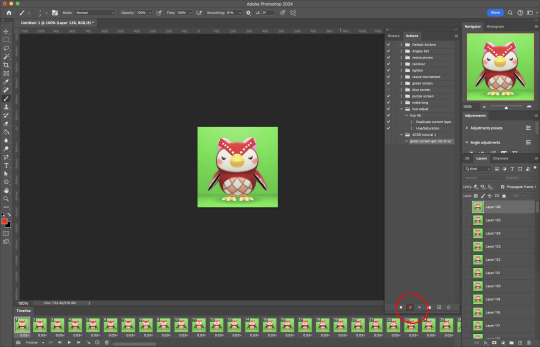
so once you have them in green purgatory, record them doing their emote or whatever. I just use the built-in screen record function that the switch has. press and hold this button to record the last 30 seconds that your switch displayed:

next send that video to your computer and trim off the start of the video so it starts right before a recognizable part of the animation. for this emote I cut it off right before the blink. if you have a slow computer, you'll probably want to trim the end off too so the video is only a little bit longer than one full animation loop
(you can use the video editing software of your preference, I just use quick time player Edit -> Trim)
okay time for photoshop. go File -> Import -> Video Frames to Layers
for "range to import" select "from beginning to end" (or you could skip the last step about trimming the video and select a range here, but I find it kind of finicky), and make sure "make frame animation" is checked
once imported, if it doesn't pop up on it's own, go Window -> Timeline to get your animation at the bottom

click through those frames at the bottom until you find an easily recognizable frame (I chose the first frame where her eyes are closed) and delete all the frames before it. in the layers panel, the layer from the frame you've selected should be the only one turned on. delete all the layers below it
now go through the frames to find the next identical frame. this is where the animation loops. delete that frame and all the frames after it, as well as all of their corresponding layers (note in the picture, frame 121 is selected, and it's exactly the same as the frame from the start of the animation)

hit the play button on the bottom left to double check that it loops properly
next, make sure both THE FIRST FRAME AND BOTTOM LAYER are selected, and crop and reduce the image to your desired size. you can do this step later if you want, it's just that doing it now will reduce the load on your computer and make it run a bit faster. just as long as the first frame and bottom layer are selected, you can do this at any time
SAVE HERE because if you mess up this next part it's a pain to fix, but it's easy to quit and start over if need be
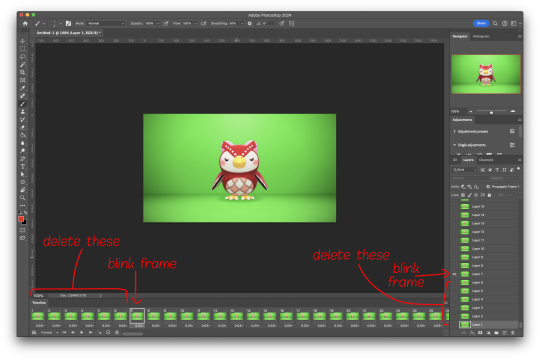
now it's time for my best friend the actions panel !! say hi actions panel !! (Window -> Actions). what the actions panel does is record your steps so you can quickly automate repetitive tasks.
in the actions panel, click the folder and name it whatever you want
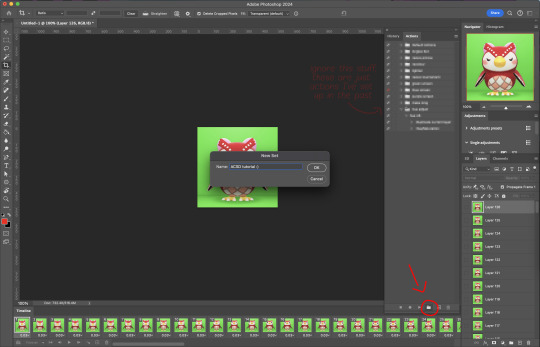
then click the little plus and name that whatever you want and hit record. You'll see the dot turn red to indicate that your actions are now being recorded
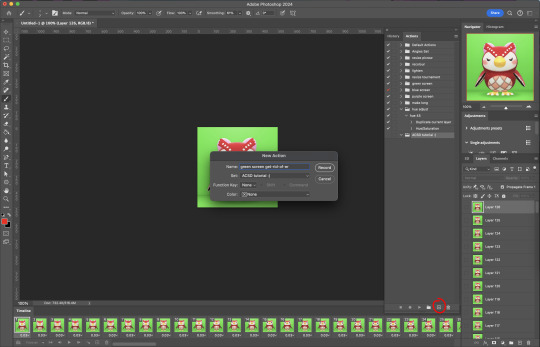
now with the BOTTOM LAYER AND FIRST FRAME selected (ignore that I have the wrong layer selected in the pictures, I fixed it after), go to Select -> Colour Range

click on a part of the canvas that would be green

shift+click on the rest of the green background and adjust the fuzziness until just the character's silhouette remains
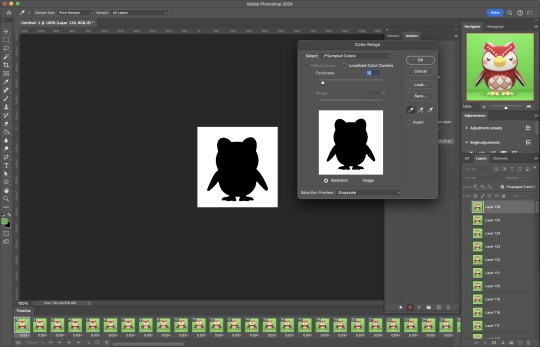
hit OK, now the background should be selected. go Select -> Inverse so that the character is selected, and click on layer mask.
click the next frame button (you MUST click the button, not the actual frame. you need the recording to recognize "go to next frame" and not "select frame 2"),
then keyboard shortcut option + ] to select the next layer up (again, you MUST use the shortcut so it knows to move up one layer and not just "select layer 2"),
and then stop recording.
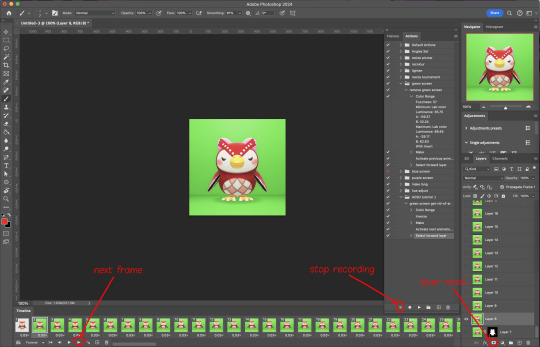
now just repeatedly click the play button and it will do all those steps we just did for each frame :)

this part is usually where it gets messed up for me. if it did something weird like duplicate the same frame or layer your animation over a static frame, just quit and reopen that save I told you to make earlier. the action recording you just made will still be there when you reopen photoshop, so just select the first frame and bottom layer and repeatedly hit play again. if it STILL doesn't work, you probably did something wrong
the recording is now saved in photoshop forever until you delete it, so you can reuse the recording for other gifs! but if they use a different colour background, you'll need to make a new recording (you can see I have separate ones for blue and purple screens). also if you were working with one of those colourful villagers and parts got masked out that shouldn't have been, you'll have to go frame by frame and manually fix them. that's why we masked out the background instead of deleting it.
now it's time to make it into a gif! go File -> Export -> Save for Web. make sure Matte is set to "none" so you don't get those weird white flecks. colours and dither you want as high as they can go, but you can lower them if you need to make the file smaller (though I'd recommend resizing the image smaller first). the bottom left shows your file size. currently as of January 2024, tumblr allows gifs of up to 10MB
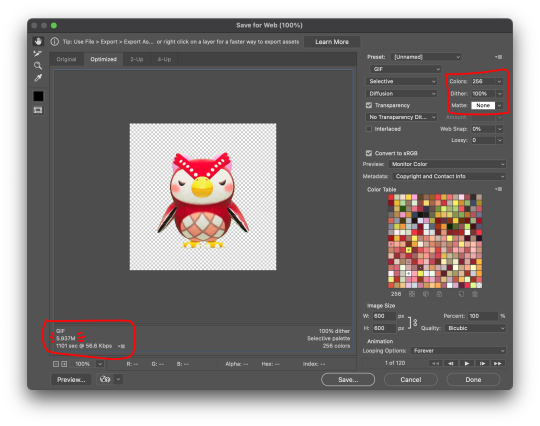
and there ya go! gif! :)
61 notes
·
View notes
Text
a very foking detailed GIF tutorial you asked for and how I color my gifs
However, I color them individually, so there will be explanation of tools I choose instead of showing what settings I used for this specific gif in this tutorial.
I will go through entire process of how I create gifs, the process of gifmaking can be different for others and there is no obligation of how to create a gif. Basically, do it however you like and enjoy the process.
this is part I, part II is here\in reblogs.
First, you will need to prepare everything, you choose the moment you want to gif and make screencaps. I use mpv player to create them, here is a great tutorial on how to install it. So I won't go over it, just follow it and or use another player which allows to make screencaps, such as kmplayer.
Once you make screencaps go to photoshop - file - scripts - load files into stack - browse - select screencaps and upload them.
At this point I will also add that I use keyboard shortcuts a lot, you can set them up to your preference, that is much easier for me and might be for you too, and I am so used to them that I forget where are some settings. You can do it from edit - keyboard shortcuts, you may set up anything there.
You will have all screencaps uploaded into one file. Once I have it I change canvas/image size, I also remove 10 pixels from each side, because I hate that some files have that weird black line which looks awful on gifs. But that's up to you. Use proper dimensions for tumblr, that is important since your gifs will look 'not good' when you upload them. I will go with 540x500px this time. (correct dimensions for tumblr are 540px for big gifs, 268px for two gifs along each other and 177-178-177px for the three gifs together)
Go to images - image size (crtl+alt+i) and change the size.
After that I make animation, because without it we would not be able to convert all the screencaps into smart filters. Go to windows - timeline
you will have something like this by default

click on create frame animation - then on 4 horizontal lines which will open menu - make frames from layers

click on convert to video timeline (that 3 horizontal lines and 1 vertical line or whatever it is, right under the first layer) you will get something like this.
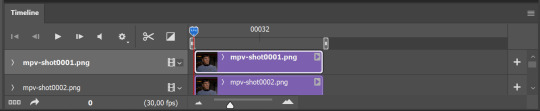
now, this will be animated. If you choose convert to video timeline right away it will not be animated.
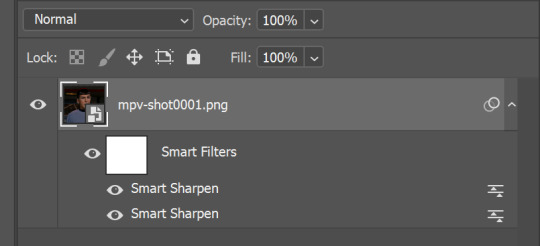
Now, select all the layers - filters - convert to smart filters
You will have something like this, and if you play it - it will be animated anyway. That way you can edit ALL the screencaps at once.
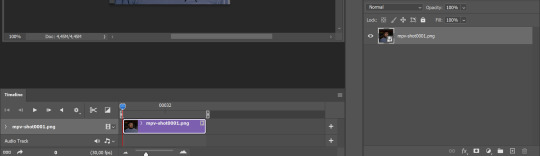
I usually start with sharpening, settings may change according to the files I have, for some you will need more sharpening, for some less. I go with filters - sharpen - smart sharpen and usually that's enough
but I sometimes add more sharpening, just change radius to 0,2. So, repeat the action.
You will have it like this
and at any point of making gif you will be able to change settings for it, if after coloring it will look not as good as you wanted to.
I will not go into a lot of details about coloring for this gif, because does not matter how good the coloring on this gif will be, it won't work as good on another gif.
There is no right way to start coloring, you may start with curves, levels or selective colors depending on the screencaps you want to edit.
Well, this time I did start with layer - new adjustment layer - curves. (yeah, i guess by the end of the day we all do lmao)
(Always use 'layer - new adjustment layer'. That's the only thing I suggest to remember when you color. )
Just to brighten gif a little bit, but you also can change colors with it.
those are not settings I used for this gif!
Curves have option to edit colors, just press RGB and you will see options for RED, GREEN, BLUE. Upper slider adds the said color, the slider at the bottom removes it. That's a great tool if you have a very red\yellow\blue\green scene, with those settings and moving sliders here and there you will be able to add the color you want, for red scene I suggest to use more green and blue, as well as for yellows but with less green. Just move them to see what fits your gif better.


there are also eyedrop tools which will help you to edit picture, with the first one you need to find the darkest part of your gif and click, it will adjust your picture according to it. If there's too much red, it will make it bluer, etc. The middle one is the one I use the most out of them, cos it changes the midtones, it's great if you have very yellow picture, just press the yellow part and it will make it bluer\greenish, depends on the picture, and then you can adjust it to make it look better. And the last one you can use to lighten picture as well, just find the brightest part of the picture and press it. It will adjust other colors accordingly.
I like to play with settings, I could add more darkness to the gif by levels, by selective colors making dark colors even darker, but sometimes I just use layer - new adjustment layer - black & white. Putting it on soft light blending mode and changing opacity. Idk, I like the effect :D Also, by using these, you will be able to darken part or lighten specific colors
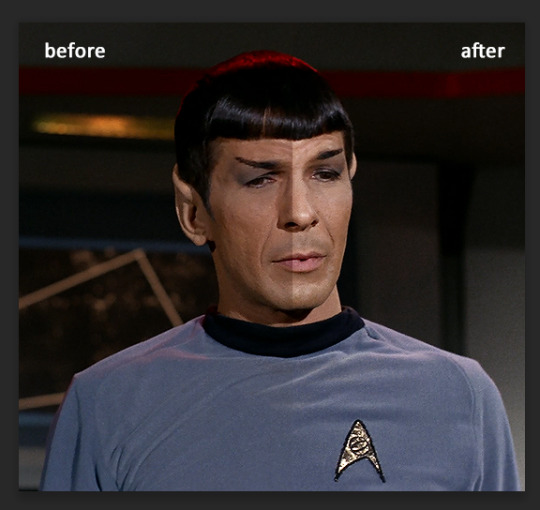

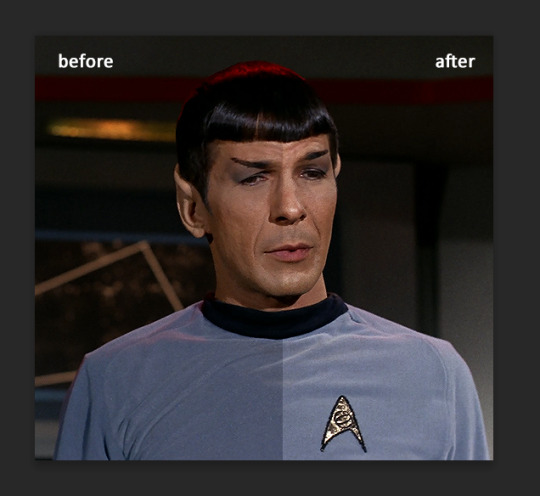
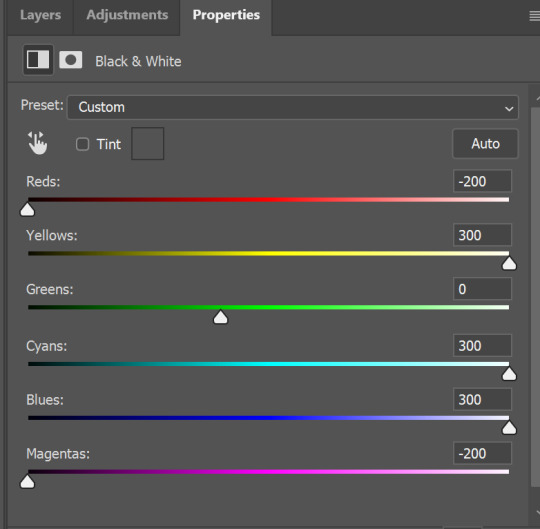
so yeah, play around and figure out what is the best way for you.
after that I used layer - new adjustment layer - selective colors. I think this is one of my favorite tools out there, I love it, I usually end up with 30 selective color layers if I make a super complex gif :D
You can change colors with it, make them more vibrant, or less.

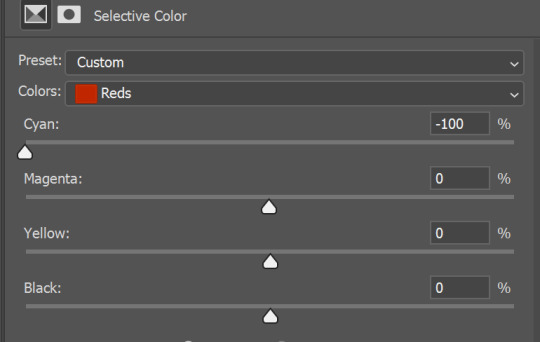
for each color you will have 'cyan, magenta, yellow and black' and by dragging sliders you can change colors, make them darker or lighter for the lovers of those paster gifs :D
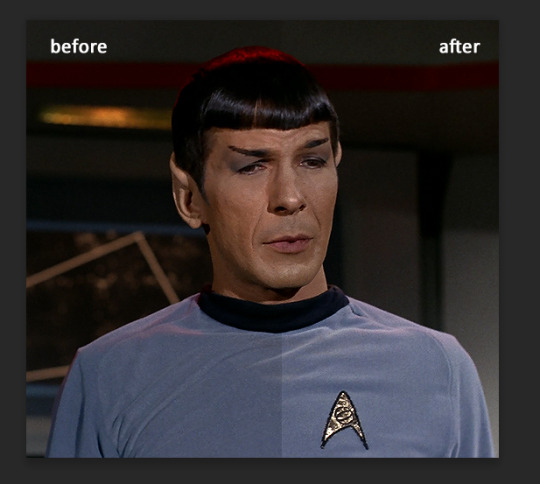
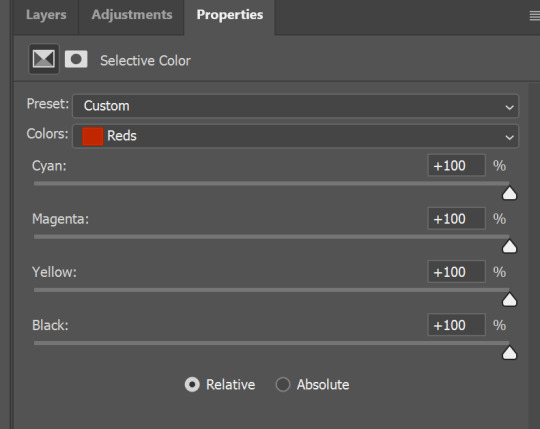
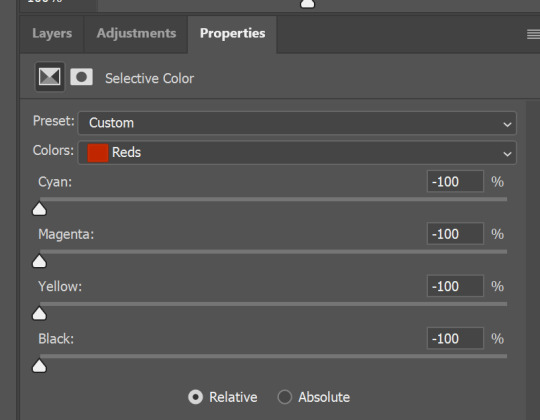

But don't worry, that's not where I will go with the gif, so it will look better, i promise.
You know how much I love making blue even more blue. So I go with more selective color layers to enhance it.
You do not have to use just one, and you won't be able to make it with just one sometimes. So add as many as you like to get the result you want.
next is one of my favorites - layers - adjustment layers - levels
with it you can darken colors or lighten them, there's also auto, as well as on curves, which will find the most suitable settings for your picture.
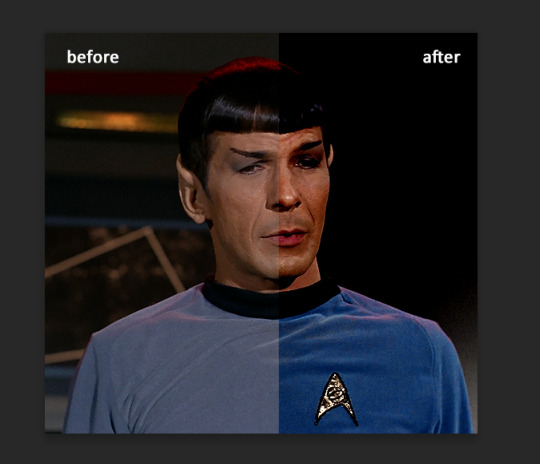
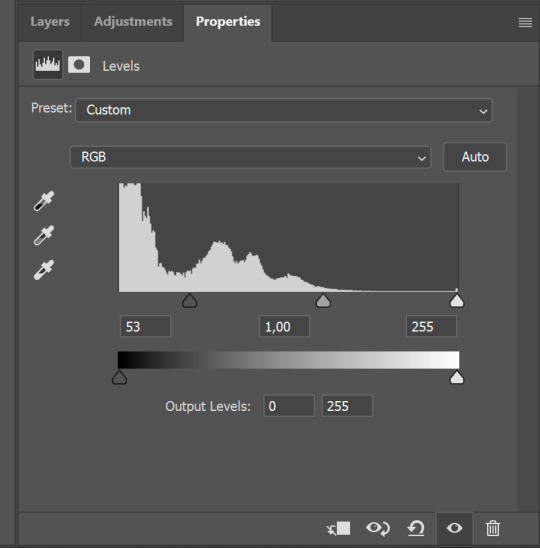

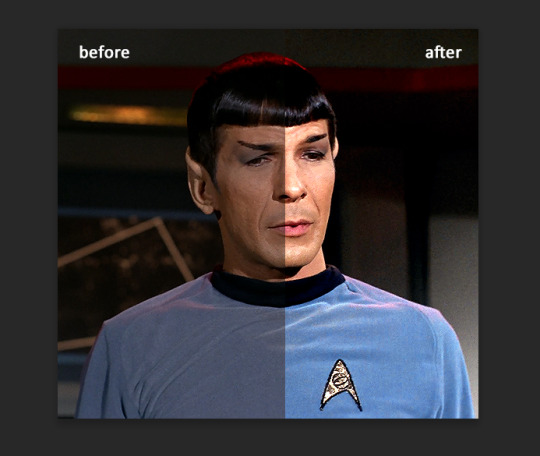
I hardly ever change the middle slider, cos
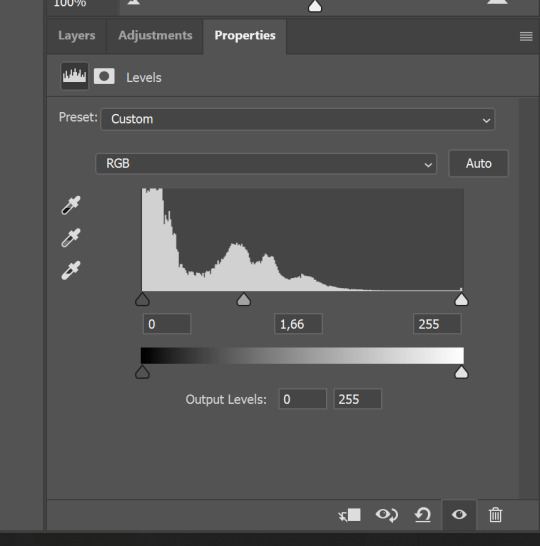
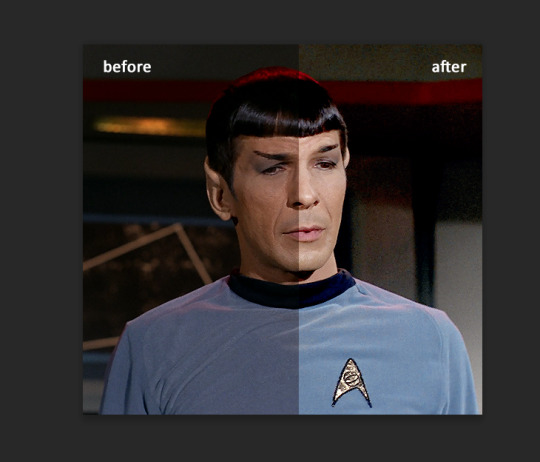
nope.
so, we are at this part of the gif by dragging sliders.
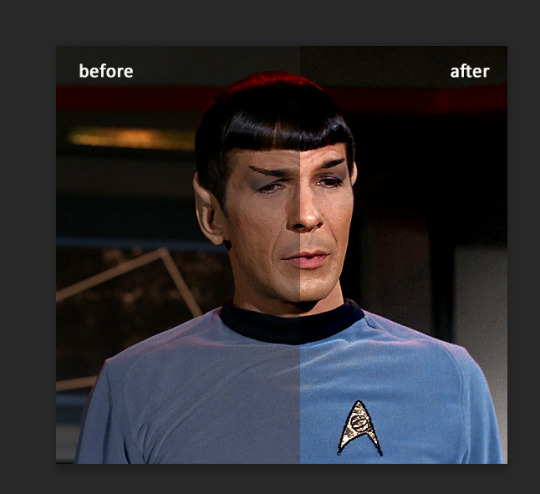
next one I used is layers - adjustment layers - color balance.
right now I will stop adding directory, this tutorial is already long enough, so most of the things are there in layers - adjustment layers.
Absolutely love it, most of settings do the same things but a little differently, this one changes colors but also entire picture, not just part of it. You have shadows, midtones and highlights
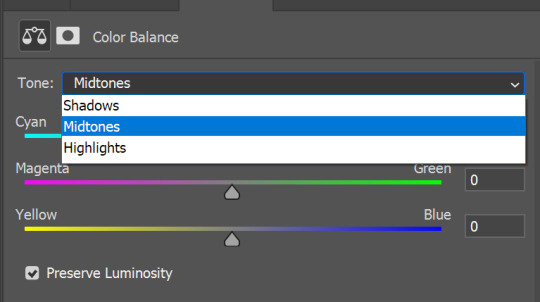
Each of them is really great when you have a yellow\red\blue\green picture to edit. And each of them has 3 sliders cyan\magenta\yellow.
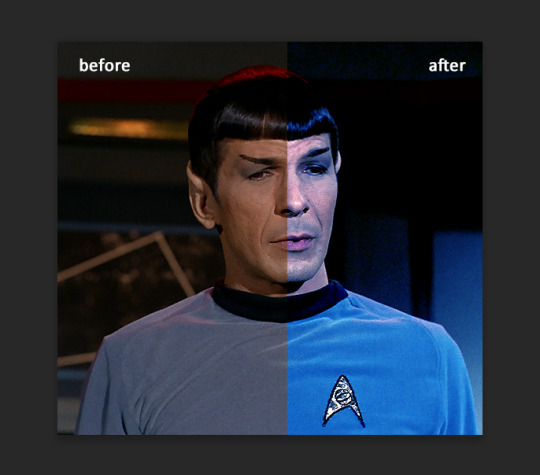
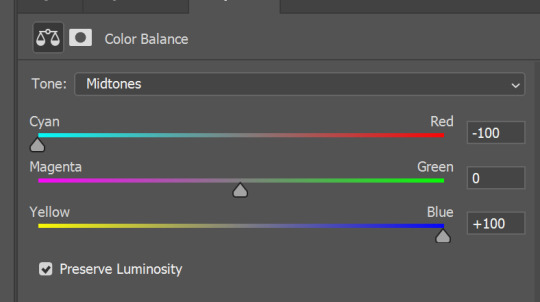
You see, if you drags sliders the other way it will make picture more yellow.
END OF PART I
since tumblr

101 notes
·
View notes
Text
♡A Y/n like Yae Miko♡


♡.Character(s): Cater Diamond
♡.headcanons(kinda?) Might be ooc, but I tried
♡.Reader is Gender Neutral/can be platonic or romantic
♡.Reader is based on Yae Miko from Genshin Impact
♡. Note: I had this in drafts since last year lmao
Caters first impression of you was a memorable one. Aside from seeing his Housewarden turning a gradient of red to purple with rage, he was surprised you had the guts to still be grinning in front of him. It was quite a sight to see Riddle be anraged already by yet another transfer student.
He certainly asks a lot of questions about where you are from and is interested in the customs and foods you have in Inazuma. Make sure to write down every single detail since you'll soon see a lengthy post about you on his Magicam page. Naturally, he would need to keep track of each new transfer student at the school.
"Locking herself away in the Plane of Euthymia, it's as if she was putting herself in timeout. She was stubborn trying to hold the belief, yet it was cute as well."
"Hm? What? Do you want me to call you cute too? I suppose I can, but only if you ask nicely."
Within a couple months of you settling in, you're definitely his favorite gossip buddy, always in the loop of all the new rumors and details going around campus. You help him keep track of new topics that he may have missed. It's like you truly do have eyes and ears everywhere, actually on the topic of ears.
Cater likes the way your ears bob as you walk. It's cute to him, along with your ears, it holds the hypnotic chimes of your vision dangling from it. He's seen his fair share of different ears, but yours appear unique. You always manage to catch him staring, allowing you to attack him with teases.
"You like how I wear my vision, don't you? Dear me, don't shy away now. You've already gotten this far. Might as well ask the question. Go on, we have all the time in the world right now.
I can see him attempting to accessorize similarly to you. Specifically, he would provide you with several ear cuffs or earrings to wear to stay current with fashion. Maybe matching bracelets might also be fitting with custom charms on it, and perhaps matching phonecases can accompany that.
In the middle of PE, it was when he noticed that you never had your tail in eyesight. Which honestly confused him, he spent the entire class questioning where did it go or what happened to it. He really thought you didn't even have one until you cleared up the misconception.
"So, you want to see my tail? Alright then, close your eyes and count to 10. Pfft, you really thought I was going to show them? In your dreams."
He was definitely disappointed to open his eyes to seeing nothing out of the ordinary. At this point, he might as well photoshop one on you.
The first time, you saw Cater's clones in action. The first thing you thought was 'He'd be useful for the Publishing House', but sadly, that idea was shut down by riddle. It seems he is holding a small grudge against you from your first interaction.
"Tsk, Tsk what a pity. I would have loved to snatch you up for the Publishing House. But it seems your housewarden doesn't like to share."
Despite his repeated attempts to catch you off guard for the camera, you consistently seem to be one step ahead of him. It doesn't matter what kind of setting you're in—a kitsune like yourself is very photogenic. The images of the two of you together and of you tend to circulate more on the magicam website due to both of you having the same energy in photos.
Cater is not exempt from your jokes and pranks. You take pleasure in watching him wriggle in his seat and make an effort to divert his attention away from you by using his phone. He is aware that you are still wearing a smile. That's right, this is a great method to kill time in class.
Despite the continual taunting, Cater appreciates your reliability and thanks you for that. His academic progress is always maintained by you, notably in his literature class. You, by his side, ensure that he never becomes sluggish of attempt to find an easy way out. Though he can't help but feel uneasy in the pit of his stomach on days when he must ask for your assistance. Especially with essays.
"I see, so you've come to me for help. What do I receive in this exchange?"
"I can-"
"Hm? What? Your loyalty? Ah yes, I would very much like that. Start by assisting me around the publishing house; I won't take no for an answer.'
Needless to say, Cater had a lot of rewriting to do. The essay should be interesting for the teacher but for her as well.
"I still can't see how adding a love story and a boss battle is a key detail...when we're researching about Dwarf's Mines."
"Well, the writing should at least be entertaining, but fine, Since you want to keep it as historically accurate as possible; let's see what you come up with."

#I don't trust myself with grammar lmao#i haven't written in so long#RomiiWriting!#twst x reader#cater diamond#cater diamond x reader#x reader#cater x reader#twisted wonderland#twst x y/n#twisted wonderland x reader#twst x gender neutral reader#twst x gn reader#x gn reader#gender neutral reader#gn reader
85 notes
·
View notes
Note
Idk if you’ve already done this (newer follower and still catching up) but would you ever do a post on how you plan a post? Like what your planning process looks like with shots, poses, etc? You’re one of my favorite storytellers and I hope to get on your level one day but no idea what goes into a true story telling post
Ooooh hi hello, welcome! I don't believe I have ever gone into my process, no! but how interesting.. what better excuse! let's take yesterdays post as an example, shall we? 👀
First of all, we start with the premise/notes, which are very rough n' look like this in a word document...
Camping – the twins are fiiighting/being a pain, Oscar loses temper with em n almost says why can’t u be like ur brother?! throwing him into memories of Salton saying that to him all the time :[ he catches himself like no wait ur perfect I just gotta finish this, twins like wtf?? But robin ofc knows what’s going on with his pappy.. Oscar wanders off later n Robin sits with him, ur not like them u kno, what? Grandma n grandpa ur not the same, OUGH ;-;
2. I suppose this step changes depending on what I feel like, sometimes I'll make the poses/take the screenies first, then write the dialogue, other times I'll write the dialogue first.. I try for the latter since I can make more accurate poses, but time is usually my enemy here cos dialogue needs a nice quiet period to write lmao (let's call this step dialogue for now though)
3. Rip sims for blender, make poses, then head in game to dress everyone, set dress and take screenies, I take a LOT and choose the best ones but here're some unedited examples for you...
In this case cos there was a flashback, I also had to remake Oscar/fam as a child n' whatnot, but luckily I have their old house saved so I plonked them all in an alternative save to take those.
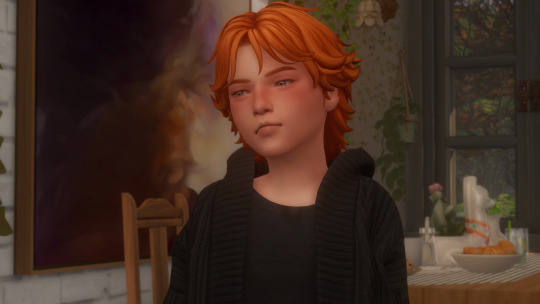

4. Now we have our dialogue/screenies, it's time to throw it all together in photoshop, I usually edit the screenie first to fix any clipping etc, fix the lighting, sharpen it up a bit maybe.. but that's about it! Then I press my handy lil (custom made) storyboard action and end up with smth like this, to which I add the text! (this step takes the longest prolly.. cos it takes me forever to pick the screenies I wanna use my GOD 🙈)
VOILA! Once I've chosen all the screenies in the right order I go thru each of em in PS one by one to edit/add captions, then we're done! \o/
I realise this probably seems quite quick/vague or even streamlined if u wanna toot my horn lmaooo but I've spent a while doing this by now so ig I've kinda figured out the quickest way of doing it - still tho, I'd imagine the above still taking between 4-5 hours from start to finish! I usually spread these things over days/weeks in advance tho like.. during the week I mostly make poses/take screenies and write, then at the weekend I'll usually edit a bunch n' throw it all together, so it doesn't rlly feel tedious since I'm switching it up all the time/doing what I fancy.
#ranswers#<3333#hopefully this is useful?#idk i feel like everyone is so different n does stuff so many different ways this could equally be unhelpful depending on how u work urself#u kno?#each to their own!#i'd just say u gotta start cos then u'll figure out your fave/best way of doing things
38 notes
·
View notes
Text
hello friends! 🌷
recently i got an ask on how i edit my instagram screenshots and here in gemville, all you have to do is ask and you shall receive my child
fun stuff under the cut!
this guide will be divided into two parts: how i take & edit my gameplay screenshots and how i edit my simstagram posts

before we get into the actual tutorial, here are a list of things that i use to help me take better screenies :)
gshade
i'm using an older version of gshade because - thanks to my procrastination - i never updated the version before everything went to shit.
2. presets!
i switch around between presets a lot lmao but for the most part, i use ellcrze's gshade preset for my family dynamics save, sunset n vinyl for my globetrotter save & sim download pictures and a modified boho dreams for my tjol legacy save (first post coming up soon!) sometimes i use lithium for cas pics too :p click here for a somewhat detailed explanation lol
3. tab mode camera mod
this camera mod is a godsend and makes taking screenshots soooooo much easier! 😌 i highly recommend getting this mod!!!

i think i mentioned this before in an ask - i edit my screenshots in photoshop before posting them on tumblr :D i don't really do much, just running a few actions and cropping my screenies. gshade does most of the work for me lol
this tutorial by @buglaur is insanelyyyy helpful omg i based my entire editing process on her tutorial, except for the colouring part because i'm lazy hehe
here's an example of my screenshots before and after editing (cropping the screenshot and running some actions)! there’s not much difference because as i said earlier, gshade will basically carry your entire editing process 💀

sometimes i put text in my pics like these screenies below :) i mainly use these two fonts - winkle and lemon milk :D
and that's about it for part one! now it's time for

here's what you neeeeeed
1. photoshop
i'm using a 🏴☠️ version of photoshop that i got from a somewhat sketchy website but it runs great so i'm not complaining 💀
2. instagram post template and instagram story template
a HUGEEEE thank you to @windslar for sharing the instagram story template link 😭 she is such an inspiration to me 💛
3. the actual instagram app
this is how i add text and emojis to my simstagram posts lol
disclaimer: i am NOT a photoshop expert. there's probably an easier way to do what i'm about to show you, but this works for me and i don't really mind the steps hehe
first things first, you're gonna want to open the psd files on photoshop and it'll look like this, depending on which file you opened
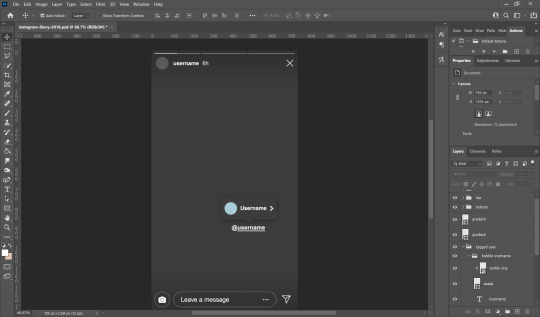
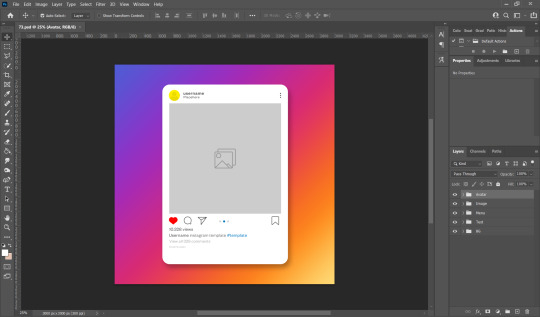
i usually just hide the layers that i don't need so in this case i'll hide the tagged users layer from the story psd and the bg layer from the post psd.
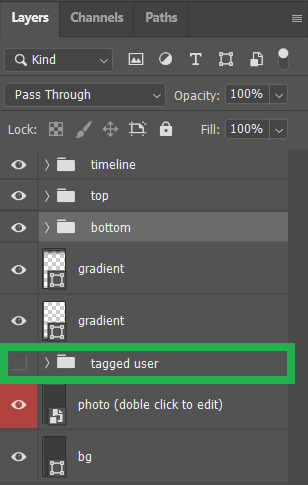

these are the layers that i hide but you can also leave them on if you want hehe totally up to you my dude. then you'll end up with something like the pics below

now we move on to the profile pictures! so what i do is i click these layers (shown below) and go 'file > place embedded > selected picture'

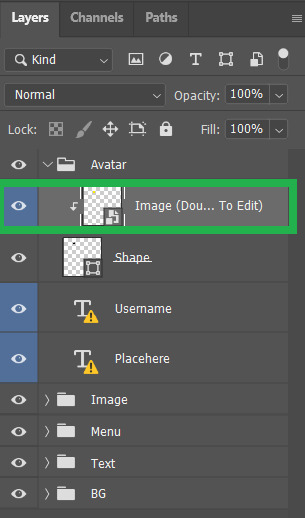
once you do that, you'll end up with something like this (below)! use 'ctrl + t' to resize your picture to fit into where the profile picture would go.
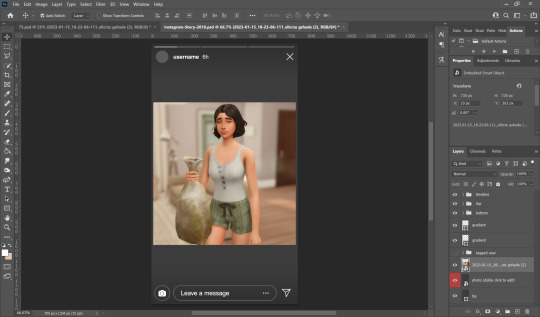


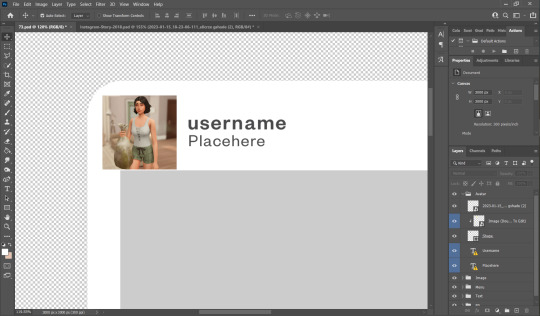
right click on the layer of your selected picture and click 'create clipping mask'. then you can hit 'ctrl + d' to adjust the picture to your liking!
now for the actual pictures for the posts. click on these layers (shown below) and go 'file > place embedded > your selected picture'


now all you have to do is 'ctrl + t' to resize your pictures, right click on the layer of the selected picture and click 'create clipping mask' then 'ctrl + t' again to adjust the pics!
after this whole process, i'll export my pics to my family dynamics folder on my desktop and queue it up on tumblr! :D sometimes my simstagram story posts have text and emojis like these ones below

all i did was upload the pics to google drive, download it to my phone, add text/emoji on the actual instagram app then saving the story to my phone... a lot of work but i don't really mind <3
aaannnnddd that's it!!!! i can't believe i made this guide 😭 hopefully this helps :D english isn't my first language so apologies for any grammar/spelling mistakes i've made in this post 🙈 feel free to ask any questions and i'll try my best to reply to you asap!!
166 notes
·
View notes
Last Seen Blogs

billara57
Cincopes on T

jagojet
JAGOAN GADGET INDONESIA

cherrymoonvol6
this is not the sound of a new man

kemoy-favz
kemoy favz
rifatrt
Digital Marketer & keyword researcher