
lolanovauk
Lola Nova Blog
Seamstress, Disney Lover, Mermaid Admirer
33 posts
Don't wanna be here? Send us removal request.
Last Seen Blogs

holyfries-blog1
LOCKSCREENS

pinkwright
— ౨ৎ

oddballtumbles
Oddball Tumbles

zagreusdaughter
ᶻ 𝘇 𐰁 . ✰

alliesuhn
The World According to
Text
Purple Ocean Exit Victory Dress

Do you remember the scene at the end of The Little Mermaid when Ariel emerges from the Ocean in a beautiful, sparkly purple gown? Well, that scene may be all of 5 seconds long, but the memory of that dress has been with me since childhood!
The important thing about this Ariel dress is that it must sparkle. All of the sparkles. Now, my camera doesn’t quite capture the glitter but believe me it’s there. I spotted this fabric and I knew I’d finally found the one.
I didn’t dare cut into my precious glittery fabric until I’d perfected the pattern, so I got to designing a cowl dress. My previous attempts at the cowl where more like tank tops around the shoulders whereas I wanted to create very thin straps. Ariel’s seafoam dress has thin straps and I wanted to capture that. I also wanted the dress to be constructed from thin vertical panels rather than attaching a bodice to the skirt. This helped give it that glorious fit and flare design with a seamless look.

I got through a lot of scrap fabric testing this pattern out but I got there in the end and I couldn’t be happier with the end result.
I opted to make this a short version of the dress rather than the full length maxi dress, as I wanted it to be more of a party dress, and the short, above the knee look is just more me!
If you wish to indulge your inner child and get your hands on one of these racy little Ariel inspired number then swing by my store where it can be made to size, or made to custom measurements.
0 notes
Text
Sabrina Weird Sister Dress

Happy New Year! Who’s been enjoying the Chilling Adventures of Sabrina? I’m always vigilant for cute outfit inspiration and Sabrina’s white lace collar red dress was an instant favourite! She looked pretty bad-ass wearing it along with the Weird Sister pose.
The dress itself is a simple, classic fit and flare a-line dress. I added princess seams to the centre front of the dress to make it as tailored to the female form as possible, and to add extra detailing.
Peter Pan collars were a new challenge for me. I’ve often admired them but found them a little intimidating. However, I’ve recently mastered the art of binding necklines on jersey and I found that this knowledge made it easier to construct the collar. I think the key is to use a light weight material for the collar so that it doesn’t get too bulky around the neckline.
I really enjoy the aesthetic of the lace around the sleeve cuffs; I was concerned that it would look a little old fashioned but I think that it’s actually super cute!
The Sabrina dress is available to order in my Etsy store, and it can also be made in black and navy blue!
6 notes
·
View notes
Text
My Dress is in a Music Video!!
youtube
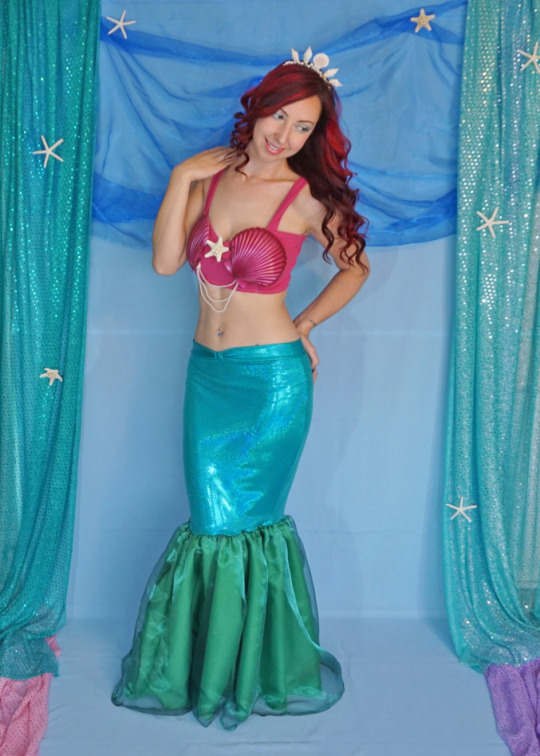
Very exciting news for Lola Nova! The talented Brooke Surgener wore the Lola Nova mermaid dress for her fantastic cover of ‘Kiss the Girl’. Being a life long Ariel fan, this has made me extremely happy! Brooke’s Ariel cosplay is perfect, and I love the whole vibe of the video, from the sunset shots to seeing Ariel rock out with a guitar.
Check out her YouTube channel and show this lady some love!
5 notes
·
View notes
Text
Make a Bohemian Canopy Tent: The Perfect Summertime Garden Accessory

A while back I saw a tutorial on Pinterest for making a simple hanging canopy tent. I pinned it in the hope that I would one day get around to making it and I’m rather pleased to say that I actually did!
I wanted something that would provide me with a little bit of shade in the garden so I knew it was time to put this into practice. It’s really so simple! All you need is an embroidery hoop, lots of lightweight fabric and some string.
I used ‘Spotty Dotty’ fabric which is very floaty and cheap with glittery sequins all over it. I wanted three bright colours on my canopy to give it a bohemian tent feel, so I purchased 3 metres of each colour and sewed them together vertically.
Next, I folded the top edge over by about 3 inches and sewed along it to create a channel through which I could thread the outer hoop of the embroidery hoop.
I tied 3 long pieces of string around the inner hoop and placed it inside the outer hoop and tightened it up. That’s really all there is to it! Here’s a link to the tutorial that I followed so you can see the original instructions and detailed photos.
It’s very relaxing to lounge around under this colourful hanging canopy and it makes me feel a bit like I’m on holiday; a pitcher of cocktail certainly helps add to the holiday vibe!

If I made one of these again I would consider using a different material. The Spotty Dotty is very difficult to sew due to the sequins that cover it. They are glued on and it leaves a sticky residue over the sewing machine needle each time it passes through a sequin. I tried to avoid sewing over the sequins but that proved difficult as there’s so many of them! My thread also snapped about 5 times so my machine did not enjoy working with this fabric. On the plus side though it doesn’t need to be hemmed and it has a lovely drape.
1 note
·
View note
Text
Lavinya Top: Free Sewing Pattern

Summer arrived in the UK, and it lasted for a glorious 3 days! It’s not often I get the opportunity to wander around bare foot in the grass whilst wearing crop tops and floaty skirts but I certainly make the most of it when I get the chance. I’ve been working on sewing my summer wardrobe since January and I’m so glad I finally get to wear what I’ve made.
I’m delighted to share with you a free downloadable sewing pattern for this peasant style crop top. You can get your free Lavinya top sewing pattern here.
This top is very simple to make, and the size is determined by how tightly you pull the elastic through the channels that you sew along the shoulders, waist and arms.
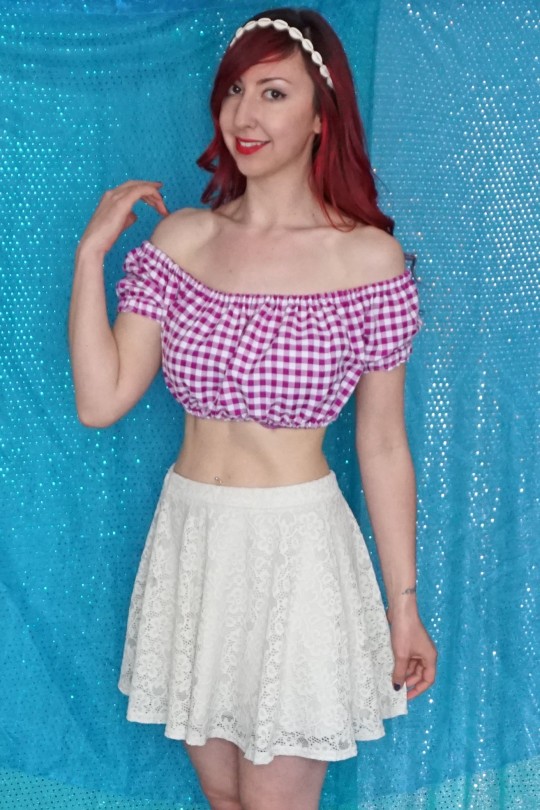
This sewing pattern is intended for lightweight cotton fabrics; I’ve had this purple gingham in my stash for a while so I decided it would be perfect for this peasant style top. It’s quite a light material which is ideal because a heavier fabric could get quite bulky around the gathered sections.
The free download is for a UK 6 to 14 (US 2 to 10), but it is simple enough to make the top larger by following the instructions on the pattern pieces.
I hope you enjoy this free sewing pattern, I’m currently working on a range of knit dress sewing patterns which can be found here so be sure to check them out. Also, All Free Sewing is a great resource for patterns.
Don’t forget to tag me in your Lola Nova makes on Instagram (@LolaNovaUK), I love seeing your creations!
6 notes
·
View notes
Text
Giselle Maxi Dress

In amongst life and work, I am still on a mission to fill my wardrobe up with my own creations and I’m proud to say I have actually made myself 12 dresses so far this year! Feeling inspired still by Giselle from Enchanted, I wanted to channel her style into a more ‘everyday’ summer dress. I kept the same bodice style from before as I really like the cap sleeves and sweetheart bodice; however I added a full length pleated skirt.
I love how floaty and girly this dress is; it’s easy and comfortable to wear because the fabric is so soft and stretchy. It’s made from Jersey fabric which means it’s remarkably simple to make. The stretch in jersey knit fabric is very forgiving, and it has such a lovely drape.
Currently I am working on making a range of downloadable PDF patterns specifically for stretch knit fabric, and the Giselle dress will be included. It is my intention to create a range of simple sewing patterns for all skill levels, using primarily jersey fabrics.
If you can’t wait until the pattern is released to make your own Giselle dress, I will show you how to draft your own pattern. The beauty of this dress is that every piece is a rectangle! This will only work with lightweight jersey fabric that has a lot of stretch to it (such as cotton lycra). You want something nice and floaty, and once you’ve got your pattern just right you can make yourself one in a variety of different prints.
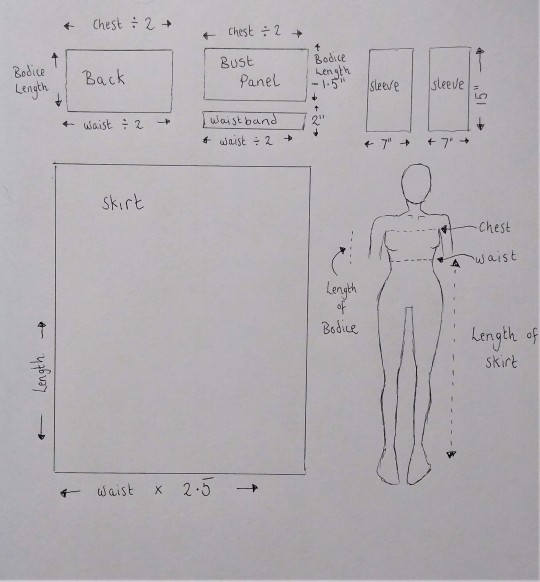
You will need to take the following 4 measurements:
-Width around chest
-With around smallest part of waist
-Length of bodice (from underarm to smallest part of waist)
-Length of skirt (from smallest part of waist to ankle)
Use these measurements to calculate the sizes needed for the 6 rectangles you will need to cut out. Cut the fabric so that the most stretchy part of the fabric is going around your body, then follow these instructions to assemble your dress:
1. Obtain a small length of flat elastic (approximately 4 inches). Using a zig-zag stitch, sew it to the wrong side of your bust panel, starting from the bottom centre and sewing towards the centre top. Pull the elastic as you sew to create the ruched effect in the centre of the bodice.
2. Using a zig-zag stitch, sew the bust panel to the waistband, right sides together.
3. Sew the bodice front to the bodice back, right sides together.
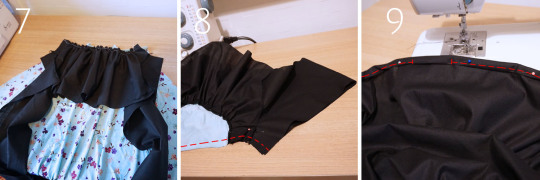
4. For the sleeves, hem the four longest sides before you attach them. Put a few pleats at the back and front bottom edge of each sleeve; pin the pleats in place.
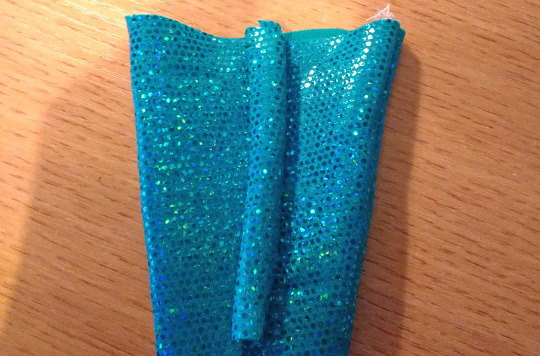
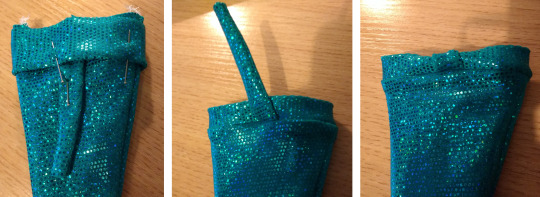
5. To attach the sleeves, we will tuck them under the top hem of the bodice as we sew it. then sew the ends to the bodice edge. These 3 photos below from another tutorial should illustrate this method. Please note, that you will need to decide on the placement and length of the straps first by trying the bodice on and pinning it in place.

6. Taking your skirt fabric, fold it in half vertically, right sides together and sew down the side to create a skirt tube. Turn it through the right way. Pin the skirt to the bottom raw edge of your bodice, right sides together. I started by pinning the seam of the skirt to the centre back, then measuring every quarter of the skirt and pinning it to the sides and front of the bodice. Once the fabric was evenly spaced out I manually added pleats and pinned them into place. I made sure all of the pleats were even before sewing the skirt and bodice together with a zig-zag stitch.
7. Try your dress on before hemming to check the length. The weight of the dress can pull on the fabric a little,making it longer. When you are happy with the length, hem it by turning the edge under and stitching with either a zig-zag stitch or a straight stitch.
If you make one of these, don’t forget to show off your creation on Instagram and tag me (@LolaNovaUK) because I love to see what you guys make!
0 notes
Text
Rosella Dress Pattern Tutorial
I find myself gravitating towards ruched, gypsy style tops at the moment; I really admire the slightly bohemian, care free aesthetic. This is what inspired my latest design, a fit and flare dress with gypsy sleeves and neckline. It's my aim to sew myself a new wardrobe for the summer so I have been experimenting with new sewing techniques and designs. All Free Sewing is my go-to source for inspiration because it has so many free patterns created by like minded sewists! The projects posted always include visual step by step instructions which is wonderful if, like me, you rely on visuals to understand how something works. I also think it’s wonderful how, in the sewing community people are so happy to share their ideas and helps others progress with their sewing. I’ve learnt so much about sewing from the internet! In the spirit of sharing knowledge, I’m going to explain how to draft your own pattern for my latest design- the Rosella Dress.
Be warned though, a fair bit of maths is required for the circle skirt, but I'll do my best to explain it. When I left school I never thought there would actually be a real life scenario that required the use of 'pi' so often, but pattern making means that I have to use it in calculations all the time! Unfortunately, I had completely forgotten everything I learned in school so I had to remind myself how it works (thanks again internet, you’re the best teacher a gal could ask for!).
Begin by taking all of the measurements shown in the diagram below.
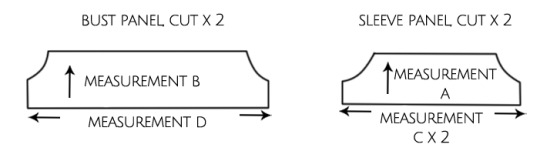
A: Desired sleeve length.
B: Height of bust panel.
C: Width around upper arm, where your sleeve will sit.
D: Width around torso, directly under bust
E: Distance between underbust and the smallest part of your waist (the smallest part of waist is where the skirt flare will begin).
F: Width around smallest part of waist.
G Desired length of skirt, from smallest part of waist to hem

Draw a sketch of a 'ring doughnut' to represent the circle skirt. You need to calculate the circumference, diameter and radius for both the small inner circle and the large outer circle. The inner circle is the width around your waist, therefore the circumference of the inner circle is the measurement taken for F. In this example, lets say that your waist measurement is 70 cm. Divide 70 by 3.14 (Pi) to get the diameter (22.29 cm). Divide the diameter by 2 to get the radius (11.14 cm). We can use this information, plus body measurement G to work out the same information for the outer large circle. We'll say that G is 50 cm, and we can calculate the radius of the outer circle by adding 50 cm to the radius of the inner circle (50 cm + 11.14 cm = 61.14 cm).
Now we have the radius for the outer circle, we'll times it by 2 to get the diameter (61.14 cm x 2 = 122.28 cm). Next, we times the diameter by Pi (3.14) to get the circumference (122.28 cm x 3.14 = 383.95). I hope that’s not too bamboozling, it took me a while to get my head around all of this circumference and diameter malarkey!
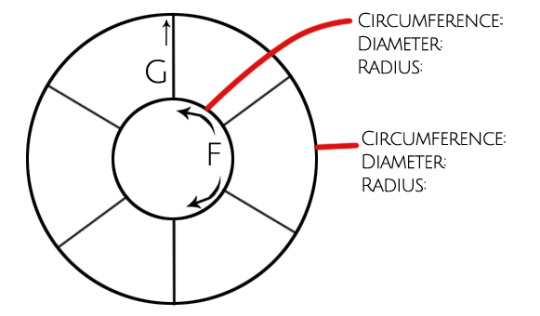
The circle skirt in this pattern consists of 6 panels, therefore our segment will divide the waist measurement F by 6. Sketch out one segment of your circle skirt and label each measurement as indicated in my example below. I have filled it out using the demonstration measurements used in my earlier example.
Inner Circle Radius: 11.14 cm
Waist Measurement: 11.66 (Inner circle circumference 70 cm divided by 6)
Skirt Length: 50 cm
Hem Measurement: 63.99 ( Outer circle circumference 383.95 divided by 6)
Outer Circle Radius: 61.14 cm

Use these figures to draw your one sixth circle skirt segment. Do not include seam allowance yet. Draw a dot at the top of your paper, leaving plenty of room to draw your bodice onto the skirt afterwards. Use this dot as a starting point for your tape measure; mark 11.14 cm (the inner circle radius) away from the dot in a curve (see figure 1). Repeat the same process using the outer circle radius to draw lots of curving dots 61.14 cm away from the top point. Connect the dots up into a smooth curve, then use your tape measure to mark the waist measurement of the top curve (11.66 cm), and the hem measurement (63.99 cm).Form your segment by drawing 2 straight lines either side of your curves, making sure that they intersect with the dot that you measured the radius from (see figure 2). Now that you have your segment, you will need to draw the bodice panel on top of your segment. The height of your bodice panel will be the measurement that we took for E. Once you have a shape that looks like figure 3 you can add your seam allowance. I used a seam allowance of 1.5 cm around the entire shape.

That's the hardest part done; the drafting process for the blouse and sleeves is far simpler. You will essentially have 4 long thin rectangles, 2 of them being slightly shorter than the other, with inward curving edges for the arms.
The bust rectangles are calculated by taking measurement D as the width, and measurement B as the height. Add a 1.5 cm seam allowance at the sides, and a 3 cm seam allowance at the top and bottom edge to allow for a generous hem that we can insert our elastic into later. Free hand draw your corner curves, following the ratio shown in my example. Cut 2 pieces, one for the front and one for the back.
The sleeve rectangles are calculated by taking measurement C x 2 for the width, and measurement A for the height. Apply the same seam allowance rules as above (1.5 cm for the sides, 3 cm for top and bottom).
Now you have your pattern, let’s get onto the construction of the dress!
You will need jersey stretch fabric for the skirt panels, but the bust and sleeve panels can be jersey or non-stretch as they will be gathered. Light to medium weight thickness is recommended. Thin elastic is also required, along with safety pins and general sewing equipment.

1. Cut all of your pattern pieces; you should have 6 skirt panels, 2 bust panels (one is for the bust, one is for the back, but the pieces are identical, so they shall both be referred to as bust panels) and 2 sleeve panels. We will construct the front and the back of the dress in two separate sections then attach them at the end. Lay out 3 of the skirt panels for the front of the dress. Unless otherwise specified, use a straight stitch to sew the pieces together then secure the edges with either an overlocker or a zig-zag stitch. Leave a seam allowance of 1.5 cm.
2. Pin the skirt panels to each other, right sides together. Sew them together down the sides using a straight stitch as indicated in the photo. Repeat for the back 3 skirt panels
3. Pin the sleeves and bodice panels together at the curved seam, in the following order: Bust panel, sleeve panel, bust panel, sleeve panel. Stitch together at all 4 curved seams.

4. You should create a 'loop', with the sleeve panels separating the bust panels.
5. Run a straight stitch along the bottom edge of both the bust panels. Leave one end of the thread long for gathering, but secure the opposite end of stitches so that your gathering thread doesn't come undone.
6. Pull one of the threads, and manipulate the fabric down the thread to gather the fabric. Repeat for both the front and back panels, leaving the sleeve panels untouched at this stage.
7. Lay your gathered bust panel along the top of the front skirt pieces, right sides together. Make sure that the gathered material is the same width as the top of the skirt. Stitch them together on top of your gathering stitch, using a long, tight zig-zag stitch. Try to keep the straight gathered stitch in the centre of your zig-zag stitches. Repeat this process for the back 'bust' panel, attaching it to the back skirt. You should now have the front and back skirt pieces attached to your gathered pieces.
8. Line up the front of the dress to the back of the dress, right sides together. Make sure that the dress is lined up at the armpit seam, and at the seam where the bust section attaches to the skirt. Pin in place, and run a stitch down the entire side of the dress, starting at the end of the sleeve and finishing at the hem of the skirt. Repeat for the opposite side of the dress. Trim away any excess seam.
9. Hem the entire top of the dress on the blouse section. Roll the raw edge over, then roll over once more so that the raw edge is completely tucked in. Stitch down with a straight stitch, being sure to leave an opening roughly 10 cm wide where the elastic will be inserted. The red dashed lines in the photo indicate the gap that should be left. Make sure that the channel you sew is wide enough for you to get your elastic and safety pin through. Repeat the same process for the sleeves.

10. Measure your elastic for around the entire width of your shoulders, and around the top of each arm. The elastic should be flush to your skin with just a slight amount of stretch to it, otherwise it will be too tight. Attach a safety pin to the end of your elastic.
11. Feed the safety pin through the opening along the top of the dress, manipulating the fabric in order to pull the elastic all the way through. Make sure that the opposite end of the elastic is left hanging out of the small gap. You can fasten it in place with a safety pin if you like in order to stop it getting pulled through.
12. Sew both ends of the elastic together to form a loop. Use a small zig-zag stitch, then use a straight stitch to close up the opening in your hem. Repeat the same process for each sleeve.
13. Hem the bottom of your dress by folding it over twice to tuck the raw edge in. Hem with a zig-zag stitch so that your hem won't snap once in place.

Happy sewing! If you do make yourself a Rosella dress, be sure to tag @LolaNovaUK on Instagram because I love to see what you come up with. This pattern could easily be modified to lengthen the skirt and make it into a maxi dress....get creative and have fun!
Jeni
19 notes
·
View notes
Text
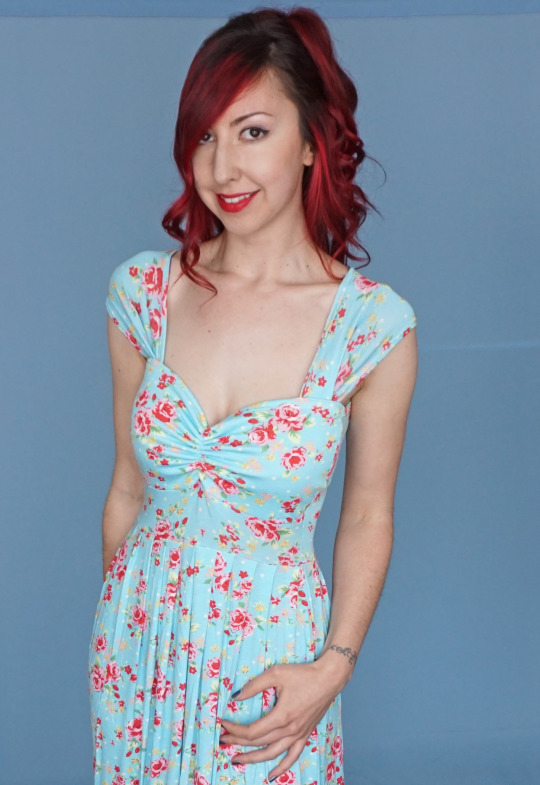
Giselle ‘Curtain’ Dress

Belated Happy New Year! It’s been a while since I’ve posted because sometimes life just gets in the way. I’ve still been sewing and creating though. Over Christmas I used my time off to work on some new patterns and designs for dressmaking (that’s actually something I do for fun!). I started off with this summer dress inspired by Giselle from Enchanted; I watched Enchanted over the holidays and remembered how much I loved her ‘curtain’ dress. I really wanted it when I first saw that movie over 10 years ago but I didn’t have a sewing machine back then.
I made it using a lightweight printed jersey fabric with a pretty floral design. I put a white panel in the centre,and created capped sleeves with a sweetheart neckline. It has a really floaty, summery feel to it with an ‘everyday Giselle’ vibe.
I will be adding this design to my Etsy store as a made to order dress.
1 note
·
View note
Text
Mermaid Costume Tutorial
The nights are getting darker, and there’s a chill in the air; that can mean only one thing- Halloween is coming! Autumn always seems to me to be such a melancholy time of the year as Summer draws to an end, but planning Halloween shenanigans with my friends is my favourite part of the season!
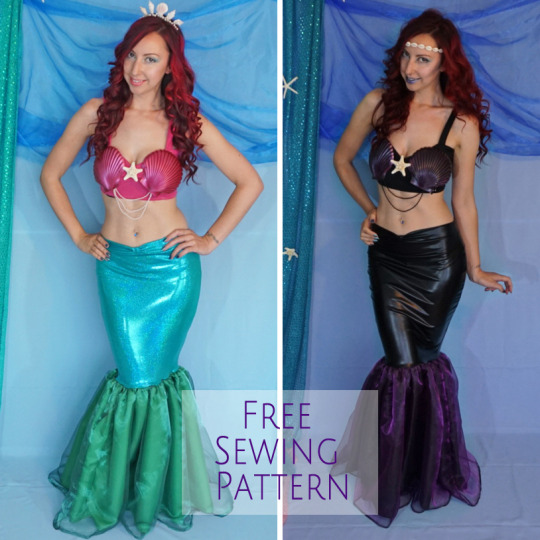
I have so many ideas for fun Halloween costumes, so I’m going to share some of my favourite costume ideas, along with free downloadable sewing patterns and tutorials. The first Halloween costume I’m sharing is the humble mermaid. You can use this pattern to go classic ‘Ariel’, or you can use darker fabrics to create an evil sea siren look. I’ve created two different versions myself to give you some inspiration.
You can download the free PDF sewing pattern here.
The pattern shows you how to make the crop top (which can be worn over a bra) and fishtail skirt. The crop top was decorated using plastic seashells from a fancy dress shop, beaded necklaces that I already owned, and a starfish hair clip. I painted the shells with spray paint from a local hardware store. You can use whatever aquatic things you can get your hands on though to decorate your own top!
The plastic shells I bought had holes in the sides and top, making it simple to stitch them onto the crop top by hand. The starfish has a clip on the back, so it was easy just to clip it onto the centre of the top. To attach the beads, I found a couple of necklaces and fastened them to the top with safety pins. Make sure you try everything on before you stitch and pin into place, because you will want your shells to cover up the safety pins that hold the beads in place.
Instructions:

1. Cut out pattern pieces. The skirt pattern will need to be taped together as indicated on the pattern.

2. Pin the side front pieces to the centre front piece, right sides together. Sew together with a straight stitch, carefully following the curves. Use a zig-zag stitch or overlocker to secure the edges.
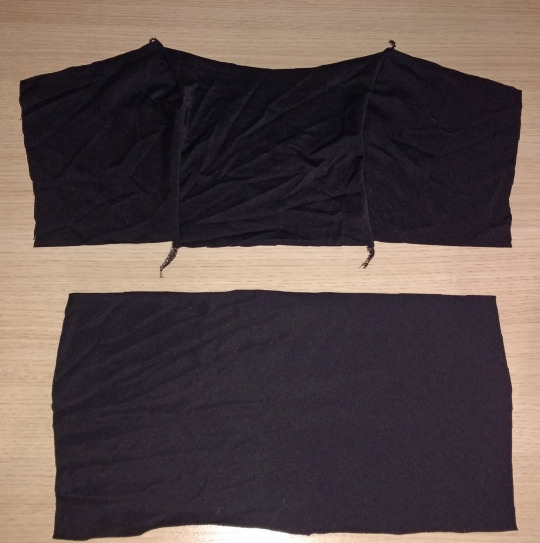
3. Pin the back piece to the newly made front section, sew down each side and secure edges.

4. Neaten up the top and bottom raw edges either by overlocking, or trimming with scissors, Use the pattern to add the marker points for the straps. The marker points for the back can be seen in the photo below as white dots.
5. Make the straps by sewing your pieces of fabric in half length-ways, right sides together, to create two long thin tubes. Turn these through the right way. Safety pin your straps in place and try them on to figure out your desired length. Trim if necessary.

6. Manipulate the seam of your straps so that it runs down the side of the strap. Position it onto the wrong side of your top, level with the marker points, and 0.5 inches away from the top edge. Do this for both ends of the straps.

7. Hem the top, making sure that the strap is secured under the top edge of fabric as you sew. Use a stretch stitch.

8. Flip your top over the right way, and run a straight stitch along all four points where the strap meets the top. This will provide extra security.
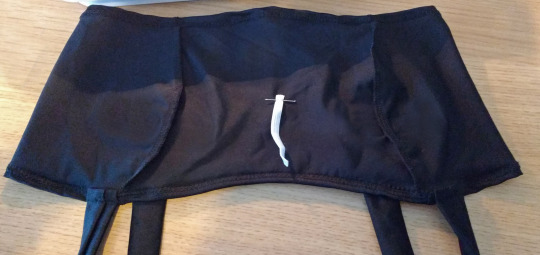
9. To create extra ruching at the centre bust, stitch a piece of elastic to the inside centre. Stitch a piece approximately 2 inches long on to the wrong side of the centre bust panel.
10. Pull the elastic tight as you stitch it down.
11. For the mermaid skirt, pin the front and back pieces right sides together and stitch down the side seams. Secure edges.
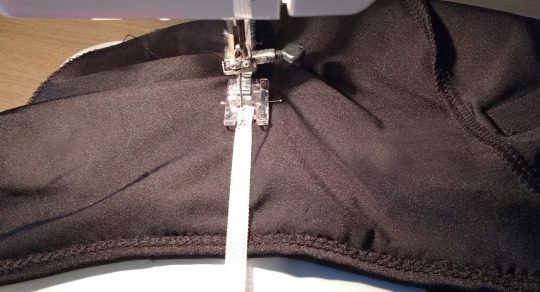
12. For the waistband gathering tube, fold the piece in half vertically to form a tube, stitch down the side and turn through the right way. Position seam to the side, then pin the tube to the centre front top of the skirt.

13. Fold the waistband piece in half, so that the short edges meet. Stitch along the short edge to form a loop, and secure with a zig-zag or overlock stitch. Turn right way, then fold in half horizontally (wrong sides together) to form the waistband. Pin so that the waistband holds it's shape.
14. Pin the waistband to the top raw edge of the skirt so that the raw edges of the waistband are level with the raw edges of the skirt, ensuring that the waistband seam is positioned at the centre back of the skirt, and that the waistband gathering tube is sandwiched between the waistband and skirt. Stitch in place with a stretch stitch, making sure that the gathering tube is securely stitched down under the waistband. Once the waistband is in place, fold the gathering tube over the top of the waistband, and stitch it down to the inside seam at the top of the skirt. Be sure to pull it tight enough that it creates a ruched effect to the waistband. Trim any excess gathering tube left over.
15. For the tail of the skirt, fold your lining fabric in half, right sides together so that the short edges meet to form a loop. Stitch and secure edges. Turn right way round. If you wish to use multiple layers of fabric for the tail of your skirt, then repeat this process for the second layer.
16. To gather your skirt, sew a long, straight stitch around the upper edge of your tube, being careful not to back stitch the beginning or end (for a double layered skirt, position the secondary layer under the top layer, right side to wrong side, and sew the straight stitch through both layers). Start your stitch roughly 1 inch away from the skirt seam, and finish it 1 inch in front of the seam.
17. Hold the top layer thread at the beginning and end of your straight stitch, and gently manipulate the fabric so that it gathers up.
18. Work the material, until your gathered tail fabric is the same width as the opening at the bottom of the skirt. Tie the ends of thread up so that your gather stays in place, then pin to the bottom of your skirt, right sides together. Stitch in place with a stretch stitch.
19. Hem the bottom of your skirt by folding the raw edge under and stitching it into place.
Here are a few more pictures of the finished costume:


Have a happy Halloween folks, and don’t forget to share your photos with me on Instagram (@LolaNovaUK) if you use this tutorial to make your own mermaid costume!
18 notes
·
View notes
Text
Spooky Pumpkin Handbag

My birthday was last week, and as a present to myself (funnily enough I always know what I want!) I made myself this cute pumpkin handbag. I was going to wait until September at the very least to start using it, what with it being Halloweeny, but life is too short to care about whether your handbag is seasonably acceptable!

I went down to my favourite spot by the river today and I took it on it’s first outing. I felt pretty damn fancy sporting this pumpkin bag on my shoulder, I must say.
I used the same pattern to make this that was used for my pentacle bag in a previous post. The face was not as challenging as I thought it would be, but sewing through all those layers of leatherette was tough! I may need to upgrade my sewing machine before I make any more of these (perhaps a new sewing machine could be another present from myself to myself, lol).
1 note
·
View note
Text
Pentacle Handbag
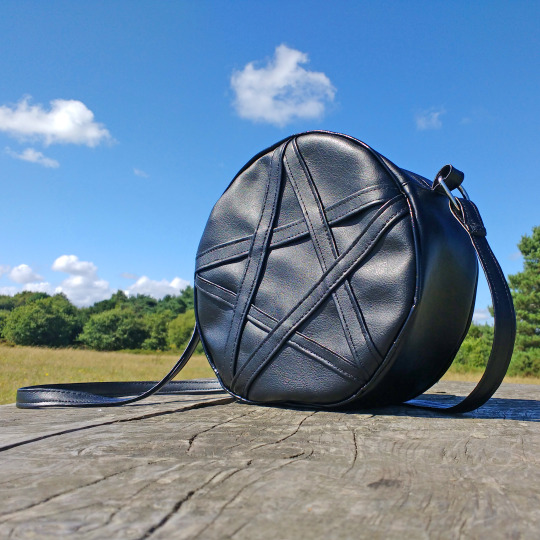
I currently have the urge to make handbags, and this is my first foray into making one from leatherette (artificial leather). I’ve made tote bags before, but I wanted to try my hand at making something a bit sturdier, and I’m really digging the look of round bags right now.
Before I started, I was quite intimidated by the idea of putting a zip into such heavy fabric, and also attaching it to the internal lining. I practiced zips on some scrap leatherette before I tried it on the real thing (I’ve finally learnt my lesson, about testing on scraps before I use the good stuff!). It was surprisingly easy, the hardest part was actually getting the pattern size right! Trying to get the gusset of the bag to match the circumference of the front panel took some trial and error.
I’m pretty pleased overall, and I’m currently testing it out. I am happy to report that the initial trials have been positive; it has successfully allowed me to transport my paraphernalia around without it bursting open at the seams! It is a little on the floppy side though, and nobody likes a floppy bag. My next one will be interfaced with some rigid fabric to give it more structure. I’m hoping to make a pumpkin one in time for Halloween so watch this space!
1 note
·
View note
Text
Athena Dress Pattern & Tutorial

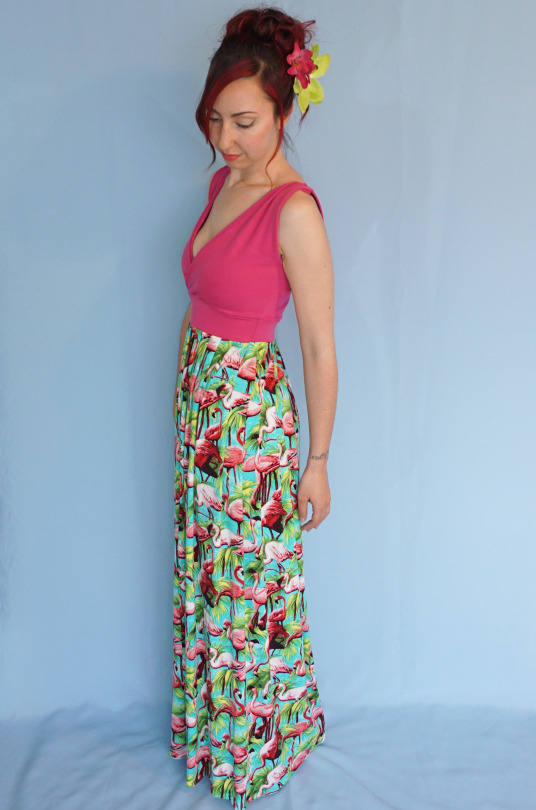
As a seamstress, I spend my days sewing for other people, and it’s actually quite rare that I make anything for myself. I decided it’s time to start making things for myself! What’s the point in being a dressmaker if I can’t reap the benefits?! I picked up this amazing flamingo jersey in Fabric Land, and it’s been in my stash for a while just waiting to be transformed into this maxi dress.
I’m giving this pattern away for free. I’ve learnt so much from the generosity of people on the internet who have shared tutorials and sewing tips, so here is my contribution! The pattern can be downloaded here.
**I have been advised of a flaw in the pattern, which I have now amended.**
To make the dress you will need a sewing machine (an overlocker is preferable, but a sewing machine will do just fine), light or medium weight jersey for the bodice (outer and lining fabric) and a lightweight jersey for the skirt.
1. Download and print the pattern and assemble your pieces. The downloadable pattern is for a UK 8 to 10. At the moment, I don’t have a tutorial for pattern re-sizing, but a good one can be found here. Your pieces should look like this:

2. Sew the shoulder pieces of the bust panels to the shoulder pieces of the back panel, right sides together. Carry out this process for the lining and outer fabric. The green line illustrates where the stitches should go. You can use a straight stitch for this part.

3. Pin the outer fabric to the lining, making sure the shoulder seams match up. Sew along the arm holes and the neck line, where the green line shows you. A zig-zag stitch is recommended for this part. Turn it through the right way when you’re done.

4. Now it’s turned through the right way, you will need to connect the bodice at the armpit seams, right sides together. Pink should be against pink, and black against black, as it is pinned on the left. The right side has not yet been sewn in this photo below. Stitch side seams together with a straight stitch.

5. Sew your waist band together with a straight stitch at the side seams. Lay your bodice out flat, and bring the bust flaps in to the centre. Pin the flaps together where they naturally meet. Attach the waist band by sewing it onto the bodice, right sides together, with a zig-zag stitch.

6. The skirt can be as long or as short as you desire. You could make it super short and use this as a mini dress pattern, or have it long like the maxi dress in the photo. The dress in the photo used a rectangular piece of lightweight jersey that was 42 inches long, and 65 inches wide. You must only use a lightweight knit fabric for the skirt or it will be too heavy for the pleats to retain their stretch. To get enough volume in the skirt, the width should be approximately 2, to 2.5 the width of the waistband. Sew your rectangle for the skirt in half to create a tube. Pin this tube to the bodice, right sides together at the front, back and sides. That way you know how much fabric needs to be pleated in each section. Pin the pleats before you start sewing. Your pleats should be approximately 1 inch in width, with a gap of 0.5 inches between each pleat.

7. Attach the skirt with a zig-zag stitch. Try it on before you hem the bottom of it because I have found that the weight of the material can sometimes cause the skirt to end up longer than you intended. Once you’re sure it’s the right length, hem it with a zig zag stitch.
Once you have made your maxi dress, go forth and be fabulous! If you have any questions or feedback about this tutorial, please leave me a comment and I will try to get back to you as soon as I can. If you do make this dress, please share your photos with me on my social media, I love to see what you guys can do!
5 notes
·
View notes
Text
I Finally Have Light Blue Fabric!

This probably sounds absurd, but I’ve always struggled to find light blue jersey fabric (at a reasonable price). It’s like the elusive, mythical unicorn of the fabric world, but I have finally managed to find a good source! I’m very excited about this because it opens up so many possibilities for designs that I have in mind.
The first thing I did was create this Cinderella inspired off shoulder dress. It’s the perfect shade of blue for ol’ Cindy so I couldn’t wait to make this! This material is actually so soft and comfortable so it’s a really nice dress to wear. It would be perfect for a Disneybound outfit, I could just see someone whirling and twirling in the Magic Kingdom whilst wearing this dress!
0 notes
Text
Giant Inflatable Pink Clam Shell

I’m so thrilled I finally got the chance to use my giant pink inflatable clam shell! I bought this inflatable shell in the Black Friday sales, back in November last year. I purchased it mainly because it fits the criteria for 2 of my obsessions: mermaids and inflatables.
I have mostly grown out of my love for all things inflatable, but it can’t hurt to indulge your childish side now and again. The weather has been incredibly glorious here in the UK for the last few days, and i’m blessed to live near a beach. Naturally, I packed a picnic and spent a beach day floating around on this bad boy. Floating around was actually a lot more fun and relaxing than I thought it would be, you can fully recline your head back without it sinking in the water.
It would be an opportunity missed to float around on an aphrodite-worthy inflatable clam shell, and not wear my mermaid bikini, so here I am, sporting an Ariel inspired shell bikini handmade by me. If you fancy indulging your love of all things mermaid, check out my Etsy store for mermaid bikinis, and other Ariel worthy accessories.
1 note
·
View note
Text
Bombshell Make Up Case to Bombshell Handbag

When Spectrum launched their range of mermaid inspired make up brushes in clam shell shaped cases I couldn't resist treating myself to one; I'm a sucker for anything shell shaped, and this set was the ultimate mermaid accessory! The case for the Bombshell brushes is just mesmerising, with its iridescent shimmer. However, being that I never really take my makeup brushes anywhere, I ended up putting them in a jar for ease of use, and didn't have much use for the case (other than staring at it's beauty!!). It's sacrilege for such a gorgeous item to go unused so I decided to re-purpose it as a handbag. It already came with a rose gold chain, but as the case hinges open at the centre and opens out completely flat, it couldn't be used as a handbag without some adjustments.
Firstly, I unpicked the stitching on the elastic that held in the brushes. With a bit of trial and error I managed to draft up a pattern for a bag insert which I intended to glue to the inside of the bag. I've even saved you the trouble of drafting a pattern, by creating a free PDF for you here. The instructions for assembly are below.
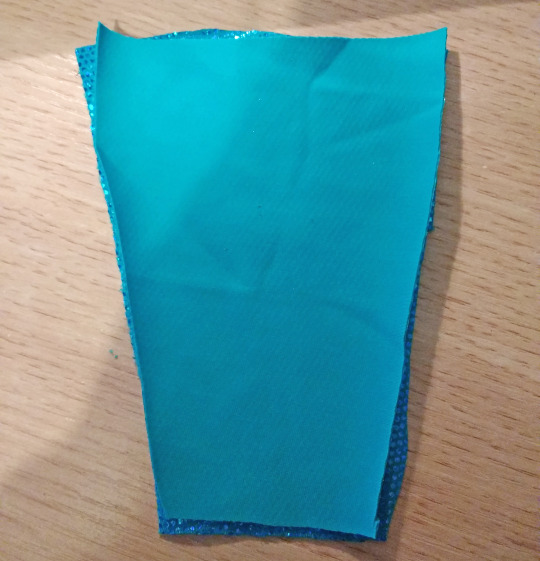
I chose purple fabric, and turquoise scale fabric for a mermaid vibe. I recommend using a medium weight cotton with no stretch for extra durability. The liner is thin at the base, and tapers out wider towards the top, so that when it's glued into place, it allows the clam shell to open part way, creating a compartment for your essentials.
1. Download the PDF pattern, and follow the cutting instructions on the pattern.

2. Pin the side panel to the long thin piece at the centre, right sides together. Sew a straight stitch across at the centre base.
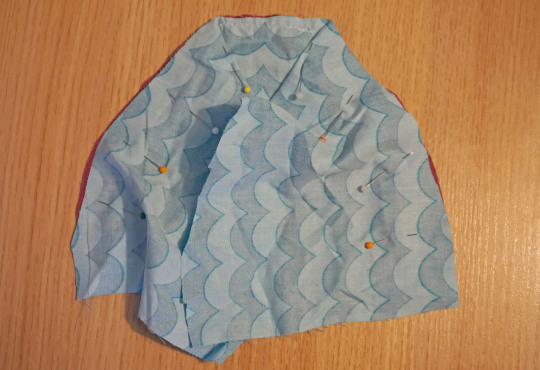
3. Folding the fabric to match the curve, sew up the sides, making sure that your stitch intersects with the straight stitch already in place.
4. You should have something that looks like this (above). Repeat these steps until the other 3 side panels have been sewn into the long thin strip.
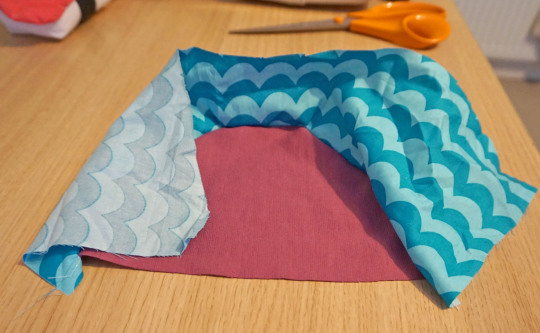
5. You should have 2 liners now, place one inside the other, right sides together, and straight stitch around the edge. Leave a small opening so that you can turn it through the right way
6. Sew the opening closed, and press the edges with an iron to get a crisp, flat edge.
7. Using a hot glue gun, glue the liner into the sides of the clam shell starting at the bottom and working in sections. I positioned the liner first, and lifted up small sections at a time until the entire half of the liner was glued. Repeat for the opposite side. Remember, you're only gluing the liner onto the flat side of the clam, not the hinge at the base, or the sides with the zip.

Now you should have a cute little bag that opens out just enough for you to get your things in. When the bag is zipped closed, the side fabric should fold in on itself and be tucked neatly out of the way of the zip.
Happy sewing, if you make this then don't forget to share your photos with me!
0 notes
Text
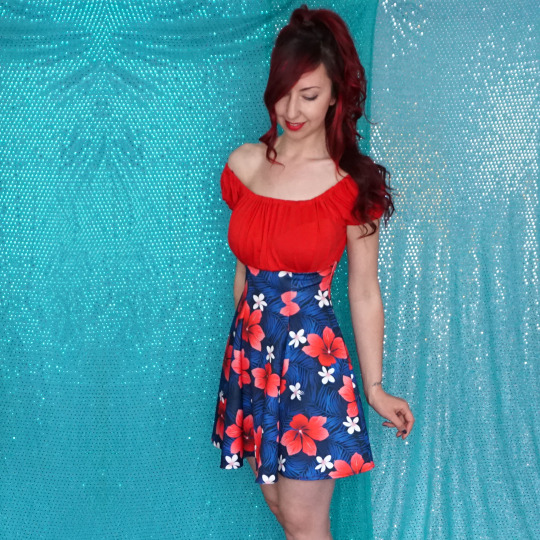
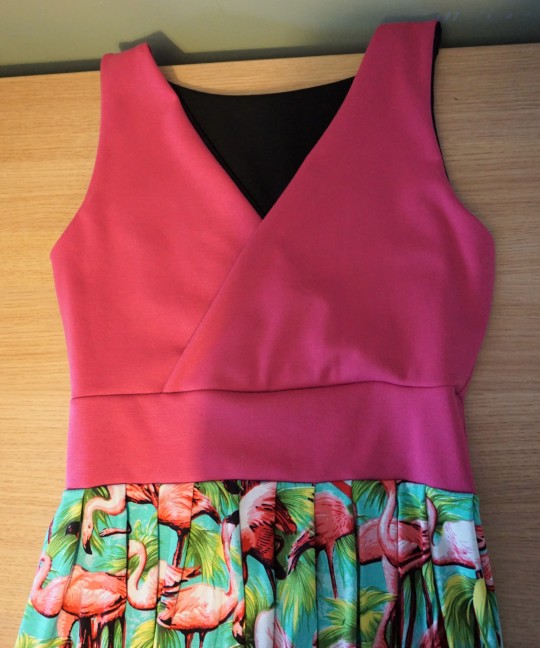
Tropical Flamingo Maxi Dress

Recently, I’ve been working on lots of new sewing projects. I feel like I need to try more new sewing designs, and I’m starting simple. I have drawn up a pattern for a v-neck cross over top, which I then used as part of this flamingo maxi dress!
I’ve never worn a maxi dress before so this is quite new to me! I initially intended for this to be a short, above the knee dress (that seems to be my signature style) but when I held up the un-cut flamingo fabric to see how short I should cut it, I kind of fell in love with the idea of making it a full length dress.
Also, I absolutely LOVE this flamingo print fabric! I purchased it from Fabric Land, and it’s the first time I’ve ever seen it in a jersey print. It is so vibrant and colourful, and it has a really beautiful drape to it. It makes me think of holidays and tropical islands.
All I need now is some beautiful sunny weather so I can wear it!
Dress available to purchase here.
0 notes
Text
Baby Disneybounding
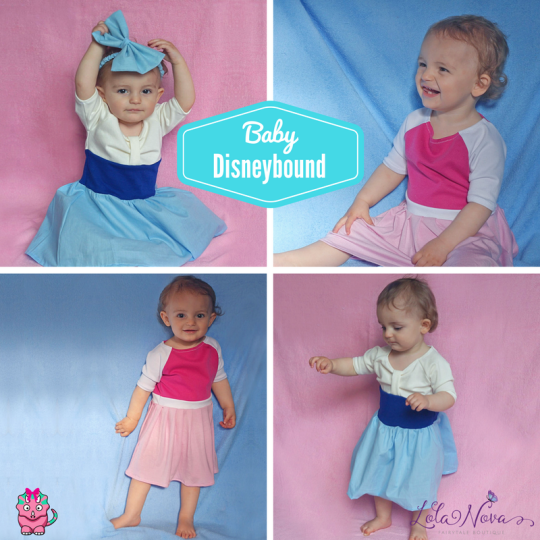
My good friend over at Tilirex Designs makes adorable baby clothing; when she suggested a collaboration between us I jumped at the chance! I thought it would be absolutely adorable to see baby sized versions of my Disneybound dresses. We started with a blue dress and hair bow inspired by Ariel’s town dress, and Aurora’s pink dress.
I’ve never made anything baby sized before, and it was surreal to make something so little. When I held up the finished product, I thought it would never fit anyone because it was so teeny tiny! Luckily, Tilirex being the expert baby clothes maker that she is re-assured me that the sizing was in fact spot on.
The real fun started when we tried them on her little girl (the brand rep and face of Tilirex Designs). She looked like an adorable baby princess and it was just too cute!!
Between the two of us, we’re going to work on making more character inspired dresses. I’m particularly looking forward to making some baby Halloween dresses.
1 note
·
View note