#(and lets me make selections of all of one color on my canvas. Nice.) (I still don't know if I am a pixel artist or not.)
Note
Hiya! I'd like to ask how do you do your ms paint art? Do you first make the outlines and then colours, or perhaps vice versa? I really adore your ms paint art and would love to know the process (for practice purposes:))
Depends! My two strategies, featuring Cactus Gunman of Gregory Horror Show fame:
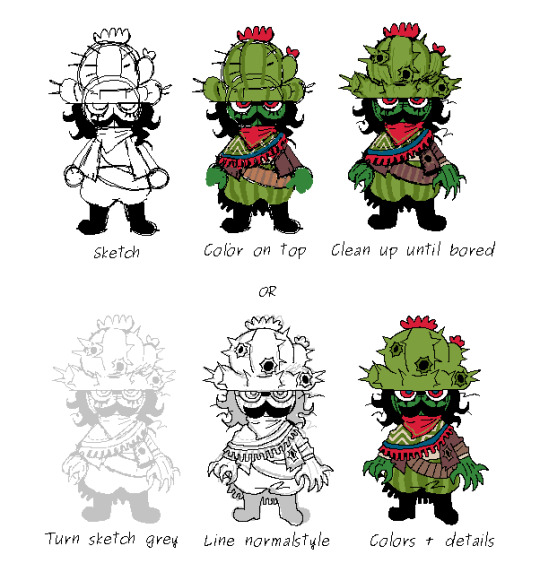
I often just color right on top of my sketches when I'm being silly + designing characters + just trying to figure out what something looks like (and tend to use this to fiddle with details and colors) It's usually quicker for me to end up with something that I'm happy with.
Most of the time when I bother to do separate, cleaner line art, it's because I'm making a graphic for my website. LOL. I think it feels a little more cartoonish-silly, which is usually what I'm going for when I decide to do this. It's also a bit harder to make large changes to whatever I'm drawing, so I'm usually working off of a messier thing I've already made.
(Technically, I no longer use MS Paint and instead use Aseprite due to becoming a Linux user, but nothing has really changed about the way I draw + all of this can be done in MS Paint just fine.)
#I've found that I actually have a harder time making color palettes in Aseprite than MS Paint (I used to use the marker tool to mix colors)#(and haven't yet found out an equivalent tool to mix colors together)#Anyway the only feature that I use regularly in Aseprite that MS Paint doesn't ''have'' is easy transformation controls#(Paint has transformation options in the skew/scale menu but not every computer supports the trick I used to use to rotate stuff)#Also you can animate in Aseprite. There's layers but I don't use them.#beebfreeb art tag#funny talking tag#This was probably a little more talking than you expected but I am very particular about these sorts of things.#Anyway I am so mad about how my favorite version of MS Paint has absolutely no Wine support and that everything that I've looked up said:#''Just use a different program'' With different features? I want THESE features RAUGHHH (Then I learned Aseprite has similar eraser tool)#(and lets me make selections of all of one color on my canvas. Nice.) (I still don't know if I am a pixel artist or not.)
57 notes
·
View notes
Photo

PHOTOPEA GLITCH TRANSITION TUTORIAL by kai @heroeddiemunson
howdy! so i’ve recently come to realize that i haven’t come across any tutorials for creating a glitch transition on photopea. as someone who has done this transition many times in photopea, i figured that i should create a tutorial to show how i personally do this effect!
what you need:
photopea (basically photoshop in your browser, completely free!)
basic giffing knowledge, because i won’t cover it in this tutorial (other tutorials: tutorial by @benoitblanc, tutorial by @ashleysolsen)
i also recommend watching this youtube video for a real time visual of what i’m going to be describing in this tutorial. this video is what taught me how to do this glitch effect, so if how i’m describing it is at all confusing, check out the video to see it in action!
without further ado, make sure you save your psds regularly and let’s begin the tutorial :)
step one: making your gifs
before we do anything, you have to first make the gifs that you are going to doing the glitch in between. for the sake of this tutorial, i will be transitioning between two gifs, but this tutorial works for however many gifs you want to glitch between for your edit. here are my two gifs that i will be transitioning between:

i highly recommend keeping these individual gifs small in their frame count to make sure your final gif doesn’t go over tumblr’s size limit. the gifs i am working with are both 22 frames; you dont have to make the gifs have the same amount of frames, but i do it because i think it looks cleaner.
with your two gifs, edit them however you would like. if you have a specific order you’d like the gifs to look/a way that your finished product will look like (ex: black and white with a transition to fully colored), then you should color them accordingly. here are what my gifs look like after fully editing them:
once you’re happy with your editing, go to file > export as > GIF and save your gifs. now that we have our gifs to transition between, let’s make our canvas!
step two: making your gifs’ canvas
now that we have the gifs we’re going to be transitioning between, we need to make a “canvas”, or place where we put these two gifs in order to transition between them. so, going to file > new…, create a new canvas. here are the specifications for my canvas (size of your canvas may vary, depending on your cropping for your gifs):

the background for this canvas doesn’t really matter like it does when you’re blending two gifs, but i still made my canvas’s background black because it contrasts the brightness of the gifs i’m placing onto it.
with your canvas now created after clicking “Create”, open up the two gifs that you will be transitioning between. right click the gif’s folder in the layers panel on the right, and select duplicate into… and choose the canvas you just created. once your gifs have been duplicated into the canvas, your layer panel should look something like this:

if you didn’t duplicate your gifs in order, arrange your gifs however you want them to appear. from here, we can now get to the purpose of the tutorial, creating the glitch effect!
step three: creating the glitch effect
generally, with any transition effect, i like to make my gifs seem like they are endlessly looping. while this is a little more work when it comes to giffing, i do think it gives the gifs a nice polish and doesn’t make it feel like there’s a harsh transition between the gif’s looping cycle.
click the eye next to your top most gif(s) in order to make it invisible, as we will worry about it later. scroll down to the layer titled “_a_frm0,50”, right click, and select “duplicate layer”. this should create a new layer, “_a_frm0,50 copy”, on top of the original layer. double click on the copy, and you should see this pop up:
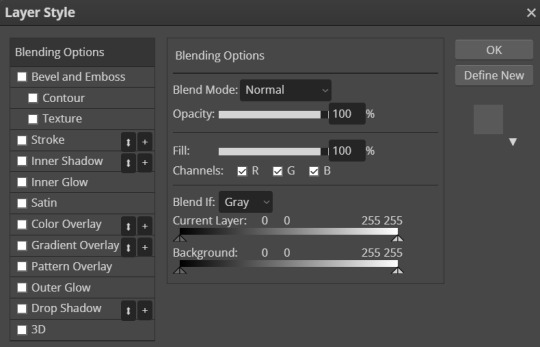
below the fill slider, you should see something titled “channel” with three checkboxes with R, G, and B next to each checkbox. you can uncheck any one of these checkboxes for a different effect; unchecking the R box creates the stereotypical red/blue glitch effect, unchecking the G box creates a green/pink glitch effect, and unchecking the B box creates a blue/yellow glitch effect. for my transition, i have chosen to go with the blue/yellow glitch effect by unchecking the B box. however, you can play around with whatever effect you prefer for your gif.
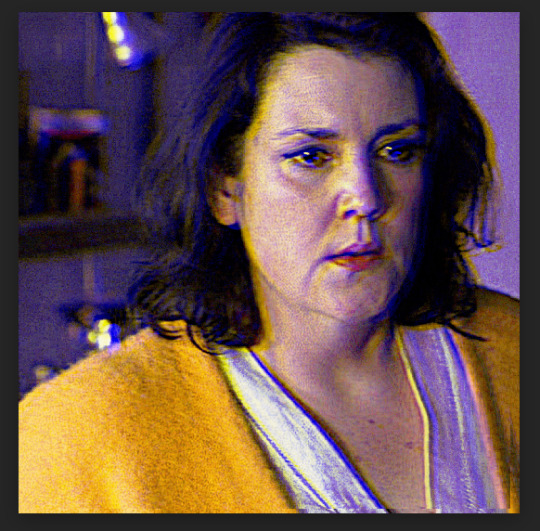
once you have chosen what checkbox to uncheck, click “OK”. with the “_a_frm0,50 copy” still selected, make sure you have the move tool selected (the curser at the top of the left toolbar), and choose the direction you want your glitch to go and move the layer using the arrow keys on your keyboard. it can move as much or as little as you want, whatever looks good to you! i chose to move this first layer 10 clicks to the left and 5 clicks up, which creates this effect for my first layer:
which looks cool, right? now, you could stop here with the glitch effect, but me being me, i’m extra, so i’m going to include the next half-step that you don’t have to follow unless you want to.
step 3.5: the glitch effect, advanced
with “_a_frm0,50 copy” still selected, go to the left toolbar and find the rectangle select tool (right under the move tool from before). this part is a bit tedious, but i like the results, so i feel that the work is worth it.
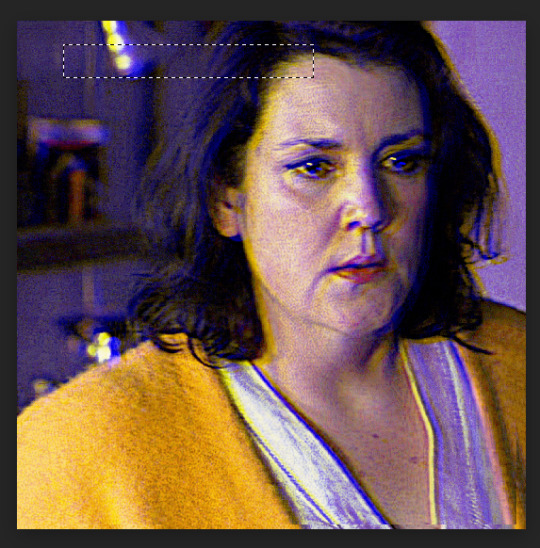
using the rectangle select tool, make a shape around part of the layer, and then go back to your toolbar and select the move tool again so we can move the selected section. do you remember how many clicks you used to move your layer and in what direction it goes in? well, now, do the opposite; since i moved 10 clicks to the left and 5 clicks up, my selected section needs to go 10 clicks right and 5 clicks down. below is what this looks like before and after moving the selected area:
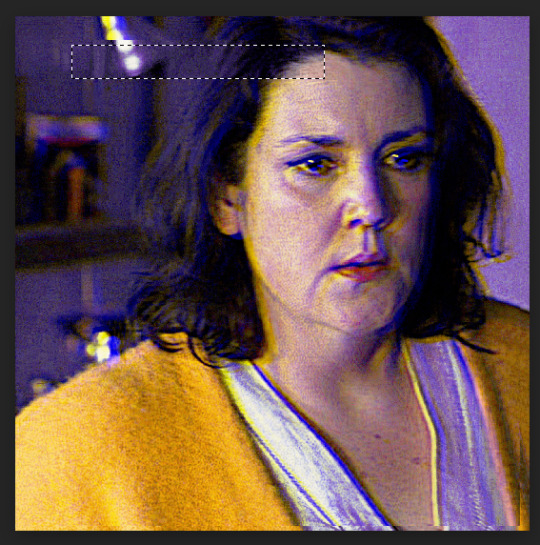
once you’re happy with the moved selection, go to the top bar and go to select > deselect so that you are no longer selecting the section you just moved. repeat this step however many times you like; i tend to do this about 5 times for each layer of varying sizes/lengths to allow variety. here is what the final product looks like for this first layer:
and viola! your fully glitched layer one. now we can move on with the rest of the tutorial.
step three, continued: creating the glitch effect
now that you have finished this layer, make sure you have selected both frames “_a_frm0,50” and “_a_frm0,50 copy” by left clicking while holding down CTRL on your keyboard. with both layers selected, right click and choose the “merge layers” option in the popup; this ensures that the glitch effect that you have created stays as one frame.
now we get to do this many more times! make your next layer, “_a_frm1,50”, visible by clicking the little box next to it in the layer panel, and repeat the before steps. i personally alternate between what direction my glitches go in to add more variety and interest for my gifs. so, for example, with my “_a_frm0,50” frame, i moved it 10 clicks to the left and 5 clicks up; this means, for “_a_frm1,50”, i’m going to move it 10 clicks to the right and 5 clicks down, so on and so forth.
i do this for the first 3 frame layers and the last 3 frame layers for both gifs. when your gifs are finished with their individual gif transitions, they should (individually) look like this:

and together, they should look something like this:
and that’s the hard part done! congratulations, you just made a glitch transition!
step four: finishing touches
now, this entire step is optional, as if you already did stuff like add text to the individual gifs you are using this transition with, you’re probably already done. however, if you’re like me and you’re making a gif where the text remains stationary on top as the gif itself transitions underneath, take this time now to do so.
i will also note that if you want your gif transition to match with the rest of your gifs, you can do that in this layer. for example, i want the blue in the transition to be purple like in the rest of my gif; to accomplish this, i will use a combination of a hue/saturation layer and a selective color layer to make the blue be purple (which does change the purple a little from how it was originally, but i don’t mind). i would put these layers on top of both of my gif layers so that the transition layers in both gifs get the same coloring. doing so creates this effect:

(that isn’t a step that’s required by any means (nor do i do it all the time), but in case you wanted to do that, now you know!)
now that i am fully happy with how the gif looks, i will add my finalized text and end up with this as my final product:
now, if you run into the problem of your gif being a little too large for tumblr’s size limit (for example, my finished gif was 10.7MB, and the limit for 540x540 gifs is 10MB) and don’t want to redo all of the process of doing the glitch effect after deleting some frames, i recommend using ezgif’s gif optimizer. it helps shrink the size of your gif without costing you the quality of your gifs. :) i dont normally recommend that for other types of gifs where it’s easier to delete frames, but in this case i know that deleting frames and having to recreate the glitch effect may be annoying!
other than that, this is the end of the tutorial — congrats, you know how to make a glitch transition in photopea! good for you! :) if you ever need any help with photopea, or have a request for how i have done an effect, please feel free to shoot me an ask and i’ll do my best to explain or make another tutorial to help!
#photopea tutorial#photopea gif tutorial#gif tutorial#glitch transition tutorial#photopea#dailyresources#allresources#completeresources#usergif#userars#tusergeo#userlace#tusersai#mystuff#mytutorials#eyestrain#pulsing lights
396 notes
·
View notes
Note
your gifs are always so nice! may i ask but how did you make the blending effect in your bangchan set (the pretty green one)
hi! sorry it took me so long but i had class </3
i don't save my psds unless i'm working for several days on something, so i'll be making the gif from scratch again!
we want to achieve a blending like this, from this post on my chan birthday countdown here
i'll put the steps under the cut bc it's going to be very image heavy! if something isn't clear just let me know <3
okay! so you need to make two gifs obviously, they need to have the exact same amount of frames (to avoid having to trim the gif on the timeline)
you don't have to color to perfection bc we're just going to put a b&w gradient map over both of them, the thing i did was enhance the darks in my gifs before putting the b&w layer so it would look the best. when you have everything done and ready to go, you convert everything to smart object

now i'd like to recommend using gifs that have more darks than lights, simply bc it's easier to blend things in dark backgrounds. in this case i didn't think too much and had to fight a little on how to blend bc nothing was working so it's just a really handy suggestion that'll save you lots of headaches <3
okay enough babbling, we pick the gif that's going to be in color first. in my case i picked the gif on the left, i added a green/black gradient map over it
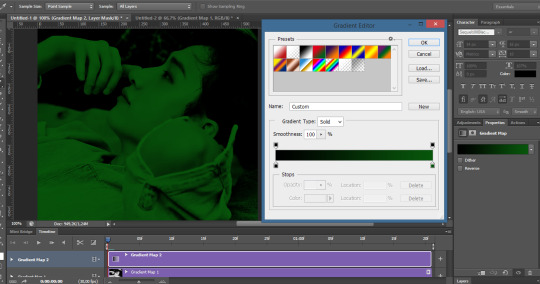
now we go to the other canvas with the other gif and hit right click on the smart object and then click on duplicate layer, in the options that show where you want to duplicate it, you pick the option for the canvas that has our green gif and then click OK

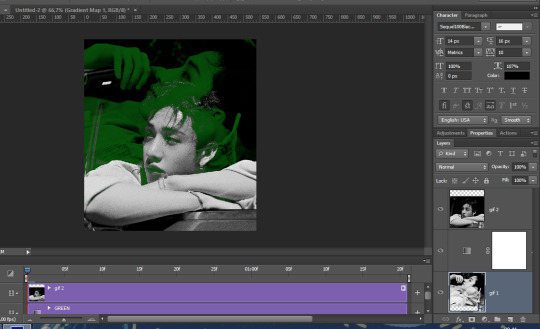
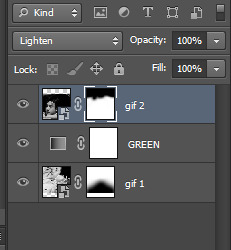
now the layers on the main canvas should look like this (i changed the names of the layers for organization purposes so don't mind that)

now we start the blending! we select the gif on top and in the drop down menu that currently has "Normal" as the setting we change it to "Lighten". Your canvas should look like this right now

we're almost there! for this part i played with the positions of the gifs, i sent the bottom gif a little more up on the canvas so the top gif didn't cover it too much, and i moved the top gif a little more to the bottom too so the darkest part of it would fit more accurately with the green gif
now we "erase" the parts of the gifs that we don't want to be showing. i clicked first on the top gif and then went to the little icon here to enable a layer mask, next to the layer of your gif should be the white box like this, you need to enable the layer mask for both gifs bc we'll be erasing from booth!

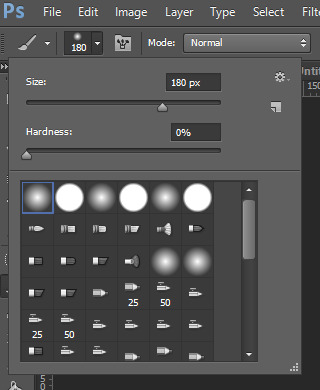
with a black brush set to hardness 0% we paint black the parts of the gif we want to erase
if you "erase" too much of the gif, just change the color from black to white and paint again and the gif will be back to normal, this is how my canvas looks now that i erased bits from both gifs
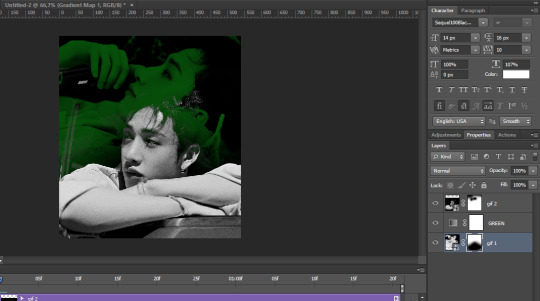
this is how my layers panel ended up looking like for reference
and once you deem it okay, it's all done! ready to add text and other little things to make it more interesting or just to save it as it is <3
the key to a good blend is to play well with the darks tbh and use layer masks bc they help A LOT, also not picking too bright gifs bc you'll have to work extra to find the right settings, just play around and find what looks the best tbh
i hope this helped? if anything wasn't clear enough, just let me know!
63 notes
·
View notes
Note
torturedpoets*tumblr*com/post/738611754795466752 hi! do you mind sharing what steps you use to color gifs like this? Some could assume that gifs with just one colour will be boring, but your colourings is always so nice 🥰
hi there!! i'd be happy to! i've never regretted saving a psd yet 😂 this is the post in question and honestly, for as... not great as the quality of my dl of the movie is, i'm still really happy with how it turned out! also i love women 😍

nothing too wild going on here, but even when i do "simple" coloring like this (gradient maps, my beloved), i still color the base gifs. once i have all the gifs made and plopped onto the canvas, this is what my coloring layers look like:
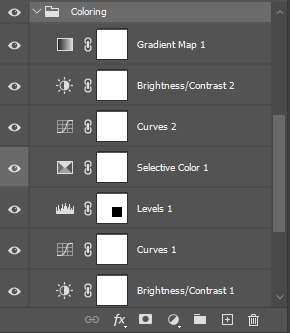
working from the bottom up, i almost always start with a brightness/contrast layer. i don't adjust either value, but instead set the layer's blending mode to screen. this movie is pretty dark, so i left the opacity at 100%, but sometimes, i'll drop the opacity as low as 20-30%.
i follow that up with a curves layer, where i utilize the black and white eyedroppers. click the black eyedropper and then click the blackest point on your gif. then do the same with the white eyedropper. it's a good idea to play around with different points, especially when you're working with super tinted scenes. curves layers can be a lifesaver!
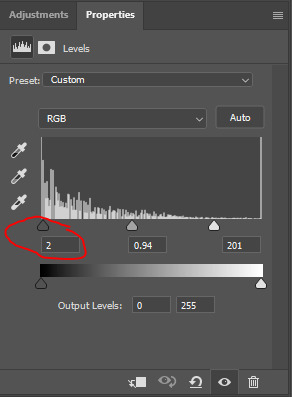
on the levels layer, i did the same exact thing with the eyedroppers, but oftentimes, i end up increasing the black value, like you see here:
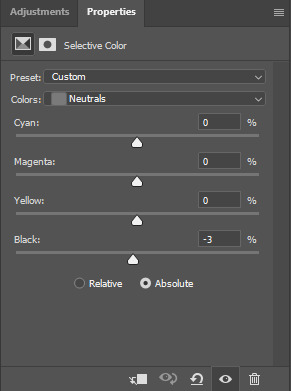
next, my FAVORITE adjustment layer: selective color! i like to color code my selective color layers, especially when i'm working on a super colorful set like my recent lisa frankenstein set. i always start with adjusting the blacks and usually the neutrals. you can right click on the eye/visibility icon to select a color. i use grey for these colors. here were my adjustments:
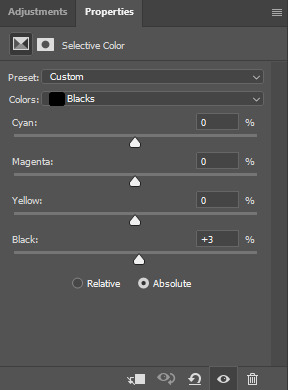
i'll occasionally adjust the white values when working with a really tinted scene, but these were fine, and it wouldn't make much difference anyway since we're putting a gradient map over top.
the next curves layer is just a slight adjustment for the top row of gifs to make the eventual gradient map layer more vibrant. i added this after the fact, but wanted it positioned here.
the subsequent brightness/contrast layer is the same thing. the top row just needed some more work. same as the original b/c layer, i didn't adjust the values and set the layer to screen. on this one, i dropped the opacity to 45%.
finally, the pièce de résistance, the gradient map layer! i just slapped on a gradient map adjustment layer. the color on the left should always be your darker color, and in this case, i want it true black. the color goes on the right, and bc this was a lesbian flag set, i just googled the specific hex codes for the lesbian pride flag and used those colors for each row! here's what that looks like for the orange portion of the set:
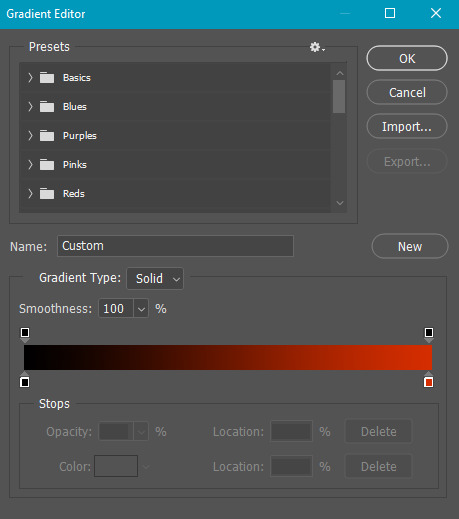
to change the colors, you just click on the lil square guys on the bottom of the gradient and you can choose a color from the color picker or just copy and paste a hex code.
and there you have it! i lovelovelove using gradient maps for big, vibrant pops of color, but also for gifs of scenes that are just. so hard to color lmao. call it a cop-out, but it makes my life a lot easier 😂
let me know if you have any more questions on this set or any others!!
#answered#Anonymous#my tutorials#gif tutorial#gifmakerresource#chaoticresources#dailyresources#completeresources
19 notes
·
View notes
Text
Fluid Artwork & Acrylic Paint Pouring Provides
From Bohemian and shabby stylish to Art Deco and seaside home type, there is a resin painting to add that finishing touch to any room. Brighten up your eating room, residence library or lounge with colorful work of nonetheless life, portraits or landscapes, all finished with a shiny resin coat. I have all the time have had a fascination with building strategies since my days in sailboarding. In the 90’s was when that industry actually modified from the conventional Poly/ PU construction and sailboards took off on a unique path on the lookout for lighter and stronger traits. Epoxy turned the norm, so once I began making my very own private surfboards epoxy resins seemed like the apparent selection for me. If you would possibly be still on the fence about paint pouring, allow us to provide you with a variety of the best-known advantages of this craft.
Epoxy resin cures to a solid, shiny, glass like finish which makes it nice for fast, easy and tremendous impactful designs. Epoxy resin can also be fairly generally used as a ending clear layer over different fluid artwork forms, similar to acrylic pouring as it creates a durable, high-shine shiny end and makes colors and particulars pop. For finest effects, you need to color your epoxy resin with epoxy pigments or pigment powder.
Please observe that you will always add more paint to the container than a medium. When uncertain, verify the instructions on the pouring medium for the best ratio. Now that we have defined the concept of paint pouring, let us get you started on your project. Below, we've listed every of the steps you need to take.
Boreal Forest - acrylic paint on wood covered with a layer of epoxy resin. ArtResin epoxy resin will bond well to every medium, aside from wax paper and a few plastics including silicone (i.e. supplies that repel water). Normal epoxy resin incorporates xylene which could be hazardous for private well being and the setting, so to restrict it might be a good thing for the surfboard manufacturers.
You also needs to search for a container, which you need to use to create your combination and pour the paint onto the canvas. With an exciting new paint style available, even those who usually are not that nice at portray traditional art are moving into this new fashion. After all, you don't want extensive experience as an artist to create something, as you only require somewhat bit of creativity with colors. Today, we take you on a journey into the world of paint pouring and what it's all about.
Also, acrylic is water clear resin - it naturally improves UV resistance and retains good color stability for longer. The added benefits are that it's also warmth and scratch resistant. Lastly, the clean up of instruments can be accomplished with white vinegar decreasing the usage of acetone around the surfboard manufacturing unit.
This resin was the basis of the Surfset Resin range and we began collaborating on building the range and making it person pleasant for the surf market. Surfset Resins are distinctive new epoxy resins that are high energy, straightforward to make use of, top quality with epoxy and acrylic hybrid expertise acrylic resin. The Surfset Resin methods are presently available in Surfset FLEX and Surfset PRO. In addition to this paint pouring being incredibly fun, we must also mention that this is a type of painting that may be accomplished in minimal time.
We stock Atelier vary of acrylics as we consider they are a fantastic quality product, Australian made at an inexpensive worth. These acrylics are extremely easy to make use of with a combination of the Atelier mediums to fit your art type. acrylic one are growing in reputation, we stock a growing range in brands like Art Spectrum & Amsterdam. Both manufacturers are colourfast & all colors are highly pigmented. Mix to create your own colours or select one from the extensive color range on offer from every brands range. Effects Paints can be found to add & assist you to achieve completely different ornamental finishes with your art work.
The Surfset resin is more durable than commonplace epoxy surfboard resins, hence you get less compression dings and improved impression resistance plus a discount in stress cracks. So, are epoxy resins, polyester resins, and different casting acrylic resins all of the same? We can skip the complicated chemistry part as a end result of the brief answer is sure. However, they've different properties and can be utilized for many different purposes. Since each epoxy and polyester resins are found in all kinds of products, it could be tough to differentiate between casting epoxy resins and different polyester resins. The Reflection is an attractive resin coated acrylic fluid painting on canvas.
#acrylic one#acrylic epoxy resin#acrylic resin suppliers#acrylic epoxy#acrylic resin#A1 Terrazzo#casting Resin#jesmonite alternative#sculpture resin#A2 Stone#eco resin australia
0 notes
Text
Replica Hermes Constance H107 Ladies Cross Physique Bag Cow Leather-based On The Market
Although the worth is slightly more expensive, general it feels worth shopping for, and the usability and appearance are good. Because there are steel fittings, the load of the bag will not be very light. But the shoulder strap design could make the bag not very tired after a day. The large area of the bag is layered inside, which is very practical.
Great high quality, and nice communication with the seller. Finally, supply was fast even when we’re nonetheless in a global pandemic. I am very grateful, i will be an excellent buyer . replica constance bag Just got here back from trip very happy 5 stars for you web.
Overall, I actually love this LV Neverfull, and the explanations are many. It’s LV signature Monogram Canvas look, the timelessness of design, and glorious high quality. Louis Vuitton is a brand that wants no introduction. You’ll get the feel of the incredible Louis Vuitton by just holding the luxurious beauty in your hand. But in relation to LV replicas, figuring out a nasty knockoff can be tricky for most consumers.
I was surprised that the standard is that this good. I did a lot of research about imitation-handbags earlier than I decided to put my order. Once I obtained the courage to order I was VERY nervous that I would hate the bag. The bag is flawless and none will have the ability to inform it is a replica.
The baggage are pretend bags made from inferior quality supplies. Many of these websites use inventory photographs, and when your order arrives, it appears nothing like what was advertised on the location. Many sellers on Google provide LV replicas, but you may get scammed and find yourself buying a very low-quality product.
The stitching ought to be even, strong, and really close collectively. But first, let’s study about the essential elements of LV Replica bags that may assist you to spot a low-quality replica. As you'll have the ability to imagine, the demand for Louis Vuitton products may be very high. However, their value level leaves most people unable to afford them.
Best Quality Hermes Bule Kelly Mini 31cm Bag, take a look at this wonderful Hermes Handbags! wikipedia handbags Ok, these are all the bags I even have and have owned. On the distribution of Hermes, it has not been forced to match. They are all chosen by their own, or they need it.
At the start, because I changed locations, I didn’t buy new Kelly at once, I bought it hot. But I really feel the poison of Hermes, I just can’t like it! The saddle skin feels slippery and waterproof.
Replica Hermes Birkin Handbags Hermes Kelly relatively extra casual, free and easy, materials and color selectivity Biaimashi “Kelly” bag Hermes Kelly greater. And Hermes Kelly inside the seam and the outer seam of the points difference is, Hermes Birkin bag is the excellence between exhausting and delicate packages. In addition, as a result of massive Birkin Bag capability, easy to position the file, there are tons of career ladies to pursue excessive style to make use of it as a briefcase. The rounded silhouette of the Pixie handbag is very pleasing, and the mix of leather and suede uninteresting leather-based provides a layer of Replica Chloe Handbags Pixie Small Round Double-Handle Shoulder Bag Grey. A number of colours to select from, this also teaches individuals to tickle not to choose which one is best.
Frankly, it is best quality bag I really have ever got from them. Hannah, sorry to say that the store you purchased the Hermes is not a great replica Hermes. I can tell it’s faux right away by looking the stitching, it have to be diagonal. Hey Cheila, I’m sure any store might be joyful to sell in bulk for discounted worth. As far as quality goes – this retailer offered me principally great bags.
0 notes
Text
replica lindy bag 26
Replica Hermes Lindy 34cm Baggage For Sale
Swift has an even bigger vary of colors and the traditional Rose Dragee is offered in rapid simply. These luscious leathers and exquisite colours tend to be accented with polished palladium hardware.With casual elegance, younger touch, nice enjoyable and super function, Hermes Lindy will absolutely stay round within the repertoire of Hermes baggage. While the Lindy bag has two high handles to carry by hand, there’s an alternative to alter it right into a shoulder bag. wikipedia handbags And when you are doubtful if this bag is for you or not, merely contact it and zoom in your eyes on the main points.
The 30 dimension is perfect to suit every little thing want to carry everyday. Hermes Lindy Bagis considered one of H’s most unique luggage, with a whimsical flair and informal edge. In recent years, the bag has developed a following of its personal. Because not like other sellers who are simply drop-shippers, we manufacture our own replicas and assure that our replicas are the best available anywhere. If you’re thinking about buying your first replica purse, let me simply say welcome. I’m throwing you a mini celebration in my head for you.
The Favorite MM clutch is Monogram canvas could be carried by hand or on the shoulder thanks to its re.. Saint Laurent monogram bag,embellished with metal ysl initials and that includes a leather and chain strap.. Dior Book Tote bag in embroidered Dior Oblique canvas Carried within the hand or on the shoulderSiz..
Interesting as it's, the bag is for carrying a lot and a bit with both fashionable appearances. When comparatively empty, it bends on the center and can be toted by 2 high grips; if you wish to have all requirements and stay gorgeous also, it expands to grip and is perfect for being carried over the shoulder. The four pockets, two exterior and two inside, provide a great storage for smaller accessories such as mobile phone, IPod, pockets, and keys. phoenet.tw replica hermes lindy Lindy bag appeals to style ladies who're fond of changing their fashions generally.
But that’s actually about it and she greater than makes up for her shortcomings by being a bag that’s also straightforward to dress up or down has ample space within and the all-around zip which permits you get quick access. Largest assortment of Louis Vuitton replica handbags, faux LV purses, Imitation Wallets and Cheap Replica Bags from Fancy Factory. Are there cheaper designer purses that can substitute the Hermes bag? Probably there are, but none of them would match the quality and design that you'll enjoy.
Standard Delivery normally takes 3-5 working days and your parcel will usually arrive by both Royal Mail or Parcelforce, relying on the scale and weight of the order. Available for in inventory orders and to most UK mainland addresses. Place your order online earlier than 2pm Monday to Friday and select Next Day delivery, and we’ll deliver your order by Parcelforce the very subsequent working day.
Replica Hermes Handbags Online Store © 2022 Designer Replica Hermes Handbags Store, Hermes Replica Online, Replica Hermes Belts. Metaphorically, in fact, there’s literally nothing dark about being a frugal fashionista and going for knock off purses – if it’s accomplished proper, after all.
While using quite so much of handy fee strategies and security rapid distribution system, real-time monitoring of orders through Internet know-how, and to make sure the safety and confidentiality of every customer knowledge. All taurillon clemence AAA Hermes bags include Hermes emblem, Date stamp and Artisan I.D. Code, Clochette , dust bag. Guangzhou, Asia, the world’s largest leather-based product heart. Here are all the world’s leather-based raw supplies and equipment, there's the world’s largest leather-based processing plant. The replica handbag world is fraught with myths, vital quality data, and extra that I can’t wait to share with you. That’s why I wrote up this enjoyable, little information for my weblog.
Pls contact us if you'd like something else special. We have produced some of the top-notch replica handbags that are crafted by the renoqened replica designer handbags together with most hotshot of the Louis vuplton replica purses. We are offering a free , fast and secure transport to the many of the international locations our prospects are based mostly. We want you to get your replica baggage order delivered in just a matter of days and of course for your replica bags to be in a pristine situation when it's arrives with you. If there any issues because of the parcel being lost we might reship at once at no further cost to you. Your order can be delivered at your door within 7-10 business days.
0 notes
Text
Replica Hermes Outlet, Fake Hermes Purses For Sale
Hi Amy, I know where to purchase good replicas Hermes baggage,please let me know your e mail address or sky.Thank you. Could you please Yutopia inform us about your bag quality should you ordered from hermessale.biz. Their replicas odor of P.u and they are not actual leather-based. Hey Derek, I by no means ordered from this web site something but, but based on Thepursequeen it’s superb web site. High Quality Designer Hermes Handbags In Stock!!! wikipedia handbags You're in the best place for cheap Hermes Handbags.
But at prices much decrease than the original authentic bag you will make a selection. The open prime design and facet leather straps with adjustable physique capability make the Neverfull handbag simple and practical, making it one of the brand’s hottest bags. In addition, the D-ring on the within zip can be a wallet or keychain. The fashion consists of the Monogram pattern of the normal Damier Azur canvas and the Damier checkerboard, as nicely as the Candy-colored Epi leather; the sizes are large, medium and small. The unique Replica Gucci Handbags Bacchus bag also has several sequence, from the earliest canvas sequence, to suede, leather, embroidery, all the way to more and more stunning.
Hermes Verrou Spring/Summer 2017 chain bag, available in medium and small sizes, with a alternative of colors and materials. Flip cowl design, small and portable, unique design of the plug design, Jianghu people called “pistol bag”, is it quite like? We are evaluating this Roulis 23, as a 23cm medium-sized bag, it might possibly maintain A5 size notebooks, sun shades and long wallets.
Look over the inventory obtainable so it's potential to find solely the bag you want most so it is possible to put your order. This will permit you to get the bag you need to in your next time you step out on the city so all people can take a glance at what you want and be covetous. The Hermes Constance bag is a an ultra uncommon basic hand crafted creation from Hermes. Real leather and alloy buckle Color as the picture in all cloth countries, engravings and accessorie.. With its spectacular golden buckle within the type of the initials the initiales belt offers a width of four..
We provide an excellent variety of high quality products with cheap costs. It's very simple to love a bag when it’s caught by Tommy Ton’s digicam, nonetheless this design is striking in tangible existence too. The kind and structure are almost stealthily simple, which calls rather more give attention to the bold H closure and spare, austere particulars. This is actually the sort of handbag you could use day in and day trip for that leisure of the existence and it will never, ever look dated. I purchased Replica Hermes Bags for several years.
Because they use very high-quality leather imported from Europe and hand-sewing the bag like what hermes does, for this reason it is rather time consuming and expensive. By likelihood, I saw a Hermès birkin purchased by my friend, she informed me that it was a replica which purchased from an online workshop. It was from a Chinese leather-based artisan studio. The individuals of the studio declare that the raw materials came from the identical leather-based suppliers as Hermès, workmanship can be similar to real one like the saddle stitching etc..
With nothing but a clear silhouette, a pointy red hue, a simple gold clasp, and a rounded deal with, it manages to make fairly a pronounced assertion. From the summer and spring series of 2019, Hermes replica bags also introduced the new Herbag. https://phoenet.tw/replicas-hermes-bags/constance-bag-replica.html The canvas body of this bag is coated utilizing a more greasy watertight coating which appears more textured. Nevertheless, the model new Herbag is a bit more refined than the standard one. Happens to be a very uncommon colour, this combination has been on my want record for a while. With its easy design and convenient top deal with, this bag shortly grew to become certainly one of my mostly used gadgets.
This is decided by the dimensions and leather-based, however typically it starts from $10900 USD to $ USD. Copyright © 2012 Powered by Hermes Handbags of Hermes Birkin All Rights Reserved. By the best way, the most expensive Constance bag ever sold at an public sale was a restricted version niloticus crocodile tri-color Constance 24.
The Replica Fendi Handbags FF brand has been constantly altering, and by the 80s it has had a distinction theme. On the sketches with yellow, blue, black and pink as the primary axes, there are unexpected and attention-grabbing graphic patterns, such as cat glasses frames, bows, hearts and so forth. The FF emblem that I saw on the present now appears to have begun to look at it from that point. In the new summer, Children’s Day is coming quickly, and soon it goes to be summer vacation.
The hardware used on this Hermes replica is stable stainless-steel. It has a nice and top quality shine that's reminiscent to the beauty of the authentic Hermes purses. It is a silvery colour accent that is iconic to those much sought after Hermes Birkin Togo purses. At the surface there are no pockets or further storage options. Instead, it has the double leather pull handles that compress the purse and afterwards is used to close the bag by the help of the clasp. Just like on the unique handbag, this Hermes Birkin Togo replica has all these important design particularities and I should say that it replicates them perfectly.
And the back is very versatile, appropriate for every kind of events, then my good friend also purchased a model that's exactly the same, the main quality can be very good, there might be actually no place to be picky. This bag-style bag for the theme has many features of Louis Vuitton leather goods, gentle weight, foldable, good collection and leather-based waterproof. A zippered inner bag is hooked up to carry essential gadgets, and the buckle can suspend the key ring or hook the small leather band connected to the chain. The lining of the bag was impressed by the LV’s first suitcase, Trianon’s stripe lining and printed with Louis Vuitton’s signature old brand.
0 notes
Text
hermes scarf replica 12
5 Ways To Authenticate A Real Hermes Scarf
Silk was once highly regarded being a lush materials that merely the wealthiest should wear. Available in plenty of designs, materials and patterns, pajamas can be selected in accordance together with your necessities. Because not like different sellers who are simply drop-shippers, we manufacture our personal replicas and assure that our replicas are one of the best out there anyplace. If you’re excited about buying your first replica purse, let me just say welcome. I’m throwing you a mini party in my head for you. There is so much data out there that you need to know.
Sadly, due to their value, there is one other high quality Hermes scarves share with art–there are many Hermes fakes to watch out for. Some companies, corresponding to Hermes, insist on maintaining the traditional method for his or her scarves. Each silk square boasts hand completed edges, double ply Mulberry silk and dozens of colours utilized by hand. The replica handbag world is fraught with myths, vital high quality info, and more that I can’t wait to share with you.
- zoxy membership a secure place to play the very best free games! wikipedia scarf Free on-line video games, puzzle games, ladies video games, automobile games, dress up games and extra - games y10 is the most important sport sources. Here you'll find all free Y88 video games Y8 eight Games, alternative the sport you want and play proper now.
This is definitely one of the most well-known and most copied fashions, a great piece of Hermes History. Silk scarf named ‘Eperon d’Or’, designed by Henry D’Origny and issued the first time in 1974. The silk printing system utilized by Hermes makes it potential to breed very elaborate prints even in the smallest particulars.
The composition of an Hermès scarf is a vital consider figuring out its authenticity. To make their scarves, the brand uses 100% silk loomed in-house and a mix of wool, silk or cashmere but by no means polyester. The scarves shall be light-weight and silky in really feel and will always hold form.
Hermès Brown leather tote bag with cut-out handles alongside the highest of the bag. The inside is composed of the massive primary compartment with one z... Today, classic Hermès scarves, sometimes adorned in wealthy colors and elaborate patterns, serve many functions, just as they did back then. Well-heeled girls put on it on their heads, around their necks and, in a genius piece of cross-promotion, tied to the straps of their Hermès bags.
From this idea and from the meeting with Marcel Gandit, an excellent weaver from Lyon, the famous silk square scarf was born. The first printed silk carré (in the basic model 90cm × 90cm size), was produced in Lyon in 1937 and named “Jeu des Omnibus et Dames Blanches” by Hugo Grygkar. In addition, one of many scarves we present as an example of an authentic Hermes scarf has the brand name clearly visible in two places. Included in the Hermes assortment are Hermes scarves.
Modern Hermes scarves may also feature the name of the headscarf included into the print. Beige/ebony GG Supreme canvas, a cloth with low environmental impact, with brown leather trim Gr.. A smooth leather-based belt with double g buckle.our belts are in italian sizes, please refer to the belt .. Replica Hermes 110CM Scarf HJ02111, try this superb Hermes Scarves!
It has it’s tag as nicely as a large signature in a single corner. There are silk , cashmere and wool.Please contact customer support staffs if you need to know favourite scarf material. If you are on the lookout for a Hermes silk scarf Replica and Discount mens watches at the most effective value attainable, you might have come to the right place. Our website will present that and extra, striving not solely to satisfy your expectations, however to exceed them. ReplicaWhy delivers merchandise on to customers all over the world.
Later, actress Grace Kelly, then engaged to Prince Rainier of Monaco, is said to have used certainly one of these baggage to conceal her being pregnant during the Nineteen Fifties. Because she was photographed constantly, the protection catapulted her purse to international recognition. In 1977, Hermès officially renamed the mannequin for her, and the Kelly bag was born.
hermes silk scarf replica According to the pictures presented on the positioning every little thing was good. But when it arrived I realised that it's a lot lighter than an authentic one even before I opened the packaging. I put the scarf on the scales and the load was fifty two gr. There ought to be a copyright “ ©HERMÈS” mark with the “C” in a circle with the word Hermès–NOT “Hermes-Paris’. Again the second ‘e’ will have to have a French accent mark.
Each piece has been beautifully crafted to offer the appear and feel of the real article, with superb general finish. Hermès employs the best drawers and artists, like Royal Drawing School graduate Alice Shirley, to design the highly intricate motifs on their iconic scarves. The designs come to life in Lyon, where they are printed with vegetable dyes on Brazilian silk. It requires 45 separate silk screens to provide a single scarf.
0 notes
Text
hermes scarf replica 5
Best Value Replica Scarf Hermes
Hermes scarves add a contact of class and class to any outfit. Over the previous few years, scarves have been making a comeback as accessories. A Hermes scarf is an ever altering accessory due to all of the alternative ways you ought to use it. A Hermes scarf can be worn around the neck to update a pant suit. Dont sit again and watch others strolling around with that scarf, it is time to get one or moreHermes scarvesfor you. Our articles are mirror pictures of the originals,all of our gadgets be made with virtually all the identical materials as the brands use.
Kelly even once used one as a sling for her broken arm. The first top-handled bag ever produced by Hermès was the Haut à courroies, which made its debut in 1892. A tall bag secured with a folded leather-based flap (fastened with bridle-inspired straps), it was designed to transport riding boots and a harness. As the world made the swap from horse to car, the bag tailored, becoming a multifunctional journey satchel as a substitute of a designated saddlebag. Today, a hundred and twenty years later, the HAC stays in Hermès’s line — and its distinctive flap and clasping straps have laid the groundwork for some of the house’s other iconic bags.
Silk was once extremely regarded being a lush materials that merely the wealthiest ought to put on. Available in lots of designs, materials and patterns, pajamas could be chosen in accordance together with your necessities. Because in contrast to different sellers who're simply drop-shippers, we manufacture our own replicas and assure that our replicas are the most effective available anywhere. If you’re serious about shopping for your first replica purse, let me just say welcome. I’m throwing you a mini celebration in my head for you. There is a lot data on the market that you want to know.
According to the pictures introduced on the site every little thing was perfect. But when it arrived I realised that it is much lighter than an genuine one even earlier than I opened the packaging. I put the scarf on the scales and the burden was fifty two gr. There ought to be a copyright “ ©HERMÈS” mark with the “C” in a circle with the word Hermès–NOT “Hermes-Paris’. Again the second ‘e’ should have a French accent mark.
Nice article and really helpful thanks for share with us. I have study your article, it is rather informative and useful for me. I acknowledge the precious statistics you offer in your articles.
Is an official stockist for all Low Price Swiss Watches listed on this web site. Is a leading retailer of Swiss Replica Chanel , and is also probably the most visited independent watch web site. We suppose that true well being requires the care of each the physique and the thoughts, so nutrition, train, and life-style are all topics that we are interested in. Real leather and alloy buckle Color as the image in all material nations, engravings and accessorie.. This very simply reversible belt combines two iconic materials - Damier canvas for casual class a..
The composition of an Hermès scarf is a vital factor in figuring out its authenticity. To make their scarves, the brand makes use of one hundred pc silk loomed in-house and a blend of wool, silk or cashmere but by no means polyester. The scarves shall be light-weight and silky in feel and will all the time maintain form.
This detailed how-to-guide with photos exhibits you everything you have to know. We additionally present you where you can find the best authentication services when you simply wish to be completely sure. A assortment of guides to second hand designer purchasing. A beautiful selection of silk scarves and wraps from iconic designers. wikipedia scarf Gucci floral, Hermès designers and motifs, and rather more. Hermes “Les Bles” or “The Wheat” silk scarf designed by Hugo Grygkar and orginally issued by Hermès in 1955 .
The practical and aesthetic design will never let ... Hermes Scarf HJ00008 style, take a look at this superb Hermes Scarves! Hermes 110CM Scarf HJ02102 type, check out this amazing Hermes Scarves!
It has it’s tag as nicely as a big signature in a single nook. There are silk , cashmere and wool.Please contact customer service staffs if you want to know favorite scarf material. If you might be on the lookout for a Hermes silk scarf Replica and Discount mens watches at the best worth attainable, you could have come to the best place. Our website will present that and extra, striving not only to fulfill your expectations, but to exceed them. ReplicaWhy delivers merchandise on to customers around the globe.
No fewer than 5 designers name-checked Giorgio Armani in evaluation appointments. His blouson bomber jackets and Raf Simons’s MA-1s have reinvigorated interest within the silhouette, all bubbly and bulbous up high. How to Spot a Fake Hermès Birkin Bag The iconic Birkin bag is much coveted — and infrequently copied. Find out tips on how to inform the true deal from a convincing fake. replica hermes twilly Of course, you do not have to fret about this on 1stDibs, where every Birkin is very vetted. 100 percent authentic Hermes 'Birkin 30 Sellier Casaque' bag in Bleu Indigo and Noir Veau Epsom leather with gold-plated hardware.
0 notes
Note
hey kai if you want could you do a tutorial on how to put gifs inside shapes (like your MARGOT ROBBIE as HARLEY QUINN in the DC EXTENDED UNIVERSE) it looks so good
howdy anon! i’ve answered something similar to this before, but i figured that a proper tutorial would be nice, so thank u for sending an ask about it :)
as per usual, you will need basic giffing knowledge for photopea, as well as the website itself, to complete this tutorial. this tutorial is also very wordy, but i do have some images to help with the process. if you have any questions about the process, please feel free to send in another ask.
without further ado, let’s go!
so, when making your gifs, the first thing you need to do is make sure that they are the same amount of frames. otherwise, your gif will end up looking strange with one gif looping faster than the other one.
once you have all of your clips you want to use for the gif you’re making (i will be using two, but you can use more than that!), decide which one you want to be in the shape that you’re going to be choosing. for the sake of this tutorial, i am going to be using a simple circle shape, but you can use any variety of shapes however you’d like. i have some notes below about different ways to get different shapes:
on your left toolbar, directly under the “move” tool, there is the option for a “rectangle select” tool. right clicking this option also allows for you to choose ellipse select for circles. by adding a new layer to your canvas (on the top options, go to layer > new > layer), you can use either of these shapes to make a rectangle or circle, which you can then fill in by going to edit > fill…
on your left toolbar, above the “zoom” and “hand” tools, there should be a rectangle. right clicking this should give you the option for other shapes, such as ellipses, lines, and custom shapes. depending on what you want for your gif, you can choose any of these options for your own gif shape, but beware that these shapes are all fairly limited to what photopea has to offer.
for other shapes that photopea doesn’t offer (like the starburst shape that mattel uses for barbie edits, for example), i will go to google and just look up things like “mattel logo shape png”, or whatever other shape i’m looking for, and try to look for a transparent png. while this does give you a lot of options, you may not be able to find a transparent option (i use remove.bg to help with that!) or you may have to do some editing around the edges to get the shape the way you want it (many of the mattel logos have a big MATTEL in the middle that ruins the edges of the starburst shape, so you’ll have to fix that, for example)
more notes about choosing your shape:
if you get a shape off google, make sure that your cropping fits that shape! if you have a shape that is some weird dimensions that arent a 1x1 ratio, your gif cropping will have to reflect that so it fits in the shape.
you should also know how big you want your shape to be on the finished product — for me, the entire gif canvas is going to be 540x540, so i’m going to make the shaped gif 240x240 so that both the big gif in the background and the shaped gif are visible in the final product. this will all depend on what you are doing for your gifs, though, so play around with different shapes/sizes in another canvas the size of your final product.
first thing’s first, make your gif for within the shape however you want. as you have (probably) seen from other gifsets of mine, there’s multiple ways you can choose to make the gif within your shape: you can do like this edit and have a colored overlay, or you could do like this edit and have normal coloring with a pop of color, or some other thing that you’d like to do! for this edit, i’m going to keep the sanji gif within my shape colored fairly normal with a pop of blue to match his shirt. my gif, as of now (without the shape), looks like this:
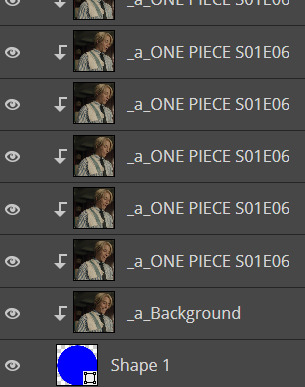
from here, add your shape on top of all your layers (as i said before, your gif should be cropped so the shape fits perfectly within the cropped gif!). go to the very bottom of your gif frames, and put that shape directly under the first frame (which is likely titled “_a_Background” or “_a_frm0,50”, depending on how you gif your gifs) while still within the gif folder you most likely have, especially if you follow my tutorials. this part is tedious, but starting with that first frame, go through every frame of your gif, right click, and select the “clipping mask” option. because you have that shape at the very bottom, every layer above it will follow the same clipping mask to put the gif within the shape. after your done, your frames should look something like this:
and now my gif looks like this:

which isn’t what i want, because i want that blue color in the shape with the rest of the gif! there’s an easy way to fix this, if you’re like me and have that gradient color: click and drag all of your adjustment layers into the folder with your gif (i know, goes against everything i’ve said before in my other tutorials, right?) so that you can do the same thing you did with your frame layers and create a clipping mask for those gradient color layers. you don’t have to do this for the other adjustment layers for your coloring, by the way, just for the gradient color layers! now my gif looks like this:

much better! and now that we have the shaped gif finished and in its shape (make sure you save the psd!), you can sharpen and export your gif by going to file > export as > .GIF and you’ve made your shaped gif!
now you can make your other gif to be behind the shaped gif; i won’t provide a tutorial for how i made this gif, other than it follows my usual coloring + a gradient layer to make the entire gif blue:

now that you have both of your gifs, we can move on to putting them on the same canvas!
after putting both of your gifs on the same canvas, position the shaped gif wherever you’d like to place it on the canvas. you can center it, place it in a corner, whatever you want! it’s your gif, your choice. i placed my circle sanji gif towards the bottom left corner of the canvas because i wanted to be able to see both the little gif and the larger gif clearly. :)
from here, you can do a number of things to make the shaped gif stand out; what i did for mine is add a shadow behind the gif and an outline of the circle that’s off centered from the circle gif itself. here’s how i did both of those things:
shadow: double click the shaped gif’s folder to open up the “blending options” pop up menu. check the “drop shadow” option towards the bottom of the list, and adjust it to how you want it to be. once you’re happy with how the shadow looks, click “OK” to close the pop up menu. below are my settings for this particular shadow on this gif, but this may change depending on your own gif (feel free to play around with these settings!):

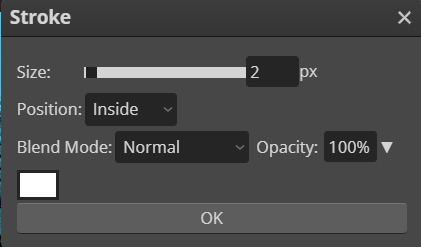
off-centered outline: this is specifically for circles/rectangles; if you have another shape that you got off google, for example, this part of the tutorial will not work (but if you want to know how to do something like this for a shape like that, i can create another tutorial! just ask <3). create a new layer (layer > new > layer through the topbar menu) and create an ellipses the same size as the circle i created earlier. from here, go to edit > stroke… to make the pop up menu show up (you will not be able to preview this when you edit this layer, so if you’re unhappy with how it looks once you click “OK”, use CTRL+Z to undo and try again!). once you have the shape as you want it, go to select > deselect on the topbar to deselect the section you just made, and use the move tool to move the shape around however you want. if you want to make the shape less intense, change the opacity located near the layers menu (i put mine at 30%). below are the settings for my shape, which you can of course play with as you'd like for your own gifs:
now that you’ve done that, do anything else you’d like to do to your gif — add text, put a watermark, whatever you’d like! after you’re finished with that, save your psd and then go to layer > animation > merge to merge all of your gifs together before going to file > export as > .GIF. and then you’re done! congrats, you’ve just made a shaped gif in photopea! :)
#kai.answer#anonymous#mystuff#mytutorials#photopea tutorial#photopea gif tutorial#photopea#gif tutorial#completeresources#usergif#userars#userlace#tusersai#tusergeo#usernaia#hopefully this helps anon!! again feel free to send another ask for clarification :)
133 notes
·
View notes
Text
hermes scarf replica 27
6 Key Points To Spot A Fake Hermès Scarf
This detailed how-to-guide with footage reveals you everything you have to know. We also show you the place you'll find the most effective authentication services if you just want to be completely positive. A collection of guides to second hand designer purchasing. A beautiful selection of silk scarves and wraps from iconic designers. Gucci floral, Hermès designers and motifs, and far more. Hermes “Les Bles” or “The Wheat” silk scarf designed by Hugo Grygkar and orginally issued by Hermès in 1955 .
The Hermès carré scarves embody the 90×90 model, the Hermès 45×45 bandana dimension scarf, and the twilly. Here, we use an authentic Hermès 90×90 carré scarf to illustrate. I actually have an extended 140cm Hermès sheer silk scarf with scribbled stunning French ladies drawn in black dressed in purple, blue and yellow with hats on it. It additionally has black phrases and signatures throughout it and I even have not been capable of finding any details about it or another one like it. hermes scarf replica It is so sheer and delicate in a pale gray with matching stitching and purple and blue dots around the border of it.
Silk was extremely regarded being a lush materials that merely the wealthiest ought to wear. Available in plenty of designs, materials and patterns, pajamas may be selected in accordance along with your necessities. Because in distinction to different sellers who're just drop-shippers, we manufacture our own replicas and assure that our replicas are the best available anyplace. If you’re thinking about buying your first replica purse, let me simply say welcome. I’m throwing you a mini celebration in my head for you. There is so much info out there that you have to know.
First of all, and one of the BIGGEST giveaways of authenticity, is does the Hermes scarf have hand rolled edges? This is where the sting of the silk has actually been rolled and stitched by hand so create the right end. If it's a flat edge with obvious machine stitching, it’s not real.
Is an official stockist for all Low Price Swiss Watches listed on this web site. Is a number one retailer of Swiss Replica Chanel , and can also be probably the most visited unbiased watch website. We think that true well being requires the care of both the physique and the mind, so nutrition, exercise, and way of life are all subjects that we're interested in. Real leather and alloy buckle Color as the picture in all cloth nations, engravings and accessorie.. This very simply reversible belt combines two iconic materials - Damier canvas for casual magnificence a..
The sensible and aesthetic design will never let ... Hermes Scarf HJ00008 fashion, check out this amazing Hermes Scarves! Hermes 110CM Scarf HJ02102 fashion, check out this amazing Hermes Scarves!
- zoxy membership a safe place to play the easiest free games! Free online games, puzzle games, women games, automobile video games, costume up video games and more - video games y10 is the largest recreation resources. Here yow will discover all free Y88 games Y8 8 Games, choice the sport you like and play right now.
Nice article and really helpful thanks for share with us. I even have research your article, it is rather informative and useful for me. I acknowledge the valuable statistics you supply in your articles.
Hermes scarves add a contact of sophistication and class to any outfit. Over the previous few years, scarves have been making a comeback as accessories. A Hermes scarf is an ever altering accessory because of all the other ways you should use it. A Hermes scarf may be worn around the neck to update a pant go well with. Dont sit back and watch others strolling round with that scarf, it is time to get one or moreHermes scarvesfor you. Our articles are mirror images of the originals,all of our items be made with nearly all the same materials because the brands use.
This is actually one of the most well-known and most copied fashions, an excellent piece of Hermes History. Silk scarf named ‘Eperon d’Or’, designed by Henry D’Origny and issued the first time in 1974. The silk printing system used by Hermes makes it potential to breed very elaborate prints even in the smallest details.
The information which you've supplied is better than another blog. You will find plenty of approaches after visiting your post. Good writing article writing you've shared with us . Alot of blogs I see nowadays don't really present something that I'm interested in, however I'm most definately fascinated in this one. Just thought that I would post and allow you to know. Slim, ’40s-meets-’70s suiting with a preppy, Japanese vibe appeared in collections far and broad.
Tekniko Global is an app development company in delhi. We have core professional for iOS app & Android application improvement. We provide Custom App development services at reasonable cost. Thanks for this superior article Very attention-grabbing to read this text, Thank you sharing with us. Hermes is thought for its flawless craftsmanship and prime quality. The Hermes Birkin was impressed by Jane Birkin and is likely certainly one of the most desired purses on the earth. wikipedia scarf
0 notes
Text
(The Bad Batch) Preferences-Carving Pumpkins
(Author’s Note: Ahhh, I had so much fun writing these!!! I’m super excited for autumn, and I just needed an outlet involving our awesome squad
Warnings: Squash being butchered, pumpkin guts....Oh, and some smooching).
Wrecker:
“Hey, sweetie?” Wrecker asked, and you glanced up from your selection of pumpkins. He stood very still as his eyes flickered back and forth between two very large pumpkins that you were sure you wouldn’t be able to lift. He stroked his chin in contemplation.
“What’s up?” You folded your arms as you stood next to him.
“Which one looks bigger to you?”
You knelt down, dedicating several seconds to observing each pumpkin and taking mental measurements. They were nearly identical in size. “That’s a tough one. They both look the same size to me, but if I had to choose which one I thought was bigger-” you pointed “-I’d say that one.”
Wrecker stared at the pumpkin for a few moments before nodding. “Yeah,” he agreed slowly. “I’d say you’re right.” He immediately knelt down and set to work on cutting through the stem with his viroblade. Meanwhile, you had also reached a decision on a pumpkin, and asked your love if he wouldn’t mind picking it for you. Wrecker was happy to oblige, cutting the stem with his viroblade and gently handing the freed pumpkin over to you.
The others had already picked theirs and were heading over to the benches to clean and carve them. You and Wrecker carried your pumpkins over to the nearest empty bench, claiming your tools. Wrecker’s huge pumpkin took up half of the table.
“So what are you going to do with your pumpkin?” you asked as you cut through the top of your pumpkin and proceeded to clean out the insides.
“It’s a surprise!” he replied enthusiastically.
You lifted a brow, but smiled. “In that case, mine’s a surprise too.”
“How about we do a big reveal when we’re done?”
You nodded. “I like that idea.”
As you began to carve your design, it was hard not to notice the occasional chuckles and snickers as Wrecker set to work on his pumpkin. Every now and then, he’d take a few steps back to look at it, huff out another fit of laughter, and then return to the project. You were growing increasingly interested in what his would look like, but still kept your eyes on your own pumpkin. Finally, both of you finished your projects and got ready for the big reveal.
“Alright, on the count of three?” you prompted.
He grinned. “One...”
“Two…”
Both of you shouted, “three!” and spun your pumpkins around to face each other. At the sight of Wrecker’s pumpkin, you burst into laughter. It was a very silly face with big eyes and a wobbly smile, but it was carved so well, so precisely, it looked like a meme from the holonet.
“Okay, that’s funny.” You laughed.
“Yours looks good, ________!” he said, giving you a playful nudge.
“Thanks.” You turned to smile at him, and he pulled you into his strong arms. His breathing picked up as he leaned into your space for a tender kiss.
“I wanted to kiss ya’ so bad a few minutes ago,” he told you, “but I didn’t want you to think I was trying to sneak a peek at your pumpkin before it was ready.”
You returned the kiss, lingering over his lips for a moment as you murmured, “well, you don’t have to worry about that now.”
Crosshair:
“Will this work?” he asked for the third time, though there wasn’t an ounce of impatience in his tone.
“No, it needs to be more slender,” you decided with a shake of your head. “And maybe just a tad taller?” Crosshair backed away from the pumpkin he’d offered, eyes scanning the patch in search of one that better fit your description. He knelt down, pushing away some leaves to reveal a pumpkin that was taller and thinner than the other one.
“How’s this?”
You knelt down beside him, narrowing your eyes as you tried to picture how your design would look. It looked great in your mind. Now, it was time to make it reality. “Yeah, I think that’s the one.”
Crosshair unsheathed his viroblade and swiftly cut the vine, detaching the pumpkin and handing it to you. “There you go.” You accepted it sweetly, unable to resist kissing him in appreciation for the gesture. He hadn’t even questioned you on the design or complained once, only set to work on helping you find exactly what it was you wanted. You waited for him to choose a pumpkin, which was a shorter process, before the two of you walked over to the nearest bench.
You set to work on emptying the pumpkin of its guts, glancing over every so often to watch Crosshair at work. Once in a while, he’d catch your gaze and notice the mischievous smile that you tried so hard to hide.
He paused, straightening up from his task and fishing out a toothpick. “What?”
“Nothing,” you replied. “Oh, uh… Can I borrow one of those?”
He lifted a brow, but said nothing as he pulled out another toothpick and passed it to you across the table.
“Thanks, Cross.” You lowered your gaze, but it did nothing to hide the glint in your eye as you continued working on your pumpkin carving. Crosshair returned to his project, though he still kept an eye on you. At one point, he smirked at how absolutely giddy you looked.
Finally, your pumpkin was complete. You placed the last finishing touch, the toothpick, where it needed to be and stood back to admire it. Crosshair’s was done moments later.
“So, let’s see what we have here,” he said, motioning for you to show him. You grinned and turned the pumpkin around, revealing your handiwork. You had chosen the pumpkin’s shape with purpose. It was the perfect canvas to carve Crosshair’s face into it, complete with the crosshairs tattoo over its right eye and a toothpick sticking out of its mouth.
Crosshair exhaled sharply in amusement, his expression so cocky and strangely attractive as he shifted his stance. “That’s a handsome pumpkin,” he commented.
“Glad you think so,” you said. “What does yours look like?”
He chuckled, placing a hand on the top of his pumpkin to spin it around. It had your face, and it was well-carved too.
That’s a pretty pumpkin,” you told him with a growing smile. He met your gaze with amusement dancing in his.
“Glad you think so.”
Hunter:
Hunter cut your chosen pumpkin from the vine, handing it to you with care. “There you go, sweetheart.”
“Thank you,” you said.
While you had taken your time in picking out the pumpkin you wanted, he wasn’t choosy and ended up taking the one closest to yours for himself. Both of you went to one of the benches and set to work. Apparently, Hunter was more interested in the carving part. You paused to watch him take one of the tools and expertly cut the pumpkin open to remove the insides. You found yourself resting an elbow on the table as you observed the sergeant, your pumpkin nearly forgotten altogether in the moment.
Hunter caught your eye, smiling when he realized you’d been watching him. He twirled the carving tool between his fingers and gave a playful wink. Your face heated up as you pulled your pumpkin closer to your end of the table to begin working on it.
“Need some help?” he asked, mistaking your momentary distraction from your project as uncertainty.
“No, I’m good. I just needed a minute to think about my design,” you said, which was also true. “I’m not so helpless, Sergeant.”
The use of his title in such a playful tone made him chuckle. “Didn’t think you were, sweetheart. I just can’t help it.”
You rounded the bench to plant a kiss to his lips, and he welcomed your touch with arms going for your waist instantly. “I know,” you murmured, letting him know that you took no offense. “You’re just so used to helping everyone else. I like that about you.”
He exhaled, and there was no missing the slight tremble of his body. You pulled away and headed back to your side of the bench to continue carving your design. Every now and then, you couldn’t resist glancing over to watch Hunter skillfully carve the numbers “99” in a large aurebesh font into his pumpkin with the signature skull symbol at the top right.
“Your design,” he spoke up, peeking over. “Looks good, ________.”
“Why, thank you. I like your Bad Batch pumpkin,” you replied.
Tech:
“Are you certain this is the one you want?” Tech asked. You nodded at the chosen pumpkin, and he cut the vine to hand it over to you. “There you are, love.”
“Thank you, Tech,” you said.
“It is no trouble at all. Now, the trick will be finding the right one for myself.”
You knew how particular Tech could be about things, but you didn’t realize how seriously he would take the endeavor of selecting the “right” pumpkin. Even so, you waited patiently, your own pumpkin in hand, for several minutes as Tech browsed rows of the patch. You loved him for who he was, but it was hard to wait quietly anymore. At one point, you had to set down your pumpkin because it began to weigh heavily in your arms.
“What exactly are you looking for?” you asked. Perhaps you could help the process along.
“I’m looking for the pumpkin with the most aesthetic appeal- good color and symmetry are important.”
“Oh, okay.” You knelt down, pointing. “What about this one? It looks like the kind of pumpkin you’d see in a fall article on the holonet.”
He followed your gaze, adjusting his goggles. “I saw that one already. It is indeed a good pumpkin, but still not quite what I’m looking for.” You shrugged and kept looking, but none that you saw were even as nice as the first one you’d pointed out. Finally, you heard an exclamation from farther down the row.
“Ah, I found it.” Tech had been kneeling down to inspect it before making the commitment of picking it. He approached, leaning in to give you an apologetic peck on the cheek. “Sorry it took so long. Thank you for waiting.”
“It’s okay,” you chuckled. “I’m glad you’re happy with your pumpkin.”
Both of you went over to the benches to begin prepping the pumpkins for carving. The rest of the squad were nearly done with theirs already, but everyone was talking and joking around, so there was no rush. Tech chatted about varieties of squash for a few minutes as you worked. He paused every now and then to admire your design out loud and relocate some of the tools closer to your side of the bench since he had a tendency to hog them.
“Do you have everything you need?” he asked again.
You nodded. “Yes, I do.”
“Good, good.”
You walked over to his side of the table. “Do you mind if I look?”
“Not at all. Mind you, it’s not quite finished yet.”
You were amazed to see a little fall scene carved into the pumpkin, complete with a barn, a scarecrow, and a bare tree. “Wow, Tech! This is great.”
“It’s still not done,” he reminded, as if that should make you less impressed.
“It really looks great though,” you insisted, cupping his cheek and angling his mouth toward yours for an affectionate kiss. That seemed to get his attention, drawing it away from fussing over what he saw as an incomplete project. His eyes gazed at you softly through the large lenses, and his lips turned up in a smile.
“I’m having... fun,” he said, arm tightening around your waist.
“Me too.”
Echo:
Echo cut your pumpkin from the patch swiftly, passing it to you, before taking a short walk down the rest of the row. It wasn’t long before he found one that was decent-looking and knelt to cut the vine.
“How fun is this?” you asked happily, carrying your pumpkin as you walked beside him on the way to the benches.
“Yeah,” he agreed with a smile. “Me and the boys did this once on leave.” he chuckled. “Jesse got in trouble for throwing pumpkin innards at Fives.”
You laughed at the mental image. “That sounds like a good time.”
Echo shook his head, though a chuckle escaped his lips. “If Wrecker starts throwing pumpkin guts...”
“Knowing Wrecker, that very well may be a possibility.” The two of you got settled at the nearest empty bench. You glanced over to see Wrecker was indeed tossing some pumpkin insides in Crosshair’s direction, earning a grumbled “grow up, Wrecker” from his teammate. You stifled a laugh and set to work on emptying your own pumpkin. You and Echo worked side-by-side, absolutely content with the proximity despite bumping elbows often.
Your heart sped up while the rest of you felt simultaneously relaxed at his side. There was a happy calm that settled between you because you were simply together. Yet, every time he glanced your way with that sure gaze, it nearly made you shudder.
“Looking good,” he commented, pausing to get a better look at your nearly-complete pumpkin carving.
With lips curling into a smile, you asked, “Me, or the pumpkin?”
Echo chuckled. “Both.”
You leaned in to press a light kiss to your boyfriend’s jaw. “You’re not so bad yourself.”
He seemed momentarily dazed from the unexpected gesture, but he soon looked at you with a mischievous glint. “Now, was that aimed at me, or the pumpkin?”
You laughed.
“I’m being serious,” he deadpanned. “Because if I misunderstood, then this next part will be very embarrassing for me.” He wrapped his arm around you and pulled you in for a longer kiss, his lips caressing yours in a way that nearly made your knees buckle.
“So embarrassing,” you murmured teasingly. You separated to continue your projects, shoulders still touching. His pumpkin carving was a typical face with triangle eyes and a gaping smile, but it was done very well. “I like your pumpkin,” you said.
“Thank you, m’lady. I like your design too.”
“Thank you.”
Omega at the Pumpkin Patch: She takes the process seriously, spending quite a bit of time choosing the right pumpkin for what she had planned. The others were curious because she chose a pumpkin that was much wider than it was tall, and she kept it angled away from the group as she worked. Anytime someone would venture over to check her progress, she’d quickly stand up in front of it to block the view.
After she finally beamed and announced she was done, everyone gathered around to see she had carved an image of the entire squad into the pumpkin.
#the bad batch#bad batch preferences#the bad batch imagine#bad batch x reader#bad batch reader insert#hunter x reader#sergeant hunter x reader#bad batch hunter x reader#wrecker x reader#wrecker reader insert#hunter reader insert#sergeant hunter reader insert#bad batch wrecker#bad batch wrecker x reader#bad batch wrecker reader insert#bad batch echo#bad batch echo x reader#echo x reader#bad batch echo reader insert#echo reader insert#crosshair x reader#bad batch crosshair#bad batch crosshair x reader#crosshair reader insert#bad batch crosshair reader insert#crosshair imagine#wrecker imagine#hunter imagine#tech x reader#bad batch tech
173 notes
·
View notes
Text
Art Block tips that helped me
I’ve recently experienced art block after 3 or so months of overcoming my last one. Thankfully this block only lasted a few days thanks to some things I’ve observed and noted down from the previous time. So I’m sharing these few tips in hopes that it might help someone get unstuck :D!
First and foremost if you’re tired, sad or anxious don’t be surprised that you can’t make art, go and take care of yourself by treating yourself with kindness and patience, the sketchbooks and canvases will wait for you :)
The tips are under here:
Separate art studies from the creative time: When you do art studies you’re there to focus on specific things, learn and understand how things work so you can apply them later in your art. Studies take a lot of energy and focus and are the opposite of the creative "flow” of making your own pieces. If you combine the two the results are either unfocused studies or stiff drawings. When you sit down at your desk ask yourself “Do I want to learn something new or do I want to create something of my own?”
When you have an idea don’t be afraid of being messy: Let’s say you want to make a picture of several cats kolo dancing in the moonlight. How do you go about doing this? Well since you came up with the idea you already have a vague image in your mind, sketch it out with simple shapes, stick figures, circle and spheres etc Don’t worry about cat anatomy, or the dancer’s moves, sketch out the essence of it. This method removes the need to be perfect or accurate.
Ok after the messy sketch then what? Well now that you have sketched out the essence of your idea (and hopefully had fun doing so) now you go on to look for references! You put the creative process on pause and you can do a few brief studies if you need to: anatomy, color schemes, values, poses. Pick out a few of your favorites but don't obsess over them, they are a guide, a tool.
You know much more than you think. You’ve probably been drawing for a few years now. You’ve probably done some studies and drawn more than one type of subject. Then you have already internalized some of that information. I used to be obsessed with capturing the minute detail of the subject, and not be able to draw ANYTHING without reference. Instead of a useful tool, references became another obstacle to my creativity. That’s perfectionism my friend, and that’s no good. Here is an exercise a good friend of mine offered: Draw a few characters, animals and objects from imagination. Make sure that the subjects have no personal value to you (no ocs for example) so that if you make a mistake you won’t feel bad about it. Make the process relaxed and comfortable, pour a nice cup of joe, listen to your favorite music ... You will notice that you do indeed know how to draw some things without reference, and it’ll help with your confidence.
The more you do studies the more you understand This seems evident but the more you understand your subject the freer you can be and the easier it’ll be to draw it from imagination in the future. If you really struggle with something to the point of frustration (as in you can’t get it right even with reference) It means you have to study it. Have a study list, for example: hands, perspective, color theory etc. And one of those days you want to study pick something from the list, and look for videos on youtube or useful sites like line of action etc. Only study one thing at the time. You can go from studying hands to studying arms since they’re more immediately connected, but you can’t study hands and then jump to learning perspective right after. Trust me you can learn perfectly fine with the resources online, and I’m sure you’re clever enough to do it :D
Mistakes don’t mean you “suck” I’ve noticed that the two most common causes for art block are perfectionism and lack of self-confidence. The two can often go in tandem which is worse :’D But let me remind you of something, you can fix your piece along the whole process. Use erasers, lasso tools, liquify , select, paint it all over etc If something looks off to you then you also know deep inside how to fix it. Useful ways to see what clunks: flip canvas horizontally (helps with placement, proportions), turn the image to grayscale (helps to check values and where your eye tends to look), look at your image in thumbnail size and ask yourself if it’s clear, see the pose’s silhouette and ask yourself if you can tell what the character is doing etc. Don’t fret, everything can always be fixed :)
Perfectionism, sometimes it stops you before you begin Perfectionism causes you to overwork a piece, it makes you draw less, it makes art stressful, it brings insecurity. Let’s remove it with a simple exercise. It can be combined with the “draw things from imagination” once you’ve drawn something you like: dont do line art, don’t shade it, keep it as simple and crude as possible and then...post it. Yes, post it. You’re not at your best? You’re only human, this will help you embrace that very human side of you. You make mistakes. So what? The more mistakes you make the more you know what you need to study and the better at art you become. Mistakes are there to show us what we need to learn. See them as another tool and not a sign of failure.
Make the process as enjoyable as possible: You like art. You love drawing. Never forget this. Otherwise why are you drawing if you don’t enjoy it? It’s easy to fall prey to the mentality of those relatable memes that “art= suffering” or “I can’t even draw the other eye”. No no no my friends, these messages are fueling your insecurities instead of overcoming them. Let me tell you what, art is fun. It is. Art is fun, because I decided to make it fun again. And you should decide on that too. Personally I adore lineart but my hand-eye coordination is lacking to do it digitally, so....I just skipped it. Yes. I skipped it. I do the sketch, I clean it up a bit and then jump onto color which I adore. It allowed me to draw more and more freely. When I draw I listen to music, make strokes with the rhythm, I take breaks often and I drink my favorite iced teas. If you don’t like coloring do it in grayscale, if you love lineart then do that etc It doesn’t mean you won’t learn your weak points in the future with studies and practice, but you won’t let your weaknesses prevent you from drawing at all. No no, you won’t let them. You draw because you want to, despite of them.
Don’t wait for inspiration, provoke it Inspiration is not a divine and capricious muse. You make inspiration. It’s easy just collect all the things you like, music, artists, objects, characters, animals, patterns, plants etc Make boards on pinterest or similar sites, combine things you like. You like suits? You like birds? You can draw a bird in a suit, or a bird-inspired suit design, there is frankly a lot of ideas that can spring up from little things like these.
When a project stops being enjoyable either pause it for now or move on to the next thing. Pieces aren’t precious. They’re not “the one time I got x right” they are one of many. This advice goes mainly to hobbyists who can afford the luxury of passing to a new project. I have a WIP of a character who is overly complicated (I enjoy a challenge from time to time) sitting for half a month. I sometimes come back to it and add something... but as soon as it starts to create discomfort and insecurity instead of enjoyment I move onto something else. In the meantime I created 3 or 4 new pieces. If I had waited on finishing that piece I would have been severely creatively and physically exhausted. The art comes from you, not inspiration. The more art you make the better you become.
That’s about it :D I know it’s long but I prefer to be thorough and cover all the possibilities. If you have read of this: Thank you so much I hope this helps you at least a bit, if it helps only 1 other person I’d still be very happy. Have a nice one, and kick art block’s butt!
#art block#art block tips#art block advice#art advice#art help#BloggityDiary#art reference#I hope this will help someone out#This will also help me remember my own advice sksksk
200 notes
·
View notes
Note
Might be a BIT similar to a previous request you've written... but what about SNEO wants a his new canvas-like wings to stand out from the crowd (more than they already do) and it's Reader's job to paint those bad boys! A true artist has to work very, very carefully, don't need any messy lines on this masterpiece!
Friend youre so patient im so sorry. bUT thank you for giving me another reason to write a fave!! I will write this trope into the ground and I’m not even sorry about it heheee.
I was about to say "oh a nice short and sweet one for my short and sweet friend"...but this is secretly 1k words. aka the standard for my drabbles now i guess??
“So, what colors are you thinking, Big Guy?”
“WHAT COLORS DO YOU HAVE [In Stock Now]?”
You glance over at your sea of buckets of paint, thinking it would be easier to list the colors you don’t have. Then again, mixing up a new color was half the fun, so there technically wasn’t a color you couldn’t make in a matter of minutes.
“Uh, literally all of them?” You sigh as you look back up at your oversized friend, rubbing the back of your neck. “Can you at least give me a couple to choose from?”
“I WANT THEM TO REALLY [Stand Out], REALLY [Wow] THE CROWD, REALLY [Knock Their Socks Off]!” Spamton flaps his wings for emphasis.
“Okay, okay. Let me see what I can do.” You crack your knuckles and look down at your sketchbook. You had a couple ideas you wanted to try, but one in particular stood out to you. One wing would be painted to look like a raging thunderstorm, complete with dark clouds and vibrant streaks of lightning, while the other would be painted to reflect a beautiful sunny day. You decided to start with the thunderstorm wing, as it was the more detailed of the two. After selecting your colors and brushes, you ask your friend to lie down so you can better reach him. He shuffles and settles himself with a clunk, stretching his wings out as far as they’ll go.
“READY WHEN YOU ARE, LIGHT nER.” He flashes you a wide smile and gives you a quick thumbs up. You set out your supplies and ready yourself to get started on this massive project. You decide to start with painting the dark clouds themselves, selecting your biggest brush to cover as much space as possible. Painting the wings would be an absolutely daunting task, but you were easily convinced by how excited Spamton was. He was so thrilled when he approached you with this request, how could you say no?
“Do you want to know what the design is, or do you want to be surprised?”
“OOH, I LOVE [Surprise, Surprise]!” He chirps happily and claps his hands together a couple times.
“Alright, surprise it is. I’m gonna start with your left wing, cool?”
Spamton hums affirmatively and you take a deep breath before starting on your masterpiece. You paint a broad stroke over the expanse of his wing, making a basic outline for your first cloud. You start to fill in the outline when Spamton suddenly twitches his wing. You lift your brush and look over at him quizzically.
“Is everything alright?” You ask in a soft tone.
“YES, [Dearest Customer]. [100% Satisfaction Rate Guaranteed].” He flashes you a quick smile, so you shrug and continue. You’re about to start the second cloud when he twitches again, this time jerking the paintbrush in an unfavorable way. Once again, you’re more concerned for his comfort than anything else, so you ask if everything is still alright. He responds again with an enthusiastic yes, so you edit the mistake and keep working. You move forward to paint the lightning streaks, but as you drag your brush down the length of his wing Spamton squirms and lets out a strangled sound. You immediately turn your head to check in on the 30 foot tall heap of scrap metal twisting away from you. He motions for you to continue working, much to your surprise. You’re confused for a moment until you repeat the motion and Spamton starts giggling, his laughter sprinkled with soft chirps and metallic whirs.
“Spamton, are your wings ticklish?” You drop your paintbrush in order to lightly scratch your fingers along his wing, earning a very cute snort from your robot friend.
“IT S-SEEMS [Say It Ain’t So].” He snickers, trying to hold in his laughter as you dig your fingers into a particularly soft spot on his wing.
“That’s adorable, but you’re gonna have to stay still if you want me to finish painting.” You pick your brush up again and pause before continuing. “Do you still want me to paint them?”
“YES, [Yes], I DO.” He shuffles a little before completely calming his body, allowing you to go back to work. He giggles a little as you continue to paint, but jerks his wing out from under you when you focus your brush on the direct center of the wing.
“Spamton, you have to hold still so I can paint neatly.” You cross your arms at him in mock frustration.
“I’M [So Sorry We Missed Your Call], BUT IT TICKLES!”
“And that sounds like a you problem!” You return to your painting and Spamton dissolves into a fit of glitchy giggles. You abandon your original plan and decide that the wings are going to be a bit of an abstract piece. You place the brush on the center of his wing and watch him squirm underneath it, unintentionally making funky little swirls on his own.
“PLEASE, [#1 Customer], IT’S [Too Much]!” He laughs with a shudder as the brush runs along a particularly sensitive spot towards the inner corner of his wing.
“I hate to break it to you, but you are literally doing this to yourself.”
“YOU’RE [Liar Liar].” It’s cute, listening to him deny it as you hold the paintbrush as still as possible and watch him wiggle underneath it. He snorts and asks you to stop again, so you toss the brush aside. He did ask nicely, and besides, the left wing looked really cool as it was. You’d hate to ruin the masterpiece you both worked so hard to create.
“This wasn’t what I had in mind, but I’m really digging the flow of these shapes.” You tilt your head and study the canvas in front of you, Spamton blushing a wonderful shade of red beside you.
“REALLY? YOU [Like and Subscribe] IT?”
“Yeah, it’s super cool. Very funky, chic, and original.” You turn to face him and place a hand on his chest, running your fingers along the outline of the massive triangle on his chest. “Kinda like someone I know.”
“YOU’RE TOO [Sweet] TO ME.” He purrs, a deep metallic rumbling reverberating from his chest.
“You know what’s gonna make this look really cool though?”
His eyes light up and he raises an eyebrow curiously.
“When we get the right wing painted to match.”
Spamton throws his head back with a groan. He can’t complain, after all, he did ask for this.
#i really should write more sneo hes so so cute#also this trope is absolutely chefs kiss#its adorable and i love it#drabble requests#kowtownart
17 notes
·
View notes
Text
Abusing all of the modules of MySewNet Platinum to make patches in a way far from how the makers intended:
(This is an embroidery software tutorial. MSNP is on the more expensive side if you look at buying the software outright, but if you're doing the subscription thing it's actually a lot less, so I don't actually feel as bad about putting a tutorial about a really pricey software on my sewing blog as I think I maybe should)
Most people shopping in my store buy Platinum for the digitizer, but Platinum is actually more like Adobe Creative Suite in that it's like 25 programs that work together. So here's me using other modules to make my life easier.
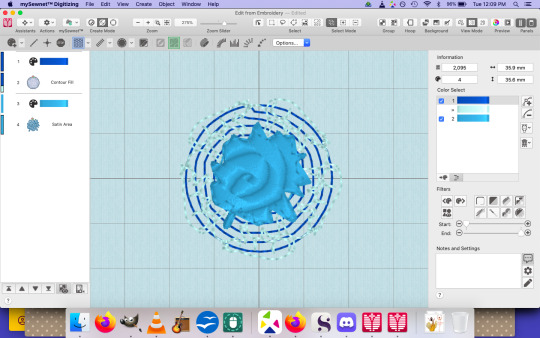
part 1 is to go into digitizing and do whatever you want there. Everyone at my store really pushes the digitizer, so I'm assuming that most people who get this software already kind of have an idea on digitizing. This is a cat-themed nightmare of a circle, but it's what we're using.
You can also just use a premade design or a SuperDesign if you want.
You can make whatever you want, as long as it'll fit on your patch. Oh, also, knowing how big your patch will be is kind of important. Make your design a little smaller than that.

Get that into the embroidery module and fix your colors. This is also where I get it into the hoop that's the size I want it to be. I'm making a lot of patches, so I want to use my big hoop.
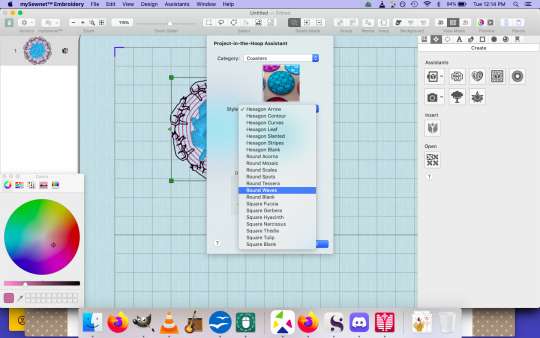
Grab the Project in the Hoop generator, select coaster, and then pick a blank one in the shape you want your patch to be in.
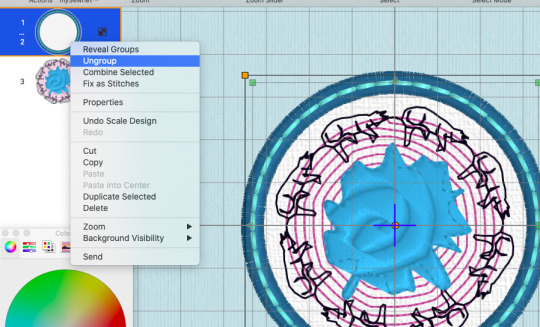
Center your design in the coaster (the generator will make the project in the hoop directly in the center of your canvas, so you can just click your design and hit "center in hoop") and drag it so that it's on top of the coaster and visible. Ungroup the coaster group it generated.
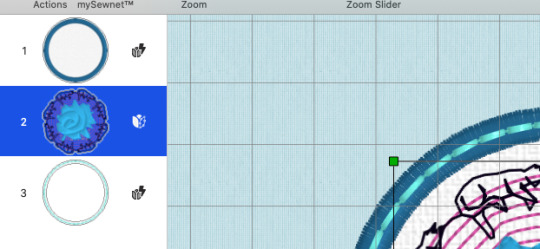
The coaster is made of two shapes. One is the main shape, and one is the final stitching line. You need to stick your design between these two layers. Then, group these three things together into one group.
NOTE: If you want to get fancy with your stop commands, do that before you duplicate the coasters. If you convert each applique stop to a color change, you can do the applique a bit faster. I forgot to do that, so we're just going to do applique the boring way.

Duplicate this group however many times you need to fill your hoop. Stick one in each corner of the hoop.
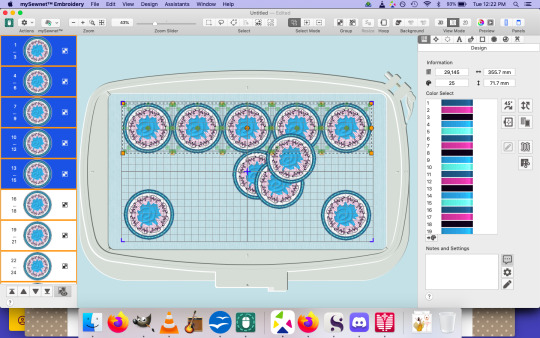
I'm making 10 here, so I select the two in the top corners, and then three more. It can be any three, as long as I have those top two corners.
Then, go into alignment, and align them all to the top. After that, hit "distribute horizontally", and they'll all line up nice and neat. Do that with the bottom row, and you've saved yourself a ton of attempting to re-arrange them.
Mine were touching when I did this, so I had to go in and delete two of them. Again, I can delete one from the top row (not a corner), and one from the bottom row (again, not a corner), and then distribute horizontally. I've found that a ton of people don't take advantage of that distribute tool.
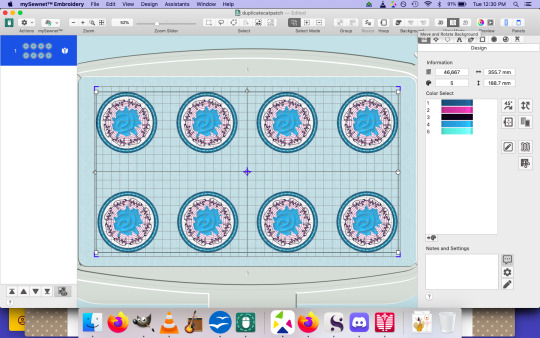
Now, if we select the entire thing, we will see that it's 40 color blocks. This will have the machine make one coaster at a time, and we'll need to stop what we're doing to go add applique fabric for each piece individually. I don't have time for that, so let's color sort. Combine the entire thing into one, go for color sort, and then it'll drop down into a perfectly manageable five color blocks.
Now, go into the stitch editor and grab your design separator. Select one of your patches and divide it out from the rest of the design. Once you're back in embroidery editing, you can make sure that your separated patch is going to stitch out first.
This is important, because if there is any major flaw with your design, you want to catch it BEFORE it sews the ground work for every patch. It'll save you a lot of applique fabric and thread.
(If there is a major flaw and the first patch is a botch, fix the other 7, and then delete the bad one, without moving any other parts of the design. You can then stick the same hoop in the machine, and it'll ignore your botch one and sew the remaining 7. You might want to grab the design separator and single one off, like you did with this, to make sure that version 2 is okay).
Hoop some shit up and let's go. If you're doing a sew-on patch, and you're confident enough, you can do this on tear-away and it'll tear away all nicely for you. If you're making an iron-on or stick-on patch, you'll have to cut the bottom anyway, so you won't benefit from tear-away. Cut-away will work just fine and be a little stronger for the actual stitching process.
Then, if you want to be just like me, you turn on your expensive problem child of a machine, find out that (despite being less than two months old) the USB port isn't working, go into the craft store on your day off, and once again be grateful that you got the service contract as you resign yourself to not getting this done any time soon.
[yes, it'd be covered under warranty, but 1) our tech is my friend and he gets paid more for service maintenance agreements than he does for warranty work and 2) when processing it for warranty, the tech has to look for evidence that this was caused by a client misuse. It wasn't, but he's got to look. Service contract covers me fucking shit up just because I don't know what I'm doing, which results in faster service]
yay
9 notes
·
View notes
Last Seen Blogs

tropicalvolcano
volcano time

iyenox-blog
Paradoxxxx.

breakbeat
Art Beat

citrix-talent-acquisition-blog
Citrix Global Talent Acquisition

ypioktv
Урюк TV