#I decided to turn on keyframes and just wing it
Text
Status or Friendship?
Lately, ive seen a lot of people considering that Amity might have to choose between Luz or The Emperors Coven. I think this is undeniable, but i also firmly believe her choice is just as obvious.
I want to preface my thoughts with; most of this is from memory, so excuse any errors. ADHD brain decided I NEEDED to type this right now.
Amity is a very interesting character. She starts off as an antagonist, but becomes a friend to Luz as the season continues. This isnt unheard of, obviously, but its still interesting. Characters like Amity are almost always antagonists throughout the entirety of their shows, or their soft side is shown near the end or middle (See: Pacifica Northwest) . Amity makes her change midway through season one, which is something that doesnt happen often.
Amity has been shown to be a witch the emperor's coven has been keeping an eye on. Shes talented and studious, why wouldnt they? and as a Blight, Amity would of course want to impress and side with them, Right?
I think not. I think this is out of the question.
Lets take Amity's fall out with Willow. In the episode, we see that Amity is attempting to hide her previous friendship with Willow from her friends, Specifically. Not from herself necessarily, but from her friends, to perserve her status. Later in the episode, we see Amity lament her decision to turn Willow away; even if she had a justified reason, she was still choosing to side with her status and power, instead of siding with her friend.
Now lets look at Wing it like witches. Here, we get to see Amity do the opposite of what she lamented in the previous example. Despite knowing her actions can lead to social ruin, she stands up for Willow in her own... unique way. She fights Against her former "friends". She chooses friendship and love over status and power. This is HUGE for her character, especially considering this episode came immediately before AOAW.
These two episodes are the keyframes of her arc; the big pieces. But between and before them we also see Amity displaying this development. Her idea of magic, being a witch, and her attitude are influenced by her sheltered life and her status early in the season, but as her character develops, all of those ideas/traits changed as she got to learn more about others and find Real friends. Friends who didnt care about status or power. Friends who would be there even if she were scum on the floor.
Amity won't choose the coven. Maybe she will be conflicted, but personally, i see WILW as an allegory for the choice she will eventually make. She will once again choose friendship and love over power and status, because thats what we've seen her do throughout her character arc. Shes been slowly rejecting the ideas she was taught, slowly building up to being her own person. I think the peak of her arc will be her choosing to help Luz instead of the Coven.
Also, I feel like Amity choosing Luz and Co also lines up with the shows apparent message about Found Family vs Blood Bonds. If she chose Luz and Co, it would perpetuate that message. Her found family is shaggy and bit rough, but its full of love and friendship and acceptance.
also... come on, Amity wouldnt be able to turn away from a crying Luz. i genuinely think her gay little heart couldnt do it, considering the bond they have now.
#however it could be possible that amity sides w the coven#but later chooses to side with luz#it would illustrate the fear that her families/the covens power instills in her#but id like to think her rapid character development wouldnt be put to waste like that#then again... zuko...#sorry for how scattered this might be#i didnt plan this out it came to me very suddenly#lmk what you think#the owl house#toh#disney#theory#lumity#amity blight#eda#edalyn clawthorne#lillith#lillith clawthorne
178 notes
·
View notes
Text
An Animation-Term and Keyword List For People Who Haven’t Studied Animation
I’ve decided it’s time to put my BFA in animation to use and share with you all about 40 terms I could get off the top of my head that I’ve seen confusion and misconceptions about.
If you know a term that was missed here, feel free to add a definition or ask for one!
Animation (in this context) -- The act of taking a series of images and putting them in a sequence next to each other which is then viewed in rapid succession, thus giving the images the illusion of movement.
Anime -- The Japanese word for “animation”. This term is often used to refer to the style of drawing in the west, but it literally ONLY means “animation”.
Animatic -- Unfinished visuals and audio cut together into a watchable video format. This is NOT another word for short animation. An animatic would use visuals from a storyboard rather than rough or finished animation
Anticipation -- A slower movement made by a character to lead into action. This is used to great effect in comedy animation and in games like Dark Souls. The posing and buildup makes you expect something is going to happen.
Cel -- A tool for animating. Traditionally, this is a sheet of clear plastic that a frame of animation is drawn on and painted color is applied to. These are set on top of background images and photographed so they can be used in the final animation. The term can also be applied to hand-drawn digital animation. Pre-digital nearly everything was animated in this fashion, like Bugs Bunny cartoons or classic Disney movies. Some Japanese animation is still done like this, but the move to digital has only recently begun there.
Claymation -- A branch of stop motion animation, it is when moldable clay is shaped, photographed, and reshaped in a manner that gives it the illusion of movement.
CGI -- Stands for Computer Graphics Imagery. Any image that is generated by a computer. This applies to all digital artwork, even 2D, but is most commonly used to refer to 3D images created by a computer.
2D -- Flat images such as those you would draw on paper. They have height and width but no depth.
3D -- Images with height, width, and depth. Computer generated images and physical sculptures fall under this category. 3D computer animation and stop-motion animation are 3D.
3D Computer Animation / 3D Animation -- Animation done on a computer specifically using 3D software to either give the image more depth or to make it look more lifelike. It is made by creating digital sculptures of characters which a “rig” is attached to which gives the animator the ability to move the sculpture like a puppet. If you say 3D animation, people will know you are referring to computer animation. Most American movies in the past decade are or include 3D animation.
Digital -- Any animation done on a computer. This applies to 3D animation, 2D graphic animation, and hand drawn animation done on a computer. Most animation has moved to digital formats because of computers ability to automatically in-between--thus saving large amounts of work. Computers also eliminate the need to physically store easily lost or damaged piles of paper and film, and they eliminate the need to manually photograph individual animation frames.
Flash -- Refers to the now mostly defunct Adobe Flash program which gave animators the ability to turn 2D drawings into puppets that could be animated. The similar Adobe equivalent is now called animate. It popularized a style of puppeted animation similar to paper cutouts in a digital format, but while it is known for that, it can be used for hand drawn animation as well. This puppet style of animation has improved dramatically since it’s beginning in Flash, and the same (or similar) technique is used by people who animate with programs like Toon Boom. Shows animated in flash include Johnny Test and My Little Pony: Friendship Is Magic.
Frames -- A single image as part of the whole animation. A picture of a cel on a background would be one frame.
Frame rate/ Frames per second -- How quickly the frames are played back for the viewer. Film standard is 24 FPS, or 24 frames played in rapid succession for the duration of 1 second. Games often play at 30-60 FPS to aid reaction time.
1′s and 2′s -- To animate something on “1′s” means to create 24 distinct frames to play for a full second. 24:24, or, just 1. 2′s--also known as 12FPS--similarly means you do half that amount of work. 24:12. Most things are animated at 12FPS because it is less work and accomplishes approximately the same thing as animating on a full 24 frames. Animations at these rates are still played at 24FPS. Contrary to popular belief, classic Disney movies are mostly animated on 2′s.
3′s and 4′s and so on -- Like 1′s and 2′s, but less. 8 and 6 FPS respectively. These rates are used more commonly in television than movies, but even then rarely. 3′s and 4′s most often exist in conjunction with 1′s and 2′s to both save work and give the animation more expression. These are also always played at 24FPS. Studio Trigger most notably animates like this.
Hand-Drawn -- Animation that is fully drawn by hand and does not involve manipulating a puppet character. Traditional 2D animation is hand drawn, Flash animation isn’t.
Hold -- When a frame or pose lasts longer than normal. A hold can be completely still or have slight movement. They are used to break up action and very often used to create anticipation of an action.
In-between -- Frames that connect the action happening between keyframes. They change something from a set of poses to actual animation.
Keyframe -- Important frames in the animation, often major poses in an action. These are sometimes taken from storyboards but not always.
Meaningful animation -- Or animation with intent. Parts of an animation that were specifically made to do a certain thing. This comes up in discussions about higher frame rates and whether or not they matter to a work. An action that could be expressed in 8 frames played at 24 FPS does not necessarily need 24 frames, because the additional frames provide too much visual input, could be drawn more poorly, or are a waste of time to do. A computer generated tween is not always meaningful because it was not always intended to exist by the animator. The frames generated when you take an animation at 24FPS and modify it to be 60FPS are not meaningful.
Mocap/ Motion Capture -- When a person wears a silly suit with little balls or other markings on it and acts around a stage, that is for motion capture and animation reference. Motion capture tracks a persons movement and can apply it to a 3D rig, but it is not perfect so animators are still needed to correct the movements and make it work in the final product. This is used in many live action movies that feature CGI and notoriously in The Polar Express.
Mograph/ Motion Graphics -- This is the animation style used in many commercials, how-to explainer videos, and animated company logos. This is the lovechild of graphic design and animation. It is most often 2D, sleek, and heavily design focused as opposed to character focused. Most often made in Adobe After Effects.
Paper cutout -- A form of stop motion animation where pieces of paper are placed on a flat surface and photographed from above. This can be done with light from the front to see the full detail of the paper, or back lighting to give it the effect of shadow-puppetry. The first animated film was done in this style.
Pre-production -- Work that is done before something is animated. Includes character designs, environment designs and layouts, scripting, storyboards, audio recording, and anything else necessary to have done before you begin the arduous process of animation.
Post-production -- Anything that needs to be added after all pre-production and animation is finished. It includes editing everything together, adding effects, and whatever else must be done before you can call something “finished”.
Procedurally Generated Animation -- This is animation made entirely in a computer through use of algorithms. Used more often in games than anything else. Animations are generated in real time to create more variety in the movement. It allows for things that can’t be done with pre-made animations like making characters feet land and/or slip on rocks or track their head and eyes to look at something.
Puppet Rig/ Rig -- A skeleton applied to any type of puppet you want to animate. 3D and puppeted stop motion animations both use this, though in stop motion it is more likely called an armature. 2D animations like Flash animations also use these
Onion Skin -- A 2D animation term. In traditional animation, a person works on paper over a light table which shines light through the paper and lets them see the frames they’re animating between. In digital animation, you press a button and the onion skin will display in either a lighter color or different hue the frames in front of or behind where you’re working to a point you can set and adjust. It’s called onion skin because peeled onions are transparent.
Reference -- Looking at something from life to base your work on. If you are animating a flying bird, you need to know how their wings move, so you need to watch birds or maybe film them and play it back slowly so you can see the small details. Animation since Snow White has used life action reference heavily, many old animated movies were fully acted out and recorded before they were animated. Movies today don’t do that much, but animators will record themselves acting out scenes they’re working on to capture body language and lip sync. Reference is not tracing or rotoscoping, but it can be.
Rotoscope -- Animation drawn directly over life action footage. This is reference to it’s extreme, because the drawings do not take inspiration from the movements so much as they are an exact recreation. It is often easily noticed for the higher framerate it often has and for having movement unnatural to animation. Unless the character is heavily stylized, rotoscoped animation often looks strongly like real people. 2D animation traced over 3D animation is not rotoscope. Motion capture is also not rotoscope. Many classic Fleischer films had rotoscoped sequences and Anastasia is known for it’s heavy use of the technique.
Rough Animation -- Animation in it’s early stages, it may not be fully in betweened, but even if it is, it isn’t cleaned up or finished. Drawings in the rough stage are often messy and incomplete so it is easier to throw out frames and replace them.
Rough Cut -- The next step from an animatic. A rough cut contains all finished and unfinished work as a preview of what the final product can be. They can have any combination of animatic materials, rough animation, and finished work.
Stop motion -- Animation of physical objects on a set, photographed one frame at a time. Covers everything from claymation, to paper cut outs, to puppets, and more. More prominent in early film as visual effects before that became what it is known as today. The most popular form is puppet animations like those done by Laika studios.
Storyboard -- A sequence of rough drawings paired with script that dictate what will happen in an animation. These are not keyframes for animation, nor should they themselves be animated.
Timeline -- In digital animation, this is the bar that holds the individual frames in sequence so they can be played and viewed as you work. You can also stretch the frame length to last longer or shorter, hence “time”.
Traditional (Cel animation) -- Earliest form of 2D animation, the same as hand drawn animation only it’s done on physical paper. The terms are blurred together however, so when talking about traditional animation you may need to specify whether it’s on paper or digital.
Tweens -- Computer generated in-between frames. Applies to 3D animation, but most often refers to puppet rig 2D animation like flash animations. Often used as a derogatory phrase, as computer generated frames can lack the visual appeal of hand made ones. Tweens move extremely smoothly and evenly from pose to pose, which is the tell of a puppet rigged animation.
VFX -- Stands for visual effects. They are effects applied to a film in post-production that can be CGI or not, but are very often CGI. Includes aspects such as explosions, weather effects, background details, cleanup, etc.
696 notes
·
View notes
Text
Week 5 & 6 - Mini Animation Project
For this week’s task, we are going to create an animation based on what we’ve learnt over the past few weeks. Moreover, we only have one week to create the animation, and so we’ve decided to use Roald Dahl’s work for the animation. Furthermore, we also do have the option to choose which quote we are going for, and I chose a quote from ‘Fantastic Mr Fox’.
'Boggis and Bunce and Bean
One fat, one short, one lean.
These horrible crooks
So different in looks
Were none the less equally mean.'
Source: https://www.thebookpeople.co.uk/webapp/wcs/stores/servlet/article?articleId=100-roald-dahl-quotes
The reason I chose this quote was that it is engaging and I can create an animation that could look interesting as well. At this point, I already have a few ideas in mind as to what I wanted to develop. However, before I can even begin to create the animation in Adobe After Effect, I’d need to create quick sketches of my ideas first.
I drew small thumbnails of a storyboard to quickly generate ideas, rather than doing a big drawing as it could take me a long time. For my first idea, I wanted to use simple geometric shapes for the animation. As shown in the image below, Boggis is a circle, Bunce is a triangle, and Bean is a rectangle. These shapes show their appearance such as circle is round and big, meaning fat. For the triangle, I could make it smaller to fit the appearance of Bunce, while Bean is a rectangle as he is described as being lean.
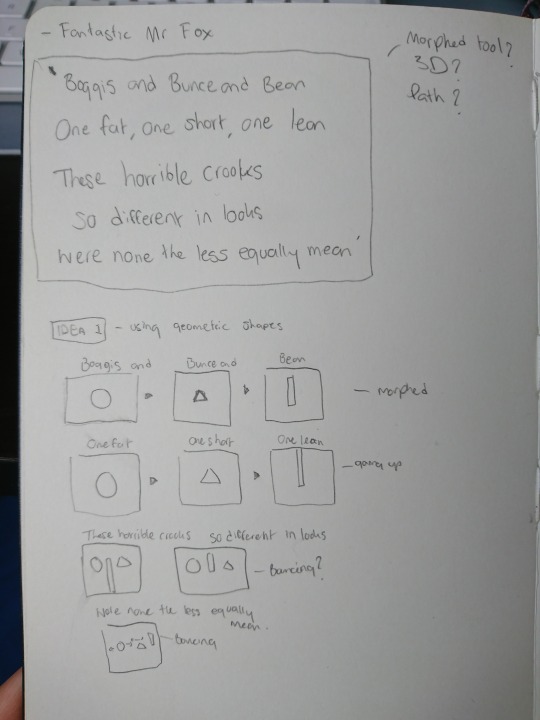
I have an idea to create the transition between the characters using the techniques called, ‘Morphing’. What it does is converting one shape to another, which is perfect for this particular animation.
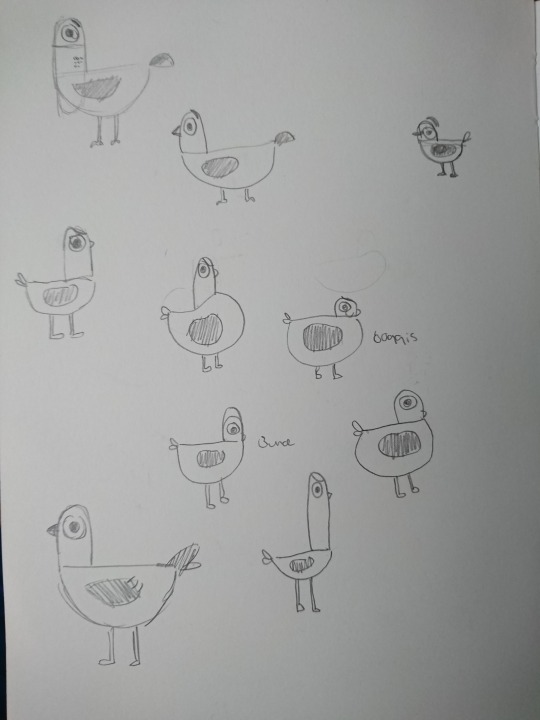
Another idea I’ve generated is turning Boggis, Bunce, and Bean into bird characters. The reason was that I wanted this animation to have a sense of humour into it to create interests, and I turn them into birds to do just that, as I could create the birds to have funny appearances.
The next thing I did was coming up with a mood board showing all the interesting appearances of the birds and what colour schemes I am going to be using.

Once I have the mood board set, I then coming up with quick sketches of the birds. I’d also have to take their appearances into the considerations as Boggis is fat, Bunce is short, and Bean is lean. I didn’t want to draw the characters too complicated as I’d have to re-create it in Adobe Illustrator again.
Once the characters have been designed, I then create a mini-storyboard showing all the ideas of how it all going to connect and my planning in general.
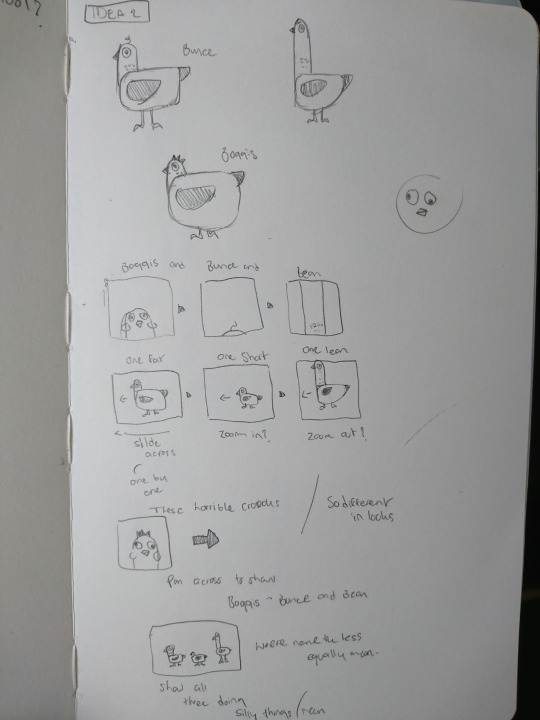
I have also decided to go with my second idea as I thought it was pretty funny and engaging to the audience. I knew that by going with the second idea, it would be time-constraint as I’d have to create all the assets in Illustrator, and then animating it in After Effect. Not to mention, this mini project’s deadline is in one week, however, to compensate that - it was a great choice going for a simple character's design as this would save me a tremendous amount of time designing it in Adobe Illustrator.

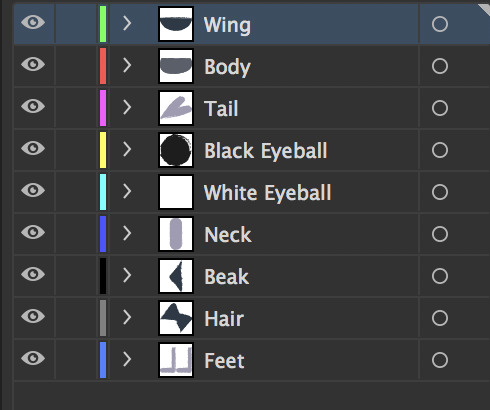
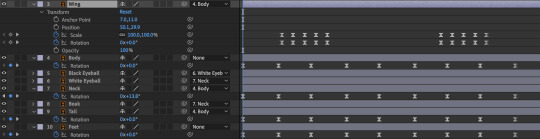
In Adobe Illustrator, I have created all of the assets with each feature in separate layers. The reason why I do this was, for instance - if I wanted to have the wing and tail move, I’d need to have these in separate layers as Adobe After Effect will not recognise each feature that is in the same layer; therefore, I have to do it manually.

Furthermore, I created different variations to experiment with colours and how the birds are going to be displayed. Moreover, I decided to go with the bottom ones as I really like the outline of the character, which has a drawing feel to it, and it makes it perfect for this particular animation.

The next thing I did was create assets for the close-up shot, and an introduction to the characters at the beginning.
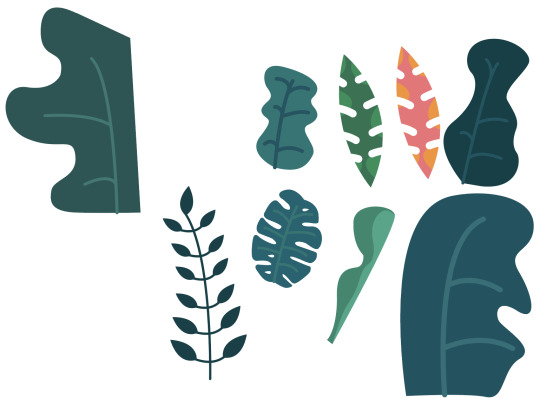
As for the transition between each scene, I decided to use different variations of plants covering up the composition which later on changes the scene once the plant has been moved out of the composition. This creates an entertaining and engaging animation to the audience, and it fit perfectly with the simplistic characters that I have designed.
The creation process for these plants assets is the same. It was created in Adobe Illustrator while making sure that each plant is in its own individual layers. In extension to that, I went a step further ahead and exported these assets into Adobe Photoshop so that I can add textures into them to create interests as opposed to having just a plant vector with no textures.

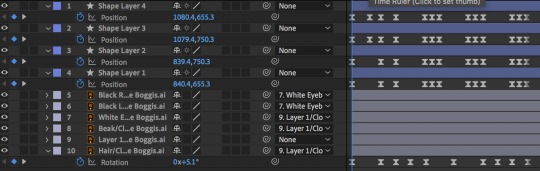
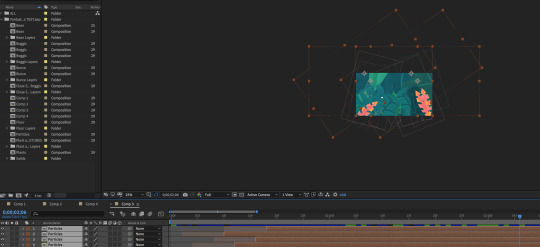
Once all of the assets are made and exported into Adobe After Effect, it is time for me to animate it. However, there are a few things that need to be considered and prepare before that. For instance, the character assets that I have exported - I need to make sure that the assets are layered correctly and are placed in the correct orders. After that, I need to parent some of the assets to the body of the character so that it moved as a whole, and finally - making sure that the anchor points are placed in the correct position to where I want to animate from. In addition to that, I need to make sure to pre-composed all the layers as this will keep everything organised.
Once everything is in order and placed correctly for all of the assets, from the characters to the plants. It is now time for me to animate. It may seem really confusing and intimidating given how there are a lot of assets to use for the animation and a lot of planning and timing involved. However, at a time like this, it is always best to have a storyboard at hands so that I will know exactly what I need to be doing first and break it down into step-by-step.

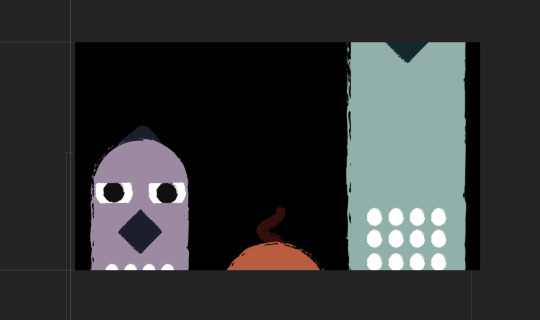
Following the storyboard, the first scene that I need to be animating is a close-up and an introduction scene for Boggis. This is really simple to get started as there are not a lot of moving elements for this scene, except for his eyes and hair. I animated his eye using the position keyframes while making sure that the keyframes are placed at a distance from each other to get the timing correct, and overall, make it look natural. As for his hair, it is a little simple, and all I have used is the rotation keyframe to animate slight movements.

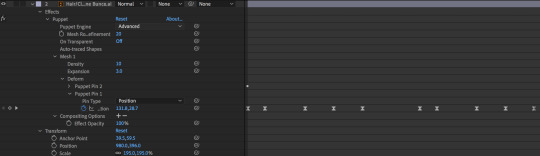
As for the animation for Bunce, I tried to make it funny by only displaying the top of his head, given how he is described as being short. This one is also easy to animate as well as the only element that I need to be animating is his hair. I wanted his hair to have subtle wiggle movements, and to do that - I am going to use the tool called ‘Puppet Position Pin Tool’. This tool allows me to freely manipulate his hair using the pin indicator. I placed one pin at the tip of his hair while the other one is behind the head. To animate it, I move the tip of his hair to the desired position while moving the keyframes to get the action in.

Meanwhile, for Bean, I didn’t want to animate anything as I thought it would be funny this way. I tried to also make it funny for Bean by making him so tall that he could hardly fit into the scene - which is why I decided not to animate anything.
The next step for me is to animate a fast moving scene where the character is described by their appearances. To do this, I created a floor in Adobe Photoshop to illustrate where the character should be standing, and I will also be animating only the floor. The way I go about making this is positioned the character at the centre and parent it to the floor. This way, when I animate the position keyframe of the floor, the character will move with it.
To animate the floor, all I did was use the position keyframe and carefully planned out the distance between each keyframe to make the movement natural. I then set the easy ease to smooth out the animation.

At this point, I realised that not animating the character would look dull and plain. It was a good idea to make a fast-moving introduction of the characters. However, I wanted to make it look even more natural, and the best way to go about this is animating the character when the floor moves back and forth.

What this means is that when the floor come into the scene, I will be animating the character’s body position, the character’s neck, and tail. These slight movements can have significant changes in the animation that I have created as it gives the character a personality and made it look more dynamic.

To properly explain this, what I mean by animating the neck and body position is when the floor is moving so fast into the scene, the character will actually be leaning backwards as well as his neck. I will be animating it the opposite when the floor suddenly made a stop - this will give the animation a sense of speed.

Once completed, I repeated the process for Bunce and Bean and ready to move on to the next scene. As for the next scene, I will be animating this part from the quote: “These horrible crooks. So different in looks.”
For this scene, it is easy for me as I didn’t have to animate anything, but rather position the character correctly. I will be re-using the characters I have already animated for this scene as it would save me a tremendous amount of time. I placed the character right next to one another and pre-composed all of the layers. I then animate the pre-composed layer using the position keyframe to create the panning effect.
To finish the animation off, the last animation will require extra attention and detail as I have to animate all three of the characters individually. The final scene quote is: “Were none the less equally mean.”, and to animate this part - I wanted to make the characters looking silly and doing silly things which were supposed to be funny.
For Boggis, I made him look like he was dancing by moving up and down. I animated him by using the position keyframe and set the distance equal to one another to create a consistency movement. I also animated his neck by using the rotation keyframe, as well as his tail. As for his wings, I made it look like he was flapping his wing twice by animating the scale to about -100% and this gives the illusion that his wing is actually flapping.


For Bunce, I made him trying to fly for a short distance and back down to the floor again. The animation in itself is simple as all I did was animate him flying using the position keyframe, while making sure that I get his wing flapping correct. As he ascends from the floor, his wing will be flapping really hard, some in mid-air, and some of it as he’s slowly descending to the floor again.
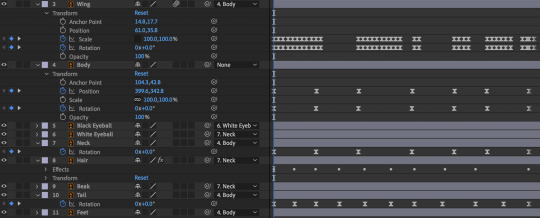
Moreover, I have also animated his body and neck position using the rotation keyframe to make it look natural. For instance, If Bunce were to fly to the left side, his body language would need to move to the left as well as his neck as this signifies that he is moving left. This also makes the animation looked more natural and dynamic which is fundamental and note not to miss out on.
For Bean, I animated him similar to how I animated Boggis as I really want to make him do a funny and silly dance. Bean was animated using only the rotation keyframe such as his body, feet, tail, and neck. There isn’t anything complicated for Bean animation process at all.
Last but not least, for the transition animation - this is something that will be taking me the most time as I would have to animate the plants individually and there are about nine plants in total. I also think that I can get away by copying the keyframes to save time and changes some of it to create variations.
The plants will be animated using the position keyframes as well as the rotation keyframe to make it appear to cover the composition. It is rather a simple process but time-consuming. Moreover, I could also easily turn these keyframes into easy ease to save time. However, I really wanted to go the extra mile and make the animation look more dynamic, and to that - I decided to use the graph editor.


I can easily manipulate the motion between each keyframe to my desire using the graph editor, and it is a very useful tool in creating a beautiful animation. I wanted some of the plants to move into the composition slowly, while some move in quickly to create different variations. Moreover, I need to pay extra attention to details and see the movement between each keyframe as I really want the plant to flow smoothly, and no sudden movements.

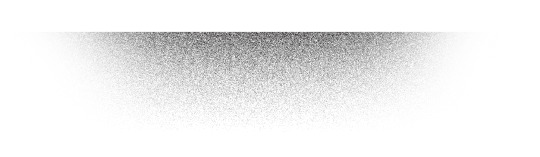
While I was at it, I also animated some of the particles that came flying when the plants move into the scene. This was created easily using the ellipse and rectangle shapes available in Adobe After Effect. I then use the position keyframes to move the particles in random places. Moreover, this was done individually, which is why it took me an amount of time to complete, but nonetheless - I am satisfied with the subtle movements in the animation which makes it look ten times better without the particles.
Moreover, I also repeated some of the particle processes by pre-composing it and duplicating the layers - changing the position and rotation of the pre-composed layer to create different variations.
I have also added some plants into the final scene to create some interests into the scene and visually make it look colourful as opposed to having just the birds there.
Once the animation is completed, the next step I did was render the animation into a movie file and importing the movie file into Adobe Premiere Pro. The reason why I imported it to there was that I wanted to add music and sound effects into the animation, and the best place for me to do that was in Premiere Pro. Sure, I could also do it in After Effect, however, since the project is layered with different assets and all of the pre-composed layers, I thought it would confuse me in the process. Besides, I already have prior knowledge on how to use Adobe Premiere Pro anyway, which makes it my choice into adding the sound effect.
This is a list of websites I used to get my soundtracks and sound effects:
Zapsplat
Freesound
dig.ccMixter
Final animation:
youtube
8 notes
·
View notes
Text
Character animation
I am going to start writing this so that I’ll at least have a draft so I can get it done at some point. I really want to write this as I’ve learned a lot from “re” animated Cron.
So I started out a bit unorganized doing a walk, reading an article, getting a run animation, reading some other stuff.. All of these are pretty straight forward, idle is pretty simple, no motion just posing pretty much. Walk is pretty simple, it looks just fine after posing and the same goes for jogging and running.
I decided pretty soon that I wanted to make use of root motion as I like the idea, and I also set up a 2D blend tree since I want Cron to handle quite exact and snappy I set up a tree with two degrees of turning for each movement state. This is where it started to get difficult.
First of all finding material on google on how you make a walk or run cycle is simple, finding one for turning is not as easy. I had a short chat with a great animator I know and got some ideas about the posing and expression. I tried first of all to wing it more or less. So I tried to turn it around as I animated a same-pace animation as the straight walk. I didn’t really get happy with it and I struggled with understanding how to work with actions, dope sheet and NLA.
I got some animations in and went back to fix something in a previous animation found something that broke in subsequent animations and so on. I realized that my first attempt, to wing it, would not work because I just went back and forward putting out fires.
I guess I had my epiphany when for no reason my turn walking animation turned up like this.

I realized: Being organized is key in animation. I really want that stated. I find it helpful to keep organized while modeling, writing code or making music as well, but when it comes to animation I feel like you soon will loose track if you aren’t.
What do I mean when I say organized? Basically I mean to keep conventions, pushing actions that are ready onto NLA clips. But also to keep it clean, following naming conventions and so on.
At this point I went back, removed unneeded stuff and actions, basically cleaned it up. I created actions for the clips I want to produce for basic locomotion and sat down to think about how to do turning animations.
For the turning animations I realized I wanted a guide as they felt uneven and random as I did them first. So the way I remade them now was for example doing walk I created a new action from the key-frames of walk. and created a circle to use as a reference. I continued to create two more circles, one for sharp turns and one for running. I ended up with this.

so now, when doing a left turn I will select the left turn circle and snap 3D-cursor to it. I then rotate the walk cycle around the 3D-cursor frame by frame with 4.5 degrees (I want to sample a 90 degree turn over 20 frames if you are interested in the maths). I then tweek it so that the feet works for the turn and also tweek the animation so that the head looks a bit more inwards and you tend to lean inwards when walking in a circle. For a sharp turn I do the same but the 3D-cursor in the center of the small circle and for run I make use of the big circle and so on.
You will have a relation to most of your keyframes, and if not that level you will for sure have that relation to your poses. Each control in your rig will have a set of key frames per animation, and scrubbing back and forth I would argue that you end up with a relation to all your key frames.
So you will gain a lot from keeping organized.
However, I still am at the stage where something suddenly doesn’t work any more. I have set up all my animations and am starting to tweak the feet and so on. And all of a sudden my head control starts acting up. I get this

There is no key-frame for the head when the bob occur, I have all other animation clips muted, I have checked other bones, I have deleted the key-frames and remade them, I have deleted the channel and remade it. I can see in the Graph editor that there seem to be something strange going on.
Anyhow that’s where I am at right now. phew! I am happy that I am having so much fun with it otherwise I might not have kept going. But I am and I will continue doing so!
I hope to get back with a post talking about the finished locomotion for Cron, or at least a finished draft through all of them!
0 notes
Last Seen Blogs

forthegothicheroine
For the Gothic Heroine
derek-dolohov-blog
Fear the Dark Lord
22wildasies
my favorite Pins
dazzlin-qwq
SEND IN ASKS PRETTY PLEASE BE SILLY IDC !!!!
acespace42
Time To Rewrite The Canon Material Given To Me