#LEDgo
Text
Film Project - Week 4-6
https://docs.google.com/presentation/d/1pm8pHm5VDb_m-m-4lgjCcXpciGIrP1pLj1Lo8v_UUsc/edit?usp=sharing
Exercise 3
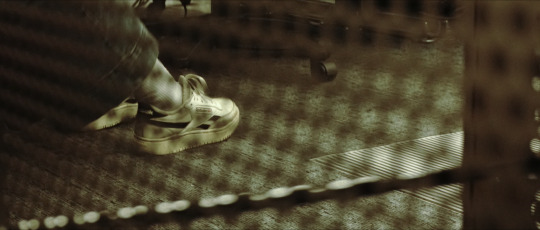
Analysing how a change in aspect ratio affects our perception of a space/feeling. I think we’re starting to get somewhere... Again, not totally happy, mainly due to the inconsistency in the colour palette and I find that there isn’t the best sense of space throughout the shots. BUT, I am happy with some stuff - the close-ups are nicely lit and framed, I think and they convey the grimy, dull focused feeling of a late-night study session.
I wanted to create this idea of finding someone alone in a space almost surprisingly, from a voyeuristic perspective, so we start off with these details of the space and then her presence invades the frame and we take notice of her. I staged Zoe in a tucked away corner of the Kilby to emphasise the emptiness, and create these long leading lines in the wide angle shot.

I tried to use this exercise to also test out some ideas I’ve had for Longboard Nights. As it’s going for a high-concept, spectacle feeling, I wanted to see how widescreen aspect ratio would add to this idea. The vague, but telling, compliment of “cinematic” was used a couple times by the class when talking about the widescreen shots compared with the 16:9 shots. I agree, I think the shots in widescreen add a lot to the space and the feeling of the images, emphasising the expanse of emptiness and, as Andrew said, also made the use of negative space feel more deliberate. So I think it is something we want to use for Longboards... Still kinda unsure.


Film Project Development
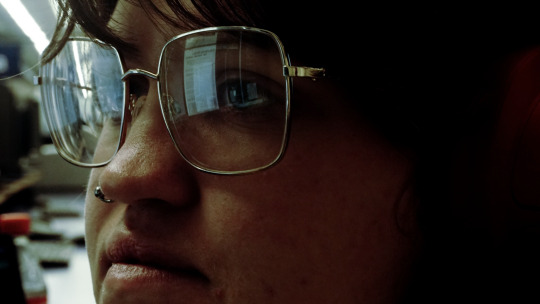
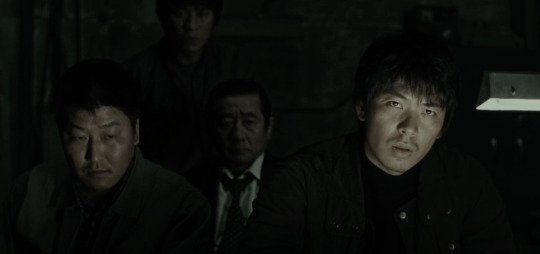
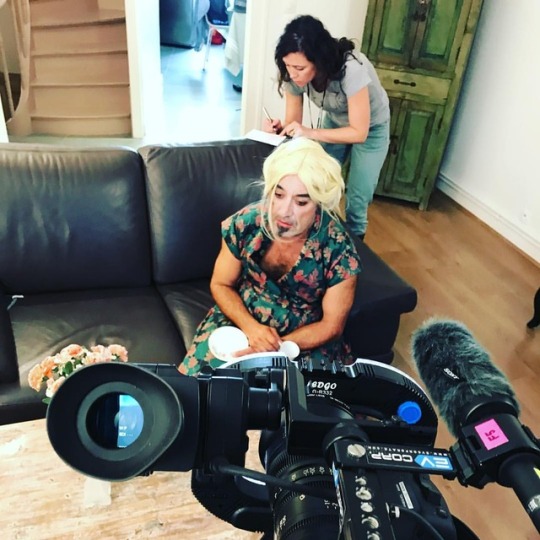
The other thing I was testing out in this exercise was this grimy green/yellow colour palette paired with a wide angle lense. This is the approach I want for the bathroom scene in Longboards. The colour palette and lenses is something I’ve been talking to Ben a lot about in terms of their metaphoric/subtextual purpose. The bathroom scene is the peak of the film, where Alex is confronting her past and talking it through with her friend. She’s feeling insecure and scared, on loose footing after being reminded of her father and getting her friend hurt. So, the warping of the room and her face makes her seem sickly and uncomfortable while the yellows have connotations of insecurity and cowardice, showing Alex’s mental state. At the start of this week, I began testing lighting and camera set-ups for the scenes. I shot a reference for the bathroom scene, with the lighting and lense choices I’ve talked about.

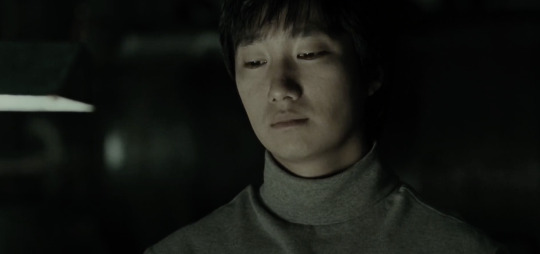
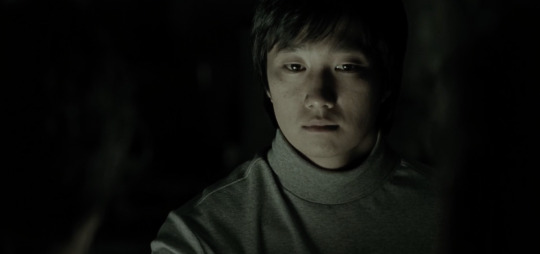
This scene will be handheld, so I can use these slight dutch angles easily and inconsistently throughout, to add to the fear and discomfort. This edge light paired with the ultra soft wrap around bounce allows us to totally see our character, one of the first shots of Alex without dark shadows on the face. She’s exposed in this moment so we want her to have nowhere to hide in these shots, getting right up in her face with a wide angle lense. I love the way the 14mm looks - the warping isn’t as extreme as I would have originally wanted but, I actually prefer this slightly more subtle look. The close-focus is excellent and the lense flaring is also quite nice - very soft. For this I used a 1.2k HMI, a couple gels plus trace frame, a LEDgo and the natural bounce that occurs in the chapel. For the actual shoot, I think a 650w would give the right amount of light to bounce around the small bathroom. The light would be outside, with diffusion taped to the outside of the window and instead of the LED, I will be using the practical lights that are built into the bathroom mirror that I noticed during our recce. I’m also considering, depending on the amount of bounce I get on set, to flag off the wall behind camera as negative fill, to remove some of the bounce straight on to the face. I’m really happy with this test and am confident I can make the bathroom scene look and feel the way the story needs it to.
I also tested the lighting plan for the garage scene - high contrast, isolating, red lighting.

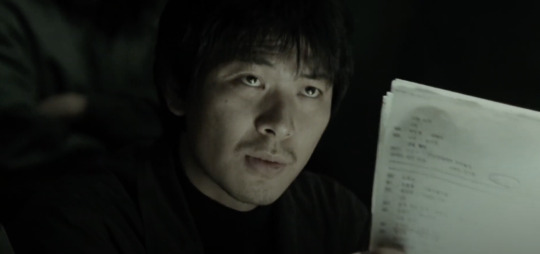
I first tested the ECU’s we have planned for the exercising/flashback montage. these were quite simple, using one large light with red gel and light diffusion. The one thing I added was the shutter angle, shooting 360 degree gives this gorgeous amount of motion blur. I think this will be the shutter angle for the whole film, I really like the abstracting effect and the emphasis of the speed of movement. It also gives me more exposure when shooting these dark scenes with only one or two lights without having to bump up the ISO, a mistake I won’t make twice with that bloody URSA. I tested the close-up as well, this time adding an LED for an eye-light.
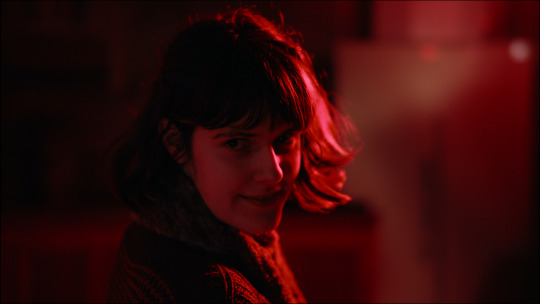
This one I’m less happy with - need more shadows on the face! I didn’t have it booked out, but I should’ve added in some negative fill on the left side to counteract the bounce off the walls. But the edge light works really well on the face and the eye-light is doing wonders, just might need to be a bit brighter in the final scene. For the actual scene, I plan on using (again, one trick pony) the 650w with a triple-layer red gel and a trace frame and an LED, motivated by the projector used in the scene. There is also a practical fluorescent tube light in the location that I want to use, with a couple layers of ND and red gel that we can have in the shot to add a bit more depth and motivate the lighting. These are all shot on the 50mm which I plan to stick with for the shoot as it gives a nice feeling of tightness without a lot of depth compression. Again, feeling confident when it comes to lighting and shooting this scene.
The pitch could’ve gone better I think - lots of ideas thrown out without the clearest angle through them. But the feedback given has helped us hone in to the core of the story and streamline our script.

For Natalia’s project, I’m getting more set up. We have a recce on Monday which I will be taking a mixer to so I can start building the sound library I want to use for the film. With my sound work on this film, I’m trying to get the specificities of the location into the film, with close recordings of small details and wider recordings of a whole place’s ambience. I’m excited to start getting my tools together and have more discussions with Nat about my ideas. The pitch was far more cohesive for this project, maybe only having our director and producer pitching kept it more focused.
Anyways, exciting week ahead, starting to shot list/storyboard with Ben, starting recording for Nat and doing tests for the grad film I’m working on. Busy, busy, busy.
2 notes
·
View notes
Text
Group 8 Scene Recreation - Memories of Murder Production Breakdown
Brainstorming
For the final week of the production workflow module, my group were tasked with recreating a scene of our choice. Bar some budgetary and time concerns, nothing was off the table.
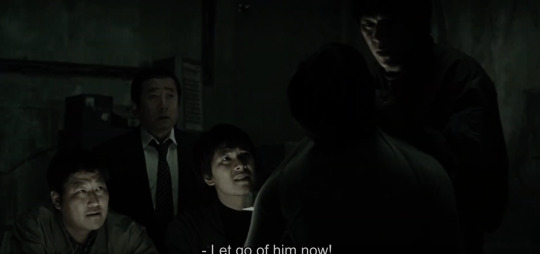
Eventually we settled on the interrogation scene from Bong Joon-Ho's Memories of Murder. I personally had not seen the film but was excited to tackle it based on seeing the director's other work Parasite.
Pre Production
We had plenty of kit to acquire in order to convey an accurate recreation of the scene:
Camera:
Blackmagic Pocket PRO 6K, Samyang Xeen Cinema Lens Kit, Smallrig Tripod
Sound:
Sennheiser 416, Sound Devices MixPre3-Recorder and Mixer, Large Boom Pole, Microphone Stand.
Lighting:
LEDGO LG-B308K 3x 308 light Daylight Reporter LED Lighting Kit, Gloves
Other:
Polyboard (White), Black Flag x3, Floor Cable Cover, Clapper, Sandbag x3
In terms of props we also had to purchase a light from amazon which would replicate the look of the desk light found in the original scene as well as being flexible to being adjusted in order to match different shot compositions. We had also our crew supply shirts and ties for respective actors as well as paper for the process of interrogation.
Aside from kit, scheduling was also CRITICAL and just as important as many groups were filming at the same time. This ended up being a close call as the only time we ended up getting kit that was far enough in advance to leave plenty time for editing conflicted with the premiere of another group project we unfortunately had to miss.
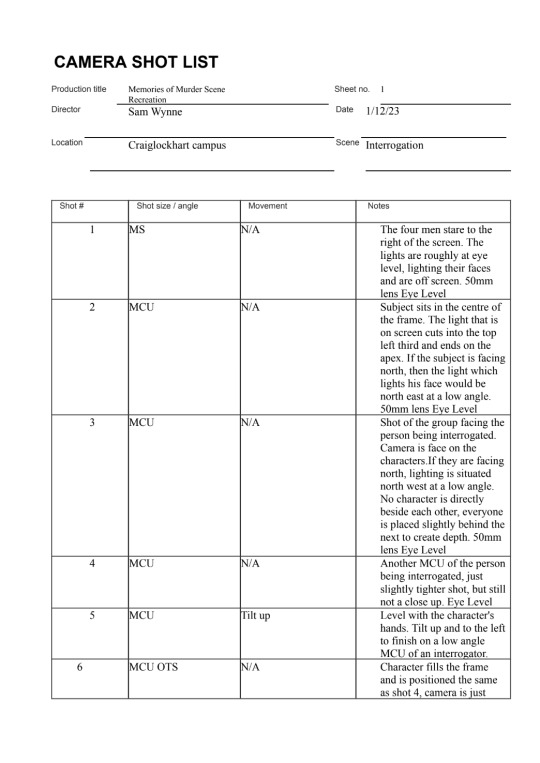
Next we took still frames from each shot in order to plan out lighting:


From there we planned our shotlist:

Along with this we decided on Crew Roles:
Sam Wynne: Director
Jack Burns: Producer, Actor, Runner
Jake Rae: Director of Photography
Jacob Doig: Lighting, Camera Assistant
Rushil Deepak: Production Design, Sound
And our actors:
Harry Batkin: Park Hyeon-Gyu
Daniel Lee: Seo Tae-Yoon
Cameron Mcintyre: Park Doo-Man
Jack Burns: Shin Dong-Chul
Euan Hunt: Cho Yong-koo
Our chosen filming date the 4th of December 2023.
Filming
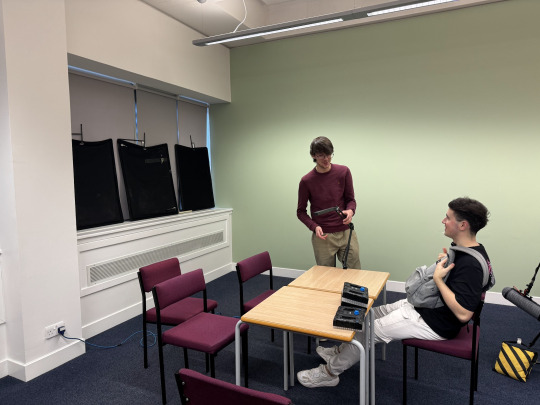
While the location of the scene might not seem complex there was lots of shots and respective lighting to match each.
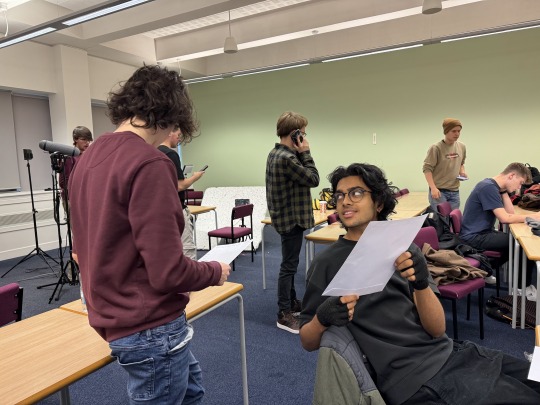
Figuring out framing with the crew/ Practicing lines with actors
We experimented with different angles and setups in the classroom we had booked for the day, and settled on using the corner of the room, which was conveniently near lots of sockets (Useful for our luck of batteries dying).
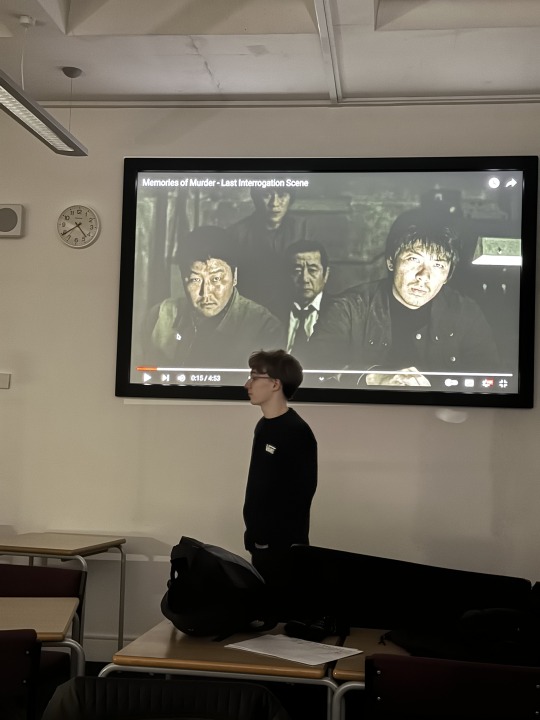
The classroom booking and the orientation of set placement actually worked out in our favour as we had full view of the room's projector, on which we displayed the original scene allowing both actors and the crew to get a feel for each respective shot as it came and went.

This initial shot we filmed first was actually quite simple compared to the others as we only had one character to worry about, along with just having to light his face, as opposed to later shots with characters blocking part of the framing.
Post Production
I helmed the post production of this project, inheriting the audio and video files onto my macbook. I then edited the film in premiere pro.
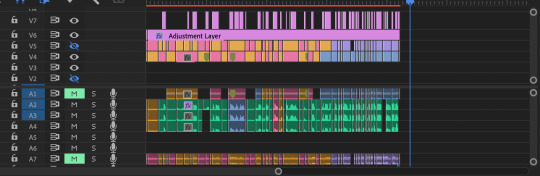
FInished Timeline
I attempted to organise individual cuts by colour coding different takes and angles, as the scene ended up being pretty complex to put together.

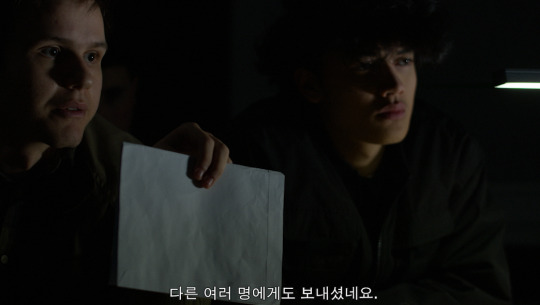
While not integral to recreating the scene, I thought a nice touch in the post production process would be the inclusion of Korean subtitles, paying homage to original language of the film.

Colour Match Feature
I used premiere pro's colour match feature to try and make some small lighting adjustments based on the original scenes. Admittedly, I don't have much experience with colour correction so I didn't go too in depth past this stage. However, this definitely something I want to learn over the winter break..
0 notes
Text
KIT LIST, Shoot Date -04/12/23
Blackmagic Pocket PRO 6K, Samyang Xeen Cinema Lens Kit, Smallrig Tripod
Sennheiser 416, Sound Devices MixPre3 - Recorder and Mixer
Large Boom Pole, Microphone Stand
LEDGO LG-B308K 3x 308 Light Daylight Reporter LED Lighting Kit, Gloves
Polyboard (White), Black Flag x3, Floor Cable Cover, Clapper, Sandbag x3
0 notes
Photo


DATE: April 22, 2023 Event: School Event Service/s: DJ & LEDGO Photo Booth We are grateful that you consistently select #FotoKraftWerks and #BeatMasterMobile! It brings us great joy to have surpassed your expectations. In the event that you require Photography, Videography, Photo Booth, DJ, Light Set-up, and other event services and rentals for your future events, please feel free to reach out to us. We are always available and eager to assist you! ☺ FOR INQUIRIES: 📲 (432) 243-0288 📩 [email protected] | [email protected] FOLLOW US: 🐥: BeatMsterMobile | Fotokraftwerks Photo Booth, Photography and Videography of West Texas 📷: thebeatmastermobile | FotoKraftWerks 🌐: www.fotokraftwerks.com | www.beatmastermobile.com
#FotoKraftWerks#BeatMasterMobile#ATA_Photo_Booth#KaraokeRental#Uplightings#LED#Bubbbleworks#Cakepinspotting#Danceandpartylights#Dancinginthecloud#Digitalmonogram#Followspotlights#Glowinthedark#Hazelighting#TVrental#LEDdancefloor#MarqueeLEDletterlights#Projectogram#Sparktakularfireworks#Stagedeckandroofing#UVneonblacklights#Geyserpyrotechnic#Photoboothrental#DJrental#Party#Wedding#Music
0 notes
Text
Form Mid-Shoot Update
Oops; been a little while since I updated on here. The preproduction process went relatively smoothly from the presentation until now, though there were some issues with communication. We also had some equipment limitations, as is to be expected. We were unable to get any more than one set of ledgo lights, which was unfortunate, but we have made do. Additionally, we were only able to get the xeen lens kit until today, meaning that the final day of the shoot will be with only a zoom lens. This is unfortunate, but necessary.
Our casting process went relatively smoothly, though a little behind schedule. I arranged a rehearsal with the actors and Kristian about a week before the shoot, which was very useful, especially for India on costume design. We also cast a friend from the course, Kyle, as our additional character. Everyone has seemed happy with the actors performances so far, and as of last night we wrapped Michael, the older actor’s, scenes.
The first day of shooting was a tad hectic, with some schedule changes being done somewhat on the fly, but that’s kind of how it goes. We still managed to finish 3 minutes ahead of schedule (!!!!!) which I was happy with. We ended up needing some pickups the following day which John told me about ahead of time and I reworked the schedule before I got to sleep. Joseph and Saoirse were on set for their last times this day, as they were helping out in stead of the first year PAs we had on the second day. They were both incredibly useful. I left set after day one feeling confident in my ability to manage the set and happy with the results of the day.
Day two was more packed with shots than the day before, as well as starting with Kyle’s scenes later on in the evening. This meant managing another actor on set which was tad stressful but we ended up getting all the shots we needed as well as pickups from the day before and finishing roughly on schedule. The first year PAs were fantastic, really helpful, and our new boom op replacing Saoirse, Robbie, was great too. I’m really happy with the additional crew we were able to get on set, they have made the whole somewhat difficult shoot a lot smoother. We wrapped on Michael’s scenes, and he was a pleasure to have on set - he even brought chocolate eggs for the cast & crew!
Tonight is the final night of shooting, now at the Newington location. I am a bit worried about the busyness of the street, but we should be able to handle as the scenes we are filming are short overall. We have our extras confirmed and are set to go. Exciting!
0 notes
Quote
Oh, ich bin so frei
Doch frei heißt auch alleine sein
Liebe is the place to be
Ich bin bereit für diese Galaxie
Bilderbuch - LED go (2019)
#Bilderbuch#Maurice Ernst#Vernissage my Heart#Liebe#Love#LEDgo#Quote#Zitat#Musik#music#deutschpop#austropop
12 notes
·
View notes
Photo

Hung out with filmmaker @tongantonia and my manager @ztalentmanagement @filmfestlalive! Thank you @bighousela ! - - - - #filmfestival #bighousela #ztalentmanagement #tongantonia #pingpong #shortfilms #baileybalzerofficial #newfriends #ledgo #lumix #sponsors #networking #leatherjacket #greeneyes (at Regal Cinema at L.A. Live) https://www.instagram.com/p/B45jpTtgwVI/?igshid=1cxjfo6ywaewf
#filmfestival#bighousela#ztalentmanagement#tongantonia#pingpong#shortfilms#baileybalzerofficial#newfriends#ledgo#lumix#sponsors#networking#leatherjacket#greeneyes
0 notes
Photo
Ça tourne #Sony #f5 #fujinon #fujifilm #cabrio #ledgo #ringlight #gearporn #shortfilm (à Festival Off Courts - Trouville)
0 notes
Photo

One of my favs with the #ledgo led tube. Shot this a few months ago during a workshop. It has enough power to be mixed with the #hensel strobes. #hensellighting #xrite #modelphotography by FrankDoorhof https://flic.kr/p/2iKh5HD
4 notes
·
View notes
Text
Ledgo LG-G260 RGB Skypanel klantreview | Een eerste indruk
Door: Ton van Moll
Sinds kort heeft Budgetcam het Ledgo LG-G260 RGB Skypanel in de verhuur. Een uitgelezen kans om de Ledgo een keertje uit te proberen! Mijn insteek voor de review met de Ledgo Skypanel was om te kijken in hoeverre dit Ledpanel was aan te passen aan lichtbronnen die, naast kleurtemperatuur, een afwijking hebben in groen/magenta. Daarnaast wilde ik weten of je met dit paneel kunt invullen bij daglicht met behoorlijk wat zon.
Dit is de opstelling die ik binnen gebruikt heb:
In de set staat een X-Rite video kleurenkaart als referentie, de waarden hiervan zijn bekend. In de bijgesloten video kun je mijn tests zien.
youtube
Wat fijn is aan dit armatuur is dat er diverse modus zijn om het aan te sturen. Het belangrijkste voor mij is de CCT modus het belangrijkst, je kunt de kleur in graden Kelvin van 2700-7000 graden Kelvin regelen. Meer als genoeg dus! Wat hierbij opvalt dat het verschil in lichtopbrengst bij lage en hoge temperaturen niet zo groot is. Bij Bi-Color panels scheelt dit namelijk meestal nog al wat. Daarnaast kun je een correctie voor groen of magenta instellen, dit is handig bij TL of spaarlampen, die meestal een groen zweem geven.

Eerst heb ik daglicht ingevuld. Met de LEDGO werkte prima: invullen witbalans en klaar. Iedere keer heb ik de kleuren in de video gemeten, over deze beelden zit geen correctie. Vervolgens ben ik het invullen bij zonlicht gaan proberen. In de video kun je dit zien. Ik heb hierbij de afstand van 1,25m tot het object aangehouden en dat werkt prima. Bij een grotere afstand zal dit minder worden.
‘S avonds ben ik de Ledgo gaan testen met kunstlicht. Eerst heb ik het panel gebruikt om een blauwe achtergrond gloed te laten geven, de voorkant is verlicht met ander ledpanels. Voor de blauwe kleur is de RGBW modus gebruikt waar je elke kleurcombinatie kunt instellen op basis van RGB. In dit geval dus R=0 G=0 en B=100%.
Hierna ben ik een schemerlamp gaan combineren met de Ledgo G260. Alleen in de schermlamp zat een spaarlamp waardoor de kleur niet klopte met de Ledgo G260 met alleen de kleurtemperatuur instelling. De oplossing was simpel: even wat groen erin draaien met de groen/magenta correctie, witbalans en klaar: het resultaat was helemaal neutraal. Daarnaast zijn er in het filmpje nog een paar effecten zien zoals bliksem en discolicht.
Mijn conclusie is dat de Ledgo echt een mooi armatuur is met zeer nauwkeurige kleurweergaven. Dit is lang niet bij alle ledpanels het geval.
Benieuwd hoe de Ledgo LG-G260 RGB Skypanel bevalt? Reserveer ze dan direct via de Budgetcam website. Ook een keer de nieuwste apparatuur testen voor het schrijven van een review? Schrijf je dan in voor de Budgetcam reviewpoule.
0 notes
Photo

Mmm... lite blandade känslor inför det här testet... 😬🤘😕 — Klippet kommer på vår Youtube inom kort😅🤪😂 #filtrkids #testar #ledgo #ringlight #filtrkidsyoutube #linkinbio👆
0 notes
Photo

Testing out the #ledgo LG-B5603Kit+T Portable Video Light at our @beyondreviewstv studio! Thank you @christiannong and @mq_lightings! #studiolighting #filmmaking #beyondreviewstv #mqlightings #led #ledlights
0 notes
Text
LEDGO LG-R320C Bi-Color Shoot-Through Flood LED Ring Light with 2 Batteries & Charger + Cleaning Kit Reviews
LEDGO LG-R320C Bi-Color Shoot-Through Flood LED Ring Light with 2 Batteries & Charger + Cleaning Kit

KIT INCLUDES 6 PRODUCTS — All BRAND NEW Items with all Manufacturer-supplied Accessories + Full USA Warranties:
[1] LEDGO LG-R320C Bi-Color Shoot-Through Flood LED Ring Light +
[2] Battery for NP-F550 NP-F570 +
[3] Additional Battery for NP-F550 NP-F570 + [4] Battery Charger +
[5] PD 5pc Complete…
View On WordPress
0 notes
Photo

Filming, always filming. You should see my to-do list for next year. Thanks for capturing this moment @kimariee1 👍🏻#vitamix #greensmoothie #30daygreensmoothiechallenge #ledgo
0 notes
Photo

With LEDGO's photo booth, you can get all your favorite photos back & share them with the world. This no-printing experience, so no more waiting for prints to show up. Our photo booth uses a wide-angle camera that takes in your whole face and body, in HD quality photos. Unlike other photo booths where you need to print out your photos, LEDGO simply sends your photos directly to your email. FOR INQUIRIES: 📲 (432) 243-0288 📩[email protected] | [email protected] FOLLOW US: 🐥: @BeatMsterMobile | @fotokraftwerks 📷: thebeatmastermobile | FotoKraftWerks 🌐 www.fotokraftwerks.com | www.beatmastermobile.com
#FotoKraftWerks#ATA_Photo_Booth#AudioStageLight#Photoboothrental#DJrental#Photobooth#iPadphotobooth#Rental#bestphotobooth#Bubblebooth#Classicphotobooth#Entouragephotobooth#Greenscreenbooth#Musicphotobooth#Neonphotobooth#Openairphotobooth#Selfiephotobooth#Shadowphotobooth#360photobooth#LEDGOphotobooth#DropOffphotoBooth#Photography#Videography#Events#Quinceañera#Corporateevent#Birthday#Schoolevent#Photoboothtexas#Wedding
0 notes
Text
Filming Cinehaiku:
On Monday 11th October, Brontë and I set up in Studio 2 and filmed our Cinehaiku.
After collecting our equipment, we began to set up. Firstly, we chose a corner of the room to shoot in, which would be best for protecting the equipment in Studio 2. This resulted in filming in the far left corner. To protect the computers, speakers and other equipment in the room, we covered each of them all with a sheet.
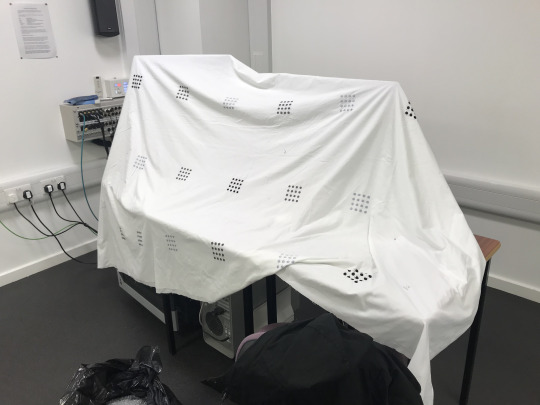
Therefore, if any ceramics were to smash toward them, the sheet would protect the computer screens etc., from being broken. Then we set up our set. This consisted of a table and two c-stands, which we draped a white sheet from. Next, we paid a visit to Petros to gain access to the foley room to use the concrete slab, which we need to throw the ceramics on to ensure they would smash. Once this was secured, we began to light the set. Admittedly, lighting isn't either mine or Brontë's strong points. I had booked out the LEDGO LG-B308K - 3 x 308 light Daylight Reporter LED Lighting Kit, as we both felt more comfortable with LED lights, and the kit gave us the option to create three-point lighting set up.

With the lighting, there was a compromise to be made. Brontë wanted to create a more orange feel to the image with the light focusing on the object being smashed. However, I thought the scene should be more white and filled with light, especially on the backdrop. But I think what we ended up with was a poorly light shot.
Anyway, after finalising the set, we moved on to the actual filming of the project. Before any filming could occur, we needed to secure the set and put all the safety precautions in place. Petros came in to view the room and give his consent for filming to go ahead, understanding all the measures we had put in place to stay safe. Brontë and I had both turned up to set in longsleeved shirts and trousers to protect our skin. We wore our face masks at all times, one to follow covid filming regulation, but also they were beneficial for shielding our faces from harm. And, of course, we wore safety goggles and gloves at all times.

We also put a sign on the door of studio two which said "filming in progress (sorry for any convenience and noise)". Therefore, all those in the building understood what was happening. And we also emailed Alex and Petros to let them know what was happening too.
Now we were ready to film. We had three different colours to smash and choose to rotate the colour we would smash. Therefore, instead of breaking all the blue pots at once, we would smash a red pot, then a green pot and then a blue pot and follow this pattern till everything had shattered. We wanted to do this because the more we filmed, the more comfortable we would get with smashing the pot and might develop a particular way of throwing the pots, ensuring a good smash. Therefore, we didn't want to figure this method out on only the blues. We tried to prevent all the blue smashes from looking less effective because we hadn't formulated a technique yet. So we spread this actuality across all the different colours.
After we had smashed everything, we felt everything had gone reasonably well. There were a couple of instances of smashing, which didn't go too well; this mainly concerned the red objects. For some reason, the pottery we chose for the red seemed more challenging to smash. Therefore, a couple of the red things didn't smash on the stone but did when they fell off the table. Thus, the smash happened off-screen. A similar situation occurred a couple of times, and we were worried that we would not have enough good red smashes for the edit. But I think the main thought we had when we left the set was that our lighting wasn't very good, and we had produced an uncinematic image which might affect our image and sound relationship.
0 notes
Last Seen Blogs

nikzyyslife
Nikitaa jiwani

coledepressed-blog
bcs i'm done

artivisive
meet the frownies

xoxoholix
𝑳𝒐𝒗𝒆𝒍𝒚 𝑲𝒐𝒏𝒊💋🫦

economic-focus-front-daughter
Untitled