#absolutely no idea how to write something readable for an id so
Text

pov of an evil book
#tw fire#tma#the magnus archives#tma fanart#gerry keay#gerry keay fanart#absolutely no idea how to write something readable for an id so#no id
115 notes
·
View notes
Note
Do you have any tips or pieces of advice for someone who's looking to start up an rp blog for a character? I have plenty of experience roleplaying, but none of it is with tumblr.
//OH sure sure !!
lets get the technical stuff out first, make the account for your new blog in advance, before you prepare anything else because tumblr has this anti-bots security system in place which doesnt allow new blog’s posts to show up in the tags (and tags such as #indie rp, #anime rp, #insert show here rp are pretty important in getting ur blog out there). you’ll also have to follow some people, get followed back by at least one, reblog+like some posts before your stuff starts showing up in the tags
of course u can disregard the whole promotion thing and just follow people and wait for them to follow you back, but if u want new people to find you without you actively looking for them, its good to drop something in the rp tag. but again, you dont have to do any of this.
ALSO IM PUTTING THE REST UNDER READ MORE BC IT GOT LENGTHY:
so heres stuff you can prepare (or not, its totally up to you !!)
icons - a relict of dreamwidth era , not necessary but i find that they add some zest to the interactions so personally, im a fan. usually 100px x 100px u can make them fancy or not, your choice. just get some basic facial expressions (but again, you dont NEED them)
themes - some rpers pay a lot of attention to blog themes, i used to be like that but tbh rn i dont think anything beats a nice basic theme w/ a readable font. hit up theme hunter and snag a theme u like !!! OR DON’T, thats totally up to you !!!
also you can set your blog to dash only in the blog’s settings which means u dont have to bother w/ a theme !! its a popular thing in rpc nowadays !!!
oh and just a hint – id avoid using somebody’s art for icons or elements of theme… i mean sure u can credit them but hardly anybody looks at credits so idk id just avoid it altogether cuz the artists dont like that and theyre absolutely right. i used to use peoples art for icons and i had some artists reach out to me and ask that i dont do that and tbh now i cringe at my past-self for not seeing that its soo disrespectful of the artists
what to put on blog:
about page - its a page where rpers put some basic information about the character they write as. it can be super important if youre writing as an OC (not many people will follow an OC if they dont know anything about them tbh) !!! if youre writing a canon character u can just resort to filling out a basic dossier (like listing their name, age, whatever… YOU CAN USE THIS and fill out what u like). or you know, do whatever. on cell, i just wrote a piece of Something and linked his wikipedia page lol. do what you feel like, its just a thing in rp community.
rules page - slightly more important. this is where you set boundaries and introduce yourself ooc. after introductions ur expected to tell people what’s NOT ok by you, for example, you say that godmodding is not ok (godmodding is when people write in their own responses what ur character is doing), maybe shipping is not ok by you, maybe u dont want to write smut ever etc. you put all of that there and any additional info you feel the need to add (for example, asking people to tag certain triggers etc). try to browse other peoples rules pages to get the feel
verses page - some blogs have a lot of specific verses like idk, an AU in which ur character is evil etc. this is a page where u can put them and add descriptions, UP TO YOU. i find that its less important than about or rules page, focus on those 2 first, especially the rules page bc its what people usually check out first before writing with u!! add verses later !!!
how to start an rp blog:
OK so lets say you’re prepared and ready to write. i usually post a promo to announce my Arrival to the rp market. take a look at what’s in the indie rp tag for example, just to give you an idea what ppl post there. it used to be REQUIRED to post like… a graphic advertising ur blog but tbh these days u can just drop a text post (preferably with ur icon so that people know which character u write) and you say smth like ‘HELLO, a new (character here) RP blog here!!! like/reblog if youre interested in writing with me!!’ (ofc write whats natural to you, just introduce ur blog in whatever way u feel like it– OR DONT, YOU DONT HAVE TO DO THIS)
BEFORE POSTING A PROMO MAKE SURE YOUR POSTS SHOW UP IN TAGS FIRST. YOU MIGHT HAVE TO FOLLOW SOME PEOPLE FIRST (refer to this) – where to find those rp blogs?? refer to tags below.
what to tag your promo with: remember that only 5 first tags will show up in the search results. so pick some good tags, i think the most important tag is #(show/movie/books name) rp. heres my promo, u can check the tags i used there and come up with your own accordingly. and also browse these tags to find people to follow, like idk, lets say u wanna rp sb from naruto, then u hit up #naruto rp and just scroll and follow ! also avoid using swear words or nsfw words in ur promo bc tumblr will censor it lol
but remember YOU DONT HAVE TO POST A PROMO, THIS IS ENTIRELY UP TO YOU !!!!!
how to start WRITING on an rp blog:
ok so youve gathered some followers, now what. i usually just post a starter call! this is a post that people who want to write with you will like and you in turn will start a thread with them (doesnt have to be IMMEDIATELY, take ur time). you can also reblog rp memes which are like writing prompts people send to you (but i dont recommend starting ur rp blog w/ a memes barrage, people usually want to get to know your blog a little bit more before they send you a prompt).
you can also wait for other people to post starter calls and then you like them (but check their rules first !!! for example, most people have a rule about being mutuals only, which means they will write you something only if youre following each other back), which also works.
AND THATS HOW IT GOES !!! you are now writing on an rp blog. remember to take it easy and do what feels natural !!! browse some other rp blogs to get Inspired (but dont just lift things, stealing is a big no-no in the community). do what you feel comfortable with, if you dont want to make icons then dont! you’ll always find somebody who’ll write with you without icons (we just rly like them lol). be patient with others and yourself, read peoples rules, be nice, dont reblog an rp meme without sending a prompt to the person youre reblogging from (thats called reblog karma, if you dont wanna send a prompt then rb from the source), put yourself out there and UHH have fun !
#if u have any other questions feel free to ask IVE BEEN AT IT FOR A LOOONG TIME i am a fountain of knowledge#Unfortunately.#Anonymous#and again you dont have to do any ot this its jsut advice. there is no RP police that will hunt you down if you dont have an about page#those r just standards people are most familiar with !
7 notes
·
View notes
Text
Outsmart Your Competition: Learn About Search Engine Optimization Now
Successful companies employ strategic SEO methods. If you wish to compete, you need to up your game and learn about Search Engine Marketing. The tips here will show you how to optimize your search engine rankings. Follow the below advice and strengthen your business.
It’s best to have lots of short articles than a few long ones. Pages that are long don’t do as well as the short ones within search engine results. Not to mention that websites visitors would rather read a short article over a long article, too.
To achieve the best ranking in search engine results, incorporate a number of keywords related to your market niche in the meta tags for your website. Many experts have also recommended including misspellings of the keywords in the meta tags if someone happens to spell it wrong. The search engines decipher your meta tags and integrate the information into their algorithms used to generate search results. For example, if you have a website about Maine Coon cats, then use “Maine Coon” as well as “Main Coon” and “Mainecoon.”
In order to fully optimize your site, you must focus on keyword density. Your keyword content on any given page should not exceed 20 percent.
It is important to be patient while enduring the process of boosting your Search Engine Marketing. Significant changes cannot happen over night. On the contrary, it can take several months if your site is fairly new. Online business is no different from offline business. Either way, it is going to take time to build your brand.
Choose a domain name for your site that people can readily recall and also gives a clear indication of what you are offering. This is very helpful to people who have found your content on YouTube. They are memorable and easy to say.
When creating URL names for your separate pages, remember that spiders are not able to make sense of session id names and dynamic language, like /page_id=59. Search engines get confused with irregular names, so you will want to create something that is meaningful for every URL, along with relevant keywords that flow naturally.
Search Engines
Using Flash is not a good idea when you are optimizing a site for the search engines. Flash does not load quickly and search engine spiders cannot read it, so the text in this type of file cannot be indexed. Search engines need to crawl and see your site in order to make use of Local SEO.
Include keywords in each page’s URL. If a URL has symbols or numbers that won’t be searched for, it is unlikely to rank highly in search engines. Including keywords that are important and relevant to the site can really improve rankings and traffic.
To attract people to your site, you must think about the keywords they would use to search for and find the site, and then ensure you use the keywords often on your site’s pages. You want to use them strategically in both content and the titles, but be wary of over saturating your site with the keywords. You don’t want to be flagged as a possible spam site.
In order to achieve enhanced search engine optimization, become a member of area business associations. Local searches are more likely to then show your website due to the automatic inclusion of links by these organizations. Also, if your business has a good Better Business Bureau rating, you will also get the added benefit of consumers trusting your website even more.
Try basing your articles on keywords to help improve Search Engine Marketing of your articles. When you incorporate keywords that pertain to the subjects of your articles, search engines can find them easier. That, therefore, makes it easier for readers to find your articles. Be sure to include the keyword in the article’s title and summary. You should also use it a few times in the body of the article.
Make sure to write for human readers when doing your search engine optimization. So keep that in mind as you decide on your content. Readability is a must. If they cannot, your business may fail.
Social Media
Social media sites are absolutely necessary when you are working with Local SEO In Lynchburg VA. If you join Youtube, you can show videos of your products and perhaps the way you use them. You can talk directly to your visitors with social media sites.
It is crucial that you never make the mistake of posting any article to your website more than one time. Google views this as attempting to cheat the system, and your Page Rank can plummet as a result. Link count will also decrease when two pages have the exact same content; this will make your ranking decline.
Be sure that you are informed about a Lynchburg SEO company before using one. Ask questions such as how long have they been business, what do they do in order to drive more traffic to your site, what should my expectations be and what is the price. In addition, ask if you can view a portfolio of some of their completed projects, and request contact information for references. A great company will allow this to happen.
If search engines catch the fact that you are manipulating your site to fraudulently achieve top return rankings, they will intercede to manually suppress your pages. Some engines, such as Google and Yahoo, will ban companies from appearing in the results because of fraudulent behavior. You should always optimize your search engine strategy in an ethical manner.
Make sure to use language meta tags if your site’s content is written in something other than English. They can help improve your rankings since they will be found in those foreign language searches.
The information from this article will assist you in optimizing your website. Therefore, it is important to understand the best practices concerning Search Engine Marketing. These tips will give you a plan for success.
Many people would like to understand When it comes to SEO, you really shouldn’t trust your company’s Google ranking to someone who is not a Lynchburg SEO Expert. If you are reading this, you most likely are looking for someone who can advice you build your business’ online visibility, website traffic, and leads.

, but they don’t always know how they should go about it. Thankfully, you came to the right place to help you get started with the learning process. Now is the time to take the knowledge you have gained and apply it to your life!
from Lynchburg SEO Expert https://lynchburgseoexpert.com/outsmart-your-competition-learn-about-search-engine-optimization-now/
from Lynchburg SEO Expert https://lynchburgseoexpert.tumblr.com/post/621541799766491136
0 notes
Text
Outsmart Your Competition: Learn About Search Engine Optimization Now
Successful companies employ strategic SEO methods. If you wish to compete, you need to up your game and learn about Search Engine Marketing. The tips here will show you how to optimize your search engine rankings. Follow the below advice and strengthen your business.
It’s best to have lots of short articles than a few long ones. Pages that are long don’t do as well as the short ones within search engine results. Not to mention that websites visitors would rather read a short article over a long article, too.
To achieve the best ranking in search engine results, incorporate a number of keywords related to your market niche in the meta tags for your website. Many experts have also recommended including misspellings of the keywords in the meta tags if someone happens to spell it wrong. The search engines decipher your meta tags and integrate the information into their algorithms used to generate search results. For example, if you have a website about Maine Coon cats, then use “Maine Coon” as well as “Main Coon” and “Mainecoon.”
In order to fully optimize your site, you must focus on keyword density. Your keyword content on any given page should not exceed 20 percent.
It is important to be patient while enduring the process of boosting your Search Engine Marketing. Significant changes cannot happen over night. On the contrary, it can take several months if your site is fairly new. Online business is no different from offline business. Either way, it is going to take time to build your brand.
Choose a domain name for your site that people can readily recall and also gives a clear indication of what you are offering. This is very helpful to people who have found your content on YouTube. They are memorable and easy to say.
When creating URL names for your separate pages, remember that spiders are not able to make sense of session id names and dynamic language, like /page_id=59. Search engines get confused with irregular names, so you will want to create something that is meaningful for every URL, along with relevant keywords that flow naturally.
Search Engines
Using Flash is not a good idea when you are optimizing a site for the search engines. Flash does not load quickly and search engine spiders cannot read it, so the text in this type of file cannot be indexed. Search engines need to crawl and see your site in order to make use of Local SEO.
Include keywords in each page’s URL. If a URL has symbols or numbers that won’t be searched for, it is unlikely to rank highly in search engines. Including keywords that are important and relevant to the site can really improve rankings and traffic.
To attract people to your site, you must think about the keywords they would use to search for and find the site, and then ensure you use the keywords often on your site’s pages. You want to use them strategically in both content and the titles, but be wary of over saturating your site with the keywords. You don’t want to be flagged as a possible spam site.
In order to achieve enhanced search engine optimization, become a member of area business associations. Local searches are more likely to then show your website due to the automatic inclusion of links by these organizations. Also, if your business has a good Better Business Bureau rating, you will also get the added benefit of consumers trusting your website even more.
Try basing your articles on keywords to help improve Search Engine Marketing of your articles. When you incorporate keywords that pertain to the subjects of your articles, search engines can find them easier. That, therefore, makes it easier for readers to find your articles. Be sure to include the keyword in the article’s title and summary. You should also use it a few times in the body of the article.
Make sure to write for human readers when doing your search engine optimization. So keep that in mind as you decide on your content. Readability is a must. If they cannot, your business may fail.
Social Media
Social media sites are absolutely necessary when you are working with Local SEO In Lynchburg VA. If you join Youtube, you can show videos of your products and perhaps the way you use them. You can talk directly to your visitors with social media sites.
It is crucial that you never make the mistake of posting any article to your website more than one time. Google views this as attempting to cheat the system, and your Page Rank can plummet as a result. Link count will also decrease when two pages have the exact same content; this will make your ranking decline.
Be sure that you are informed about a Lynchburg SEO company before using one. Ask questions such as how long have they been business, what do they do in order to drive more traffic to your site, what should my expectations be and what is the price. In addition, ask if you can view a portfolio of some of their completed projects, and request contact information for references. A great company will allow this to happen.
If search engines catch the fact that you are manipulating your site to fraudulently achieve top return rankings, they will intercede to manually suppress your pages. Some engines, such as Google and Yahoo, will ban companies from appearing in the results because of fraudulent behavior. You should always optimize your search engine strategy in an ethical manner.
Make sure to use language meta tags if your site’s content is written in something other than English. They can help improve your rankings since they will be found in those foreign language searches.
The information from this article will assist you in optimizing your website. Therefore, it is important to understand the best practices concerning Search Engine Marketing. These tips will give you a plan for success.
Many people would like to understand When it comes to SEO, you really shouldn’t trust your company’s Google ranking to someone who is not a Lynchburg SEO Expert. If you are reading this, you most likely are looking for someone who can advice you build your business’ online visibility, website traffic, and leads.

, but they don’t always know how they should go about it. Thankfully, you came to the right place to help you get started with the learning process. Now is the time to take the knowledge you have gained and apply it to your life!
source https://lynchburgseoexpert.com/outsmart-your-competition-learn-about-search-engine-optimization-now/
from Lynchburg SEO Expert https://lynchburgseoexpert.blogspot.com/2020/06/outsmart-your-competition-learn-about.html
0 notes
Text
Outsmart Your Competition: Learn About Search Engine Optimization Now
Successful companies employ strategic SEO methods. If you wish to compete, you need to up your game and learn about Search Engine Marketing. The tips here will show you how to optimize your search engine rankings. Follow the below advice and strengthen your business.
It’s best to have lots of short articles than a few long ones. Pages that are long don’t do as well as the short ones within search engine results. Not to mention that websites visitors would rather read a short article over a long article, too.
To achieve the best ranking in search engine results, incorporate a number of keywords related to your market niche in the meta tags for your website. Many experts have also recommended including misspellings of the keywords in the meta tags if someone happens to spell it wrong. The search engines decipher your meta tags and integrate the information into their algorithms used to generate search results. For example, if you have a website about Maine Coon cats, then use “Maine Coon” as well as “Main Coon” and “Mainecoon.”
In order to fully optimize your site, you must focus on keyword density. Your keyword content on any given page should not exceed 20 percent.
It is important to be patient while enduring the process of boosting your Search Engine Marketing. Significant changes cannot happen over night. On the contrary, it can take several months if your site is fairly new. Online business is no different from offline business. Either way, it is going to take time to build your brand.
Choose a domain name for your site that people can readily recall and also gives a clear indication of what you are offering. This is very helpful to people who have found your content on YouTube. They are memorable and easy to say.
When creating URL names for your separate pages, remember that spiders are not able to make sense of session id names and dynamic language, like /page_id=59. Search engines get confused with irregular names, so you will want to create something that is meaningful for every URL, along with relevant keywords that flow naturally.
Search Engines
Using Flash is not a good idea when you are optimizing a site for the search engines. Flash does not load quickly and search engine spiders cannot read it, so the text in this type of file cannot be indexed. Search engines need to crawl and see your site in order to make use of Local SEO.
Include keywords in each page’s URL. If a URL has symbols or numbers that won’t be searched for, it is unlikely to rank highly in search engines. Including keywords that are important and relevant to the site can really improve rankings and traffic.
To attract people to your site, you must think about the keywords they would use to search for and find the site, and then ensure you use the keywords often on your site’s pages. You want to use them strategically in both content and the titles, but be wary of over saturating your site with the keywords. You don’t want to be flagged as a possible spam site.
In order to achieve enhanced search engine optimization, become a member of area business associations. Local searches are more likely to then show your website due to the automatic inclusion of links by these organizations. Also, if your business has a good Better Business Bureau rating, you will also get the added benefit of consumers trusting your website even more.
Try basing your articles on keywords to help improve Search Engine Marketing of your articles. When you incorporate keywords that pertain to the subjects of your articles, search engines can find them easier. That, therefore, makes it easier for readers to find your articles. Be sure to include the keyword in the article’s title and summary. You should also use it a few times in the body of the article.
Make sure to write for human readers when doing your search engine optimization. So keep that in mind as you decide on your content. Readability is a must. If they cannot, your business may fail.
Social Media
Social media sites are absolutely necessary when you are working with Local SEO In Lynchburg VA. If you join Youtube, you can show videos of your products and perhaps the way you use them. You can talk directly to your visitors with social media sites.
It is crucial that you never make the mistake of posting any article to your website more than one time. Google views this as attempting to cheat the system, and your Page Rank can plummet as a result. Link count will also decrease when two pages have the exact same content; this will make your ranking decline.
Be sure that you are informed about a Lynchburg SEO company before using one. Ask questions such as how long have they been business, what do they do in order to drive more traffic to your site, what should my expectations be and what is the price. In addition, ask if you can view a portfolio of some of their completed projects, and request contact information for references. A great company will allow this to happen.
If search engines catch the fact that you are manipulating your site to fraudulently achieve top return rankings, they will intercede to manually suppress your pages. Some engines, such as Google and Yahoo, will ban companies from appearing in the results because of fraudulent behavior. You should always optimize your search engine strategy in an ethical manner.
Make sure to use language meta tags if your site’s content is written in something other than English. They can help improve your rankings since they will be found in those foreign language searches.
The information from this article will assist you in optimizing your website. Therefore, it is important to understand the best practices concerning Search Engine Marketing. These tips will give you a plan for success.
Many people would like to understand When it comes to SEO, you really shouldn’t trust your company’s Google ranking to someone who is not a Lynchburg SEO Expert. If you are reading this, you most likely are looking for someone who can advice you build your business’ online visibility, website traffic, and leads.

, but they don’t always know how they should go about it. Thankfully, you came to the right place to help you get started with the learning process. Now is the time to take the knowledge you have gained and apply it to your life!
from Lynchburg SEO Expert https://lynchburgseoexpert.com/outsmart-your-competition-learn-about-search-engine-optimization-now/
0 notes
Text
Outsmart Your Competition: Learn About Search Engine Optimization Now
Successful companies employ strategic SEO methods. If you wish to compete, you need to up your game and learn about Search Engine Marketing. The tips here will show you how to optimize your search engine rankings. Follow the below advice and strengthen your business.
It’s best to have lots of short articles than a few long ones. Pages that are long don’t do as well as the short ones within search engine results. Not to mention that websites visitors would rather read a short article over a long article, too.
To achieve the best ranking in search engine results, incorporate a number of keywords related to your market niche in the meta tags for your website. Many experts have also recommended including misspellings of the keywords in the meta tags if someone happens to spell it wrong. The search engines decipher your meta tags and integrate the information into their algorithms used to generate search results. For example, if you have a website about Maine Coon cats, then use “Maine Coon” as well as “Main Coon” and “Mainecoon.”
In order to fully optimize your site, you must focus on keyword density. Your keyword content on any given page should not exceed 20 percent.
It is important to be patient while enduring the process of boosting your Search Engine Marketing. Significant changes cannot happen over night. On the contrary, it can take several months if your site is fairly new. Online business is no different from offline business. Either way, it is going to take time to build your brand.
Choose a domain name for your site that people can readily recall and also gives a clear indication of what you are offering. This is very helpful to people who have found your content on YouTube. They are memorable and easy to say.
When creating URL names for your separate pages, remember that spiders are not able to make sense of session id names and dynamic language, like /page_id=59. Search engines get confused with irregular names, so you will want to create something that is meaningful for every URL, along with relevant keywords that flow naturally.
Search Engines
Using Flash is not a good idea when you are optimizing a site for the search engines. Flash does not load quickly and search engine spiders cannot read it, so the text in this type of file cannot be indexed. Search engines need to crawl and see your site in order to make use of Local SEO.
Include keywords in each page’s URL. If a URL has symbols or numbers that won’t be searched for, it is unlikely to rank highly in search engines. Including keywords that are important and relevant to the site can really improve rankings and traffic.
To attract people to your site, you must think about the keywords they would use to search for and find the site, and then ensure you use the keywords often on your site’s pages. You want to use them strategically in both content and the titles, but be wary of over saturating your site with the keywords. You don’t want to be flagged as a possible spam site.
In order to achieve enhanced search engine optimization, become a member of area business associations. Local searches are more likely to then show your website due to the automatic inclusion of links by these organizations. Also, if your business has a good Better Business Bureau rating, you will also get the added benefit of consumers trusting your website even more.
Try basing your articles on keywords to help improve Search Engine Marketing of your articles. When you incorporate keywords that pertain to the subjects of your articles, search engines can find them easier. That, therefore, makes it easier for readers to find your articles. Be sure to include the keyword in the article’s title and summary. You should also use it a few times in the body of the article.
Make sure to write for human readers when doing your search engine optimization. So keep that in mind as you decide on your content. Readability is a must. If they cannot, your business may fail.
Social Media
Social media sites are absolutely necessary when you are working with Local SEO In Lynchburg VA. If you join Youtube, you can show videos of your products and perhaps the way you use them. You can talk directly to your visitors with social media sites.
It is crucial that you never make the mistake of posting any article to your website more than one time. Google views this as attempting to cheat the system, and your Page Rank can plummet as a result. Link count will also decrease when two pages have the exact same content; this will make your ranking decline.
Be sure that you are informed about a Lynchburg SEO company before using one. Ask questions such as how long have they been business, what do they do in order to drive more traffic to your site, what should my expectations be and what is the price. In addition, ask if you can view a portfolio of some of their completed projects, and request contact information for references. A great company will allow this to happen.
If search engines catch the fact that you are manipulating your site to fraudulently achieve top return rankings, they will intercede to manually suppress your pages. Some engines, such as Google and Yahoo, will ban companies from appearing in the results because of fraudulent behavior. You should always optimize your search engine strategy in an ethical manner.
Make sure to use language meta tags if your site’s content is written in something other than English. They can help improve your rankings since they will be found in those foreign language searches.
The information from this article will assist you in optimizing your website. Therefore, it is important to understand the best practices concerning Search Engine Marketing. These tips will give you a plan for success.
Many people would like to understand When it comes to SEO, you really shouldn’t trust your company’s Google ranking to someone who is not a Lynchburg SEO Expert. If you are reading this, you most likely are looking for someone who can advice you build your business’ online visibility, website traffic, and leads.

, but they don’t always know how they should go about it. Thankfully, you came to the right place to help you get started with the learning process. Now is the time to take the knowledge you have gained and apply it to your life!
from
https://lynchburgseoexpert.com/outsmart-your-competition-learn-about-search-engine-optimization-now/
from Lynchburg SEO Expert - Blog https://lynchburgseoexpert.weebly.com/blog/outsmart-your-competition-learn-about-search-engine-optimization-now
0 notes
Text
Email Lead Marketing – The Art and Science of Turning Subscribers Into Raving Customers | Ema...
Email Lead Marketing – The Art and Science of Turning Subscribers Into Raving Customers | Ema...
Email Lead Marketing – The Art and Science of Turning Subscribers Into Raving Customers | Email Marketing Tutorials | Email Marketing Design Layout | Email Marketing Mailchimp | Why Advertise Through Email. #traditionaladvertising #Email Marketing Strategy Email marketing tools | Email Marketing Tools Provider| Click the link to read the medium article abo
Source by wpboost
SEO AGENCY 2-Minute Rule for Email Marketing Solution

How great have you been in email marketing? Can it be a little something you are a professional or a little something You will need a lots of assist with? Frankly, I think electronic mail advertising is the simplest detail on earth. Actually, when several of my offline colleagues inquire me how I may get absolutely free gross sales online, I inform them to obtain their names and connect and send me Specific delivers by using email.

For many who usually do not abide by my information, their business comes along with much more clients quickly. Now they need to know more about having inexpensive or free income from the online market place. Don't be concerned if you want help with email promoting. I'd like to provide you with speedy and simple strategies regarding how to reach e-mail advertising, and I think you can do great points with them. Here's the primary hint:

Monitor where your adverts come from
Checking is vital. It lets you realize wherever your potential customers originate from, which of them you have to delete following a while, or which ad supply to get rid of. To start with I used to be hesitant to watch, but now After i do, my perform is more predictable and readable.
E-mail internet marketing is surprisingly easy to observe. You can utilize an vehicle responder to keep an eye on your potential prospects. Personally, I take advantage of an autoresponder provider identified as "Aweber" to track potential customers. Any time I test a whole new ad resource, I just produce a new autoresponder and just "generate monitoring ID" I just wrote the title in the advert supply from which potential prospects arrived. This details is only seen to me; A further idea for the good results of email advertising and marketing:

Discover copywriting
Metin Copywriting "is the opportunity to create profits letters and electronic mail articles that encourages individuals to receive from you. Copywriting is a long program in itself, but may be a specialist. The best way to discover copywriting should be to "scroll" the file. A scroll file is a set of successful advertisements, e-mails, and sales letters which you could use and emulate for your personal income letters.
Now you don't want to repeat elements of the scroll file specifically. This is often plagiarism. What you wish to do is utilize them being a information to achieve insight in the copywriter and acquire the "strategy for wondering". This will provide you with a big boost in your e-mail conversion charges as opposed to writing email messages from scratch. Right here is another very good e mail marketing suggestion:
Never do your e-mail an excessive amount of
You're a loved one with the men and women you promote, so Do not generate a one thousand-word dissertation whenever they open up your email. Give people today the quality information and facts they are able to use and might use and are now living in a brief time and right away. Really don't get your emails as well prolonged.
I hope it took me a very long time to master due to the fact these 3 e-mail internet marketing strategies served you well. Achievements within your email advertising and marketing attempts. I know it could be really successful with him.
Read the full article
#Art#bulkemailmarketing#Customers#directemailmarketing#ema#Email#emailadvertising#emailcampaign#emailcampaigns#EmailMarketing#emailmarketingcampaign#EmailMarketingServices#EmailMarketingsoftware#emailmarketingsolution#emailmarketingsystem#emailmarketingtargeted#emailnewslettermarketing#htmlemailmarketing#lead#Marketing#marketingemail#marketingemailsoftware#massemailmarketing#OnlineEmailMarketing#optinemailmarketing#Raving#Science#subscribers#Turning#webbasedemailmarketingsoftware
0 notes
Text
Blogging tips and tutorials


This report includes the resources we use and recommend based on our experience in the online world. If you have doubts in applying these please reach out. We are glad to help and grateful to connect.
Jose Louro
BLUEHOST
BlueHost is one of the best web hosting sites out there !
Take a look at BlueHost’s many benefits:
A guaranteed 99.9 uptime– Quick recovery from site crashes, meaning you get unmatched access speed and almost constant uptime.
Presence of cPanel, for ease in navigation– Customers get to navigate and manage a number of features without going through complicated processes.
Multiple hosting options such as shared and VPS hosting– Greater versatility means customers get to choose how to host based on business needs.
Absolutely unlimited Domain hosting, with unlimited file transfer and space– Customers will never want in terms of capacity with more than enough space to go around.
Unlimited emails– Receive all the emails you can and send as many. Indefinitely.
Competent pricing for beginners– A great deal for those new to the industry, especially for new startups looking to get more value for less expenditure.
A lot of powerful add-ons for extra value– This is a boost for an already powerful hosting service enabling for better features and efficiency.
Unbeatable moneyback guarantee– BlueHost doesn’t force you to pay if you don’t like it. You get what you paid for or you get back what you paid.
The first thing to do to start off on this is to create an account on Bluehost. Follow the detailed steps below for this purpose.
1. First, go to the Bluehost website and click on the “get started now” button in green.

2. Once you have clicked on “get started now”, you will be redirected to a page with four plans to choose from. These are Basic, Plus, Prime and Go PRO.
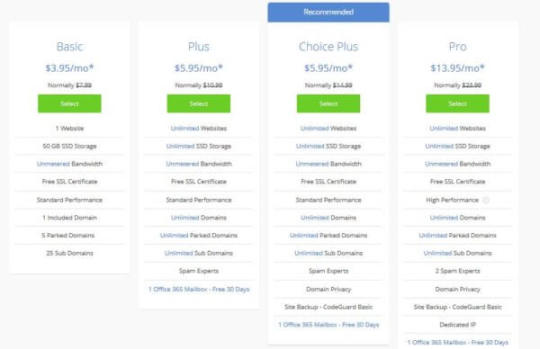
*The recommendation is that you start off with the basic plan for its cheapness and simplicity.
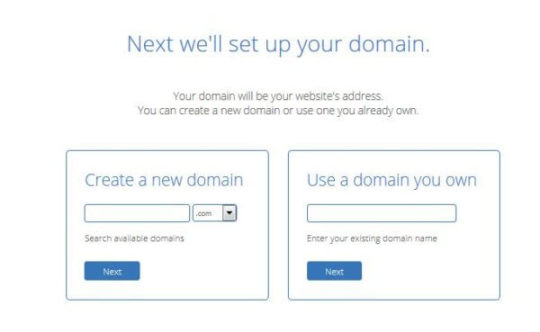
3. The next step after you have selected your preferred plan is to craft a domain name. You will be asked to do so. If you have an existing domain, you may enter it in the right box, and if you want to create one, enter the new domain name in the left box.
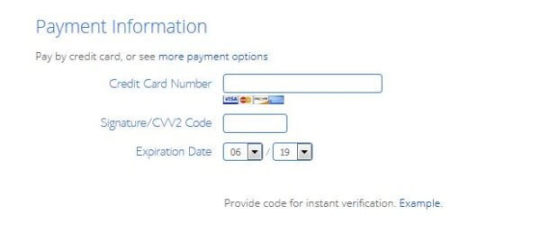
4. After the domain name is entered, you will be taken to a page where you will have to enter your personal information. This is integral to your credibility so ensure that you put in the right details.

You will also be prompted to enter your payment details. Carefully do so. PayPal is also an option.
5. You also have add-ons that you can choose from to make your experience smooth and secure.

Small notes about the Add-Ons:
Domain privacy - You get to hide your personal information and contacts, such as your name.
Site Backup pro - In case of a website crash or some glitch, you get to restore your information by clicking one button. This means that all information is automatically backed up.
Search Engine Jumpstart - From quick indexing to head-to-head comparative analysis reports, you are covered under this. You are also guided through the steps to improve your SEO rankings yourself and learn the tricks of Search Engine Mastery.
SiteLock Security - This assures a security boost for your domain, involving scans for malware to DDoS protection.
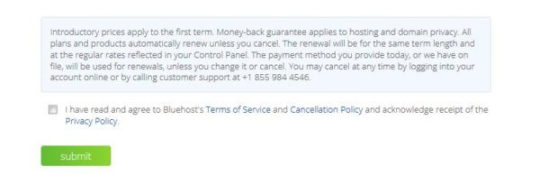
6. Just read the disclaimer carefully and then click on the green button “Submit”, once you are done.
7. Now that you are done with the sign-up process, log in to your Bluehost account and you will see a control panel, where you need to click on the WordPress button.
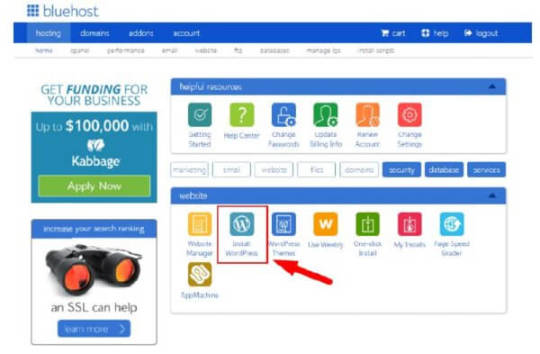
You may be redirected to the Mojo marketplace where you need to click on “Install New Scripts”.

On the next page, please enter your domain name that you have decided upon. This is where your WordPress will be installed on.

Notice that there is a small box stating “directory” on the right after a forward slash.
You may leave it blank, in which case, WordPress will be installed on the root domain.
If you write something there, for example “xyz”, the directory will appear as domain.com/xyz, and WordPress will be installed here.
After this, click on the button “check domain”. Click “continue” on any following window until the installation starts.
8. WordPress installation will be followed by a page asking for your login credentials for WordPress.

This will be followed by a confirmation email at your registered email address.
So, if you have a wish to have a website of your own, get on this immediately! Get a Bluehost account now! That’s all really! Also, check out more here!
After having your Domain and Hosting you need to install a Theme that is User-friendly and lets you customize in an easy way if you’re not very tech-savvy.
Elegant Themes
Elegant Themes is considered as one of the biggest revolutionary aspect of WordPress development. Being the most empowered WordPress community on the web, it helps users to create amazing website designs using premium WordPress themes and plugins. With these, you can take your website to a new level of professionalism.
These are the benefits of utilizing Elegant Themes:
Incredibly customizable – You get to customize your website theme and colour down to the smallest details.
No need to dive deep into the coding process – You don’t have to be a coding savant to be able to use Elegant Themes to its fullest.
Takes very less time to just drag and drop to develop a website – Optimization to the greatest level to bring about an ease in website designs and aesthetics.
Offers design consistency – Every design is streamlined to ensure that bugs are minimized, making for a beautiful experience for those who visit your site.
Compatible with several e-commerce plugins – You get to add a number of eCommerce plugins to your theme, meaning that you get to expand your business scope.
Promotes your websites with premium WordPress plugins – This means that you don’t need to jump around the site for different functions but get most options at your fingertips thanks to these.
Follow the detailed steps mentioned in the next page to make the most of the premium themes and plugins provided by Elegant Themes.
1. First, go to the Elegant Themes website and click on the “Pricing” button.

2. Once you have clicked on it, you will be redirected to a page that includes the sign-up process.
They have two membership plans which include Yearly Access ($89/year) and Lifetime Access ($249 one time) as you can see on the screenshot below:
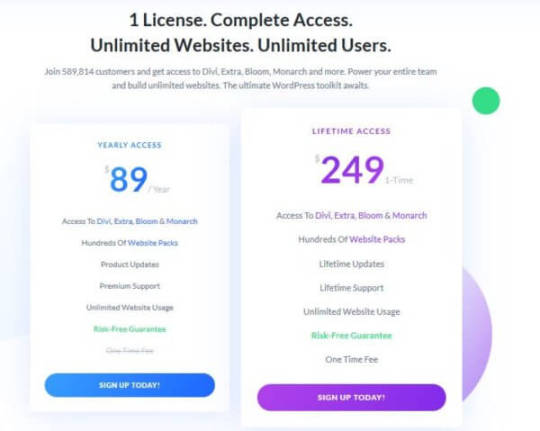
Select your choice and click on the “Sign up Today” button. It will take you to another page, where you need to submit your personal details such as username, password, email ID.

3. Once you’ve filled out all the mandatory slots, click on “Complete Registration”. Now, you’ll be asked to provide your payment account details for the completion of online payment.
4. After completing the sign-up process, you can visit the members area anytime by just logging in from the main page.
There, you will find several themes and plugins which you can download and try out like ‘Divi’.

To get these themes and plugins, you need to click on the download button.
5. Next, save the downloaded file according to your preferences and keep it for utilizing through your WordPress website.
6. Now, head onto your WordPress website, go to “Appearance” - there you will find a drop-down menu containing “Themes” option. From there, upload the previously downloaded theme from Elegant Themes.
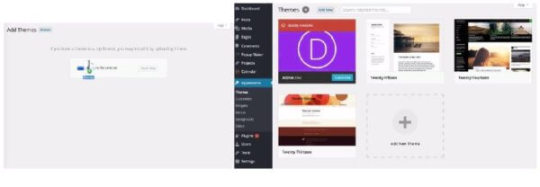
Now the installation process can be initiated. Once it is complete, you will get to see that the theme is active.
The same procedure should be followed in case of installing plugin packages to your website.
Download the plugin from the membership area. Next, go to WordPress dashboard, click on the Plugins option. This will let you add the downloaded plugin.
Thereon, all you need to do is just activate the plugin by clicking on the relevant option.

Go through the readme file for that particular plugin, and get a thorough idea on its implementations.
Elegant Themes’ packages are quite useful for web designers, business owners who think to use their WordPress framework for developing a website at its best. So, if you wish to use the themes and plugins from Elegant Themes and build attractive websites for your clients, sign up with an account right now!

Thrive Themes
Today, when building a professional website or blog has become a crucial part of digital marketing, Thrive Themes is one of the strongest WordPress theme that one must install to attract audience and enhance the site’s conversion rate.
Many people would regard this one to be just a theme, but in actuality, it offers different types of plugins that provide the audience much better experience.
Different Thrive Themes Plugins are designed for distinct purposes and can be purchased separately. But a Thrive Themes package is always better to purchase as it offers everything from themes to plugins along with all the training and support that goes along with the package and that’s for a much-discounted price.
Following are the advantages of Thrive Themes:
The designs are simple in terms of layout and the fonts are clear, thus easily readable.
Using specific action forms or calls to action, one can easily set focus areas in the website.
The themes come with pre-built landing pages that can make website look stunning in minutes.
Its lead generating plugin can be used to design and place email option forms to expand business email list.
Using Thrives plugin like Thrive Clever Widgets, reaching out the audience with targeted content, makes much easier.
Thrive Themes enhances conversions, promotional options and sales.
With in-built social media sharing, reaching the target audience has become easier.
In-built image optimizer builds images that compliments the website’s theme.
Displays related posts at the end of the blog posts without slowing down the website.
Very quick maintenance and excellent support.
To enjoy these features, one must start with creating a membership account with Thrive Themes.
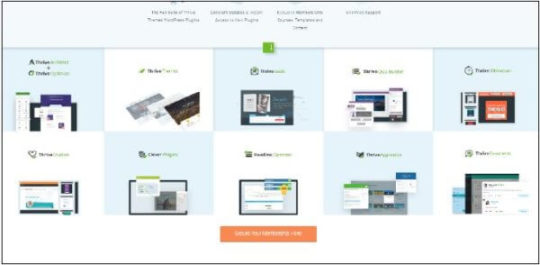
1. First go the Thrive Themes website and their click on the “Get All Our Products” button.

2. Once you have clicked on that button, you will land into a page that talks about the membership plans. Now scroll down and click on “Secure Your Membership Here!” button.
3. Now, you will be redirected to membership pricing page, where first of all you have to select either “Paid Quarterly” or “Paid Annually” options. After selecting the same, you have to choose your Membership plan according to your requirement and business type. If you are an individual or an entrepreneur, pick “Thrive Membership” option and if you are running an agency or is a web designer, click on “Agency Membership” plan. Click on the “Add To Cart” button to buy the service.

4. Now, a checkout page will appear, where you must put all the required information. After filling up the details, proceed with your desired payment option to download and enjoy the facilities of the plugins.
5. Once you have purchased the membership plan, you can now go to member’s login page by clicking on “Member Login” button on the top of the webpage. Here, you have to enter your Username and Password to log into the Thrive Dashboard.

6. Now, when you are into the Thrive member’s dashboard, you can scroll down to get access to different Thrive products. Pick the one that suits your need and click on the ‘Download’ button. Here to guide you, I am picking up the Thrive Leads plugin. As soon as you click on the button, you will be asked to save the .zip file. As you save it, the download process will start spontaneously.

7. Next, to begin the installation process, go to your WordPress Admin Dashboard and long into it.
8. In the left side menu bar, look for “Plugins” option. When you take your cursor on top of the button, you will find “Add New” option. Click on the same.

9. On clicking on “Add New” option, a page will appear with a “Upload Plugin” button on the top of it. Click on it.

Now, you can upload the plugin by clicking on the “Choose File” option. choose the .zip file that you earlier saved and then click on the “Install Now” button to successfully upload the file.
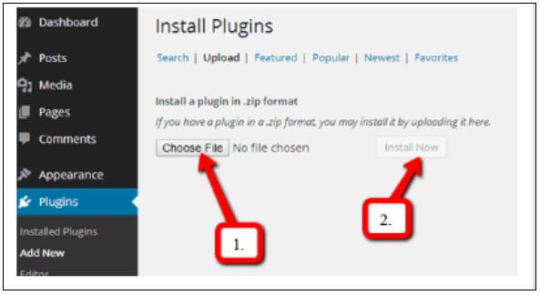
10.After a successful installation, a page will appear before you with an option “Activate Plugin”. click on it.

11.Now, it’s the time to activate the license of this plugin. In the menu bar of WordPress, go to the Thrive Dashboard and choose the License Manager.
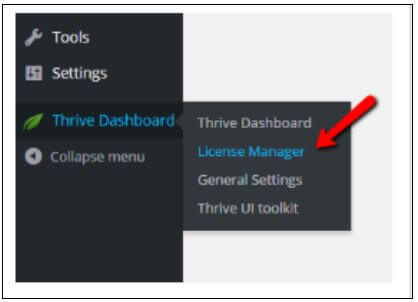
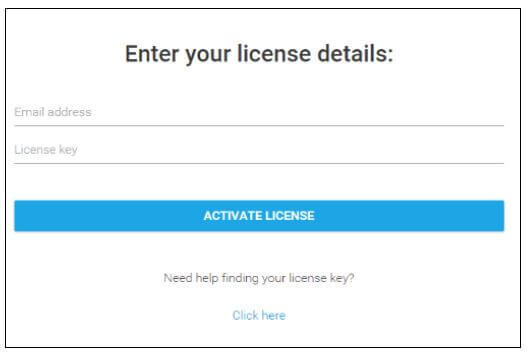
12.Go back to your Thrive Themes account to find the license key. Provide both the email address and the key on License Manager page and click on the “Activate License” button to enjoy the features of the chosen plugin.
Thrive Themes is the ideal theme to enhance the look and functionality of a website. The newbie bloggers or entrepreneurs can use this theme to gain leads and engage the audience to their website. Different plugins with pretty powerful features not only maximize conversion rate and customize the website but also allow you to target ultra-segmented audiences and experience dramatic business growth.
So, apply for its membership today to build your business website smoothly.
Next You need a reliable Email marketing Service.

CONVERTKIT
ConvertKit is one of the finest tools to assist bloggers get their craft off the ground! It is a one stop destination for any aspiring or established writer to work on and reap actual benefits.
The best benefits you get of using ConvertKit are:
Ease of tracking clicks and tagging users – Exceptionally well thought of tagging functions and click tracking abilities that tag according to the person’s interest.
Efficient system for making email sequences – Compose and create from a single page rather than having to go to different pages for different functions.
Automations & segmentation that are well designed – Automatic functions that ensure the tagging of new subscribers to your email list and much more!
Integrates with a number of different platforms – Multi-platform support like with WordPress that allows you to use ConverKit in a number of different ways.
Let’s find out how to sign up and use it!
1. Signing Up - Go to ConvertKit and sign up.
Enter your billing information & create your account.

Once you are done with entering your details, choose a plan. Make sure to be careful in choosing the most appropriate plan for you, don’t worry, you can always change it later, start with the lowest one.

2. Account approval – The next thing to get done is to have your ConvertKit account verified and approved! The purpose is obviously to test your credibility as a blogger. Normal business requirements allow you to submit your piece via an URL on their chat feature. The other way to gain acceptance is through the submission of a ticket feature and then provide the URL to your blog. Although you may browse around ConvertKit in the interim period, it is only post-approval that you can send something on it.
3. Time to Import Any Existing Subscriber – Do you have an email list? No? Then let’s go to the next step. But if yes, here’s what you do!
Adding tags is the primary thing to do in the “Add Subscribers” process before anything else. This will categorize your subscribers accurately and for this, click on “Subscribers” on the menu and then hit “Create a Tag”.
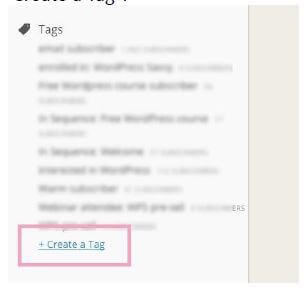
This is a really simple and effective process. For one, you may use a mundane and self-explanatory title to a tag like “imported subscribers”.
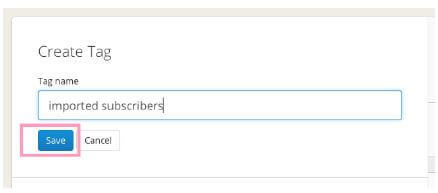
Make your checks and name your tags and when you are sure that you are done, hit “Save”. The next step is to import subscribers from the current email provider you have, saving that as a CSV file.
Then, hit “Subscribers” on the main menu and then “Import Subscribers”.

Next, upload the saved CSV file and put your subscribers under the designated tags, in this case, “Imported Subscribers”. Align the columns on the CSV sheet to the relevant ConvertKit fields and then, finally, hit “Import Subscribers”. Repeat this for other lists, if available.
4. Form creation – This is the first look of your dashboard.
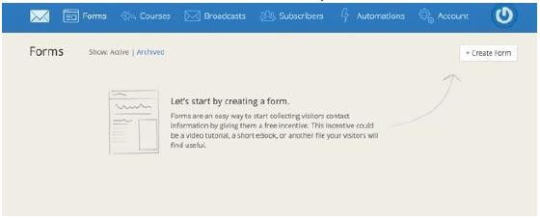
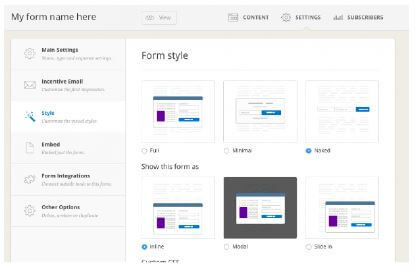
Once you click on “Create Form”, you can choose a form or a landing page. Let us go with form for now. You may choose one of three styles that serve different purposes.

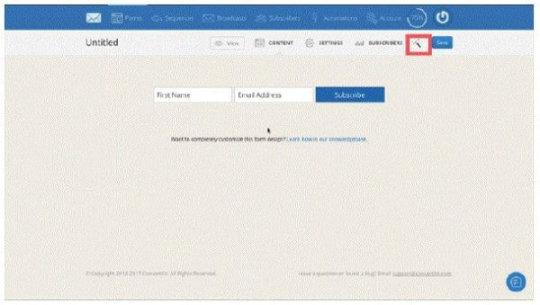
You can also go ahead and customize your form by clicking on the icon at the top right edge as per the picture below. Colour as you wish, and you may even personalize as per your brand.
Access settings and change your form name, which is only visible to you, available on Dashboard once you sign-in.
Modify the success message to what you want your subscribers to see when they fill up the form and hit “Subscribe”.
You may, if you wish, redirect subscribers to a different page that displays a thank you message for subscribing or something else. After this, click on the “Save Form” button.
5. Incentive Emails – This is the very email that subscribers will receive that will be a confirmation of their subscription. You can turn it off if you so wish by clicking on the checkbox adjacent to the “send incentive/double opt-in emails” to your subscriber checkbox.
Configure email and the subject title along with the email and button text! Go ahead and select the form style!
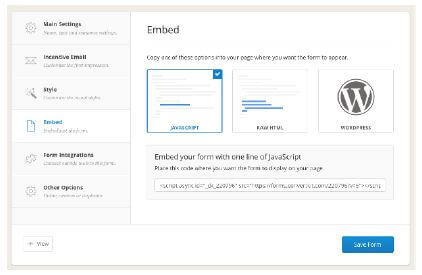
6. Form Addition – Now, on to embedding the subscription form on your website. There are three methods present, namely, WordPress, Javascript or Raw HTML.
So, don’t wait and lay the groundwork for your future with ConvertKit’s excellent facilities!

GetResponse is a complete online marketing solution.
It provides turnkey newsletter publishing and hosting features, as well as unlimited follow-up autoresponders, landing pages, webinars, marketing automation, and CRM to deliver information to your contacts and convert them to paying customers.
Through responsible and fully automated list hygiene, anti-spam practices, and established relationships with major Internet service providers and email service providers, GetResponse prides itself on the highest possible email deliverability to ensure that your messages get through to your prospective customers.
The platform delivers over 5 billion emails each year in 172 countries.
GetResponse is fully scalable and capable of handling both small and very large lists (1+ million subscribers).
GetResponse in highlights:
Over 100,000 active accounts
30-day free trial
Deliverability of up to 68% higher than our competitors
Unlimited emails
Powerful, automatic message personalization
Smart tracking features
What benefits does it bring?
Catches lost sales and jolts your leads into profitable action
Boosts your lead generation and business-building results
Chops away tedious and repetitious email marketing tasks
When you sign up for an account with GetResponse, you will be supported every step of the way by their excellent customer support and materials (context help, user guides, FAQs, and video tutorials).
You will benefit from industry-leading email deliverability which GetResponse consistently maintains through their solid relationships with ISPs, proactive delivery initiatives, and strong anti-spam commitment. Try GetResponse today and find out how you can instantly get tangible, measurable results without wasting your time or investing a lot of money.
The GetResponse List Building Program is a comprehensive email marketing course
that covers everything you need to know to grow your list by up to 10,000 subscribers in as little as 90 days. Now marketers can maximize their email marketing efforts by taking advantage of this free program and enhancing their lists with new, engaged subscribers.
The list building program, used with GetResponse email marketing tools, is the complete marketing solution. Marketers are provided with the know-how and necessary tools to launch a comprehensive and effective email marketing campaign.
The course is unique to GetResponse and created exclusively for GetResponse customers; both free trial and pro accounts that have less than 10,000 subscribers.
Customers may choose from two program schedules: the 90-day fast track and the 180-day standard program.
Each session consists of a video tutorial, presentation, and an article.
Those who complete the program and acquire at least 1,000 new subscribers will receive a GetResponse University Certificate of Performance.
More details about the course may be found here:
Getresponse Course
So, then we have Social Media, if you are active and I think you are and should be consider using SMARTERQUEUE

SmarterQueue is a great post scheduling platform and a better alternative to the likes of Hootsuite and others. Why? Simply because it is all round more flexible with a focused view on customer friendly usability.
These are what makes SmarterQueue truly effective:
User-friendly interface- SmarterQueue has a great user-friendly interface which is very easy to use. The navigation is straightforward, and you can even filter your queue by category and social media platform.
Competent pricing- In terms of pricing, no one can beat SmarterQueue. $20 a month will connect you up to four social media platforms that include Facebook, Twitter, LinkedIn, and Instagram.
RSS Feeds to help in content curation- If you are currently using Feedly to curate your content, you will love how easy it is to integrate Feedly with SmarterQueue. SmarterQueue will import all your feeds so that you can curate content from one place without having to log in to Feedly.
Posting simplicity- SmarterQueue makes posting content effortless and easy. Simply set a posting schedule for each of your accounts and then create categories for each type of content that you want to share. From there, just add posts to your categories and SmarterQueue will do the rest.
Social media analytics- Social Media Analytics in SmarterQueue can help you decide when is the right time to post on Facebook or tweet, so that it gets the maximum visibility.
Let’s learn the steps to properly get on with the SmarterQueue platform!
Step 1: Visit SmarterQueue and go ahead to the sign-up page!

Choose how you want to sign-up and then log-in in the future. You will be prompted to start a trial or leave that for later. Once you are past that, it is time to set up the account for your work. This is how it looks:
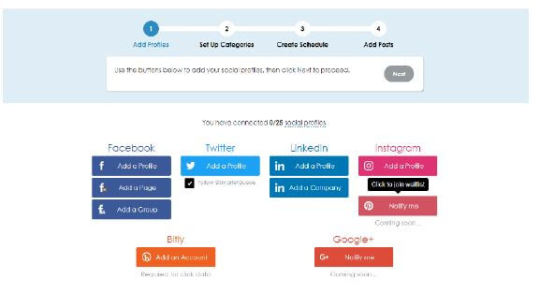
Add the profiles accordingly to expand your network on the platform. These are where you will be able to post via SmarterQueue, once you are up and running.
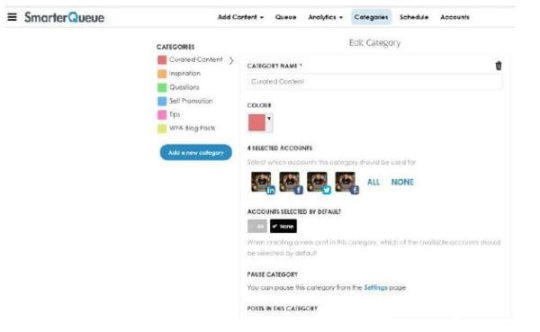
Step 2: This is where you categorize by creating post categories. What are these? They are the different varieties of content that you will be putting up on social media. Name these as you like and make them relevant for ease of scheduling in the future.
Step 3: It is now time to create a schedule based on the categories that you have defined. The schedule is also for which accounts you want to post and in what order.
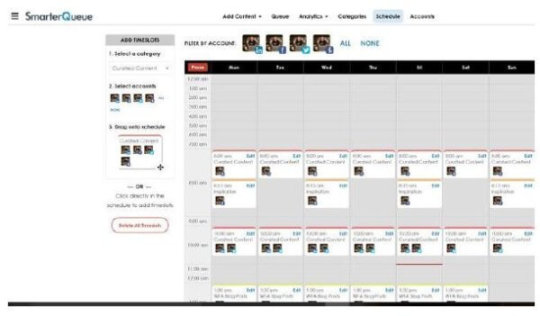
Step 4: Next up, add content to the posts! Your first option should be evergreen posts. What are these? Well, these are posts with a continuous recycle patter, that is, they are always renewing themselves. On SmarterQueue, the moment you add a new post, it immediately goes for the next available time and after being shared, it is sent to the bottom of the queue automatically. Basically, you fill up your queue once, and the platform automatically takes care of the scheduling from then onwards.
Step 5: Like what you have seen so far? If you have had a great experience for the trial period, don’t forget to go for the paid subscriptions for continued services and greater benefits.
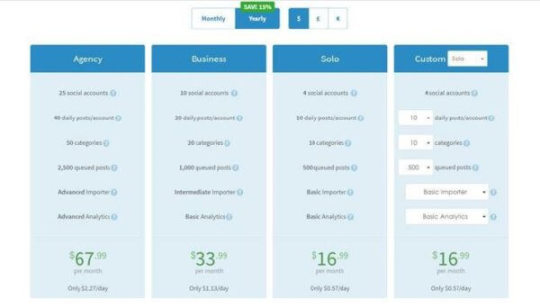
Every plan has the same basic features, except that the real difference is with the number of categories, volume of social media accounts, queued and daily posts.
This is obviously one of the finer options out there and it’s time you get your membership of SmarterQueue! An alternative for Social Media is Social Pilot

Social Pilot
SocialPilot is one of the most popular social media marketing and scheduling platform which was specifically developed for social media professionals and agencies.
Here are some unique features that sets it apart from others; custom Facebook branding, bulk scheduling, team collaboration, social media calendar and client management.
The Benefits of SocialPilot are as follows:
Customized Facebook Branding- Using SocialPilot for sharing on Facebook, you can put your own customized branding so that it does not look automated.
Bulk Scheduling- Using this feature you can create bulk posts as much as 500 or more at once, by simply uploading the CSV files. This awesome attribute allows users to manage multiple social media platforms with great ease and flexibility.
Collaboration within teams- Using this platform, users can easily invite their team member to work in collaboration, share files, communicate, and come up with some useful business ideas. You can include as many participants as you want.
Social Media Calendar- Users can visualize their social media sharing strategies and make them more creative and fruitful using SocialPilot.
Effective extension on the browser- SocialPilot offers browser extension for Chrome, Firefox and Safari which not only lets the user share an interesting article from the internet, but also enables them schedule images from Canva.
Social Media Analytics- The platform provides powerful, yet easy to understand social media analytics that lets a user improvise social media marketing with efficiency.
Step 1: Visit the SocialPilot website and click on the “Get Started” button in orange.

Steps 2: Once you click on the Get Started button you will be redirected to the “Plans” page, which offers 4 distinct plans, namely Individual, Professional, Small team and Agency.

*we recommend you start with the “Individual plan” to see how it pans out.
Step 3: In the next step, after you have chosen your preferred plan, click on start your 14-day trial and you will be redirected to the following page. You won’t require your credit card for this process.

Step 4: Fill up the credential details and click on “Signup”. You will be further redirected to a page where you will need to connect with any of your available social media account. You can also save time by skipping this step and connecting with any of the 3 specific social media platforms mentioned here, namely Facebook, Twitter and LinkedIn and complete the registration procedure.

Step 5: When you have completed registration, you will receive an email asking to confirm the email address you used for signing up. As soon as you confirm that email address you will be redirected to a dashboard.
Step 6: As you reach the “dashboard” page or log into your SocialPilot account, the first thing you need to do is to connect your social profiles. To do this, click on “Connect Account” on the left panel under Social Accounts.

After you’ve completed connecting a profile, you will now be able to set a schedule for your posts. Please note that the default time zone is set for the United States, so adjust it accordingly to your needs. You can click on the “Edit” button to select your desired time zone on the next page.

To revisit setting a schedule, click on Manage Accounts on the left pane. Then, click on “Edit” for that account. Now you’re equipped to add a schedule for your social profile.

You can specify the time to add to the posting schedule under “Select Time” option. You can also choose the specific days of the week on which the schedule should be running. Once completed, click on the button displaying “Add Time”. Then, click on “Create Post” on the left pane to start adding posts into your schedule. Now you can start composing your post and adding links.
Once you have created the post, you will find three options in the drop-down menu: Add to Queue, Share Now and Share Next. Add to Queue will add that post to the schedule queue, while Share Now will share the content right then and there.
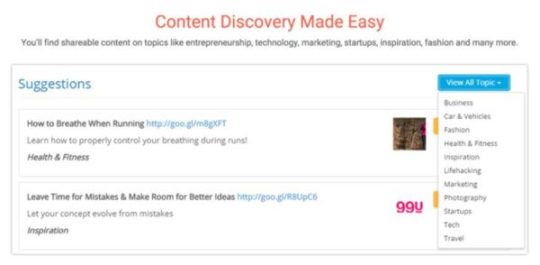
If you are out of content ideas, you can always use “SocialPilot content discovery” to get your hands on more interesting stories to share on your network.
Social Media is the future, it is the place where most interactions take place, and where your content will most likely get noticed. However, you don’t need to be on every platform, just the ones providing the best exposure, and SocialPilot is one of the best tools to do so. But then we have something Special: Sniply

Sniply
From link sharing to custom call to action to audience engagement monitoring, Sniply has come a long way in becoming integral to the online marketing process.
The benefits of Sniply are as follows:
Simple Setup and Installation- Sniply is one of those innovations with super-easy interface that involves a simple setup and installation.
Great Call-to-Action- You can create a call-to-action for every link you share. The call-to-actions are not only time-sensitive that instill a sense of urgency but are also, interesting, and intriguing that are ultimately valuable to your customers.
Compact Links Creation- The link shortener from Sniply is so compact that it lets you put a customized call-to-action on every page you share. When people click on a Sniply-generated URL, the page displays the ‘snip’ with a floating mini-banner which contains your CTA message along with a button that clicks through to the URL of your choice.
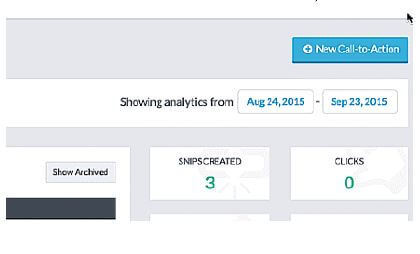
Social Media Analytics- The platform’s dashboard shows you clicks, conversions, and conversion rates. You can also see your top-performing snips, top websites, and favorites as well.
Customizable Free Edition- The free edition of Sniply is greatly customizable, leave alone the paid one. It allows you to change color, style and position of your snips, making them stand out without being irritating.
The real question for beginners to the scene is how to use it to its full potential. That’s what we are about to find out!
Step 1: Go to Sniply. There is an option to sign up for free as you can see below.

The next page will ask you to sign up via Twitter or Facebook or the age-old way of putting your details in.
Step 2: Choose any of the plans that suit you. Everyone of them is free for 14 days. The recommendation is that you choose the basic for now as it’s the simplest.

Step 3: Find a content to share on social media platforms and ensure that it is an article/journal/blog that is connected to your occupation or business. Then, copy the URL of this piece to Sniply as shown below.

After you have entered the URL, hit the ‘snip’ button which will customize the URL as per your wish.
Click ‘create’ next and then copy the custom URL to be shared on the social media platform of your choice.
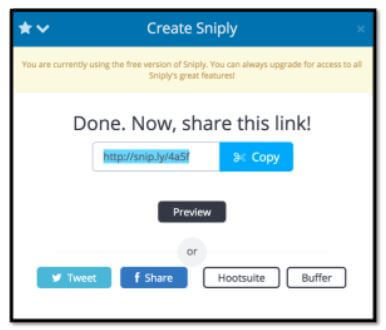
* Remember that when you are using Twitter to share, don’t forget to add the handle or name of the writer of the original post. It gives credit where it’s due and ensures that more people see your post.
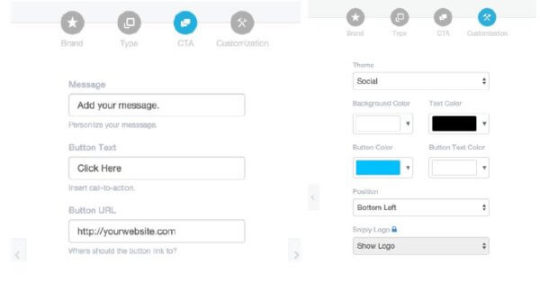
Step 4: Now it is time to set up a call to action through Sniply. On the dashboard, click on ‘Manage’ and then ‘call to action’.

Hit “+ New Call-to-Action” and then select a brand that exists or create one.
Now choose a type for your call-to-action.

Put in the preferred link for the call-to-action and then customize as you wish to be a worthy match for your company/brand.
So start with Sniply today and behold the changes to your social media functions!
If you plan or already have Products like E-books or other Digital (or Physical) Products you can set up a successful online shop with Shopify and leverage Sales. So lets see how it works:Shopify

Shopify
Shopify’s exceptional capabilities in easily setting up your online shop has cemented its position as one of the most reliable ecommerce platforms out there!
The benefits that you get are:
Round the clock customer support- Shopify is big on customer support. It’s customer support is available 24 hours a day, 7 days a week. The response time is fairly instant, which means your business is never on its own.
Mobile optimized- All of Shopify’s themes are mobile responsive. The platform also includes a free built-in mobile commerce shopping cart, which means your store looks great on all devices.
Availability of SEO tools- Shopify has powerful Search Engine Optimization (SEO) features that will help your website rank higher in search results, so customers can find you easily.
Stripe-powered payment gateway- Shopify has integrated with dozens of payment gateways, but also offers its own which is powered by Stripe. If you choose to use the Stripe-powered payment gateway, you will not incur any transaction fees instead, you will benefit from lower credit card fees.
User-friendly interface- Shopify has a user-friendly customer front-end and admin backend which provides enhanced navigation options and various tools to help you manage inventory, insert product details, create web pages, track customer details, set up customer accounts, receive payments in various currencies, and much more.
App store for addons- Shopify has an app store which provides some free and some paid plugins that seamlessly integrate with the platform and helps you to expand the functionality of your online store.
Indeed, with it, your dreams of running an online business has become within your reach and if you learn every option that the platform provides, there is nothing that can prevent you from having your own online shop.
Let’s Start!
1. Sign up to Shopify and then navigate to the Shopify website. Click on the Get Started button.

You need to enter your information, such as the store name, desired password and an email address and finally stating what kind of an online or physical shop you are looking to create.

This is where you put in the information. Ensure that these are all valid and accurate.
2. Customize the appearance of your store and it’s rather easy. Check out the image below. You need to click on the “Add Product” button and then enter all the details pertaining to the product such as price, vendor and description. When you are done, save it.

3. Return to your dashboard and hit the button saying, “Customize the Look of Your Site.” This is an extremely versatile place for changing colours and logos alike!

4. This step involves the selection of a domain and getting your site LIVE.

At the Dashboard, click on “Add a Domain.” Choose one to your liking and proceed to the next step in the process.

5. On the Dashboard, check out the “Payments” button at the left. You may now choose from numerous options such as Stripe, PayPal, etc. and if in doubt, you may also choose Shopify’s personal payment processor that is quite user-friendly. Once you choose one that suits your purpose/requirements, you will be able to receive payments from customers and store them. Once you are satisfied, hit the “Launch Website” button!

So you can use Shopify and have your own successful online venture today!
Disclaimer: This is an important note that there are some links above which are affiliate links and if you click on them and decide to purchase something, I shall earn a commission at no additional cost to you. Let me say on record that I have used and experienced the services of this company, and my recommendation is strong as I have found them to be very helpful and useful. My opinion is not based on the commission I make, but because of how reliable I found this to be. You are not compelled to make any decision unless you see fit and feel that they will help you achieve your goal.
Check out our shop with all these resources:

Read the full article
#blogging#bloggingsuccess#buildhomebusiness#business#BusinessSkills#Creativity#Determination#digitalmarketing#digitalnomad#DisciplineinLife#EffectiveTools#entrepreneur#Entrepreneurs#Entrepreneurship#internetbusiness#lifegoals#LifeStyleAttitude#locationindependent#luovita#makemoneyonline#mompreneurs#onlinebusiness#OnlineEntrepreneurs#onlinemarketing#OnlinePlatforms#OnlineTools#personalandprofessionalworld#ProcessFlow#travelfreedom#workfromhome
0 notes
Text
Pig Eat Ball is a bewildering and frankly disgusting game of sportsball

by Amr (@siegarettes)
Pig Eat Ball
Developer: Mommy’s Best Games
Publisher: Mommy’s Best Games
PC
Bizarre, bewildering and frankly disgusting. That’s how I’d describe pretty much any other game from Mommy’s Best Games. Thankfully, they’re also a lot of fun, Pig Eat Ball included.
The trademark Mommy’s Best Games originality is here, with out there mechanics and art. Previously, their games all shared a similar rough, overgrown art style. There were grimy textures that felt as if they’d been melted and reconstituted into ridiculously detailed tableaus.
Pig Eat Ball goes for a more animated vibe, with a lighter hand on textures, more broad strokes of colors and expressive characters. It’s still made up of an absolutely bewildering combination of imagery, but there’s a more confident, less chaotic approach this time.
Not that the chaos is gone, no, no.

While the art goes with a clear, readable style, the mechanics branch into several bizarre takes on the maze running genre. There’s a few basic moves, but how they interact with each level’s layouts and gimmicks gets a lot of mileage out of them.
The princess, a pig in disguise at a tournament held to decide who wins her hand, constantly inhales objects in front of her, which can be spit out in a barf covered state. Holding her breath makes her move slower, and a dash lets her crash through objects and build speed by timing the next two dashes. Inhaling tennis balls increases her size, which prevents her from getting through narrow passages, but might be useful to take down certain obstacles. Oh, and if you inhale a barfed up ball too soon, or get hit, you’ll spew the contents of your stomach.

Things get really chaotic when these basic mechanics play off the environment. At the start I was simply gathering up tennis balls, spitting them into new rooms, and avoiding them as I waited for the gross stuff to roll off the spit up balls. But soon I was puking on bugs to make them puke, losing ghosts in Pac-man mazes, eating their brains, and using my suction to drag balls through mazes to get them to areas where I could gobble em up.
There’s a real madcap, experimental quality to a lot of the stage designs. It’s the kind of game where you look at the stage title to get an idea of what the heck the designer was thinking, then parse the gimmick while trying to avoid the tricks they’ve laid out for you. Then you do it again to get the gold medal.
It’s a familiar loop, and it would be easy to get comfortable with if it wasn’t for how outlandish it gets. It seriously, seriously gets weird. Like, I’ve played a lot of games and seen a lot of weird games, but most of them use familiar, predictable mechanics to direct you. In Pig Eat Ball I’m never quite sure what I’m gonna see next, or what the next stage is gonna have me do. It’s not so scattershot that I find myself lost, but there’s an astounding set of ideas on display.

Within the first stage I was doing careful sneaking missions, fast paced races against the clock, convoluted mazes, and even engaging in battles with bugs where I had to gobble up more balls, catch stars and uh, build a sandwich. Then I topped it off by fighting a giant dragon who was also an accordion.
Describing what you do in Pig Eat Ball really doesn’t do it justice. This is the kind of game that’s bursting with a creative energy that you just sort of have to witness yourself. It’s got the level design sensibility of an arcade game, but with a willingness to recontextualize itself at every turn. I could write another five paragraphs just listing notable stage gimmicks, but you wouldn’t get the same rapid fire nonsense that comes along with each of them.
There really is something wonderful and bizarre about Pig Eat Ball. It’s a refreshing game to take in bite sized stages, often leaving me with a a bemused, and somewhat disgusted, smile.
0 notes
Text
Create an Intelligent App With Google Cloud Speech and Natural Language APIs
An application that truly understands a natural language is something sci-fi enthusiasts, programmers, and AI researchers have dreamed about for decades. Today, thanks to large advances in machine learning technologies, that dream is closer than ever to becoming a reality. What's more, cloud-based services such as Google Cloud Machine Learning have made those technologies freely available for everyone to use.
In this tutorial, you'll learn how to use two powerful natural language-oriented APIs offered by the Google Cloud Machine Learning platform: Cloud Speech API and Cloud Natural Language API. By using them together, you can create apps that can handle speech in a variety of widely spoken languages.
Prerequisites
To follow along, you'll need:
Android Studio 2.2 or higher
a Google Cloud Platform account
a device that runs Android 4.4 or higher
1. Why Use These APIs?
An application that can process speech must have the following capabilities:
It must be able to extract individual words from raw audio data.
It must be able to make educated guesses about the grammatical relationships between the words it has extracted.
The Cloud Speech and Cloud Natural Language APIs enable you to add the above capabilities to your Android app in a matter of minutes.
The Cloud Speech API serves as a state-of-the-art speech recognizer that can accurately transcribe speech in over 80 languages. It can also robustly handle regional accents and noisy conditions.
On a similar note, the Cloud Natural Language API is a language processing system that can, with near-human level accuracy, determine the roles words play in sentences given to it. It currently supports ten languages, and it also offers entity and sentiment analysis.
2. Enabling the APIs
Before you use the Speech and Natural Language APIs, you must enable them in the Google Cloud console. So log in to the console and navigate to API Manager > Library.
To enable the Speech API, click on the Speech API link in the Google Cloud Machine Learning section. In the page that opens next, press the Enable button.
Press your browser's back button to return to the previous page.
This time, enable the Natural Language API by clicking on the Natural Language API link and pressing the Enable button on the next page.
You'll need an API key while interacting with the APIs. If you don't have one already, open the Credentials tab, press the Create credentials button, and choose API key.
You'll now see a pop-up displaying your API key. Note it down so you can use it later.
3. Configuring Your Project
Both the APIs are JSON-based and have REST endpoints you can interact with directly using any networking library. However, you can save a lot of time—and also write more readable code—by using the Google API Client libraries available for them. So open the build.gradle file of your project's app module and add the following compile dependencies to it:
compile 'com.google.api-client:google-api-client-android:1.22.0' compile 'com.google.apis:google-api-services-speech:v1beta1-rev336-1.22.0' compile 'com.google.apis:google-api-services-language:v1beta2-rev6-1.22.0' compile 'com.google.code.findbugs:jsr305:2.0.1'
Additionally, we'll be performing a few file I/O operations in this tutorial. To simplify them, add a compile dependency for the Commons IO library.
compile 'commons-io:commons-io:2.5'
Lastly, don't forget to request for the INTERNET permission in the AndroidManifest.xml file. Without it, your app won't be able to connect to Google's servers.
<uses-permission android:name="android.permission.INTERNET"/>
4. Using the Cloud Speech API
It goes without saying that the Cloud Speech API expects audio data as one of its inputs. Therefore, we'll now be creating an Android app that can transcribe audio files.
To keep it simple, we'll only be transcribing FLAC files, files that use the Free Lossless Audio Codec encoding format. You might already have such files on your device. If you don't, I suggest you download a few from Wikimedia Commons.
Step 1: Create a Layout
Our app's layout will have a Button widget users can press to display a file picker, an interface where they can browse through and select audio files available on their devices.
The layout will also have a TextView widget to display the transcript of the selected audio file. Accordingly, add the following code to your activity's layout XML file:
<TextView android:layout_width="match_parent" android:layout_height="wrap_content" android:text="" android:id="@+id/speech_to_text_result" android:textSize="18sp" android:layout_alignParentTop="true"/> <Button android:layout_width="match_parent" android:layout_height="wrap_content" android:layout_alignParentBottom="true" android:id="@+id/browse_button" android:text="Browse"/>
Step 2: Create a File Picker
The file picker interface should be displayed when the user presses the button we created in the previous step, so associate an OnClickListener object with it. Before you do so, make sure you initialize the button using the findViewById() method.
Button browseButton = (Button)findViewById(R.id.browse_button); browseButton.setOnClickListener(new View.OnClickListener() { @Override public void onClick(View view) { // More code here } });
With Android's Storage Access Framework, which is available on devices running API level 19 or higher, creating a file picker takes very little effort. All you need to do is create an intent for the ACTION_GET_CONTENT action and pass it to the startActivityForResult() method. Optionally, you can restrict the file picker to display only FLAC files by passing the appropriate MIME type to the setType() method of the Intent object.
Intent filePicker = new Intent(Intent.ACTION_GET_CONTENT); filePicker.setType("audio/flac"); startActivityForResult(filePicker, 1);
The output of the file picker will be another Intent object containing the URI of the file the user selected. To be able to access it, you must override the onActivityResult() method of your Activity class.
@Override protected void onActivityResult(int requestCode, int resultCode, Intent data) { super.onActivityResult(requestCode, resultCode, data); if(resultCode == RESULT_OK) { final Uri soundUri = data.getData(); // More code here } }
Step 3: Encode the File
The Cloud Speech API expects its audio data to be in the form of a Base64 string. To generate such a string, you can read the contents of the file the user selected into a byte array and pass it to the encodeBase64String() utility method offered by the Google API Client library.
However, you currently have only the URI of the selected file, not its absolute path. That means that, to be able to read the file, you must resolve the URI first. You can do so by passing it to the openInputStream() method of your activity's content resolver. Once you have access to the input stream of the file, you can simply pass it to the toByteArray() method of the IOUtils class to convert it into an array of bytes. The following code shows you how:
AsyncTask.execute(new Runnable() { @Override public void run() { InputStream stream = getContentResolver() .openInputStream(soundUri); byte[] audioData = IOUtils.toByteArray(stream); stream.close(); String base64EncodedData = Base64.encodeBase64String(audioData); // More code here } }
As you can see in the above code, we are using a new thread to run all the I/O operations. Doing so is important in order to make sure that the app's UI doesn't freeze.
Step 4: Play the File
In my opinion, playing the sound file that is being transcribed, while it is being transcribed, is a good idea. It doesn't take much effort, and it improves the user experience.
You can use the MediaPlayer class to play the sound file. Once you point it to the URI of the file using its setDataSource() method, you must call its prepare() method to synchronously prepare the player. When the player is ready, you can call its start() method to start playing the file.
Additionally, you must remember to release the player's resources once it has completed playing the file. To do so, assign an OnCompletionListener object to it and call its release() method. The following code shows you how:
MediaPlayer player = new MediaPlayer(); player.setDataSource(MainActivity.this, soundUri); player.prepare(); player.start(); // Release the player player.setOnCompletionListener( new MediaPlayer.OnCompletionListener() { @Override public void onCompletion(MediaPlayer mediaPlayer) { mediaPlayer.release(); } });
Step 5: Synchronously Transcribe the File
At this point, we can send the Base64-encoded audio data to the Cloud Speech API to transcribe it. But first, I suggest that you store the API key you generated earlier as a member variable of your Activity class.
private final String CLOUD_API_KEY = "ABCDEF1234567890";
To be able to communicate with the Cloud Speech API, you must create a Speech object using a Speech.Builder instance. As arguments, its constructor expects an HTTP transport and a JSON factory. Additionally, to make sure that the API key is included in every HTTP request to the API, you must associate a SpeechRequestInitializer object with the builder and pass the key to it.
The following code creates a Speech object using the AndroidJsonFactory class as the JSON factory and the NetHttpTransport class as the HTTP transport:
Speech speechService = new Speech.Builder( AndroidHttp.newCompatibleTransport(), new AndroidJsonFactory(), null ).setSpeechRequestInitializer( new SpeechRequestInitializer(CLOUD_API_KEY)) .build();
The Cloud Speech API must be told what language the audio file contains. You can do so by creating a RecognitionConfig object and calling its setLanguageCode() method. Here's how you configure it to transcribe American English only:
RecognitionConfig recognitionConfig = new RecognitionConfig(); recognitionConfig.setLanguageCode("en-US");
Additionally, the Base64-encoded string must be wrapped in a RecognitionAudio object before it can be used by the API.
RecognitionAudio recognitionAudio = new RecognitionAudio(); recognitionAudio.setContent(base64EncodedData);
Next, using the RecognitionConfig and RecognitionAudio objects, you must create a SyncRecognizeRequest object. As its name suggests, it allows you to create an HTTP request to synchronously transcribe audio data. Once the object has been created, you can pass it as an argument to the syncrecognize() method and call the resulting Speech.SpeechOperations.Syncrecognize object's execute() method to actually execute the HTTP request.
The return value of the execute() method is a SyncRecognizeResponse object, which may contain several alternative transcripts. For now, we'll be using the first alternative only.
// Create request SyncRecognizeRequest request = new SyncRecognizeRequest(); request.setConfig(recognitionConfig); request.setAudio(recognitionAudio); // Generate response SyncRecognizeResponse response = speechService.speech() .syncrecognize(request) .execute(); // Extract transcript SpeechRecognitionResult result = response.getResults().get(0); final String transcript = result.getAlternatives().get(0) .getTranscript();
Finally, to display the transcript to the user, you can pass it to the TextView widget. Of course, because changes to the user interface must always happen on the UI thread, make sure you do so after calling your activity's runOnUiThread() method.
runOnUiThread(new Runnable() { @Override public void run() { TextView speechToTextResult = (TextView)findViewById(R.id.speech_to_text_result); speechToTextResult.setText(transcript); } });
You can now run your app, select a FLAC file containing speech in American English, and see the Cloud Speech API generate a transcript for it.
It's worth mentioning that the Cloud Speech API can currently process only single-channel audio files. If you send a file with multiple channels to it, you will get an error response.
5. Using the Cloud Natural Language API
Now that we have a transcript, we can pass it to the Cloud Natural Language API to analyze it. To keep this tutorial short, we'll only be running entity and sentiment analysis on the transcript. In other words, we are going to determine all the entities that are mentioned in the transcript, such as people, places, and professions, and also tell if its overall sentiment is negative, neutral, or positive.
Step 1: Update the Layout
To allow the user to start the analysis, our layout must contain another Button widget. Therefore, add the following code to your activity's layout XML file:
<Button android:layout_width="match_parent" android:layout_height="wrap_content" android:layout_above="@+id/browse_button" android:id="@+id/analyze_button" android:text="Analyze"/>
Step 2: Annotate the Transcript
The Cloud Natural Language REST API offers a convenience option called annotateText that allows you to run both sentiment and entity analysis on a document with just one HTTP request. We'll be using it to analyze our transcript.
Because the analysis must begin when the user presses the button we created in the previous step, add an OnClickListener to it.
Button analyzeButton = (Button)findViewById(R.id.analyze_button); analyzeButton.setOnClickListener(new View.OnClickListener() { @Override public void onClick(View view) { // More code here } });
To interact with the API using the Google API Client library, you must create a CloudNaturalLanguage object using the CloudNaturalLanguage.Builder class. Its constructor also expects an HTTP transport and a JSON factory.
Furthermore, by assigning a CloudNaturalLanguageRequestInitializer instance to it, you can force it to include your API key in all its requests.
final CloudNaturalLanguage naturalLanguageService = new CloudNaturalLanguage.Builder( AndroidHttp.newCompatibleTransport(), new AndroidJsonFactory(), null ).setCloudNaturalLanguageRequestInitializer( new CloudNaturalLanguageRequestInitializer(CLOUD_API_KEY) ).build();
All the text you want to analyze using the API must be placed inside a Document object. The Document object must also contain configuration information, such as the language of the text and whether it is formatted as plain text or HTML. Accordingly, add the following code:
String transcript = ((TextView)findViewById(R.id.speech_to_text_result)) .getText().toString(); Document document = new Document(); document.setType("PLAIN_TEXT"); document.setLanguage("en-US"); document.setContent(transcript);
Next, you must create a Features object specifying the features you are interested in analyzing. The following code shows you how to create a Features object that says you want to extract entities and run sentiment analysis only.
Features features = new Features(); features.setExtractEntities(true); features.setExtractDocumentSentiment(true);
You can now use the Document and Features objects to compose an AnnotateTextRequest object, which can be passed to the annotateText() method to generate an AnnotateTextResponse object.
final AnnotateTextRequest request = new AnnotateTextRequest(); request.setDocument(document); request.setFeatures(features); AsyncTask.execute(new Runnable() { @Override public void run() { AnnotateTextResponse response = naturalLanguageService.documents() .annotateText(request).execute(); // More code here } }
Note that we are generating the response in a new thread because network operations aren't allowed on the UI thread.
You can extract a list of entities from the AnnotateTextResponse object by calling its getEntities() method. Similarly, you can extract the overall sentiment of the transcript by calling the getDocumentSentiment() method. To get the actual score of the sentiment, however, you must also call the getScore() method, which returns a float.
As you might expect, a sentiment score equal to zero means the sentiment is neutral, a score greater than zero means the sentiment is positive, and a score less than zero means the sentiment is negative.
What you do with the list of entities and the sentiment score is, of course, up to you. For now, let's just display them both using an AlertDialog instance.
final List<Entity> entityList = response.getEntities(); final float sentiment = response.getDocumentSentiment().getScore(); runOnUiThread(new Runnable() { @Override public void run() { String entities = ""; for(Entity entity:entityList) { entities += "\n" + entity.getName().toUpperCase(); } AlertDialog dialog = new AlertDialog.Builder(MainActivity.this) .setTitle("Sentiment: " + sentiment) .setMessage("This audio file talks about :" + entities) .setNeutralButton("Okay", null) .create(); dialog.show(); } });
With the above code, the sentiment score will be displayed in the title of the dialog, and the list of entities will be displayed in its body.
If you run the app now, you should be able to analyze the content of audio files, as well as transcribing them.
Conclusion
You now know how to use the Cloud Speech and Cloud Natural Language APIs together to create an Android app that can not only transcribe an audio file but also run entity and sentiment analysis on it. In this tutorial, you also learned how to work with Android's Storage Access Framework and Google Client API libraries.
Google has been regularly adding new and interesting features—along with support for more languages—to both the APIs. To stay updated about them, do refer to the official documentation.
And while you're here, check out some of our other posts on mobile app cloud services and machine learning!
Android SDK
Serverless Apps With Firebase Cloud Functions
Chike Mgbemena
Android Things
Android Things and Machine Learning
Paul Trebilcox-Ruiz
Android SDK
How to Use Google Cloud Machine Learning Services for Android
Ashraff Hathibelagal
via Envato Tuts+ Code http://ift.tt/2roy5zN
0 notes
Last Seen Blogs

incorrect-galavant
Incorrect Galavant Quotes

geetwo57
Untitled


nineeleven29
It's a wonderful life

tenaciousheartnacho
Untitled