#i can make ravioli i can make penne i can make angel hair i can make tagliatelle
Text
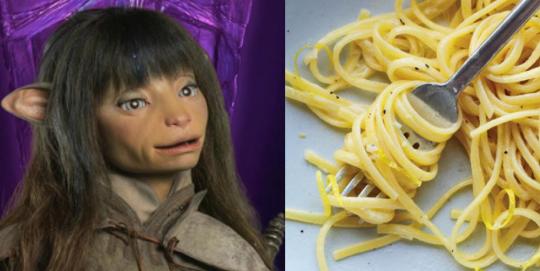
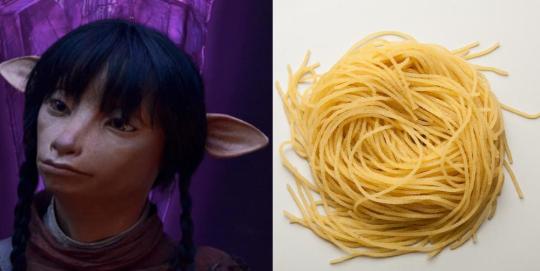
The Dark Crystal: Age of Resistance Characters as Pasta
Rian - Linguine
Linguine is spaghetti+. It’s a staple pasta, but a little more interesting than the standard spaghetti just like Rian! While he’s the protagonist of AOR he’s got a little more substance and a little more intrigue than many ‘heroes’ of the same genre.
Deet - Macaroni
Macaroni is a fun pasta. It can be dressed up, dressed down, and it’s always there for you when you don’t feel like cooking anything else. Like Deet, macaroni is a comfort food that will make you feel full and happy - that is until the carb bloating sets in and you remember she’s being consumed by the darkening.

Brea - Penne
Brea is definitely penne pasta. I don’t why. She just is.

Hup - Gnocchi
Fun. Unconventional. Round. Packs a nice hearty punch - Hup has so much in common with gnocchi I’m almost convinced that he isn’t a podling but rather a sentient ball of pasta come to kick my palate’s ass with how awesome he is.

Seladon - Farfalle
Farfalle struggles to find it’s place in the pasta world. Is it elegant and refined? Secretly wild? Feminine and gutsy? Or just a last resort when the regular pastas are sold out? Whatever it is it’s trying just a tad too hard. Like Seladon it needs to stop looking to others for guidance and carve its own pasta path.

Gurjin - Ravioli
It should come as no surprise that Gurjin is ravioli. It’s a buff pasta, what can I say? But don’t be too quick to dismiss it on that alone. Like bold Gurjin who has endured so much for the sake of his friends, ravioli - from wild mushroom to chef boyardee - has seen us at our best and our worst and stood by us through it all.

Naia - Tortellini
If Gurjin is ravioli then Naia is ravioli’s twin, tortellini. They’re both a little edgier and a little more assertive than their sibling, but at the end of the day you know they’re part of the same family while still appreciating how they stand on their own.

Kylan - Angel Hair
Kylan is the sensitive intellectual who appreciates the finer things, but knows better than to take himself too seriously. He and angel hair are the perfect fit because they both take a lighter touch approach compared to say spaghetti or linguine, but that doesn’t mean they’re any less filling. In fact, sometimes that’s exactly what you need.
#the dark crystal#age of resistance#deet#brea#rian#kylan#naia#gurjin#seladon#hup#i don't know what possessed me to make this#but i did#pasta#pasta memes#meme#mine
242 notes
·
View notes
Text
Pasta Shapes Correspondences
I love to make meals with pasta and sometimes it can be good to slip your intention in with the very shape of your pasta pieces and not just the toppings. Here is my list of personal correspondences and uses, feel free to use them!
Acini di pepe- This is pasta in tight tiny balls- For temporary spells
Agnolotti- Little pasta parcels- Gifts, money
Alphabet pasta- This is pasta that is in the form of letters- Writing, studying, research
Anelli- This is pasta in the shape of small rings- Bonding, relationships/friendships
Calamarata- This pasta resembles squid rings- Good for hiding/invisibility glamours
Campanelle/Gigli- This pasta is in the shape of a frilly flower- Relaxation, tranquility, peace
Casarecce- The name of this pasta is from the Italian word for ‘homemade’- Family, warmth, hearth magic
Conchigle- This pasta is made in the shape of a shell- Communication, sea magic, water magic
Crest di galli- Pasta shaped a bit like the pipette but had a frilly edge like tripoline on top. I had it a lot when I was very young and I think looks like the Loch Ness monster- Imagination, creativity
Elbow Macaroni- I think this pasta looks like rainbows- Welcoming, affection, bonding, comfort, hope
Farfalle/Farfalline/Corbatta- This pasta is in the shape of butterflies- Transformation, renewal, changes
Fusilli/Cavatappi/Rotini- This pasta looks like a corkscrew- Celebrations, festivals and holidays
Gemelli- Means ‘twins’ in Italian but many think it looks like a unicorn’s horn- Good for fae work
Lanterne- Though the name means ‘lantern’, I think they look like waves- Sea magic, turbulance, change
Lasagna- Flat sheet like pasta- Protection, safety
Linguine/Fettuccine/Pappardelle- These are all flat, ribbon-like pasta shapes- Beauty, self love and acceptance
Maltagliati- Meaning ‘badly cut’ as it is made from scrap and left over pasta- Resourcefulness, creativity, adaptivity
Mezza Luna- This pasta is shaped like crescent or half-moons and is stuffed with meats or vegetables- Lunar magic, celebrating points of the lunar cycle
Nuvole- This pasta is shaped like little clouds- Good for weather magic
Orecchiette- This shape is named after ears- Communication, understanding, listening
Penne- The name of this pasta means ‘pen’ in Italian- Writing, long distance relationships/friendships
Pipe/Pipette/Lumache- These all look like closed ended pipes or snail shells- Good for slow acting but stubborn spells
Radiatori- This pasta is named after radiators!- Warmth, affection, friendships
Ravioli- Little pillows stuffed with meat, cheese or vegetables- Dreaming, rest, good sleep
Rigatoni- Wide and ridged tubes- Memory, retaining information
Rotelle/Ruote- This pasta is shaped like wheels- Safe travel, exploration
Spaghetti/Angel Hair/Bucatini/Vermicelli- Thin lengths of pasta- For long-lasting spells
Spighe- This pasta looks like an ear of cereal- Harvest, fertility, plenty, money
Sorprese- Meaning ‘surprise’ in Italian due to not having filling and they resemble fortune cookies too- Luck
Stelle- Often given to children and are shaped like stars- Adventure, discovery, finding spells
Tagliatelle- Little nests of flat ribbon pasta- Hearth magic, family, affection
Tortellini- Little stuffed rings of pasta- Bonding, relationships/friendships
Tripoline/Mafalda- Both are frilly edged long pastas, but tripoline only has one frilled side and they look like jellyfish tentacles- Good for curses, banishing
Trofie- Twisted up pasta- Reliving stress, relaxation
Vesuvio- This twirled pasta has a flattened and domed end and is named after Mount Vesuvius- Destruction, power, good for curses
Ziti/Tubini- Smooth sided tubes- Forgetting, fading, disappearing
This list is not for every single pasta type, just types I have came across and have used and think I will use/make in the future. Please, if you have an interesting pasta shape, add it on!
225 notes
·
View notes
Text
Do you have a pasta roller collecting dust? Oh, baby! Let’s break that thing out! I’ve been playing in an amazing pasta book for a week. The Ultimate Pasta and Noodle Cookbook. It’s just fantastic.
I couldn’t decide which recipe to ask permission for. Maltagliati with Creamy Lemon Sauce is the perfect first homemade pasta. As the author explains, “Maltagliati translates to “badly cut” in Italian.” It’s generally the scrap pieces from making more specific pasta like ravioli, so she has you cut diamonds and triangles in the sheets with a pasta wheel without any fussiness. And the creamy lemon sauce is the easiest and it’s delicious. It would be the perfect first pasta to tackle, getting you that wow at the table right out of the gate
At the other end of the spectrum, is a Ravioli with Sausage and Broccoli Rabe with a Browned Butter and Sage Sauce, showing you what you can do when you want to flex in the kitchen.
I couldn’t decide. So I asked for either one of those. A huge thank you to Cider Mill Press for giving me permission to share both so you can really taste that book! I’ll tell you all about the book first, then give you the recipes to try!
If you love it, please come and find me again, or hit that follow button! 😀
What do you need to make pasta? Everything I’ve prepared here uses just a KitchenAid KSMPSA Pasta Roller Attachment ($59), a Norpro Grip-EZ Pastry/Ravioli Wheel ($8), and a Fantes Gnocchi Board ($5), just to show that you don’t really need anything. You don’t. You could use a hand powered pasta roller, but it takes about 64-68 passes through the machine for one recipe, and I don’t want to make you all jealous with arms that toned. ;D
If you want to cut your sheets into spaghetti or fettucine, this set includes the roller and 2 cutters for $122. KitchenAid KSMPRA 3-Piece Pasta Roller & Cutter Attachment Set They’re nice if you have the money. A ravioli mold is nice. I have those, but didn’t use them here.
My review of the book…..
The Ultimate Pasta and Noodle Cookbook
By Serena Cosmo
Hardcover
This is a beautiful book of global pasta. It’s nearly encyclopedic in its scope. The first 127 pages cover history, ingredients, equipment, cooking technique, and an encyclopedia of pastas that will delight any food nerd. The next 625 pages are recipes, and I used up a pad of sticky notes flagging potential dinners. The range is awesome. Then she finishes with a glossary, and a discussion of when shapes matter.
Who’s this book for? Anyone who loves pasta. If you want to learn how to make your own fresh pastas, with or without any previous experience, she’ll get you there. Her directions are really clear and thorough. She teaches well. The learning curve to get something slightly misshapen and delicious goes by quickly! If you prefer to buy pasta, and make your own dishes from it, you’ll love this, too. Ideas are rarely created in a vacuum, and I love it when authors mention their inspiration, and she does which adds to the overall charm. She gives manual and machine options, so you can go with your preference, and don’t need to get a bunch of equipment if that’s not your thing.
There are lots of beautiful photos in the book, but not for every single dish. That’s the only potential drawback I could find. And my kiddo flagged a few pastas like samosas that are mentioned in the encyclopedia section, but there’s no recipe for them. I already have a samosa recipe, so no big deal.
My pics and thoughts on the dishes that I tried:
1-5) Three-Egg Basic Pasta Dough – p 131. Excellent dough. It really does feel like playdough, just as she says. She gives instruction for two ways to make the dough. You can mix the dough by hand and then knead it for 8-10 minutes, or take a little help from a machine, and let the Kitchen Aid with a dough hook handle it while you sip espresso. I tried both, and actually a third method – a hybrid of the two in which I started by hand and then moved it into the mixer to finish when my kiddo asked for help with something. All worked beautifully. Budget a little time, because the dough needs to rest for an hour or two before you roll it into sheets.
6) Maltagliati – p 183 (uses the three-egg pasta dough). I hadn’t heard of this before. She explains that it translates to “badly cut” and that it’s traditionally make from all the leftover trimmings from making pastas like ravioli. She suggests cutting it into diamond and triangular shapes if you’re making it intentionally, which I was, because I needed it for the next dish. It seems like such a great first pasta to start with since there’s no need to be precise. She listed angel hair and some other very thin ones as alternatives, so I’ll probably cut my diamonds much smaller next time.
7) Maltagliati with Creamy Lemon Sauce – p 469. This sauce is divine and absolutely effortless. It has a bright lemon flavor, with the cheese as a background note. It balances perfectly with the pasta. They don’t overshadow each other.
8-11) Pork and Roasted Squash Potstickers – p 329. The flavor on these is fantastic! It makes enough filling to make these twice. She gives instructions for boiling, but I pleated and pan fried mine. If you want to, too, you need a big nonstick skillet with a lid. Add about 2 tablespoons of oil to nicely cover the bottom and heat over medium. Add the potstickers in a single layer with the seam up, add about 2/3 cup of water and pop on the lid. Let them cook for about 10 minutes. Add a little more water if it’s all evaporated at any point. Then remove the lid and give the pan a swirl, until they’re cooked through, are nice and crispy on the bottom, and they release from the pan. Repeat until they’re all done. `
12-13) Ravioli with Sausage and Broccoli Rabe – p 273 (uses the three-egg pasta dough) and Browned Butter and Sage Sauce – p 466. Delicious! She gives instructions for a pastry cutter or a ravioli tray mold. I just hand-cut them with the pastry wheel. Beautiful ravioli. Budget two hours for the dough to rest before rolling, and two hours for the ravioli to dry after to fill, seal, and cut them.
14) Fonduta – p 472. Oh my gosh! This is wonderfully decadent pasta, filled with cheesy goodness, and made even richer with egg yolks and heavy cream, and finished with a kiss of nutmeg and pepper, and a flourish of fresh parsley. Absolute perfection. This one’s our favorite.
15) Chicken Soup with Chicken Meatballs, Farfalle, and Spinach – p 381. Fantastic soup! The tomato paste adds a wonderful depth of flavor to the cheesy meatballs. I think it’s a kid pleaser because there were no leftovers in our house.
16-20) Garganelli – p 192. This one uses semolina pasta and it smells lovely. Instead of rolling out all four sheets one after another, I rolled them out one at a time, cut them, and formed them before moving on to the next sheet so they wouldn’t dry out. Pasta dough’s a kid magnet. My little girl walked into the kitchen, watched me rolling them, and I heard, “Can I try?” over my shoulder. She loved it and formed half of them.
21) Kira’s Garganelli Pasta with Cream, Ham, and Peas – p 533. Delicious. The sauce is very rich and easy.
Some others I have flagged to try: Farfalle (bowties) – p 170 * Orecchiette (lamb’s ears) – p 173 * Trofie (darling corkscrews) – p 186 * Garganelli (diagonally rolled squares with ridges) – p 192 * Potato Gnocchi with Truffled Cheese Sauce – p 223 * Arugula Gnocchi with Herbed Cheese – p 225 * Baked Spinach and Ricotta Gnocchi with Sage Butter – p 235 * Butternut Squash Gnocchi – p 237 * Spätzle – p 257 * Korean Rice Cakes with Uyghur-Style Lamb and Three Pepper Sauce – p 266 * Caramelle with Roasted Butternut Squash, Parmesan, and Gorgonzola Filling – p 294 * Culurgiones (potato filled) – p 298 * Herb and Cheese Filled Pansoti with Aromatic Walnut Sauce – p 302 * Pierogis with Potato, Onion, and Farmer’s Cheese Filling – p 305 * Manti with Spiced Meat Filling with Garlic Yogurt Sauce – p 312 * Pan Fried Pork and Cabbage Gyoza – p 348 * Miso Soup with Udon Noodles – p 372 * Penicillin Soup with Egg Noodles and Matzo Balls – p 387 * Phở – p 406 * Sesame Soba Noodles – p 411 * Ramen Noodles and Tofu San Bei – p 429 * Chicken Lo Mein with Bean Sprouts, Cabbage, and Carrots – p 435 * Shrimp and Tofu Pad Thai – p 438 * Fettucine Alfredo – p 470 * Gorgonzola Cream Sauce with Pan-Toasted Spiced Walnuts – p 474 * Puttanesca Sauce – p 494 * Asparagus and Ricotta Sauce – p 499 * Spaghetti Alla Carbonara – p 527 * Pasta with Pancetta, Hazelnuts, Orange, and Sage – p 529 * Truffled Mushroom and Pine Nut Sauce – p 555 * Roasted Poblano Pepper and Mexican Sour Cream Sauce – p 563 * Classic Fresh Tomato Sauce – p 565 * Spicy Anchovy, Caramelized Onion, and Toasted Breadcrumb Sauce – p 573 * Broccoli, Raisin, and Pine Nut Sauce – p 575 * Shrimp and Pistou Sauce – p 587 * Penne Alla Vodka – p 605 * Sausage Ragu – p 617 * Bolognese Sauce – p 629 * Sesame Stir-Fried Carrot Noodle Spirals – p 654 * Cucumber “Noodles” with Coconut, Lime, and Cumin Dressing – p 657 * Zucchini “Noodles” with Oven-Roasted Stilton, Radicchio, and Peaches – p 667 * Tofu “Noodles” with Chicken and Mixed Peppers – p 670 * Classic Lasagna with Bolognese and Bechamel – p 696 * Bacon Macaroni and Cheese – p 700
*I received a copy of this book to explore and share my thoughts.
THREE-EGG BASIC PASTA DOUGH
YIELD: A LITTLE OVER 1 POUND; ABOUT 6 SERVINGS / ACTIVE TIME: 1 HOUR / TOTAL TIME: 1 ½ HOURS
This recipe is your standard, go-to recipe when you want to simplify the pasta making process and still get delicious results. Suitable for hand- or machine-rolling, it forms a malleable and nicely golden-hued dough that is a pleasure to knead by hand since it resembles PlayDoh in texture and produces tender pasta. For best results, all the ingredients—even the flours—need to be at room temperature. Keep in mind that the thickness suggestions for each pasta shape are just suggestions. If you prefer any pasta
shape slightly thicker or thinner, you are the master of your own dining destiny.
Suitable for fettuccine, pappardelle, tagliatelle, maltagliati, quadretti, farfalle, fazzoletti, cappellacci dei briganti, ravioli, ravioloni, caramelle, pansoti, tortellini, tortelloni, agnolotti, anolini, and cappellacci di zucca (butternut-squash stuffed pasta).
INGREDIENTS:
2 ¾ cups all-purpose flour
3 large eggs
I egg yolk
1 Mixing and kneading the dough by hand: On a flat work surface form the Hour into a mountain-like mound. Create a well in the center, then add the eggs, egg yolk, and 2 tablespoons water. Using a fork or your fingertips, gradually start pulling the flour into the pool of egg, beginning with the flour at the inner rim of the well. Continue to gradually add flour until the dough starts holding together in a single floury mass, adding more water— I tablespoon at a time— if the mixture is too dry to stick together. Once the dough feels firm and dry, and can form a craggy looking ball, it’s time to start kneading.
Begin by working the remaining flour on the work surface into the ball of dough. Using the heel of your hand, push the ball of dough away from you in a downward motion. Turn the dough 45 degrees each time you repeat this motion, as doing so incorporates the flour more evenly. As you continue to knead, you’ll notice the dough getting less and less floury. Eventually it will have a smooth, elastic texture. If the dough still feels wet, tacky, or sticky, dust it with flour and continue kneading. If it feels too dry and is
not completely sticking together, wet your hands with water and continue kneading. Wet your hands as many times as you need in order to help the flour shape into a ball.
Knead for 8 to 10 minutes. It seems like a long time, but it accomplishes two things.
l. It creates a dough that is smooth and springy.
2. It eliminates any air bubbles and bits of unincorporated flour in the dough.
The dough has been sufficiently kneaded when it is very smooth and gently pulls back into place when stretched.
Mixing and kneading the dough with a mixer: Put the flour in a large bowl. Create a well in the center. Using a hand-held or stand mixer fitted with the dough (spiral) attachment, set the speed to 1 or 2 and slowly add half of the eggs and 1 tablespoon water while mixing. Mix until the wet ingredients have been fully incorporated into the flour, then add the remaining eggs and another tablespoon water and continue to mix on low speed until fully incorporated. Soon the dough will begin coming together in a single floury mass. Add water 1 tablespoon at a time—if the mixture is too dry to stick together. Add flour— 1teaspoon at a time—if the mixture is too wet and sticky. Once the dough feels firm and dry, and can be formed into a coarse looking and slightly tacky ball, it’s time to start kneading.
Turn the speed on the mixer to medium-high, typically notch 4, and mix for 8 to 10 minutes. The dough has been sufficiently kneaded when it is very smooth and gently pulls back into place when stretched.
2 Resting the dough: Wrap the ball of dough tightly in clear food wrap and let rest for I hour—2 hours is even better if you have the time. If using within a few hours, leave it out on the kitchen counter, otherwise refrigerate it (it will keep for up to 3 days). If you do refrigerate it, however, the dough may experience some discoloration (but it won’t affect the flavor at all).
3 Rolling the dough: Cut the dough into four even pieces. Set one piece on a smooth work surface and wrap up the rest in clear food wrap to prevent drying. Shape the dough into a ball, place it on the surface, and, with the palm of your hand, push down on it so that it looks like a thick pita. Using a rolling pin, roll the dough to 1/2 inch thick. Try as much as possible to keep the thickness and width of the dough “patty” even, as it will help the dough fit through the pasta machine more easily.
Set the pasta machine for the flat roller (no teeth) on the widest setting (typically notch 1). Now feed the dough into the rollers. As a rather rough, thick sheet of pasta comes out the other end, make sure to support it with your hand or fingers. Fold the sheet of dough over itself twice, as you would a letter, and then turn the folded dough on its side and feed it back into the machine again. Repeat this folding and feeding it back into the machine three more times. Ihis process is called “laminating” and it makes the dough more sturdy and manageable to handle.
Set the machine to the second-widest setting (typically notch 2) and feed the dough into the rollers. Again, support the pasta as it comes out the other side. Again fold it as you would a letter and feed it into the rollers on its short side; repeat this three more times.
Set the machine to the third-widest setting (typically notch 3) and feed the dough into the rollers. Again, support the pasta as it comes out the other side. Again fold it as you would a letter and feed it into the rollers on its short side; repeat this three more times.
Set the machine to the second-smallest setting (typically notch 4). Feed the pasta into the rollers. Again, support the pasta as it comes out the other side. At this point, there is no need to laminate the pasta.
Stop rolling at this point if making sheets of pasta 1/8 inch/2mm thick for pansoti, agnolotti, maltagliati, farfalle, and cappellacci dei briganti. If you like your fettuccine, pappardelle, and tagliatelle a little thicker, then this is the setting for you.
Set the machine to the smallest setting (typically notch 5). Cut the pasta sheet in half and feed it into the rollers. Again, support the pasta as it comes out the other side.
This last setting makes pasta sheets so thin (about 1/16 inch/ 1.5 mm thick) that you can see light through them. It is ideal for filled pastas like ravioli, ravioloni, tortellini, tortelloni, anolini, cappellacci di zucca, and caramelle, whose fillings can easily be overshadowed by too much surrounding dough, as well as fazzoletti and quadretti. If you like your fettuccine, pappardelle, and tagliatelle very thin, then this is the setting for you.
The just rolled pasta will be very delicate, so be gentle handling it. If the pasta sheet is too long to easily handle, carefully cut it in half. Lightly dust each sheet with flour and lay it on a surface lined with wax or parchment paper. Repeat all the above steps with the remaining pieces of dough.
4 Drying the sheets of dough: Pasta dough needs to be allowed to dry for approximately 15 minutes after it has been rolled out and before it is cut into strands or other shapes. This drying time makes the dough less sticky and easier to handle. Keep in mind that when the pasta is very thick or wide it will need to be turned over to ensure thorough and even drying (not necessary for thin noodles). Pasta sheets are now ready to be shaped or cut according to recipe requirements.
The notable exception to this rule is if you are making stuffed pasta. In this case, not letting the dough dry is best because the slight stickiness helps the pasta adhere better and creates a better seal.
5 Drying the cut pasta before cooking: Once fresh pasta has been cut (see the individual recipes), toss it with semolina flour and then place it on a lightly floured surface (again, with semolina flour) and allowed it to dry for at least 15 minutes before cooking. This drying period is important because it allows the pasta to dry enough to become firmer and less sticky, which prevents the pasta from sticking together as it cooks (shaped pasta also holds its shape better when allowed to dry slightly before cooking). More specific drying times are indicated in individual pasta recipes. Just note that the drying process can be fickle. Depending on temperature, humidity levels, and the size of the noodles or pasta, the process may take a longer or shorter period of time than stated in the recipes. It is probably best to avoid making pasta on very humid days. If you can’t avoid it, turn on the air conditioning or even a movable fan to help the air circulate more effectively.
MALTAGLIATI
YIELDS: 6 SERVINGS / ACTIVE TIME: 1 HOUR / TOTAL TIME: 1 ½ HOURS, PLUS 2 HOURS TO DRY
Maltagliati translates to “badly cut” in Italian; they are similar to fazzoletti (page 184) in that they are both pieces of thinly rolled pasta dough. But while fazzo/etti are cut into squares or rectangles, traditionally maltagliati were made from all the irregularly shaped trimmings leftover from cutting out the dough for pastas like ravioli, anolini, and agnolotti. Those pastas are generally made from pasta rolled out so thin, it’s almost transparent; I prefer to prepare maltagliati from scratch so I can make them slightly thicker, for a bit more chew.
Suggested sauce and pasta dishes: Puttanesca Sauce (page 494), Fresh Mushroom Sauce (page 551), Duck Ragu (page 600), Truffled Mushroom and Pine Nut Sauce (page 555), Maltagliati with Creamy Lemon Sauce (page 469)
INGREDIENTS:
1 recipe Three-Egg Basic Pasta Dough (page 131)
Semolina flour for dusting
Salt
1 Prepare the dough as directed on pages 131—133, rolling the dough to the second thinnest setting (generally notch 4) for pasta sheets that are about 1/8 inch thick. Lay the pasta sheets on lightly floured parchment paper-lined baking sheets. Let the sheets air-dry for 1 5 minutes, turning them over halfway (doing this will make them easier to cut).
2 Lay a pasta sheet on a lightly floured work surface directly in front of you. Lightly flour the sheet, then fold it into thirds lengthwise, like you would a letter. Using a pastry cutter, cut the folded-up pasta into rough diamond and triangular shapes. No precision is required, so have fun with it. Gently toss the maltagliati with flour and transfer to lightly floured parchment paper covered baking sheets. Repeat with all the pasta sheets. Allow them to air-dry for 2 hours, turning them over once halfway, and then cook. Alternatively, you can place them, once air-dried, in a bowl, cover with a kitchen towel, and refrigerate for up to 3 days. Or freeze them on the baking sheets, transfer to freezer bags, and store in the freezer for up to 2 months. Do not thaw them prior to cooking (they will become mushy), and add an extra minute or two to their cooking time.
3 To cook maltagliati, bring a large pot of water to a boil. Once it’s boiling, add salt (I tablespoon for every 4 cups water) and stir. Add the maltagliati and stir for the first minute to prevent any sticking. Cook until the pasta is tender but still chewy, about 2 minutes. Drain, add to the sauce of your choice, and serve.
MALTAGLIATI CREAMY LEMON SAUCE
YIELD: 4 SERVINGS / ACTIVE TIME: 10 MINUTES / TOTAL TIME: 25 MINUTES
Ideal for hot summer days, this refreshing pasta dish makes you feel as though you are having a lovely meal in Sorrento, the enchanting coastal town located on the Amalfi Coast. The lemon, so representative of the gigantically bumpy and canary yellow citrus fruits that grow abundantly on the area’s spectacular cliffs, breaks up the richness of the cream with its acidity, making the sauce piquant and feathery light. Because the sauce is so light, this dish is at its best when paired with a delicate pasta shape since larger pasta shapes would overwhelm it.
Other recommended pasta shapes: tagliatelle, angel hair, vermicelli
INGREDIENTS:
Grated zest and juice of 1 lemon
5 tablespoons unsalted butter, divided
½ cup heavy cream, more if needed
¼ teaspoon freshly ground white pepper, or more, to taste
Salt
¾ pound maltagliati, homemade (page 183) or store-bought
½ cup freshly grated Parmigiano-Reggiano cheese, plus more for serving
1 Put a large pot of water on to boil for the pasta.
2 Put the lemon zest and juice in a 2-cup Pyrex measuring cup along with 4 tablespoons of the butter cut into small pieces, the cream, pepper, and a few generous pinches of salt. Put the measuring cup in a microwave and heat on high for 45 to 60 seconds, until the butter is fully melted. Cover and set aside.
3 When the pasta water is boiling, add salt (1 tablespoon for every 4 cups water) and stir. Add the pasta, stirring for the first minute to prevent any sticking. Cook according to the pack- age (or recipe) instructions, draining the pasta 2 minutes short of the directed cooking time. The pasta should be soft but still very firm. Right before draining the pasta, reserve 1/4 cup of the pasta water. Return the empty pot to the stove. Immediately turn the heat to high, add the remaining 1 tablespoon butter and reserved pasta water. Add the drained pasta and toss. Add the warm lemon cream mixture and the Parmigiano and cook, tossing continuously, for 2 minutes.
4 Divide the pasta among four warmed bowls and serve piping hot dusted with Parmigiano (or pass the grated cheese at the table).
RAVIOLI WITH SAUSAGE AND BROCCOLI RABE
YIELD: 4 TO 6 SERVINGS / ACTIVE TIME: 2 HOURS / TOTAL TIME: 3 HOURS
Ravioli are one of the oldest types of pasta, and related forms of this dish are believed to date back to early Roman times, though they don’t actually begin appearing in historical manuscripts until the 12th century. Filled with varying mixtures of meats, vegetables, and/or cheeses, they can be shaped like squares, discs, or triangles and are typically 1 ¾ inches wide. You can make raviolini using this recipe by placing ½ teaspoon of filling spaced 1 inch apart on the pasta sheets and then cutting them into I-inch squares. Similarly, you can make ravioloni by placing 2 tablespoons of filling spaced 4 to 6 inches apart on the pasta sheets and cutting them into 4- to 6-inch squares. I include instructions for making ravioli by hand and with a ravioli maker tray mold.
Suggested sauces: Browned Butter and Sage Sauce (page 466)
INGREDIENTS:
FILLING:
½ pound broccoli rabe
Salt
2 tablespoons extra virgin olive oil
½ pound sweet talian sausage, casing removed
2 garlic cloves, thinly sliced
¼ teaspoon red pepper flakes
Freshly ground black pepper
½ cup Parmigiano-Reggiano cheese
½ cup freshly grated pecorino Sardo (preferable) or pecorino Romano
DOUGH:
Three-Egg Basic Pasta Dough (page 131-133)
Semolina flour for dusting
Salt
1 Discard any discolored leaves from the broccoli rabe. Detach the florets from the tops of the stems, rinse under cold water, and set aside. Trim off and discard the last 2 inches of the stems. Using a sharp paring knife, cut off the leaves and place in a bowl. Peel the skin from the thicker stalks and cut them crosswise into thin slivers. Add the leaves and stems to a bowl of cold water, swish around to remove dirt, and then transfer to a colander. Rinse under cold water.
2 Bring a medium saucepan of water to a boil. Once it’s boiling, add salt (1 tablespoon for every 4 cups water) and stir. Add the peeled stems and cook for 2 minutes, then add the leaves and cook for 4 minutes. Add the florets and cook for 2 minutes. (Note: If the stalks are still crisp, they will remain bitter.) Reserve 1/4 cup of the cooking water and drain the greens. Once cool enough to handle, mince.
3 Heat a large skillet over medium heat for 2 to 3 minutes. Add the olive oil and let it heat for a couple of minutes. Add the sausage, breaking it into small pieces with a potato masher or wooden spoon as it cooks. Add the broccoli rabe, garlic, red pepper flakes, and salt and black pepper to taste, and stir. Add the reserved broccoli rabe cooking water and simmer until the sausage is cooked through and there is no liquid left in the pan, 5 to 6 minutes. Transfer to a medium bowl and let cool, draining off excess liquid—if any—that may accumulate. Once cooled, add the cheeses and mix well. Set aside. The filling can be prepared a day ahead; cover, refrigerate, and bring back to room temperature before proceeding.
4 Prepare the dough as directed on pages 131—133, rolling the dough to the thin- nest setting (generally notch 5) for pasta sheets that are about 1/16 inch thick. The pasta sheets will be very long on this setting. Cut them into 12 ½ -inch-long lengths. Lay the cut pasta sheets on lightly floured parchment paper-lined baking sheets and cover loosely with clear food wrap. Work quickly to keep the pasta sheets from drying out, which makes it harder for the pasta to stick together.
5 Forming the ravioli by hand: Place a sheet of dough on a lightly floured work surface and fold it in half lengthwise. Lightly tap on the folded edge to create a guideline. Unfold the dough so that it’s laying flat, the fold line now delineating two pasta strips that are still connected. Place balls of filling about the size of hazelnuts in the center of one pasta strip, spacing the mounds, from the top to the bottom of the strip, about 1 ¾ inches apart. Should the dough have become a little dry during this process, lightly moisten the pasta border with a fingertip dipped in water (it’s helpful to have a small bowl of water nearby for this purpose). Cover the filling with the other half of the sheet of dough. Using your fingertips, gently but firmly press down the dough around each filling mound. As you do this, try to push out any air from around the filling (this keeps the ravioli from coming apart in the water when boiling due to vapor pressure). Press one more time to ensure you have a tight seal. Using a ridged pastry cutter, slice between the mounds to create squares approximately 1 ¾ inches in size.
Forming the ravioli with a ravioli maker tray mold: Lightly dust the metal ravioli mold with flour, then place a sheet of dough on top. Gen- tly press the plastic mold over the pasta sheet to create depressions (should you press too hard and tear the dough, simply ball it back up and roll it through the machine again). Place approximately 2 teaspoons of filling in each depression. Remove any filling that falls on the
surrounding dough. Gently tap the metal mold on the table a few times to help remove any air bubbles that may be trapped underneath the filling. Should the dough have become a little dry during this process, lightly moisten the pasta border with a fingertip dipped in water. Lay another sheet of dough over the mold. As you do this, gently press down with the palm of your hand to push out any air within the ravioli. Run a rolling pin over the surface of the ravioli mold until the ridges of the ravioli beneath become visible. Carefully flip the mold over and gently remove it. If some of the ravioli get stuck to the mold, gently tap one edge of the mold against the table. Gently pull the ravioli apart. Should they still be slightly attached to each other, use a ridged pastry cutter to cut them apart.
6 No matter how you form them, set the ravioli on lightly floured parchment paper-covered baking sheets so they are not touching. Allow them to air-dry for 2 hours, turning them over once halfway through, and then cook. Alternatively, you can place them, once air-dried, in a bowl, cover with a kitchen towel, and refrigerate for up to 3 days. Or freeze on the baking sheets, transfer to freezer bags, and store in the freezer for 3 to 4 weeks. Do not thaw them prior to cooking (they will become mushy), and add an extra minute or two to their cooking time.
7 To cook the ravioli, bring a large pot of water to a boil. Once it’s boiling, add salt (I tablespoon for every 4 cups water) and stir. Carefully drop the ravioli into the boiling water and stir for the first minute to prevent any sticking. Cook until they are tender but still chewy, about 3 minutes. Drain and serve with the sauce of your choice.
BROWNED BUTTER SAGE SAUCE
YIELD: 4 SERVINGS / ACTIVE TIME: NEGLIGIBLE 1 TOTAL TIME: 10 MINUTES
Piney and aromatic sage is the star in this classic pan sauce for a seemingly endless list of filled pastas, gnocchi, and dumplings. Browning the butter gives it a delicious toasty flavor. Use the crisp fried sage leaves as a garnish.
Recommended pasta shapes or dumplings: meat-, vegetable-, and cheese-filled ravioli, spätzle, agnolotti, and vegetable- and cheese-based gnocchi
INGREDIENTS:
6 tablespoons (3/4 stick) unsalted butter, cut into several pieces, plus I tablespoon for seasoning the pasta
8 fresh sage leaves
Salt
¾ pound filled pasta like ravioli, dumplings, or gnocchi
Freshly ground black pepper
Freshly grated Parmigiano- Reggiano cheese for serving
1 Bring a large pot of water to a boil.
2 While the water comes to a boil, heat a skillet large enough to hold the finished pasta over medium-low heat for 2 to 3 minutes, then add the butter. Turn the heat up to medium and, once the butter melts and stops foaming, add the sage leaves. Cook, stirring occasionally, until the butter begins to brown on the bottom and the sage leaves become crispy. You will need to be very attentive during this step, as butter can burn in a blink of an eye. You want to make sure the sage is sizzling very gently so that it gets nice and crisp when finished, while monitoring it carefully to ensure it does not burn in the process. If sizzling too much, lower the heat and take the skillet off the stove for 30 seconds or so before returning it to the burner. Take the pan off the heat once the sage leaves are done. Remove the leaves from the butter and reserve as a garnish.
3 When the water is boiling, add salt (1 tablespoon for every 4 cups water) and stir. Add the pasta, stirring for the first minute to prevent any sticking. Cook according to the package (or recipe) instructions. Right before draining the pasta, reserve ½ cup of the pasta water. Return the empty pot to the stove. Immediately turn the heat to high, add the remaining tablespoon of butter and reserved pasta water. Add the drained pasta and toss. Now add the browned butter and cook, tossing continuously, for 1 to 2 minutes.
4 Serve piping hot on warmed plates, each serving topped with two fried sage leaves, a few good cracks of black pepper, and Parmigiano (or pass the grated cheese at the table).
#theultimatepastaandnoodlecookbook
#serenacosmo
#cidermillpress
Serena Cosmo’s Maltagliati with Creamy Lemon Sauce AND Ravioli with Sausage and Broccoli Rabe with a Browned Butter and Sage Sauce recipes and Cookbook review: The Ultimate Pasta and Noodle Cookbook Do you have a pasta roller collecting dust? Oh, baby! Let's break that thing out! I've been playing in an amazing pasta book for a week.
#broccoli rabe#food porn#Jennifer Guerrero#JenniferGuerrero#lemon#maltagliati#pasta#ravioli#recipe#sausage#Serena Cosmo#The Ultimate Pasta and Noodle Cookbook
0 notes
Last Seen Blogs

drippingbunny
🩷🩷🩷

sinotechmarine1
SINOTECH MARINE

castman0023
Helpless

twinklepetaln6743
CozyKittyKingdom

iamr1na
R1na