#instead of giving us this in 4k resolution on youtube
Text
How to make a gif + sharpening
Gifs are part of the Tumblr experience and you may want to learn how to do them.
If that is the case, here is a tutorial, showing all the tricks I learned in the past years.
Contents
Software needed
Videos
The process.
Software needed
Windows or Mac OS
Gom Player [download]
Photoshop (I use Photoshop CC 2018, but you can really use any version as long as it has the timeline option).
Talking about Photoshop. You should buy it - but for educational purposes, I can tell you that if you google, you can find many many tutorials on how to install it.
Here is the link to one & [another one]
Overall, I suggest you to google for tumblr tutorials - there are plenty.
Videos
To make HQ gifs you may want to get the scene you want to gif in the highest quality possible.
On Youtube there are a lot of 4K and 1080p videos (especially music videos)
If you are looking for a film or a TV show I am sure you know there are some websites that provide you with 1080p quality files (look for Bluray Rips, they have the best quality).
The process
Now for the fun part. Before starting I want to give you a little cheat sheet on Tumblr’s post dimensions (useful if you want to have really HQ gifs) [here].
Here is the gif I’m gonna make with you today:

It has no filter: just some sharpening.
STEP ONE: SCREENCAPPING
Run Gom Player and open the video you want to get the screencaps from.
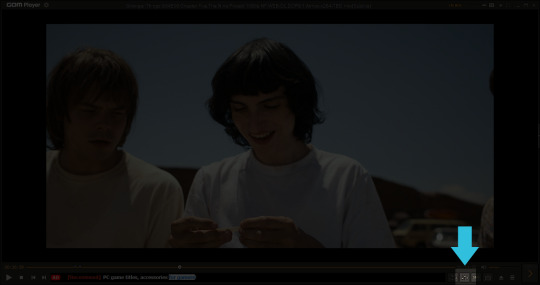
See that little button there? You have to press it. It is called Control Panel.
Once you pressed on it, a pop-up window should load + make sure to click on the Video bar, and the Advanced Capture option:

These are my options:

Now, play the video and press the Burst Capture: once you’re done, press that same button again to stop the process.
Now, the designated folder where you saved the screencaps should have all of the saved frames.
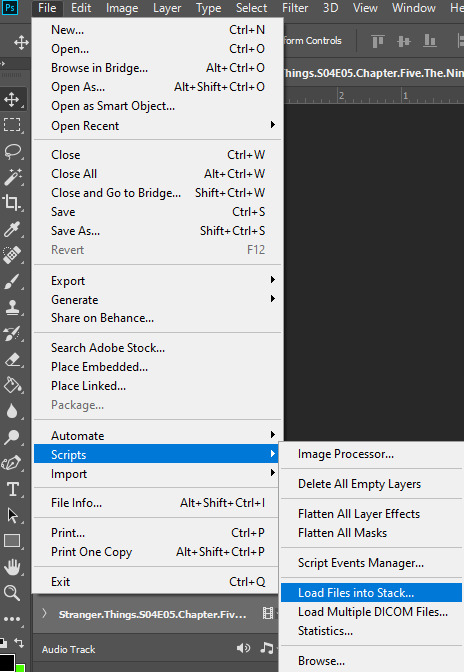
STEP TWO: PHOTOSHOP
On Photoshop go to File > Scripts > Load Files into Stack
This window will pop up:
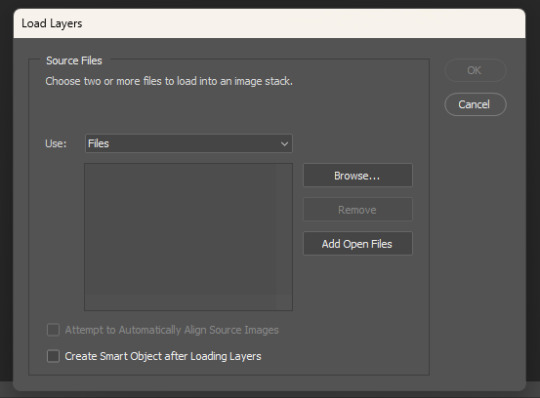
Click on Browse… and select your screencap folder, and select now all the frames of the scene you want to gif, you’ll get something like this:
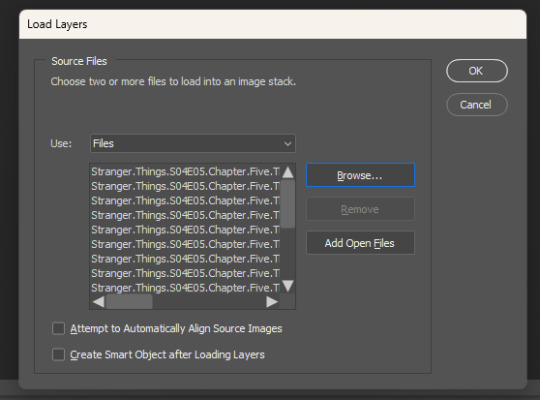
Now press OK and let Photoshop do its job.
Before starting, make sure the timeline is on (it’s on if it has a tiny check next to it - see the picture below):
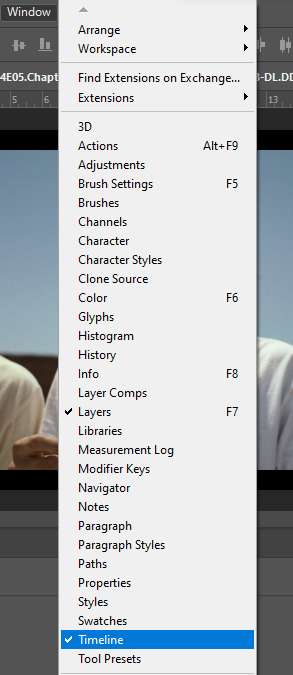
Now, your timeline should be visible at the bottom of your screen. Please select the Create Frame Animation option:


Once you’re done, click on the burger menu on top left (see image above):
Click on Make frames from layers
Click again on that menu
Now on Reverse frames
For the last time click on the menu
Select all frames.
Now all of your frames should be selected. Right click on one of those frames where you read “0 sec.”:

Select Other… and write 0.05 (or 0,05 - it's the same tho, for example, my version of Photoshop supports as decimal symbol the comma instead of the full stop!) and confirm.
STEP THREE: CROPPING
Ok, now cropping is really delicate. First, select the crop tool and on the top bar use the Ratio option, like this:
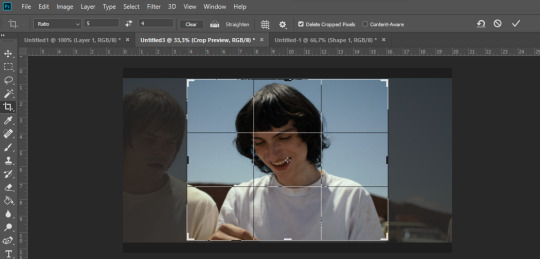
Now, really pick whatever ratio you want (mine is 5:4), and using the handles cut out the black portions of the scene - nothing more. Then confirm.
Go to Image > Image size and write the width based on the cheat sheet I linked above (if the little chain symbol is selected, the height will automatically adjust!) -> These are my options:
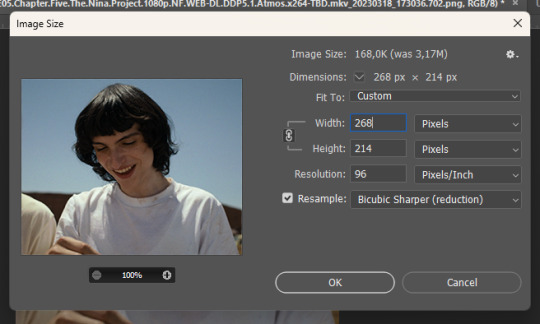
Note: if your resolution is different than 96, don’t change it - leave the number you have.
Confirm.
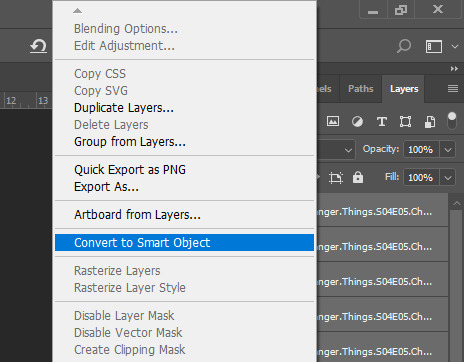
STEP FOUR: CREATING THE SMART OBJECT AND SHARPENING
Now, on the timeline, select the first frame, and on the bottom left there is this symbol you may want to click:

Select all the layers, right click and select Convert to Smart Object
Select the newly made smart object and go on the Filter > Sharpen menu and pick Smart Sharpen: these are my options
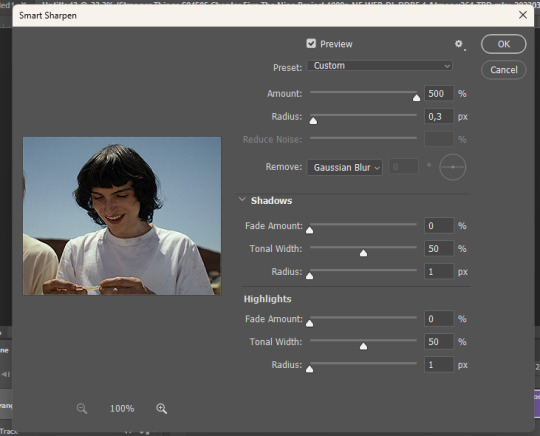

Press OK and then redo it (the smart object has to be sharpened twice).
STEP FIVE: SAVING
File > Export > Save for web

Make sure the looping setting is on Forever - click on save and you’re done!
[list of other tutorials here]
9 notes
·
View notes
Text
Lifetime Stock Video Review
Lifetime Stock Video Review
Read in depth=> https://explorreviews.com/lifetime-stock-video-review/
Who Needs Lifetime Stock Video?
Will JV Partners Make Money?
Video is clearly the highest generating niche on JVZoo
The number of Sales Letters / Explainer Softwares / Video Tools and the volume of sales they generate are epic.
These top video softwares have sold over 370,000 products for $15,000,000 in sales.
And that's just the start of the target market for Lifetime Stock Video.
Our Stock Footage works with any software or service that allows you to import/upload videos.
Vidgeos, VideoScribe, Keynote, Adobe (Multiple Tools), ScreenFlow, Camtasia Studio,
Apple iMovie, Windows Movie Maker, PowerPoint, Google and more.
All of our videos are available in full 4K and HD resolution as well as multiple smaller
formats to guarantee compatibility.
Why Lifetime Stock Video?
Why Do Your Clients Need It?
Video is no longer a "nice to have" in marketing - it is a 100% requirement. 4x as many consumers would rather watch a video about a product than read about it. Video on a landing page can increase conversions over 80%
Far too many videos use rubbish low quality free backgrounds & scenes. 62% of consumers are more likely to have a negative perception of a brand that published a poor quality video.
Quality Matters. Backlinko.com analyzed 1.3 million YouTube videos to better understand how YouTube's search engine works. One of the key indicators identified is that high quality videos dominate YouTube's search results. 68.2% of videos on the first page of YouTube are in HD or better.
It's time to improve the quality of asset sales on JVZoo. Lifetime Stock Video provides one of the best formats for any asset sale on JVZoo - instead of giving buyers 30 zip files of unsearchable videos, we provide a full membership club. Buyers can see full previews, browse videos and keyword/tag search their assets. And they don't need to download and store 280 GB of files on their hard drive.
We've put together a rock solid product, with monthly updates at a crazy low price. Buyer remorse and customer returns should be minimal.
Key Selling Points for Lifetime Stock Video
Full Membership Site
Unlike other low-cost graphics / videos / audio specials, this isn't a "firesale" or "collection". We're not giving the buyers a 100 GB dump of unsearchable assets with crazy names that sit on their hard drives and gather dust.
Multiple Sizes for Each Video
All 4K videos are in 6 sizes from 3840x2160 down to 426x240. All HD videos are in 4 sizes from 1920x1080 down to 426x240. This guarantees compatibility with any software, website or tool that can import video (buyers don't need to downsize videos on their own.)
New 4K Assets Monthly
For the next 24 months we will add 200 new 4K videos to the Professional Membership Accounts (4,800 over 2 years.)
And 75 new 4K videos monthly to the Standard Membership Accounts (1,800 over 2 years.)
One Payment
Pay once, use forever. Just like our Lifetime.Hosting product, customers will only make a single payment to join our membership club for life. Other stock video memberships charge $100/month recurring.
Our recurring cost is $0/month.
The Funnel
Generating up to $120 in your pocket for each customer.
Funnel Details
Front End - Standard Lifetime Stock Video
Standard for $24.95 - 1,000 4K & HD videos for own projects/videos and clients projects/videos.
Plus 75 4K videos per month.
OTO1 - Professional Lifetime Stock Video
Professional for $37.00 - Upgrade to 3,300 4K & HD videos for own projects/videos and clients projects/videos.
Plus 250 4K videos per month.
OTO1 Downsell - Professional Lifetime Stock Video
Professional for $27.00 - Upgrade to 3,000 4K & HD videos for own projects/videos and clients projects/videos.
(300 less videos and no bonuses.) Plus 250 4K videos per month.
OTO2 - Professional Lifetime Stock Images Membership Club
Enterprise for $47.00 - Addon 15,000 HD Images for own projects/videos and clients projects/videos.
OTO2 Downsell - Standard Lifetime Stock Images Membership Club
Premium for $27.00 - Addon 12,000 HD Images for own projects/videos and clients projects/videos.
(3,000 less images and no bonuses.)
OTO3 - Lifetime Stock Video Reseller
Reseller 20 for $67.00 - resell 20 Standard packages ($940 value)
Reseller 50 for $97.00 - resell 50 Standard packages ($2,350 value)
Reseller 500 for $127.00 - resell 500 Standard & Professional packages ($47,000 value)
OTO3 Downsell - Lifetime Stock Video Reseller 3-Pay
Reseller 20 for 3 monthly payments of $27.00 (total $81) - resell 20 Standard packages ($940 value)
Reseller 50 for 3 monthly payments of $37.00 (total $111) - resell 50 Standard packages ($2,350 value)
Reseller 500 for 3 monthly payments of $47.00 (total $141) - resell 500 Standard & Professional packages ($47,000 value)
Richard who? Ask these guys...
Richard and his team put together a great product and a funnel that converted really well. When I promoted the first Lifetime.Hosting I generated 844 sales in under a week. And my list and I were really impressed with the live support provided.
His launch was in the top 10% of all my 2016 launches. Pretty impressive stuff. If you're think about working with Richard, do it.
- Sam Bakker
Richard is not only a great affiliate that can hit your top 10 but also a great person to connect with. If you're looking for a great offer to promote, make sure you sign up for Richard and put his on the top of your list. He is one of a few people that will actually reciprocate hard for you.
- Han Fan
Of all the products I have promoted, Richard's Lifetime.Hosting launch resulted in the best affiliate earnings. He is easy to reach out to and always helps with all my JV related questions. Also his product support team is top notch. I highly recommend promoting Richard's products.
- Igor Burban
I've worked with Richard twice on his Lifetime Hosting promotion. Both converted amazingly well. His support and dedication that he provides for his customers and affiliates are some of the best in the industry. I'll definitely look for his future launches as I know they'll convert really well. The fact that he's a really cool guy is an added bonus.
- Gee Sanghera
I'm happy to talk about Richard Madison and the heat that he can bring to your launch. This guy jumped on my recent launch 48 hours after it started and within 24 hours he rocketed to the top of the leaderboard sending the most sales and revenue. It's the first time I've dealt with Richard and I'll tell you I'm happy to deal with him more and more. 24 hours, 100+ sales.
- Jason Fulton
I was thrilled to see this gentleman crush the #1 best seller spot on my leaderboard back in September 2016. Richard is "The Man, The Myth, The Legend" most people haven't heard about. But in the elite circles of the online marketing world, he's known as the founder of Lifetime Hosting and an overall A+ affiliate marketer.
I give Richard two thumbs up and I recommend you work with him - you will see a major difference to your bottom line. His copy converts & his team consists of experienced top-shelf tech support & customer service reps. You don't know what making money online is until you've work with Richard - period.
- Vas Blagodarskiy
More Reasons to Partner with Us
Instant Commission for trusted partners on the JVZoo platform
Proven Results from our entire team (copywriter, design, product, delivery)
Professional Product exceeding all other video assets ever sold on JVZoo
Fantastic video and long salesletter pitch by proven copywriter
Limited time launch for urgency; converting to monthly price after launch
Plenty of upsells and OTOs for you to earn more when the buyer has their wallet out
Source: https://statisticalsite.blogspot.com/2023/05/lifetime-stock-video-review.html
0 notes
Text
Top sony, canon, nikon cameras for photography
Top sony, canon, nikon, cameras for photography
Introduction
Are you a photographer? Do you want to take better pictures with your camera? If so, this guide is for you! We've compiled a list of the best cameras for photographers based on our extensive research and testing.
The best cameras for photographers
The best camera is the one that suits your needs, not the one that suits someone else’s.
If you’re a professional photographer, then we all know what matters most: how well your gear performs in different conditions and situations. That said, there are plenty of cameras from Sony and Canon on Amazon that will suit any budget—and all come with a variety of lenses to help you expand your capabilities. For example:
Canon G9 X Mark II Body Only (Black) | $2199 - This camera has been designed for both stills and video shooting thanks to its 10 MP sensor and 5-axis gyro sensor stabilization system (which reduces blur caused by shaky hands). It also comes with built-in Wi-Fi connectivity so users can wirelessly transfer photos from their phone or tablet directly onto their computer without having to use any cables at all!
Sony mirrorless cameras
Sony mirrorless cameras
The Sony a7R III is the latest and greatest from the company, with a 35mm full-frame sensor and BIONZ X processing engine. It also has 5-axis in-body image stabilization, 4K video capture at up to 60p (at 1/30 second), and 10fps continuous shooting.
The Sony A7III is an even better camera than its predecessor: it features an improved autofocus system that can track moving subjects more accurately than before; it has a magnesium alloy body for durability; it offers improved battery life; and it comes preloaded with 4K video files that are compatible with high-quality streaming services like YouTube or Netflix. The only thing missing from this great camera is weather sealing protection against dust or rainwater splash!
Canon DSLRs
Canon DSLRs are the most popular among photographers. They have a good reputation for their autofocus system and image quality, as well as video quality. The battery life on these cameras is also very good; you can get up to 400 shots per charge with a standard battery.
Nikon entry-level DSLRs
If you're new to photography and want a good entry-level DSLR, the Nikon D3400 is a great choice. It has an 18 megapixel sensor with an aperture range of f/3.5 - f/22, which means it will let in more light than its competitors without having to use higher ISO settings. It also has a built-in flash for taking pictures in low light conditions and comes with WiFi capabilities so you can control your camera remotely from your smartphone or tablet device.
The next step up from this model is the Nikon D5600: it offers 24 megapixels on its sensor (making it better at capturing detail), but only has an aperture range of f/8 - f/16 instead of being able to go as wide open as possible like many other cameras do; however, this isn't necessarily bad news if you're just starting out because most people wouldn't need anything much wider than f8 anyway! Lastly we have the Nikon D7500—this model features a 36 mpix resolution along with just one AA battery powering everything inside including Wi-Fi capabilities (but no remote shooting capabilities).
Best Interchangeable Lens Cameras
Best Interchangeable Lens Cameras
Best Camera for Travel Photography
Best Camera for Sports Photography
Best Camera for Wildlife Photography
These are the best cameras for photography.
There are many camera brands, but the best cameras for photography are Sony, Canon and Nikon. These are all DSLRs (digital single lens reflex) cameras that have interchangeable lenses and sensors. The mirrorless cameras feature a smaller body than traditional dSLRs so they're easier to carry around with you in your bag or pocket.
These entry-level models will give you plenty of features at an affordable price point that won't break the bank if something goes wrong with it!
Conclusion
When you're looking for a new camera, there are tons of options. The best cameras can take beautiful photos and they're not hard to use, which makes them easy to recommend. We've taken the time to test out some of the best cameras on the market today and compiled this list of our favorite picks.
0 notes
Text
How to save on net chrome youtube
Are you having trouble saving videos from YouTube? Have you been trying to save them for a while, but keep getting an error message about incompatible formats? You're not alone - this problem has been plaguing a lot of YouTube users lately. Luckily, there's a workaround that'll let you save videos without issue.

How to save on net chrome youtube
There are a few ways to save on net chrome youtube. One way is to use the built-in saving features. When you're viewing a video, there's a "Save" button in the bottom right corner of the player. Clicking this will open a window that asks what you want to do with the video: keep it for now, add it to your watchlist, or share it with someone. You can also save videos by pressing ctrl+s ( cmd+s on a mac) when you're viewing them.
Another way to save videos is to use the "Add To Watchlist" feature. When you're watching a video, hit the three lines in the top left corner and then hit "Add To Watchlist." This will add the video to your watchlist so that you can come back to it later. You can also save videos by hitting ctrl+shift+s ( cmd+shift+s on a mac). This will save the video as a preset so that you can play it later without having to first watch it all the way through.
Finally, if you just want to keep a video for yourself rather than share it with others, you can press ctrl+k
How to save on other online stores
There are a few ways to save money on various websites. One way is to use the browser’s bookmarking feature. This lets you save webpages for future reference. You can also use the “save as” function on most websites to save the page as a PDF or other file type. And finally, you can use the “download” button on many websites to get a copy of the page for offline use.
How to save on groceries

There are a few ways to save on groceries when shopping online. You can compare prices and find the best deals on items you need. You can also check for sales and stock up on items before they go out of stock. You can also use coupons to get discounts on your groceries.
How to save on travel
If you're anything like me, your time is always more valuable than money. So when I'm planning on traveling, I try to find ways to save as much money as possible. Here are a few tips for saving on travel:
1. Book your flights and hotels ahead of time. This will help you save money on airfare and hotels.
2. Use public transportation whenever possible. This can be especially helpful if you're staying in a city for an extended period of time.
3. Try to eat at local restaurants instead of chain restaurants. This can save you a lot of money on food expenses.
4. Save on souvenirs by buying them online or in bulk. This can save you a lot of money overall.
FAQ About save from net chrome youtube
can you save your videos from net chrome using this extension?
Yes, you can save your videos. We also allow users to download their favorite YouTube videos for offline viewing with a single click of a button. You can even bookmark your favorite YouTube videos within the app with just a few clicks. All of these features come with no restrictions or limitations because we're not selling it! Plus, this extension is free!
what is different in save from net chrome youtube
save from net chrome youtube does more than just letting you save videos in standard resolution for offline viewing. It also gives you the option of saving videos in 4K resolution and higher, which is perfect for editing and creating a professional quality video. On top of that, its lightning fast speed will let you get your work done much faster without having to worry about buffering or waiting to save.

What is save from net chrome youtube's mission?
We have one single mission and that is providing resources for students, workers and bloggers. As a student, you might need to save time on homework or tests. As a freelancer, you might need to quickly share work with clients or another team member. As a videoblogger or designer, you might want to quickly save videos that you've created and want to keep them forever or generate a short video clip in one click.
save from net chrome youtube
Save from net chrome youtube is a YouTube video downloader and browser extension. You can download any YouTube video without leaving the page and view it on the save from net chrome youtube dashboard. Additionally, we have a mobile app that works on both Android and iOS. The app allows you to back up your videos offline, watch your saved videos, and more!
save from net chrome youtube is a video blog, what type of video are they talking about?
They are talking about video blogging. Video blogging has also become known as vlogging or webcasting. This is a discussion of how to film and make videos. They talk about equipment that they use, what their process is and how often they typically post new videos.
What are the best save from net chrome youtube extensions?
Our most popular extensions are: save from net chrome youtube playlist, save from net chrome youtube playlist 2, and save from net chrome youtube bookmark. Save from net chrome Youtube playlist is for the students that want to quickly access their best videos automatically. The "2" stands for two videos because it can hold two video's at a time, which saves the student a lot of time scrolling. Finally, the "bookmark" extension allows you to add your favorite videos to your bookmarks and then have them easily accessible on any computer or device with a web browser installed.
How do I save a video from YouTube
Open YouTube.com and sign in. Hover over your video you want to be saved and click "save video as" or "Save Video As." In the new window, choose one of the two options given - you will either be asked if you want to download the video or save it directly to your computer. A third option is available at the bottom of this new window, which allows you to save it on a DVD that can then be played on any other system than your computer.
Can I use save from net chrome youtube to create a video blog?

Yes, save from net chrome youtube is the perfect solution for creating a video blog. You can download the app, import your videos and photos then edit them in your own way. Just point the button at your phone and save from net chrome youtube will start to record directly. Remember that you'll need a YouTube account for this to work!
Pros of save from net chrome youtube
• Allows you to save videos from YouTube without having to sign in.
• Allows you to save videos in various formats, including MP4 and MP•
• Has a built-in player so you can view saved videos right away.
• Can be used on both desktop and mobile devices.
• Is free to use.
0 notes
Text
Why Booter Is The Most Effective Strategy To Record Game Clips For YouTube
What's higher than a game? A recreation that you may as well watch! On this weblog article, we'll focus on the very best way to file game clips for YouTube, what you should get started with recording your own PlayStation 4 gameplay, and the way to use the software.
What makes a great gaming video?
Some individuals wish to capture the sport play footage of their favourite games and publish it online for others to view. There are a number of different ways to do this, but one in every of the most popular is to use a gaming console’s constructed-in video recorder. However, this approach has a number of drawbacks. First, the quality of recordings can vary significantly relying on the standard of the video recording hardware and software. Second, if you wish to capture multiple recreation clips at the same time, it's good to schedule a number of recordings or use a multi-digicam recording setup. Finally, if you wish to put up your videos on YouTube or other social media platforms, you might want to transcribe the recorded audio in addition to document new video footage. Booter is a novel streaming software program that makes recording and streaming gaming clips a lot easier and sooner than ever before. With Booter, you'll be able to report excessive-high quality video and audio concurrently without any transcribing or recording delays. Additionally, Booter means that you can seize up to Eight separate game clips without delay with no restrict on duration or number of clips. Lastly, as a result of Booter integrates with YouTube and other streaming platforms, all it's important to do is upload your videos and share your wonderful gaming feats with the world
The way to document recreation clips
Booter is the proper way to report game clips for YouTube. It is simple to use, and you will get great results with minimal effort. Here are four the explanation why booter is the very best approach to document recreation clips for YouTube: 1. Booter makes recording video video games straightforward. Instead of getting to be taught an sophisticated recording software program, you can use booter. This program is straightforward to make use of, and it gives you with all of the instruments you must make nice recreation clips. 2. Booter provides a wide range of features that makes recording your video games straightforward. There are several options included in booter that make it an amazing selection for recording your games. These options include quick seize, video editor, and timeline creation. 3. Booter additionally includes quite a lot of results that may add spice to your recreation clips. The effects included in booter allow you so as to add a unique flair to your recreation recordings. These results include blur, crop, and temperature changes. 4. Finally, booter permits you to share your game clips with ease. Booter makes it simple to share your game clips with mates and relations. You may easily add them to YouTube or
What are the benefits of using a ps4 stresser ?
There are various explanation why you must use a ps booter to file game clips for YouTube. One among the main advantages of utilizing a ps booter is that it means that you can capture excessive-high quality footage. Ps booters are able to capture video at resolutions up to 4K, which makes your movies look stunning. Another good thing about using a ps booter is that it lets you report gameplay in real time. This means which you can capture the motion because it occurs, which is ideal for creating videos which are fast-paced and thrilling. Finally, ps booters are straightforward to make use of. You don’t want any particular expertise or information to use one, which makes them good for beginners.
How does it work?
Booter is the very best technique to file game clips for YouTube. It is easy to use and means that you can record high-quality videos with out having to spend quite a lot of time modifying them. Booter additionally has a whole lot of features that make it the proper instrument for recording gaming movies.
Pros and Cons of utilizing a ps4 booter
There are loads of various video recording strategies accessible, and each has its own advantages and disadvantages. One in every of the most common strategies for recording video games is to use a ps booter. Pros of utilizing a ps booter: - Very simple to make use of. All it's important to do is run the ps booter, choose the game you need to record, and begin recording. - Low overhead. The ps booter doesn’t require any special software program or hardware, so it’s simple to use on even low-end computers. - Can document a number of games at once. In case you have a computer with more than one video card, you should utilize a ps booter to file multiple games without delay. This is great if you wish to create a montage of your favourite gaming moments. - No want for special software or hardware. The ps booter works with any video game that uses the Windows operating system. Cons of utilizing a ps booter: - Not as correct as another strategies. Ps booters usually are not as accurate as some other video recording methods, similar to using a dedicated video capture system or recording directly to an exterior onerous drive. This means
Tips for getting began with recording
0 notes
Text
Young DJs should buy top quality music. It's absurd to play with low-bitrate mp3s.
I'm not a DJ. This is the way I've always told myself. I attempted DJing in high school and later in college however all I could do was repeat what someone else did elsewhere. To be honest, I could not imagine or utilize my ears to become a professional DJ. I'd often skip beats, turn on the 7th instead of the 8th and other issues led to my DJ career being a failure. But I'm a listener. I can listen to the mistakes of DJs and comprehend the meaning behind them. However I'm not sure how to entertain my audience for many hours.

Do not let yourself be discouraged if your aim is to become DJ professional. My experience should not hinder your plans. I believe in being flexible to changes and doing what you enjoy. Do your thing and be your best self. DJs, like all other individuals require constant support to comprehend the reality. It's helpful to help them to see what's happening within them. New trier DJ should not convert Youtube music into mp3, because not only it's not allowed according to their TOS, but it's not suitable for human ears according to the quality of the sound. No matter how high the resolution of the video (e.g. 4k 8k, 4k and so on.) the bitrate of the audio is still limited to 128kbps M4A container. But, it could technically create 160kbps MP3 or something similar. I hope this doesn't be a problem for anyone. If you are a DJ/computer audiophile like me you'll realize that mp3 can store up to 320kbps of sound quality. It's fine, but it doesn't have the same sound quality that MP3 that is compressed by eliminating high and low frequencies. So the final sound is lacking something. The deepest house music you can find isn't very deep when played at 320kbps. Compare to playing it off the vynil format - then the depth of sound is what knocks crystal glasses off of the table.
Don't waste your time and money on inexpensive copies of the most popular tracks as a beginner DJ. Beatport and Juno Download are good places to start. They offer a wide range of solid, great, high-quality sound. They can be used in remixes and remixes. You will still be able to get amazing bass if you use an MP3 with a poor quality, but it'll still sound amazing with its incredible bass. mp3-juices.cc This is the sound that mp3 lacks - amazing bass.
However, this knowledge should not be enough to make a DJ who is new feel comfortable. You can enhance your sound each day. Doesn't that make you a master artist and great entertainer? It is essential to invest in your tools to achieve the best results, best-sounding live sets, a club dancing spirit, and most importantly the best time for young people. If you give them good beats, they'll be to you again. It's the rule.
0 notes
Video
head 2 head with fxpro (full video)
#lando going it's weird not impressive#like the sore loser he is#.mov#LN4#DR3#also can't believe mclaren posted this on facebook#instead of giving us this in 4k resolution on youtube
306 notes
·
View notes
Text
oh boy i sure did write many words in 2020
Hi! I am copying people due to i want to. This is a lil (well... 63) round up of all the fics I wrote this year! Cos i’m very evil @ myself and writing fic and think i’m either not doing enough, or not doing it good enough, so i wanna full list of what I actually did so I can see my own accomplishments and can maybe... clap 4 myself for once. And honestly writing has helped MASSIVELY with my depression so.. that’s a bonus.
ALSO. this is a big huge thankyou to everyone! I only joined here + started writing in august and you’ve all been so so nice and welcoming and supportive <333 ;_; and I know they say write for yourself... but honestly peoples comments and excitement about my stuff has just been really, really lovely and I would never have written this much without all of you cheering me on<3.
so here is a list of everything i’ve written, organised by length and everything, so if you find yourself bored over the holidays... have a lil browse. (Sorry if u are on mobile and this doesn’t show as a read more)
Chaptered:
Can we try again? series (M) Complete - 35k - “Yeah, Phil. I’ll see you tomorrow.” Dan answers, softer than he’d wanted because he already knows what he’s about to do next.(or Dan doesn't turn up in 2009 and bumps into Phil 11 years later at a youtube convention
2. I like cupcakes, especially the gay variety (M) Complete - 30k - Firstly, Dan was 29. How was that a mature student?Secondly, his actual book was on the university fucking syllabus.(or the one in which Dan tries university again in a desperate attempt to prolong his procrastination, and his lecturer Phil is apparently something of a fan)
3. 7 Letters series (M) Complete - 9k - Your penpal can be the person you live with, actually.
4. There's Beans in Here (T) Complete - 2k - Phil has his wisdom teeth removed; Phil says many questionable things.
5. Roadtrip (E) Complete - 8k - “Exactly. I am right, as always.”“As always.” Dan agrees.Series
6. night shift, please (E) Wip - 27k I PROMISE THIS WILL COME BACK IN 2021 - Ten years and he’ll never get over how early he has to get up sometimes. In all honesty he prefers the night shift.
7. Still Not Calling it Fate (M) Wip - 14k - It’s become a bit of a thing, a bit of a thing that everyone he crosses paths with takes the piss out of him for
8. when i met you, a blue rush began (M) Complete - 5k - They end up in a small restaurant overlooking the sea, everything here is so blue. The sky, the sea, Phil’s eyes, the shirt he’s wearing buttoned up all the way to the top.
9. Luggage Tags (E) Complete - 2.5k - Just because it looks like your suitcase, it doesn't necessarily mean that it is.
10. Demon in the sack (E) Complete - 2.5k - Dan’s leg jiggles beneath his desk, knee hitting the table as he tries to force himself to hang up and ring the number he was supposed to ring— he doesn’t, he can’t.
Long ( for me) oneshots (3k+)
11. Electronics and the Phil's who break them (M) Complete - 9k - The first time’s an accident, a proper accident— a Phil forgot how to hold his cup and now he’s watching his coffee seep into his keyboard type accident.
12. A Letter of Specifics (T) Complete - 4k - You'll know it's your soulmate because no one else on earth could be doing what they're doing.
13. The Benefits of A Weak Floor (M) Complete - 4k - He quite literally falls through Dan’s ceiling.
14. 10:35 on a Thursday (E) Complete - 3.7k - He’s tapping his pen against the paper, acting as though he isn’t asking Phil to take a sex quiz at 10:35am on a Thursday morning.
15. 2009, catboys (T) Complete - 3.2k - “You have your own ears, can’t have four.”“Why?”
16. Wrong Room (T) Complete - 3k - “Congratulations!’’ And he was expecting to hear a cry, or at least his mother telling him to be quiet because a certain baby was sleeping. Instead he heard the deep clear of a throat, a rustling of sheets.
2k-3k oneshots
17. Dinner with a stranger (T) Complete - 2.5k - @amazingphl hi! second year of doing this, sooo if anyone has nowhere to go for Christmas dinner I am once again offering..my flat (and by extension me) ;oSeries
18. Easy Lover (M) Complete - 2.4k - ''Yeah. We're always fine.'' It was always fine. It was always easy, despite always behind hard.
19. Cold Season (M) Complete - 2k - Dan is ill, insatiable and another word beginning with I.
1k-2k oneshots
20. Morose men on rooftops (T) Complete - 1.9k - “Dunno, maybe chatting up morose men on roofs is my thing.” He laughs, and it’s a nice noise.
21. Love with tongues of fire (T) Complete - 1.7k - So when Dan waltzed into the room, declaring his hunger Phil thought nothing of it. Just another night for another takeaway.
22. Your Rocks are my Rocks (T) Complete - 1.7k - Phil wants a new rock for Norman, Dan wants a peaceful life.
23. Joint Content (M) Complete - 1.6k - It started of a as a joke— a Joint Content joke.
24. 24/7 Fantasies (M) Complete - 1.5k - He thinks about Dan 24/7, constantly in two separate fantasies
25. A Conversation in Multiple Hallways (T) Complete - 1.5k - You're still here then?
26. Sharing Space (T) Complete - 1.5k - It's 2010 and dan has had a day.
27. The Obvious (T) Complete - 1.5k - "Can I use that?” He doesn’t wait for an answer, already scrawling it beneath the only three words he currently has— I love you.
28. I'm Thinking of Ending Things (T) Complete - 1.5k - Dan hears half a conversation, jumps to one whole conclusion.
29. Love Language of the Tactile (T) Complete - 1.4k - “I’m just— that’s a hypothetical.” Dan leans in this time, takes the touches that Phil always so freely gives away. “Can’t kiss in secret rooms if I leave.”
30. Don't Let the Self-Doubt Ruin You (T) Complete - 1.3k - “I’m here.” “Yeah, you’re here.”
31. Conflict Resolution (T) Complete - 1.3k - Following recent events we’ve decided it best we take a combative approach to your current workplace issues, we have booked you into a conflict resolution class this Thursday afternoon - we will not be paying you to attend.
32. when it comes to love (i want a slow hand) (E) Complete - 1.2k - And there it is, the refusal of anything in return. This is just for Dan and it always will be.
33. You're Still The one (T) Complete - 1.1k - “What’re you thinking about?” “You.”
34. Teach Me, Dad. (T) Complete - 1k - "Do you think I could be the next Mozart?”
35. The Logistics of a Clone (M) Complete - 1k - “I don’t think that’s a clone, though, like maybe more of a Doppelgänger.” Dan doesn’t know why they’re delving so deep into this, why he’s so damn bothered about being right. “It’s just literally you.”
36. All's fair in Love and Monopoly (T) Complete - 1k - Phil does not play by the rules, Dan lets him win anyway.
Under 1k oneshots
37. Hide out in your heart (E) Complete - 0.9k - The second time Dan comes to visit it’s different.
38. Oh, there you are. (G) Complete - 0.9k - So after all this, after everything, he doesn’t think anything of it when someone else slips into his dms.
39. The Boy has Attitude (T) Complete - 0.9k - “You didn’t tell me you looked like this.”“Like what?”“This!” Phil’s waving a physical copy of the magazine in his face— so that’s where he’d been.
40. Hairties (and how not to use them) (M) Complete - 0.8k - “Why would you do that? Let us settle in, nice and slow and— gently does it.”
41. The Second Apartment. (T) Complete - 0.8k - It’s a stop-gap apartment, a we’re going to get our forever home after this.
42. Japan, 2019. (G) Complete - 0.8k - NO summary, just an obviously I was going to write this after phil's post
43. Doting Man (T) Complete - 0.7k - They’re both drunk, Phil more so— definitely more so.Series
44. Imposter (T) Complete - 0.7k - Among us is.. a bastard.
45. Ratemyprofessors.com (M) Complete - 0.7k - ‘Maybe if that Phil bloke from the English dep he’s always staring at fucked him he’d stop being so uptight’
46. Failed Attempts (T) Complete - 0.7k - Dan enlists the help of Phil for his latest Instagram.
47. Bonus Prize (M) Complete - 0.7k - Phil Trash Number One
48. Feels like home (G) Complete - 0.7k - Home is where the Phil is.
49. We can make Forever work (T) Complete - 0.7k - It’s a moment of realising forever may sound too much to people, but we’ll get through everything together— we don’t have any other choice.
50. Scene in the Kitchen (T) Complete - 0.7k - New place
51. 4'11 (T) Complete - 0.6k - Dan is baby
52. Pillow Imprints (T) Complete - 0.6k - Dan is a menace, and Phil loves him anyway.
53. Parachute Jacket (T) Complete - 0.5k - Dan thinks Phil is obsessed with them
Those few times I thougt I was goddamn Ri**ard S*ken
54. Home (G) Complete - 0.7k - It’s their forever home, because their actual forever lives inside of it.
55. secrets spoken in empty rooms (T) Complete - 1k - So he wants to be the same, but he wants Dan more.
56. Separately Together (T) Complete - 0.9k - Phil’s soft hands and even softer words. It gets harder to leave. Gets to the point where Dan turns off an alarm just so he misses the train.
57. It's not hard to fall (T) Complete - 0.7k - Still a little bit of your words I long to hear
Some more Epistolary (apart from 7 letters)
58. A Play in One Act (T) Complete - 1.1k - [Manchester Piccadilly train-station, midday, October 19th, 2009.]
59. R/AITA (T) Complete - 0.8k - AM I THE ASSHOLE FOR MAKING MY BOYFRIEND BE A WORM?Series
60. Lonely Hearts (T) Complete - 1.8k - I will not say you were crying on the tube (out of politeness)
61. Conversations of the Lazy Kind (T) Complete - 1k - eggs? wot? Smells like eggs
50 notes
·
View notes
Text
How I encode videos for YouTube and archival
Hello everyone! This post is going to describe the way in which I export and encode my video work to send it over the Internet and archive it. I’ll be talking about everything I’ve discovered over the past 10 years of research on the topic, and I’ll be mentioning some of the pitfalls to avoid falling into.
There’s a tremendous amount of misguided information out there, and while I’m not going to claim I know everything there is to know on this subject, I would like to think that I’ve spent long enough researching various issues to speak about my own little setup that I’ve got going on... it’s kind of elaborate and complex, but it works great for me.
(UPDATE 2020/12/09: added, corrected, & elaborated on a few things.)
First rule, the most golden of them all!
There should only ever be one compression step: the one YouTube does. In practice, there will be at least two, because you can’t send a mathematically-lossless file to YouTube... but you can send one that’s extremely close, and perceptually pristine.
The gist of it: none of your working files should be compressed if you can help it, and if they need to be, they should be as little as possible. (Because let’s face it, it’s pretty tricky to keep hours of game footage around in lossless form, let alone recording them as such in the first place.)
This means that any AVC files should be full (0-255) range, 4:4:4 YUV, if possible. If you use footage that’s recorded with, like, OBS, it’s theoretically possible to punch in a lossless mode for x264, and even a RGB mode, but last I checked, neither were compatible with Vegas Pro. You may have better luck with other video editors.
Make sure that the brightness levels and that the colors match what you should be seeing. This is something you should be doing at every single step of the way throughout your entire process. Always keep this in mind. Lagom.nl’s LCD calibration section has quite a few useful things you can use to make sure.
If you’re able to, set a GOP length / max keyframe range of 1 second in the encoder of your footage. Modern video codecs suck in video editors because they use all sorts of compression tricks which are great for video playback, but not so efficient with the ways video editors access and request video frames. (These formats are meant to be played forwards, and requesting frames in any other order, as NLEs do, has far-reaching implications that hurt performance.)
Setting the max keyframe range to 1 second will mildly hurt compressability of that working footage but it will greatly limit the performance impact you’ll be putting your video editor’s decoder through.
A working file is a lossless file!
I’ve been using utvideo as my lossless codec of choice. (Remember, codec means encoder/decoder.) It compresses much like FLAC or ZIP files do: losslessly. And not just perceptual losslessness, but a mathematical one: what comes in will be exactly what comes out, bit for bit.
Download it here: https://github.com/umezawatakeshi/utvideo/releases
It’s an AVI VFW codec. In this instance, VFW means Video for Windows, and it’s just the... sort of universal API that any Windows program can call for. And AVI is the container, just like how MP4 and MKV are containers. MP4 as a file is not a video format, it’s a container. MPEG-4 AVC (aka H.264) is the video format specification you’re thinking of when you say “MP4″.
Here’s a typical AVI VFW window, you might have seen one in the wild already.
In apps that expose this setting, you can hit “configure” and set the prediction mode of utvideo to “median” to get some more efficient compression at the cost of slower decoding, but in practice this isn’t a problem.
Things to watch out for:
Any and all apps involved must support OpenDML AVIs. The original AVI spec is 2GB max only. This fixes that limitation. That’s normal, but make sure your apps support that. The OpenDML spec is from the mid-90s, so usually it’s not a problem. But for example, the SFM doesn’t support it.
The files WILL be very large. But they won’t be as large as they’d be if you had a truly uncompressed AVI.
SSDs are recommended within the bounds of reasonability, especially NVMe ones. 1080p30 should be within reach of traditional HDDs though.
utvideo will naturally perform better on CGI content rather than real-life footage and I would not recommend it at all for real-life footage, especially since you’re gonna get that in already-compressed form anyway. Do not convert your camera’s AVC/HEVC files to utvideo, it’s pointless. (Unless you were to do it as a proxy but still, kinda weird)
If you’re feeling adventurous, try out the YUV modes! They work great for matte passes, since those are often just luma-masks, so you don’t care about chroma subsampling.
If you don’t care about utvideo or don’t want to do AVIs for whatever reason, you could go the way of image sequences, but you’ll then be getting the OS-level overhead that comes with having dozens of thousands of files being accessed, etc.
They’re a valid option though. (Just not an efficient one in most cases.)
Some of my working files aren’t lossless...
Unfortunately we don’t all have 10 TB of storage in our computers. If you’re using compressed files as a source, make sure they get decoded properly by your video editing software. Make sure the colors, contrast, etc. match what you see in your “ground truth” player of choice. Make sure your “ground truth” player of choice really does represent the ground truth. Check with other devices if you can. You want to cross-reference to make sure.
One common thing that a lot of software screws up is BT.601 & BT.709 mixups. (It’s reds becoming a bit more orange.)
Ultimately you want your compressed footage to appear cohesive with your RGB footage. It should not have different ranges, different colors, etc.
For reasons that I don’t fully understand myself, 99% of AVC/H.264 video is “limited range”. That means that internally it’s actually squeezed into 16-235 as opposed to the original starting 0-255 (which is full range). And a limited range video gets decoded back to 0-255 anyway.
Sony/Magix Vegas Pro will decode limited range video properly but it will NOT expand it back to full 0-255 range, so it will appear with grayish blacks and dimmer whites. You can go into the “Levels” Effects tab to apply a preset that fixes this.
Exporting your video.
A lot of video editors out there are going to “render” your video (that is to say, calculate and render what the frames of your video look like) and encode it at the same time with whatever’s bundled in the software.
Do not ever do this with Vegas Pro. Do not ever rely on the integrated AVC encoders of Vegas Pro. They expect full range input, and encode AVC video as if it were full range (yeah), so if you want normal looking video, you have to apply a Levels preset to squeeze it into 16-235 levels, but it’s... god, honestly, just save yourself the headache and don’t use them.
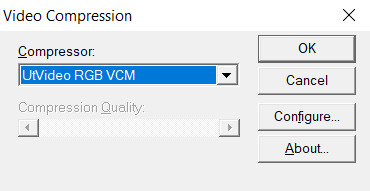
Instead, export a LOSSLESS AVI out of Vegas. (using utvideo!)
But you may be able to skip this step altogether if you use Adobe Media Encoder, or software that can interface directly with it.
Okay, what do I do with this lossless AVI?
Option 1: Adobe Media Encoder.
Premiere and AE integrate directly with Adobe Media Encoder. It’s good; it doesn’t mix up BT.601/709, for example. In this case, you won’t have to export an AVI, you should be able to export “straight from the software”.
However, the integrated AVC/HEVC encoders that Adobe has licensed (from MainConcept, I believe) aren’t at the top of their game. Even cranking up the bitrate super high won’t reach the level of pristine that you’d expect (it keeps on not really allocating bits to flatter parts of the image to make them fully clean), and they don’t expose a CRF mode (more on that later), so, technically, you could still go with something better.
But what I’m getting at is, it’s not wrong to go with AME. Just crank up the bitrate though. (Try to reach 0.3 bits per pixel.) Here’s my quick rough quick guideline of Adobe Media Encoder settings:
H.264/AVC (faster encode but far from the most efficient compression one can have)
Switch from Hardware to Software encoding (unless you’re really in a hurry... but if you’re gonna be using Hardware encoding you might as well switch to H.265/HEVC, see below.)
Set the profile to High (you may not be able to do this without the above)
Bitrate to... VBR 1-pass, 30mbps for 1080p, 90mbps for 4K. Set the maximum to x2. +50% to both target and max if fps = 60.
“Maximum Render Quality” doesn’t need to be ticked, this only affects scaling. Only tick it if you are changing the final resolution of the video during this encoder step (e.g. 1080p source to be encoded as 720p)
If using H.265/HEVC (smaller file size, better for using same file as archive)
Probably stick with hardware encoding due to how slow software encoding is.
Stick to Main profile & Main tier.
If hardware: quality: Highest (slowest)
If software: quality: Higher.
4K: set Level to 5.2, 60mbps
1440p: set Level to 5.1, 40mbps
1080p: keep Level to 5.0, 25mbps
If 60fps instead of 24/30: +50% to bitrate. In which case you might have to go up to Level 6.2, but this might cause local playback issues; more on "Levels” way further down the post.
Keep in mind however that hardware encoders are far less efficient in terms of compression, but boy howdy are they super fast. This is why they become kind of worth it when it comes to H.265/HEVC. Still won’t produce the kind of super pristine result I’d want, but acceptable for the vast majority of YouTube cases.
Option 2: other encoding GUIs...
Find software of your choice that integrates the x264 encoder, which is state-of-the-art. (Again, x264 is one encoder for the H.264/AVC codec specification. Just making sure there’s no confusion here.)
Handbrake is one common choice, but honestly, I haven’t used it enough to vouch for it. I don’t know if the settings it exposes are giving you proper control over the whole BT601/709 mess. It has some UI/UX choices which I find really questionable too.
If you’re feeling like a command-line masochist, you could try using ffmpeg, but be ready to pour over the documentation. (I haven’t managed to find out how to do the BT.709 conversion well in there yet.)
Personally, I use MeGUI, because it runs through Avisynth (a frameserver), which allows me to do some cool preprocessing and override some of the default behaviour that other encoder interfaces would do. It empowers you to get into the nitty gritty of things, with lots of plugins and scripts you can install, like this one:
http://avisynth.nl/index.php/Dither_tools (grab it)
Once you’re in MeGUI, and it has finished updating its modules, you gotta hit CTRL+R to open the automated script creator. Select your input, hit “File Indexer” (not “One Click Encoder”), then just hit “Queue” so that Avisynth’s internal thingamajigs start indexing your AVI file. Once that’s done, you’ll be greeted with a video player and a template script.
In the script, all you need to add is this at the bottom:
dither_convert_rgb_to_yuv(matrix="709",output="YV12",mode=7)
This will perform the proper colorspace conversion, AND it does so with dithering! It’s the only software I know of which can do it with dithering!! I kid you not! Mode 7 means it’s doing it using a noise distribution that scales better and doesn’t create weird patterns when resizing the video (I would know, I’ve tried them all).
Your script should look like this, just 3 lines
LoadPlugin("D:\(path to megui, etc)\LSMASHSource.dll")
LWLibavVideoSource("F:\yourvideo.avi")
dither_convert_rgb_to_yuv(matrix="709",output="YV12",mode=7)
The colors WILL look messed up in the preview window but that’s normal. It’s one more example of how you should always be wary when you see an issue. Sometimes you don’t know what is misbehaving, and at which stage. Always try to troubleshoot at every step along the way, otherwise you will be chasing red herrings. Anyway...
Now, back in the main MeGUI window, we’ve got our first line complete (AviSynth script), the “Video Output” path should be autofilled, now we’re gonna touch the third line: “Encoder settings”. Make sure x264 is selected and hit “config” on the right.
Tick “show advanced settings.”

Set the encoding mode to “Const. Quality” (that’s CRF, constant rate factor). Instead of being encoded with a fixed bitrate, and then achieving variable quality with that amount of bits available, CRF instead encodes for a fixed quality, with a variable bitrate (whatever needs to be done to achieve that quality).
CRF 20 is the default, and it’s alright, but you probably want to go up to 15 if you really want to be pristine. I’m going up to 10 because I am unreasonable. (Lower is better, higher numbers means quality is worse.)
Because we’re operating under a Constant Quality metric, CRF 15 at encoder presets “fast” vs. “slow” will produce the same perceptual quality, but at different file sizes. Slow being smaller, of course.
You probably want to be at “slow” at least, there isn’t that much point in going to “slower” or “veryslow”, but you can always do it if you have the CPU horsepower to spare.
Make sure AVC Profile is set to High. The default would be Main, but High unlocks a few more features of the spec that increase compressability, especially at higher resolutions. (8x8 transforms & intra prediction, quantization scaling matrices, cb/cr controls, etc.)
Make sure to also select a Level. This doesn’t mean ANYTHING by itself, but thankfully the x264 config window here is smart enough to actually apply settings which are meaningful with regards to the level.
A short explanation is that different devices have different decoding capabilities. A decade ago, a mobile phone might have only supported level 3 in hardware, meaning that it could only do main profile at 30mbps max, and if you went over that, it would either not decode the video or do it using the CPU instead of its hardware acceleration, resulting in massive battery usage. The GPU in your computer also supports a maximum level. 5.0 is a safe bet though.
If you don’t restrict the level accordingly to what your video card supports, you might see funny things happen during playback:

It’s nothing that would actually affect YouTube (AFAIK), but still, it’s best to constrain.
Finally, head over to the “misc” tab of the x264 config panel and tick these.

If the command line preview looks like mine does (see the screenshot from a few paragraphs ago) then everything should be fine.
x264 is configured, now let’s take care of the audio.
Likewise, “Audio Input” and “Audio Output” should be prefilled if MeGUI detected an audio track in your AVI file. Just switch the audio encoder over to FLAC, hit config, crank the slider to “smallest file, slow encode” and you’re good to go. FLAC = mathematically lossless audio. Again, we want to not compress anything, or as little as possible until YouTube does its own compression job, so you might as well go with FLAC, which will equal roughly 700 to 1000kbps of audio, instead of going with 320kbps of MP3/AAC, which might be perceptually lossless, but is still compressed (bad). The added size is nothing next to the high-quality video track you’re about to pump out.
FLAC is not an audio format supported by the MP4 container, so MeGUI should have automagically changed the output to be using the MKV (Matroska) container. If it hasn’t, do it yourself.

Now, hit the “Autoencode” button in the lower right of the main window. And STOP, do not be hasty: in the new window, make sure “no target size” is selected before you do anything else. If you were to keep “file size” selected, then you would be effectively switched over to 2-pass encoding, which is another form of (bit)rate control. We don’t want that. We want CRF.
Hit queue and once it’s done processing, you should have a brand new pristine MKV file that constains lossless audio and extra clean video! Make sure to double-check that everything matches—take screenshots of the same frames in the AVI and MKV files and compare them.
Now all you’ve got to do is send it to YouTube!
For archival... well, you could just go and crank up the preset to Placebo and reduce CRF a little bit—OR you could use the 2-pass “File Size” mode which will ensure that your video stream will be the exact size (give or take a couple %) you want it to be. You could also use x265 for your archival file buuuut I haven’t used it enough (on account of how slow it is) to make sure that it has no problems anywhere with the whole BT.601/708 thing. It doesn’t expose those metadata settings so who knows how other software’s going to treat those files in the future... (god forbid they get read as BT.2020)
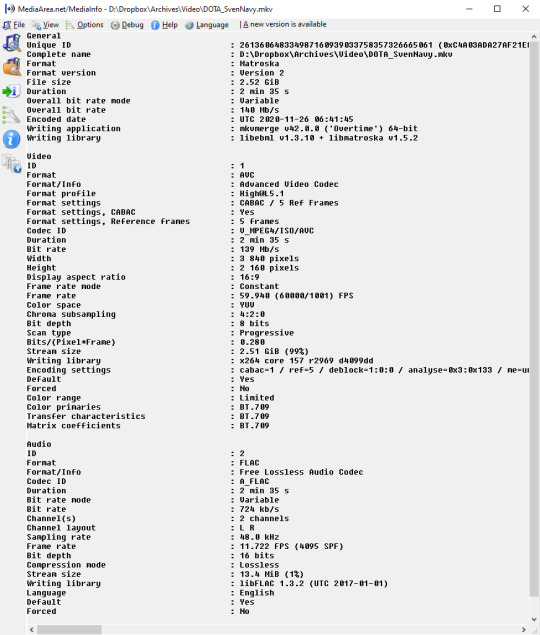
You can use Mediainfo (or any player that integrates it, like my favorite, MPC-HC) to check the metadata of the file.
Good luck out there!
And remember to always double-check the behaviour of decoders at every step of the way with your setup. 99% of the time I see people talk about YouTube messing with the contrast of their video, it’s because they weren’t aware of how quirky Vegas can be with H.264/AVC input & its integrated encoder.
Hope this helps!
15 notes
·
View notes
Text
ProfitVideo Reviews 2021 -⚠️HOAX or LEGIT⚠️
ProfitVideo is a Brand New “Camtasia Killer” Software Lets You Record, Screen Capture & Edit Videos In The Cloud Within Minutes.
FACT: you’ve probably always dreamed of creating your flagship video course that you’d be proud of, and could sell passively (don’t we all?). FACT: video marketing converts better than anything else, allowing you to truly live the ultimate “Internet Lifestyle”. This here helps you do it all. The video revolution is already here: Just check the myriad of vloggers on Youtube, TikTok and so on. Just check how every single sales page this day has at least a video on it. Just check Fiverr or Upwork and see how businesses are ready to pay $1000 or more for just one professional video.
==> Read More Here: Don’t Miss Out Today’s Special Offer <==
PROBLEM? Creating videos takes time and technical know-how even if you’re using a great video builder software. Camtasia, Adobe Premiere, Sony Vegas, Final Cut Pro X are video editors that cost hundreds of dollars and take months of work for a tech wizz to figure out properly. What if you wanted to reap all the benefits of video marketing, but with a low cost solution… and minutes of your time instead of months? SOLUTION: ProfitVideo, an incredible software offered at a massive discount today which lets you do screen capture, recording, editing, annotating, filters, everything! (you get the point).
PROFITVIDEO FEATURES
Cloud Based “Camtasia Killer” Video Editor: ProfitVideo Runs Fully In The Cloud: there’s no download or installation process. Just login and start creating, editing and publishing. It’s simple and it’s fun and it can be done right away, on any platform, from anywhere on Earth!
Multiple Ways To Create The Perfect Video: From screen capture/recording, to camera & mic recording, to adding in additional videos, it’s all easy, drag & drop and 1 click away.
“Black Canvas” Timeline Editor Lets You Do It All: This is really the ultimate Camtasia Killer: you can add in music, voiceovers, text or images, and you can crop, resize, trim and join videos with ease!
A.I.-Based Means Next Level Editing Doesn’t Have To Be Hard: ProfitVideo runs on AI code, which means you just have to tell the software what you want, and it will get it done for you. No tweaking involved for you. That means adding filters, animations, watermarks and transitions are all 1 click away!
Built-In Templates Like You’ve Never Seen Before: Use their hand-crafted templates so all you have to do is fill them in with your own videos, and let the software add in the appropriate transitions, animations, intros and outros.
Subtitles Let You Reach A WorldWide Audience: It comes with subtitles in any language so you can now reach audiences in 180+ different countries. That’s right – ProfitVideo Subtitles gets you Netflix-level of market coverage!
Thumbnail Creator Makes You Stand Out: Have you ever seen how thumbnails look like on Youtube? They instantly grab your attention and are created by expert designers to make you click. Well ProfitVideo has the same thing, only it’s better, faster and it only takes 1 click for you to get yours. So you can now be the next “Youtube Star”!
Done-For-You Products To Promote: Just activate one of their DFY affiliate offers, edit any of the pre-recorded videos they give you and insert your affiliate link and be on your way to $1,000+ commissions without doing any work!
Publish & Share Instantly: With just 1 click you can now export & publish your video anywhere on Earth. Download to your computer, or make it go live on the world’s biggest platforms. It’s all easy to do with ProfitVideo.
Commercial License Is Built-In: Start a thriving passive business by creating & editing videos for others – and letting the software do the work for you!
Built-In Training To Get You To $1,000+/Month: Unlike other programs they’ve built over-the-shoulder case studies and in-depth training straight into ProfitVideo showing you step by step how to create, edit & publish a winning video!
24/7 “White Glove” Support: Their dedicated support concierge team is ready to accommodate any request, question or suggestion. They’re here for you any time day or night – there is always someone on their support desk no matter the hour.
And So Much More – ProfitVideo Is A Software Like No Other!
WHAT PROFITVIDEO CAN DO FOR YOU
Record & Screen Capture Unlimited Videos On their Cloud Infrastructure For A Low One Time Fee
Use The Built-In “Black Canvas” Timeline Editor To Create & Edit Any Video
AI Based Video Creator & Editor Makes It All Take Only SECONDS
Publish & Share With 1 Click
Commercial License Built In: Sell Videos To Local Businesses Or Provide Video Editing Services
Create Jaw-Dropping Attention Getting Thumbnails (Just Like You See On Youtube)
Multiple Input Sources: Record From Camera, Mic, Your Screen Or A Combination
Import Any Video, Audio Background, Image With Drag & Drop Simplicity
Clip, Cut, Trim Or Join Videos With Ease
Overlay Animations, Add Filters And Transitions
DFY Templates Built-In
Subtitles, Annotations & Watermarks Are 1 Click Away
Unlimited Free End-To-End SSL Encryption Protects You, Your Privacy And Personal Data
You Can Add Their DFY Videos If You Don’t Want To Be “Live” Yourself
Included Done-For-You Affiliate Offers To Promote
100% Newbie Friendly
No Monthly Fees – Pay Once, Use Forever
Double Your Money Back Guarantee
24/7 Support From Marketing Gurus
PROFITVIDEO OTOs
FRONT-END: PROFITVIDEO – $17
ProfitVideo Cloud-Based “Camtasia Killer” Software and Interface! $997 Value
Groundbreaking Tech Lets You Capture Video From Screen, Camera, Mic or Import! $997 Value
Thumbnail Creator Makes You Stand Out! $997 Value
Publish & Share Instantly! $997 Value
AI-Based Editor Lets You Add Filters, Animations, Watermarks & Transitions With 1 Click! $697 Value
Commercial License Built-In! $697 Value
Black Canvas Timeline Editor With Music, Voiceovers, Text & Images! $497 Value
Crop, Resize, Trim & Join Videos With Drag & Drop Ease! $497 Value
Built-In Video Templates! $497 Value
Done-For-You INCLUDED Affiliate Offers & Videos! $497 Value
Subtitles Let You Reach A World-Wide Audience! $497 Value
Built-In Training & Over-The-Shoulder Case Studies! $397 value
Full SSL Encryption Keeps Your Data SAFE & Privacy Protected! $397 value
24/7 White Glove Support! $397 value
PROFITVIDEO OTO 1: PRO EDITION – $27
No Restrictions – $997 Value! Create unlimited videos of unlimited length for an unlimited number of clients. You’re also not limited in the quality of your video output – ProfitVideo PRO comes with 4K rendering built in!
Dedicated Video Player- $997 Value! You’re getting our in-house dedicated video player to use for your own videos, or upsell to your clients!
Text-To-Speech Module – $697 Value! ProfitVideo PRO gives you the ability to turn any written text into cursive speech, in ANY language!
VSL Script Creator- $697 Value! Get the ultimate copywriter on demand with the push of a button, to create gorgeous video sales letter scripts for you!
ProfitVideo PRO-Level Features – $697 Value! Record with your mobile phone, get pro-level stats & reporting on how your videos are performing, and even add intros and outros from the ProfitVideo PRO built-in library!
Priority 4K Resolution Processing – $697 Value! Skip the queue and make sure your videos get rendered, processed & published at 4K Resolution the SECOND you press the “EXPORT” button!
Premium Support – $497 Value! This will help you focus on the one thing that’s important: growing your business and we’ll always be there to help!
In-Depth Training – $297 Value! ProfitVideo PRO comes with in-depth training on how to do ALL of the above!
PROFITVIDEO OTO 2: ENTERPRISE EDITION – $37
Your Own ProfitVideo Store – $997 Value! Showcase and sell your videos, offer on-demand video creation services, sell video packs and even sell fully fledged video courses you create with ProfitVideo!
Broadcast On Multiple Platforms – $997 Value! Publish and share your video across all the major social media platforms: from Youtube, to WhatsApp and Instagram!
Cloud Based Storage – $997 Value! Keep your video media, files or campaigns stored safely in the cloud inside our unlimited storage account. It’s like your personal Dropbox you don’t have to pay for. You can even use it for family photos, documents or other important files you want to keep a backup of. And sharing files with others is always just 1 click away!
DFY Video Encryption – $997 Value! ProfitVideo now lets you encrypt your videos with a password so only your buyers or friends can access important information you share with them (such as for example delivery videos for a course after they make a purchase!)
Auto-Backup & Copyright Protection – $697 Value! Have your videos backed up automatically and even encrypt them with a password so only your buyers, clients or friends can access them!
Collaboration Features & Outsourcers License – $497 Value! Enable your video projects to be taken over by your assistants, developers or designers without sharing your full account access with them. Safe and secure, 100% automated!
In-Depth Training – $497 Value! ProfitVideo Enterprise comes with step-by-step training on how to run the perfect video marketing business!
Full 1-On-1 Personal Support – $297 Value! Reach out DIRECTLY to the team behind ProfitVideo for in-depth knowledge on how to best use this powerful software to get amazing results!
PROFITVIDEO OTO 3: DFY EDITION – $29
ProfitVideo DFY automates start-to-finish getting you big-ticket commissions and sales like never before – to the tune of $434 for every visitor you get!
It includes commercial rights to our top selling software tools that you can sell as your own and keep 100% of the profits!
Comes with done-for-you templates & affiliate reviews that you can just copy/paste right into ProfitVideo – include your affiliate links and start seeing sales hit your account!
Slideshows included: just copy/paste inside ProfitVideo, add your link, and let the software get sales for you…it’s really THAT easy!
We handle marketing, sales, support, updates, etc. – you keep 100% of the profits!
All done-for-you reviews are SEO optimized to get you easy organic & viral traffic!
OTOs and Upgrades are built-in, so a simple $16 software sale can turn into a $400+ fat commission – all from one single visitor!
PROFITVIDEO OTO 4: RESELLER EDITION – $67
On this ProfitVideo Review page only, you can get an AGENCY license to ProfitVideo. Which means you will keep 100% of what customers pay you!
NOT JUST THAT – You can use all our marketing pages, our amazing high converting videos and our sales copy to make all your sales!
We’ve spent thousands of dollars in making our marketing pages perfect and we’re letting you use them to make profits and keep it all for yourself!
Oh and the best part is… WE TAKE CARE OF ALL THE SUPPORT!
You don’t have to do anything, just collect your 100% profit and find a way to spend it!
PROFITVIDEO OTO 5: IMX BUNDLE – $97
That’s right: you are 1 click away from having access to every single tool you’ll EVER need to market online. These are all best selling products who have been previously launched for thousands of dollars – all yours today at a one time low price.
Here’s just a glimpse of what you’re getting:
#1 ContentPress 100% Unique Content Creator
This Revolutionary App Lets You Create 100% Unique Content, Articles and even eBooks With 1 Click & Get Traffic To It On Autopilot!
#2 Profit Enigma Unique Product & Service Generator
DFY Cloud Software Creates Done-For-You Products & Services From Scratch With 24/7 FREE Traffic & $1,000 Commissions Built-In!!
#3 AgencyPress Done-For-You Agency Business Generator
Jaw-Dropping DFY Tech Lets You Find Desperate Businesses And Sell Them Services Like SEO, Website Design or GDPR (ALL 100% Automated By The App!)
#4 TrafficMate Unique Traffic Generator
New Cloud Software Generates Unlimited, Targeted, Free Traffic To Any Site, Link or Affiliate Offer With The Push Of A Button!
PROFITVIDEO FAQs
Is ProfitVideo Cloud-Based? Yes, It is a cloud-based app easy to access from anywhere. Works with Mac, PC and mobile.
Does it Work For Any Niche? Yes, it will create quality videos in any niche or for any product.
Does It Cost A Monthly Fee? Normally yes, but if you act now, you’re getting one-time access to ProfitVideo without EVER having to pay a monthly fee
Is Commercial License Included? YES – during the early bird launch period, It comes with commercial rights which lets you start your own video creation/editing service and sell to local & online businesses for a huge profit.
Do I Need Any Tech Skills Or Experience To Make This Work? NO – It is seamless and 100% newbie friendly.
Is Support & Training Included? Absolutely. By purchasing today you can get instant access to the ProfitVideo training portal and their 24/7 support desk.
HURRY UP GET EXCLUSIVE 50% DISCOUNT OFFER ON OFFICIAL WEBSITE.
1 note
·
View note
Text
My review of the XBOX Series X
So I’ve had nearly a full week with the XBOX Series X and here is my honest opinion on my experience with it and this is my initial review of it. I’m not gonna talk about the technology or go into anything about the console’s hardware too deeply. I will talk about the features and benefits it offers. Going into some things that work and don’t work as well as promised by Microsoft and XBOX. Finally, I will talk about all the bugs and issues that I experienced and found most annoying. Most of which have already been identified and reported.
First up, be aware that I am coming from an XBOX 360 as my last XBOX console experience so I may say stuff that applies to the XBOX One as well.
1. BACKWARDS COMPATIBILITY AND AUTO HDR: Microsoft promised that the XBOX Series X and S would work right out of the box with 1000’s of gaming titles across 4 generations. This promise holds up… However, they do not run anywhere half as well as they also promised they would. They do run better than their native platform, that is true. But it’s not a groundbreaking difference. And AUTO HDR doesn’t really work with most games that never had it to begin with. It makes the colours and textures look really odd and you don’t get that nostalgic feeling of playing an old legacy title because of the “updates”. Which is something I was very much looking forward to. It’s pick your poison I guess. You can either have a legacy game running better and looking greater on a platform that can take the graphical fidelity and framerate boosts, or have a full reunion with your beloved legacy games from your childhood. You can turn AUTO HDR off via the main console settings, but this still doesn’t really give you the latter. Not in my personal opinion anyway. It’s not disappointing as it’s not something I really expected. I just would have liked to have it. Nostalgia >>> Shiny any day.
2. QUICK RESUME AND LOADING TIMES: The XBOX Series X (can’t speak for the S) has significantly improved on speed thanks to the custom lightning fast and functional SSD. So much so that you can now travel between multiple games fully loaded up on the SSD within the time of a few seconds. However, quick resume is not only useful to be able to play between 3 or 4 games (more according to YouTube influencers who have tried and tested this out far more than me) in one sitting. You can also effectively use it to save your game. Or rather… Replace save states IN a game. What quick resume allows you to do is keep your game saved at ANY point, and completely SHUT the console down and UNPLUG it for several days (or longer, again, never tested it that far) and then PLUG it in and switch it ON again, and come back to exactly where you left off in the game. And I do mean EXACTLY WHERE YOU LEFT OFF!
For example; you could be in an all-important boss fight in ‘Assassin’s Creed: Valhalla’ and be so frustrated with not being able to beat this boss after trying many times. You could indeed just pause the game, come out to the dashboard, turn the console off and walk away from it all…. And when you came back to have another go at it, you would not have to restart the boss fight and just carry on with where you left off in chopping down their health. I did this several times because I suck at boss fights… And every time, this worked and it was the strategy that got me through them all. So a little cool off time is more than affordable with the XBOX Series X. And if you hate boss fights, suddenly you won’t hate boss fights as much anymore if you do the same. It makes a world of a difference to your experience. Believe me, quick resume is a literal life-saver.
To add to that, you also benefit from much quicker load times both with booting up the games and in-game fast-travelling or level-entering. Instead of 5 minutes waiting for a game to boot up into the main campaign or wherever,… It will take at most up to 50 seconds for the most power-taxing of games. 'Grand Theft Auto 5' for instance, known for it’s notoriously long boot into story or online mode… Now only takes 10 seconds from the company title advertisements to get into the area of the game you want to play. It is so fast that you do not have the time to read the tips and tricks dialogue that takes up the screen during the initial loading. It’s honestly a quality of life you never even knew you needed or was missing until you had it.
3. BUGS AND ISSUES: Being that I bought the XBOX Series X at Launch (November 10th), I very much expected it to come with a plethora of bugs and issues to discover and be witness to as a consumer and user of newly developed and released hardware and software. And these bugs and issues have already been identified and reported to Microsoft and the respective console and game developers. Bugs where you cannot play games that offer 4K at 120 hertz (4K/120fps) without visual and audial distortions or even without turning the game off altogether. I particularly had trouble with this in trying to play ‘Rise Of The Tomb Raider' 20 Year Celebration edition. Once I downloaded it from the XBOX Store fully, (which took a LONG FUCKING TIME, we’ll get on to that in a bit), I immediately tried to play it and because my display settings were set at 4K/120 because I have a TV that supports that setting, it was having all sorts of problems in booting up. There was all this distortion happening on screen both visually and audially that I thought my ultra high speed HDMI cable that came with the console was broken or faulty. I also remember specifically that it kept turning my Game Mode on and off rapidly and I didn’t know how to stop it avoiding a full reset of the console. This game was the worst for it but it also happened in other games I tried to play too. Including those I had as physical disks.
Speaking of… I did not encounter the “black/blank screen of death” issue other next-gen XBOX consumers and users did where you would enter a game disk and be met with a black or blank screen. BUT I did have trouble with downloading the “updates” for the games I had bought physically. I expected the games I downloaded digitally to take a long time to download fully, but I figured that it would be much quicker for the “updates” for physical games. This was not the case, and for some games, it actually took LONGER. I don’t know why this happens or if it can even be fixed in a firmware update, but it has put me off buying games physically for it, which is certainly not a good thing for store game retailers. And I’m someone who actually cares about that and would want to help them out as much as possible since they are a dying breed. But if it takes longer to download physical games than to download digital games, I’m not sure I can hold up that promise. The time it takes to download is a major frustration for me. I’ll be leaving my console on for long periods of time doing nothing but downloading that I otherwise wouldn’t. And I’ve got to say right now that I am glad I do not have an OLED TV where this would be much more of a problem due to burn-in risks. I would highly suggest anyone who is buying a new TV for their XBOX Series X or S with all the bells and whistles to not buy an OLED for this reason. Leaving an OLED TV on with a display picture that never moves for hours at a time would severely decrease it’s life and usage capacity. I recommend a Samsung QLED TV instead. That’s what I’ve got. I bought their Q95T 55inch 4K TV for gaming alone and it has not disappointed in the slightest. But I won’t go into why it’s the better TV to buy for next-gen gaming since this is not a TV review. You can look that up for yourselves at your leisure.
Another issue the XBOX Series X has is with its sharing image snapshots and video clips feature. The new controller for the console has a dedicated share button and that works really well. I’ve had no problems with it capturing the content that I want to share. But sharing to social media and to XBOX Live itself is the issue. And this happens with video clips more so than image snapshots. For some reason, when I go to share a video clip to Twitter, the load bar moves forward partly but then it immediately stops and gives me a black/blank screen. And sure enough, when I go to check my Twitter on my phone, it has not posted the video clip. And trying to share it to XBOX Live first and then share it to Twitter from my phone via the XBOX app doesn’t work either. The same issue applies here too. Black/blank screen when trying to share it to XBOX Live. Snapshot images also has this issue but every once in awhile it will allow you to share to both XBOX Live and social media (Twitter, Facebook, Instagram, Twitch ect…) whereas it will not allow you to share video clips at all. This is an issue Microsoft are aware of and are apparently fixing in a November firmware update at the end of the month. To what degree they fix it though is the real question because this feature is buggy as hell. So much for promoting and hyping up that dedicated share button on the controller, eh Phil Spencer and Co?
Well, that’s it. That’s been my experience with the XBOX Series X so far. Of course the pros of quick resume and loading times cut in half far outweigh the cons of faulty 4K resolution at 120 hertz gameplay and buggy sharing content features. I say do not let that put you off buying this fantastic piece of hardware because those bugs and issues can be fixed easily. The extremely long downloading for digital and physical games might not though and you might want to reconsider buying a next-gen XBOX console if you have an OLED TV. Or if you have the console already but not the TV to get the most advantages out of the console, consider buying a Samsung QLED instead. Thank you.
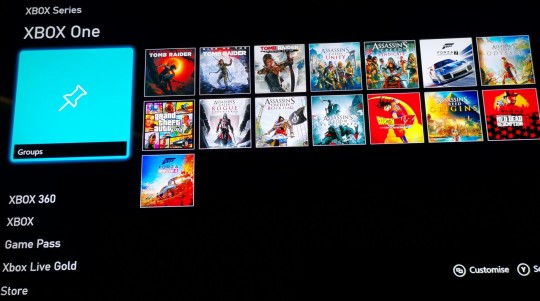
#xbox series x#microsoft#next-gen gaming#phil spencer#review#backwards compatibility#auto hdr#quick resume#loading times#bugs and issues#downloading#digital#physical#games
3 notes
·
View notes
Note
how do you make your gifs?
hi there! i’m not sure if you wanted the very basics or a tutorial, but i think this is more of a tutorial? sorry if that isn’t what you wanted! i tend to overexplain everything ;;;
i only started making gifs this summer, but i hope i explained everything (somewhat) clearly! feel free to send any other questions if you have any~
to make gifs, i use vapoursynth (alternatively, you can use avisynth) and photoshop cc 2019
under the cut!
downloading videos:
so! for live stages, i always use the ts file for it. ts files give the best quality for your gifs, and i’ve found i don’t like how the quality looks even if it’s 1080p, but that’s all your preference!
to find and download ts files, i use these websites:
4sashi, kpop24hours, kpopexciting // along with these, i’ve heard you can use twitter as well for ts files but i honestly don’t know what to search to find them lol
if you’re downloading from youtube, i always look for 4k videos, but if i can’t find any 4k for what i’m looking for, i use 1080p! i don’t really like going less than that, though ;;
to download youtube videos i use 4k video downloader! it’s really nice because it lets you download any youtube video (no matter the length) and it lets you download it in the highest quality for free! (if you want to download videos with 4k resolution, you have to pay a one time fee of $20 *i believe* and you have an access key for up to three computers! otherwise, 4k video downloader is completely free!).
if you want to download anything from vlive or twitter, i normally just look up “vlive video downloader” or “twitter video downloader” and just click the first thing that pops up
using vapoursynth: (link to where i downloaded vapoursynth -> here)
i somehow by miracle got vapoursynth to work on my windows computer, but i honestly have no idea how because the first time i tried it just would not work! it’s a big pain, but i’ve heard it’s a lot easier to download and get to work on mac! if you’re using windows, though, a nice alternative is avisynth, which i used before i got vapoursynth!
vapoursynth is really simple to use, to be completely honest! i don’t know how good i’ll be at explaining it so i’ll leave a link to a tutorial i used at the end of this explanation! it can be a bit daunting at first because of all the code, but tbh you don’t really need to know everything it says, most of it is just copy and paste!
to get the resizer and the vapoursynth script to load, you just have to click and drag your video file over on top of the file called vapourscript, which can be found in your vapoursynth folder! (my folder is called “VapourSynth64Portable”, because that’s how it came for me) to know if you’re in the right folder, you should see other files in there like “gifs” “scripts” “plugins” and others!
after you drag your video file onto the vapourscript and resize your gif, copy what it says in the resizer and paste it in vapoursynth!
here’s the tutorial i used to explain it easier -> here
options i use:
i normally use the size 268 x 400 in the gif resizer (makes it portrait), or if i want it to be a landscape type size, i use 268 x 200!
if you’re using a ts file, click the preprocessor option (the first one that says none), and change it to one of the qtgmc options! i always use qtgmc 60 fast, but it’s up to you!
for anything else (mkv, mp4, etc), i would suggest leaving it on none!
i don’t use any sharpen actions in photoshop, i use vapoursynth instead!
typical vapoursynth settings:
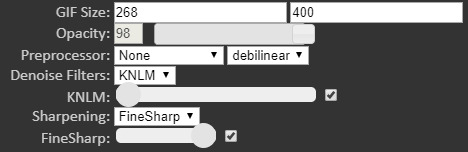
for the amount of frames: ts files i try to keep under 200 (even under 100 if possible) and for everything else i don’t really pay attention to the number of frames!
everything from here on is done on photoshop!
coloring:
this is all preference!! a lot of gifmaking is just about what you like personally! some people actually have a base psd or use others’ colorings (again, preference!), but i personally really love coloring, it’s my favorite thing about gifmaking, so i almost always make a new psd (coloring) for every gifset i make! the main things i use in coloring though are selective layers, color balance, hue/saturation, threshold, contrast/brightness, and then i top it off by lessening the exposure!
frame delay:
0.04 or 0.05 seconds, i never use anything above or below that! this is another preference thing though lol
exporting:
to export your gif go to file > export > save for web (legacy)! here are my export options!

i hope this tutorial helps you! sorry if it was too long or if i overexplained anything/made it even more confusing! i only started making gifs during the summer, so if you have any tips for me as well, please don’t be afraid to send any in! you can send in any more asks as well, if i made things too confusing/you have any more questions!
bye bye!
43 notes
·
View notes
Text
In-Home Streaming, or: How I Learned to Stop Worrying and Love the Couch
I’m a longtime PC gamer for many reasons. Yes, there’s the snob factor: PC games can look better than consoles almost all of the time. But it’s also because of the customizability. You pick your framerate, your resolution, your graphical settings. But you also own a machine, not an appliance: you learn its quirks, its inner workings. It’s something you take care of. For an enthusiast, a custom built computer is like a tailored suit.
And yet, there’s something I have missed for a long time: gaming on the couch.
Couch gaming is how I grew up. Huddled with friends around a tiny TV and N64, controllers in hand, shouting and laughing. Or leaned back in a chair with a cold soda, savoring every moment of a lengthy Final Fantasy cutscene. An office chair just isn’t the same. It’s rigid and harsh. It says “at attention,” not “relax.” It was the antithesis of my ideal gaming experience.
But after I got my PC, I never bought a console. For one, I couldn’t afford them. In college my money was precious, and my computer – already cobbled together from low-end or used parts – was expensive enough to maintain. The idea of dropping hundreds on a console and proper television was out of the question.
As an adult with more disposable income and now a home of my own – complete with an awesome living room my wife put together – I wanted to have that experience again. But my budget-mindedness and graphical snobbery hadn’t changed, and my PC was upstairs on the other side of the house. What to do?
I wanted couch gaming. And I managed to get it without buying a console or moving my PC to the living room thanks to a hugely underappreciated technology: in-home streaming. Here I’ll share what I’ve learned, discuss setups, and evangelize one of the coolest tech tricks I’ve discovered in homeownership.
What is In-Home Streaming?
You’ve probably heard of Google Stadia, Google’s uh…interesting new streaming game service. The basic idea is that your console isn’t in your living room. Instead, it’s located in a Google datacenter, which streams the game as a video through the internet. It sort of works, with the hiccups you’d expect with streaming a game over the internet: lag, input delay, graphical glitches. It’s like having very, very long HDMI and USB cords.
In-home streaming is basically that, but in your house. With the distance being just a few rooms instead of across state lines, latency becomes much less of an issue. It finally gives PC gamers the one thing we were missing: the couch.
Because it encodes video in real-time, in-home video streaming is a pretty new technology, and it requires certain hardware and software. The two dominant solutions are Steam and Moonlight, and they’re different in important ways.
Steam Remote Play
Steam Remote Play is by far the simplest method. For one, it integrates directly with Steam, so there is no complicated setup. Just install Steam on both devices, boot em up and you’re good to go. It pairs well with Steam’s “Big Picture” interface for a console-like experience.
Steam streaming also runs on just about anything, including very small computers like a Raspberry Pi. This is because it uses H.264 encoding, a standard that has been around for a long time. Just about any computer made since 2008 can play H.264 video, meaning that your old laptop or a $25 PC from Goodwill can be turned into a stream machine. Encoding H.264 on the host machine also has little performance cost.
Where Steam hits a limit is in resolution. Steam can only stream games at the resolution they use on your native monitor. So if your computer monitor is 1080p, you can’t play in 4K when it’s streamed to your TV. You can go lower resolution, which is fine if you’re streaming to some laptop screens.
Steam works with all Xbox controllers, as well as the Dual Shock 4 through DS4Windows.
Moonlight
Moonlight is what I use for in-home streaming. It’s an open-source implementation of NVidia’s “GameStream” technology, originally developed for their Shield devices. My main PC has a GTX 1070, which supports GameStream.
Moonlight has a number of significant advantages over Steam. For me, the most important is its ability to stream in a different resolution than your desktop. So while my desktop monitor is 1080p, I can play games in native 4K on my TV set! For newer games that my PC can’t run at full 4K, I use NVidia’s dynamic super resolution feature to run at 1440p or another resolution, then upscale it to 4K.
GameStream can also encode in HEVC, a cutting-edge video codec that offers superior quality with lower bandwidth. There’s virtually no artifacting, and colors usually look better than with Steam streaming. There is also HDR support. Because HEVC is lower bandwidth, it’s also ideal for wi-fi streaming.
If you’ve been keeping up with all the NVidia mentions, you’ve probably figured out the most significant drawback of Moonlight: hardware exclusivity. GameStream can only encode certain NVidia graphics cards. For instance, the 10-series locks GameStream to the 1050ti or higher, so budget gamers with a 1030 or 1050 are out of luck. Good news is that the receiving PC can run non-nVidia graphics.
GameStream also supports H.264, but for HEVC you need more powerful hardware on the receiving end. So while any old shitty laptop could stream with Steam, it would choke on HEVC.
Moonlight has the same controller support as Steam.
My Setup

When I first built my setup, I set a few standards:
4K, 60 frames per second
Option for “upscaled” 4K similar to the PS4 Pro/XB1X
4K Blu-ray quality HEVC (around 100mbps bitrate)
Quiet
An unobtrusive look, like a home theater appliance
A hard-wired setup for low latency
Less than a week after we moved in, I hard-wired my house for internet. I ran an Ethernet cable all the way from my office, through the garage, under my crawlspace and into my living room. I then crimped the ends (badly) and installed a wall outlet in my office (barely.) If I were to do this now, I’d buy a pre-made 200-300ft CAT6 cable on Amazon and just run that. That said, my cable still works for what I need.
For my streaming PC, I knew that I had to go small form factor. The credenza in my living room didn’t have space for a full-size PC, and the aesthetic of most of those would offend my non-gamer wife. I considered building one, but most SFF hardware is targeted at enthusiasts and so doesn’t come cheap.
But small form factor PCs have a particular application: offices. When offices dump their old hardware, you can get it for almost nothing. I found just such a deal on reddit’s /r/buildapcsales for a Lenovo ThinkCentre m58p, refurbished from Staples for $20 shipped. It was small, simply designed, and not too flashy. But it is from 2008, and needed a few cheap upgrades:
I swapped out the dual-core E8400 processor for a quad-core Q9400 I had on hand.
I replaced the loud, slow hard drive with a small, cheap ADATA SU635 solid state drive.
For my quiet living room setting, I also replaced the cooling fan with a high-quality Noctua model.

But chief among these upgrades was a graphics card. This PC, being more than a little old, could not play HEVC video without specialized hardware. And it had to be silent, not require much power, and be able to fit inside this small case.
So I turned to the NVidia GT 1030, specifically the MSI low profile silent model. Targeted at home theater PCs and poor gamers, the GT 1030 is not gonna blow anyone’s socks off. But it does 4K, and it does HEVC, and it does all of this over HDMI so it plugs straight into my TV with no issues. One quirk with my model is that the heatsink didn’t fit in my unusual case, so I had to take a hacksaw to it.
For a truly 1%er experience, I wanted to be able to start my upstairs PC remotely. That way when I want to play, I don’t even have to walk up there. For this I used an Android app called Unified Remote, which allows you to remotely control a computer from a phone. Unified Remote is free, but I bought the premium version with Play Rewards points.
The Value Question
Let’s get the first question out of the way: if a NVidia Shield is $150, why not just buy that? A few reasons:
It has hard-wired ethernet. No matter how good your wifi is, hard-wired is better.
Moonlight’s interface is more flexible than the Shield’s.
This also runs YouTube with a full keyboard remote for easier searches.
I can install a Blu-ray player at some point, if I choose.
I can emulate many games on the living room PC; the GT 1030 is great for that.
It runs party games like Jackbox just fine.
This is more fun.
So let’s run a tally. I’m not counting the hard-wiring, since I needed that for my office computer anyway.
The PC itself: $20
GT 1030: $75
Noctua 92mm fan: $15
Bluetooth receiver: $10
SSD: $15
Q9400: free to me, but you can get one on eBay for like $10
So for $135 – less than a PS4 Pro or Xbox One X – I get 4K couch gaming at higher framerates and higher settings. And for certain games, like Overwatch or Cities: Skylines, I still have a killer keyboard and mouse setup.
You can easily make this cheaper, especially if you use Steam and aim for 1080p instead of 4K. A Raspberry Pi – around $60 with accessories – can do 1080p Steam streaming flawlessly. Most Intel CPUs made after 2011 can decode H.264 without a graphics card, and the 6000 series and higher can even decode HEVC. You could also go for a GT 1030 with a fan, which are usually cheaper.
So How’s It Perform?
In short: great!
I’ve played everything from The Outer Worlds to Slay the Spire to Rocket League on my streaming setup, and they all work perfectly. Sekiro – which requires extremely precise inputs – does suffer a bit from the input lag, but I can’t detect lag with most games. Visual quality is excellent with very little loss in color saturation. You will notice artifacting on grass or leaves when you’re up close, but this is less visible at 1440p or higher.
I would not play competitive games on a streaming setup. The only one I play seriously is Overwatch, and there is definitely a difference in my performance when streaming. Competitive first-person shooters also suck to play on a controller, and a proper couch desk is not an investment I’m prepared to make.
Be prepared to tweak graphical settings if you’re shooting for 4K on most setups, as the video encoding does have a slight performance cost. This is not true for older games; Dark Souls and Dishonored run at a locked 4K and 60fps. For modern games, Forza Horizon 5 runs at 1800p on High, and Resident Evil 2 is smooth as silk at 1440p.
One final tip: if you’re streaming over wi-fi, be prepared to make some compromises. I would stick to 1080p to avoid lag, or do 4K only on HEVC with lower visual quality. Also streaming basically requires 5ghz wifi, so if you have an old router you should probably cut back to 720p.
So that’s in-home streaming! If you’re already a PC gamer, it’s an affordable and easy way to achieve a console-like experience. Feel free to DM me with any questions you have about hardware or software setup.
#tech#gaming#streaming#in-home streaming#remote play#steam#moonlight#nvidia#gamestream#hardware#pc gaming#couch gaming
1 note
·
View note
Text
5 Best USB Microphones For Small YouTubers In 2020
YouTube is one of the most preferred ports of call, when it comes to watching videos. One of the major reasons for which we skip on to the next video instead of watching the one we have been up to is none other than its sound quality. It is extremely annoying to watch a video and still sticking to it despite not being able to hear the dialogues clearly!
For all those savvy content creators, YouTube is certainly one of the best platforms to uphold their skills. However, creating videos isn't only about filming the scenes in a 1080 p HD or 4K video quality. There's a lot more to it! One of the most significant things that a lot of youtubers tend to ignore is the sound. Whether you are a semi pro youtuber or a professional one, you ought to focus on the sound quality beyond the video quality. It is important to remember that the audience prefers to look up to contents that are audio-visually updated.
Getting microphones isn't a tough deal anymore. You can fetch it quite easily and that too, at a very competitive price range. Here are a few USB microphones that you certainly look for:
Blue Yeti
If you are looking for an immediate purchase, you can definitely go for this USB microphone. It is handy enough and is available at a really affordable price. It isn't cheap but you may definitely consider it to be a 'value for the money you pay'.
Features:
16-Bit/48 kHz resolution
Option to choose between the four different polar patterns (stereo, omnidirectional, cardioid or bi-directional)
Featured with a built-in headphone amp
Easy accessibility
It has a handy headphone output
Versatile
It comes with a decent stand and a headphone jack
Featured with a mute button so that you can tap it to quit the recording for that time-being
Apogee MiC Plus
It is one of the best USB microphones that you can ever have! It gives you the exact feel of watching a video in a theatre. If you are expecting to shoot a video in a studio, this device would deliver right according to your expectations. A lot of musicians prefer to use it for their acoustic recordings and vocals as well. Versatility of this mic is indeed a matter to note!
Features:
It connects to Windows and Mac devices with a 3.5 mm cord
This mic is equipped with cardioid polar pattern
Good for 96 kHz/24-bit HD recording
Featured with a microphone preamp
It also comes with an A/D converter into one device
It is portable. You can carry it along with you anywhere you want (particularly apt for travel vloggers)
It has a low latency
Razer Seiren Elite USB Digital Microphone
It is one of the most popular choices among the youtubers. Even if you are a small youtuber and is aspiring to do really well in this industry, you need to ensure that your contents have the right amount of sound. The best thing about this model is that it cuts off all the undesirable background noises. It minimises the clipping even at the higher volumes through its digital/analog limiter.
Features:
Delivers an astounding sound clarity
It comes with a built-in high-pass filter
It is a pro-grade “streamer-certified” device
Seiren Elite is capable of capturing clear sound from multiple distances and angles as well
The USB connectivity of this device eliminates the requirement for a separate audio interface
Easy to access and use
Rode NT-USB USB Condenser Microphone
Are you aspiring to do better in vlogging? YouTube is growing big each day. All you need is to ensure that your contents are adding value to the viewers. Rode NT-USB USB Condenser Microphone is gaining a lot of attention these days for its versatility and sound clarity. It is just apt for meeting the expectations of a musical performer, as well as, at the same time, goes great for voice-over and podcasting.
Features:
It is compatible with Apple iPad using RØDE Rec, GarageBand, along with many other recording apps that call for an external microphone
A premium pop-filter is connected to the base of the mic
The installation procedure is quite easy and straightforward
One can be use it for podcasting, Skype, and Gaming
It comes with a tripod stand
You may connect it easily with your PC or Mac
It is extremely budget friendly
Samson Go Portable Mic
If all that's bothering you from doing well in vlogging is the sound, you should definitely have a check on the equipments you are using to shoot your video. This Samson Go Portable Mic is quite versatile and gives you the desired quality in terms of sound. It improves the overall quality of your video, thereby, making it more desirable among the audiences.
Features:
It is portable and thus, you can carry it anywhere you go
It gives you the provision to choose between the polar pattern options. Thus, you can set it between the cardioids mode or omnidirectional mode, whichever you need!
While the cadioids mode allows you to record the sounds that are coming from the front, the omnidirectional mode lets you record sounds from every direction. Hence, it is extremely beneficial for voice-over.
Featured with a mini clip which you may use to mount it to your LED or LCD screens.
Focusrite Scarlett Solo Studio USB
Focusrite has been known as one of the trusted brands in the recording circle. If you are a newbie and have got no idea about the equipment to purchase, go for this pack. It is a perfect solution both in terms of home usage as well as for studio recordings. A lot of musicians also recommend it.
Features:
It is compatible with Windows 7 and higher. It goes well with Mac OS 10.10 and higher as well.
Featured with a preamp
It is an all inclusive package. Hence, you get all the things together.
1 note
·
View note
Last Seen Blogs

digitalbugs
is Q

dheyusup-blog1
Untitled

wootenhermansen59
The Journaling of Bladt 525

bconsult
Bastian Consult

bhorror
The Working Copy