#external tutorial 3
Text

Simple gif test with Photopea.com following this tutorial. Photopea is just a browser-based editor, so you can follow the tutorial on any operating system.
You can do... most anything you'd want to do in this online tool. Cropping, sharpening, coloring, scaling, trimming, removing inner frames you don't want, etc... provided you have enough RAM to do all of this in a browser. I could have tried a little harder in the gif above—I think you could make some very good gifs that look nice and sharp with this tool.
Notes on this tutorial:
I use Brave (which is a Chromium browser for Mac) and did not have problems with my browser reloading or frames loading out of order. However, the reloading I imagine has to do with the amount of RAM/memory on your computer. You can just keep saving your work as a .psd file on your computer though if the browser keeps reloading and then just reopen that file on the website.
The recommended saturation layer in the tutorial was not a good move for the specific scene I have (made everything look green—not surprising with the green tint to SPN). Instead, I saturated through the Image > Adjustments > Hue/Saturation panel.
I had trouble at first getting the color adjustments to apply (this might also have to do with the ad blocker in Brave). A pop-up box should appear telling you "this action will be applied to x number of layers" and then you know you've selected your frames right and everything is working.
I scaled at the very end after cropping, sharpening, coloring, and captioning (you can scale down in the pane that opens after selecting File > Export as... > GIF) However, waiting to scale down probably uses more memory in your browser, so you may want to just weigh the pros and cons of that.
1 note
·
View note
Text
I love interacting with anime only and say stuff like "oh yeah, Nanami is in Malaysia now. With his best friend" or "We're all waiting for Gojo to stop playing Minecraft"
#everytime they ask for spoilers i try to not say much still#once someone asked me if it gets worst than Junpei#what was i supposed to answer ?#i said it got one hundred time worse#junpei was a tutorial or whatever. a tutorial for us to understand that gege doesnt care#once (2) someone asked me if Nobara died#internally i was screaming#externally i succeeded to keep a normal face and answered : no#once (3) an anime only said to me: Megumi's father is an asshole#but i do not spoil#so i just said#youve only got Megumi's point of view. his father is more ambiguous than that#jjk spoilers#jjk#jujutsu kaisen
6 notes
·
View notes
Text
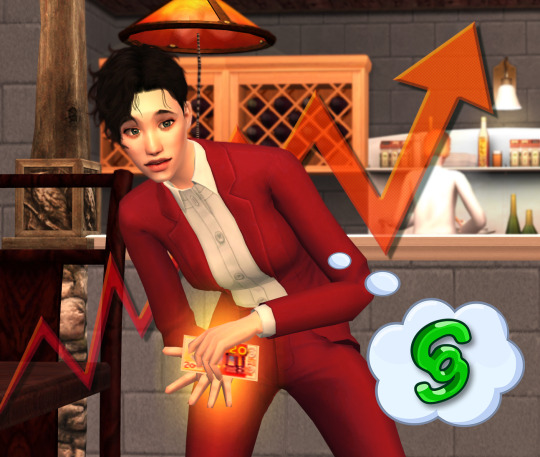
Owned Restaurant Profit Increase
Two versions to download:
-Double profit: SFS / GD
-Triple profit: SFS / GD
Choose only one version!
We all know how hard it is to maintain a restaurant business in The Sims 2, right? You barely make any money and, if you have some employees to get paid hourly, there's a good chance you'll even end up losing money. Well, once again I've been digging through the files for a while until I've found something to fix this issue. I have to say, this is not the ideal solution at all, but it still makes the business actually profitable, so I thought it might be worth sharing anyways. This tiny mod edits just one single BCON value, and it's super easy to tune to your liking! A lot of technical details, a tutorial on how to tune it, and a big testing research under the cut (bear with me please, I promise it's worth reading).
So the way an unmodded game moves money in a restaurant business goes like this: the moment your waiter puts the dish on the customer table, you get a small percentage of the price of the food deducted. Then, once the customer finishes eating, they pay you the full price of that food (based on how expensive or cheap you set your business). Simple enough, right? Ideally, the best solution would be increasing the price of the food, but no matter how hard I tried, I just couldn't find those values anywhere. So what's left on the equation? Yup, that small percentage you get deducted first. I was lucky enough to find that one, so changing it to a negative value means you actually get extra paid first. And that money comes from nowhere, the customer doesn't pay extra, they only pay the price of the actual food. That works for me!
As a quick example, in a new business with 0 stars, if you keep the default price on average, you always gain 28 simoleons for serving a bowl of Mac N Cheese. However, you also get deducted 4 simoleons first, so it's actually 24 simoleons per customer. That's just sad. The Double version of my mod makes it so you get 22 simoleons first, and then the customer pays those 28 simoleons. That's a total of 50 simoleons per customer. More than double the profit, not bad! The Triple version gives you a total of 71, pretty self explanatory. The numbers don’t match exactly with double or triple profits, but I didn’t want to spend that much time finding the exact value to make it exactly double or triple, you know, especially considering there might be other factors that affect your business income. I’m not that good at maths to be honest... orz
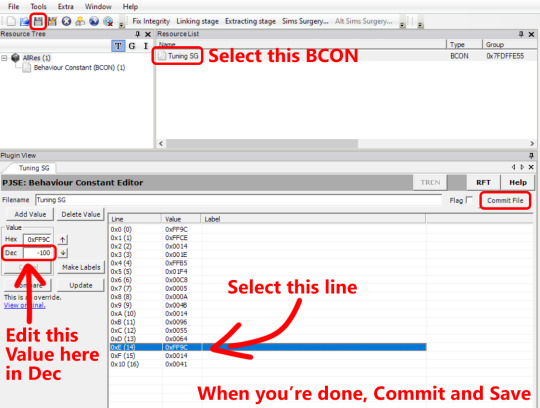
So how do you tune this? All you need is SimPe. Open the package, click on the BCON file and edit line number 14, on the Dec box. The default Maxis value was 20. I changed it to -100 to get roughly double the profit, and -200 to get triple profit. If you want to increase the profit even more, make sure you keep it negative when changing the value! Then just click Commit and Save. Done!
One extra note before I continue. The extra money you get with the mod does count for the balance you see on the UI menu for the business on the top right. So if you like to keep track of your income, the mod will take effect on those bars. However, it won’t count for things like the First Simoleon prize thingy. So for now I’m not really sure if this extra money would count for other things such as Lifetime Wants related to gaining money. I haven’t tested it that much.
Okay, now you know almost everything you need to know about this mod. If you want to read some ramblings on how I tested this, keep reading. Otherwise, you’re good to go!
So, let’s talk testing, because that’s something I actually enjoy doing. I built a simple restaurant lot, with about 5 tables available. The conditions were:
-3 Sims from my household to work as host, waiter and chef. No external employees, so I don’t need to keep track of extra salaries to pay.
-Schedule is roughly 15:00 - 22:00.
-New business level 0. Prices were kept at the default average.
-I didn’t use the Basic Sell interaction. If the customer didn’t want to eat at my restaurant, then so be it.
-The chef had 10 points of cooking skill, so I could add any food to the menu. However, I only chose one food to cook to keep the profit numbers as consistent as possible.
For the first case, I chose cooking only Mac N Cheese, a very cheap food that makes almost no money at all. It doesn’t require any cooking skill points.
Mac N Cheese gives you 28 simoleons when the Sim pays.
-In an unmodded game, you also lose 4 simoleons, so it’s 24 simoleons per customer. After running the business for the set schedule, I got 240 simoleons of profit. Pretty disappointing! If I had employees to pay, I would only have a few simoleons to spare, if any at all.
-With my Double version of the mod, you get an extra 22 simoleons, making a total of 50 simoleons per customer. After running the business with the mod in, I got 400 simoleons. Not much, but hey, it’s something.
For the second case, I chose Filet Mignon. This food is pretty fancy, and it requires max cooking skill.
Filet Mignon gives you 83 simoleons when the Sim pays. I also noticed the customers take way less time to eat it compared to the Mac N Cheese, so that’s an extra bonus to make the business run faster.
-In an unmodded game, you also lose 13, so it’s 70 simoleons per customer. After running the business, I got 630 simoleons of profit. Not bad, but considering you need to max out the cooking skill, it’s almost insulting spending so many hours just to get that…
-With my Double version of the mod, you get an extra 65 simoleons, making a total of 148 (!) simoleons per customer. After running the business with the mod in, I got 1036 simoleons. Okay, nooow we’re talking! That's the fancy restaurant status I like to see.
You might be wondering why these numbers are so inconsistent. Well, sometimes my lovely waiter decided to drop the tray on the customers, poor guy. That added to the randomness of how customers decide to enter the restaurant or not, and if the game sits more than one customer on the table or just one of them, if someone gets stuck for a while losing time… all of that can end up making the results a bit inconsistent. That being said, I had better luck when I was running the business without the mod in, yet I still got quite a lot more money with the mod in. I didn’t keep track of the numbers for the Triple version, but as you can probably guess, that one would be even more profitable.
One last case I wanted to test and compare: a completely different type of business, a games and entertainment one using the Bandatron ticket machine. In that scenario, I got 21 simoleons per customer, each hour. So after that schedule of 15:00 - 22:00, I got a total of 789 simoleons! All my sim did during those hours was bartending. That shows how easy it is to run a business with a ticket machine, and the biggest advantage is that you don’t have to pay employees if you don’t need them, and you don’t need any skills at all. Just plop down that machine, put some objects, relax and let the money flow by itself.
So yeah, in conclusion, Eaxis really messed up programming the restaurant businesses, there’s no doubt about it. Hopefully my mod helps balance things out. And if you think it's still too low on the incomes department, you can always tune it to your liking! As far as I know, this should not conflict with anything, but if you run into any issues, let me know and I’ll try my best to fix it asap.
Special thanks to EddySims for their fantastic HQ Icon Pack I used to make the preview pic! <3
#ts2 mod#sims 2 mod#can you tell i had a lot of fun making that preview pic#stonks moment#now i want to run a restaurant business hehe
423 notes
·
View notes
Text


NEW YEAR, NEW FONTS #USERGIFNYNF
TYPOGRAPHY CHALLENGE ・ JAN 8-12
Let's kick off 2024 with a new challenge... all about typography! If typography has ever made you feel stuck, we hope this challenge helps you break out of your comfort zone, discover new fonts, and try new styles! This event is open to gifmakers from all fandoms and will run from January 8-12, featuring 5 prompts:
DAY 1 (1/8): LAYER STYLES
↳ Use any combination of blending options (screen, hard light, difference, etc.) and/or layer effects (bevel, shadow, glow, gradient overlay, etc.).
DAY 2 (1/9): ONLY ONE
↳ Refine your choices and use ONLY ONE font throughout your entire set.
DAY 3 (1/10): PERFECT PAIRS
↳ Use a different font pairing per gif. Check out our font pairing recs!
DAY 4 (1/11): THREE TYPEFACES
↳ Use 1 Serif + 1 Sans Serif + 1 Script typeface in your set.
DAY 5 (1/12): FAVORITE FONT(S)
↳ Show off your favorite font(s) any way you want!
Rules for how to participate below the cut:

Reblog this post and follow @usergif
Create a gifset using the prompts provided above
Tag #usergifNYNF so we can reblog your creations!
Caption your post with:
@usergif new year, new fonts: day # - prompt
description
[fonts used: font name (source)]*
*Optional: We encourage including font names and their sources in your caption so others can find them [e.g. Blastimo Sans (dafont.com)]. After all, this challenge is about discovering new fonts and typography styles! You can also put this in a "read more" after your main caption or put a link in part of your caption that redirects to an internal Tumblr link (e.g. a page on your blog that lists fonts used). We don't recommend linking to external sites as doing this too many times in one post can affect the visibility of your post.
Questions about the event? Send us an ask here. We’ll tag all event answers with #usergifNYNF.ask. Need inspo? Check our RESOURCE DIRECTORY for typography tutorials or look through some of our members' font recs!
We also want to take this moment to thank you all for helping us reach over 10k followers! We hope this blog can continue to be a source of help and inspiration for gif effects, and we can’t wait to see what you create for this challenge! 🪄

Fonts used:
Gif 1, in order of appearance: Traveling Typewriter*, Bassy*, Buy More*, Germanica [Plain Germanica]*, Doky*, Magic Retro*, GIN Grotesk [Gin Rounded] (befonts.com), Random House*, Lostar*, Amberla*, Schizoid Personality* (* = dafont.com)
Gif 2: Karla (Google Fonts), Buffalo Script (dafontfree.io)
#usergifNYNF#userace#usershreyu#userelio#alielook#userhella#uservivaldi#usertreena#tuserabbie#userhanyi#tusererika#userbecca#uservalentina#useraish#larlies#usercats#userabs#tusermona#userpickles#*usergif
383 notes
·
View notes
Note
ur art is so advanced for a teenager!! have you been taking classes or are you self taught?? :0
self taught for the most part ! i went to a fine arts highschool for 3 years but they focused on traditional art and i already knew the fundamentals so it was mainly experimental and furthering our growth without much external intervention- but all my digital art stuff is self taught- mainly cause i always refuse to watch tutorials on new programs-
(i recommend actually watching stuff cause i only figured out a few months ago that i can color pick the transparent bg and use it with my brushes..)
#asks#im very stubborn when it comes to teaching myself new stuff- aka refusing tutorials until i absolutely have 2 watch them
306 notes
·
View notes
Text
・ ゜ ʚɞ ゜ ゜𝕳𝖔𝖜 𝖈𝖆𝖓 𝖞𝖔𝖚 𝖆𝖈𝖍𝖎𝖊𝖛𝖊 𝖞𝖔𝖚𝖗 𝖉𝖊𝖘𝖎𝖗𝖊𝖉 𝖇𝖊𝖆𝖚𝖙𝖞? ♡ ・ ゜ ʚɞ ゜ ゜♡‧₊˚✧ ૮ ˶ᵔ ᵕ ᵔ˶ ა ✧˚₊‧♡


♡ “𝒯𝒽𝑒𝓇𝑒 𝒶𝓇𝑒 𝒶𝓈 𝓂𝒶𝓃𝓎 𝓈𝓉𝓎𝓁𝑒𝓈 𝑜𝒻 𝒷𝑒𝒶𝓊𝓉𝓎 𝒶𝓈 𝓉𝒽𝑒𝓇𝑒 𝒶𝓇𝑒 𝓋𝒾𝓈𝒾𝑜𝓃𝓈 𝑜𝒻 𝒽𝒶𝓅𝓅𝒾𝓃𝑒𝓈𝓈. ~ 𝒮𝓉𝑒𝓃𝒹𝒽𝒶𝓁" ♡

All pictures and gifs are not mine but belong to their original artists.♡
I. -> II. -> III.
ᴛʜɪꜱ ᴘᴀᴄ ꜰᴏᴄᴜꜱᴇꜱ ᴏɴ ʜᴏᴡ ᴛᴏ ᴀᴄʜɪᴇᴠᴇ ʏᴏᴜʀ ᴅᴇꜱɪʀᴇᴅ ᴘʜʏꜱɪᴄᴀʟ ʙᴇᴀᴜᴛʏ ᴛʜʀᴏᴜɢʜ ᴄʜᴀɴɢᴇꜱ ɪɴ ʏᴏᴜʀ ʙᴇᴀᴜᴛʏ ʀᴏᴜᴛɪɴᴇ. ᴘʟᴇᴀꜱᴇ ᴀᴘᴘʟʏ ᴛʜᴇꜱᴇ ᴛᴏ ᴀɴʏ ʀᴇᴀʟᴍꜱ ᴏꜰ ᴘʜʏꜱɪᴄᴀʟɪᴛʏ ʏᴏᴜ ᴀʀᴇ ꜱᴛʀᴜɢɢʟɪɴɢ ᴡɪᴛʜ, ꜱᴜᴄʜ ᴀꜱ ʙᴏᴅʏ ᴡᴇɪɢʜᴛ, ᴅɪᴇᴛ, ꜰɪᴛɴᴇꜱꜱ, ꜱᴋɪɴ, ʜᴀɪʀ, ᴛᴇᴇᴛʜ, ᴇᴛᴄ. ♡ ɪ ᴀᴍ ɴᴏᴛ ᴀ ᴅᴏᴄᴛᴏʀ ɴᴏʀ ᴅᴏ ɪ ᴄʟᴀɪᴍ ᴛʜᴀᴛ ᴍʏ ʀᴇᴀᴅɪɴɢꜱ ᴄᴀɴ ꜰɪx ᴡʜᴀᴛᴇᴠᴇʀ ᴘʜʏꜱɪᴄᴀʟ ᴀɪʟᴍᴇɴᴛꜱ ʏᴏᴜ ʜᴀᴠᴇ. ꜱᴇᴇᴋ ᴀ ᴘʀᴏꜰꜰᴇꜱꜱɪᴏɴᴀʟ ᴍᴇᴅɪᴄᴀʟ ᴘʀᴀᴄᴛɪᴛɪᴏɴᴇʀ ɪꜰ ʏᴏᴜ ᴄᴀɴ.
~ XOXO 💋🎀
P.S ✨️Remember to check the collective message AND the poll at the end!✨️
⊰᯽⊱┈───✧
౿૮꒰ྀི collective message◞꒱ა
This is what I channeled. To all my readers, please know that beauty is an INVESTMENT. You must treat it as such! Things like smooth skin and weight loss typically take months to achieve. Be wary of miracle cures, overnight subliminals, or trendy products (even if they are said to be scientifically backed up). I know with subliminals the whole point is to have unfaltering belief, but don't put so much pressure on yourself to where all the time you're listening to subliminals and overloading your brain with them. Everybody's body is different. Everybody's journey of expression is different. Remember that your body loves and supports you. It's the vessel for which we navigate through life and we only have 1 for this current lifetime. I would say with any beauty routine moderation is key (think of the Temperance card). These types of things take just as much mental strength as physical to keep up with, so it's good to treat them with simplicity, not just in consideration for what you physically can do, but what mentally you can handle. ♡
౿૮꒰ྀི pile 1 ๑◞꒱ა
9 wands (rx), 5 of wands (rx), The Lovers (rx), 9 of Swords (rx)
So this pac was supposed to focus on improving your external beauty, but apparently spirit is saying that you need to focus on what's going on internally. The major reason why you haven't achieved your desired beauty results is because you're burnt out. You've overloaded yourself with so much information and recommendations on how to achieve your desired results through the internet (video tutorials, how-to guides, beauty forums, subliminals, product reviews, etc.) that you think you should have had your results by now, and that it's a punishment from the universe that you are stuck in your "ugly duckling phase". This has led you to being perpetually frustrated, underconfident, and jealous of those that fit your beauty ideals. The truth of the matter as to why you haven't seen much results is that you try too hard and you lack the motivation to commit to any of these self-improvement tools. You may have researched so much that now you're confused and intimidated by all the information with some ideas and opinions even overlapping or contradicting thotherser. You may have tried multiple things at once and expected that to accelerate your results. You may also be the type to buy a bunch of recommended products in bulk and so far nothing has been working. Spirit is saying that your body itself is confused and cannot adjust to all these routines you keep trying out. It's like you go through aup-and-downwn cycle: you try one routine for 2-3 weeks and if it doesn't work, you leave it, go through an inactive wallowing stage for the next 2 weeks, and start over with a new routine. Your body cannot support these constant switch-ups and exposure to new chemicals (yes, even 100% natural ingredients). They're taxing your body and you're not giving it the chance to properly process what you've put in/on it. Your body and mind are also in conflict; it's like you've detached yourself from it out of anger and resentment. I have to say it: self-love is VERY much needed here. The Lovers in reverse just emphasizes that you need to compromise your wants and desires with what your body is physically capable of doing. Be patient and gentle with it. A few weeks is not enough time for many products/actions to take effect. When they do, the effects are usually internal first before they show in the external. Your body needs consistency and simplicity. Spirit is saying you only need a few products and to stick to a strict routine for a few months. Extensive routines will do more damage than good. Regarding forming your routines, you need to create solid habits. Your main obstacle is you are impatient. Given for most of you, it's probably been years that you've been working on your body and confidence, but a few months seem little in comparison to those many painstaking years of trial and error. Another obstacle here is you worry excessively and tend to assume the worst. By not caring for your mental and spiritual well beiyou'reyour psyching yourself out from doing the groundwork that's needed to solidify your imaginings into reality. Your moods heavily affect your motivation which is essential in moving your results forward. Know that success is destined for you! You just need to take the long road and to simplify the things carrying you along the journey.
⊰᯽⊱┈───── ✧
౿૮꒰ྀི pile 2 ๑◞꒱ა
9 of Swords, Page of Pentacles, 3 of Pentacles, The Devil (rx), 2 of Swords
Pile 2 you also need hug! I can tell you are overly anxious and stressed out. I think self love is very much needed here as well. In order for you to improve your beauty routine, you need to get out of your toxic headspace and have faith in your ideas. I can see that you suffer from periods of anxiety and isolation. Maybe you avoid going out as much because of your insecurities. You have very low confidence and don't have much faith in your future. I think the main problem stopping you from getting your desired beauty results is low self esteem and an obssessive mentality. You are self sabatoging yourself from taking action. It's like your stuck in a cycle of rumination. Your scared of having to commit to one thing and if that one thing doesn't work out you have to tear down all of what you've built and start over. The process of dissapointment is one you try your hardest to avoid by doing...nothing. Could also be that you do too much but feel you never do enough. Either way, your in your head a lot about what you can do and you don't know how to navigate the wealth of information that's out there, but you are scared on who and what to trust. I think in order for you to get your desires, you first need to ground yourself, start believing that change is possible and you are not stuck in your circumstances. Beauty is an investment, and it's not so much as what you put on that matters as much as how often you do it. Spirit is saying take the time to formulate a plan and stick with it, make sure every moving piece correlates well together. You may be young and fairly new to making routines like this. Take your time and have patience, it's not a race, but you should start making these plans for the longterm future. It can't be something that you quit right after seeing results, these will be things that you will need to give consistent care and attention towards, just so you know how to care for your body and recognize the signs it gives you moving forward. You also need to detach the results from your mind. You need to think clearly and objectively, let the changes come to you and don't try to force it, because I'm getting that some of you will stress so much that your body will have bad physical reactions, like migraines, rashes, breakouts, food cravings, and more. I'm also getting the message that for some of you, ya'll need to go to the doctor (nutritionist, dermatologist, gynecologist, whatever). Everyone needs to visit a doctor if they can, but ya'll especially. I think you would do well to go to professionals and get expert advice rather than trust unknown sources on the web. Some of ya'll maybe even need coaching, like a trainer or life coach. There's a lot of confusion and doubt in this pile. I think a clear, defined path is what you need, so do please be open to seeking help from others. I do think you've been working hard on the spiritual front to manifest your results, but you are constantly being disheartened. I think ya'll need to fix yourselves mentally first because its inhibiting your motivation. For some of you, you have even formed obsessive attachments to your appearance and do things to feel "right" or stable. It's giving me OCD. It's even giving me Cassie from Euphoria's excessive beauty routine (look it up). Like in the TV, it appeared as if she was doing all those things for Nate's attention, but really she did it because it was her way of grounding herself and feeling in control. I think ya'll have an issue with feeling in control and may be prone to acting out of impulse, like buying unnecessary things out of desperation or just simply overinvesting your time and energy in the wrong things. For the others, you lose steam and don't actually do the things you need to do. Be more wise with your money and where your putting it, as well as your energy. Try not to over exert yourself or comit to a bunch of things at once. Your time and energy is precious, and your mental wellbeing comes before all.
(I had a headache while doing this reading, so sorry for the confusion. That 2 of Swords energy was strong, lol)
⊰᯽⊱┈───── ✧
౿૮꒰ྀི pile 3 ๑◞꒱ა
5 of wands, Page of Wands, Ace of Wands (rx), Judgement, The Tower
Oof, all this fire energy Pile 3. So I do sense that ya'll have problems with taking on too much. You have a lot of insecurities you want to tackle, for example, skin, weight, hair, teeth, etc. and you are trying to "fix" all those things at once. Maybe you are around people that make you feel insecure and you're in this unspoken competition with them on who's prettier. There maybe even family members or friends that speak out on your appearance ( I'm so sorry if this resonates) and make you feel insecure and like you have to work on yourself. I think you've been stretching yourself thin, searching for ways to constantly improve all the while you are already trying your hardest, and instead of achieving your desired looks your heading towards a total burn out. The Tower here is telling me loud and clear, you need to slow down and take a deep breath before you crash. What other people's opinions of you don't matter. Like at all. What matters is how comfortable you are in your own skin, and what makes you feel authentic and beautiful. I don't think you are even insecure or underconfident, but rather nitpicky, and those around you are making you so. I see that you're intentions in your beauty routines are either not genuine or are unnecessary, and are forced and uncomfortable. You don't feel motivated enough to keep doing them but you still do it anyway. It maybe compulsive, but you are taking on so much at a time that it's building frustration within. What you need to do to improve your beauty routine and improve your mental health is to do a serious self evaluation. Check that you are doing these things for the right reason and not because of outside influences. Check on whether these things make you feel confident or are downsizing you. Check if your overall happiness and wellbeing is in order, whether you've spent too much money or have invested so much into your routines you've neglected other aspects of your life. I don't think what you've been doing has been necessarily bad, but it is somewhat obssessive and it will eventually backfire if you don't lessen the burden. I think you've once enjoyed doing all these things in your routine; they were fun and kept you on your toes, but now you've fallen out of love with the whole monotony of them. I think you should take a break from your beauty routine, maybe just do the bare minimum if you can't afford to drop everything. Focus on one focal point at a time, like skin and hair, or body and skin, and make sure your setting boundaries and prioritizing your mental and emotional wellbeing. I think your body is currently feeling overloaded with all that your putting in/on it. You may feel low energy and because your neglecting sleep or not staying hydrated. Make sure your also doing these bare basics and not just whats in your itinerary as they can greatly hinder your results if not catered too. Consider changing the direction of your journey or take a momentary break.
⊰᯽⊱┈─── ✧
Put in the comments down below if you would like me to make PACs focusing on specific bodily insecurities, like a pac for how to improve your skincare routine, how can I achieve my desired dream body, and how can I improve my physical health, stuff like that!
⊰᯽⊱┈───── ✧
ᴀɴʏ ᴄʀɪᴛɪᴄɪꜱᴍꜱ ᴏʀ ꜰᴇᴇᴅʙᴀᴄᴋ ᴀʀᴇ ᴡᴇʟᴄᴏᴍᴇᴅ. ɪ'ᴍ ᴛᴀᴋɪɴɢ ᴀ ɴᴇᴡ ᴅɪʀᴇᴄᴛɪᴏɴ ᴡɪᴛʜ ᴛʜɪꜱ ʙʟᴏɢ ᴀɴᴅ ᴀᴍ ᴏᴘᴇɴ ᴛᴏ ᴀɴʏ ᴏᴘɪɴɪᴏɴꜱ ᴀꜱ ᴛᴏ ᴡʜᴇʀᴇ ɪ ᴄᴀɴ ɪᴍᴘʀᴏᴠᴇ ɪᴛ. ♡

ᴅɪꜱᴄʟᴀɪᴍᴇʀ
© lolita-bonita — Please do not plagiarize, translate, or repost any of my work on other social media platforms without my permission. This is the only platform that I post this type of content. If you see my work being posted anywhere else, please kindly report them to me. ♡
⊱┈───── ✧
✨️ᴘʟᴇᴀꜱᴇ ɴᴏᴛᴇ: Tarot is not an exact science, nor can it produce information that is factually true. All things posted are alleged and for entertainment purposes only. The future is fluid, and what may happen is based on your choices and actions, not what I and a deck of cards say. You are still the creator of your future. ✨️
⊰᯽⊱┈───── ✧
#pick a card#pick a picture#pick a pile#pick a photo#tarot#tarot blr#tarot blog#tarot cards#tarot reader#free tarot readings#free tarot
415 notes
·
View notes
Text
I don't want to hijack anyone's post so I'm putting my two cents about media piracy/preservation here.
As someone who literally grew up in the era of "Keep Circulating Those Tapes", I have this thing about keeping things. About "owning" them.
If I like something, be it a fanfic or a tv show or even a yt video, I save it. I literally pay money for a yearly subscription to one of the best stream ripping programs out there because I'm obsessive about this. Before that, it was ripping websites. Before that? P2P. Before that it was literally copying and pasting text into a MS Works document and printing it out.
I have fanfictions still printed out from 20 years ago. Catherine Semerjain, one of the biggest authors of Shane McMahon fanfiction in the 90s... I have her stories printed out and saved in little books. Encyclopedia Xenaica, a proto-version of a fan wiki, I have printed out and saved in it's ENTIRETY from before it was taken down.
Yes, I printed a WIKI.
This was 2000, the internet was small back then.
This behavior has never stopped.
It has, however, transformed.
So damn many data discs. SO MANY. I have volumes upon volumes of data discs of media that I saved because you literally never know when or where shit will vanish. Somewhere, I have a full series burn (absolute potato) of "You Can't Do That On Television" because that series evaporated for decades until someone uploaded the converted tapes, only for it to vanish again.
But it is preserved. I have it. On disc. On file. On backup.
My backups have backups.
I have FIVE external hard drives, the smallest of which is 3 TB. That's also the oldest and everything on there is backed up at least one other place.
The point I'm making is that I am obsessive about hard copies of things and I have even more digitally.
And it's all because I remember the 90s.
I remember before the internet, before there was streaming, before TV on DVD. Back when if you liked a show you damn sure better have your VHS running when it was on because you might not get a second chance. (I'm looking at you 90s Shanie who accidentally taped over the original broadcast of Xena's banned episode). I have been hardwired to distrust the internet as an archive because I've gotten hurt so many times.
Listen to me closely.
Streaming has never been a savior.
If it's on the internet it is, by definition, temporary. They say "the internet is forever" but that's a lie. Very few things on the internet are truly forever. Everything ends, everything fades, and if you don't preserve these streaming shows while they're around you're gonna find yourself empty handed the moment that the winds change and the mood shifts.
Seriously, there's tutorials out there on how to do piracy right. Read them. Learn them. Love them.
Then start doing it.
Because it's been made very clear that corporations don't give a shit about preserving media. It's up to us.
It's always been up to us.
1K notes
·
View notes
Text
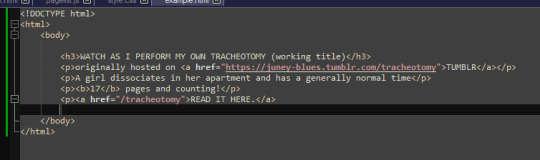
ever since i made THIS POST a lot of people have been asking for a tutorial, even though in pretty much all of the screenshots i included the specific part of inspect element showing exactly what i edited.
so buckle the fuck up I guess because the tumblr userbase want to find out how to make html pages unusable and who am I to deny you.
get ready for Baby's First HTML and CSS tutorial lmao
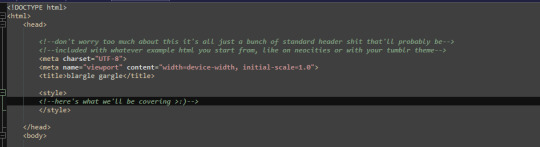
ok so first things first we need to go over BASIC HTML
html is made up of these things called "tags" which specify certain parts of the web page, such as
HEADERS (<h1> through <h6> in terms of importance)
PARAGRAPHS (<p>paragraph here</p>)
LINKS (<a href="linkhere"></a>)
BOLDED SECTIONS OF TEXT(<b>bold here</b>)
and a bunch of other stuff,
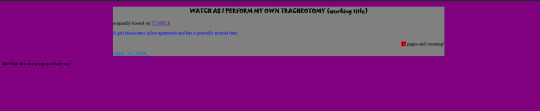
by default however, specifying all of this just gives us a plain white page with plain black text of varying sizes

that's of course, no fucking good, and sucks shit, so the arbiters of html decided to let us STYLE certain elements, by adding a STYLE parameter to the tag

this can change any number of elements about how things are formatted.
text colour, page colour, font, size, spacing between elements, text alignment, you name it? you can change it!


you might've noticed that, certain elements are nested in other elements

and that any changes that apply to one element, apply to everything included under that element!


how convenient!
anyway this method of styling things by adding a style=" " to their tags is called "in-line style"
i think because the "style" goes "in" the "line"
it's generally ALSO a pain in the ass to style an entire website like this and should be exclusively reserved for small changes that you only want to apply to specific parts of the page.
for any real change in style you want to create a <style> section in your page's header!
this can be used to make changes to how all elements of a type in your page are displayed

or even add new elements with whatever wacky styling you want that can be used with the <div> tag!

wow! isn't css just dandy!
and hell you can even use External CSS™ if you're making multiple pages and want them all to have a consistent theme, by pointing to a .CSS file (which is basically just a <style> header without the <style> tags lmao


ok this is all well and good and very interesting if, say, you're making your own website
*cough*neocities*cough*itsreallycoolandfree*cough*
but you came here because you want to FUCK UP A WEBSITE and make it look STUPID!!
so this is where the transform css property comes in~
you can read up on it HERE if you want the details but basically it allows you to apply mathematical transformations to any html element you want,

all of these fun bastards,
they can be really useful if you're doing some complicated stupid bullshit like me

OR for having fun >:)
if you'll remember, earlier i said that css properties apply to literally everything nested in an element,
and you MIGHT notice, that literally everything in pretty much all html files, is nested in an <html> tag

you can use style=" " or regular css on pretty much ANY html tag,


INCLUDING HTML!


ok ok that was a lot of buildup for something that i could've explained in one or two lines, but i gave you all this fundamental knowledge for a reason,
well, two reasons, go make a neocities
CHAPTER 2: THIS POST HAS CHAPTERS NOW
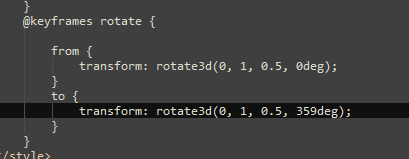
CSS KEY FRAMES BABYYYY
THESE FUCKERS DON'T WORK AS INLINE STYLING
I HAD TO TEACH YOU HOW CSS WORKED, TO GIVE YOU THE KNOWLEDGE YOU NEED, TO ANIMATE PAGES. TO MAKE THE FUCKERY COMPLETE!!!!
OKAY SO AGAIN READ UP ON THIS IF YOU WANT THE FULLEST POSSIBLE UNDERSTANDING
BUT WHAT KEYFRAMES ALLOW YOU TO DO, IS ANIMATE CSS PROPERTIES

and then make a class, which calls that animation...

and then assign that class. to your html tag.
and then vomit forever
we can do it in 3d too,

the only limit is your imagination... (and how many parameters you want to look up on w3schools and mozilla mdn web docs)
CHAPTER 3: APPLYING IN PRACTICE
ok now the fun thing about all of this, is you can apply it to your blog theme, literally right now
like literally RIGHT now
like step one, make sure you have a custom blog theme enabled in your settings, because that's turned off by default for some reason

step 2: edit theme

step 3: edit html:
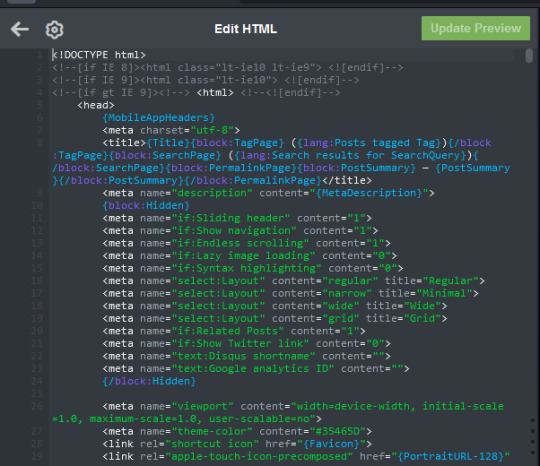
step 4: apply knowledge in practice >:)
428 notes
·
View notes
Text
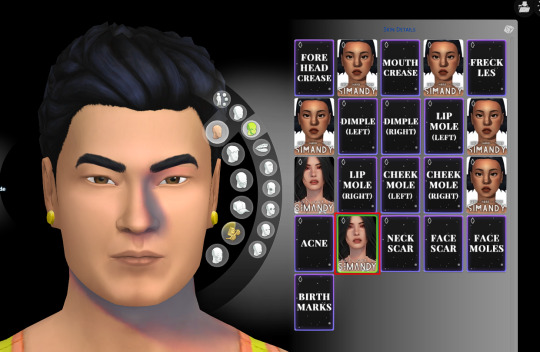
How to clone CAS CC into multiple categories while keeping filesize to a minimum
Thanks to Monochaos and amethyst lilac for the help
I am using @simandy's Spotlight V2 CC to demonstrate
💜 Explanation
You might want to have some CC in multiple categories, for example if you want to layer them, if you want to have more options if a category is already taken, etc.
This however will create the issue, that it will take up a lot of PC storage space if you keep everything inside the package, textures etc. which can slow down your game.

💜 How does this work
Instead of loading it's own textures, the file you created takes the exact textures from the original file on all of the swatches.
That is why it also only works if the original file is in the game too.

💜 What you need
Your package you want to have in multiple categories
Sims 4 Studio
💜 Tutorial
1.Place the package you want to clone inside the Mods folder of Sims 4 Studio, NOT YOUR ACTUAL GAME
For me it's: D:\Dokuments\Sims 4 Studio\Mods

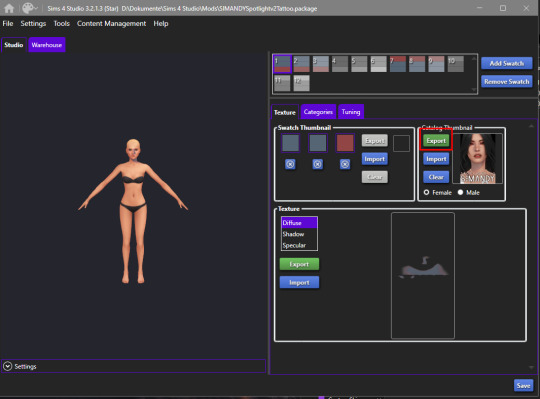
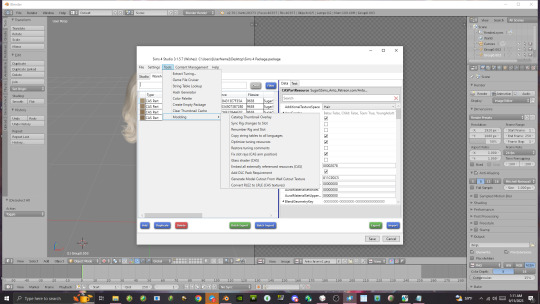
2. Open the package file in Sims 4 Studio and extract the catalog thumbnail. Cloning it will not keep the thumbnail so if you want it, you need to add it manually.
Export it as .png.
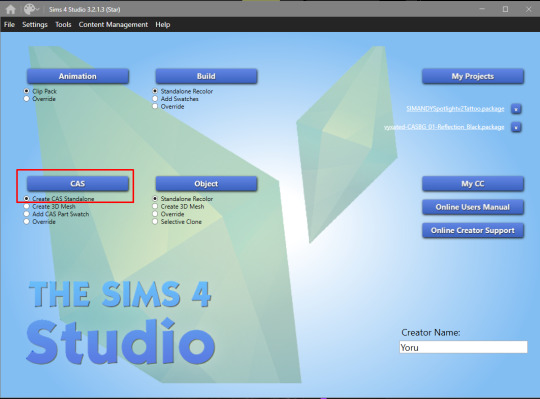
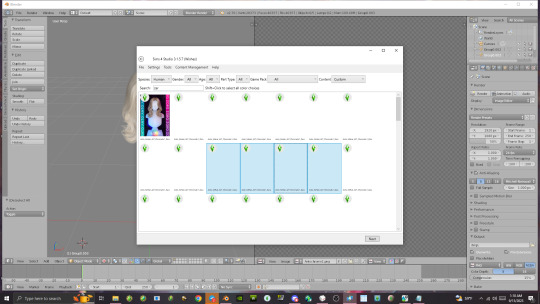
3. Go back to S4 Studio home and select "Create CAS Standalone"
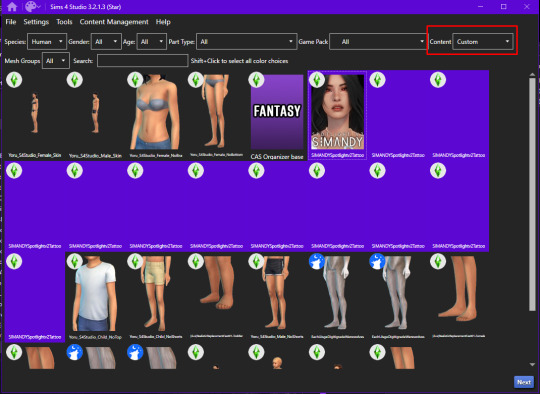
4. Under "Content" select "Custom" and select all swatches of your package by Shift-Clicking the thumbnail.
Then press "Next" and save your package under whatever name you want.
5. Import the thumbnail
6. Under Categories change "Outfit Type" to whatever you want and press "Apply to all swatches"

7. Save your package.
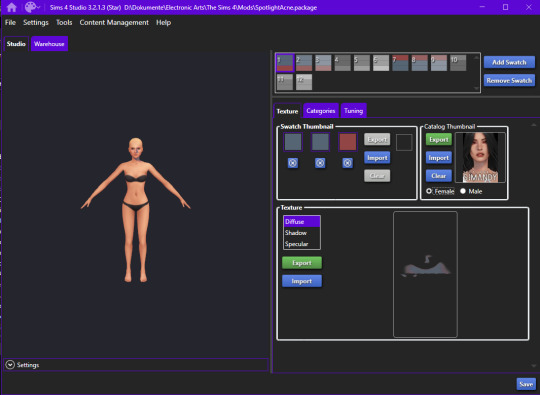
8. Now take both your package from the S4 Studio mods folder, the original package and and the one you just created and copy them into your actual game mods folder.
For me it's: D:\Dokumens\Electronic Arts\The Sims 4\Mods
As you can see, the file you just made is significantly smaller.

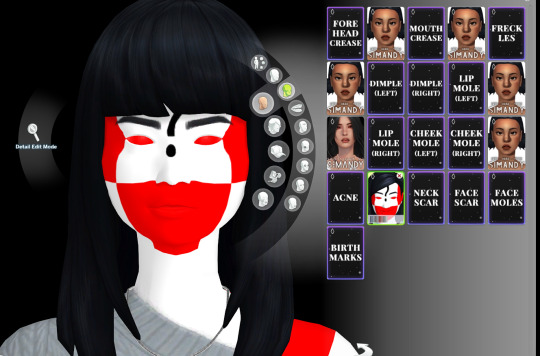
9. Check in-game if it worked.
Yup.
If your Sim has a white and red texture overlay with question marks, you probably forgot to place the original file back into the game.
💜 How do I add the textures back in?
If you want your new package to work on its own again, do this:
1.Make sure the original file you used for cloning is still inside the S4 Studio mods folder
2. Open your cloned package
3. Go to "Tools - Modding - Embed all externally references resources (CAS)"
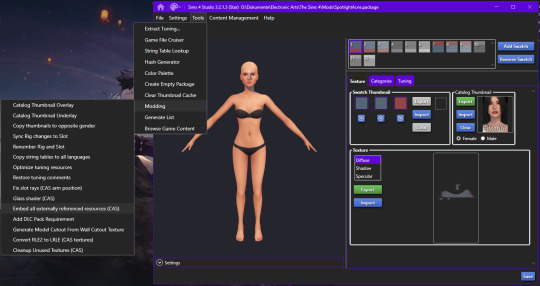
4. Now your Warehouse tab will be full again, the file will work on its' own and the filesize will be around the same size of the original package.

@thefoxburyinstitute
#yorututorials#yoru tutorials#ts4 tutorial#ts4 resources#tutorial#Sims 4 tutorial#s4 guide#ts4 guide#Sims 4 studio#Sims 4 cas#ts4 cas
46 notes
·
View notes
Text
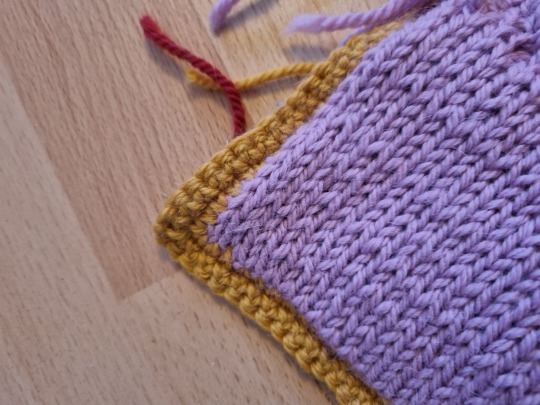
The Making of the Howl Jacket (Tutorial)
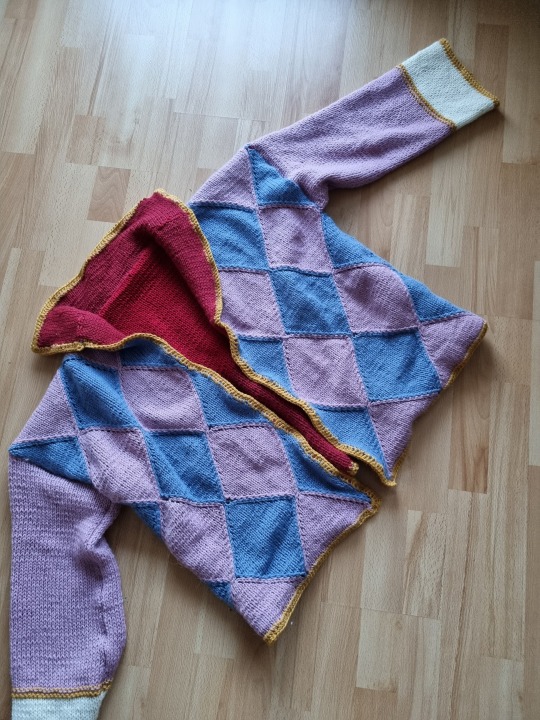
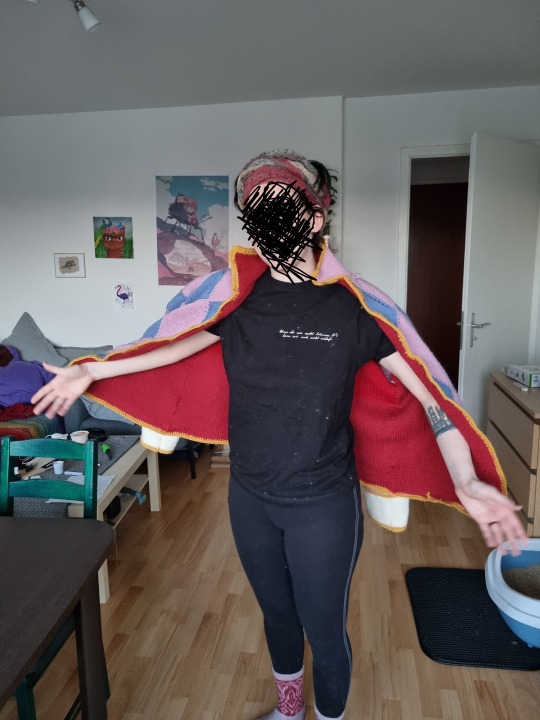
Many People have been asking me about how I did my Howl (inspired) jacket, so here it goes:
(obligatory disclaimer that I am just some person and not a professional pattern maker or anything)
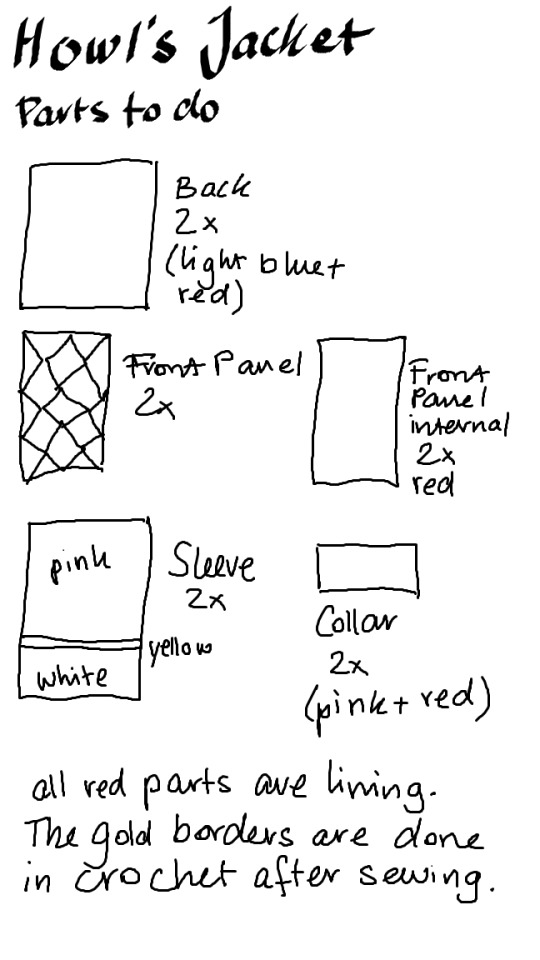
This is an overview of the parts I did. Note that I did no lining for the sleeves because I felt it would be overkill (and strand me on sleeve island forever).
So, let's get technical:
I used Drops Nepal (65% wool, 35% alpaca) and 5 mm needles.
pink (6 balls)
light blue (7 balls)
red (9 balls)
yellow (2 balls)
white (1 ball)
however I was a dumbass and only ordered 6 red balls so there is a colorshift on the backpanel of the lining.
The knitting:
All the pieces are rectangular and mostly in stockinette stitch. I had most trouble with the front panel which also changed the most after blocking, so I would recommend starting with them. Also block the pieces as you go and pay attention to the dimension you block them to.
Frontpanels (outer and lining):
Cast on 55 stitches.
For lining: work flat for 120 rows (or until desired length. Mine are 32 cm wide and 60 cm high)
For outer layer: work 1 stitch blue, 26 pink, 1 blue, 26 pink, 1 blue from seperate balls of yarn. Then work increases and decreases like I outlined here.
This will lead to you having odd stitches of blue and even stitches of pink. When you come to the tips of the pink diamonds, cross them over like you would with cables (1/1 left over right). On the tips of blue diamonds you can slip one, knit two together and slip the first stitch over to make 3 into 1 stitch.
Backpanels (outer and lining):
Cast on 100 stitches, work flat for 120 rows (or until desired length. mine are about 60 cm high and 65 cm wide)
Collar (outer and lining):
Cast on 109 stitches, work flat for 18 rows.
Sleeves:
Cast on 60 stitches, work flat in pink for 72 rows (about 35 cm), then work 3 rows in GARTERSTITCH in yellow (this will raise the yellow off the flat part) followed by 18 rows white.
You can either work the crochet border immediately (2 rows of single crochet) or after you sewed the sleeves together.
Congrats! You did all the parts!
The construction:
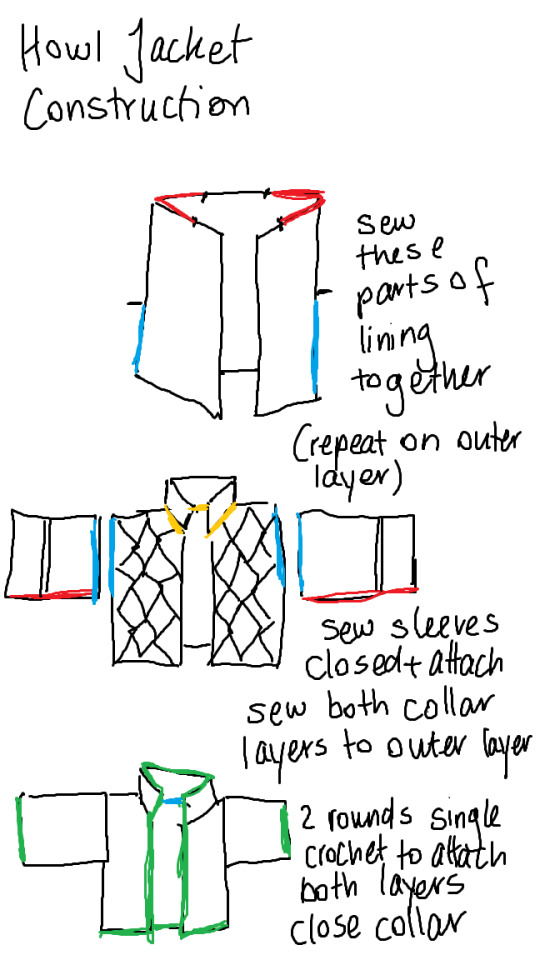
sew the front panels to the back panels. leave 20 cm on the backpanel and 10 cm of each front panel open for your neck to fit and attaching the collar. leave about 30 cm open to attach the sleeves. do this on the lining AND the external layer.
sew sleeves closed and attach to both lining and outer layer at the same time. attach collar on both layers seperately (outer and lining).
Finish off the edges by doing two rows of single crochet.
Weave in all your ends and DONE!
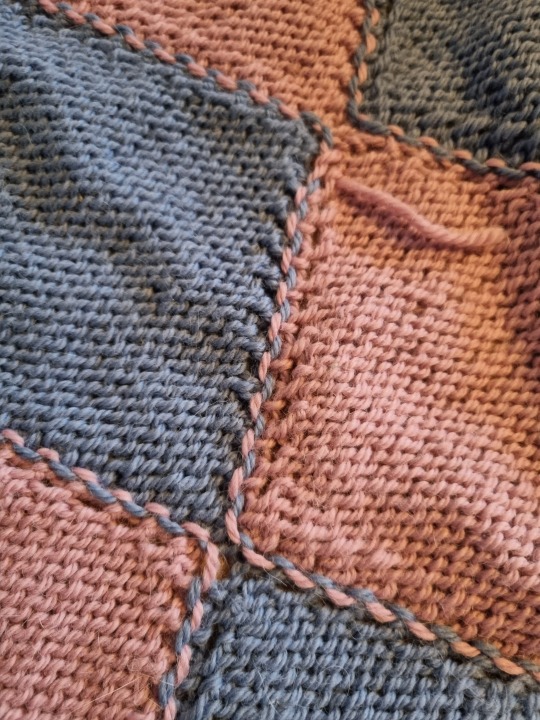
Some detail photos for you:
32 notes
·
View notes
Text

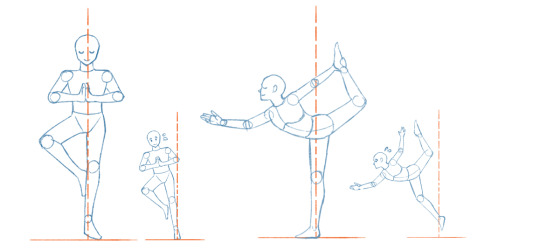
@dazzlerazz my apologies for taking so long :3 as per request, here are my thoughts on posing!
For this tutorial, we will be learning how to draw and analyze standing poses! Poses that are related to movement and action will not be covered. I believe that these types of poses are more complex and require a comprehensive understanding of standing poses first.
So, let's begin by analyzing some examples of standing poses! Whether you are drawing from imagination or from reference, it is very important to analyze a pose so that you understand two things:
How do I make a pose 'work'? Does the pose look real? Could a person make this pose in real life? Does it look natural? Would a real person be able to hold this pose for a reasonable length a time?
How do I make a pose 'appealing'? Does the pose look interesting? Does it communicate the character's personality and attitude? Does it properly express the feeling or emotion I am trying to aim for?
Let's take a moment to examine the first question.
First, let's assume that the character you are trying to draw is beholden to the laws of gravity.
When a character assumes a standing position without the help of props, all of their weight is supported by the feet.
Below, we can see that the weight of a character is evenly distributed between the left and right sides of an imaginary red line. This ensures that the pose is stable.
This stability ensures that a character can hold a pose for a reasonable length of time without falling.
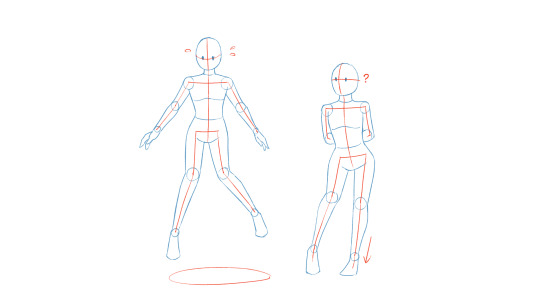
Of course, external forces may cause a character's center of gravity to shift, redistributing their weight to favor one side of the center line.
When this occurs, the pose is no longer stable, and the character looks like they are about to fall.
Luckily, we can remedy this by shifting the feet further apart.
Now that the character's weight is once again distributed equally between both feet, stability is restored. The character is no longer falling - and we have created a new pose in the process!

Theoretically, we can create stable standing poses simply by making sure that a character's body weight is equally distributed between the left and right feet at all times. Although the end result is a little boring looking, at least we now understand the importance of foot placement when building a pose.
So how do we create poses that are a little more interesting?
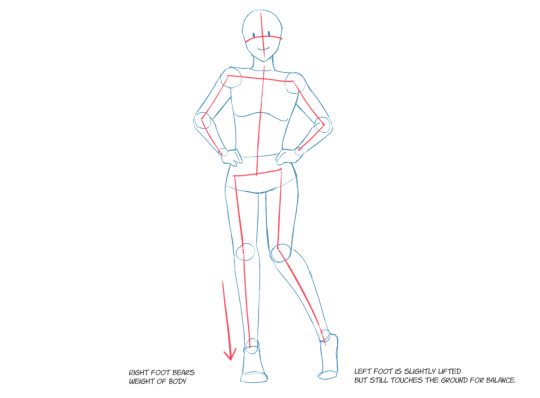
One way is to adjust the pose so that the character's weight rests primarily on one foot, rather than both feet equally. The result is a pose that is stable, yet more interesting. The foot bearing less weight is free to do other things. As such you can get a little more creative with positioning the legs and feet without putting the character in danger of falling.
Be warned that if you draw the feet without considering which foot is supporting the character's weight, then you may end up with a floating character.
Even when all of a character's weight is supported by a single foot, you can create poses that are stable and resemble something that might feasibly be seen in real life.
However, with these kinds of poses, it is especially important that the character's weight is evenly distributed over both sides of the load-bearing foot, otherwise we will run into the same risk of falling.
Now that we understand how stability makes a pose 'work', lets ask the next question.
What makes a pose appealing?
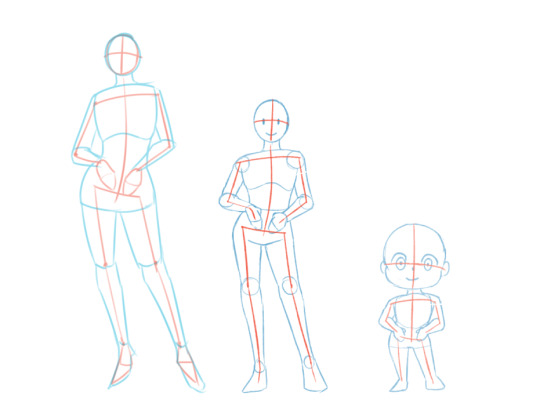
Let's analyze some examples!
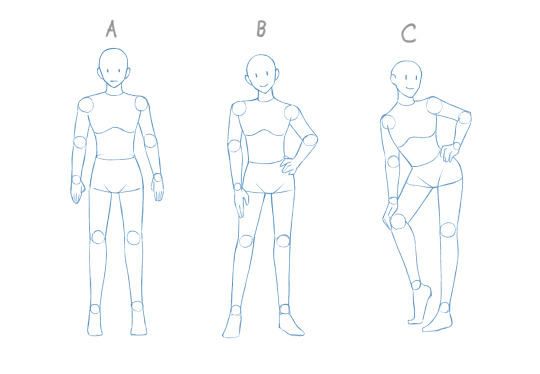
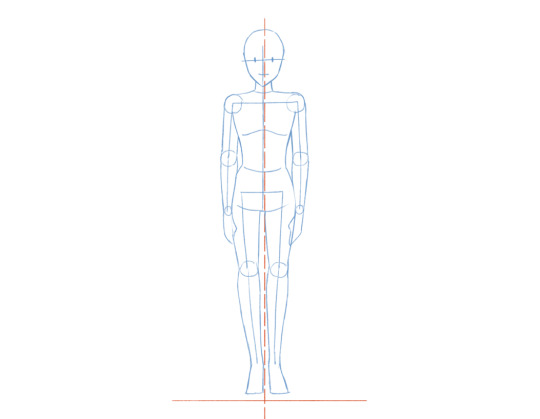
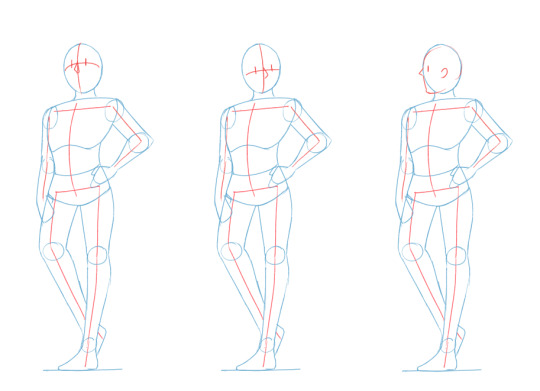
Here we have some nice, stable, standing poses! Feet placement looks pretty good. Nobody is in danger of falling. But what is it that makes these poses so different from each other?
To help analyze each pose, lets add some red lines.
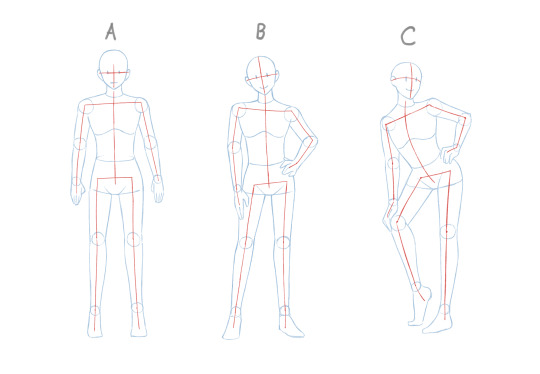
While the blue lines show us the silhouette of the body, the red lines show us how certain parts are aligned. The crosshairs on the face show which way the character is looking. We also placed red lines on the shoulders, hips, spine, arms, and legs.
Lets go through each of the poses one by one.
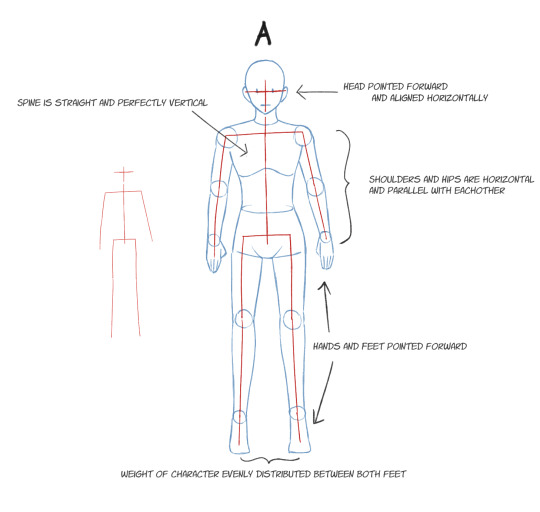
In Pose A, the lines we placed on the head, shoulders and hips are horizontally aligned and perfectly parallel with one another. Likewise, the limbs are mostly straight. The feet are facing the same direction, and the weight of the character is evenly split between both the left and right sides.
Overall, the pose is stable. It is also very neutral and symmetrical. The character doesn't seem to be doing or expressing very much. The hands are kind of floating in space. You might see this pose more often on a character design sheet. But when used in a scene, it is difficult to know what this pose is communicating without additional context. It is also challenging to draw because of the amount of symmetry it demands.

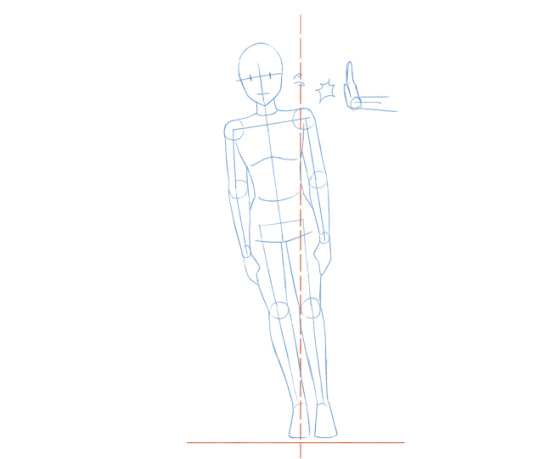
Pose B has some minor adjustments compared to Pose A, yet the difference is immense. The horizontal lines that we placed on the head, shoulders and hips are no longer parallel. Instead, they are tilted towards alternating directions. The spine also leans such that the hips swoop up slightly the right. While the feet continue to support the character's weight evenly, their direction has been adjusted.
Notably, the hands are now deliberately positioned on the leg and hip. When planning a pose, don't neglect the positioning and placement of the hands! It is fine if the hands are not drawn in full detail in the early sketch - just make sure you know where the hands will be located and have some idea of what they are doing. Otherwise, the pose will look woefully incomplete.
Overall, Pose B is a bit more natural-looking and relaxed than Pose A. They still aren't doing much, but this looks more like a pose you would see in real life. Even when standing at rest, people tend to let the hands and feet do their own thing, and rarely stand in a way that is perfectly straight - hence, the tilting of the head, shoulders and hips.
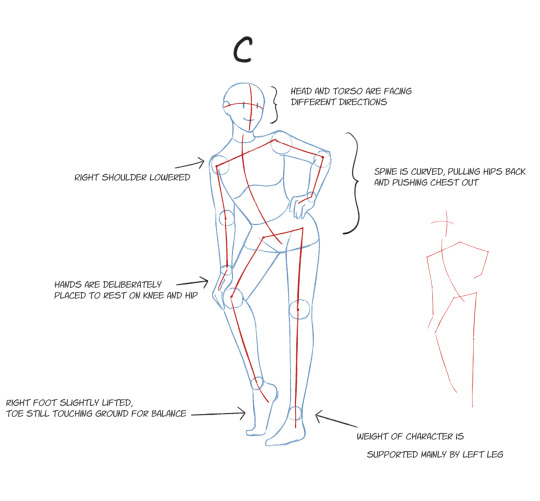
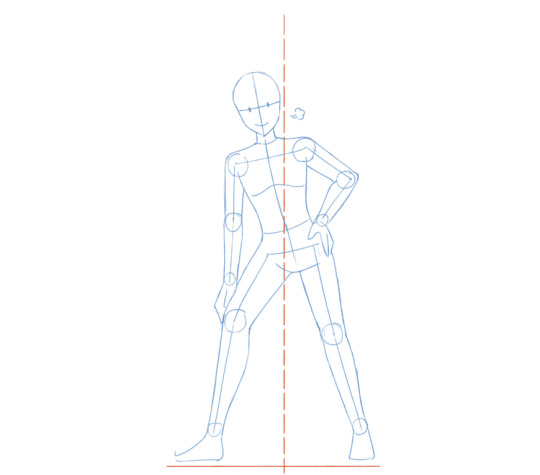
With Pose C, we see some adjustments that are a lot more dramatic. The head and torso are now facing opposite directions. The right shoulder is tilted further downwards. The spine is now visibly curved such that the hips are swung back and the chest puffs outward slightly. The body is now leaning most of its weight on the left leg, freeing up the right foot such that it can assume a slightly lifted position.
This pose is showy and expressive. It looks as though the character is actively posing for someone, rather than merely standing at rest. While this pose is stable, it doesn't look like a pose someone would assume naturally, or hold for a very long time. It does however, look unique, and shows off some personality.
Between Poses A, B, and C, which one is the most appealing? I would say that it really depends on personal preference, and also the context in which these poses are being used. Each pose can be used for different purposes! But I think it is helpful to understand what makes each pose unique and that every artist should keep the following in mind when sketching a pose:
Alignment of head, shoulders and hips
Curvature of spine
Direction of head and torso
Placement of hands and feet
As a personal recommendation, I would suggest paying special attention to the torso when sketching poses. Why? Because the torso is the largest juncture by which the head and all limbs are connected. It also contains the shoulders and the hips and the spine.
The torso has a limited range of mobility compared to the legs and arms. However, as we've seen in the above examples, even slight changes in the shoulders, hips, and spine can pave the way towards a greater variety of different poses.
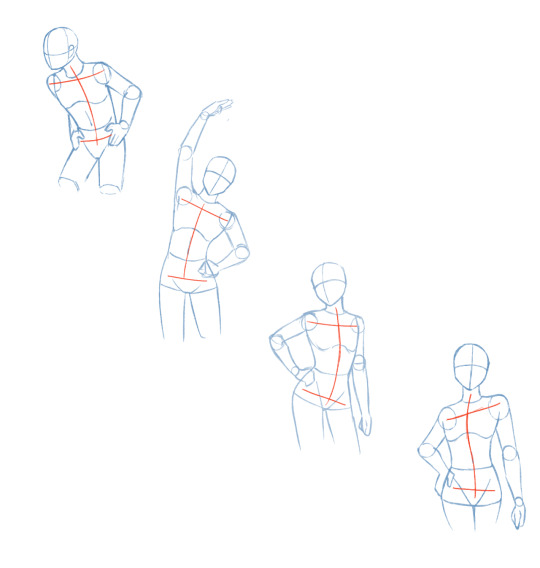
Drawing the torso in the early stages of the sketch will can help inform what the head, arms, and legs are doing in the pose.
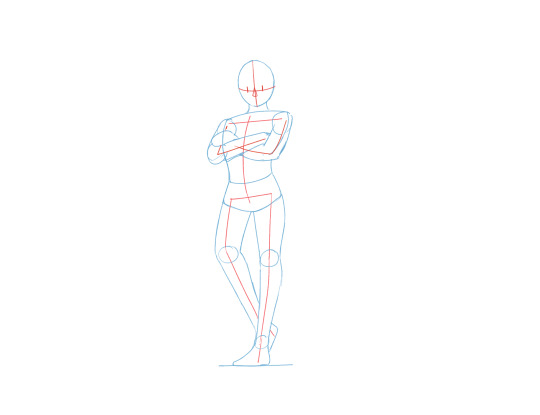
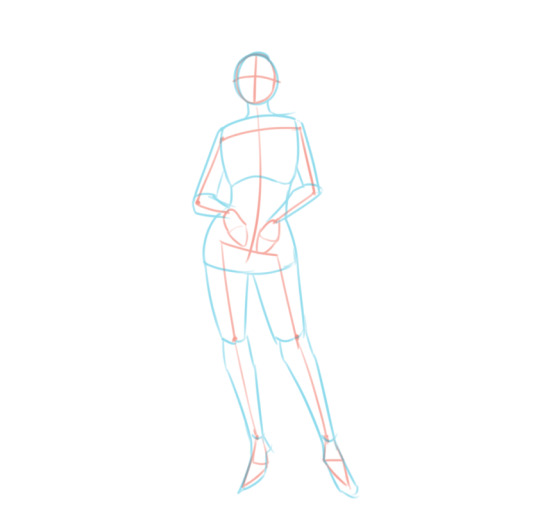
So, now that we've learned to look a bit more closely at some different poses, what is the recommended process for drawing them? Here is the approach I usually use.
Draw the head. This will help determine the character's proportions. Establish the character's height by drawing a flat line to mark where the ground is located and a vertical line leading up to the head. The midpoint is also marked.
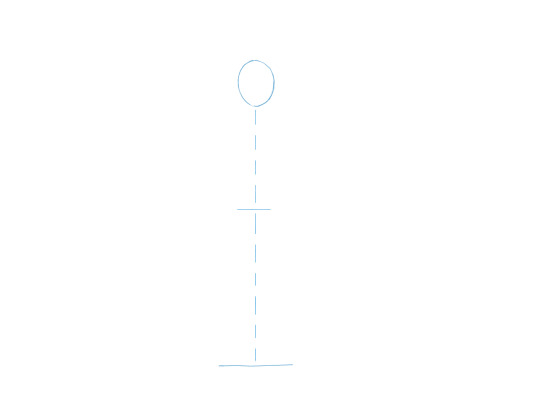
2. Draw the torso. Here, I decide on the shoulder, spine, and hip alignment. Depending on the artist's personal preference, the torso ends more or less at the midpoint.
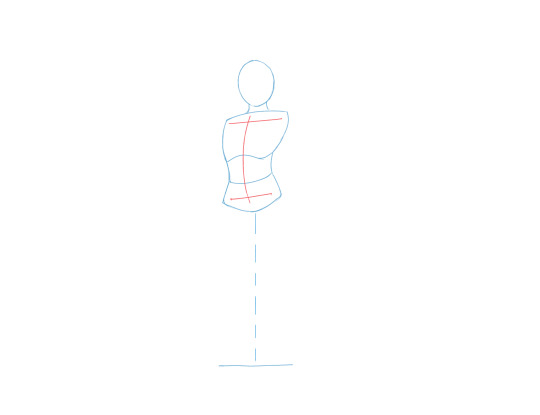
3. Draw the legs and feet. Because we've marked the ground, we know exactly where to place the feet such that the pose is stable. The center vertical line we drew at the beginning (omitted below) helps find the balance in the pose.
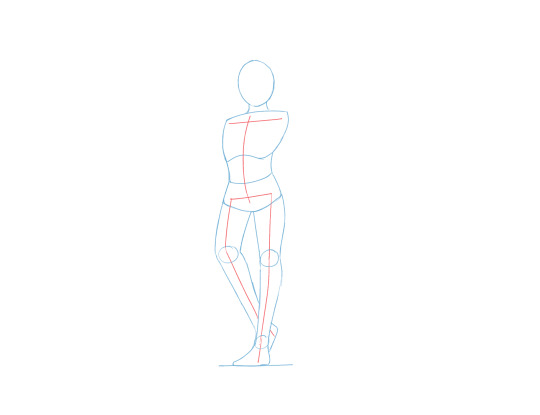
It is worth noting that now that we have finalized the placement of the feet below the head and torso, we have achieved a stable pose. At this point, it is much easier to consider how the arms and hands should be drawn.
4. So, lets go ahead and draw the arms and hands. As mentioned before, it is important to consider what the hands are doing in this pose.

5. Finally, lets decide which direction the head should be facing, and what the facial expression should be!
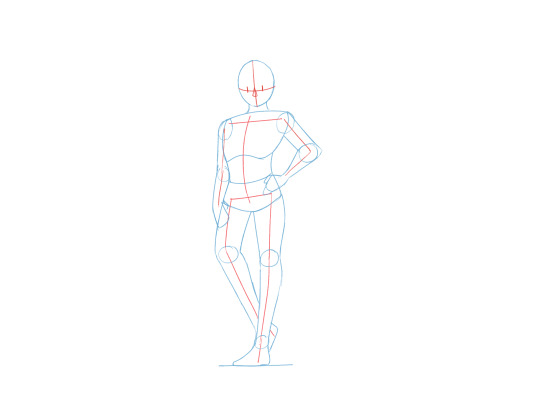
A lot of artists do prefer to draw the head and face first, and that's totally fine! However, I think it is worth nothing that once you have a pose established, you can still make adjustments to the head fairly easily.
Likewise, you can adjust the arms if needed without worrying about the stability of the pose, since this has already been established.
Give it a try, and see what works for you!
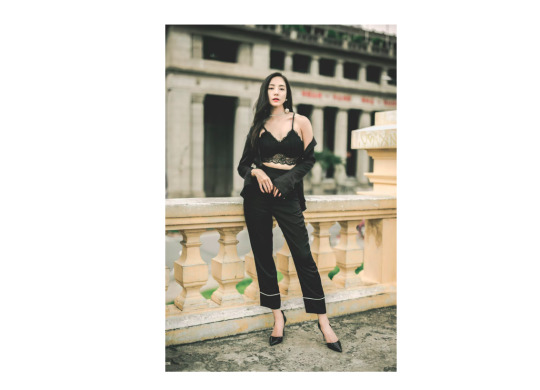
Finally, I will show you how to analyze a pose using a reference photo
Photo Credit: https://unsplash.com/@binthieu
Here is the example photo we will be using.
To analyze the pose, use red lines to mark what we have discussed before:
Alignment of head, shoulders and hips
Curvature of spine
Direction of head and torso
Placement of hands and feet
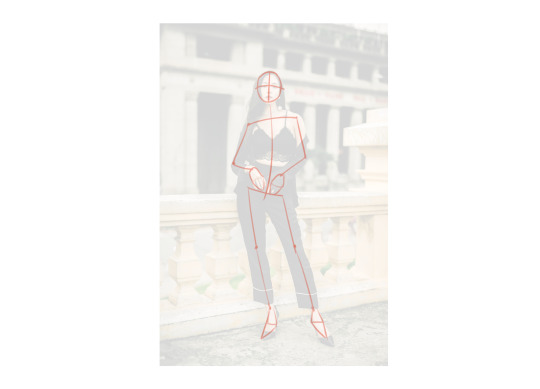
If it helps, use blue lines to outline things like the joints, limbs, the silhouette of the body, whatever aspects you would like to bring to your drawing.
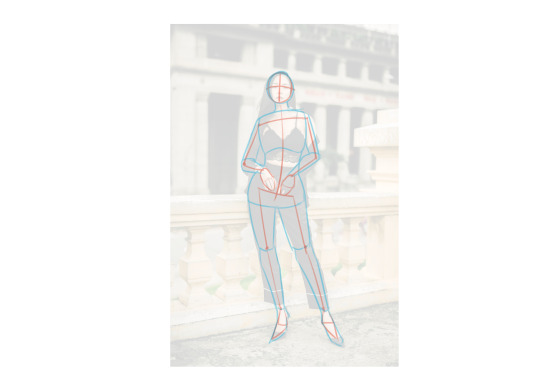
With these relatively quick and simple steps, we have finished analyzing the pose!
At this point, you can adapt the pose to your desired proportions and make adjustments where desired.
Feel free to practice with some different references and see what the results are like! From simple to complex, there are a huge range of different poses you can find on the internet. It is definitely worth taking the time to analyze each pose to see what ideas you can bring to your own art.
That concludes this somewhat lengthy tutorial on posing! I hope I have managed to answer some of the questions you've had about creating standing poses that are stable and appealing! Please let me know if there are any details you would like me to clarify. :3
In the meantime, I hope you have fun building some cool and unique poses!
59 notes
·
View notes
Text
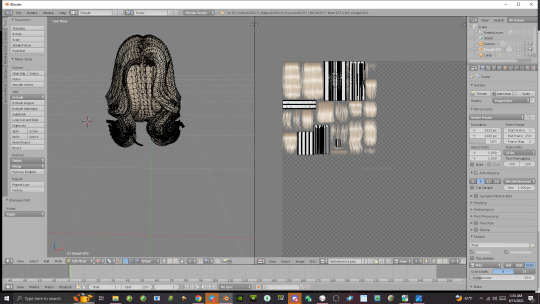
Extracting Anto Hairs/Geoms With S4S
This tutorial helps you how to extract Anto hairs/geoms with the sims 4 studio.
step 1. click just one hair, don't shift click all of them.
step 2. Go to warehouse and click tools, then click embed all externally referenced resources (cas)
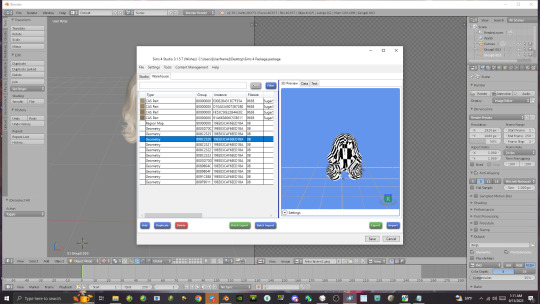
step: 3 You'll be able to see all the Geoms or Geometry of the mesh in the 3D view port. Pick the geom(s) that look like a completed mesh(s) then export the groups and save them. Add .simgeom at the end of the package to turn into a simgeom file.
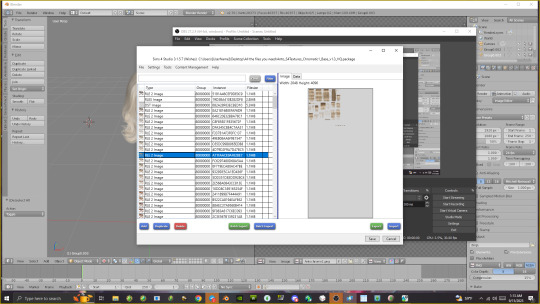
Step 4: Open the chromatic base files in my projects then extract only one as a png and save
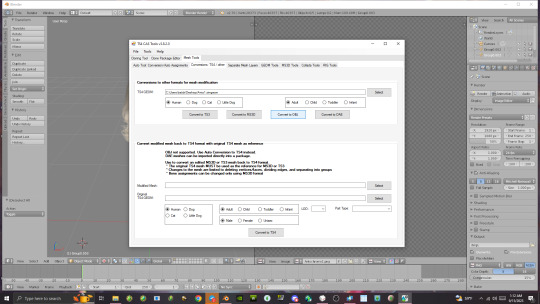
Step 5. Open TS4 Cas Tools Program, undermesh tools click conversions TS4/other. Select your geom files and click convert to obj then save.
You successfully converted simgeom files to obj/extracted Anto meshes! ^_^ *
37 notes
·
View notes
Text
youtube
Watch the 2024 American Climate Leadership Awards for High School Students now: https://youtu.be/5C-bb9PoRLc
The recording is now available on ecoAmerica's YouTube channel for viewers to be inspired by student climate leaders! Join Aishah-Nyeta Brown & Jerome Foster II and be inspired by student climate leaders as we recognize the High School Student finalists. Watch now to find out which student received the $25,000 grand prize and top recognition!
#ACLA24#ACLA24HighSchoolStudents#youtube#youtube video#climate leaders#climate solutions#climate action#climate and environment#climate#climate change#climate and health#climate blog#climate justice#climate news#weather and climate#environmental news#environment#environmental awareness#environment and health#environmental#environmental issues#environmental education#environmental justice#environmental protection#environmental health#high school students#high school#youth#youth of america#school
15K notes
·
View notes
Text
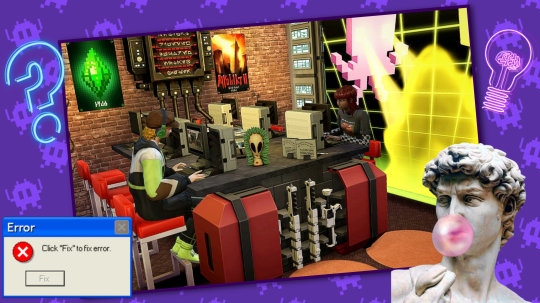
If yes, where to?
And which folders?
How often?
Do you know a tutorial/guide?
Any other advice/tips?
My (only) save is 9 years old, so losing it would be a nightmare for me. Once I lost files of my Sims 3 game and that tought me to backup at least once a month on an external hard drive. Plus I always save in rotation, so I have backup saves if the main save goes corupt.
37 notes
·
View notes
Text
How to Make High Quality Gifs
A few people have asked me for a gif tutorial, so here we go! As a disclaimer, there are many parts of gif-making that are subjective, and this is just my personal process/preferences. If anyone is confused about a particular step, or wants more in-depth info about something, just message me!
Tools:
✧Laptop/computer
✧Adobe Photoshop 2024
✧External Hard Drive (mine is 250GB)
✧Video Downloader (I use the Video Downloadhelper extension on Firefox)
PHASE ONE: Make Animated Gif
1. Download high quality video
This is very important! You should download the highest quality of the video you can find. I use the free Video DownloadHelper extension on Firefox, but it doesn't download audio sometimes (it could be me not using it properly, or they want you to pay to get audio). No audio is fine for gifs, but if I'm doing a video edit, I either need to record the audio separately with Quicktime or use a free online downloader for youtube, twitter, or instagram videos.
For this gif, I downloaded an HD interview from the F1 website with the Video DownloadHelper extension on Firefox.
Tip: Make sure your video file is an .mp4 -> photoshop can struggle with .mov files bc they're larger
2. Import: Video Frames to Layers...
File -> Import -> Video Frames to Layers... -> Open your video -> Selected Video Range -> Make Frame Animation
If photoshop has to load a while to make the frames, it means you should select a smaller portion of the video to animate.
Tip: If you discover that there are duplicates of every frame or that there are way too many frames for the portion of video you want to gif, you may need to re-import and check the "Limit to Every _ Frames" box, and write in "2". This will import every other frame of the video and get rid of duplicates or too many frames.
Once your frames are imported, make sure you're working in the "Motion" workspace by going to the top to Window -> Workspace -> Motion.
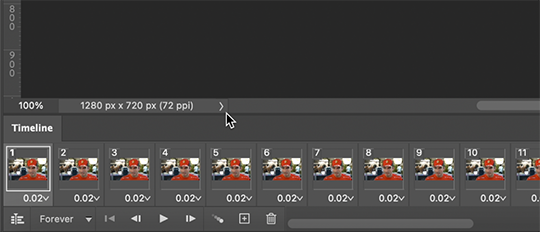
Now, all your frames should appear at the bottom in the Timeline. Make sure that the box in the left corner is set to "Forever", and now it should play the frames and loop back to the beginning each time.
3. Choosing your frames
I usually aim for around 60 frames total for a gif, but sometimes I'll go under or over that number. This particular gif is 55 frames in total. In general, I want my gif to be around 3 seconds in length bc under that feels too short and over that starts to be a large file size. Totally subjective, though! (edit: I have started to experiment with up to 80 frames for some gifs, which comes out to about 4 sec.)
Play through your frames and if you want to delete some, select them and click on the trashcan icon, which you can see in the screenshot above. (If you don't delete them this way, you'll have issues later.)
4. Set Frame Delay

Once you're happy with your frames, select all of them and click on the part that says "0.02", then go to "Other..." I usually choose 0.05 or 0.06, to land my gif around 3 seconds, but it depends on the video and how many frames you have. This particular gif is set to 0.06 because it looked good and brought me to around 3 seconds.
You can always choose a delay and if you don't like it, go back and change it! Just do what looks good to you.
5. Convert to Video Timeline
Click on the symbol that looks like 4 lines stacked, and choose "Convert to Video Timeline". Now is usually when I play through the gif to see what the speed is looking like/if I like the frame delay and it's landing somewhere around 3 seconds. If not, you can just Undo and adjust anything when it's still in the frame animation stage.
Next, scroll through the Layers on the right side and delete any layers that don't have the "eye" symbol next to them -> these are frames you deleted in the frame animation stage, but they need to be deleted in the timeline stage as well. Lastly, select all your remaining layers (which should all have the "eye" symbol) so they're all highlighted.
6. Convert to Smart Object
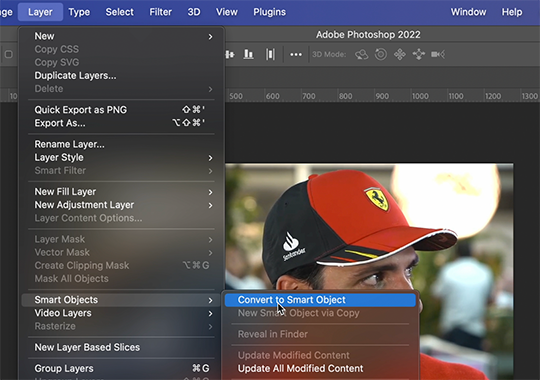
With all layers selected, go to the top to Layer -> Smart Object -> Convert to Smart Object. Ta da! You have a gif.
I always make sure to save my file at this point (you can do it before, but it just depends on how fast you work). Remember to frequently save your progress while gif-making: sometimes, photoshop gets overwhelmed and quits while you're mid-color correction 🥲. You never want to start over from scratch...
Now, some people like to crop & resize their gifs first. Or do sharpening before color. Or color, resize, then sharpen. It's really up to you. The order I like to do is Color, Sharpen, Crop, Resize, Export.
PHASE TWO: Color & Sharpening
(the fun part!)
1. Brightness/Contrast
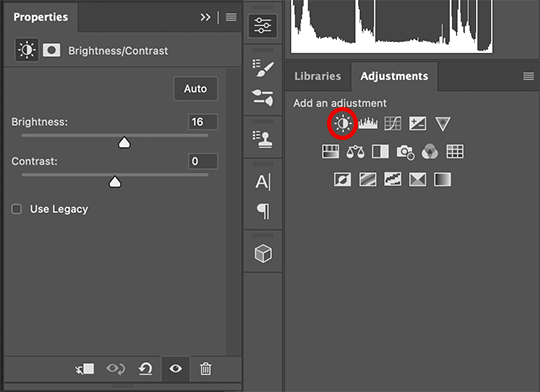
So here's where we start getting into the really subjective stuff. I always use the Brightness/Contrast and the Selective Color adjustment layers to do my coloring. I rarely touch the contrast bc that can be adjusted in selective color, but almost always, the gif needs overall brightening.
Tip: Even when I think a video looks bright to my eyes, sometimes I post the gif and they look dark once they're in the app. My advice is to always brighten a little bit, even when you don't think it's needed...
Here shows the very subtle shift in brightness I did for this gif. It can be a lot more intense depending on the video quality/lighting. The difference will also look a lot more stark after the color layer is applied.
2. Selective ColorNext is color. This is totally up to you and what looks good to your eyes. Make sure you have any software turned off that might change the color of your screen (like a nighttime filter or something that removes blue light).
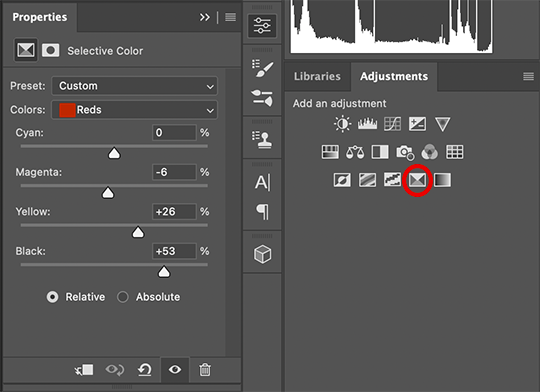
I use selective color bc you can adjust the levels of cyan, magenta, yellow, and black in each color channel independently. This is how I adjust the specific color of red that Charles and Carlos wear, or the amount of cyan in the blacks, etc. The "Neutral" layer effects the whole image, so I'll sometimes add some yellow there if I'm wanting a warmer image, or I'll add or remove black to brighten or darken the mid-tones.
Just play around! Sometimes, I'll take the slider from +100 to -100 back and forth just to see what it's doing to the gif. And I frequently turn on and off the color layer to see what the gif looked like before and after color. (I've found that most F1 content is really magenta-skewed, which you may not even notice until you've corrected it out).
Above is Color vs. No Color.
It might look extreme to you presented this way, but when the whole gif is colored, no one questions it! As long as there's consistency across gifs, that's all that matters. I frequently copy and paste my adjustment layers onto another gif from the same interview/video so the look stays consistent.
Above is Color w/ Brightening vs. Without.
This gives you a better idea of how much of a difference that Brightness/Contrast layer makes.
3. Sharpening
I got my Sharpening routine of choice from this tutorial on gif-making. To be honest, I don't know if it's the best sharpening procedure bc I haven't taken the time to in-depth compare to other ways of doing it, but it looks good to me! So I've stuck with it. (edit: I've also added a Reduce Noise filter to my sharpening routine. But as always, just do what looks nice to you!)
I copy and past the sharpening from my other gifs onto new ones so I don't have to do all the steps again. There are quicker ways of doing this, like using quick actions and stuff, but how I do it is fast enough for me.
If you want to figure out your own Sharpening routine:
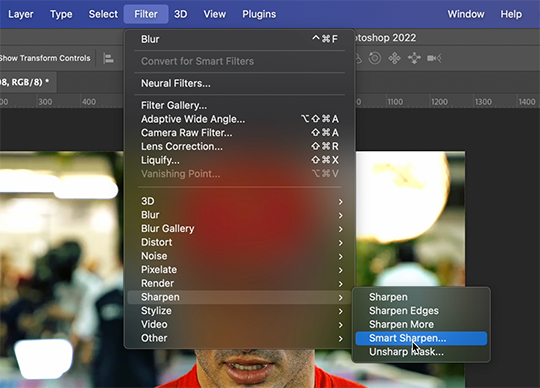
With the gif layer selected, go to the top to Filter -> Sharpen -> Smart Sharpen. It will bring up this window:
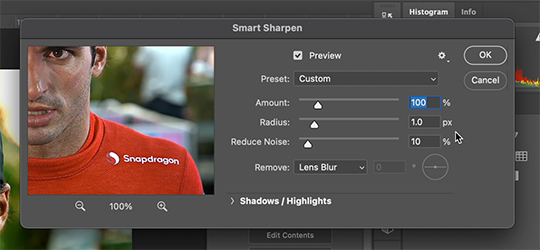
Here you can play around with the amount, radius, noise reduction, etc. and see what you like.
I also add a Gaussian Blur effect, which you'll find under Filter -> Blur -> Gaussian Blur.
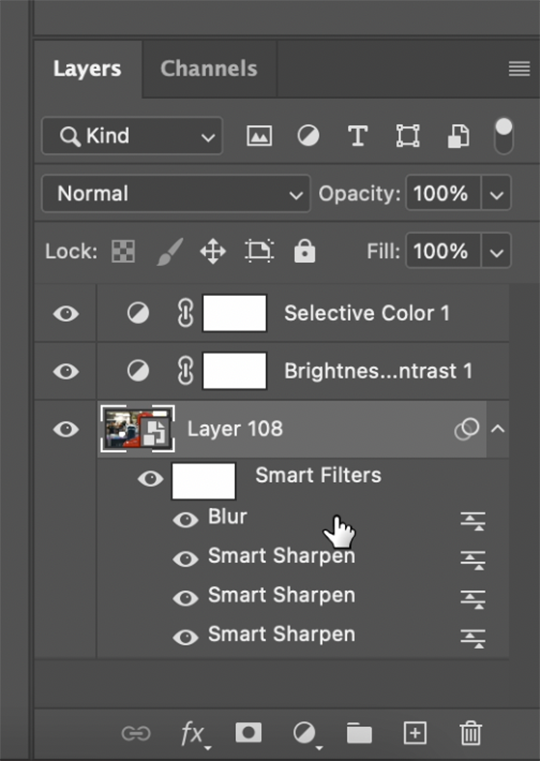
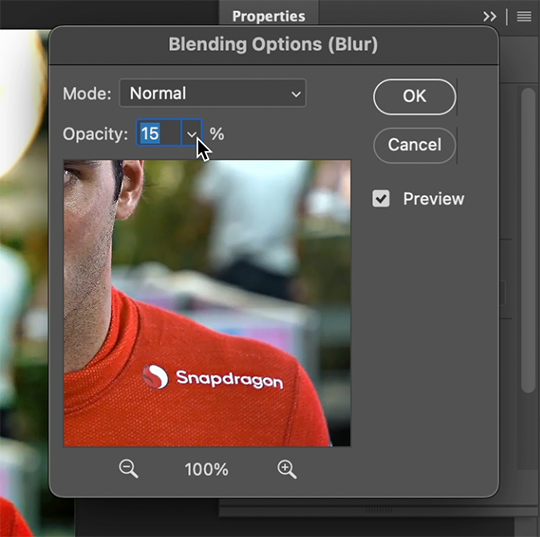
^All of your Sharpen and Blur effects will stack up underneath your gif layer like this. To adjust the opacity of one of these effects, double click on its adjustment/slider symbol to the right, and it'll bring up the Blending Options window.
If there's any sharpening or blurring layer you don't like, you can easily drag it into the trashcan symbol to get rid of it.
Above is a visual of Sharpened vs. None.
You can really tell with the difference in the Snapdragon logo on either shoulder. But I also personally love how much more Carlos' eyes pop to me on the Sharpened side.
As you can see, it's up to your preference. Sometimes, I really love gifs I see that aren't sharp, but rather really smooth and almost painterly. It's up to the gif-maker!
PHASE THREE: Crop & Resize
1. Cropping
Go to the toolbar on the left and choose the Crop Tool. Above where it says "Ratio", you can choose from preset ratios that photoshop has, or you can make your own. I like to use the presets, or at the very least, clear numbers that you can apply to a whole gifset. Free transforming without a ratio makes it nearly impossible to maintain consistency across a gifset.

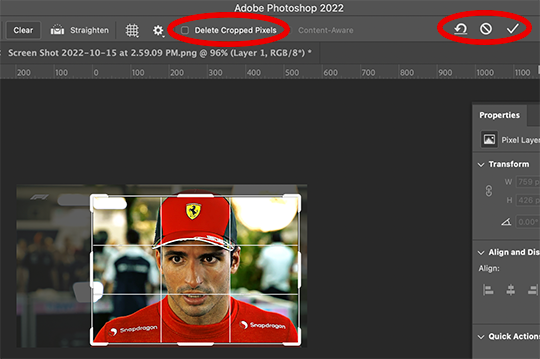
If it isn't already, uncheck "Delete Cropped Pixels". This will allow you to move the gif around inside the cropped area later if you want to adjust what's in frame. It also gives you the option to increase the frame later, if you want. You can also click the gear icon next to "Delete Cropped Pixels" and change how you view the gif during cropping.
When you're done, click the check mark or hit Enter. Now, you've got a cropped gif!
2. Resizing
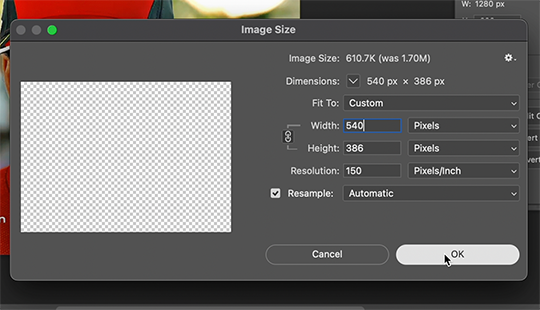
Go to the top to Image -> Image Size...
Make sure you have Pixels selected. For the Resample tab, I have it set to Automatic here, but sometimes I'll use Bicubic smooth or sharpen, depending on what I'm doing. Here's a cool post that compares the different settings. Just experiment with it.
(edit: I no longer change the resolution to 150. I've found that increasing the resolution, and therefore the size, before ultimately resizing down to 540 px means you are compressing even more (the larger something is, the more it has to be compressed within 540 px). I now leave the resolution at 72, which is what it's set at originally, and if the image composition allows it, try to crop in as close to 540 px as I can get so that when I resize, there's the least amount of compression happening.)
If I know a gif is going to be the full width of a tumblr post, I'll resize the width to 540 pixels (the height doesn't matter). But if I make a portrait-style gif which will be sharing a row with another gif, I'll resize anywhere from 270 px -> 350 px. If it's smaller than 270 px, tumblr will enlarge the gif and it'll look bad. If it's wider than 270 px, tumblr might reduce its quality a bit and it won't look as good. But personally, I prefer that if someone clicks on the gif to enlarge it, it looks better enlarged, so I usually will leave it around 345 px as long as the file isn't too big.
PHASE FOUR: Export (last one!)
Once you're happy with everything about your gif, it's time to export. (Remember to save your progress frequently!)
Go to the top to File -> Export -> Save for Web (Legacy)...
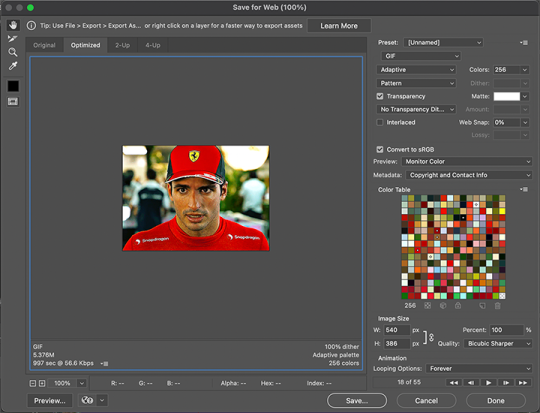
^It'll bring up this Save window.
These are the settings I like to use for gifs. You'll find a lot of differing opinions out there about Adaptive vs. Perceptual/Pattern vs. Diffusion, but you should always have "GIF" selected, "Transparency" checked with "No Transparency Dither" selected, Looping set to "Forever", and Colors set to "256". I like "Bicubic Sharper" for my Quality tab, but there are whole tutorials just about comparing those settings. The best thing to do though is to try them out and compare for yourself.
(edit: I've discovered that if a gif is slightly too large and I don't want to shorten it or resize it down, I can try to reduce the colors from 256 to 128 to get it under the limit. I'll never go below 128, and sometimes I will go to 200 or 170 to try to eliminate as little color variety as possible, but often there is not a noticeable difference in your finished gif. But always compare, of course, to make sure.)
On the bottom left is where the size of the gif is shown -> tumblr requires gifs 10MB and under, but in my experience, gifs load/play best on tumblr when they're around 6MB. I always leave a little growing room as well, bc it might say 5.8MB in this window, but after it saves, the file will have grown a little bit and will likely be over 6MB at that point. (edit: I now regularly post gifs that are around 9.5MB and tumblr seems to be able to handle it better.)
AND THAT'S ALL!
If you've made it this far...congratulations! haha
I know this is a whole lot of information and you might be feeling overwhelmed! But I hope, if anything, this shows you just how complex gif-making can be, and how it is absolutely an art! No one should be stealing anyone's gifs, as a lot of hard work and love goes into the process.
This doesn't include things like adding text to a gif, or more complex adjustments and corrections like masking or key frames. But I'm happy to do more of these if there are specific questions people have.

Let me know what you're curious about or if something is unclear! And happy gif-making! ❤️
#wooow this was a process to make lol#people can let me know if they're curious about adding text or more complex adjustments - i am at your service!#gif tutorial#ask
202 notes
·
View notes
Photo

HOW TO: MAKE HIGH-QUALITY GIFS WITHOUT STRAINING YOUR STORAGE
i recently had a problem with one of my drives where i kept all my material and lost all my series and films i kept there - it was on my laptop itself and i’m selling this laptop soon anyway, so i didn’t think it was worth it to redownload over 100GB of gif material.
however, modern problems require modern solutions, so today i’m going to show you my new method for making gifs that means you do not have to download large files to your hard disk. tutorial under the cut!
i should preface this by saying it’s obviously better to download stuff you’re gonna gif frequently onto your hard disk so it’s easier for you, but if you simply don’t have the space or don’t want to get an external, this is a useful way to gif!
to start off, you’ll need:
a shared drive on google drive. (best practice is to make this shared drive on a throwaway account, too). you can generate one here. shared drives can hold a lot more than the 15GB free limit on your personal drive, but keep in mind that google can nuke these drives at any time, so you might want to keep backups.
google drive for desktop. available for both pc and mac.
a video player that can show thumbnail previews when seeking (like youtube). i use mpc-be on windows, but i don’t know which mac video players have this feature. you CAN get mpv to do this but it requires scripting knowledge and i simply cannot get it to work so i prefer using mpc-be.
handbrake to clip out parts of the video. mpc-be is a fantastic player but it can’t take sequential screencaps effortlessly like mpv, so we’re going to use handbrake.
photoshop to make the actual gif.
with all of that, let’s start!
PART I: GETTING VIDEOS AND OPENING THEM
when you’ve made your shared drive on your google account, you’re going to need to store your video files on there. i’ve joined a bunch of telegram p*racy groups for this and, if you’re in any gifmaker servers on discord, you can probably get links to stuff on google drive from others. if you’re having trouble, feel free to dm me (@shangs) and i can send you a link to a helpful server.
to copy stuff to your shared drive just press ctrl+c (or the mac equivalent) to copy the videos and ctrl+v to paste it into your drive. for tv shows, you can’t copy folders, so open up the folder and select all the episodes and paste them over in a new folder on your drive - that should work fine!
once you have stuff in your shared drive, we’re going to use google drive for desktop to be able to open it. download the app and log in and you should see your google drive showing up as a separate disk on your computer - “Google Drive (G:).”
open up the “Shared Drives” folder and your shared drive and you should be able to see your video files!
in MPC-BE, you have to manually check the setting to use thumbnail previews. in preferences, go to Player > Interface and check “Use the preview in the search.”

[caption: an image of the mpc-be preferences with the needed setting circled.]
this is important because we don’t have these files downloaded, so seeking is going to take just a bit longer than if you had the file all downloaded on your actual hard disk. the google drive app is constantly syncing your progress, so it’s way easier to navigate with the thumbnails than it is just fast-forwarding and haphazardly moving through an episode the way you would on a player like MPV.
PART 2: COLLECTING YOUR FOOTAGE TO GIF
i’ve started using handbrake for this part because i’d rather just get a video encoded than a bunch of screencaps if i’m not using my player to screencap. if you prefer you can always choose to screencap in mpv with the timestamp of your scene as well.
find the timestamp of your scene’s starting and ending (i generally just do 3-4 seconds after the start) and open up the video in handbrake.
at the top of the screen you’ll see some options that say Range: and then it goes by Chapters. change this to Seconds and put in your start and end timestamps.
if it’s 1080p, i select the “HQ 1080p30 Surround” Preset and change the framerate to “Same as Source” in the Video tab. i also make the content quality lossless at 0.

[caption: a picture of the settings described in handbrake.]
if you’re giffing something 4k, you will have to go into Filters and modify the colorspace at the very end, but i’m giffing 1080p here, so there’s no need. i have my settings saved as my own custom preset for both 1080p and 4k.
make sure, on the Summary tab, your video is being saved as an MP4. (it will export as an M4V, but this is the same thing.) photoshop won’t read MKVs.
set the destination to export and hit Start Encode - your video should appear in the destination folder when it’s done!
PART 3: MAKING YOUR GIF
there are multiple ways to make a gif in photoshop once you have your video from handbrake; you can go to File > Import Video Frames to Layers, or you can do Open > and just open up your video file. i prefer the second option since it opens up in timeline and will have the same framerate as the video so Ii can export directly from timeline as well with no need to go back to frames the way you’ll need to with screencaps.
with your video open, roll the playhead through until you’re at the frame where you want to start the gif, and then press the three dots at the corner of the timeline and click Work Area > Set Start at Playhead. go to the frame you want to end the gif and click Work Area > Set End at Playhead. this will set the boundaries of the gif even if there are extra frames.
that’s the basics of gifmaking covered. now just crop, sharpen, and color to your liking. i won’t go over them in this tutorial because it varies a lot by gifmaker and this tutorial is long enough already.
export by clicking File > Export > Save for Web or the keyboard shortcut Alt+Shift+Ctrl+S.
you should have a smooth looking gif like the one in the header above.
if you have any questions, please feel free to ask me on my personal blog @shangs or on usergif. happy giffing, and i hope this tutorial helped you out!
#gif tutorial#completeresources#userphotoshop#resourcemarket#userrobin#tuserems#userkosmos#usermorgan#tuserkay#useralison#usercas#usernik#userlau#arthurpendragonns#usersalty#userk8#*usergif#*tutorial#by v
427 notes
·
View notes
Text
How to add a page with custom theme
If you want to create a WIP page, character page, page for all your interests (e.g., reading or gaming catalogue, etc.) or whatever.
I tried to keep this as simple as possible; hope it's helpful!
Note: You can only do this on desktop. And this tutorial was made using the new tumblr layout.
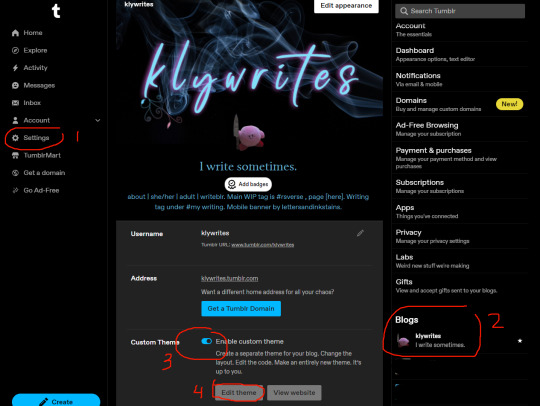
1. Go to Settings.
2. on the right side, under Blogs, click on the blog you want to add a page to.
3. In the middle you will see the basics of your blog that you can edit, such as appearance, enabling asks, choosing whether to show your likes/followers.
Where it says Custom Theme, click the slider to Enable custom theme.
4. Click on the Edit theme button that appears.
Next you will see a left sidebar where you can customize your main theme (theme of your entire blog). On the right side will be a preview of your blog.

But that's a different tutorial. For now we want to create a page.
5. Scroll down and look for Add a page in the left sidebar.

Once you add a page, you can give it the Standard Layout or a Custom Layout or Link.
You can choose which one in the top left corner of the box that appears.

Standard Layout: The page will use your blog's main theme. If you just started out on tumblr you most likely have some default theme. You can type normally in this box, like you would when making a text post.
Link: The "page" can go to an external link.
Custom Layout: The page will have whatever theme you put here in code. Every page can have a different theme. It's great and fun.
6. Choose Custom Layout.
Paste your own code if you know how to make one. Or get one that's made already. Some places to find tumblr themes:
magnus themes
theme hunter
vault themes
shudesigns
glenthemes
You will find some instructions on how to use each theme. I do recommend knowing some basic HTML because it's useful.
7. Once you choose a theme you like, copy the theme's code. Usually the instructions will have a link to an external source like pastebin, where the code's text will be stored.
8. Paste the code in your Custom Layout box.
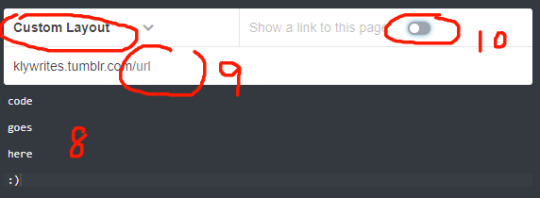

9. Give your page a URL.
10. If you want, you can click the slider to Show a link to this page. If you enable it, a link to the page will appear on your homepage. In this case, give it a title.
Alternatively, you might be using a custom main theme and don't want the link to show up in its default way on your homepage because you would rather play around with the custom code. Or perhaps you want the page to be "secret" (e.g., it's available, but not ready to be shown). Or you might have minor pages and it doesn't really matter to you if people can find it or not. A page could be entirely just for you. In that case, disable Show a link to this page.

You can click Update Preview to see how the page will look. This will show on the right side.

12. When you're done, click Save.
Note 1: The preview isn't always accurate due to spacing constraints so I recommend having your new page open in another tab. (You must save it initially otherwise it won't exist.) So any time you make changes, save your code and see how it looks in another tab.
Edit code > save > open new tab > type in URL of your new page. Any time you make changes, refresh if changes don't show immediately.
Update Preview is good though for minor edits like font colour.
Note 2: If you exit custom theme editing, you will lose prior progress. So remember to save! But sometimes you don't know if you want to keep the changes you made. That's another reason I recommend having your new custom page open in a separate tab. If you exit custom theme, you won't be able to restore previous saves in the event you decide you actually prefer some previous changes. If you keep editing open, you can freely undo (ctrl+z) any changes you made and save when you're happy.
Congratulations you have added a page to your blog and given it a custom theme!
If you're unable to create/save a custom theme and you get the dumb javascript message (“Looks like you’re trying to add some Javascript or invalid html to your page. You’ll need to contact Support if you’d like to use Javascript.”) go here on how to fix that.
47 notes
·
View notes
Text
youtube
Watch the American Climate Leadership Awards 2024 now: https://youtu.be/bWiW4Rp8vF0?feature=shared
The American Climate Leadership Awards 2024 broadcast recording is now available on ecoAmerica's YouTube channel for viewers to be inspired by active climate leaders. Watch to find out which finalist received the $50,000 grand prize! Hosted by Vanessa Hauc and featuring Bill McKibben and Katharine Hayhoe!
#ACLA24#ACLA24Leaders#youtube#youtube video#climate leaders#climate solutions#climate action#climate and environment#climate#climate change#climate and health#climate blog#climate justice#climate news#weather and climate#environmental news#environment#environmental awareness#environment and health#environmental#environmental issues#environmental justice#environment protection#environmental health#Youtube
15K notes
·
View notes
Last Seen Blogs

baboost
Lone Ranger

bruchteil-grabenhalle
Bruchteil
5starsbutallroomsarevacant
{ The Dreamer's Hotel } - BLM!!

clophiadraws
Clophia Draws

mayarsspace
الفاشلهـ