#hanfu pattern drafting
Text
I live! Time to sew another hanfu cosplay.
So yeah, SQQ sewing project - um got relegated to the back burner last year for reasons. And will likely never happen unless I really feel like challenging myself more . . .
But I already have the fabric on hand and I was feeling like I'd be stuck not using it until I saw her.
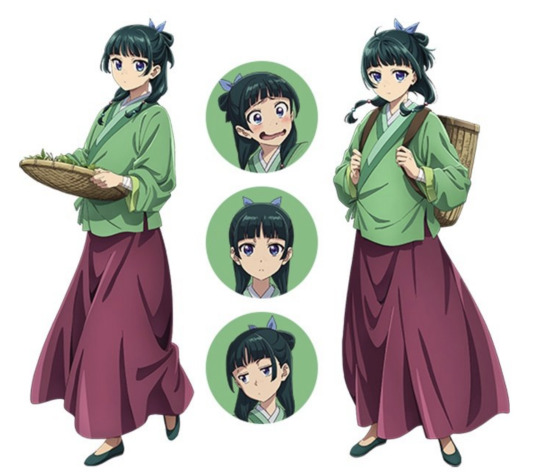
That's right! I have a con in just over a month and I'm gonna do Mao Mao from the Apothecary Diaries. I love me a pragmatic plant nerd.
I'll use my green fabric I already bought for the SQQ project, I found burgundy cotton/linen mix at my local fabric store getting the last of the bolt, and figure out the few accent pieces.
I'll try to post my process as I draft the pattern pieces and then sew it together! This will be much easier than my previous one since she wears what appears to be a simple wrap circle skirt.
Even though the series is set in a pseudo-Ming dynasty setting (it has to be after 1492 since chocolate is a luxury good), she is not wearing a Ming style outfit completely.
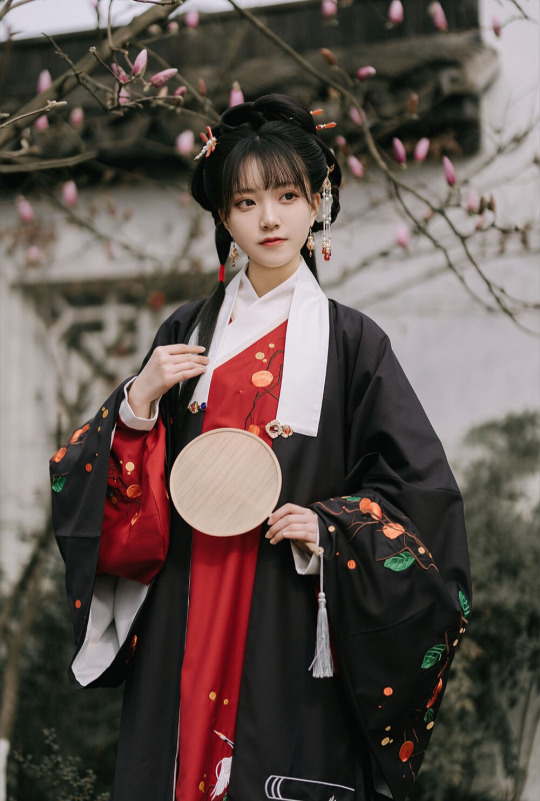
We can break down her outfit to:
Aoqun - green top layer which falls around her hips. Narrow sleeves and a simple style. The neck placket has a dark green strip that goes to the end while a spring green strip on top for part of it.
The white underlayer is a mystery - we can see the collar but nothing else. The design is pretty simple and we never see a white sleeve underneath, the light green are cuffs on the sleeve of the aoqun.
Circle/wrap skirt - burgundy skirt that is either a circle or wrap skirt. Not the historically accurate mamian skirt (with all the pleats). This could be due to the fact that animating it might be more annoying or to keep the Ming time period vague.
She also does not wear anything under the skirt in the anime or nothing that doesn't move as a part of the skirt, so I'm gonna skip trying to put something under the skirt.
Things to do:
1.) Draft aoqun pattern. I will use one of my old patterns from WKX but cut off the long skirt part.
2.) Draft skirt pattern. I am going to be a bit lazy on this one and either will do a full circle skirt or pull out a regular skirt pattern (4 panel) and use that.
3.) Determine placket pattern. Just rectangles, but what is the right size of rectangles on rectangles?
4.) Figure out white underlayer? Make a full top like my last one with short sleeves to hide under the aoqun?
Anyhoo, that's all for now!
66 notes
·
View notes
Text


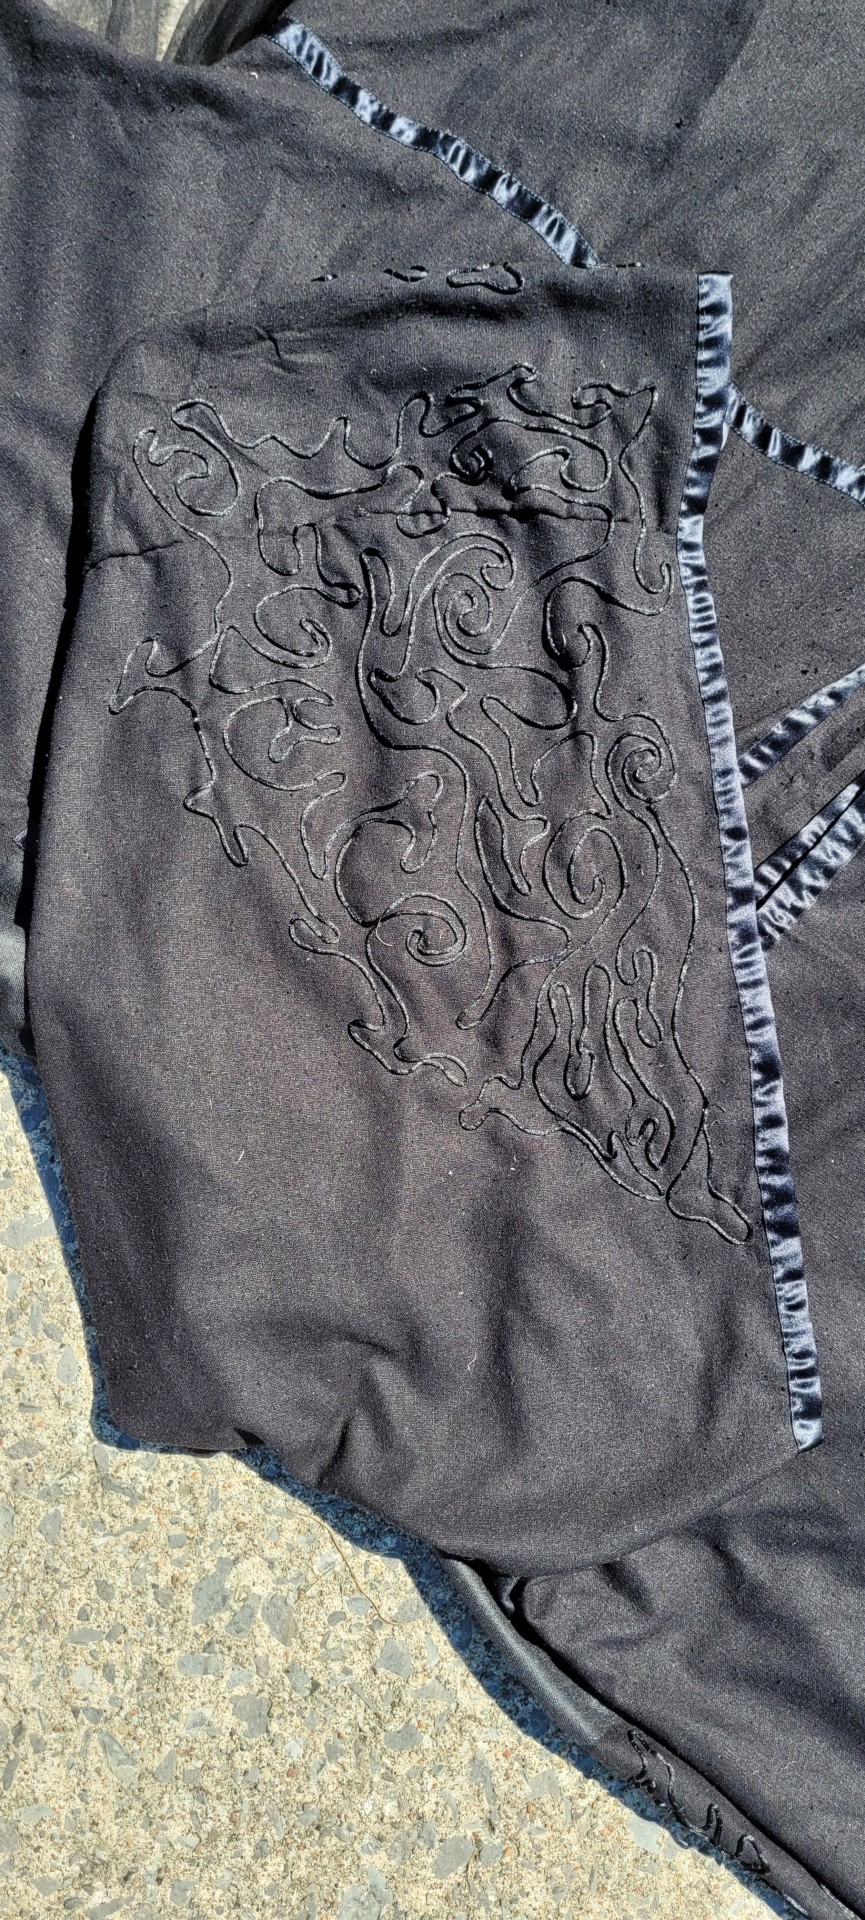
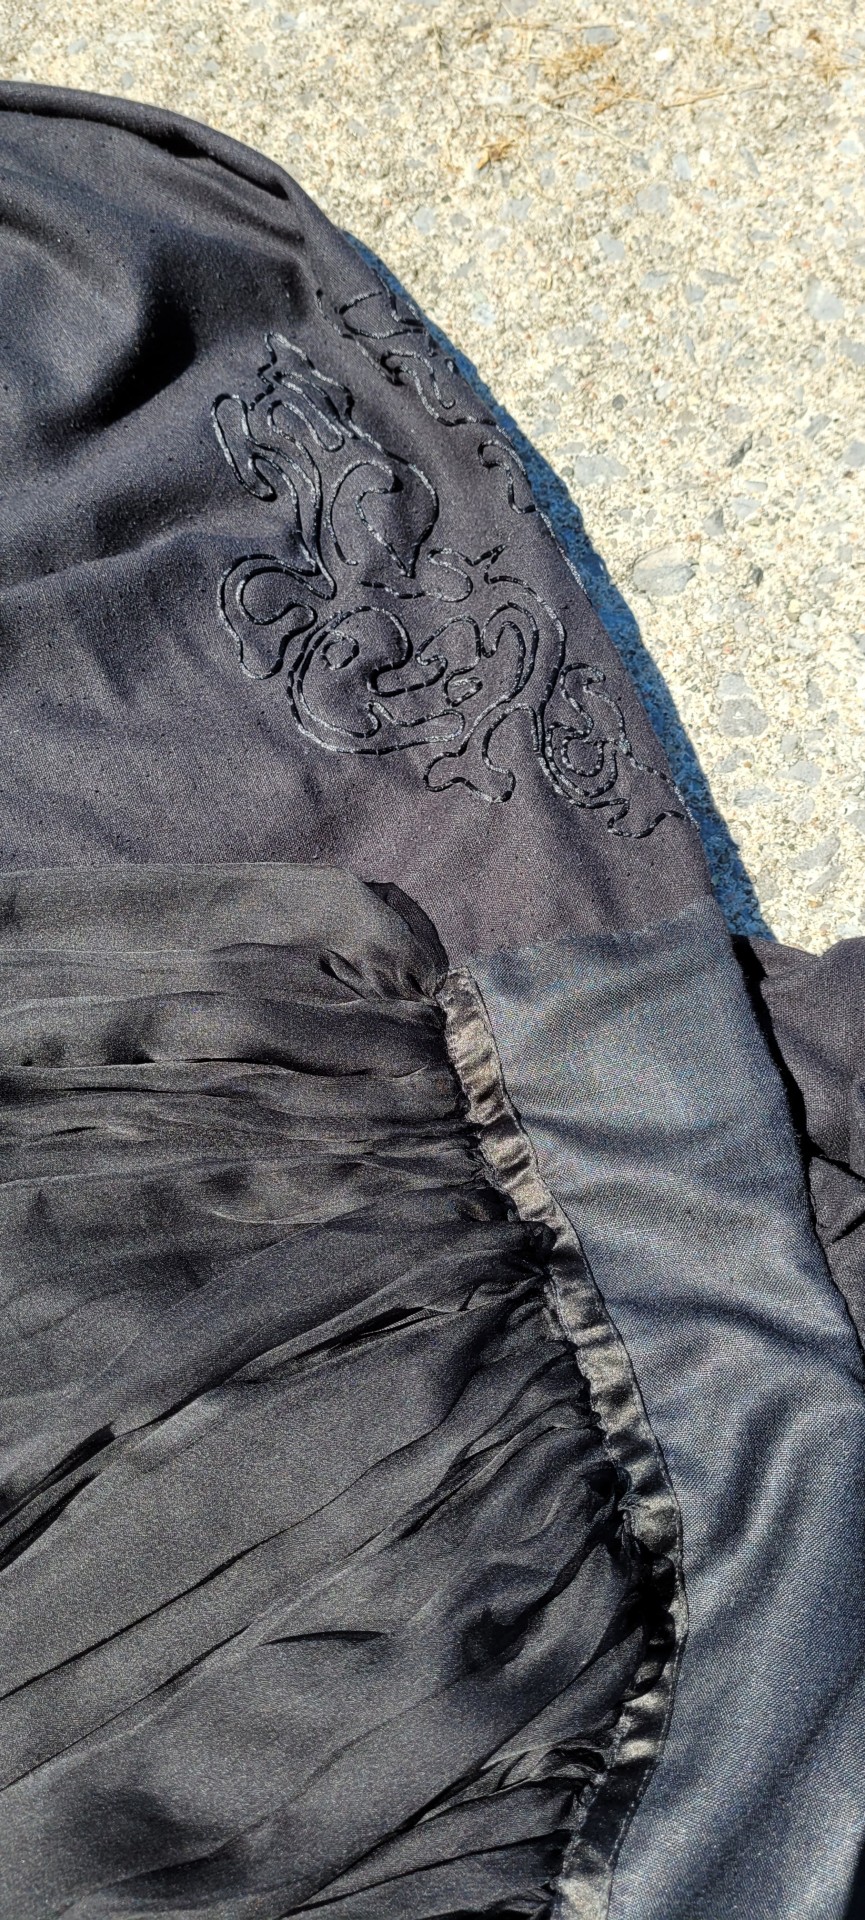


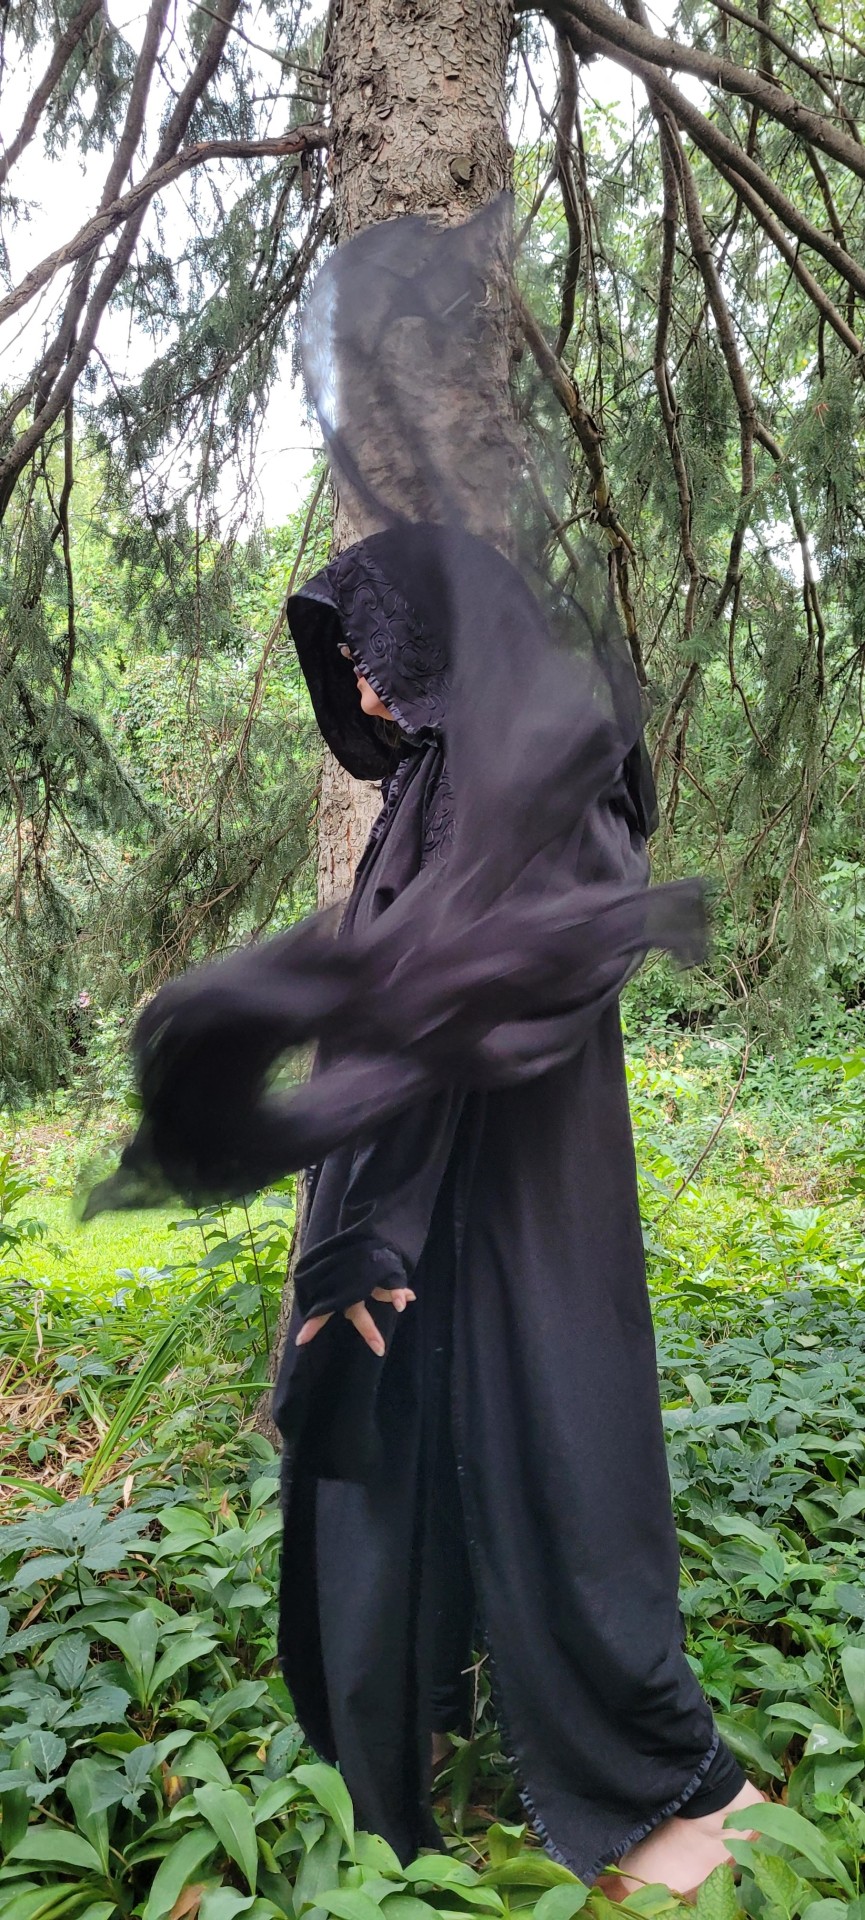
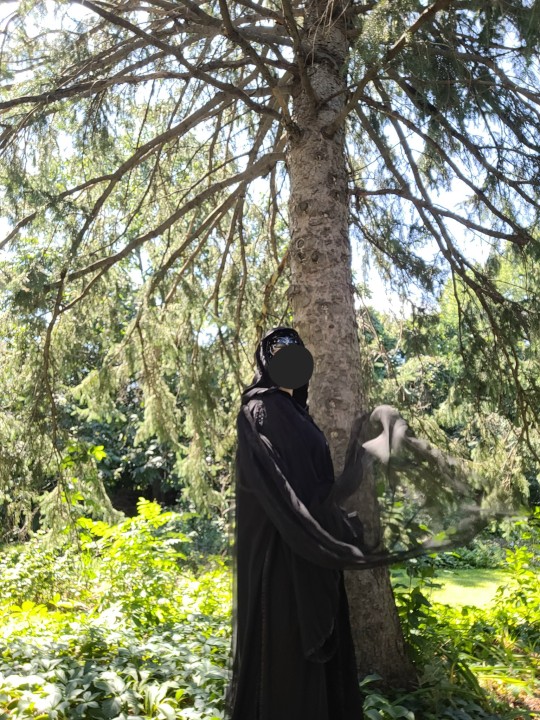

Fill for G1 - Black Cloaked Envoy on my Guardian Bingo Card!
The base pattern is taken from this daxiushan (大袖衫) pattern. To make this daxiushan (Heipaoshi's Version), I shortened the sleeves a bit, added extra length to the body, added a hood, and added the weird gauzy bits on the back. I also added some cording on the shoulders and the sides of the hood, following the design from the show as closely as I could. You'll also notice a couple decorative bands of black ribbon on the chest and at the waist, as well as a square of skightly different black fabric on the back — these are also embellishments added to follow the model in the drama.
Fabric: raw silk noil, cotton lining in the hood, a silk habotai square, silk gauze, silk ribbons, cotton cording. Entirely handsewn using waxed black linen thread.
#guardian#heipaoshi#guardianbingofest#cosplay#(ish)#fanARTifact#handmade#modified hanfu#this was my first time making anything other than a basic circle/half circle skirt and it was very fun and im very happy with the result#there are places i could for sure improve for next time (and there will be a next time - this is one of the comfiest things I've ever worn)#but for my first time drafting a pattern and sewing anything more complex than a circle skirt#i say this is a job very well done#also the hood was so scary but it was actually pretty simple to make!! it's also GIANT#i could for sure hide a big black cat in there no problem#i am also planning on making the rest of heipaoshi's outfit (belt and little hand guards and all!)#we're posting just the cloak bit and calling that square filled bc i won't have the rest finished before the end of January 😅#but i keep getting intimidated by the closures on the yuanlingpao im making and then not sewing for months on end so.#jaysart
59 notes
·
View notes
Text
:( once more defeated by pattern drafting and math, my archnemesis
i found a different tutorial to try so i'm going to attempt that one to get the basic pattern and then will alter it for the silhouette i want, assuming it turns out ok. I like lomi playground's videos and tutorials, but the pants drafting one is a little hard to follow, and I definitely did something wrong, but have no idea what. which honestly just sums up me doing any flat pattern drafting ever. Except sleeves. somehow of all things, those are the only things that the flat pattern drafting made sense on in my classes xD Draping is much easier for me, but i can't exactly pin into resin, and since i already did the blushing on dollbei jun and am already having issues with it chipping in places, i don't want to try the tape method (I'm also not sure how to make that work for pants anyway).
#quilleth in real life#quill's bjd adventures#my measurements are more or less the same as what's given on the doll listing#so as far as i can tell i didn't mess up there#lomi has the sid pattern for basic pants on her website but i really ought to work on my drafting more#it's not quite the same size for the 73 loongsoul body but close#so i guess if i can't figure it out with the other tutorial i'll just use it#but that won't help me for dollhua#or for their shirts tbh. i have a pattern book for hanfu for those but they're for human scale#so it's going to be a trial getting those right at all. i was hoping the pants would be easier :/#doesn't help that my drafting ruler has a chunk out of the centimeter side#i ordered a new one but idk when it will be here#and it was surprisingly hard to find one with centimeters on one side and inches on the other
4 notes
·
View notes
Photo
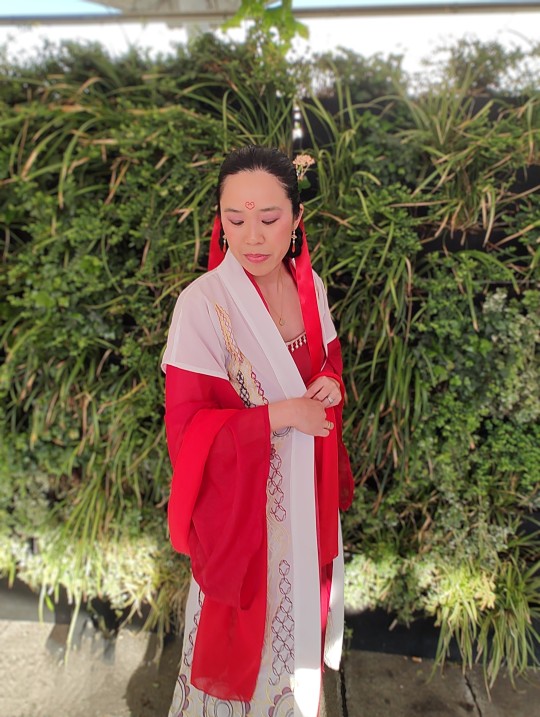
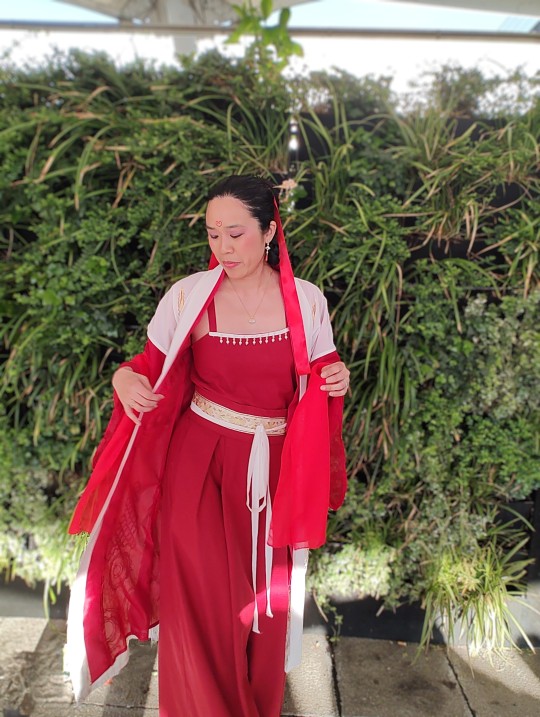
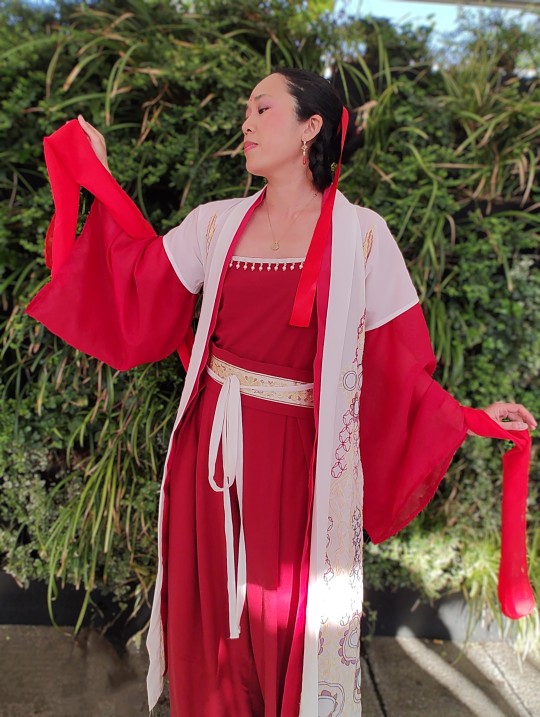
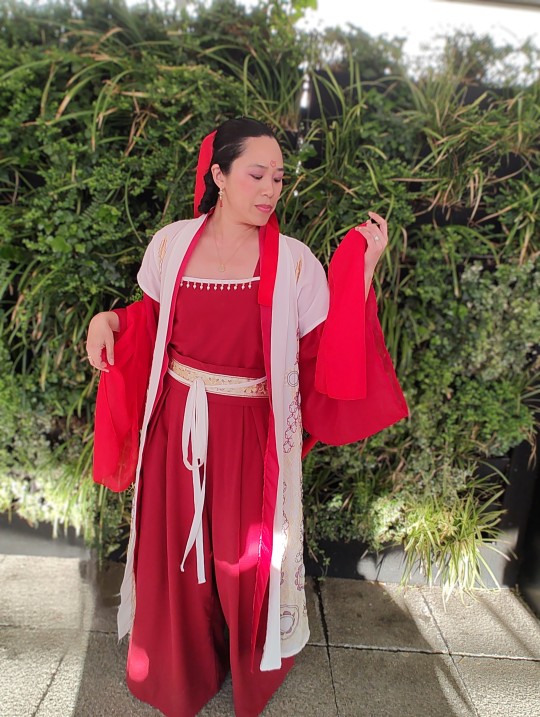


I haven’t posted a whole lot here about this project, but I finally wore it to Celebration on Saturday and have various pictures so it’s time!!
Leia’s Bespin dress has always been my favorite, probably because the colors are in line with a palette I like. I decided a while back that I wanted to make a hanfu version of it, inspired by cationdesigns’ hanfu Ariel. The costume seemed like it would translate especially well to Song dynasty hanfu because it’s relatively simple: tunic, pants, and cape, which I (currently) have done as moxiong (tank top), pants, and layered beizi (jackets). I also wanted to lean into the Chinese cloud design because Cloud City :D
Wanting to do Bespin Leia meant deciding if I wanted to try all the embroidery, which is why I worked on other random projects last summer to see if I really could dig in and learn how. I started actually embroidering my Spoonflower printed fabric for the costume in October 2022, and finished the fourth panel of motifs by the first week of March 2023. (There were some delays due to to other projects, haha.) In February or so I worked on drafting and tweaking the patterns for the beizi and moxiong from a hanfu pattern making book available on Amazon, so that in March I could hopefully knock everything out in a couple of weekends and be done in time for SWCE.
Figuring out what to do about the embroidered fabric was the hardest part. I talked to Ronnie at length about it as well as cosplay friends, and ultimately went with what you see here. I wound up taking the entire piece of fabric and my pattern pieces to the library so that I could trace directly onto it and decide placement. Actually cutting into embroidery that I’d worked on for months was surprisingly not as stressful as I anticipated, largely because I’d spent so long tracing the pattern on that I just had to trust myself that I’d done it correctly and just get the rotary cutter out.
A few more notes about the make:
patterns: self-drafted everything except for the pants, which are Winslow Culottes from Helen’s Closet
white embroidered fabric is from general_leah on Spoonflower
red chiffon (with auspicious cloud print) beizi underlayer, earrings, pendant, hair stick, and trim for belt are all from Etsy
red silk noil for moxiong and pants is from Fancy Tiger Crafts
red chiffon pibo scarf is a table runner from Amazon XD
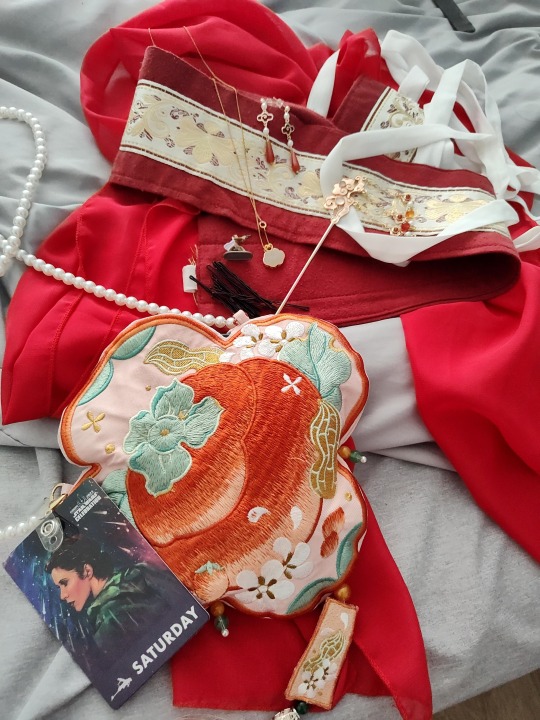
purse is from New Moon Dance
shoes were from the thrift store with my insoles stuck in them so I could survive a con in flats -- which actually WORKED! (I also wore socks.)
#josie needs a proper star wars tag#bespin leia#princess leia#princess leia cosplay#leia organa#star wars cosplay#star wars celebration#hanfu inspired#song dynasty hanfu inspired#josie makes things#sewing project#cosplay project#empire strikes back cosplay
71 notes
·
View notes
Note
if it's ok, can i ask about what patterns/materials you used for your lbh cosplay from a couple months ago? 👉👈
of course!!! i modified patterns from this [ hanfu pattern book ], which i think does a really good job of walking you through what you need to do.
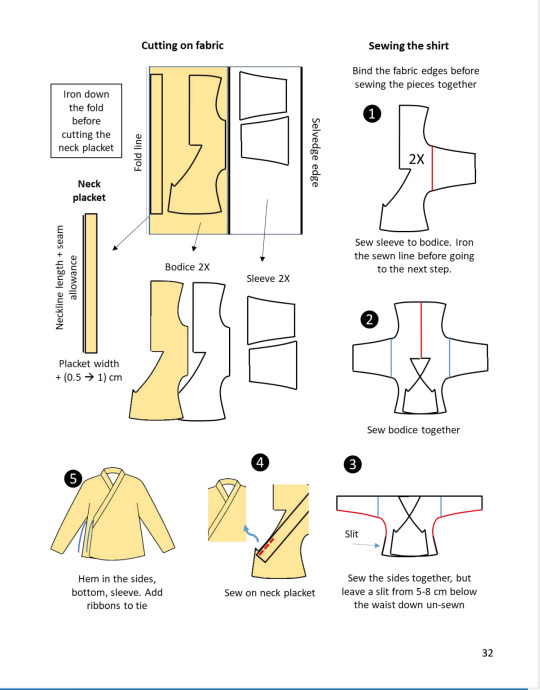
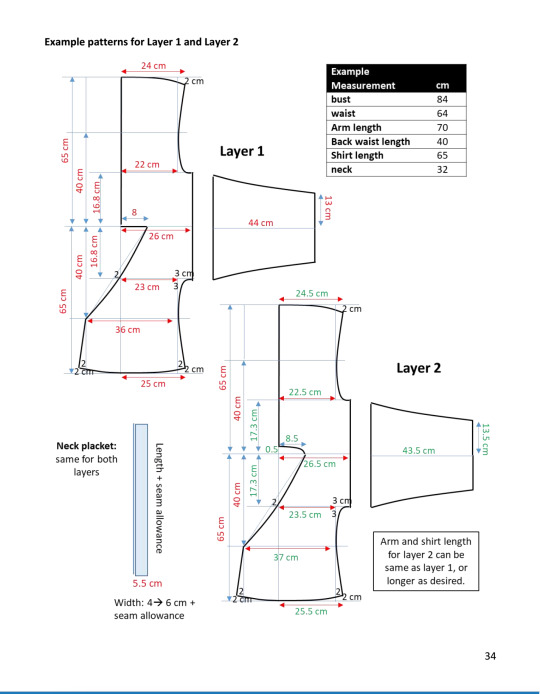
[id: two screenshots from a book showing how to cut and sew a hanfu shirt and it's measurements.]
it's got about 10 patterns, and there's also a bunch of variations and shortcut suggestions. i bought the book in metric units, but it also comes in imperial.
my pants, under robe (you can only see about an inch peeking thru at the collar when i'm not wearing my face mask), and my coat were all linen i got from joann. the main black fabric was a polyester satin with bamboo brocade that i got on etsy. i later found it in fashion district on a day trip for muchhhhhhhh cheaper. it's also on [ amazon ]. the red satin on the sleeves was pulled from my rough draft, and i think i also got it from joann. because i made all the layers instead of "cheating" them as one or two layers, wearing binghe gets very toast.
the matching purse i made i used my left over linen for the lining, and the green satin was the last ~half yard from the same etsy shop i got my black satin from. my face mask i made using nose clips from amazon, elastic from either my mom's sewing stuff or joann, and scrap fabric. i copied the pattern of a target cloth mask i had laying around, and then i hand sewed chiffon along the sides and top of the mask. the dangling accessory is embroidery floss and a bead from my brother, and i just tied it to my elastic. at con, i wore a disposable under the mask bc it's not mask-approved fabric.
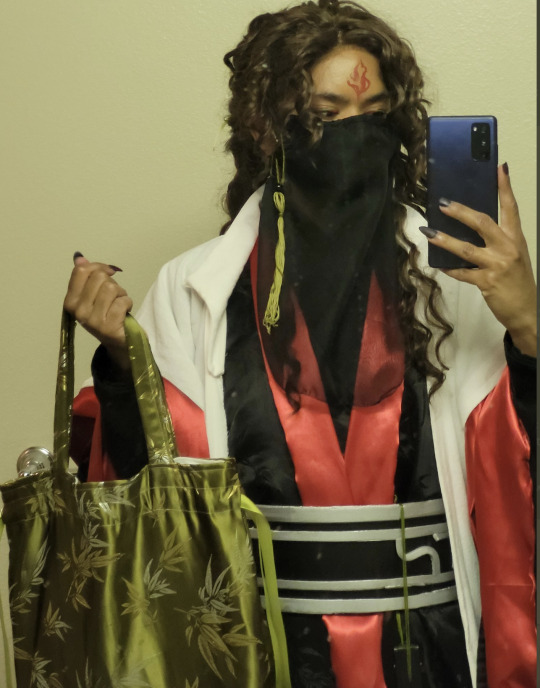
[id: a photo of me in luo binghe cosplay. i'm holding a purse and wearing a face mask.]
the belt is made from eva foam! i think i used 4mm, and i used acrylic paint. it's all hot glued together, and it ties in the back using ribbon that is also hot glued down. i had done the measuring wrong, so i didn't have enough belt to use velcro, which i think would be the better method 😅
my wig is from [ wigisfashion ].
but i hope this was helpful! sorry if it was too long and redundant, but if it wasn't i am more than happy to expand on anything!!
10 notes
·
View notes
Text
did some research on hanfu pattern drafting and man. before today i hadnt written a word in chinese going on a decade. no more.
its traditional methods so its 99% straight lines and addition which is great considering ive never drafted a pattern ever. if i tried to figure out some modernized hanfu pattern drafting id be fighting for my life
#my handwriting still sucks but i learned correct stroke order so its intelligible which is all i need#im only writing in chinese bc i need to remember the words in case they pop up later in the book. machine translation is well.#inaccurate for technical stuff
0 notes
Photo
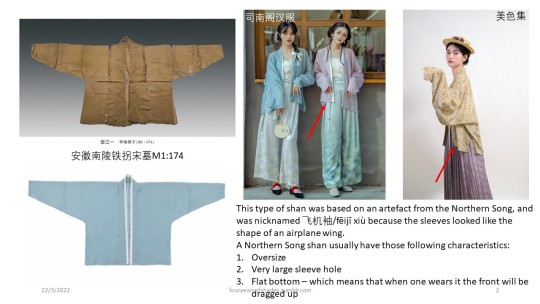


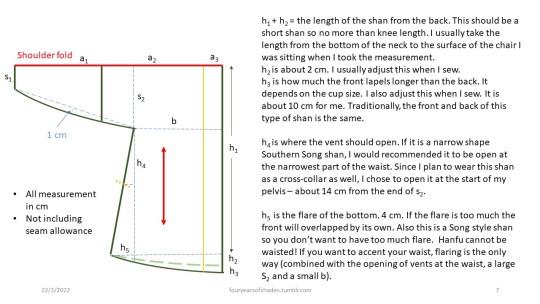


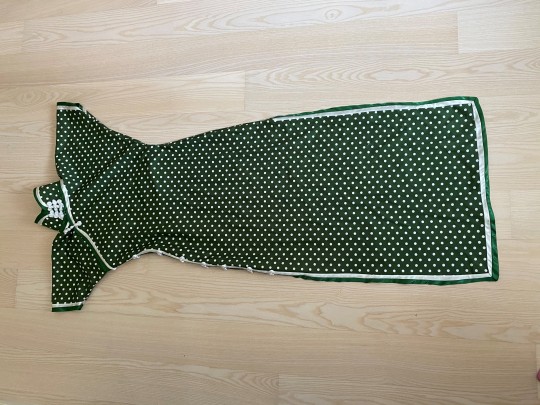
So, after four days of fighting with the sewing machine, broken threaders, and so much fraying, I finally finished this shan! It will be my first shan in this style - because when it finally started to be fashionable, I stopped buying much hanfu... Also I really hate when the bottom hem is uneven on me, so it will have to be tailored-made instead of buying from the rack.
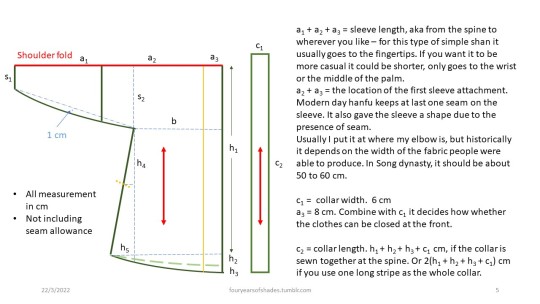
This post only talks about drafting the patterns and the measurement. The steps of making... I think @yi-gege‘s post here should be enough. I usually sew in the following sequence (not sure if it is the right way of doing it): the back seam, the sleeves, front and back, the collar, and at last the bottom and sleeve hems.
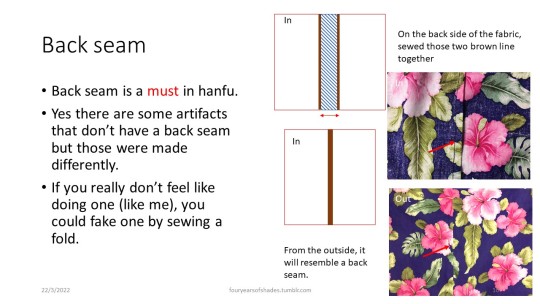
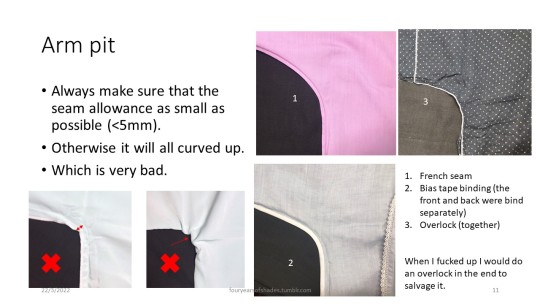
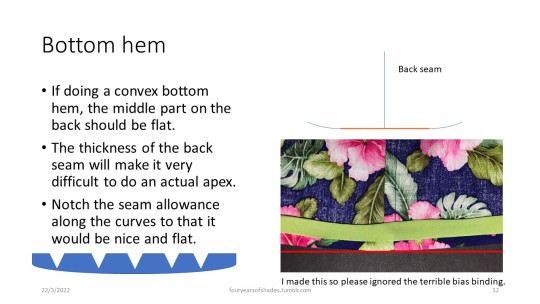
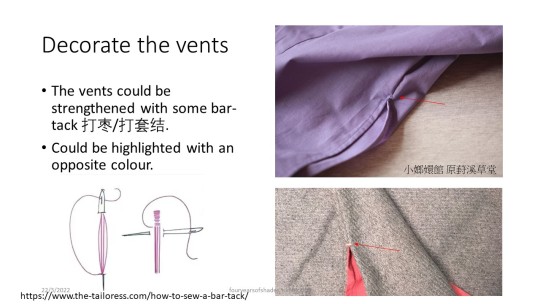
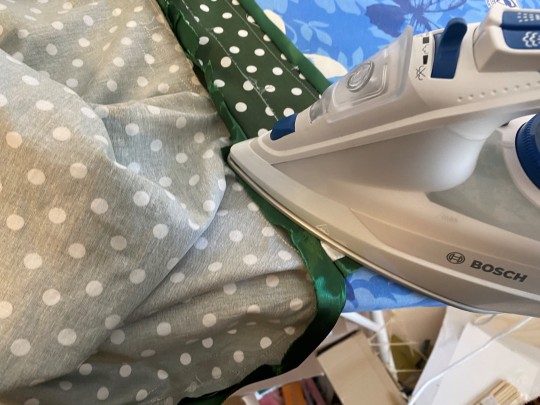
This post also includes some tips on the back seam, the arm pit, the bottom hem, bar-tack at the vents and what to do if you ran out of fabric. Also, while I did not put it in the slides, but do remember to iron before and after sewing every seam to get a sharp finish.
There will be another post specifically on how to collar a hanfu.
I hope this post is understandable LOL.
#hanfu#hanfu sewing tutorial#sewing tutorial#hanfu making#song#feijixiu#shan#fouryearsofshades#long post
452 notes
·
View notes
Text
Making a (somewhat) historically accurate 1930s cheongsam

It’s summer holiday for me already and I have plenty of free time, so I decided to try my hand at making a 1930s style cheongsam. I started this in freaking April and only finished now because of supplies ;3 I’ve never made any cheongsam from the 30s before so this is gonna be half tutorial half me trying to figure stuff out. I cannot guarantee 100% historical accuracy, although I try my best. I don’t think people will actually follow this and make a whole cheongsam, but if someone does, please tell me about it and feel free to ask any questions :D
You can read about 1930s Chinese fashion in this post.
The design
I wanted to make something glamorous that exaggerates some typical features of the 30s such as the wide, shiny binding, tall collar and drapey floor length skirt. I was heavily inspired by this one worn by 阮玲玉 Ruan Lingyu.
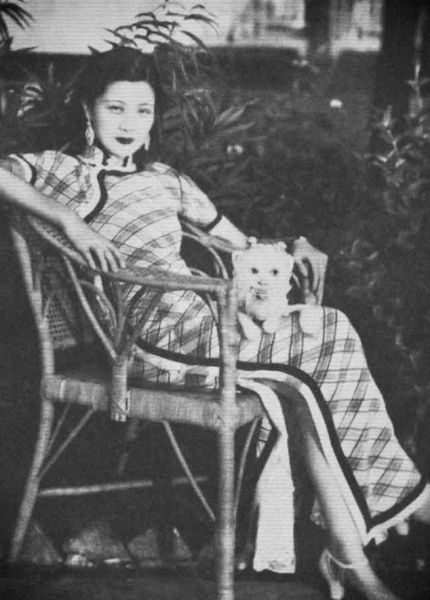
Source here
I’m gonna make something like this: short sleeves, floor length skirt, slits up to mid thigh (so I can show off my lace petticoat uwu), 厂字襟 (厂 shaped closure), with double row wide binding and a really tall collar with three buttons.
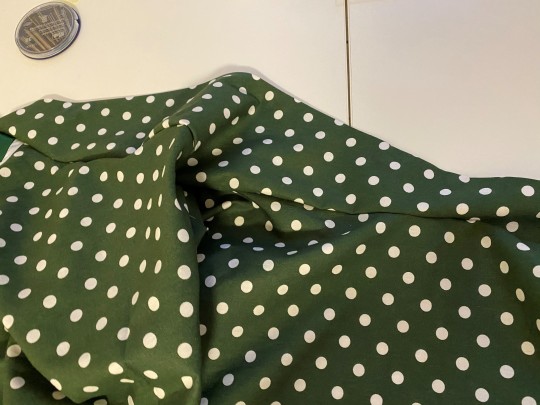
However, since I wasn’t able to find a similar fabric in my local fabric stores’ websites, I decided to go for a green polka dot cotton poplin which did exist in the 1930s and is also great for my budget. For the pankou, I chose elaborate floral ones for the collar and front closure and plain white 一字扣 yizikou for the side, a common historical practice. The binding will be made from green and white polyester satin; polyester did exist in the 30s as well and was a popular novelty choice. This cheongsam is for summer so it will be unlined, plus the poplin is stiff enough to hold its own shape.
Pattern drafting
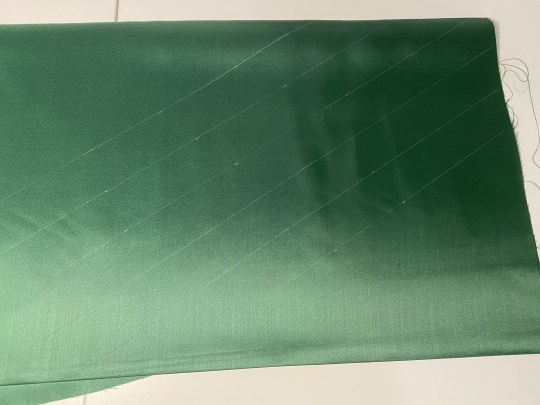
Now, prior to the 1950s, cheongsam makers used 平裁 pingcai, the historical Chinese method of pattern making without any darts, tucks or shaped pattern pieces. The whole gown is cut as one continuous piece with the fabric folded over twice. By doing this, the center front, center back and shoulder would be on fold and have no seams. Unlike historical hanfu pieces which were very, very big and required additional front pieces, 30s cheongsam were slender and didn’t require them, meaning there is no 中缝 zhongfeng, center front seam. Instead, the front piece is cut open at the 大襟 dajin, the front closure. Since I don’t own any period originals, I cannot use their pattern, so I followed this tutorial on bilibili to draft my own. It’s in Chinese but I think you can still understand with her calculations and drawing. I have no idea if this is what people used back then, but the end result is pretty convincing and the idea is legit so I guess it’s alright. She did use a bust dart though, just ignore that.
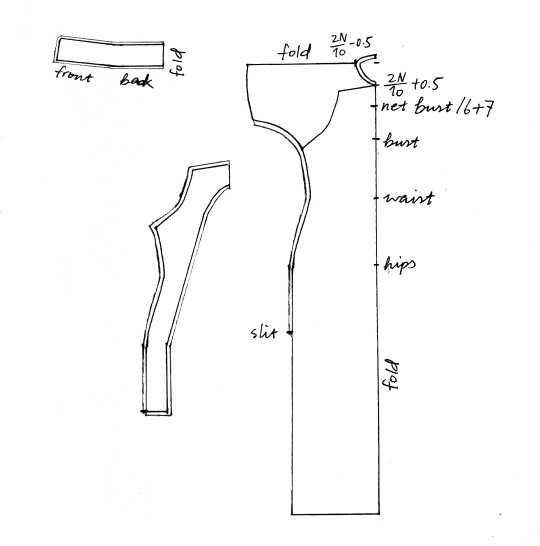
So this is the finished pattern on paper. There is the main piece, the collar piece and the placket (which I will need two pieces of). The equations are from the tutorial, I don’t know why they are like that. There are no darts or tucks, and the main bodice is cut twice on fold. The overall length is 145cm and I’m 168cm tall so it should be just about floor length for me. The slit is 60 cm, sitting on the middle of my thigh, which is accurate to around 1934-36. The collar is 8cm tall, which was tall even for the 30s but still within the acceptable range, and it’s cut on fold as well. The placket doesn’t have to be so wide but I want to have a nice big placket :))
You may have noticed that since the front is one piece and cut open at the front closure, there is no seam allowance for the placket/front seam so when the cheongsam is buttoned, it will be slightly distorted. There is a commonly used historical method for countering this and there are multiple names for it; I’ve heard people call it 偏襟法 pianjinfa, bias closure method, or 归拔 guiba, which is a general term for abusing the bias cut in dressmaking. It’s explained with diagrams in this article and this one. Hopefully as I start explaining it will make sense.
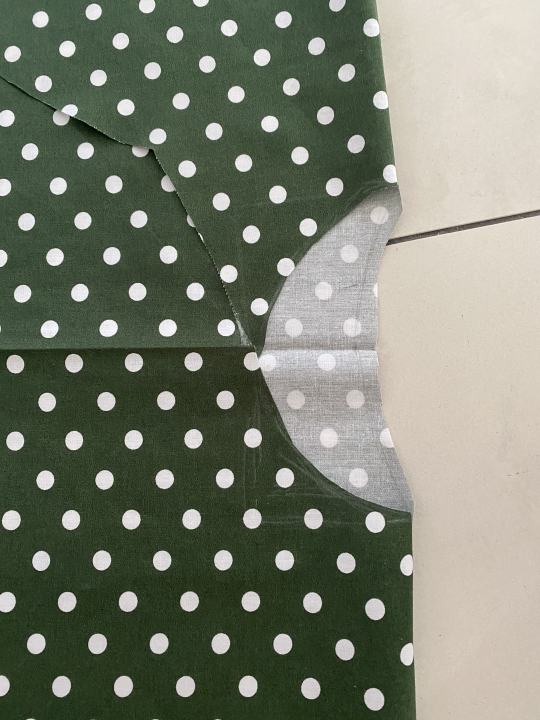
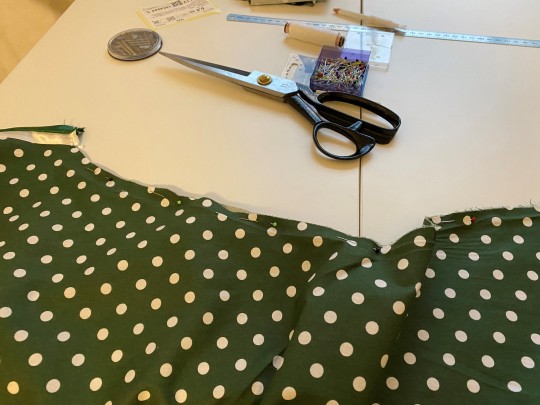
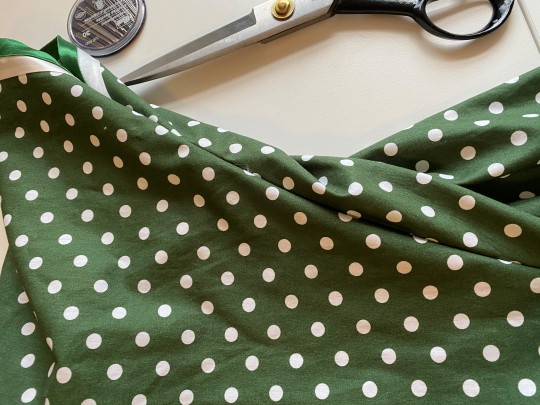
Cutting
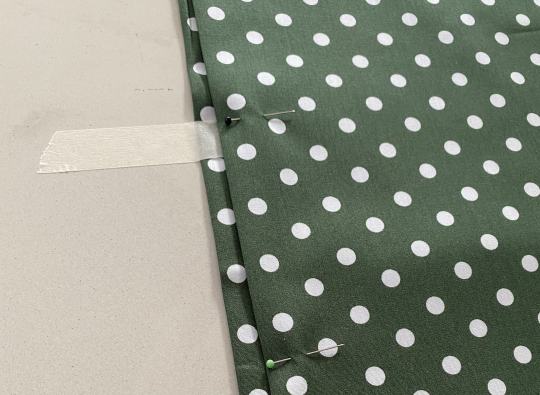
First, I folded the fabric in half from selvedge to selvedge and then again in the other direction, creating four layers of fabric. I taped down the lower two layers, pulled the uppermost layer outward and flattened it down. It should now be slightly on bias. In the drafting tutorial it is said that you should pull it out 1cm at the point 60cm away from the top fold, but just a little bit is fine; you don’t want to overdo it.
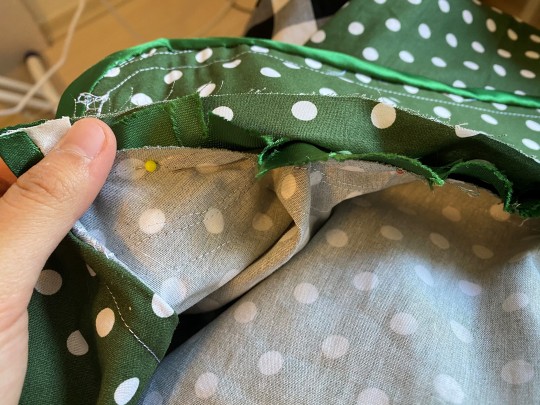
I pinned the upper two layers together and flipped the fabric upside down. I did the same thing with the uppermost layer here, aligning the two center layers. Now both the uppermost and lowermost layers should be slightly on bias. Now I need to cut open the dajin (front closure). I pinned the three lower layers together and started drawing out the pattern just around the dajin area.
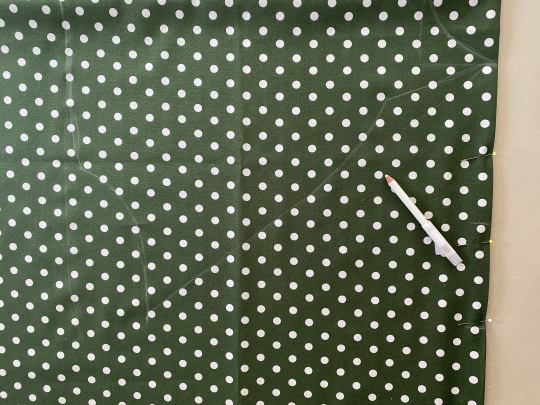
On the uppermost layer only, a cut is made straight to where the dajin begins under the armpit, perpendicular to the selvedge. Then I cut along the dajin and at the fold, so that I could open the uppermost layer.

Once you open the uppermost layer, you could see that the top fold of the fabric is not aligned i.e. the two layers in the middle are slightly lower. Fold the uppermost layer over, following the fold of the two inner layers. You should be able to see the upper dajin piece slightly overlapping with the lower, creating a seam allowance.

If this sounds really complicated, do not panic; once you start handling the fabric it’s actually very easy to understand. It just works :3
I started drawing out the full pattern on this new fabric alignment. Since I will be finishing the raw edges with decorative binding, I only added seam allowances for the side/underarm seams and collar seam. Then I pinned the layers together and simply cut out the piece.
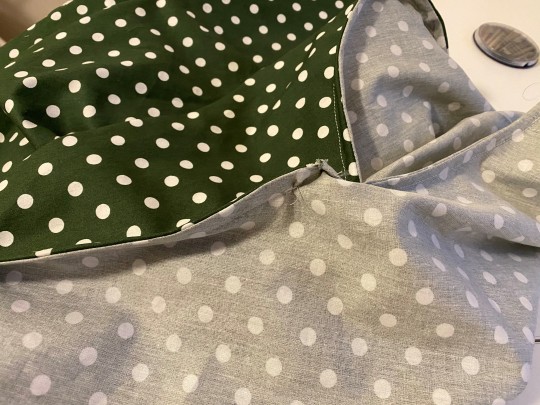
Now let’s take care of the collar opening. Open the fabric once, so that it’s only on fold at the shoulder. Since the dajin is now open, I could transfer the front collar pattern onto the fabric and cut it out on the upper layer. Once that is finished, flip the smaller dajin piece over so you could see the back piece, transfer the back pattern to the fabric and cut it out.
Then I need to cut out the placket and collar. The collar is self explanatory, just cut out two of the pattern pieces on fold, not forgetting to add a seam allowance. I gave it a very slightly tapering edge accurate to the period, but not to the extent that it had a v shape gap at the front which is definitely not early to mid 30s. I also need some stiffening for the collar, so I used a scrap piece of cotton coutil from my previous corsetry projects. This is not historically accurate since coutil was an expensive fabric and not so commonly used in the 30s anymore. Starched net interfacings were far more standard but I didn’t have any at the moment and I didn’t bother ordering, so I just recycled.
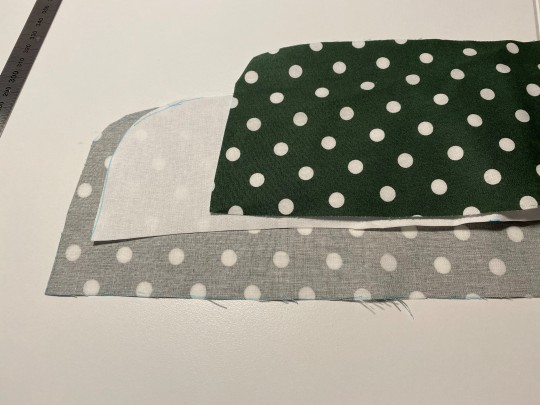
For the placket, I just traced the shape of the dajin from the main piece, extending down to where the slit begins, and added a 5cm width. Oh and also seam allowances. Since there needs to be two layers, I went ahead and stitched the two pieces right sides together at the three exterior seams (not the one that will be connected to the front piece later), turned it over and ironed it flat.
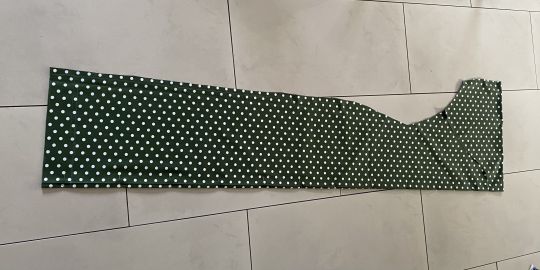
After I finished cutting all the pieces, I basted the side seams together on the main piece to see if it fit. I figured the hip part was a tad too protruding so I went ahead and smoothed the curve out a bit after taking out the basting stiches. I think this is because the drafting tutorial was for a shorter cheongsam that tapers inward below the hips, whereas I’m making a more flowy floor length one.
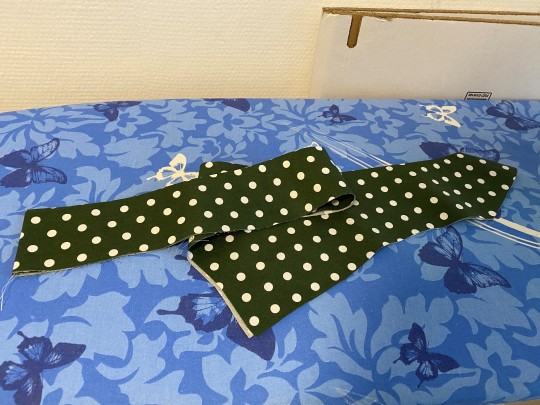
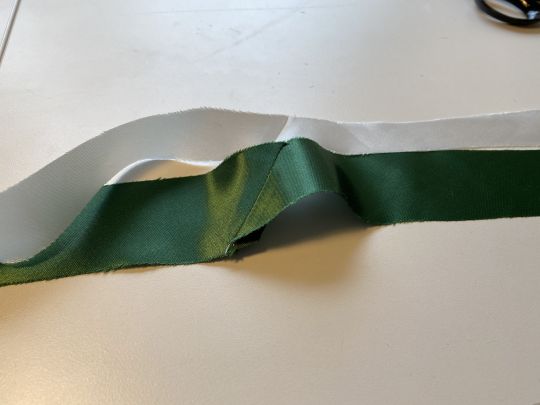
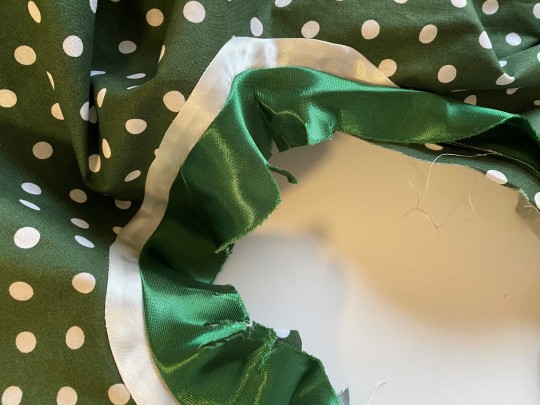
Binding
The double row binding is the most iconic design feature of this era and could really make or break a cheongsam in my opinion. I decided to bind the raw edges before putting the garment together. First I need to make some bias tape. I got half a meter of white and green polyester satin each, which was for some reason much cheaper than half a meter of bias binding? Anyway I folded them twice along the same direction to make a square and drew out diagonal lines with the desired thickness of the binding (I’m always using a chalk pencil because I can’t find my proper chalk for fuck’s sake). I decided on 1.5cm as the width of the finished binding, which is pretty wide and accurate to the 30s. Since I wanted the white binding to be inside and the green binding outside and actually enclosing the raw edge, I made the white bias strips 3cm wide and the green ones 4.5cm. I cut the strips out and clipped the edges, then stitched them together right sides together and ironed the seams flat. Just standard bias tape making. I cut out way too many and ended up with one long ass bias strip for each color and a bunch of shorter ones, which will come in handy later.
By the way, I have absolutely no clue how 30s double row binding was actually constructed, like whether the two pieces of binding are stitched together and applied together or separately, I just did it the way that made the most sense to me and that would be easiest to do with a machine (yes machine sewing was commonplace in the 30s). If anyone reading this owns an original 30s cheongsam, please analyze the binding and tell me about it :D
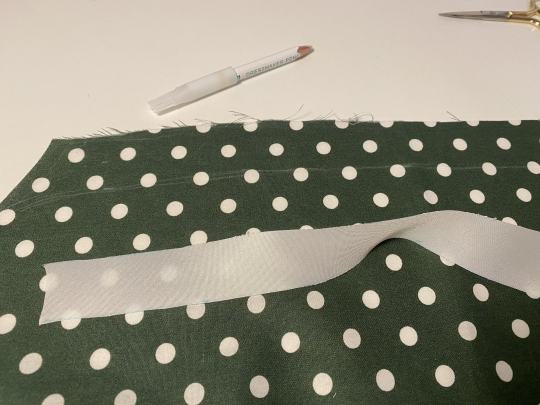
I decided to start with the sleeves cause they’re the most straightforward. I measured out how wide the two rows of binding will be and marked out the outermost edge. Then I pinned a short white bias strip to the line right sides together with 0.5cm of seam allowance.
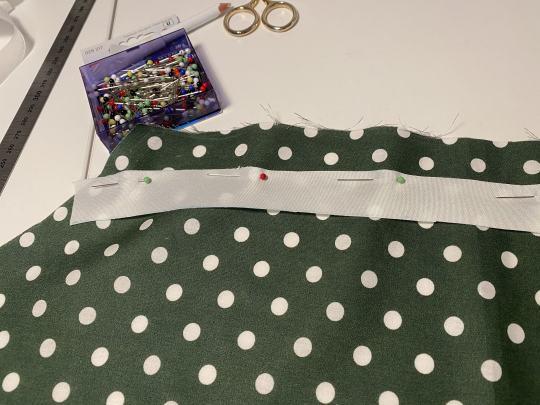
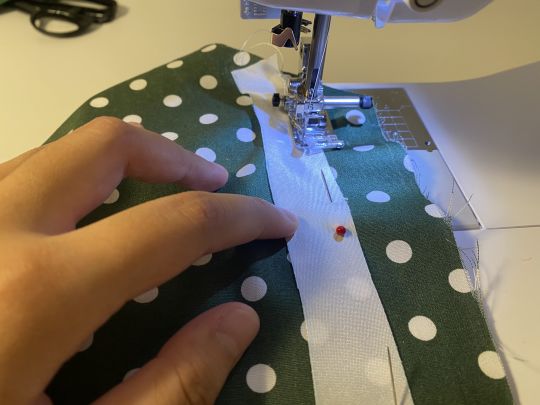
I stitched it in place, turned the white binding over and ironed it flat.

I just realized the white polyester satin is thinner than the green one and is actually slightly see through T_T it’s fine, no one will notice... no one will... notice ::.)
Now I just need to repeat the same with the green binding. I stitched it on top of the white binding right sides together with 0.5cm seam allowance.

Now, I originally planned to topstitch the green binding when it’s folded over and enclosing the raw edge, but then I remembered that I don’t think I’ve seen topstitching on period photographs, so I deduced it must have been finished by hand on the inside. Since the inside of the pieces could occasionally be seen, I suppose they were hand sewn with a tiny slipstitch. Actually, some heritage cheongsam makers nowadays stitch the binding to the inside first and then finish the exterior, but I don’t trust my hand sewing skills enough to be able to pull that off, and I also can’t do a proper slipstitch. So I finished the inside by hand with an invisible stitch. Although now that I think about it, I could also make the binding wider, topstitch it just outside of the first stitch line, then use the excess width to cover that up when ironing it flat. Maybe this explains why the binding on a lot of 30s cheongsam appear slightly detached to the fabric, it’s because the actual stitch line is concealed behind the fold (if any of that made sense). Well that’s too late now I’ve already finished the cheongsam :3
At this point I figured the sleeve openings were much too wide, and 30s sleeves were supposed to be tight. So I reduced the original 34cm opening to just 28, which fit very well.
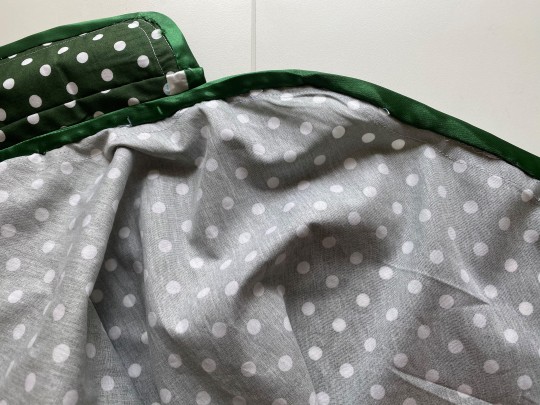
And then I began to bind the slits, hem, dajin and neck area (always bind the neck area for pre 50s cheongsam!!), which shared a continuous raw edge, on the front piece. I did the same thing as with the sleeves. Right angles are needed at the hem edges but I’m not exactly the best at doing them :3
For the slits, the top edge needs to be triangular.
Then I did the back piece slits.
I’m not known as the best seamstress so feel free to read me for the wiggly lines 🤦♀️ But hey, I did it. Binding took me forever but the final product looked so fucking cool it was worth it.
I left out the inside finish at the neck area because I still need the seam allowance for stitching the collar and I will bind it after that is done. I clipped them so they looked a bit messy but that makes it easier to finish later.
Now the collar. I just remembered that since I was gonna bind the upper edge, I didn’t need a seam allowance for that. So I trimmed off the seam allowance for the top edge on all three layers (two fabric, one interlining).
I sandwiched the interlining between the two fabric layers and basted them together. Then I did the same thing with the binding. This time, the collar top edges should be rounded rather than rectangular, which was more common in the 30s.

Sewing
Now it’s time to actually put the garment together. A lot of historical Chinese garments were finished by a French seam (it’s not actually from France just called that in English) so I don’t see why that wouldn’t be used in the 30s. While I doubt that it was a good idea to use a French seam on cotton poplin instead of something like crepe or georgette which were more commonly used for summer cheongsam in the 30s, I also had no energy left to bind the interior seams if I didn’t do that, so French seam it was. Other possible seams for this era would be mock French seam, pinking (for softer, stable fabrics), bound seams (both interior and exterior) and machine serged seams etc., depending on the fabric, basically any seam that does not show visible topstitching. The Victorian part of me is saying that you could also fell the seams by hand with a whipstitch but I don’t think anyone in China ever did that.
For the French seam, you need to stitch the pieces wrong sides together first with a super tiny seam allowance. When that is done you check the seam and trim off any fraying.
Then you turn the piece over and stitch it again with a bigger seam allowance right sides together, thus enclosing the original seam within the new one. Since I left a roughly 2cm seam allowance, I stitched the wrong sides with a 0.5cm allowance and the right sides 1.5cm. I finished the left side seam (without the closure) first because it’s more straightforward and it worked out surprisingly well for my cotton poplin, maybe because it was relatively soft.

For the right side seam, I sewed the top of the placket to the smaller front piece first and then sewed the placket, now continuous with the sleeve front, to the back piece at the sleeve back and side.
Now to attach the collar. I just sewed the collar to the neck right sides together, open the seam allowances and iron them flat.
For the collar, I didn’t think a French seam could be attempted cause I wanted to open the seam allowances and bind them separately so they could be flat against the neck. This wasn’t a concern historically since most cheongsam were lined so the raw edges would be in the lining, but the sheer summer ones were probably also bound internally. I’ve seen a lot of photographs and museum examples of 30s cheongsam where there is another row of binding/piping between the collar and the bodice, however I have no idea how this would be achieved. Actually, now that I think about it, maybe this was used to bind the upper edge of the collar while the lower edge is bound by the binding?? Oh shoot, that’s too late I’ve already finished the thing. I decided to finish the opened internal seams by hand with an invisible stitch. The lower layer of the binding would be continuous with that on the front closure.
That should conclude the assembly process! I made some mistakes but I corrected them and I think my cheongsam looks pretty good :D

Finishing
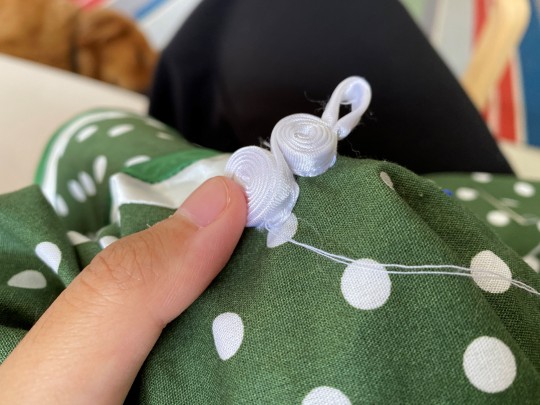
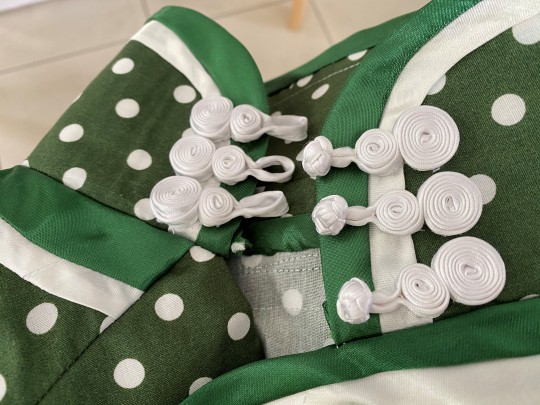
Yayy now I finished putting the garment together, I just needed to attach the pankou. I originally wanted to use floral ones for the collar and placket and plain 一字扣 yizikou for the side, a common historical practice, but the yizikou I bought weren’t of passable quality so I had to settle for the white round 盘香扣 panxiangkou I got later for everything. This is also historically accurate.
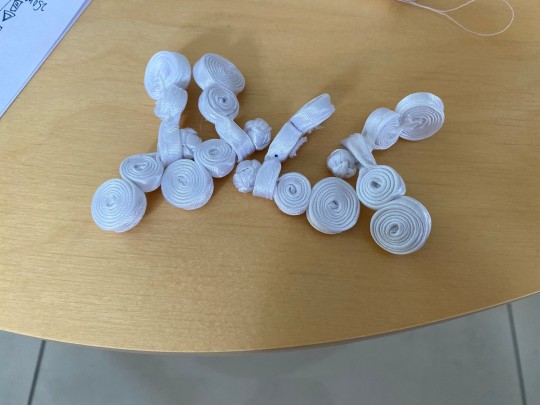
In a lot of 30s cheongsam, the looped part of the pankou is attached to the right side and the knot part to the left. I attached three to the collar and one to the edge of the dajin, then eight to the side ending at the slit. In the 30s, the collar could have three to five buttons, the dajin one or two and the side six to eight (depending on slit length). I couldn’t find any information on how the buttons were attached historically so I just tacked everything on by hand.
There is an extra step you could take if you want the cheongsam to have that ability to circumvent and drape around the boobies visible in a lot of pinup posters: the process of 归拔 guiba, which translates to something like “push and pull”. This terms describes any techniques that make use of the bias of the fabric to micromanage the shape of the finished garment, and in this case, you could put the cheongsam bodice on two round cushions, pulling it diagonally while blasting it with hot steam. I’m quite flat chested so this isn’t necessary.
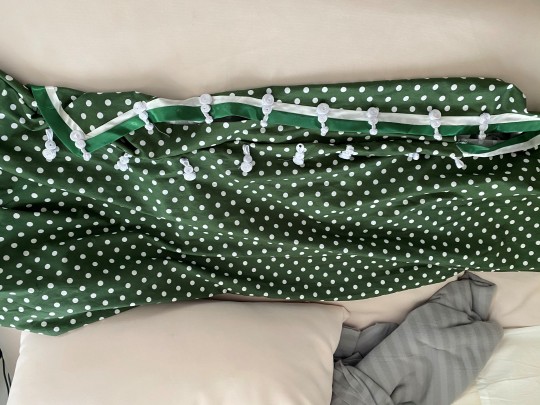
And with this, my cheongsam is done!! 😆
Since I’m busy again, I’ll post photos of me wearing it in the future. I can tell you that it makes me look very skinny and fierce, and it’s also weirdly comfortable.
Conclusion & takeaways
So there are some things I learned with this project. I’ll summarize below:
Be careful with the seam allowance of the collar. It’s easy to miss and if you miss it the collar will look wiggly and cocked to one side like mine :(
The bottom end of the dajin should be much lower, at around bust level instead of directly under the armpit
The binding could be topstitched; if there is some extra width in the binding it could be ironed over the stitching line to hide it
The binding strip could be starched to hold better shape
The inside finish was usually a slipstitch instead of an invisible stitch
Be extra careful when buying pankou from the internet, the really big and messy ones cannot be used for proper period cheongsam at all
Be careful with the placement of the collar (note to self, experienced sewists take no notice)
A proper interfacing should be used for the collar instead of recycled coutil
That’s it for now, thanks for reading :))
#cheongsam#1930s#1930s fashion#historic fashion#vintage fashion#sewing#republican era#chinese fashion#historical costuming#sewing tutorial
314 notes
·
View notes
Text
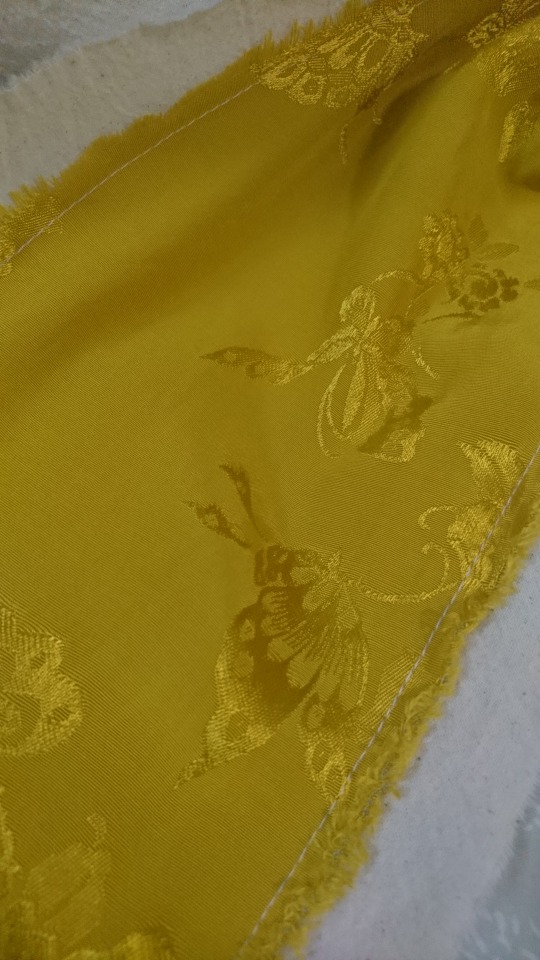
progress 11th April 2022
I had ordered the jacquard fabric I talked about and it arrived today. It's a lovely viscose/rayon blend (80% viscose, 20% rayon) and it matches the yellow cord I ordered perfectly. I have pre-shrinked it and the fabric went shorter by 15 cm! There goes my floor-length gown, I guess (because I ordered the exact amount of fabric I needed). This banyan is ankle-length from now on. Welp, on the bright side, I can now consider wearing it out-doors! You can't fight rival pirates with your hem tripping you up all the time, right?
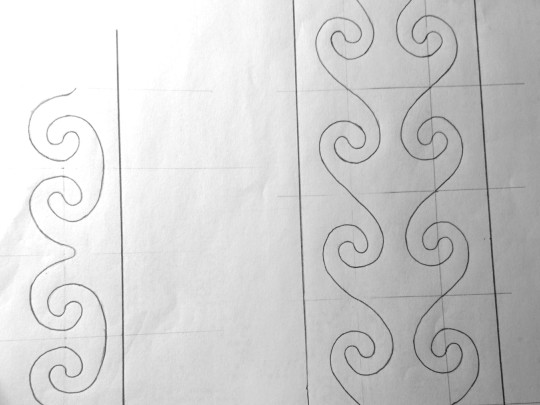
I have attempted to draw the soutache pattern, or as I call it, swirlies, and adjusted its size in proportion to the garment. Then, as I was browsing through the Instagram page of the costume team behind OFMD, I've discovered that there are not only swirlies on the center front and cuffs, but also extra ones on the shoulders! I have never noticed them while watching the show and there are not enough images out there that show off this detail clearly. I have DM'ed the costume designer in hopes that she would send me some "exclusive" detail photos of the soutache, but I'd say that the chances are slim. I will have to improvise if I still can't find a clear reference picture by the time I get to that part of the costume.
Speaking of the Instagram post: I now have a detailed description of the costume piece by its creators! How cool is that?!
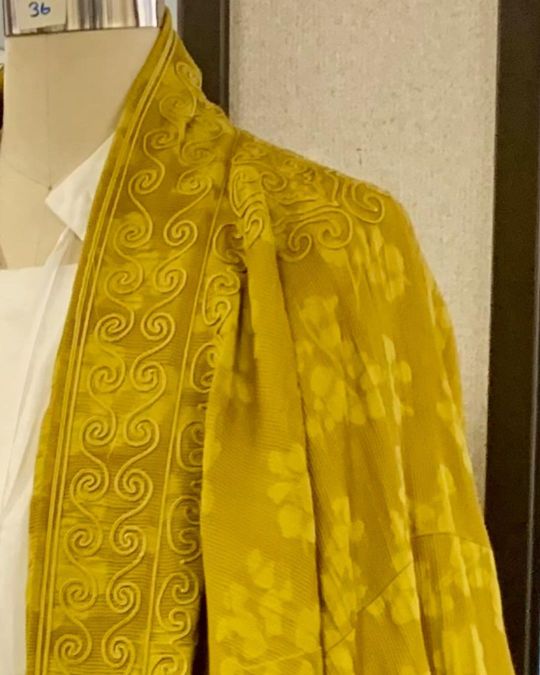
The Yellow Dressing Gown:
I believe this was the very first costume piece we made for Stede. It was made out of a crinkle textured rayon with a jacquard floral motif from @ moodfabrics in LA with a silk charmeuse lining. The best part about the robe is all the incredible soutache that was all the work of the incredible Maria Ivakhinova
It seems like my choices of fabrics aren't that far off, though I've already ordered some cotton sateen for the lining. I can't afford that much silk lol.
I have drafted a pattern for the banyan. It's a mixture between
@Willoughby & Rose 's pattern in her YouTube video and a pattern for 披风(Pi'feng) on this Hanfu website (I have already talked about the similarities between 18th-century banyan and some Hanfu garments from the Ming Dynasty). I think the pattern turned out great.
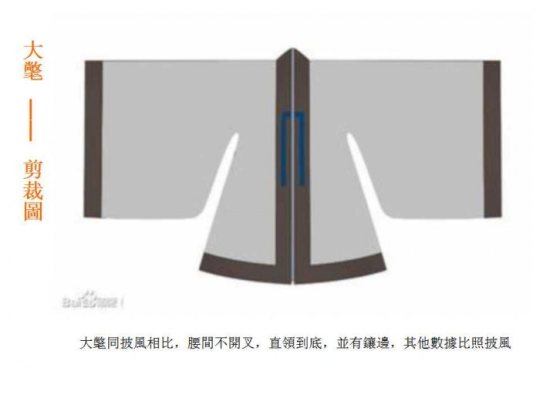
(a 披风(Pi'feng)⬆️ )
I have cut off a strip of the jacquard fabric for the soutache and based it onto a long strip of cotton muslin. I think it could use some backing to make the coaching easier. I would ideally prefer canvas, but all I have is muslin laying around. I hope it would work just fine.
So... That's it, I think. I will write again when there's more progress :)
9 notes
·
View notes
Text
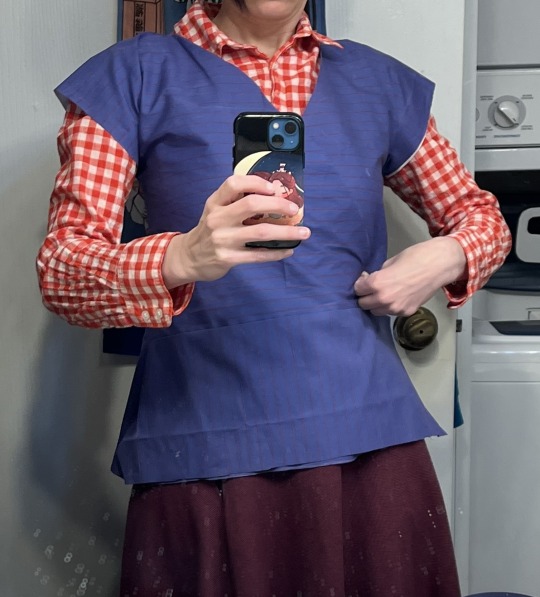
Maomao's undershirt/zhong yi?
I had procrastinated on making an undershirt for my Mao mao outfit. Finally got around to knocking this out in an afternoon. I'd say this took me about four hours with some grocery shopping in between.
In the anime, she does not have a long sleeve shirt underneath her aoqun so my goal was to make something long enough to cover my armpits. I am a sweaty person. I went back to my old pattern from my WKX cosplay, and cut it much shorter.

This is scrap fabric which I had left over from making my WKX outfit and I was getting down to some odd shapes. I had to cut it out as two back panels and front panels.
To keep it crisp, I pressed all the seams and the top stitched it down for more security. For the sleeves, I just made them long enough cover my shoulder and armpits. The neck placket was reinforced with fuseable interfacing.

I'm not going to bother with adding in ties since it is not going to be seen and also tucked into the high waisted circle skirt.
This isn't the best shot but I'll need to fuss around with it a bit more. I also wonder if since I'm using cotton which is sort of stiff, it keeps getting stuck in a weird angle. I still have no idea how all those cdramas have perfect layers but it will do the job of keeping my skin from touching the fabric which is the point.

I may got back and add one more tie on the side to keep it a bit neater. But she's ready to go with 2 weeks to spare before my local con.
61 notes
·
View notes
Text
When I was buying fabric for my Jin GuangMeow outfit, I noticed one of the projects hanging up around the store (I know from having worked for the company that one of the perks of working for them is that if you want to sew something, you get all the materials for it free so long as you’re willing to have it on display for a bit.) I pay a little more attention to that particular store because one of the staff there sews hanfu.
Anyway, today I saw...

...Like, am I crazy, or is that gothic lolita Wei Wuxian? Am I just seeing it everywhere, or am I really in a megafandom that pops up all over the place?
The pattern source is just “TailorNova” which is a pattern drafting software, so it might be totally unique. I’m dying to know! I might have asked but the store is doing inventory this week so all the staff are crazy busy.
33 notes
·
View notes
Note
I love your blog. I was wondering if you know anyone selling sewing patterns based on modern hanfu styles. I've seen some websites with instructions on how to draft your own patterns, but I'm awful at drafting...
Hi, thanks for the question! (image via)
I’ve shared some resources on hanfu sewing patterns here, as well as in my hanfu making tag - but I don’t know of any for sale.
I’d like to pass on this ask over to @hanfu-asks, who may be better able to assist ^^
Edit: @squigglydeath offered a suggestion:
“Hey I was just reading through your resources for sewing hanfu. I wanted to let you know that taobao sells them if you search 汉服纸样 (hanfu pattern) although I haven’t had any experience with them.”
88 notes
·
View notes
Text
Turnabout and Start Again part 4
(Thanks as always to @miyuki4s and @morphia-writes for beta help!)
part one | part two | part three
Lan Wangji reaches the edge of the village at dusk on the third day. Three days of walking, of meditating while a small handful of rice cooks over a smoldering campfire and easing his body through unarmed, sword, and horse-whisk forms when twilight makes continued travel too treacherous. His horse-whisk forms are not as fluid as his sword forms but the flow of it is coming back to him with practice, even if this body is weaker than his own and sometimes stumbles through movements he’s accustomed to performing by instinct. His spiritual energy replenishes slowly; it’s clear that the cultivator who was born to this body had training, and practice, but perhaps in a limited and unfocused direction. Or perhaps the time in the cells had been more grueling and damaging than Lan Wangj first assumed. The curse mark has darkened around the edges, which does not bode well. Without a golden core to draw on he will need assistance soon.
The soul bond does not care about buildings, fences or propriety. He knows Wei Ying is nearby, close, but that is all.
“Wait!” He turns. A man wearing a merchant’s apron is running towards him, one arm raised to gesturing him closer. “Please come inside quickly, it’s not safe—” he startles to a halt and bows. “Ah, forgive me, Daozhang. Perhaps you already know of our problems.”
He frowns. “Problems?” Perhaps he should not be surprised to find trouble. Wei Ying must be here for a reason.
“It’s plagued us for three days now.” The merchant looks over his own shoulder. “The whole of the Wang family—The streets are not safe—”
There is a scream to the east, and the merchant pales.
“It’s started again.”
“Protect yourself and your family,” Lan Wangji instructs, looking beyond the man to the lantern-lit doorway of a pottery shop and the faces peering through it. He turns toward the sound of the scream and runs.
He is not fast enough. He arrives to find an elderly man dead on the ground and a pair of onlookers, both grieving. No. Not elderly. The dead man has been stripped of both life and spirit, his remains sunken and shriveled, making it impossible to tell his original age. He is also missing his left arm, as if it had been severed from the shoulder.
“What did this?” Lan Wangji asks.
“It was the ghost,” the younger woman says, “We were on our way home, and Gege started attacking that man—” she hiccups, “—I told him not to touch the cultivators’ things. He said it would protect us—” she stops, crying harder. The older woman has not looked up at all.
Lan Wangji has never been good at giving comfort. The best he can offer is a quick and just conclusion to this family’s troubles. He bends to search the corpse for the mentioned cultivator’s tool and finds a spirit lure tucked inside the cross of his yi. It seems the man drew trouble upon himself, however good his intentions.
“You should move indoors,” he says, folding the lure into his own sleeve. There are worse-prepared targets at risk. “Where is the other man now?” he asks. The young woman points wordlessly down an alley and he sets off again, more slowly this time, listening hard.
Not a ghost, he thinks. Not if it has killed for multiple nights in a row.
The alley opens onto the main market street; the street stalls are deserted, the lanterns snuffed out. Even the buildings are closed and shuttered, weak light bleeding around the edges of windows and doors. Spirit lures hang at intervals, most of them drafted by the same hand as the one he carries, but there are small differences. The first one he passes might reach twelve li, the second only ten li. By the time he reaches the third he realizes the change is deliberate; this cultivator is trading distance for attraction. The flags are a path, drawing spirits ever inward. The one he bears is stronger than the ones he passes. He picks up his pace.
Something lunges out of the shadows, a hand outstretched toward his face, and he whirls aside, sinking into a ready stance.
There is no life in his attacker’s bulging eyes. No human coordination to his movements. Whatever has possessed him does not restrict itself to the limits of skin and bone and muscle. Lan Wangji whirls again, readying the horsetail whisk in one hand and shaking out the spirit lure with the other.
Three passes with the whisk and a few steps deeper into the lure trap and the body shudders. The skin sucks inward, the legs stumble. It falls.
The left hand still moves, twisting out of the man’s pale sleeve and lunging towards Lan Wangji even faster than before, as if possessing a body had been holding it back.
Turn, strike, step back. Strike, step, turn.
This is no average fierce corpse, born from an average man resentful in death and dismemberment. Each strike takes more effort than the last. The whisk will not survive another.
Lan Wangji can feel his spiritual power fading. His arms are trembling, and his breath comes more quickly. He drops the strikes out of the pattern, whirling and turning, leading the arm back and further back down the path of lure flags in the hopes that whoever set them has more in mind than simply choosing their battlefield.
“Over here!” someone yells, but he cannot take his eyes off the arm. A moment later he is flanked by two cultivators, one in dark colors, one in pale shades, their swords already drawn. The high, piercing notes of a familiar dizi sing through the night air.
Chenqing. Wei Ying.
In the shadows beyond the arm, back up the path Lan Wangji has traveled, the corpse of the formerly possessed man lurches to its feet and rushes forward.
“There’s an array 3 zhang behind you,” the cultivator on his left says. “Throw the lure in the center!”
“We don’t need the lure,” scoffs the other one, but Lan Wangji can see how their swords shake under the arm’s attacks, even with another fierce corpse to act as distraction.
Lan Wangji backs up quickly and spins to find this new target. The array is a shadow, darker and more menacing than the simple absence of light, a peculiarity emphasized by the ring of lanterns placed around it. He throws the lure into its center.
A dismayed shout sounds behind him and something hits his shoulder hard. The arm. Long nails dig through the layers of his clothes, which are only cloth—there are no protective talismans stitched into the seams or collar.
He turns as swiftly as he can, shedding his outer layer and swiping with the whisk to flip the whole bundle—arm and yi together—into the array.
The arm struggles for a moment, then quiets.
Chenqing’s notes fade. A sharp whistle sounds out.
Wei Ying jumps to the edge of the array.
Wei Ying.
He looks … older than Lan Wangji remembers. And calmer, the riot of resentment that had churned within him no longer threatening to slip from his grasp due to a moment’s inattention.
He still does not carry a sword.
A lingering, scrabbling fear that Lan Wangji’s efforts had come to nothing or gone awry is soothed and swept away. Wei Ying lives. Wei Ying is whole.
Wei Ying kneels at the edge of the array and snaps his fingers. The shadowy edges rise like a cage and twist inward, bearing down until the arm is engulfed in it, and then the dark mass is swept neatly into a qiankun pouch. Lan Wangji’s dark outermost yi and the now-broken horsetail whisk sit alone on the cobblestone street.
“That was quick thinking,” Wei Ying says as he retrieves the _yi _and holds it out. “Sorry it came to that. Someone was supposed to be guarding that lure.”
There is no recognition in Wei Ying’s eyes. Lan Wangji is not certain why he thought there would be, when he still does not recognize the face he wears any time he catches a glimpse of it.
He reaches for the yi. Perhaps if they touch—perhaps the soul bond—
“Wei-zongzhu,” one of the cultivators says, the one who had stood on his left, who wears the same black and red as Wei Ying. Because, Lan Wangji realizes, Wei Ying is a sect leader now, with disciples, and not only refugees in his care. Zongzhu. He hadn’t thought Wei Ying was interested in the position.
Two more cultivators have joined the group, also in black and red. The fourth wears pale gold that glimmers in the lantern light. Lan Wangji takes the yi from a lower part, far from Wei Ying’s hand. This is not a revelation he feels like sharing indiscriminately.
Wei Ying follows his disciple’s gaze and looks over his shoulder. “Oh.” He sounds resigned. Lan Wangji turns to see what has caught his attention.
A party of cultivators is alighting in the street. A very familiar party of cultivators, wearing Gusu-Lan white and blue, pale ribbons drawing bright lines across their foreheads. Most of them are young, the cut and embroidery of their hanfu marking them as junior disciples. Lan Wangji doesn’t recognize any of them. None but the leader, who is so familiar Lan Wangji knows him by the glare of his sword before he lands, by the xiao at his side, by the line of his shoulders and the way he scans over his companions to make sure they’ve all arrived safely.
His brother’s face was more familiar than his own even before the past three days.
“Wei-zongzhu,” says Lan Xichen. He sheathes Shuoyue, then bows with cold grace. There is no smile for Wei Ying. Instead of a curious glance to ascertain the health of his companions, his gaze is wary.
“Lan-zongzhu.” Wei Ying’s smile as he bows is bitter. “I didn’t realize the Lan Clan had extended their territory. We were investigating reports of a beast in the next valley when news of this threat reached us.”
“Of course.” Lan Wangji has never seen his brother so stern. “And do you have conclusions to share?”
“A particularly angry victim of lingchi.” Wei Ying holds up his qiankun pouch. “Or rather, his left arm. The rest of him seems to be beyond my lures’ reach.”
Lan Xichen nods. “And is the Yiling-Wei Sect taking on the responsibility of reuniting the pieces?”
Wei Ying shrugs, then turns to Lan Wangji. “Unless you wish to claim it?” he asks.
Lan Wangji shakes his head. Speech is impossible, words locked in this throat.
“Liang Feihong-gongzi?”
The name is familiar, but still it takes him a moment to realize Lan Xichen is not looking among his own disciples, but at Lan Wangji. Recognizing the body, but not the soul occupying it. That too is a blow, different from Wei Ying’s ignorance. His brother has always known him best, but does not see him now.
Liang Feihong. That’s who this body belongs to. Born in Caiyi, Lan Wangji remembers. Son of a fisherman. Trained for several years but returned to his family after news of his father's death during the war. Lan Wangji is abruptly grateful he’d thought to wear the forehead ribbon only to tie up his hair before encountering another cultivator. He has no explanation for why Liang Feihong would still be wearing it as intended.
“I was sorry to hear about your circumstances,” Lan Xichen is saying, concern and warmth returning to his voice. “I hope you remember that you can always return to us, if you have need.”
Lan Wangji does not reveal himself, or ask why Liang Feihong might have a publicly known need for aid. The tension between his brother and Wei Ying is too alarming to risk further confusion.
“Thank you Lan-zongzhu.” He bows in acknowledgment, the familiar necessities of polite niceties loosening his tongue. “I am grateful for your offer. I will keep it in mind.”
His brother smiles. “Please,” he says, “allow us to at least escort you back to Gusu, and see to your injuries.”
Gusu. Homesickness crashes over Lan Wangji like a wave. He could return to Cloud Recesses. In Cloud Recesses, the world will make sense, the last three days shrunken down to something more manageable. Cloud Recesses holds familiar clothes, familiar food, familiar patterns and quiet. His brother's familiar smile and steadiness and supportive, listening ear.
Or at least. Cloud Recesses had held those things. A lifetime ago, before he stood with his blade between his clan and Wei Ying, and before he was pinned to the stone of the central courtyard and whipped until he could do nothing but lie on his stomach and ache. Before he was banished to seclusion for three years and a war party marched for the Mass Graves.
He has not served that sentence. He has no reason to think the clan’s stance has improved; if anything, his brother’s icy politeness could indicate a change for the worse. If he goes to Gusu, if he reveals himself to his brother, he may never find Wei Ying again.
“Thank you, Lan-zongzhu,” he says, bowing again, “but I would prefer to remain with Wei-zongzhu. I have some questions for him.”
Lan Xichen’s gaze returns to Wei Ying. To the young cultivators at his sides.
“I see you are making a collection,” he says.
The Jin boy rolls his eyes. One of the Wei cultivators stiffens, her hand moving to her sword. The tallest sneers. The third looks to Wei Ying, who only shrugs, twirling Chenqing between his fingers.
“I only met your Liang-gongzi a few moments ago. Am I expected to turn away guests now?”
Even the young Lan disciples look uncomfortable. Whatever is happening between Wei Ying and Lan Xichen, Lan Wangji has just somehow made it worse.
“I mean no disrespect,” he tries, but his brother shakes his head, dismissing the words.
“There is no need,” he says. “I am long familiar with Wei-zongzhu’s … popularity.”
And then he leaves, moving back up the main street with long, deliberate steps. Moments later the Lan party rises above the rooftops, flying south.
“Self-righteous jerks,” one of the Wei cultivators mutters. When Lan Wangji looks at them the tallest one is being prodded with the young woman’s sword pommel and soundly shushed. The third one is still watching Wei Ying.
“Zongzhu…”
“Later.” Wei Ying’s expression as he faces Lan Wangji is unreadable. “I will be happy to consider your questions later this evening, Liang-gongzi, but I have some errands to see to. For now, please accept the hospitality of the Yiling-Wei Sect.” he bows, and Lan Wangji hurries to bow back, somehow still surprised at being addressed with someone else’s name.
“Thank you, Wei-zongzhu,” he says, forcing the title over his teeth. Wei Ying doesn’t know him. A personal name is inappropriate in the circumstances. Still, his throat aches with unsaid words.
“A-Yuan, see to it that our guest gets a meal and a bed for the night,” Wei Ying instructs. “We’ll return in the morning.”
“Of course,” the young man says. “Just remember—”
But Wei Ying is gone, already returned to the rooftops and making his way toward the town’s main square.
The young man sighs.
“My apologies, Liang-gongzi. Wei-zongzhu has a lot on his mind at the moment. I am Wen Sizhui, and these are my sect siblings, Liu Weixin-shidi and Zhou Xiuying-shimei.”
“And I’m Jin Ling,” says the Jin cultivator, also bowing. “Jin Rulan, but no one calls me that except Dajiu when he’s annoyed.”
Lan Wangji stares; a fathomless abyss of things he doesn’t know is opening under his ribs. Wen Sizhui, and Jin Rulan. The two of them, mostly grown and standing before him with swords at their sides, when last he’d known Wen Yuan had still been young enough to be carried and the infant Jin Ling had barely passed 100 days.
How much time has he lost?
How long has Wei Ying been walking the world without him?
on to part 5
#wangxian#wangxian fic#mo dao zu shi#mo dao zu shi fic#mdzs#lan wangji#wei wuxian#role reversal au#soulmate au#turnabout verse#alex writes
32 notes
·
View notes
Photo
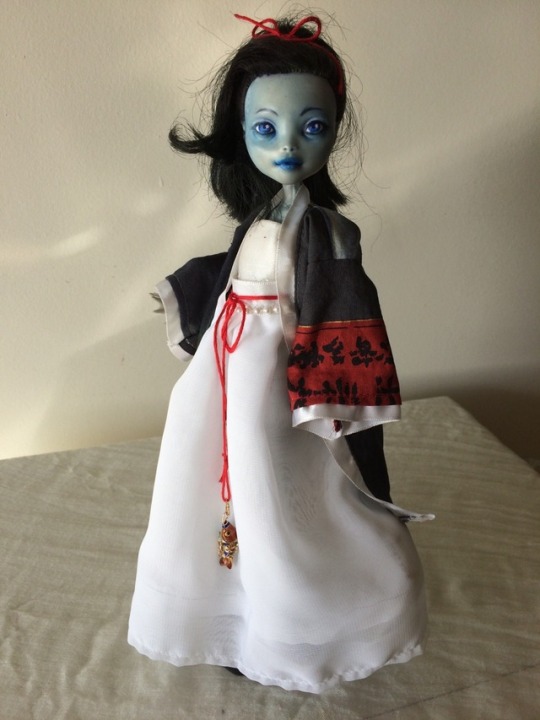
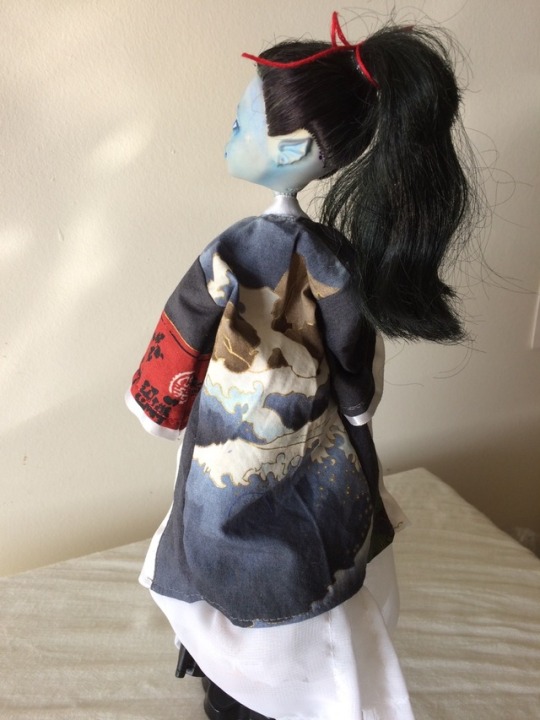
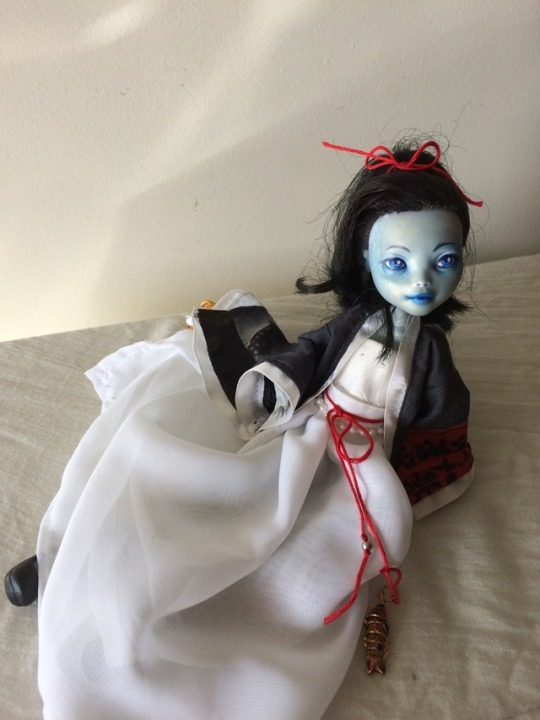
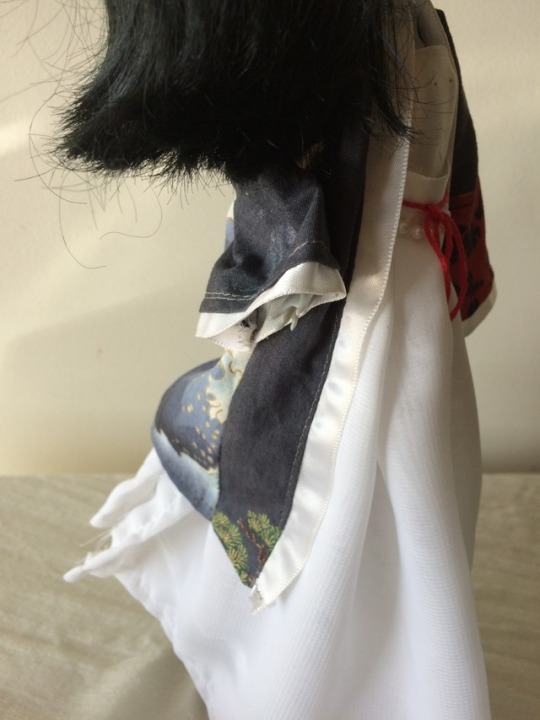
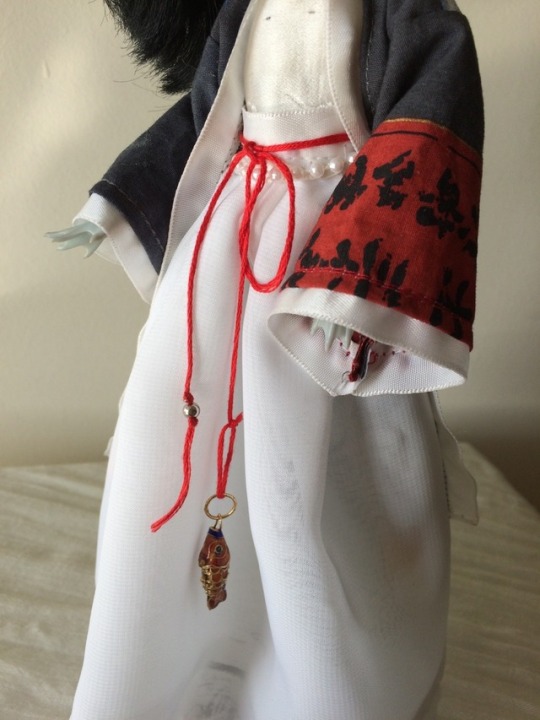
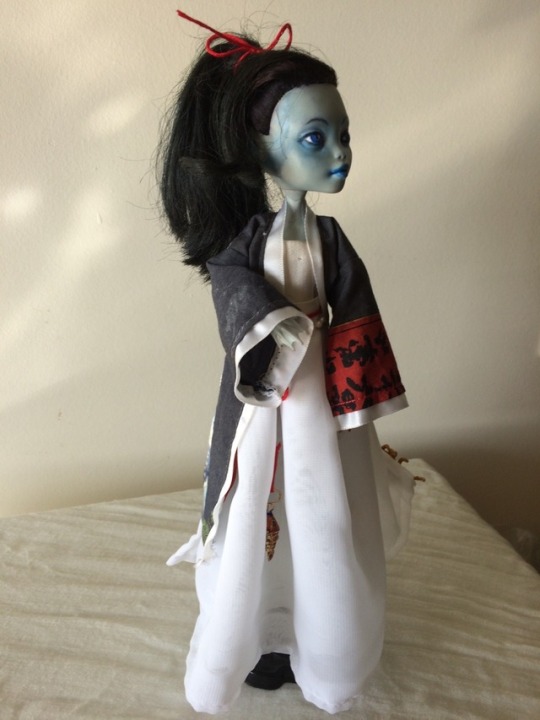
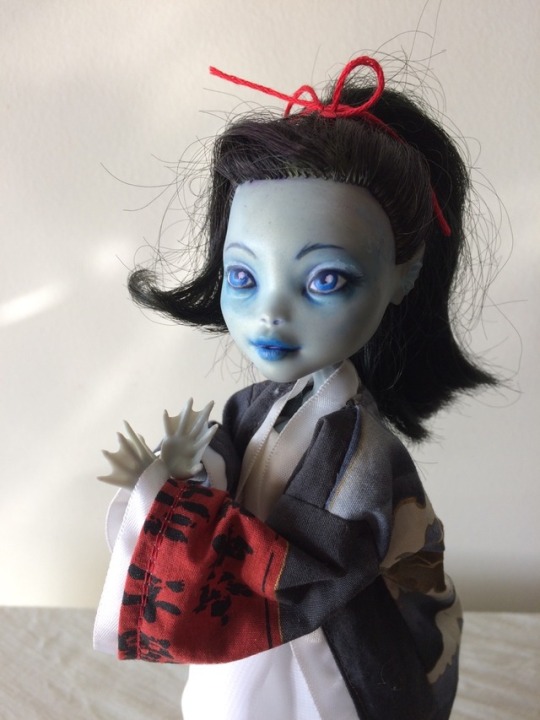
The result of my weekend hanfu vendor websites binge :> dolls are how I exorcise my thirst for expensive & Extra clothing Hailong is very much about traditional Chinese clothing, all the time. Other modes than hanfu, too, but boy is it a lot harder to just draft a cheongsam pattern! Expect more to come, it’s not out of my system yet
#monster high custom#ooak#monster high#Lagoonafire#hanfu#chinese hanfu#historical dress#doll clothes#Hailong#dragon#Fairfolk
21 notes
·
View notes
Text
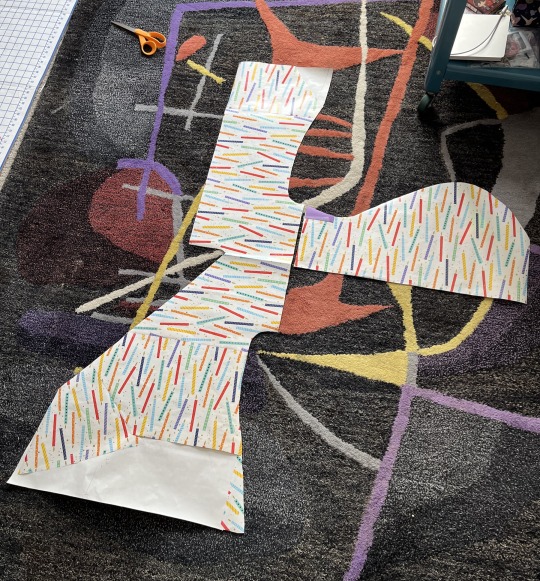
Maomao's aoqun
Next up, I need to pattern her aoqun top. I always like to do a quick sketch to get an idea of all the pieces that I'll need. The main body of the garment only consists of two pieces that criss-cross in the front to tie on the sides and a center seam in the back.

There is the neck placket that makes the contrasting collar, sleeves with slight puff between the elbows and wrist and then the yellow-green cuffs.
I've already patterned something similar to this - so I'm taking my previous 3rd layer which will be more loose fitting and making it shorter and giving it a touch more flare out than close fitting to be snug with the waist.
I added 7 inches to the main pattern piece and did a mock up. Here is the result.
It is pretty close but I decided to take a bit of the flare out of the sides and added another inch to it.
Here is the modified pattern piece.
I then laid out the pattern pieces, marked them, cut the fabric out and then zigzag stitched all around the edges to prevent fraying. This time I used light green and light blue thread so it won't show up when I press the fabric this time.
I went ahead and sewed the sleeve onto the shoulder and then pressed it open here. I am much happier with the thread color for the zigzag stitching as well.
After sewing both sleeves onto the half of the bodice the next step is to sew the side seams. Before that, this is what one of the sides looks like with the sleeve on before I pinned it along the sleeve and side seams.

After sewing both sleeves onto the half of the bodice the next step is to sew the side seams. You start at the sleeve cuff and work your way along the bottom of the sleeve, to the armpit and then back down around the side. To get around the armpit, increase your stitch length to handle the curve.
I was able to get the left side sewn as shown here. I pinned the right so tomorrow I can sew up that side as well. I then pressed the sleeve and armpit area with my iron. I also used the corner-pokey thing. I totally forget that it is called but it is the point on what looks like a knife that you use to press open a seam.

I am going to have to make a trip to the fabric store soon to find material for the cuffs and the two-toned neck placket. Whoo. But really, the fabric store is 1 minute from work. I'll keep you posted on the progress but really trying to avoid con crunching myself here.
19 notes
·
View notes
Text
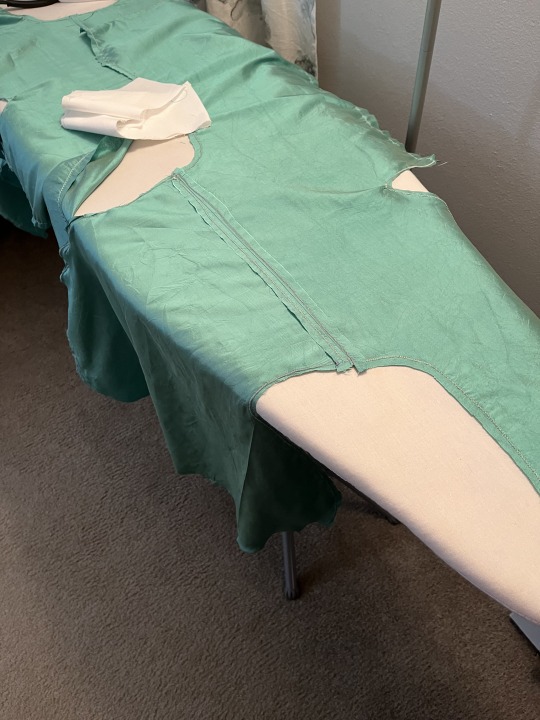
Finishing the aoqun
After getting the main panels of the garment together, I went to my local fabric store to get some different pieces for the collar and cuffs. I bought 1/3 of a yard of each, even if I didn't need that much but asking the staff to cut anything smaller is silly. Plus, I never quite know what the size of the bolt will be selvage to selvage.
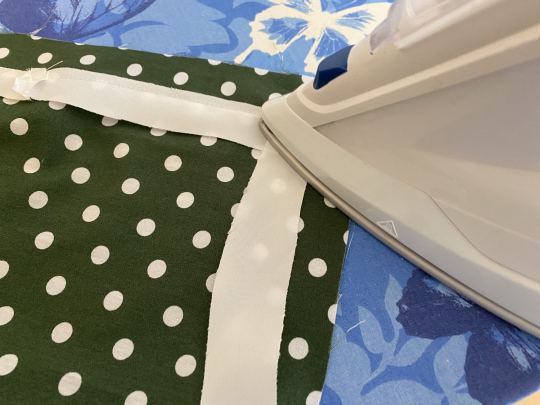
I washed all the fabric and ironed it out. I started with the cuffs, the circumference of the cuffs was 12" so I made a rectangle that was 13" long, folded and pressed the edges, sewed it down to remove all the raw edges. Right sides to right sides, I sewed the length of the cuff to the actual sleeve cuff, pressed it down and then tucked the rough edges after the seam into the sleeve. I removed the flat part of my machine to have the free arm and then top stitched all the way around to attach the inside of the cuff to the inside of the sleeve.
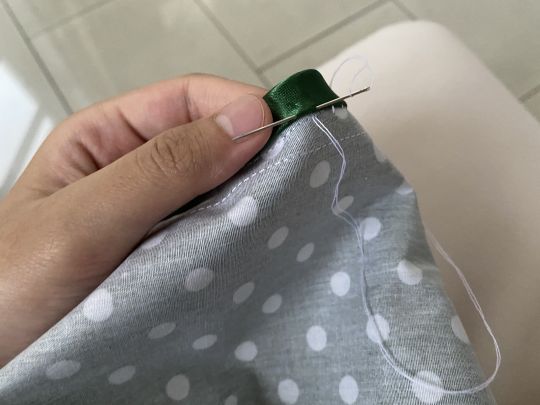
For the collar/placket I started with the long dark green strip. It was to be 52" long so added extra on each end, pressed down all the edges, sewed them down securely and then did the exact same thing as with the cuffs. Do right side to right side on the garment for the outside seam, fold over add in interfacing if you want, press and then sew down underneath. For the lighter strip, I made a tube sewn right sides together, used a safety pin to pull it out, pressed with my iron and then sewed it on top. I debated sewing both before attaching them but I wanted the ratio to look decent.
If you want to see what I did, look back at my WKX posts where I do the collars for each layer.
This time, I put a lot of effort into figuring out where exactly to put the ties, I'd estimated I futzed around with the ties for about 2 hours, sewing them in, using the seam ripper, putting the ties back in etc.

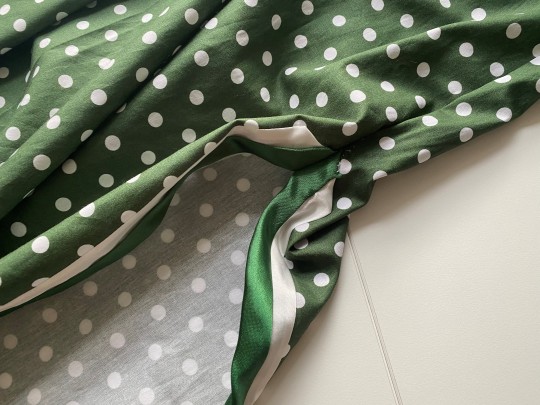
Here are a few more pictures of what the aoqun looks like in more natural light.

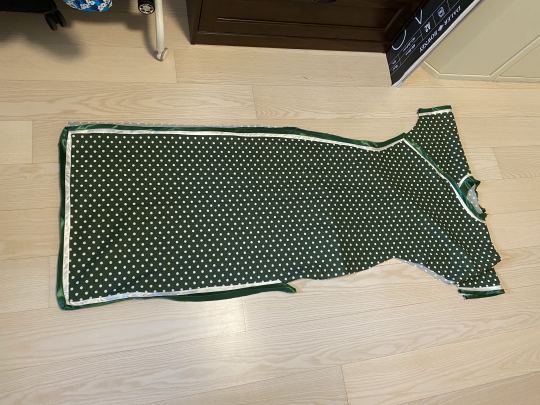
Here is it laid out.

All that I need to do is hem the skirt and I will pretty much be done. I'm still debating it I want to make a tank top for the white undershirt. We know that Maomao doesn't have another long sleeve shirt under her aoqun and I also need to have some white fabric for her arm.
#cosplay#maomao#the apothecary diaries#hanfu pattern#diy#hanfu pattern drafting#apothecary diaries cosplay
8 notes
·
View notes
Last Seen Blogs

sailorsenshigifs
sailor moon gifs

spookyratking
DEADASS

kpoptothetop
Hoe for Chaeyoung

jcmesklrk-blog
James T(rash). Kirk

lextherandlxce
Leather & Lace