#have a low quality gifset <3
Text
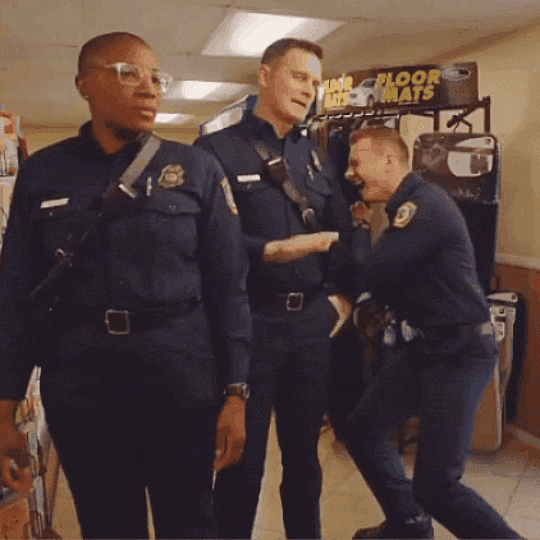
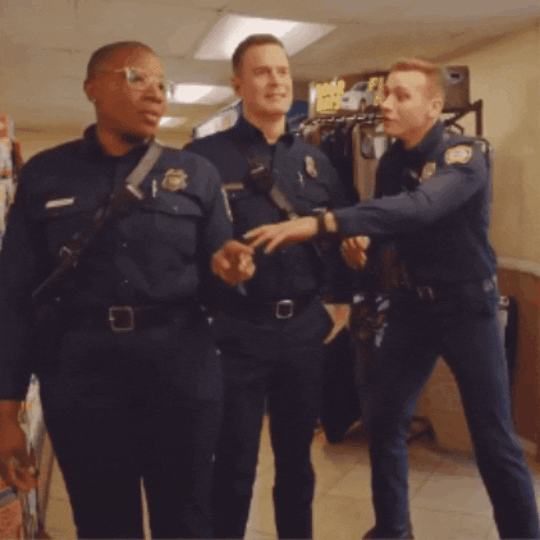
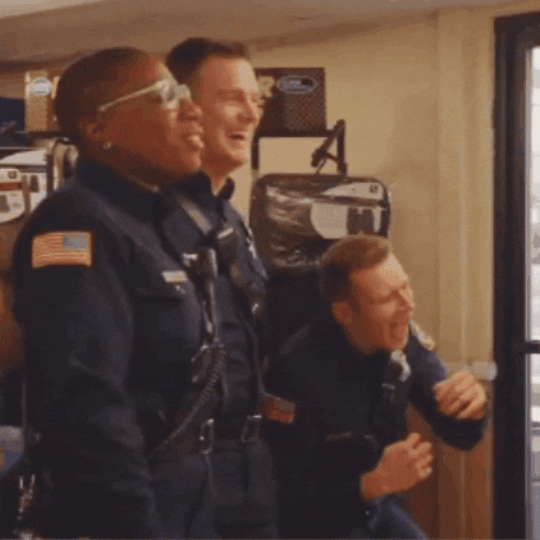
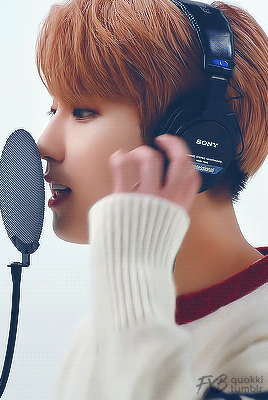
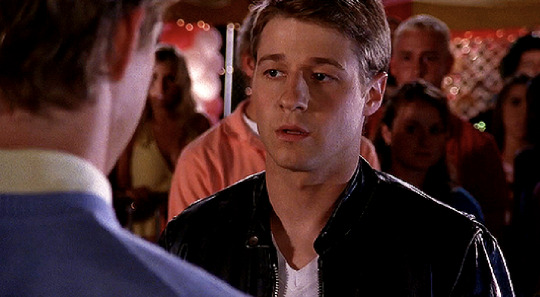
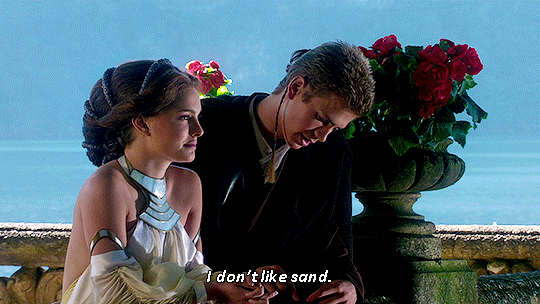
Hen, Bobby and Buck in 1x05
#have a low quality gifset <3#911edit#nolan edits#911#evan buckley#hen wilson#bobby nash#tv: 911#911verse#usercam#userevan#tuserrae#uservictoria#ajlook#tuserdaria#tuserjw#oliver stark#peter krause#aisha hinds
109 notes
·
View notes
Photo


"I never once considered finding that notebook and gaining this power a misfortune. In fact, it's made me happier than I've ever been"
Gift for Mars ♡ @man4jiro
#dnedit#death note#anisource#dailyanime#dailyanimatedgifs#light yagami#sky gifs#maarrrsss I finally made the gifset of your beloved I promised!!!#I love you so so so much bestie! ty for being on of my bestest besties in the entire world <3#it's almost been an entire year since we started talking <3 time flies!!!!#I hope you like this! sure did take me forever to get done.... :')#Finding death note stuff is soooo difficult but it's one of my favourite series so I did it for you <3#the love/hate relationship I have with light is no joke :')#hope the colours look okay and the quality as well#not me having to type up his quotes just to find a caption LMAO!#you've made me so many wonderful gifts I had to do something for you <3 ily#quality low key looks trash but we're gonna ignore it
840 notes
·
View notes
Text
Full giffing process - tutorial (*≧ω≦*)
Due to little demand, i will be going thru my complete process for making gifs. so this will cover all the basics i hope! keep in mind this is just the way I personally do things! please feel free to send me asks or dms if you have any doubts or questions!
☆☆☆☆☆☆☆☆
DISCLAIMER: Everything I know about giffing, I've learned from other tutorials, including the VapourSynth Resources I'll be using in this tutorial so I'll leave links to those tutorials I've used here as well!
In Depth Giffing Tutorial (link here)
How to use VapourSynth (link here)
☆☆☆☆☆☆☆☆
(o´▽`o) I'm a windows user so idk if this works exactly the same on mac!
First things first, you will need:
☆ 4k video downloader (download it here!)
☆ Vapoursynth (download it here!)
☆ Photoshop (download it here! -64bit version only)
Okay! The first thing you need to do is make sure you're working with the highest quality material possible to ensure a decent looking gif!
I'd say the minimum quality needed for decent gifs is 1080px. But if you really want to gif that low quality 2 frame milisecond of your fave, i respect that
☆ lives / streams and tiktoks are typically not very high quality
☆ for stage performances such as music shows, ts/tp files are preferred but those can be really hard to get a hold of (this is a whole deeper level of giffing hell and more of an advanced class topic so nevermind this for now!)
☆ those occasional 4k facecams on youtube work fine tho!
☆ for mvs, variety shows etc, you can download the video with good quality from youtube using 4k video downloader
_(:3 」∠)_
Now let's talk about tumblr and it's pre-requisites for a good looking gif post :D
Tumblr can be sooooo annoying about gifs okay.... I find it's best to plan my whole set before I actually start doing anything but hey that's just me. Some things to keep in mind are: dimensions, file size, number of frames and post layout!
☆ Dimensions
You have 3 main options here and it's all about the width!
☆ 1 collumn: single gifs! these should be 540px wide
☆ 2 collumns: split that in half! 268px wide so there's a lil breathing space between the gifs!
☆ 3 collumns: 3's a party! 177px for each gif please
You can go crazy on the height but the width should mostly stick to one of those 3 unless you want tumblr to pull and squeeze your gif around like a piece of gum.
☆ File Size
This is really important because tumblr has a single image size limit of 10mb. Which means that every single gif you make has to be under that size or you won't be able to post it. The other thing about this is that the dimensions, number of frames and ammount of varying colors throughtout your gif will greatly impact on the final file size. Basically, the larger the dimensions and the more frames it has, the bigger the final file will be. Later on I will show you how to check your gif's final size before exporting it!
☆ Number of frames
This has more to do with the length of your gif, the longer it is, the bigger the final file will be. Typically gifs should be under 3 seconds long. So if you are making a set, try to break the moments you want to include in your set by increments of up to 2 - 3 seconds each, otherwise it might not fit all into one single gif. The number of frames is also extremely important when making combined gifs but that's for another tutorial.
☆ Post layout
If you want to make a cool looking gifset (where some gifs are larger in dimension than others, or when you want to have a single gif followed by a line of 2 gifs next to each other), then it might be worth it to plan out the layout before you start making the gifs. This way you ensure you won't have to remake gifs down the line because they don't fit together the way you wanted to.
☆ミ(o*・ω・)ノ
Timestamping
For this step, you will go through the video you want to gif from and you will just write down all the sections you want to use, down to the exact seconds. Example: 02:30 - 02:32.
(^◕ᴥ◕^)
VapourSynth (VS) - Clipping the video
I know VS can look pretty intimidating with it's bare coding and all but I promise it can be your friend. You just have to set it up correctly and pay close attention whenever you're using it. This software is a must for giffing, it will do all your cropping, resizing, sharpening and denoising for you, making sure your gifs look good. It is also indispensable when giffing ts/tp files because it deinterlaces those files so you can clip them.
First, let's set it up. This is the most annoying and difficult part of this tutorial so make sure you pay full attention to every single step!
☆ step 1) download a version of VS here (link).
☆ step 2) unzip the file on your desktop area.
☆ step 3) open the folder and find the file named "vapourscript (drop video file on me)" - make a shortcut of that file and move it to the desktop.
☆ step 4) find the folder named "gifs" - make a shortcut of that file and move it to the desktop.
☆ step 5) drag your video file you want to gif from and drop it on top of the "vapourscript (drop video file on me)" shortcut on your desktop.
☆ step 6) enter the timestamp input, in the first line it will be the starting of your timestamp, in hours format, then hit enter. in the second line enter how long your timestamps lasts, in seconds, also in hours format. then hit enter and let the code run.
☆ step 7) the resizer tab should now load on a web browser, then you will set the dimensions of your gif on the top left corner. you can also adjust the position of your gif within the video screen and zoom in if wanted.
☆ step 8) choose the preprocessor, denoise and sharpening options on the left and tick the boxes on. I usually just stick to the settings i'm using in my video down below.
☆ step 9) now in the VS box, go to file > load, choose the script saved in the gifs folder.
☆ step 10) copy the code from the resizer into the code in the vs screen, under the designated line.
☆ step 11) alter the code exactly like I did in my video down below. save it. this is now your default vs script for clipping your gifs. what you are doing by adding the hastag and the quotation marks is you're disabling those sections of the code. the reason you do that is in case you want to run the preview before exporting. this is because those lines involve some heavy graphic processing which can make the computer slow. I will talk about the script in more detail later on.
☆ step 12) i don't usually use this option but you can also preview your gif and set specific frames to start and end your gif. This is around the 4:30 mark in the video.
☆ step 13) time to export your clip! now you will temporarily remove the marks you added to disable the code and then go to script > encode video. in the popup box, you will select the option "export to MOV", then start so that you can use that video file in photoshop later.
☆ step 14) after you are done exporting, close the encoding box and then close vapoursynth, never agree to save the script when closing it, or that will override your default script.
☆ step 15) now you need to rename the encoded file for your gif. go to the gifs shortcut folder you created on your desktop, then go to output. this is the folder where VS will save all your encoded files. but everytime it saves the file with the same name so you need to come to this folder and change the name for every gif file you encode before you clip a new one, otherwise VS will just replace the previous clip with the new one you just finished.
Here's a detailed walk through of each step in this video tutorial:
youtube
IMPORTANT
After you are done processing your first clipped file, now you have your default script already built in VS, so whenever you run it to clip more videos, this script will already be in your VS screen. So now all you need to do whenever you want to clip more files (to make more gifs) is to adjust the dimensions, positioning and zoom of the video in the resizer screen and then change a few numbers in your script! then run encode to save the clipped file.
☆ To make new clips: go thru steps 5- 7, also do 8 if you want to mess with the denoise and sharpening filters again, but I don't really know much about how those work so I can't help you with this.
Now what you need to alter in the code, each time you are making a new gif:
after you run VS and change the settings in the resizer to what you want, you need to change the zoom numbers and the video positioning in the code.
you need to replace the numbers in the VS script on the left so they match the numbers in the resizer on the right.
Do step 12 if you want to set specific frames to clip. Then steps 13 - 15 and you are done! You need to do all this every single time you want to make a new gif.
Now let me talk a bit more about some of the lines in this script:
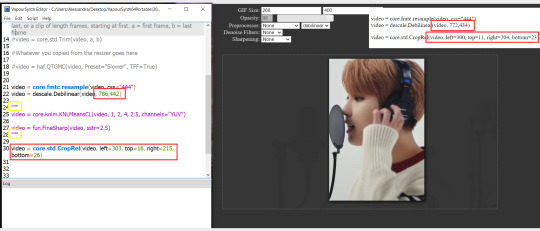
☆ line 14: #video = core.std.Trim(video, a, b)
this line is to set specific frames to trim your video section, your final encoded file will be only the frames inbetween the numbers you input here. a = first frame, b = last frame. you will need to run the preview option in VS in order to see every single frame of your clip and select your first and last frame. I usually do this in photoshop later instead so I don't bother with it on VS unless i'm making combined gifs, in which you need all the clips to have the exact same number of frames. the hashtag at the beginning of this line means that the script won't follow this command when executed. so if you want to include it, you need to remove the hashtag before encoding your file.
☆ line 18: #video = haf.QTGMC(video, Preset="Slower", TFF=True)
this line is for the preprocessor option in VS, that tool is mainly only used when giffing ts/tp files because you need to deinterlace them before you can use them on photoshop. so you will only need to remove the hashtag and enable it when giffing those types of files. when im giffing those files, i usually always keep it with this setting:

I don't really understand much about this so I never mess with it. If you want to know more, I believe there's more info about it in the tutuorials I linked at the beginning of my post.
☆ line 22: video = descale.Debilinear(video, 786,442)
this line is for the zoom of the video screen. you just need to match what you have in your VS script to what you end up with in your resizer.
☆ line 25: video = core.knlm.KNLMeansCL(video, 1, 2, 4, 2.5, channels="YUV")
this line is for the denoising filters, in my case I always use KNLM and this is what it's line looks like. I know you can change those numbers to change the filtering settings but I never messed with it so I'd usually just have it like that.
☆ line 27: video = fun.FineSharp(video, sstr=2.5)
this line is for the sharpening, in my case I always use FineSharp and this is what it's line looks like. I know you can change the number to change it's settings but I never messed with it so I'd usually just have it like that.
note: lines 25 and 27 (which have to do with denoise and sharpening) are the ones within quotation marks in your default script. I believe the quotations work in a similar way as the hashtag, in which the script only executes the lines when the quotations are removed. Which is what you do everytime you are about to encode your clip, otherwise they stay on. I think you should also remove them if you want to test how they affect your gif in the preview screen but i think these filters also require heavier graphic processing which my computer can't handle well so I never do that.
☆ line 30: video = core.std.CropRel(video, left=303, top=16, right=215, bottom=26)
this line is for the positioning of your video screen within the gif dimensions. you just need to match what you have in your VS script to what you end up with in your resizer.
ʕ •̀ o •́ ʔ
Photoshop (PS) - let's make a gif!
Now that we have clipped and preprocessed our video file, it's ready to go to photoshop!
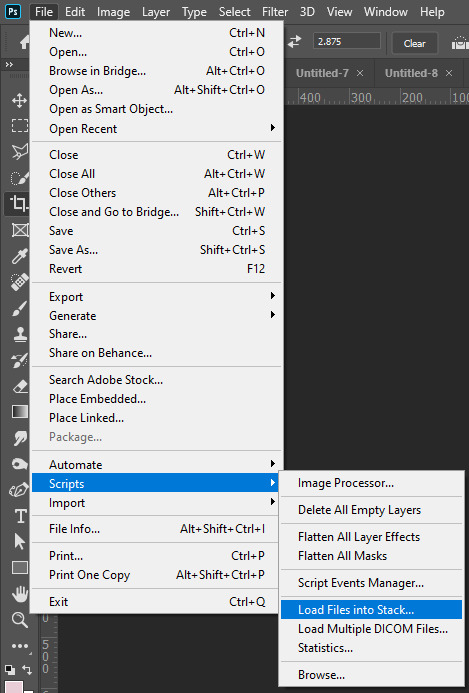
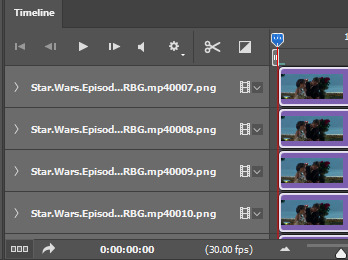
☆ step 1) after you have opened PS, go to File > Import > Video Frames to Layers. Then choose the clipped file you created through VS.
PS should open a box like this:
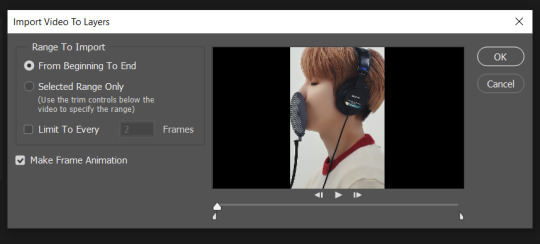
Keep those options ticked and hit OK
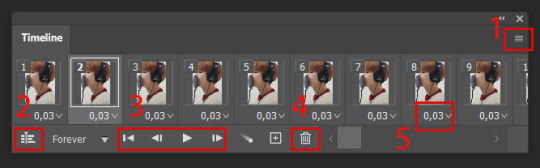
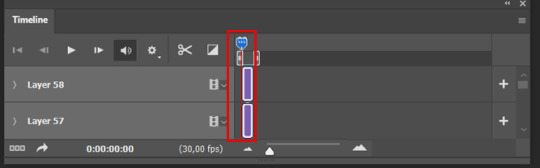
☆ step 2) now you need to go to Window > Timeline to bring up the timeline tool box. This window will always be necessary when making gifs. Let's take a look at it, I've marked down all the important buttons you will need:
timeline menu: there are several commands in here, you will need to use some of them later on.
convert to video / frame timeline
play controls to watch your gif
trash can to delete selected frames. (when deleting frames, first delete them here and then delete it's matching layers which are still there after deleting the frames)
frame delay time: this is where you set the time for how long that frame will be visible in your gif
☆ step 3) remember how I mentioned the preview option in VS and how i don't usually use it to trim the frames of my clip? That's because I usually do that at this step of the process, in PS. Notice how each frame is also a layer, and when a frame is selected, the matching layer has the eye symbol next to it turned on. So now you should play your gif and see if there are any frames you don't want to keep, then delete the frames and it's matching layers.
Since we applied sharpening filters back when we were clipping the video on VS, your clip should probably already look pretty decent even before the next steps, so steps 4 - 9 are optional. The coloring part of my video has been sped up.
☆ step 4) click on the timeline menu and select "Select all frames", then go to the select menu at the top of the PS screen and select "All layers". Now click on button 2 of the timeline at the bottom left, switching from the frame timeline to the video timeline.
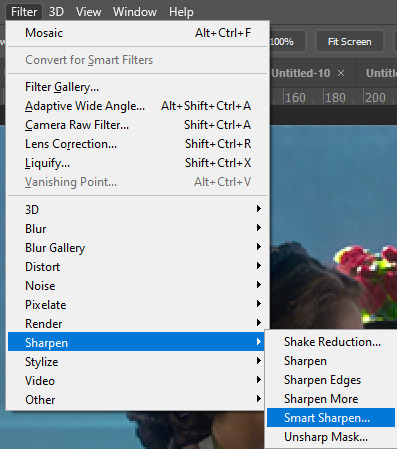
☆ step 5) before you do anything else, make sure the blue holder is at the beginning of the track before you do anything else. Then go to Filter (at the top of PS) and select "Convert for smart filters". This will convert all the layers into one single layer.
☆ step 6) now make sure the layer is selected, then go to Filter > Sharpen > Smart Sharpen. A box will open with several options:
I usually keep the amount to around 30, I don't touch on radius and you can also mess with reduce noise if you think your gif is looking too sharp. Hit OK when you're done.
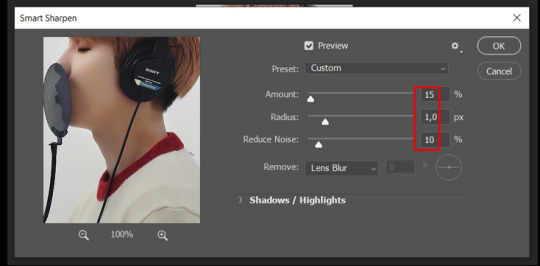
Since this is a filter applied to a smart object (the converted layer that contains all our layer - frames), this means you can turn this filter on or off as long as the layers are in the form of a smart object. You can also go back to it and alter it's settings (like I've done in my video down below)
☆ step 7) now while making sure the blue holder is still at the beginning of the track and the layer is selected, click on the timeline menu that i mentioned above. Then go to Convert Frames, then select Flatten frames into clips.
☆ step 8) again go to the timeline menu, Convert Frames, but now select Make Frames from Clips. Now click on the button at the bottom left of the timeline box, to convert the video timeline back into a frame animation. Then hit continue in the pop up box.
☆ step 9) now you are back to the frame timeline screen from before, but now the first frame is empty. You need to delete that first frame and then check the final frame because sometimes PS also creates another empty frame at the end at this point.
☆ step 10) PS also created a new layer under the layer 0, where the filter is still applied, you can delete this new layer as well. Now for organizational purposes, select all remaining layers (that contain your frames) and group them (you can see how in the video).
☆ step 11) This step is also optional, now I like to add the coloring to the gif. I have a separate tutorial exclusively on this topic. You can check it here:
☆ step 12) This is the time when I also add my signature. This is optional. You need to have the signature layer(s) on top of all the other layers. I usually have it in all black or all white, with lowered opacity of around 40%.
NOTE:
When adding elements (such as a signature) to a gif, it's important to always make sure you have the first frame selected, otherwise PS can move your newly added elements around the canvas on different and random frames. This also applies to anything in the layers pannel that has specific opacities. It's best to already add the elements with the final wanted opacity with the first frame selected.
Exporting + Delay time
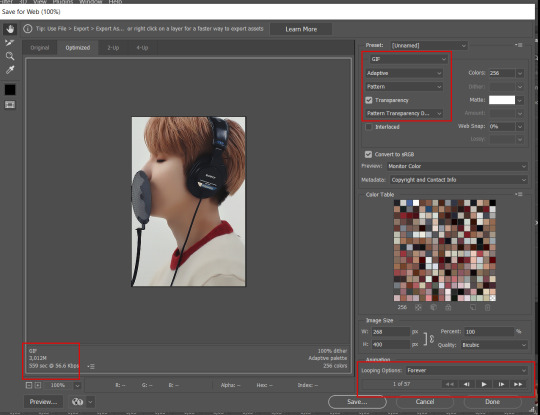
☆ step 13) To export: go to File > Export > Save for web (Legacy). PS will open this box:
First I just use the exporting screen to test the delay time of my gif, and to check the gif's final size.
About the size:
The final size is displayed at the bottom left. Remember it needs to be under 10mb. If it's above that, then you will have to go back and delete frames and test again until the size is within the limit.
About the delay time:
To test the delay time, hit that play button and the gif will play at it's default delay time. If it's too fast or too slow, you will hit cancel and change the delay time (at the next step).
For actual exporting:
The highlighted box at the top right of the screen is very relevant now. Make sure the first box has the GIF option selected. At the next box, you can select either perceptual, selective or adaptive. I usually like to use adaptive. At the next box you need to choose either diffusion or pattern. I like to use pattern. Tick the transparency box and then select either pattern or diffusion transparency dither.
Once you are satisfied with all aspects of your gif, hit save to export your final gif.
To fix the delay time:
After you have exited the export box, go back to your timeline, click on the menu button at the top right and select "Select all frames". Then, on any random frame, click at the small arrow next to the numbers under the frame. Select the option "Other". That will open a pop up box to alter the delay time. To test it again, use the export box explained above. Once you are satisfied, save your gif! I've also altered the delay time in my video to show you the process.
☆ step 14) After your gif is done and saved, I'd suggest to save your psd file if you added any coloring to it. This is so you can reuse the coloring later in other gifs without having to redo it all. This is useful if mking a set of gifs from the same moment / video.
Here's a detailed walk through of each PS step in this video tutorial:
youtube
I hope this tutorial is helpful! Feel free to send me any asks if you have doubts or need extra help! (つ≧▽≦)つ
175 notes
·
View notes
Text
Happy 1st Anniversary of KinnPorsche the Series!! 🎉 🎊 🥳 🥂
allow me to be emotional a bit (i say this as if i'm not emotional over the series and the actors every other day lol)
kinn and porsche are SO precious to me...as individuals and as a couple...i relate to kinn a lot: his struggles with a parent, his crushing sense of duty, trying to fit into the world he's forced to be a part of, him not always knowing how to communicate feelings...i had talked about it a bit here about how soft he is despite everything around him and ya...kinn is extremely close to my heart because of these things...i see myself in him (barring the killings and sadly barring the butt sex too)
porsche is just....SO MUCH lol!!!! if i spend time with him i would need 3 to 5 business days to get my energy levels back! but i understand his love for his brother and relate to how he's fiercely protective of him (i'm the same with my sister...but she's older than me)
and ofc mile and apo
man i related a little too much with apo's early life struggles lol...him being told to always 'correct' himself, him feeling disconnected with who he is made to be, being subjected to casual homophobia at workplace (he talked about these things in the On That Day interview and that press con that had happened with the entire cast)...the fact that he felt so unhappy coming back home from the US...it broke my heart and it hit a little too close actually...i had talked about this a bit here (i feel apo is queer coded) coz it reminded me of things that had happened in my life quite recently at that time and the fact that both apo and i were still going strong gave me a sense of kinship with him (hahha 'kinn'ship haahhhaha)...i ofc don't have a mile who has been a positive and happy addition to apo's life since he came back but i am making efforts to have those positive and happy additions in my life
and one of these positive and happy additions happens to be the kpts fandom....y'all....it is SO AMAZING TO BE PART OF THE FANDOM.....y'all are SO TALENTED! the art, the gifs, the meta, the fics, the vids, the polls, the thoughts on the characters, the crackposts, the textposts, the fandom archivers! i'm so thankful to all of you...each and every single one of you
and lbr we've had our fair share of trials and tribulations but because i'm only on tumblr and not on any other social media sites, it has been generally a brilliant experience...i have made such great friends, have talked to a bunch of you, received amazing mile thirst traps in my inbox, have been entirely inappropriate in writing my shameless tags in posts, have openly admitted to my armpit and armpit hair fetish (i made armpit appreciation gifsets ffs), have again very openly talked about my other kinks as well (i think y'all know 🙈) (the armpit fetish admission has led to a beautiful friendship that i cherish <3 and my thirsty tags have led me to meet my feral twin <3)
personally as well i felt like investing myself more into the fandom and the series and the characters and the actors....it made me do things that i had not done before! i talked to fellow fans actively, i made gifs (low quality and using free software lol but i'm actually happy with them), i wrote stuff, like i legit made an ao3 and wrote some stuff lol! i have not done that before and again it is primarily for me and i'm proud of myself for doing these things y'know
last but not the least, kinnporsche the series gave me my thai husband: mile phakphum romsaithong .... and for this alone, it is the best thing out there in the world 🙈🤣
the anniversary of my foray into the series will be next month (it was mile's asscrack that convinced me to finally watch the series that kept trending on tumblr from time to time) but let me be emotional today too
thanks y'all and happy 1st anniversary!
#wow that got entirely too long#kinnporsche the series anniversary#i just wanted to let y'all know that i love you#it has been nice....to actually like something so intensely....it had been a while#how are you celebrating the anniversary?#i ate 3 samosas and a chocolate chip muffin#and did other important personal things...all in all a very productive sunday!#kinnporsche#kinnporsche the series#my tumblr wife that i got from the fandom is in the replies ♥️
46 notes
·
View notes
Text
possible indicators of stolen gifs
(this isn't about going to the gif menu which automatically sources the gif underneath the image itself, this is about downloading and later uploading the image in a completely separate post.) (@gerardwaist's post reminded me to make a proper compilation of information which i've been meaning to do for a bit now because i'm tired so ty kit)
odd or inconsistent resolution - most people make gifs that are 540px wide for single-row gifs, 268px for 2 per row and 176px for 3 per row (as these are the resolutions that the gifs will be displayed on most people's devices when viewing the post in the dash). people who've stolen gifs often don't line gifs up correctly and this can result in oddly pixelated/small or clear/large looking gifs.
generally inconsistent gif style - this is pretty easy to spot, if gifs vary greatly in quality, size and colouring they may not all belong to the op (this is because the maximum image size on tumblr has increased massively over its existence; gifs from before 2012ish often being small with a low frame rate while most after 2017ish are very clean and smooth.)
captions with no source/information - the majority of seasoned gifmakers use the text part of their gif post as a place to denote what the gifset is about, source videos and/or add a relevant passage/quote. stolen gifs are usually accompanied by "reactions" to the gifs rather than information about them.
over-tagging or no tagging at all - since what most people who steal gifs want is engagement, they often over-tag said gifs with things that aren't particularly relevant to the actual content in the post (most people who've been on tumblr a while don't do this because tags are a way to find specific content, not just a way to get your stuff in front of more people. you'll probably get grilled for this).
also, most gifmakers tag their gifs as something along the lines of "my gifs" or another signature tag in order to find their ops later (for example mine is "candy.gif").
new or half-empty account - as i mentioned, a lot of this has to do with how long someone has been on tumblr. gifmaking is a very tumblr-based thing, people who have brand new or semi-active accounts probably aren't gifmakers.
watermarks (i.e. text stating the creator's username) that don't match the url - this can always be because the user has changed their url after making the gif, but if there are other indicators that the gif isn't theirs then it probably isn't.
the post itself isn't about the gif(s) - it may be a diary-type text post, fanfiction etc accompanied by a gif of the character they're talking about. plenty of people source these nowadays but there's always a few who don't get it.
either reply or send a quick message/ask to the person letting them know that they shouldn't repost someone else's gifs without permission and if possible track down the original post(s) to reblog and/or let the gifmaker know. a lot of people genuinely don't know the etiquette around fanmade content online so it's safest to let them know and give them a chance to right themselves before being particularly mean or judgemental.
19 notes
·
View notes
Note
hi sadie! i hope you don't mind me asking, but i saw your recent gifset from sex and the city and the quality is literally GORGEOUS and i was wondering how/where you found the show at that quality. thank you so much!!
hi tj!<3 i use a bunch of different t*rrent and direct dl sites, but t*rrentgalaxy has all seasons in 1080p. bitsearch is also worth checking out in case you have trouble with low seeds, and i always sort by size to get the best quality. hope this helps 🤍
3 notes
·
View notes
Note
How did you get into making gifsets? I want to learn how to but I don't know where to start 😭<3
loaded question lmao, but long story short- the lockdown + boredom.
longer story- i made some gifsets every now and then since '16 (but not that seriously (the earliest were made on my phone, not even using photoshop lmaooo). maybe it Should've been seriously since it was easier to get your sets reblogged back then with minimal tags imo). but i always took Loooong breaks inbtwn so i always had to relearn how to gif from the ground up (i still keep a google doc w/ pointers and links and notes about how to do everything). but in '20, since i was basically stuck at home and bored, i was able to figure shit out. i use a bootleg portable photoshop cs6 for everything.
some links that i revist are: this for km player, this for sharpening, (a mix of) this And this for coloring, and literally any/everything on this blog. also this for gradient captions. it's easier to make better gifs w/ higher quality videos btw (otherwise who get endlessly frustrated w/ pixelation and shit).
(disregard anything in those tutorials that mention a super low gif limit or 10 gifs limit bc those are the rules of yesteryear. i dislike the new post editor Immensely, but i had to do math if i wanted to make a gifset with more than 10 gifs and i don't miss that lol. i'll give the new post editor that One thing)
after a while tho, you just sorta vibe and do your own thing. i'm Not out here doing overlays (tried my hand at it tho) and really crazy complicated gifs (more power to those who do lol i just don't wanna do math if i don't have to)!
i hope these help!
#i said 'long story short' and then went on for 4 paragraphs lmaooooo i'm so tired#anonymous#photoshop#gifs
3 notes
·
View notes
Note
Hi! I’ve always loved your gifs and I gotta say they have never looked better! Would you mind sharing a bit of your giffing process? Do you have any tips for giffing shows that don’t have HD (💔) episodes available? Anyway, thanks for your creations and for being so passionate about this character and this ship! Xxx
😭😭 you’re too kind, thank you. First off, we got blessed by the show being put on Max so the upconversion from even a few years ago has recently improved when it comes to redness and pixels (for the later seasons but even more for the first season). Thank god for t*rr*nts.
Second, my general advice for episodes in low quality is to stick to 268px gifsets rather than attempting 540px because lq episodes just aren’t conducive to wide gifs (in general!! some people have done incredible things with PS and lq videos). Doesn’t mean I haven’t tried though 😅 I def used to do this for Dawson’s Creek before their own migration to Max.
As for some tips:
I use the import method to make gifs which is less common than loading caps into stacks but it's how I've always done it.
For coloring, I'm really a novice even though I've been doing it for years. I'm nowhere near as skilled as most gifmakers on here but I like doing it and it's fun. I really recommend looking through the tutorials on @usergif ! Also, this tutorial was one I learned a lot of basic techniques from, including things I describe below.
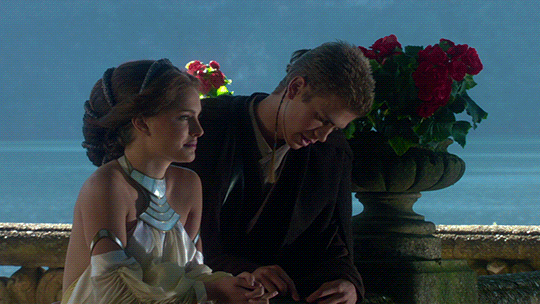
Two adjustment layers that I think are really important for most gif-making is Curves and Channel Mixer but I'll share all that I did for this one scene in a gifset I posted a few months ago.
Here it is with no added coloring (though it has been smart sharpened):
First I use a Brightness/Contrast layer and set it to 73 brightness and 3 contrast:

This is where Curves comes in. I use the black eyedropper tool to select Ryan's jacket to bring out the black in the cap/gif:
So right now it's super saturated but that's a good thing that we can work with. Also, I'm no good at explaining PS so here's a good tutorial that explains Curves a little better. I like Curves because it emphasizes colors while also brightening the image (there's probably a way better way of describing it).
I add another Curves layer to brighten it (I probably used Auto on RGB; that so often works tbh):
Then I use Levels to get rid of some of that redness while also upping the green and blue (generally just sliding the thing until it looks good):

So to me this is way too green and yellow but still somehow red which is why I next bring in my favorite layer which is Channel Mixer. Basically this is the layer that helps with getting rid of the yellow filter many tv shows use that drives all us editors mad. It neutralizes your image which I think really helps with lq video. Here's an in-depth tutorial.
This final cap skews more purple than it probably should but it felt right to me in the moment when I made it. Looking back I probably would've gone even harder on the Channel Mixer to neutralize that blue/red combo but I like the coolness of the tones and the contrast we get:

I'm 100% sure I didn't explain this well enough but @usergif really is a great resource so I rec looking around there. For all footage but especially lq footage it's important to neutralize the image which usually means eliminating the redness and the yellow tones.
Let me know if there's anything else I can help with!
3 notes
·
View notes
Text
new tag game! be your own biggest fan! 💗
making a new post 'cause the other one was super long!! but shout out to @there-was-a-hole-here-itsgonenow for tagging me, and @magentamee and @likegoldintheair for starting this tag game
link 3-5 of your favourite & most underrated posts, that you have made! If they’re hard to find, just choose something recent that you think deserves some more love!
then tag 5 other people to keep the positivity flowing ✨
favourite(s):
Why Byler is the Only Logical Outcome of Stranger Things: A Necessary Breakdown of Will, Mike, and Eleven’s Narrative Arcs
This was the post that fully entrenched me in Byler fandom and Byler tumblr and helped me find a nerdy community of beloved mutuals, and I still feel like it's a great primer/entry-level Byler analysis that can help more general-audience-type viewers see the Truth.
most underrated:
my "byler truther energy" gifset
idk i thought it was funny but the gif quality is v low
most unhinged:
Why Byler Can Be Canon and Mileven Should Breakup
These are the most unhinged for me just because I generally tried to stay away from negativity or being fully anti-anything but these posts marked me getting more and more unhinged with my anti-m*leven slander lolol
i’m tagging: @willthewise7 @hawkinsp0st @estelinhabb @ronance-and-reddie
anyway this was neat to reflect on my time in the bylersphere thanks yall <3
20 notes
·
View notes
Note
your gifs restore my love for Johnny. have been a fan for about 10 years but for the last couple of years i find it really hard to watch his new stuff or even keep up with him because of the quality of his work rn & his personal life (cough mara cough). anyways seeing all of the gifsets and posts of his projects i once knew by heart brings my obsession back. keep doing what youre doing, Jonathan & your blog deserve more recognition !! <3
🥲❤️ thank u. that's so nice to hear especially since i haven't been as active lately as i used to be. but i totally feel you on the not feeling jrm anymore. the fact that i used to watch his movies the moment they were released and now it's been a month and i still haven't made the effort to see ambush or disquiet speaks volumes. the last movie of his that i enjoyed was a dangerous game but the bar for enjoyment is so low it's through the floor. in my head jrm's last movie is black butterfly and he dropped off the face of the earth after that<3 also i'm ngl he used to be such a good actor but now it feels like he's forcing it for whatever reason so at this point i'm like. maybe retire 😭 so i'm sticking to primarily giffing his older projects
2 notes
·
View notes
Note
how do you make your gifs?
i use photoshop :) and basically everything i do is a collection of tactics picked up from various tutorials. this is the tutorial i first followed, but i can give a brief overview of my current process (i can't tell if you're asking for a tutorial but i'll write one anyway) under the cut
first step is screen capping using kmplayer (free to download). screen capping is the best for high quality
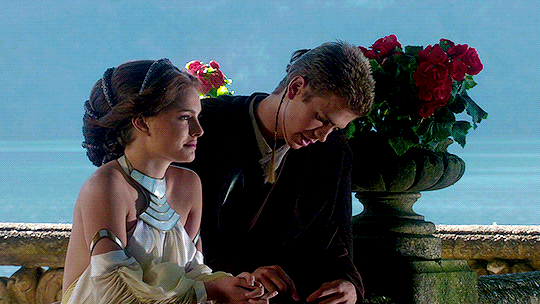
open video file (always 1080p or better), scrub to the scene you want to gif (i'll use aotc. for fun)
right click for this menu:

make sure you have these settings:

by default, frames will go to the 'capture' folder, but i find it useful to make a unique folder for each gif i make to access it easier
click start and then play the video until the frames you want to gif have passed, stop frame extraction. simple enough
now, all the frames are in a folder and you can load them into photoshop
2. actually using photoshop
i always load my frames into a stack:
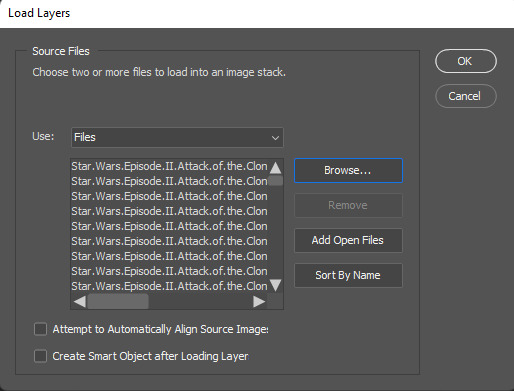
this takes a second, but i think it's worth it for high quality
with all layers selected, switch from the 'video' timeline to the frame-by-frame timeline, using the icon in the bottom left corner of the window
from:
to:

right now, all the frames are in the opposite order. go to the three bars in the upper right hand corner of the timeline
first, make frames from layers

then, select all frames (again using the three horizontal lines in the top right). finally, reverse the frames.
3. cropping, timing, image size
this is the step where you have to do all three.
cropping: you can crop however you want, but i usually use the photoshop presets like 16x9. just make sure all your layers are still selected.

it's also important to trim any frames that are extraneous or you don't want. for tumblr, i try to aim for at least less than 50 frames on any given gif. ~30 is what i prefer
timing: most people put gifs at a delay of 0.05 sec. between frames. with all FRAMES selected, click the drop down at the bottom of any frame, change the delay as you please (Custom delay)

image size: every post on the tumblr dashboard is 540px wide. when making gifsets, this is important to consider
with everything still selected, go Image -> Image Size... (ctrl+alt+i on pc)

from there, you could export and have a gif appropriate for tumblr, but you probably still want to do some coloring.
here's my gif with NO coloring:
4. sharpening & coloring
everything after this part is pretty subjective in terms of what's "best" to do. this is just my method!!
to color, i convert my frames into a smart object. with everything selected (frames and layers), i switch to the video timeline again
then Filter -> Convert for Smart Filters. now every frame is condensed into one layer! yay!
i have a sharpening action, but it's just Filter -> Sharpen -> Smart Sharpen...
with these basic settings:

you can play around with these settings, though (FOR ANIMATION: set the opacity of this layer to ~30-40%). oversharpened gifs look low quality and unsharpened gifs look fuzzy
coloring is where you really get to have fun!! generally, my basic goal with any coloring layers is to brighten and balance colors.
go to the Adjustments windows and add a curves layer.

selecting white and black points (if they exist) with the eyedroppers can help balance colors AND brighten the gif

gif now:

next, i use a Levels layer to add contrast
you can use white/black/grey points again, but i usually don't.

the left box can be from anywhere ~10-25 and the middle ~1.0-1.5
with levels:

from there, i use Color Balance and Selective Color layers to alter anything else.
in this gif, i think the midtones are too yellow, so i'll change that with a color balance layer. i'd also recommend playing with the shadow tones to shift the overall tone of the gif. never go too extreme with these values, it ruins quality
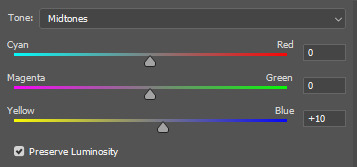
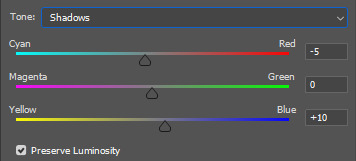
with these settings:
after that, i adjust any layers as needed!
5. caption (worst part)
add a layer of text, the box should span the entire gif:


then, i use a stroke and drop shadow (triple click on text layer for blending options):


but, again, this is all up to you.
6: export
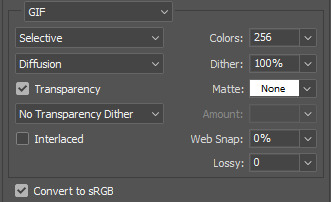
here are the settings i'm gonna use (File -> Save for Web):
finished gif:
7 notes
·
View notes
Note
can i ask how you color and sharpen your gifs? they’re so vibrant 👀
Of course! I don't know how helpful I can be because I don't do anything special, so this is mostly an incoherent ramble and offers absolutely no insight. There's so many amazing coloring tutorials out there, so I would recommend any of those rather than reading the jumble of words below the read more lmao. The best resource ever is this blog. You can find tutorials for everything ever.
First, I crop by using width x height x resolution rather than just plain cropping and then resizing the image. I have no idea if that actually makes a difference in the quality, but I've gaslit myself into believing it's a difference maker. My settings are usually 542 px x 400 px at 135 px/in. The reason I do 542 is because then I go into canvas size and do 540 x 398 to cut off those tiny transparent borders that always show up after you crop (I don't think it's noticeable at all when you upload a gif but I'm just in the habit of doing it). Once it's cropped, I flatten my frames into layers and use a sharpening action. I have no idea what tutorial and specific sharpening action I downloaded because it was years ago, but there's so many out there. Here's just some random ones I found, but there's a lot if they don't work for you [x, x, x].
As for coloring, I color every gif from scratch each time. I know a lot of people use PSDs, and then might alter them slightly based on the gif. That looks great and is faster and works very well, and it can be a great option for you to seek out. I'm just a control freak who wants to manually adjust everything.
Gifs with a dark or solid, colorful background are my favorite to color because it's so much easier to make the person stand out. I can just talk you through my mindset for this gifset.
I used exposure, brightness/contrast, selective color, color balance, vibrance, and levels. Exposure was +.53 and offset was -.0015 (I like using offest and gamma correction when I have a very dark background I want to emphasize, but I keep them at very very very low levels). Brightness was 9, contrast 7. I don't really like using brightness/contrast too much, but a little contrast in the right color conditions does sometimes make things more visually interesting. Selective color in black under the black subheading was +26. I go wild to make a dark background darker. If it had been a pretty blue background, however, I would've been in the blue and cyans section just messing with the sliders until I got a nice shade of blue I liked, and then I would've gone to the blues under hue/saturation to make it even brighter. I didn't use any 'selective color: neutrals' on this gifset, and I kind of avoid them because it's really easy to wash someone out or give the gifset a kind of ugly color tone if you're not very cautious.
Specific color balance numbers would be annoying for you to read through, but make sure you work with all 3 of the shadows, midtones, and highlights. I almost never go more than a +/- 5 on any of the sections, and I always hide the layer after to make sure I actually like the colors I added because you might accidentally take a totally normal gif and suddenly, all the blacks are looking magenta toned because you went too wild in color balance. I just added a tiny bit of vibrance (+8) to make sure I wasn't washing him out, and then I finished off messing with levels to once again emphasize the dark background.
90% of the gif coloring I do is done in exposure, selective color, and color balance. Those three are the backbone of my gifmaking. I spend so much time messing around in selective color with all the standout colors in the gif. I wish I could drop a magic secret here, but I really just go through and adjust the sliders until I find a balance I like.
I think color balance is so important to making sure the person isn't a weird shade after you mess with other colors - it ensures sure they're not super yellow or overly cool-toned. When I have a colorful background that isn't a red/yellow/orange (because messing with those colors will mess with a person's skintone), I also usually make it brighter through selective coloring and hue/saturation. I cannot emphasize enough how much selective coloring changed my life. It's my world. When I finally do upload my gifs, I always save them to my drafts and view them from mobile and desktop to see if there's anything that looks super weird that I need to fix. Sometimes a gif will look great in photoshop but suddenly the person is bright red on mobile, so it helps me make adjustments.
I used to be very conservative in adding lots of color and I tended to wash people out and was too afraid to make a colorful background even brighter or a dark background darker. For example: this old gifest I made on my main just looks so .. dull? There's no life in that skin. What I would do differently now, just as a basic starting point, is brighten the blues and the reds in his skin through selective color + hue/saturation, add more exposure, and use color balance to make his skin tone more human. With just those adjustments alone on top of the gif (which did already have coloring on it!), it looks way better and brighter. I mean, does it look good? No, it's a screenshot of a gif from almost 2 years ago and I spent 30 seconds on it, but it's better!
My advice is just to not be afraid to mess with colors and make them stand out. I have zero comprehension of color theory and no artistic background, so I was flying blind when I started adding all these adjustment layers and was very timid about them. I really just think the best thing to do is to mess around in photoshop working on gifs with different colored backgrounds so you practice how you want to mess with those colors. I seriously spend so much time making gifs that will never see the light of day because it's fun to do and it helps me learn the adjustments. My understanding of color also significantly improved when I started trying to make more edit-y style gifsets, because I'd try to recolor the background of the gif with the brush tool and changing the blend mode and wouldn't understand why the color I'd painted over top an orange background wasn't turning out exactly how I wanted when I changed the blend modes.
I'm sorry that this is an absolute mess with no real advice besides "I like these adjustments" and "just mess around!" I know that's not particularly helpful, but I'm honestly too busy being flattered that I was even asked for advice.
#ask#this is my first ask on this sideblog#and it's just a full 'i haven't taken my ritalin in months' word scramble#i am so sorry#but i'm so honored to even be asked#i am NOT qualified to be giving photoshop advice but have it anyway!
2 notes
·
View notes
Note
https://at.tumblr.com/anyataylorjoy/httpsattumblrcomanyataylorjoycertainty-of-de/epkverlvsa7k
^^^ I forgot to add that besides the canvas size being 268px by 433 px, it's actually divided into 4 rows and columns instead of 3 rows and columns, with the large gif too. So 13 gifs in all with 27 frames each. Maybe that???
hi anon, so you're making a gif that has a canvas size of 268 x 433, and 4x4 so each of your small gifs is about 64x105 ish? i'm guessing that's where the low quality is coming from! i've never really gone below 100x100 due to quality loss so i don't have any tips in that area but if you want to stick with the 268 canvas width i would suggest doing only 2 columns with 132 px width and then as many rows as you want! the gifset you're linking has a canvas width of 540 px and each of the small gifs is 178/177 x 200 i think!
the amount of frames isn't going to affect quality much as long as you're under the 10 mb size limit (although i am not up to date on tumblr's compression tools rn) but the px size of your gifs definitely will! i also typically tinker with my sharpening settings the smaller in size i go as smaller gifs can very easily look oversharpened. i tend towards using my 'sharp' action from my action pack and then duplicating the layer and using gaussian blur and decreasing the opacity - here's a really great guide to that 💜
3 notes
·
View notes
Note
Hi! I just wanted to say that I love your media edits. They’re all so beautifully made, not to mention emotionally engaging. Would you mind my asking what editing software you use, and any tips you may have for somebody looking to get into that kind of editing? Thank you!
hello! thank you for the kind words, they mean a lot 💛
as for editing tips and apps, I have answered some of your questions here and, although this other ask was geared towards one edit, this ask also explains some of my process. DISCLAIMER: VSCO recently put a lot of free tools within their editing interface behind a paywall, most notably the Grain tool, so look out for that in other apps if you don’t want to pay.
additional advice -
find other edits/gifs/quotes/lyrics that resonate with you and look at them collectively; ask yourself what commonalities do you see in them that you frequently fall into? whether it be coloring, fonts they use, recurring themes [ex: you said there’s an element in my edits that you find emotionally engaging, so I would ask what aspects speaks to you most about them]
if you are specifically insp by an edit, feel free to use their edit as a guide to creating your own edits; part of art making is imitation, it’s very ingrained in the history of art so don’t get too hung up on ‘will they hate me if i copy what they’re doing’; the one thing I would advise, if you do closely copy another person’s edit, is to make sure it still represents your style [ex: i was heavily insp by this edit recently and there are stark similarities between my composition and op’s but at the end of the day, there’s still choices that makes mine mine and theirs theirs; same with this and this]
and if you do specifically want to call out the insp work, make sure to link the orig edit/gifset back to the op
don’t get too discouraged off the bat; you are just starting, which means you have some idea of what you want your style to be, but editing is a fluid process. My style has changed maybe 3-4 times. it can feel frustrating because either youre not happy how something turned out or the quotes/lyrics don’t fit perfectly, or maybe the quality of the image is low, so your edits look weaker against the rest of the set- these are common struggles, even for a lot of us making content these days
you can make something you don’t like and choose not to post it, just never think for a second that it was a waste of your time; each time you spend making something is worthwhile if it means you make something else you like again later
NOTES DON’T MATTER; NONE OF THAT MATTERS
don’t rely on p*nterest/g**gle images, when unsplash is your friend
if you have questions about how to use the apps in particular, you can DM me and I can try to walk you through some of it. that goes for anyone reading this and also wants to give it a try.
oh! Lastly, pls pls have fun with this! i find a lot of enjoyment pouring my enthusiasm for a show into an edit, so never spend time making if it doesn’t stem from a place of catharsis. does that make sense?
anyways, happy editing!
#replies#my-year-2002#anyone is welcome to DM me with your edits if you also want a second opinion on something#the jessi editing class is growing by the day#mj gei and a few others have graduated with high honors#hope you had/have a great day wherever you are at
2 notes
·
View notes
Photo

"Wij twee."
"Wij twee."
#wtFOCK#Zoë Loockx#Senne De Smet#Zoenne#wtFD#02 mei 2020#so many twos#best number tbh#their number#happy one year of wij twee my loves#I have 8327382 wtFD gifsets but I want to post them with the equivalent chapters of my fic -_-#this is so ugly I'm sorry babies you deserved so much better on your 1 year anniversary#try giffing low quality image of webcam footage tho ;')#I failed on the last if aka the wij twee gif#according to the subs they say 'wij tweeën' I can't believe it but I decided to use wij twee#who would have thought 2 has a plural ??????????#love that there's a word with 3 Es in sequence I could never imagine it existed#the only low quality here fortunately is from the camera this clip makes me ugly cry every time I watch the emotions please#I can't explain what they did here#fucking art man#just-#love
57 notes
·
View notes
Photo
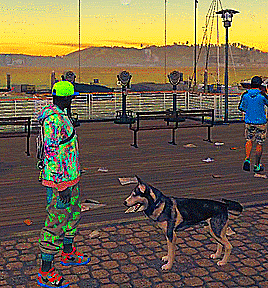
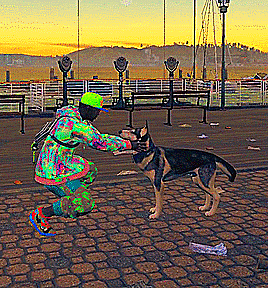
you get me, don’t you, dog?
#watch dogs#watch dogs 2#watchdogsedit#marcus holloway#gamingedit#mine#this gifset raises many questions:#1. does watch dogs still have a fandom#2. why is ubisoft so low quality on my screen recorder#3. how did i get so out of practice making gifs#4. whose idea was it to put this mechanic in the game and did they get a raise#i LOVEEEEEEE marcus so much... ahhhh it's been so long since i was so in love with a game#wd
64 notes
·
View notes
Last Seen Blogs
kengjubjub
Kengjubjub
err0
let's go out into the fields.


theanonymousstormer-blog
Untitled

anqito
Untitled