#morningstr
Text


lucifer: one random deckerstar scene per episode [the would-be prince of darkness, 1x03]
#luciferedit#lucifergifs#detectiveplease#deckerstardaily#morningstr#deckerstar#randomdeckerstar#lucifer#tv: lucifer#chloe decker#tom ellis#lucifer morningstar#lauren german#ohheycool#dailylucifernetflix
153 notes
·
View notes
Note
Hello do you know if there are any active Lucifer blogs around? Is this fandom still around on the hellsite?
it's definitely worth it to check out the lucifer and luciferedit tags to see the "active" lucifer blogs. i doubt there's till anyone out there only blogging about lucifer but people ik that still love lucifer and for example also reblogged my latest deckerstar set are:
@burningblake @katherineebishop @fionagallaqher @deckerstar @claire-randall @laurellance @spiridakos @samcaarter @lucifergifs @luciferloveschloe @leighstonmurray @damn-salvatore @motherflunker @avengerdaisy @simplymanuela @fyeahlucifernetflix @morningstr @seeleybooth @kiddstellas @roseapothecary @simoneashley @bellamysgriffin @morgana-pendragon
i truly hope this helps <3
- kers (@mauraeyk)
#answered#anonymous#in case you don't wanna be tagged or for whatever other reason want your tag to be removed please let me know#also if you wanna be added bc you post/reblog lucifer stuff :)
39 notes
·
View notes
Note
hii i was wondering how you blend gifs such as this one? it’s something i wanna start doing but haven’t got the slightest clue how🥹
hi there !! blending is definitely one of the more fiddly aspects of gifmaking, but i'm happy to help !! before i start, here's some tutorials that really helped me out/look really helpful:
difficulty: low (by morningstr)
difficulty: intermediate (more tailored to colourful gif blending) (by lamberts)
difficulty: intermediate (by yenvengerberg)
difficulty: low (by jackarthurdavenport)
difficulty: intermediate (by nelsonnicks)
before you start, you should have a basic knowledge in how to colour your gifs, sharpen, etc etc. if you want any information on that, feel free to send me another ask for that.
i use photoshop 2022 for all my creations. and big disclaimer my process is VERY different to to others, but i don’t think it should change too much of your result.
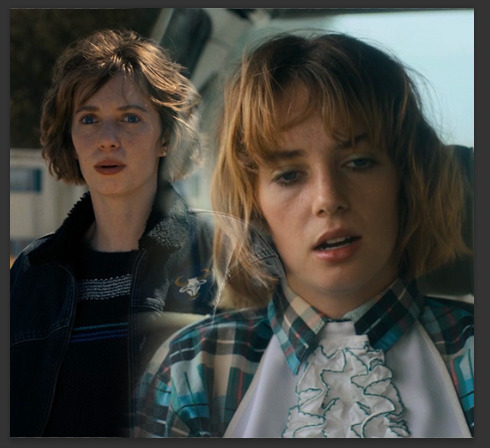
1. create two gifs.
you’re going to start by creating two entirely separate gifs. when you’re blending, i find that it is typically easier if you can get two types of shots (mid, far, close up, that kind of thing) because it makes it easier to blend later on.
here we can see robin is kind of more of a mid shot on the right, but the left shot is zoomed in on her face to make it the focus.

from here, ensure your gifs have the same amount of frames and layers. you can delete the excess frames + layers to get them at the same amount. (eg. one gif had 42 frames, and the other 15, so i selected every layer + frame past 15 and deleted them.)
2. combining your gifs.
this is where it can all get a little hairy quick !! start by selecting all your layers, and putting them in a group. you can then rename that group so you can tell them apart when you duplicate them. then, select all your frames, change the frame delay to 0.05 and go from there.
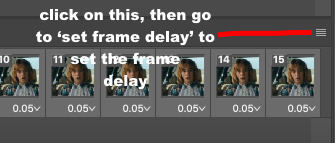

now, pay attention to this bit. you’re going to take ONE gif over to the other. to do that, click on the four lines i highlighted up ^^ and go to copy frames. make sure all your frames are still selected. then, go to the gif we’re going to place the other gif on, and go to those same four lines but press ‘paste frames’ this time. this menu will come up:
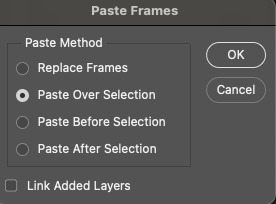
click the exact same one i have highlighted, then press ‘okay’. now, your frames and layers have copied over. you should have two folders, and the gif you were copying will probably be the only one you see, but don’t worry ! your other gif is just underneath.
3. blending your gifs.
this part differs for each creator, but here’s how i do it. select the top layer that you want to blend in, and open this dropdown menu:
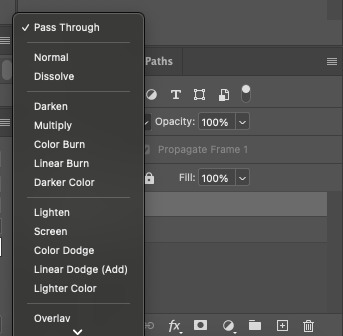
you’ll want to select either ‘lighten’ or ‘screen’. choose whichever looks better. your gif will now look like this:
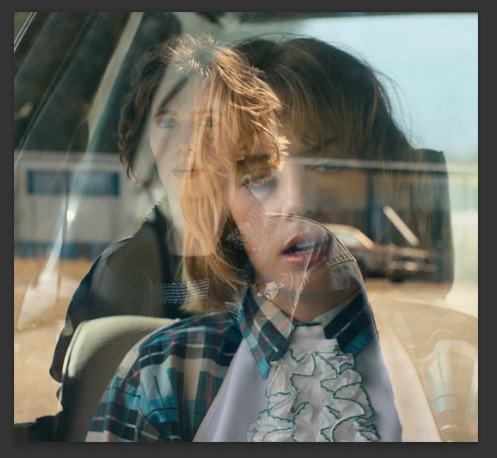
so now we’re going to blend !
because of the negative space behind robin in the gif underneath, i’m going to try and move the top gif into it. how you blend and where is kind of down to just a visual thing. so, i’ll move my layers into that space and then i’ll properly begin blending.
now that i moved both of my gifs it leaves these pesky lines behind:

to blend them out, do the following:
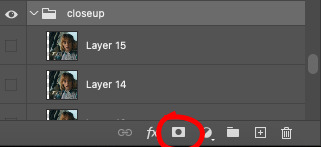
select the folder itself.
go down to this bottom bar, and select the circled icon (it’s a layer mask):
now, you have a layer mask. to use it, go over to your brush colours on the side bar (pictured below)
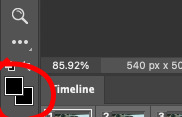
and make sure it’s on black. if it isn’t, you won’t be able to blend. after this, go to the gradient tool (in between the rubber and the blur tool on that same sidebar) and make sure your gradient looks similar to this:
if you need to change it, click on that gradient, go to basics, go the one with the checkers and change the colours to black. now, go back to your layer mask, making sure that your gradient tool is selected and create little increments going across that line. make sure you work horizontally, otherwise it’ll blend your gif away.
then, just keep doing that until you’re getting results you’re happy with. i’ve done a layer mask on both layers, and i’ll show you a tip in case you need to do that as well. but for now, do a rough blend with the gradient tool.
after that, go to the brush tool, and change your brush to a soft round brush, probably on 75-100. you can brush over spots you want to blend, as it allows you to be more particular.
this is what my gif looks like now:
from here, you colour each gif in their respective folders, convert to timeline -> convert to smart object, sharpen and save !! this is my final result:
#*tutorials#completeresources#gif tutorial#blending tutorial#useranne#tuserkay#usernorah#tuserrex#userrsun
124 notes
·
View notes
Note
How do you make your gifs blend so smoothly? Can you make a tutorial or point me to one that you use? Your gifs are so great :)
Before I answer anything else, thank you so much for your message. I am very happy that you are enjoying my gifs ❤
And I actually do have a tutorial for blending gifs but, let's be honest, Tumblr really upped their game when it comes to allowing bigger gif sizes and completely changed their measures. Which is a good thing! I used to hate how much we had to cut down on gifs. But the tutorial I linked is from nine years ago. Thanks for making me feel super old. (I also have another tutorial for 'overlapping' gifs, which is also from nine years ago. I'm just going to go ahead and check myself into a nursing home now.)
Now, I still use the same techniques, but obviously, I got better with practise. If you have any questions about a specific effect, please feel free to link the relevant gifset and I'll gladly answer it. In the meantime, please check out these amazing tutorials:
by @morningstr: https://morningstr.tumblr.com/post/628783912451211264/hey-guys-this-will-be-a-quick-tutorial-for
by @delphines: https://delphines.tumblr.com/post/678274668653838336/buckypascal-requested-a-tutorial-on-how-i-blend
by @eddiediaaz: https://eddiediaaz.tumblr.com/post/698010206026760192/can-you-please-do-a-blendingoverlay-tutorial
Hope this helps :)
7 notes
·
View notes
Text
It me
tagged by: @wingsofthenorth
last song: About Damn Time by Lizzo
last movie: The Rainmaker (1997)
last show: Shopping and Shipping | Critical Role: VOX MACHINA | Episode 14
currently watching: Drawfee on Youtube
currently reading: The God Delusion by Richard Dawkins
currently working on: Christmas gifts :O !!!
favourite colour: Green/yellow, deep forest green and mustard yellows are so pretty together but I also like rusty red and brown tones. Earth colours I guess.
sweet/savoury/spicy: Give me a spicy Kare Burosu Ramen from Wagamama any day!
coffee/tea/cocoa: All of the above, but tea is the one I can’t live without!
craving: Doggo cuddles :3
tagging: @morningstr @dilfosaur @petardaaaa
1 note
·
View note
Photo

#luciferedit#tvedit#sincerelygabby#userveronika#userannalise#dcmultiverse#userfanni#tuserdaniela#morningstr#lucifer morningstar#lucifer#mine
881 notes
·
View notes
Photo

Lucifer 06x01
↳ 1962 Chevrolet Corvette C1
#lucifer#mine#luciferedit#dailylucifernetflix#userlucifergifs#tuserkers#userfanni#mensource#fyeahlucifernetflix#mikaeled#caredit#tvcentric#dailynetflix#tvedit#malecharacters#morningstr#usersource#userstream#bbelcher#dcmultiverse#usertk#userneve#tusershay#tuserdi#tvfilmsource#useronedirrection
466 notes
·
View notes
Photo


MAZIKEEN AND EVE
LUCIFER | 5.13 - A LITTLE HARMLESS STALKING
#lucifer#luciferedit#lucifergifs#fyeahlucifernetflix#morningstr#tuserdee#userzsofi#usermazy#useryoumna#userannalise#usertrixie#tuserssam#cinematv#cinemapix#useroptional#*#by rishita
424 notes
·
View notes
Text


Lucifer can't help himself once the music starts.
#lucifer spoilers#deckerstar#lucifers5b#thedeckerstarnetwork#luciferedit#dailylucifernetflix#fyeahlucifernetflix#hellyeahlucifer#lucifer on netflix#filmtv#cinemapix#cinematv#tvcentric#dailyshowbiz#dcmultiverse#useroptional#userveronika#userfanni#morningstr#captainmorningstar#userlucifergifs#dailylucifergifs#tvfilmsource#televisionblog#dailyreblogs#bbelcher
598 notes
·
View notes
Photo

I have to say that I think tonight is the best date I’ve ever had.
#userharumi#morningstr#userseeleybooth#dailylucifernetflix#lucifergifs#dcmultiverse#luciferedit#lucifer spoilers#carol corbett#lucifer#dc#tv#photoshop adventures#photoshop: gif#photoshop: dc#photoshop: lucifer#i just think he's cute :')
257 notes
·
View notes
Text

— Sanober Khan (insp.)
#luciferedit#deckerstaredit#bbelcher#userstream#userveronika#userszabi#userlaura#usetix#jemmablossom#morningstr#dailylucifernetflix#deckerstardaily#lucifer netflix#lucifer morningstar#chloe decker#*
343 notes
·
View notes
Photo
The smiles on their faces. They are blissfully content.
#luciferedit#lucifergifs#dailylucifernetflix#deckerstaredit#deckerstardaily#deckerstar#chloe x lucifer#lucifer morningstar#chloe decker#mygifs#lucifer spoilers#lucifergif#5x07#1k#2k#usersharon#tuserkers#softdeckerstars#userveronika#morningstr#absolute bliss#I'M DONE#i can't with them anymore
3K notes
·
View notes
Photo


“You don’t even call her by her name, which is Chloe.”
#luciferedit#deckerstaredit#deckerstar#chloe decker#lucifer morningstar#lucifer x chloe#dailylucifernetflix#dcmultiverse#bbelcher#chewieblog#filmtv#userstream#tusersoph#morningstr#sincerelygabby#chloexdecker#lucifer netflix#lucifer#*#mine: lucifer2#request#long post#phew this took 3 hours i'm tired#i hope you like it anon :)
9K notes
·
View notes
Photo


+ bonus

#luciferedit#lucifer spoilers#lucifergifs#netflixedit#dailylucifernetflix#lucifermorningstaredit#cinematv#tvedit#filmtv#lucifer season 5#lucifer#sincerelygabby#fieryfrankie#tuserlisa#morningstr#dailyreblogs#gif#mine#1k
2K notes
·
View notes
Photo

- Ashe Vernon
#this is deckerstar you can't change my mind#lucifer#lucifer spoilers#lucifer on netflix#lucifer morningstar#chloe decker#deckerstar#luciferedit#dailylucifergifs#dailylucifernetflix#deckerstaredit#deckerstardaily#userlucifergifs#morningstr#captainmorningstar#usersharon#tusersoph#userengy#userveronika#tuserkers#tuserangela#usersho#buckybames#gif#mine#1k
3K notes
·
View notes
Photo


READY OR NOT (2019) dir. Matt Bettinelli-Olpin & Tyler Gillett
It says “hide and seek”. Are we really gonna play that?
#filmedit#filmgifs#moviegifs#horroredit#dailyhorrorfilms#chewieblog#bbelcher#filmtv#cinemapix#userstream#userthing#userveronika#uservanessza#usertix#morningstr#userhorroredits#mygifs#ready or not#engy's stuff#she's my hero#the fifth gif is weird#1k#2k
3K notes
·
View notes
Last Seen Blogs
grollow
you are wildfire and i'm standing in the rain
tetraterantula
Tetra

noodle8
hoho heehee

lorianbladeoflothric
Gonna Be Honest Its Mostly Elden Ring

petaeyeington
in an inst-a-gram..