archist-fashion
Anarchist Fashion
Eco friendly and gender expansive, community based fashion.
66 posts
Don't wanna be here? Send us removal request.
Last Seen Blogs

drpepperangel3implodeangel
Untitled

elektrashimmies
Elektra Shimmies

fallinky-lovesmugman
Fall Inky

omar98a
O Mad
lunaandhelios
루나 헬리오스 🌙
Text
A hat: the beginnings
3 notes
·
View notes
Text
the genders are craft scissors, kitchen scissors, fabric scissors, and knife
2K notes
·
View notes
Text
Been really busy lately and did some great work, so I'm rewarding myself by making a pair of shorts with liberated fabric!
Apparently they needed to be wild and more complicated than necessary haha

1 note
·
View note

Link

GUYS I’VE FOUND A VERY IMPORTANT WEBSITE FOR PEOPLE WHO CAN KNIT WITHOUT INJURING THEMSELVES!!!!
92K notes
·
View notes
Text
Hand-sewing: how to start and how to finish
I've discussed how to thread a needle before, but I've yet to make a post on two other important elements of hand-sewing: how to start and how to finish.
These things may seem obvious to an experienced sewist but can be very frustrating when you're new to the craft, especially as a lot of tutorials assume you already know how to do them.
By machine:
When you're sewing by machine, securing your thread at the start and end of your work is easy: just sew backwards for a few stitches, then forwards. This is called backstitching (not to be confused with the manual backstitch) and will stop your thread from coming loose.
Some sewing machines also have a lockstitch function. A lockstitch is less visible than a backstitch as your thread is locked in one specific spot rather than across several stitches. If your machine doesn't have a lockstitch, you can still make one by shortening your stitch length as much as possible and sewing several stitches in the same spot. Note that this may jam your machine, so proceed with caution.
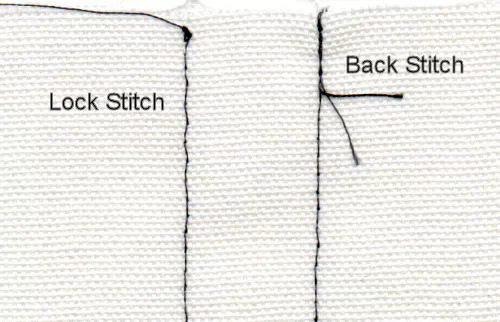
(Image source) [ID: two lines have been sewn in black thread on a piece of white fabric. The line on the left was started with a lock stitch while the line on the right was started with a back stitch.]
By hand:
There are various ways to secure your thread at the start of your project when you're sewing by hand, ranging from different types of knots to locking stitches. Check out this Sew Guide article to learn five different ways to tie a knot and secure your thread when sewing by hand.
The easiest way to do this is to tie a knot at the end of your thread. If you'd rather not have any knots in your work, you could also look into using different stitches to lock your thread, like the loop knot stitch.
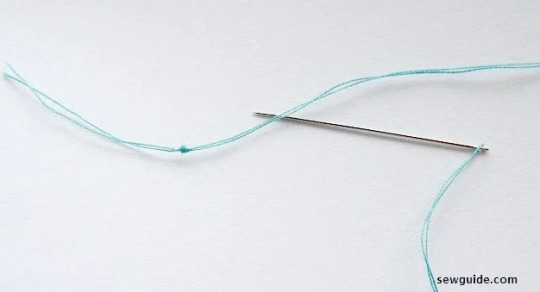
(Image source) [ID: a sewing needle double threaded with blue thread lies on a white background. A knot has been tied near the end of the thread. Text: "Sewguide.com".]
Various techniques exist for securing your thread at the end of your project, too. This Instructables article will show you four ways to tie off your thread to finish sewing, including how to do so with and without a visible knot.

(Image source) [ID: a line of purple running stitches sewn with a double threaded needle on white fabric is secured in place by tying a knot with the two ends of thread.]
Which technique to use depends on your personal preferences and on the project you're working on. Try out a few different techniques and see which ones you like the most!
1K notes
·
View notes
Note
Hello! Do you have any suggestions on how to upcycle leggings? I have some old legging, and I really don't want to throw them out.
Upcycling leggings
Make and repair leggings:
If you'd like to see if you can repair them first, check out my compilation post on how to repair leggings.
You can also use a pair of leggings as a base pattern to make your own leggings. You could also draft a custom leggings pattern to make a new pair.
If parts of the leggings are still fine, you can reuse those as leg wear. For example, if the crotch of your leggings is busted but the rest is still fine, you can turn them into stockings. If the legs are busted but the crotch is still fine, turn them into a pair of shorts.
You can also go the Frankenstein route: if you've got a pair with busted legs and one pair with a busted crotch, just cut and combine them into a new pair of leggings.
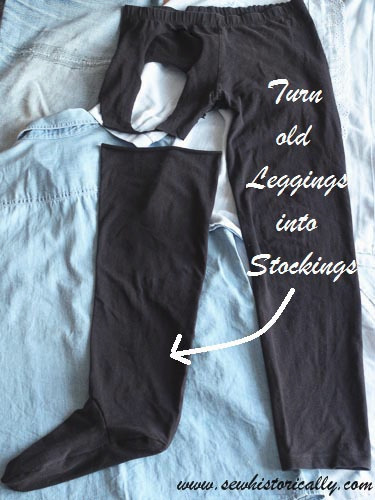
(Image source) [ID: a black pair of leggings lying on top of blue fabric. One leg has been cut and turned into a stocking. Text: "Turn old leggings into stockings. www.sewhistorically.com"]
Reuse leggings:
Some more ideas on how to reuse leggings:
Leggings to stockings
Leggings to shorts
Leggings to crop top
Leggings to hair ties and cleaning cloths
Leggings to bikini
Leggings to summer tops
Leggings to turtleneck top
Leggings to halter top
Leggings to long-sleeve crop top
Leggings to strapless dress
Leggings to leg warmers
Leggings to hand warmers
Leggings to pouch
Leggings to bag
Leggings to sling bag
Leggings rag rug
Leggings to yarn
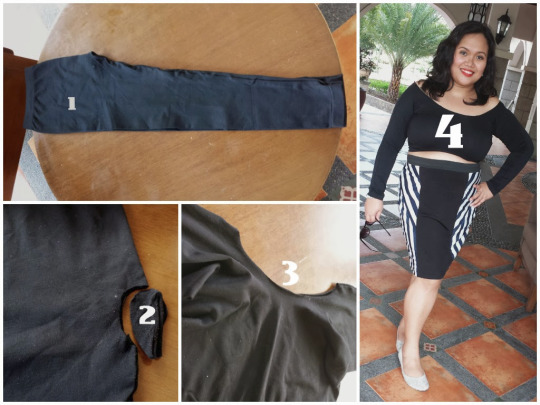
(Image source) [ID: a four step photo guide on how to cut leggings into a long-sleeve crop top.]
Leggings come in a variety of materials, so double-check if the fabric of your leggings is suitable for whatever project you've got in mind. A polyester top with long sleeves will make you sweat a lot but could make for great hair ties, for example.
Conclusion:
In the end, leggings are just fabric. Use them as a base material for small sewing projects that require stretchy fabric, or cut them up and patch holes with them. A cotton pair of leggings might be a good base material to upsize a t-shirt, for example.
If your leggings are truly busted beyond repair, you can always use them as stuffing for a sewing project or as cleaning rags.
205 notes
·
View notes

Note
Hiya! Thank you as ever for all the time and effort you spend on this, I've learnt so many things!
So I have a chunky knitted jumper with weirdly flappy sleeves
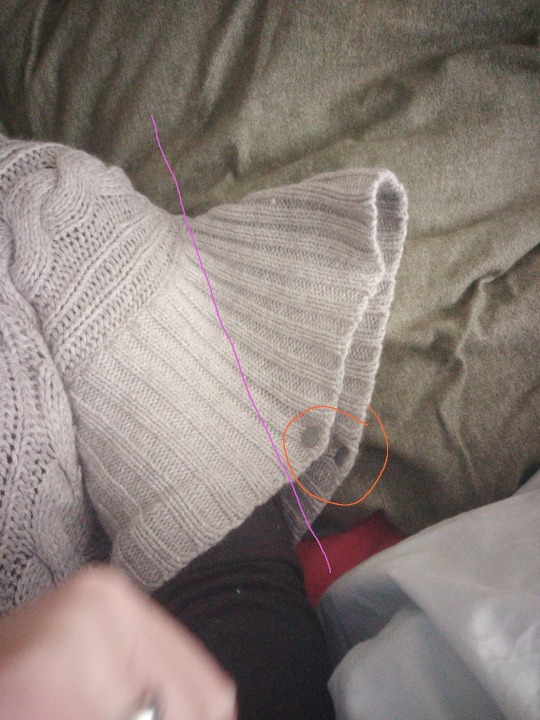
As you can see in the orange circle I tried adding kam fasteners so I can tuck the extra bit in and fasten it into place but it doesn't stay put for long and it still makes it too bulky when I put a coat on.
I wanted to sew along the purple line then but off the extra material but how do I make sure it doesn't all unravel? Am I better off just removing the entire ribbed section and adding another cuff?
Thank you! ❤️
[ID: close-up on the knitted sleeve of a beige short-sleeved knit top. The sleeve ends in a ribbed flared piece. A pair of snaps has been installed on the sleeve's edge, and an orange circle has been added to the photo to indicate these snaps. A diagonal purple line has been drawn across the sleeve, following the direction of the wearer's arm. ]
Altering a knitted sleeve
Knit fabric is basically a collection of loops. If one loop gives in, the rest of the fabric risks unravelling, too. This can make altering knit items daunting, but not impossible.

(Image source) [ID: a woven fabric (plain weave) versus a knit fabric (stockinette stitch).]
You've got a few options here.
Cutting off the excess fabric:
If you're careful, you actually can cut into knit fabric. Mark the line you want to cut on your sleeve, then sew two lines along each side of the line to secure the stitches in place. Doing this by machine will be more secure than by hand, though doing it by hand is an option too. This will minimise your risk of the fabric unravelling.
Make sure to properly finish off your new seam to avoid any future issues.
Check out my post on cutting knit fabrics without unravelling for more info.
Knitting a new cuff:
Removing the current cuff and knitting a new one's a good option too. Judging by the photo, it looks like the flared cuff was added after the rest of the top was knit by either picking up stitches or by knitting it separately and sewing it on (which is common in mass-produced knits). Try to carefully unravel the current cuff if it's been knitted on, or remove it with a seam ripper if it's been sewn on. If you avoid damaging the original edge where the cuff"s attached to the sleeve, you can simply pick up stitches and start knitting your own cuff. With a little luck, you might even be able to repurpose the original yarn.
Altering the existing cuff:
Your snaps were a good idea, too! There's a lot you could do with the current cuff. You could thread a ribbon through it to create a puffed sleeve, add a strap to bunch up the fabric, fold the fabric and sew it in place to form a frill at the side of your sleeve,... Play around with it and see if you can find something that works for you.
145 notes
·
View notes
Note
hi!! i really appreciate your blog, its really really useful. i have a pleather jacket thats wearing out around the collar, and i was wondering if had any advice for fixing it/patching it up? its my favourite jacket and i like having the collar painted :(
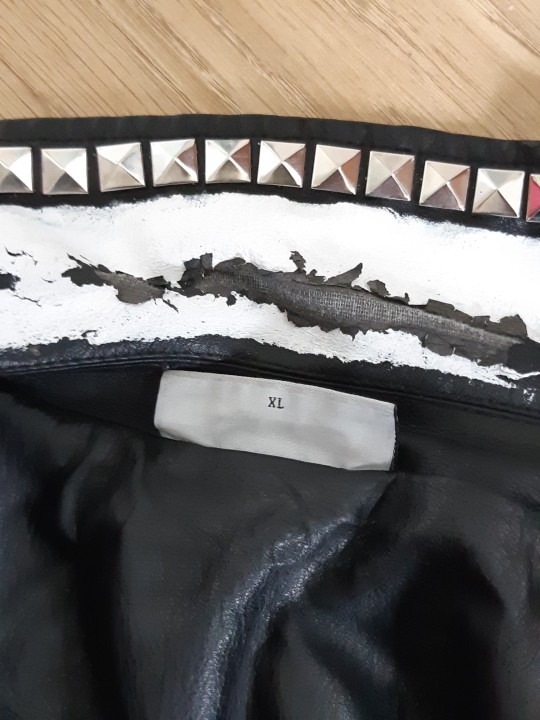
[ID: close-up of a the collar of a black pleather jacket. The studded collar's material has peeled down to the white surface and even the fabric base beneath the faux leather.]
Mending a flaking pleather collar
You could try repainting the flaking pleather. My post on fixing up pleather shoes has some ideas on how to get started. This might effect the texture and pliability of your collar, though.
Another thing you could try is to find a fabric or a patch of faux leather that's a nice match (or contrasting detail) to your jacket and use it to cover up the peeling collar. Either get some fabric glue that's suitable for this type of material, or sew it on with a sturdy needle.
Check out this refurbished collar YouTube tutorial by Kate Sewn to see how it's done.
youtube
This mended jacket by Being A Bayer has been mended in a different spot, but the idea's the same.

(Image source) [ID: the back yoke of a green faux leather jacket. The yoke part is covered with a patch of white fabric with pink flowers and green leaves.]
Good luck with fixing up your jacket! It sucks when something we love starts to wear down. Luckily, that doesn't necessarily mean we have to get rid of it.
258 notes
·
View notes

Text
anyone else regretti spaghetti because it’s almost december and you have a whole list of handmade presents you’ve yet to make? just me?
140 notes
·
View notes
Text

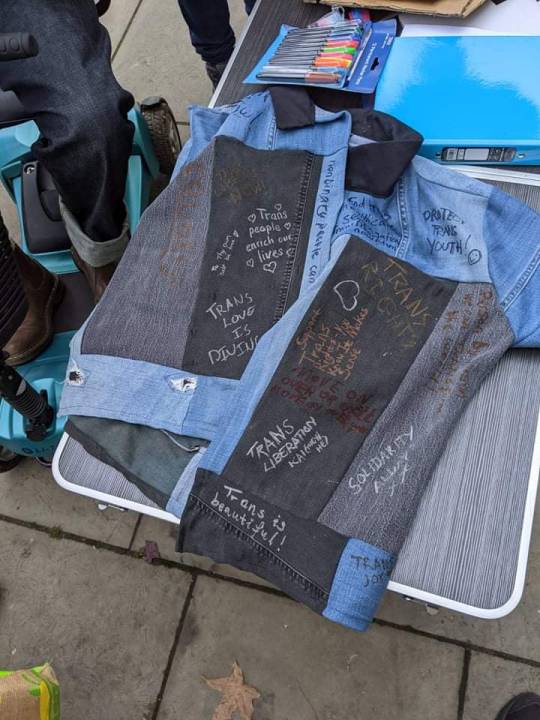

The protest jacket for trans day of remembrance! Hope to have it displayed and then worn at pride marches!
#anarchist fashion#custom fashion#denimlovers#tdor#tdor 2021#trans rights#trans#trans day of remembrance#trans pride#activism#community art#pride#human rights
39 notes
·
View notes
Text
I've made a denim jacket as a community art project for TDOR this year, so that all the community members can write on it with their protests and concerns. I'm hoping to get it displayed somewhere for a few weeks and then trot it out for someone new to wear every year at pride, I'll upload pictures of it tomorrow, after the rally!
12 notes
·
View notes
Text
One Hour Dress and matching slip dress
If you're into vintage fashion, you've probably heard about the one hour dress. It was a simple style of dress that was popular back in the 1920's. While they rarely only take one hour to make, they're beginner-friendly and highly customisable thanks due to their simple shapes.
The dress:
The one hour dress is a simple dress that's usually made out of a woven fabric. It's nice and loose, which means it doesn't need any fasteners.
The top part is a simple T-shape while the bottom is a wide rectangle, extending far beyond the top's margins. This extra fabric would be gathered and sewn into a cut inside of the main dress to create room for the hips.
If you'd like to find out how to make these, check out these tutorials by The Closet Historian, Festive Attyre and The Vintage Dancer. They'll show you how to draft a pattern according to your own measurements, and how to put the dress together.

(Image source) [ID: a peach-coloured one hour dress with colourful floral embroidery and pearls.]
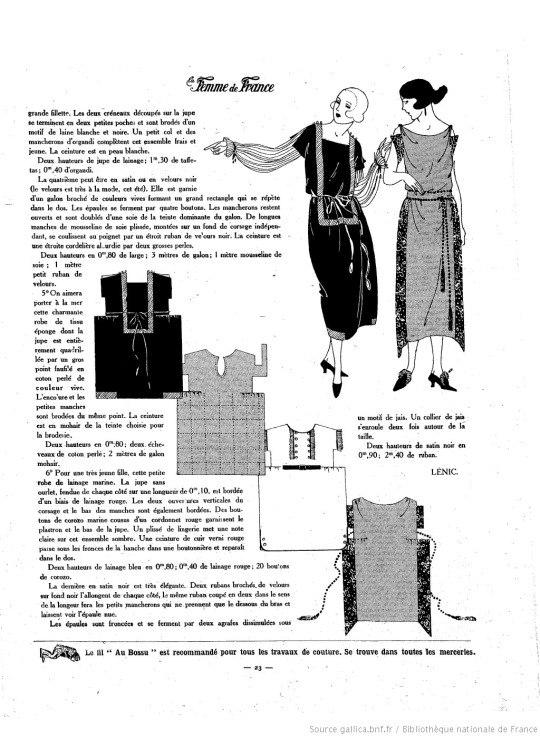
(Image source) [ID: a page out of a 1921 edition of the French magazine "La Femme de France", showing instructions on how to sew a one hour dress.]

(Image source) [ID: a hand-drawn diagram showing how to draft a one hour dress pattern from scratch. The torso is a simple t-shape, while the skirt part is a wide rectangle.]
The slip dress:
Sometimes, one hour dresses were made from sheer materials to create different effects depending on what slip dress was worn underneath them.
These slip dresses are even easier to make than a one hour dress. The principle's the same, but the top's a rectangle instead of a T-shape with sleeves. Check out this tutorial by Sew Historically to find out how to make your own 1920's slip dress. This tutorial by American Duchess shows you how to make a version without the gathered hips.
You can easily turn these slip dresses into a playsuit by adding a rectangle at the crotch, turning the skirt part into shorts. Check out my 1920's playsuit project to see an example.
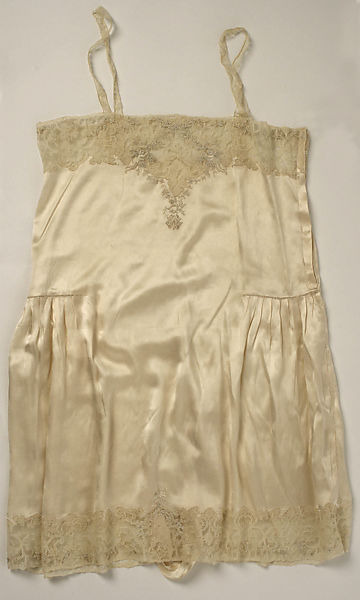
(Image source) [ID: off-white silk slip dress with gathered hips, lace decorations, and a flap at the crotch.]
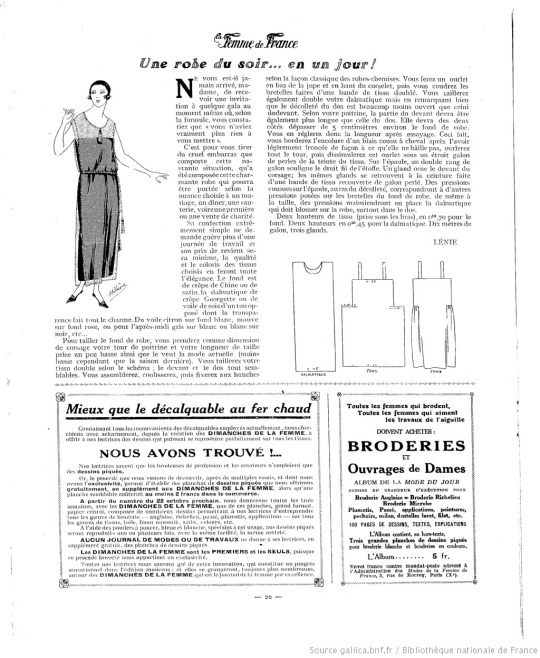
(Image source) [ID: page out of a 1922 edition of the French magazine "La Femme de France", showing instructions on how to sew a dress and a matching slip.]
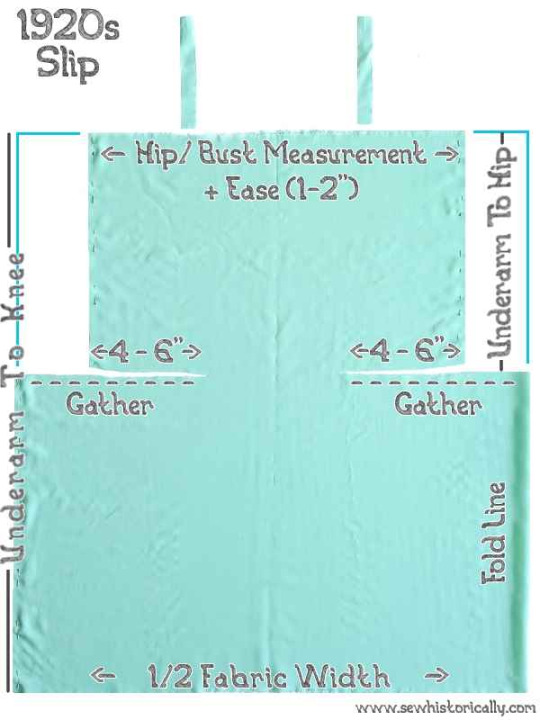
(Image source) [ID: pattern drafting instructions for a 1920's slip dress as shown on a piece of green fabric. Text: "1920s slip. www.sewhistorically.com".]
Conclusion:
This type of dress is a lot of fun if you're looking for an easy, highly customisable project. Add whatever trims you want, mess around with the neckline, make a sleeveless version or one with longer sleeves, turn it into a mini- or maxi-dress,... There's plenty of options.
Check out my post on 1920's sewing patterns for more inspiration. If you know how to read French, Gallica makes for a very useful resource, too.
1K notes
·
View notes