
ck-sims
Welcome
I'm just a simple goose tryin' to make my way thru the (Sims) universe.
20 posts
Last active 60 minutes ago
Don't wanna be here? Send us removal request.
Last Seen Blogs

elizavp-art
elizavp
squishdraws
46 childes drawn 1mil to go

jolynees
i just really like jojo

ask-twilightshimmer-and-spike
living in the sunlight

midwestkali
Midwest Kali
Text
Montana Stall Set - Maxis Match
A Maxis-Match recolor of Raya Collin's Montana Stall Build Set. Remember to download the original set, or these won't work in-game <3
Confession: I finished this recolor set back in early February and then promptly got steamrolled by real life obligations, meaning I completely forgot about sharing these. oop.
edit: local dumbass makes cc post, forgets to add link
-- DOWNLOAD --
#Ts4 horse cc#ts4 equestrian cc#sims 4 horse cc#sims 4 equestrian cc#ts4 equestrian#sims 4 equestrian#ts4 horses#sims 4 horses#ts4 horse ranch#sims 4 horse ranch#sims horses
99 notes
·
View notes
Text
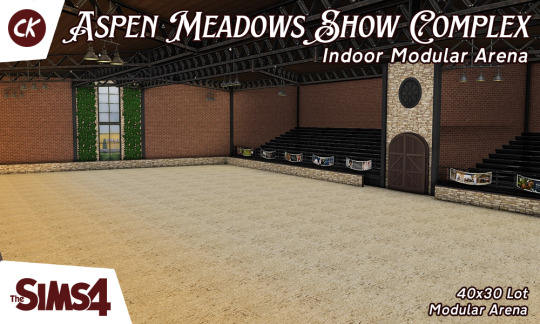
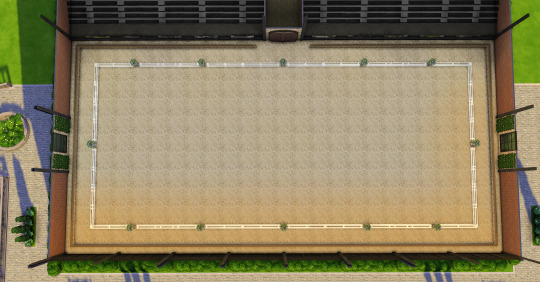
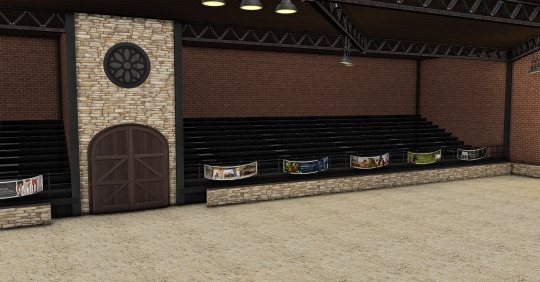
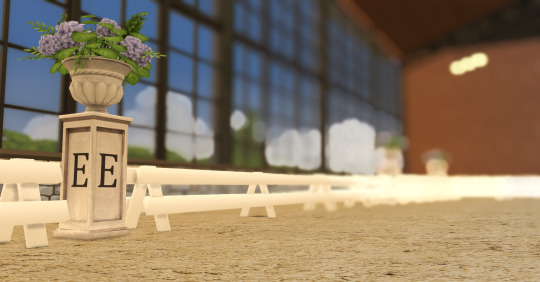
ASPEN MEADOWS SHOW COMPLEX
INDOOR MODULAR ARENA
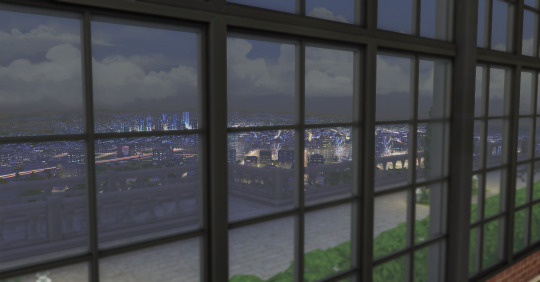
Welcome to Aspen Meadows, a three-lot show complex built to meet all your equestrian needs! This is the second of three arena lots I plan to share. Aspen Meadows has been a big project of mine since November and I'm very excited to share it with you now. The Aspen Meadows Outdoor Arena is a 50x40 lot built specifically to be placed on The Ward Den lot in Del Sol Valley. It's an indoor arena with spectator seating & large, expansive windows to let in lots of natural sunlight.
Modular arena, you say? What's a modular arena?
This is a system I've been using to build most of my arenas lately - I place down a room, adjust it to the size I want my arena to be, delete the ceiling, and replace the walls with fences. Since each arena layout is an individual 'room', all I have to do to switch between them is click the room, delete it, and then swap the layout I want into the empty spot. This has allowed me to make multiple configurations of an arena on the same lot, without having to save each lot over and over again. As such, this download comes with tray files for the lot itself, the Dressage Arena, and an empty arena for you to DIY to your heart's content!
This lot is built with items from Horse Ranch, Get Famous, Get Together, Get To Work, Werewolves, My Wedding Stories, and Industrial Loft Kit
All CC is included in the file, but can also be found here:
Arena banners by @buckarooranch
Arena Sand by Pure Winter
Dressage Arena Fence & Marker by @rembrandtdesigns
Florence Bouqet, Colonial Spandrel by @felixandresims
Brownstone Steel Window (Double Medium) by @harrie-cc
Orjanic Barn Doors & Shutters by @felixandresims and @harrie-cc
RVSN Flood Saucer Light by @ravasheencc
Domaine du Clos Wallpaper (Brick) by @pierisim
Catasta Painted & Concrete Platform Override by @syboubou
-- DOWNLOAD --


#Ts4 horse cc#ts4 equestrian cc#sims 4 horse cc#sims 4 equestrian cc#ts4 equestrian#sims 4 equestrian#ts4 horses#sims 4 horses#ts4 horse ranch#sims 4 horse ranch#sims horses#my cc#!!!!!#!!!!
82 notes
·
View notes
Text

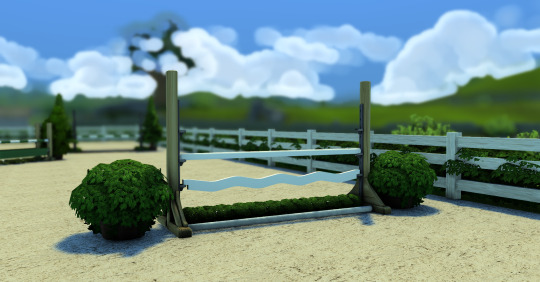
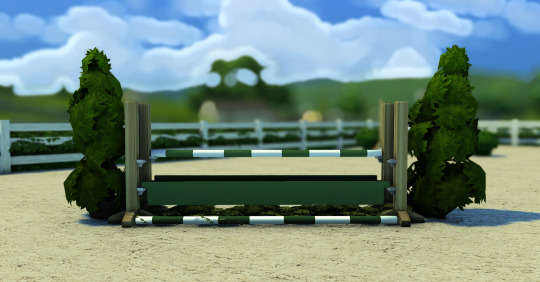
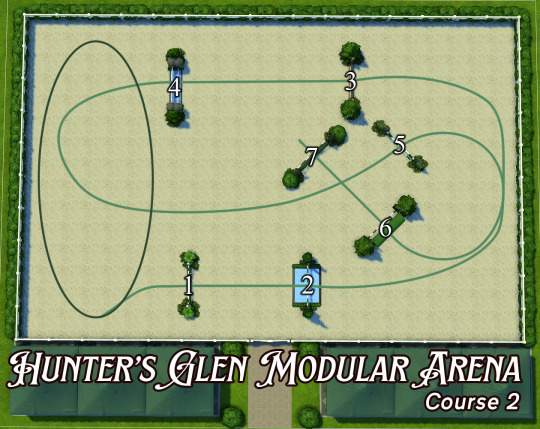
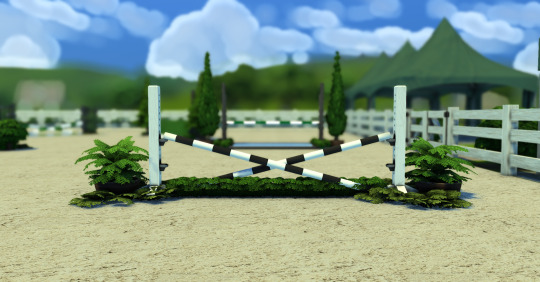
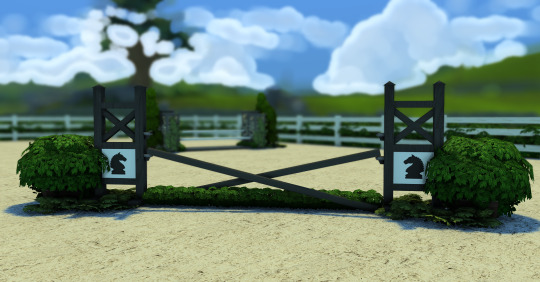
Hunter's Glen Modular Arena
This hunter-jumper course was built in collaboration with @pixelpony-ccfinds. They asked me if I was willing to build a course to showcase their new Hunter-over-Fences set, and, as ever, I was delighted to do so.
Hunter's Glen is a 50x40 lot built in Henford-on-Bagley, but it could honestly be placed anywhere as the landscaping is pretty generic. I created two courses in order to properly showcase each jump. Each jump is fully functional, however, due to the layout of each course and spacing of the jumps, it might be tricky to actually use them during actual gameplay; this lot was built with posed screenshots in mind. Ringside, there is a posh little seating area with a fancy rustic bar for spectators to enjoy.
I would like to thank @walnuthillfarm and @equinista for answering my questions regarding hunter-jumper courses and helping me figure out how to lay out each course. Without them, I'm sure I'd still be trying to figure things out.
Modular arena, you say? What's a modular arena?
This is a system I've been using to build most of my arenas lately - I place down a room, adjust it to the size I want my arena to be, delete the ceiling, and replace the walls with fences. Since each course layout is an individual 'room', all I have to do to switch between them is click the room, delete it, and then swap the layout I want into the empty spot. This has allowed me to make multiple configurations of an arena on the same lot, without having to save each lot over and over again.
As such, this download comes with tray files for the lot itself (with Course 1 pre-loaded), Course 1, Course 2, and an empty arena for you to DIY to your heart's content!
This lot is built with items from Basegame, Horse Ranch, and My Wedding Stories and possibly Jungle Adventures?.
All CC is included in the file, but can also be found here:
Hunter over Fences set by @pixelpony-ccfinds
Outdoor Arena Sand by @pure-winter-cc
BOTW plants by FakePikachu (can you find the Korok flower?)
Chateau Rug & Colonial Bar by @felixandresims
Wine & Flowers by @plumbobteasociety
Deco Wine Glasses by @imfromsixam
Ivy by @syboubou
Course layouts and jump previews are under the cut!
-- DOWNLOAD --


#Ts4 horse cc#ts4 equestrian cc#sims 4 horse cc#sims 4 equestrian cc#ts4 equestrian#sims 4 equestrian#ts4 horses#sims 4 horses#ts4 horse ranch#sims 4 horse ranch#sims horses#my cc#!!!
103 notes
·
View notes
Text

ASPEN MEADOWS SHOW COMPLEX
OUTDOOR MODULAR ARENA
Welcome to Aspen Meadows, a three-lot show complex built to meet all your equestrian needs!
This is the first of three arena lots I plan to share. Aspen Meadows has been a big project of mine since November and I'm very excited to share it with you now.
The Aspen Meadows Outdoor Arena is a 50x40 lot built specifically to be placed on the Bailey Moon Manor lot in Del Sol Valley. It is a sand arena with covered spectator seating, a judge's tent, and a lighting setup to make both day and nighttime competitions possible.
Modular arena, you say? What's a modular arena?
This is a system I've been using to build most of my arenas lately - I place down a room, adjust it to the size I want my arena to be, delete the ceiling, and replace the walls with fences. Since each arena layout is an individual 'room', all I have to do to switch between them is click the room, delete it, and then swap the layout I want into the empty spot. This has allowed me to make multiple configurations of an arena on the same lot, without having to save each lot over and over again. As such, this download comes with tray files for the lot itself (with the Dressage arena pre-loaded), the Dressage Arena, and an empty arena for you to DIY to your heart's content!
This lot is built with items from Island Living, Get to Work, Romantic Garden, and High School Years.
All CC is included in the file, but can also be found here:
Outdoor Arena Sand by @pure-winter-cc
RVSN Flood Saucer Light by @ravasheencc
Skanzen stone fencing by Lili's Palace
Country flagpoles by @bakiegaming
Banners by @buckarooranch
Dressage arena fencing and markers by @rembrandtdesigns
Chateau Rug & Colonial Chair by @felixandresims
Deco Wine Glasses by @imfromsixam
Trophy by @objuct
Domaine du Clos Brick Wallpaper by @pierisim
Galileo Homework and Classroom Essays by @syboubou
Trotting horse statue (One & Two) by TheJim07
Equine floors by @walnuthillfarm
Hexagonal planter by Xelenn
-- DOWNLOAD --
#Ts4 horse cc#ts4 equestrian cc#sims 4 horse cc#sims 4 equestrian cc#ts4 equestrian#sims 4 equestrian#ts4 horses#sims 4 horses#ts4 horse ranch#sims 4 horse ranch#sims horses#my cc#I'M SO EXCITED FOR THIS SET YOU GUYS
61 notes
·
View notes
Text


Above: before-and-after pictures of this process. Thank you to @cloudywithachanceofsims, @silverthornestudfarm, and @blueridgeequines for giving me permission to use their coats as examples!
CK's Guide to Fixing Pixelated Horse Coats
As we all know, every time you paint a horse (or any pet or werewolf, really) in Create-a-Pet, it inevitably gets pixelated. This is due to the TS4 engine's compression of Sims textures, which it does to theoretically save on file space and load time. The more you paint on your horse (and the more you save it over and over again), the greater the artifact damage becomes, until you're left with a pixelated mess.
Luckily, I've figured out a way to fix it. Yay!
This method uses a program called chaiNNER, which is an incredibly versatile node-based graphics UI that (among many other things) uses AI models to upscale and process images. After a month and a half of experimenting on multiple different types of coats with about a dozen different models, I've identified two AI models that work best at repairing the artifacting damage done by TS4: RealESRGAN_x2plus and 2xAniscale. I extract the painted coats from the tray files using Cmar's Coat Converter, process them using chaiNNER, use Photoshop to make any touch ups (softening hard edges, fixing seams, adding in the appropriate hoof texture), and then create a new hoof swatch to put the newly fixed coat back into the game.
Fair warning: chaiNNER is a bit of a hefty program that requires significant RAM and VRAM to run. If you have a beefy gaming computer, you should have no issues running this (as long as no other major programs - games, graphics programs, etc. - are running as well). If you've got a lower end computer, though, your computer might not be able to handle it and this method might not be for you. Make sure to read all the documentation on chaiNNer's github before proceeding.
Before we begin, we're going to need to gather some resources. We will need:
A graphics program. I use Photoshop, but GIMP or any other program that can work in layers will work too.
chaiNNER
AI Models; these are the ones I use are RealESRGAN_x2plus and 2xAniscale
Cmar's Coat Converter to extract the coat textures from your tray files
Tray Importer (Optionally) to isolate your household tray files and save you the trouble of searching the Tray Folder
The TS4 Horse UV as a helpful guide to make sure all our textures are lined up properly
Sims 4 Studio to create your new package.
I recommend using S4S to export hoof swatch textures from the game or from existing hoof swatch cc. Some popular hoof swatch CC include @walnuthillfarm's Striped Hooves and @pure-winter-cc's Glorious Striped Hooves
This tutorial assumes you are familiar with the basics in how to use Sims 4 Studio, such as how to clone a base-game item & how to import and export textures, and the basic functions of your graphics program, such as adding multiple different image files together as layers. I'll try to keep my explanations as straight-forward as possible.
STEP ONE: Extract the Coats
Install Cmar's Coat Converter and run it. Cmar's Coat Converter works by looking through your tray files for specific texture files (ie. The coats of cats, dogs, horses, and werewolves) and converting them to png files. You can go through the households of your Tray folder one by one, but I typically just use Tray Importer to separate the household containing the horses I want to fix.
Save the extracted coats in a project folder. These are your OG coats.
STEP TWO: Extract the hoof textures
Open up S4S. To extract the hoof swatches from the base game, create a new package by clicking CAS -> New Package, filter everything by species (ie. Horse) and then part type (Hoof color). Highlight all the basegame swatches and then save your new package.
Open up that package and then extract the texture for each swatch. Save them in your project folder (In a 'basegame hooves' folder to keep things organized).
To extract the textures from Hoof Swatch CC files, simply open them up in S4S and repeat the above.
STEP THREE: Download the AI Models
Right as it says on the tin. These are the models I use currently & some notes about them:
RealESRGAN_x2plus - this model is THE workhorse. It repairs artifact damaging with minimal loss to texture quality and results in a very smooth coat. It may sometimes darken the texture a little bit, but it's not noticeable in-game. That being said, it has a harder time with finer details such as spots, individual ticking for roans, dapples etc. I run this one first on all the coats because it usually does the job.
These models are trained to find and repair any incidence of artifacting/jpeg damage and approximate what the image is supposed to look like. The reason RealESRGAN_x2plus has an especially hard time with spots/dapples/tiny repetitive details etc. because it registers those areas as particularly damaged and works extra hard to smooth it out… which can sometimes result in a bit of an iffy coat repair. When things don't turn out the way I want, I turn to...
2xAniscale - I use this model for any appaloosas, roans, sabinos etc. that have very fine detail and came out mangled by RealESRGAN_2xPlus. It's also good for light-duty repairing (in cases where people have only 'saved' the coat once, as opposed to working on it on and off). While not strong enough on its own to tackle the more heavily damaged coats, it still does a decent job while keeping the fine details intact.
Go make a folder somewhere and name it 'AI Models' or something similar, and drop these guys in there.
STEP FOUR: Setting up chaiNNER
Obviously, go ahead and download chaiNNER, and then (through chaiNNER itself) download & install the dependencies. You really only need PyTorch for this, so if you'd like, you can skip NCNN, ONNX, and Stable Diffusion.
At first glance, chaiNNER is a bit overwhelming. It is unlike any other graphics ui I've seen before, but the basic premise is pretty straightforward: you 'chain' together specific functions ('nodes') in order to get your result.
We're going to start by setting up a chain for single coat conversions.
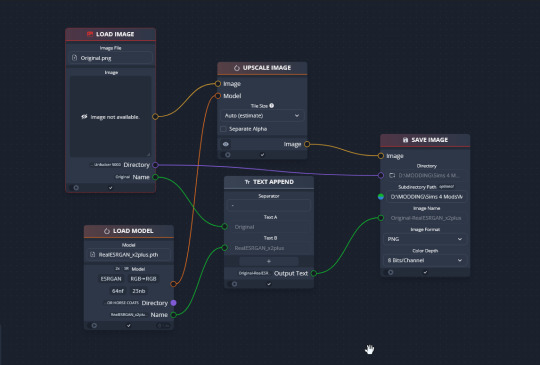
Drag & drop these nodes into your workspace:
Load Image
Save Image
Upscale Image
Load Model (From the PyTorch tab only!)
Text append
Next, connect the nodes just as I have connected them in the image.
Load Image, obviously, loads your image. We then tell the program we want to upscale that image by linking to the Upscale Image node. Upscaling can't happen without a model, so we then want to link Upscale Image with Load Model.
Text Append takes the original name of the image and combines it with the model name. This is super helpful, because if you're playing with many models at a time, you need to tell your result images apart. Link the output text to the Save Image Model.
Finally, Save Image obviously saves the image. We link the directory from Load Image to save it in the same place as the OG image, or, optionally, add in a file path link to another folder (in my case, I load images from a folder called 'Unprocessed' and save them into a folder called 'Processed'. Link the image from Upscale Image to Save Image to complete this chain.
Go in and select your image, model, and save locations.
Ta dah! You made your first chain.
To create an Iterator to batch process coats, we follow the same general idea, only we use 'Load Images'.
STEP FIVE: Run chaiNNER
Go ahead and run chaiNNER. Repeat using 2xAniscale if your spotty/dappled coat comes out funky.
Optionally, you can also add 'Resize' between 'Upscale' and 'Save Image' so the output texture is the same size as the OG. I like keeping mine big, as it makes it easier to fix any fine details in Photoshop.
STEP SIX: Combine in Photoshop
Go ahead and open up the horse UV, your coat texture & hoof swatches in Photoshop. This is a fairly straightforward process: layer the hooves overtop the texture, and then hide all hoof layers except the one you want. Make sure everything is lined up properly using the horse UV.
This is also where you would go in and fix any sharp, jagged edges you might spot. I often notice jagged edges on white face markings. Since the head is often one of the worst areas for artifacting, the AI models don't really have much to work with, resulting in jagged edges as they try to extrapolate what had been there 'before'. Either paint over it or use blur to smooth it out.
I personally would also remove any stray color that isn't the horse texture (body + ears). It won't hurt to leave it there, but I personally like things neat and tidy. Use the horse UV as a guide.
I also add in any little details using extracted stencils & layer masks.
Save your new coat as a png. Optionally, downsize it by 50% back to the original size. I don't do this because I'm very forgetful, but this would definitely help in keeping your package size smaller.
STEP SEVEN (Optional): Make a thumbnail
I make thumbnails for all the coats I do because it makes it much easier to identify them under the Hoof Swatch category. TS4 thumbnails are 144 x 148. You can label it with your horse's name, or stick a headshot in there etc. whatever works for you that will help it stand out from the other hoof swatches.
STEP EIGHT: Put it all Together
Finally, we've come to the end.
Using S4S, create a new package cloned from a hoof swatch. Import your new coat into 'Texture', and your thumbnail into 'Thumbnail'. Make sure you import the thumbnail for both Male and Female!
Check to make sure there aren't major seams, and that your texture is properly projected onto the S4S horse model. If there are seams, go back to check that your texture is lined up properly with the Horse UV. If there are minor seams (legs, chest, underbelly etc.) you can carefully paint (using the same color as on either side of the seam) just beyond the UV mesh boundaries to close the seam.
Then, go into Categories, scroll down, and uncheck Random. This will prevent random townie horses from wearing the coat.
Save your package.
Congratulations! You're done!
#ts4 tutorial#ts4 resource#ts4 guide#Ts4 horse cc#ts4 equestrian cc#sims 4 horse cc#sims 4 equestrian cc#ts4 equestrian#sims 4 equestrian#ts4 horses#sims 4 horses#ts4 horse ranch#sims 4 horse ranch#sims horses
50 notes
·
View notes
Text

JUMP PADS - The BEE Collection
After a couple months of on and off work, I am very excited to present The BEE Collection: six jump pads with bee-themed patterns. These jump pads are specifically designed to have three fits:
EA Fit
Walnut Hill Realistic Fit
Sundayxgaming Realistic Fit | Schrodcat Realistic Fit (Compatible with some saddles; see my pinned post for more details)
-- DOWNLOAD --
#Ts4 horse cc#ts4 equestrian cc#sims 4 horse cc#sims 4 equestrian cc#ts4 equestrian#sims 4 equestrian#ts4 horses#sims 4 horses#ts4 horse ranch#sims 4 horse ranch#sims horses#my cc
49 notes
·
View notes
Text
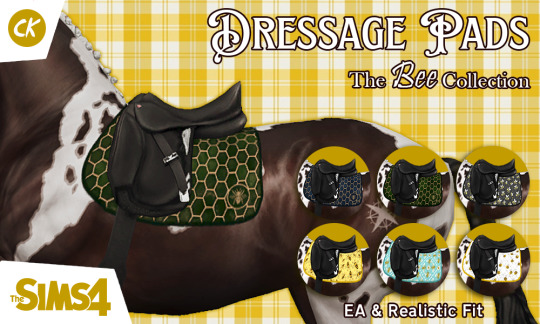
DRESSAGE PADS - The BEE Collection
After a couple months of on and off work, I am very excited to present The BEE Collection: six dressage pads with bee-themed patterns. Though designed to be dressage pads, these also work excellently as all-around saddle pads for a few of Schrodcat's saddles.
These pads are specifically designed to have two fits:
EA Fit
Sundayxgaming Realistic Fit | Schrodcat Realistic Fit (Compatible with some saddles; see my pinned post for more details)
-- DOWNLOAD --
#Ts4 horse cc#ts4 equestrian cc#sims 4 horse cc#sims 4 equestrian cc#ts4 equestrian#sims 4 equestrian#ts4 horses#sims 4 horses#ts4 horse ranch#sims 4 horse ranch#sims horses#my cc
50 notes
·
View notes
Text
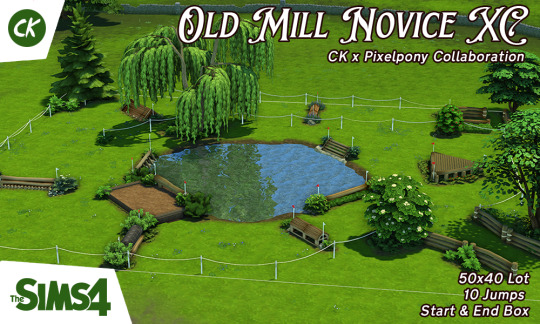
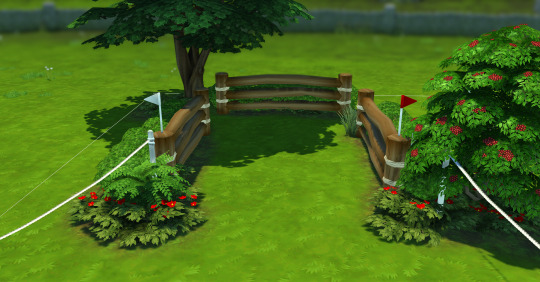
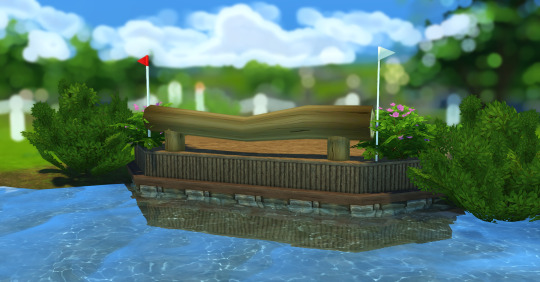
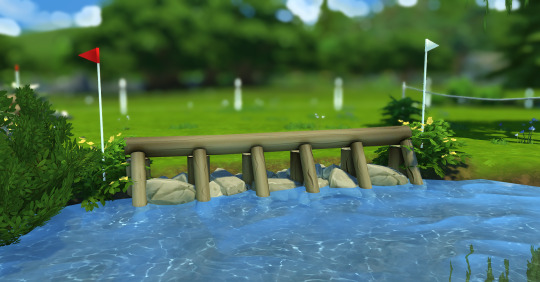
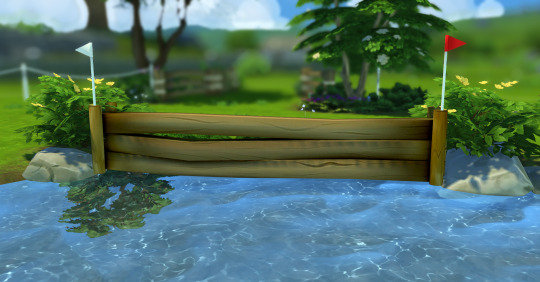
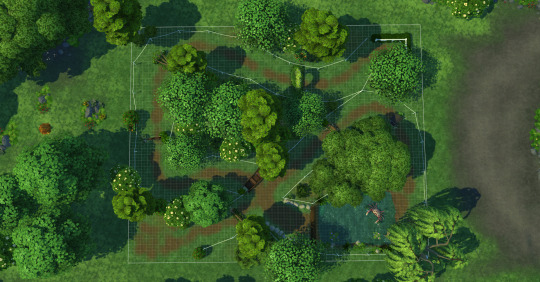
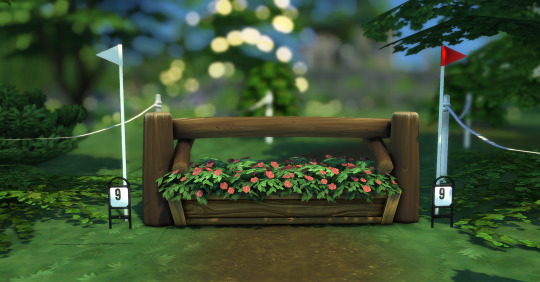
OLD MILL NOVICE XC
This course was built in collaboration with @pixelpony-ccfinds! They approached me about building a course for their new XC jump set, and I was absolutely delighted (and excited) to accept.
Old Mill Novice XC is a 50x40 lot, built & landscaped with Henford-on-Bagley in mind. When I planned this course, I wanted to mimic the aesthetic of courses laid out across wide open fields. It has 10* fully functional jumps, meaning your horse can jump them in normal game play. Using @littlemssam's Horse Parkour mod, your sims will even ride a circuit around the outermost ring of jumps!
*Only 9 of the jumps are actually usable - the drop jump from the platform into the water in the bottom left corner of the picture isn't actually accessible to horses because horses can't climb up on platforms. When not on a platform, however, this jump is also functional.
This pack is built with (mostly debug plants) items from:
Cottage Living
Get Together
Horse Ranch
High School Years
Cats & Dogs
All CC is included in the download file, but can also be found here:
Novice XC Jump set by @pixelpony-ccfinds
Rope XC fences by @walnuthillfarm
Jump flags by @horsesimblr
Catesta Platform set by @syboubou
Rock add-ons by @brazenlotus
Breath of the Wild Plants by FakePikachu. See if you can find the Korok flower.
-- DOWNLOAD --
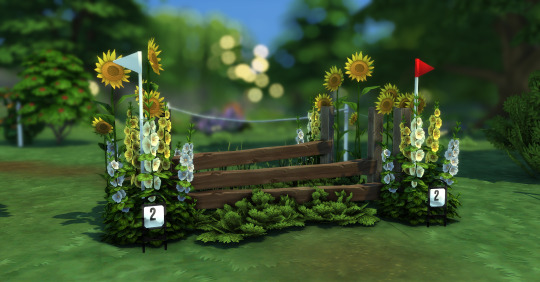
Course layout & jump previews are under the read more.


#Ts4 horse cc#ts4 equestrian cc#sims 4 horse cc#sims 4 equestrian cc#ts4 equestrian#sims 4 equestrian#ts4 horses#sims 4 horses#ts4 horse ranch#sims 4 horse ranch#sims horses#I AM SO EXCITED FOR THIS COLLAB YOU GUYS#my cc
186 notes
·
View notes
Text

Today I bring an offering - some dressage cones!
This is a recolor of Sass & Freckles dressage cones (Thank you for giving me permission to recolor them!), so you'll need to download their version in order for these to work. I have included all twelve letters needed for a full-size dressage arena & versions with the centerline letters for your training arenas. Each swatch comes with a custom icon so you know exactly which letter is which.
If there is interest, I'm thinking of doing a few different fonts (Maybe Times New Roman & a Western-ish looking font) as well as numbers to use with jump courses.
-- DOWNLOAD --
53 notes
·
View notes
Text
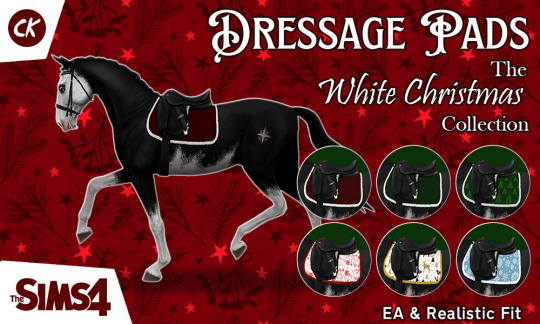
The White Christmas Collection
Merry Christmas, folks! I swear I am not dead! The month of November (and then the first week of December) ended up being far busier than I ever imagined, but I am very happy to present to you the White Christmas Collection: a set of six Holiday-themed saddle pads for your horses!
These dressage pads are specifically designed to fit @silverthornestudfarm/ SundayxGaming's Dressage Saddles. These were originally created for @theequestriansims Advent Calendar (and an exclusive TES branded set was released on the server!), but I decided to make a public set to share with everyone.
-- DOWNLOAD --
#ts4 horse cc#sims 4 horse cc#ts4 cc#ts4#ts4 horse ranch#ts4 horses#ts4 equestrian#sims 4 cc#my cc#equus-sims#theequestriansims
28 notes
·
View notes
Text

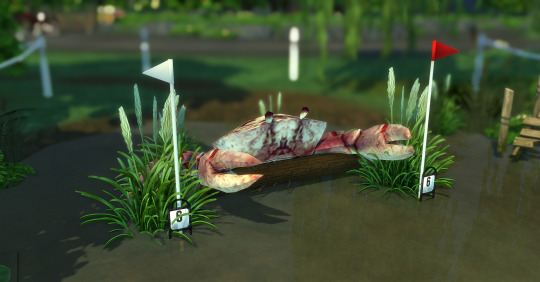
VULPES XC I
Hello folks!
This 50x40 lot has 9 jumps created with a variety of in-game and debug items, including a drop jump, a water feature, and the infamous CRAB RAVE jump. It is fully landscaped to match
the Henford-on-Bagley aesthetic, and is meant to be placed on the Isle of Volpe Park lot.
This lot requires the following game packs:
Cottage Living (EP11)
Get Together (EP02)
Romantic Garden Stuff Pack (SP06)
I know there's more due to the debug item usage I s2g
This lot requires the following CC (provided in the mods folder, but I also like to give attribution!)
@walnuthillfarm's XC Fence -
@hiddenshrinestables's Arched Dressage/Jumping Markers -
@horsesimblr Jump Flag Markers
@dravenxivsims4cc's TW3 Crab
Terms of Use
You may use this lot for any competition on any website or Discord server
You may not claim it or the jumps I designed as your own
As payment for usage, you must post screenshots of your horse spooking at the Crab Jump and your Sim being dumped on their butts and tag me so I can make a Confirmed Casualty List
For the course overhead view & jump previews, click the read more <3
-- DOWNLOAD --


#ts4#ts4 horse cc#ts4 equestrian#sims 4 horse cc#equus-sims#theequestriansims#ts4 build#the equestrian sims
40 notes
·
View notes
Text
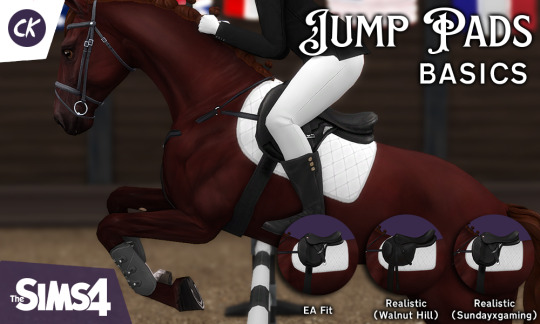
As promised, here are my Maxis Match Jump Pads!
This Basics set comes in ten basic colors (white, black, cream, navy, dark green, mauve, dark red, light green, and purple, same as the dressage pads).
This was specifically designed with @silverthornestudfarm / Sundayxgaming's Eventing/Jumping saddle in mind, but I also wanted to make sure it was as versatile as possible, so I made an option to fit @walnuthillfarm's jumping saddles as well. So, my jump pads come in THREE fits:
EA Fit (For EA & EA-Fit saddles)
Realistic - Walnut Hill Saddles (EA Position Fix & Hunter Saddle)
Realistic - SundayxGaming's Eventing Saddle
-- DOWNLOAD --
I intend to release more colors & patterns in the future, so stay tuned!
#ts4 horse cc#sims 4 horse cc#ts4 cc#ts4#ts4 horse ranch#ts4 horses#ts4 equestrian#sims 4 cc#my cc#equus-sims#theequestriansims
109 notes
·
View notes
Text

My one-day-late Simblreen treat for all of you - eight Spider-verse CAS backgrounds. These were created from screenshots & concept art from Spider-man: Across the Spider-verse. They aren't as crisp as I'd like them to be, but since they're a background replacement and not a complex CAS scene, there's not much I can do to combat the image compression. They still look really damn cool.
Included:
Gwen's Verse (A watercolor concept art of Gwen's New York)
Miles' verse (A shot overlooking New York)
Comic (A frame yoinked from Hobie's intro)
Collider (The Mumbattan collider)
Portal (The orange & purple octagonal Spider-society portal)
Lobby (Self-explanatory)
Nueva York (A shot of Nueva York from above)
Web (The threads linking all of the Spider-verse together... plus a bonus Dr. Ohn)
As a reminder, you can only have ONE CAS background replacement in your mods at a time. I keep mine in a separate folder and then swap them out when I need them c:
If these are particularly popular, I'll probably do another set eventually. Feel free to make suggestions!
-- DOWNLOAD --
#ts4 cc#sims 4 cc#spider-man cc#ts4 spiderman#ts4 spider-man#ts4 marvel#ts4 spiderverse#ts4 spider-verse#cas background#simblreen#my cc
26 notes
·
View notes
Text

I am proud to present my very first horse cc: a set of dressage pads specifically designed to fit @silverthornestudfarm/ SundayxGaming's Dressage Saddles. Since I designed the pad to fit with the longer version of the saddle, the shorter version should also work.
This Basics set comes in ten basic colors (white, black, cream, navy, dark green, mauve, dark red, light green, and purple), each with an EA and a Realistic fit. I intend to release more colors and patterns, so stay tuned <3
edit: re-uploaded the file after accidentally deleting it on SFS. Sorry folks! :"D
-- DOWNLOAD --
#ts4 horse cc#sims 4 horse cc#ts4 cc#ts4#ts4 horse ranch#ts4 equestrian#sims 4 cc#ts4 horses#sims 4 horses#equus-sims#theequestriansims#my cc
137 notes
·
View notes
Text

The wonderful @walnuthillfarm gave me permission to convert all their Sims 4 horse coat brushes to Photoshop, and so I'm delighted to share this with all of you! It includes appaloosa spots, roaning, dapples, stripes, and more.
All brushes were made by Maeve, I just converted them & sorted them into folders for ease of finding things. This includes all brushes made as of September 30th, 2023 - if/when Maeve makes more, I'll update the .abr file.
For most of these brushes, I really suggest you edit the brush dynamics to add size, angle, and roundness jitter to create more variation for texturing your horse coats. Play around with things to find what works best for you! I'm using them to create custom coats in Photoshop, but they'd also be very useful for normal non-Sims horse painting activities as well.
[[DOWNLOAD @ SFS (No Adfly!)]]
#the sims 4#ts4#ts4 horse cc#ts4 equestrian cc#photoshop brushes#horses#not technically cc but stuff to make cc
38 notes
·
View notes
Text
ABOUT
Hello folks, I'm CK, and welcome to my Sims 4 CC blog. This is where I'll share all the CC I make as well as CC I happen to trip over in the wild.
TERMS OF SERVICE
Do not re-upload any of my work to any other site or claim it as your own.
Feel free to share my CC privately between friends or with tray files.
Do not put my work behind a paywall.
Edits and modifications are 100% welcome and encouraged! All I ask is that you credit and link me <3
IMPORTANT LINKS
Main Blog
Equestrian Sims Blog
My CC Tag
NOTES
My Dressage Pads fit:
EA FIT
Sundayxgaming's Dressage Saddles
Schrodcat's Australian Saddle
REALISTIC FIT
Sundayxgaming's Dressage Saddles
Schrodcat's Hunter & Equitation Saddle
Schrodcat's Iberian Saddle
Schrodcat's Endurance Saddle
Schrodcat's Icelandic Saddle
Schrodcat's General Purpose Saddle
Schrodcat's Australian Saddle
My Jump Pads fit:
EA FIT:
EA English Saddle
Sundayxgaming's Eventing Saddle
REALISTIC FIT (Walnut Hill)
Walnut Hill's Jump Saddle
REALISTIC FIT (Sundayxgaming)
Sundayxgaming's Eventing Saddle
Schrodcat's Hunter/Equitation Saddle
Schrodcat's Jumper V1 & V2
2 notes
·
View notes
Photo
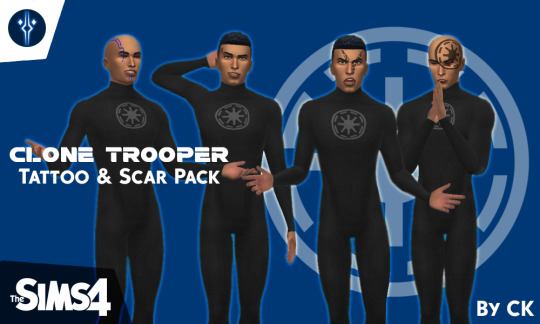
Clone Trooper Tattoo & Scar Pack
A month of hard work has paid off, and I am happy to present to you my latest Clone Trooper CC!
Previews & download under the cut:
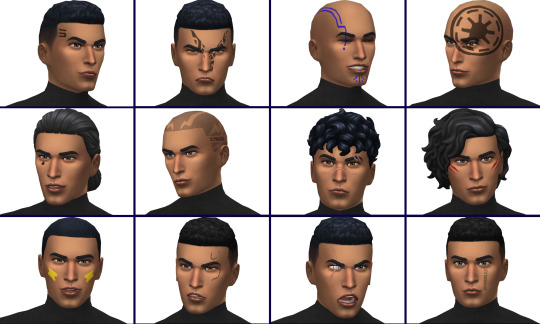
Characters include:
Fives
Dogma
Hardcase
Jesse
Tup
Kix (+ Kix’s electric hairstyle)
Fox
Thorn
Bly
Cody
Wolffe
Neyo
Tattoos and scars will be found under Face Details -> Forehead. Kix’s hairstyle will be found under Short Hair. Disabled for random, enabled for both male + female, and enabled for all occult lifestates.
Some notes:
Fives - some hairstyles (both CC and Maxis) distort his tattoo slightly and I have no idea why. I’m looking into it.
Wolffe - Wolffe should not wear wrist accessories as the texture of his cybernetic eye will conflict with the texture of said accessories.
Special thanks to @amikoroyaiart for allowing me to take inspiration from her designs and use her art as thumbnails for Thorn and Fox!
Huge thanks to mauvemorn and Feyona over at the Sims 4 Studio forum for patiently walking me through texture painting with stencils in Blender.
>> DOWNLOAD <<
#sims 4#ts4#s4cc#star wars#clone wars#s4star wars#my cc - tattoos#my cc - scars#sims 4 star wars#my cc - hair#my cc
304 notes
·
View notes