
knbassessmentblog
KNB217 Assessment 1
Soojung Lee, n9667598
9 posts
Don't wanna be here? Send us removal request.
Last Seen Blogs


contenidodescartado
Contenido Descartado.

hayniac-maniac
Love Makes Me Stalk Hunter Hayes

verytrustworthyblog
trust me

marseille1323-blog
Sans titre
Text
9. Final
Soojung Lee, n9667598
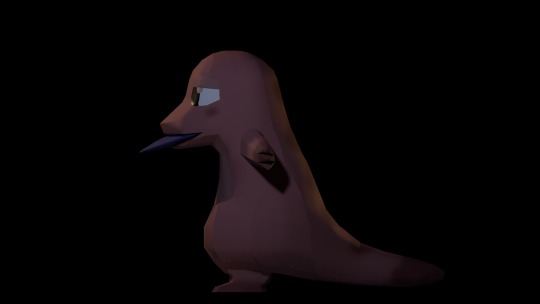
Blue Tongue Lizard
Sketchfab:
No light: https://skfb.ly/6IKHZ
With light: https://skfb.ly/6JBUL
Render images:


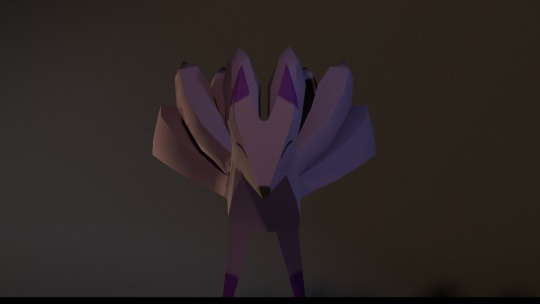
Nine-tailed Fox
Sketchfab:
No light: https://skfb.ly/6Jo6Q
With light: https://skfb.ly/6JBUw
Render images:


0 notes
Text
8. UV unwrapping, Texturing, Arnold lighting and Render Images
Soojung Lee, n9667598
As I finished yo modelling the character, I moved on to UV unwrapping for texturing.
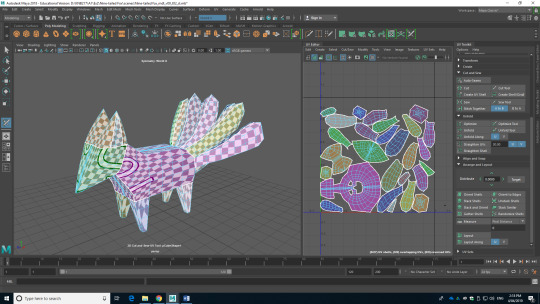
^ Figure 1: UV unwrapping
I finished UV unwrapping, but they are layout in random places, therefore, I need to change their position to texture them easier.
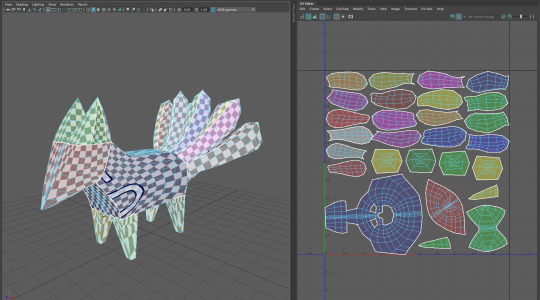
^ Figure 2: Clean up the UVs
I arrange their place and size to make the squares close as possible so the texture will be nicer and similar quality. As I finished to arrange the UVs, this is time to move on to Substance Painter to texture the model.

^ Figure 3: Textured
The texture was done based on the character as the 2D drawings I have done in the past. I controlled the roughness of the paint so this will not look metallic. I also used the fur brush and increase the height to represent the fur texture.
Sketchfab
https://skfb.ly/6Jo6Q
Arnold lighting

^ Figure 4: Apply texture
As I had lots of different trouble with Arnold lighting and render images for the blue tongue lizard model, this was a quick process with a nine-tailed fox model. I applied the texture after checking the UV.
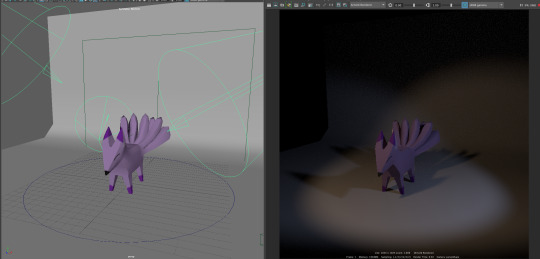
^ Figure 5: Arnold lighting
Created the environment to take render images. I also placed the lights around the model and checking is it looking alright to take render images.
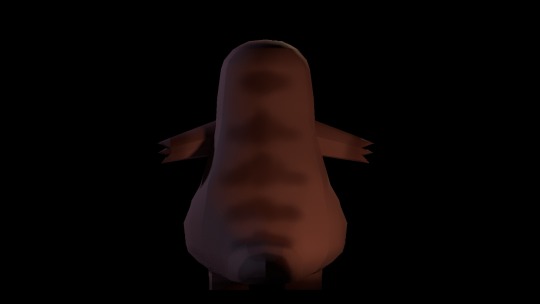
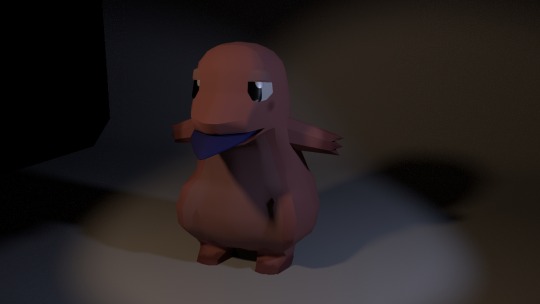
Render images

Front view
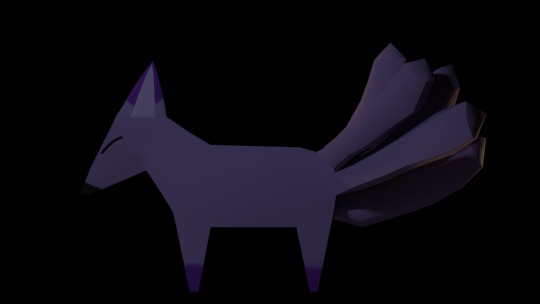
Side view
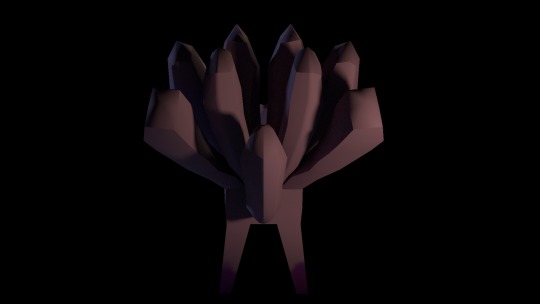
Back view
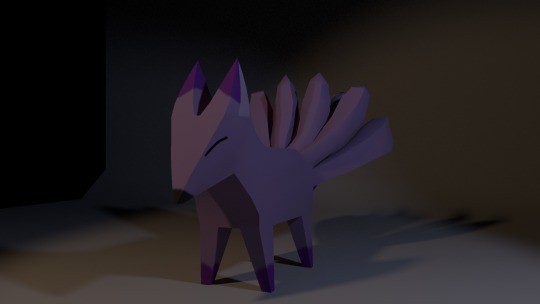
Quarter view
0 notes
Text
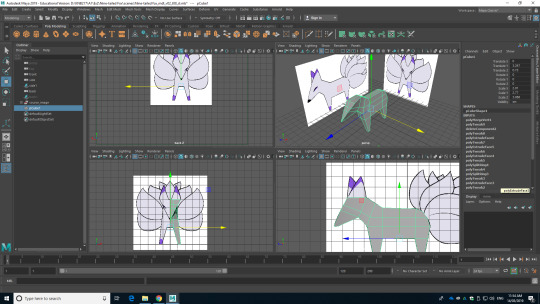
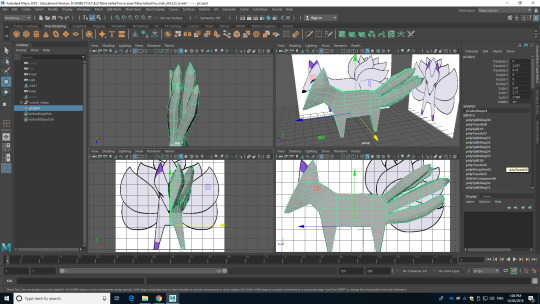
7. Modelling Nine-tailed Fox
Soojung Lee, n9667598
This week I am started to modelling my second character, which is a nine-tailed fox.
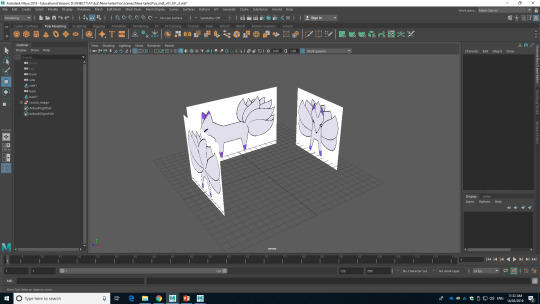
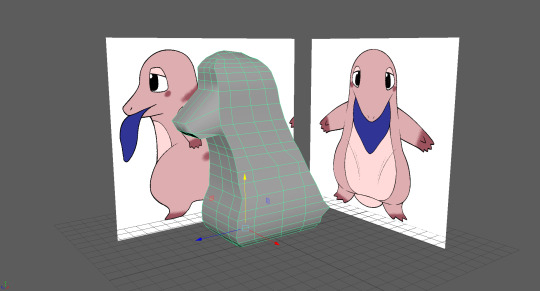
^ Figure 1: Import source images
The first thing I have to do was to import the source images to each perspective as I did in the previous modelling.
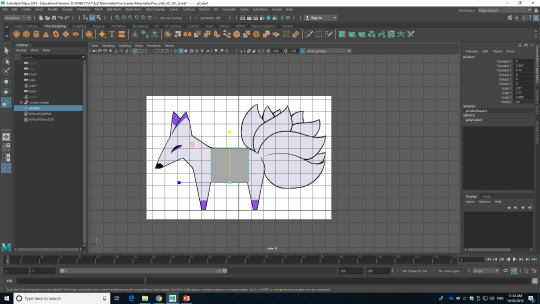
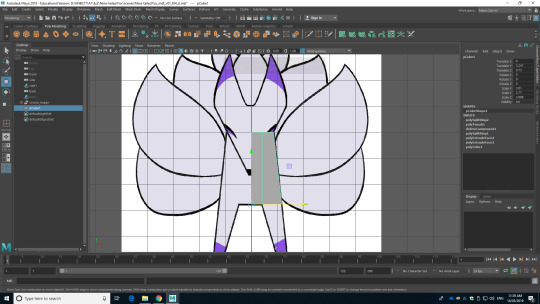
^ Figure 2: Create the body
After I import the source images, I apply the basic mesh. I decided to start with cube mesh as my character has angled body shape.
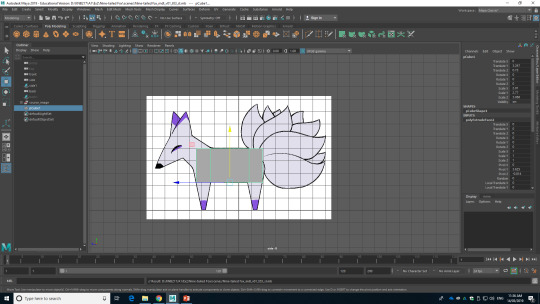
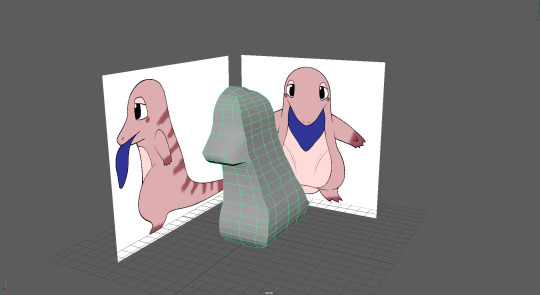
^ Figure 3: Extrude the faces
^ Figure 4: Cut the mesh into half
I extrude the cube as body length, but before I go any further process, as I have symmetrical character design, I have to cut it into half to make my work easier. Therefore, I added the edge loop to the centre of the cube mesh and delete the faces, as you can check in Figure 4.
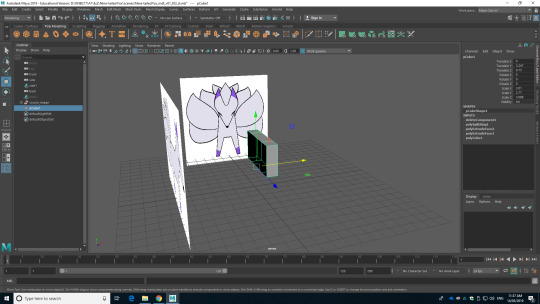
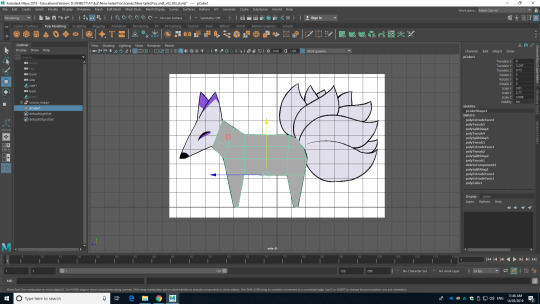
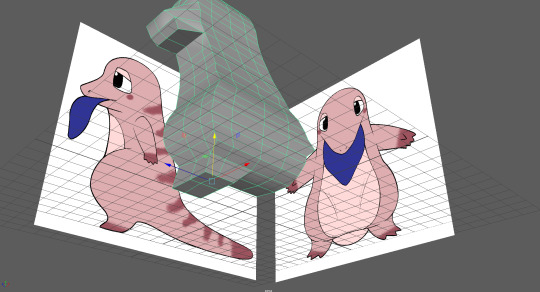
^ Figure 5: Change the shape
I changed to the front view and started to change the shape of the mesh as source images. I moved the vertex of the mesh to fit as source images. The reason I choose to work with vertex because this is much easy to transform the mesh compare to edges or faces.
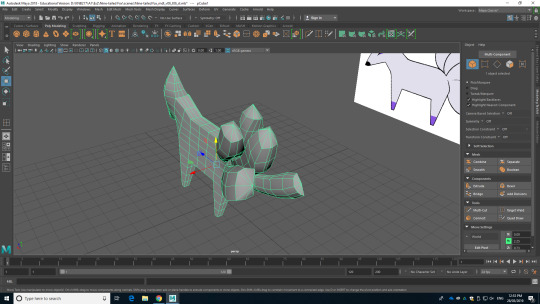
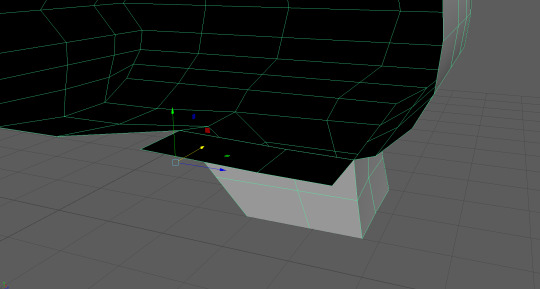
^ Figure 6: Extrude the faces to create the legs
After I transform the mesh in front view, I moved back to the side view of the mesh to model the legs. I have to extrude the faces to model the legs and to do this, I have to add edge loops to where the legs need to be placed. As I added the edge loops, I grab the face for each place and extrude the faces. However, as you can see in Figure 6, the legs are not square. It was much close to the triangle. Therefore, I select the vertex and scale down to narrow the area.
^ Figure 7: Extrude the faces to create the neck
^ Figure 8: Extrude the faces to create the head
The next step I moved on was to model the neck and head. This was done in similar steps with the legs. I added extra edge loops, grab faces and extrude the face.
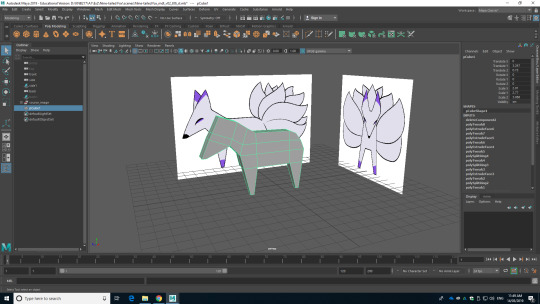
^ Figure 9: Changing the shape of the mesh as source images
As I extrude the face to modelling the head, I have to check all the perspectives to check is it matching with the source images, and anything went wrong. During this step, I also change the place of the vertex to model as the source images.
^ Figure 10: Extrude the faces to create ears
^ Figure 11: Add extra edge loops to the side of the face
^ Figure 12: Change head to be more round
I finished with modelling the head shape and I moved to model the ears. First thing I have done was to extrude the face, however, the extruded faces were square rather than triangle as showing in source images. Therefore, I merge the vertex to triangle shapes. After merging, I realised that the shape of the face does not look right. It was too angled compare to ears, so I add extra edge loops to the mesh and pull out the vertex to make the head more round and natural.
^ Figure 13: Add extra edge loops
^ Figure 14: Model the ears
I moved to more detail for the ears. The initial ears were angled, but the actual ears on the source image are more round and soft. Therefore, I add edge loops the ear model, grab the vertex, and pull it out to match with the source images. This result more rounded ears.
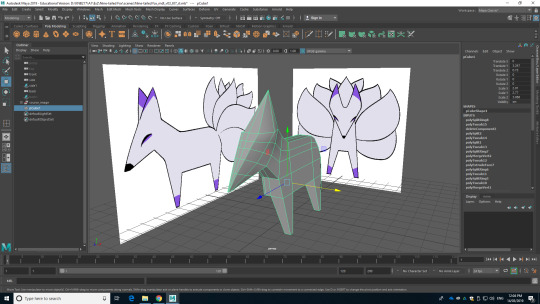
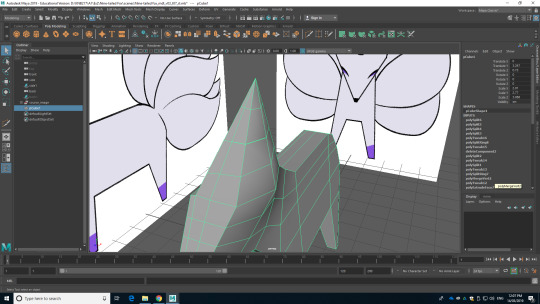
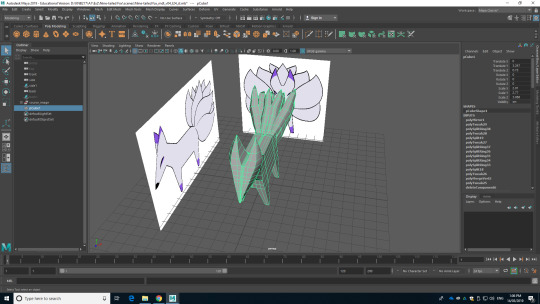
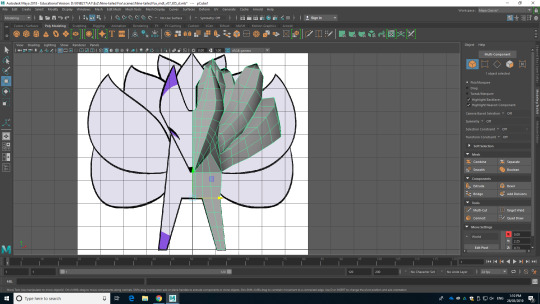
^ Figure 15: Extrude the faces for tails
^ Figure 16: Tails
I was having trouble with modelling the tails because I have to make nine of them and they are rounded rather than angled like triangle or cube. I tried various options that I can think of, but this final one is the best idea I can think of. I extruded the faces for four tails, and when I extruded the face of the last tail, I deleted the half of the face after I extrude the face. The reason I delete the half of the face was I have to mirror the mesh at the end, which means I only need to model half of the tail for the ninth tail.
Figure 15 is showing after the extruded the faces, and Figure 16 is showing the steps to modelling the tail. I merge the vertex to create the triangle mesh as I did to ear mesh, and I pull it out to create the end of the tail.
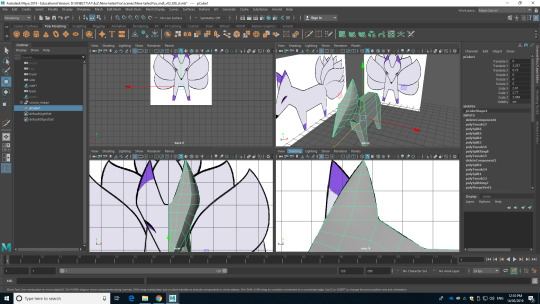
^ Figure 17: Finished all tails
Figure 17 is showing the end of the tail modelling. I added edge loops to the tails to model the round shape with square mesh. I grab the edges and scale up the gave them a volume, which will make more tail looking mesh.
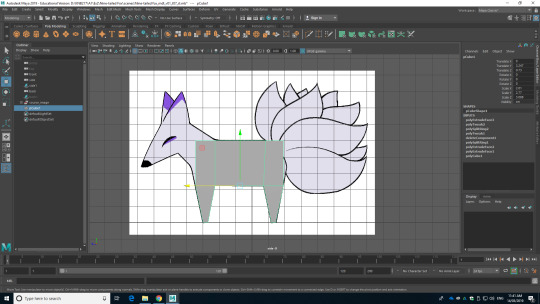
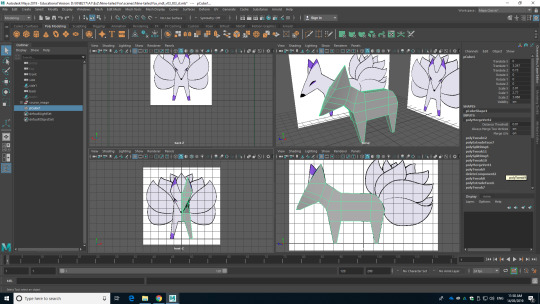
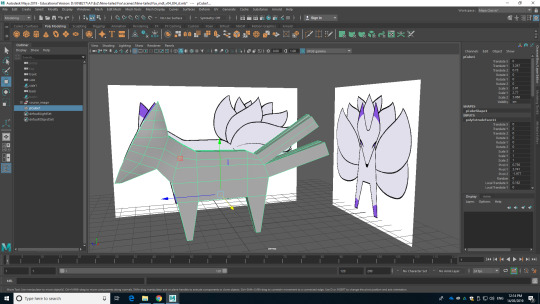
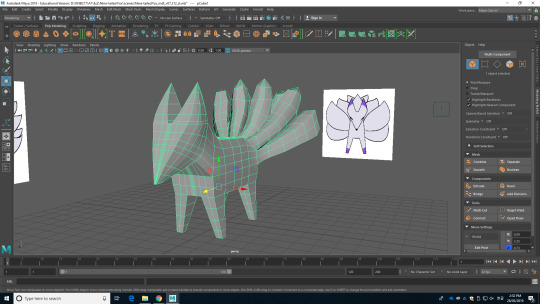
^ Figure 18: Mirror
^ Figure 19: Finish modelling
After I finished all the modelling that I need to be done for this character, I mirror the mesh to create a complete model.
This was complicated modelling, but this was also interesting and challenging. This was a great experience to research the story, set the character profile, design the character and modelling with my own designed character. However, through this process, I realised that I only like until drawing turnaround pose of the character. I also like 3D modelling, but personally, I am more comfortable and suitable for 2D drawing.
Sketchfab
https://skfb.ly/6IPMY
I sent the model to the tutor and received the feedback. He told me that the character is looking angle and broadening out the tail as they get close to the tips, like the mood board in the previous post. I will go to fix the tail as the feedback, but I might keep the boxy shape of the character because as I designed rounding and soft character before, I want to design the opposite character to the blue tongue lizard I have done. Therefore, I designed the fox with angles.
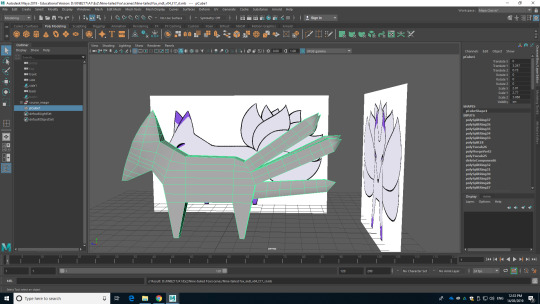
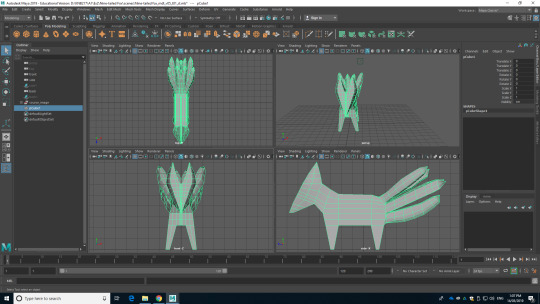
^ Figure 20: Fixed the tail
As the feedback I received, I started to change the shape of the tail. First thing I have done was to spread them out more for space. After I thought it now has enough space between each other, I started to angle and scale up the size of the tails by grabbing the faces and edge loops on the tails.
^ Figure 21: Angled tail and have more volume
This is the front view of the mesh after angling the tail and scale up the size of the tails’ edge loops. It now looks more natural compared to Figure 19. According to the feedback, the tails are now broadening out the tail as they get close to the tips.

^ Figure 22: Create the ear hole
After I fixed the tails, I thought the ear need more detail, such as ear hole so it will look more like the ear. Therefore, I add extra edge loops and grab the edges and pull it in. Now, I can add extra detail to the ear.
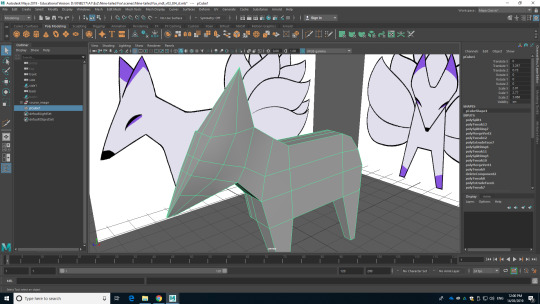
^ Figure 23: Mirror the character
As I think I finished with the modelling, I mirror the mesh to create the one mesh.
Sketchfab
https://skfb.ly/6ITG9
It was also difficult as the previous blue tongue lizard modelling even I decided to work as more boxy form. This is because of the tails. I have a lot of problem with modelling the tails with balance, the shape of the tails and place the tails. However, I can end up with final modelling with the tutor’s feedback.
As I finished with modelling the character, now it is time to move on to UV unwrapping and texturing steps.
0 notes
Text
6. UV unwrapping, Texturing, Arnold lighting and render image
Soojung Lee, n9667598
As I finished modelling the character, this is now time to UV unwrapping for texture the character mesh, and texture the character with Substance Painter.
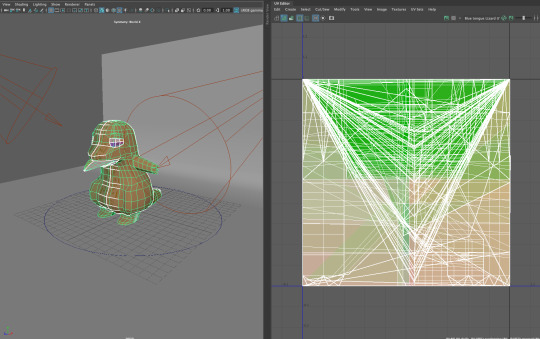
^ Figure 1: UV unwrapping
^ Figure 2: Cut and unfold the mesh
I opened the UV tools and started to cut the edges to unfold the model. I tried to divide them into the easiest way to texture them. As such, for the back, where it has the pattern, I cut them as one piece so I can texture the pattern much easier. When I finished cutting the mesh, I pressed the unfold button, and Maya automatically layout the pieces like in Figure 2. However, they are not placed in the best place to texture.
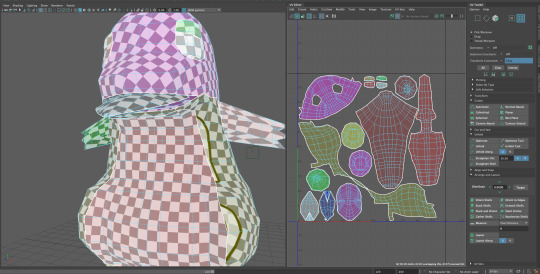
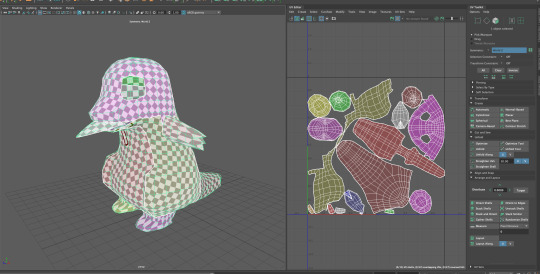
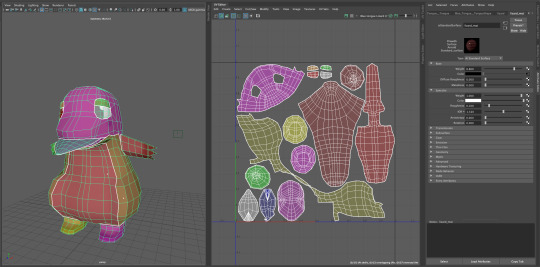
^ Figure 3: Layout the unfolded mesh
Therefore, I have to arrange the layout. I have to change their place because they are too close together, which is hard to texture each piece, so I changed their place to bit away as well as placed them in categories, such as eyes, legs and arms are placed close together. This was to help myself to texture the mesh.
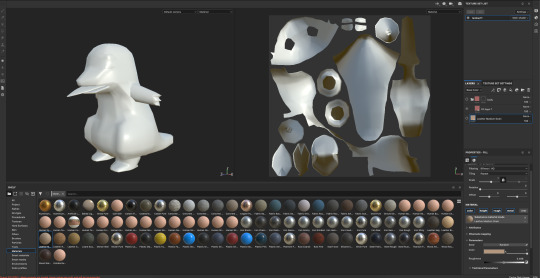
^ Figure 4: Moved to Substance Painter
When I finished with UV unwrapping, I export the mesh and import the mesh into Substance Painter for texture. It shows mesh and UV unwrapped of the mesh together as shown in Figure 4.
^ Figure 5: Texturing
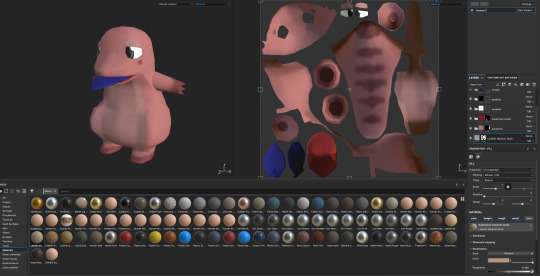
I used the black mask to texture each part. In Substance Painter, I can control the roughness, metallic and height of the texture. Lizard is not shining like glass, so I reduce the metallic and increase the roughness to represent the lizard skin. Also, I add basic texture as well because I want to represent that lizards leather skin texture.
After add and change the setting to a suitable setting for the character I am going to texture, I started to add the colours with the fill layer, and I manually draw the patterns by brush tool. You can see how does the UV looks like after texturing in Figure 5, and the final textured model is published to Sketchfab.
As this model is not a complicated model like a human or real-world animal, it was easy to UV unwrapping, and personally, texturing is not hard compared to modelling, and most interesting and fun step in 3D modelling.
Sketchfab
https://skfb.ly/6IKHZ
I finished the texturing, then it is time to export the texture as a normal map, and go back to Maya to do the Arnold lighting and render the image in 4 different perspectives.
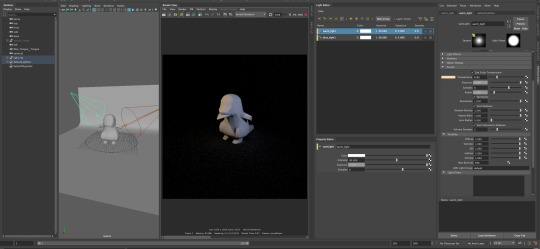
^ Figure 6: Set the lights and ground
I placed two different spotlights to the model and they are warm and blue lights. I changed the name of them and changed the colour. After I finished with placing and changing the colour of the lights, I add the planer to create the ground.
It was really hard to come up to this stage because the tutorial on the Blackboard was not helping at all, so I have done a few research to find much helpful tutorial and follow the steps.
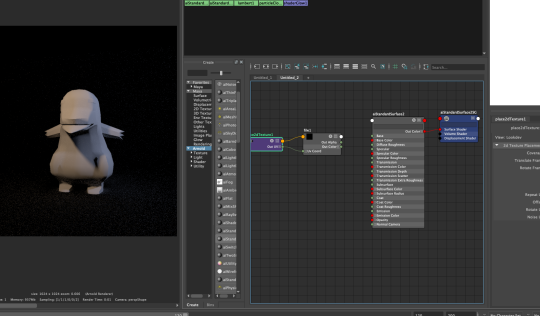
^ Figure 7: Add nodes
After setting the lights and plane, I started to work with the nodes. I study this through YouTube tutorials as well. This step is to add the texture I have done in Substance Painter, but I could not found the way to apply the texture to the mesh.

^ Figure 8: Add a few more nodes
I did some more research on YouTube to find out to apply the texture to the mesh, but I could not get the result I am looking at. I had export the texture, so I have three different images, which are a normal map, metallic smoothness map, and transparency map. However, it is not working. I have to figure out this to take the render images.
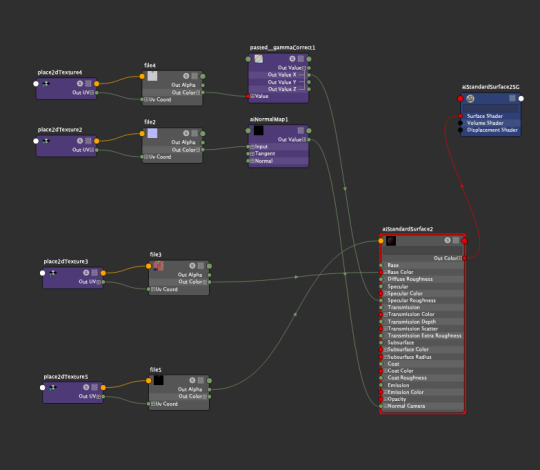
^ Figure 9: Nodes
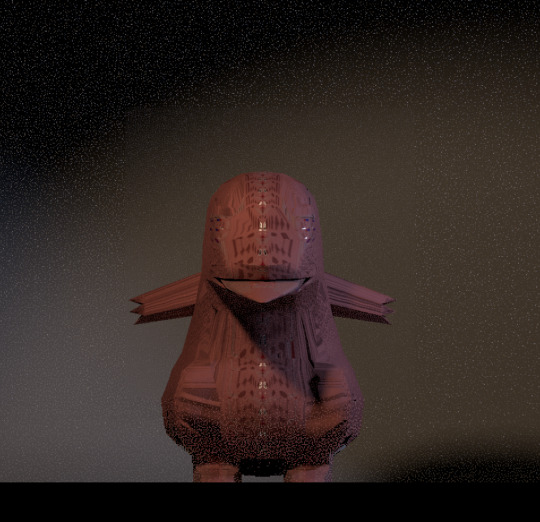
^ Figure 10: Not working
^ Figure 11: Actual textured
I applied all the textures exported from Substance Painter, which are roughness, normal map and metallic image to Maya, but as you can see in Figure 10, it is not showing texture properly like the Figure 11, which taken from Substance Painter.
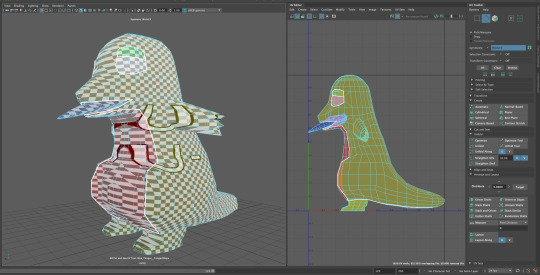
^ Figure 12: Found out the problem
All of the sudden, I realised that I have to check the UV because the texture lookiung werid mean there is something problem with UV, and as you can see in Figure 12, sonehow, UV is not right.
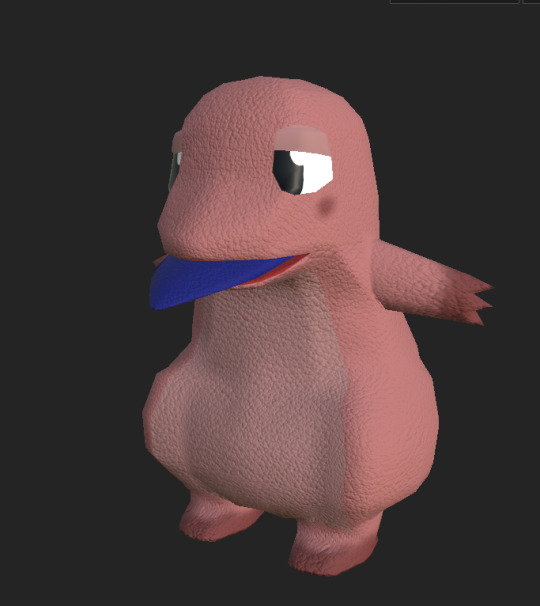
^ Figure 13: Fixed the UV
In the first place, I was thinking to fix, but rather than that, I decided to start from the beginning. and I started to apply the texture on top of the model. As to showing in Figure 13, the texture applies very well as it has collect UV.
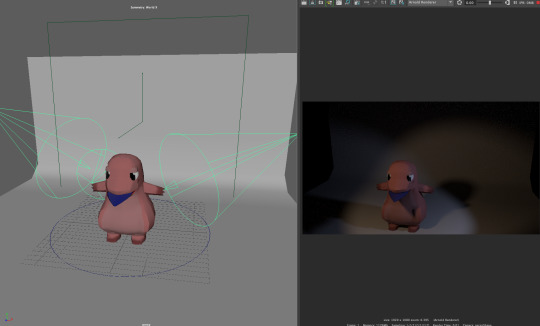
^ Figure 14: Set the environment and light again
The texture applied and this is now time to set the environment again. I set the lights and ground. Now, finally, I can take render image with lighting.
Render images
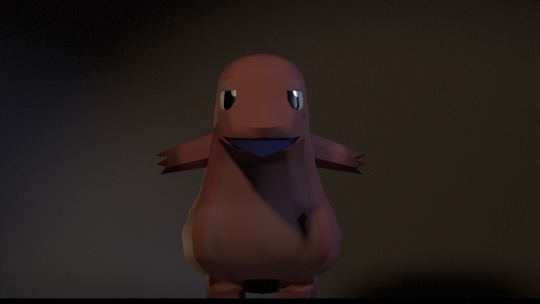
Front view

Side view
Back view
Quarter view
Reference list:
- Andrew, Z. (2018). Arnold Lighting and Materials. Retrieved from https://www.youtube.com/watch?v=gvcHQsDax_o
-Blanc, L, B. (2019). Lighting in Arnold for Maya | Lighting Tutorial. Retrieved from https://www.youtube.com/watch?v=iUfCRXbL9ZM
- C-Media. (2018). Tutorial | Substance Painter. Retrieved from https://www.youtube.com/watch?v=rLI0J77vSa0
- Pereira, F. (2018). Exporting from Substance Painter to Maya 2018 Arnold Part 1. Retrieved from https://www.youtube.com/watch?v=aZ_NrD1pEMg
- Schiffmann, A. (2017). Maya 2017 How to render and save an image. Retrieved from https://www.youtube.com/watch?v=MJjHH8iLbJY
- SURENDRA KUMAR VARMA. (2018). How to export texture from substance painter to maya (arnold) | Tutorial. Retrieved from https://www.youtube.com/watch?v=MpQokgLp73I
0 notes
Text
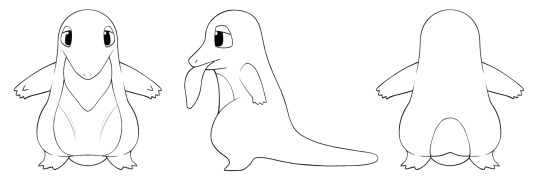
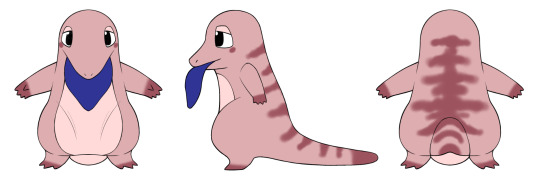
5. T-pose, Facial expression and Movement Drawing
Soojung Lee, n9667598
As I finished the idea sketches and made my mind with one of the sketches, I moved on to draw t-pose of that sketch for modelling.

^ Figure 1: Draw the guidelines
Before drawing character, I had set the guidelines to keep the same height and place. If I do not have this guideline, I cannot draw them in the same height, which will end up useless t-pose drawing.
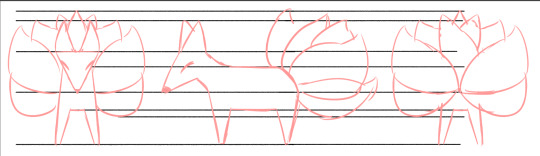
^ Figure 2: Roughs
This is the rough sketches of the character drawings. I tried to stay on the guidelines. I added a few more guidelines as I draw because I thought I need more for tail height and etc.

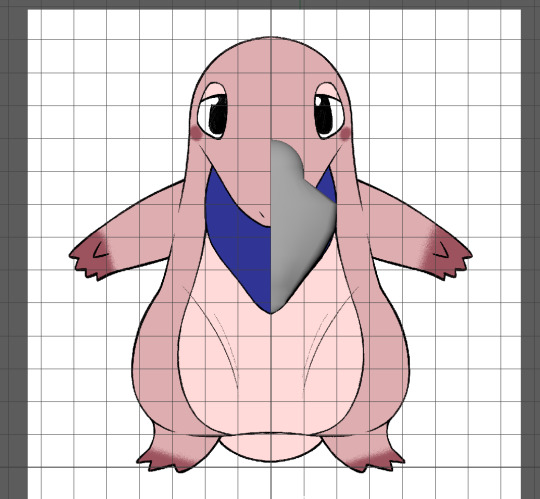
^ Figure 3: Line
I finished the rough sketches, I draw clear black lines over the top of the rough sketches, and Figure 3 is the result of the character.

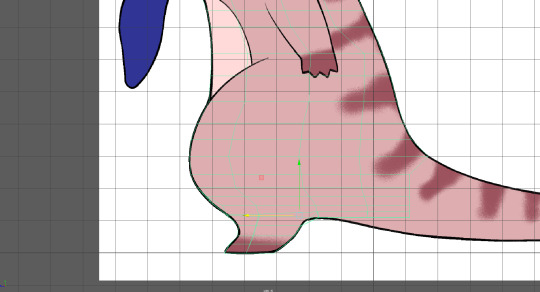
^ Figure 4: Final drawing
I can start modelling with Figure 3 images, but it is good to have a simple and basic colour of the character for texturing. The reason I choose this colour was because as researches I have done, most of the characters were designed with red and blue colours. Therefore, I want to colour the character with a different colour from published characters. Moreover, I added point colours to the character as well because one colour design character is too simple, so I decided to add the point colour to the character to give more characteristic.
^ Figure 5: Sketch of the movement and emotion of the character
I also draw out some sketches of the character’s movement and facial expression. I draw as much as I can think of the movement and facial expression of this character. This step is helping me to extend the idea and characteristic of the character.
0 notes
Text
4. Exercise 2 Character design
Soojung Lee, n9667598
For the second exercise, I asked to design fantasy mythological creature. What I need to do are choose an ancient mythological story, establish the setting, establish the character profile, reference the visual and movement style, and design turnaround ready for modelling.
I chose the nine-tailed fox story, which is pretty familiar and popular in Asia countries. This character is also an attractive topic in all over the world, therefore, we also can see the nine-tailed fox in the game, such as Ahri in League of Legend.
The story of the nine-tailed fox is the nine-tailed fox transform to beautiful women and get the men’s liver after tempting the men, and they repeat this over 100 times to become human.
The nine-tailed fox in the story, it does not have the actual name that people can call because this is just fox and in the story, beautiful woman, that the nine-tailed fox transform, showed up and tempt the man. After it tempts the man, at night, it tried to get man’s liver. This is because they have to collect 100 men’s liver to become human.
As this fox has nine-tails, this character is aged over 1000 years. Also, it has the ability to transform into a beautiful woman and some of them can control the death fire.
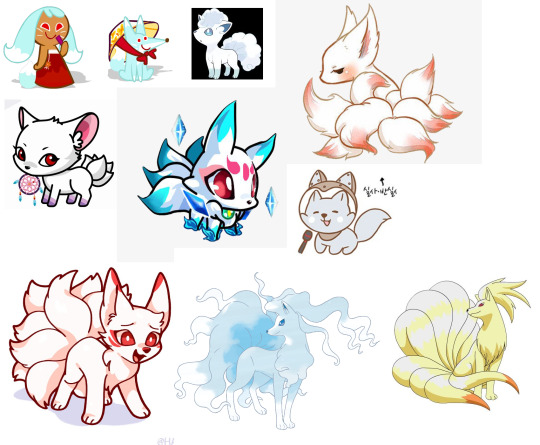
^ Figure 1: Character mood board
The character I decided to model was a fox form character, which is much cute and simple to modelling. This is the mood board for the character design. I research various style of fox character.
^ Figure 2: Fox image 1
^ Figure 3: Fox image 2
^ Figure 4: Fox image 3
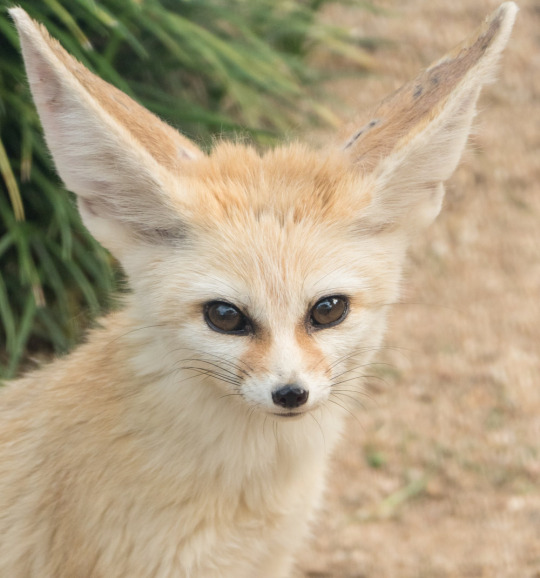
^ Figure 5: Fox image 4
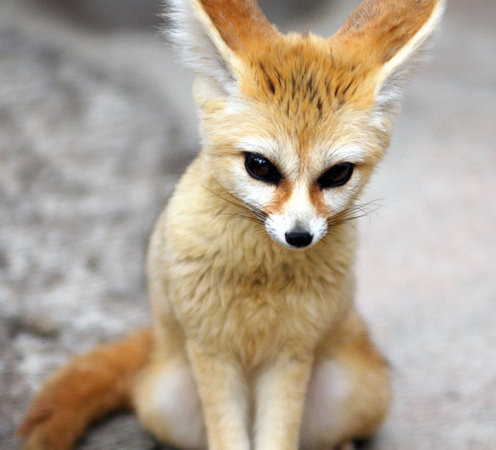
^ Figure 6: Fox image 5
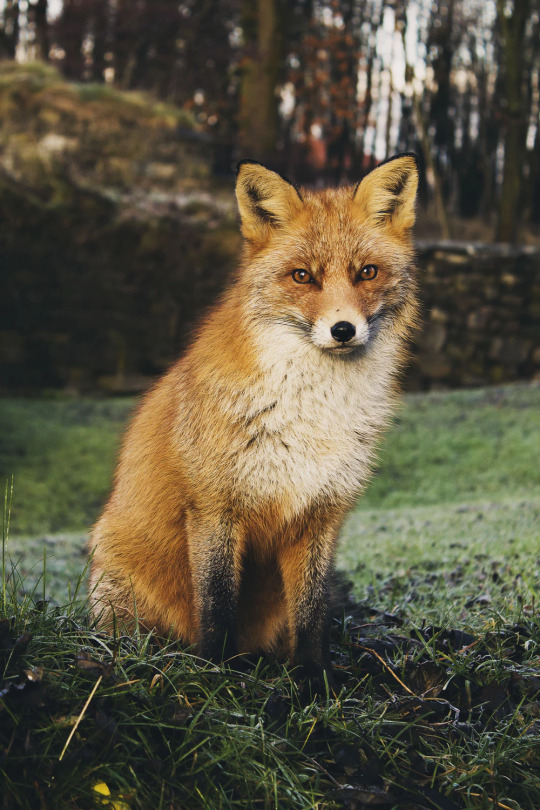
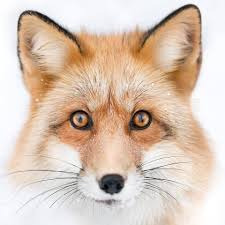
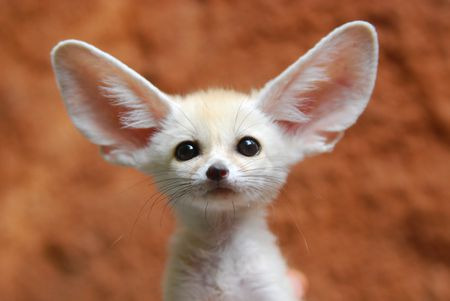
Furthermore, I also did some research on the real fox pictures to get the feeling and mood of the fox more easily. The reason for collected these real fox pictures are because the drawing from someone else, such as Figure 1, are already having their own feeling and characteristic, therefore, this real fox pictures will help me to build my own characteristic design.
According to those various research, I was allowed to gather the ideas for my own character.

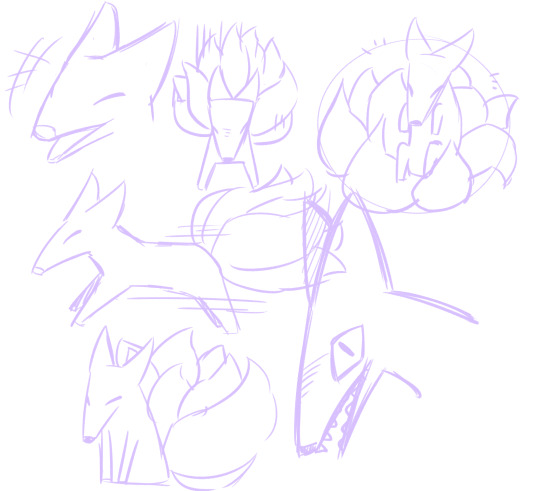
^ Figure 3: Idea sketches
As I finished collecting data, I started to sketch out my own idea of the nine-tailed fox. The initial sketch was that rounded shape fox, however, I think this design does not have characteristic points. So, I decided to work with the shapes, which I saw from the lecture slide. I was thinking about that shape is came first when I think a fox, and that was a triangle. As you can see in Figure 2, I set a triangle as a character’s head and use the square for the body. I quite like this design, so I decided to work with this sketch for final character design.
When I finished the sketches and made my mind which idea and sketch I will go to work with for the movement and T-pose drawings for the modelling.
0 notes
Text
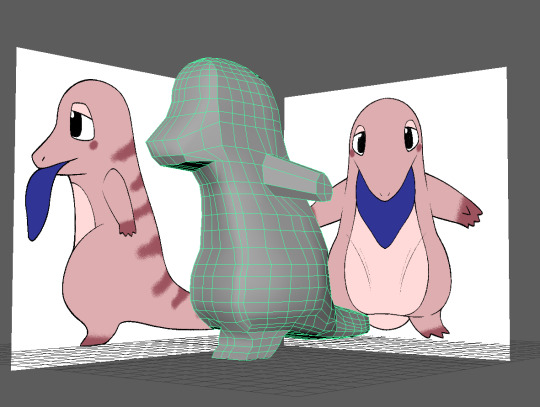
3. Start modelling
ISoojung Lee, n9667598
As I finished the t-pose of the character, now this is time to move to Maya to modelling the character.

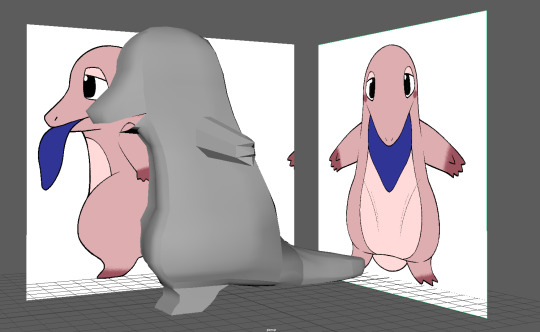
^ Figure 1: Import source image
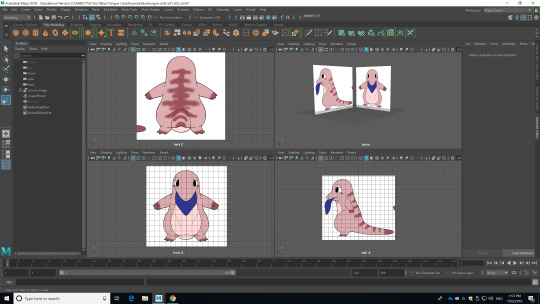
^ Figure 2: Import source images to the right place
Before starting the modelling, I have to import the source images, which is t-pose, in the right direction. This is the guideline for modelling.

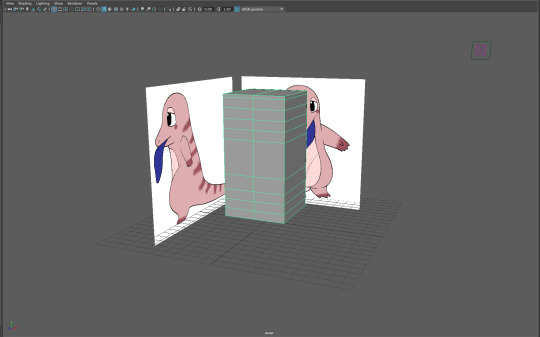
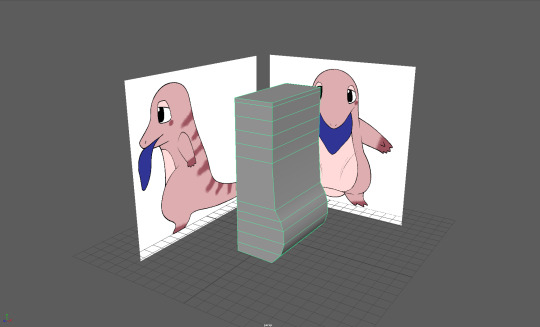
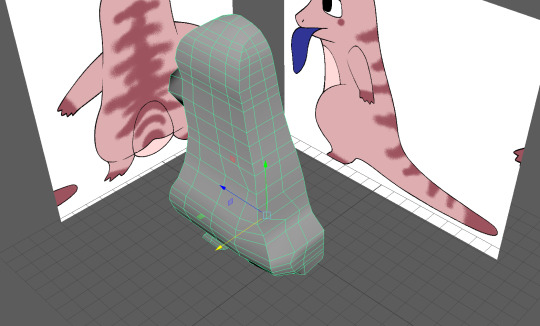
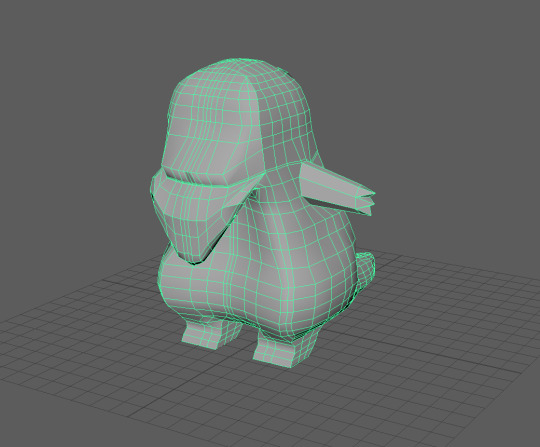
^ Figure 3: Start modelling with base mesh
After import the source images, now I can start my modelling. I decided to start with a square basic mesh.
^ Figure 4: Extrude the mesh and add edge loops to create the body of the character
^ Figure 5: Grab and pull out the edges as the source image
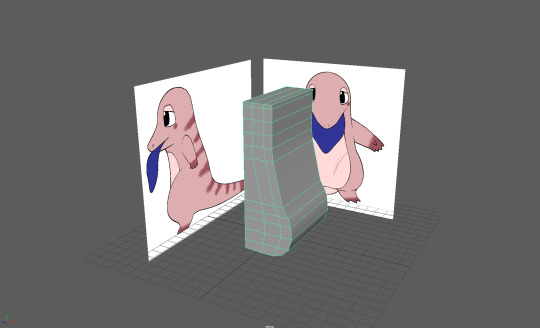
^ Figure 6: Add extra edge loops
^ Figure 7: Grab and pull out the edges as the side source image
^ Figure 8: Add more edge loops to create the flow of the body and round the head area

^ Figure 9: Rounding the stomach
I extrude the size of the cube and add edges loops to create the shape of the body. I grab the vertex, edge or face of the mesh and pull out as much as I want to make it round. While I was doing this, I change my viewpoints so I can check how my mesh looking and matching with the source images.
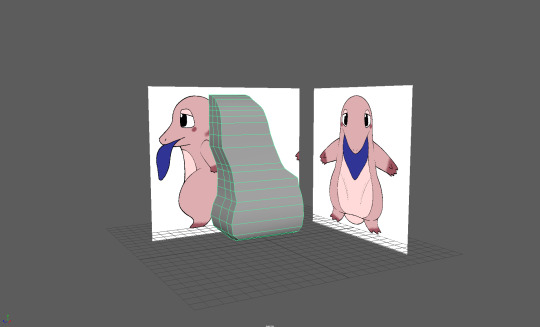
^ Figure 10: Grab and extrude the face to create the mouth
^ Figure 11: Editing mouth to modelling as similar to the source images
When I was creating the mouth, I only pull out the faces as shown in Figure 10. However, I realised that this might not work very well. Therefore, I undo my works and extrude the face to create the mouth.
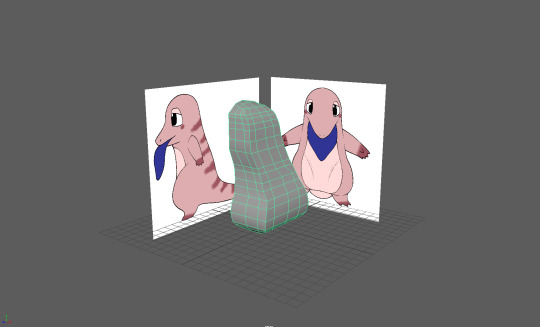
^ Figure 12: Create the leg

^ Figure 13: Place the leg as the source images
I moved to create the leg. As I create the mouth, I extrude the face. However, when I change my viewpoint to the front view, I realised that the leg is not in the right place, so I move the leg out.
^ Figure 14: Fill the gaps by extruding the edges
^ Figure 15: Fill the other gabs by extruding the edges
As I move the leg, there are the gaps I have to fill. Therefore, I extrude the edges. As I got the new faces, I merge the vertex and made them as one connected mesh.
^ Figure 16: Gave the shape to the leg
After filling out the gaps, I change my viewpoint to the side view and add the curve to the leg by adding extra edge loops.
^ Figure 17: Create a tail

^ Figure 18: Extrude the face
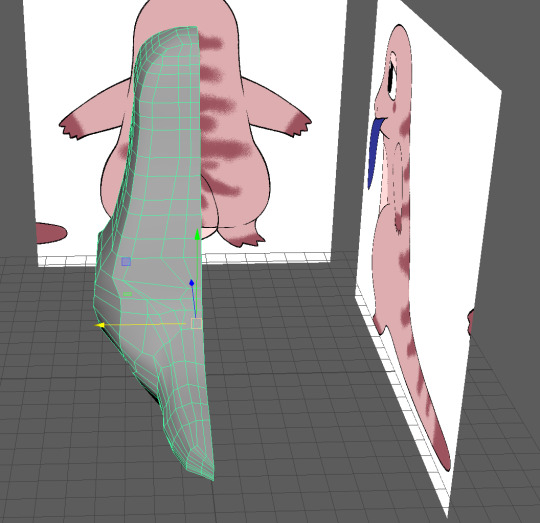
^ Figure 19: Finishing tail
Now it was time to create the tail. I extrude the face and move lots of vertexes to create a round shape, so it more looks like a tail. It was pretty hard to create the tail because the tail has to be thick and get thinner. I tried various stuff to create the tail.
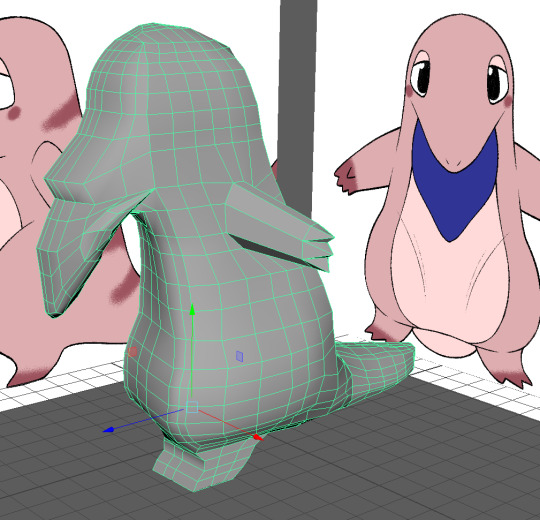
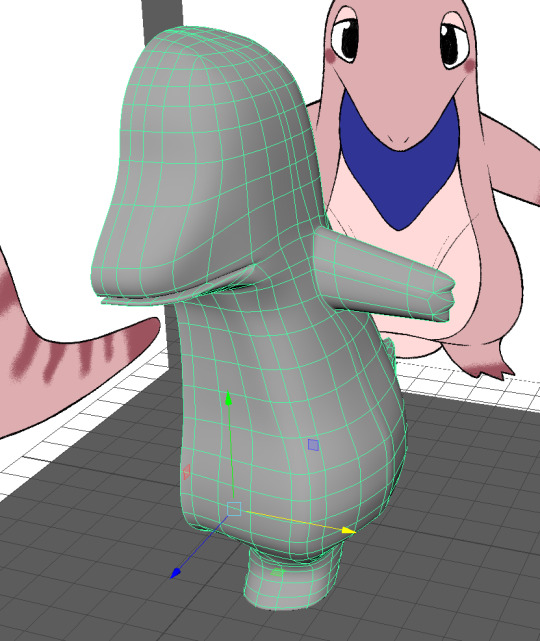
^ Figure 20: Create arm
I created the tail as I want, I moved on to the arm. I add a few more edge loops and extrude the face.
^ Figure 21: Extrude the face and merge the vertex
I also extrude each face and merge the vertex to create that triangle shape.
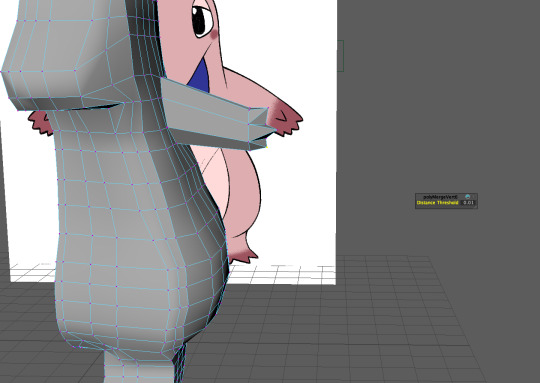
^ Figure 22: Multi-cut for tongue
As I finished the arm, I moved to the tongue. Before I start, I add edge loops by using multi-cut. The reason I cut the edge as shape of the tongue I want to make.
^ Figure 23: Extrude the face and move the vertex to make the shape
I extruded the face as I cut the edges, and fix the shape of the tongue by moving vertex.
^ Figure 24: Mirror the mesh
^ Figure 25: Press number 3 to see the smooth of the mesh
As I finish modelling all the part I need to model, I mirror the mesh to complete the full body character. The reason I press the number 3, which is preview smooth, was to see is there anything weird thing happen. It allows me to find out the problem with faces, vertex and everything that wrong.
However, I received the feedback from the tutor, and I better separate the tongue with body mesh because the tongue is the mesh that needs to be inside the mouth, and we only animate the tongue, not model the tongue like what I have done. Therefore, I have to redo the modelling.
^ Figure 26: Delete the tongue
I started with delete the half of the mesh, and delete the tongue mesh, and model the mouth and inside of the mouth, and model the tongue separately.

^ Figure 27: Extrude the edges

^ Figure 28: Merge the vertex
After I deleted the tongue, I have to fill up the empty space, so I can model the inside of the mouth and place the tongue. As I extrude the edges to fill the place, I merge the vertex to make them as one closed mesh.
^ Figure 29: Decrease the size of the mesh
I decided to decrease the size of the body mesh because I think its too fat when I modelling the character.
^ Figure 30: Modelling tongue separately
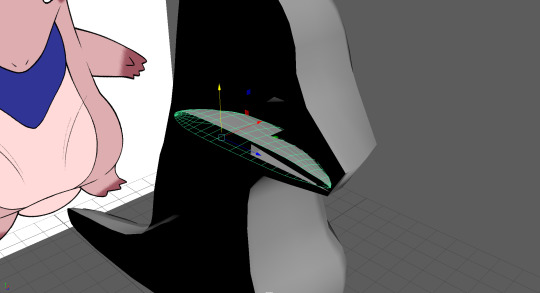
^ Figure 31: Placed inside the body mesh
Figure 30 is showing the process of modelling the tongue separately. I decided to work with circle mesh and started to change its shape by moving vertex. As I finished to modelling the tongue, I moved it inside the body mesh.
^ Figure 32: Decrease the body mesh again
I was looking all around the mesh and decided to decrease the size of the front view as well because as the side view did, it looks too fat than I thought, so I deicded to decrease the size to make it more cut and nice.
^ Figure 33: Mirror and combine
Finally, I mirror the mesh again and combine the mesh as I have separate mesh, tongue mesh, inside of the body mesh.
This was much difficult and complicated process I have done in Figure 25. I did not know that I have to model tongue and body mesh separately, and I learnt that I have to animate the tongue rather than model the tongue.
This was a challenging task for me to model two different things, but through this process, I learnt how and got the idea of modelling the character.
Sketchfab
https://skfb.ly/6Izs8
I was about to end the modelling and move to UV unwrapping and texturing, but I received the feedback that my model is too boxy compared to the source image, more geometry needed on the arm length because compare to the body mesh, the arm is in low poly.

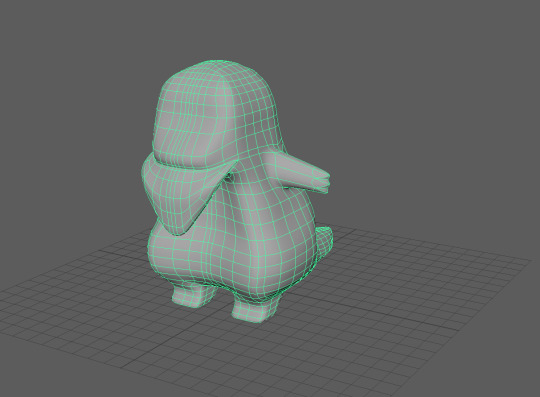
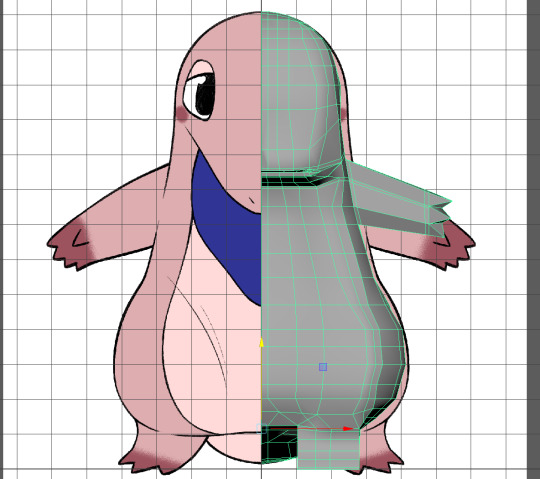
^ Figure 34: Move edges and vertex
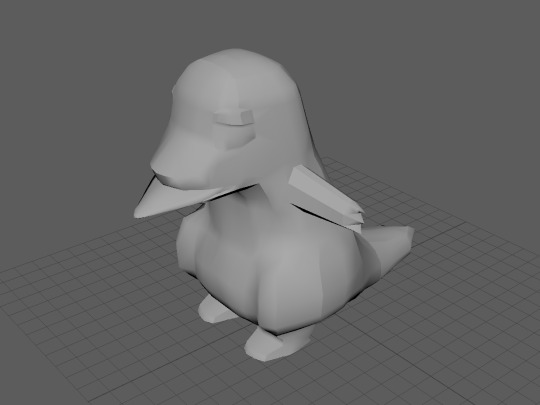
^ Figure 35: Smooth preview
To make the model more round mesh, I grab and move the edges and vertex to model them more round. As in Figure 35, when I press number 3 to preview the smooth view, it is now more round and smooth shape compare to Figure 33. The differences you can find easily is the shape of the foot. When you look at the Figure 33 model or from the Sketchfab link, the foot of the model was square, but when you see Figure 33, the foot is now more rounded by moving the vertexes.
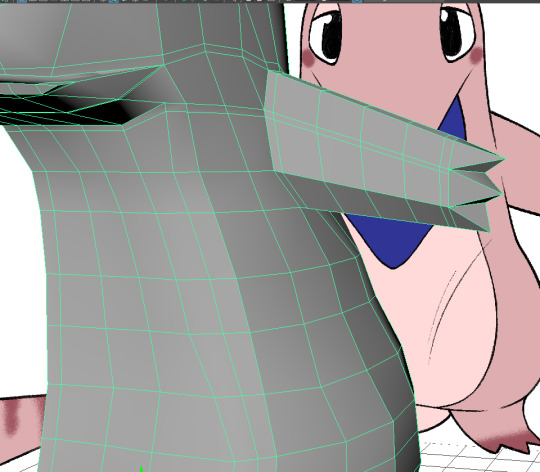
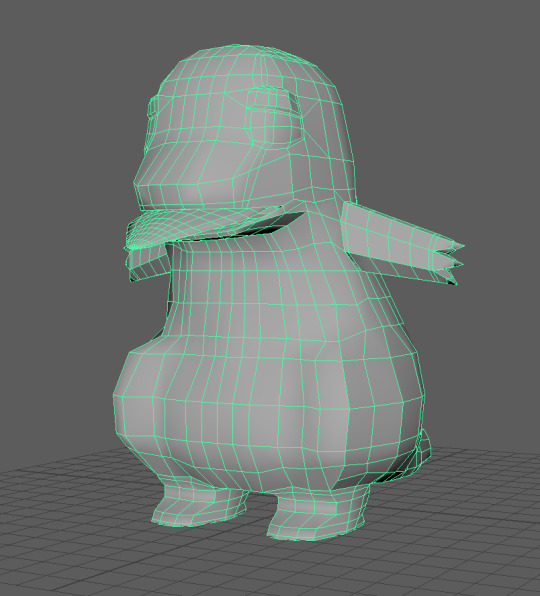
^ Figure 36: Add edge loops on the arm
As feedback from the tutor, I add edge loops to the arm because the body mesh is in high poly, but the arm was not, so I made it high poly as well by adding edge loops.
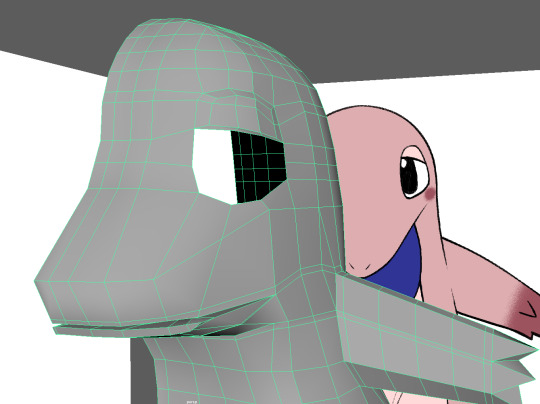
^ Figure 37: Create an eye
First I delete the face of where the eyeball going in, and create the eyelid by extruding the face.
^ Figure 38: Eyes
I was trying to create the eyeball with sphere mesh, but it was too hard to match with the empty space. Therefore, I decided to extrude the edge and fill the space again. After that, I extrude the face again as I did to the eyelid.
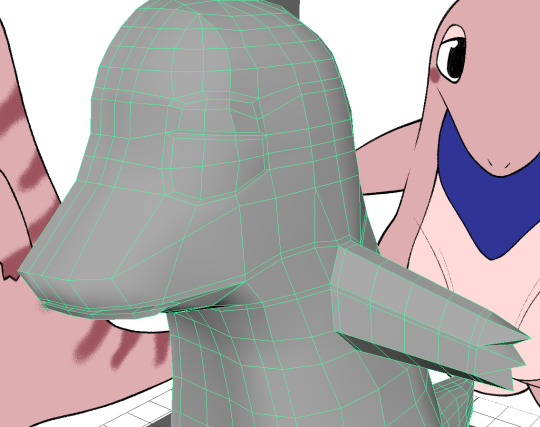
^ Figure 39: Cleaning up the edge loops
I fixed the eyes to come out more and started to delete the triangle faces. I tried to make it to quad faces by using the multi-cut tool. Also, I delete the edge loops that useless. This was to clean up the mesh.
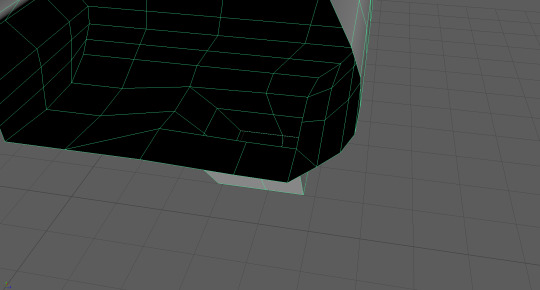
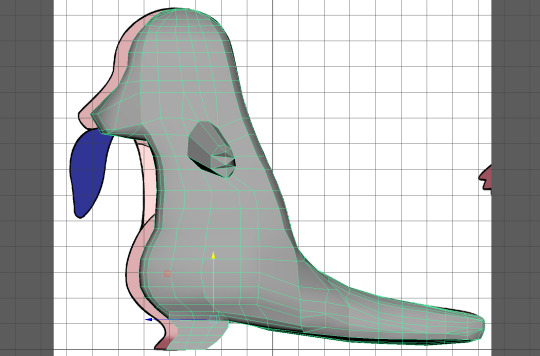
^ Figure 40: Put out the stomach
I was still having trouble with the stomach, so I got help from the tutor. He showed me how to make it more close to the source image by changing the angle of the face, and make them more round stomach and also separate the leg muscle.
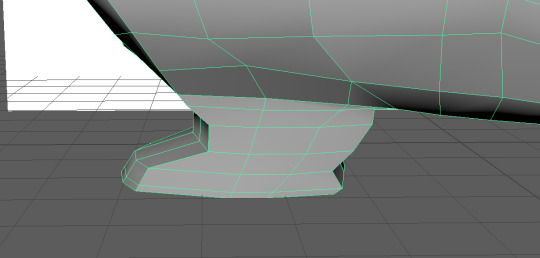
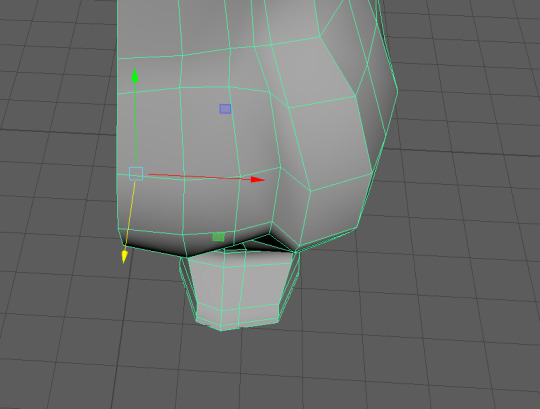
^ Figure 41: Change the foot
Moreover, he also showed me to change the foot shape a more balanced shape. This was done by pulling out the edges of the front and back foot.
After he showed the way to edit the mesh to model it more cute and rounding shape, I followed the way he taught me. I add some more edge loops to the place where it needs the loops and grab the edges or vertex to create the shape I want to create.
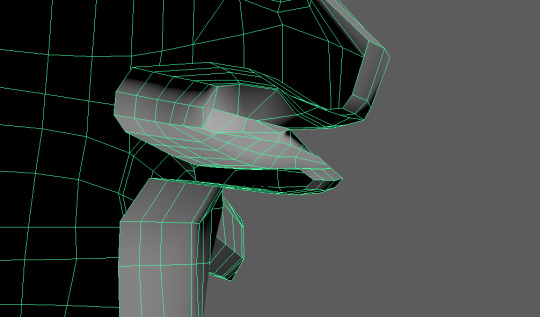
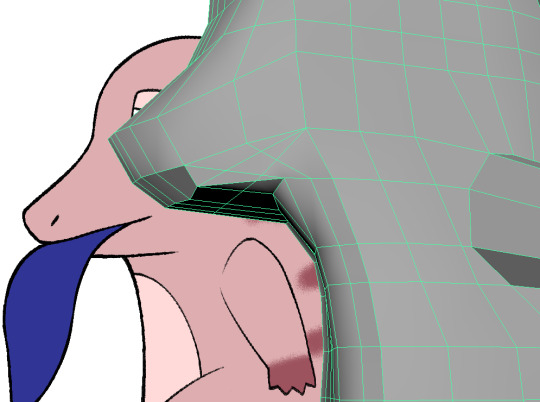
^ Figure 42: Create the mouth
Additionally, I was model the character with a closed mouth, but he suggested me to create it as opened mouth so we can show the tongue, which is one of the characteristics of my blue tongue lizard model. As he told me, I added some more edge loops and pull them out to create a round shape of the inside of the mouth.

^ Figure 43: Place the tongue
When I was finished with modelling inside of the mouth, I placed the tongue that I already model while ago. I change the angle of the tongue mesh and placed it to where it supposed to be.
^ Figure 44: Mirror the mesh
I fixed the model as my tutor told me in the class, and I mirror the model to finish.
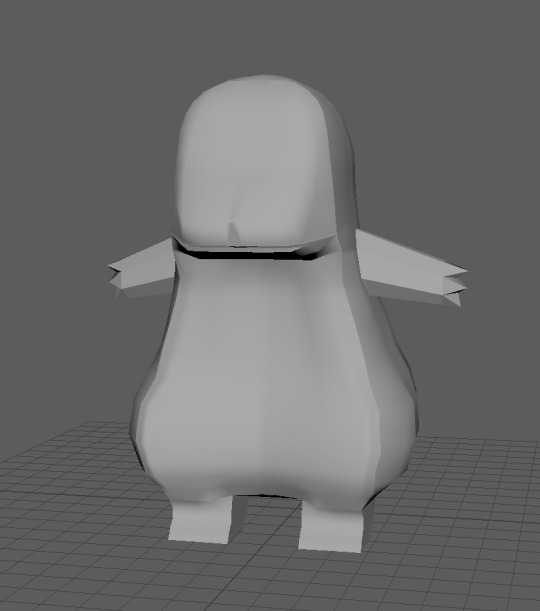
^ Figure 45: Final mesh
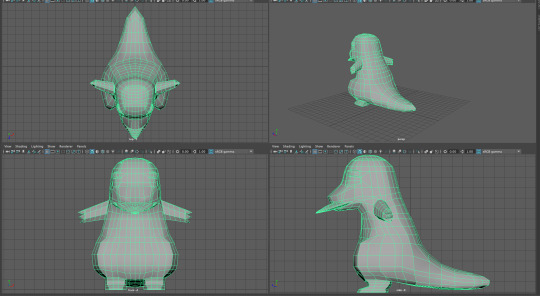
^ Figure 46: A perspective views
Figure 45 and 46 were just to show the mesh in different perspective views.
Sketchfab
https://skfb.ly/6IHVs
This was very hard to fix and modelling. I have to fix various things, such as vertex, add edge loops, fixing the boxy shape of the model to round shape, and everything. The hardest to modelling was to modelling the tail and the eyes. I have not model them before, so this was the first time to model tail and eyes. Therefore, I spent most of my times to fix the shape and modelling those two part. If I did not get help from the tutors, this model would not end up like showing in Figure 45 and 46.
This model was challenging and interesting to model as well as it was the hardest and difficult character to model. As I finished the modelling, this is now time to move on to UV unwrapping for texturing.
Reference list:
- ARTV_Tutorial. (2016). Maya: Simple Character Part 01 - Modeling. Retrieved from https://www.youtube.com/watch?v=xzmg0grXHyE
- Edge-CGI 3D Tutorials and more!. (2014). Maya Character Modeling Tutorial - Cartoon Mouse HD #1. Retrieved from https://www.youtube.com/watch?v=2dLMctUGKXw
- QuickDrawCreate. (2014). Speed Modeling Pikachu in Maya. Retrieved from https://www.youtube.com/watch?v=DGw3vCfLLO0
0 notes
Text
2. Character T-pose
Soojung Lee, n9667598
After I finished the character idea sketches, I started to draw t-pose of the character for the modelling.
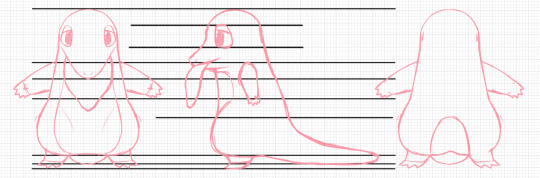
^ Figure 1: Sketches
First thing I have done was to sketch out the character. I used two different guidelines to line them up at the same place, which allows me to draw more equal drawings, such as the height of the character, place of arm and etc.
^ Figure 2: Line
When I finished sketches of the t-pose of the character, I clean up the line, so it is more recognizable when I move to 3D modelling.
^ Figure 3: Finish with colour
After cleaning up the lines of the character, I also add the base colour of the character. This is the plan for character texture.
1 note
·
View note
Text
1. Create mood board and sketches
Soojung Lee, n9667598
As the semester started now, I have to start work on the assignment. The first assignment I have to do is design the stylised character of Australia animals. In my case, I decided to work with blue tongue lizard. Therefore, I started to do some research to gather the ideas for my own characteristic character design.

^ Figure 1: Character mood board
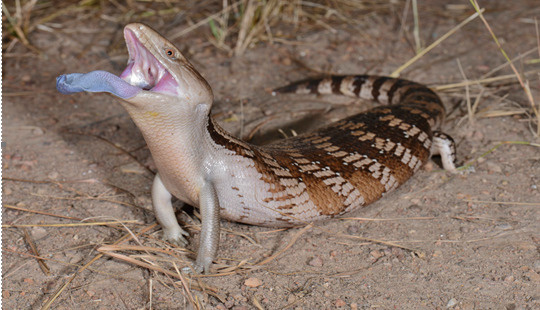
^ Figure 2: Blue tongue lizard 1
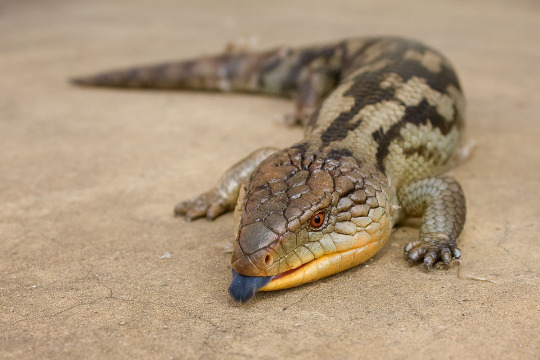
^ Figure 3: Blue tongue lizard 2
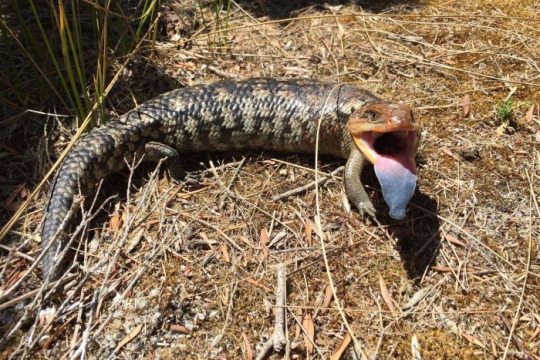
^ Figure 4: Blue tongue lizard 3
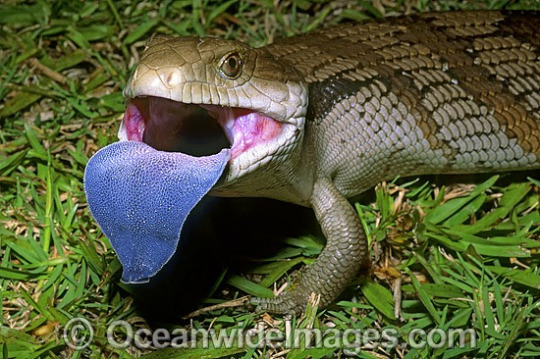
^ Figure 5: Blue tongue lizard 4
I did some research to gather the ideas and understand the style of the blue tongue lizard. I also did some research on cartoon style drawing because I need to draw a 2D character first before start 3D modelling.
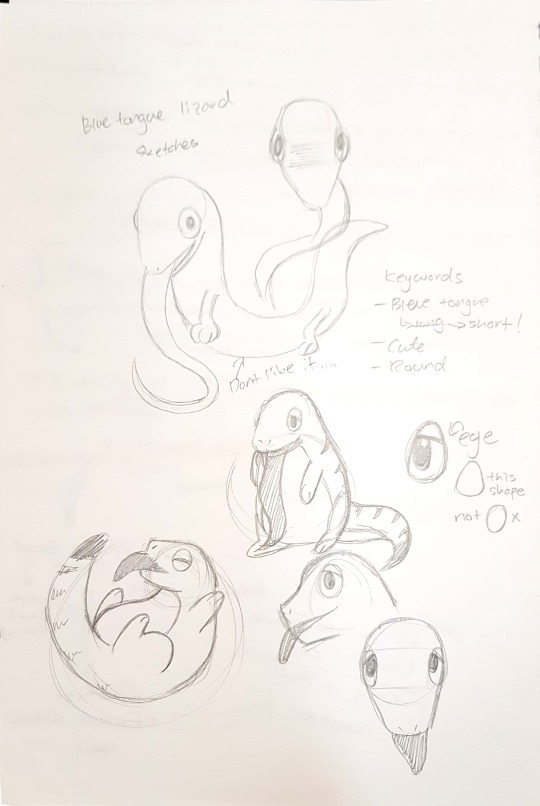
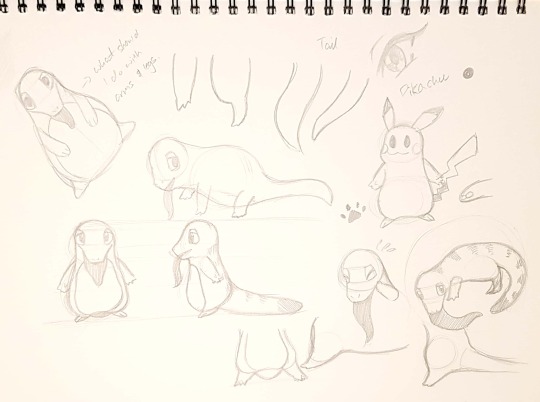
^ Figure 2: Idea Sketches
After I did the research, I started to draw some simple sketches for the character. I first set the keywords. They were long blue tongue, cute and round character. As this character does not have to be a realistic character, I decided to design something cute character, therefore, I came up with those keywords.
Also, as you can see on the top of the page, my initial character has a long body, but I end up with a rounded and cute body character. This decision was made because of the cute keyword. When I was drawing the initial long body character, it does not look cute. Therefore, I changed to more small and rouned body character.
However, the long tongue does not fit with that cute small rounded body. Therefore, I decided to change it to the short tongue, which is more balanced then initial sketches.
Additionally, I also designed the eyes. Eyes in the initial sketches were just circle. I thought this is not cute enough, and it also might look scary in some way. I changed the shape of the eyes from circle to drops, and add eyelid to create a more soft and cute image.
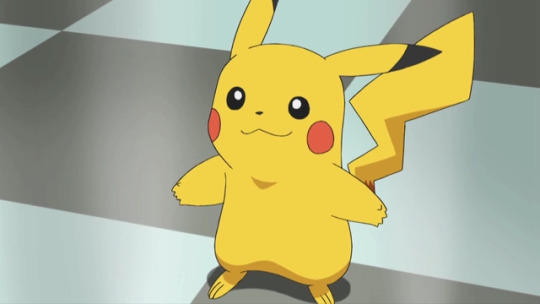
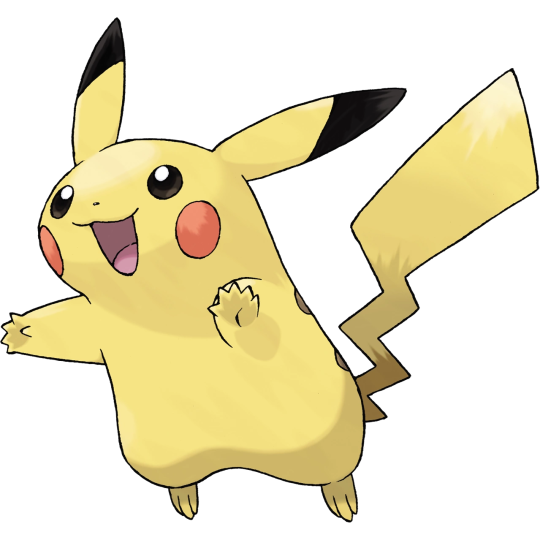
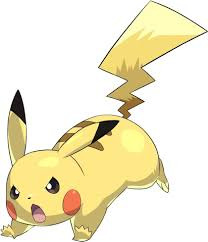
^ Figure 3,4, and 5: Pikachu Research
^ Figure 6: Extend the idea sketch
I did several more sketches to extend the idea and detail of the character design. Through this process, I realised that the arms, leg and body are not balancing the flow of the character. I tried to found out which style will suitable for the character. After trying several styles, the pocket monster image just came up to my brain. I did the research for the references.
I got the idea from Pikachu and started to apply it to my sketches. In the end, I came up with smoother and balanced sketches, but I still made a change to the legs. In the first place, I apply the Pikachu legs, but this was not working very well to me. Therefore, I change the legs longer and rounder so I can recognise there are the legs. I also made a small change to the length of the tongue. The tongue is now flatter, bit longer and rounder.
This was kind of my final sketches for character design.
1 note
·
View note