rainbow-cottage-kitchen
The Rainbow Cottage Kitchen
Welcome to my kitchen!
11 posts
Don't wanna be here? Send us removal request.
Last Seen Blogs

singekoo
Place were Guy face puts pictures and stuff.

techopensystem
Techopensystems

ichiigoidol
clover ☆

megmoon1111
☾ meg moon ☽

orangepawn39
Little Mikey
Text
In other news: does anyone happen to have any name suggestions for chocolate chip cookies? (no reason)
9 notes
·
View notes
Text
Updates!!
Hey everyone!
So good news: the semester is over, which means I have access to a kitchen and can start baking/sharing recipes again!
Even better news: I’ve quit my job as a sorority house mom, so I’m moving into an actual apartment next semester while I finish up grad school which means I’ll actually have a kitchen and can continue positing recipes throughout the semester!
I have some recipes I’ll be posting soon so keep a look out! (Hopefully later today, but no promises!)
If you have any suggestions/requests, lmk and I’ll begin experimenting!
#personal#seriously i have about 15 pounds of flour i have to get through according to my mom#she's on a diet too so this might be a rough december for her#sorry mom#on the plus side I have an entire graduate program I can force my food on once school starts up again
2 notes
·
View notes
Text
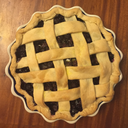
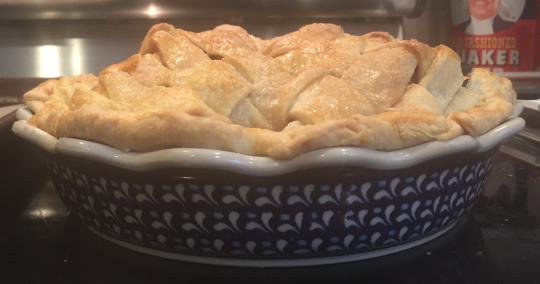
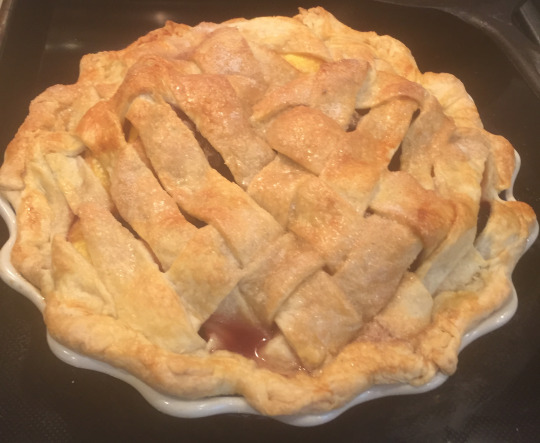
Abra-ca-fuck-Blackberry Peach Pie

((Naming help by @nobodyjess. It’s not quite as good as their suggestion of Abra-ca-fuck-blueberry but I’m trying guys))
I apparently have this thing where elves remind me of peaches because between this and Jareth, that’s TWO peach pies for fae/elves. (And Lup’s will also be peach related because twins gotta twin). I think it’s mostly that peaches (and peach pies) are absolutely gorgeous and they’re delicious.

(I mean just look at them)
For the decoration, I went for a different take on the traditional lattice crust. Taako’s all about the unique and the elegant, so this is a triangular lattice that I designed. (Also Taako and triangle start with the same letter I guess.)
So grab your prettiest pie pan and let’s get started!
Ingredients:
Extra flaky pie crust
At least 5 cups worth of peaches (I strongly believe the more the merrier)
1 container of blackberries (about a cup)
1/2-3/4 cup sugar
1/8 teaspoon nutmeg
1/4 teaspoon cinnamon
1/2 cup King Arthur Pie Filling Enhancer
Alternatively: Use a combination of flour and cornstarch/tapioca
1 egg white (for a glaze)
Cinnamon sugar for coating the top
So what’s a glaze?
So a glaze is something that you coat on top of your baking. For cakes, you can do a sugary glaze that’s not quite like icing but does give your cake a sort of sticky sweetness on the crust that is amazing. For tarts, glazes can give your tart a sort of glossy sweet finish on top. For pies, glazes can do a few things. For one, glazes can help prevent any decorations your add to your crust from melting. They can also add an extra nice crispness to the crust or give your pie an additional flavor that will further add to the flavor pallet. There are different types of glazes (such as an egg white, beaten egg yolk + water, milk, etc) that can do different things. You can substitute glaze types depending on what you’re going for/what’s in your fridge. I actually only recently started using glazes and usually only for highly decorated pies, or ones that I’m planning on taking photos of (glazes also give your pie a nice color for peak photogenic-ness!)
Instructions
Oven temperature: 425 degrees F
0. Put on your favorite TAZ episode and grab your prettiest pie pan. This is mine:
1. Make sure your workspace is clean and make your pie crust (I recommend my extra flaky pie crust. I recently learned a new technique (oooooh) that makes your pie crust even lighter and flakier and it’s described there.) Place your pie crust in the fridge
2. Combine your sugar, nutmeg, cinnamon, and filling enhancer/flour in a bowl and put it off to the side.

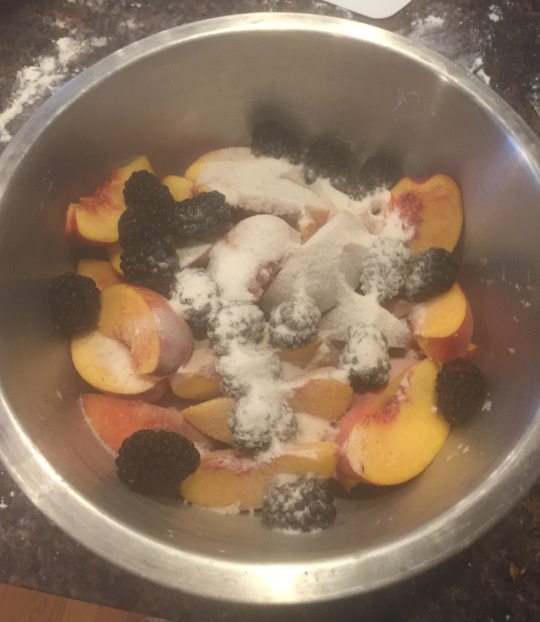
3. Wash your peaches and blackberries. Cut your peaches in whatever size you want (I tend to go for dividing them into eighths). I like to leave the skin on the peaches because the color is absolutely beautiful, but if you don’t want the skin in your pie, you can remove it.

4. Throw your blackberries in with your cut peaches. Next throw in your sugar mix and coat the peaches/blackberries with it as much as possible. Put your fruit filling off to the side.
5. Grab your dough out of the fridge. Take about half of it and roll out your bottom crust. Put this in your very pretty pie pan.
6. Next grab your fruit filling and fill the pie pan.

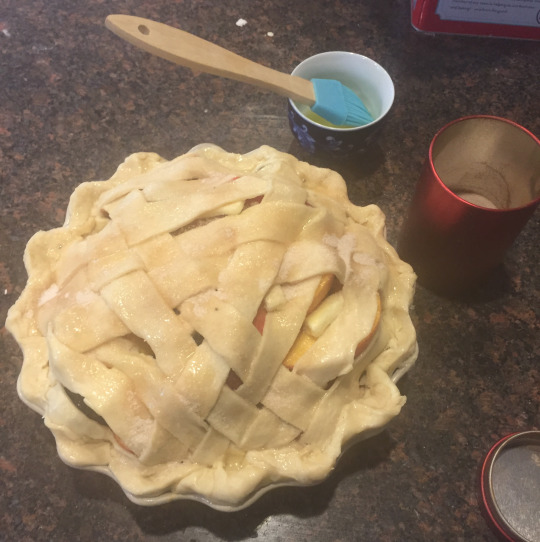
7. Get excited, it’s time for the top crust!
a. Start by rolling out the rest of your dough.
b. Cut the dough into approximately 1-inch strips

c. Take three strips and make a triangle centered at the middle of the pie. Make sure each strip crosses over and under the other two strips.

d. Much like a normal lattice, flip your previously “crossed over” strip up and lay down the next strip. This means that you will have your original triangle and an extra strip on one side of the triangle that reverses the “crossed over”/”crossed under” junctions in the og triangle.

e. Repeat this with the other two sides.

f. Continue doing this around the triangle. You use the same rules of normal lattice work, you’re just doing it around a triangle.

8. Brush your top crust with the egg yoke and then coat with the cinnamon sugar.
9. While you wait for your oven to preheat, put your pie back into the fridge so it can firm up a bit. Bake your pie for 20 minutes at 425 F, then reduce the temperature to 350 for 40 min.
10. Wait for your pie to cool at least 5 minutes before digging in!
16 notes
·
View notes
Text
Name suggestions for a Taako themed pie?
#i want to avoid another merle piechurch#taz#taako#true to character its a fabulous pie#im just terrible at naming things
3 notes
·
View notes
Text
Merle Piechurch would be an amazing name, but much like our fav “cleric”, I’m not very good at my job so.... 🤷🏻♀️
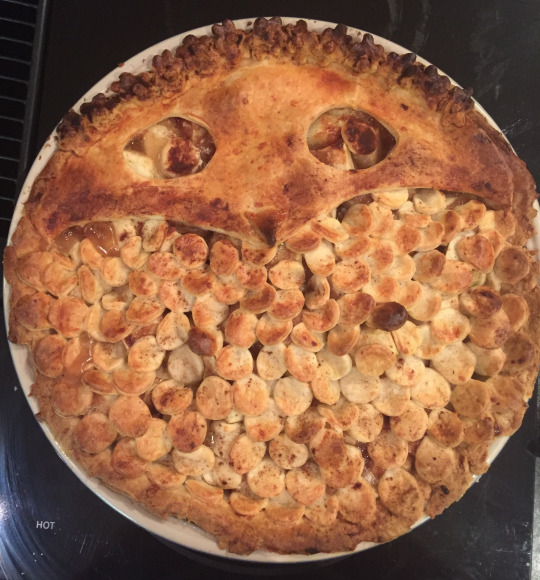
Pie of Truth- Merle Highchurch’s Apple Pie

Merle’s an earthy kind of guy and he seems like he’d appreciate comfort foods, so I decided on an apple pie with a cheddar cheese crust decorated in one of his favorite re-occuring motif: an owl.
(I thought about trying to do a “zone of truth” crust but I started this at like 9pm so like, no)
Keep reading
#merle piechurch is fantastic#ill add an edit renaming it ok?#but i also struggled to realize that barry bulejeans would have to be a blueberry pie#so the bar is low#(you could argue that me messing up naming this just means merle and i are pn the exact same wavelength)
122 notes
·
View notes
Text
Cheddar Cheese Pie Crust
My mom grew up in Wisconsin which means I sometimes say pop instead of soda and have a deep abiding love for all things Dairy. This means that I also like to throw cheddar cheese into everything, including my pies.
Ingredients
2.5 cups flour
1/2 teaspoon salt
1/4 pound cheddar cheese (grated this should about a cup)
8 tablespoons unsalted butter
6-8 tablespoons ice water
Instructions
1. Combine your flour, salt, cheese, and butter. Use a pastry cutter/blender (or a fork) to chop the cheese and butter into smallish pieces.
2. Add about half of your water and continue blending. I like to break up adding the water so the dough doesn’t become super sticky all at once.
3. Add the other half of your water and start mixing the dough by hand. (I just find it easier to do it by hand than by using a fork at this point)
4. Once your dough is in one cohesive piece, wrap it up and stick it in the fridge to chill.
Note:
The cheddar cheese pie crust dough does not last as long as a more traditional pie crust. You really need to make your pie the same day or the morning after.
(I once made the mistake of trying to wait 2 days because I had like 4 other pies I had to put together first, and when I unwrapped my dough it was like grey. Maybe it would have been okay to eat, but I wasn’t willing to take that risk.)
2 notes
·
View notes
Text
Merle (Apple) Piechurch
Edit: it’s been pointed out to me that I wasted the opportunity to name this “Merle Piechurch”. So that’s been fixed. Much like Merle, I’m not very good at this thing. (Hey at least I didn’t try to seduce the apples okay??)
Merle’s an earthy kind of guy and he seems like he’d appreciate comfort foods, so I decided on an apple pie with a cheddar cheese crust decorated in one of his favorite re-occuring motif: an owl.
(I thought about trying to do a “zone of truth” crust but I started this at like 9pm so like, no)
Ingredients:
Cheddar Cheese Dough (+some scraps of other dough if you have them)
10 cups apples
1/2 cup sugar
1/4 cup King Arthur’s Pie Filling Enhancer (Optional)
Alternatively: You could throw a bit of flour in here but apple pies don’t tend to be as liquidy as berry pies so you don’t super need it?
1/2 teaspoon salt
1 very heaping teaspoon cinnamon
1/4 teaspoon nutmeg
1/2 teaspoon allspice
1 tablespoon lemon juice or apple cider vinegar
2 tablespoons butter
Note: So apples...
There are different types of apples and they do bake differently. While this is not necessarily alway the case, generally sweet apples (think galas) will be mushier than tart apples (think granny smiths). My family doesn’t tend to like mushy food so I tend to stick to granny smiths during the off-season. When apples are in season though, I absolutely love pies made with cortlands. If you don’t know what types of apples you like in your pie, you can pick a couple to throw in to a single pie and determine what you prefer after trying them!
Instructions:
Oven Temperature: 425 degrees Fahrenheit (at least initially)
0. Put on your favorite music or Merle Highchurch TAZ episode and get ready for some interpretive jazz dancing! (Alt: cast zone of truth so anyone who tries to steal your ingredients has to ‘fess up) Also consider quickly cleaning your workspace now.
1. Make your cheddar cheese dough and place it in the fridge to chill
2. Gather your sugar, pie filling enhancer (optional), and spices in a bowl and mix it all up. Put it off to the side for now
3. Take half of your dough and roll it out. Transfer it to your pie pan and put both the pan and the remainder of your dough in the fridge

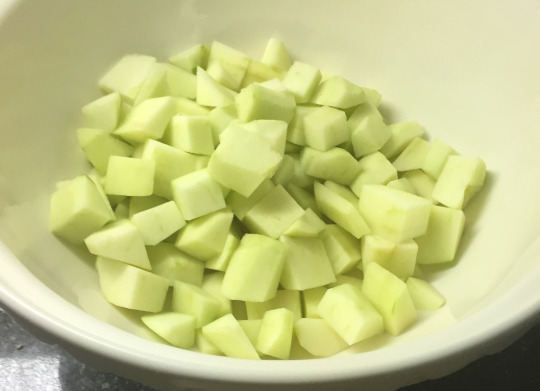
4. Cut up your apples. I tend to not leave the skin on when I do this, but that’s a preference thing. If you don’t know what you like, skin some pieces and leave the others so you can figure out what you prefer next time!
Apples brown fairly quickly so occasionally as you cut up the fruit, pour some of your apple cider vinegar/lemon juice over the sliced fruit. This will slow down the oxidation process, keeping your apples a little bit fresher while you put the pie together

5. Once you’re done cutting all of the apples you want, take your sugar and spice (and everything nice) mixture and add it to your bowl of fruit, along with whatever vinegar/lemon juice you have left. Mix it up a bit so everything is coated in yumminess before dumping it into your pie pan. Put the butter on top of your filling, spreading it out as you see fit.
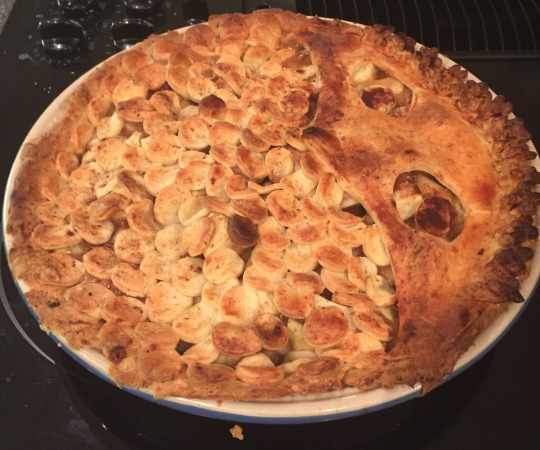
6. Time for the top crust! I decided to make this pie look like an owl which, since we’re in a zone of truth and I have to be honest, was a whole lot of work and just ended up looking more like a hedgehog?
Anyways, the best way to do that is to roll out your remaining dough and cut out the top, non-obviously-feathered part of the face. I used a dinner plate to help me get the curves I wanted. Cut out eye holes and put this off to the side.
Next, take your remaining rolled out dough and start cutting out circles. I used a metal baking/frosting tip, but you can also use a tablespoon and it will probably go faster. Cut out as many circles as you can and start laying them down on top of your filling. I started at the bottom edge of the crust and worked my way up so there’s a layered effect. Once you’ve run out of circles, take your scrap dough, smash it together, and then re-roll it out so you can cut more circles. Repeat as needed until you’ve covered enough of the pie so that the owl’s “face” can do the rest.
Since I had some extra dough, and because it’s Merle, I cut out a few dough flowers and gave my owl a flower crown. (I think this is the main reason my owl looked kind of like a hedgehog- the flowers looked like they could be spikes when they came out of the oven)

7. Cover your top crust with an egg wash- 1 tablespoon of water mixed with 1 egg white. This will help prevent your dough from just melting together.
8. Turn your oven on to 425 degrees Fahrenheit and let the pie chill in the fridge as your oven gets to temperature. Once at temp, throw your pie into the oven for 20 minutes. After 20 minutes are up, reduce the temperature to 375 degrees and continue baking for 30 minutes.
9. Pull out your Merle pie and enjoy!
Baker’s Note:
Sorry for the delay in posting this. I live in a non-air-conditioned house in Vermont in the summer, which means that when horrible heat waves hit us, we do everything in our power to keep the house as cool as possible. That means no washing machine/dryer and especially no oven. Once the heat wave passed however, I got to pack up and spend 2 weeks in Massachusetts and Minnesota for a cousin’s wedding which is why this is so late.
To make matters worse, I’m only up here for a week or so before I have to return to upstate New York for the upcoming school year. Since I don’t have access to a kitchen, I’ll still be able to post recipes but I won’t be able to experiment or take pictures of each step in the process. I’m hoping I can get Taako’s pie done before I have to go back, but be forewarned that he may be the last character pie for a bit.
I do promise though that I’ll spend some of my time at school coming up with new baked goods series!
#Merle#Merle highchurch#taz balance#Taz#pie#baking#recipe#mine#character pie series#taz pie collection
122 notes
·
View notes
Text
“No Dogs on the Moon” Sausage and Apple Pie
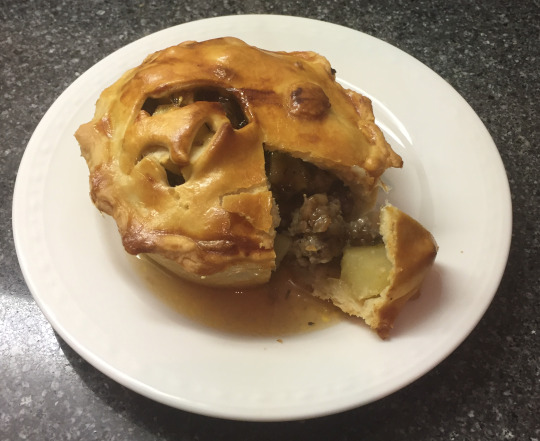
Magnus was the only TAZ character who I instantly knew the type of pie I wanted to create. Sausage and Apple Pie is one of my favorites and it’s got a sort of... rustic hospitality to it. Add to that the fact that my brother and mom just got me a set of new dog themed cookie cutters and we’re in business for the perfect pie for Magnus Burnsides.
Ingredients:
Enough pie dough for a double crust
1 pound (or more) ground pork sausage (Breakfast sausage works really well in my opinion)
6 tart apples (such as Granny Smiths)
1 cup apple juice or cider (I prefer the cider)
1/4 teaspoon salt
1/3 cup packed brown sugar
1/2 teaspoon dried thyme
1/4 teaspoon rosemary
1/4 teaspoon allspice
2 table spoons water
1 egg
So....apples?
For this recipe (and most recipes with apples tbh) I recommend Granny Smiths or other tart apples. This is for a few reasons. One: it’s easier for me to get a hold of Granny Smiths even in the off season and they’re not usually as expensive as other imported apples at my local grocery store. Two: sweeter apples tend to get mushy very quickly (something neither my mom nor I like). This is because they have a lot of water. If you like or are cool with a watery pie and mushy apples, feel free to use whatever.
Instructions:
Oven temp: 400 degrees Fahrenheit
0. Put on your favorite TAZ arc
1. Prepare your dough and let it chill in the fridge while we prep the fillings.
2. Part of this recipe is a sort of glaze. Combine your cider, brown sugar, salt, and spices in a small sauce pan.

3. We need to reduce this mixture to about a 1/4 cup, so bring the liquid to a boil and then reduce the stove’s temperature to medium (4-5 on my stove). Make sure you stir the mixture so it doesn’t burn. It can take a while to reduce the liquid, but you’ll know you’re there when you reach this consistency. (You can also periodically check by transferring the liquid to a metal measuring cup and seeing how much you have.

(Sorry for the shitty photo, I wanted it to be a video but heaven forbid tumblr make anything easy)
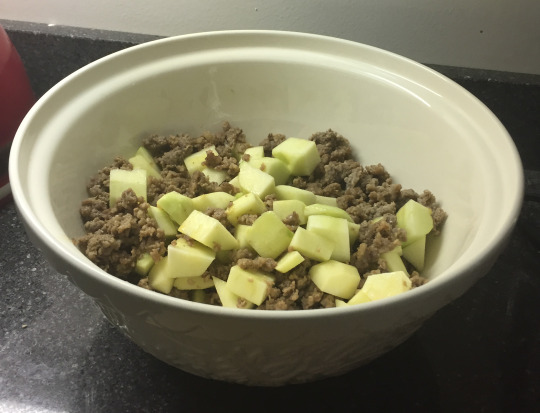
4. Once your glaze is done put it off to the side and cook your sausage. Put that off to the side as well.
5. Now is a good time to roll out your pie dough and line your pie pan with it. For this recipe I decided to use my individually-sized pie pan, mostly because I thought it would be cute and because they’re a little easier to store in my fridge than the other giant pie pan I currently have access to. (Seriously the thing is huge, my cabinet can’t actually close when it’s in there)
6. Time to wash and cut up your apples. Save this for one of the last things you need to do before filling your pan so the apples don’t brown as much. I removed the apple skin but it should be fine on there if you like it. For normal sized-pans you can leave the apples in slices or chop them up a bit smaller (I generally do a combination so there’s a slight variety of texture and flavor). For individual pies, I recommend chopping the apples up in smaller chunks so they can fit in the pies better.
7. Combine your now no longer piping hot sausage with your apples and pour the glaze on top. Transfer the filling to the pie pan. (For individual pies, it may be easier to transfer the sausage and apple pre-glaze and then distribute the glaze evenly afterwards)
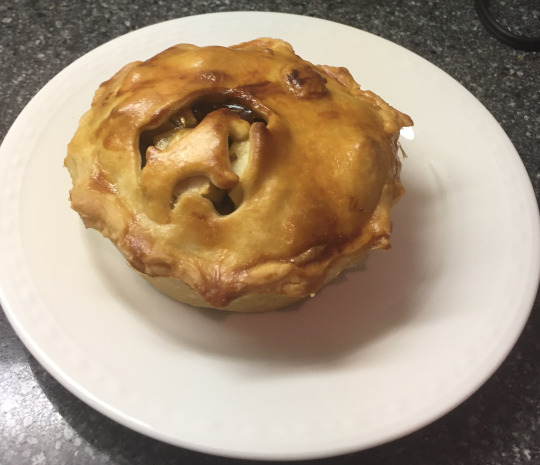
8. Grab the other half of your pie dough and roll it out. I used dog shaped cookie cutters to cut out part of the crust. I placed the crust over the filled pie, making sure to keep the dog shaped cut-out in the center.
9. As an added decoration, I took some of my leftover dough and used a 1/2 teaspoon to cut out little “moons” for my decorative dogs.

10. Set your oven to 400 degrees Fahrenheit
11. Mix the 2 tablespoons of water with the egg to make an egg wash. While this is optional it helps keep your decorations neat and in place while you bake. Wash the pies with the egg mixture right before it goes in the oven and you can also add more wash at 10 and 20 minutes.

12. Bake your pie for 40 minutes.
13. Spend a few minutes letting your pie cool and being grateful you don’t live on the moon and can enjoy man’s best friends. Enjoy!

#taz#taz: balance#magnus burnsides#pie#recipes#taz pie collection#apple and sausage#mine#txt txt txt-txt-txt
8 notes
·
View notes
Text
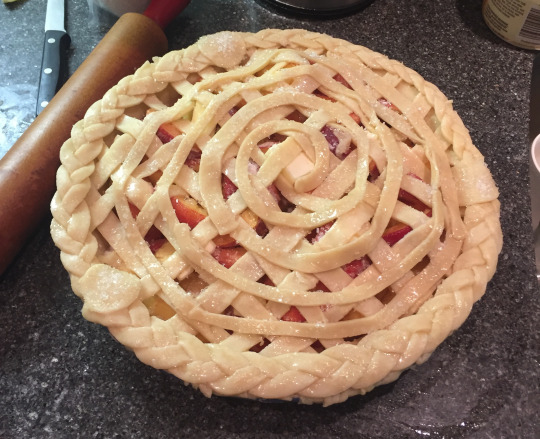
Jareth’s Unforgettable Peach Pie

I only recently watched the movie Labyrinth, but it instantly was added to my list of favorite movies. So of course, that means pie time.
What type of pie could Jareth, Goblin King and wearer of too-tight-leather-pants, be except a peach pie? It’s sweet, pretty, and can represent either innocent or *coughs* grown-up love, which gels fairly well with the whole coming-of-age story themes. For decoration the pie is topped with a lattice crust with a braided edge, spiral over the lattice, and three sugar crusted magic balls.
Ingredients:
At least enough pie dough for a double-crust
6 cups (1 1/2 - 2 lbs) peaches
Note: if your peaches are very sweet you can reduce this to 1/4 cups sugar if you want
Alternatively, you can use 1/4 cup flour and 2 tablespoons of quick-cooking tapioca
Instructions:
Oven Temp: 425 degrees Fahrenheit
0. Put on some David Bowie (The Labyrinth soundtrack is recommended but not required)
1. Prepare your pie dough and stick it in the fridge to cool
2. Gather your sugar, salt, nutmeg, and filling enhancer (or flour+tapioca) and combine them in a small bowl or mug
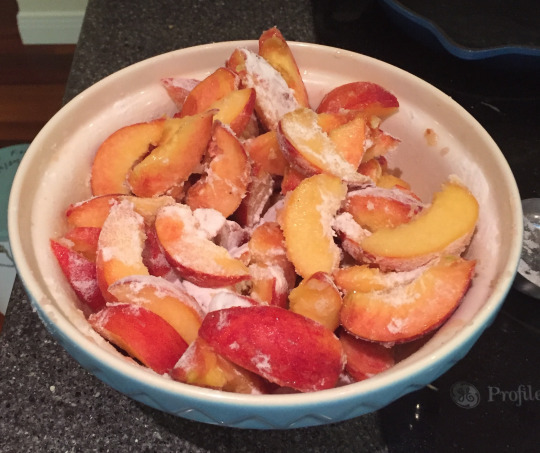
3. Wash and cut up your peaches. You don’t need to remove the skin, but you can if you don’t like it. Check to make sure they’re not enchanted!

4. Dump your lemon juice onto your peaches.
5. Dump your sugar, nutmeg, etc mixture onto your peaches and mix in order to coat your slices

6. Prepare your dough work station. (Wash it and coat lightly with flour.
7. Roll out about half of your dough and place it in your pie pan. For this pie I just used a normal pan (this one is actually fairly large so I actually used more peaches than I normally would).

8. Put your peach mixture into the pan and dot with the 2 tablespoons of butter.
9. Roll out the other half of dough and create a lattice crust on top of the peaches.
10. Using your leftover dough, create a few braids for the crust. Put these off to the side for later. With some of the leftovers, cut out a bunch of long, narrow strips and lay them out in a spiral over the lattice. Then take your braids and line the edge of the pie with them. While you’re decorating, cut out a few large-ish circles to use as your Magic Balls (You can use a circular tablespoon as a cookie cutter). Coat these with your decorating sugar and place them over the points where the braids meet on the crust edge.
11. Coat everything liberally with your leftover decorating sugar. (It’s what Jareth would have wanted).
12. Preheat your oven to 425 degrees fahrenheit. (You can do this whenever, I just like to do it now so I can let my pie chill a bit in the fridge while I wait for the oven and not feel pressured to hurry). Bake the pie at 425 degrees for 20 minutes before reducing the temperature to 350 for 40 more minutes.
13. Give your pie at least five minutes to cool a little bit before grabbing your favorite Goblin King and digging in!

29 notes
·
View notes
Text
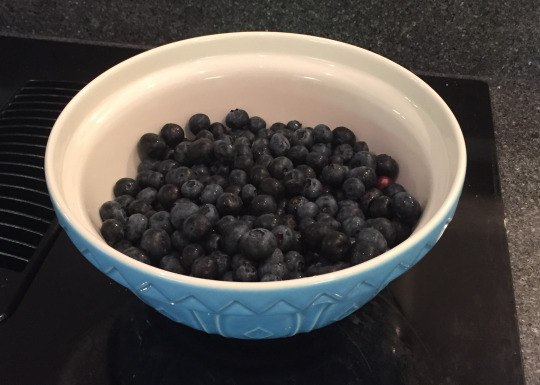
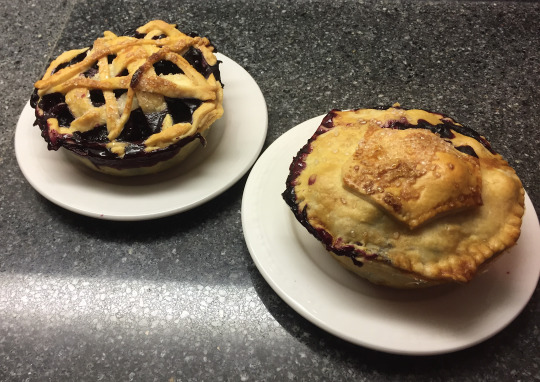
Barry Bluejeans Blueberry Pie
When I sat down to think “What type of pie would Barold ‘Barry’ Bluejeans be?” I was initially stumped. At least until I saw the blueberry entry in my favorite pie book and face palmed so hard that you could hear it in the Ethereal Plane.
Ingredients:
Pie crust
5-6 cups or so blueberries
1 teaspoon lemon juice
1/2 cup King Arthur Pie Filling Enhancer
Alt: 1/3-1/2 cup flour and (optional) 2 tablespoons quick-cooking tapioca
3/4 cup sugar
1/8 teaspoon nutmeg
1/8 teaspoon cinnamon
Just over 1/4 teaspoon of salt
2 tablespoons of butter
What is Pie Filling Enhancer and why do you like it?
Neither my mom nor I are huge fans of watery pies. That’s not to say that they aren’t good (all pies are valid and beautiful), but we just prefer gooey flavorful, non-watery ones. I prefer the King Arthur Pie Filling Enhancer (this is in no shape, way, or form sponsored btw, I just really love King Arthur and their products really are good quality without being too overly expensive). Instead of the enhancer, you can also use 1/3-1/2 cups of flour with 2 tablespoons of quick-cooking tapioca, but I haven’t had much luck in the past with that.
Instructions:
Initial oven temp: 425 degrees Fahrenheit
0. At some point during all of this, set your oven to 425 degrees Fahrenheit. I don’t like to do it at the beginning because having the oven ready for pie makes me stressed that the pie is not ready yet. I also recommend putting the pie into the fridge for a bit before putting in the oven, so I tend to start the oven when I’ve finished assembling the pie and it’s chilling.
1. Prepare your rolling workspace. (I make it a habit of always cleaning my workspace before flouring it up, even if I know nothing has contaminated the space since last I washed it)
2. Combine your Filling Enhancer, sugar, nutmeg, cinnamon, and salt in a bowl. Stir it a bit and then place it off to the side for later.
3. Now wash your blueberries, dry them, and dump them into a large bowl. While you dry them, take a second to remove any gross berries or any leaves/stems. Put the blueberries off to the side.
4. Take your chilled pie crust dough out of the fridge. Take half and roll it out- this will be your bottom crust. Keep the other half of your dough in the fridge for later. For my Barry Bluejeans Blueberry Pie I used my six individual pies pan.
If you are making individual pies I’d recommend taking a small plate and using that as a template for the bottom crust. If the plate is too big, don’t worry, you can trim the edges later.
If you are making a larger pie, just carefully lift up the pie dough and lay it on top of your pie pan, pushing down on the middle.
For either individual or normal pies, take a fork and poke the bottom of your crust a few times in order to dock it.
5. Take your previously mixed sugar, enhancer, and spice mix (way back from step 2) and your blueberries (way(?) back from step 3). Dump your sugar mix onto your blueberries. I like to do this a bit at a time, tossing the blueberries between each addition in order to coat them a bit more evenly.

6. Take your now very sugary and enhanced blueberries and dump them into your pie pan. You’ll have a lot of sugar/enhancer at the bottom of your bowl. Just throw that on top of your now-filled pie.
7. Take your butter, cut it into pats and spread it semi evenly across your filing. It doesn’t have to be even but I like it to be for The Aesthetic (tm)
8. Take the second half of your dough and roll it out. We’ll use this to make our top crust. For three of my pies, I had a solid top with a bluejeans back pocket added. For the other three, I made a lattice crust and added a star on the top for our favorite necromancer. I forgot to take pictures of this process but an explanation is here:
Bluejeans pockets:
Cut out a home-base shaped pentagon. If you’re having issues thinking of what this looks like, cut three sides of a rectangle. Then draw two more sides from the open end that connect below the imagined rectangle. (Alternatively, google “home-base” and just make that)
Take a fork and poke small holes around the edge to imitate the thread on jean pockets
Necromancer lattice:
There are a lot of great explanations of how to make lattice crusts online and tbh I recommend you look at one of them but here goes
If you ever had to weave placemats in kindergarten or really anything to do weaving ever, it’s the same concept just with dough
Roll out your dough and cut it into strips.
Take a few of these strips and lay them down vertically on top of one of your open pies.
Take every other strip and flip it “up” so it is not lying across the blueberries
Take another dough strip and lay it horizontally across the “down” vertical stripes towards the top of your pie
Take your “down” stripes and flip them “up” so that they fold over the horizontal stripe. Flip the original “up” stripes so that they are “down” and cover the first horizontal stripe
Lay down another horizontal stripe
Continue this pattern until you can’t fit anymore horizontal stripes on your pie
To add the star: Cut another five stripes. Lay them out in the outline of a star or pentagram
Optional but highly recommended: add some sort of sugar to the top crust. For blueberry pies, I love adding a layer of lemon sugar, but I didn’t have it with me for these guys so they got sparkling baking sugar. (Normal sugar is also both fine and tasty!)

9. Bake your pie for 20 minutes at 425 degrees. After 20 minutes, reduce the temperature to 350 degrees and continue baking for 35-40 minutes (30 for individual pies). Put a cookie sheet below your pie just in case some filling tries to escape! It will make clean up a lot easier if that happens. (Personal experience? I don’t know her)
10. Once it’s done, pull out your pie(s). Let them cool for at least 5 minutes (everyone recommends long enough for the pie to cool but like.....nah man) or until they’re cool enough to not burn your hands, before digging in.
11. Enjoy!
Thanks for reading guys! Hope you enjoy the recipe and your Barold ‘Barry’ Bluejeans Blueberry Pie. Tune in for the rest of the TAZ Pie Collection! Coming soon to a blog near you!
4 notes
·
View notes
Text
Pie Crust

At the base of every good pie is an excellent pie crust (see what I did there?)
This is the recipe that I found works best for me. It’s not terrible difficult to work with, it’s pretty flakey, and it’s got great flavor.
Ingredients:
2 1/2 cups flour
1/2 teaspoon salt
1/2 cup unsalted butter
1/2 cup vegetable shortening
~1/2 cup cold water
Note: you shouldn’t shift the flour you use for the crust. You can if you want, but you’ll have to add a lot of flour while mixing the crust and rolling it out. The book I adapted this from says to just “swipe and level” and I’m inclined to agree with that.
Instructions:
I like to start off by chopping up my butter into smaller pats. It’s not necessary but I find it makes my life easier when it comes to blending the butter and shortening into the dry ingredients
Put your flour and salt into a large bowl. Throw your butter and shortening in at the same time.
Blend together the butter, shortening, flour, and salt. If you have a pastry blender now would be the time to use it- I find that it makes life a lot easier. If you don’t have one, don’t worry. You can use a fork to the same practical effect and if that’s too much of a pain, you can just use your hands.
When the butter and shortening are smaller than 1/4 inch size pieces, add the cold water. I like doing this a bit at a time as I find it makes it easier to work the liquid into the dry mixture.
Note: You don’t want to overwork your crust. A fully homogenous mixture won’t be as flaky and in general, over mixing flour isn’t great. You basically want to combine everything enough so that you can easily roll stuff out.
When you’re done mixing your dough, wrap it up and toss it in the fridge. If you want to save it, the dough will keep for at least a few days although I don’t know exactly when it will go bad. If you want to use it right away, still give it a few hours to chill before rolling it out- it’s actually a lot easier to work with and will bake up a lot nicer if it’s on the colder side of things.
When you do roll out your dough, make sure you clean and flour your work surface and rolling pin and give the dough a liberal dusting of flour before beginning!
Enjoy the fruits of your labor!
3 notes
·
View notes