#I want to make sticker sheets based off of size and water type
Text
I’m glad you all like my fish so far! I have been drawing a lot of them and have many left to post so be on the lookout for fishies! 🐟🐟🐟
#you may see your fav! I’ve got lots planned too#I want to make sticker sheets based off of size and water type#like big freshwater big salt water#deep sea and domestic/pet#stuff like that#fish are very fun to draw btw I recommend it#not comics#smiling at some of the replies bc I already have some of them drawn hehe
381 notes
·
View notes
Note
IWANT TO KNOW MORE ABT MARROW AND NYMERIA SO BAD IM GRASPIBG @ THEM WITH VIGOR.. for the ask game what abt 33 and 22 for both of them (if you are down) !!❓
ffrogey beloved i will paypal you my firstborn
my funky little college babies i lov them <3 lesgo with the questions !!
Nymeria
33) when creating your character, did you take inspiration from characters in other media? or just other media in general? name them, if any!
Hmmmm god yes im almost certain i did,,, i'm just trying to think what it was. Her name was ripped straight out of Game of Thrones because its a gorgeous name, and she takes a LOT of inspiration design-wise from Almalexia (makes sense considering she's her mother) I think vaguely story-wise she also takes some inspo from Daenerys Targaryen because they both have themes of discovering their history and taking back their "birthright" throne, difference being Daenerys knows who she is and Nymeria has absolutely no idea aside from a little telvanni necklace. I think she also got inspiration from that one dunmer in riften for that bit too!
22) if they were to have a social media profile, what would it look like? the username, bio, type of thing they’d post about, etc.
ooooo okay. i think during her time at the college of winterhold it would be something like:
@/PersimmonCrabs
🌸 Studying dunmer history at the College of Winterhold 🌸 She/Her 🌸Please DM me if you find any artifacts or historical records from Morrowind! 💜
Her favourite fruit is persimmons and she has a little palm-sized dwarven crab automaton that Marrow fixed up for her that helps her with her studies (brings her a pencil or a sheet of paper, whatever she needs), also she would definitely use proper grammar and spellings for everything, 100% the type to end all her messages with "thank you lovely xx" I think she'd mostly post pretty aesthetic photos, selfies, photos of her hanging out with her classmates, and whatever the tamrielic equivalent of starbucks would be. Her account would have a purple theme and if the photo didn't have purple in it she'd either add a filter or a few stickers or drawings to make it suit the theme!
Marrow
33) when creating your character, did you take inspiration from characters in other media? or just other media in general? name them, if any!
Marrow my sweetheart. I'm so bad with remembering where i got inspiration this is embarrassing 😭. I know i built them first off entirely around seeing the skull face paint in Skyrim and thought "wouldn't it be cute if i gave the sweetest purest character that". Her design came mostly from the water tribe's clothing in avatar the last airbender actually! never watched it but absorbed the fandom through osmosis. also this video made me want to make a character that would love cooking (well, making) foods like that, and thus marrow was born!
22) if they were to have a social media profile, what would it look like? the username, bio, type of thing they’d post about, etc.
Pure and utter chaos. Unlike Nymeria's there'd be absolutely 0 theme or put-togetherness, if it's an instagram-based platform she'd have story highlights dedicated to cooking recipes, tips + tricks for college, silly selfies, pictures of his friends, etc. For the acc itself:
@/marshmari
they/she/he !! genderfluid & pan !! dwemer ruins > nordic ruins fight me i'll win !! pls stop stealing books from the arcaneum :(
Mari is the nickname her tribe call her, and marsh comes from how she got her name, when the khajiit tribe found her she couldn't pronounce marshmerrow and thus the name Marrow was born. Her posts would be an absolute mess of adorable pictures of her pets, book recommendations, gorgeous falmeri carvings she finds on expeditions followed immediately by a photo of Kin'aru sticking his hand into a dwemer automaton and screaming when he gets stuck, aaaaaand i think she'd also have an art account called @/onionhater where she posts all her paintings :))) grammar simply does not exist on her page
#ty ffrogey ily#my memory is so bad i was digging through old posts to try and find a single piece of inspiration JSDSJDJS#my ocs#oc: nymeria#oc: marrow#oc: kin'aru#my beloved is also mentioned#love that little dumbass sm
1 note
·
View note
Note
That Allister cosplay is outstanding!! How did you make the mask and the gym symbol+endorsements? I'm planning on doing an Allister cosplay in the future myself
Thank you so much, and happy to answer! I took lots of pictures through the process so I’ll answer this in two parts.
“How did you make the gym symbol/ endorsements?”
So the first thing I did is take a TON of screenshots I have almost 300 screenshots of reference images of allister and the gym league trainers and the pokejobs logos and so on to get good references for all the logos I needed.Once I was done taking all the screenshots I spent hours tracing them to the best of my ability to create these images: (Not all of these were the final versions which were modified right before printing, apologies)Gym Logo - QUAY/ Gym Logo

XXA - Sponsor (This is the logo for MC Insurance, Allisters Sponsor)

291 - Number
ASTSA - Name (This is the new pokemon language for Onion, Allister’s japanese name)

The square with the diamond - This I nicknamed the “NIKE” cause its the logo for the spotswear company in game

Galar league logo - Galar League logo (this is the logo thats the red and blue pokeball with white marks, and “galar league written underneath it)

And then I put together this ref sheet to make sure the logos looked good together color wise, and some of the colors were still altered later but it all looked pretty good

And then once the logos were all set, I printed them onto heat transfer vinyl and let me explain why I did that specifically. The fabric I used was polyester, which is the kind of fabric that sports jerseys are made of. I did that because the gym’s uniforms are based on soccer jersey’s so it felt fitting!IT WAS A HUGE PAIN I DONT RECOMMEND ITbut now because of the fact that it was polyester paint wouldnt’ work on that fabric because of how stretchy it is and the fact it doesn’t absorb moisture easily. So we printed it onto heat transfer vinyl with my cheap ink printer and then I ironed them onto my clothes! I made sure they were placed correctly by first taping them to my clothes and making a note of the location before ironing it, and then once I was happy with a placement I’d carefully iron it on. This vinyl seems kinda cheap and like the ink might come off with too much water so watch out if you choose to use it. There are also printable iron on paper for other types of fabric as well and are cheaper iirc!
Same goes for the dots, thos were all cut using a CNC/ off brand cricut (just a bunch of circles all at once) and I placed them by hand using painters tape and trimmed as needed to make the designs:

Hopefully that was helpful!
“How did you make the mask?”
So this ones a little more complicated to answer because its not complicated but its not something everyone can do.
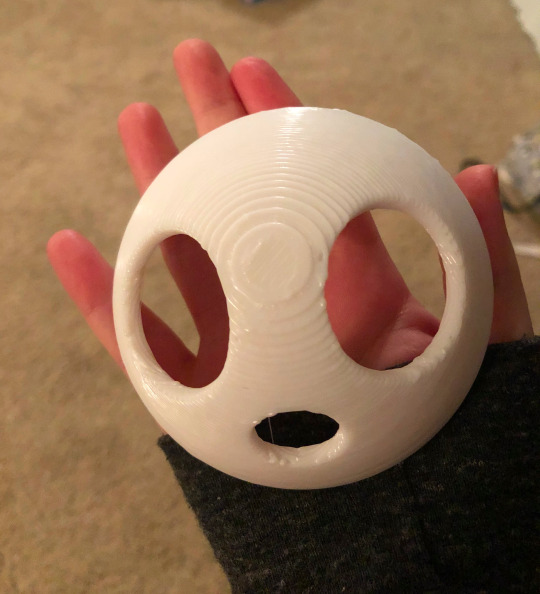
So we started on this one before the game came out, and before I’d gotten to Allisters battle in the game but we had enough reference material to figure out the general look of Allister’s mask, so we made a 3D model of it that we planned to 3D print (my bf has a 3D printer and a CNC and helped me a TON for this project) and did a test print of a tiny mask to start to make sure we were happy with the 3D model (here is the tiny mask in my tiny hand, we affectionally nicknamed it “mini mask”)
Now after we had the 3D model we had another issue of how big does it need to be? I have a round head on my own so I didn’t need to modify the shape of the mask thankfully (one time my fat head came in handy!) But we needed to figure out how big to make the mask to make sure it “fit” correctly.
So we tried cutting out a circle with paper in a few sizes until we thought we found a good size for my face (which for me was a little over 7 inches)
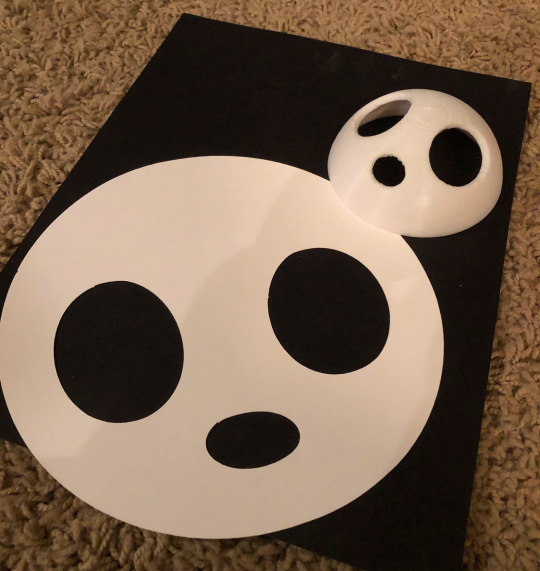
went and bought a styrofoam dome from the craft store in that size to make an EVA foam dome and then checked if that fit my face (later this worked fantastic as a way to transport the mask as a protective shell around it) I don’t have a picture of this EVA foam dome but all it was used for was putting it on my face and making sure it went over my chin and such. Once we had that we were ready to start printing the final mask.
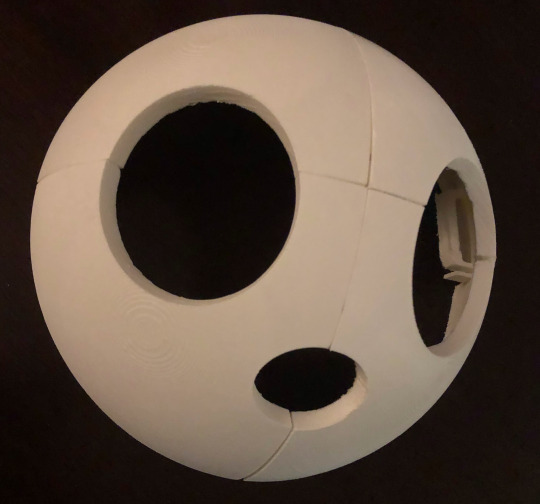
Once the 3D model was scaled for the final mask, it was too big for my bf’s printer to print all in one go so we split it into 4 pieces. Each piece took about 9 hours to print, and a few of the prints failed and had to be redone, so after a few days of printing it looked something like this:

for those who don’t know much about 3D printing all those beams are the supports that lets the printer print raised surfaces like that and have to all be removed. So after about 2 hours of pulling plastic with pliers it looked more like this:

so we left small gaps in the edges of the mask so that we could put metal pins between each piece to help hold it together so we cut our metal pins and assembled the mask and it was starting to come together!
So from here we melted some plasitc onto the seams (plastic welding!) with a wood burner and - wow that looks gross

but trust me its better than gaps in the mask. so after a bit of sanding here we entered the rounds of priming it with spraypaint primer and sanding it for like an hour and doing that again, occasionally using bondo putty to try and even out those seams and those rounds tended to look like allister just murdered a village:
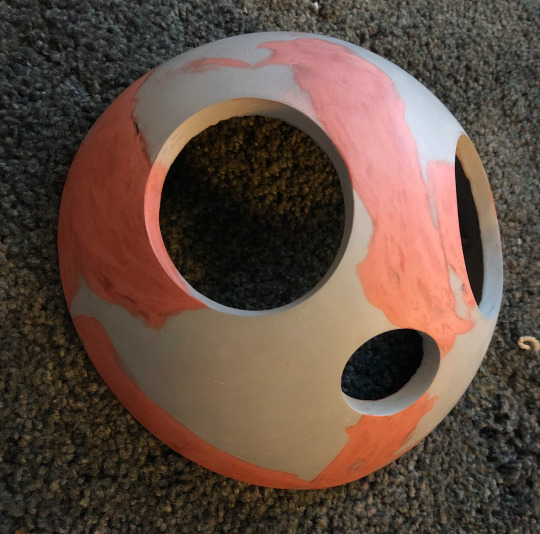
but you can see compared to the previous image that the mask is a lot smoother! This was the final round of sanding and you can tell that most of the layer lines from the printer have been sanded down! You can almost not see the seams anymore! (though now they’re also very red but they’re very smooth in comparison to the beginning trust me…I sat there sanding for many hours for this)
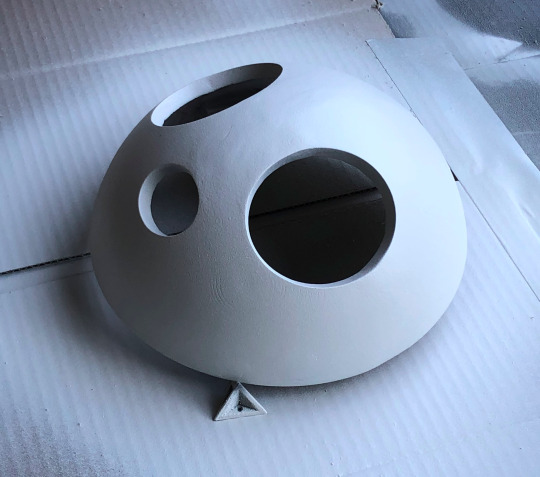
But after this all that needed to be done with a final priming in grey, and then painted it gray!
While the paint was drying, we prepared some masking in the design of allisters mask which if you don’t know what the full mask looks like I wanna reference this from the collectors guidebook (which I just now got my hands on today but saw these on twitter)
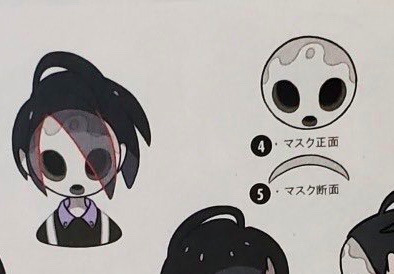
So we cut out a sticker sheet in that design and placed it down with some painters tape to keep that part of the mask gray and then it was painted white, and that was the painting done!
For the black in the eyes, I got a scrap of black fabric for cheap at joann’s that I picked up and pulled and it was a very soft polyester/spandex material that you’d use for pantyhose so i’m sure you could also cut up some of those for a similar effect. But when stretched you can see out of them.
So we made small rings the same shape as the inside of the mask behind the eyes, glued the fabric using super glue to that ring (and the mouth as well) and viola:
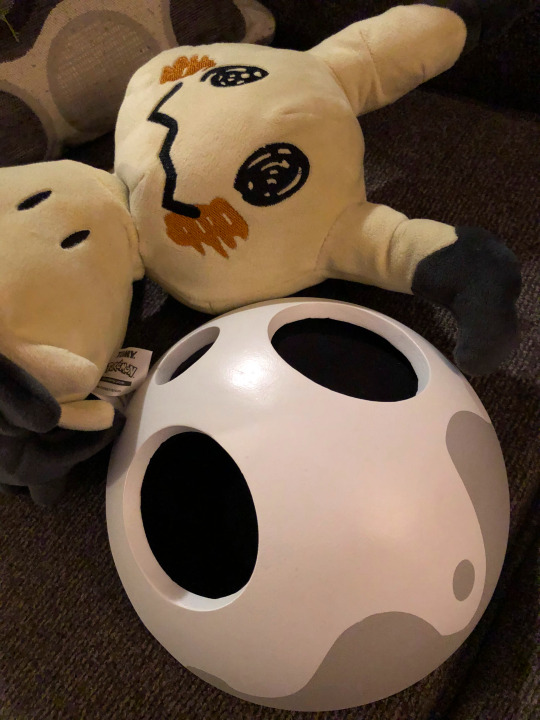
and then the final step was to get that mask on my face, and basically we had some rings on the left and right sides of the inside of the mask that I attatched some elastic too, and then needed to glue a third strap over the top of my head. and sewed it all in place and put some craft foam along the forehead and chin inside the mask for some cushioning and it was done!
I really hope that was helpful and I tried to make sure I took lots of photos along the way so I hope they were helpful. If you have other questions feel free to ask! Sorry for the novel but just wanted to be as detailed as I could be!
Thank you for your nice words and best of luck!! Allister is a detailed boy but he’s very fun!
#my cosplay#allister cosplay#allister#gym leader allister#cosplay help#cosplay reference#allister reference#galar#swsh cosplay#cosplay description#ask#answered#long post#if theres other tags I should add let me know#anon
101 notes
·
View notes
Text
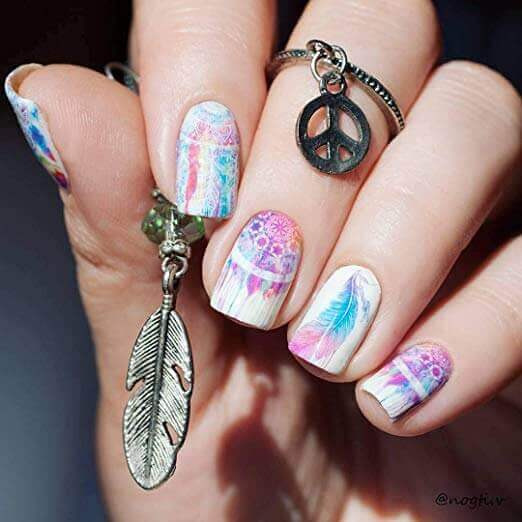
DIY: Nail Art Temporary Tattoos

For the past few decades nail art has gained immense popularity. And the simple reason behind nail arts popularity is the beautiful looking nails after getting nail art. Nail art is not common amongst college girls and teenagers, but also office going women love to apply nail art. However, doing art on nails require skill and practice as it is very delicate kind of art, and the nail is very small part on which art has to be done. There are many professionally trained artists who do nail arts, but they are pricey.
There are many women who want to get beautiful nail art but due to several reasons they just avoid getting it. But now you don’t need to resist your temptation to get a nail art as in this post we are going to share with you how you can use temporary tattoos for a nail art, that too easily.
Yeah, now you can create wonderful nail art with temporary tattoos and it looks stunning and gorgeous! You will definitely love the idea and it’s so easy that you can apply whenever you wish to have different nail art.
There are many ways you can get a look of nail tattoos, such as:
I. By using water slide temporary tattoos. It doesn’t matter whether they are made specifically for nail art or not. Temporary tattoos look stunning when done on nails. Also, they look their best in colors or if they are in dark shades.
II. Another wonderful way is – use full-nail sticker decals to get a look of nail tattoos. Believe you me, it also look amazing.
III. Third method to get a look of nail tattoos is to use Tattly temporary tattoos. They look mesmerizing!
If you are also looking for beautiful nail art, then you have definitely landed on the right page. As we are going to share with you the method to apply temporary tattoos nail art, which you are going to love for sure…..
Okay… no more talking now, let’s get to work and see how easy it is to apply temporary tattoos nail art.
Here we go……
I. Water Slide Temporary Tattoos

First things first, list of things that you will need to make beautiful nail art:
Nail Polish or Nail Paint: Base Coat and Clear Top Coat (More often than not, the edges of temporary tattoos have a translucent, filmy border, so it is better if you go for a white or light-colored polish. It will make for a canvas for good contrast with your tattoos. However, some water slide tattoos, which are specifically made for nails can be used with any color.).
Sewing Scissors or Nail Scissors
Your Favorite Temporary Tattoo: (Make sure you choose temporary tattoos with dark or colored shades or details, to contrast with your nail lacquer.)
Water & Sponge
Steps to follow….
1. First of all you need to have neat and clean nails. So, for that you can get your manicure done a day before. As nail art looks amazing on clean nails. Dirty nails do not make for a great art work.
2. Start by applying a base coat and nail polish, just brush on a clear base coat. And wait until the base coat gets fully dry. Once it’s dry, brush on one to two coats of nail polish (let the nail polish dry between coats). Once you get satisfactory coverage you don’t need to apply nail polish.
3. Now, cut your favorite temporary tattoos with nail scissors or sewing scissors to fit on your nails. A curved blade of sewing scissors or nail scissors will help you cut the temporary tattoo finely.
Once you have cut the temporary tattoos into pieces, pick up the pieces of the tattoos you like best. Make sure that each piece you pick fits on your nails without any overlap. Part of your nail plate should be visible around each tattoo piece.
Also, it is not necessary to cut perfectly around the tattoo. All you have to do is just cut small squares that fit onto your nails. That’s all!
Make sure your nails are fully dried before you do this step, as it will avoid smudging of your nail polish.
4. Now, wet the tattoo face-down on your nail and remove the plastic sheet from the tattoo. Place your temporary tattoo in a way that it touches your nail only, and not your skin. Now take a wet cotton swab or sponge, paper towel, or cloth to dampen the back of the tattoo.
Some water slide nail tattoos require you to soak them first for five to ten seconds each. Then, you can remove tattoos from a bowl of water with tweezers, after soaking them for a required time.
Let your tattoo be soaked until it loses the backing.
5. Make sure you hold the damp cloth against your nail for at least 30 seconds. Keep pressing down firmly and evenly. And if your tattoo has some specific instructions that recommend holding the moist tattoo for even a longer amount of time, then follow those instructions. Avoid moving the tattoo while it sets.
6. Once your tattoo is settled, remove any excess (if any). If you find your tattoo overlapping the edge of your nail, just snip it off with scissors.
7. Finally, apply a topcoat, it will help your tattoo to stay longer. While applying a topcoat, try to dab a little bit of top coat onto one of the tattoos first, just to make sure that it’s not smudging.
II. Applying Nail Stickers
Another easy temporary tattoo nail art is Nail Sticker tattoos. They are very easy to apply and they look beautiful as well.
Things that you need for this nail art:
Cotton or Cotton Pads
Nail Paint Remover
Nail Sticker
Sewing Scissors or Nail Scissors
Blow Dryer
Glass file
Steps to follow….
1. As usual you need to clean your nails first. Take a cotton pad dabbed with nail polish remover or rubbing alcohol and start cleaning on and around your nails. In this step we will not apply a base coat as it can prevent nail stickers from properly adhering or sticking.
2. For applying nail stickers, first of all you need to prepare the nail sticker:
First you need to find a nail sticker that matches perfectly to the size of your nail.
If you don’t find a sticker that matches the size of your nails well, then better to choose a sticker that’s larger than your nail. As you can trim it down with sewing scissors or nail scissors to fit your nail.
Before applying the stickers on your nail, rub the sticker in your hands and warm it up a bit. This will simply improve its flexibility and longevity.
3. Now, it’s time to apply the sticker on your nail. To apply:
First, remove the backing from the strip.
Then, place the sticker on your nail plate, close to your cuticle (make sure it’s not overlapping).
Now, start smoothing the sticker down from your nail bed to the tip.
4. Now take your blow dryer and use it on the nail for some time. (Make sure you use the warm setting on your blow dryer. And if your blow dryer runs quite hot at close range, then hold it a little back ensuring that your skin is not hurt by the hot dryer.)
Heat of the dryer will help nail stickers smoothly adhere to the nails.
5. Once your sticker is adhered, file off any excess decal, if needed. Hold a large-grit file (specifically glass file) perpendicular to the nail. Make sure you file the nail downward and detach excess strip from the free edge of your nail. First you file it roughly and then finish up with a finer grit.
Using a glass file is better as it smoothes the edges perfectly.
6. Once your sticker is adhered properly, now is the time to maintain your nail tattoos. You can maintain your nails by doing following things….
You can simply add a top coat for gloss.
Avoid any kind of pressure and moisture.
Treat your nails gently.
Completely avoid using any lotion or oil-based products on your nails, as it can separate your sticker from the nail.
Also, make sure you keep your nails away from heat.
If you find the decal starts to come off, use a blow dryer on your nail to smooth the sticker back down (as you did while applying the sticker).
If possible, cover your hands or wear gloves while doing dishes or other household task, it will help you protect your nail stickers from coming off.
III. Applying Tattly Temporary Tattoos
The method for applying tattly tattoos is same as water slide temporary tattoos. The entire procedure and required material in both the process is the same.
Also See: Types Of Temporary Tattoo
To pan out….
I hope you liked the post, and you are going to love the nail art as well!
Now you know how to get beautiful looking nails with temporary tattoos…. What are your waiting for??? Go, get everything ready and start doing the nail art!
You are going to enjoy it, believe you me!
Happy Tattooing…. ☺ ☺
Source: https://www.trendingtattoo.com/nail-art-temporary-tattoos/
#Nail art#temporary tattoo#DIY#tattoos#nail#art#ink#Water Slide Temporary Tattoos#sticker tattoo#temporary tattoos#girl tattoo#tattoo girl#nailart#Nail Stickers#tattly#trendingtattoo#temporary inks
3 notes
·
View notes
Text
Shika’s Guide To Selling at Conventions #1: Table Set Up
Sooooo, to take my mind off somethings that are bugging me and to give myself a break from drawing; I thought I might offer a bit of insight to those who want to sell at conventions or those who already do but, just might want to read a long ass post about artsy shit. This post in particular will be about your table set up and I’ll probably make another one on what type of things you should sell and where to get your stuff made and or/how to make them yourself, one on what the content of your merch should be, and basic convention etiquette. Coming from someone that has done plenty of research on conventions, is currently getting ready for the 2018 con circuit, and has sold things herself I have quite a bit to talk about.
Strap in kiddies, because I’m going to cover everything I can possibly think of when it comes to table set up.
PART 2: PRODUCTS AND HOW TO MAKE THEM/WHERE TO GET THEM DONE
Now the first thing I want to list is the things that you will need REGARDLESS of your table set up. These are things that everyone needs to have whether they have a grid display, pipe display, etc.
Tablecloth: At most conventions/fairs you’re going to be given a table that is 2′x6′. You can have just a cheap ass plastic tablecloth meant for one time use if you’re just testing the waters but, if you’re going to be selling multiple times a year or if you’re even just going to sell more in the future I recommend that you have something made of cloth. It doesn’t even have to be specifically a tablecloth. Mine is a tapestry that I’m using so whatever fits the table will be fine.
Paper For Keeping Count of Your Inventory: This is important to make sure you’re keeping track of what you have and what you’ve sold.
Pens and Markers
Sign(s) Listing Your Prices For Your Items: It’s annoying to keep having to ask the artist what the price of everything is so make sure everything is marked.
Money Box with Change
Scissors
Container for holding your merch including your prints and everything else
T-Shirt Bags: You can get a box of them at Office Max/Depot, or colored ones on Ebay. Your costumers will thank you for having them trust me.
Pocket Folder
Paracord: This is useful for hanging or tying your banner and so much more.
Invisible Tape
Banner
Card Reader: Not everyone has cash on them these days. I sure as hell don’t so, get one. I recommend Square personally.
Phone Stylus: Get a cheap one at Walmart so people can sign when they buy with a card.
Velcro
And now that, that is out of the way let’s get onto the actual table display. There are tons of ways to set up your table and you can look up pictures as reference but, I will be going over the 5 most common types that I have seen, the pros and cons of each, and the extra items you made need for each particular display. I’ll start at the cheapest and go up.
ABSOLUTELY NOTHING!
Price: $
Eyup, that’s right. You can get by with just having your stuff spread out on your table. This set up is good because it’s cheap and good for first timers and it’s also good if you’re only selling prints and/or maybe a few items. But, at the same time it may be tiresome for customers to have to look down at a table and it may look cluttered and unprofessional as well.
Pros: Cheap, Good for first timers or people on a budget, Good for those with minimal items to sell, Set up is very easy
Cons: Can look cluttered/unprofessional, Can be tiresome for customers to look down.
Extras You May Need: Portfolio/Page Protectors to Display Prints, Binder
PVC PIPING
Price: $
This is probably the one everyone is most familiar with. It’s a simple and cheap and does a great job of displaying many different prints. It’s starting to fade out in recent years as Photography Stands are getting more popular. It’s common for most beginners to use this but, that also may be a con because it can look a bit amateurish with those big white pipes showing. They are readily available at any hardware store and are pretty cheap. Most beginners (especially people in the mid 2000′s) would use clamps to hold the pipes up and tape the hell out of them but, I would recommend a setup like this. No matter how you set it up, the set up its self takes time so you’ll have to go in early to set up.
Pros: Cheap, Readily available, Can be customized to different heights and widths
Cons: Set up may take some time, a bit amateurish and unprofessional, can be a bit wobbly and unstable, Hard to transport to keep track of all of the pieces
Extras You May Need: Plastic Page Sleeves, Binder Clips/Binder Rings
WIRE GRID STORAGE CUBES
Price: $$
This is neck in neck with Photography Stands with the most current popular display method. It’s actually the one I use and its my favorite. It’s very easy to find; You can find it at Walmart, Bed Bath and Beyond, Target, and Kmart (which is where I got mine). You can even order the individual little grids online through certain stores. They come in both black and white. How much you spend will depend on whether you get a 4 cube set or a 6 cube set. I have a 6 cube set that I got at Kmart for $20 and it’s worked perfectly for me. The set up is easy but takes time (longer than the PVC pipes) so you’ll have to go in early to properly set up. My favorite thing with these is how customizable they are. You can do so many different looks with them.
Pros: Fairly inexpensive, Readily available, Customizable, Good for Products like Charms/Jewelry/Bookmarks because they can be hung, Easy to transport
Cons: Can be unstable based on how it’s set up, set up takes time
WIRE GRID PANELS
Price: $$$
This is one of the more rarer ones but, I still think it’s worth mentioning anyways. These work like the Storage Cubes but, on a larger scale. These will have to be placed on the floor unlike the rest and you need to buy more than one, which isn’t a big deal because they’re actually fairly cheap in a pack. They can be bought in different sizes but, because they are so big, heavy, and almost exclusively sold online shipping will probably bite you in the ass. Also set up will most likely be difficult without a helper. Also because of the fact that they are so big will give you plenty of space to display prints. The fact that they’re on the floor will free up you table space and give you more room to show other things.
Pros: Pretty affordable for their size, Very professional looking, Easy to hang things like Charms/Bookmarks/Jewelry from, Plenty of display space, Frees up table space
Cons: Hard to set up without help, Hard to transport, May make your booth space feel crowded with things behind you
Extras You May Need: Zipties
PHOTOGRAPHY STAND
Price: $$$$
This is tied with the Grid Cubes for the most popular option and it’s steadily growing as well. They’ll set you back about $80-$90 but, they have a lot of benefits. They are the easiest to set up. They have the concept of PVC pipes but are far easier to put together, are customizable with the height and width, and are much more sleeker and professional looking. They are perfect for anyone selling alot of prints and like the grid panels they free up table space. And also like the panels they can make the surrounding area feel closed in.
Pros: Very easy setup, Very professional looking, Plenty of Space for prints, Customizable height and width, Frees up table space, Easy Transport
Cons: Very expensive for a quality one, Mostly exclusive to online, Depending on the feet type it can be a tad bit unsturdy, Makes surrounding space feel cluttered
Extras You May Need: Plastic Page Sleeves, Binder Clips/Binder Rings
And those are only the 5 most popular set ups. I’ve seen people use other methods so do you research and pick and choose which one suits you best. And now unto how to display certain popular items. The prints are covered by the stand setup but, this is for the smaller things.
Buttons
Foam Core Board (Can be by it’s self or with a fabric covering like felt)
Jewelry Beading Box
Cork Board
Charms
Foam Core Board
Cork Board
Display Case
Stickers
Bowls (Good for individual stickers)
Foam Core Board (Good for sticker sheets)
Jewelry Beading Box
Jewelry
I would have to list alot but, unless you’re going to have them hanging if you have wire grid panels/storage cubes You’ll need a necklace stand, bracelet stand, ring holder, etc.
These are extras that completely optional but, I thought they would be nice to mention anyhow.
Peg Board With Pegs: These are great for displaying hanging things like Keychains,Charms Etc. They can even be used to display prints if you get them big enough.
Cloth Backdrop for Photography Stand: If you don’t want to put your prints in sleeves and then tape them together, You can attach them to a cloth backdrop.
Gift Card Display, Revolving or Stationary: These are great if you’re like me and you sell 4x6 Mini Prints.
Boxes: I often see these used to elevate certain products and show off certain things. They’re more often than not painted small wooden boxes flipped upside down with the merch placed on top.
Easel Stands: If you’re going to be using Foam Core Boards Or Cork Boards, you’ll need something to prop them up.
Business Cards and Business Card Holder: This may be a weird one to be optional, you’d think it would be up with the essential stuff but, not exactly. I personally prefer to keep businesses cards but, at a Con I went to this year there was alot of people that instead of many business cards they had one little sign with all of their social media (some even had a QR Code) that people would take a picture of.
Brads/Finishing Nails: Again if you’ll be using Foam Core or Cork Board for displays you’ll need something to have your product hang off. I personally prefer brads over finishing nails because they can come in different designs.
Hangers: If you’re selling t-shirts and you’re not going to have them on the table top, you can use hangers to display the t-shirts.
131 notes
·
View notes
Text
My Current Skincare Routine (012017)
Hello, Lovely!
5th blog post YAY! Again I would love to thank everyone who had liked my Innisfree no sebum mineral powder blog, 100 likes and counting. I'm so amazed at the amount of attention I've been getting I'm very grateful, I've had some lovely conversations with some friends here on Amino I'm just amazed at how lovely everyone's been so THANK YOU 🍑
I thought I should let my friends (all of you) know about my personal skin care routine! DISCLAIMER: I am by no means a skin care expert, I do whats been working for me, it may not work for you but it does work for me. At the moment I'm still testing things out, I mean I'm still using a westerner eye cream and I am in hope to find an amazing Korean one! So if you have any recommendations please let me know and they will go on my wishlist, Thank you in advance!
Okay, let's get started!
Background Info:
I do wear makeup nearly every day as I'm working or I'm at school. I love makeup and feel the need to do it every day (don't judge I do it for me, not for anyone else, I enjoy 'painting' my face). But I do have to say after a long day I'm hyped to take it all off, best feeling every.
Just info on my skin type too, I have an oily T-zone (nose, cheeks forehead and chin) cheeks and the surrounding of my face is dry too. I have past acne scarring, which has faded and not a big problem. I have small pore which I treat every week with a mask, I don't do any nose pore strips nor do I use that tool that brings the sebum out, I just leave it. I do suffer from acne ( I'm only 17, I'm a teen so I'm not threatened by pimples, I'm still young!) which I never pop my pimples, I leave them to do it thing and I have somewhat sensitive skin, like super sensitive to acidic masks (*caugh lemon).

01.Beauty water
I first start off with a Beauty water, taking my eye makeup off first, ensuring everything off. I know this is a westerner brand, in all honesty, this was like my first 'skincare' product I ever got, I've been using it for the last 3 years!

Product: Simple Kind to skin micellar cleansing water.
How: I usually put some of the water on a cotton pad and softly wipe my eye makeup off, ensuring that everything is taken off before going on to the next step.
02.Oil Cleanser
Secondly, I use an oil cleanser, I always use a water-based cleanser around my eyes as oil cleaners seem to make my eyes foggy (?) and I hate that. Everyone knows this brand, I personally like it. The oil does get my foundation off my face while not being harsh which is a benefit!
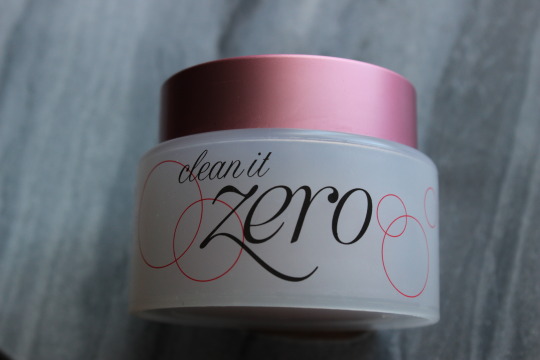
Product: Banila co. Clean is zero (original)
How: Using a spatula, I grab about a 10c coin amount and rub it into my face, I usually message it in bringing it down to my neck. I usually do this before I go into the shower so when I'm in I run warm water and wash the oil away, it turns almost milky.
03. Water Based Cleanser
The third step is cleansing all of the oils off, I usually use a foamed based cleanser which I know isn't the best to use as foam cleanser can spread germs, but like I mentioned before it works for me and I haven't practically broken out from using a foam. I usually wash my face with a foam cleanser in the shower which is easiest for me.

Product: Innisfree Green Tea Cleansing Foam
How: Squeeze as small amount of the product (10c coin size) onto wet hands and rub onto a wet face massaging it into the skin ensuring that all of the oils and makeup comes off, wash with warm water.
Recommendations
Another great foam cleanser is the Innisfree Jeju Volcanic Pore Cleansing Foam!

04. Exfoliation
I usually exfoliate about twice to three times a week. It really comes down to how I feel, if I've worn thick makeup that day or I feel the need to exfoliate, I never do this too hard just enough to ensure that I've softly scrubbed the dead skin away.

Apologies for the dirty packaging its been in my shower, where I usually keep it as I do most of my cleansers!
Product: Skinfood Black Sugar Perfect Essential Scrub X2
How: I usually (as mentioned) do this in the shower, so I grab a small amount and water it down a little bit before i softly scrub over my face washing the srub off after scrubbing my face for 50 seconds to a minute.
Another Exfoliation Method
Now and again i change it up and use a peeling gel, which i feel can provide better results, i defently see and feel the difrence afterwards.

Product: Holika Holika Lazy & Easy Egg Smoothing Egg Peeling Gel
How: Squeeze a small amount onto hand and rub into face and watch how your dead skin forms into little balls, wash away with warmish water.

How cute is this, I love Gudetama!
05.Toners
I actually love toners, they have actually help with my past acne scarring and seem to balance my skin's redness! Plus toners make your skin feel as soft as a babies bottom.

Product: Skinfood Black Sugar Perfect First Serum in Light
How: I usually shake some into my hand then I pat it into my face and neck. If I'm feeling fancy I'll pour some onto a cotton pad and swipe all over my face and neck.
06.Serums
I actually just started using serums as I was kind of lost as to what they do, but honey can I tell you I'm so happy I tried it. My acnes has healed up a tonne (still have some left but it's fading which is positive) and my pores seem to be smalleer (not that they were big, to begin with). My skin legit drinks this in, i love it!
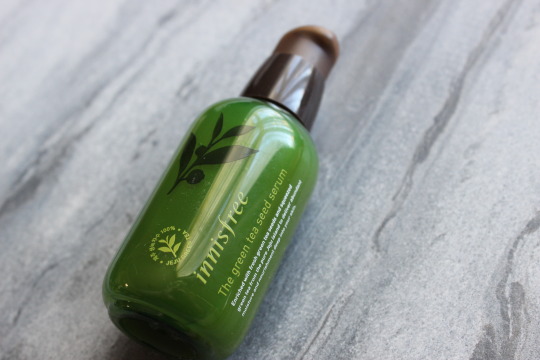
Product: Innisfree Green Tea Seed Serum
How: Like the toner, i pump two pumps into my hand and dab (please don't) into my face and neck.
07.Eye Creams
Eh, I I'm sorry I don't have any Korean products to show you but this is what I've been using for the last 5 months, I'm looking for a Korean eye cream so if you have any recommendations I'll be highly grateful.
I know I'm young (17) but I still hope to keep my under eyes hydrated, that's all. I don't care about bags or darkness I just hope for them to be nice and hydrated.

Product: Olay Anti-Ageing Eye Cream
How: I lightly dip my finger into the cream and light tap it around my eyes bringing it onto my lids.
08. Moisturiser
I've had a hard time trying to find the one (not that I've had a massive look around) and I've just started using this again, I say again because I started using it about 1 -2 months ago and I started to break out. I want sure if it was something else (as I was trying other things) or it was this product. Well, I confirm that this wasn't the problem. I've been using it the last 3 - 4 days and I haven't broken out and it seems to do the job, not sure if it's going to be great in winter. It's summer where I am right now...prays.
Moisturisers I've been using for 2 years or so, I was so bad with my skin before. Definitely, notice the different in just hydrating my face!
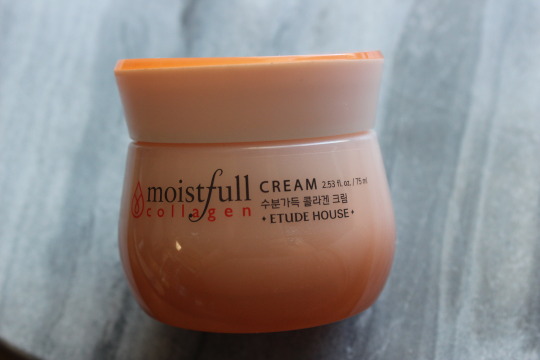
Product: Etude House Moistful Collagen Cream
How: I spoon a little on my hand (clean) and dot it around my face then I rub it in (not too hard) and round my face bringing it down to my neck.
EXTRAS
This section is just other things I do now and again, spot treatments, mask, sleeping mask etc.
Spot Treatment
I usually use two things, I know one of them is a little harsh but for me, it works and it doesn't leave scarring.

Product: Thursday Plantation Tea Tree Oil Antiseptic
How: I usually put some tea tree oil on a q-tip then apply to the risen pimple before bed, in the morning I make sure to wash my face.

Product: Nexcare Blemish Clear Cover
How: Peel off a sticker and place over a pimple, let that stay one overnight and in the morning peel it off, carefully. You can actually see all the junk come out off onto the sticker, ew!
Sheet Masks
Sheet mask does wonders to the skin, you can get all different types brightening, moister, pore tightening etc. I usually use mask 2 - 3 times a week depending on how my skins feeling and looking.
I've been using sheet masks for the last 1-2 years, these were the first skincare items I had even before moisturisers. I use to get mine from The Face Shop, the only Korean place in my city. I love them so much.

Product: Olive Young X DreamWorks Sheet masks (Fav: Kung Fu Panda)
How: After toning your face place one of these onto your face and leave for 20-30 minutes afterwards pat what's left into your skin.
Others:
-Innisfree Rose, Strawberry and Honey Mask
-Etude house Hydraulic and Snail Mask
-Too cool for school Egg Cream Mask
-The Face Shop Mung Bean Mask
-Nature Republic Snail Mask
Clay Mask
I do switch between sheet and clay mask every week, for me sheet masks are something that quicker and easier and clay mask are something I use when I'm not busy and have time to sit down.
These masks are popular and everyone knows them, I personally love these two the most out of clay mask that I've tried.

Product: Innisfree Jeju Volcanic Pore Clay Mask
How: I use the little spatula (that was in my ELIZAVECCA Carbonated mask review) and put a good amount into my hand then I spread it onto my face and leave it for 30-35 minutes. Afterwards, i wash it off with warm water and pat my face dry.

Product: Elizavecca Milky Piggy Carbonated Bubble Clay Mask
How: Using a spatula I spread onto my face and let it bubble for 5 minutes, then I wet my hand a message my face for 2 minutes, washing it off with warm water.
I have a review on it if your interested if I remember ill leave the link here (*)
Sleeping Masks
Now and again when five had a busy day and haven't had the time to put a sheet mask or clay mask on, then ill stick with a sleeping mask. These are great for something quick to use.
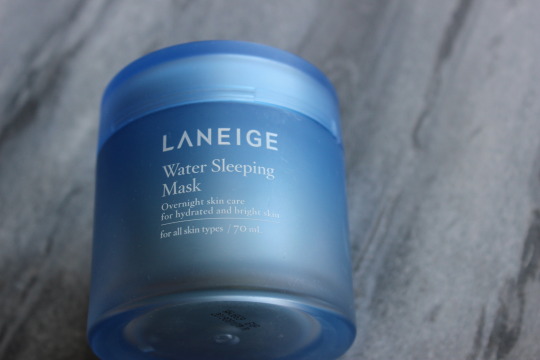
Product: Laneige Water Sleeping Maks
How: Apply a thin amount on your face before bed. When you have awoken wash this off with the little bit of water and notice how squishy your face is.

Product: Too cool for school Pumpkin Sleeping Pack
How: Apply a thin amount on your face before bed. When you have awoken wash this off with the little bit of water and see the brightening effects.
Random
I got this as a freebie in Beyond and have been using it the past month, it's just a simple body moisturiser but it's so good, smells great too!

Product: Beyond Deep Moisture Body Emulsion
How: Put an appropriate amount into hand then spread over wanted dry area on the body, it's not oily so it's okay for wearing during the daytime !
Thank you for reading this very long post, I hope this was somewhat informative!
Thank you for your support again x
Till next time, Peach out 🍑
1 note
·
View note
Text
OnePlus 8 Series Review: Which One Would Be Best for You?
I’ve been testing the OnePlus 8 series for a bit over a month, and I have good news: the phones are very well made, and the cameras are better than expected. Long story short, starting at $699 for the OnePlus 8 and starting at $899 for the OnePlus 8 Pro, both of these phones have a lot going for them. Let’s dig in.
The OnePlus 8 series includes two 5G-ready models, the OnePlus 8 and the OnePlus 8 Pro. The OnePlus 8 Pro is an ultra-premium flagship phone with all of the premium bells and whistles including a 6.78″ QHD+ display with a 120Hz refresh rate, water and dust resistance, 4,510mAh battery, and OnePlus’s Warp Charge 30T that can take the phone from 1 – 50% charge in about 23 minutes (it also offers reverse wireless charging), and it has a 48-megapixel quad-camera system. The OnePlus 8 is a slightly more compact premium smartphone that provides the flagship features users want without making them compromise on pocketability. The OnePlus 8 has a 6.55″ Fluid AMOLED display with a 90Hz refresh rate, a 4300mAh battery with Warp Charge 30T that can take the phone from 1 to 50% in about 22 minutes, and it has a 48-megapixel triple camera system. Both phones have very responsive in-display fingerprint sensors and facial recognition.
Both OnePlus 8 series phones have the Qualcomm Snapdragon 865 with the Snapdragon X55 5G Modem-RF System. This gives them both multi-gigabit 5G connectivity, advanced Wi-Fi 6 performance, “professional-quality photography at Gigapixel speeds, desktop-level gaming with ultra-realistic graphics, and intuitive AI experiences.” They also both run OnePlus OxygenOS based on Android 10; this is my second favorite Android OS Skin behind the Google Pixel Series as it is minimalistic, more intuitive, and less intrusive than the overlay on, say, the Samsung Galaxy series phones.
The size difference (while in cases) illustrated between the OnePlus 8 Pro and the One Plus 8.
One Plus 8
If you prefer something a bit smaller in your hand than all the current over-sized flagships phones, the OnePlus 8 may be just what you’ve been waiting for. The OnePlus 8 measures approximately 6.3″ tall by 2.9″ wide by 0.35″ thick, and it weighs 6.4 ounces. Inside the bold red OnePlus 8 box you’ll find the phone, a Warp Charge 30 power adapter, a Warp Type-C Cable (that supports USB 2.0), a quick start guide, a welcome letter, the safety information and warranty card, a sheet of OnePlus stickers, a pre-installed screen protector, and a SIM tray tool.
With shorter and tighter curves along the edges of its screen when compared to the OnePlus 7 Pro, the OnePlus 8 also has a more comfortable and more secure grip. On the upper left corner of the 3D Corning Gorilla Glass display, the OnePlus 8 has a 3.8mm punch-hole covering the 16-megapixel front-facing camera (with electronic image stabilization). The OnePlus 8’s display has a 20:9 aspect ratio, which is excellent for gaming and watching movies. Before you start thinking that smaller means less powerful, I remind you that the OnePlus 8 has the same Qualcomm Snapdragon 865 and Snapdragon X55 5G Modem-RF system as the 8 Pro. Like the 8 Pro, the OnePlus 8 can come also come with up to 12GB RAM and up to 256GB user memory. The One Plus 8 is available in Onyx Black, matte Glacial Green, and the gorgeous Interstellar Glow I was sent. It’s an absolute fingerprint magnet, but you’ll hardly notice if you wisely keep it in a case.
The curved 3D Corning Gorilla Glass on the front is joined with the 3D Corning Gorilla Glass on the back by a thin aluminum band.
On the right rand side of the phone, there is a power/wake screen button and OnePlus’s three-stop ring, vibrate, and mute alert slider. The familiar OnePlus slider has ridges cut into it so you can differentiate it from the power button, even when it is in your pocket.
On top of the phone, there is a microphone.
On the left side, there is a volume rocker.
The OnePlus 8’s 3D curved glass has a slight angle on the sides, which may or may not bother you if you are used to a flatter, less curved screen.
On the bottom, there is a dual nanoSIM tray (no memory card slot, sadly), a microphone, the Type-C port, and the speaker cutouts (with the earpiece speaker, it offers dual stereo sound). There is no headphone jack, but in 2020 that hardly seems like something to dock a phone for not including.
All that glass is just begging to be cracked, so keep it in a case!
Lined up on the back of the OnePlus 8 from top to bottom are a 16-megapixel ultra-wide-angle camera, a 48-megapixel primary camera (with OIS and EIS), a macro camera, and an LED flash just below the slightly raised camera cluster.
Isn’t the Interstellar Glow color lovely? It’s like a pearlescent white when you see it in real life, but it casts off so many colors that it is hard to pin them down when photographing the phone.
The OnePlus 8 does not offer wireless charging, and the international and unlocked versions do not specify IP dust and water resistance. Still, OnePlus phones generally have some — even when not explicitly rated that way. Worth pointing out, though, is that if you buy your phone from one of the carriers offering it (Verizon and T-Mobile), it will carry the same IP68 rating as the OnePlus 8 Pro.
The OnePlus 8 has a triple-camera system on its rear; the primary camera is 48-megapixel with the Sony IMX586 sensor (with optical image stabilization). The second camera is a 16-megapixel ultra-wide-angle lens with a 116º field of view. The third camera is an independent macro camera. A macro camera may not seem necessary to most, but if you habitually take closeup photos of crazy bugs you come across, or if you are a product reviewer (hi!), or if you are just someone who lists a lot of smaller things on eBay, you’ll appreciate it. Like when using every other phone on a camera, you’ll likely take multiple shots when using it; some will be amazing, and some won’t be quite what you were looking for.
Photos Taken with the OnePlus 8 (click a photo to open the gallery)
The display on the OnePlus 8 may not have the 120Hz refresh rate of its larger sibling, but unless you are really looking to find something to fault, you won’t even notice. The 6.55″ Full HD+ (2,400 x 1,080 pixel) display is large and brilliant with bright and sharp colors (1100 nits at peak brightness); action on it is smooth and responsive. Thanks to the Qualcomm Snapdragon 865 processor, the OnePlus 8 phone is fast and again, super responsive; I never noticed a single lag or stutter. Unfortunately, I don’t live in an area with 5G, and thanks to being in lockdown since March, I am not traveling anywhere anytime soon, where I might have been able to test it. Battery life has been better than expected; thanks to years as an Apple and later Pixel user, I’ve been “trained” to expect my phone’s battery to be dead by mid-afternoon with hard use, which is why I still always carry a portable battery pack when I do step out, but the OnePlus 8 has impressed me with its excellent battery life. I can easily get through a full day with it, and if my use is light, I can go without charging until about mid-day on the second day.
Overall, the OnePlus 8 has proven to be an excellent device, and it would be a wise choice for someone who wants something a little bit smaller than the OnePlus 8 Pro without having to accept too many trade-offs for the lower price.
You can see the OnePlus 8’s full list of specifications here.
One Plus 8 Pro
Now comes the beast. As OnePlus’s most feature-rich phone to date, the OnePlus 8 Pro has a 6.78″ (3168×1440) QHD+ Fluid 3D Corning Gorilla Glass Display with a 120Hz refresh rate and 1300 nits at peak brightness. As with the OnePlus 8, a 3.8mm punch-hole on the upper left side of the display houses the front-facing 16-megapixel camera. The hole is so small and over to the side, rather than in the center of the screen, that half the time I don’t even notice it. But even better? The OnePlus 8 Pro is now IP68 rated, so you no longer have to worry about your phone getting wet when you’re soaking in the hot tub after a grueling day of Zoom.
Included in the red OnePlus 8 Pro box are the phone, a Warp Charge 30 power adapter, a Warp Type-C Cable (that supports USB 2.0), a case, a quick start guide, a welcome letter, the safety information and warranty card, a sheet of OnePlus stickers, and a SIM tray tool. The official spec sheet lists a screen protector, but my review unit does not appear to have it pre-installed, and I didn’t find one in the box. :shrug:
TheOnePlus 8 Pro measures approximately 6.5″ tall by 2.9″ wide by 0.35″ thick, and it weighs 7.1 ounces. It is a tall phone, but it is not an overly broad device. With that said, if you are used to a smaller phone, you may find it a bit too big for one-handed use. The OnePlus 8 Pro also has a 3.8mm punch-hole for its 16-megapixel front-facing camera (with EIS) in the upper left corner of its 3D Corning Gorilla Glass display. The OnePlus 8 Pro’s QHD+ and HDR10+ display (3168 x 1440 pixels) has a 19.8:9 aspect ratio, which also performs well when watching movies and playing games. Like the OnePlus 8, the OnePlus 8 Pro can come also come with up to 12GB RAM and up to 256GB user memory. The One Plus 8 Pro is available in Onyx Black, matte Ultramarine Blue, and the matte Glacial Green that I was sent. The 8 Pro also has 3D curved glass on the front and back with a thin aluminum band in between.
Buttons and ports on the OnePlus 8 Pro are the same as on the OnePlus 8; on the right side, there is a power/display button with a ridged slider above it.
On top, there is a microphone.
There is a volume rocker on the left side.
The OnePlus 8 Pro’s 3D curved glass has a steep angle on the sides, which may or may not bother you if you are used to a flatter, less curved screen.
On the bottom, there is a dual nanoSIM tray (again, no memory card slot), a microphone, a USB Type-C port, and the speaker cutouts (with the earpiece speaker, it also offers dual stereo sound). Again, there is no headphone jack.
The matte back of the OnePlus 8 Pro in Glacial Green is fab because it doesn’t show a lot of fingerprints. To the left of the slightly raised camera array, you’ll find an 8-megapixel hybrid-zoom camera with a 30X digital zoom (with OIS), and a dual-LED flash below it. Inside the camera array, you’ll find a 48-megapixel ultra-wide-angle camera (with a 3cm macro mode), a 48-megapixel primary camera (with OIS and EIS), and a 5-megapixel photochrom color filter camera.
In hand, the OnePlus 8 Pro feels only slightly longer and wider than the OnePlus 8; it is quite sleek and feels like a premium device. Compared to the Samsung Galaxy Ultra that I’ve been using and my usual Pixel 4 XL, it feels especially svelte. I have the 8GB RAM and 128GB user memory version, but I couldn’t really detect a difference from the speed found on the OnePlus 8, which came with 12GB RAM and 256GB user memory. The 120Hz display is brilliant, beautiful, smooth, and super responsive; it ships with 120Hz selected as default, with the option to downgrade to 60Hz; due to its excellent battery life, I have seen no need to lower the speed to get better battery life. Thanks to the Qualcomm Snapdragon 865 processor, the phone is blazing fast, with absolutely no lags or stutters.
The 8 Pro has a 4,510mAh battery that supports Warp 30T charging, which can take the phone from 0-50% power in about 23 minutes. Battery life on the OnePlus 8 Pro has been exceptional. I can easily get through a full day of hard use with the screen refresh rate on 120Hz; with lighter use, the phone can easily last well into the next day.
On top of all the other features I’ve mentioned, there is one that sets the OnePlus 8 Pro apart from any model that came before it. It supports Warp Charge 30 Wireless, which — as you guessed it — means wireless charging has finally made its way to OnePlus — along with reverse wireless charging for your small wireless charging capable accessories. Since the phone now has wireless charging, it makes sense that OnePlus also offers its own $69.99 Warp Charge 30 wireless charger; with it, you can charge the 8 Pro from 1 – 50% in about 30 minutes. And because the phone supports wireless charging, it also offers reverse charging, so you can use it to charge other Qi-enabled devices such as your wireless headphones or in a pinch, another phone. All you have to do is turn it on, and place the other device on the 8 Pro’s back.
For many of us, a smartphone’s camera is its most important feature. The OnePlus 8 Pro sports the most significant camera upgrade that the company has ever delivered in one of its phones. The OnePlus 8 Pro’s primary camera can shoot 4K, and it has hybrid video stabilization (combining Optical Image Stabilization (OIS) and Electronic Image Stabilization(EIS)); there are three hybrid microphones to collect clear stereo audio. Other video recording features include audio zoom —which lets you zoom in on the sounds you want to magnify, and there is an audio windscreen on the mics which automatically cuts wind sounds when you are recording. Since good lighting can be such a challenge when shooting video, the 8 Pro has 3-HDR Technology, which weaves together three exposures into one frame with a higher dynamic range; this fills in shadows for more precise, more colorful details.
Photos Taken with the OnePlus 8 Pro (click a photo to open the gallery)
Warning — we had a tarantula in the yard one day, so of course, I took a photo of it.
At a starting price of $899, the OnePlus 8 Pro is the company’s most expensive phone yet. The pain of the purchase price is slightly offset by its gorgeous and large 120Hz display, the Snapdragon 865 processor with X55 modem, its iP68 certification, the excellent cameras, and its 30W wireless charging. The beauty of the OnePlus 8 and the OnePlus 8 Pro being so closely matched to each other is that if you do decide you’d prefer the smaller, less expensive phone, you can still get a fantastic device by giving up just a few of the bells and whistles.
You can see the OnePlus 8 Pro’s full list of specifications here.
The OnePlus 8 starts at $699, and the OnePlus 8 Pro starts at $899; they are available directly from the manufacturer, as well as at T-Mobile and Verizon, and from other retailers including Amazon.
Source: Manufacturer supplied review sample
What I Like: Both phones have beautiful displays (although the 8 Pro’s 3168 x 1440 pixels are superior to the One Plus 8’s 3168 x 1440 pixels); Both phones are sleek and not overly wide; Excellent cameras; The OnePlus 8 has a 90Hz refresh rate and the OnePlus 8 Pro has a 120Hz refresh rate; Both phones have highly responsive and accurate in-screen fingerprint readers and facial recognition; Both phones have the top of the line Qualcomm Snapdragon 865, and the Snapdragon Modem X55 5G modem; Both phones have dual nanoSIM slots; Both phones are available in beautiful case colors — not that you’ll ever really see them because these largely glass phones should be kept in cases; Both phones have excellent battery life
What Needs Improvement: There’s no headphone jack for those who prefer wired headsets; Neither phone can accept a memory card; Both phones have steeply curved sides (the 8 Pro even more so), which may not be to your personal preference
from Joseph Rushing https://geardiary.com/2020/07/10/oneplus-8-series-review/
0 notes
Text
How To Cling Objects On Wallpaper
Since it's so simple to make shelf liner photos, and basic to minimize them out and implement them, you can use them to develop new appears for all types of issues close to the property. Transform the appear of the kitchen cabinet doors, make window stickers for holiday seasons, give a lamp a make-in excess of, different types of wallpaper borders for bedrooms, give a new search to an aged toy box or even use the shelf liner photos to redecorate a window cornice. There are several diverse models you can make and quite a few methods to use them.
If it is on kitchen area wallpaper or laundry space wallpaper border, you can wipe it off quickly with a soaked fabric. Wallpapers installed in high-exercise and high-dampness rooms like these are much more inclined to stains. Bulk of kitchen wallpaper, laundry room wallpaper border, and people employed for little ones's rooms are made of vinyl, which are a lot more resistant to drinking water and stains, and a lot long lasting than all those manufactured of paper.
Find the center point of the wall that you're likely to start out with. Make certain that you mark the wall so you know precisely in which to start off with the initial sheet. Operate your way about the area from wall to wall; guaranteeing that all seams satisfy up and any styles on the paper match perfectly. If you see any adhesive on the front of the wallpaper, promptly wipe it off with a damp sponge. The very last issue you want is to destroy the attractive work you're performing with huge globs of glue.
Lets be rational about this !!! Begin at the prime and operate down. While we could equally deal with a paint brush and Https://Justclassads.Com/ that was about the restrict of our skills. Before retiring I was a nurse and Geoff was in accounts, not the ideal knowledge base for what we desired to do. Who should we check with ?Who could we phone? We have been properly mindful that our french language expertise remaining a good deal to be wanted. We had been quite fortunate to be launched to an English builder and an English electrician., 'Terence' was the builder, a person of numerous skills with infinite tolerance. He needed every little bit of his endurance as Geoff labored with him as labourer and college student. The electrician re-wired upstairs. Of course he was really efficient but to say he was a very little temperamental is an exercise in diplomacy.
It all performs with starch! The cloth is held to the wall by liquid starch. Saturate the material in starch, area in opposition to the wall and easy out the wrinkles and bubbles. Its significantly simpler and far more forgiving than preparation before installing wallpaper! If it is crooked, pull it off, wet it again and push back again in spot. When the edges start off to peel absent, as they often will, consider a bit of liquid starch on your finger and press alongside the edge. When it is time to transfer, peel all the fabric off the partitions and run it by means of a wash and rinse cycle a handful of occasions. Dry, fold and stash it absent for another undertaking sometime.
A rotary or rotating level allows you to mark all walls with just one set up. This is great for setting up chair railing, finding all electrical shops at the similar peak and for setting up dropped ceilings.
Save money on restore costs by getting a drain snake. This will keep you from needing drain cleaners as typically. You need to know what you are carrying out to use a drain snake. Searching for out advice from a expert may possibly be a very good concept prior to doing work with it. Get a snake that's the right size so you don't bring about any problems.
So, how do you get the brilliant style that you order? A designer has to set it up. It is intricately computer cut on a machine with a quite little blade. When the device is finished slicing the design, a creation human being has to get rid of all of the unneeded content (vinyl) normally by hand. When this is completed, if you don't have transfer tape applied to your design, you would have to just take each letter of your quote off the paper, letter by letter. So transfer tape, which is like masking tape but not as sticky, is applied so that you can transfer your design additional competently.
Once you have picked a home to start off with, contemplate the colour plan you want to have. You will be painting the ceiling and walls (or preparation before installing wallpaper, based on your likes and dislikes) and quite possibly changing the flooring as nicely. Do you want carpet or hardwood flooring? Would laminate be a less costly selection? Believe of all the options and go from there.
If your life isn't good then your feelings are no for a longer time pertinent to the lifetime you want to develop. A detrimental thinker will believe that they're changing their existence but sooner or afterwards you will hear a edition of "life sucks" or "no subject how challenging you consider somebody constantly places you down", and so on. That is mainly because they sincerely wish to adjust their daily life but they're still functioning with the identical unfavorable believed designs that created the life they have now.
0 notes
Text
25+ Genius Ideas We Can’t Believe Are Still Not Implemented Everywhere
Wash Your Hands And Reuse The Water For Your Next Flush
source
Free Coffee In Exchange For Some Rubbish
source
Mountain Finder Device In Switzerland
source
The Design Of This Water Fountain Let’s The Water Flow Down So Dogs Can Drink Too
source
This Sign Is 100% Necessary
source
My New Desk’s Parts Came Separated By Steps Instead Of By Item
source
This Pill Bottle Lid Tells You When You Last Opened It
source
Seniors And Handicapped People Can Extend Crossing Time For This 8 Lane Highway
source
Accessibility Matt On The Beach For Wheelchairs And Strollers
source
These Traffic Lights In Ukraine
source
This Toothpaste Describes Both Its Ingredients And Their Purpose
source
This Elevator Has Buttons You Can Kick
source
This Fence Is Shaped To Create Seating
source
The Curtain Design In My Hotel Room Ensures That There Is No Annoying Light Gap In The Middle
source
The Elevators In My Office Building Have An Umbrella Sign That Lights Up If It’s Raining Outside (Osaka, Japan)
source
My Roommate’s Spatula Has A Stand So The Bit That Touches Your Food Doesn’t Touch The Counter
source
The Roofs Of UPS Trucks Are Not Brown. They’re Translucent So The Inside Of The Truck Doesn’t Need To Be Lit During The Day
source
This Elevator Has A Call Button 30 Feet Away So The Doors Will Be Open By The Time You Get To Them
source
These Chairs In A Ski Resort Restaurant Have Room For Your Gloves, Helmet, Hat Etc.
source
This Restaurant Has A “Toepener” For People Who Want To Avoid Germs On The Doorknob
source
Shopping Cart With A Calculator
source
My Hotel Room Comes With A Complimentary Android Phone With Free Data And Calls
source
This Elevator Shows How Close To Capacity It Is Based On The Weight Of The Riders
source
This Swing Is Designed So That The Kid And The Parent Can Swing Together
source
The Mirror In My Hotel In Japan Has A Heated Part That Won’t Steam Up After A Shower
source
My Bottle Of Canadian Whisky Came With Free Public Transportation
source
Some Roads In Australia Are So Long And Boring They Have Trivia Signs To Keep Drivers Alert
source
This Bridge Has A Crisis Hotline Machine
source
At My Work’s Parking Lot The Paint Lines Continue Up The Wall To Help People Park
source
These Bikes Have Airless Tires
source
Trash Bins In Copenhagen Are Angled So Cyclists Can Toss Their Trash While Biking
source
This Checkout Has No Candy For Parents With Kids
source
This Highlighter Has A Clear Part To Show You What You’re Highlighting
source
This USB Drive Displays How Much Of Its Storage Is Being Used
source
This Bar Has A Frost Strip To Rest Your Drink On So It Stays Cold
source
In Copenhagen There Is A Childrens Bicycling Playgroud, Where They Can Practice Bicycling In The City, And Learn The Rules, Before They Enter The Streets
source
My Work Laptop Has A Webcam Cover
source
The Back Of This Park Bench Can Swing Back And Forth, Allowing The User To Face Either Direction
source
This College Has Drink Coasters That Can Test For Common Rape Drugs
source
This Tire Tells You To Change It When It’s Time To Change It
source
These Batteries Have An USB Port To Charge Them
source
These Tiny Model Tents Give You A Look At What You’re Buying
source
This Airport Has A Therapy Dog For People To Pet Before They Fly
source
My Local Library Has Vault You Can Go Into To Talk On Your Phone
source
These Sheets That Tell You What Side Of The Bed To Put Them On
source
Benches In Sweden Are Very Friend And Couple Friendly
source
These Shopping Carts Have A Magnifying Glass For The Elderly
source
At This Airport, They Have A Machine That Will Print Off Free Short Stories For You To Read While You Wait
source
My Hotel’s Restaurant Has A 3 Button Device You Can Press To Call The Server, Call The Bill Over, And Tell Them That The Table Is Done
source
You Can Rent Sleeping Cabins At This Airport
source
These Chairs Have A Notch Cut In Them To Keep Your Bag From Slipping Off
source
My City Added A Safe, Public Place To Conduct Exchanges Made On The Internet. Directly In Front Of The Police Station
source
My Beach Has A Sunscreen Station
source
This Store Lets Customers Choose Whether They Want To Be Bothered By The Staff
source
My Local Pizza Joint Puts One Of Every Filler On Top Of The Stomboli
source
This Bag Of Chips Has 2 Perforations, So You Can Open It More The Further Down You Eat
source
My Favourite Shop Has Light Settings So You Can See How Good/Bad Your Outfit Will Look At Different Times Of Day
source
Rental Car In Ireland Has Dashboard Sticker That Reflects In The Windshield To Remind You What Side Of The Road To Drive On
source
My Local Coffee Shop Gives Free Compost Made From Their Used Coffee Grounds
source
My Local Laundromat Has Gym Equipment To Use As You Are Waiting For Your Load To Finish
source
Our Dishwasher Projects How Much Time Is Left
source
Little Rentable Office/Workspaces In An Airport
source
This Shower Handle Shows The Temperature Of The Water
source
This Train Has An Information Screen Which Shows How Full Each Carriage Is
source
This Restaurant Bathroom Has Two Different Kinds Of Soaps
source
This Credit Card Tip Jar
source
This Phone Charging Station Where You Have To Sit Down And Pedal To Get Power
source
This Chicken Comes With A Strip That Shows How Many Days Before It Goes Bad
source
This Inflatable Mattress Turns The Back Of Your Car Into A Bed
source
This Library Has A Directory For Topics People Might Be Embarrassed To Ask For
source
Local Farmer Has A Vending Machine In Our Mall
source
There’s A Carriage On Swiss Trains For Children
source
This Bottle Has A Map Of All The Water-Filling Stations Around Campus On It
source
My Local Mcdonalds Has All The Menus In Brail
source
This Vending Machine Sells Socks At The Bowling Alley
source
This Tray Used To Walk Your Bike Up/Down Steps
source
This Coffee Shop Shows The Differences Between Coffee Drink Types
source
These Bathroom Stall Doors Have An Overlap To Avoid That Awkward Crack
source
The TV In Our Hotel Room Has Easily Accessible HDMI And USB Sockets
source
This Measuring Jug Has Markers For When Pouring
source
My Local Library Has Dozens Of Different Cake Pans To Check Out
source
This German Milk Carton Has Windows So You Can See How Much Is Left
source
This Fake Skylight In The Surgery Waiting Room
source
You Can Shoot Your Car With Suds While You’re Waiting Inside At My Local Car Wash
source
My Hospital Visitor Sticker Fades Out And Void Appears After 24 Hours
source
This Ceiling Fan Differentiates The Light And Fan Chains With A Light And A Fan
source
Euro Snacks Tell You How Much Exercise You Need To Burn It Off
source
This Roll Of Toilet Paper Comes With More Paper In The Middle To “Take On The Go”
source
I Bought A Hat Online And It Came In A Bag Of Air To Prevent It From Getting Creased
source
This Hot Sauce Bottle Allows You To Adjust The Spice Level
source
In Rwanda The Stoplights Have The Seconds Until The Light Changes On Them
source
I Bought A Pack Of Cigarettes And They Came With A Postage Paid Recycling Pouch
source
My Library Tells Me How Much I Save By Borrowing Books Instead Of Buying
source
This Restaurant Labels Their Brownies Based On What Part Of The Pan It Was Baked On
source
This Pharmacy Has A Magnifying Glass So People Can Read Medicine Labels And Details More Easily
source
This Immigration Office In Korea Has Glasses You Can Borrow For Filling Out Forms
source
This Cupboard Drip Drys Into The Sink
source
This Carpentry Tool With Pins To Outline A Shape
source
An Item We Had Delivered At Work At An Indicator Telling Us If It Had Been Tipped Or Not. This One Had Been
source
This Bathroom Door Handle Has A Built-In Hand Sanitizer Dispenser
source
My Colleague Has A Micro-Fibre Cloth To Clean His Glasses Stitched Under His Shirt
source
This Cemetery Has A Gravesite Locator
source
This Coin Laundry Has A Washer And A Dryer Machine Just For Pet Clothes
source
This Japanese Gum I Have Came With Little Pieces Of Paper Inside For You To Spit Your Gum In To When You’re Finished With It
source
My University Library Has Cell Phone Booths So People Can Talk In Private
source
This Pasta Box Helps Approximate How Much Pasta To Make
source
This Sandwich Shop Has A Wrapping Station By The Door So You Can Take Your Leftovers Home
source
This Dressing Room Has Their Clothing Hooks Labeled
source
My Backpack Has A Bottle Opener
source
This Juice Carton Tells You How Many Glasses You Have Left
source
Two Story Target In Minneapolis Has An Escalator Just For Carts
source
A Bus Stop Nearby Offers A Small Library Of Books To Read
source
This Pizza Place Tells You The Area Of All Their Pizza Sizes And How Large They Are Compared To Each Other
source
My Local Supermarket Has Tags That You Can Put On Broken Trolleys
source
Café Doesn’t Take Pennies Or Dimes
source
This Pen Tells You How Many Pages Worth Of Ink You Have Left
source
This State Park Is Using Social To Track Fire Recovery
source
My Local Zoo Has A System To Prevent Little Kids From Pressing The Button And Disturbing The Keepers
source
The Small Circles On These Lids Are Tiny Lids For Smaller Containers
source
I Went To A Convenience Store In Colombia And They Sold A Pack Of 4 Slices Of Bread
source
My Receipt Came With A Nutritional Breakdown
source
Local Chinese Restaurant Explains Their Definition Of Different Spice Levels And How Often They’re Ordered
source
This Bathroom Has A Built In Timer For The Fan That You Can Set Differently Depending On How Smelly The Visit Was
source
My Beef Jerky Came With A Toothpick/Floss Inside The Package
source
This Pho Restaurant Has The Bathroom Options To Brush Your Teeth, Use Mouthwash And Even Moisturize Your Skin
source
This Refrigerator Has An Automatic Water Pitcher Built Into It
source
Button To Save People From Crossing The Desert From Mexico
source
The Adhesive Side Of This Wrist Band Tapers In So It Doesn’t Accidentally Stick To Your Skin
source
Different Shaped Slots For Different Tubes In The Hospital To Make It Impossible To Mix Them
source
The Shelves In The Boston Public Library’s Children Section Have Gaps For Children To Walk Through
source
from Viral News HQ http://ift.tt/2D9i4PI
via Viral News HQ
0 notes
Last Seen Blogs

rf3r3r4g
Untitled
plumeetprose
Plume & Prose

thedaywemetcomic
The Day We Met

hotcoacoa-marshmallows
Like what even is this?

aplaceforyoutoheal
hopelessly hopeful