#Ubuntu 20.04
Text
I swear to fucking God.
Mozilla VPN's 2.17 update completely broke it's Ubuntu 20.04 compatibility. It won't even launch on Zorin OS. I'm now without a VPN on my Linux machine.
I'm getting real tired of this shit. This VPN has been nothing but problems and reliability issues since I got it. When it comes time to renew, I'm cancelling this shit and moving to Mullvad.
#rant#rambles#mozilla#vpn#mozilla vpn#mullvad#mullvad vpn#ubuntu#linux#linux ubuntu#zorin os#zorin#ubuntu 20.04
16 notes
·
View notes
Text
JetPack SDK 5.1.2 Release Now Live!
JetPack 5.1.2 is the new production release for the full NVIDIA Jetson Orin and Jetson Xavier family of hardware. It adds support for the newly available Jetson AGX Orin Industrial Module.
NVIDIA Jetson AGX Orin Industrial Module
Here’s the official blurb from the NVIDIA Jetson Forum:
JetPack 5.1.2 , the latest production release for Jetson is now live! JetPack 5.1.2 adds support for Jetson…

View On WordPress
0 notes
Text
How to Install ONLYOFFICE Docs on Ubuntu 20.04
ONLYOFFICE Docs is a free and open-source web-based office suite that allows you to create, edit, and collaborate on documents, spreadsheets, and presentations. It also provides features like real-time co-authoring, version control, and integration with popular cloud storage platforms. In this guide, we will cover everything you need to know to install ONLYOFFICE Docs on Ubuntu 20.04.
Hardware…

View On WordPress
0 notes
Text
Setup Wireguard VPN Server and Client in Linux (Ubuntu / Linux Mint)
Setup Wireguard VPN Server and Client in Linux (Ubuntu / Linux Mint)
This a guide on setting up Wireguard Server on Ubuntu and setting up a Wireguard client.
Requirements:
1. Ubuntu Server 20.04 used in my lab. (20.04 or higher is required for Policy routing)
2. Ubuntu Client (Ubuntu 20.04)
3. Root access to the server.
4. Network Access
Note: This should also work on Linux Mint 20.04
Setting up the Wireguard Server
Login to the In my lab, I have set up a EC2…
View On WordPress
0 notes
Text
#How to Install and Setup VS Code in Ubuntu 20.04 LTS#install visual studio code ubuntu 20.04 command line#install vscode ubuntu 20.04#Step By Step Tutorials
0 notes
Text
Ubuntu 20.04 架設 tftp server
TFTP,全名為 Trivial File Transfer Protocol,
通常用於檔案的傳輸,
在嵌入式系統中常用來下載韌體或者檔案,
作為一種更新或者復原的手段
今天就帶大家來看看
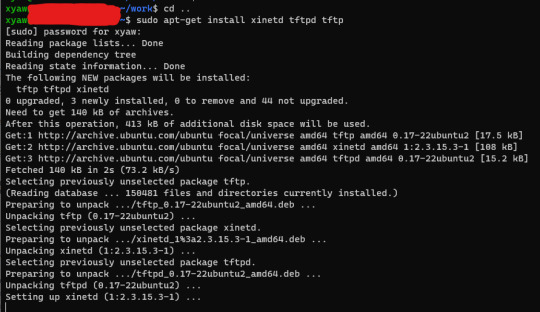
Ubuntu 20.04 架設 tftp server
首先當然要安裝相關的套件
sudo apt-get install xinetd tftpd tftp
接著要建立一個設定檔:
位於 /etc/xinetd.d/tftp 內容大概長這樣
service tftp
{
protocol = udp
port = 69
socket_type = dgram
wait = yes
user = nobody
server =…
View On WordPress
#tftp教學#tftp設定#Trivial File Transfer Protocol#Ubuntu 20.04 架設 tftp server#xinetd restart#嵌入式系統更新#嵌入式系統還原#檔案傳輸
0 notes
Text
Zabbix Server 5.0 Installation Tutorial for Ubuntu 20.04
Zabbix Server 5.0 Installation Tutorial for Ubuntu 20.04
Zabbix is an open-source monitoring and management solution that provides real-time visibility into the performance and health of IT infrastructure, networks, applications, and services. It enables organizations to monitor various aspects of their systems, including servers, network devices, databases, and more, by collecting and analyzing…

View On WordPress
0 notes
Text
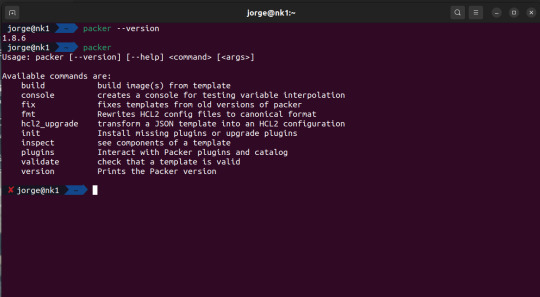
Instalar Packer en Ubuntu 22.04/20.04/18.04/16.04
Packer es una herramienta de código abierto para crear imágenes de máquinas idénticas para múltiples plataformas, pero que se usa mucho para las nubes como AWS, GCP, Azure, vmware, virtualbox, etc. Hoy veremos como instalarla en Ubuntu 22.04/20.04/18.04/16.04.
1. Pre-requisitos:
sudo apt update
sudo apt -y install apt-transport-https ca-certificates curl software-properties-common
2. Importe la…
View On WordPress
0 notes
Text
Ubuntu 20.04 install webmin

Ubuntu 20.04 install webmin install#
Ubuntu 20.04 install webmin software#
Ubuntu 20.04 install webmin windows#
Once you log in, you will be redirected to the Webmin dashboard, which provides basic information about your system. Login to the Webmin web interface using your root or sudo user credentials. By default, Webmin uses an untrusted self-signed SSL certificate. NOTE: To access Webmin Web Interface, open browser and type your server’s hostname name or public IP address followed by the Webmin port 10000: Note that you may see that the browser complains about the certificate being not valid. You can also run the command to make things easier:įirewall-cmd -zone=public -add-port=10000/tcp -permanent Step 4: Open Webmin Port on Ubuntu Firewall.
Ubuntu 20.04 install webmin install#
Step 1: Update the System and Install Requisites Packages. Example: If the Webmin server doesn’t respond, you might need to adjust firewall settings to allow port 10000. In this article, we take a look at how you can install Webmin on Ubuntu 20.04 and Ubuntu 18.04 so that you can seamlessly manage your system. You need to open the port in your firewall so that the Webmin interface is accessible from the Internet. NOTE: By default, Webmin listens for connections on port 10000 on all network interfaces. Once Webmin is installed and runing, you can access Webmin via the IP or web address you supplied or were given by the system. The Webmin service will start automatically. You can now login to as root with your root password, or as any user who can use sudo to run commands as root. Once all the dependencies are installed, the following output will be displayed: Sudo sh -c 'echo "deb sarge contrib" > /etc/apt//webmin.list' Just input or copy and paste the text below and hit Enter/Return: The commands below add the Webmin repository to your system and install the latest version of Webmin and all necessary packages. Sudo sh -c 'echo "deb buster main non-free" > /etc/apt//nonfree.list' On Debian, make sure that wget is available first: You can add the Webmin repository (webmin-repo) and use Jamie Cameron’s key to install and maintain the latest version of Webmin/Usermin.
Ubuntu 20.04 install webmin windows#
Share files with Windows systems by configuring Samba Windows File Sharing.
Manage databases, tables and fields in a MySQL or PostgreSQL Database Server.
Create and configure virtual web servers for the Apache Webserver.
Set up a Linux Firewall to protect your computer or give hosts on an internal LAN access to the Internet.
Change your system’s IP address, DNS Server settings and routing configuration.
Ubuntu 20.04 install webmin software#
Install, view and remove Software Packages in RPM and other formats.
Set up Disk Quotas to control the amount of space available to users for their files.
Export Files and Directories to other systems with the NFS protocol.
Create, edit and delete Unix Accounts on your system.
Some of the things you can do with Webmin are: This makes the job of administering your system much easier. Webmin lets you perform these tasks and many more through an easy to use web interface and automatically updates all required configuration files for you. Normally you need to manually edit configuration files and run commands to create accounts, set up a web server and manage email forwarding.
0 notes
Video
youtube
How to Dual Boot ubuntu 20.04 or Ubuntu 22.04 LTS and Windows 10 or 11 | Bangla TutoriaL | MD RAFSAN JANI |- UEFI Linux
#youtube#how todual bootubuntu 20.04install ubuntu 20.04how to dual boot ubuntu 20.04 lts and windows 10how to dual boot windows 10 and ubuntudual bo#MD_RAFSAN_JANI#duel_boot_ubuntu_and_windows#Bangla_Tutorial
0 notes
Text
Welp, that's a wrap on my Mozilla VPN subscription. It's a shame, but I'm not paying for a service that hasn't worked for over a week on my daily driver machine. Especially when Mullvad is the exact same service, with a working Linux client, better pricing, and a MUCH better Kill Switch implementation.
#rambles#irl#vpn#online privacy#privacy#online safety#safety#online security#security#mullvad#mullvad vpn#mozilla#mozilla firefox#linux#ubuntu 20.04#broken software#subscription#subscription services
3 notes
·
View notes
Text
JetPack SDK 5.1.1 Release Now Live!
JetPack 5.1.1 is the new production release for the full NVIDIA Jetson Orin and Jetson Xavier family of hardware. It adds support for the newly announced Jetson Orin Nano Developer Kit (see the review here).
NVIDIA Jetson Orin Developer Kit
It also adds support for Jetson AGX Orin 64GB, Jetson Orin NX 8GB, Jetson Orin Nano 8GB and Jetson Orin Nano 4GB production modules.
Here’s the official…

View On WordPress
0 notes
Text
Install angry ip scanner ubuntu 20.04

#Install angry ip scanner ubuntu 20.04 how to
#Install angry ip scanner ubuntu 20.04 install
#Install angry ip scanner ubuntu 20.04 update
As of June 2021, at the time of this blog writing, the latest version was 1.4.0, we use that version for this tutorial purpose. You can go to their official download page to get the latest version. To see the changes, log out from SSH and re-login, then invoke: hostname -f 3. You will see output like this: ~ # hostnamectl status You can invoke the following command to see your hostname: hostnamectl status
#Install angry ip scanner ubuntu 20.04 how to
Or, if you don’t know or have a doubt on how to do it, you can contact our support team anytime. If you are using our Free Managed DNS server (, and ), you can edit/add A and MX records for your domain name through the client area. As for A record for your hostname, should be pointed to your server IP address. An MX record of your domain name should be pointed to the mail server’s hostname. hostnamectl set-hostname īesides creating A record for the hostname, you also need to create an MX record. For example, in this tutorial, we will use. Once created, you also need to create A record for it.
#Install angry ip scanner ubuntu 20.04 install
The FQDN should be like, if your hostname is only a domain name, iRedmail would not install properly. You need to have a proper Fully Qualified Domain Name (FQDN) as your server’s hostname to be able to install iRedmail.
#Install angry ip scanner ubuntu 20.04 update
Once logged in, run the following command to update all installed packages to the latest available version apt update & apt upgrade 2. Log in via SSH and update the system ssh -p Port_number A fresh Ubuntu 20.04 with a minimum of 2 GB of RAMġ.It means it is highly recommended that you install it on a newly installed OS. iRedmail is designed to be installed on a fresh operating system. iRedmail supports all major Linux distribution, but in this tutorial, we will show you how to install iRedmail on Ubuntu 20.04. It will install the needed services and application to run a mail server. It can help you to reduce the time you spend when building a mail server. iRedmail is an open source mail server solution, with iRedmail we can deploy a full-featured mail server in several minutes. But, installing and configuring a mail server can stress you and consume your precious time. Having our own mail server is cool, we can create as many email accounts as we want, configure how big the attachment limit, create our own spam filters, etc. Then run the following command to view current IP addresses configured on your system.Let’s learn how to install iRedmail on Ubuntu 20.04. Press CTRL + ALT + T to launch the terminal on Ubuntu desktop system. You can also view the IP address via the command line. It also show you the default network route and dns servers details. Here is the IP address of your Ubuntu desktop system. After that click icon to open setting for your systems network interface as shown in the below screen. In the left sidebar click on the Network tab. Then open settings windows on your Ubuntu Desktop machine as showing in the below screenshot. You can either use the command prompt to check the current IP address on your system or use a GUI option to view the local IP address on your system.įollow this tutorial to setup a new IP address on Ubuntu 20.04 desktop system. Ubuntu 20.04 LTS (Focal Fossa) desktop provides an attractive GUI interface to work with it. Question – How to find local IP Address of my Ubuntu desktop system? 2 Ways to find IP Address on Ubuntu 20.04 Desktop operating system?
0 notes
Text
Install angry ip scanner ubuntu 20.04

#Install angry ip scanner ubuntu 20.04 how to
#Install angry ip scanner ubuntu 20.04 install
#Install angry ip scanner ubuntu 20.04 update
You have now learned basic management commands and should be ready to configure the site to host more than one domain. To re-enable the service to start up at boot, you can type: If this is not what you want, you can disable this behavior by typing: To do this, type:īy default, Nginx is configured to start automatically when the server boots. If you are only making configuration changes, Nginx can often reload without dropping connections. To stop and then start the service again, type: To start the web server when it is stopped, type: Now that you have your web server up and running, let’s review some basic management commands. If you are on this page, your server is running correctly and is ready to be managed. You should receive the default Nginx landing page: When you have your server’s IP address, enter it into your browser’s address bar: your_server_ip If you do not know your server’s IP address, you can find it by using the tool, which will give you your public IP address as received from another location on the internet: You can access the default Nginx landing page to confirm that the software is running properly by navigating to your server’s IP address. However, the best way to test this is to actually request a page from Nginx. ├─2369 nginx: master process /usr/sbin/nginx -g daemon on master_process on Īs confirmed by this out, the service has started successfully. Loaded: loaded (/lib/systemd/system/rvice enabled vendor preset: enabled)Īctive: active (running) since Fri 16:08:19 UTC 3 days ago rvice - A high performance web server and a reverse proxy server.You should get a listing of the application profiles:
#Install angry ip scanner ubuntu 20.04 how to
List the application configurations that ufw knows how to work with by typing: Nginx registers itself as a service with ufw upon installation, making it straightforward to allow Nginx access. Step 2 – Adjusting the Firewallīefore testing Nginx, the firewall software needs to be adjusted to allow access to the service.
#Install angry ip scanner ubuntu 20.04 install
Afterwards, we can install nginx:Īfter accepting the procedure, apt will install Nginx and any required dependencies to your server.
#Install angry ip scanner ubuntu 20.04 update
Since this is our first interaction with the apt packaging system in this session, we will update our local package index so that we have access to the most recent package listings. Step 1 – Installing Nginxīecause Nginx is available in Ubuntu’s default repositories, it is possible to install it from these repositories using the apt packaging system. When you have an account available, log in as your non-root user to begin. To learn more about setting up a domain name with DigitalOcean, please refer to our Introduction to DigitalOcean DNS. You will also optionally want to have registered a domain name before completing the last steps of this tutorial. You can learn how to configure a regular user account by following our Initial server setup guide for Ubuntu 20.04. Prerequisitesīefore you begin this guide, you should have a regular, non-root user with sudo privileges configured on your server. In this guide, we’ll discuss how to install Nginx on your Ubuntu 20.04 server, adjust the firewall, manage the Nginx process, and set up server blocks for hosting more than one domain from a single server. It is a lightweight choice that can be used as either a web server or reverse proxy. Nginx is one of the most popular web servers in the world and is responsible for hosting some of the largest and highest-traffic sites on the internet.
0 notes
Text
在WSL Ubuntu 20.04 安裝中文包
WSL是微軟輕量化的子系統,
為的是讓開發人員能夠直接在 Windows 執行Linux相關的應用程式,
之前也介紹了不少WSL上面的應用,
今天則是要來教大家
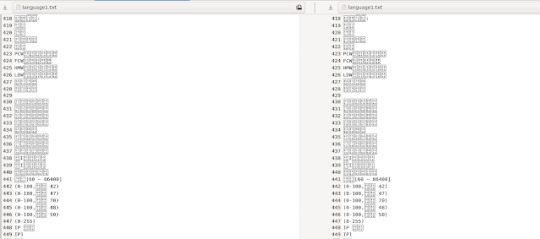
在WSL Ubuntu 20.04 安裝中文包
在WSL執行一些應用程式有時候讀取或顯示中文會有問題,
就像底下圖片一樣,
這是執行meld 進行檔案比對的時候,
中文並未正常顯示
這是由於輕量化後的WSL 中沒有中文包的緣故,
所以需要自行安裝與設定
首先安裝中文語言包
sudo apt install language-pack-zh-hant
接著執行底下命令進行設定:
sudo dpkg-reconfigure locales
選好數個要支援的語言:
此處選擇 en, zh_TW BIG5, zh_TW.UTF8
並在下一頁選擇預設的語言,
建議選擇 en 或者…
View On WordPress
#dpkg-reconfigure locales#fc-cache -f -v#fontconfig#language-pack-zh-hant#local.conf#WSL Ubuntu 20.04#WSL中文顯示#WSL顯示中文#zh_TW.UTF8#中文亂碼#安裝中文包
0 notes
Text
Ubuntu 20.04 install webmin

#Ubuntu 20.04 install webmin install
#Ubuntu 20.04 install webmin update
#Ubuntu 20.04 install webmin software
We have successfully installed Webmin on Ubuntu 20.04. From here you can perform a list of system administration tasks as discussed earlier in the introduction. On the left pane is a list of options that give you access to various server functionalities. You will be presented with a dashboard shown below that gives an overview of key system metrics such as CPU & RAM utilization, as well as other system details such as hostname, Operating system, system uptime, etc. Provide your details and click the ‘ Sign In’ button. This presents you with a login page shown below. Next, click on the link ‘ Continue to server-IP’ as shown. To navigate this warning, simply click on the ‘ Advanced’ button. This is because Webmin comes with a self-signed SSL certificate which is not validated by CA. Open Webmin Port on Ubuntu Step 5: Access Webmin on Ubuntuįinally, to access Webmin, launch your browser and browse the address: You will encounter a warning message that the connection is not private, but don’t worry. To do so, execute the command: $ sudo ufw allow 10000/tcp If the UFW firewall is enabled, then you need to open this port. Step 4: Open Webmin Port on Ubuntu Firewallīy default, Webmin listens on TCP port 10000. The output above confirms that Webmin is up and running. This can be confirmed by running the command. Upon installation, the Webmin service starts automatically. The output below confirms that the Webmin installation has been successful. When prompted, hit 'Y' to proceed with Webmin’s installation.
#Ubuntu 20.04 install webmin install
Proceed and run the following command: $ sudo apt install webmin Step 3: Install Webmin in UbuntuĪt this point, we shall install Webmin using the APT package manager. The above command also updates the system package lists. $ sudo add-apt-repository "deb sarge contrib" Next, add the Webmin repository to the sources list file as shown. Having updated the system and installed the packages, we are then going to append the Webmin GPG key as shown. $ sudo apt install wget apt-transport-https software-properties-common
#Ubuntu 20.04 install webmin update
To get started with installing Webmin, it’s advisable to update your package lists as follows: $ sudo apt updateĪdditionally, install the prerequisites packages as shown. Step 1: Update the System and Install Requisites Packages In this article, we take a look at how you can install Webmin on Ubuntu 20.04 and Ubuntu 18.04 so that you can seamlessly manage your system.
Creating virtual hosts (If a web server is installed).
Configuring disk quotas to manage the space used by other users.
#Ubuntu 20.04 install webmin software
Installing, updating, and removing software packages.
Adding and removing users on the system.
Some of the tasks that you can accomplish with Webmin include: Webmin is an opensource web administration tool that allows users to easily monitor and manage servers. It can be rather boring to work perpetually on the terminal. They involve creating users, running updates and changing configuration files and so much more. If you are using the DEB version of webmin, first download the file from the downloads page, or run the command : wget http. Most system administration tasks are usually carried out on the terminal.
1 note
·
View note
Last Seen Blogs


princess-geek
little pieces of myself

barbidule44
Tea, Toast, and Spritz

vinicius-brasil-teresina-piaui
Sem título

odenboden
Untitled