#a finished stick figure is better than an unfinished oil painting
Text
draco malfoy x gryffindor reader pt 1
As with all steamy/nsfw works, all characters are aged up to 18+
Any parts that take place while still in/are implied to be at school at hogwarts are in 7th year at age 18
Ik that probs doesn’t line up with the timeline but guess what bud
It’s fanfiction
I can make everyone sea monkeys if I want to and it’s still valid
So don’t worry about it
Cause I’m not
Also full disclosure this is going to be very self indulgent bc I found out Draco’s a gemini are we surprised
And since I’m a leo I’ve been hella jeff obsessed with the chemistry and dynamic of gemini x leo pairings so er ah
Reader’s a leo w they them pronouns but probs gonna at least somewhat femme/lollipop since like
I’m imagining myself
Anyway let’s get into it before I ramble more lmao
‘,:)
Draco Malfoy is a motherfucking bottom and you can pry that from my warm crispy crunchy deep fried fingers
He acts like a top
Sure
But it’s cause he’s a bratty bottom that runs on some kind of parsnip flavored magical energy drink and moderate amounts of concentrated attention
And the energy he gets from you is very concentrated to him
You laugh at one of his jokes and he’s good for like a day
You pet his hair while talking to him and he’s still thinking about it a week later
He’s somewhat low maintenance
Like a love cactus
Like a sexy fashion cactus
And it’s like a reasonable relationship for most people
But if you give him more attention and praise
You will absolutely have a fastburn enemies to lovers arguing that turns immediately into hooking up energy
Which is honestly preferable if you ask me
It’s way more fun
He doesn’t want to admit it to people
But it really was a love at first sight situation type deal
He saw you and was immediately enamored
Then you lock eyes
But you don’t just lock eyes
He expects you to be intimidated or defensive since your houses have such a rivalry
But you just look right at him
Through him
You analize him, completely non judgemental and unafraid
He suddenly understands gryffindor bravery as more than an abstract concept
He’s looking at it
He could be frozen in that moment in time forever, completely okay with it
He doesn’t think he can ask for anything more than this
Because he just knows somehow
That you’re looking at him
Not Malfoy, that the whole school hates
Not Draco, that’s struggling not to bow under the increasing pressure from his father
But just him
Pure and unconditioned
And then
Your eyes skim up and down his frame
They lock with his again
And
You smile at him
It’s more of a smirk, but who’s counting
He knows right then and there that he’s completely and thoroughly wrapped around your finger, even though it will take a l o t for him to admit it
It will take an equal l o t for you to admit how affected you are by the way he looks at you after you smile at him
You know there can be some pretty intense looks
But honest to god
This doesn’t even take the cake, it takes the whole goddamn bakery
You both do admit to these eventually though
This leads to the first part of your relationship
Where you incessantly get under each other’s skin
Arguing over nothing
Riling each other up, sexual tension skyrocketing
It’s absolutely one of those cases where you start hooking up in secret before you even like
Hold hands in public
Yk
You know that meme of the two people kissing and someone’s high fiving one of them
When draco finally kisses you in front of everyone blaze deadass high fives him
They recreate the meme
If you’re from the muggle world you’ve probably recreated that one scene from the princess diaries 2 at least once
I high key want to write a one shot abt that now
Stay tuned lmao
Part two really do be looking safe doe coming soon
Anyway asks are open,,, I’m on semi hiatus but you’re more than welcome to shoot me a request or say hi or send me a message if u wanna be mutuals lmao
My head is officially empty of brain juice so I gotta refill it but like
I need instant gratification and validation from strangers on the internet????? So this part is going up now lmao
Just got diagnosed
But er ah yeah ig i’m writing for harry potter too now???
More ranting in the tags bc otherwise we’ll both be here all night
Edit: rip to the four paragraphs of lost tags where I talked about Wallace and gromet
#draco x reader#draco malfoy#draco#draco malfoy x reader#draco x gryffindor!reader#gryffindor reader#oof ouch the ranting in the tags is hot#I used to have a pretty shitty friend who's only personality trait was liking harry potter so like#I'm not going to let that keep me from enjoying it in a way i can enjoy it#like I have some hot takes abt draco#like how he's a fucking b o t t o m#and no one can silence me on that#i'm the fae's problem now#these hcs are kind of all over the place#but like#i'm here for it#really wish I had some brain juice but like#a finished stick figure is better than an unfinished oil painting#plus like#you can eat a shitty boxed mix cake#but you can't eat organic eggs and fancy flour#finish baking your cake and eat the whole thing to decide if you like it#you get way more cake that way too#holy shit two cakes#does anyone know that comic#also like#theorietically#if I started making writing vlogs for youtube would anyone be interested in watching them>>#???#or like
48 notes
·
View notes
Photo
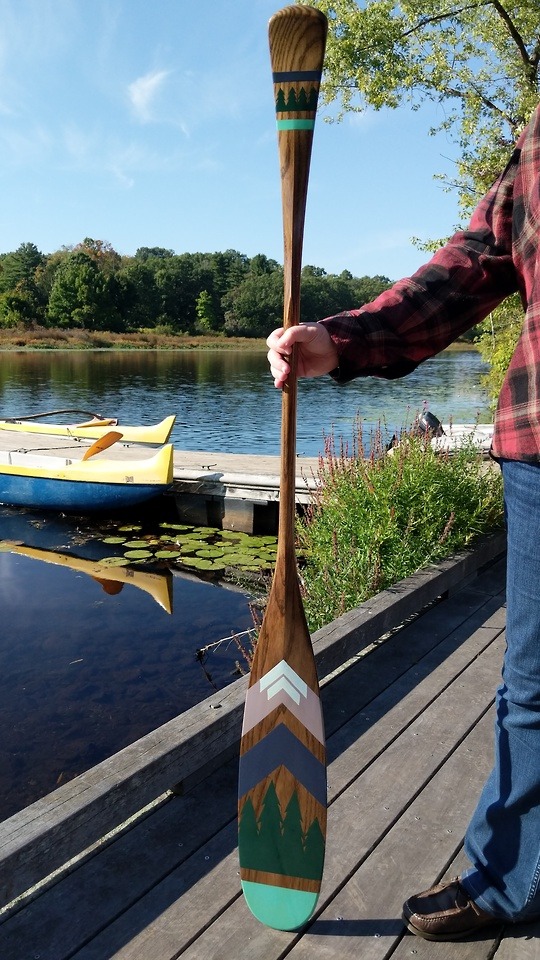
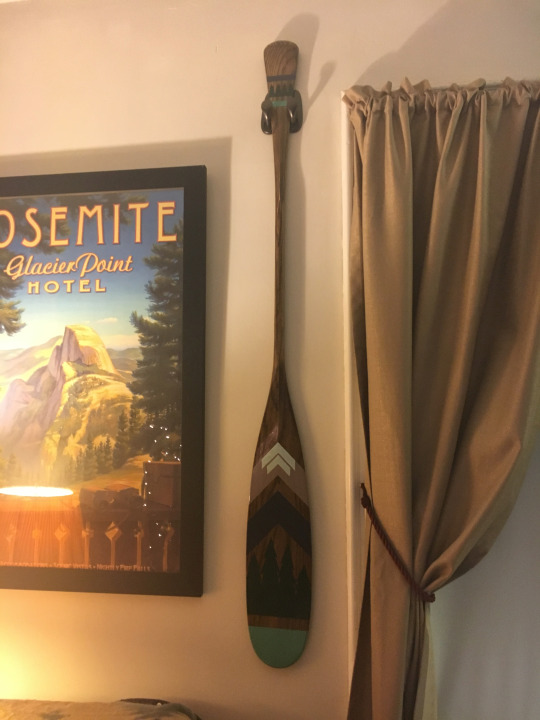
Okay! So, this project was a LONG TIME coming to fruition, considering I first had the idea in about May of 2018, and bought the actual paddle that summer.
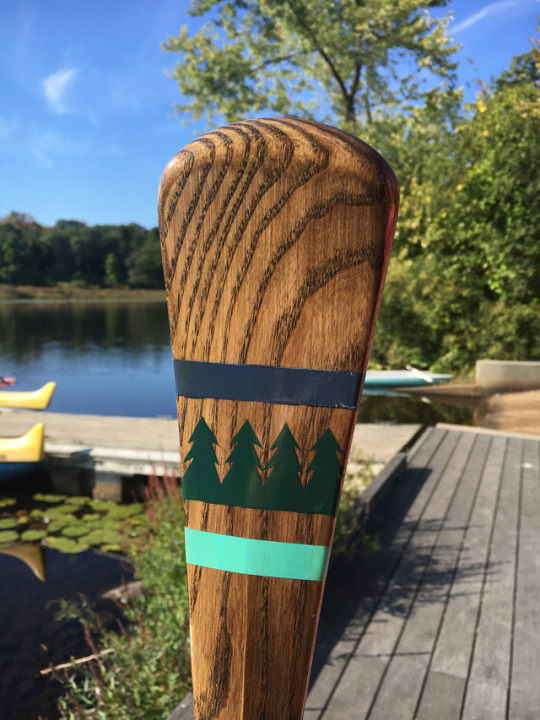
There are a number of artists who do painted canoe paddles on Etsy and so on, and I admired them a lot. Most are strictly geometric (all the easier to do with painter’s tape; see under the cut). But they’re also pretty expensive, and I didn’t think I could afford one. THEN I came up with this idea for the design to not just be geometric, but pine trees and a symbolic lake and mountains (specifically 4 pine trees; I bet some of you can guess why!). Once I had that idea, I couldn’t shake it, and that meant I had to do it myself if I wanted a paddle like that. (And I wanted one that was full-size so that I could use it once it was all done.)
I bought an unfinished paddle from a seller on Etsy, and some of the materials, last year. But for one reason and another (partly, intimidation about the process), I didn’t get around to doing it in the summer; and then I didn’t get around to doing it in the fall/winter/spring either. I finally started it in August of this year.
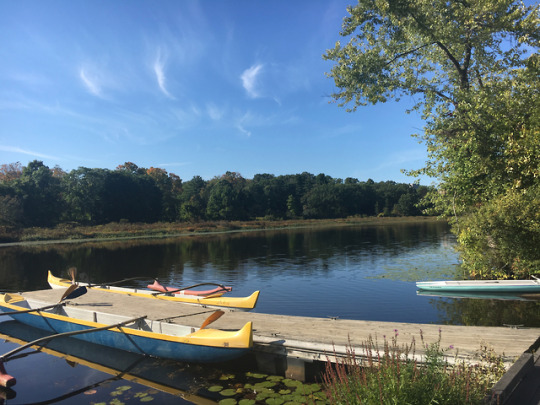
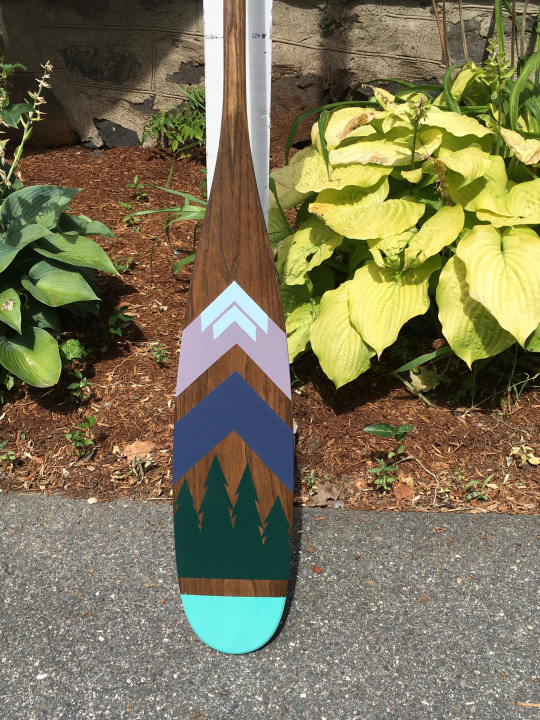
I thought that it would take me about 1 week to do. Perhaps if I’d known what I was doing, it would have. In fact it took a little over 3 weeks, what with various false starts and fixing mistakes; and also just, drying time for various layers. Today I finally got a friend to come out with me to a location where I wanted to get a picture of it in good lighting. Either this weekend or next, I’ll be taking it out with a canoe to actually use it.
I’m pretty happy with it! It’s hanging in my living room now. I know a GREAT DEAL more about the process now. If I ever do another one, it will go much more smoothly. I also really now appreciate why the person whose work on Etsy I admired was charging $275 for one. That is not over-priced AT ALL. (I actually never truly thought it was! Just more than I wanted to spend. But I totally get her pricing, now, too.)
Under the cut, I’m going to put a bunch of process pics and some explanations, because, might as well record it somewhere!
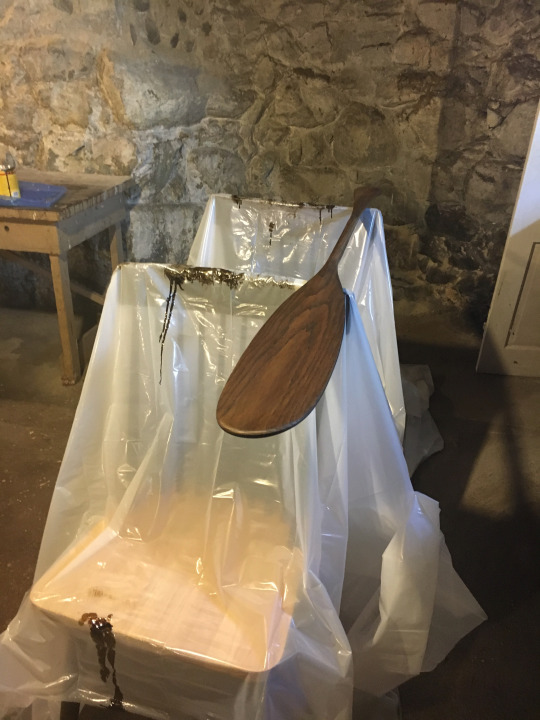
I don’t have a pic of it in its raw state, but here it is in the midst of the staining process! In its raw state, it was a very light color; I think it’s made of ash wood.
I should mention that I had drawn patterns to test out the idea, and then used Photoshop and color sampling from Krylon spray paints to work out what colors I wanted to use. However, as we’ll see below, I ran into a lot of problems with the color samples not actually matching the colors of the spray paint out of the can.
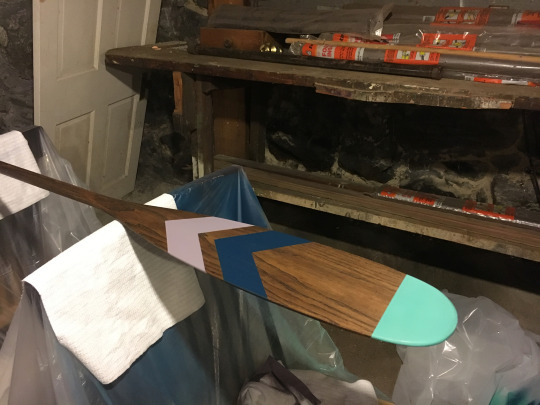
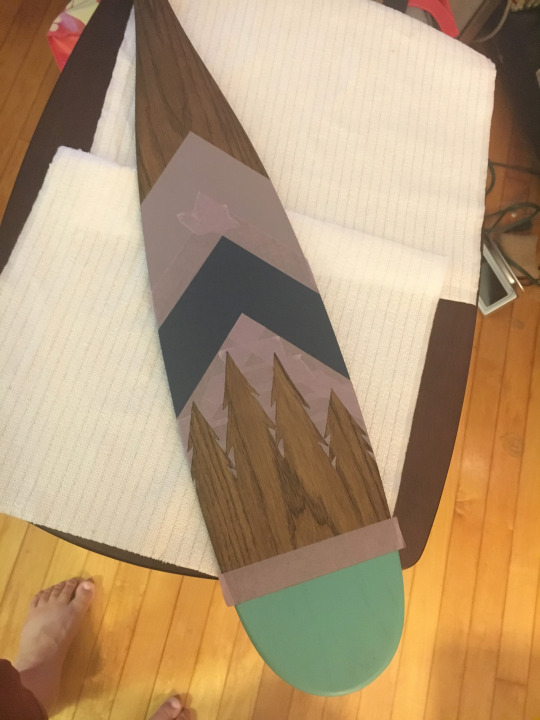
First color on! Spray paint. You can see at the top where the masking fabric is still on up near the grip for the stripe of the same color.
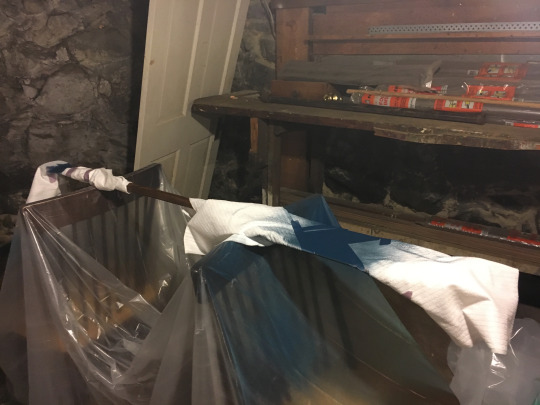

Above, just to show what it looked like with the blue “mountain” chevron all taped up. I used these cheap painters cloths to supplement the masking tape, to keep the mist of the spray-paint from getting on the rest of the paddle. (I was mostly successful.)
Issues with the masking not quite working, and also at right you can see where the color has faintly gotten onto the wood, from the spray’s mist.
Third spray color down! The “farther mountain”. At this point I was NOT super happy with how the dark blue looked. I had wanted it to be a bit lighter and a bit more greyish? (To suggest a mountain in the middle distance.) This was a case where the blue out of the can was different from the blue color chip on the website.
Now here’s where things get really tricky! I had drawn the pine trees on a manila folder, to cut out and create a stencil from them. At this stage, I didn’t think I could create a tape mask for them, so I decided to hand-paint them. I was aiming for a nice, deep-but-not-too-dark hunter green. So I did one side in an acrylic paint. And... it’s not the RIGHT color. I felt it was too yellowish, whereas I wanted a green that leaned more towards bluish.
So I went and bought more paint, hoping I could get a better color. (Note: I was also, at this stage, afraid of mixing a custom color, because of the time it would take to paint all those details on BOTH sides of the paddle, needing it to dry between painting each side, and being worried that the custom-mixed acrylic would dry up before I could finish.)
Anyway -- after this attempt, it’s STILL WRONG. Much too dark. Almost black in some lights.
At this point I decided that I needed to use spray paint to get the color green I wanted. But that would mean creating a tape mask for the trees.
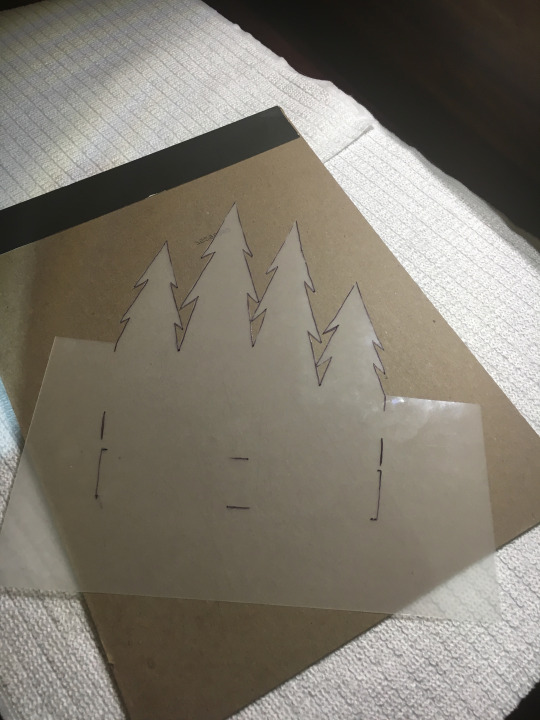
So, stick with me here -- I still had the stencil that I had created, to line the pattern onto the paddle, to do the above painting. But when I was doing the hand-painting, I allowed myself to go over those lines, and make the branches of the pine trees more robust. But that meant I could not use the older stencil to create the tape mask, because it was now smaller than what I had painted ON the paddle, and wouldn’t cover the existing paint.
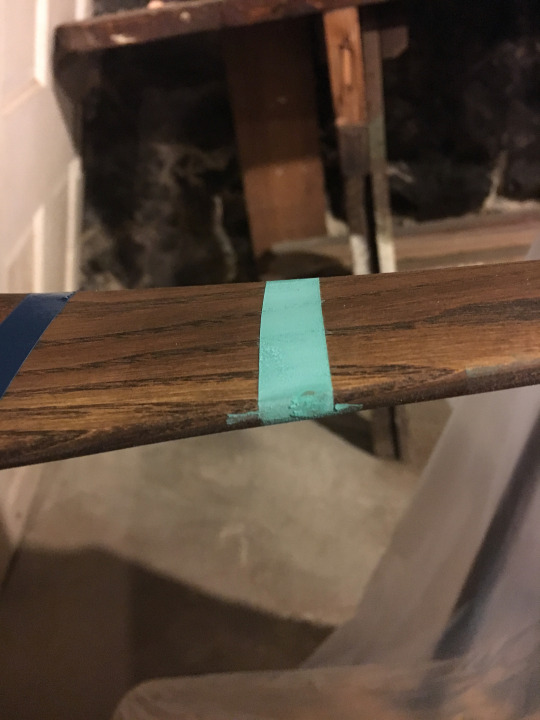
So I got this translucent film (it’s actually for a laminating machine), traced the actual linework on the paddle, used an exacto knife to cut it out, and used THAT as a stencil.

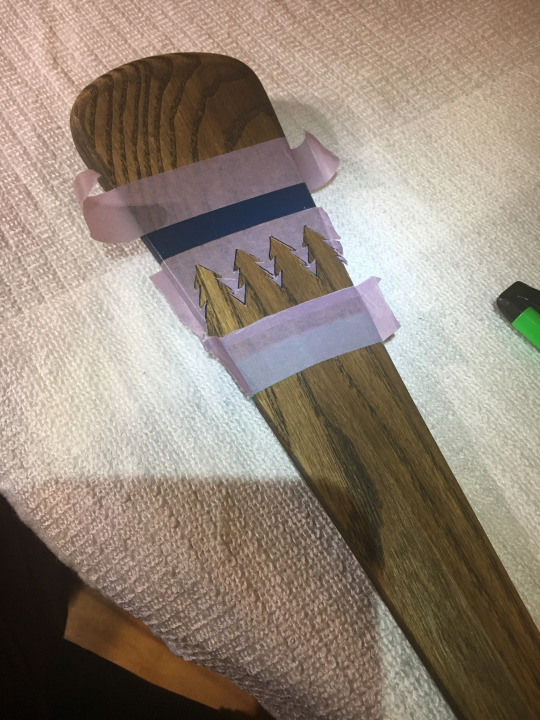
At the same time, I decided to try to fix the problem with the color of the blue chevron, by buying a spray paint that said it was “slate blue”. AND, I also had to create a little stencil and tape mask for the little pine trees up on the grip.
So yeah, once I had used the stencils to mark the lines of the pine trees on the taped areas, I then had to cut all along those lines with an exacto knife, and carefully peel away the tape on the parts I wanted the paint to go on. On BOTH sides of the paddle.
So, you’re not going to believe this, but... BOTH the blue and the green were STILL WRONG!
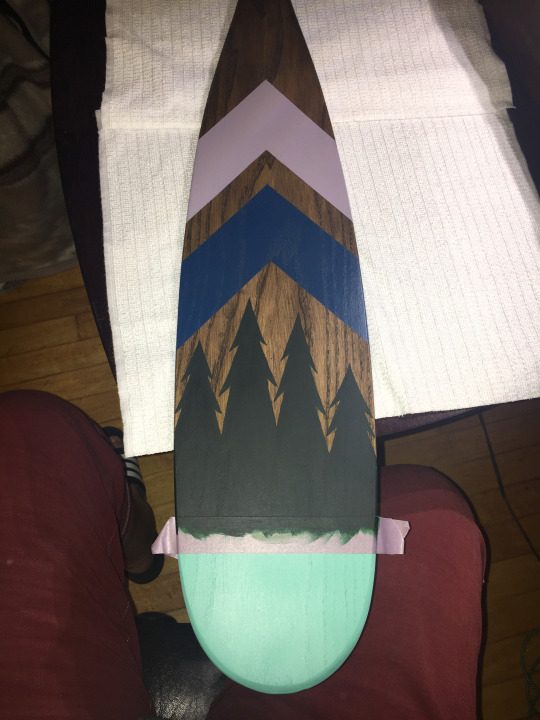
The blue was WAY too light and not what I wanted at all. (The color swatch on the spray can lied to me.) This doesn’t show it, but the first pass I took with a “hunter green” spray resulted in trees that were also too light. This was the SECOND spray painting of the trees, with a darker hunter green. (While it looks very dark here, trust me, this one will actually work out in the end.)
In order to fix the blue chevron, I decided that I would have to custom-mix a color and hand-paint it.
(You’ll notice above that I had also finally done the symbolic snow-caps on the “farther mountain”.)
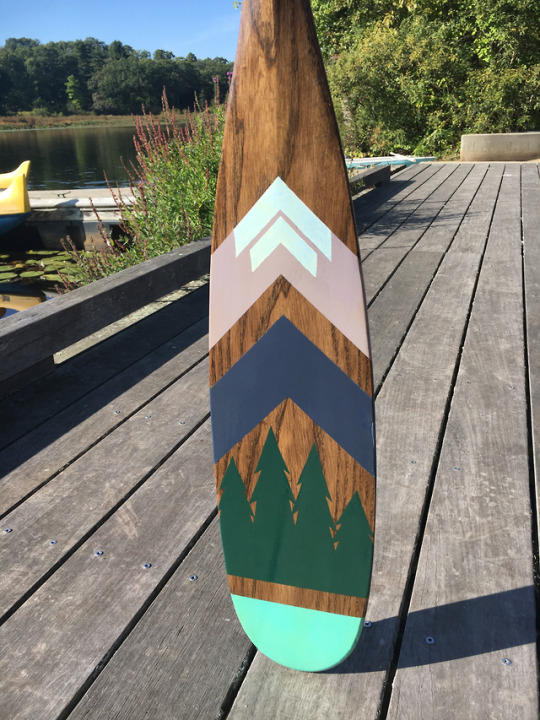
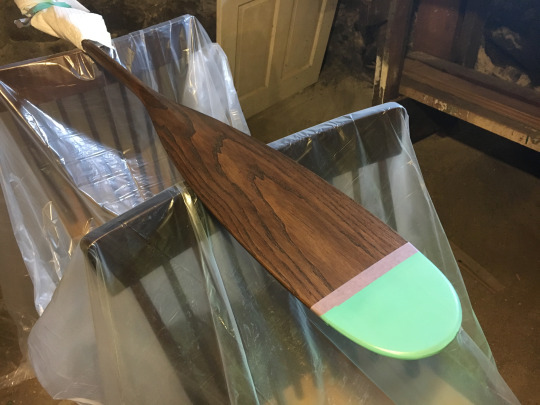
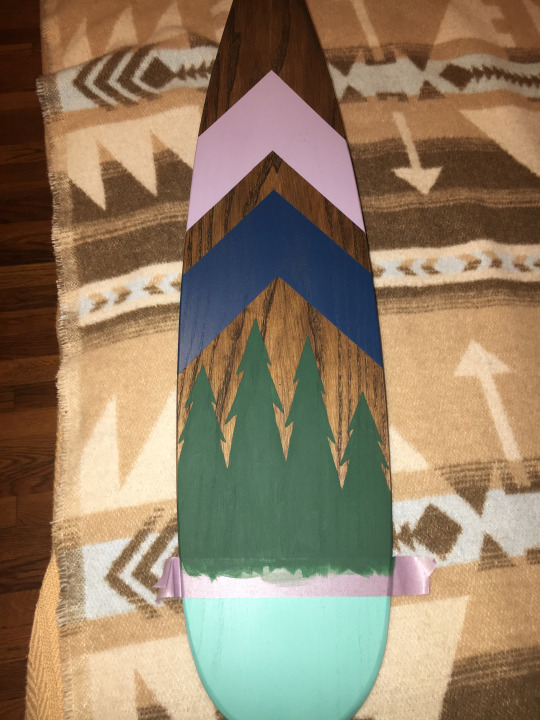
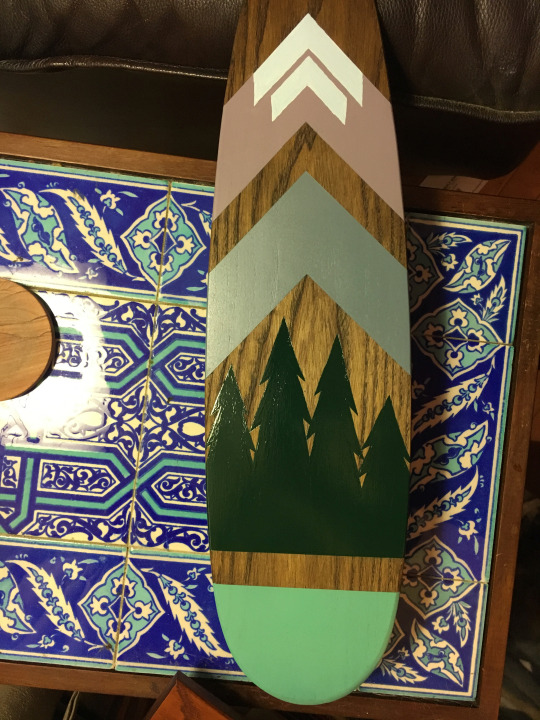
This is probably the best pic I have showing the colors pre-varnishing. This blue is perhaps not completely what I envisioned, but it was close enough that I don’t think it will bother me. (I would also say that I wish the lavender of the “farther mountain” wasn’t quite so bright, either. You know -- hat’s off to the “glacial lake” turquoise at the bottom, the only one I never had trouble with!)
I didn’t actually take pictures of all of the varnishing steps, but let me just tell you: so first I tried to use a spray varnish. But I didn’t like the gritty texture it was producing, I wanted something smooth. So I had to sand all of that off. Then I got an oil-based liquid spar urethane (for waterproofing wood on boats and stuff), but it was very yellowish. While that wasn’t a problem on the darker colors, it definitely could be seen over the lavender, the white, and the turquoise. So then I had to sand THAT off all those bits. And I got a water-based crystal clear gloss spar urethane that promised it would not yellow.
Then I had to do like 4 coats of that, on each side. And let it dry for a really long time between coats. And I had to figure out how to do it so that I didn’t get too many long drips of the varnish. (Problem: trying to do a coat of varnish with the paddle resting over the improvised saw-horses seen in the earlier pics led to problems. Even letting the varnish dry for longer than usual, this was still August and kind of humid. I would flip it over to do the other side and -- once I found that the plastic drop-cloth had bonded to the varnish; and I had to sand that off and re-coat those bits. Then, when I tried to rest it on cloth, I found that even though I’d let it dry thoroughly, there was an imprint of the cloth texture in where it had rested. So I had to sand THAT off and re-coat those bits. I finally hung it from the basement ceiling, which worked, except even with very thin coats, I got some drips as the varnish dried. I would LOVE to know how the people who do this for a living get nice even coats of the varnish!)
So anyway, there it is, and the irony is that in the light in my living room, it’s not that easy to see the color of the pine trees anyway, lol. But I still really like how it looks. And as you will have seen in the top pics, it looks really nice outside in natural light.
Will I ever do one of these again? Maybe! But not soon.
(And if this inspires you to want to do this, and you want an even more exhaustive discussion of what I learned during the process, tips, and what I’d suggest avoiding, please do hit me up! I will say that if you don’t care about being able to USE the canoe paddle for real afterwards -- if you just want something decorative -- you can get even cheaper canoe blanks on Etsy, and the varnishing would probably be even easier.)
110 notes
·
View notes
Text
Best Natural and Non-Toxic Toys for Kids
New Post has been published on http://healingawerness.com/news/best-natural-and-non-toxic-toys-for-kids/
Best Natural and Non-Toxic Toys for Kids
Reading Time: 7 minutes
It wasn’t until I had my first child that I ever really thought about the ingredients used to make many common household objects or their potential dangers. Once I had a little one who completely relied on me for his safety, I started to really research what was in common items like cleaners, scented candles, and detergents.
Then I learned about the problems with many children’s toys… ones my baby would be putting in his mouth. Since that time, I’ve been working to find natural, organic, and sustainable alternatives to many common toys. This swap took years to make and a lot of trial and error, but we found our favorites.
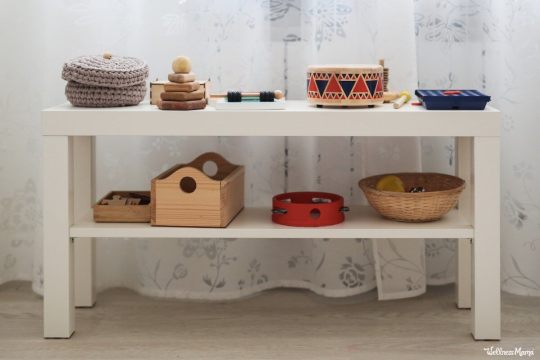
While I’ll always be a big believer that outdoor equipment is better than piles of indoor toys, these are our favorite natural and non-toxic toys that have stood the test of time.
Are Toys Today Toxic?
It’s hard to believe that any toys today are made with toxic materials considering there are more regulations than ever before. Unfortunately, there are still big concerns with the materials being used by toy manufacturers and regulations are not enough to fix the problem.
A significant revelation in the awareness surrounding this issue came from a 2008 report from HealthyToys.org. According to the report, one in three children’s toys contains significant levels of toxic chemicals. For example, lead was still a major concern in toys despite the public knowing about its toxicity since the 1970s (and that there is no safe level).
They found not only lead, but other toxins in toys as well:
BPA
PVC
Lead
Phthalates
Cadmium
Chlorine
Arsenic
Flame retardants
Many families stay away from toys made in China because they have fewer regulations, but the report showed there were similar amounts of toxins in toys from many different countries (including the U.S. and Canada).
The report also found that children’s jewelry is the worst source of contamination. Compared to other products, children’s jewelry is twice as likely to contain detectable levels of lead.
Toys Today
Shortly after this report, the Consumer Product Safety Improvement Act (CPSIA) was set in motion which imposed new testing and documentation requirements. It also set new acceptable levels of several substances used in manufacturing.
This was a huge step forward for reducing toxins in toys (specifically lead) but experts say it isn’t enough. For one thing, the chemicals that replace banned chemicals may be just as harmful (more on this below).
In 2017, the Public Interest Research Group (PIRG) published its 32nd annual Trouble in Toyland report. It found that there is still a lot to be concerned about regarding toys and toxins. Toys are still being recalled regularly, and those recalls are based on known toxins or safety issues, not on new and emerging ones. Many toxins are not yet recognized as unsafe by the government. All in all, we can’t rely on government regulations to completely protect us from toxic toys.
Toxic Plastics
Plastics are a huge problem for the environment as well as the human body. PVC is a common plastic in children’s toys but is arguably the worst kind of plastic. It can contain lead, cadmium, phthalates, and volatile organic compounds. According to Ecowatch, vinyl chloride, the chemical used to make PVC, has been described as a known carcinogen. The EPA has created more restrictions on PVC building materials (like flooring) based on growing evidence of toxicity, so using PVC for children’s toys is simply outrageous.
Another concerning plastic is BPA. According to research including a 2014 study, BPA can disrupt hormones, causing sexual dysfunction, fertility issues and defects in growing embryos like feminization of male fetuses.
Many manufacturers began phasing BPA out of their products in 2008, but this chemical is often being replaces with another similar one BPS. Scientific America reports that BPS is just as harmful as BPA. It can disrupt normal cell functioning which can lead to diabetes, obesity, asthma, birth defects or even cancer.
How Do You Know If a Toy Is Safe?
The tricky thing about chemicals in toys is that you can’t tell just by looking at them whether they contain toxic chemicals or not. Luckily there is a handy website called ToySafety.org can help guide you when choosing toys. Additionally, check for recalls regularly on the United States Consumer Product Safety Commission (CPSC) website.
While these steps are important, it’s equally important to follow these guidelines for choosing toys:
Avoid Plastic
Plastics are generally toxic for humans and for the environment, so avoiding them when possible is your best bet. Stick with natural materials like:
unfinished, solid, non-toxic wood
organic cotton
untreated wool
If the wood is finished, it should be finished with natural oils and waxes like beeswax or walnut oil. If avoiding all plastic isn’t possible, choose toys made with polypropylene or ABS, which are some of the safest plastics available.
Avoid PVC and Phthalates
Because PVC is especially harmful to people and the environment, it’s a plastic I recommend avoiding specifically. Plastic softeners (phthalates) in many plastics, including PVC, often have a specific smell (think beach balls, kids plastic tents, slip and slides, etc), so they’re fairly easy to avoid. Also, consider whether the plastic smell is being covered up by fragrances (which aren’t healthy either).
Avoid Painted Toys
Avoid coatings or paints that can contain lead. Many toys made in China (and some other places) that are painted have lead in them. Stick with U.S., Canada, or European toys if you want painted wooden toys (and, of course, research the company).
Best Non-Toxic Toy Brands
It’s still not easy to avoid toxins in toys, that’s why it’s important to find companies you can trust. Many companies have pledged to keep harmful chemicals out of their toys. Here are some of the best ones and the ones that have stood the test of time for us:
Blocks, Building, and Figures
PlanToys – These toys are made from natural rubberwood trees that no longer produce latex. The dyes they use are free of heavy metals as well.
Grimm’s – A great selection of painted wood stacking and building toys.
Haba – This company produces most of its wooden toys in Germany and uses sustainable wood harvesting practices. They also use non-toxic paint.
Petit Collage – All these toys are made with recycled paper and without PVC. This company also makes great puzzles and magnet sets.
Cloth and Fabric
Cloth and fabric toys are often a baby’s first toy, but choose a company that uses non-toxic, untreated fabrics.
Under the Nile – This company uses 100% GOTS-certified organic cotton for its cloth toys and teethers.
Finn and Emma – The fabric toys are made with organic cotton and the wooden toys are made with natural wood. I also find their prices pretty reasonable.
Arts and Crafts
Arts and crafts are a favorite around my house so I’m glad to have some choices:
Eco-Kids – This art supply company uses natural materials for its products including natural wax, mineral pigments, and 100% pure beeswax.
Natural Art Supplies – This company is very open about where the materials they use come from.
“Safer” Plastic Toys (Gasp!)
Here are some of the VERY few plastic toys that have made it into our stash simply because they are such favorites:
Legos – These are made with ABS plastic which is one of the safest plastics.
Magnatiles – Made in China but without toxins like BPA, phthalates, and PVC. They do contain magnets though, which can be dangerous if the pieces break, so consider using these with supervision.
Our Favorite Non-Toxic Natural Toys (Kid-Tested and Mom-Approved)
And the Kids’ Choice Awards go to the following toys that are totally worth keeping around:
Basic Wooden Natural Toys
Wood toys are by far my favorite toys, especially for little ones. I love finding handmade wooden toys at farmer’s markets or on Etsy. As I mentioned, I love Haba brand toys for babies and little kids and they are made to European standards, which are stricter than U.S. standards for safety and avoidance of chemicals. These natural Montessori-inspired baby teething toys are also a big hit with my babies.
Blocks
I’m a huge fan of toys that encourage creative play. Legos are one of the only plastic toys we have, and I make the exception because they encourage hours of imaginative play. For little kids, plain wooden blocks are a great thing to have on hand. We still have some blocks that my husband’s father made for him when he was young, and I also got these all-natural lead-free blocks.
Dress Up
We have a variety of play silks that the children use for dress-up and imaginative play, as well as many homemade costumes. I’ve found that these encourage hours of creative play at our home. Melissa and Doug also makes a great line of dress-up costumes.
Wooden Trains
A huge favorite at our house. I’ve found some great wooden trains and tracks on Craigslist and at yard sales and we also have this set.
Craft Bins
I love having pre-made activity and craft bins that I can pull out and do with the kids. i’ve chronicled many of our favorites on Pinterest. We also have a wooden tabletop easel for drawing and painting.
Musical Instruments
This one isn’t for the faint of heart. Seriously. If you have more than one child, musical instruments can quickly turn a room of otherwise quiet children into a rock band that rivals a crowded stadium in sound levels. Instruments are, however, really fun for children. We have these simple wooden instruments and the children love creating their own songs with them.
Dolls & Dollhouse
One of my most fond childhood memories is playing for hours with the dollhouse she and my grandfather made when I was young. Instead of plastic dolls with fake faces, I had five rooms of wooden doll furniture and a little wooden family with yarn for hair. I redecorated that dollhouse, rearranged furniture, made miniature books for them and took them on vacations in the backyard. My children may not all remember my grandmother, but I have a heck of a dollhouse to pass on to them one day and some great memories to share.
If you don’t have a handmade dollhouse, a friend has this solid wood dollhouse from Hape and loves the quality.
Bow & Arrow and Slingshots
Such are the things boyhood is made of. These carved wooden slingshots are a favorite with my boys and they love shooting wooden bow and arrows at the trees in the backyard.
Support Your Natural Toy Maker!
It’s wonderful to see companies making toys more like they used to be: simple, interesting, and made of natural materials. Let me know if I forgot some of your favorite non-toxic or natural toys!
What toys are favorites at your house? Share below!
Sources:
Ecology_Center. (2018, April 09). Toys 2008. Retrieved from https://www.ecocenter.org/healthy-stuff/reports/toys-2008
Trouble In Toyland. (n.d.). Retrieved from https://uspirgedfund.org/sites/pirg/files/cpn/USN-112117-A1-REPORT/trouble-in-toyland-32.html
Chen, S., Ma, Y., Wang, J., Chen, D., Luo, X., & Mai, B. (2009). Brominated Flame Retardants in Children’s Toys: Concentration, Composition, and Children’s Exposure and Risk Assessment. Environmental Science & Technology,43(11), 4200-4206. doi:10.1021/es9004834
Brominated Flame Retardants. (2012, January 17). Retrieved from https://cfpub.epa.gov/si/si_public_record_report.cfm?Lab=NHEERL&dirEntryId=226582
Why You Should Avoid PVC Products. (2019, January 31). Retrieved from https://www.ecowatch.com/why-you-should-avoid-pvc-products-1881927242.html
Manfo, F. P., Jubendradass, R., Nantia, E. A., Moundipa, P. F., & Mathur, P. P. (2013). Adverse Effects of Bisphenol A on Male Reproductive Function. Reviews of Environmental Contamination and Toxicology Reviews of Environmental Contamination and Toxicology Volume 228, 57-82. doi:10.1007/978-3-319-01619-1_3
Bilbrey, J. (2014, August 11). BPA-Free Plastic Containers May Be Just as Hazardous. Retrieved from https://www.scientificamerican.com/article/bpa-free-plastic-containers-may-be-just-as-hazardous/
Source: https://wellnessmama.com/23984/natural-toys-for-kids/
0 notes
Text
Our Budget Nursery Makeover: Miss Nerd’s Room
Not everything about writing a blog is fun and roses. But one of the things I love most about blogging being a part of my life is that it gives me so many kicks up the butt – deadlines and incentives to finally get my act together and do something.
I need these kicks up the butt, guys! Otherwise I would never make decisions and actually get things done. And this couldn’t be more true of Little Miss Nerd’s nursery makeover.
This room was unfinished and it had been bugging me for AGES. Literally every time I walked in I felt bleh. You know when something broken or just-not-done brings your energy down? I would feel irritated with myself for not having made the time to tackle it yet.
It used to look like this, after I had fixed it up and made it a craft room.
Photo by Heather Robbins.
This is nice. This I liked! (Before that it was our junk room, our dumping ground – you can see those photos in this post before I fixed it up and made it a craft room) My budget craft room makeover! It was even in a magazine.
Then it became a guest bedroom for a while (it was so small it barely fit our old double bed) and then it became Little Miss Nerd’s bedroom after she moved from her bassinet in our bedroom to her cot in here, and then it sort of became a junk room all over again.
All these things that didn’t have real homes kind of migrated there. And I’d never decorated it properly with a colour scheme and styling and everything. I’d never decided what to actually do. I’ve talked about this before when I shared Little Nerd’s toddler bedroom reveal, but the thing about our 1970s house is that the bedrooms are SMALL. And Miss Nerd’s nursery is the smallest – it’s 265cm x 265cm – it’s a small and dark room and not super-inspiring. We had nice things – the painting on the wall, the cot, the little toys and bits and pieces, but I’d never tied them altogether properly.
Miss Nerd was nine months old and I was literally always thinking, “I REALLY have to decorate her room properly,” when I got the perfect excuse to finally do it. A publicist for Channel 7’s House Rules contacted me and asked if I would like to do a budget room makeover on my Instagram and share it to celebrate the new season. Of course I was keen – it was the motivation I needed.
The aim was a $250 budget and I was actually excited about having a tight deadline. Maybe it’s the journalist in me that always needs a deadline.
And then, a weekend of solid work, and the room was finished. Have a look.
It is done! Done feels SO GOOD, I wish I’d done it earlier! Sometimes I deliberate all sorts of design decisions for AGES. This time I tried to trust my gut and just do things like choosing a paint colour and place art without second-guessing (and third-guessing, and fourth-guessing) my decisions and I surprised myself because I am actually really happy with it. Sometimes ‘done’ is better than perfect, right? (Something I constantly need to remind myself).
The bit that I’m most proud of is my DIY wall beading/cornicing/railing/trim/picture line (a few people asked me what I would call it and I’m actually not sure what the best term is).
Regardless of what it should be called, what I wanted to add to this room was some wall colour and some character. I was thinking if I did one solid feature wall, it might overwhelm the room and make it feel more closed-in. Adding some beading seemed like a nice way to add some wall detailing and a paint colour without sort of overpowering what is a really small space. I bought the trim from Bunnings – from memory it was about $13 a length.
It’s so simple but it’s quite pretty. What I’m proud about is that I did it myself. Mr Nerd was on a work trip, and I did the room in a weekend on my own. Okay not entirely, Little Nerd helped me measure and cut the beading (but then again, he is three, haha) and my Mum helped me glue it up so it was level, but still, I’m proud of my DIY trim!
(adsbygoogle = window.adsbygoogle || []).push({});
You have to cut the beading at angles to get it to sit right around the corners and the windows, and I used to have this amazing Dremel which would have been PERFECT for cutting the beading at an angle, but then my charming sister borrowed it and left it in her car and someone broke in and stole it. So annoying.
So, I literally sawed all these pieces with a hand-saw. That wasn’t so easy. I’m sure all my carpenter readers are looking at my DIY beading in these photos dry-retching in their mouths as we speak, but I am so proud of it. Like I did it and I just wanted to keep walking into the room afterwards to look at it gleefully.
It’s probably because I am NOT the most practical person. I am inventive, not practical. Once me and my sister, the one who lost my Dremel, hung shelves in my toilet by drilling holes into the double brick walls with a cordless drill driver, because we couldn’t find the hammer drill that my husband had probably hidden from me somewhere. “It will be fine,” Simone said. (Surprisingly it actually was, even though it took about two million hours, I even wrote a DIY on it). See? Creative. Not practical.
But yes. What I wanted to say about this little DIY was, if I can do this, you DEFINITELY can. Have a crack. If you use a piece of beading with a more rounded profile, you have to cut the ends to get them to sit flush, then sand them, then I used putty to fill in any gaps and painted those with a tiny brush.
DIY WALL MOULDING TIPS
Measure the line from the ceiling, not from the floor.
Paint the walls before you affix the trim, not after. Then your trim will cover any slightly wonky bits and make it look smart.
Paint the beading before you affix it rather than after – way easier. I used white Annie Sloan Chalk Paint.
If you have low ceilings, consider making the line higher up rather than lower. I would actually have raised the picture line up a little higher than where it is, because this is a tiny room with low ceilings, and that would visually make the ceiling seem a little taller. However, when I removed the old IKEA picture ledge, it left two unsightly holes that still didn’t look right even when I puttied over them, so I used the trim to cover them.
Being slim and pine, my beading was lightweight enough to be able to be glued up (I used a Liquid Nails) but a heavier, thicker wood might have to be screwed in – take it into consideration when you choose.
Get someone to help you glue it up so you get it level. Ideally someone who is not in kindergarten.
Initially I actually wanted to paint the walls a sort of light duck egg blue, deep blue or blue-green. But when I looked at those colours on the walls, they just didn’t work. Because this room barely gets much sun (it’s also overshadowed quite a lot by the two-storey house next door) it already feels quite dark, and the cool colours made it seem cold and depressing. I wasn’t even thinking of pink but I was on Pinterest and saw a pretty apricot-coloured room – and then I realised a warm tone was probably the way to go.
The wall paint is Dulux Diva Rouge in half-strength. The colour is actually almost exactly like the same pinky-peachy-apricot colour my parents painted their entire rear extension in the 1990s, and as a little girl who loved blue I always swore I would never, ever paint my house that colour when I got a house, but here I am 20 years later painting my house 90s pink. Go figure.
After the walls were painted and the trim up it was time to play with pictures! For some reason artwork that might look a bit plain or shabby on a white wall somehow looks so special on a coloured wall. And when there is trim or just some sort of colour difference, it gives a nice ‘anchoring point’ for artwork. It sort of looks more pulled-together especially when your art collection is a little more random.
I had so much fun pulling out all these random bits of art that I’d collected over time from markets and op shops and then realising they looked pretty good in here. The little castle long stitch was $4 from an op shop and I thought it was so cute. (Mr Nerd calls things like this my ‘old lady art’). The pink and blue floral cross-stitch I got from a woman at the markets for $5 and I remember her saying happily, “It’s so nice to see younger people appreciate cross-stitch, no-one likes it anymore.” (Mr Nerd probably would have said, ‘that’s true’ had he been there). The castle cross stitch was $4 from a Good Sammy’s.
The oil flower painting was $4 from a market and the Love print I got yeeears ago from a girl who had a stall outside Jessie’s years ago. I have to admit it sat in my cupboard for years, waiting to be framed and hung… does anyone else buy prints and then frames them like years later? The mobile was a cheapie from Kmart.
That huge painting by the cot I got for $10 from the Melville Markets. I love it there. I literally walked past this painting every Sunday at the markets for about five weeks and I liked how it sort of looks like a paint-by-numbers. Then one day I decided I HAD to buy it even thought I had no idea where I would put it.
Sometimes I say wide-eyed to my husband, “I would NEVER buy something from the markets if I didn’t know exactly where I’m going to put it,” but that is such a lie. I impulse buy weird things all the time and then I stick them in the cupboard where they sadly wait for a home/the day when we buy a big house ten years in the future/the day my sister comes over with the (screwdriver) drill to help hang them up.
Anyway, thank God for my hoarding DNA. I was never intending to put this one in Miss Nerd’s room but somehow I think it just works. So, colour can make random art work, guys. Art walls don’t have to cost a fortune and if you like random stuff, a coloured wall can help you tie it all together. Eventually, I might add a pretty patterned rug – how cute is this from Temple and Webster, for example. But for now it’s fine. I was also initially planning to paint the wardrobe doors a light blue or grey, as I thought it would be too much pink, but when the walls were painted it somehow didn’t look too bad, so I’ve left them for now.
(adsbygoogle = window.adsbygoogle || []).push({});
(adsbygoogle = window.adsbygoogle || []).push({});
All up, I went JUST over my $250 budget for this room. The last splash was a huge palm from Bunnings – $110, which I put outside her window to make up for the lack of garden there. That view is so crap – ugly old fence and paving. Sometimes a huge plant is just what you need. One day we’ll eventually pave that part of the yard and put some sort of more permanent (possibly potted) garden there, but the effect of having a plant there definitely visually brightens it all up for now. Palms seem to be one of those plants that fall in the love them or hate them category. My husband hates them, but he usually lets me do what I like with the garden, and did I mention he was away that weekend? It has its perks.
Then I celebrated finishing by taking a break and taking Nala for a run by the river with my sister (the other one, not the one who lost the Dremel) and we got pizza.
The best part was when I showed Little Miss Nerd. I’d done the last bits of the room, hanging the art work and the mobile and putting in the toys, while they were at my mum’s place, then picked them up and brought them home. Being just a baby, I didn’t actually know if she would notice any change to be honest, but she lit up. If you go on my InstaStories, I saved a Highlight reel of stuff called Nursery Makeover – there’s a clip where she sees the finished room. Her face cracks me up. Make sure you put the sound on so you can hear her brother harping on. He is a details man.
And I kid you not, the day after I finished her room, I was hanging out in there with the kids (something we never did before, because it wasn’t a nice place to play in) and Miss Nerd took her first steps in her new room! We were all super excited about it and she was so proud of herself. Maybe it was her way of celebrating. (“Finally! Mama got her shit together.”) At nine months old, she started walking SO much earlier than Little Nerd did, which has been new territory for Mr Nerd and I, having an adventurous walker, but it’s also been fun. And funny. I think I could just watch babies walk all day. She reminds us of E.T).
I can’t even describe how good it felt, to FINALLY have finished a room that has been bothering me for months and months. It felt so energising. The home decorating equivalent of Marie Kondo-ing a messy kitchen cupboard. Now this room literally makes me feel lifted up each time I walk in there, but best of all the kids love it too, and they play in there (by themselves! Every morning! At their own free will! Heaven!) It’s still small, and dark, but it’s a much nicer, way more pleasant part of our home. Maya x
SUPPLIERS
Wall paint Dulux Diva Rouge half-strength
Pine wall moulding Bunnings
Bed linens Bedtonic pure linen cot sheets
Moulding paint Annie Sloan
Wall shelf IKEA
Dog wall print Mokoh Design
Wall art Thrifted
The post Our Budget Nursery Makeover: Miss Nerd’s Room appeared first on House Nerd.
from Home Improvement https://house-nerd.com/2019/06/24/budget-nursery-makeover/
0 notes
Last Seen Blogs

rogoba-kilim-furniture-blog
ROGOBA KILIM

innerwaved
moved

cynderrfall
slightly singed
cocoabats
bat in a hat

realbiznuts
I got 5 dollars in my pocket (no I don't)