#autolayout
Link
NUEVO VIDEO-TUTORIAL: Proceso paso a paso para crear un botón con ajete automático (Auto Layout) en Figma. Video disponible desde los enlaces en la biografía o desde este enlace: https://youtu.be/bpcOTsykThM ____ Para ver clases y tutoriales paso a paso…no olvide visitar ✅ https://www.youtube.com/titocampos Encuentre en mi blog otras frases, tips, lecturas y recursos gratuitos ➡️ https://blog.titocampos.com Más contenido en los enlaces de la biografía ➡️ https://links.titocampos.com _____
#figma#illustrator#tutorial#link#tip#truco#proceso#boton#autolayout#botones#botonFigma#ui#ux#uxClases#uiClases#aprenderUI
0 notes
Photo

Posso até estar de férias, mas o design não. As novidades não param, nunca! Já testou as novas funcionalidades do @figma? O aprimoramento do #autolayout é muito útil, não só para prototipação de interfaces, mas também para criação de materiais publicitários expressos! Sabe aqueles banners que seguem sempre um layout predeterminado, que mudam apenas o texto e alguns ajustes mínimos? Nesses casos o auto layout mantém ajustes padronizados previamente sem “quebrar” seu design. Vale a pena estudar essa evolução na ferramenta! Me diz aí se você já testou essa e as outras novidades que chegaram no #Figma #config #design #vacation #férias #aprenderdesign #figjam #graphicdesign (em Urubici - Serra Catarinense) https://www.instagram.com/p/CdoI562uYIB/?igshid=NGJjMDIxMWI=
0 notes
Text

every time i get this bug on the iOS app it feels like a panel blew off and i'm seeing the moving parts i'm not supposed to see
43 notes
·
View notes
Text
project im currently developing at work is taking an app prototype and turning into its web version. which is ok. but! the person who worked on this didn't use a single fucking autolayout anywhere and it's driving me nuts everything is hardcoded. damn bitch you live like this???
#the design system looks very pretty and organized but the components SUCK#there's an enormous gulf between the figma experience with and without autolayout#im trying not to mess with the components too much so that i don't break anything but by god
3 notes
·
View notes
Text
Codejet Assistant
Figma Community plugin – 🔍 This plugin ensures your designs are ready for generating code with Codejet.
✅ By using this plugin, the code you generate with Codejet will be pixel-perfect.
Features:
Highlights areas for autolayout implementation (so that generated code will be RWD).Indicates where to detach your current co…

View On WordPress
0 notes
Photo

10 iOS Programming Tips to Improve Your App Development When it comes to developing apps for iOS, it can be a daunting task. With the increasing complexity of the operating system, it is important to stay ahead of the game and stay on top of the latest trends and technologies. To help you out, we have compiled a list of 10 iOS programming tips to help you improve your app development. 1. Familiarize Yourself with Swift: With the release of Swift, Apple has made it their primary programming language for iOS apps. It is important to familiarize yourself with this language to ensure that you are able to develop the best apps possible. 2. Use Storyboards: Storyboards allow you to quickly design user interfaces and connect them to code. This can be a huge time saver and can help you to quickly create a great looking app. 3. Utilize Autolayout: Autolayout is a great tool for making sure that your app works correctly on all iOS devices. It can be a bit tricky to learn, https://digitaltutorialsapp.com/10-ios-programming-tips-to-improve-your-app-development/?utm_source=tumblr&utm_medium=socialtumbdigitutorials&utm_campaign=camptumbdigitutorials
0 notes
Text
Bosta is hiring IOS Developer to join our outstanding Engineering team.
Who you are!
- Bachelor’s degree in computer science or engineering is preferable.
- 2 years of iOS development experience.
- Pro Swift, UIKit, MVVM/MVC, Git
- Experience with Autolayout constraints in Storyboards, XIBs and Code
- Experience with Concurrency in iOS Using GCD and OperationQueue
- Experience with RESTful APIs using both URLSession and Alamofire
- Experience with different design patterns and object-oriented concepts
- Proficient understanding of Reactive functional programming concepts and good Knowledge of at least one RFP framework such as RxSwift, Combine or ReactiveSwift
- Proficient in deploying apps on App Store
- Familiarity with continuous integration
- Excellent Problem-Solving Skills.
0 notes
Text
Americanas está com muitas vagas de emprego abertas para profissionais de nível médio, técnico e superior
A Americanas é muito mais do que uma empresa de varejo, é uma plataforma de inovação tecnológica com infinitas possibilidades, tanto físicas quanto digitais, tendo as pessoas no centro de tudo. Dessa forma, se está desempregado e a procura de novas vagas de emprego, essa é a sua chance! Venha fazer parte de uma companhia líder na América Latina e que faz a diferença na vida dos brasileiros.
Confira algumas das vagas de emprego disponibilizadas pela Americanas
Analista de Negócios Pleno (Hub e Plataforma) | Hub de Parcerias
Para concorrer a esta vaga é necessário possuir formação de nível completa, conhecimentos intermediários de Excel, assim como conhecimentos sobre Api’s e documentações técnicas.
O perfil buscado é de profissionais com organização e métodos, com visão de processos e fluxos, deve também possuir visão analítica.
Local da vaga de emprego: São Paulo/SP.
Account Manager | Belém — PA
Os interessados nessa vaga devem possuir experiência em atendimento ao cliente. A empresa também busca profissionais com disponibilidade para reuniões presenciais.
A formação exigida é de nível superior completo ou em andamento na área de exatas, administração e afins. Conhecimentos em Excel nível intermediário ou avançado é um item obrigatório.
Advogado Tributário Pleno
Esta vaga é destinada à profissionais com graduação em Direito completa. Vivência na área Tributária é um requisito obrigatório para essa vaga.
Segundo a empresa, MBA ou Pós-Graduação na área são itens essenciais para se inscrever neste processo seletivo.
Local da vaga de emprego: Rio de Janeiro/RJ.
Veja outros cargos disponibilizados pela companhia
Analista Comercial Sênior (Dados) | Marcas Próprias
Os concorrentes que desejam participar da seleção referente a esta vaga devem possuir curso superior completo. A empresa também exige conhecimento em Power BI e conhecimento em SQL. Habilidades com Excel nível avançado é um item obrigatório.
Local da vaga de emprego: Rio de Janeiro/RJ.
Consultor de Franquias
Para concorrer a esta vaga é exigido que os candidatos possuam experiência em atendimento consultivo, conhecimento de processos e habilidades com atendimento à rede de franqueado.
Conhecimentos de DRE, Fluxo de Caixa, KPIS e Indicadores, assim como de Sistemas de Gestão (CRM, ERP) e de Sistemas de Análise de Dados (BI) são essenciais para se inscrever na vaga. Habilidades com PowerPoint são obrigatórias.
Local da vaga de emprego: São Paulo/SP.
Desenvolvedor(a) iOS – Pleno
Esta vaga é destinada a profissionais com formação completa, em andamento em Ciência da Computação ou áreas correlatas, ou experiência profissional equivalente. De acordo com a Americanas, é importante que se possua de 2 a 4 anos de experiência ou conhecimento em desenvolvimento em plataforma iOS.
Experiência em desenvolvimento de aplicações iOS, como: Swift 5.0, Autolayout, MVC, MVVM, View Code e experiência em ferramentas de CI/CD (Bitrise, Jenkins) são essenciais para execução de cargo.
Conhecimentos sobre integração via APIs REST (protocolo HTTP), habilidades com publicação de versões do app na Apple Store, noções de UX e design de interação, de controle de versão (GIT), como também conhecimento sobre testes automatizados (unitários e de interface) e metodologias ágeis de desenvolvimento (Scrum, Kanban) são itens obrigatórios para essa vaga.
Local da vaga de emprego: Vitória — ES
Esta vaga está sendo disponibilizada pela Americanas em modelo remoto.
O post Americanas está com muitas vagas de emprego abertas para profissionais de nível médio, técnico e superior apareceu primeiro em Petrosolgas.
0 notes
Video
youtube
Cosmetics Landing Page UI Design In Figma + Responsive + AutoLayout | St...
0 notes
Text
As long as you’re ok with ignoring Autolayout errors. I get tonnes of those in my SwiftUI views and it’s like “what would you like me to do with that info…exactly?”
— Russell Ivanovic (@rustyshelf) March 11, 2022
0 notes
Text
Universal for IOS – Full Multi-Purpose IOS app 4.4.3 [Latest Update & Pre-Licensed]
0 notes
Text
layer 와 autolayout을 같이 사용 작업하는 경우 유의점
original source : https://marcosantadev.com/calayer-auto-layout-swift/
Introduction
Recently, I had to work with CALayer to make some effects in an iOS Application. Unfortunately, I had some problems with the auto layout and I had to find a workaround. In this article, I propose some approaches which I tried. You can find the best one at the end of this article in “Final Comparison”.
This article is not supposed to be a guide for CALayer but it’s just an explanation of a specific scenario: a workaround for the missing auto layout in sublayers.
Happy Reading!
Content
What Is A CALayer?
What About Auto Layout?
Conclusion
Update In viewDidLayoutSubviews/layoutSubviews
Update With KVO
Custom UIView
Final Comparison
What Is A CALayer?
We can consider CALayer a graphic context of any UIView object where we can add corners radius, borders, shadows and so on. Then, we can also apply animations to some layer properties to get nice effects—like a corner radius animation when we highlight a button.
Core animation provides several layer types by default, the main ones are:
CALayer: it’s the base class which we can extend to create our custom layers.
CATextLayer: it’s a layer which provides the possibility to render a text from a string with the possibility to set some attributes.
CAShapeLayer: it’s a layer which provides the possibility to draw shapes using a CGPath object.
CAGradientLayer: it’s a layer which provides the possibility to create a color gradient using an array of CGColorRef.
What About Auto Layout?
As we saw previously, a layer is a context of an UIView object. It means that any UIView object has a main layer which we can use to change its corner radius, border and so on. We don’t need to set any constraint to this main layer, since it fills automatically its view—we cannot change the frame of this layer manually since it will always fill its view.
At this point, you may be wondering: why should we bother about constraints if the main layer doesn’t need auto layout? Well, let’s consider that we want to use a sublayer in our view to add an additional text, shape or gradient with a specific frame. Unfortunately, iOS doesn’t allow the usage of constraints for sublayers. This means that we need a workaround to replace the missing auto layout.
We can use 3 approaches to achieve our goals. To simplify our code, we use a gradient layer which fills the parent view.
Please note that we can add a sublayer with whatever frame we want. We have just to set the CALayer propertyframe. In this example the sublayer fills its parent view to keep the example easy to understand.
Update In viewDidLayoutSubviews/layoutSubviews
In this approach, we add the new gradient layer and set its frame to the parent view bounds. Then, to keep the frame updated we must use the callback which says that the view layout has been update. If we are inside an UIViewController we can use viewDidLayoutSubviews, otherwise layoutSubviews inside UIView.
In the following example, we use the implementation inside an UIViewController:
class ViewController: UIViewController {
let gradientLayer: CAGradientLayer = {
let layer = CAGradientLayer()
layer.colors = [
UIColor.red.cgColor,
UIColor.green.cgColor
]
return layer
}()
override func viewDidLoad() {
super.viewDidLoad()
view.layer.addSublayer(gradientLayer)
gradientLayer.frame = view.bounds
}
override func viewDidLayoutSubviews() {
super.viewDidLayoutSubviews()
gradientLayer.frame = view.bounds
}
}
Update With KVO
The second approach is using KVO to observe the parent view bounds. When bounds changes, we manually update the layer frame to fill its parent view:
class ViewController: UIViewController {
let gradientLayer: CAGradientLayer = {
let layer = CAGradientLayer()
layer.colors = [
UIColor.yellow.cgColor,
UIColor.brown.cgColor
]
return layer
}()
override func viewDidLoad() {
super.viewDidLoad()
view.layer.addSublayer(gradientLayer)
gradientLayer.frame = view.bounds
}
override func viewWillAppear(_ animated: Bool) {
super.viewWillAppear(animated)
view.addObserver(self, forKeyPath: #keyPath(UIView.bounds), options: .new, context: nil)
}
override func viewWillDisappear(_ animated: Bool) {
super.viewWillDisappear(animated)
view.removeObserver(self, forKeyPath: #keyPath(UIView.bounds))
}
override func observeValue(forKeyPath keyPath: String?, of object: Any?, change: [NSKeyValueChangeKey : Any]?, context: UnsafeMutableRawPointer?) {
if let objectView = object as? UIView,
objectView === view,
keyPath == #keyPath(UIView.bounds) {
gradientLayer.frame = objectView.bounds
}
}
}
Remember to remove the observer when you use KVO.
Custom UIView
The last approach is using a custom UIView.
We know that the main layer of any UIView fills automatically its view, this means that, if we have a view with a specific frame, we are sure that we have also its main layer at that frame. We perfectly know that when we apply the constraints to a subview, the latter has the frame automatically updated to satisfy the constraints. At this point, we can deduce that, if we set proper constraints to a subview, we’ll have also its main layer at the specific frame since the layer is always at the same frame of its view.
The problem of this approach is that we must replace every sublayers with a custom UIView. On the other hand, in this way we can take advantage of the constraints used for this custom view which will be applied automatically also to its main layer.
For this approach, we must create a custom UIView class:
class LayerContainerView: UIView
We said that the view has a main layer which is a CALayer by default. For our custom view we want a main layer of type CAGradientLayer, therefore we must override the layerClass property which says the type of the main layer:
override public class var layerClass: Swift.AnyClass {
return CAGradientLayer.self
}
If we don’t override it, the main layer will be always CALayer without any way to change its type.
And, finally, we can set our gradient in awakeFromNib:
override func awakeFromNib() {
super.awakeFromNib()
guard let gradientLayer = self.layer as? CAGradientLayer else { return }
gradientLayer.colors = [
UIColor.blue.cgColor,
UIColor.cyan.cgColor
]
}
At the end, the class should be like this:
class LayerContainerView: UIView {
override public class var layerClass: Swift.AnyClass {
return CAGradientLayer.self
}
override func awakeFromNib() {
super.awakeFromNib()
guard let gradientLayer = self.layer as? CAGradientLayer else { return }
gradientLayer.colors = [
UIColor.blue.cgColor,
UIColor.cyan.cgColor
]
}
}
Final Comparison
At this point, we have 3 valid workarounds which we can use. The next step is testing the performance to understand what is the best approach. To compare them, we can create a sample project where we use all of them and check how they behave.
If you don’t want to test by yourself, you can watch the following video with the final result:
In this sample app, I added three sublayers and rotated the simulator—with slow animations enabled—to check how the layers behave when the parent view bounds changes.
Spoiler:
As we can notice in the video, the approach with the custom UIView performs better than the other ones. The reason is that we are relying on the auto layout applied to the view instead of updating the sublayer frame manually. Therefore, creating a custom UIView is an acceptable trade-off to obtain the best result so far.
Conclusion
We have just seen some workarounds for the auto layout and the best approach to use. Unfortunately, it’s just a workaround and not an official approach. This means that we may find an approach which may be better than the custom UIView. For this reason, if you have a better approach, feel free to leave a comment with a description of your solution. I would be more than happy to discuss alternatives. Thank you.
1 note
·
View note
Text
Tumblr iOS has a glitch where if you tap in the empty post header in the trailing space after the "follow" button (empty space inside the red rectangle in the screenshot below), it taps the follow button. That empty space should just take you to that post's permalink. I filed a ticket about this, it's probably a mistake with autolayout, but yeah in case you noticed you were accidentally following people more.

58 notes
·
View notes
Text
每日一文:Autolayout
Creating Cacoo’s database import autolayout
貝爾實驗室 Emden Gansner 的 autolayout 演算法:
1. ranking
2. ordering
3. positioning
4. routing
0 notes
Text
[iOS] Constraint Conflict
Left Section > BreakPoint
add UIViewAlertForUnsatisfiableConstraints
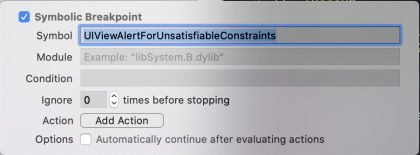
출처: https://littleshark.tistory.com/50 [꼬마상어의 생각]
View On WordPress
0 notes
Last Seen Blogs

lorephobic
indebted to light

ravoilie-blahblah
Ravoilie's doodles

domono08
Dom's toony blog

mageofdreamart
Thorquill family

newrockstarsofficial
New Rockstars