#four's shorter than prime by ~3 inches
Photo

all of them are Macmillan But To The Left, in some fashion
#blaseball#three's got a cane coz his ankle is bad#four's shorter than prime by ~3 inches#smal tiny#five can 'hide' his extra eyes unlike the others but his vision is really bad w/o em#and is also taller by abt 2 inches#parker macmillan iii#parker macmillan iiii#parker macmillan iiiii#mine
25 notes
·
View notes
Link
The Crown's talented cast and period-drama allures have made it one of Netflix's most successful shows in recent memory, with two more seasons on the way. Since The Crown's characters are based on real people, it was necessary from the start to find actors who could convincingly pull off the show's long lineup of famous historical figures. One of the most important ingredients in this is height, specifically how tall the actors are compared to their real-life counterparts.
In casting the series' principal characters across its four-season run, The Crown has ended up with a wide variety of actors both short and tall; these ones all lean favorably into one of those two sides. Unless otherwise stated, all heights for both actors and royalty are taken from their IMDb bios.
10. SHORTEST: Helena Bonham Carter (5'2")

[...] Bonham Carter stands at just 5'2", making her the shortest actor in the show's cast, but a perfect fit for the role of Princess Margaret, who was 5'1"
9. SHORTEST: Gillian Anderson (5'3")

8. SHORTEST: Claire Foy (5'4")

[...] She stands at 5'4", the same height as the Queen herself.
7. SHORTEST: Victoria Hamilton (5'4")

[...] the actual Queen Elizabeth was somewhat shorter, coming in at 5'2" compared to Hamilton's 5'4".
6. SHORTEST: Lia Williams (5'5")

The Crown cast English actress Lia Williams as Wallis Simpson, the Duchess of Windsor. Though Williams is 5'5" tall while the Duchess herself was only 5'2", the height difference isn't too noticeable, thanks to the show's incredible cinematography and Williams's captivating performance.
5. TALLEST: Alex Jennings (6'2")

Alex Jennings was cast as Edward VIII, The Duke of Windsor, on The Crown, though his height of 6'2" makes him noticeably taller than the former monarch he's portraying, who was only 5'7".
4. TALLEST: Jeremy Northam (6'2")

Standing at 6'2", actor Jeremy Northam is about two inches taller than the historical figure he portrayed on The Crown, politician Anthony Eden.
3. TALLEST: Matthew Goode (6'2")

The Crown's Matthew Goode earned a Primetime Emmy nom for his role as Princess Margaret's husband, 1st Earl of Snowdon Antony Armstrong-Jones. Goode, at 6'2", is nearly nine inches taller than the Earl was (according to the New York Times), but given the strength of his performance, he should be allowed to bend the rules of historical accuracy at least somewhat.
2. TALLEST: Charles Dance (6'3")

Charles Dance plays Lord Mountbatten on The Crown. Though Dance's 6'3" stature makes him taller than the 5'11" viceroy, he's a prolific-enough actor to be able to carry a role without fitting into the character's shoes, so to speak.
1. TALLEST: John Lithgow (6'4")

John “plays 5'6" British Prime Minister Winston Churchill (surprisingly, it works).”
______
*Coincidentally Matt Smith is 6′0″ and Prince Philip is also 6′0″. (Tobias Menzies is 6′1″.)
#the crown#claire foy#helena bonham carter#gillian anderson#matthew goode#jeremy northam#charles dance#john lithgow#alex jennings#the crown netflix
37 notes
·
View notes
Text
Leaving the Pond:
Part One: A Moment in a Millennia
(A Fablehaven AU)
Author’s Note: Hey y’all! I’m working on like 3 different fics at the moment, so sorry it’s taking so long! I’m not dead, I promise! 😂
Hope you enjoy! This is (loosely) based on Brandon Mull’s “Fablehaven” (which is a great series, 10/10 would reccommend).
It was a normal day, sprawling out and melding with the millennia that came before it and the millennia that would surely follow. The pond where Logan resided was cold to most mortals, but if someone had lived in the pond their entire life, it was just a normal temperature. It wasn’t clear or murky, light filtered through the water the higher up you went, and the plants on the floor of the pond swayed gently, the currents acting as their breeze. Logan had lived in the pond his entire life, on the magic preserve called Fablehaven. There, magical creatures of all kinds came to reside, and had lived in relative peace for eons. Relative indeed, seeing as the demons that plagued the preserve were always stirring up trouble and causing some ripple of disturbance or another on the calm surface of Logan’s pond. There was always someone who needed rescuing, always some world ending event going on, some earth shattering problem or another for the mortals above the surface to deal with.
That’s why Logan dedicated himself to the noble sport of his brother naiads: drowning people. To naiads like Logan, it was entertaining, if not hilarious, to take the mortal’s problems away from them in an instant and see time continue to march on. Mortals thought the fate of the world hinged on their existence, that only they could save the earth from complete and utter destruction. It was amusing (to say the least) to remove them from the world and watch the problems fade with time, as all of them inevitably did.
However, the naiads sole purpose was not to drown people, contrary to how other people may have perceived it. In the middle of the pond they lived in resided a small, fragile island on which a shrine to the Fairy Queen stood. The naiads were meant to dissuade unworthy people from approaching the island. Their efforts were often in vain, as anyone insane enough to attempt a journey to the shrine usually had the moxie to get there despite the naiads. Not many people tried anyway, seeing as the Fairy Queen had a nasty habit of turning unworthy trespassers (which had been everyone who had set foot on the island, so far) into dandelion seeds, left to scatter on the wind.
Thus, naiads lived a life of luxury. Protected by the shrine of the most powerful being of light in existence and allowed to do whatever they pleased, naiads lived out their immortality in a dreamlike bliss, hours feeling like years, years feeling like hours. Blessed with otherworldly beauty and a dreamlike personality, the water nymphs people called naiads were perfectly content to waste away their days in bliss, never focusing on a single moment, living every second like it was already a memory. The only way the ignorant bliss would ever end is if a naiad chose to willingly leave the pond. Then, the naiad would “fall” to mortality, doomed to age (albeit slowly) as part of the world they had laughed at since its beginning.
Logan was a naiad with pale skin and water-colored hair that looked like gravity had no hold on it. His eyes were the color of human skin (or powdery sand, if you asked him), which the others often made fun of, seeing it as a connection to the frail creatures plodding along above their watery home. He lived in the pond with four other naiads, each beautiful and cruel in their own ways. There was Virgil, Emile, Remy, and one who kept to himself. It had been eons and Logan still didn’t know his name. Some of the others had taken to calling him “Deceit”, on account that he could coax any mortal into the water without using any force other than his charisma.
Virgil was a pale naiad, who took to smearing paste from the plants in the pond underneath his deep green eyes. He normally didn’t participate in trying to drown people unless the prospects looked promising or it was someone attempting to reach the shrine of the Fairy Queen. The reason for this was he sunburnt more quickly than even Logan, and going near the surface at all caused his skin to look like strawberries for at least a week. Even so, Virgil loved wandering the halls of the treasury the naiads had made to store the bodies and belongings of people they had taken over the years. He seemed to enjoy fiddling with the gadgets of the world above, laughing at the futility of such devices. He had hair the color of the twilight on the pond, a deep purple dotted with black. His fingers and toes were connected by nearly invisible webs, and he was the tallest of the naiads (if they ever cared to stand up, that is).
Emile was a bubbly naiad with hair the color of the pastel sunset on the water, watery and deep eyes, and wet sand colored skin. His hair was chin length and curly, his face dotted with freckles. He was the most social of the naiads, and the one who found it most amusing to drown humans. He saw them as a way to have bonding time with the other naiads, and as such personally thanked each and every human they drowned together. The thanks probably didn’t mean too much to the human, but Emile thought it was important. He was always eager to start a conversation with one of the others, who usually entertained him for the sole purpose of having something to do. Emile was a peculiarity in that he seemed to cherish and remember each and every conversation he had with another naiad, savoring a single moment among an infinitely many others. Many regarded him as strange for this, but still found it endearing when Emile remembered something they had told him centuries ago. Or minutes ago. Really, the time frame didn’t matter. He was exactly the middle of the height range of the naiads, shorter than Remy, but not as short as Logan.
Remy was a lazy naiad with dark skin and some dark eye covers he had stolen off a human a thousand or two years ago. They were horribly ruined from the water, but Remy insisted he could see through them just fine (even though the others were certain he could not). Remy had hair the color of the pond at night, a black that shunned the light wherever he swam. His eyes were the color of the wood of the boats the humans used to travel to the shrine, a deep earthy color, although they were rarely seen by the other naiads. He only came up an inch short to Virgil, a fact he pretended not to care about but secretly seethed with jealousy about. Indeed, true to this trend, Remy was extremely laid back, even when his internal emotions were in turmoil. He flirted with the other naiads occasionally, but everyone except Emile found living in the moment for long enough to care about another naiad in that way futile.
“Deceit” was something of a mystery to the naiads he had lived with his entire life. He looked slightly less dreamlike than the other naiads, his face less perfect, giving him a foreign look compared to everyone else. His eyes were the color of the sun shining through the surface of the pond on a clear day, and his hair was so bleached by the sun that it was as white as the light that came from the Fairy Queen’s shrine. Half of his face was covered in a slightly pink crisscrossed pattern he insisted was a birthmark, but that looked more like a scar. He, unlike the original four, had entered the pond later than them. He showed up one day, never explaining who he was or how he came to be there. He was the shortest of the nymphs, a fact he often resented. He was the most active in trying to drown humans, but seemed to find only a grim humor to it, as opposed to Emile’s apparent glee. He seemed to have something against them, though what that was he never said.
The nymphs had lived in the pond for eons, drowning many humans who dared to get to close to the water. The pond they lived in was nestled in a small park-like field dotted with gazebos surrounded by a perfect-looking hedge. A small, cumbling wooden boathouse was a stark difference to the polished and pristine state of the field and the boardwalk surrounding the slightly insignificant looking little pond. Outside of the hedge was thick forest in all directions. After twists and turns along lightly trodden paths, a two story Victorian-style house stood surrounded by a massive yard. This was the caretaker’s estate, where the current overseer of Fablehaven, a man named Patton Sanders, resided. Patton Sanders was a strong looking man, in his prime, the lust for adventure ever lurking in his sky-colored eyes. Despite his tan skin, dirt colored hair, and perfect smile, Patton Sanders, figure of legend and rumor alike, was a massive dork. In public he was a figure of renown who was rumored to have slain a dragon, but at home he was a lonely, giddy, hopeless romantic with round reading glasses and an adorable quizzical smile always stuck on his lips. He’d seen many saddening sights in his life, but that smile always stayed there no matter what as he wrote in his Journal of Secrets in umite wax, an invisible substance that could only be read if a candle of the same kind of wax was burned nearby.
Journal of Secrets,
Tomorrow, business brings me to the pond of the Fairy Queen’s shrine. And by business, I mean curiosity. I’ve only read of the splendor of that place, but I’d like to see it with my own eyes. I’ve been told satyrs, nymphs, fairies, dryads, and (very rarely) centaurs reside there! To see so many kinds of (relatively) good natured magical creatures in one place is astounding! It’s through quite a rough patch of forest, but I’ll be careful. Well... I may be a bit reckless too. But hey! It hasn’t backfired so far, I’m still mostly intact. And I plan to stay that way, so I won’t be visiting the Fairy Queen. I’d prefer not to become a bunch of dandelions in the forest, thank you very much! I make preparations tonight to go to the pond. I can hardly describe how excited I am, so I won’t! Goodbye!
Sincerely, Patton Sanders, dragon slayer extraordinaire
Taglist:
@flyingturtlecat @prinnxe0 @stop-it-anxiety
#Leaving the Pond#fablehaven au#sanders sides#logan#virgil#deciet#remy#emile#patton#logicality#naiad#fablehaven
6 notes
·
View notes
Text
Stretching a Canvas 101

In today’s class we learned how to properly assemble, stretch, and staple a canvas as well as how to properly apply gesso onto a newly stretched and stapled canvas.
Before doing so, we learned some major key terms and points of interest on different tools, materials, and supports that are normally used in painting such as:

TOOLS: a wide variety of brushes (such as natural hair and synthetic), sponges, tape, rags, spray paint, stamps, and easels, etc.
MATERIALS: paint which branches out to acrylic, oil, chalk, watercolor, ink, etc. With oil paints there are different drying mediums such as linseed stand oil, damar varnish, and cobalt dryers.
Some mediums that can be used could include binder, extender, glaze, modeling paste, and impasto just to name a few.
SUPPORTS: paper, canvas, people, buildings, glass, wood, metal, fabric, and plastic, etc.
By breaking down each of these three main categories, we get to learn and see what makes up painting as a whole. In addition, we also learned about different painting conditions such as light, temperature, humidity, and location.
Now let’s break down the steps on how to properly stretch and prepare a canvas.
Step 1: Gather All of Your Materials
In order to start the stretching process, we must make sure that we have all of the necessary materials.
The materials you should have are as follows:
2 Long & 2 Short Stretcher Bars
Half a sheet of canvas
Mallet
Staple gun
T square
Pliers
Gesso
Gesso brush
Container for clean water
Container for Gesso mixture
Step 2: Assemble Your Canvas Frame
Take your 2 long and 2 short stretcher bars and form a rectangular shape as shown below.

Now using your mallet and T square, make sure that your rectangle has corners that are 90 degrees and that are proportional and stable.
Your frame should now look similar to the one shown below.

Once fully assembled properly, use your staple gun and staple twice at each of the four corners so that way you have a sturdy canvas frame to work with.
Now that your frame is assembled, you now will move on to the next step which will include taking your sheet of canvas and stretching and stapling it onto the canvas frame.
Step 3: Stretching Your Canvas
You are now ready to begin stretching your canvas.
Taking your sheet of canvas, place it onto a smooth table surface and place your newly assembled canvas frame centered and faced down.

At this step, make sure that your frame has approximately 3 inches of extra canvas around each of the edges.
An important note here is to make sure that whatever you do on one side, you must do on the other.
Using your first section of canvas, fold it over the frame and apply a single staple in the middle. Next, you should turn the frame around to the opposite side, and with the help of a partner and pliers, hold the folded canvas in place and pull. It is super important to make sure that it is super tight. Now, using the staple gun, add a single staple to the middle like you had originally done on the first side.
Repeat this process for the remaining 2 sides. Make sure that when you flip your canvas over, that it is tight to the touch.
Using the staple gun, add 2 staples to each side of the original first middle staple for all four of the sides.
Since we will be working with a landscape oriented canvas, we have to make sure that the shorter edges are completely clean.
To each of the four edges, place your finger up the edge of the canvas and create 2 little folds/wings. Fold these 2 little wings over so that you see a triangle shape. Also, make sure that the front wing is larger than the back wing. Once folded over properly, use the staple gun and apply multiple staples to the corners to lock everything into place.
Your finished stretched canvas should look very similar to the images below.


Once you have completed stretching your canvas, you will now move onto applying a layer of gesso on top of your newly stretched canvas.
Step 4: Applying Gesso onto Canvas
Gesso is used during the priming step and is applied after the sizing step if a sizing step is used. Size acts as a glue and is made from rabbit skin. Size is a liquid used to seal the surface and make it less absorbent.
Before applying the gesso onto your canvas, you must first dilute it.
Diluting the gesso is done by simply mixing the gesso with water. The mixture should have a milky/liquid consistency.
Take one container and fill it with clean water and another container that will act as your mixing bowl. Take some of the gesso and place it into the mixing container, then pour in some of the clean water into the mixing container and stir the mixture with a palette knife.
Once properly mixed, take a gesso brush and dip it into the diluted gesso mixture. Apply the gesso in both a left/right and up/down motion, making sure that your strokes are as even as possible. It is up to you if you want the sides of your canvas to be bare or have gesso applied to all of the 4 sides.
After applying your first coat of gesso, it should look similar to the image below.

Once the first layer has completely dried, use a sanding sheet and sand the canvas.
Once the canvas has been sanded for the first time, apply a second and third coat of gesso onto the canvas. In between applying each of the coats, make sure to let each coat dry and sand before applying the next coat of gesso.
You have successfully stretched a canvas!

Make sure that your name is on all of your work, and place it in a safe spot for next the class period.
Also, don’t forget to clean up your area, clean your brush and containers, and put back any materials that you used during the class period.
Reflection:
Overall, stretching of a canvas was fun and easy to do. I learned that:
It’s crucial to make sure that your canvas is stretched as tight as it can be, or it will not look the way you want it to look.
When applying gesso to a stretched canvas, it is important that you make sure to apply your coats as evenly and smoothly as possible.
By sizing, priming, and sanding our canvases, we are able to create a smooth working surface and a perfect support for all of our painting needs.
10 notes
·
View notes
Text
His Girl Friday (a TTOI fic) 1/3
Malcolm Tucker x Sam Cassidy, Mature
Summary: Malcolm Tucker needs a PA. Sam Cassidy needs a job. It's kismet.
Notes: The first of what will likely be more. All of it as canon compliant as I can make it. The series title is from a Florence and the Machine song. Don't ask me why. This is probably crap, but here we are. For @rufeepeach, who is a treasure and a delight and a blessing.
[AO3]
Fuck.
Malcolm Tucker sagged in his chair and covered his face with his hands, pressing his fingertips over his eyes, behind which a dull throb had started to build. For a moment he wondered if he could press hard enough to just pop his fucking eyeballs out and spend the rest of his life blissfully unaware of how fucking stupid and useless everyone in this fucking Number Ten Downing Street building was because he couldn’t see the fucking newspapers or the steady scroll of the news ticker. He supposed he’d still be able to hear the twats though, and he'd miss out on seeing enough other things that in the end it wouldn’t be worth it.
The party had been in office for only forty-five days and in that time Malcolm had managed to hand hold the newly elected Prime Minister through five potentially horrible TV interviews, bury four junior minister fuck-ups, and run through three personal assistants, the most recent having just dropped her resignation on his desk a few minutes ago, at his request. He ran his hands down his face and sat up, picking up his Blackberry and flipping through a couple of new messages before dropping it back on the desk.
He got it. He was difficult at his best, utterly terrible at his worst, but he got shit done and that’s what mattered in the long run, at least to his superiors and to the party as a whole. He knew where most of the bodies were buried, had suspicions about others, and had personally dug a few holes himself. But in the grand scheme of things he thought he was relatively easy to please.
Don’t. Fuck. Up.
It was a pretty simple rule, yet so few seemed able to follow it. Now he was faced with having to handle the latest almost-catastrophe by himself. He needed a good, no a fucking great PA, but for now he’d settle for a warm body that could type at least seventy words per minute, make a decent cup of coffee, and not fuck up before noon.
With a heavy sigh, he pushed away from his desk, snatched his jacket from the back of his chair, and stalked out of the office.
Shit.
Sam Cassidy sagged against the back of the seat and let out a breath. She was late. She hated being late, but taxis and mid-morning London traffic were two inescapably necessary and annoying things conspiring against her. Anymore she just wanted the interviews to be over so she could quit her PA job with that too handsy solicitor and be in a place where she thought she might do some good. And maybe not get her arse leered at or grabbed every time she went for coffee.
Though this was politics, so that was probably still going to be an issue.
The taxi finally pulled up to the back entrance of Number Ten Downing Street, and she took a slow deep breath before getting out. She checked her bag and her portfolio with the newly printed, crisp copy of her resume, and strode to the door. After showing her ID and having it compared to a clipboarded list, the guard nodded her through, and she hurried inside before she lost her nerve.
She ran into him on the stairs.
Literally.
“Oi! Watch where you’re going you daft-”
Malcolm stopped mid sentence, as soon as he was hit with the steady glare from a pair of dark brown eyes. She was young, dressed quite professionally in a basic black suit, and despite her being several inches shorter he felt instantly chastised into silence.
As soon as she righted herself, Sam was met with a hard stare from a tall, hawkish figure in a grey suit. His mouth gaped open at her, his rather expressive eyebrows doing a more than adequate job of conveying his general annoyance.
“Excuse you?” she said, raising an eyebrow. He seemed familiar, but she didn’t know why.
“Me?” he replied, eyebrows shifting from annoyed to surprise as his eyes went wide.
“You ran into me.”
His mouth opened and closed, lips twisting at a frown. “I - that’s not -”
He stopped and huffed, hands on his hips.
“Look, I’m already late for my interview and you’re making me later.”
She started back up the steps with a quick ‘have a nice day’ tossed over her shoulder, but he hurried after her.
“Hold on. Interview?” he asked.
She stopped at the top of the staircase, a step above him, and turned. “For the PA spot in Transport.”
“Well, why didn’t you say so?” He smiled. “Look, I’m very busy this morning. Do you mind if we do this on the way to my office?”
She gave him a skeptical look, but allowed him to lead her back down the stairs, still not sure why he seemed familiar.
“I was told I was going to be interviewed by a panel,” she said while trying to look at him from the side, and keep up with his quick, long gate.
He smiled again. “I’m speeding up the process.”
She figured she was late enough that she’d already lost the job, but if he wanted to interview her anyway, so be it, and at first it seemed relatively normal and above board. He asked all the usual questions, how many years had she been a PA, (three), how fast she could type, (eighty-five on a good day), did she mind working late, (of course she didn’t).
They turned down a paneled hallway lined with outdated artwork, and came to what she presumed was his office. He gestured for her to enter first, and then stopped just inside the doorway.
“Of course you mind,” he said.
“What?”
“Working late,” he replied. “Of course you fucking mind. Everyone fucking minds, unless their sorry excuse for a life consists of tweeting abuse at the Kardashians from their mother’s basement. No one wants to be stuck here until two in the fucking morning cleaning up the sewage that dribbles out of these fucking useless morons’ mouths on a daily basis.”
Her eyes went wide at his language, and years from now she would wonder why this wasn’t the moment where instinct took over and she ran and never looked back. She would also wonder why her first instinct was to smile, instead of run and never look back.
“This isn’t the Transport Department is it,” she said, and it was definitely not a question. “And you’re not Tom.”
He laughed and shook his head. “Nah, Tom in Transport’s a boring fuck, and so is his department. It’s all about cars, buses, trains, boring fucking stuff. But look, I’m in desperate need of a good PA, and even though I don’t know you from Adam, you’re here, and you haven’t run screaming yet. Fuck knows why, but the job is yours if you want it.”
She blinked and sat back.
“And I need you to start as soon as possible,” he continued, his rather prominent eyebrows lifting. “And by that I mean right fucking now.”
She laughed. “Are you mental?”
“Probably.” He shrugged and rocked back on his heels. “Usually.”
Then he smirked, the corner of his mouth curving slightly into an almost half smile, and it did something to her insides that she chose to ignore.
“Do you always talk like that?”
“No.” He took a step towards her, pushing his suit jacket back to tuck his hands, which so far had been very active parts of the conversation, into his trouser pockets. “Most of the time it’s much worse.”
Her lips twitched. At least she knew he was being honest. Her head tilted slightly, like she was studying him, and she could tell that for a second it unnerved him. She liked that.
“Well, so far you’re better than the grabby prick I’m currently working for,” she said, assuming that if he was going to use foul language, then she could too, at least if it was just the two of them.
He gave her a dark look. “Grabby?”
“It’s nothing -”
He stepped towards her again, now just at the edge of her personal space, and she was the one feeling a touch unnerved.
He frowned. There was no tolerance in him for people in positions of power taking advantage of others in that way, especially subordinates. It was one of the things he wouldn’t stand for with his staff or those he served.
“Would you like me to inform the sexist pig that you’re resigning effective right fucking now?”
His voice was low and even as he spoke. It made her swallow hard.
Shaking her head, she answered, “No, I don’t need your outdated chivalry. I can handle it myself.” Then she took a quick breath. “In fact it would probably be the highlight of my tenure there to tell him exactly where to shove his fat little arse pinching fingers.”
Oh he liked her. He caught himself hoping she didn’t fuck up too badly in the next three days because he might feel bad having to fire her.
“Oh, it’s not chivalrous at all, darling,” he said, laughing softly. “I just really enjoy having a bit of a shout at morons and tossers.”
“Right,” she smiled. “Well, then, guess I should actually introduce myself, Sam Cassidy.”
He shook her outstretched hand, pleased that there seemed to be no hesitation on her part, but also wondering how fucking bad her current boss was that she thought he was worth saying yes to before she even knew what fresh new Hell this job was going to be. Maybe later, he’d actually bother to read her resume and track the fucking prick down. Maybe he’d send Jamie for a visit.
“Malcolm Tucker,” he said, finally, and then let her hand drop.
Sam’s mouth fell open in a silent oh. Now she knew why he seemed familiar. And now she was wondering what the hell she’d gotten herself into.
Later that evening, after a whole day of filling out paperwork, establishing that it was definitely Sam and never Samantha, and trying to get even half of a view of her new job’s landscape, she sagged on the couch next to her boyfriend. They’d been on and off for ages, though mostly on now, she supposed.
“How’d it go?” Will asked.
She shrugged. “I really don’t know. It was sort of a blur.”
He gave her a strange look. “Transportation is that confusing?”
“No,” she laughed, tipping her head back as she realized that for the first time in years she might be looking forward to going to work. “Not exactly.”
#the thick of it#ttoi fic#malcolm tucker x sam cassidy#malcolm x sam#otp: bit of a shout#fic#workplace relationship#boss/employee relationship#lots of swearing and bad language#fic: his girl friday
16 notes
·
View notes
Text
Missing maestros
If a week is a long time in football, six years can be an era. Stars grow old and retire, new upstarts come through, and the ruling class changes.
In a much-discussed statistical trend, national teams that dominate one World Cup tend to go out in the group stage of the next. Of all the sides to reach that pinnacle of world football, Spain sustained their reign for the longest. They won an unprecedented treble of successive tournaments, the 2008 Euros, 2010 World Cup, and 2012 Euros, sweeping all challengers before them. In their ten knockout games, facing Italy, Russia, Germany, Portugal, Paraguay, Germany, the Netherlands, France, Germany and Italy, they scored 14 goals and conceded none.
In the three tournaments since, they have done as badly or worse than England have. A group stage exit at the 2014 World Cup preceded first knockout round exits in the 2016 Euros and the 2018 World Cup. This isn’t just the usual one tournament hangover, the curse that has also claimed France, Italy and Germany in recent years. This is the steady decline of a footballing nation now past its prime.
The strength of that all-conquering Spain side was indisputably its midfield, so much so that at times in the course of romping home to Euro 2012 victory they played no forwards and just six attack minded midfielders interchanging with each other. Building on the success of Barcelona’s fast-passing ‘tiki-taka’ style in the same period, they played rotating midfielders instead of a fixed defence and attack, shifted the ball in short patterns around the pitch, and successful passed other sides to death.
This tactical system was staffed by an incredibly gifted generation of midfielders who helped titans of their homeland Real and Barcelona dominate, but even behind the likes of Xavi, Iniesta and Xabi Alonso there were another crop of Premier League stars who would have walked into any other national team in the world. Cesc Fabregas paved the way by breaking into the Arsenal first team at 17 years old, recording the most assists in the Premier League in two consecutive seasons from 2006 to 2008, being named Arsenal player of the season for both, and earning the captaincy.
He returned to Barcelona in 2011, tired of his old club knocking him out of the Champions League, but by then the revolution was underway. David Silva had arrived at Roberto Mancini’s new-look Man City the year before, and was a major part of helping them to the Champions League places and an FA Cup in his first season, and to their first league title in the next. He arrived in July, was City fans’ player of the month for October, November, and December, and became a core part of the team which would emerge as one of the best in England across the next decade.
Not to be left out, Chelsea’s biggest signing of the 2011 transfer window was a Spanish central attacking midfielder, Juan Mata. He had a similarly impressive start, named as Chelsea player of the year for both 2011-12 and 2012-13, before Jose Mourinho arrived in his third season and sold him to United for a profit in January. Less than five months later, Chelsea had replaced him with Fabregas from Barcelona, who duly completed the cycle by again recording the most assists in the league in his first season.
It was like he had never left, or perhaps like Mata hadn’t. Even Arsenal, having sold Fabregas in 2011, replaced him in 2012 with Santi Cazorla, a (you guessed it) Spanish central attacking midfielder, who was (you guessed it) Arsenal’s player of the season in his first season, and central to their success in the next few seasons to the extent that his long-term injury was often blamed for their eventual decline.
This was a distinct period when Chelsea, Arsenal, City and United were the biggest four teams in England, starting in 2009/10 when City replaced Liverpool in the famous “Big Four”, and ending after 2014/15 when Chelsea started suffering title hangovers and Arsenal slipped below Spurs in the North London rivalry. In the six seasons between these dates, Chelsea and Arsenal finished in the top four 6 times, and United and City joined them 5 times (City only got started in 2011, once they’d signed Silva).
All of them had a Spanish central attacking midfielder in their heart. Four players, all with not just the same position but a similar style of play, the Spanish passing style which was enjoying success on the international stage in the exactly same period (from their success in 2008 up to their fall in 2014). Not just with the same nationality, but with the same physical profile. Silva and Mata were 5′7″, shorter than most Premier League stars but the same height as Iniesta, and half an inch shorter than Xavi. Fabregas was a little taller at 5′10″, but Cazorla was only 5′6″.
They were so similar as to be interchangeable. Arsenal replaced Fabregas with Cazorla to instant success, Chelsea replaced Mata with Fabregas to the same. As their four clubs dominated the league, these four players dominated their role. In three of the four season from 2011 to 2015, the Premier League assist charts were topped by not just one but two of these players. Silva and Mata starred in 2011/12, Mata and Cazorla in 2012/13, and then Fabregas and Cazorla in 2014/15.
To put that surfeit of talent into context, no Spaniard has ever won the Premier League golden boot in 25 years, let alone taken the silver boot at the same time. English fans talk about the impossible puzzle of playing Gerrard and Lampard together in their prime, the curse of having your two best players in the same role, but Spain in this period had Silva, Fabregas, Mata, Cazorla starring for four of the biggest clubs in Europe and started the 2010 World Cup final without any of them because their midfield of Iniesta, Xavi and Xabi Alonso picked itself.
Those three are retired from top level football now, whilst Silva, Mata and Fabregas are still at City, United and Chelsea respectively. Cazorla’s later career has been heavily curtailed by serious injury, and he has surpassed expectations by continuing to play at all, but the others would have been expected to step up to fill those masters’ skillful boots. Instead, they have faded with the Spanish national team.
Silva, aged 32, is the only one who has kept up his levels of performance. He has moved deeper in City’s play, but continues to pull their attacking strings along with new Premier League star Kevin De Bruyne, both of them starting in the centre of the pitch with three attackers out in front and a style of play which maximises possession and goals. But Fabregas is a year younger, and Mata is a year younger than him, and they are nowhere to be seen.
Let’s talk about Cesc. He fuelled Chelsea to the title in his first season with 18 assists, then slumped to 7 the next year, up to 12, down to 4. This year he has played a part in just two of Chelsea’s eleven games, and contributed nothing in those brief appearances. His passes per game have similarly dwindled: 81, 76, 46, 68, 22. He appears as a pundit more often than a player, as if he is retired, but these years from 25 to 31 are what pundits would call the prime of a midfielder’s career.
Mata’s career has followed a similar downwards trajectory. His first two seasons at Chelsea rewarded the team with 13 and 12 assists, but since he has only managed 6, 4, 3 and 5. In his first five seasons his passes per game ranged from 44 to 53, but the previous two seasons didn’t reach that bar. This year he has started five of United’s eleven games, and his influence has shrunk to an average of 29 passes per game.
Fabregas and Mata now face a battle with youth team products to get into their club’s starting eleven, a far cry from their efforts to break into that world class Spain side behind some of the best midfielders in the recent history of the game. One excuse for Mata is Jose Mourinho’s presence as his own personal curse, shifting him out of position at Chelsea and selling him before later following him to United, but Fabregas flourished most at Chelsea when Mourinho was there.
There is a more general reason that these stars of the league have dwindled together, and that they have not been replaced with a new generation with similar powers. The game of football does not stay the same. Tactical trends come and go, and the role of a clever creative player leisurely sat behind the striker is now as outdated as a traditional strike partnership. Just as 4-4-2 made way to a 4-2-3-1 with a traditional number ten, which had its turn at dominance, that system has itself been superseded.
The Premier League follows trends. When Antonio Conte arrived at Chelsea and played five at the back, half of the teams in the league copied his 3-4-3 to counter it. There was a period when defences and defensive midfielders ruled the league, with Leicester’s counter-attacking triumph sandwiched by Conte and Mourinho’s similar Chelsea victories. Before that was a time when strikers decided titles, including the 2013-14 shoot-out between free-scoring City and Liverpool. Why do we expect attacking midfielders to be as influential as they were back in their era, before even then?
Today’s league is an attacking one again. Pep Guardiola’s City and Jurgen Klopp’s Liverpool have set a new trend, followed by the arrival of Sarri-ball at Chelsea, of fast, attacking, short-passing and pressing football. The system of the day is 4-3-3, with wide forwards such as Sterling, Sane, Salah, Mane and Hazard relied upon to score goals as much as or more than the man in the middle. There is no space for players who do not press as hard or score as much, no time for leisurely playmakers to pull their strings, and the job of switching from defence and attack has been spread across the width of the team.
Players who were masters of this art now find themselves as relics of an outdated system, luxury players who can still pick a killer pass but have to be carried by the rest of their more dynamic team. Managers, too: Arsene Wenger’s teams were known for playing in this previous style, with the likes of Fabregas or Cazorla as the sole puppet-master in the middle, but his refusal to adapt to the changing times saw his demise. Fabregas seems to be doing the exact same thing, but for some reason the correlation of the career paths of these two and Mata is never linked. Silva has only survived because he thrives in a new role as a deeper-lying playmaker, a role he has been coached in by Guardiola, who used to play as one himself.
Specifically, no correlation is ever drawn with the most obvious example in this category. Mesut Ozil was the latest occupants of this role at Arsenal when he joined in 2013 and, just like his peers above, he became a key part of their side. The season after Fabregas and Cazorla topped the Premier League assist charts, Ozil surpassed them both with 19 assists, one off the record, a tally even more remarkable considering that Arsenal’s top scorer that season was Olivier Giroud, with the sixth most goals in the league.
Like the Spaniards above, Ozil has won everything in his career. He won the World Cup in 2014 with Germany, and was named German national player of the year in every other year from 2011 to 2016. He has recorded the most assists in at least one edition of the Premier League, the Bundesliga, La Liga, the Champions League, the World Cup and the European Championships, possibly the top six competitions in world football.
He is clearly one of the best in the world at what he does. But since coming to Arsenal, since that exceptional season, he has come in for nothing but criticism. His assist numbers for the past five years, 9, 5, 19, 9, 8, speak of consistent performance compared to those above. His passes per game, 63, 64, 65, 64, 70, suggest the same. But Ozil above all others is lambasted for his inconsistency, for having no impact on games, for not dominating big matches, for being a shadow of player Arsenal spent a club record of over £40 million on.
Ozil is 30, the same age bracket as Fabregas and Mata. My sense, watching all three of them fail to be as influential as they once were, watching them fail to dominate the league as they once did, is that singling him out for criticism is a little harsh. It isn’t that he’s no longer good as what he does, it’s just that what he does well isn’t rewarded any more. He is criticised for not working and pressing and defending, as is the new style, and for being a luxury player who needs to be carried by his team. Perhaps he is. Perhaps he isn’t good at this new game. But it’s hardly his fault that teams stopped playing the game he is good at.
Looking at Fabregas and Mata puts that criticism in new light. They were contemporaries of Ozil in similar role, performing at a similar level, and their stars have faded much more suddenly than his has. He has been played wide, or in a deeper role, and he is struggling to keep relevant. We shouldn’t expect to see the same levels from him we saw when he played in a system that was built to use him as he was meant to be used, just as we have sympathy for strikers made to play as wingers.
If Ozil was the only central attacking midfielder to decline in influence across this period of change, it might be fair to criticise his character as the cause. But as well as Mata and Fabregas we’ve seen the decline of Oscar, who bridged the gap between them at Chelsea, Samir Nasri, Adam Lallana, Dusan Tadic, Ander Herrera, Shinji Kagawa, Rafael van der Vaart and many others of the same generation.
Of the younger generation coming through, we criticise Jack Wilshere and Ross Barkley of failing to fulfil their potential most of all, having been seen as bright hopes in an era when that style of player was successful, but they’ve found it as hard as the stars they aimed to emulate. Of the new players brought in as big names, it’s central attacking midfielders such as Angel Di Maria and Henrik Mkhitaryan who have been seen as the biggest flops.
It all started to turn south around 2014, when the prevailing system changed, but nobody draws the connection. We criticise Ozil as having given up, but perhaps he has done pretty well for himself, considering what has happened to his peers. Instead of endlessly criticising him, we should acknowledge that he is simply the victim of a wider trend, and instead spend our energy praising the likes of Silva, who have shown their class in succeeding in spite of it.
2 notes
·
View notes
Text
How to Build a Wooden Planter Box
Download Article
Download Article
You're reading: How to Build a Wooden Planter Box
Want to exercise your green thumb, but don’t have the space? Maybe you have the space, but your soil is too harsh to be cultivated easily? A wooden planter box is a cheap, easy, and effective way to solve these problems! Planter boxes can be made any shape and size, and out of a variety of materials. You can learn how to build one of these planters quickly and with little damage to your wallet.
Sizing and Cutting the Wood
1
Decide how large (or small) you want your planter box to be. Your decision should be based on how many plants you want to have in each planter, as well as the size of the area where you will be putting your planter. For this article, we will build a smaller box that is about 4 feet by 2 feet (121.9 by 60.9cm).
2
Purchase your wood. Untreated wood or cedar will work well for this project as they are both easy to work with and can hold up against the natural elements your planter will be exposed to. For a small 4×2 ft (121.9×60.9 cm) planter, you can buy a 12-foot (365.76-cm) board, which you will cut down to form the sides of the planter. The width should be at least 10 inches (24 cm).You will also need a piece that will act as the bottom or floor of the planter if your planter is going to be used on a deck or similar surface. If the box will be over soil, you can place a layer of flattened cardboard boxes on the bottom to act as a weed barrier.[1]
Pressure-treated lumber contains chemicals that will kill plants in the box and can things like arsenic to your food if you are growing vegetables. A safe alternative is using ACQ-treated wood, a process which does not use any toxic chemicals.[2]
3
Cut the wood down to the right sizes. Use a measuring tape to measure out each side. Mark the places where you will make your cut with a pen or pencil. Use an electric saw or standard hand saw to cut the pieces to size (two 2 foot boards and two 4 foot boards), taking care to make the cuts as straight as possible.[3]
If you do not have a saw of any kind, or prefer to not make the cuts yourself, you can ask the workers where you purchased your wood to cut it down to the measurements you need. You may need to pay a small fee, but some lumber and hardware stores will cut your planks down to size for free.
Attaching the Boards
1
Create pilot holes in two of the boards. Pilot holes are holes drilled into the wood to ensure that the wood won’t splinter when you insert the screws into it. You only need to do this on the two end boards (the shorter boards). You should make three pilot holes, 3/4 inch (1.91 cm) from the end edge of the board. The middle hole should be centered in the middle of the width of the board.
2
Fasten the boards using galvanized screws. Galvanized screws are better for outdoor planters because the galvanized metal can stand up to the elements and will not rust. Line the boards up so that the boards with the pilot holes are positioned on the outside corners. Use a drill and drill bit to make sure that each screw goes through each hole and into the adjoining board.[4]
You can also use a screwdriver, rather than a drill and drill bit.
3
4
Drill drainage holes in the bottom of the box. Turn your now fully-formed box over and use your drill to create four or five drainage holes in the bottom of the box. These holes are very important, as most plants will develop diseases if they get ‘soggy feet’, meaning that their roots sit in very wet soil for too long.
Read more: How to create a low maintenance garden
If you have constructed a much larger planter box, you should consider adding a few more drainage holes.
Again, if your planter will be over soil, this is not necessary. Simply use flattened cardboard as the bottom of your box.
Adding the Finishing Touches
1
Place a layer of nylon or vinyl screen inside the planter. Doing this will protect the wood of your planter. Cut the screen so that it is the same size as the board you used for the bottom of the planter. Lay it in the bottom of the planter and fix in place with some small nails. Make sure that you remember to drill drainage holes in the screen that line up with the drainage holes in the bottom board if your box has a bottom.[6]
2
Sand any rough edges. Doing this will give your box a nice finished look, but it is not absolutely necessary to do. Take a sander or a piece of sandpaper and run it along the edges and corners of the box. Run it along the sides of the boards to vanquish any potential splinters.[7]
3
Paint, prime, or stain the outside of your planter. Pick out some paint that matches your backyard or home’s decor, or stain your planter to really bring out the wood’s colors. You can also choose to leave your wood alone, as cedar is a beautiful wood all by itself.
Do not treat the inside of your planter, as this may contaminate the soil and your plants. Instead, use a plastic liner (with holes) to protect the wood.
4
Add a thin layer of gravel, then add the compost or potting soil. The gravel will help to drain the planter box. The type of soil or compost you use will depend on the types of plants or flowers you intend to add to your planter box.[8]
5
Add your flowers, plants, or whatever seeds you plan to cultivate. Don’t forget to water! For ideas on types of flowers and plants you can add to a planter box, click here.
6
Enjoy your new planter box!
Community Q&A
Add New Question
Question
What do I make the bottom of the box out of?
Andrew Carberry has been working in food systems since 2008. He has a Masters in Public Health Nutrition and Public Health Planning and Administration from the University of Tennessee-Knoxville.
Food Systems Expert
Expert Answer
Question
How long should the piece of wood be?
Andrew Carberry has been working in food systems since 2008. He has a Masters in Public Health Nutrition and Public Health Planning and Administration from the University of Tennessee-Knoxville.
Food Systems Expert
Expert Answer
Question
Can I set the planter box on rocks?
There is no reason why not. I am building 4 planter boxes to put in an area between fences and the whole area is rocky. I am not putting bottoms on them because once they are filled with dirt, the rocks should provide good drainage.
Question
Where do I buy the vinyl screen?
You can purchase screen at Home Depot, Lowe’s, Ace Hardware, etc. I prefer fiberglass screening, it seems to last longer, and I line my planters with landscape fabric.
Question
Can the box be placed on grass or soil?
Yes, but consider adding ‘feet’ to elevate the box off the grass or soil, or it will rot.
Read more: Your Complete Guide to Growing a Successful Vegetable Garden
Question
How deep should it be?
If you use 12-inch-wide boards (1″ x 12″ x 8 ft.), the planter box will be 1 ft. deep by default.
Question
What size of galvanized screws should be used for this planter?
Many sizes would work depending on the wood that you use. When working outside, deck screws are a great choice, probably 2 inch deck screws.
Question
What sort of wood should I use to build my planter box?
Cedar, redwood, and pressure-treated woods are all great choices. Cedar and redwood are both naturally resistant to insects and weathering. Pressure-treated wood uses chemicals to make it insect and weather resistant, so it may not be great for areas with children or pets. Cedar and redwood are safe for children and pets because they are natural, but they can also be more expensive than pressure-treated wood.
Question
How many drain holes do I need for a 6′ x 2′ planter box 3′ with legs?
Drill holes every 6 inches for drainage, or use the cut end (boxed end) of the cedar to place them randomly.
Question
How do I put legs on a planter box?
3 X 3 boards are the best. You can even attach wheels to the bottom of them for mobility. But, when raising your planter off the ground, you will need to add thin strips of wood to the inside bottom of the box for support. The corners of the bottom board will have to be cut to accommodate the 3×3 legs. If you don’t want the legs to be visible from the dirt surface, don’t bring them up to then top of your box.
Show more answers
Ask a Question
200 characters left
Include your email address to get a message when this question is answered.
Submit
Video .
By using this service, some information may be shared with YouTube.
Tips
You can take these plans and scale them down for a window box.
Warnings
As always, when working with tools, don’t forget to use the necessary eye and hand protection.
Things You’ll Need
Four lengths of wood. We used 2″x9″ (two 4′ lengths two 2′ lengths)
Another board cut to the size of the bottom
Drill or screwdriver and galvanized screws
Piece of nylon or vinyl screen
Small nails and a hammer
Planting soil
Plants or seeds
About This Article
Article SummaryX
To build a wooden planter box, start by cutting some wooden planks so you have 2 that are 2 feet long and 2 that are 4 feet long. Then, use a drill and galvanized screws to attach the ends of the planks so they form a long rectangular box. Next, cut out a wooden board for the bottom of the box and drill a few holes through it for drainage. Finally, secure the board to the bottom of the box with the drill and some more galvanized screws. To learn how to add the finishing touches to your wooden planter box, scroll down!
Did this summary help you?
Thanks to all authors for creating a page that has been read 619,889 times.
Reader Success Stories
“I want to thank you because I couldn’t find any idea for my FFA banquet. I’m an 8th grader and I’m assistant…” more
Did this article help you?
Source: https://livingcorner.com.au
Category: Garden
source https://livingcorner.com.au/how-to-build-a-wooden-planter-box/
0 notes
Text
Best Electric Start Lawn Mowers HandyGuyPros
Generally, gas-powered lawn mowers are more powerful compared to their electric counterparts. Despite this, there is one thing that most people hate – complicated start-up.
Often, you will need to pull a cord to activate the lawn mower. This will require additional effort on your end and can even strain your hand. The good news is that there is a better alternative – a gas lawn mower that comes with an electric start.
With most modern models, all that you have to do is to push a button and the motor will start in an instant. But, which one is the best? Read on and we’ll help you pick the right lawn mower!
Top Electric-Start Gas Lawn Mowers
Keep the lawn in its best shape with a lawn mower that does not require a lot on your end, especially when it comes to starting the engine. Below are some of the brands and models that should be part of your list.
Husqvarna LC221FHE Self-Propelled Lawn Mower
The company has made a name in the global market for gardening equipment, which is why this product will be hard to match. More than its brand name, it is packed with features that allow it to deliver impressive performance.
Looking at its features, one of the most notable is the Briggs & Stratton 675 Series engine. It is made by a reputable company, so you can be confident of the power it can deliver.
To add, it also has a front-wheel-drive system, which is one of the reasons why it is user-friendly. This is an innovation that allows you to push it without exerting a lot of effort. It improves the maneuverability of the unit, regardless of the terrain that is being mowed.
Speaking of maneuverability, it is also well-loved by many because of the presence of 11-inch wheels at the back and 8-inch wheels at the front. The traction is also notable, allowing it to have a strong grip on the surface while being easy to move around.
The 3-in-1 cutting option also gives it an edge over many others that you can find in the competition. You can choose from bagging, mulching, or side discharging.
For added versatility, the height can also be adjusted in four positions depending on the grass that you will cut.
Lastly, it has a cutting width of 21 inches, which will allow you to mow a wider area in a shorter span of time. Even for large lawns, this can prove to be perfect.
Snapper P2185020E / 7800982 Self-Propelled Lawn Mower
Among others, one of the secrets of this product is the 190cc Briggs & Stratton Pro Series Ready Start Engine. This means that there is no need for priming or choking. It is unnecessary to pull a cord. With the electric key-start, you can expect power right away.
Like the mower from Husqvarna that has been mentioned above, the cutting path of this model is also at a width of 21 inches. They are also similar in the sense that they both have a 3-in-1 steel mowing deck.
The disc-drive and self-propelled rear wheel drive system is also notable. This allows turns to be smoother, making it great if you are looking for a lawn mower that is a breeze to maneuver. It also comes with a disc that shifts depending on the action that you would like it to perform, such as to accelerate or decelerate.
You will also like how it comes with a throttle control that can be easily accessed on your fingertips. All that you have to do is to adjust the lever to control the engine. This also makes it possible to customize the function of the engine depending on a specific application.
Even if you have not used a lawn mower in the past, there is nothing to worry about. This model has a user-friendly console. It also does not compromise your comfort in any way. There is a foam grip to minimize the vibration. The handle can also be adjusted in increment of three inches.
Troy-Bilt 12AGA2M6766 Self-Propelled Lawn Mower
The power of this self-propelled lawn mower is derived from the 159cc OHV engine that is effortless to start with a single push of a button. In an instant, it is ready to get working on the lawn!
It comes with a steel deck that is known for its longevity. Plus, the cutting width is also 21 inches, similar to the two models that we have briefly reviewed above. The deck also has an adjustable height. You can change it from 1.25 to 3.75 inches to suit a variety of applications.
Another reason why this is impressive is how it provides a complete cutting system, making it the ultimate gardening companion. From lifting grasses to having it bagged, this tool can offer the perfect solution. It has a tri-action cutting deck, an innovation that has been exclusively developed by the manufacturer.
To make it even more versatile, it has the ability to mulch, side discharge, or bag, depending on how you would like to get rid of the grass as it is trimmed.
The adjustable handle is also a plus, especially if there are multiple users. It also comes with an ergonomic shape, which will allow it to minimize fatigue, even with extended use.
Lastly, the company also offers a two-year warranty. This can be quite limited, but this will be good enough to provide you with peace of mind.
Troy-Bilt TB270ES Self-Propelled Mower
This is from the same manufacturer as the product that has been mentioned above, so you can expect that the two share similar features. For instance, they are both powered by a 159cc OHV engine. They also have a 21-inch deck with a Tri-Action cutting system for a complete mowing solution.
With the use of this lawn mower, you do not need to be stuck in a single setting that can limit its functionality. For instance, there is an adjustable loop handle so that you can have it customized based on what you are comfortable with.
You will also love how it has dual-lever height adjustment. With the latter, you will be able to adjust its cutting capability from a minimum of 1.25 inches to 3.75 inches.
Aside from being able to adjust the cutting height, you will also be able to adjust the speed in a breeze through the single-lever variable-speed drive control. With this, you can choose from four speeds.
It should also be noted that this unit comes with an impressive blade design, which allows it to cut and mulch grass finely. The deck is also designed in such a way that grass will have a superior flow, preventing it from getting stuck. This means that there is a minimal chance that there will be a disruption when you are mowing.
Lawn-Boy 17734 Self-Propelled Lawn MowerOne thing that makes this an exceptional pick within the product category is the Kohler XTX OHV Engine. The latter allows it to deliver performance, minimizing the effort that is needed on your end. The engine does not require any oil change.
Meanwhile, it also has the Tri-Cut Cutting System. The latter allows it to deliver the cleanest cuts regardless of the type of the grass that it mows. Plus, there is a 21-inch steel deck, which will allow it to cut more within a short span of time.
Users of this lawn mower have also expressd words of praises for its two-point height of cut. Basically, what this means is that there are two height adjustments for the deck, making it possible to have it customized depending on what a specific task requires.
Like the other lawn mowers that we have tackled in this post, it also comes with 3-in-1 discharge ability – mulch, bag, and side discharge. The bag, meanwhile, has a large capacity, which means that you do not need to empty it frequently.
Lastly, the manufacturer offers a 3-year Tru-Start Commitment and 2-Year full warranty, which should be enough to provide you with peace of mind.
Source : https://handyguypros.com/best-electric-start-lawn-mower/
0 notes
Text
ECS Liva Q1D Mini-PC Review: The Most Eco-Friendly Tiny PC Ever
ECS Liva Q1D
8.00 / 10
Read Reviews
Read More Reviews
Read More Reviews
Read More Reviews
Read More Reviews


See on amazon
The Q1D is an excellent enterprise-class computer for budget prices. It's also a solid thin client, marginally capable of handling basic home-computing tasks. The two-year warranty on such an inexpensive system makes it a good fit if your computing needs are modest. It's best for those who need a 4K head unit and nothing more powerful.
Key Features
4K streaming at 60Hz
72 x 72 x 31mm in size
Bluetooth 4.1, Wi-Fi 5
181 grams in weight
Specifications
Brand: ECS
Storage: 64GB
CPU: Intel Celeron N4200
Memory: 4GB LPDDR4
Operating System: Windows 10 Home
Ports: DP, HDMI, USB 3.0, USB 2.0, Micro-SD
Pros
Low-energy footprint
Smallest mini-PC available
Versatile
Affordable
Eeasy to disassemble
Great for streaming
Cons
Not for gamers
Slow processor
Not upgradeable
No fan control
No USB-C
No HDR
Buy This Product
ECS Liva Q1D amazon
Shop
// Bottom var galleryThumbs1 = new Swiper('.gallery-thumbs-1', { spaceBetween: 10, slidesPerView: 10, freeMode: true, watchSlidesVisibility: true, watchSlidesProgress: true, centerInsufficientSlides: true, allowTouchMove: false, preventClicks: false, breakpoints: { 1024: { slidesPerView: 6, } }, }); // Top var galleryTop1 = new Swiper('.gallery-top-1', { spaceBetween: 10, allowTouchMove: false, loop: true, preventClicks: false, breakpoints: { 1024: { allowTouchMove: true, } }, navigation: { nextEl: '.swiper-button-next', prevEl: '.swiper-button-prev', }, thumbs: { swiper: galleryThumbs1 } });
The ECS Liva Q1D is the smallest and greenest mini-PC ever. It can stream 4K video at 60Hz. It's great as a Netflix streaming box, digital-signage system, or thin client. But it has a few performance limitations. So is the Liva worth $188 (MSRP $226.88)?
Hardware Analysis
Going off the specs alone, the Liva Q1D offers a low-tier processor along with an absolutely tiny form factor. Its use of soldered-on components and low-wattage electronics should make it a green monster for chopping down power expenditures. But a potential fly-in-the-ointment is its processor, which is almost five years old, and its single-channel RAM, which could bottleneck its video capabilities.
Operating system: Windows 10 Home (optional)
Processor: Intel Celeron N4200, Goldmont Cores, 14nm Lithography
RAM: Single-channel 2400 MHz LPDDR4
Graphics: Intel HD Graphics 505
Storage: 32GB or 64GB eMMC NAND memory
Wireless: Qualcomm QCA6174 Wi-Fi 5 (802.11ac), Bluetooth 4.1
Ports: HDMI 2.0, DisplayPort 1.2, 2 USB 3.0, USB 2.0, 1GB LAN, Kensington lock, DC jack, Micro-SD
Dimensions: 2.83 x 2.83 x 1.22 inches (72 x 72 x 31 mm)
Price: MSRP $226.88 without an OS; $239.99 with Windows 10 Home
Intel Celeron N4200
The quad-core Intel Celeron N4200 "Apollo Lake" processor is designed for fanless, mobile devices. While delivering weaker performance than Intel's mainstream desktop processors, it uses between two and four times less power, depending on the mode of operation.
The lower power consumption goes hand-in-hand with heat production, which also means it's ideal for smaller, passively-cooled devices, such as tablets. But with a cooling fan blazing away, a Celeron N4200 can sustain higher clock speeds, meaning it provides greater performance compared to a tablet or stick PC. In particular, ECS's Liva can pull "Burst Speed" frequencies of 2.4GHz for all four cores for brief periods or 2.5GHz on a single core. Stick PCs or tablets might only ramp one core up to full burst speeds, for even shorter periods of time.
Even with a tiny, whispering fan blowing, the Q1D ranks among the most performant smaller-than-a-NUC mini-PCs (what's a NUC?). On the downside, Apollo Lake released in 2016, making it a generation behind Intel's ambitious Jasper Lake architecture.
Intel HD Graphics 505
The integrated graphics inside of the Liva Q1D won't perform any miracles, but it will drive 4K displays at 60Hz over HDMI and it will decode H.265/HEVC videos. Considering that even the much newer Intel UHD 630 can't drive a 4K display at 60Hz over HDMI, that's quite an accomplishment.
But don't expect to play games or perform other resource-intensive video-rendering tasks. It's first and foremost a graphics system for playing, at most, 4K video. It also lacks HDR compatibility so while it's great for 4K content, it won't automatically adjust contrast ratios or brightness.
Unfortunately, while the Liva technically possesses a dual-channel memory controller, it appears to only use a single stick of RAM. That means dual-channel mode is out. And because integrated graphics rely heavily on fast RAM, single-channel mode damages graphics performance.
On another note, there's also no BIOS option to allocate more system memory to the integrated graphics processor.
Ports and VESA-Mounting in an Ultra-Small Size
The ECS Q1D measures in at 2.83 x 2.83 x 1.22 inches (72 x 72 x 31mm), while weighing in at around 6.4 ounces (181 grams). In comparison, a NUC form factor measures in at 4.61 x 4.41 x 1.54 inches (117 x 112 x 39mm). The smallest motherboard made, a Pico-ITX board, is about the same size as the Liva's case. For reference, a can of soda towers over the Liva.
Overall, there aren't any mini-PCs that come smaller or lighter, outside of stick PCs. Combined with the VESA-mounting bracket (which comes included with the Liva Q1D), you can even screw it onto the back of a monitor.
Streaming and Playback: 4K Videos at 60Hz and 30Hz

Playing downloaded content proceeded normally and without issue. 4K videos play fine all the way up to 60Hz.
Streaming suffers from a few issues in Firefox, but not in Chrome. In Firefox, streaming 4K content plays fine at 24 FPS. Unfortunately, higher refresh rates caused graphical issues as well as massive frame-rate drops. But Chrome doesn't suffer from these issues, so I can only assume the problem is with Firefox's use of the Intel HD 505 graphics processor.
As a streaming device for Netflix and Amazon Prime Video, the Liva performs adequately, although that depends on your internet connection. Streaming 4K 60Hz content on a non-fiber connection will result in significant performance issues. Otherwise, the Liva doesn't overheat and its fan emits no more than 42 decibels. Likewise, video quality stays fluid and without choppiness.
On the downside, the lack of HDR support means you can't use screen-enhancing features like Dolby Vision or HDR10. Also, keep in mind that while the Liva supports the most-common HEVC/H.265 content, it may not handle other codecs at 4K60Hz.
File-Transfer Speeds

The eMMC storage drive isn't designed for high performance. Even so, it's adequate for most purposes. While 64GB isn't a lot of storage, it's sufficient to contain Windows 10 along with around 40GB of space remaining.
It actually performs reasonably well for an eMMC drive. However, compared to even a DRAM-less SSD, the performance isn't great.
Browser Benchmarks
Image Gallery (3 Images)
Expand
Expand
Expand
Close
Image 1 of 3
Image 2 of 3
Image 3 of 3
window['gallery_1'] = new Swiper('#swipper-1', { direction: 'horizontal', spaceBetween: 20, slidesPerView: 1, centeredSlides: true, preventClicks: false, observer: true, observeParents: true, loop: false, keyboard: { enabled: true }, // If we need pagination pagination: { el: '.swiper-pagination', }, navigation: { nextEl: '.swiper-button-next', prevEl: '.swiper-button-prev', }, }); var images = document.getElementsByClassName("gallery-1-images"); for (var i = 0; i < images.length; i++) { images[i].addEventListener('click', function (event) { var swiperDiv = document.getElementById('gallery-modal-1'); var imagesArray = document.getElementsByClassName("gallery-1-images"); index = Array.prototype.indexOf.call(imagesArray, this); window['gallery_1'].slideTo(index, false, false) swiperDiv.style.display = 'block'; document.body.style.overflow = 'hidden' }); } function closeGallery(element){ element.parentNode.style.display = 'none'; document.body.style.overflow = "initial"; }
As far as browsing the internet goes, the Liva offers adequate, although slow, performance. However, loading pages in tabs and other resource-intensive tasks will result in stuttering and molasses-like page loads. Overall, it's not a device that handles intense web operations. It's best used for infrequent web browsing, with media playback as its primary function.
PassMark Benchmarks

The utility of synthetic benchmarking isn't useful, particularly for a low-power PC. For comparison's sake, I include the results of a PassMark bench test. The numbers, unfortunately, do not tell the full story of a computer designed for 4K playback using a minimal wattage.
Power Efficiency

The Liva Q1D's superb power efficiency means two things: low operating costs and a tiny energy-consumption footprint.
With EUP/ErP enabled in its BIOS, the power-off energy usage falls beneath the minimum consumption that my power meter detects. In suspend mode, the energy usage remains stable at 0.3 watts. Idle power consumption hovers between 4.8 and 5 watts.
Under peak loads, the Liva consumes up to 13-watts. While streaming 4K content at 24Hz, it consumes an average of 10 watts, although my power meter showed usage bouncing between 7 and 12 watts. During 4K playback at 60Hz, it consumes 11 watts. In comparison, a desktop-class processor usually consumes three-times or four-times the power while delivering the same video experience.
Overall, the Liva is extremely power efficient. There are a lot of reasons for its power efficiency. Some of the components, such as the RAM, use lower voltages. And because it uses a sub-Pico-ITX, custom-designed motherboard, there are fewer components that require power. In sum, ECS's engineering has created one of the most eco-friendly, green computers that I've ever tested.
Temperatures and Fan Performance

The Q1D's cooling system runs at whisper-quiet speeds, even at maximum loads. On the downside, it aggressively reduces CPU frequency in response to its oftentimes too-high CPU temperatures. I noticed throttling down to around 1.8GHz
To test fan noise and thermal performance, I hit the CPU with a Prime95 stress test for 30 minutes. While the CPU never passed the thermal shutdown limit, the CPU temperature leapt to its thermal limit of 105C. Concerningly, the fan never passed 38 decibels in volume, which is audible but extremely quiet for a small fan.
Even after the Liva's CPU aggressively throttled down to 1.8GHz, the temperature remained at, or near, 105C. It seems that ECS prioritized low fan volume over cooling performance. That's unfortunate because ECS also set each core to be able to run at their full Burst-Speed mode of 2.4GHz simultaneously. I wish that ECS had enabled fan control in the BIOS settings for those who didn't mind noise.
But, in summary, streaming 4K content does not require massive amounts of resources. And unless you plan on running some really heavy software, there's no reason to be concerned. In streaming 4K video at 60Hz, the fan never exceeded 42 decibels in volume and its temperatures remained well within its operating threshold.
Repairability and Modularity

The Liva Q1D lacks modular features. All of its components, down to the wireless adapter, are soldered onto the mainboard. Unfortunately, if any single component fails, you'll have to replace the entire system. However, ECS offers an above average 2-year warranty on its Liva series, double the warranty offered by most PC manufacturers.
Linux Compatibility
Ubuntu 20.04 and its derivatives worked on the Liva Q1D. I also installed Mint and a few other distros. Even Wi-Fi worked perfectly, without any complication.
Unfortunately, the Liva isn't compatible with Ubuntu 18.04 or with any ChromeOS-based operating system, like Neverware's CloudReady.
Additionally, Intel's VT-d/VT-x technology is turned on by default in the BIOS/UEFI, which allows for virtualized Linux installations to run without issue.
Q1D Problems
The Q1D isn't perfect and won't fulfill the needs of those who need high-performance computers.
Not for Gaming
The Celeron N4200 doesn't handle 3D graphics well. Even the most basic of 2D-platformers will run sluggishly.
Micro-SD Card Isn't Bootable
You won't be able to boot the system from the Micro-SD card slot. If you want to use a bootable image, you'll need to use one of the three USB ports.
Not Upgradeable
All of the Liva Q1D's components are soldered onto the mainboard. In other words, if any component fails, the entire motherboard will need replacement. ECS covers the Liva series with a 2-year warranty, however.
Apollo Lake Is Old
The Liva's CPU and graphics released in 2016. While Intel hasn't made huge advances in its low-power processors between 2016 and 2020, in 2021, it will release Jasper Lake, a cutting-edge design based on its much newer 10nm production process. Jasper Lake brings with it superior video-streaming capabilities, HDR, and a lot more.
No USB Type-C (USB-C)
The lack of USB-C ports increases the physical presence of the Liva, while reducing its flexibility. While not everyone loves USB-C, the ports can handle any peripheral, provided you have the right adapter. On top of that, USB-C can also serve as a power source as well as provide video output using HDMI's Alt Mode.
Should You Buy the ECS Q1D?
The Q1D is an excellent enterprise-class computer for budget prices. It's also a solid thin client, marginally capable of handling basic home-computing tasks. The two-year warranty on such an inexpensive system makes it a good fit if your computing needs are modest. It's best for those who need a 4K head unit and nothing more powerful.
While ECS's engineering team has squeezed about as much performance as possible from an older Apollo Lake Celeron N4200 processor, unfortunately, Intel's upcoming Jasper Lake architecture makes all older mobile processors obsolete for Windows 10. If you can live with its shortcomings, consider buying a Liva Q1D.
ECS Liva Q1D Mini-PC Review: The Most Eco-Friendly Tiny PC Ever published first on http://droneseco.tumblr.com/
0 notes
Text
How to Build a Garden Gate
The white picket fence may be what we all dream of, but who says you need the whole thing? A crisp white garden gate provides the same feel. Install it at the head of a path, leading to a garden or your front door, and flank the posts with tall plantings. Though there are more styles than we care to count, choosing one could be as easy as researching historic designs. In fact, it may be necessary; some localities enforce historical accuracy, which is how we landed on this design in Bellport, New York. Luckily, This Old House senior technical editor Mark Powers’s approach applies to a variety of styles. Follow along to see how to build a gate that won’t get you pilloried by the locals.
Shown: Devonshire Twisted Ring Gate Latch, about $49, and 16-inch Old Fashioned Heavy Reversible strap hinges, about $110 a pair; Walpole Woodworkers
You're reading: How to Build a Garden Gate
How to Build a Garden Gate Overview

Illustration by Gregory Nemec
Day-to-day timeline
PREP DAY: Install the posts (Steps 1 & 2).
SATURDAY: Cut the parts and build the gate (Steps 3-11).
SUNDAY: Attach the hardware and install the gate and post caps (Steps 12-16).
Size your gate to the width of your path, allowing room for the postholes on either side. Our gate is unusually wide, at four feet, but you can easily adapt the cut list to a narrower size by adjusting the width of the horizontal pieces.
Garden Gate Cut List
Stiles: 2 @ 35 inches
Top rail: 1 @ 47½ inches
Bottom rail: 1 @ 42½ inches
Crosspiece: 1; trace to fit
Filler block: Rip 1×3 to fit between pales; ours was 2 inches
Rip 2 ½-inch-wide stiles from 5/4 decking.
1×5 cedar brace: 1 @ rip to 4 inches wide, length cut to fit
Using a circular saw, rip edges at opposing 30-degree angles.
1×3 cedar pale: 4 @ 38 inches
1×3 cedar pale: 4 @ 39 inches
1×3 cedar pale: 2 @ 40 inches
1×3 cedar pale: 1 @ 41 inches
Shape the tips of the pales, then cut them to length.
Apron board: Rip one to 4 inches wide by 47½ inches long.
Apron strip: Rip one to 1½ inches wide by 47½ inches long.
Using a circular saw set to a 5-degree bevel, rip a 5/4 deck board into two pieces to create both the apron board and strip.
6×6 treated post: Cut two to the desired height while maintaining a portion that’s at least one-third the total height of the post that will be buried. For our design, we used 6-foot posts and left 4 feet above ground.
Step 1: Dig the Postholes

Photo by Kolin Smith
Use stakes and a mason line to plot two holes evenly on either side of the walkway so that, center to center, they create a line perpendicular to the path. Dig each hole 6 inches below the frost line or far enough to sink one-third of a post, whichever is deeper. Make the diameter three times the size of the post.
Step 2: Wrap and Set the Posts

Photo by Kolin Smith
To prevent rot, wrap the sections of post to be buried with self-adhesive flashing, from near the bottom to just below ground level. Use the posts to tamp 6 inches of drainage stone into their holes; place them, and add another few inches of stone to hold them plumb. Pour dry concrete mix into one of the holes, filling it to just below the flashing. Add water until the mix is saturated, and stir it with a stick. Before setting the second post, use a board and a level to make sure the posts are the same height. Hold the board up to their faces to make sure they’re not twisted. Allow the posts to sit undisturbed overnight, then sand and prime them.
Read more: Eight Eggplant Recipes You’ll Love
Step 3: Assemble the Frame of the Gate

Photo by Kolin Smith
Rip the top and bottom rails to 4 inches and the stiles to 2½ inches. Cut the top rail 1 inch shorter than the span between the posts to get a ½-inch gap on each side. Cut the other three pieces to length, then prime all four. Once dry, align the stiles beneath the top rail, like legs. Drive 3-inch stainless-steel screws at an angle through the edges and up into the top rail. Fit the bottom rail between the stiles 5 inches from their lower ends. Drive screws through its edges and into the stiles, as shown.
Step 4: Mark the Crosspiece

Photo by Kolin Smith
Rip a 2½-inch-wide crosspiece from a 6-foot board and prime it. Mark a centerline at each end of the crosspiece, slip it under the frame running from the latch location to the lower opposite corner, and position the centerlines at the corners. Now simply trace the inside of each corner on the crosspiece, as shown.
Step 5: Cut the Crosspiece

Photo by Kolin Smith
Using the circular saw, cut along the corner marks. Prime the exposed ends. Fit the crosspiece into the frame and use a drill/driver to send 3-inch stainless-steel screws through its edges and into the frame.
Step 6: Bevel the Brace to Make the Gate’s Trim

Photo by Kolin Smith
Set the circular saw to a 30-degree bevel and rip one edge of the brace. Now set the saw’s fence to 4 inches and rip the other edge at an opposing 30-degree bevel, as shown, to make the wider face 4 inches. Prime the brace.
Step 7: Install the Apron
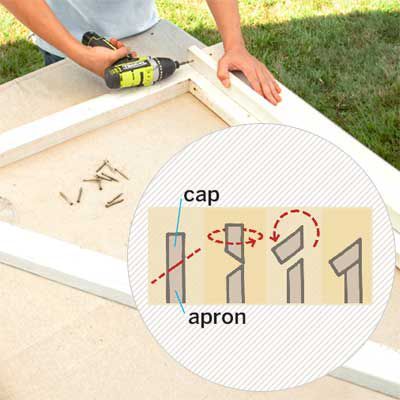
Photo by Kolin Smith
Cut the apron to the width of the frame. Set the circular-saw blade to 5 degrees and rip a 1½-inch strip off one edge. This cut produces the beveled apron and a slanted cap for it. Prime both. Position the apron on the front of the frame, flush with the bottom of the stiles, and drive 1 5/8-inch stainless-steel trim-head screws through it and into the frame. Position the cap with its beveled edge against the frame and its narrow edge against the apron’s bevel, as in the diagram at right. Screw it into the apron.
Step 8: Create the Pales
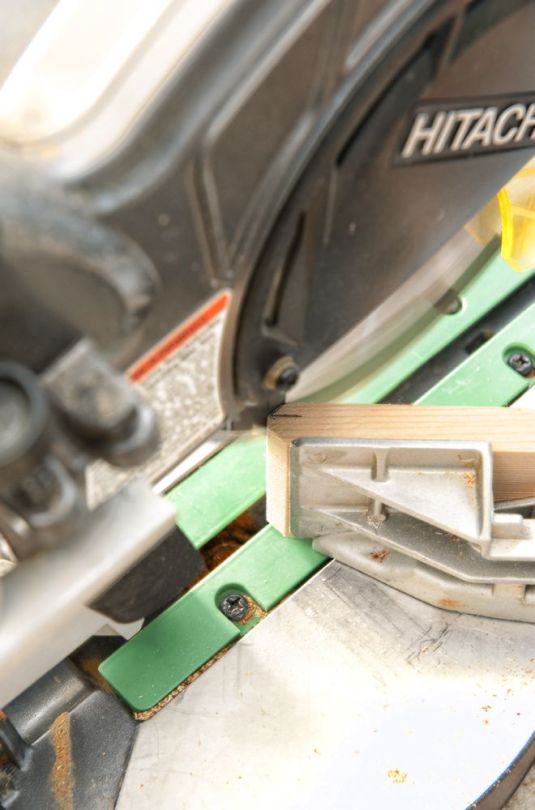
Photo by Kolin Smith
Cut the face bevels. You’ll bevel all four sides of the tips to shape the gate’s vertical slats, or pales. At the top, make a hash mark ¼ inch in from each edge. Set the miter-saw blade to 45 degrees and place a pale on edge against the fence. Align the blade with the mark and cut the bevel; flip the board and do the same on the opposite edge, as shown. Cut all the pales the same way.
Step 9: Cut the Edge Bevels
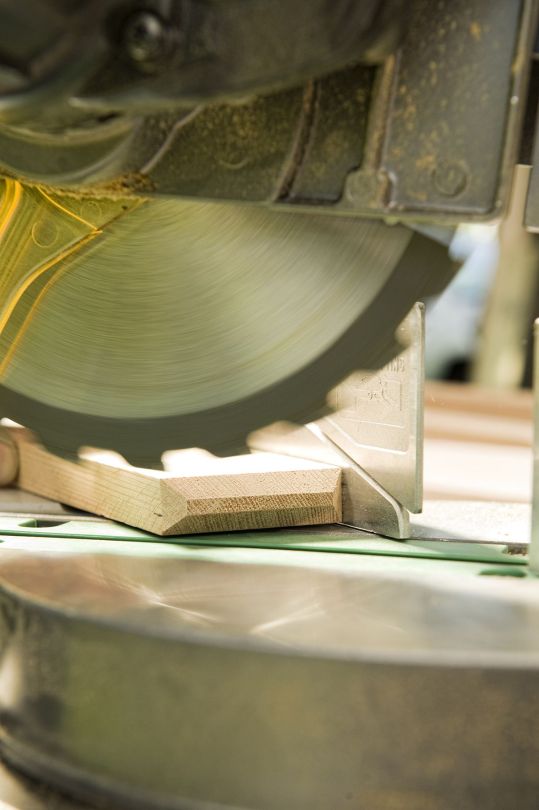
Photo by Kolin Smith
Lay each board flat on the saw. Keep the blade at 45 degrees, line it up with the point where the bevel meets the edge, and clip the corners, as shown. Once you’ve shaped all the tips, cut the pales to height by beveling the bottoms at 5 degrees, to match up with the slanted cap of the apron. Prime the pales.
TOH Tip: Use a combination square with the blade depth set to ¼ inch to quickly make accurate cut marks.
Step 10: Install the Pales
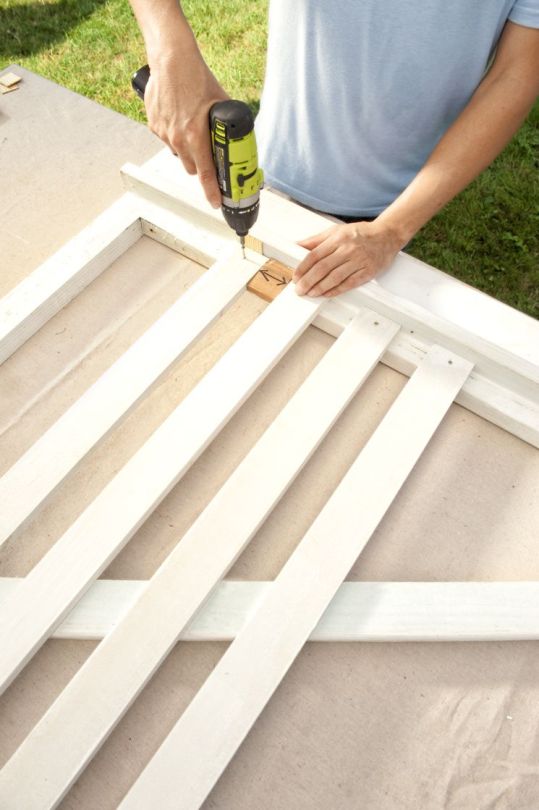
Photo by Kolin Smith
Center the tallest pale on the frame, with the bevel at the bottom mirroring that of the apron cap but not quite touching it. Leaving a tiny gap is critical to staving off end-grain rot; a paint stick makes a perfect spacer. Using a drill/driver and 1 5/8-inch stainless-steel trim-head screws, attach the center pale to the top and bottom rails. Then take two of the shortest pales and attach them flush at either end of the frame. Evenly space the remaining pales in descending order between the center pale and the ends. Cut a block equal to the width between pales and use it as a spacer. Attach the pales. Finally, screw a filler block between the first two pales for the latch.
Read more: Possum Security
Step 11: Finish the Gate: Secure the Brace
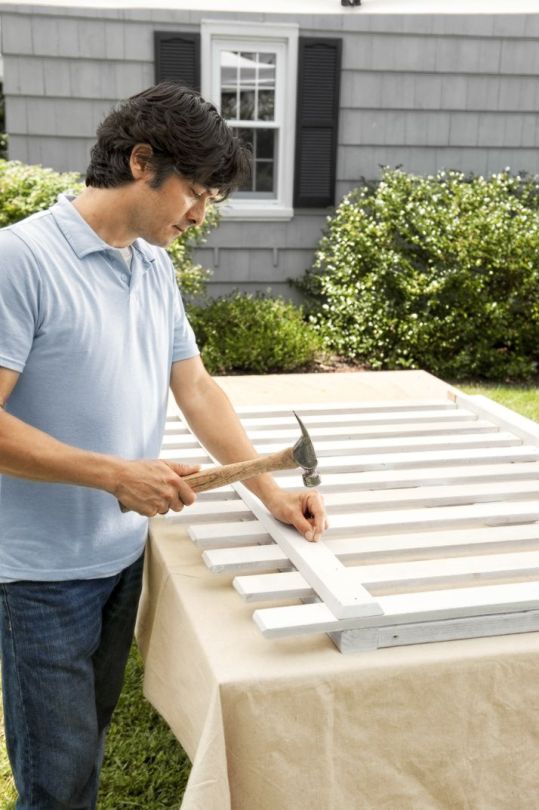
Photo by Kolin Smith
Lay the brace across the pales, beveled-side up, in line with the top rail. Use a hammer and 1 5/8-inch stainless-steel siding nails to attach it. Next, paint the gate, posts, and caps.
Step 12: Add and Secure the Post Caps

Photo by Kolin Smith
Using a caulk gun, apply adhesive to the post caps and press them in place on top of each post. If there’s any play, be sure to center the caps.
Step 13: Shim and Level the Gate in Place

Photo by Kolin Smith
Prop up the gate on scrap blocks between the posts, at least 2 inches above the highest point in its path, apron-side out. Shim it level, and use a level to check your work. Be sure to keep an even gap on each side. Center the gate on the posts, then shim it in place between them.
Step 14: Position the Hinges

Photo by Kolin Smith
Hold the strap hinges and their lower pin cups up to the back of the gate, in line with the top and bottom rails. Mark their screw holes on the gate and post.
Step 15: Attach the Hinges

Photo by Kolin Smith
Lay the gate flat, and align the strap hinges with their marks. Drill pilot holes into the frame, and screw the straps in place with their included fasteners. Install the lower pin cups on the post and slip the pins into them to hang the gate. Check to see that it stays level through its swing; if it does, install the upper pin cups to lock it in place.
Step 16: Add the Latch and Stop

Photo by Kolin Smith
With the gate closed, position the stop on the post below the brace. Drill pilot holes and screw it to the post. Working from the back, position the latch assembly on the top rail and post, mark their hole locations, and drill a hole for the spindle and pilot holes for the fasteners. Finish by mounting the latch and corresponding hardware.
Source: https://livingcorner.com.au
Category: Garden
source https://livingcorner.com.au/how-to-build-a-garden-gate/
0 notes
Last Seen Blogs

johns-writing-room
Afterlife

muka-rapak
Flour Raven who likes KRABAT a lot

relishfingers
gamzee ruined my life

girl-light-dark-roads
~goodgirl~

ezsale
EZSale