#ts4 male underwear
Photo
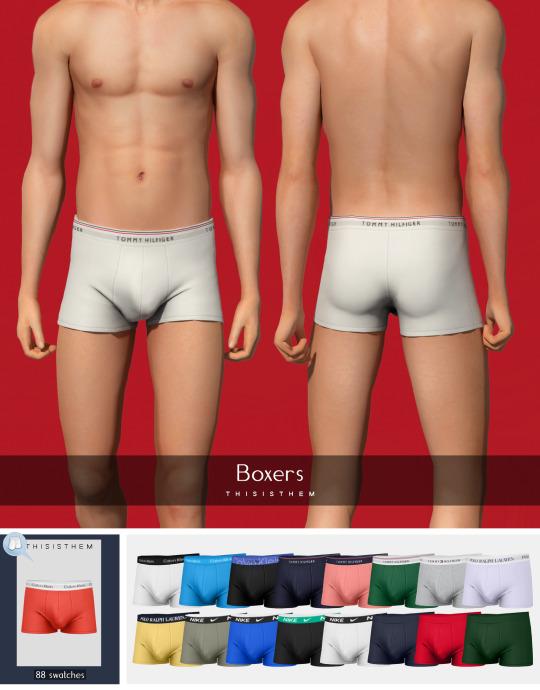
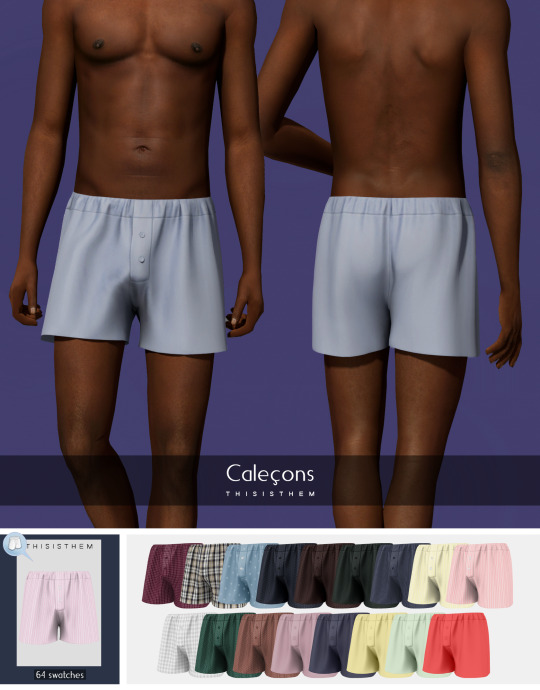
Boxers N1
New mesh ;
All Lods ;
Normal map ;
3400 polys ;
Male ;
Teen+ ;
88 swatches ;
HQ Compatible ;
Don't re-upload, convert or claim as your own.
DL
#TS4#ts4cc#ts4 male cc#ts4 male clothes#ts4 male underwear#s4#S4CC#s4 male underwear#s4 male cc#s4 male clothes#ts4 simblr#MYCC#the sims4#the sims 4 download#ts4 download#ts4 clothes download#ts4 clothes cc
1K notes
·
View notes
Text
LV Boxers briefs (Free for public)
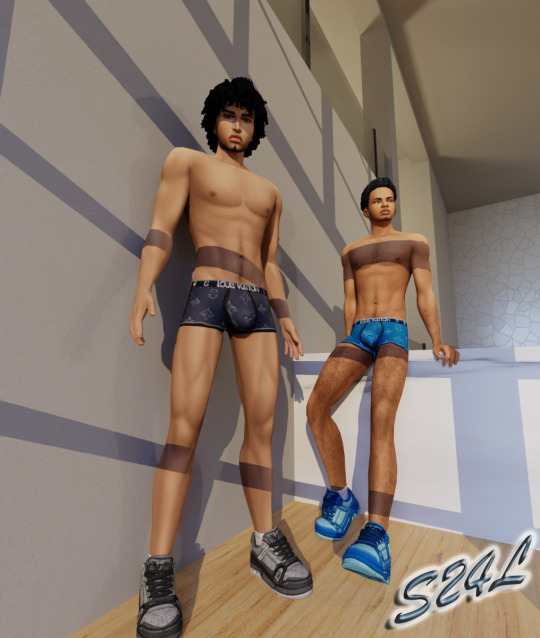

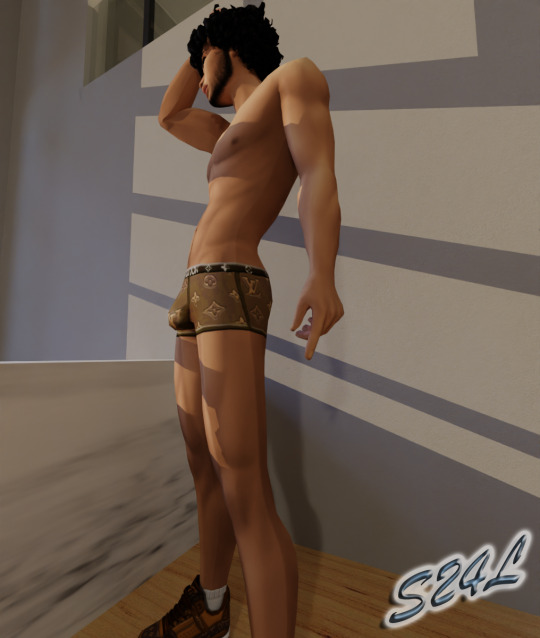

LV Boxers briefs (Free for public)
For male s
22 swatches
Found underwear
Teens, Young Adults, Adults, Elder
Please don't reupload to any other site, file share folder or and claim as your own. Recolors allowed only for personal use.
Any problems, feedback, or suggestions feel free to message me. Also I would love to see your sims in my cc so feel free to tag me in any post on Tumblr
Link [ Download ]
#My cc#sims#ts4#sims 4#the sims 4#ts4cc#sims4cc#simblr#sims 4 men cc#sims 4 mens cloths cc#male sims#sims 4 underwear#sims 4 boxers#urban sims#urban sims cc#sims 4 cc finds#sims 4 look book#ts4 cas#sims 4 edits#My/ free cc
59 notes
·
View notes
Photo

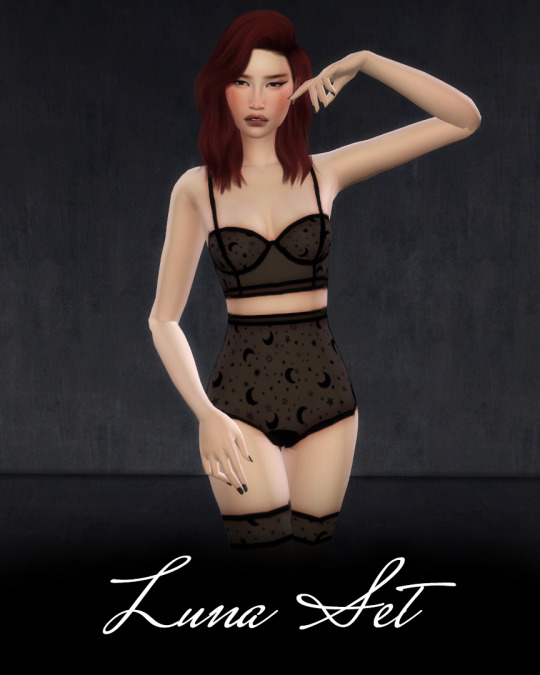
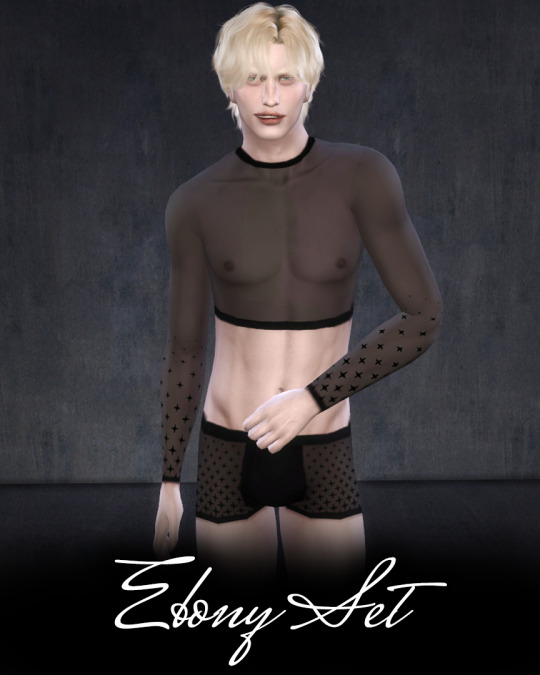


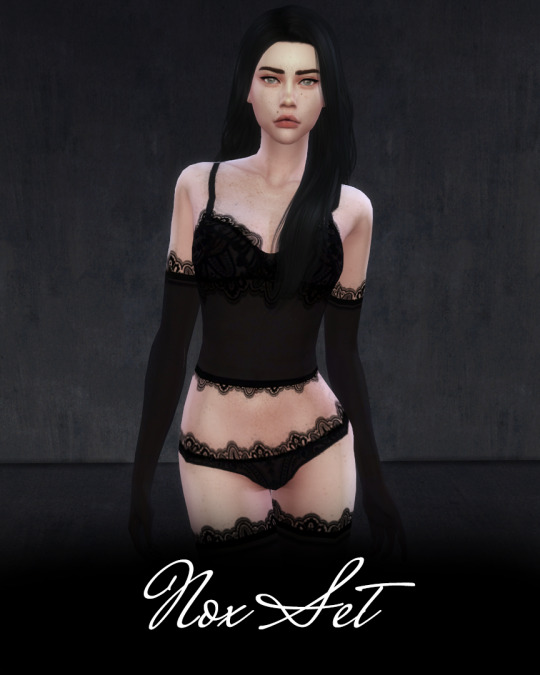
The Obsidian Obsessions Collection includes five sets featuring black sheer, embellished pieces for both female and male Sims, inspired by all things dark and whimsical, with a vintage flare.
Download it now on Patreon or CurseForge
DOWNLOADS | TERMS OF USE | LINKS
#ts4 cas#ts4 clothes#ts4 clothing cc#ts4 download#elloneandreea#obsidianobsessions#s4 male cc#s4 female cc#sims4cc#mycc#sims 4 lingerie#sims 4 underwear#sims 4 maxis match
204 notes
·
View notes
Text
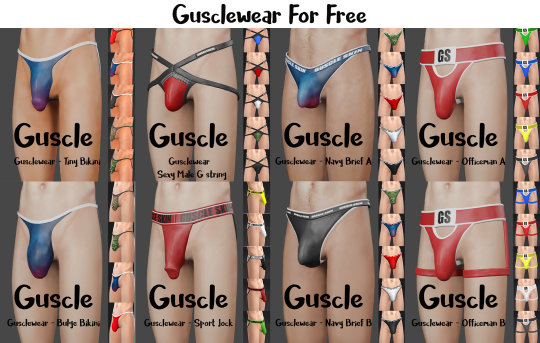
Unlock Now
you can download for free on my Patreon.
#sims 4 male underwear#sims 4 underwear#sims 4 sexy#ts4cc#ts4#s4#ccfinds#s4cc#sims4#sims4clothing#sims 4 cc#sims 4 male#sims 4 male cc#the sims 4 download#ts4 download#guscle#gusclewear#gusclewearx
32 notes
·
View notes
Photo
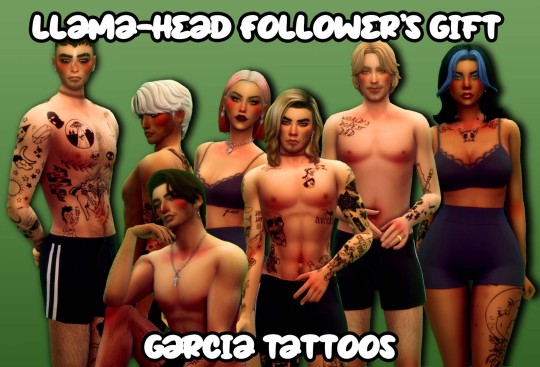
Garcia Tattoos
I hit a follower milestone and decided to make these! So now your sims can have my sims weird-ass tattoos. More info and download below!
I removed any personal tattoos aka anything with specific names so they can be used on any sim now! I will say the male-frame tattoos look a lil off on female-fame and vice versa. I also removed tattoos that were from other cc packs, since I didn’t make those. Most if not all art is from Pinterest.
7 swatches, bgc, both frames (kinda lmao)
Gif Preview (Google Drive)
Download (sfs)
Alt DL (Google Drive)
Let me know if you use them! I’d love to see them on other sims!!
@maxismatchccworld @sssvitlanz
#sims 4#sims 4 cc#ts4 cc#sims cc#sims 4 custom content#the sims 4 custom content#ts4 custom content#my cc#lets say thank you to griffin for modelling the male tats in that gif#just needed a male with short hair and no height presets#and could be in their underwear#also lowkey this looks like a skims ad ngl#i thought abt including landslide characters but...they are mostly cc tattoos so#anyway!! yay! first followers gift
986 notes
·
View notes
Text
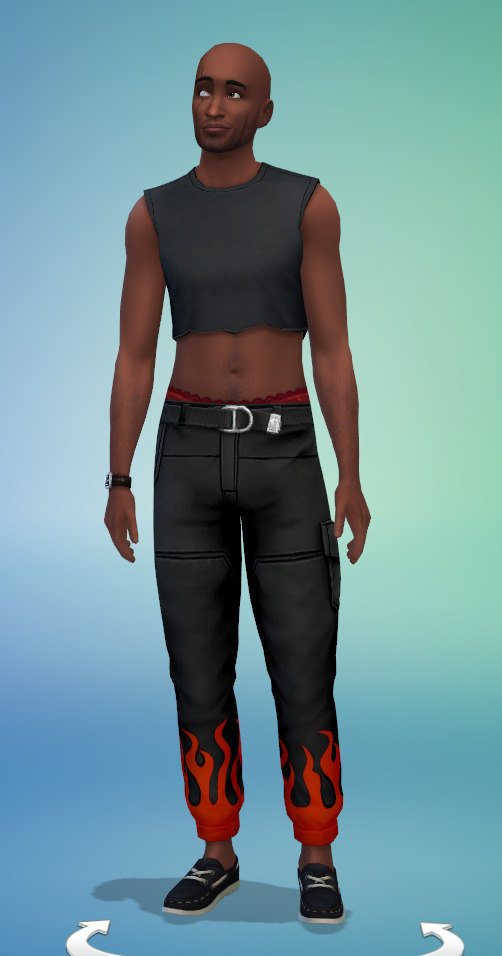
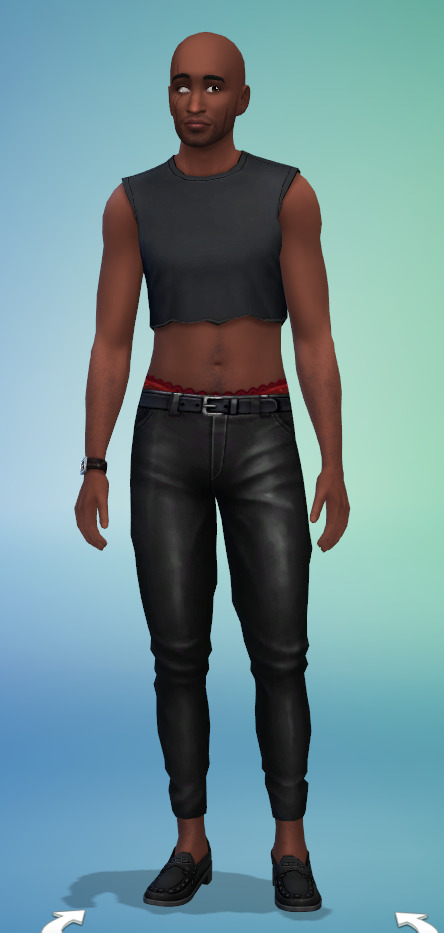
ignore the baldness, but, uh, how do we feel about the lace underwear poking out from wyll's pants. to. emulate the red details of his camp outfit of course
#i think i hauve covid#i was trying to see if i had any red accessories and for that i had to turn of the masculine clothing filter#but the way ts4 works is that most custom content is displayed on a model with either a feminine or a masculine frame and the images in#create a sim are that of the sim's frame. so. if i have a masc frame sim and there's fem frame cc it won't display the cc properly meaning#have to click on it to see what it is#in this case it was accessory underwear. and ofc i had to see if it looks good in red. and it did.#also i know he's wearing leather pants in camp and that's hot but i just really like the flame pants so that might be his go to outfit?#also also ignore the shoes. i know they suck ass but i'm going to go for cc hunting soon#bc i also need hair.#but good maxis match male custom content is rare#there's only a handful of creators making hair and clothes for men#and a lot of cc doesn't work on both frames#i have like a billion hairstyles that could suit wyll but they're all locked for feminine frames#leevi liveblogs
8 notes
·
View notes
Text

update** all mods should be good now 🥰
I am keeping an eye on the Scarlet's Realm list so I will continue to update the list and with any new mods I add to my game 💕💕
overrides
Refreshed Main Menu - mine is Glade
Urban Erotica (functional books)
No Tune After Loading
Nap Replacement Mod
Restaurant Default Menu
MyxDoll Fenty Beauty Override
HighSchool Years Textbook Override
Toothbrush override by dsco
Paintbrush Override
The Ultimate Default Underwear Collection by vixonspixels
Paired Selfie (in game photo overrides)
iPhone 12 Override OR H&B Smartphone Override (ONLY CHOOSE ONE)
UNO Card Replacement
Photo replacements (in game)
Pink Build Buy UI
Black Sitcom TV Overrides
San Sequoia Bridge Override
Realistic TV Mod (Reality TV)
Realistic Phone Icons (multiple available on CoCo Games patreon)
Phone Wallpaper Kit OR Phone Wallpaper Override (only pick one)
Control Any Sim
San Myshuno Billboards
PC Game Overrides
CocoGames Video Game Bundle
Starbucks on Campus
My Wedding Stories Engagement Ring Recolours
Stand Still in CAS Poses
Hidden Highlight
Functional Airpods
Hello Kitty Infant Seat
The Missing Plumbob
No zzz (when sim is sleeping)
Towel After Shower
Functional PS5
Black Art Painting Mod
The Sims 2 Font or Life is Strange Font (only pick one)
Gallery Poses (female)
Gallery Poses (male)
Gallery Poses (couple or duo)
Take Off Shoes With Animation
Stop Random Accessories on Townies
Parenthood Recolour - link is at the bottom of the thread
lighting
check my updated lighting mod list here
cas & loading screen
CAS background
Loading Screen Plumbob Replacement OR by pinkishwrld
Minimalist CC Wrench Override
More CAS Columns (I use 5)
Map Replacements Overhaul
I alternate my CAS backgrounds so see below for my fave creators:
- MeekGames
- Ellcrze
- LadySimmer
- SlimmazSimz
- Essemelle
- BougieChloe
- SierraTheSimmer
- Xurelia
- DonavinGames
- NeriSims
food
Somik & Severinka (I use the Realistic Cooking Mod & all others they have)
ONI Custom Food
QMBIBI Stirring the Pot
QMBIBI Thee Kitchen Tablet
Functional Breakfast Cereals
Airfryer
Waffle Maker
Pressure Cooker
gameplay
misc
Computer Side Gigs
Kuttoe Mini Mods: Small Additions
Bed Cuddle
Carry & Kiss
Longer Parties & More Guests
Functional Magazines
Better Social Media Sponsorships
Higher Lifestyle Brand Payouts
QMBIBI Skincare Mod
QMBIBI Express Delivery
QMBIBI BabyCare Overhaul
Online Skills
It’s Movie Time
BabyCare Mod
Basemental Drugs
Basemental Gangs
Celebrate Adoption
Sip & Paint Event
Luxury Real Estate Career
Recipe Notebook
Functional Selfcare Set
Sulani Events Calendar and Flyer
Functional Personal Care Products
Go For A Jog... Together
Morning Routine
Everyone Can Sleep Together
Spa Day Face Masks From Mirrors
Pole Dance Mod
Online Apprenticeships
Turn the TV on
Ask For Money
UI Cheats
MC Command Center
Self Manicure & Pedicure
Make Functional Perfumes
Shear Brilliance - Active Hairstylist Career
Cute Romance
LOT 51
- Ring Doorbell
- Dust Buster
- Plumbros (heating, plumbing & cooling)
- Alarm Clock
- Simlink (wifi)
High School Years
Fashion Authority KimbaSprite has a tutorial on this mod here
More Classmates
Adeepinigo
I have many mods by this creator, check out their website here
Lumpinou
There is an index on Lumpinou’s Patreon with all the below mods listed, see here
- LGBTQIA+
- Memory Panel Mod
- Open Love Life
- RPO Collection “Realistic & Pregancy Overhaul”
- Science Baby Tweak
PandaSama Childbirth
SimRealist
- Mortem
- Real Estate
- Private Practice
- Sim National Bank
- Sim National Bank Bills
- Sim National Bank Financial Center
SimWithShan
- Cyber Teacher Career
- Homebody Prefences
- Housewife Aspiration
pose player mods (for in game photos)
- Andrew Poseplayer
- Teleport Any Sim
Go to creators for poses & animations:
- KatVerse
- King Black Cinema
- Frxsk0sims
- helgatisha
- AfroSimtricSims
- Gawdly Games
- Hardswae
- Maysbat
- TS4 Poses (tumblr blog)
♡

1K notes
·
View notes
Text
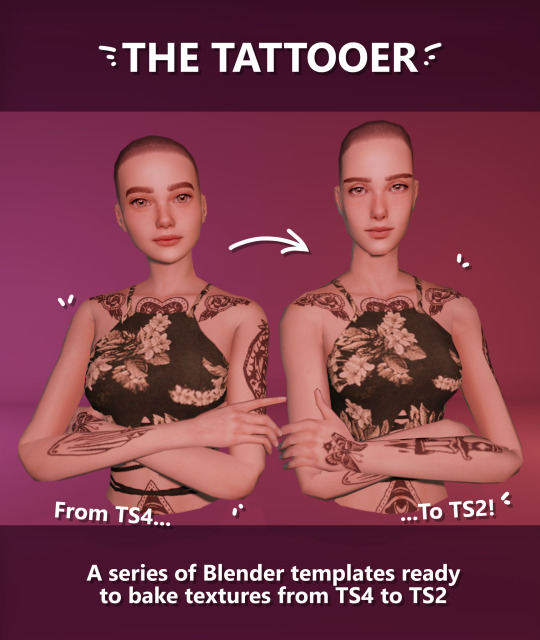
Updating... The Tattooer (ver. 3.4)!

Finally! Took me a while, huh. This is the updated version of the Tattooer project. It skips some steps, making the workflow much, much faster! Huge thanks to @applewatersugar for his
suggestion on how to bake textures while preserving the transparency. This is kind of a repost of the original Tattooer post, but it actually has some new stuff and a few changes here and there, so please take a look if you want to learn how to use this new version.
This is a series of Blender template files already set up to quickly bake textures from The Sims 4 to The Sims 2. The different Blender files will allow you to:
-Bake body textures from TS4 to TS2 (Female)
-Bake body textures from TS4 to TS2 (Male)
-Bake body textures from TS4 (Female) to TS2 (Male)
-Bake body textures from TS2 (Female) to TS2 (Male) [Bonus!]
-New! Bake face textures from TS4 to TS2 (Unisex) [Bonus!]
-Bake head textures from TS4 to TS2 (Face + Scalp) (Unisex) [Still experimental]
Check the file names to see which one is which, and the resolution of the baked texture it will give.
Everything you see in the render above was 100% converted using those Blender files.
Download here! SFS / GD
Update: Version 3.4.1 (27/08/2023) Fixed some issues on the shoulders for the AF-body-4t2-1024 and AF-body-4t2-2048 templates. Now the top straps on most converted underwear/swimwear should look right.
Update: Same version (13/12/2023) As requested, added a new spanish version of the included pdf guide!
These templates were made mainly to bake and convert tattoos, but there’s more you can do with them if you get creative. I have to say, these are NOT perfect. Results may vary depending on what you are trying to convert, so! With that in mind, this is all the stuff you will be able to convert almost seamlessly from TS4 to TS2:
-Tattoos.
-Other body details such as body hair, scars, freckles, supernatural/occult details…
-Body painted underwear and swimwear, as well as some other clothing that’s mostly painted on the body.
-Socks, stockings and maybe leggings.
-Even skintones! In some areas they will look weird, so I recommend editing and blending them with other existing TS2 skins.
-Makeup, eyebrows and beards. In the old version this was just a proof of concept, but now I’ve added a new Face file template which gives some pretty decent results!
-Hair scalps. Very useful when converting some hairs! Although keep in mind part of that texture might also need to be baked on the face mesh, you know, that hairline makeup stuff.
Got your attention? Nice! Editing some of the textures from TS4 to match the UV mapping in TS2 using a 2D editing program can be incredibly hard. That’s where texture baking in Blender comes to the rescue!
You will need to download Blender, at least version 3.4, but you could always use a newer version. It is only incompatible with versions older than 3.4.
-You can download Blender for free here.
-You will also need Sims 4 Studio to extract the original Sims 4 CC textures you want.
In the first version of these Blender files, there was a necessary step using Photoshop, but that’s no longer needed. However, there’s still a tiny extra step which requires resizing the newly baked texture on some of the high resolution templates, so you might need a 2D editing program like Photoshop. More on that later.
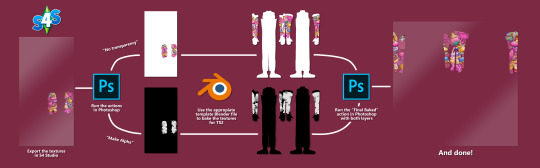
So, before we begin, let’s clear out some questions you might have. What the heck is this texture baking thing and what does it do? Well, let’s imagine you have a video projector and point an image into a blank wall. Then you pick up some brushes and start painting and copying that projected image in that wall. Texture baking is kinda like that when it comes to 3D models. You align two models and match them as closely as you can in shape and form, and once you adjust some parameters and values, Blender does the rest for you: it will give you a new texture for a new model with a different UV map. These files I’m sharing have everything already set up, so it’s a matter of plopping in that Sims 4 texture and you will get that new texture for TS2 in just a few clicks.
This tutorial assumes you know literally nothing about how to use Blender, so if you feel uncomfortable with it, worry no more! This will guide you with pictures showing where you need to click and explaining what is happening. For Sims 4 Studio and Photoshop the process might be a bit less detailed, but still this should be pretty beginner friendly. For this tutorial, I will use some tattoos as an example (properly credited at the end of the post). Alright, enough with the rambling. Let’s get started!
·EXTRACTING TEXTURES IN SIMS 4 STUDIO:
First things first, you will need to extract as pngs all the textures you want to convert from TS4 using Sims 4 Studio. It should be pretty straightforward. Just open the packages and export the Diffuse textures. Keep them organized in a folder for easy access.
·BAKING THE TEXTURES IN BLENDER:
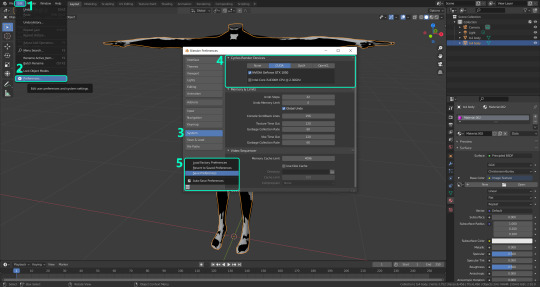
PRELIMINARY STEP 1: CONFIGURING BLENDER’S GRAPHICS SETTINGS:
Open your preferred Blender file depending on what you’re going to bake and the desired resolution (in this example I’m going to use the AF-body-4t2-1024 file). Before we start messing around in Blender, there’s one thing you should set up. It is a onetime step, and once it’s done, you won’t need to do it again. So, does your computer have a dedicated graphics card? If you don’t know or you’re not sure, just skip to the next step. Configuring Blender so it uses your graphics card instead of your CPU will make the baking render much faster, so it is recommended you set it up correctly.
If your computer has a dedicated graphics card, click File (1) > Preferences (2) > and on the window that pops up click System (3) > and select CUDA and make sure your graphics card is there and tick it (4). I have an Nvidia Graphics card but your case may vary. Once you’re done, click on the tiny button on the bottom left corner and Save Preferences (5).

PRELIMINARY STEP 2: CHOOSING THE RENDERING DEVICE:
Click on the tiny camera button on the right, called Render Properties (1), and on Device (2) select GPU Compute if it’s not already selected. If you’re not sure if you have a graphics card or not, just select CPU. Then select the Material Properties tab (3) and Save your changes, either by pressing Ctrl + S, or clicking File (4) > Save (5). You might need to do this second step with the other Blender files, but once you have it done and saved, you won’t need to do this again. Okay, time to get into the good stuff!

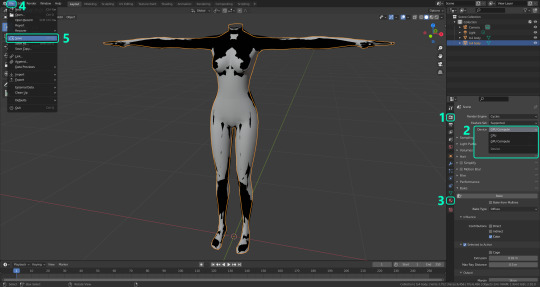
·STEP 1: LOADING YOUR TS4 BASE TEXTURE:
In the Material Properties tab, click the folder icon that says Open (1) and on the window that pops up, navigate through your folders and select your first texture. To navigate easily, the 3 buttons on the top right (2) are for the display mode. They will show your files in list mode, vertical and horizontal, and the one on the right will display the file thumbnails, pretty useful if you want to easily preview your textures here. The icons on the left side (3) will let you go one folder back and forward, go to the parent directory, and refresh the folder in case you just dropped something new in there. Double click on the image you need and that will load the texture into the Sims 4 body model, named “ts4 body”.

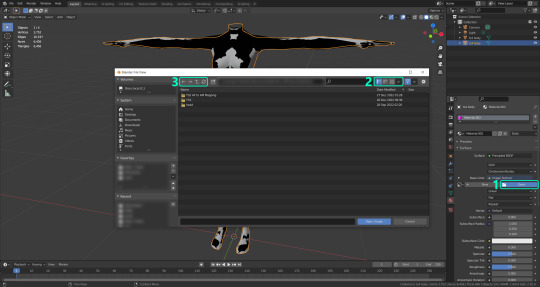
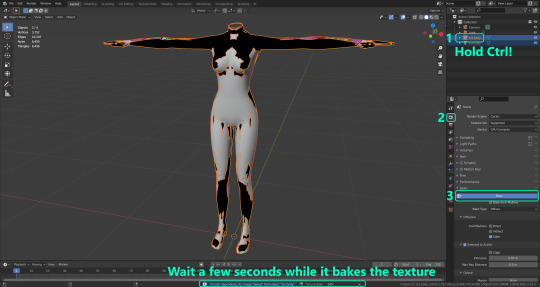
·STEP 2: SETTING UP YOUR SELECTION AND BAKING THE TEXTURE:
On the top right of the screen, you will see the names of the 2 models in the scene. Hold the Ctrl key in your keyboard and left click on the “ts2 body” model (1). If you did it correctly, you should see “ts2 body” in a yellowish orange color, and right down below, “ts4 body” should look more like a red orange. If not, try again by clicking first on ts4 body, and then while holding Ctrl click again on ts2 body. Then switch to the Render Properties tab by clicking the tiny camera icon (2) and click Bake (3). Depending on your screen resolution, you might need to scroll down a bit with your mouse to see the Bake button. Wait a few seconds for it to finish. You will see the progress percentage down on the bottom of your screen. Don’t panic if you notice your computer fans start ramping up, that’s completely normal! As I said in the beginning, using your GPU will bake the textures much faster than the CPU.

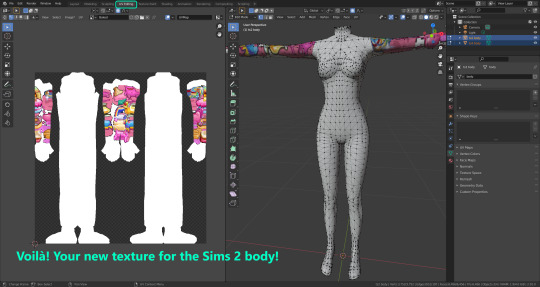
·STEP 3: SAVING YOUR NEW TS2 TEXTURE:
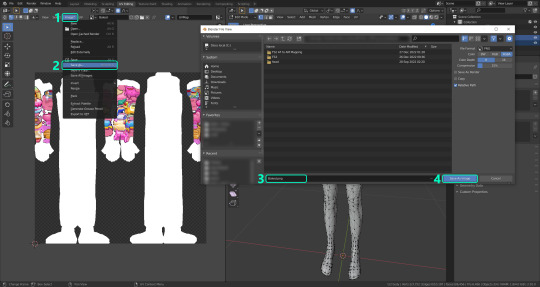
Once it’s finished, switch to the UV Editing Mode by clicking “UV Editing” on the top of your screen. And there it is: your new texture! You might have to scroll up your mouse wheel a bit to zoom in and see it in all its glory on the left side of the screen. We’re still not done yet though. You need to save it to yet another new folder (always try to keep your stuff organized!).

You can save it by pressing Shift + Alt + S, or clicking on Image* (1) and then Save As… (2). That will pop a window where you’ll need to navigate again and save it somewhere. Give it a proper name (3) and hit Enter to save it… well, Enter doesn’t always work for me for some reason, so if that happens just click Save As Image (4). And that’s it! You’ve successfully converted your baked texture. Congrats!

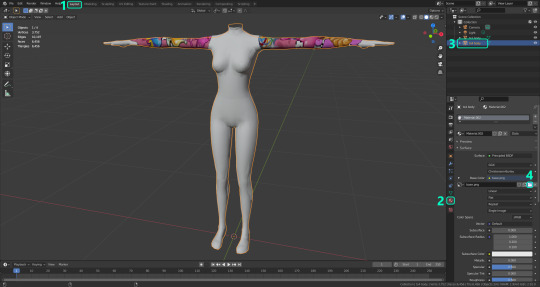
·STEP 4: GOING BACK TO STEP 1:
Alright! If you’re done with your textures, you can close Blender without saving and call it a day. But let’s say you want to keep baking other swatches. In order to go back to step 1 and start the process once again, click Layout (1), go back to the Material Properties tab (2), select “ts4 body” (3) and click on the folder icon (4) to open and load your next swatch.

Then it’s just a matter of repeating the process from step 2. When you’re ready to move on, close Blender without saving. If you see a small check telling you it will save some images, make sure you uncheck it, so you will be able to use it again in the future from the starting point with no issues. I don’t think it really matters if you accidentally save your progress in these files, but I like to keep it clean and fresh so I can do the process where I left it from the beginning next time I open it. And in case you mess up and save somewhere, you can always just delete the .blend file and download the template files again.
In case you’d like a video tutorial on how to use these files, the amazing @platinumaspiration recorded this fantastic video showcasing the process! You can watch it here.
One final note: some of the baking .blend files save the textures with a resolution of 2048x2048 pixels, as clearly stated at the end of their file name. That’s way too overkill, because TS2 only properly supports up to 1024x1024 for most of its textures and you should always resize your final product to that max resolution (or lower if needed). I just made those 2048 versions because there might be some really tiny and slim details on some tattoos that might look a little too blurry when baked into a 1024 resolution texture, so for those cases use that if you want and then resize them using your 2D editing software of choice.
In Photoshop, in the Resample mode of the Image Size menu, there are a few options to choose. For the fine details, I like the Nearest Neighbor (hard edges) option, which, even if it looks a bit pixelated, it still preserves most of the texture and quality.

For anything else, I would just directly bake them using the 1024 versions in Blender (512 for the face and scalp).
And for the folks who feel comfortable playing around in Blender, this is just the beginning! Texture baking opens a LOT of possibilities, so feel free to move stuff around and edit the models to your liking! If you notice the baked textures look warped or stretched somewhere, or don’t like where some textures are placed in the S2 body, poke around that area moving stuff and then give it another try. The main objective of the baking process is keeping both overlapping models as close in shape as possible. You may also edit and save new copies of the templates, or make new ones from scratch using mine as a reference (keep a close look on those Baking settings and values, I think they work pretty well) and share them if you want to. Go ham, do whatever you want with them! I still have plans on making templates to convert body textures from Sims 3 to Sims 2, but for now it’s not on my priorities, so we’ll see when that happens.
Whew! Hope none of this was too confusing. Need help or have any issues with these? Please ask/message me here and I’ll be glad to help when I’m able to!
Credits for the CC used in the render demonstration:
-Skin by Sims3Melancholic.
-Eyes by Northern Siberia Winds.
-Eyebrows by PeachyFaerie.
-Tattoos by xtc.
-Top by SerenityCC.
And the Tattoo I used for the tutorial can be found here, by ValhallanSim.
Last but not least, a huge thanks to all the people who somehow contributed to make this project and update possible, either by doing initial testing, finding issues to fix, or teaching me new Blender tricks to make the workflow way faster and easier. So thanks again to @elvisgrace @moyokeansimblr and @applewatersugar on Tumblr! <3
And thank you for reading! Hope you have fun playing with this (not so) new toy hehe.
#tattooer project#tattooer update#ts2 tutorial#ts2 resources#ts2 blender#ts2 overlays#ts2 texture baking#4t2 conversion tutorial#this took me so LONG to update#im really sorry for the delay :(
288 notes
·
View notes
Text
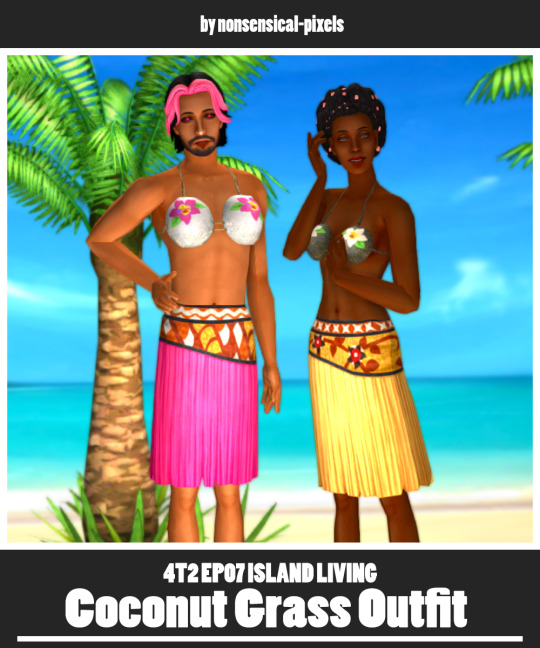
COCONUT GRASS: A COUPLE OF UNISEX SEPARATES FROM TS4 ISLAND LIVING, CONVERTED TO THE SIMS 2 [download - 🥥🦗]
have you ever wanted to put your male sims in a coconut bra, but couldn't? @oceansmotion sure wanted to, but the game sadly wouldn't let her throw a coconut bra on her beloved sim ocean grisly. a tragedy, right? well, fast forward... a whole year? and here we are! with the most random download you'll come across on my blog!
idk why this was the first cc project i picked up when my arm got better but it is what it is
the actual coconut bra was requested by @oceansmotion, and then @shibarulata suggested that the skirt would pair well with it too. and it really does, imho! 🥰
these are the ep07 coconut bra and ep07 skirt grass that came with ts4 island living, converted to the sims 2! they are separates, so you can mix & match them with other outfits 🎊 they're not particularly versatile obviously, but i did have a lot of fun making them and i can see a lot of potential for their use!
credits go to ea/maxis for the original ts4 meshes & textures, and to @skittlessims for teaching me how to convert clothing and fix the bugs that i encountered while doing so!
note: if you downloaded these on the simscord previously (est. 04.02.2023) please delete the meshes for the coconut bra and replace them with the new ones! the originals are fine, but they won't fit well with the new skirt!
keep reading for more info, rambles, and preview pics!
important info
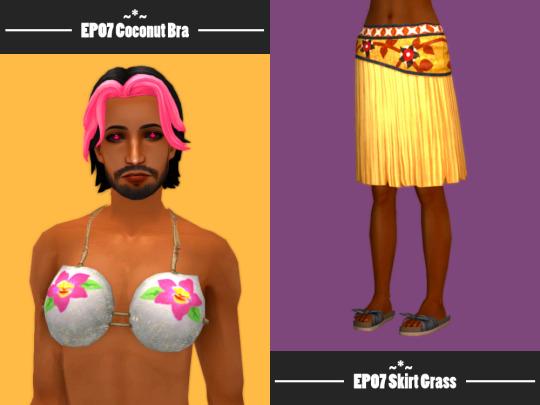
4t2 EP07 Coconut Bra
- yu-au only
- 2306 polys
- categorised as everyday, formal, swimwear, sleepwear, and underwear
- comes in 9 swatches
- has all morphs
- it's a coconut bra for men. it likely won't quite 'fit' as well on male frames. idk the only alternative was to flatten it and that. wouldn't make it a bra.
4t2 EP07 Skirt Grass
- yu-au only
- 2363 polys
- categorised as everyday, formal, swimwear, sleepwear, and underwear
- comes in 12 swatches
- has all morphs
- paired with a recolor of 4t2 ep07 sandals tie. converted by me 👡
- might have some clipping while walking?

huh... that was a long one! i hope y'all enjoy this incredibly high-effort shitpost and find some use for these items 💝 if there are any issues, don't be afraid to contact me! my askbox is always open! (anon off)
to celebrate the end of my mid-year exams. have a guinea pig--

o-oh wait there's 4 of them sorry. at least i finally paid my taxes 🍀🐗
have a lovely day simming, enjoy the random guinea pig tax, and as always, keep in mind,

cheers ~ 🥂
69 notes
·
View notes
Photo
Caleçons N1
New mesh ;
All Lods ;
Normal map ;
4600 polys ;
Male ;
Teen+ ;
64 swatches ;
HQ Compatible ;
Don't re-upload, convert or claim as your own.
DL
#TS4#ts4cc#ts4 download#ts4cc download#ts4 clothes cc#ts4 clothes download#ts4 clothes#ts4 male clothes#ts4 underwear#s4#S4CC#ts4 simblr#s4 download#s4 clothes#s4 male cc#s4 male clothes#MYCC#ts4 male underwear
645 notes
·
View notes
Text
My TS4 CAS CC/Mods Part 1
Hello to whoever's reading this! I'm prettty new to TS4 and i've been loving CCs and mods lately. I figured out that I should at least make like a masterlist to have everything collated in one place where I can continuously update it.
So here are some great stuffs that I found! Would be great if you guys could share some of your fav cc/mods as well. Thanks!
Accessories:
Feels like summer by Arethabee
Girls girls girls by Arethabee
Komfy by Arethabee
Long Scarf by Gorilla X3
Nuit Jewelry by Oydis
Stellar Earrings by Anessasims
Necklace 10 by Bobur3
Bare Hoop Earrings by Christopher 067
Butterfly Feeling Set by LeahLillith
Libellule and Papillon Glasses Duo
Y2K Headphones by Simgirlz
Female Top/Skirt/Pants/Dress/Set:
Ella Default Bra + Panty by ellcrze
Jessica Dress by Kumikya
Hot Girl Summer by Arethabee
Feels like summer by Arethabee
Girls girls girls by Arethabee
AxA Alt by aharris00britney
The Slasher by greenllamas
Random Set 5 by Miro
Riley Cardigan by Oakiyo
Sydney Top by Oakiyo
Sweather Weather by Oakiyo x QICC
Urban Eco Mini Set by simcelebrity00
Strap and Layered Dress by Sudal&Sims
Sadness Fairycore Sweater by Babyetears
Paradise Trousers by AdrienPastel
Levitation Dress by AdrienPastel
Milena Outfit by babyetears
Puffer with mini dress by Babyetears
Fall Breeze Dress by Blacklily
Bliss Dress by Christopher067
Grigio Girls Lace Top by Cubersims
Bell Bottom Jeans by Euno
Butterfly Frill Dress & Top by Euno
Daisy Dress by Gisheld
Zip Hoodie/Sally Skirt by Korkassims
Long Tube Skirt by Luxy Sims
Yelena Set by Madlen
Energy Set by Miiko
Leslie Set by Maxis Match
Holly Pants by pixeluniverse
Sulani Swimwear by Renorasims
Midnight Out by Serenity
Euphoria by Serenity
Naomi Matching Set by Simpliciaty
Mauve Swimsuit by sundialsims
Wave Bikini by Trillyke
Simsa Star by Trillyke
Taffy Dress by TwistedCat
Cutout Tops by TwistedCat
Rainy day by Trillyke
Male Top/Pants/etc.
Softe Part 2 Underwear replacement by grimcookies
Basic Sweather by Gorilla
April 2022 Collection by QICC
PRADA Nylon Pocket T-shirt Set by RonaSims
SP34 Sweatshirt Conversion by AdrienPastel
Aquarius Collection by nucrests
Blue Moon Puffer Jacket Set by nucrests
Hot Cropped T-Shirt by Plbsims
Sloppy Tuck Jersey by Cement
Ethan jacket by MarySims
cerulean by boonstow
CC Pack - Feb 2021 by darte77
Denim on Denim Look by marsmerizingsims
[Continuously updating - more to come!]
Part 2, Part 3
17 notes
·
View notes
Text
Сангвин
Lookbook
Сангвин (ориг. Sanguine) — Даэдрический Принц, чья сфера — пирушки и радость, а также стремление к тёмным сторонам натуры — разврату и пьянству.

Причёска: https://www.patreon.com/posts/55381804
Рога: https://bellassims.tumblr.com/post/646953135253979136/i-made-this-purely-because-i-wanted-to-make-my-new
Наряд: https://www.patreon.com/posts/random-set-2-39809937
Кулон: https://mmatteog.tumblr.com/post/703628035810885632/sims4cassims-4-ccsims4sim4ccthesimsts4
Наплечник: https://www.patreon.com/posts/41935115
2.
Верх: https://www.patreon.com/posts/kaeya-shirt-64674327
Низ: https://www.patreon.com/posts/pants-set-01-75477067
Сапоги: https://www.patreon.com/posts/plazasims-set-by-32896021
3.
Верх: https://www.thesimsresource.com/downloads/details/category/sims4-clothing-male-teenadultelder-everyday/title/ye-medieval-peasant-tunic/id/1637008/
4.
Низ: https://lady-moriel.tumblr.com/post/694288208030203904/medieval-underwear-set

5.
Верх: https://www.thesimsresource.com/downloads/details/category/sims4-clothing-male-teenadultelder-everyday/title/ye-medieval-male-blouse/id/1636987/
Низ: https://www.thesimsresource.com/downloads/details/category/sims4-clothing-male-teenadultelder-everyday/title/ye-medieval-elias-pants/id/1640300/
Сапоги: https://www.patreon.com/posts/lonelyboy-ts4-56223556
6.
Низ: https://lady-moriel.tumblr.com/post/694288208030203904/medieval-underwear-set
7.
Верх: https://www.thesimsresource.com/downloads/details/category/sims4-clothing-male-teenadultelder-everyday/title/steampunked-zynn-male-top/id/1578704/
8.
Наряд: https://www.patreon.com/posts/43661325
Сапоги: https://www.simsfinds.com/downloads/256890/baldur-s-gate-3-astarion-outfit-by-satterlly-update-sims4
10 notes
·
View notes
Text
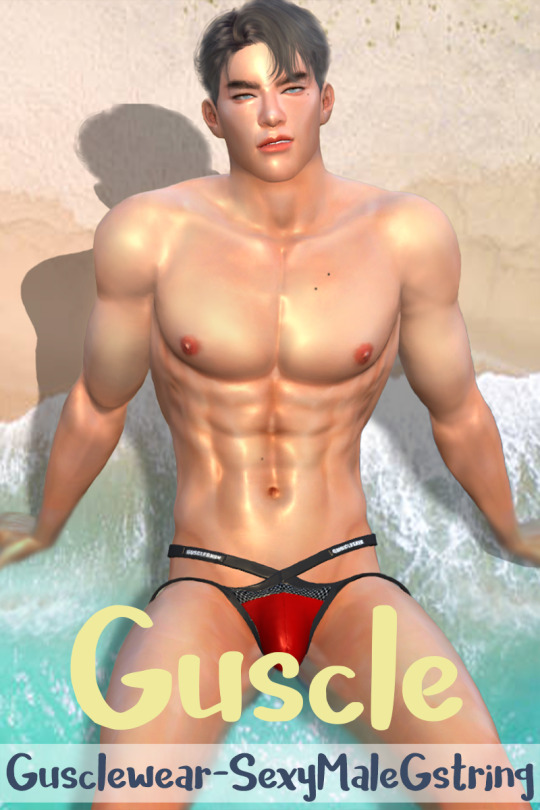

Gusclewear - Sexy Male G string
Features
Teen to Elder
Bottom Category
9 Swatches
Download Patreon
#sims 4 male underwear#sims 4 underwear#sims 4 sexy#ts4cc#ts4#s4#ccfinds#s4cc#sims4#sims4clothing#sims 4 cc#sims 4 male#sims 4 male cc#the sims 4 download#ts4 download#guscle#gusclewear#gusclewearx
37 notes
·
View notes
Photo
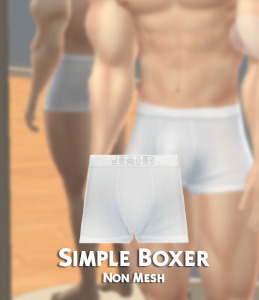


Basic Boxer for the Sims 4
this is a simple retexture just a little transparent and bigger
14 Solid Swatches
Custom Thumbnail
Teen - Elder
Not allowed for random
Download : SimFileShare
edit 27/11/19: Added Bulge Mesh
#download#ts4cc#s4cc#thesims4cc#sims4malecc#ts4mmcc#ts4mm#ts4 male clothes#s4mmcc#s4mm#s4mm male#s4 male cc#ts4 male underwear#ts4underwear#s4underwear#ts4 maxis match#ts4maxismatch#sims4 male clothing
290 notes
·
View notes
Link

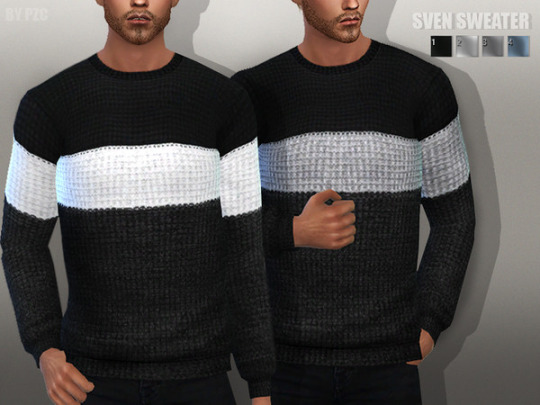
Sven Sweater

Terry Sweater

Bjorn Borg Briefs
#pinkzombiecupcakes#ts4 cc#sims 4 cc#ts4 male sweaters#sims 4 male sweaters#ts4 male clothes#sims 4 male clothes#ts4 male underwear#sims 4 male underwear#ts4 briefs#sims 4 briefs#ts4 urban cc#sims 4 urban cc#ts4 urban male clothes#sims 4 urban male clothes#ts4 urban male cc#sims 4 urban male cc#ts4 urban clothes#sims 4 urban clothes
62 notes
·
View notes
Text
Introducing... The Tattooer!
[This version is OUTDATED! Please, check the new version here. I updated the workflow, skipping a lot of unnecessary Photoshop editing. It's way faster! I'll leave this old version and files up though, for archiving purposes. But yeah I still totally recommend you use the new version!]
Finally! I’ve been working on this for so long and I couldn’t wait to share it. This is a series of Blender template files already set up to quickly bake textures from The Sims 4 to The Sims 2. Really neat for cc creators! The different Blender files will allow you to:
-Bake body textures from TS4 to TS2 (Female)
-Bake body textures from TS4 to TS2 (Male)
-Bake body textures from TS4 (Female) to TS2 (Male)
-Bake body textures from TS2 (Female) to TS2 (Male) [Bonus!]
-Bake head textures from TS4 to TS2 (Face + Scalp) [Experimental]
Check the file names to see which one is which, and the resolution of the baked texture it will give.
Download! SFS / GD
Everything you see in the render above was converted using those Blender files. I only did a couple tiny edits to the eyes and lips to fix them.
These templates were made mainly to bake and convert tattoos, but there’s more you can do with them if you get creative. I have to say, these are NOT perfect. Check out the eyebrows on the render above. They look a bit wonky compared to the original, don’t they? I left them as is to keep your expectations with these as realistic as possible. Results may vary depending on what you are trying to convert, so! With that in mind, this is all the stuff you will be able to convert almost seamlessly from TS4 to TS2:
-Tattoos.
-Other body details such as body hair, scars, freckles, supernatural/occult details…
-Body painted underwear and swimwear, as well as some other clothing that’s mostly painted on the body.
-Socks, stockings and maybe leggings.
-Even skintones! In some areas they will look weird, so I recommend editing and blending them with other existing TS2 skins.
-Makeup. Kinda bad but hey it works! Eyeliner and anything that is around the eyes looks terrible for now, but other stuff like blush may look just okay.
-Eyebrows and maybe beards. A bit of hit or miss with those.
-Hair scalps. Very useful when converting some hairs! Although keep in mind part of that texture might also need to be baked on the face mesh, you know, that hairline makeup stuff.
Got your attention? Nice! Editing some of the textures from TS4 to match the UV mapping in TS2 using a 2D editing program can be incredibly hard. That’s where texture baking in Blender comes to the rescue!
It is recommended you download Blender version 2.91.0, which is the one I use. Don’t worry, it’s free! There’s also 3 Photoshop actions you will need to set up the textures for baking and then putting them back together, because unfortunately Blender doesn’t support transparencies in that baking process, so that takes a couple extra steps to make it work, but I think it’s still pretty fast and easy. And just in case Tumblr manages to blow up or something, I decided to include a pdf with the upcoming tutorial that will guide you step by step with all this process, so if this post gets deleted somehow (I really hope not!), you will still have that pdf as a backup archived.
You can download Blender here. Personally I recommend picking the fourth option, “blender-2.91.0-windows64.zip”, which is a portable version and doesn’t need to be installed.
You will also need Sims 4 Studio to extract the original Sims 4 CC textures you want.
As for Photoshop… I’m not going to tell you to buy that subscription service and give Adobe some undeserved money, so… yeah, there might be some other options out there to get it (very legit, yes yes).
So, before we begin, let’s clear out some questions you might have. What the heck is this texture baking thing and what does it do? Well, let’s imagine you have a projector and point an image into a blank wall. Then you pick up some brushes and start painting and copying that projected image in that wall. Texture baking is kinda like that when it comes to 3D models. You align two models and match them as closely as you can in shape and form, and once you adjust some parameters and values, Blender does the rest for you: it will give you a new texture for a new model with a different UV map. These files I’m sharing have everything already set up, so it’s a matter of plopping in that Sims 4 texture and you will get that new texture for TS2 in just a few clicks.
This tutorial assumes you know literally nothing about how to use Blender, so if you feel uncomfortable with it, worry no more! This will guide you with pictures showing where you need to click and explaining what is happening. For Sims 4 Studio and Photoshop the process might be a bit less detailed, but still this should be pretty beginner friendly. For this tutorial, I will use some tattoos as an example. Alright, enough with the rambling. Let’s get started!
·EXTRACTING TEXTURES AND EDITING THEM WITH PHOTOSHOP:
First things first, you will need to extract as pngs all the textures you want to convert from TS4 using Sims 4 Studio. Once you’ve done that, open them up one by one in Photoshop and run the “No transparency” action. This will remove the alpha channel from the image, getting rid of all the transparency. Go ahead and save a png copy of it. Then run the “Make Alpha” action on those same swatches (from the beginning, make sure you’re not running the action on an already edited swatch!), which will only show the alpha channel of the image in black and white, and save another copy of that. You should have 2 textures for each tattoo swatch. For the “No transparency” action I like to name it BASE (And your swatch number or name), and for the “Make Alpha” action I usually name it ALPHA (And that same swatch number/name). I recommend saving them in different folders named BASE TS4 and ALPHA TS4 respectively to keep it organized. If you want to make this much faster in Photoshop, there’s an automation option in it that allows you to run an action through a batch of files in a folder and then saves it all. I won’t cover how to do it in this tutorial, but you should be able to find it easily on Google by searching something like “Photoshop automate batch”. It’s really powerful and will make your workflow with actions much faster. Definitely recommend learning about that!
·BAKING THE TEXTURES IN BLENDER:
PRELIMINARY STEP 1: CONFIGURING BLENDER’S GRAPHICS SETTINGS:
Open your preferred Blender file depending on what you’re going to bake and the desired resolution (in this example I’m going to use the AF-body-4t2-1024 file). Before we start messing around in Blender, there’s one thing you should set up. It is a onetime step, and once it’s done, you won’t need to do it again. So, does your computer have a dedicated graphics card? If you don’t know or you’re not sure, just skip to the next step. Configuring Blender so it uses your graphics card instead of your CPU will make the baking render much faster, so it is recommended you set it correctly.
If your computer has a dedicated graphics card, click File (1) > Preferences (2) > and on the window that pops up click System (3) > and select CUDA and make sure your graphics card is there and tick it (4). I have an Nvidia Graphics card but your case may vary. Once you’re done, click on the tiny button on the bottom left corner and Save Preferences (5).
PRELIMINARY STEP 2: CHOOSING THE RENDERING DEVICE:
Click on the tiny camera button on the right, called Render Properties (1), and on Device (2) select GPU Compute if it’s not already selected. If you’re not sure if you have a graphics card or not, just select CPU. Then select the Material Properties tab (2) and Save your changes, either by pressing Ctrl + S, or clicking File (4) > Save (5). Okay, time to get into the good stuff!
·STEP 1: LOADING YOUR TS4 BASE TEXTURE:
In the Material Properties tab, click the folder icon that says Open (1) and on the window that pops up, navigate through your folders and select your first texture. For now we’re going to bake the BASE texture, so go to that folder where you saved the edited “No transparency” image. To navigate easily, the 3 buttons on the top right (2) are for the display mode. They will show your files in list mode, vertical and horizontal, and the one on the right will display the file thumbnails, pretty useful if you want to easily see your images. And the icons on the left side (3) will let you go one folder back and forward, go to the parent directory, and refresh the folder in case you just dropped something new in there. Double click on the image you need and that will load it into the Sims 4 body model, named “ts4 body”.
·STEP 2: SETTING UP YOUR SELECTION AND BAKING THE TEXTURE:
On the top right of the screen, you will see the names of the 2 models in the scene. Hold the Ctrl key in your keyboard and left click on the “ts2 body” model (1). If you did it correctly, you should see “ts2 body” in a yellowish orange color, and right down below, “ts4 body” should look more like a red orange. If not, try again by clicking first on ts4 body, and then while holding Ctrl click again on ts2 body. Then switch to the Render Properties tab by clicking the tiny camera icon (2) and click Bake (3). Depending on your screen resolution, you might need to scroll down a bit with your mouse to see the Bake button. Wait a few seconds for it to finish. You will see the progress percentage down on the bottom of your screen. Don’t panic if you notice your computer fans start ramping up, that’s completely normal! As I said in the beginning, using your GPU will bake the textures much faster than the CPU.
·STEP 3: SAVING YOUR NEW TS2 TEXTURE:
Once it’s finished, switch to the UV Editing Mode by clicking “UV Editing” on the top of your screen. And there it is: your new texture! You might have to scroll up your mouse wheel a bit to zoom in and see it in all its glory on the left side of the screen. We’re still not done yet though. You need to save it to yet another new folder (always try to keep your stuff organized!).
You can save it by pressing Shift + Alt + S, or clicking on Image* (1) and then Save As… (2). That will pop a window where you’ll need to navigate again and save it somewhere. Give it a proper name (3) and hit Enter to save it… well, Enter doesn’t always work for me for some reason, so if that happens just click Save As Image (4). In this case, I personally like to call it something like “BASE TS2”.
·STEP 4: GOING BACK TO STEP 1:
Alright! So you have your new baked base texture, but we still need to bake the alpha channel to give it its transparency. In order to go back to step 1 and start the process once again, click Layout (1), go back to the Material Properties tab (2), select “ts4 body” (3) and click on the folder icon (4) to open and load the alpha texture you did in the beginning in Photoshop.
Then it’s just a matter of repeating the process from step 2: bake the alpha channel and save it again as a new image (watch out, don’t overwrite your previous image!). This one I like to name “ALPHA TS2”. When you’re ready to move on, close Blender without saving. If you see a small check telling you it will save some images, make sure you uncheck it, so you will be able to use it again in the future from the starting point with no issues. I don’t think it really matters if you accidentally save your progress in these files, but I like to keep it clean and fresh so I can do the process where I left it from the beginning the next time I open it. And in case you mess up and save somewhere, you can always just delete the .blend file and download the template files again.
·FINAL STEP: PUTTING EVERYTHING BACK TOGETHER IN PHOTOSHOP:
We’re almost done! Open Photoshop and drop in both your 2 new baked textures, “BASE TS2” and “ALPHA TS2”. Keep both layers on top of each other and aligned. For that you can enable the snapping in View > Snap to… > All. Rename these layers so the Alpha layer is “ALPHA” and the Base is “BASE”, and make sure ALPHA is on top.
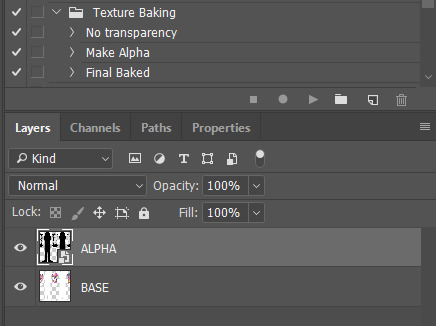
Then run the “Final Baked” action and now for real, it’s finally over! You just fully baked and converted these new textures. Congratulations!
So, to summarize, here’s a small guide with all the steps of the workflow I developed. Once you get the hang of it, baking and converting one swatch of a texture just takes a couple minutes. It really is that easy!
One small note though, some of the baking blend files save the textures with a resolution of 2048x2048 pixels, as clearly stated at the end of their file name. That’s way too overkill, because TS2 only properly supports up to 1024x1024 for most of its textures and you should always resize your final product to that max resolution. I just made those 2048 versions because there might be some really tiny and slim details on some tattoos that may look a little too blurry when baked into a 1024 resolution, so for those cases use that if you want and then resize them in Photoshop. In the Resample mode of the Image Size menu, there are a few options to choose. For the fine details, I like the Nearest Neighbor (hard edges) option, which, even if it looks a bit pixelated, it still preserves most of the texture and quality.

For anything else, I would just directly bake them using the 1024 versions in Blender.
And for the folks who feel comfortable playing around in Blender, this is just the beginning! Texture baking opens a LOT of possibilities, so feel free to move stuff around and edit the models to your liking! If you notice the baked textures look warped or stretched somewhere, or don’t like where some textures are placed in the S2 body, poke around that area moving stuff and then give it another try. The main objective of the baking process is keeping both overlapping models as close in shape as possible. You may also edit and save new copies of the templates, or make new ones from scratch using mine as a reference (keep a close look on those Baking settings and values, I think they work pretty well) and share them if you want to. Go ham, do whatever you want with them! I have plans on making templates to convert body textures from Sims 3 to Sims 2, but for now it’s not on my priorities, so we’ll see when that happens.
Whew! Hope none of this was too confusing. Need help or have any issues with these? Please ask/message me and I’ll be glad to help when I’m able to!
Credits for the CC used in the render demonstration:
-Skin by Sims3Melancholic
-Eyes by Northern Siberia Winds
-Eyebrows by PeachyFaerie
-Tattoos by xtc
-Top by SerenityCC
And the Tattoo I used for the tutorial can be found here, by ValhallanSim
Last but not least, a huge, special thanks to @elvisgrace for all her help testing this for me. I’ve never shared Blender files, so hopefully everything works as intended and everyone can use them with no weird issues. Fingers crossed! And thank you for reading! Hope you have fun playing with this new toy hehe.
#ts2 tutorial#ts2 resources#ts2 blender#ts2 overlays#ts2 texture baking#4t2 conversion tutorial#i swear blender is the coolest thing ever#yes you can consider this post as blender propaganda
303 notes
·
View notes
Last Seen Blogs
glass-coffin-will-graham
Saw Trap That Man!

avidaem8bits
a vida em 8 bits

stuffish
everything you need
quietbutnotblind
Courage, Dear Heart

trekkingestilodevida
Sem título