#watch a tutorial to tie it once and then just loosen it to remove it and never untie the knot
Text
Sometimes I just get the most nonsensical crossover ideas.

Doki Doki Literature Club! Milgram Edition
Does this make sense? No.
Was it fun to draw? Yes!
And that's what's important!
#milgram#mikoto kayano#haruka sakurai#shidou kirisaki#fuuta kajiyama#doki doki literature club au#i think this might be the first time i've properly drawn shidou#the reason it's only the boys is because i wanted to make a separate version for the girls#sorry for the lack of kazui there's only 4 characters in ddlc#minus the protagonist but nobody cares about him#fun fact! shidou's shoes are the same purple as his prisoner color while everyone else's is blue#just like how monika's shoes are different from everyone else's#fuuta ties his jacket around waist to emulate his Bring It On knight outfit (i really hope his T3 outfit does this)#i wanted to fuck his tie up (to imply he doesn't know how to tie a tie) but then realized that he'd probably be the type of person to#watch a tutorial to tie it once and then just loosen it to remove it and never untie the knot#this was originally a sketch but i got a bit carried away and colored it#I wonder how obvious my struggle with haruka's pose is#his upper legs look off but i don't want to keep changing it over and over again#random thought! Natsuki's first 2 poems actually sort of fit Fuuta I think#i can imagine him writing Eagles Can Fly#Both Sayori and Mikoto are also people pleasers and depressed so yeah#and Shidou gives me a Monika vibes IDK why
113 notes
·
View notes
Text
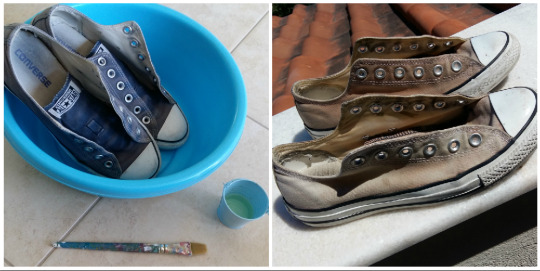
Metal DIY Projects #7: Thrash-as-fuck shoes

White high tops and skinny jeans. If that doesn’t scream 80s fashion to you, I don’t know what else does. Thrashers have been wearing these since the early 80s, thank Lemmy that they are back in fashion and we can find them everywhere for decent prices.
But, what if you don’t have a pair of high tops? Maybe they don’t fit your style, maybe you have amazing friends that will step on them just for giggles.
I’m here to show you a great alternative to flashy white high tops, that you could make with things that you could have laying around the house!
The materials that you are going to need are:


1. First, find thes shoe that you are going to use for the DIY. For me, personally, it was this pair of Converse that I had for so many years now, that from dark blue, they turned grey, and they pink-ish brown. I was going to throw them away, but then I had this great idea..!
The only thing that you have to watch out for, is the fact that not all fabrics change colour with bleach. Synthetic fabrics will not change colour at all, while those made out of cotton will turn completely white after a few hours.
To test this out, drop a drop of bleach on the fabric of the shoe and let it do its work for an hour. If the fabric has changed to white (or at least cream white), your pair of shoes will do just fine for this DIY!
2. Prepare the shoes for bleaching. Remove the laces and put them aside. Wipe any mud and dirt from the shoes and put them in a bucket. Take them outside, in a well ventilated space, like a balcony.
Make sure that you are wearing old clothes that you don’t mind staining. Wear your mask, or at least tie a cloth over your nose and mouth. You don’t want to breath in the bleach as you work. It will make your eyes itch, and your throat will feel dry and sore. Wear plastic gloves and secure them around your wrists with hair-ties. Finally, if you have sensitive eyes, wear sunglasses.
In a container, mix 3 parts of bleach and 1 part water. With a brush, start applying the mixture on your shoes. Make sure to cover the entire shoe as you work, and that it is absorbing the mixture well.
Personally, it took me five coats to reach the colour that I wanted. You can see how mine looked like after the first application of bleach and... yeah they suck. They look worse than they did before I started. Continue applying bleach until you are satisfied with their colour.
Also, make your life easier by letting them in the sun between coats. The sun will speed up the process so much more! I did this twice, once on my own on a sunny day and once with a friend on a rainy day.
It took me two hours with breaks to bleach them out, but when I did it in an enclosed space with no light, it took an entire evening. Good luck to people living in countries where sun is scarce. xD
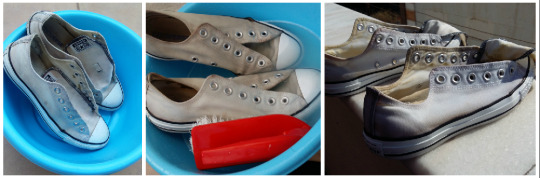
3. Time to wash all the bleach away! Start by letting them dry once they are white enough for your taste. Take them inside and start rinsing all the bleach off under running water. It is very important that no bleach stays on the fabric of shoe, because if it does, it will start leaking into your socks once you start sweating. This might cause skin iriitations, so watch out!
Once your shoes stop giving off that weird smell that bleach has, put them in your bucket and apply detergent all over them. With a hard brush (or with your hands if you can) start cleaning the shoes, until no dirt and dust is left.
Let them dry in the sun for about two days. You want them to be completely dry before you move to the next step.

4. As you wait for the shoes to dry, wash your shoe laces with some more detergent. Applying bleach won’t make them any whiter, as they are made from synthetic fibers, so try your best to clean them. Let them dry too.
Lace up your shoes and walk them around for a bit, to break them in. Converse have a tendency to tighten up after washing, so take a walk around the house to loosen up the fabric.
Now, your pair is white as a fucking canvas! You can either leave them like that, or you can follow the steps below to add a design of your choice.
And of all the things I could have choosen, I decided to write EET FUK on them.
Yeah. So unique, I know.
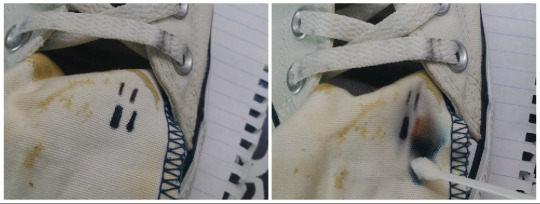
5. Time to test out which inks will work the best. I turned the tongue of my shoe inside out and and drew four lines with four different pens/markers:
Ballpoint pen
Archival Ink
Permanent maker
Colouring marker
Then, I soaked the fabric with water and started rubbing them with a cotton swab. I went with the ballpoint pen and the permanent marker, as they were the onces that even after 10 minutes of rubbing, faded/bled very little.

6. Using a picture of the guitar as a guide, I sketched out the EET FUK sticker on a piece of paper. With an exacto knife I carved the basic outline of the letters to use it as a stencil then taped it on the shoe.
With a pencil I marked the outline on the shoe and removed the stencil. I did the same thing for both shoes.

7. I went over the outline with the pen, and then did the same thing with the permanent marker. Using my picture as a guide, I smudged the ink to make it look more like the sticker and added more details with my pen.
I did the same thing for the other shoe, and erased any remaining pencil outline with a white eraser.
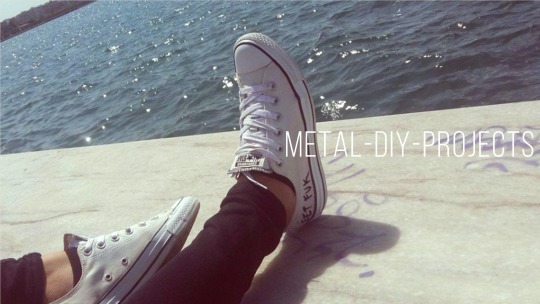
Aaaaaand you’re done!
Thank you for following through this tutorial and I hope I have helped you out somehow! Send in any questions that you might have, submit your own DIYs, or even send picture of what you have made for me to feature on my blog!
Fun Story: I always wanted to get my hands on that legendary guitar. I saw once a replica at a local guitar shop and I was drooling in front of the glass display, long enough that one of the employees came out of the shop and asked me if I wanted to come inside and play it.
#metal#thrash metal#heavy metal#diy#do it yourself#metalhead#shoes#shoe#eet fuk#metallica#hetfield#white#bleach#bleaching#craft#arts and crafts#crafts
19 notes
·
View notes
Text
How To Maintain Hairstyle While Wearing Helmet
There is nothing worse than arriving at the office with hair that looks like it has been dragged through a ditch. Here is our tutorial that explains how to avoid it.
Hello, fellow motorcycle riders. I just wanted to go through how to maintain your hairstyle while wearing a motorcycle helmet, especially when you have hair that is medium-length or longer.
In the past, people would just put it in a ponytail (braided hair), well, the problem with this is I’ve never known how to do a ponytail and to do a decent one someone else has to do it for you.
If you don’t have a partner you’re probably not going to mess with that. Ther are also things called hair gloves which are these tubular things that have snaps on one side that you would throw your hair back and snap it inside this long tube.
The problem is those tubes still leave five to six inches of your hair hanging out the bottom which is still gonna flail in the wind and especially if you have long hair which most women do.
Anything that flails in the wind is going to be all tangled up at the end of a few miles, so what are you supposed to do?
Other bike riders have taken hair bands and put them at various links in a ponytail, the problem with that is your hair tailors and gets thinner towards the ends.
The chances are your hair bands at the end are going to fall off on the road at some point and then you’re gonna still have 6 inches of hair flailing around in the wind getting tangled.
Here’s what I do and this works. It took me a while to figure this out but it works with just a $1 bandana.
First of all, take your hair and just throw it back as if you were going to put a band into your hair and put a hairband into your hair, something you probably do every time you put your motorcycle helmet on.
Now go get yourself a $1 bandana roll the ends in together until you get a long band then place it below that hairband at the back of your head then in the front just tie it off like you would a shoe but don’t go too tight.
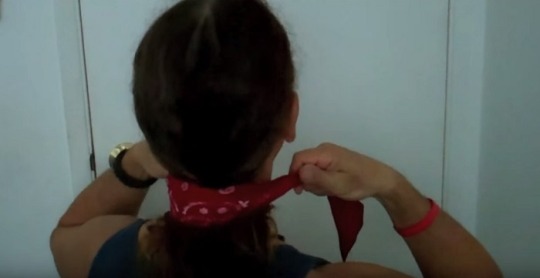
Image Taken From https://www.youtube.com/watch?v=WzxqDQsxoSU
Take the free ends and put one over and one under on the other side this will make it where the wind resistance won’t loosen it.

Image Taken From https://www.youtube.com/watch?v=WzxqDQsxoSU
At the back, your hair should be underneath the bandana being held down. Give your hair a few twists with your finger and wrap it under the bandana this should stop the back of the hair flapping around in the wind when you are out on your bike.

Image Taken From https://www.youtube.com/watch?v=WzxqDQsxoSU
This will last you 10 miles, a hundred miles, 200 miles it doesn’t matter. If you have a cap or a half based helmet or a full-face helmet this will hold forever, the best part is it will only take you about 30 seconds to do this.
Once you reach your destination you can just remove the bandana and you are good to go. This takes literally seconds to do and you will not experience one single tangle again on your motorcycle.
Some people prefer to wear a headscarf which will cover more of the scalp of your head so I thought I would include a short tutorial on how best to tie a headscarf.
How to Tie a Biker Head Scarf
For bikers, head style is for those that are out on the open road and the main concern is keeping your hair out of your face, but just because you’re playing it safe does not mean that your style needs to go out the window.
First, bring the scarf up around the back of your head and right above your brow line, this should create a triangle in the back.
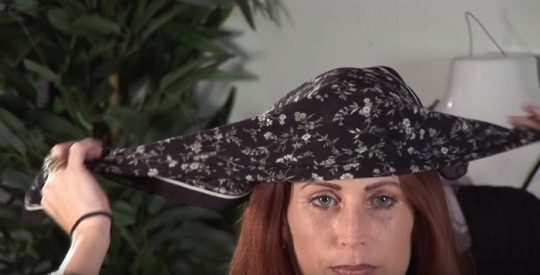
You can then take both ends and tie it once and twice and you’re ready for the open road and stylish for those of you with long hair and you need to secure that as well you may want to tie your hair back so that you say stylish and safe.

Related Questions
Is Wearing A Motorcycle Helmet Bad For Your Hair?
Anyone who wears a helmet for long periods can have issues with their hair. It doesn’t matter if you are wearing your helmet for legal reasons like a motorcycle or you take part in a contact sport prolonged wearing of a helmet can cause problems.
Traction Alopecia
Constant pulling or tension being put on your hair can cause damage to hair follicles over a period of time. This called traction alopecia.
Traction alopecia can often be seen in those who wear tight helmets or a bandana, hair braid, ponytails for prolonged periods.
This happens when someone wears a motorcycle helmet that is too tight for them, to avoid hair loss when wearing a motorcycle helmet it’s important you purchase the right size helmet for your shape of the head.
The constant pulling of your hair, especially from the roots, can cause permanent hair damage so again having the correct fitting helmet is very important.
One way to avoid this is too not to tighten the helmet too much, keep it tight enough so that if you had an accident your helmet would still be tight enough not to fall off but loose enough so that your hair follicles are not pulling all the time.
Bacteria from sweat can cause issues, especially if you live in a state like Florida where the temperatures are a lot higher. Bacteria can build up especially in areas where you have the most padding which can over time, make your helmet a little smelly.
It’s important to keep the interior of your helmet clean so regular cleaning of your helmet interior is essential. There is an antibacterial solution available that you can use for the interior of your helmet after every ride. I use Neutramist Helmet Sanitizer available from amazon, I find this to be good for those people who like me suffer from a sweaty head after riding.
0 notes
Text
Nautical Organization: Easy DIY Floating Rope Shelf
Hi everyone!! It’s Emily from Table + Hearth here again from the Texas coast with a project using one of my favorite materials to work with…rope!
When we welcomed our son last year, we had to switch some rooms around to make the nursery. Our office had to become the guest room which caused some awkward ugly clutter when we had to remove the desk so the bed would fit. All of our internet connections and wires now just lived on the floor in this little nook where the desk used to be and our printer and all our office supplies were just hanging out under the window. Real inviting and classy, right?!
That small nook where the desk used to be is only about 12″ deep so finding a new desk or cabinet that fit was proving slightly difficult as most were about 14″. The footboard of the bed is right in front of that space so we don’t have a lot of clearance for anything to stick out. Like any true DIYer, I eyed my ever-growing scrap wood pile and started thinking of creative ways I could organize that small space.
Watch and subscribe to the Remodelaholic channel on YouTube, please!
youtube
A few boards, some rope, and some boat cleats and we now have a super cool nautical-inspired storage shelf that makes those unattractive necessities not seem so hideous!
Nautical Floating Rope Shelf Tutorial
I used two walnut boards I had left over from another project as well as a weathered old 2×4 that our friend Hurricane Harvey left for me. The nearby destruction from Harvey was/is absolutely horrible but if anyone was looking for old weathered boards they were in luck. We drove around the island for weeks scouring the set out debris piles for beautiful old chippy weathered lumber to build with
This post contains affiliate links. Learn more and read our full disclosure policy here.
Materials Needed
Rope
Boards/reclaimed wood – I used two 1″x6″ walnut boards and an old 2″x4″ of “Harvey wood”
2 wall cleats
Kreg jig and clamp
Hole saw
Drill
Palm sander
Miter saw or circular saw
Wood stain (I used a weathering stain)
Scissors
Stud finder
Level
Anchors and screws
Instructions
Measure how long your boards need to be then make a mark where you would like your rope holes. I marked mine roughly 8″ in from the edges.
Choose a hole saw bit that will allow plenty of room the rope to pass through (and two ropes per hole on the top board). For my rope it was the 1.5″ bit. Carefully drill your holes in each board. I have found it is easiest, and makes the cleanest edges, to drill about halfway through from one side of the board then flip it and finish from the other side.
Since my bottom board needed to be wider, I joined 6″ wide walnut boards using my Kreg pocket hole jig. I put pocket holes 3″ in from each side, then every 10″ or so in between. You just want enough evenly spaced down your boards so that they are firmly joined together.
Before joining the boards I stained them with my favorite reactive/aging stain and let them dry. The walnut gives a beautiful light gray with this stain and matches perfect with the true weathered Harvey board as the top shelf.
Once dry, I finished joining the boards by screwing in the Kreg screws. Now my boards were all ready to be hung!
Level and install your cleats using heavy-duty screws into a stud or use drywall anchors if necessary.
Tie your rope onto the cleat using whatever sort of knot you want. I have no idea if this is a legit nautical tie or not, but I just went with it because I liked the way it looks and because my boating husband was gone. I’m sure there are a handful of fancy nautical knots you can do!
Thread your ropes through one of the first board’s holes and tie a knot for it to rest on. These steps are MUCH easier with an extra set of hands but can be done solo I promise, that’s how I did it
Set your level on the board while you thread the rope and make a knot under the other hole. Adjust the knot as needed by loosening and re-tightening it to get your board level.
Repeat this same knotting and leveling process for the bottom board then trim the excess rope when you’re all done.
It is SOOOO much nicer to have all of our gear up off the floor, have the space below the shelf free and clear, and have a unique and fun little space to display cute signs and decor for our guests! I will still probably try to find some slim lidded baskets for underneath to contain all those office supplies but it is fine hidden in the closet for now
Re-wrangling the extra cords into our sneaky cord-hiding box also helped clean up the look. I’ll probably find a couple more small frames to put in front of it to conceal it a little more but luckily it is white like our other equipment and blends right in.
I just love the weathered finish and little chips of paint left on that old top board, plus it is a little reminder of Harvey and making something useful and beautiful out of his destruction <3
It was fun to repurpose some of my hoarded wood pile to make a quick and simple solution for this difficult little space in our home! I am so thankful for DIY projects when there are wonky-sized spaces you need some sort of storage in. I don’t think we ever would have found quite the right piece of furniture for this little spot, and I’m glad we hadn’t now that these fun shelves are there!
See y’all again in a few months!
In the meantime check out some of my favorite shelving/storage projects below as well:
DIY Industrial Pipe Shelves | Hanging Book Holder | Hanging Crate Closet Storage
More wall shelves to DIY:
DIY suspended shelving with chain
DIY double-decker rope shelves
repurposed wall shelf from upcycled old books
plus more beautiful shelving ideas:
The post Nautical Organization: Easy DIY Floating Rope Shelf appeared first on Remodelaholic.
from RSSMix.com Mix ID 8265713 http://ift.tt/2FDChTh
via IFTTT
0 notes
Last Seen Blogs

stygiovictoria
ignis
layan-bra-panty-mertua-member
Untitled

karmic-toast
Eternally a Xiao simp

blythewoo556-blog
What You Havent Heard About products

wesjamflem
Wesley Jamal Fleming