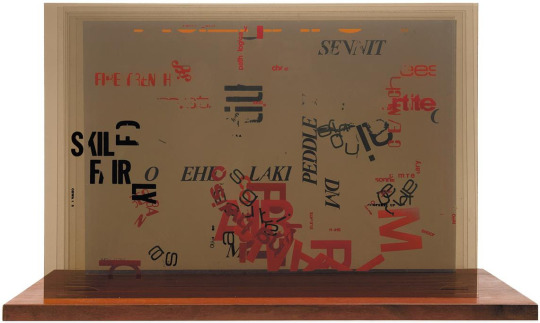
#screenprint on wood
Text

Peace Dove
Shepard Fairey
Screenprint on wood, 2011
75 notes
·
View notes
Text
#John Cage#Not Wanting to Say Anything About Marcel#Plexigram I-VIII#(eight colour screenprints on plexiglass wood base)#1969
27 notes
·
View notes
Text
Well what a relief, project finished. Exhibition up on Tuesday.
3 notes
·
View notes
Text
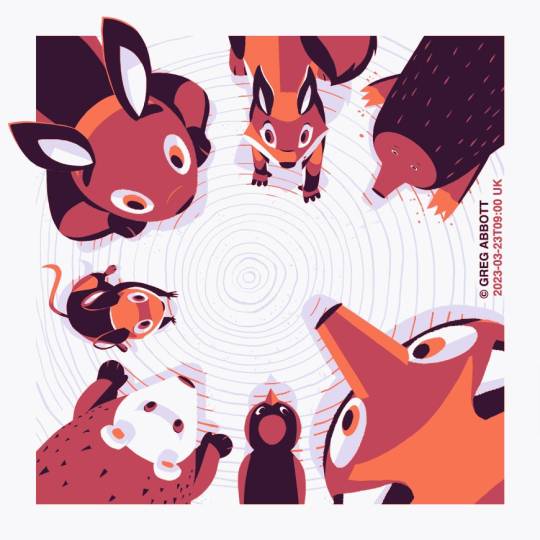
"A Discussion". © Greg Abbott 2023 MAR 23. 2023_0323_0900.
#friendly#animal#character#characters#gregabbott#greg abbott#forest#woodland#woods#screenprint#silkscreen#limited palette#fox#bird#hedehog#mouse#rabbit#bunny#squirrel#mole#tree stump#stump#downshot#illustration#art#2023#2016#nature#limited colours#screen print
8 notes
·
View notes
Text


Some pieces I made in late august. I was really experimenting with simplifying my forms and lines so that more of my drawings could be translated to other media like block/ screen printing and pyrography- which I hope to spend more time with in 2023.
#artists on tumblr#digital art#procreate#procreate art#illustration#kymberli janine#original art#fantasy#wlw#block printing#screenprinting#wood burning#pyrography
12 notes
·
View notes
Text
MA interim show
This year there are only eight people completing there MA in Fine Art. We have worked well together and curated our own interim exhibition at The Birley Gallery Preston.
I decided on two pieces of art
Enclosure screenprint 90cm x105cm
As I walk I have been struck by the number of fields which have filled with houses. Places where children used to play and footpaths we used to use have…
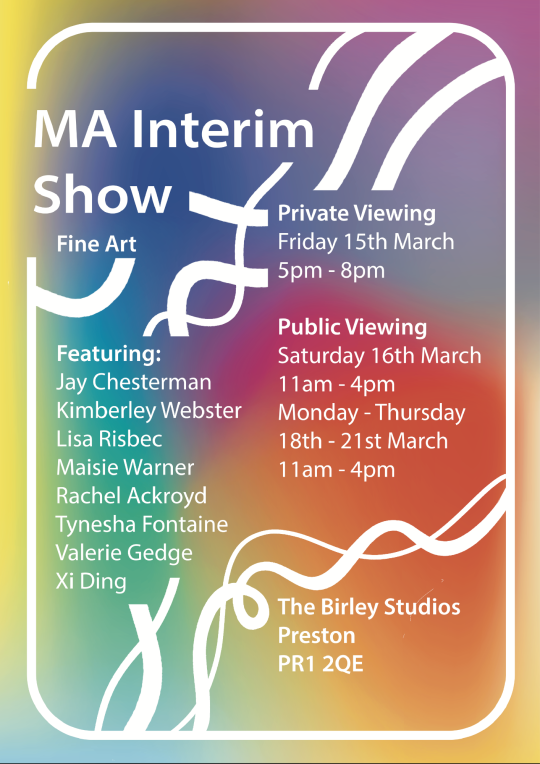
View On WordPress
#found objects#art#digitalmanipulation#Fine art#flowers#landscape#mans influence on the planet#nature#screenprinting#sculpture#uclanstudent#wood#Printing
0 notes
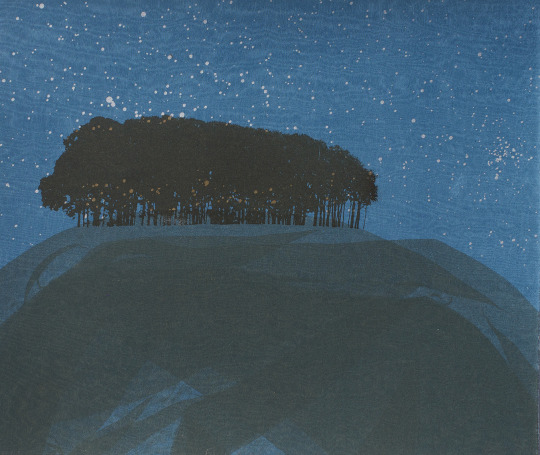
Text

Marina Apollonio, Dinamica Circolare 5F, (screenprint on wood), 1965-1969 [Museum Haus Konstruktiv, Zürich. © Marina Apollonio]
410 notes
·
View notes
Text
Fairy Wood - Anna Harley
British, b. 1931 -
Screenprint on somerset paper , printed to the deckle paper edge, 38 x 32 cm. Ed. 10/12.
477 notes
·
View notes
Text
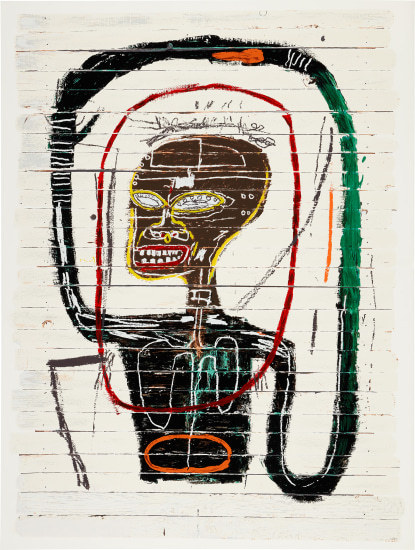
Flexible
screenprint of wood-panel painting of 1984
Basquiat
110 notes
·
View notes
Photo
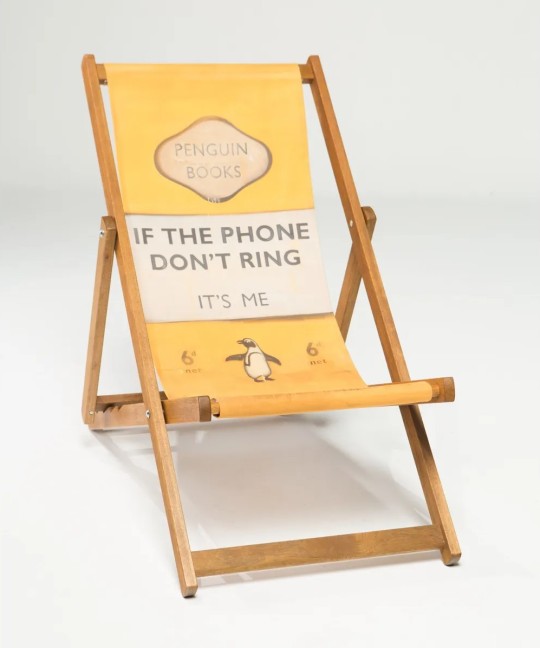
Harland Miller - Deckchair - If the Phone Don't Ring, 2013
Screenprint on canvas with merpauh wood (122 x 53 cm)
174 notes
·
View notes
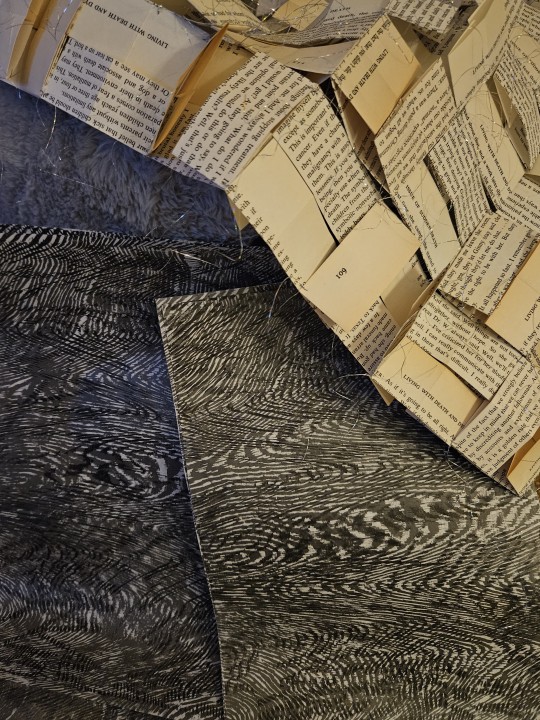
Text
The vintage death vibe is coming together with digital print, woodcut, paper folding and stitching.
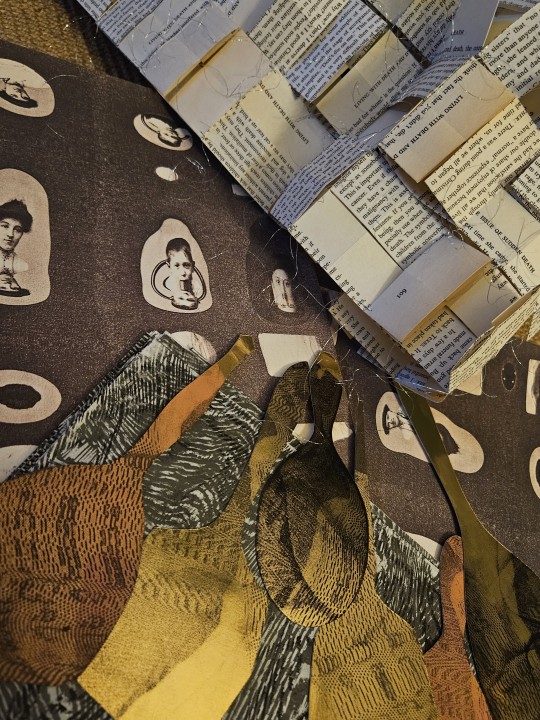
Sometimes you think you haven't made any progress to then realise you have done more than you think.
Little and often is paying off perhaps.
3 notes
·
View notes
Text
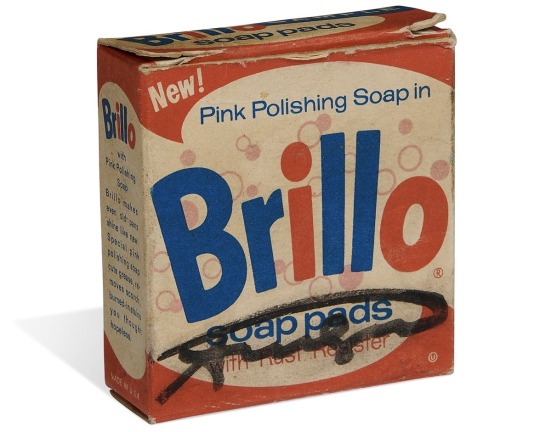
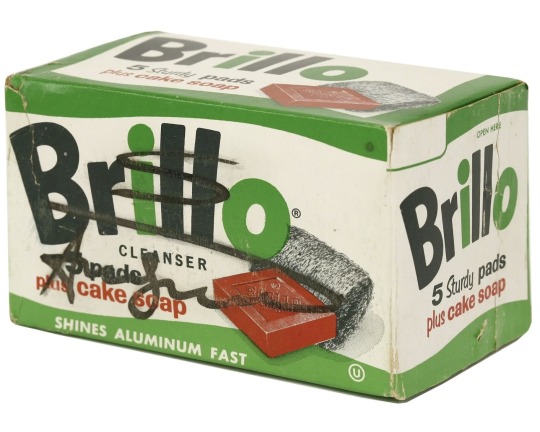
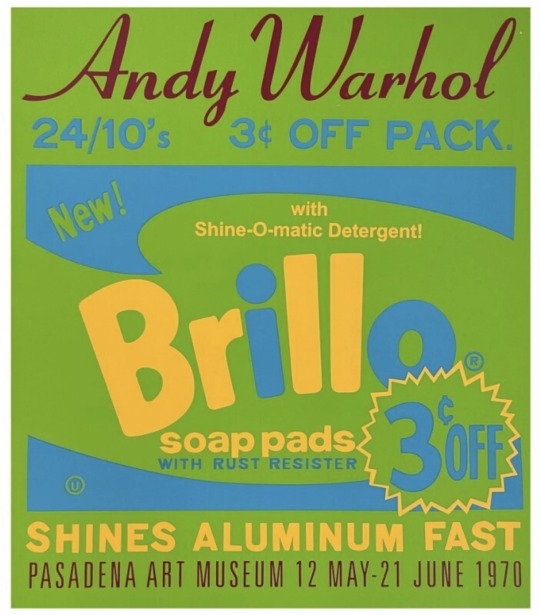
Andy Warhol, Brillo Box, screenprint and ink on wood
Andy Warhol, Brillo Box - 5 Sturdy Pads Plus Cake Soap
Andy Warhol, Brillo Pasadena, 1970
#andy warhol#pop artist#pop art#american art#american artist#american painter#american painting#new york artist#queer artist#queer painting#queer art history#brillo#pop culture#modern art#art history#aesthetictumblr#tumblraesthetic#tumblrpic#tumblrpictures#tumblr art#aesthetic#beauty#tumblrstyle
14 notes
·
View notes
Text
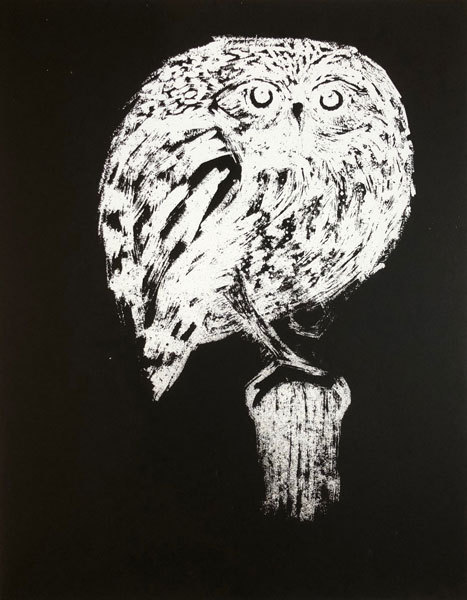
John Norris Wood 1930 - 2015, Athene, Spirit of the Night 5/24 Screenprint 51cm x 40cm.
28 notes
·
View notes
Text
quick rundown of different ways i've made patches
for @pescabianca cuz they asked lol
gonna start by saying i'm far from an expert on any of this, especially proper screenprinting and blockprinting. i'm just some guy that's been winging it for the past 3 years and it's just kind of what i do now? idk. here's the methods i've used for making patches
method 1: stencil and fabric paint
in which you're making a stencil and painting by hand. first time i made patches i hand carved out the letters on some cricut vinyl (i didn't have a cricut i just used a craft knife and taped it to my desk), put it down on top of a piece of fabric and sponged on some fabric paint. you can also use cardboard or cardstock you tape down for the stencil and tape down, whatever you got, i just find the vinyl was the easiest to make it not bleed as much. pretty simple, pretty accessible. the vinyl option is more for a single patch, smth like a cardboard stencil is better for multiple. make sure to use an iron to set in your paint once it dries
method 2: diy screen with mod podge
you can make a simple screenprint with mod podge, some kinda mesh fabric and an embroidery hoop. take voile or chiffon, pull the fabric taut on the embroidery hoop, and sketch on your design with a pencil (be careful as to not rip the mesh). remember that the flattest part goes down on your fabric, so make sure youre drawing inside the hoop.
paint on the mod podge in the negative space of your design, let dry. you can at this point use screen printing ink or continue with fabric paint, i think this was the time where i first bought screen ink. put your screen flat onto your fabric, some ink/paint at the top of the screen, then use an old gift card or id as a squeegee to do the actual printing part, dragging it down in a scraping motion. pull away and leave the patch to dry. you probably wanna iron it to set in the ink once you're done.
this is good esp if youre printing a bunch at once but doesnt wash very well so it can be kinda one and done sometimes? i used fabric mod podge so it lasted like 2 gos before getting all gross. but if you already have this kinda stuff laying around for other crafts, its pretty simple and introduces you to screeprinting somewhat without spending too much money
inspo/instruction link
method 3: screenprinting
getting/making an actual screen, you can just buy them online tbh, though it's not too hard to diy imo, especially if you're good with wood (haha) at all. i'm not, the way i diy'd it initially was finding some cheap wood picture frames from the dollar store or smth, pulling the screen mesh taut with a big embroidery hoop cuz i didn't have clamps and such, and using the staple gun to staple them onto the frame. it works just as well tbh, but i don't know how much i can speak on the longevity of dollar store frames or how well i attached the screen mesh, those are kinda skills in of themselves you gotta hone which is why this is all so much more involved
speaking of which, the next part is emulsion. i use jacquard emulsion fluid because it's cheap and i'm used to it. speedball is fine but i bought a bulk bottle once that was expired and i've never forgiven them for it. emulsion is a fluid thats mixed with a photosensitive fluid that causes it to cure and harden in uv light. you spread that across your screen, leave it in a dry, dark place to dry overnight (i used to use the bottom shelf of a bookshelf with a curtain over it, then the top drawer of a dresser. you can put it in your closet or something, depends on the space you have.) keep it in that dark place until you're ready to use it, otherwise you risk hardening it by accident.
once you've got a screen prepped, you want to have a transparency of your image in all black so light can get in everywhere but your design, and then expose it either to the sun or a lighting set up that you've bought/made. once you've cured it, you can then remove your transparency and you should be able to rinse out the emulsion fluid that was under it, leaving you with a screen to use!
for lighting setup, i use a flood lamp type thing that speedball sells that i bought years ago off of blick, i think? since the places i've lived have very specific times of day where you get direct sun to reliably use, at a certain point getting the lamp became worth it. depending on what you're using both in terms of your emulsion fluid and light source, the curing time can be very different, but this method allows for fine detail that can be difficult to attain by hand. stuff like screentones to create gradients, and the ability to make several screens for different color layers. it can be tricky to do sometimes but the ease of making more complex designs and having longer lasting screens can be worth it
also at this point you definitely want to be using actual screen printing ink, probably. you can buy a squeegee, i often still just use old credit cards and such, especially with my smaller designs, so it's up to you on that end. make sure you're using fabric ink, not acrylic ink, for your patches. just in general be aware of what type of ink you're getting, i use water-based inks that rinse out the screen easy with a spray bottle of water and some paper towels (you can also just rinse em in the sink but mine is too shallow lol).
i'll link to some tutorials i used when starting out, cuz this stuff is a lot easier with a visual aide and i don't think i explained it very well skdjf
youtube tutorial // tutorrial 2 // tutorial 3 // screens i used to get // emulsion fluid i use
method 3.5: screen filler
if you liked method 2, you can use the screen filler method to make screens, i've never done it but i understand it's similar in that you are basically panting on the negative space or something? again, i've never done it, i've just used emulsion after moving on from the mod podge method.
method 4: blockprinting
block printing is pretty straightforward, imo. basically you take a block of rubber or linoleum (or wood but i've. never done wood printing but it's fairly similar in basic method afaik) and trace or draw a design onto it. you then carve out the negative space of your design, leaving an impression of only the part you want to print. you then take a brayer/roller, roll it in ink until it's covered and then roll the ink out onto the raised part of the block that remains once you've carved it. take your fabric and press it flat onto the inked block, using something smooth like the back of a spoon to press it down and make sure your ink gets in there. i usually always make at least one more patch than i need with this method, since the first print often tends to be a bit rough/light and it improves over time. like your first pancake bein the worst one i guess. when you're done, you can wash the blocks with soap and water, maybe using an old toothbrush to get in all those crevices. but that's it, it's intense on focus, time, and physical effort, but pretty straightforward
note that when you blockprint something, the image will be reversed, so if you're drawing directly onto one keep this in mind. what i usually like to do is take some paper and put it over my original sketch, draw over it with a soft charcoal, then press it down onto the block to transfer the image. that way it makes sure your image is flipped, and it's a hell of a lot easier than any of the weird printer methods i've seen.
btw you can get a plate for rolling ink onto but i'll be honest? for about a year or two i just used like panes of glass i had from the picture frames i used for screens or i'd tape a piece of plastic or transparency down onto the table/desk. it's like, slightly easier now that i have an inking plate, but only just because it's a bit less waste, but it doesn't change much, imo. i even sometimes prefer using a gel printing plate, which is not really supposed to be used the way i'm using it! honestly, as long as your surface is flat and smooth it seems to be fine.
theoretically you don't even really need to use block printing ink, but i'd always struggled using other stuff? idk. if you're making patches, id suggest getting some fabric blockprinting ink. it'll take a day to dry, a bit longer than screenprinting ink, but it'd very sturdy. you can iron it to help secure it like the other stuff, but if you let it dry a couple days you might not even have to.
youtube tutorial/inspo // carving tools i use // some rubber blocks to start with // rubber brayers for rolling ink
note: if you can find any art supply exchanges, they're great for getting supplies for the latter methods on a budget. in chicago, there's a like, art supply thrift store of sorts called the waste shed where i got most of my early blockprinting supplies for pretty cheap, and if i didn't have those, i probably wouldn't have started making blockprints when i did.
note 2: this is all for printing on fabric, but you can also get acrylic screen printing ink or block printing ink for making prints on paper if you want!!
17 notes
·
View notes
Note
crashes in with my printmaker hat on HI so as an fyi wooden frame screens are cheaper which is nice but eventually they WILL warp as you clean you screen and use it more. wood and water... no bueno. if u end up buying more screens go aluminum if u can, those dont warp!! also smart choice on the vinyl!! hows it holding up?
hi! i figured as much. i bought a cheapo 3 pack of wood ones just for experimentation purposes and the drandle shirts, but i plan to look for some metal ones later on especially if it makes replacing the mesh easier :]
the vinyl is perfect! i just washed off the screen earlier for later attempts but it hasnt budged an inch. im glad i opted for HTV even though the mesh its on is pretty much unsalvageable once i dont need the design anymore since you cant peel it off without damaging the mesh. however i think if i had decided to keep trying with permanent non-htv vinyl the hot water may have weakened its bond. I opted for vinyl and not the usual emulsion stuff because I already have so much random vinyl lying around + a vinyl cutter if you're wondering why i took that approach. my original plan for my drandle shirt actually was to just use HTV originally, but unfortunately it usually ends up peeling off the shirt or wrinkling badly after a point so i opted to finally try my hand at screenprinting :]
6 notes
·
View notes
Last Seen Blogs

whenlifegivesyougays
Mr Mothman Moth Me A Man
sheep-tea-party
Shepp

babeylives
ฅ^•ﻌ•^ฅ

hellokittyscuntologydegree
pussy on the floor
babeylives
ฅ^•ﻌ•^ฅ