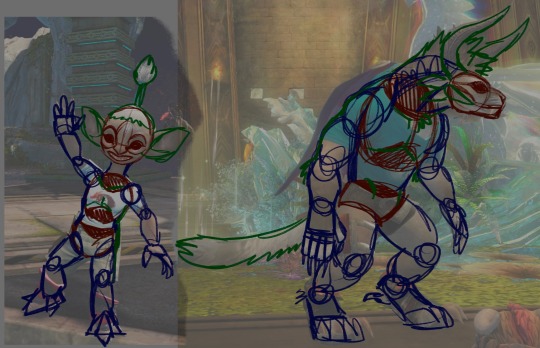
#so my process for this was taking screenshots in my game and basically tracing them for the backgrounds. collage style sometimes
Text
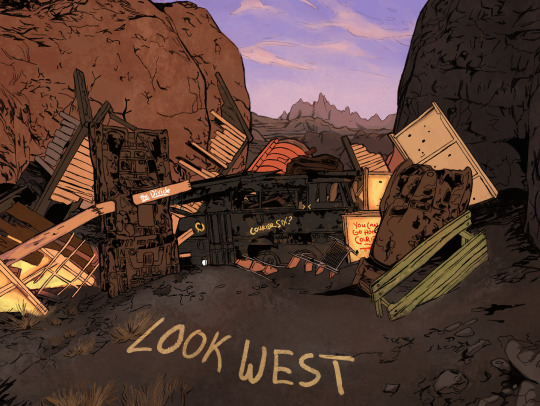
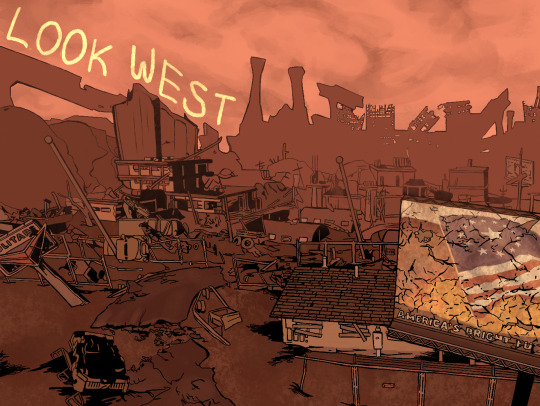
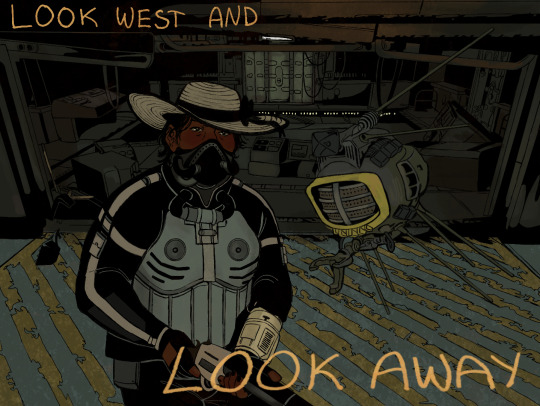
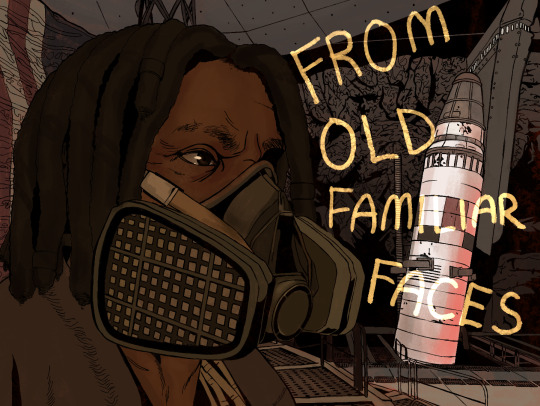
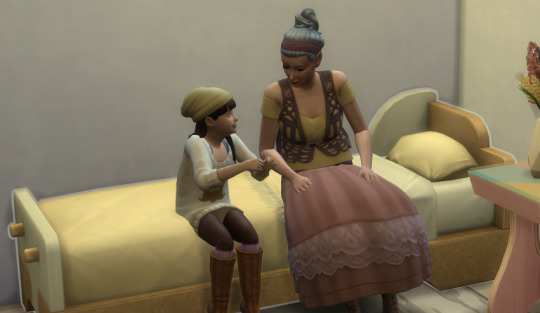
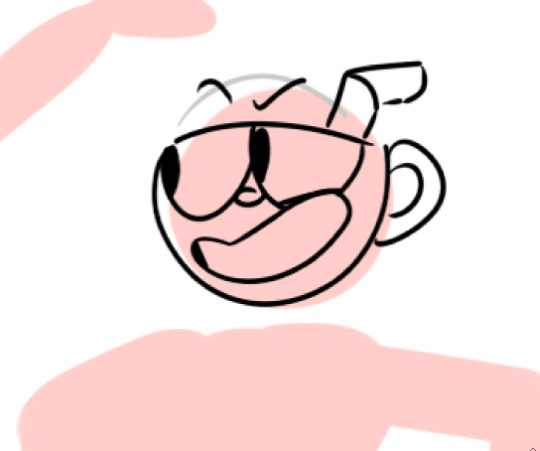
VERY late entry for Ulysses Week's prompt "the divide". Lyrics are from Autopsy Garland by the Mountain Goats. I have a project for fnv planned involving the whole song, but I couldn't get this concept for an alternate Ulysses thing for these lyrics out of my head. I love Ulysses and the divide very much. >24 hours of drawing on this one.
#fallout#fnv#fallout new vegas#ulysses fnv#ulysses fallout#ulyssesweek2023#courier six#kel#fanart#digital art#illustration#so my process for this was taking screenshots in my game and basically tracing them for the backgrounds. collage style sometimes#i think it turned out well but i will NOT be doing this for the main project. mostly bc of how long it took#also bc i felt like a dingus for tracing. nothing against tracing esp if its your own image. but i wanted to challenge myself more than tha#for composition and simplification of the details which i obviously did not do FNSVSMS#art#500#!!#1k#tee hee heeee
2K notes
·
View notes
Note
would you be willing to do a sort of tutorial about how sort through the shapes of charr and asura?
sure thing! i'll go to the absolute basics so folks from any art level might get something from it, so i apologize if i'm explaining something that might be obvious, but bear with me here
soOoo:

i've pulled a couple in-game screenshots! using refs to start with is gonna be the most help tbh, and it's good practice imo to get the hang of everyone's shapes this way. our models today will be Mycologist Seeli and Hazel Steelcrasher
it can help to start by just taking the characters and tracing over top of them to figure out their shapes. the way i tend to do it is with a sort of wooden art mannequin way, separating out the sections into blocks and connecting them with joints, adding median lines that help track the direction different aspects are pointing, things like that! if you're just starting out it might be really helpful to crack some art anatomy books for humans and animals before tackling funky li'l guys like these, as we can take observations from life and apply 'em fictionally


from there I can start to try and eyeball the shapes-- both of these mannequins i've drawn were just by referencing their adjacent images, and all the shapes have done for me is map out my pose as well as the characters sort of volumes so that i can get a feel for where they are in the space i've put them in, if that makes sense. all the extra little lines on the face can help me with proportions and expressions too, but i've gone a little loose with 'em here for the sake of just focusing on structure

then from there, I can apply my sketching process to freehand drawing without references! that said, there's absolutely nothing wrong and it is in fact a good thing to use lots of references to apply to your work, especially for a piece you super wanna polish
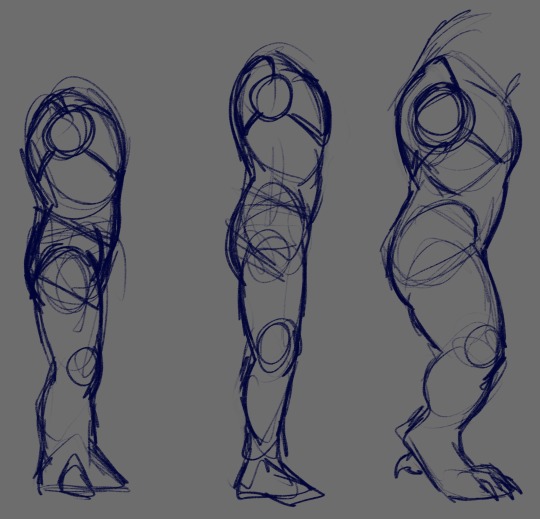

and finally!! it's very, Very helpful to figure out how both asura and charr differ from a strictly humanoid anatomical setup! admittedly i draw my charr and my asura slightly more human-proportioned (usually around the legs) but doing studies that compare and contrast certain structures, like the face or the torso and legs like i've demonstrated above, can do wonders in designing characters in the future and translating certain features between body types.
anywho!!! uuh! hopefully that's helpful, thank you for reading! if there's anything y'all can think of that you'd like me to focus on in specific, i can do my best to break it down for ya!
#my art#art reference#charr#asura#gw2#guild wars 2#seeli#hazel steelcrasher#can't sleep post art refs
76 notes
·
View notes
Text
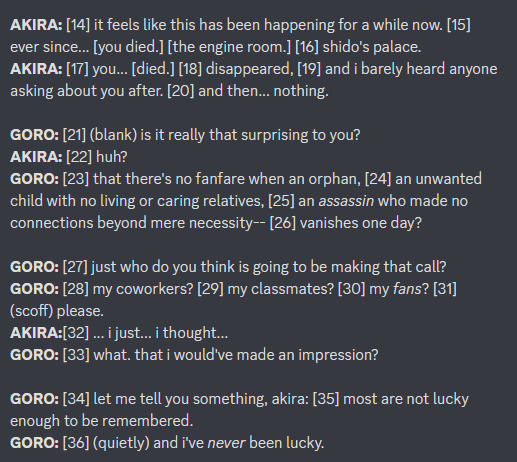
some "behind the scenes" stuff from this comic (read as: wips and assorted thoughts)
SOME BACKSTORY: i was halfheartedly playing through strikers after finishing p5r. the fact that akechi's not even mentioned in that whole game made me sad. the fact that akechi stops being mentioned basically the moment he dies in p5 vanilla makes me sad. i had thoughts. so i decided to make a comic about it
i wrote down the entirety of the script for this while in a complete haze listening to third eye by florence + the machine on repeat for an hour straight. that song has nothing to do with anything the comic is about. or with either of the characters involved. i can't explain my thought process there.
(the 'official' title of the comic is "a ghost amongst the living (consequences of a cognitive death.)" as a sort of tribute to that song, even though it has, again, nothing to do with what the comic is about)

THE SCRIPT: the numbers correlate to text bubbles on my thumbnails (see next). i also put it on discord so i could more easily see it/edit from either my phone or computer, which i don't think is the MOST efficient or professional way to go about doing this, but


you may notice this is a little bit different from the text on the final product. this is because. i changed some things while typing it out for the final thing. i don't know what else to tell you.
i did reach a point where i had read these same words over and over so much that i started questioning if anything i wrote made sense and if i even knew how to speak english correctly. i'd like to thank my friends for reassuring me that some of my wording was ok, and also google because every time i asked "is that even a thing people say" i would just plug it on there to try to figure it out (because i was too embarrassed to ask anyone to read over it)
THE THUMBNAILS: just a rough idea of panelling and where to put text bubbles and such. this took fucking forever. comics are hard. nobody ever tells you this (<- something i said about like 10 times to the same people while making this)

THE SKETCHES: basically grabbing the thumbnails and making them into an actual thing i can draw onto. also getting all the text laid out-- i don't think that's entirely necessary at this point but i was just excited to see it all laid out and being able to read it
(shoutout to my friend sophie for making the font i used for this/use for all my longer comics. she's an icon and a legend and has really nice handwriting)

you may notice that page 9 is completely different from the thumbnails. this is because i was tired by the time i got to that part in planning and i paid for it. brainstorming & reworking that page took me an entire day. comics are HARD. I AM TELLING YOU THIS
page 6 also changed by the time i got around to lining it because i decided that it sucked and i hated it. reworking that into something more acceptable also took me about half a day. i'm happy with how it turned out though, and glad that i no longer have the issue of having a flop ass page in the middle of this
THE PROCESS: was actually quite straightforward after that, just doing the lines and the like. but i wanted to share how i did the backgrounds. i grabbed a bunch of in-game screenshots i took for reference and just plugged them through csp's "artistic > lines only" filter and just traced over that

i love you art shortcuts that make my life & ability to make yaoi comics easier
(if you're curious too here's all the screenshots i took & was keeping on the side for reference)

ETC: some miscellaneous thoughts, because if you've made it all the way through this then you probably don't have anything better to do anyway:
all in all this took two weeks. script was written on the 11th, thumbnails were done on the 14th, sketches were done on the 17th, lining on the 24th, aaand colouring took me just one day. comics are HARD and TAKE TIME. NOBODY TELLS YOU THIS!!!!!
i actually started getting wrist pain somewhere along the 2nd day of lining/3rd page. that step of the process probably took longer than it otherwise would because i had to keep taking breaks 2 ensure i wouldn't break my hand completely -_-
my sanity throughout the lining process was only ensured by listening to a frankly stupid amount of jpop. thank you wednesday campanella and mrs. green apple
i think my favourite page is page 3. i like how the panels get crooked when akechi puts the detective prince persona on, i like how akira deadpans (in a straightened panel) to cut him off. also in order to get the hand right in the first panel i did the hair twirling motion myself and ended up hitting myself in the eye with my own hair. it was worth it though
IN CONCLUSION: i think they went a bit too hard with the yaoi fanservice in persona 5 royal
#misc#this is so long lmfao sorry i'm proud of what i made & i have a lot 2 say#i hope at least someone finds it interesting. if not. well this was entirely self indulgent so it's no biggie
46 notes
·
View notes
Note
Ask Game for writers: 1, 7, 10. 😀
In which I should have read this more carefully 🤣 I saw it was about WIPs and didn’t realise it was so fic focused. I guess I could answer this two ways. I could convert it to art which is fandom, or I could vague talk my original novels. Maybe both? 🤔
1) 🦈Tell us the name of your/ one of your WIP(s)
Hmm well I don’t want to share the name of my original novel 🫣 I know I probably should but I get afraid about it. I sort of put up a division between “personal fan me” and “career me”. Not that I have a career (yet) but I can dream.
As for art well that doesn’t have names exactly, and also I don’t have WIPs in the same way. I have a list of ideas and I tend to take one, and finish it, rather than juggle several projects like I did fanfic.
I am currently signed up to the Librarians Exchange and I will be making something for that. I probably shouldn’t talk about that though because of the whole ‘secret’ gifter thing.
I would like to pick one idea off the list and say “I’ll do that next” and talk about it but truthfully what I am hoping to do is practice basic techniques. I spoke about this earlier with my frustration at being stuck with the ‘tracing’ and wanting to do it properly. I don’t know if I will be able to ‘teach myself’ to any level so that I can use it for the exchange. I mean I have had literal years to do so and not got anywhere with it so far 🤷♂️ I got a new sketchbook (because clearly the half dozen I already had weren’t enough) but maybe this time I will commit. I got some erasable coloured pencils and sketching in purple seems very fun so 🤞
7) 🖍Post Any sentence from your wip
As said I can’t really do this. I wish I had some kind of sketch to show, but again as I said art “WIPs” are more just ideas unless I am mid-project and I’m not right now.
To make up for not answering this I have picked another question for you.
11) 🛠Is there a scene or anything in the WIP you are struggling with right now?
For my original novel quite a lot of things 😂 but description is usually the hardest part. I can see it in my head but it’s so clunky when I try and write it down. Way too much frowning or smiling going on lol. I am trying to use more body language and less dialogue tags but I need to find more variety in it.
For the art it’s like I said I have my current process of bashing together a bunch of different references. Sometimes this includes selfies when I am struggling to get limb angles to match what’s in my imagination, but it just doesn’t work. It’s a) botched together so a lot of the angles are just slightly off/mismatched and it is unnatural and b) so stiff with no flow/life. It has zero style.
10) 🤡How many Wips are you actively working on?
Well I am actively drafting one original novel. I have benched the redraft I am 1/4 of the way through, the first draft I need to reboot, the first draft I am only about 70% finished with, and the first draft I only wrote a bit of (I think that covers them 🤔). But really it’s just the one for “actively working on”.
For art… well I can’t lose sight of the gift exchange. I’m wondering if I should pick up ‘Sketch a Day’ again. I definitely want to do the 100 heads challenge. I got a copy of the Loomis Method book (heads and hands) and I think I should go through that. Same with Hamptons book (figure drawing). I was doing some screenshot redraws from “What If?” as I adore that art style. I can’t seem to pick a medium (paint, pencils, markers, ink) and so there’s so many options for rendering practice. It’s a bit overwhelming to be honest all of everything I want to work on.
Thanks for the ask ❤️
1 note
·
View note
Photo

Welcome back to our latest - and last! - Deep Dive into the gameplay of The Sims 4 Nifty Knitting Stuff Pack. I’ve really enjoyed sharing the designs and development of this pack with you, and I hope to continue doing these sorts of posts in the future. It’s been a super cool experience, and I hope you’ve enjoyed reading these!
In today’s post I’ll talk about the feature that is core to everything in this pack, Knitting! Once again, I have to remind you that we’re still in active development on the pack and so some things may change between now and the final game.
Now, let’s talk about some nifty knits!
READ IT I PROMISE YOU GONNA LIKE IT!
In order to start knitting, you’ll need to purchase a Yarn Basket from the Build/Buy catalog. You probably remember voting on these baskets a while back. This was the winning design, presented to you now in all its colorful glory! Don’t like color? That’s okay, because we included a solid black and white variant.
We have one more knitting basket coming too! Remember this one?

The basket acts as the crafting catalyst(neat term, huh?) similar to the Easel or Woodworking Bench in The Sims 4 base game. But unlike those examples, the Yarn Basket is meant to live in a Sim’s inventory so that they can take their knitting anywhere they want to go. Knitting itself is relatively straightforward: click on the Yarn Basket in your inventory, OR, with the basket in your inventory, click on the chair you want to sit in while knitting (perhaps a rocking chair?) and select the Knit interaction.
Your projects are saved to your Sim, so you can pause your progress at any time and resume later, and even juggle multiple projects at once. Starting a project costs a small amount of Simoleons for the cost of yarn, but nothing too outrageous.
(Children can knit too!)
As a Sim levels up their knitting skill they’ll have access to new patterns. They’ll start with knitting socks and beanies, but as they grow more skilled they can tackle more challenging projects like sweaters and toys for kids. But if you only want to specialize in one thing - perhaps knitted mailbox cozies? - that's fine too! Just keep knitting anything and everything, and you’ll be level 10 before you know it.
Speaking of knitting skill, sometimes your skill is reflected in your knitted work, or rather your lack of skill. Knitting projects can fail, and when they fail they can get weird. But it’s all subjective, and maybe you’ll end up accidentally knitting the cutest derpy companion, or the perfectly itchy sweater. No mistakes, only happy accidents!

(Just own it.)
One of the niftiest parts of the knitting skill is unlocking the ability to Teach to Knit, where Sims sit down together and have a knitting pow-wow. We wanted this to feel special, so we got a really sweet animation for it (Thanks Haeju!). Now that you can infect other Sims with the knitting bug, no yarn ball will be safe!
(The knitting needles aren’t finished on the Teach To Knit interaction yet, but trust me it's SUPER CUTE.)
So, what can you do with all these knitting projects? Lots of stuff!
Not only can knitted objects be listed on Plopsy, but you can also Donate them to charity. If you want to surprise a loved one, try Gifting a knitted object too. If you want to destroy all traces of your knitted failures, you can Frog the object and start again! If it's a particularly nice Sweater that you made, consider Adding it to Wardrobe to make it available in Create-A-Sim to all family members.
(Everyone appreciates a nice gift!)
We want Sims to be able to knit something for their whole family. Not only will Sims be able to knit Toddler Onesies, but Baby Onesies as well. So put your little grubworm in a handmade knitted outfit. I’m sure they’d thank us if they could! (And if they didn’t like it I’m sure they’d be polite about it.)
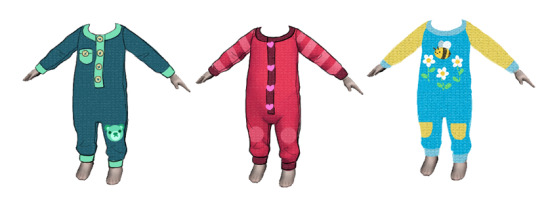
(Here’s a sneak peek at some of the concept art for new clothing for the littlest of Sims!)
It also felt like a good idea to add an Aspiration to tie this passion for knitting all together. So if you want to master the fuzzy art of knitting, consider signing your Sim up for the Lord(or Lady) of the Knits Aspiration. With yarn running through your veins, there will be no knitting mountain too hard to conquer! Master the Aspiration and you’ll be rewarded with the Sacred Knitting Knowledge trait. What does it do? Lots of stuff! What does it unlock? Something special! Am I being vague? I am! Come on guys, I can’t share all the secrets quite yet.
As I’ve mentioned previously, we’re trying to get as much cross-pack functionality for knitting as we can. Cats can play with Yarn Baskets and Yarn Balls, there will be new Club rules for Knitting, new class electives at University, and knitting counts for Emotional Control, just to name a few. I’m hoping Knitting feels nice and snug alongside our other gameplay systems.
Now let's have a chat with our lead Object Modeler, Beth Mohler!
Conor: Can you tell us a little bit about what an Object Modeler does on The Sims 4?
Beth: As an object modeler I spend a lot of time trying to figure out how to make objects work in The Sims 4. This is actually a very involved process, and somewhat different from the wonderful work our environment team does. We work with designers, concept artists, engineers, animators, vfx artists (basically everyone!) to make sure that Sims can use an object properly in an animation, or that all of our objects will work with each other. Once we understand the design for a new object, we will create a rig, a block model (a very generic version of the object used to help us make more of the same object in the future), and a footprint (tells us where the object can go and how Sims move around it). Once those are tested by animators and other disciplines we can model the final version, create UVs, and add textures. We also hook up and test everything in the game to make sure it all looks good. There is a lot to think about when it comes to making objects because we know players can find so many interesting ways to place and use them in game. That makes it a very fun challenge to make them work with everything else we’ve built before.
Conor: What feature are you most excited to work on in Nifty Knitting Stuff?
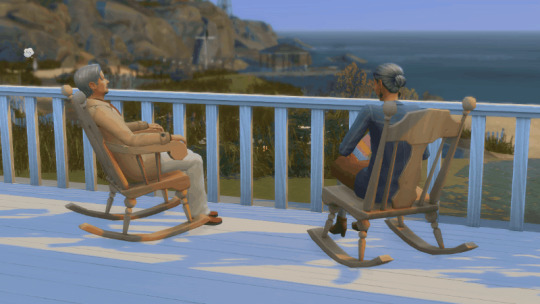
Beth: I’d say I am most excited to work on the rocking chairs! I love that we are bringing them to the game and can’t wait to see them in some cozy living rooms or on porches.
Conor: What are some of the challenges you are facing working on this pack?
Beth: One of the biggest challenges is ensuring that the knitting itself looks good and is fun to watch! This is a challenge given that it needs to work for everything you can create. Figuring this out takes a lot of iteration between modeling, animation, engineering, design, and art direction so that we come to a conclusion that will work the best given our time and technical constraints.
Another interesting “challenge” is the fact that I crochet as a hobby myself! When you are knowledgeable about something (yarn!) in real life, working on it in the game it can sometimes be hard to separate the things you know and may expect in reality from what is possible or best within a video game. I have to make sure to keep a balance and to conceptualize how we can best convert the knitting experience into The Sims 4. As someone who also generally enjoys interior design and architecture, this is actually one of my favorite challenges and one of the things I love about working on objects in The Sims 4.
Conor: What is your favorite feature you have ever worked on in The Sims 4?
Beth: I think it has to be a tie between the mini fridge or the robotics table in Discover University. That pack was the first time I got to really take an entire feature from start to finish. I’ve been with Maxis for a while, but I’m relatively new to The Sims 4. Both of these objects had some complex features we wanted that required a lot of iteration. I learned a ton about the technical aspects of our game during the process as well. I’ve also worked on a few very cool things between then and now, but those can’t be shared yet ; )
As a fan of The Sims since the very beginning I am so happy to be able to share a little about what I do on a daily basis on The Sims 4 with you! I haven’t been on The Sims 4 for quite as long overall, but some of you may also recognize me from my time on Sims Mobile where I shared some of our workflows on Twitter for making a juice bar. Thanks!
Conor: You shared a screenshot of the In-Progress Rocking Chair in our Rocking Chair Deep Dive. Can you share an updated screenshot now that the Rocking Chair is further along?
Beth: I would love to! I hope everyone has been enjoying seeing the progress on this object so far! Here it is a little further along. This program allows us to set the rules for the object materials, footprint size and rig it should use, as well as all the color variants and swatch colors you see in the catalog.
Thanks Beth! By the way, Beth is on Twitter @SimGuruBeth, so be sure to Follow her!
And thanks to all of you Simmers for following this pack’s development, this has been a really fun project in a very crazy time. A big thank you to my Stuff Pack teammates, and especially SimGuruSarah who edited my inane ramblings and wrangled the miscellaneous bits for these posts.
While this concludes my design Deep Dives, we still have more forum posts with development insights on the way! Keep checking the Community Stuff Pack forum and we’ll have more fun stuff to show off in the weeks to come.
Until next time,
SimGuruConor
Source: The Sims Forum
271 notes
·
View notes
Photo


cat out of the bag | masterlist
Chapter Three: well f*ck me
Two teams; one bitter rivalry. As manager of the Karasuno college volleyball team, you probably shouldn’t be seeing Kuroo, the Nekoma captain. How long can you keep the cat in the bag before your team finds out?
AN: I’m just going to accept the fact that each chapter is going to include a mini scene because I’m trash. They’ll all be short (1-2.5K), but if you don’t want to read them, you should be able to understand the plot just through the screenshots! On that note, there are two screenshots at the end of the scene, so please be sure to look at those!

When you agreed to go to a Fukurodani party, you didn’t expect to fall asleep cuddled up on a couch with a hot volleyball player telling you science pick-up lines. And you really didn’t expect to get coffee with him the next morning. But now here you are, a stupid grin on your face as you slip your phone back into your pocket just as Kuroo slides back into the seat across from you.
It’s kind of funny, actually, how he ended up asking you out on a coffee date this morning. You woke up this morning with a headache and the aftertaste of whatever ungodly drink concoction Bokuto created lingering on your tongue, still groggy and unable to process anything beyond being comfortable and warm, secured against a broad chest with strong limbs curled around your back. It took you a hot minute to really wake up, and you definitely weren’t complaining about being wrapped up in the arms of the stupidly attractive volleyball player that charmed you with science puns last night.
He was already awake, mindlessly scrolling through something on his phone while his thumb stroked your back over your sweatshirt. When you shifted against him and lifted your head from where you were resting against his chest to give him a sleepy look, Kuroo closed his phone with a lazy, crooked grin, peering up at you through his messy bedhead. “Morning, kitten,” he murmured, his sleep-roughened voice made your stomach slip, because holy sexy.
It should be illegal to look that damn delicious in the morning.
(He definitely noticed the way you shivered at the petname, pleased with the reaction as he filed it away for later.)
You don’t know what the hell happened next. Maybe you sat up too quickly, or he shifted the wrong way, but your legs were tangled together and suddenly the two of you were lying in a heap on the floor. Kuroo wheezed as you knocked the wind out of him, your elbow shoved into his ribs, and you were apologizing profusely through a fit of giggles.
“You must be gravity,” he said breathlessly, “because I just keep falling for you.” And then you were wheezing too, Kuroo’s cackling hyena laughter bringing tears to your eyes. “Want to go get some coffee?” he asked as soon as you could look at each other without laughing like absolute idiots.
Obviously, you said yes.
The memory has a giggle threatening to escape you all over again, and your smile makes his own mouth twitch as he reaches for his coffee. “Something funny?” he asks, quirking a brow from across the table. You catch the faintest hint of a smirk before it’s hidden behind his coffee mug, but his gaze never once leaves you. Those catlike, hazel eyes trace the details of your face, lingering on your own eyes and lips like he isn’t sure where he wants to look, and you fiddle with your own mug, pleasantly warm under his stare.
“Just my friends,” you tell him, trying not to snort as you think about multiple comments about his “beefy thighs”. He seems the type to absolutely preen under the attention, and you’re sure he’d tease you for it. Kuroo is stupidly hot with a smart mouth and sly tongue, and that’s a very dangerous combination of things.
Kuroo hums under his breath as he sets his drink down, almost done with his coffee. He wets his lips, grinning like he knows exactly what you’re thinking, but chooses not to say anything. “Kaori and Yukie, right? You mentioned them last night.”
Something about the way he says it makes you pause, like he doesn’t know them very well. Strange, considering they’re Fukurodani’s managers, but you brush it off. Not every player is close to their managers, after all.
Brushing it off, you nod. “And another,” you say, thinking about Suga. “But he had a date last night and couldn’t come.”
“Oh? Is that how you ended up at a volleyball party last night?” he jokes, watching as you stir what’s left of your coffee. “Didn’t want to be alone on a Friday night?”
Emboldened by his cheeky smile and unabashed stare, you wet your lips. “Well, I figured my options were hanging out with my brother and his roommate, or flirting with some hot volleyball players.” Kuroo’s grin widens as you lock eyes with him across the table. “And I’m definitely not complaining.” Before he can say anything, you continue with, “Besides, volleyball has always been a big part of my life, so it’s easier to find something to talk about.”
That catches his interest. “Yeah? How’s that?” Kuroo asks you curiously, the question genuine.
“My older sister played until high school,” you tell him. “And my younger brother still plays. He’s in his first year in college.”
A playful grin slowly curls at the corner of his mouth. “Not you though?” he teases. “Does that make you the klutzy middle child?”
“No!” You huff, offended, and Kuroo snickers at your cross expression. “I was always just too busy taking Tobio to practices. And matches. And managing teams. I’ve been helping him practice basically since he could walk.” You pause for a moment. “You know, saying that out loud, I’m not surprised my social life is so sad.”
He bites the inside of his cheek to keep from laughing at you outright, but can’t hide the amusement in his eyes. Or the fondness. “Well, I think that just makes you a good older sister,” he says, shrugging, and warmth bubbles in your chest at the soft way he looks at you. “What does your brother play?”
“Setter. That’s all he’s wanted to be since he was, like, two.”
Kuroo raises a brow. “No shit? My friend Kenma is a setter.”
“Really?” you ask, leaning forward just a little. “And what do you play?” Not a setter. He would have said so if he was. And probably not a libero either, if you had to guess. A wing spiker maybe? Or a--
“Middle blocker,” he says, finishing the thought for you. “That’s been my position since middle school.”
“Figures,” you tease him. “You’ve got the height.” And the arms, but you don’t tell him that. Suddenly, you frown, staring at him from across the table as your head cocks to the side. Bemusement laces your voice as you ask, “How haven’t I seen you at any of Fukurodani’s games? I’ve gone to plenty of them for Yukie and Kaori, but I’ve never seen you before.” A sly little smile pulls at your lips. “And you’re definitely hard to miss,” you tell him, flirting just a bit.
But Kuroo’s eyes narrow. “What?”
“What?”
“I don’t play for Fukurodani,” he tells you. “I’m just friends with Bokuto and Akaashi. I’m actually the captain over at Nekoma.” The declaration comes with a grin and a wink, and like last night you almost choke on your drink. Though, this time it’s not just because he’s a hot piece of ass. Horror must be written across your face, because Kuroo’s expression sobers immediately. “Shit, what’s--”
You cut him off. “Kuroo, I’m a manager for Karasuno,” you say, the words coming out in a rush. Shit, maybe you should have told Kaori and Yukie his name. They would have known who Kuroo was.
He blinks at you, eyes widening when it clicks. “Well, fuck me.”

189 notes
·
View notes
Text
The Sims 4 Nifty Knitting: Knitting Deep Dive
SimGuruConnor has released a forum post providing details on The Sims 4 Nifty Knitting!
Welcome back to our latest – and last! – Deep Dive into the gameplay of The Sims 4 Nifty Knitting Stuff Pack. I’ve really enjoyed sharing the designs and development of this pack with you, and I hope to continue doing these sorts of posts in the future. It’s been a super cool experience, and I hope you’ve enjoyed reading these!
In today’s post I’ll talk about the feature that is core to everything in this pack, Knitting! Once again, I have to remind you that we’re still in active development on the pack and so some things may change between now and the final game.
Now, let’s talk about some nifty knits!
In order to start knitting, you’ll need to purchase a Yarn Basket from the Build/Buy catalog. You probably remember voting on these baskets a while back. This was the winning design, presented to you now in all its colorful glory! Don’t like color? That’s okay, because we included a solid black and white variant.

We have one more knitting basket coming too! Remember this one?

The basket acts as the crafting catalyst(neat term, huh?) similar to the Easel or Woodworking Bench in The Sims 4 base game. But unlike those examples, the Yarn Basket is meant to live in a Sim’s inventory so that they can take their knitting anywhere they want to go. Knitting itself is relatively straightforward: click on the Yarn Basket in your inventory, OR, with the basket in your inventory, click on the chair you want to sit in while knitting (perhaps a rocking chair?) and select the Knit interaction.
Your projects are saved to your Sim, so you can pause your progress at any time and resume later, and even juggle multiple projects at once. Starting a project costs a small amount of Simoleons for the cost of yarn, but nothing too outrageous.

(Children can knit too!)
As a Sim levels up their knitting skill they’ll have access to new patterns. They’ll start with knitting socks and beanies, but as they grow more skilled they can tackle more challenging projects like sweaters and toys for kids. But if you only want to specialize in one thing – perhaps knitted mailbox cozies? – that’s fine too! Just keep knitting anything and everything, and you’ll be level 10 before you know it.
Speaking of knitting skill, sometimes your skill is reflected in your knitted work, or rather your lack of skill. Knitting projects can fail, and when they fail they can get weird. But it’s all subjective, and maybe you’ll end up accidentally knitting the cutest derpy companion, or the perfectly itchy sweater. No mistakes, only happy accidents!

(Just own it.)
One of the niftiest parts of the knitting skill is unlocking the ability to Teach to Knit, where Sims sit down together and have a knitting pow-wow. We wanted this to feel special, so we got a really sweet animation for it (Thanks Haeju!). Now that you can infect other Sims with the knitting bug, no yarn ball will be safe!

(The knitting needles aren’t finished on the Teach To Knit interaction yet, but trust me it’s SUPER CUTE.)
So, what can you do with all these knitting projects? Lots of stuff!
Not only can knitted objects be listed on Plopsy, but you can also Donate them to charity. If you want to surprise a loved one, try Gifting a knitted object too. If you want to destroy all traces of your knitted failures, you can Frog the object and start again! If it’s a particularly nice Sweater that you made, consider Adding it to Wardrobe to make it available in Create-A-Sim to all family members.

(Everyone appreciates a nice gift!)
We want Sims to be able to knit something for their whole family. Not only will Sims be able to knit Toddler Onesies, but Baby Onesies as well. So put your little grubworm in a handmade knitted outfit. I’m sure they’d thank us if they could! (And if they didn’t like it I’m sure they’d be polite about it.)

(Here’s a sneak peek at some of the concept art for new clothing for the littlest of Sims!)
It also felt like a good idea to add an Aspiration to tie this passion for knitting all together. So if you want to master the fuzzy art of knitting, consider signing your Sim up for the Lord(or Lady) of the Knits Aspiration. With yarn running through your veins, there will be no knitting mountain too hard to conquer! Master the Aspiration and you’ll be rewarded with the Sacred Knitting Knowledge trait. What does it do? Lots of stuff! What does it unlock? Something special! Am I being vague? I am! Come on guys, I can’t share all the secrets quite yet.

As I’ve mentioned previously, we’re trying to get as much cross-pack functionality for knitting as we can. Cats can play with Yarn Baskets and Yarn Balls, there will be new Club rules for Knitting, new class electives at University, and knitting counts for Emotional Control, just to name a few. I’m hoping Knitting feels nice and snug alongside our other gameplay systems.
Now let’s have a chat with our lead Object Modeler, Beth Mohler!
Conor: Can you tell us a little bit about what an Object Modeler does on The Sims 4?
Beth: As an object modeler I spend a lot of time trying to figure out how to make objects work in The Sims 4. This is actually a very involved process, and somewhat different from the wonderful work our environment team does. We work with designers, concept artists, engineers, animators, vfx artists (basically everyone!) to make sure that Sims can use an object properly in an animation, or that all of our objects will work with each other. Once we understand the design for a new object, we will create a rig, a block model (a very generic version of the object used to help us make more of the same object in the future), and a footprint (tells us where the object can go and how Sims move around it). Once those are tested by animators and other disciplines we can model the final version, create UVs, and add textures. We also hook up and test everything in the game to make sure it all looks good. There is a lot to think about when it comes to making objects because we know players can find so many interesting ways to place and use them in game. That makes it a very fun challenge to make them work with everything else we’ve built before.
Conor: What feature are you most excited to work on in Nifty Knitting Stuff?
Beth: I’d say I am most excited to work on the rocking chairs! I love that we are bringing them to the game and can’t wait to see them in some cozy living rooms or on porches.
Conor: What are some of the challenges you are facing working on this pack?
Beth: One of the biggest challenges is ensuring that the knitting itself looks good and is fun to watch! This is a challenge given that it needs to work for everything you can create. Figuring this out takes a lot of iteration between modeling, animation, engineering, design, and art direction so that we come to a conclusion that will work the best given our time and technical constraints.
Another interesting “challenge” is the fact that I crochet as a hobby myself! When you are knowledgeable about something (yarn!) in real life, working on it in the game it can sometimes be hard to separate the things you know and may expect in reality from what is possible or best within a video game. I have to make sure to keep a balance and to conceptualize how we can best convert the knitting experience into The Sims 4. As someone who also generally enjoys interior design and architecture, this is actually one of my favorite challenges and one of the things I love about working on objects in The Sims 4.
Conor: What is your favorite feature you have ever worked on in The Sims 4?
Beth: I think it has to be a tie between the mini fridge or the robotics table in Discover University. That pack was the first time I got to really take an entire feature from start to finish. I’ve been with Maxis for a while, but I’m relatively new to The Sims 4. Both of these objects had some complex features we wanted that required a lot of iteration. I learned a ton about the technical aspects of our game during the process as well. I’ve also worked on a few very cool things between then and now, but those can’t be shared yet ; )
As a fan of The Sims since the very beginning I am so happy to be able to share a little about what I do on a daily basis on The Sims 4 with you! I haven’t been on The Sims 4 for quite as long overall, but some of you may also recognize me from my time on Sims Mobile where I shared some of our workflows on Twitter for making a juice bar. Thanks!
Conor: You shared a screenshot of the In-Progress Rocking Chair in our Rocking Chair Deep Dive. Can you share an updated screenshot now that the Rocking Chair is further along?
Beth: I would love to! I hope everyone has been enjoying seeing the progress on this object so far! Here it is a little further along. This program allows us to set the rules for the object materials, footprint size and rig it should use, as well as all the color variants and swatch colors you see in the catalog.

Thanks Beth! By the way, Beth is on Twitter @SimGuruBeth, so be sure to Follow her!
And thanks to all of you Simmers for following this pack’s development, this has been a really fun project in a very crazy time. A big thank you to my Stuff Pack teammates, and especially SimGuruSarah who edited my inane ramblings and wrangled the miscellaneous bits for these posts.
While this concludes my design Deep Dives, we still have more forum posts with development insights on the way! Keep checking the Community Stuff Pack forum and we’ll have more fun stuff to show off in the weeks to come.
Until next time,
SimGuruConor
37 notes
·
View notes
Note
That Allister cosplay is outstanding!! How did you make the mask and the gym symbol+endorsements? I'm planning on doing an Allister cosplay in the future myself
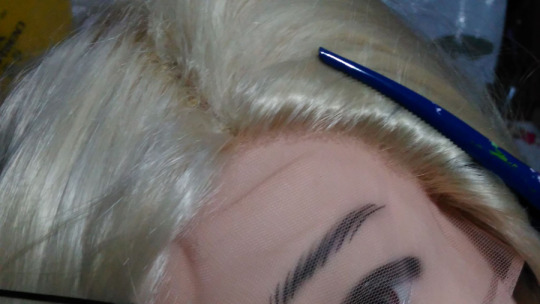
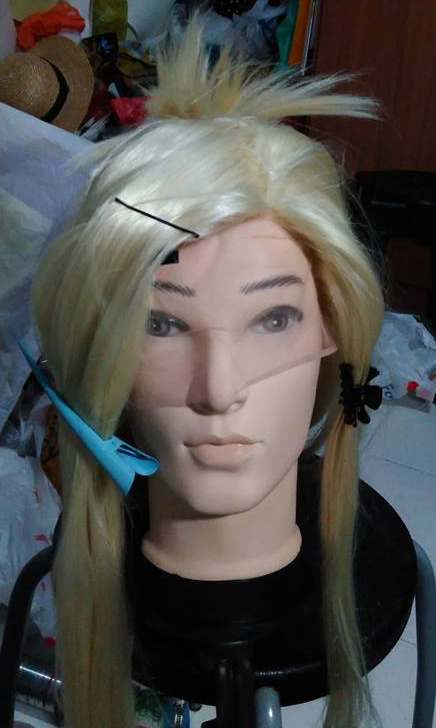
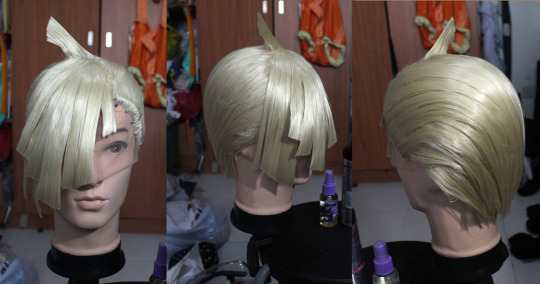
Thank you so much, and happy to answer! I took lots of pictures through the process so I’ll answer this in two parts.
“How did you make the gym symbol/ endorsements?”
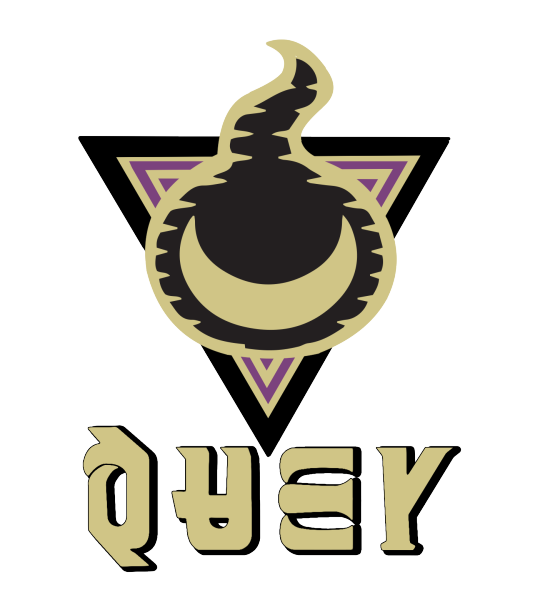
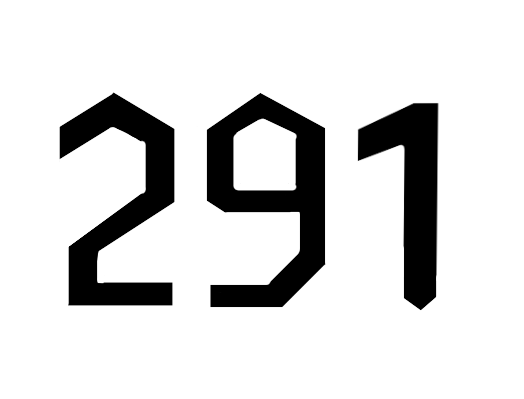
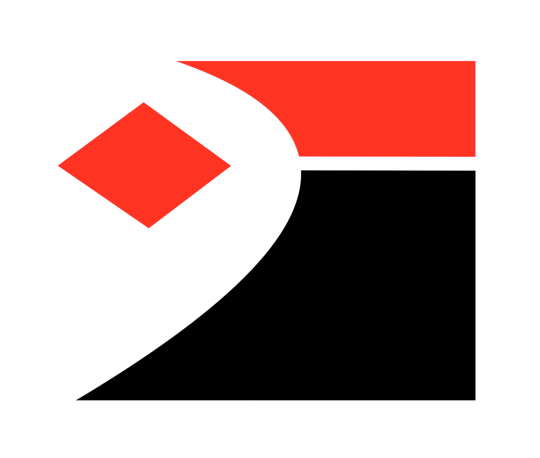
So the first thing I did is take a TON of screenshots I have almost 300 screenshots of reference images of allister and the gym league trainers and the pokejobs logos and so on to get good references for all the logos I needed.Once I was done taking all the screenshots I spent hours tracing them to the best of my ability to create these images: (Not all of these were the final versions which were modified right before printing, apologies)Gym Logo - QUAY/ Gym Logo
XXA - Sponsor (This is the logo for MC Insurance, Allisters Sponsor)

291 - Number
ASTSA - Name (This is the new pokemon language for Onion, Allister’s japanese name)

The square with the diamond - This I nicknamed the “NIKE” cause its the logo for the spotswear company in game
Galar league logo - Galar League logo (this is the logo thats the red and blue pokeball with white marks, and “galar league written underneath it)

And then I put together this ref sheet to make sure the logos looked good together color wise, and some of the colors were still altered later but it all looked pretty good

And then once the logos were all set, I printed them onto heat transfer vinyl and let me explain why I did that specifically. The fabric I used was polyester, which is the kind of fabric that sports jerseys are made of. I did that because the gym’s uniforms are based on soccer jersey’s so it felt fitting!IT WAS A HUGE PAIN I DONT RECOMMEND ITbut now because of the fact that it was polyester paint wouldnt’ work on that fabric because of how stretchy it is and the fact it doesn’t absorb moisture easily. So we printed it onto heat transfer vinyl with my cheap ink printer and then I ironed them onto my clothes! I made sure they were placed correctly by first taping them to my clothes and making a note of the location before ironing it, and then once I was happy with a placement I’d carefully iron it on. This vinyl seems kinda cheap and like the ink might come off with too much water so watch out if you choose to use it. There are also printable iron on paper for other types of fabric as well and are cheaper iirc!
Same goes for the dots, thos were all cut using a CNC/ off brand cricut (just a bunch of circles all at once) and I placed them by hand using painters tape and trimmed as needed to make the designs:

Hopefully that was helpful!
“How did you make the mask?”
So this ones a little more complicated to answer because its not complicated but its not something everyone can do.
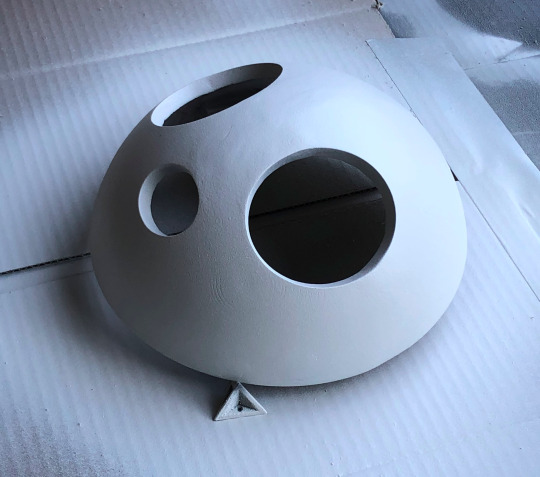
So we started on this one before the game came out, and before I’d gotten to Allisters battle in the game but we had enough reference material to figure out the general look of Allister’s mask, so we made a 3D model of it that we planned to 3D print (my bf has a 3D printer and a CNC and helped me a TON for this project) and did a test print of a tiny mask to start to make sure we were happy with the 3D model (here is the tiny mask in my tiny hand, we affectionally nicknamed it “mini mask”)
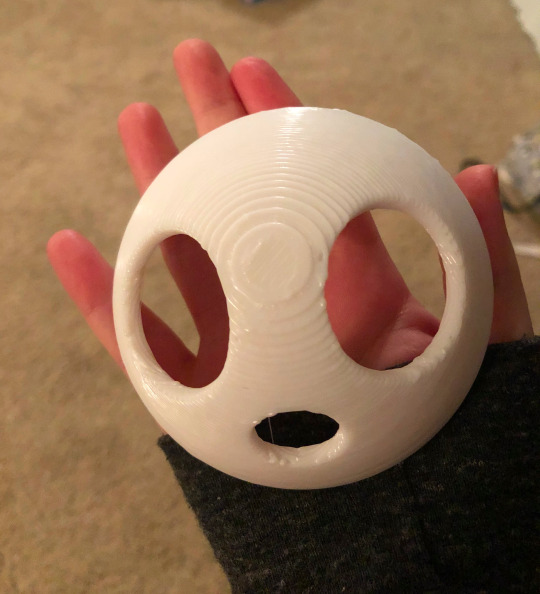
Now after we had the 3D model we had another issue of how big does it need to be? I have a round head on my own so I didn’t need to modify the shape of the mask thankfully (one time my fat head came in handy!) But we needed to figure out how big to make the mask to make sure it “fit” correctly.
So we tried cutting out a circle with paper in a few sizes until we thought we found a good size for my face (which for me was a little over 7 inches)
went and bought a styrofoam dome from the craft store in that size to make an EVA foam dome and then checked if that fit my face (later this worked fantastic as a way to transport the mask as a protective shell around it) I don’t have a picture of this EVA foam dome but all it was used for was putting it on my face and making sure it went over my chin and such. Once we had that we were ready to start printing the final mask.
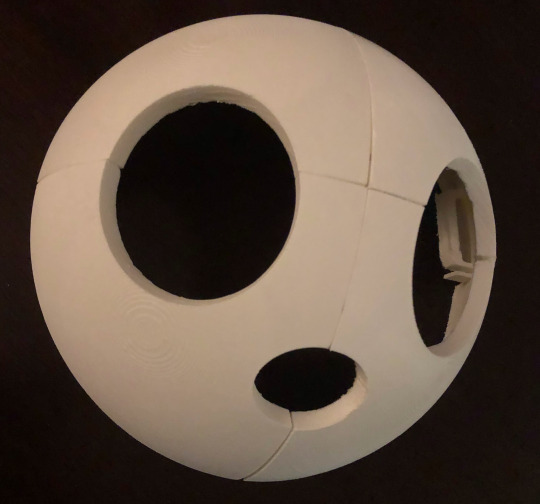
Once the 3D model was scaled for the final mask, it was too big for my bf’s printer to print all in one go so we split it into 4 pieces. Each piece took about 9 hours to print, and a few of the prints failed and had to be redone, so after a few days of printing it looked something like this:

for those who don’t know much about 3D printing all those beams are the supports that lets the printer print raised surfaces like that and have to all be removed. So after about 2 hours of pulling plastic with pliers it looked more like this:

so we left small gaps in the edges of the mask so that we could put metal pins between each piece to help hold it together so we cut our metal pins and assembled the mask and it was starting to come together!
So from here we melted some plasitc onto the seams (plastic welding!) with a wood burner and - wow that looks gross

but trust me its better than gaps in the mask. so after a bit of sanding here we entered the rounds of priming it with spraypaint primer and sanding it for like an hour and doing that again, occasionally using bondo putty to try and even out those seams and those rounds tended to look like allister just murdered a village:
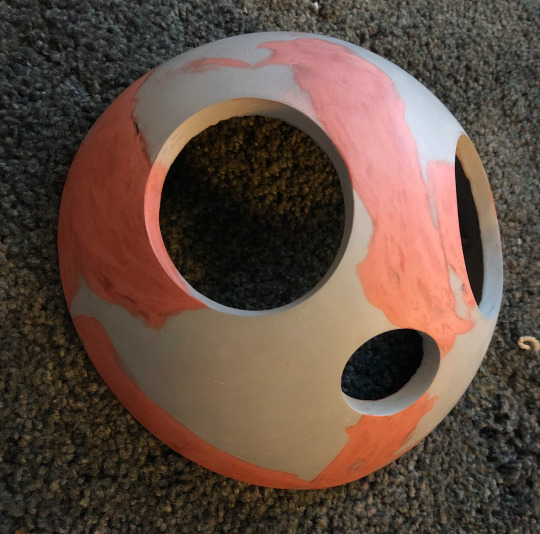
but you can see compared to the previous image that the mask is a lot smoother! This was the final round of sanding and you can tell that most of the layer lines from the printer have been sanded down! You can almost not see the seams anymore! (though now they’re also very red but they’re very smooth in comparison to the beginning trust me…I sat there sanding for many hours for this)
But after this all that needed to be done with a final priming in grey, and then painted it gray!
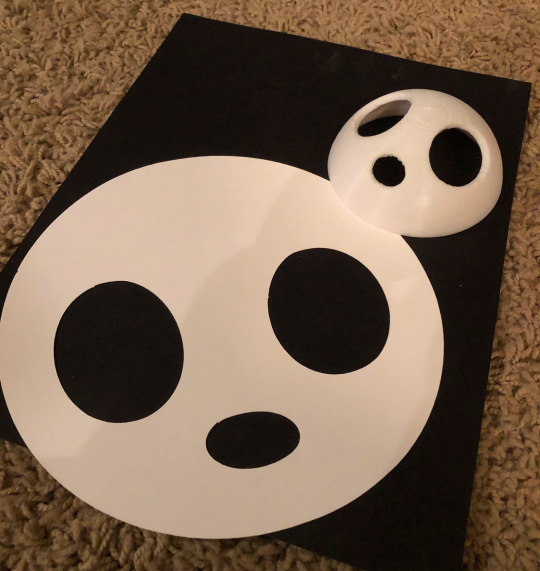
While the paint was drying, we prepared some masking in the design of allisters mask which if you don’t know what the full mask looks like I wanna reference this from the collectors guidebook (which I just now got my hands on today but saw these on twitter)
So we cut out a sticker sheet in that design and placed it down with some painters tape to keep that part of the mask gray and then it was painted white, and that was the painting done!
For the black in the eyes, I got a scrap of black fabric for cheap at joann’s that I picked up and pulled and it was a very soft polyester/spandex material that you’d use for pantyhose so i’m sure you could also cut up some of those for a similar effect. But when stretched you can see out of them.
So we made small rings the same shape as the inside of the mask behind the eyes, glued the fabric using super glue to that ring (and the mouth as well) and viola:
and then the final step was to get that mask on my face, and basically we had some rings on the left and right sides of the inside of the mask that I attatched some elastic too, and then needed to glue a third strap over the top of my head. and sewed it all in place and put some craft foam along the forehead and chin inside the mask for some cushioning and it was done!
I really hope that was helpful and I tried to make sure I took lots of photos along the way so I hope they were helpful. If you have other questions feel free to ask! Sorry for the novel but just wanted to be as detailed as I could be!
Thank you for your nice words and best of luck!! Allister is a detailed boy but he’s very fun!
#my cosplay#allister cosplay#allister#gym leader allister#cosplay help#cosplay reference#allister reference#galar#swsh cosplay#cosplay description#ask#answered#long post#if theres other tags I should add let me know#anon
101 notes
·
View notes
Note
Could you PLEASE do a tutorial or speed paint for Titanfall characters? I really wanna see how you do it and figure out how to actually draw them!!
I don’t know if I’d make a proper tutorial or speedpaint, though making a speedpaint sounds like a nice idea if I actually had a program that could record my screen (if you have something, recommend it to me please)
But I can share a bit of how my process looks like.
Because well, shapes used to make simulacrums, helmets and titans in Titanfall are difficult to draw. It took me a while to understand how stim’s head works for example. So I learned to rely on references a lot.
I usually hop into a game and take a screenshot of the asset I need to use or make a screenshot from the few rotatable 3D models available online.Then use it as heavy reference, sometimes even tracing over it lightly for the sketch to get the basic shapes and then drawing having the reference next to me, redrawing every detail. It helps a lot with understanding how all the parts work and connect with each other.
This allows you to later try and modify it and add your own spin to the design, like an OC I’m working on lately, who has modified Grapple gear.

With titans... I trace them on my screenshots a lot with the sketching, I’m not even pretending I’m good with drawing them :’) Though I am getting better.
Basically - just use a lot of references, you can make them yourself and learn from them how everything works. If you have a particular asset you’re struggling with, I can try to break it down into basic shapes and do more of a tutorial.
29 notes
·
View notes
Note
Would you ever do a step by step on how you draw Cuphead and/or Bendy? I just b r e a t h e your art style and I wish to see how you draw them
i mean i guess i could lkjsdg
recently i’ve been playing w/ a new sketching style that isn’t really skeletal based but more just. blobbing it out like silhouettes. it’s quicker y’know and kinda fun to just scribble before getting down to business
so step one is just. circles

torso/chest (we’re startin’ w/ cup)

erms

leg
same process fr bendy

so i totally forgot to stop and take screenshots fr this but basically you just. have ur circles. and trace out probably 3/4 of it (i added the faint black line to show the top of the circle) then add on his face and Other Parts. i usually do his eyes first, then nose, then mouth.
then just like. draw bode. there’s way too much here fr a step by step just drawing a body like you would normally following ur blob and go fr whatever the hell ur headcanons are may he’s a chubby circle maybe he’s a lanky Fuck

i tend to make cuphead and mugman kinda short n stout, especially in the legs. makes em a little cartoonier and more like bouncy kids
now w/ bendy digitally i always accidentally draw him lineless so the Tru process is just a black circle w/ this then throwing some white on and erasing the bit between his horns but we’ll treat this like i’m Not Doing That

i hate drawing his horns so i just do those first to get em outta the way

rest of face

adjust as needed and Add Face
i decided he needed to be a little hor-...... he needed bigger horns.

then like cup u just. draw body in. i don’t know a lot abt bendy besides fanon stuff bc i keep exiting the game w/o saving bc i’m a wimp but i know he’s a dancing boy so i like to make him a bit curvier/more lithe looking instead of blocky like the Bros. also big fun bowtie :} as far as i know from fanart he’s a Little Shit
BOYS
u can choose to keep ur sketch blobs in or not. sometimes i get rid of them sometimes i don’t. i think they look kinda cool kept in!! also makes it harder fr people to take my shit and colour it like i keep telling them not to lmao
#doodle dip#long post whoops#cuphead#bendy and the ink machine#batim#bendy#nonny#pandanons#beware the askbox ghost
857 notes
·
View notes
Text
Reasons Why I Probably Won’t be Returning to This Blog Anytime Soon.
I want to start this off by apologizing for disappearing without a trace for so long. No matter how busy I was, I should of at least left anyone who was still interested with some kind of idea where I had gone to. I just felt like it would have been cheap to pop in here with nothing to give to you guys, but seeing as 2018 will be upon us soon, I feel like it’s only fair to be honest with you guys. This blog is most likely going to remain inactive for a number of reasons that I will be getting into under the cut.
1. School
My second semester of college will be starting on the 8th of January and if it was anything like my first semester, I will be extremely busy with that. I took 5 classes for the fall semester and 5 for the spring in order to meet the requirements for my scholarship, and while I am doing well with that, it is an a lot of work to keep up so many classes. Any free time I had that wasn’t spent working on homework assignments I tried to spend with my friends, or relaxing with video games and youtube videos. Updating this blog was the last thing on my mind, which leads into my next point.
2. Gmod isn’t the fun for me anymore
This is by no means trying to bash any of the gmod artists and bloggers who still remain active. I know you can do amazing things with gmod and all the mods people have made to add hundreds of props and cool effects, however the process just became too tedious for me. While you can do a lot technically with gmod, I wasn’t very proud of anything I was producing despite sometimes spending an hour or more setting up one image. I don’t know if it was a mix of using other people’s assets to make art that made me feel unaccomplished, or just that I wasn’t willing to put as much time into my screenshots to make them look good, but nothing about my work really felt fulfilling to me.
3. Most of the gmod bloggers I started my blog for are no longer active on Tumblr
Again, this is no offense to any active gmod blogs I still follow. I wish you all the best of luck. However, the reason I started my own blog wasn’t really to tell my own story like it should have been, it was mostly to interact with the gmodders I admired. I honestly think my blog was the most fun when I got to do character interactions or just answer silly little asks from my friends. However, all good things come to an end, and most of the blogs I started mine to interact with are gone, no longer update, or are so far and in between updates it just isn’t worth it to try for any interactions. I’m still friends with a few of them personally, but as for blogs, we just haven’t found much of a need to update characters here seeing how limited gmod and Tumblr can be for writing a complex story, which does tie into my next reason for abandoning this blog.
4. I didn’t know or like where my story was going.
This is entirely my fault for trying to make a blog that was more character driven than story. Interesting characters were only able to get me so far if I didn’t have any engaging situations to put them in. The story my blog ended on with the demons and everything felt rushed out, messy, and nowhere near what I waned it to be. The arcs always ended like lack luster cop outs because they were more heavily driven by character reactions than actual big, impressive moments. Again, that could be attributed to the limitations of gmod, and how big scenes take a long time to pose and render correctly, but I honestly could of put a lot more effort into my writing and scene building to make them more interesting to look at. If I ever did come back to this blog, I would have to overhaul my story. My blog got nowhere near enough asks to run on them alone, so next time I’ll be sure to have some sort of basic story set up instead of having to craft a crap one last minute to keep the blog alive.
5. What this means for the future of me, this blog, and these characters
To start off, no. I will not be deleting this blog. I think deleting a blog just because you’re done with it is a waste of hours and hours of hard work. The blog isn’t going anywhere in case people want to look back on it, and I still use it to follow other gmod and art blogs for personal reasons. As for my characters, these are the first characters I’ve ever been brave enough to put out to the public so they will always hold a special place in my heart. I keep them alive through interactions with some close friends and in most of my art pieces, since I’ve been getting much more into digital art lately than gmod. Maybe one day I’ll revive them into their own stories, but as for their time here, it’s most likely going to come to an end. I don’t much like roleplaying on Tumblr so I doubt making an rp blog for them would be anymore successful than this blog. I could make an art blog if anyone is interested in keeping up with me, but with school I doubt it’ll be updated very frequently seeing as art isn’t my degree path at the moment., but here’s a few if teasers of what my art looks like currently if anyone is interested.


Doubt I’d make an ask blog out of it or anything, but I suppose it’d be some way to share my work with anyone if they still have any interest. Other than that, I hope everyone has a wonderful 2018, with more ups than they have downs. Sorry I couldn’t leave you with a satisfying conclusion to this blog, but it was never meant to be a grand story driven masterpiece, just a little way to interact and have fun with friends. And it did its job well enough for that, but it’s time I move on to bigger and better things.
#thank you all for the support#commet if you want an art blog I guess?#it's be more of a portfolio if I want to do more art in the future#other than that cheers to you all
11 notes
·
View notes
Text
100 Easy Drawing Tutorials for Beginners and Beyond!
Traditional drawing is certainly way harder than digital and it is true that people are able to progress much faster digitally, but one should learn the traditional type of drawing and painting before starting digital drawing, since it often lays out the foundation for screen design.
This article contains a mixture of traditional drawing tutorials, drawing techniques and some methods for transforming and preparing your creations for screen design. Some are intermediate level and some are advanced tutorials that include general theory, useful tips, comic inspired art, sketch a pencil drawing, coloring processing, character sketching, doodles, shapes, proportional, perspective and much more. We hope that drawing tutorials and techniques in this post will be a great help to you. [Content Care Dec/01/2016]
Further Reading on SmashingMag: Link
Things You Didn’t Know Your Doodles Could Accomplish
I Draw Pictures All Day
The Messy Art Of UX Sketching
Drawing Challenge: Illustrating Animals With 13 Circles
Traditional Drawing Tutorials Link
Marilyn Portrait Tutorial
A truly fantastic drawing tutorial to learn how to draw a portrait of Marilyn Monroe with pencil. Each step of the portrait is perfectly well explained and commented. This tutorial is very detailed, and requires a lot of patience.
Screenshot
Portrait tutorial
This is a step by step tutorial on how to draw a realistic portrait. The artist assumes that you have a basic understanding of drawing and shading before attempting to draw a serious portrait. For this lesson he is drawing on 11″x14″ Fabriano Hotpressed Watercolor Paper. He is using Derwent Graphic Pencils ranging from 2H to 7B. For more information on any of the drawing tools that he mention in this tutorial, visit the drawing materials page.
Screenshot
How to draw lips
In this tutorial artist will explain how to draw the structure of the human lips.
Screenshot
How to Draw a Car
For this tutorial the artist will show the different steps he takes in drawing a realistic looking car. He chose to draw an american classic, the Corvette. This tutorial will apply to any car though because for the most part, they are all the same. The key to drawing a car that will pop off the page is having a good balance of lights, midtones, and darks along with clean, sharp edges. He is using Derwent Graphic Pencils and Fabriano Artistico Bright White Watercolor Paper, he is also using mechanical pencils for small details.
Screenshot
How to Draw Optimus Prime From Transformers
In this tutorial you will be learning how to draw one of the most popular of the Autobots, Optimus Prime. This drawing tutorial will show you in detail how to sketch, draw, and shade in this character that is popular around the world
Screenshot
Pet Portrait
A very good tutorial about how to draw pet portraits with colored pencils. Basic process and tips. Medium : Prismacolor Colored Pencils.
Screenshot
How to Draw a Ninja
This tutorial will show you how to draw a ninja step by step. This tutorial has easy to follow directions and steps making it that much more possible for anybody to tackle
Screenshot
Portrait tutorial
Artist is going to show several step photos along the way on this one. Artist chose this photo because of it’s RICH content, and it’s HIGH amount of TONAL VALUES, CONTRAST as well as it being a high resolution file, Finding just the right photo is half the battle to a good drawing. NEVER EVER work with a low quality photo.
Screenshot
Hair drawing tutorial
Drawing hair is definitely one of the trickiest part of almost every portrait. However, you will definitely like it if you acquire technique and skill in it. Therefore Artist introduce some easy and effective ways to draw wavy or straight hair or hair blowing in the wind. No matter how much chaotic the hair is, you’ll be able to draw it.
This tutorial explains two techniques of drawing hair on four portraits.
Screenshot
Eye-drawing tutorial by Sarah
A great and very detailed tutorial, to learn how to draw an eye in 30 steps
Screenshot
How to Draw a Realistic Eye
Artist made this tutorial to show the different steps that he take in drawing a realistic eye.
Screenshot
How to Draw a mouth and teeth
Artist made this tutorial to show the different steps that he take in drawing a realistic mouth, lips, and teeth.
Screenshot
TRADITIONAL SKETCH RENDERING
At most design schools they teach you how to use a single wooden pencil to create an entire rendering, sometimes referred to as a “Prisma-rendering” due to the type of pencil usually used (Prismacolor wood pencils). These are fast and very pretty looking techniques, and they are fairly easy to master. This will be more of a walkthrough then a tutorial in the sense that artist won’t describe every pen stroke, more the basic steps and thoughts behind. Ok, let’s go!
Screenshot
Drawing Hands and Feet
Some useful explainations and tips about how to draw hands and feet.
Screenshot
Drawing a Rose
An excellent tutorial offered by Rachel, to learn how to draw a pink rose.
Screenshot
A Pseudo-Sugar Skull: From Start to Finish.
Create a highly detailed sugar skull illustration by following this expert tutorial, with details on the process from sketch to final digital design.
Screenshot
Hair Amanda Tapping
A step by step drawing showing amazing hair on a portrait of actress Amanda Tapping. The result is impressive realism. A must see!
Screenshot
From Sketch to Vector Illustration
Create inspiring digital creations from hand drawn sketch using these helpful tips.
Screenshot
Manga Making Tutorial
In this tutorial artist will show you the process of creating a complete Manga comic strip using traditional tools.
Screenshot
How to draw a fashion figure
In this video tutorial you will learn how to use existing reference photo to trace a fashion inspired sketch.
Screenshot
How to Draw Dragons: Step-by-Step Instructions from Tooth to Tail
Dragons aren’t real, but if we want them to look like something living in our reality, their design must obey certain rules. Dragon draw tutorial – Game of Thrones, the Hobbit or Harry Potter series.
Screenshot
Leather Wings
In this tutorial you can get ideas and techniques for drawing realistic wings stracture, Artist focuses at drawing wings.
Screenshot
Pencil Sketching by Max MaxBert Bertuzzi
very comprehensive theoritical tutorial, this article will increase knowledge and power of your drawing skill
Screenshot
Drawing Hair in Pencil
Some very useful tips for you on how to create extremely inspiring and realistic drawing hair in pencil work
Screenshot
Drawing Hands
Follow these simple and easy tips to avoid the difficulty of recreation of hands in pencil drawing and to learn some great tips and techniques of drawing hands.
Screenshot
Clothing Tutorial
An excellent roundup with plenty of tips and clothing tutorials. So, dress your characters in the best way by practicing these tips.
Screenshot
Comic Story Step by Step
If you are looking for a comic story guideline, here is a perfect step by step guide for you that will guide you starting with sketching and moving on through the inking and digital processes.
Screenshot
How to draw Marlon Brando step by step
It is now time to show you “how to draw Marlon Brando step by step” All the steps and instructions are laid out in the simplest format possible to help make this tutorial a breeze.
Screenshot
Face drawing: the heroic male
In this tutorial we’ll draw a character face of a hero-like character. In the process we’ll review an optimal placement of the facial features and the best ways to emphasize the features of the face that will make our character look manly and heroic.
Screenshot
Evil skull drawing
Looking for a terrifying evil skull drawing tutorial? Just follow the steps and you should be able to walk away with a scary skull to use in your scary projects (whatever they might be).
Let’s start with the evil skull drawing tutorial!
Screenshot
Lone Wolf Pencil Drawing
Here is a new miniature speed pencil drawing. Artist wanted to make this one different from my other ones. He combined two drawings in one to make a single image. The sunset and the single wolf. It gives the final image a different look and feeling.
Screenshot
How I making manga part 2
A step by step comprehensive and detailed tutorial about making manga.
Screenshot
Graphite Portrait
This tutorial explains all steps to create a portrait of Zinedine Zidane in graphite pencil. Time to complete: 10 hours.
Screenshot
Dance of Spring Tutorial
A step by step detailed tutorial that will help you with your Colored pencil.
Screenshot
Today, too many websites are still inaccessible. In our new book Inclusive Design Patterns, we explore how to craft flexible front-end design patterns and make future-proof and accessible interfaces without extra effort. Hardcover, 312 pages. Get the book now!
Traditional Drawing Tips & Techniques Link
How to Draw what you See: Techniques and Tips to Improve your Drawing Skills
This article contains step-by-step images of the process Artist uses to create realistic looking drawings, as well as tips he have picked up over the years which anyone can use to improve their drawing skills.
Screenshot
Shading and Blending
This brilliant tutorial is all about shading and blendng, so let start and get lot of tips and amazing techniques.
Screenshot
Tips for drawing hands
In this tutorial Artist will include many tips about drawing hands he has picked up which are useful for getting better at drawing hands, including foreshortening, nails, and finger shapes.
Screenshot
Circulism Technique
Circulism is a very interesting technique to create skin texture with pencil. With this great tutorial, learn how to acheive a realistic skin texture with circulism.
Screenshot
3 Dimensional Drawing Techniques
To learn the basics of shape, perspective and shading in order to create depth in your work.
Screenshot
9 Steps to Creating Better Compositions
Great compositions don’t just happen by accident. They take planning, patience, and a knowledge of all the visual elements at your disposal. The great thing is, no matter how much or how little talent you have, you’ll always be able to improve your art by sketching out a good composition before you begin.
Screenshot
Drawing clothes techniques
A less general point that the portrait seems to pose few problems is the representation of clothing. In this tutorial, clothing can be summarized in two points: the folds and textures.
Screenshot
Editing Drawings
Editing Drawings by Cataclysm-X offers valuable tips for bringing out the best in your traditional drawings after they have lost their depth and luster due to scanning.I am sure this technique will help many traditional artists in the presentation of their work.
Screenshot
Detailed Hair
This article contains high quality tutorials that will guide you how to create highly realistic and inspiring hair on your subjects.
Screenshot
Portraiture lesson
To study draw a portrait using the ‘inside-out’ method.
Screenshot
Proportions
Proportions in any drawing assignment hold great value; therefore we have come up with these five most helpful techniques that will help you getting grips with proportions in your drawings.
Screenshot
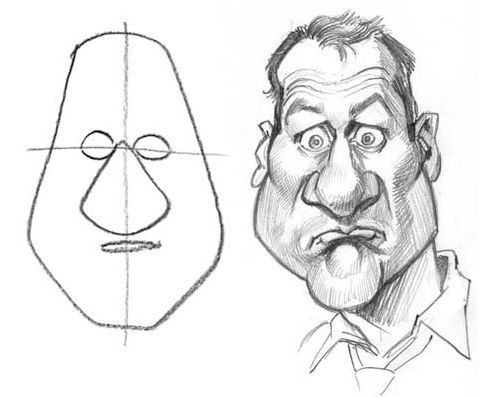
How to Draw Caricatures: The 5 Shapes
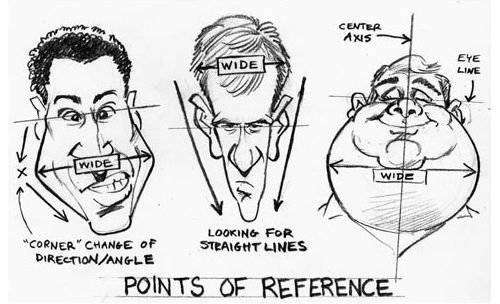
This is a great collection of tips and techniques you can use to draw caricatures and learn the basic theory and 5 shapes of caricature design.
3 notes
·
View notes
Text
When I was young, I fell in love with the Pokemon series. I loved the RBY and GSC games, I watched the anime on TV every weekend, bought the movies, played the TCG, and collected the PokeSpe manga zealously. But as the years went by, the newer Pokemon games failed to hold my interest, and I soon stopped following Pokemon entirely. Last year, the generation of Alola was announced, and after watching a few trailers, I found myself drawn to the music. The adorable Rowlet also caught my eye, and on top of that, it seemed like the story was going to be interesting. A conservation society full of nice people dressed in white that looked strangely sinister at times? Hell yesssss. So I decided to buy the game... and then I fell deeply in love. Once again I was in Pokemon heaven (or hell).
So when Mei asked me if there was any series we could cos together that'd be fun and simple to do, I suggested Gladion and Lillie, since their costumes are fairly simple (c o u g h). She agreed, and that was the beginning of it all.
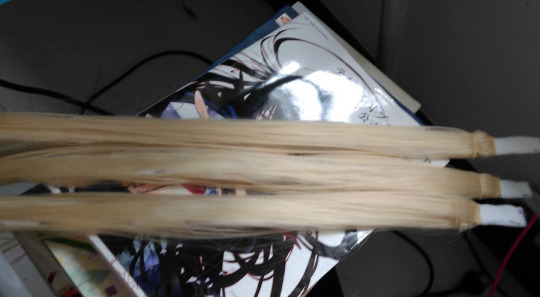
I started working on stuff around mid-June this year. People who know me know that accuracy is pretty high on my list of priorities, and I was determined to get the not-very-logical hair of Lillie and Gladion as good as I possibly could. Lillie's problem, of course, was the thickness. She has two insanely fat braids that had to be made up of almost all the hair on a normal human head, yet somehow still has a thick wide mane of loose hair behind her. So I had to spend time wefting as many extra rows of fibre into the wig, and then crafting removable bases for the braids from batting and more wefts.
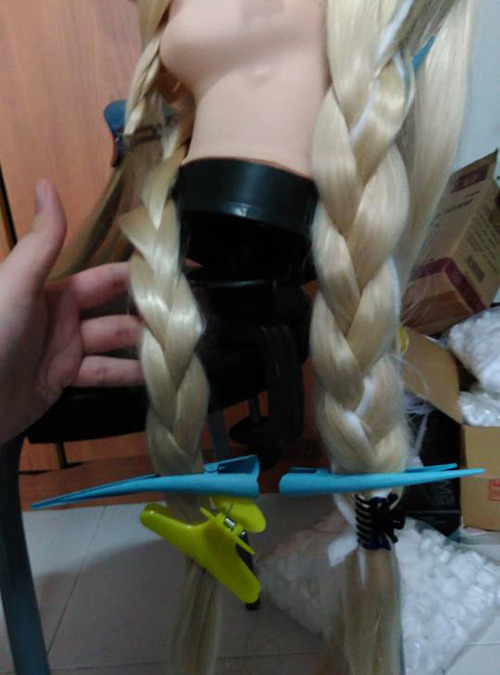
Testing!
Batting base WIP HAHAHA
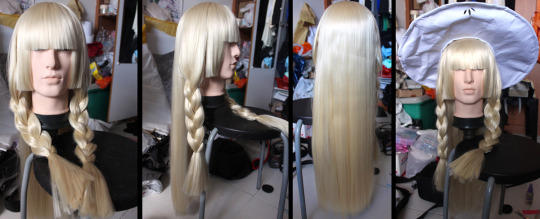
And the final result was worth it <3 <3
Next was Gladion. When it comes to the subject of pulled back hair, I've gotten to the point where I can ONLY accept lacefront. Anything else is too fake for me. For me, cosplay has always been about portraying the characters as if they were real, no matter how zany and strange their designs may be. I wanted the hair to look almost as though it grew on me. I ripped out almost the whole front to get rid of the fringe, and sewed in longer wefts, adjusting the direction of the hair to the left so that they would comb back naturally. Then ventilating hell began
Darkness, my old friend, we meet again. ;___;
My hooking skills have improved since I first started ventilating, but it's still a long, tedious process. School started before I could finish, and I had to work on everything else too...
The realization that his uncut wig looks like Mercy from Overwatch HAHAHA
But as with Lillie, the final result was worth it <3 <3 <3
With regards to his costume, I'd actually had the hoodie and pants tailored because I ran out of time. I'd wanted just the base made so I can do the rest of the details myself, but the tailor forgot and did everything for me... and ended up messing up the accuracy. It was a disappointment, so much so that after STGCC was over, and we planned to have a shoot at the end of the year... I decided to remake everything from scratch. I'm terrible at patterning, really, and Gladion's biggest problem was THE STUPID GRAVITY DEFYING HOOD. Ultimately I couldn't get it to look exactly like the original (because I didn't want extra seams and all, but it was close enough. And the second time round, all of the holes were in the correct areas HAHAHA.
I'd made his first waistpouch myself, but for some reason, despite my careful measurements, the size turned out far too large the first time. So I had to remake the whole thing a second time. The hardest part is sewing the damn thing together, because I'd had to put two layers of hard inferfacing for each piece and sometimes the needle just wouldn't. Go. Through. OTL In version 2, I had more time, so I paid more attention to getting the shape accurate. The stupid thing tapers towards the bottom and has a curved side. Even more stupid, the strap goes from FAT TO THIN TO FAT for some reason. But I succeeded!
New VS Old
Next was the Z-ring. Gladion's official art doesn't have one, but he obviously wears one in-game. I felt that it was important, because Nanu gave it to him. So I had to dig out references from the game screenshots 8D;;
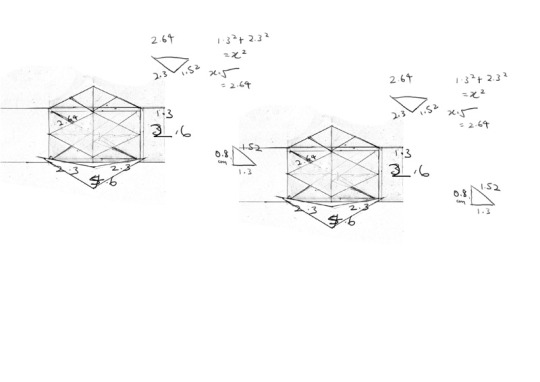
This is how a lot of my prop drafts look like. ALGEBRA IS MY FRIEND.
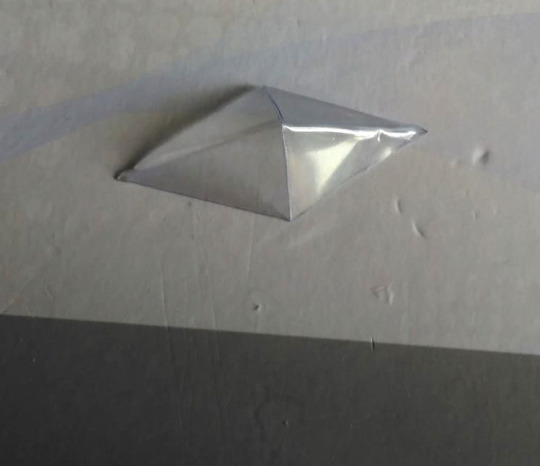
Also crafted the Z-crystal thanks to Pythagoras' theorem 8D; I used liquid quartz to glue the clear acrylic sheet together without leaving traces.
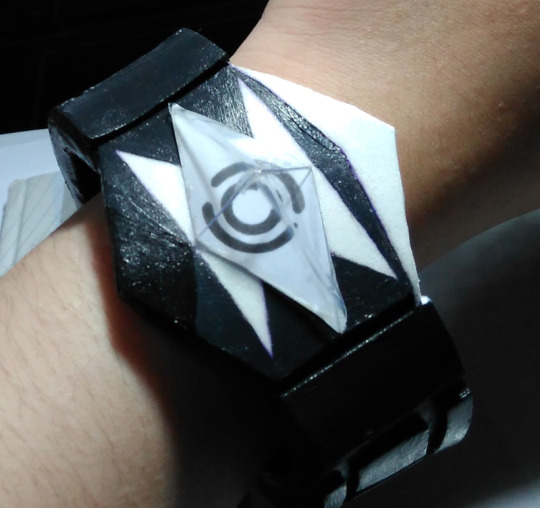
Final result! I'm pretty happy with it =>
Before STGCC, there was one more segment that I worked really hard on. After we'd decided to do SuMo together, I thought of making a Nebby plushie for Mei to carry. Yes, Pokemon Center had already released their Nebby plush by then, but... For one, it's smaller than life-size. For another, the shape looks more like a sunflower than a starry cloud. I didn't want it to look like Lillie was just carrying a toy; I wanted to give the impression that Mei had an adorable, soft, beautiful real-life Cosmog. But how on earth would someone with very terrible patterning skills make a 3D cloud plushie that could be dyed for Nebby's distinctive gradient colouring, and still be nice and soft to hug?
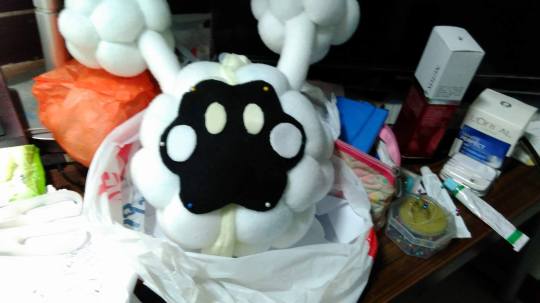
The answer is, I struggled.
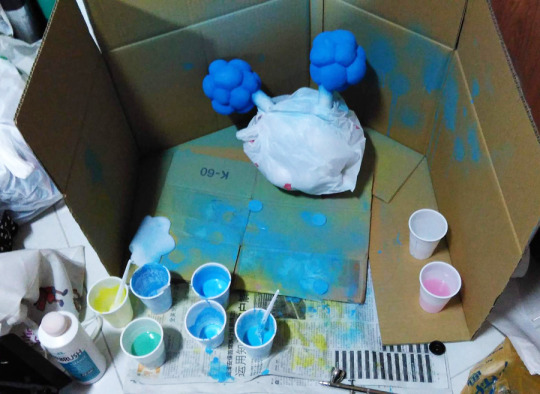
Set up a spraying booth to airbrush the gradient on. Due to a problem with shipping, I couldn't get my compressor in time, so I ended up having to splurge on compressed air cans, which were horrendously expensive oTL.
BUT LOOK AT THE FINAL RESULT. LOOK AT HIM. <3 <3 <3
Let it also be known that I tested to make sure he could fit inside Mei's bag the moment I finished the base HAHAHAHAHAHAHA-----
So that was part 1 of Project Alola! We went to STGCC together and met lots of Pokemon fans (quite a lot of people were very happy to see Nebby, in particular XD), and Laki offered to come shoot with us as Moon since she already had the costume. We then planned to have our shoot at the end of the year during my holidays.
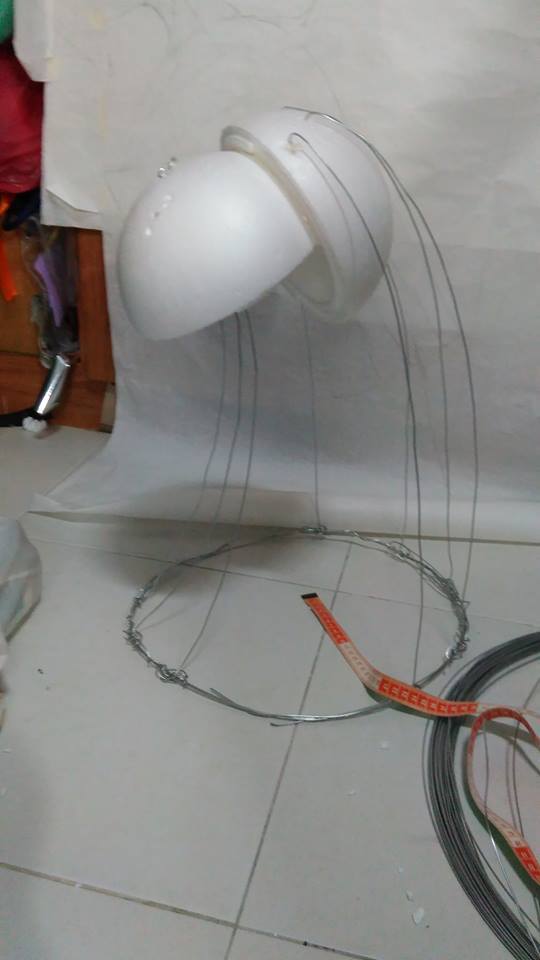
As mentioned, I'd already planned to remake my entire costume and waistpouch, but aside from that... I had the mad idea that I wanted to make a Silvally prop. It's something I'd considered for STGCC too, but I was really short on time then, and Mei told me to FINISH EVERYTHING ELSE FIRST THEN DO IT IF YOU HAVE TIME.
The problem is... Silvally's official size in the Pokedex is 2.4m. That's 80cm taller than myself. )o) Sure, I could scale him down, make a tiny lap plushie like all the other cosplayers, but what would be the point? Although I'd never cosplayed from the Pokemon series before, I'd always thought that if I were to do so, I'd want to make life-size Pokemon so that it'd look like I actually have a Pokemon partner, and not just a Pokemon toy. But I'd thought then that my projects would be starters like Pikachu or Charmander or Cyndaquil, or maybe one of the Eeveelutions. Not a giant horse-dog like Silvally ^^;;;
I had to consider the fact that my house isn't very big and I'd have barely any space to keep him. I had to consider how I'd be able to transport him, and how to construct him so that I could take him apart. I also had to consider the amount of money I'd be spending on him, because honestly, cosplay is not a cheap hobby. Materials in Singapore are especially expensive. As an unemployed student, I'd be splurging a lot if I decided to go ahead with this crazy project. When I told this to Mei during one of our dinners out, she suggested just making his head and taking halfbody shots so no one can tell that he has nobody. Like a hobby horse, except it's a hobby Silvally.
Good idea.
So when school finished, I started drafting him out, and the basic paper draft itself took like three giant sheets of patterning paper taped together HAHAHA.
The base
Honestly, even though I had an idea of how I'd make him, I wasn't completely sure if it would work. As I've said repeatedly I really, really suck at patterning. I can never seem to envision where to cut darts in a piece of EVA foam to get the shape I want, so half the time I was just taping drafting paper on and folding and taping excess parts off, then that that up for a trial-and-error pattern.
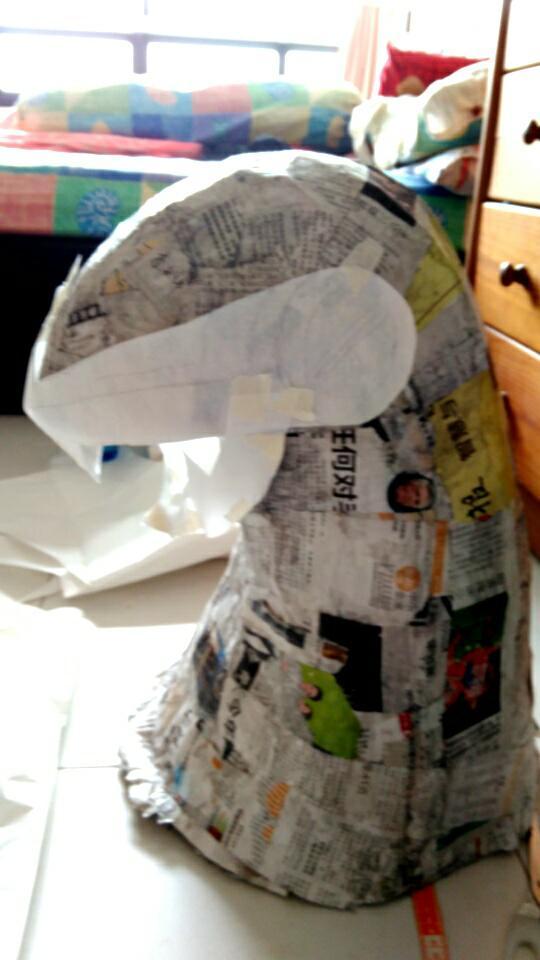
With paper mache and paper draft pattern for the mouth.
That's how large the whole thing is 8D'
Apart from the making of Silvally, I'd also spent time searching for reference pictures and sketching storyboard ideas for our shoot. I went to check out the our shoot location (Sentosa Island) a few weekends back, so that we could decide where exactly we wanted to shoot. In hindsight, there were a lot more shots I could have planned to bring out the personality of our characters more, but oh well ;w;
The shoot itself went pretty well, for the sun was quite kind to us, and hid under clouds for most of the day. Sei's working style is quite different from mine, but she was very gracious and did everything I asked of her. Sakami and Greg were wonderful helpers, and some of my best memories from the day include our hilarious videos, and the shenanigans with the Pokemon.
I've already thanked my wonderful team mates, helpers and photographer in another post, so I won't go into details here. But everyone was very kind and obliging, and listened to all my ambitious plans, allowing me to be a bossy director. I'm very, very grateful to all of them.
So now, a bit of reflection on Silvally, and the whole project.
The patterns for Silvally weren't perfect, and I messed up a lot. The final result was definitely far from what I had hoped for. Most noticeably, the top of the head is bumpy holey because I ran out of gesso to fill and sand. But the proportions also came out a bit off, and the neck piece patterning failed on the right side. But when I finished painting... I felt very, very happy. I'd gotten some small bouts of joy when I finished each stage of the crafting process, when I looked at what I'd done, but looking at the final product was just.... incredible. It wasn't as beautiful as it could have been, and I still regret all the imperfections that are so obvious to my eyes, but....I was so excited. I couldn't wait for the shoot.
Perhaps it was partly because I hadn't really been sure if I'd be able to make things work, so the success tastes that much sweeter. Some of my friends had told me I was crazy. I kept asking myself if I were crazy. All that money and time and pain sunk into a project that I'm not even getting paid for, with a success rate that seemed really low. My mom telling me straight out that I was 'too ambitious'. Was it worth it? Would it have been better to make a smaller, much more perfect prop, than an actual sized, flawed one, with half the effort and money? Cosplay is already an indulgence, but had I crossed the line into foolish waste zone?
When I looked at my completed Silvally, the answer didn't hit me like Mjolnir. I still don't know if it was the right thing to do, or if I was an irresponsible child wasting the money that could have gone into feeding me better food.
But it made me happy. So happy. I nearly cried as I stood there for a few minutes staring at him. He was truly a labour of love. I spent hours spraying gesso and paint because I love Silvally. I spent days sanding until my arms want to fall off and my eyes are dying from dust because I love Gladion. I spent hours cortorted in weird positions with a paintbrush trying desperately to stay within the pencil lines, sweat dripping into my eyes, because I love this art. Sure, the process itself was often painful; I suffered multiple burns from hot glue and a hot iron and cut my fingers open way too many times. I still hate hand-sanding with a burning passion because it's tiring as hell and I get blisters on my oversensitive skin. But the thought that all of the suffering helps to build the final piece of art that I envision makes me grit my teeth and soldier on.
Cosplay is my art, something that I would put 500% of me into. Whether the crafting of insanely large props, or the preparations for the shoot, or the styling of my entire team's wigs, or the endless sewing adventures on plushies.
Because I love it.

0 notes
Last Seen Blogs
avoskorm
Meat Wizard

yabishrihere
nah.

deidirector-blog
Director's Tumblr Blog

aly4khq
˗ˏˋ- ƙąყƖą -´ˎ˗

angelcakegf
𝔞𝔫𝔤𝔢𝔩 𝔠𝔞𝔨𝔢 🍰