#this is really just here so i can screenshot it for my fitness page on Facebook because the Tumblr screens are actually getting seen
Text
General Notes on Resistance Training Form
The most important thing to remember about "good form" is that you should not be in pain. Soreness is different, but sharp pain is never right. If you're not sure, always err on the side of stopping if you're experiencing discomfort.
Everyone's body is a little different, and you might find the standard coaching notes for a particular exercise just don't feel right to you.
So focus on the broad strokes:
No sharp pain or significant discomfort
Let your body make straight lines i.e.
-- Keep your back flat back- don't round it out by leaning back or hunching forward --Keep your joints in line with each other- shoulders over hips, knees over your ankles etc. don't lean out to the sides.
--Keep your shoulders away from your ears. This feels like you're trying to "pinch" something between your shoulder blades
Your muscles should be doing the work, really squeeze whichever muscles you're working with
-- Think about which body parts you're actually moving (like are you raising your arm for a shoulder press or squatting down for a box squat) make sure you're really squeezing the parts that are moving
-- Think about your stabilizing muscles. They're what's keeping you from tilting so you can maintain those straight lines. Make sure your core is engaged
--To engage your core and other stabilizers: ++Squeeze your glutes and your quads (your butt and your thighs)
++Squeeze your tummy like you're trying to move your belly button in and down. No matter what exercise we're doing, we need our stabilizers engaged. They protect us while we're doing work.
Inhale while you're at rest, exhale while you're doing work. Do not hold your breath. --So this might look like inhaling on the downward half of a squat and exhaling on the upward half.
--Or it might look like inhaling before you begin to move, exhaling on the downward half, inhaling again at the bottom, then exhaling again as you move back up.
Again these are just broad strokes for beginners trying stuff out for the first time. Yes you can get very technical with form, but for basic exercises, these are just good general rules to keep in mind.
#fitness#resistance training#beginner friendly#strength training#educational post#this is really just here so i can screenshot it for my fitness page on Facebook because the Tumblr screens are actually getting seen
25 notes
·
View notes
Text

Advice on how to achieve aesthetically pleasing gameplay photos!
UPDATED: 4/22/2024
I made this post earlier today and people were interested in the comments! Which made me more excited to make this post~
this is just some advice from me! this isnt a tutorial or anything of that sort, but I will be linking some things that could be helpful for editing gameplay! :D
First things first, I want to say that I use a graphics overhaul, lighting mods check my resources page for what reshade i use if ur interested.
I use these lighting mods & graphics override specifically:
sunblind
graphics overhaul
Lotharihoe's ootd* curseforge download :)
Northern siberia winds in-game better lighting mod (bright base)
these are some other lighting mods you can try out as well!
Luumia's NoBlu & NoGlo
these are some other lighting mods like sunblind
how to install lighting mod
I just wanted to add these things in since we're talking screenshots + I wanted to share for the no reshade ppl <3
Now we can move on to the advice!

I love the simple style of gameplay editing so much, but for me I love creating an ambience with my posts and put the audience inside of my gameplay. I also enjoy storytelling with gameplay more than just the "usual" gameplay post (when it comes to me). I am currently playing the globetrotter challenge with my sim Daichi. I really went all out with the editing for that gameplay. For this one its very much a virtual collage of my sim doing things. Trying new things and getting inspired by others is always fun and cool! Remember when u do take inspo: link to the inspiration and @ the simmer that inspired u!!

In my other save (my cozy save) I also take creative liberties there.


its more of a cozy vibe & silent story-telling (storytelling w/o the dialogue). for my cozy save i take inspiration from @/stellarfalls. er gameplay really helped me find my niche thing in the way i play the game tbh!
Angles/Screenshots
When you're taking your screenshots, angles are important. Depending on the shot, you're putting emphasis on a specific thing. This post is very helpful and talks about different types of angles/shots and what they mean. Check it out especially if you want to play around with the way you take screenshots!
Here’s some editing tips from @stellarfalls !!
simmingstars editing tips
Reshade
If I want to create a moody or dreamy ambience I can use reshade. Looking for a reshade that will fit the overall vibe is a must or you can make your own~
i know not everyone is able to use reshade because they're not on windows. I highly recommend using photoshop actions to create that ambience you're looking for.
*These can be used in photopea, but it cant read topaz clean. If you want to achieve topaz clean in photopea, check this post out! just something i'd like to add in case people are new to all of this + dont use photoshop. Lastly, I want to say if you decide to edit photos on photopea, it does tend to crash if you upload a big number of photos and slows down. I usually upload like 6 or 8 and then save and repeat the process. Its kinda annoying, but ive been using photopea for a while now so im used to it. My mac users, use early-grapes butter action if you want things to look cleaner and less harsh!! + the other ps actions down below. I used these a lot when I was a mac user. Of course, that comes with extra steps, but I feel its worth it in the end.
I like these photoshop action packs bc theres tons of stuff in here that can help create a reshade like look:
intramoon's ps action dump
wooldawn's ps acton dump
smubuh's photoshop actions
early-grape's butter action
hazelminesims's ps actions
Templates!
I loveeeeeee templates so much!! theres so many out there to use for gameplay. It really adds more to gameplay posts! This can be dust/dirt, film burn, that cute camera template etc etc. templates are really fun to use and play around with~
I usually go on deviantart to find templates to use! if you want to check out my deviantart account you can find it here! I favorite a lot of things I can use for gameplay screenies.
Gifs
making gifs is cool because it brings the gameplay "to life" ~
EZgif is a free website that converts videos to gifs. You'll need a recording program like OBS (which is also free).
i like making gifs when i want to capture a (cute) moment (kisses, hugs, cooking etc etc). Its also cool to capture the weather in game like when its snowing or raining.
Little details
Some people really go all out on editing gameplay posts like adding hair strands and adding more details to sims faces (catchlights, tears, blushing, etc). You dont really have to do this, but I want to mention it anyways! I want to try doing this at some point because I enjoy editing my gameplay posts/photos in general and adding tiny details is fun to me lol. It adds realism to posts, but it isnt necessary!
Procreate is a really good program that you can get if you have an ipad. its 10$ and thats, that. You dont have to make any payments. You can also animate on procreate too if you're down for that!
Find inspiration in other simmers!
the sims community on tumblr is filled with such talented people! Theres lots of gameplay simmers who dont do your typical gameplay posts that you can check out and learn from!!! Ive always struggled with getting the right angles when taking screenies. I looked at other simmers and how they take screenshots & it was really helpful for me since I noticed I would take too many over the shoulder photos on my sims lol.
I think thats all the advice I have! I hope this was helpful and if you have any questions please send me an ask or dm! :D
313 notes
·
View notes
Note
hey! They already asked you but I don't know if you forgot hehe, what are the mbti of Clora and Sebastian? 😸
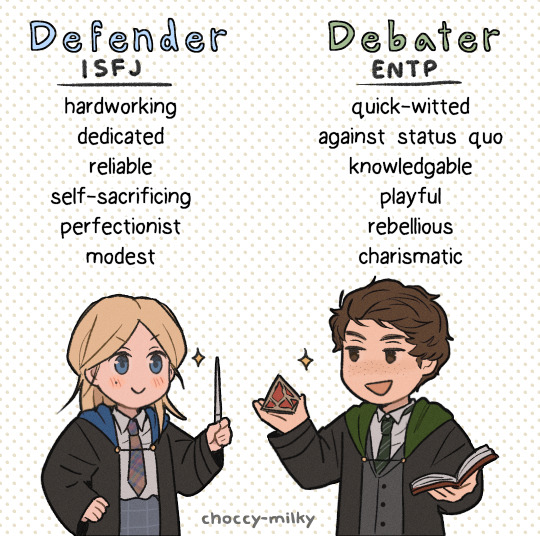
OK, I FINALLY HAVE AN ANSWER!! took me a hot minute to figure out sebs, but after reading all the pages and comparing, i do think entp fits him the best.
also i saw this picture on pinterest about a relationship between isfj and entp and its so true, esp the "do not listen to each other's advice, still get each other out of trouble" LMFAO. also the 'protecting isfj at all costs' 🥺🥺🥺im soft. (ALSO DONT COME AT ME I KNOW I SPELLED KNOWLEDGEABLE WRONG IM TOO LAZY TO FIX IT😭)
OKAY!! and its been a while so i'll be using this ask to reply to a buncha others🙏🙏
my fanfic does follow the plot of the game, but with sebastian added to every sidequest/story mission. and then from around the third (niamh's) trial, it starts to branch more into (mostly all) original stuff!^^

yes actually LMAO, clora's lawley-slap wasn't even planned. but as i was writing it i started to get so offended on her behalf i was like GIRL, SLAP THIS BITCH🤬 so she did😇😇 id say its normal, yeah! even tho i stick to my outlines, a lot of what happens just kinda happens without my prior planning as i begin to write bahaha, especially dialogue scenes.
aw, im glad u like my blog so much and that it can help u even in the smallest of ways 😭thank u!!💖💖
BAHAHA AWW TYY IM GLAD U LIKE IT SO MUCH!! i saw u re-reading it recently on wattpad and ur comments always have me dying. also im just gonna address your other ask here in this one, but as u know seb has now met mr.clemons, and you 10000% nailed the dynamic between seb and clora's dad LMFAOO, they will absolutely bond over disagreeing with how careless she is and wanting to protect her/stressing over her LOOL. ty again for all ur messages, i love seeing how much u love my art/fic😭💖
OMG u are so right i need to draw this
also god idk....following the sebinis example, i guess they'd be...sebora?? reminds me of sephora LMAO. ive also had someone call them "alliteration shipping" which i think is so cute BAHAHA. HONESTLY PPL CAN JUST SAY WHATEVER THEY WANT, i aint picky.

oh god its been too long since ive read the books (tho i do really wanna re-read them esp in the winter) but my fav movie is half blood prince, just because i love all the ron/hermione moments and the highschool drama BAHAHA. what do u mean harry potter isnt a romcom???
ok and last but DEFS not least
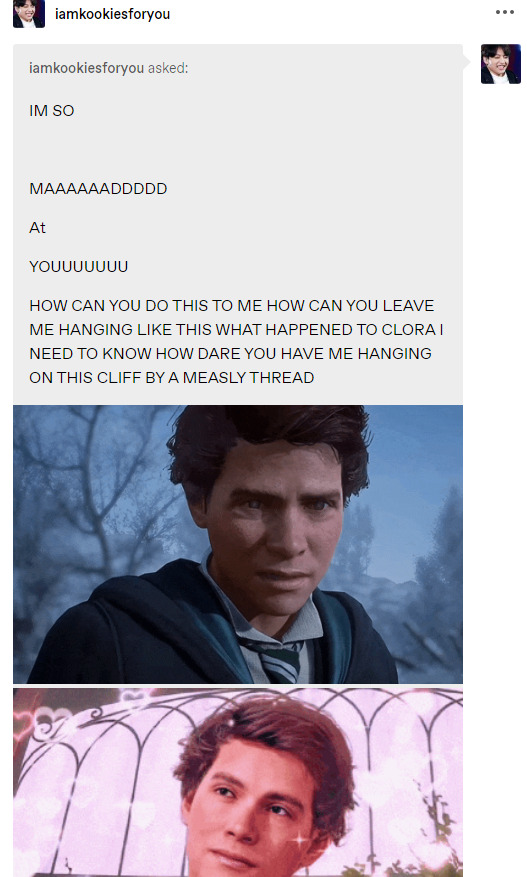
THE UNHINGED ENERGY OF THIS ASK CRACKED ME UP SO MUCH WHEN U SENT IT BAHAHAH, couldnt even fit the whole thing in my screenshot. IM GLAD U LIKED/HATED THE CHAP, and also your pfp just makes everything you say funnier, i love it LMAOOO. ty🙏🙏
#ask#ALSO SEB AND CLORA BEING DEFENDER AND DEBATOR IS AN ALLITERATION it was meant to be......#i go from drawing filthy smut to a wholesome mbti pic of the two of them awww#the duality of man
345 notes
·
View notes
Text
⋆。‧˚ʚ 𝙇𝙤𝙨𝙚𝙧 𝙀𝙡𝙡𝙞𝙚 𝙃𝙚𝙖𝙙𝙘𝙖𝙣𝙤𝙣𝙨 ɞ˚‧。⋆
a/n: sorry I went on a tangent I just love Ellie Williams
warnings: 18+ lesbian fanfiction!! Men and Minors DNI!!! Masturbation, slight stalking?, Ellie having no rizz;;
I do not own Ellie or Tlou.
﹌﹌﹌﹌﹌﹌﹌﹌﹌﹌﹌﹌﹌﹌﹌𓆩♡𓆪﹌﹌﹌﹌﹌﹌﹌﹌﹌﹌﹌﹌﹌﹌
✎ ;;
I can't stop thinking about college loser!Ellie.
Her fingers are rough and calloused from playing guitar. She plays loves songs thinking of you. Creep by Radiohead is her favorite unironically.
You're telling me she left her 2010s emo phase? No she definitely still listens to pierce the veil, fall out boy, 21 pilots. And 80s/90s rock, of course.
Her cute lesbian ass wears flannels and band t-shirts. She definitely has a carabineer on her jeans to hold her keys.
She's so in love with you, one time you let her borrow a pencil and she KEPT it. She felt so guilty about it, but you honestly never noticed it was missing.
Definitely thinks playing Wonderwall by Oasis is how she's gonna confess to you.
Sometimes she even has wet dreams about you and wakes up, shoving her hand down into her sticky boxers to get herself off to the thought of you.
She definitely whimpers and begs.
She memorized your schedule secretly and makes sure she's at least somewhere around your classes so she can see you. She always hopes to start a conversation with you, but you're too busy talking to your friends.
One day you were her partner in a science lab and she was shaking so much from being around you, you had to do all the work while she took the notes.
She had to get your number for when you write up the lab paper and she wouldn't stop staring at the contact of you in her phone.
Physically has to restrain herself from texting you all day everyday.
She writes about you in her diary. It's slightly erotic the way she describes you. Pages upon pages just talking about you and how amazing you are and how she wants to make you hers.
She plays with her cunt to the thought of fucking you, imagining your face all cock drunk and your tits. God she imagines how your boobs look way too much.
Sometimes you wear tight shirts practically teasing her. She imagines if they would be perky or plump, how they would fit in her hand... She's genuinely so perverted.
Ugh the way she has that little awkward smile. She's so cute. (´ε` )
She sits behind you in class, and she can smell your shampoo. It drives her crazy. She smells all of the ones at the store, trying to find the exact one.
She found your social media (she stalks it) and likes all of your posts (respectfully), but really she screenshots your photos and saves your videos. She has a photo album dedicated to you and you hardly even know this weird girl who's just so awkward.
She genuinely has no rizz, poor baby.
﹌﹌﹌﹌﹌﹌﹌﹌﹌﹌﹌﹌﹌﹌﹌𓆩♡𓆪﹌﹌﹌﹌﹌﹌﹌﹌﹌﹌﹌﹌﹌﹌
Let me know if you want more
૮꒰ ˶• ༝ •˶꒱ა ♡
Part Two Here
My requests and asks are open <33
﹌﹌﹌﹌﹌﹌﹌﹌﹌﹌﹌﹌﹌﹌﹌𓆩♡𓆪﹌﹌﹌﹌﹌﹌﹌﹌﹌﹌﹌﹌﹌﹌
© 𝟸𝟶𝟸𝟹 𝚕𝚒𝚝𝚝𝚕𝚎-𝚜𝚝𝚊𝚛-𝚋𝚞𝚗 — 𝚊𝚕𝚕 𝚛𝚒𝚐𝚑𝚝𝚜 𝚛𝚎𝚜𝚎𝚛𝚟𝚎𝚍 𝚏𝚘𝚛 𝚊𝚕𝚕 𝚌𝚘𝚗𝚝𝚎𝚗𝚝 𝚞𝚗𝚕𝚎𝚜𝚜 𝚜𝚙𝚎𝚌𝚒𝚏𝚒𝚎𝚍 𝚘𝚝𝚑𝚎𝚛𝚠𝚒𝚜𝚎. 𝙿𝚕𝚎𝚊𝚜𝚎 𝚍𝚘 𝚗𝚘𝚝 𝚖𝚘𝚍𝚒𝚏𝚢, 𝚛𝚎𝚌𝚕𝚊𝚒𝚖, 𝚛𝚎𝚙𝚘𝚜𝚝, 𝚘𝚛 𝚌𝚘𝚙𝚢 𝚖𝚢 𝚠𝚘𝚛𝚔!
#loser!Ellie#Ellie Williams x reader#Ellie smut#Tlou#pervert!Ellie#Ellie x reader smut#ellie headcanons#little-star-bun#I love lesbian ellie#Shes got no rizz and its perfect#shes so babygirl
547 notes
·
View notes
Text
Organizing a Stan Twins-centric Multi-Artist Lyric Comic!
There's a song I've always wanted to see as an AMV or a lyric comic for the Stan Twins, and years pass, and I've never been able to tackle a project that big. So, I wanted to try to organize it as a multi-artist lyric comic!
The song is "Trouble", by Avicii. (See below.)
What is a multi-artist lyric comic? One where people sign up, and each artist is assigned a line from the song. Artists will then do 1 page for their line, and at the end, it's all put together. Here is an example from GF fandom in 2018. (Here is a video version that someone put together with the music.)
This song has 28 lines of lyrics, but it also has some instrumental breaks, and I've thought of a way to fill those that would allow more people to participate (particularly if someone was unsure if they could take on a full page).
Here's the song:
youtube
There's a lot of details to go into, so to keep this post from taking up too much dash real estate, I'm going to put more detail below a read-more.
Here is a link to a Google form you can fill out to indicate interest. (But we do urge you to read over the details below!)
The goal would be to complete this in time to make it public on August 31st or Sept. 1st, 2023 -- in line with the actual last days in-story of the show. Therefore, the due date for final art will likely be around August 15th or 20th.
I hope folks will find this intriguing! I think it could be a lot of fun!
@mercury-falls and I are the point-people for this, at the moment!
All right -- the way I've always seen it, the first verse of the song is very Stan-related, and the second verse is very Ford related.
Here is a Google Doc with the lyrics.
My idea for the instrumental breaks was to have people contribute smaller pieces of art that look a bit like Polaroid snapshots. If we can get the lyric comic combined with the music, think of the collection of Polaroids accumulating the way they do at the end of the show's opening credits.
There are two main ways artists can contribute to the project:
For lyrics, full landscape illustrations (which include color, lettering, and a background)
For instrumental breaks, polaroid-style illustrations (smaller, simpler pieces in square format). We will use these in a video edit of the comic and have them accumulate like the show’s intro during the breaks. (We will also figure out a good way to display them in the lyric-comic post itself.)
Your art should be canon-compliant, and can depict any time period of the Stans’ lives (past, present, and near-future)! Do with your art as you best see fit with your lyrics, but keep the focus on the Stans and their relationships with each other and other GF characters. Both original content and screenshot adaptations are welcome!
We also welcome collaborations between artists on full pages! We encourage every artist in the project to help and support each other if they are comfortable. On the interest form, you can tell us if you are interested in volunteering to help others with inking, coloring, or creating backgrounds! Or, you can tell us if you think you will need help.
On the form, you can indicate your preference towards the Stan or Ford verses. But once we have the team of artists doing lyrics chosen, we will randomize the list and then contact people in order, to ask about preferences for lyrics. If you aren't chosen for one of the full pages, we would still like to have you involved for the Polaroids! (And you can indicate willingness to be called on to do a page if others drop out.)
We will have check-in dates through the summer, with goals for people to report on the subject of their piece; to have a sketch or layout ready to show; and to show progress closer to the end.
We will be setting up a Discord server to help share information, and to allow people to post WIPs or just generally discuss things, and keep motivation going. If you really don't use Discord, though, and don't want to sign up for it, that's okay. We will put whatever instructions and details we have in a Google Doc, and will share that link for reference. And we can always communicate via email.
I (Eregyrn speaking!) have been involved in a LOT of fan projects over the years. One of the key things to ask of people who sign up for a project is: communication. That is, if you're having difficulties, just let us know! If you need to drop out, just let us know! Don't feel guilty that you signed up and then had to drop out. The thing that is hardest on organizers of projects like this is when people sign up, but disappear and don't answer DMs or emails. Believe me, I've been in that position where you feel guilty and don't want to admit that you have to drop out -- but it's always much easier on the organizers if you just let them know, instead of keeping them guessing! This is just something to keep in mind when you're signing up -- life happens! It's okay! But please try to let us know if something comes up and you have to bow out.
Here is the link to the Google Form, that you can fill out to indicate interest.
#gravity falls#stanford pines#stanley pines#sea grunks!#lyric comics#trouble lyric comic#multi artist project#multi artist lyric comic
296 notes
·
View notes
Text
I FOUND A TON OF THEM
@jasper-woozy @shychick-52
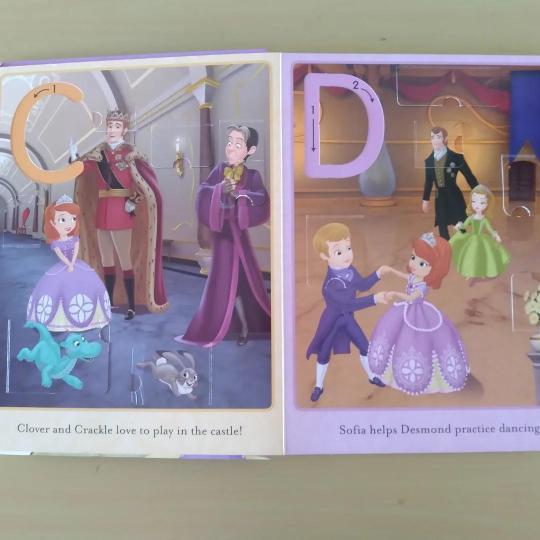
At first I was searching for the pages on google and I usually could find them on people selling the books online, but still they never published all the pages and when there was a book that Cedric was probably inside the story they never choose his page to show, and also I was so mad because in the Royal Sleepover book THEY DIDN'T PUT HIM IN, ONLY THE PUPPETS BUT NOT HIM AGAGHHRGRGRGGRGRRR
So, there are some "read along" videos on YouTube where they read books for children and basically they just scan the books and put the pages online 😭 with their voices reading of course
AND I FOUND SO SO MANY CEDRIC ILLUSTRATIONS
THERE ARE SO SO MANY THAT THEY DON'T EVEN FIT INSIDE JUST ONE BLOG
If you search for "read along sofia the first story book" then everything is there for you
Usually the books are just telling the episodes stories but the wassalia book has one small cedric making the tree
IT'S OFFICIAL GUYS CEDRIC MADE THE WASSALIA TREE WITH HIS MAGIC

And besides the screenshots from the videos I found some more stuff on google that I'm sure you won't find in any video bc they're not the storybooks yk
This one is so cute 😭🫶 it's from that book teaching the abc

And I REALLY don't know where this came from, I found it on pinterest and it's BY FAR ONE OF MY FAVORITES HE'S SO CUTE HERE

these two here came from a custom book that you can put you kid's name inside the story (they did him dirty there)

And there's the Cedric's Apprentice book which is so cute
youtube
WTH THERE'S OFICIAL READ ALONG STORIES FROM THE DISNEY JUNIOR APP AND THE ILLUSTRATIONS ARE ANIMATED???? HOLY F I NEED TO FIND ALL OF THOSE
IS THERE ANY CEDRIC VOICE LIKES OR CUTE ANIMATIONS?!?!???!?!???! QMQNSBSKSKSNN I'M FREAKING OUT
youtube
I'M GONNA FIND ALL OF THEM WAIT A SECOND
FOUND THIS ONE
youtube
These are from a game based on The Curse Of Princess Ivy (idk why they put Cedric there because they usually never put him on anything, it could be just Sofia and Amber, but no, and I will forever be grateful to the person who did this) NEW (old) 3D CEDRIC POSES AND HE EVEN HAS A CUTE ANIMATION WHEN HIS ICON SHOWS UP BAHANMQBAHSB I CANT
SOMEBODY MAKE A GIF OUT OF THIS (i made it) (that's the best quality I could find/make)

youtube
MINI LIZARD CEDRIC DOWN HERE BAHABHABAJANBABSHJSNSNDBDJ
youtube
In this one Cedric makes his appearance around 31:00 minutes and there's also a game making a spell for him (1:35:40)
youtube
That's all I could find until now!
The magazines are still a mistery though
Found some activities books:

dailymotion
I'm gonna find more and make a part 2 :)
#sofia the first#sofia the fandom#storybooks#cedric the sorcerer#cedric the great#magazine#cedric the sensational#Youtube
53 notes
·
View notes
Text
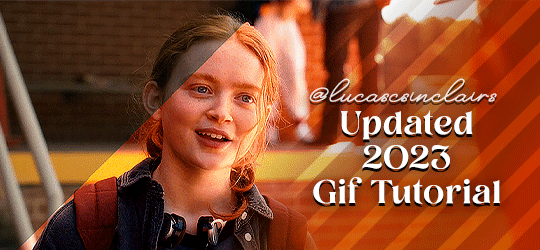
I got an ask about my gif making process, and my reply started getting way too long so I figured I'd make an updated gif tutorial/a rundown of what my giffing process looks like today. I hope this is helpful!
The anon mentioned how they really want to start making gif posts but they don't know how to, and I really was in that same spot three years ago, seeing all the pretty gifs people were making and wanting to do the same thing but just not knowing how.
I taught myself to make gifs from many different tutorials I found on here, and now years later my method is a mix-match of all of them. In this post I’ll go through my personal process but first I will link some great resource blogs that have more in-depth tutorials and resources on all different aspects of gif-making.
Both @usergif and @completeresources have great organized tutorial pages that I check all the time for different techniques. They’re so helpful! For beginners I’d recommend *these * *tutorials* for example.
For a walkthrough of my giffing process, keep reading!
First steps
Alright, let's start with the basics: I make my gifs on Photoshop and I currently have the 2023 version, so keep that in mind when looking at the screenshots I included, since there can me small differences between versions.
There are really two main ways to start out the giffing process on Photoshop. You can take consequent screenshots of the scene you want to gif and then use ‘Scripts’ and ‘Load Files into Stack’ to load them into Photoshop. I used to use this method before, and my previous giffing tutorial explains all the steps for it, as do the gif tutorials I linked.
But these days I use the other method, which involves making a shorter clip of the scene you want to gif and then using 'File' > ‘Import’ > ‘Video Frames to Layers’ to import the clip into Photoshop.
The difference between the two methods isn’t really that big, just up to personal preference and what fits your workflow best. I think the reason why I switched over was just cause I found it annoying dealing with all the screenshots.
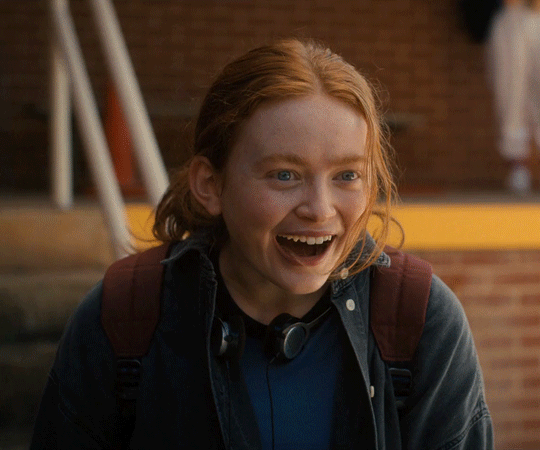
My current process starts with opening a clip I want to gif with ‘Video Frames to Layers’. In the window that opens, I use the little arrows to select the exact shot I want to use. Here it's good to include a couple frames from before and after the exact shot you want to gif. That way you can make sure to get the whole shot included.

When the frames load up, this is what my set up view looks like. It might look different depending on the version of Photoshop, and also depending on your personal customizations, but this is what my workspace looks like. In order to get this view, make sure you have 'Timeline' selected from the 'Window' menu from the top bar.

Real quick to help make the tutorial more clear even if you’re not that familiar with Photoshop yet, the three main views I’ll be talking about are the frames, the layers and then the adjustments. Frames are the little film-reel-looking horizontal row on the bottom, and the layers are the vertical stacked row on the right. I have the adjustments on the right above the layers.
To start off, we’ll be working with frames. Since I selected some extra buffer frames from the clip in the import phase, now I'll first delete those frames that I don’t need by selecting a frame and then clicking the little trash can icon under the row of frames. When you are left with the shots you want to use, go to the menu of the three little lines on the top right of the frames view and pick ‘Select All Frames’.
Now that they’re all selected, you can set the frame delay. This basically just means how “quick” your gif will be. There are different preferences to this, but generally you’d want to pick a delay from 0.05 to maybe 0.1 for really short gifs that you need to be slower. My go-to is a frame delay of 0.07.

Whichever number you go with, you’ll chance it by clicking the tiny downward arrow on one of the frames (with all the frames selected). From the window, pick ‘Other’ and then type in your number.
Resizing and cropping
After this it’s time to resize and crop your gif. Here there are again some different methods you can use, in my previous tutorial I used the Crop tool and then resized the image. But these days I do this in a different way. Again, what way you use is all up to preference.
So what I do is make sure that all the frames are selected, and then from the menu I pick ‘Copy Frames’. After copying the frames, I make a whole new file from ‘File’ and ‘New’. This will be the canvas where I’ll make the final product of the gif, making it the exact size I want the gif to be. I prefer this method because with it you can alter the cropped area easier to see what looks best. Also this way if you’ve initially loaded a lot of unnecessary frames that you deleted previously, this way only the layers that are left transfer over and it’s less bloated in the layers panel.
In the "New Document' window pick your gif size (keep in mind the Tumblr dimensions of 540 pixels wide for big, all-across gifs, and 268 pixels wide for side-by-side gifs). With today’s gif I went with the dimensions of 540x450.

When the new file opens up, select ‘Create Video Timeline’, then from the bottom left corner click ‘Convert to Frame Animation’ and then from the three-line menu select ‘Paste Frames’. After your frames load in, you can delete the first blank frame.
Now you will resize and crop your gif. Make sure to select all frames again and then press CTRL/Command + T to activate the Transform tool. Use the guide lines that appeared to drag and resize the gif to fit your canvas. Play the gif by clicking the play button under the frame row to test how it moves within the canvas and move it around until it looks right. You can also go and change the canvas size from ‘Image’ and ‘Canvas Size’ if you want to.
At this point my gif looks like this:
When you’re happy with the cropping, it’s time to start adjusting the gif!
Lighting
For coloring and lighting the gif, we’ll move over to the right to the Layers panel. Make sure you have the top layer selected. We will be using Adjustment Layers to change the appearance of the gif, and they will change the layers below them, so this way we make sure the changes apply to all layers.
There really are so many ways you can edit and adjust your gifs, these are just the methods I use the most. So, open up the Adjustments view and let’s get started!
(side note: Lighting dark scenes is a whole different topic, so for this basic tutorial I picked a well-lit shot so we won’t have to worry about all of that when lighting it.)
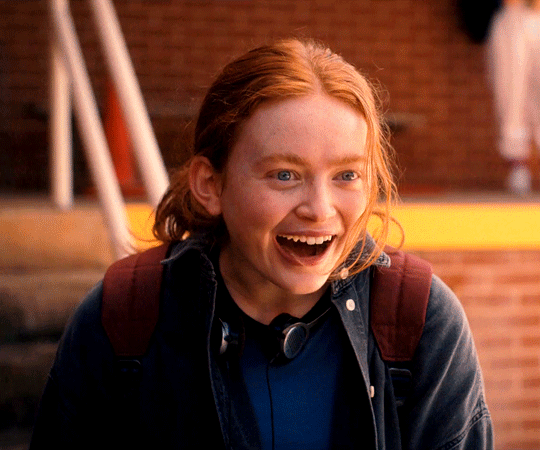
I usually start with the Curves layer. Pick the bottom eyedropper tool on the left, with the white tip. With this, click on the brightest part of the gif to set the white point. This is especially useful with gifs that have some kind of a color tint (for example the green hue in the Hawkins Lab flashback scenes). By picking the white point, it will adjust not only the lighting but also the hues of the gif.
After picking the initial white point, you can go in and adjust. From the RGB dropdown menu, pick the individual color channel (Red, Green, Blue) and drag and adjust the curve until the colors and lighting look good to you. Here again, it’s all up to your personal preference. I personally prefer coloring that is more on the warmer side, so in this phase I usually strengthen the reds in the gif and tone down the greens. Remember, this is just the first phase of coloring, it doesn’t have to look perfect right away.
Next, go back to Adjustments and make another Curves layer on top of the first one. This time pick the top eyedropper tool with the black tip. Then click on the darkest part of the gif to set the black point. I don’t always do this, especially with dark scenes, but in neutral lighting like this, it can help with the contrast and make the coloring more vivid. Here you can once again adjust the RGB curves individually until you’re happy with the result. Oh but don’t think we’re done with the Curves layers just yet! After the white point and black point layers, I usually open a third Curves adjustment layer for lighting the gif. Here I usually stick to the overall curve, not going into the individual color channel ones. I drag and adjust the curve to make the lighting of the gif look good. And here’s what my gif looks like with all the Curves layers:

The brightness is starting to look pretty good now, but I’ll just add a couple more adjustment layers that I usually use. Again, this is just my process, all the layers aren't always essential and their usefulness really varies depending on the specific shot you’re working with. My advice, especially when starting out with adjustment layers, is to try out different adjustments to see what they do and how they make the gif look. If it looks bad, no worries, just CTRL/Command+Z it away!
So at this point I usually apply a Levels layer to brighten a little and then to deepen the shadows a bit to up the contrast. Then a Brightness/Contrast layer and maybe an Exposure layer to help do the same thing. I find that by using the different tools and making small adjustments in each one, it makes the lighting look nice. After these layers, here’s what the gif looks like:
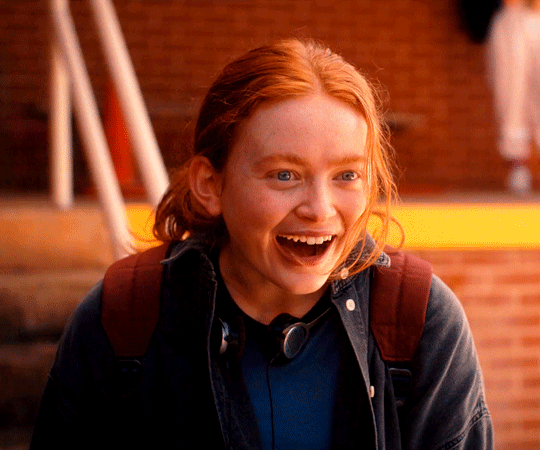
Coloring
Now it’s time for the actual coloring! My favorite part! There are a billion different ways to color a gif and a billion different styles to go for. Here I’ll be doing a pretty neutral, natural coloring, but I also love my exaggerated, color-themed sets. Let me know if you’d like to hear my tips for those in another post!
With my workflow, I usually begin coloring with a Selective Color adjustment layer. And on there, I tend to always go straight for the Yellow view. There my go-to is to drag down the Cyan slider, since like I mentioned, I usually go for a warm-toned look. Here again my advice is to just mess around with the different sliders, see what they do, test them out to find a coloring you like. You can do the same thing with the Hue and Saturation layer, picking different colors in the gif and adjusting them to how you want them to look. The shot we’re working with doesn’t need a ton of color manipulation, so I won’t be doing too much with these layers, but they allow you to make some really cool colorful stuff!
The Color Balance adjustment is up next, and it’s great at unifying the colors and also making the color shades look nicer after lighting. Especially with dark gifs, brightening a scene can make the darks look a bit muddy, so editing the Shadows of Color Balance can help with that.
And lastly when I’m done with all the coloring layers, I apply a Vibrance layer on top, usually to up the Vibrance and Saturation, since I love my bright saturated colors. This shot is pretty bright on its own so I won’t have to tweak it a lot.
Once I’ve got all the adjustment layers in place, I’ll usually group all of them together. You can do this by selecting all the adjustment layers and then pressing CTRL/Command+G to put them into a group folder. I like to have it organized like that and it also makes it easier to look between the original gif and the adjusted one by toggling the little eye icon on the left of the folder. This way you can check if there’s something you still want to change, or if you want to tone down some adjustments. With today’s gif I went and lightened the shadows a little. But after that I was happy with the coloring, and the gif looked like this:
Sharpening
It’s almost time to export the final product! But before that I'll sharpen the gif. I know many people like to sharpen their gifs before coloring them, that’s a pretty common way to do it. This is just the order I learned to do this in. I think it’s fun to sharpen last so that it’s kind of like a final polish to the gif!
To prep the gif for sharpening, go to the bottom left of the frames and select ‘Convert to video timeline’. Now go back to the right and select all the layers in the layers view, the adjustment layers and all. Then with all of them selected, right-click to open a menu and from it, pick ‘Convert to Smart Object’. Now your layers are all in one object.
From the top row menu, pick ‘Filter’ then ‘Sharpen’ and ‘Smart Sharpen’. In the window that opens, pick these settings:

Then repeat the same thing, with the Smart Object still selected but now apply these settings:
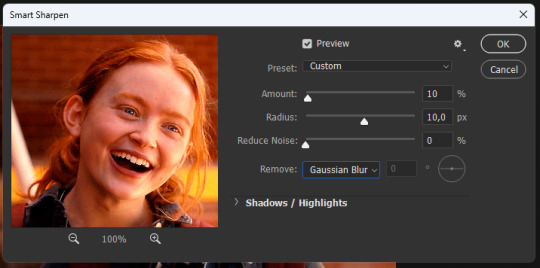
(I have made these steps into an action, so I can do it with a simple click)
Exporting
With the sharpening done, our gif is ready!
To export it, go to ‘File’ and ‘Export’ and ‘Save for Web (Legacy).

A window opens up showing you the export settings. The first thing I do in this window is check the size of the gif, which can be found in the bottom left under the preview image. The Tumblr gif size limit is 10MB, so you need to stay below that. If the gif is bigger, I go back and make it shorter by deleting frames from the start or end of the gif. There are other ways to reduce the file size, but this is usually what I do. With today’s gif the size is around 5MB so we’re all good!
If you want to preview the gif in a moving form, click ‘Preview’ from under the file size, and it will open in your browser.
On the right of the preview image in the Export window you can see a bunch of different settings. In the screenshot you can see the settings I use, you can test them out and then tweak them to your liking. I usually keep them the same, though sometimes if there’s some pixelation in areas of the gif I test switching out ‘Adaptive’ to ‘Selective’ or ‘Diffusion’ to ‘Pattern’. But these are the settings I use in 99% of my gifs, and what I have found give the nicest end result for me.
When you’re all set with the settings you can save your gif into its folder and then you’re all done!

So there we have it! A basic rundown of my giffing process. I tried to keep it as clear and informative as possible, but I know I can get rambly so I hope this was helpful! For more details and tips, please refer to the tutorials I linked. There really are so many useful tutorials on here to learn from.
Lastly I'll add that making gifs is a creative art form and a skill like any other. You aren't going to be perfect at it on your first try, it takes practice and trial and error. When I look back on my first gifs I can see a hundred things that I would fix now that I have more experience. And the same will for sure be the case if I look at my current posts a couple years from now.
Figuring things out, learning what you like to gif and developing your style is what I find the most fun about the whole gif making process. I've been making them for three years now and I can say that I've developed a style that feels my own. And I swear, every time I see someone leave a tag to my post saying that they like my coloring and the style of my gifs, it always makes me so happy.
If you're thinking of starting to make gifs, I say go for it, give it a go, and have fun with it! 💛
#kaisa talks#tutorial#gif tutorial#gif resources#answered#this turned into a mile-long post#but i hope it can be helpful!#long post
156 notes
·
View notes
Text
Unexpected Turn of Events Pt. 2
Tonowari x Fem!Reader
I do not own ANY of the fanart or screenshots used with my fics.
Pt.1 here. Pt.3 here.
You ended up sitting in his family's marui so he could prepare food for everyone instead of just you. You get up to try and help him, but he shooes you back to where you were sat.
"Is there a reason behind you being nice enough to make me food?" You asked the intimidating man infront of you.
"Is this not a custom that humans have when they court a potential mate?" Tonowari asks and you feel the heat rush to your cheeks.
"M-mate? But I'm human." You say and he looks you up and down.
"Were human. You're Na'vi now, and a very beautiful one at that." Tonowari says.
"In any case, I haven't passed an iknimaya so I am not an adult in the people's eyes." You said and he smirked.
"I can train you." He said as he set down a leaf with a serving of food on it. At this point, his children ran into the marui and stopped in their tracks.
"Hey (Y/n)." Tsireya said as she grabbed herself a serving of food and sat down next to you. Ao'nung grabbed his food and sat across from you, and Tonowari sat down on your other side.
"So you're not human anymore." Ao'nung said.
"Really? I couldn't tell." You said and Tsireya laughed lightly while Tonowari held in his laugh.
"Ha ha. Are you planning on training now?" Ao'nung asked and Tonowari nearly jumped at the chance to answer his son.
"I will be teaching her. To hunt, to breathe, to ride an ilu, and eventually a tsurak." Tonowari answered his son.
"I better keep my med kit handy. I can't say I'll be a natural. I've been in the books since I was a kid." You said and they looked at you oddly. "Oh books? They're uh paper stacks that have information on the front and back of every page." They still didn't have the idea fully grasped but didn't say anything about it.
"We will start tomorrow to test your breath endurance." Tonowari said and you nodded.
"I mean I was on the swim team in high school and college. It's how I paid for my schooling." You said. "Uh competitive swimming is a sport on Earth."
"The only thing that sounds fun about your planet." Ao'nung joked and you laughed as well.
"It was sometimes, but there were some people that were too into it. They'd cut any and all hair off of the body so they could slice through the water faster." You told him and he looked even more confused. "Anyone here would've been able to outswim all of those people. I mean you're naturally evolved to be in the water. I mean this is a fin... You can't tell me otherwise." You say as you run your fingers over the fins on the side of your left arm. Tonowari snatches your hand and looks at it.
"I think... I think the Great Mother cleansed your body of all demon blood. Only three fingers and a thumb." Tonowari pointed out and you were surprised. You hadn't noticed that it was different from Jake's.
"I assumed that I would have four fingers like Jake." You said quietly then looked outside to notice it was approaching eclipse. "I should probably go home and rest it's close to eclipse." You say as you stand. "Can I help clean up?"
"No, you were a guest. Plus it's my turn to clean up after dinner." Ao'nung says.
"I will walk you home." Tonowari volunteers and the two of you set off in the direction of your home. "We will need to get you clothes that fit you." He says breaking the silence you look down at your body and realize how your clothes sit on you.
"I didn't even realize how much smaller my clothes are on me now. I'll start weaving a new outfit." You say and he nods.
"Until it is ready I know the weaving circle will most likely have extra pieces they've made. So long as we make an exchange with some extra material they'll be willing to part with them." Tonowari says and you stop outside of your marui.
"Thank you for dinner, and allowing me to care for Kiri." You say.
"That's the issue. Tsireya was not fully trained to be Tsahík before her mother passed away. You said Ronal implanted her wisdom into your mind. She did that so you could complete our daughter's training." Tonowari said. "I bid you goodnight."
"Goodnight Tonowari. I look forward to you teaching me." You say as you disappear into your pod and close the flaps loosely. You never fasten them in fear of being needed to tend to someone during the night. You lay down on your mat and fall asleep quickly.
The next day you were awake bright and early, ready for a day of training with Tonowari. You prepared yourself a quick breakfast, ate, then left your marui. You found a good place out in the open so it would be easy for Tonowari to see you when he was ready to start. You decided to start working on your breathing and slowing your heart rate. You had sat in the same spot only for about half an hour when footsteps approached you.
"I see you're ready to go." Tonowari said as he reached you.
"Yes. I didn't want to keep you waiting." You said as you opened your eyes and looked up at him.
"We will start with diving, move into riding an ilu, and finish with learning to hunt." Tonowari says and starts making his way over to the docks. You get up and follow behind him as you fiddle with the top the aunties gave you this morning. "Let me see how well you can dive." You take position and dive into the water head first and continue down. You swim a little further ahead and you're soon joined by Tonowari.
"You dive very good." Tonowari signs and you thank Eywa that Kiri has been teaching you their Na'vi sign language.
"Thank you." You sign back and he looks at you shocked.
"I'm surprised you know our sign language." Tonowari replies.
"Kiri has been teaching me." You sign to him and he nods once. He starts leading you through the reef showing you the designated hunting areas, and the best places to get clams. At the end of the tour of the reef, he leads you to the shallows to teach you to ride an ilu. He clicks his tongue to summon the creatures and he eventually has two that come up to him.
"In order to successfully hunt you must learn to ride an ilu. When the time comes I will teach you to ride a tsurak... Unless you want to start on a tsurak." Tonkwari teases and you feel the color drain from your face.
"No, no. I'm not Jake. I'm not going to get ahead of myself." You say and chuckle nervously. He smiles warmly at you and then guides one of your hands to the ilu. When your hand makes contact it chitters happily then grab your queue. You calm yourself from your nerves then make tsaheylu and you feel your heartbeat move in sync with her heartbeat. You mount her and Tonowari makes his way around you positioning you correctly.
"When riding an ilu position is important. They move through the water fast, and you need to have a good grip on the handle." Tonowari says and you nod. "You can tell them what to do through your connection." You get a good grip on the handle and will the ilu to move forward slowly. It does so and then starts picking up speed as you get accustomed to riding it. You make your way back to Tonowari and dismount your ilu.
"You learn fast. Now you learn to hunt. Come." Tonowari says then leads you to one of the designated hunting areas.
"Any advice?" You ask him.
"Anticipate their movements and aim for their forward movements. I will demonstrate." Tonowari says then leads you down and takes aim at a fish. He pulls the trigger on his weapon and it delivers a killing blow to the fish. He turns to you with a cocky smirk and you mimic a small clapping motion. He quirks a brow and motions for you to try, and your teasing facade falls a bit. You'd never hunted a single time in your life, so you knew you'd mess it up somehow. You readied your weapon and steeled your nerves then snuck up on some fish. You aimed at a fish and waited for the right moment then pressed the trigger. Your jaw dropped in surprise when it hit its target and you turned back to Tonowari still wearing your surprised expression. He smirks at you again and you gather your hunt while he gathers his and you both surface.
"I thought I was going to miss... I've never hunted before. Or fished." You said and he led you over to your ilu and showed for you to place your fish in the ilu's bag.
"Maybe you were meant for life with the Metkayina." Tonowari suggests and you look back over the horizon.
"That had to be beginners luck. I say I try again and see if I can do it again." You tell him and he looks impressed.
"If that's what you wish then we shall continue hunting." Tonowari says and reloads his weapon and you do the same. Continue hunting the two of you did. You just continued to get better and Tonowari was very impressed by your abilities. When you both decided that was enough for the day you realized you had way too many fish for just you.
"Hey Tonowari... I got carried away and definitely have way more fish than what I need." You said sheepishly and he couldn't help but agree.
"The weavers and elderly will most likely appreciate the fish." Tonowari says. "We should head back." The two of you mount your ilu's and race back to the village. When you get back it's slightly past midday and you follow Tonowari's lead. He teaches you to prepare the fish to be cooked and eaten and then takes you to the weavers.
"Olo'eyktan!" One of the women says happily as the two of you walk into the area.
"My student caught too many fish today and was wondering if anyone wanted to make a trade." Tonowari says and motions for you to show your extra catch. You do so and are met by silence for a moment, but two women jump up at the same time.
"This is perfect timing! My mate has fallen ill and I'm providing for our family. I'm Ra'ina." Ra'ina says as she starts showing you what she has to offer for trade.
"Your mate is ill? Why haven't you come to me? I can help." You say as you look at her in question.
"Oh, he didn't want to bother you with all the responsibilities you have now." She says sheepishly.
"Nonsense. My job is to heal people. That is why I am here. I will retrieve my medicines and go with you to your marui to help your mate." You said and she nodded.
"Thank you (Y/n)." Ra'ina said with a smile.
"I'm Sya." The other woman says and you can tell by looking at her, that she is still very young. "I don't know if you were there last month, but my father passed away. My mother is still mourning so I've been trying to provide for her and my younger siblings." She says and you frown. You must have come in right after his funeral because you don't remember attending his service.
"She was not here at that time Sya. I'm sorry for your loss." Tonowari is quick to jump to your aid. "I'm sure if you ask assistance from my hunters we would be glad to help where we can." He offers the young woman and she smiles in a thankful manner.
"Thank you Olo'eyktan." Sya says and you look at what both women are offering in exchange. Ra'ina was offering a top and Sya was offering a loincloth. You split your hunt between the two and they're both thankful for the fish. You smile at your new clothing as you leave the weavers with Tonowari.
"Alright I need to retrieve my items so I may work on healing Ra'inas mate." You tell Tonowari and he nods.
"Then it is good we finished lessons for today." Tonowari says as the two of you stop infront of your marui.
"This is my stop. Thank you for teaching me Tonowari." You say and he dips his head.
"You're welcome. It is my pleasure to teach the woman I plan to court." Tonowari says and you feel yourself blush. He lifts your hand to his lips and kisses the back of your hand. "I will see you tomorrow (Y/n)."
"Have a good evening Tonowari." You tell him and he turns and walks away. You can't help but allow your eyes to roam over his retreating form. Taller than you by atleast a foot, broad shoulders, tattoos, good with children... You felt yourself mentally swoon at the God of a man named Tonowari. You turn and make your way into your marui and gather your supplies and then make your way back to the weavers. The entire evening your mind couldn't expel the thought of what Tonowari's plans are. He wants to court you, and you aren't planning on objecting or rejecting.
The next day you sat in your marui with Neytiri, Tsireya, Kiri, and Ra'ina. You were all kind of just joking, gossiping, and having a pleasant conversation as you all worked on individual projects. Neytiri was working on a gift for Jake, Tsireya was making a bracelet for Lo'ak, Kiri was mending some of her siblings' things, and you and Ra'ina were working on a new mat for her and her husband. A knock sounded on your door and you looked up to find Jake smirking at Tonowari.
"I told you they were all in here." Jake says with his voice full of humor. Tonowari rolled his eyes in amusement.
"Are you looking for something?" You asked them.
"Well..." Jake starts bashfully and you know someone is hurt. You send an apologetic look to the ladies.
"I shall return as soon as I can. I must attend to Jake's mess as per usual." You joke with them and they all chuckle, including Neytiri.
"Neytiri! My beautiful mate... You wound me by not standing up for my honor." Jake says dramatically and you smack the side of his head.
"Take me to the wounded." You demand.
"Do you see this Olo'eyktan? She abuses me." Jake says with a pout and Tonowari looks away from the two of you.
"See what? I didn't see anything." He says and Jake sighs in defeat and then starts to lead the way.
"What happened? Who's hurt?" You ask Jake.
"Don't tell Neytiri." Jake says and you look at him quizzically. "Tonowari and I took the boys out to hunt so they could hopefully bond, but Lo'ak accidentally grazed Neteyam with a bolt from his crossbow." Jake explained and you sighed while massaging your brow.
"You realize she will find out sooner or later. I cannot heal an injury into non-existence before she returns home." You tell him and he nods.
"I know." Jake says.
"Besides they are children they will learn at their own pace. Whether it be, get out of the way of a lined-up shot, or don't shoot your sibling... Either way, it is a lesson learned." You tell him. When you walk into their marui Neteyam looks annoyed as does Ao'nung, and Lo'ak is panicking. Neteyam looks up to see you and holds out his arm and you kneel next to him.
"So what happened exactly?" You asked him.
"Lo'ak was talking to Ao'nung about something and wasn't paying attention to his hands. He pulled the trigger of the crossbow and it grazed my arm." Neteyam explained and you looked to Lo'ak.
"Kid... You gotta learn proper weapon etiquette. Your finger rests idle near the trigger when it's not in use." You tell him and he nods.
"I know. I just got really into the conversation." Lo'ak said and you sighed.
"I'm just glad that it isn't something severe." You said as you started to apply the few stitches needed for Neteyams wound. Once you finished and wrapped it in seaweed bandages you pulled Lo'ak and Neteyam into a hug. "I am just happy that both of you are alright. My beautiful nephews." You say with a joking tone and Lo'ak groans while Neteyam smiles at the praise. You turned to look at Ao'nung who was laughing at the interaction. "Don't make me pull you into this group hug kid."
"My dad wouldn't allow it." Ao'nung says when he realizes you started to turn toward him. You look to Tonowari who smirks at you.
"It would allow you to bond with ma (Y/n), Ao'nung." Tonowari told his oldest who did a double take at what his father just said.
"Did you just call her 'ma (Y/n)'?" Ao'nung asked his father.
"Yes. What else do you call the person you plan to court?" Tonowari says and Ao'nung looks at you shocked.
"You could call her yawne or yawntu." Jake suggested, and your cheeks start to burn with embarrassment and your ears fold back.
"I do not think you will have any problems with courting her father. Look at her reaction." Ao'nung started to join in on poking fun at you. You finished cleaning your hands and hid your face in your hands.
"I am retreating to my marui." You stated and stood up to leave. "Neteyam be careful with that arm. You could pop the stitches if you do any strenuous activity." You tell him and he nods.
"I am very aware Auntie. It's not my first time getting stitched up." Neteyam says and you nod then leave.
"Have fun doing whatever men do in their freetime." You call over your shoulder. You hear them laugh as you leave and a small smile makes its way onto your face.
351 notes
·
View notes
Text
How I Outline/Plot: Including Author Resources for Developing Characters and Self Publishing
First and foremost, everything I’ve included in this doc that references resources (such as the plot outline below), is also available for free on the authors’ respective websites. I just wanted to recreate the template Scrivener file I use when starting a new project as I’ve collected everything in one master file.
MASTER TEMPLATE GOOGLE DOC: https://tinyurl.com/boltemp
I recently posted the chapter count for my upcoming Mafia MM romance I'm writing for NaNoWriMo this year and was asked how I plot by @duckyreads
Below, I've included screenshots of the first couple beats of my process and how much detail I usually include when outlining. The template I'm working from is an edited one of Romancing the Beat by Gwen Hayes, who offers her beat sheet for free on her site and in a Scrivener Template.
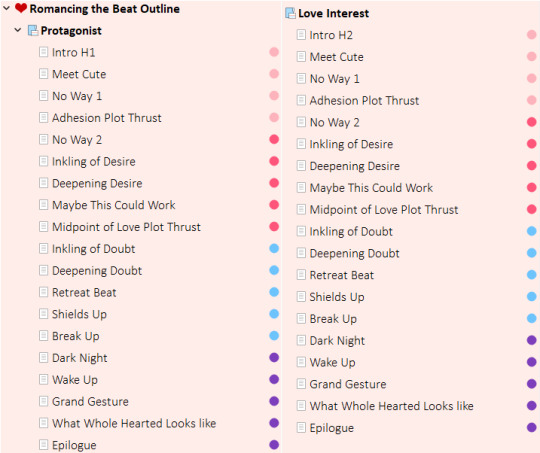
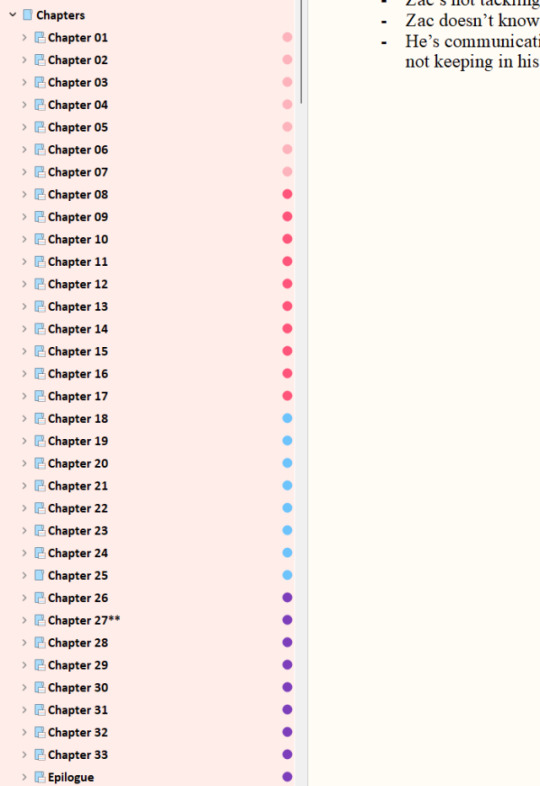
Using Romancing the Beat, I first went through and made a separate page for each story beat for my protagonist, Zac. I can't do just normal three act structure as it's too vague for me. I need Too Much to work with, then I can whittle it down later. I then did the same for the love interest and Mafia boss, Joe. (name might be changed idk yet.)
The colored dots represent which act of the story I'm in. Light pink= Act 1: Set Up, Dark Pink= Act 2: Falling, Blue= Act 3: Retreating, and Purple= Act 4: Shake it Off.
I also want to note that even though the epilogue is written in for both characters' POV, I'm only writing it once, from Zac's POV. So not every single beat necessarily translates directly into its own chapter. A few from Joe's POV are definitely combined more than once.
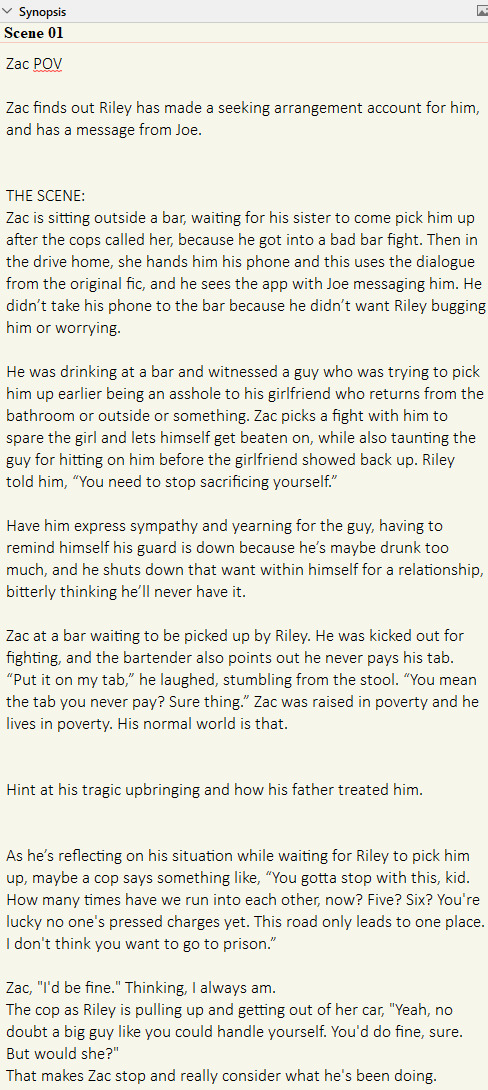
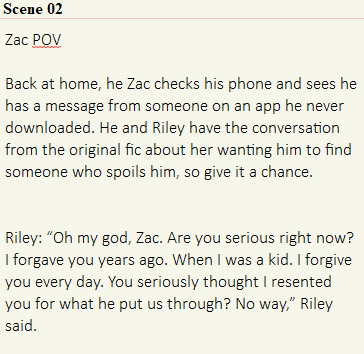
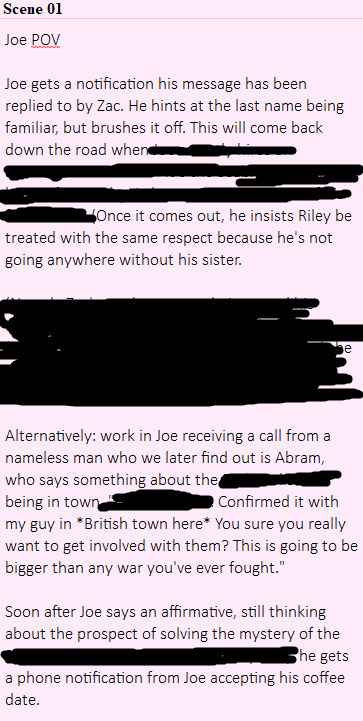
So Chapter 1, Scene 1: Zac's sister Riley has made him a dating profile and set him up on a date with who will soon be revealed as a crime lord.
I'm repetitive, because I've gone back in at different points and added little notes here and there. But my basic points I want to convey right off the bat: Zac is a hot mess who drinks to excess at times, has a sister who loves him but he is always putting her in a hard position, and has issues with money and violence from his childhood.
I also like to include some dialogue or rough snippets for scenes because it helps make the scene feel more concrete to me. I don't always do this though.
This is Chapter 1, Scene 2. Very short and to the point. (This was something I originally started writing as a fic btw.)
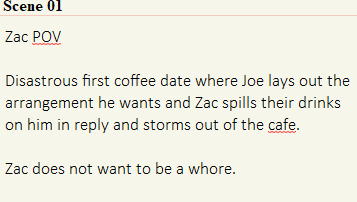
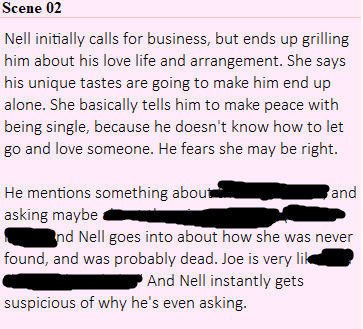
This is Chapter 2, Scene 1 and is the first from Joe's perspective.
It's plotty compared to the first chapter. I haven't done any nitty gritty location research yet so I put stuff I don't know yet in asterisks or brackets or in something like "XXX", because XXX is easy to find and change with ctrl+f > replace.
This is from Chapter 3, Scene 1. Just vibes.
This is from Chapter 4, Scene 2, from Joe's POV after the date.
This is what I ended up with. I'm sure as I work through it, the chapter count will go down. I don't really want my romance book to be so long, but I saw recently that 50 Shades is apparently over 500 pgs, which is wild to me. I'm also doing alternating POV, so it'll be switching between my protag and the love interest.
My outlining/plotting steps:
Decide on genre and type of story structure I want to use.
Decide on my protagonist and lay out a new page/note for every story beat of whatever structure I'm using.
Go in order or jump around and write a little per beat based on how I want a scene to go. For me, feeling is more important than knowing exactly what's going to happen. I'm not naturally a plotter, so I still like to not be constrained when I'm actually writing. (ie I'm not adhering to some rigid word count per chapter.) And if I changed something or added a thing while writing, I go back to the outline after and add it in so it all lines up and I don't forget something I did.
If a beat doesn't fit its own chapter, I make it a scene. It's also okay for multiple beats to happen in one chapter too.
Do the same for any other POVs involved in the story. Try to make each character have their own arc as well, no matter how small.
Really my main advice is go with your gut first because you can always add on or retract later. Write what you want (with some awareness of genre tropes/audience wants if you're trying to write to market to some extent). All book publishing is fickle and mean a lot of the time. And honestly unless you're one of the few who gets picked up by traditional publishers and offered an amazing deal, you'll be expected to pay for all the things you'd be paying for with self publishing, except with fewer rights to your own work. I'd rather pay and manage my own website, ads, and ARC readers and retain total rights to my own creations than give my rights to a publisher who might hold my book up for years, and still expect me to fund my own advertising, book tours etc.
And besides, if you self publish, there is no rule you can't have another book (and then even your backlog) traditionally published later on. You can have both.
#self publishing#writing#indie authors#boltedfruit writes#guess that's a tag#boltedfruit fic#I get heated about how trad authors are treated especially new ones
30 notes
·
View notes
Text
So I’m back…
But this time, I have a tutorial!
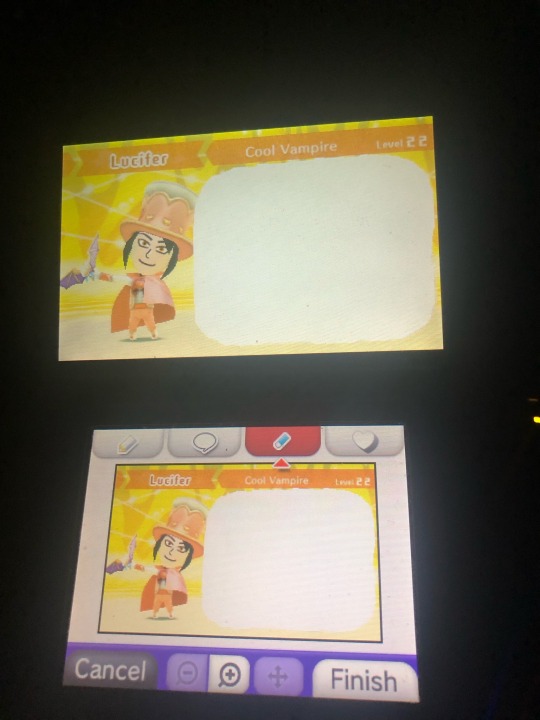
Do you have a 3DS?
(If you say yes to that, then we’re cooking).
Do you want to draw something similar if not better than…
THIS?!
Then boy I have a tutorial for you!
Since this was drawn on a 3DS, I can’t really tell you anymore than for a 3DS. Sorry..
Step One: Prep!
Grab your 3DS and go to “Nintendo 3DS Camera”! Or whatever it might be called if you have a “New” one.
Optional: If you want you can take a picture within the game- if it’s capable of doing so.
For me I’m gonna use a screenshot from Miitopia.
Step 2: Background!
Part 1: Plain Backgrounds
If you want something like the following image, follow this part’s instructions.
Take a random full screen sized image. Any image will work as long as it fits the screen perfectly. (Take a screenshot from a game such as Tomodachi Life or Miitopia).
Tap the image so that it says graffiti.
Then use a stamp, such as the dialogue bubble.
Hold the stamp and make sure it fills the corners.
Then you have a plain white background! This one you can press finish,but the other method you can’t.
Here’s a quick video tutorial, because I don’t think I phrased it right!
(I took it on my phone, that’s how easy it is).
Part 2: Backgrounds that aren’t pure white!
If you want to make the starting image (but your own), then follow these steps!
(Once again, I’m using Miitopia screenshots for an example).
Once again, GRAFFITI!
Instead of using a stamp, you might have to just color it yourself. Mainly because the stamp method is harder for backgrounds like the first one.
COLOR THE BACKGROUND, BUT DON’T DRAW ANYTHING ELSE. (Unless you just want to draw a background). Trust me, it’s easier.
Boom! Plain background ready for sketching.
Don’t press finish cause it can decrease the quality with enough graffitiing and finishing.
Step 3: Draw the Base!
You gotta draw that body-ody-ody!
Just draw a bust or whatever is easier for you. “Omg IsBus you have to have drawing skills?!” Yeah I know. How could I?
I’m gonna draw the bust up because it’s easier for me.
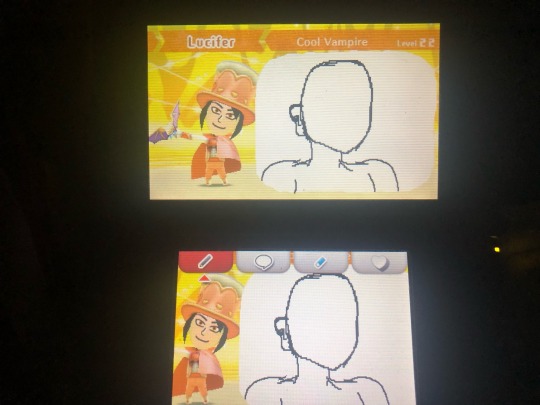
(Don’t look at me like that.)
For the plain BG ones, just do the same thing for the rest of the steps but for your screen.
Since the background hasn’t been saved, don’t use the eraser because it will remove the white BG. Unless you are using the first background method, that is. (Use the white pencil.)
Step 4: Draw the character / Coloring Page Step!
On the plain BG you can draw what ever but for me and my Miitopia character, I’m gonna draw him. If you did the color-only-a-part-of-the-drawing method (like I’m doing), you can do whatever still.
Think of the white area as a green screen; you can draw whatever you want on it.
This phase is like the pencil part of a physical drawing. White out the base as you get to parts you want over it (for example: hair or clothes).
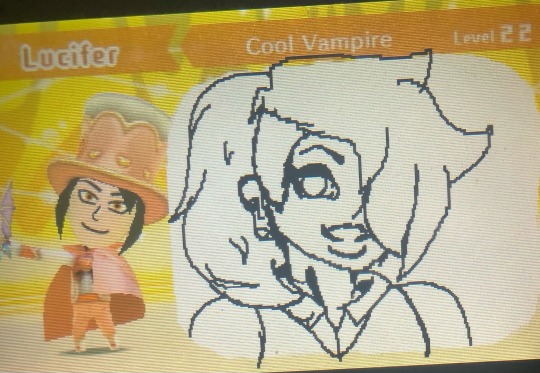
Bam! Coloring page!
Part 5: Coloring!
Remember when I called it a coloring page? This is why.
Color the drawing how you see fit!
If you’re using the all white bg, then you might have to use the stickers or the rainbow pencil. I recommend the stickers if you want to shade/shine, but if you want more options, use the rainbow brush.
If you’re basically doing what I’m doing, you can use the colors from the image to color your character!
Once you’re done coloring the image, remember to ink the lines again! Use a medium brush for coloring but a thin brush for inking the lines.
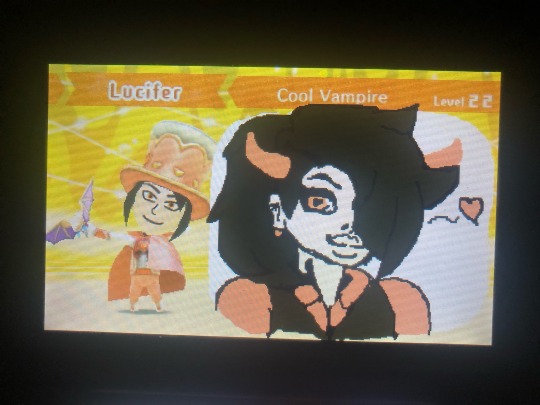
Part 6: Final Details!
For people who want any additional details, or need to clean up edges.
If you did the plain bg you can decorate and clean up as much as you need!
If you’re doing what I’m doing, you can clean up the edges of the white spot and add additional details.
And Voila! You did it!
If you have a 3DS and followed my tutorial, show me what you did! I wanna see it!
Have a good day/night! And thank you for reading!
~IsBus
#isbus#isbus original#original art#original character#original characters#digital art#3ds art#3ds#nintendo 3ds#drawings#digital drawing#drawn on a 3ds#tutorials#tutorial#I wanna see your art#miitopia#the second one wasn’t as good#sorry lol#mission failed successfully#long post#show me what you got
26 notes
·
View notes
Text
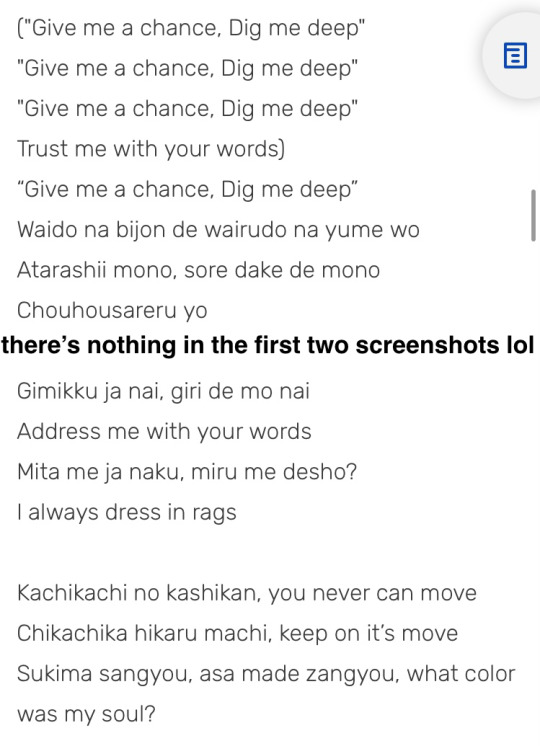
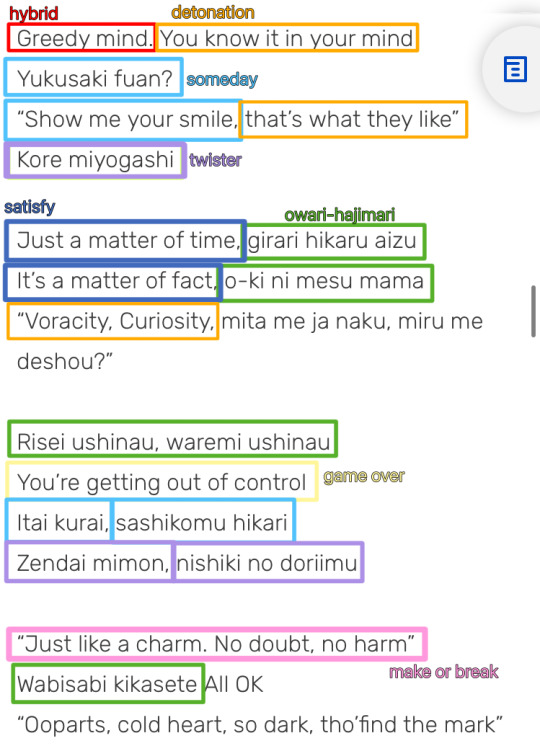
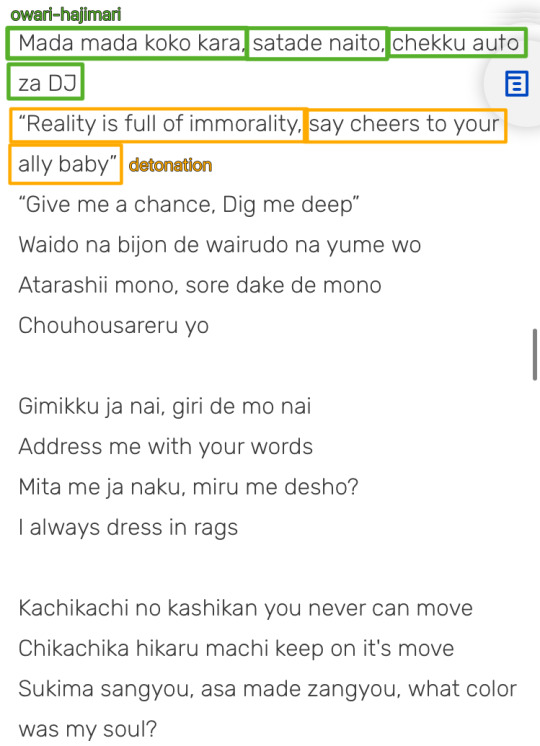
you wanted me to talk about ooparts from twewy. ok. this song is an absolute hot mess and it’s one of my absolute FAVORITES. but specifically only the version that plays when you fight konishi in final remix (‘ooparts -give me a chance’) the original is. eh. but the difference between them is not the thing that matters to me anyway so i guess i like the original too
first and foremost. i have gone through the process of color-highlighting the lyrics (screenshotted from the wiki) to point out which song each line comes from to visually represent just how much this massive word mashup borrows stuff. i also just straight up put the names of the songs next to some of them but i couldn’t fit them all or else this would be a mess lol. please enjoy
🍎red: ‘hybrid’ (both english and japanese)
🍊orange: ‘detonation’
⭐️yellow: ‘game over’
🍃green: ‘owari-hajimari’ (japanese)
💎light blue: ‘someday’ (both english and japanese)
🫐dark blue: ‘satisfy’
☂️purple: ‘twister’ (both english and japanese)
🌸pink: ‘make or break’


•‘surely there was a better way to convey this information’ no there wasn’t
•most of this information is on the wiki page but i’ll have you know i discovered most of these connections by myself anyway long before i ever even checked the trivia section. also there are a few that i caught that the wiki didn’t. not to flex or anything. but y’know what credit really isn’t important anyway it’s really all about sharing information within a community so. peace and love
•there is a bit of a liberty taken with ‘you’re getting out of control’ bc the line in game over is just ‘you’re out of control’ but i still think it counts as a connection
so basically i think this song is really cool and amazing not just bc the music goes really hard at about one minute in (but only specifically in the one where you fight konishi, at least in final remix) but mostly because it represents a few of my favorite things about twewy. the whole ‘melody/vibe over lyrics’ thing twewy has going on where it says hey who cares if these lyrics are in any way comprehensible; what matters is that it’s a lot of fun to sing
but beyond that? ooparts also does the thing that twister is known for but even better. aka word salad lyrics that may not have any innate meaning in the words themselves, but they matter BECAUSE they’re word salad. apparently the intention behind twister’s nonsense lyrics is to represent all the different clashing ideas in shibuya. it’s diverse and noisy and weird and it all comes together into something fun. ooparts does the same except its lyrics aren’t even random words; they’re from other songs in this game. including twister itself!
to me it really feels like a turning point in the game when you fight konishi, the final week’s game master, the last actual valid legal boss within the framework of the game, and you have this crazy wild song playing that, through its lyrics, serves to remind you of everything else you’ve encountered in your insane journey. it’s a culmination of all your struggles and you’re here to see it all through
and the call-and-response lyrics back and forth between the two vocalists are soooo fun! it feels like teamwork: the song. like truly this is the moment of revenge and triumph for neku and beat. they’ve made it this far and nothing can stop them now. they’re not afraid of konishi they’re hyped up to defeat her. and konishi is such a great villain with a really tricky and unique boss fight so it feels super satisfying to finally get the better of her! it’s not about fear it’s about fun! and when the beat switches on the chorus to something so much brighter and smoother… feels like that moment in the battle where you break through one of her gimmicks and you can see clearly now
in conclusion: i love the weird telephone beep song with the strangest lyrics known to man
#say what you will about solo/final remix but their music choices are better. like the way they assign certain songs to certain characters#they do it a lot better than the og i’m sorry#the world ends with you#twewy#subaseka tag#mine: twewy#mitsuki konishi#neku sakuraba#daisukenojo bito#yes i’m tagging the characters i mentioned too#long post
98 notes
·
View notes
Note
hey kekeyw
I’ve been wanting to clean up my mods folder and just start ‘afresh’ with the sims and feel more clean playing it then stumbled upon your account and instantly fell in love with your screenshots and builds and posts.
It honestly inspired me to play again.
So long story short, I was wondering if you’d ever make a post or list a few mods you use in your game ? Everything looks so aesthetically pleasing and was wondering if you use any particular cas or build buy overrides or even gameplay mods that still fit in with your aesthetic. Thanks for the time of reading my rambling and please keep posting the amazing content you give us!
I hope you’re having a good new year.
Hi!
I hope you're having a great new year so far too! Thank you so much for the message! I'm so glad that you find my content aesthetically pleasing and am so happy you found inspiration from me! Moreover, enjoy it! :)
Honestly, I've needed to clean up my mods folder because it's absolutely horrendous and there are a couple unwanted hoarded mods that I have on standby eating up my storage...
I actually have a resources tab on my tumblr page which you can find here! I haven't linked anything yet but if you search them up you'll easily be able to find them! It contains my favourite creators and mods for CAS, Build & Buy and Gameplay!
The aesthetic I have going in my game uses 99.8% Maxis Match with 0.2% being Alpha (clothes in particular) CC.
A mod that I find is an absolute game changer is Softerhaze's Sunblind Lighting Mod! It makes the game look 10x better and much more realistic.
I highly recommend checking out these creators down below as I get a lot of my gameplay, override mods from!
Ashley Plays | @aashwarr - She has amazing youtube videos showcasing really fun and gameplay-worthy mods that make the game 10x aesthetically pleasing! Make sure to check out her resources tab as I use most if not all of it! She is a must to check out and my absolute inspiration!
LargeTayterTots | @largetaytertots - Has some of the best small overrides in the game that makes it so aesthetic. This post by her is a must check out if you're looking for overrides and default replacements!
FarfallaSims, Bianca and Amelie | @farfallasims, @biancml, @pixelglam - Have really good CC recommendations and top tier aesthetic gameplay! They're also my inspiration when playing the sims!
I hope you find these helpful and find your aesthetic when playing the sims! Enjoy your day :)
12 notes
·
View notes
Text
Developer's Log: January 2023
Hi Tumblr! I'm going to try sharing more developer's logs here, for those of you interested in learning a bit more about my process as I develop Legends of Astravia.
Let's get into it!
January's primary focus was organizing and preparing documentation. This is actually a pretty common aspect of development that takes a lot of time, but it's hard to discuss in a developer's log since it's not entirely visual.
Chapter 1's Story Outline
The story outline for Chapter 1 has been completely finalized! In a document nearly 10 pages long, every aspect of the major story that will occur in the game has been summarized. There were a lot of sections I was worried about last year that are now completely cleared up. And, it made me realize that even as a "Chapter 1", the story feels whole & complete.
Game Development Document
Generally, before starting work on a game, it's good practice to create a "Game Development Document" that serves as a blueprint for the entire game. While Legends of Astravia has always had plenty of digital documentation that describe the game's mechanics, story, and key elements, I never created a formal "document".
There are some differing perspectives on this. Some believe in having an organic, digital, and always changing document, since the game very much can change throughout development. However, in my case, having a physical, printed document that I can hold in my hands is a valuable asset and motivator for the project.
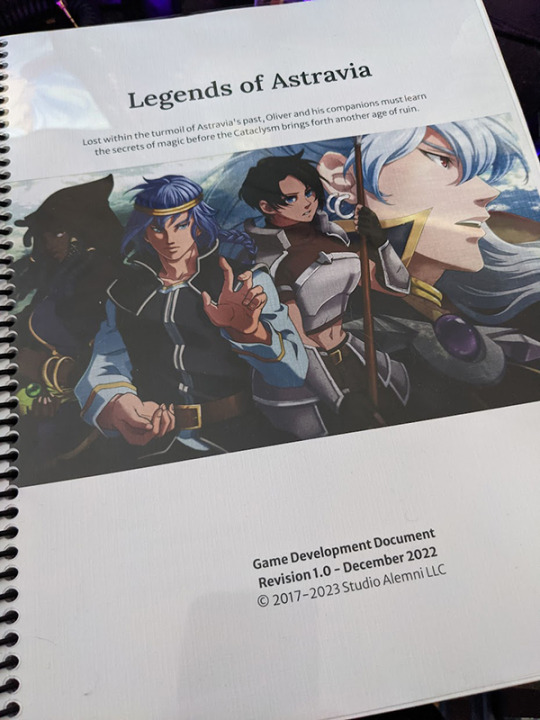
So, at over 50 pages, the game has it's first official physical game development document! It's easy to understate just how incredible it feels to hold something like this in your hands and flip through it.
For aspiring game developers who are feeling a bit "directionless", I really recommend this method.
Continued 16-bit Progress
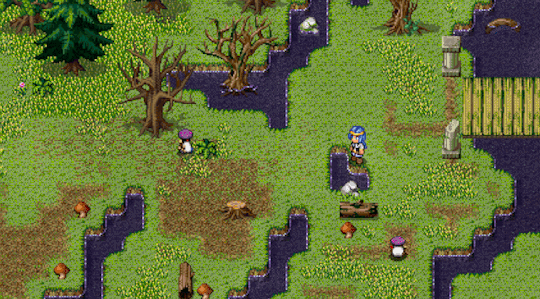
The 16-bit overhaul, while initially started in November, is somewhat of an ongoing process. Some of the areas that were already completed have been mostly reworked, and later areas whose assets were already created need to be recreated. It is going exceptionally well, and here are a few more screenshots and gifs of the demo areas in the new style:
I'm also quite happy with how the new face graphics are looking in in action! They fit with the new "GBA" vibes really well:
Overall, development is going well, and I'm feeling very good about February's progress as well.
I look forward to sharing more with you all soon!
#indie developer#game development#indie games#legends of astravia#devlog#wizards#magic#game dev#jrpg
74 notes
·
View notes
Text
Sheezy.Art

Sheezy opens today for 250 new members for their beta at 2 PM EST along with a stream :3c and I think if things go well they plan to have more openings every friday??
https://sheezy.blog/registrations-open-tomorrow
https://github.com/Sheezy-Art/sheezy-hub/wiki
The past week has been nothing but lovely since coming back and I'm so excited to meet more people 💕its like a beautiful blend of old DA, tumblr side blogs, TH's pretty customizable pages, and bluesky's custom feeds. They're against AI and NFTs too. Obviously its still in beta so there will be bugs that need to be worked out, but so far everything seems incredible
currently there's a limit of being able to post 5 images every 24 hours, but honestly?? that's been amazing so people don't flood each other out too much trying to catch back up. lets you easily space out your uploads and find others easily
I really hope it continues to thrive and everything goes well. Its been so long since I've really had a place where I felt like I fit. I hated twitter with a passion and struggled to get into tumblr since I'm not really someone who reblogs funny stuff since that's not what I'm here for. The only way to really get noticed is to hope and pray someone more popular reblogs your stuff which :'D. I still absolutely love toyhou.se and have been enjoying bluesky so far, but they aren't exactly meant to be art gallery sites and have that kind of community.
also if u do decide to join I highly recommend TweakSheezy its super nice for tweaks you might wanna make :D
screenshot of my profile layout to give an idea of what pages can look like...mines a bit of a mess rn and I need to mess around with HTML more but LMAO also you get a little pagedoll :3
the browsing area. I have my maturity level set to general, but there's ones for mature and explicit. You can choose to have mature content blurred as well even if you have it switched on

you can have little custom pixel icons by your username that stay with it where ever u post :3
you can also make silly little pin boards of things ur interested in, art you've gotten, or just random memes if you wanted to its so funny how I've been seeing people use them
I turned mine into a shrimp tank that people can draw a shrimp to put them in the tank, and it leads you to their profile when you click them (bc yes you can link credits to the images!!!)

8 notes
·
View notes
Text
Morrigan's Milanote Mess
aka "a look at how I plan my story using Milanote"
[Note: I have a subscription, so I'm not limited by the number of cards I can have, otherwise this level of detail would be impossible. My subscription was a gift, though.]

So, this is the "landing page" for my story. The left column has my "poster", and underneath that is the summary I have on my info page on my blog. The other two columns, on the right, have links to the boards that make up this mess.

This is the "outfit catalogue" board. It has pics of the outfits for every sim involved in the story, along with notes on how I have used / will use them. (The order here is meaningless. The top row is just the order from my character page on my blog, and the other ones are just grouped by their relevance / if they actually show up.)
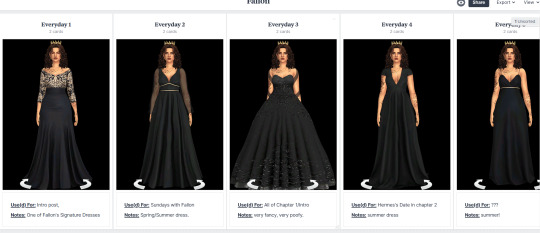
This is what part of the outfit catalogue actually looks like. I note what I might use the outfit for, and also any notes about it. (Is it out of character for said sim? Would it only be worn for specific occasions? Is it formal or casual? Is it for warm or cold weather? etc.)
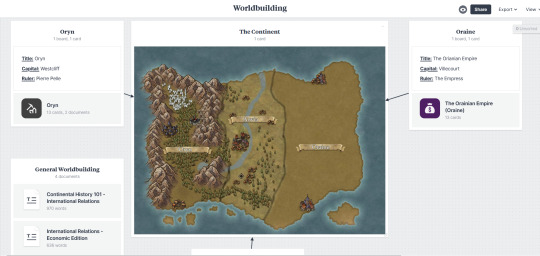
This is the main worldbuilding board. Each kingdom on the continent has a section, and there's also a place for all my rambles about the world. (Anvia is on there, just cut off.)

Each kingdom's board looks like this. There's a couple more sections underneath, along with a doc for more in-depth rambles.
Now onto the actual planning portion!!
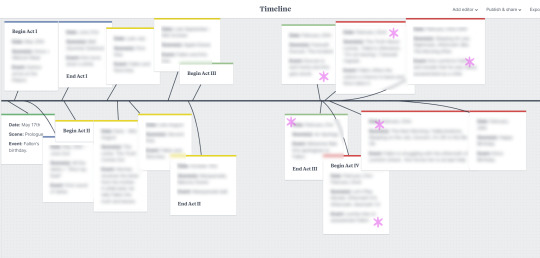
I've shared this pic before, but this is my overall timeline for the story. (It really needs an update, though.) I have mapped out the dates of when certain key events occur, as well as when the transitions between the Acts happen. (Blurred for spoilers.)
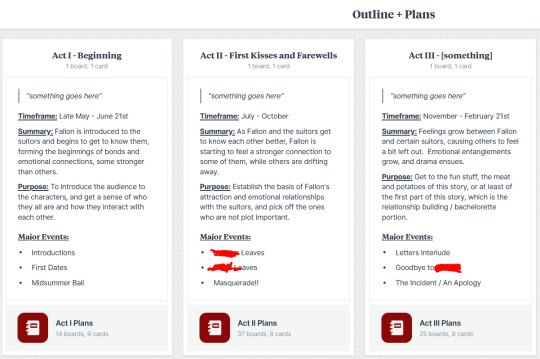
This is the main landing page for my planning though. Each Act has a spot that includes the timeframe, a summary of events, as well as what I want to accomplish during that act to move the story forwards. (Acts 4 and 5 not included for spoiler reasons, plus Act 5 doesn't fit on the screen without scrolling.)
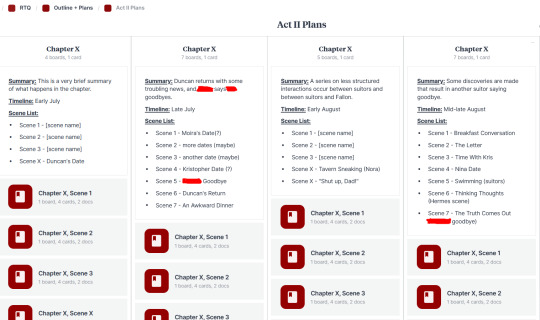
Each individual Act looks like this, but with more chapters (again, they don't all fit without scrolling). This is a look at Act 2. I have a column for each chapter, with a list of scenes, as well as the timeline of the chapter.
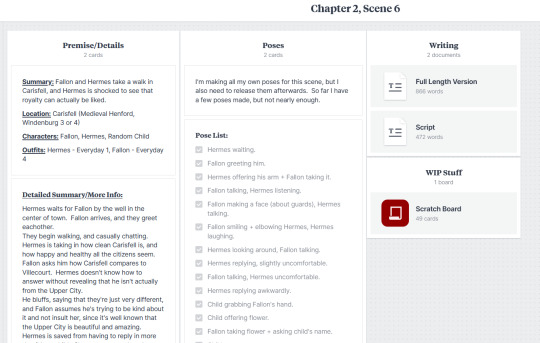
The board for each scene looks like this. I have a super short summary, the location (including which of the 6 copies of Windenburg said lot is in), who's involved, and what they'll be wearing (cross-referenced with the Outfit Catalogue, ofc.). Then there's a more detailed summary that summarizes the beats/themes of the scene, as well as has some insight into what the characters are thinking and feeling.
The poses section varies from scene to scene, but the top section is for me to list any accessories I need, or any existing poses I have that might suit my needs, as well as rambling about the poses I might need to make. The checklist part is for the poses I need to make myself, usually.
The writing section contains two versions of the scene. A full-length prose version (since I do that sometimes for fun and practice), and the actual script. The script is essentially what I type on the screenshots, as well as was goes in the transcript under the cut.

This is what the scratch board looks like. It's where I dump all of the screenshots I take for the scene, and sort them out. I decide which ones I actually want to use, and put them in the right order. Then I decide what portion of the text is going to go on which screenshot. (Better example below)

Phew! Okay, that's everything!! (Except for the character boards but those are kind of spoilery and I'm in the process of replacing them anyways.) Hopefully this was at least kind of fun to look at. It honestly amazes me how organized this is, because literally nothing else in my life is even remotely organized, lol.
I should also note that it was @mellindi who originally keyed me into the idea of using milanote for story-planning, and some of my layouts take inspiration from hers.
32 notes
·
View notes
Note
Hiii love! I like how you edit your screenshots with pictures of traits, moodlets etc. I was just wondering if you know any tutorials for Photopea? I'd love to use it too but I'm a total noob with photoshop/photopea and psds in general😭
Thank you, love!!
I'm honoured that you've asked this, but I wouldn't consider myself an expert or even really proficient with photoshop by any means 😭😭 i just kind of shove stuff together and hope it works, I'll try my best to explain how I edit below, but I apologise if it's not very clear / efficient! this is just the method that works for me
This ended up being quite a long post but I've tried to condense it where I can! ⬇️
I really recommend these bepixeled tutorials, specifically the ones linked on this post - doing photoshoot pictures & banners got me familiar with the tools of photopea when I first started out, so I'd suggest following those if you want somewhere to start :)
And I'd also recommend the tutorials by erasabledinosaur which is how I learned to do the UI elements, I also rely heavily on this icon pack from MTS as well as random pages from the sims wiki here and there - I also reblog other people's tutorials & presets sometimes under the 'resources' & 'tutorial' tag on my blog
I make heavy use of presets, so I don't really do that much of the editing myself - a while ago I answered something where I showed my main preset, but basically, I've combined this one by Strangecowplant and this action by Sterinasims, along with following this tutorial to create a curved outline - I shoved them all into one PSD together
Here's a little tutorial of how I built my franken-preset from the ground up (click through them to read):
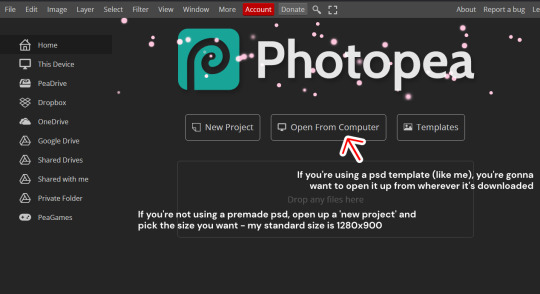
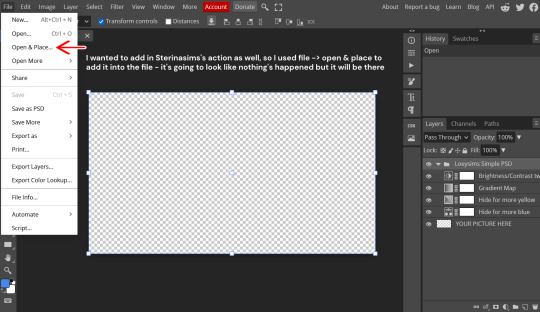
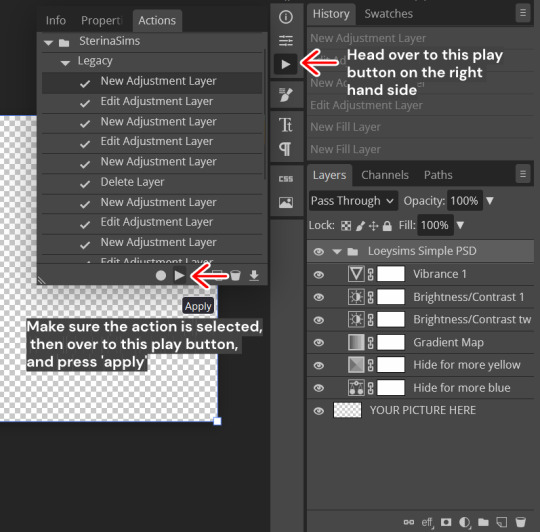
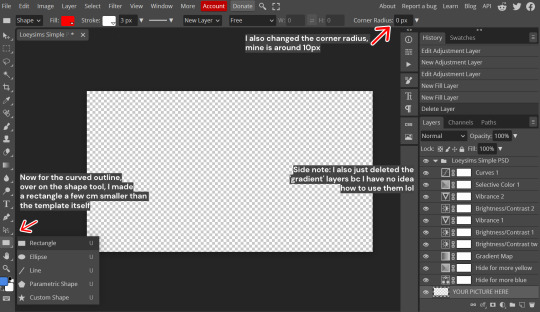
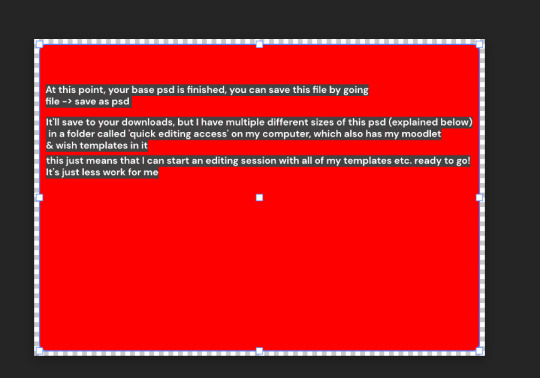
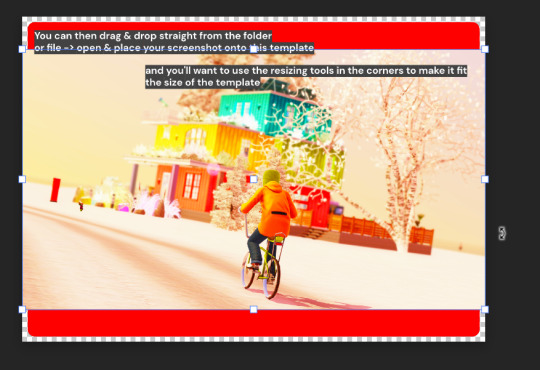
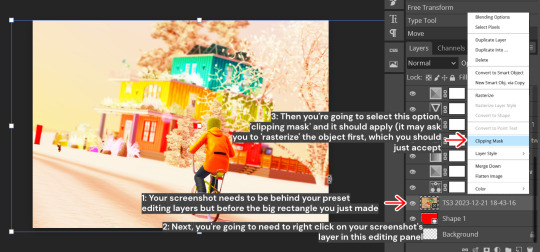
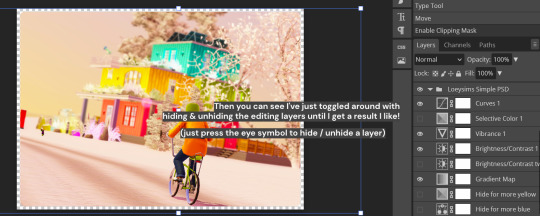

I have 3 sizes of screenshot template to choose from when I'm editing (all use the same tutorial above) I've just resized the base template under the 'crop' setting on the left sidebar & resized the rectangle as necessary to fit the size too
Here's what my screenshot sizes look like:
1280x900:
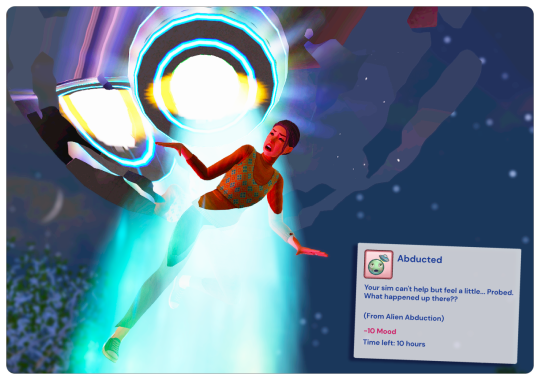
1280x450:
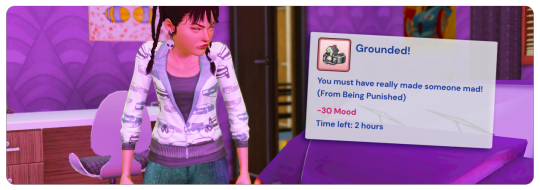
980x980: (these are good for stacking in a post as multiple tiles)
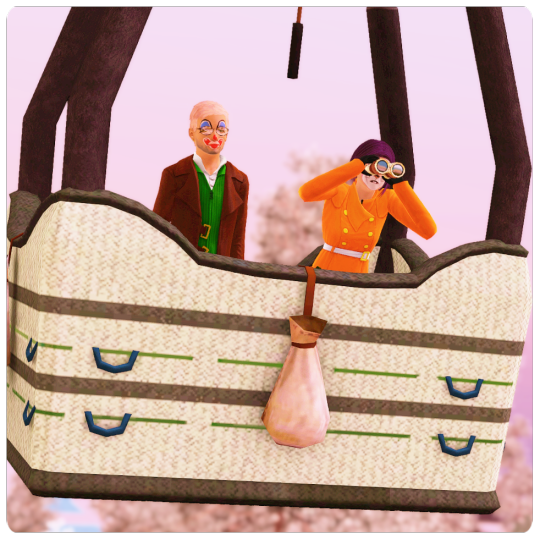
Generally, I think learning how to photoshop requires a lot of trial & error, I spent a long time just cautiously following tutorials like a snail until I got the hang of the tools and was able to start improvising with stuff, there's a tutorial out there for almost anything you could think of! just stick with it and you'll get there with practice :)
Wishing you the best of luck, I hope this was helpful 💞💞
12 notes
·
View notes
Last Seen Blogs