charlottejacksonn
CharlotteJackson
Audiovisual Interactions and Code Research Folio
15 posts
Don't wanna be here? Send us removal request.
Last Seen Blogs

tecefoser
Untitled

senjou-no-kiyo-blog
Senjutsuka

daisycantiani-blog
DAISY'S LEARNING BLOG

alunasky-blog
Alunasky

polyxrwmh-melancholia
Melancholia
Text
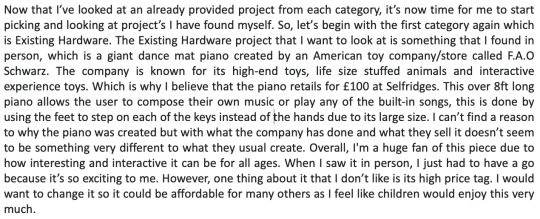
Project Proposal:
Here I would like to propose the idea and the development around my light project. The project will be a light that can be turned on or off, dimmed or brightened depending on how loud or quite the sound vibrations are which are being created through movement. These vibrations will be affecting the sensors which are below the area of the switch pad itself. Which affects what happens with the light. Instead of using a flick switch, there will be pad that controls the light through movement as I mentioned. Working the way up the pad brightens the light and down dims the light. To the left it turns it off completely and to the right turns the light back on. Vice versa.
I want to create and use this project to dig a deeper understanding in how simple everyday objects can be transformed and improved into something that changes the way we live and learn through experimentation from children to adults. This project will not solve any current problems but as we continue to explore and develop it may do. Due to a light being an everyday object that is used by all ages and generations it’s aimed at all who want to be creative and explore something new. I wouldn't practically say that my project fills a niche in the market right now, however at some point it may do, and this will be the norm to have in homes.
The breakdown of the ‘how’ of my project:
Create a few pencil sketches of my idea, to see how it would look visually. (1-2 days)
Start by gathering materials such as sensors and a base/foundation for them to work under. (3-4 days)
Go ahead by executing and building the base to the idea, such as the light and the switch pad. (5-6 days)
Begin by applying the interactive sensors underneath the switch pad and up towards the light. (4-6 days)
Finalise the project, adding a few last-minute touches. (1-3 days)
Run a few test runs to make sure everything goes smoothly and according to plan. (1-2 days)
The barriers that may be involved with this project are the fact that is something that would work in a home when it’s fully functioning or is it just a test project. Another barrier might be the lack of suitable materials that could be used for this to make sure it looks realistic enough to an actual light and switch pad. In addition to that is not having enough time to make sure everything works and runs smoothly, to overcome this I'll make sure I stick to the days I've set myself to complete each part, so I don’t run out of time. Finally, I need to make sure that all the sensors and electronics and kept hidden and aren’t exposed due to young children being able to have access to it.
Finally, if my project proves to be a success then hopefully, I'll be able expand into other ideas and objects to change the way we currently live and change how we see everyday objects. I expect it to be a success amongst most, as it could be something, we all use in the future.
0 notes

Video

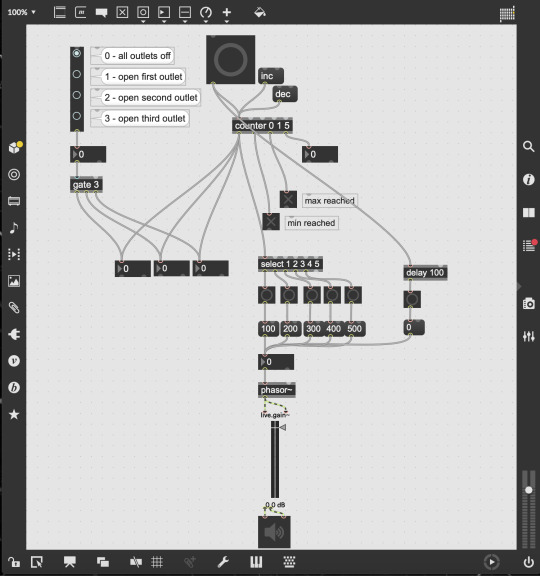
Here is the Max patch that I've created for Task 3. The Hybrid. In this task I linked my Teensy board up to this Max patch through two objects called ‘ctlin’. The first was connected to the LDR pin which was connected to pin A0. The second was connected to the potentiometer which was connected to pin A1.
The LDR sensor is then linked up to a slider that changes depending on how dark or light it is. In the image it’s 117, which is quite light. I then connected it to a sound bar which when sound is involved the slider will also increase and decrease. The Potentiometer is linked up to a dial so when the potentiometer dial is turned the dial will also turn. As you can see in the image the dial is turned up all the way up to 127 which is the highest number for both the LDR and the potentiometer. I then linked it to a phasor and a wave form so now when the dial is turned the wave form will increase and decrease from 0 to 127 as you can see in the video.
1 note
·
View note
Link
0 notes
Video
Here is a video of my work on the Teensy MIDI Mapping for task 2. In this task I created my circuit on my Teensy as you can see at the start of the video then linked it up to the software. Here in the software i used the dial to change the audio of the sounds and the connection in the wires to changed the density of the sound in vinyl distortion. Thus creating the video you can see above which is my submission for task 2
0 notes
Photo

Task 2: An Insight into my Second task on Teensy MIDI Mapping
0 notes
Link

0 notes
Link
0 notes
Link
3 notes
·
View notes
Video
Here is a screen recorded version of my Max patch for task 1. As explained in the previous post this task was an intro into the software and this is what i came up with from our brief.
1 note
·
View note
Photo
Task 1: An Insight into my first task on Max MSP
1 note
·
View note