#also yes i dual boot linux and windows
Text
i know this is my pokémon blog but i gotta say it. if you use windows i'm so fucking sorry i don't know how you guys deal with it
#modern windows is one of the most convoluted malicious operating systems i've ever seen in my fucking life#if you need windows for work or video games or something this is your sign from god to dual boot a linux distro on your computer/laptop/etc#and fuck i mean. gaming on linux is already getting a million times better than it was. and if anyone has ever told y'all that#linux was complicated to set up IGNORE THEM!!!! yes there are distros that require some assembly when installing#but there are also SOOOOO MANY that are as easy as windows to just install and start using. EASIER even#and fuck i mean i would even recommend mac over windows at this point even with mac's laundry list of problems#awful. all of it awful i tell you#i have recommendations for easy user-friendly distros. btw. if anyone's curious at all.#AND!!! THE THING ABOUT INSTALLATION!!! you can test out live version of them without ever installing them to see if you like it#if you boot it from a usb stick!!!#SO YOU CAN MAKE SURE YOU'RE COMFORTABLE WITH IT BEFORE EVER INSTALLING IT!!!!#like. head in my hands. haaaaate modern windows SO bad
8 notes
·
View notes
Note
Can i still Call myself a gay Linux user if i dual boot Ubuntu and windows for ROS purposes. Im studying robotics
yes
in the same way a bisexual person can call themselves gay
(i am also dualbooting and bisexual)
39 notes
·
View notes
Text
Getting Linux-y (for Windows refugees)
a casual users' GUIDE to the basics
Linux ? isn't that for nerds ??
yes. no. we're breaking down stereotypes here !! this post is aimed at casual users who care about freedom + privacy, are sick of the direction Windows is heading, or just curious c:
i'm talking social media, email, web browsing, online shopping, pdfs, document writing, funny meme edits, youtube/netflix/plex, spotify, dvds + cds + mp3s etc.
i'll mention gaming and running specific Windows-only software briefly, but that's outside the casual scope i'm going for d:
Arm thyself ! and decipher !! arcane secrets be upon ye !!
it's key knowledge time !! ^w^
Linux isn't Windows, but it's not completely alien :o
much like Tumblr, one curates their Linux experience. there are flavours of Linux (terminology: distribution/distro) aimed at power users who like to DIY, and there's ones aimed at normal folk that are ready to go. for the sake of this GUIDE i'm recommending Linux Mint:
its interface is similar to Windows,
it's popular as a user-friendly choice
and it has both excellent support and software
(note: i ran Mint for years, and when coming back to Linux i chose it for my gaming pc because it's easy to set up and well-supported)
key information:
Linux doesn't use drive letters :o
your C: drive is / (terminology: root directory)
your personal files (C:\Users\Username) live under /home/username (terminology: home directory)
other drives (internal and USB drives) live under /mnt/drive-label or /media/username/drive-label (terminology: mount point)
Technical Note: all hard drives and SSDs, before they get a mount point, are referred to as /dev/sdX (eg /dev/sda, /dev/sdb etc.) for HDDs and SATA SSDs (partitions are /dev/sda1, /dev/sda2 etc.), and /dev/nvmeXn1 (/dev/nvme0n1, /dev/nvme1n1 etc.) for NVMe drives (partitions are /dev/nvme0n1p1, /dev/nvme0n1p2)
however, Mint manages all this for us and stuff just shows up in your File Manager much like they do in Windows Explorer c:
Software is typically managed similar to the way App Stores work; Mint has Software Manager that lets you install common programs
the only wrinkle here is Mint supports both Mint-specific sources and a thing called Flatpak, which is like a universal App Store for all Linux distros
the Update Manager keeps both your core system and your programs up-to-date. unlike Windows, by default it will only update when you tell it to ! no more rebooting into Windows Update and waiting 10 years ^w^
it's possible to have both Linux and Windows on the same laptop (terminology: dual-booting); you choose which one each time you turn your laptop on
the Linux Mint Forums are a good place to ask questions, seek advice, and maybe even offer your own !!
additional places: Official Community Website, community-maintained subreddit, community-maintained Discord Server, Official Troubleshooting Guide
i think that's the basic info taken care of.
Let's start with the preparation, or PRE-paration
for this GUIDE you'll need:
a USB drive (4GB+)
Linux Mint ISO file
Balena Etcher (to put the ISO file on the USB drive)
i recommend reading through the info on the Mint homepage and following their installation guide for good step-by-step guide w/ screenshots ^^'
we're gonna make a 'Live Image' on our USB drive - this means we can testdrive the system before we install it. try before you buy !! wait, it's free -- uhh.. walk before you run ??
Download the ISO file using the above link. i recommend the Cinnamon Edition, unless you have a very old PC, in which case pick XFCE
Download Balena Etcher
Plug in your USB drive and open Etcher
Follow the onscreen prompts to select the ISO file and your USB drive
Alright, let's fire her up ! ^u^
now we have our USB drive it's time to boot it. because Windows is, well, Windows, you may need to disable Fast Boot in order to access the BIOS/UEFI. :c you may also have to disable Secure Boot in the BIOS/UEFI depending on your computer. this is usually found in the Boot, Security, or Authentication tab.
now we're ready !!
Power on your computer and press F1/F2/F6/F10/F12/DEL to access your BIOS or Boot Menu
Select your USB drive
A screen will come up where you can select Linux Mint (or will say Automatic Boot in X seconds)
You shall be greeted by a desktop that looks something like this

have a look around !! there's a menu in the bottom left that has programs and system settings and logout/reboot/shutdown options. the taskbar at the bottom displays icons of running apps (and pinned ones). the bottom right has your clock and system tray w/ network, audio etc.
this is a great time to get a feel for how everything works ! open some programs !! investigate the System Settings. connect to your WiFi (in the system tray next to the sound and clock).
when you're ready, double-click the "Install Linux Mint" icon on the desktop. the installer will walk you through setting everything up. i recommend following the official installation guide's walkthrough as it explains everything from setting your timezone to installing Mint by itself or alongside Windows, with screenshots showing each step. it also has an important section on installing drivers. the slideshow during installation also does a good job at showcasing the available software.
Welcome Screen
after installing and rebooting, a Welcome Screen pops up that offers a nice interface for picking a system theme/colour, installing drivers, and setting up backups etc.
Let's talk software !! :D
Mint comes with some software pre-installed. these are probably the main ones:
Archive Manager (like 7-Zip or WinRAR)
Celluloid (a video player; VLC is available to install if you prefer)
Drawing (an image editor similar to Paint)
Document Viewer (PDF viewer)
Firefox (Tumblr's favourite web browser)
LibreOffice (like MS Office - it even supports MS Office file format !)
Rhythmbox (like Windows Media Player or iTunes)
Software Manager (like the Microsoft Store/App Store; GET OTHER PROGRAMS HERE !)
System Monitor (like Task Manager)
System Settings (like Control Panel)
Terminal (like Powershell/Command Prompt; outside the scope of this post but good to have)
Text Editor (like Notepad)
Timeshift (like System Restore points, or macOS Time Machine)
Web Apps (similar to an old iOS feature - make Netflix.com into an app etc.)
Update Manager (manages updates)
Available in Software Manager:
Audacity
Discord
DOSbox
Dropbox
OBS
Spotify
Transmission (torrent client)
VLC
and much more !
these are all official apps !
How's that checklist ?
i mentioned some casual tasks at the start of this post. let's work through them !
Social Media, Online Shopping, Youtube/Netflix/Plex and general Web Browsing
Difficulty: easy
Windows Similarity: identical
Method: open Firefox. browse to your_site.com.
note: i recommend the web version of Plex as the app can be buggy
Email
Difficulty: easy (webmail), medium (mail client)
Windows Similarity: identical (webmail) or similar (mail client)
Method: webmail - open Firefox. browse to your_email_site.com. sign in
client - open Software Manager. search for Geary (similar to Mac Mail), Evolution (similar to Outlook), or Thunderbird (same as on Windows). click Install. open Geary/Evolution/Thunderbird, follow the first-time setup.
PDFs
Difficulty: easy
Windows Similarity: similar
Method: open Document Viewer from the application menu. File -> Open, browse for your PDF. OR, open File Browser, browse for your PDF, double-click to open
Document Writing
Difficulty: easy
Windows Similarity: similar
Method: open LibreOffice Writer from the application menu. on first launch it may ask if you want a traditional (Office 2003) or Ribbon (Office 2007 onwards) layout. use it as you would MS Word. there's also Calc (Excel), Impress (Powerpoint), Draw (Publisher) and Base (Access)
Funny Meme Edits (aka MS Paint level of image editing)
Difficulty: medium
Windows Similarity: similar
Method: open Drawing from the application menu. File -> Open for your image. the left toolbar provides options to resize, add text, crop etc. pro tip: remember to click the tick button on the bottom right when you do anything !
Spotify
Difficulty: easy
Windows Similarity: identical
Method: open Software Manager, search for Spotify, click Install. then open it from the application menu.
DVDs
Difficulty: easy
Windows Similarity: similar
Method: insert your DVD. Mint may ask what you want to do (choose play/open with Celluloid). if it doesn't, then open Celluloid from the application menu, click the + icon in the top left, click "Open Disc" and choose the DVD you inserted.
CDs and MP3s
Difficulty: easy
Windows Similarity: similar
Method: CDs - insert your CD. Mint may ask what you want to do (choose play/open with Rhythmbox). if it doesn't, then open Rhythmbox from the application menu. it should automatically see your CD.
MP3s - double-click your MP3 file.
Gaming and Windows-only programs
i said i'd briefly mention this (probably good bc the post is getting loonnggggggg), so here we go.
gaming on Linux has come a long way. Steam can be installed from Software Manager and supports a few titles natively, as well as the option to run some Windows-only games using compatibility software called Proton. the website ProtonDB is very handy for looking up compatibility for specific games. i'll drop a proper GUIDE on Linux gaming another time.
Windows-only programs. sometimes you need specific software and it only has a Windows version. it happens. there's similar compatibility software that allows eg Photoshop to run, called WINE (Proton is actually based on this). again, this is outside the casual scope of this post, but i'll drop a GUIDE on this too (as i use the same software to manage both my Windows-only programs and my Windows-only games).
Finale !! FINI !! Fuck me that's a lotta words !!
okay, we got to the end ! you should have Linux Mint installed, you should have your basic programs ready to rock (and know where to get more !!), and know where to get help from official Linux Mint sources as well as community-run ones <3
please drop any questions in the notes, or as an ask. i shall tag those asks #DATA_REQUESTS/GUIDES/LINUX in addition to my usual #DATA_REQUEST tag
i'll also provide the following GUIDEs/REPOs as i have time:
Flatpak (that universal App Store i mentioned earlier)
Gaming (including using Proton + Bottles for Windows games)
Windows software (using WINE + Bottles)
and if there are any specific GUIDEs (eg terminal basics, how to configure xyz in System Settings etc.) or REPOs (eg links to other people's GUIDEs, software recs, screenshot galleries etc.) i'm happy to provide those as and when i have the time !! have fun !!~
#daemon.md#GUIDES#GUIDES/LINUX#linux mint#linux#free software#foss#open source#this post is like 5x the length i expected it to be bc brevity ain't my style#oopsie#i know i should provide more screenshots but i'm tired after writing this#so i'll include some in a reblog ??
833 notes
·
View notes
Note
Whoa linux user
Do you have a guide on how to switch to it? I have zero coding knowledge (i think that's required) and I trust you with my life
I perfectly understand the "linux is scary and requires very big brain and coding its too hard to use!" thought coming from a Windows/Mac guy, i really do! But in the end, a linux distro is just a computer kernel that also has a desktop environment and just does what you want it to do like an operating system
Coding on linux is not required. Linux has so many distros at this point that designed to be beginner friendly, requiring "no knowledge but TO gain knowledge while using it"
The linux terminal is the thing that scares most of the users, but trust me once you get used to it you'll realize how efficent it is to operate your computer and do certain tasks from THE terminal instead! In the end, the cold looking white text with black background terminals are the REAL face of computers. Desktop environment is made so EVERYONE can use computers!
The terminal of gnu/linux uses the bash language. In a nutshell, it is pretty easy to learn basic commands actually!
Super beginner friendly linux distros are designed for people (YOUU) who has no experience whatsoever with linux! They are designed and engineered so you dont have to use the terminal much! For example, Linux Mint is the best distro you should start with. It looks and feels like Windows, even! And Mint does not require much terminal usage. That is also their mission, to make an linux distro friendly enough that no terminal usage is needed!
As easy as this sounds, i actually do not recommend staying this far away from the linux terminal. Please start with Linux Mint if you gonna, its just the best for beginners, but also please dont avoid the terminal much! The linux terminal is important to learn because it also teaches you how a computer really works, and certain operations are much more efficent to do via terminal anyway!
Push yourself to interact with the terminal, even. Learn very basic commands like "shutdown now" , and the "sudo" privilege and how it works (linux always asks your password while doing stuff and you also cant do muc without the sudo privileges!)
"sudo" is the command that gives you the REAL admin privileges to do ANYTHING. With your password and sudo, you can even delete your bootloader lol. Linux wont stop you
This means to be extremely careful while using sudo, though! You can do ANYTHING with sudo privileges, and that also contains accidently trashing your computer! Unlike Windows, that doesnt even let you uninstall Edge, linux has no boundries. Its like "we are gonna assume you know what you are doing."
Of course, friendly distros DO warn you on certain stuff, so dont worry too much!
So ye. U can use linux with no coding knowledge, but i dont recommend staying like that. After starting to use linux, you GOTTA let it teach you stuff!
And to the "switching to linux for the first time" part;
I recommend not deleting your main Windows, actually. For first time using linux i heavily recommend the "dual booting" , which simply means booting operating systems more than one in an computer! You can use BOTH linux and windows in thay way! Although, you need to shudown your pc if you want to switch between them and do it in the booting menu
This is because if something goes wrong, or you get very confused, just let Windows be ready in there. Only make the switch the moment when you feel you can operate linux with no issues and easily!
Dual booting basically slices your disk and creates partitions for operating systems. For example if you have an 512GB SSD, in dual booting you can slice it and make Windows use 256GB and Linux use 256GB too! Ofc u can change the numbers here (linux mimt will help u,.)
Before completely switching to linux; be aware that its a bit of a different world. Sure, very popular softwares exists in linux too but some softwares may not suppor linux. Adobe products dont support linux, for example! You can of course just emulate them with Wine software heh, but that would be a bit of a work!
Another problem will be certain online games. Online games does not like linux becuse how easy it is to manipulate the system, so they just either dont run on linux or they ban/kick you when you try to emulate it on linux
An example is Valorant. Valorant does not tun on linux!
And any online game that has a cheap anticheat system will be a problem!
With that being said, linux now supports every single game from Steam, with the Proton software. Just be careful about them online ones! If an online game natively supports linux (TF2, for example!) , it wont be a problem! Check the steam game's info thingy for it!
Oh and official Minecraft works in linux lol
Discord, Spotify etc. popular softwares also work on linux!
Linux in fact has an "app manager" software in their distros, making you install stuff with no terminal whatsoever! Think like Google Play Store but on le pc!
Anyways hehe thats it fo me bascallya! If u wanna switch to linux with no experience, start with the Linux Mint distro i say and explore it well! Tamper everything before fully installing it, dont worry about it! Linux is free. Linux does not care if you want to kill the entire system, even. Linux is freedom
Also please research the dual booting! You'll gonna be needing an 4GB+ USB for it, and a software like Rufus!
The site of Linux Mint has everything you need in detail, step by step ^^ good luck!
26 notes
·
View notes
Note
Thanks for the info about dual booting. This might be a dumb question, but if I have two internal drives, and I place Linux (Mint probably) on the C: drive alongside windows, will I have access to the additional drive if I boot into Linux OOB, or will I also have to partition that?
Yes, you will have access to the additional drive. I'm not sure if Mint will include the driver package for the NTFS file system by default, so you may need to install that manually.
4 notes
·
View notes
Text
"Finished" PC Build
Backstory: Starting 2023 I was still running a cobbled together mess of a PC, the heart of which was a Dell Studio XPS desktop from 2010. Yes, THIRTEEN YEARS old. I got 2 of them from a gaming company in 2012 for the price of a tank of gas, thanks to knowing someone working there that had been tasked with E-wasting all the Windows PCs. Company was switching to iOS dev.
Anyway, at its heart was the Dell Mobo, which featured a 1st Gen i5-920. By this point, the OG GPU was long gone and I had "upgraded" with a 1050TI. 16gigs of DDR3 RAM. This basic as hell setup had served me admirably for a decade, for a couple reasons.
I run Linux.
I have never been a HEAVY PC GAMER. Sure, I have gamed on PC since I first got one in 2005 (yeah, kinda late to the game, considering I was almost 30, lol), but I mostly used my PC for World of Warcraft, other similar MMOs, and what are now called Indie games on Steam. I've had consoles from like 6yrs old, and I tend to prefer them as they are the cheap option for gaming. I appreciate what a modern PC can do (esp lately with RT etc) but like, more often than not PC gaming can be as much of a chore as it can be fun.
Now, starting around March 2023, that old PC began having strange errors with the RAM, which would cause Firefox to crash tabs/completely, among other things. Eventually it broke my Linux Mint OS badly enough it just stopped allowing me to login. Finally figured out the HDD I had was failing and got an SSD. Installed Garuda on it and pretty quickly realized I had Mobo issues as the RAM was still reporting less DIMMs than it had, half the time.
At this point, a friend that was aware of the issues offered to mail me an i5-6400, to build a "new" system around. Naturally I accepted and bought a Fractal Meshify 2, some new DDR4 RAM, DeepCool Gammax, and a used MSI Krait Gaming Mobo. Stuck the new parts in the new case, and moved over storage/GPU from old PC. Booted and updated the OS, then launched WoW. Still getting 10fps in Valdrakken. Shit. Guess I need to upgrade this GPU.
So I bought an RX 6800. Stuck it in the case and booted. Updated the OS, which brought the Mesa drivers on board. Launched WoW again. 10fps again. What the fuck. Thought maybe swapping from Nvidia to AMD might have left over some driver mess, so I fresh installed Garuda and got all set up. Logged WoW Main again. STILL 10fps. WTF. Took my Main to SW, stood in front of the bank, then logged an alt with NO UI. Holy shit, there's a 35fps difference between them. My UI was broken, lol. Spent a day fixing that. Now I get 20fps in Valdrakken, but 55ish everywhere else. This is good.. but... What if I upgraded the core to something current gen, say AM5?
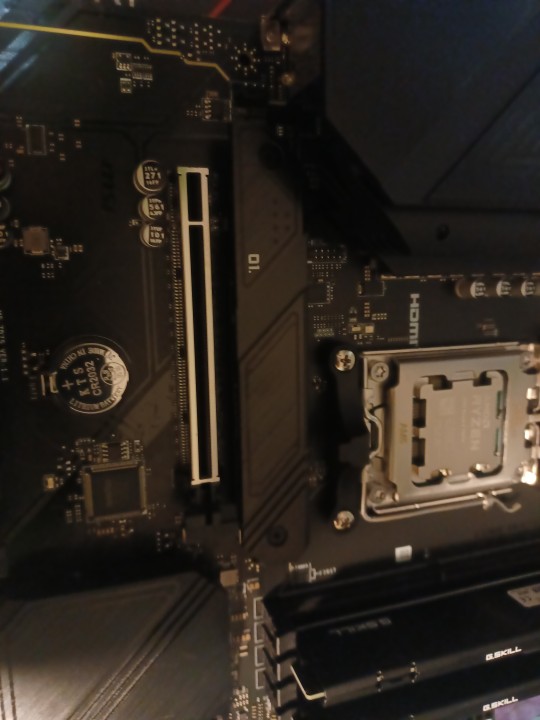
Finally we arrive at the part the title of this post suggested, building the "new" PC. I went to Newegg and picked out a Ryzen 5 7600X, MSI Mag B650 Tomahawk WIFI Mobo, G.SKILL FlareX5 32g RAM kit, and a TFORCE 2TB M.2 SSD. I also got a "free" 1TB Sata SSD with the CPU, it was also a TFORCE. The following are the pics of the "build" process. There will also be an aside for a complication. ProTip: be real fucking sure everything you want to put into a PC is absolutely compatible. Some things say they are when they aren't. You'll see what I mean.

Here's the parts laid out and ready to be installed.

This Mobo has a ton of IO.

The iFixit "Pro Tech" toolkit. I got it on sale for I wanna say 80 bucks a few months ago, as of today it's listed for $75, and I think it's definitely worth the money.
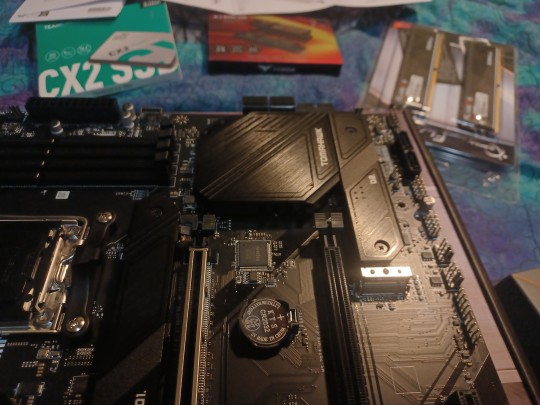
Here we see the 3 M.2 slots. 2 of them have included heat sinks. Nice.

ProTip: Remember to peel the fucking plastic off these thermal pads, cause they don't really work with it on there.

Like a glove.
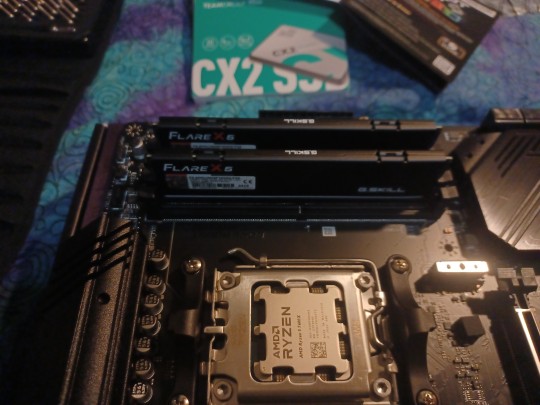
ProTip: it's real damn important to make sure you put the RAM in the proper dual channel config on an AMD system. On this motherboard there is a little diagram pointing out that the slots the sticks are in clearly say "first" on them, which is a nice touch. If you look closely, you can barely make out the very fuzzy diagram printed just above the heat sink bracket on the right hand side of the CPU.

Storage in place with the little "carder heat sink" strip in place. This SSD came with its own heat sink but I'm going to use the one that came with the board.
Like so.

And here's the board, ready to go into the case for further assembly.. however, it was at this point that i realized that the EVGA 650w PSU I had didn't have two 8pin(4x4) CPU cables. I got it open box, no manuals etc, and could have sworn it had 2 cables but I was wrong. Makes sense, really, 650 watts would be cutting it too close with this build. Bummer.
Ok, well I can at least move over my DeepCool Gammax heat sink. I looked at the listing from when I bought it and it says "AM5 compatible". I watched a vid that said "hey as long as your cooler doesn't use a back plate, it should work with AM5"
LIES, BOTH OF THEM. I tried to get the DeepCool on there but the brackets didn't quite line up, and then even if I could kinda fudge it a little to make that work, the screws were threaded differently. Fuck. So at this point, in the middle of a somewhat heavy storm, I had to make a run to Best Buy and hope the store really did have the things the website said it did. Thankfully, it did (and I guess yay for living in a decent area or something? cause I've heard stories about BBs having like 3 PSUs from one brand, so "my" store having 19 from 6 brands is luxury, it seems. I miss Fry's). Picked up an EVGA GT 850w 80+ Gold with auto Eco Mode and a Cooler Master Hyper 212 Halo, which was extremely lucky as it was the only one in the store.
That out of the way, the build can continue.

Coming along nicely. Sorry about the quality of some of these pics btw, I'm getting old so the eyes ain't what they were plus I had been dealing with this for several hours by now so I was also cranky and kinda rushing through the pics part. They looked good on the phone, less so once I moved them to the PC, heh.

Oh thank fuck, it posts. Ignore the slightly dirty desk, I been busy damn it.

That's looking clean as fuck. Yeah that old USB IO thing is old and kinda looks stupid but like, never can have enough ports, right?

I really do like this Fractal Meshify 2 case. It's laid out super well and is a breeze to build in. I mean just look at that cable routing, yo. And I was kinda rushing and not really being that finicky about it lol.

And it's home. Yeah, yeah, I know I need to clean up the cable situation on the left, there. I'll get to it. Also yes, there's some rust on that standing desk pole. I got it for free and it had been sitting outside. I've meant to clean that up but just haven't gotten to it, heh. Living in an RV as a not small dude (6ft1 240lbs or so) makes doing things like this just kinda suck, honestly. Add another person to the mix and yeah things can get tight. A 28ftx8ft box to live in just ain't the best time in the world, lol. We make do, though.
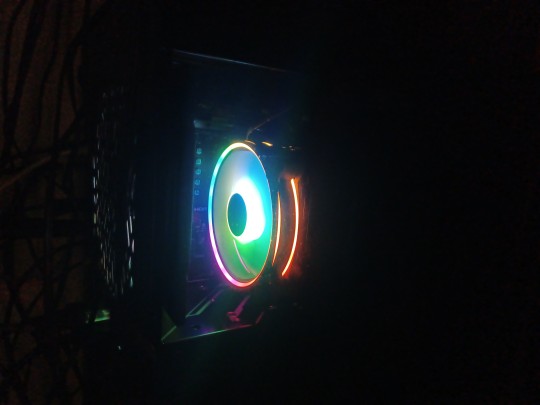
Finally, I figure I can give one nod to the RGB fans, so here you go. The Halo's fan in all its glory. I have since installed OpenRGB and managed, even on Linux, to gain access to the RGB controller and set the brightness to minimum.
I have run some benchmarks with Phoronix. I guess at least one person who might read this may be interested, especially Linux fans? So here's links to those:
GLmark2
Unigine Valley
Blender - this is an all tests, best of 3 run. Took a couple hours, which meant it was a great stress test for the CPU. I had no problems, which is impressive as the CPU sat at what I understand to be the throttle point temp of 95C. Yeah. I'm going to be looking into a better cooling solution or at least add another fan to the heat sink and see if that helps.
There's also 3 tests from when I was running the i5-6400 with the RX 6800.... if you wanna see what happens to a GPU when you severely bottleneck it, lol. If anyone actually reading this is interested you can just click "System Logs" on any of the links above, then "Show System Information" which will take you to a list of all benchmarks I've done so far.
Well, I guess that's it. Hope this was interesting and/or amusing to whoever reads this. Thanks for taking the time.
Edit*******
Oh and by the way, I launched WoW again after I finished, despite it being late and I was sore and tired. But I just had to see. I am now unable to get less than 35-40fps in Valdrakken, and I'm averaging nearly 100 anywhere else. I actually saw 130fps a few times. I'm not sure I've ever seen that high a number even when I flew as high as is allowed and looked straight up, lol.
In other words: yes, it was worth it. Especially if I can manage to baby this thing well enough it lasts me at least a few years before I "have" to think about upgrading it. Again.
1 note
·
View note
Note
Which computers can and can't run Linux? I've always heard of it but I haven't ever found the right person to ask what it is and what it allows you to do.
Wow, my first ask! Thanks! Let's try this.
To answer your question, any x86 computer can run Linux. This probably means any computer you own, specifically anything with an Intel or AMD CPU, which is pretty much all computers except some tablets, and Macs made after 2018 or so. (Yes, I know versions of Linux exist for ARM computers, you can probably find them if you need them, we are not having that conversation.) Any Windows desktop or laptop you have should be able to handle it.
As for what you can do with Linux, it basically just lets you use a computer with a different operating system than Windows or Mac. Since it is open source, it is very common for professionals to use it for custom made or embedded applications, like I have a friend who works on a company that makes robot tractors who use machine learning to recognize and pick weeds, while leaving crops intact. For whatever reason, it's easier to do what they do on Linux. So much of the world runs on it, even if you don't see it every day. (Unless you have an android phone, which is based on Linux)
The main issue with trying Linux as a beginner is it is highly fragmentary, as there are many organizations that adapt it to different needs. Different versions are called Distributions or Distros.
As for what distros to use, I have heard Ubuntu and Mint are good for beginners, and are the only ones I have really played with it. There are also specialized versions of Linux like Kali, which comes with hacking tools, if you want to learn hacking (Be sure to only use it legally if you try it!). There are also specialized versions for servers and other business applications. There are even specialized versions for gaming, like on the steam deck. Any version you are interested in should have instructions on how to install it on their site, but be sure to set up a dual boot if you don't want to destroy your install of Windows/MacOS. You can do this either by adding a second SSD, or partitioning your current one. If you just want to experiment though, you should use virtualization, more details on that later.
I have to warn you though, if you are planning to install Linux and be able to do the exact same things you are currently doing on your PC with no friction or frustration, you might be disappointment, as demonstrated by Linus Tech Tips!
I am personally not really a Linux user myself. It is great for programmers and for industrial applications, but personally I find the third party software support isn't really good enough for anything I want to do, that I can't do more easily on Windows or Mac, like creative or financial software. This is why I didn't mention Linux in my Mac post (much to the annoyance of a few snarky commenters), as I wouldn't encourage a non technical person to "Just try linux" if they are using their computer for the web and basic productivity. Anyone who wants to install Linux on an old mac has already done so and doesn't need me to tell them to do it. I don't really code so Linux isn't really for me, but I'd definitely encourage you to try it if you are curious. Each distro tends to have its own small suite of specialized software but a lot of Linux users code their own stuff.
That's my two cents as a non expert. If you want to try it there are loads of youtubers that can walk you through it. Even if you don't end up daily driving it, I'd recommend installing it to try it. If you want to experiment with it without risking partitioning your SSD, I'd recommend trying a virtual machine, where you can install it on a virtual emulated computer without risking your hardware. Here is a video that discusses how to do this, and it also shows off Kali Linux and how to install it, so if you want to know more this would be a good jumping off point. https://www.youtube.com/watch?v=wX75Z-4MEoM
0 notes
Text
Ubuntu download for vmware

#UBUNTU DOWNLOAD FOR VMWARE FOR MAC#
#UBUNTU DOWNLOAD FOR VMWARE DRIVERS#
#UBUNTU DOWNLOAD FOR VMWARE FULL#
#UBUNTU DOWNLOAD FOR VMWARE FULL#
I log in and it’s a full Ubuntu 16.0 Linux installation and system, ready to go online, run various included utilities and games, and much more:Īnd that’s it. You do remember the password you specified, yes?
#UBUNTU DOWNLOAD FOR VMWARE FOR MAC#
Looks great to me! I’m going to just let Fusion for Mac do all the work now by clicking “Finish” and sitting back to watch.Īfter a few seconds the install starts in earnest, including information windows from Ubuntu itself:Īfter a surprisingly small amount of time – it’s a fast install – you’ll be prompted to log in to your new Ubuntu Linux virtual machine. If you want to be able to access your main Mac desktop while within Ubuntu, check “Make your home folder accessible to the virtual machine” too. Turns out that VMware Fusion is smart enough to go through the entire Linux setup process without bothering you at all, so this is where you specify your basic account and password. Smart, eh? To proceed, just click “Continue” on the lower right. Notice that the program has figured out what OS we’re installing and identified it’s a 64-bit version of Ubuntu Linux. Once it’s read the file image, VMware Fusion for Mac will automatically move to the next step: Simply drag the ISO file icon onto the drop target, as shown: The new virtual machine window will pop up, ready to go. Click on it and choose “New…” to create a new VM: On the top left of the main screen there’ll be a “+” button. While it’s downloading, launch VMware Fusion. It’ll take a while for the download even on a fast connection. Easiest is to go to /download/desktop or just click on the box below (it’ll grab the latest copy if things have updated in the interim between me writing this and you downloading the OS): Grab an evaluation copy or go ahead and pay for a license at. To start, you’ll need VMware Fusion, of course. One huge benefit: You can run Ubuntu and whatever other VM you prefer simultaneous to also running MacOS X and all of your favorite Mac apps too. If you’ve just got some regular user software to test out, or just want to learn more about Linux with the easy Ubuntu world, then a VM is going to be a smarter alternative.
#UBUNTU DOWNLOAD FOR VMWARE DRIVERS#
If you’re testing software that accesses device drivers or hardware, for example, a dual boot is probably going to be better. The only comment I’ll make about dual boot versus virtual machine is that a dual boot install will be a bit cleaner and faster, if that makes a difference. Even better, you can grab a free ISO disk image of Ubuntu directly from their Web site and once you’ve grabbed the 1.5GB file, it’s rather astonishingly easy to go from download to running Ubuntu installation! Great choices all around, Ubuntu is my favorite Linux distro and VMware Fusion has been a cornerstone of my Mac experience for many years and does a great job installing and running just about every flavor of Linux (and Windows too).
0 notes
Note
Hey! I saw your post about Macs and since I'm in the process of buying a laptop and was considering buying a Mac, I was wondering if you could elaborate on why you dislike them? Thanks! :)
yes kiddo yes I can!
first thing’s first, buy whatever you want. I bought a mac four years ago, and it wasn’t the end of the world, everything turned out fine. I actually really like my mac as my personal computer, I think it’s nice, and I have no intention of getting rid of it any time soon. however. with regards to school programming, I increasingly felt like a buffoon duped by aesthetic marketing over the next four years, and all of my computer science/engineering knowledge comes from trying to make my mac act like a pc.
the quick rundown is that I’m a physics major and the majority of the computational work I do for school is in python, mathematica, matlab, origin, and labview/labwindows. for a variety of reasons and also because of peer pressure, windows tends to be the platform of choice for people in my field. macs are all well and good for mathematica, matlab, and national instruments stuff, but they have different syntax for python and there is currently no version of origin for mac that won’t kill you before it finishes loading.
this means that if I’m working on python code collaboratively, I am almost always the odd one out and have to manually adjust the syntax back and forth between the windows and mac standards for the program to run. to my knowledge, there isn’t currently a good way to automate these changes. this is TEDIOUS. it takes a lot of time and is generally sucky. plus if you write something and want to share it with your group, you have to translate it first, since people with windows machines don’t usually have to deal with the syntax changes and probably won’t know them very well (or at all).
origin is just flat-out incompatible with macs os, and when I started using origin more frequently I ended up partitioning my hard drive so I could dual boot osx and windows. I then started keeping my python ide and origin download on the windows side. this works alright, except it limits your memory a lot and it can be a hassle to switch between the different parts of your hard drive since you need to save and close everything on one side before restarting and booting the other. you could also run a virtual machine (as in, run windows inside of osx), but this takes up so much memory it almost defeats the purpose, because I had trouble fitting the programs I wanted to run in windows on my computer once I started the VM.
I ultimately ended up buying a second laptop to do my computational work, and that’s where I keep all of my software now. my mac is just for email, banking, whatever, and I am interested in trying to learn linux on it at some point. now the super experienced comp sci extraordinaire I am, I have the same pause when someone who has a mac tells me they do a lot of programming that I received so much over the last four years.
tldr: if you really want to buy a mac, buy a mac. they’re good computers and excellent for security, and ultimately, you can work around most difficulties you might encounter. however, if you think you’ll end up doing much programming in the future, do yourself a favor and just get a pc. your life will be some much easier. thank you for coming to my tedtalk.
#studyblr#studyspo#uniblr#gradblr#physicsblr#stemblr#monika's meager comp sci life lessons#just get a pc don't make my mistakes#unless!!!!!!#you don't plan on programming#which is perfectly respectable#then all of this can be disregarded#mac discourse#discourse in general#woohoo I made a post#it's literally been forever#ah well
23 notes
·
View notes
Text
Why I Don’t Use Linux

I’m an impulsive person. When I see something new and shiny, there’s generally little thought put into planning to see if it really makes sense for me. Which is why when I read about the ongoing issues Microsoft keeps having with Windows 10 updates, and its overall telemetry, I feel the need to make a change. Since the newest Mac I own is a 2009 MacBook, and I have no interest in Hackintosh-ing, the next step is Linux.
I’ve been messing around with Linux since 2010 when I discovered Ubuntu. I remember installing it on a Asus Eee PC, and was amazed at how much faster it felt than Windows XP. Not to mention, Compiz Fusion, a 3D effect window manager, was built-in to Ubuntu at the time, and it was endless fun turning on the feature that when you close a window, it sets it on fire to get it off the screen. From that moment, I was hooked. Not so much hooked in the sense that it became my daily driver, but I gained a massive amount of respect for Linux. It was fast, and free; both in the sense that it cost me nothing, and I didn’t have to worry about a license.
On the netbook, it worked well because I wasn’t doing much with it besides extremely occasional use. When I set up Ubuntu on my main desktop through Wubi, a defunct program that automatically set up dual booting Ubuntu and Windows through an easily installable and uninstallable wizard, I was conflicted. While it worked fine most of the time, but there were odd bugs that would pop up, and at the time around 2012, there simply wasn’t enough software that could replace what I had been using, like a solid video editor. Since then, I have been using Linux sporadically, with either a flavor of Ubuntu or Linux Mint Cinnamon, and after each initial use, I seem to always go back to Windows. Which is exactly what happened when I attempted to go full Ubuntu last week.
I recently bought a second SSD for my desktop because the primary SSD is only 120 GB, so I was looking for a bit more space. Around that time, the Linux bug got stuck in my mind again, and I figured since I have the second SSD in there anyway, let’s install Ubuntu on that and give the Linux life a shot. I chose Ubuntu because while I feel proficient in Windows and Mac, Linux is a whole new ballgame, and when there’s a 100% chance I will need to Google how to do or fix something, I thought it best to use the most popular distribution. I chose against Linux Mint simply because Gnome 3 looked cool.
Initial Experience
The install went smooth and I installed Chrome, Discord, Steam, and a few other programs I use on Windows with little to no issue. Except for Chrome Remote Desktop, which would cause a login loop bug where when the system boots up and I log in, it would bring me back to the login screen as if I never logged in. The same thing happened when I installed a VNC remote desktop app, but TeamViewer didn’t cause any issues, so I stuck with that. Overall, the initial experience wasn’t so bad, with the only striking issue being that overall animations were not smooth. Expect to see many dropped frames when opening and closing windows (at least on my Ryzen 7 with a Radeon RX 550).
There were a few things I missed from Windows. Office was a big one. While it’s true that Google Docs, Office Online, and LibreOffice are pretty close, nothing beats full Office (in my eyes). I also missed some of the overall ease of Windows. While nothing is quicker than opening the terminal and typing a quick command to install a program, that program better be in the software repository. Otherwise, it’s no quicker when I have to go to a website to download TeamViewer or Chrome. I especially ran into this issue with a video editor I like to use called DaVinci Resolve. The install requires a few changes for the Debian-based Ubuntu, as Resolve is built to run on RedHat or CentOS, two very robust distributions. I can understand this, but going back to the fact that I am very impulsive, this goes hand-in-hand with me being impatient, so if I can’t get something to immediately work, I tend to get just drop it.
Issues I Had
This brings me to my main issue with using Ubuntu as a Windows replacement: tinkering. Don’t get me wrong, I love going into the terminal to fix things. There’s a great satisfaction you get when you feel like David Lightman from WarGames, but I found myself needing to tinker a lot more than I really cared for. One issue that occurred involved my third monitor. When I turn it on while the other monitors are on, Ubuntu then abruptly treats it as if that monitor was unplugged and plugged back in, which causes the windows to adjust. I even ran into an issue where the third monitor never connected properly, and would endlessly readjust the windows as if someone was unplugging and plugging it in, until I turned the monitor off. This may have been what caused the system to lock up numerous times after it sitting idle overnight. I like to keep my computer on all the time, and it seemed like every two or three days, I’d go to use it, turn on the monitors, and the monitors would show no image, and the number lock light wouldn’t toggle.
I had at least one issue on the other two computers I installed Linux on. Every second or third wake up on my ThinkPad X240 running Ubuntu would result in the trackpad and trackpoint not working, requiring a reboot. My cheap Lenovo IdeaPad 11 inch running Xubuntu would tear graphics diagonally, either with moving a window or an animation on screen. Seemingly nothing I did would fix the issue with the ThinkPad’s trackpad, and I just gave up on the IdeaPad.
Are there deeper troubleshooting steps I could’ve taken to fix these issues? Sure. Should I have investigated getting drivers set up prior to use? Yes. However, when I contrast my experience with Ubuntu to installing and setting up Windows 10, there’s far less work with the Microsoft route. I either had to just open Windows Update and let Windows do the rest, or I downloaded the manufacturer’s nifty driver executable and let it do all the work. Now, is it unfair of me to judge Ubuntu’s inability to deal with my specific set of hardware? Of course: Ubuntu and other flavors of Linux have to deal with billions of combinations of hardware. Not to mention overall support has improved greatly, as I remember a time where getting the WiFi to work wasn’t a given. Is this my problem? No. Especially when I simply do not have the programming knowledge to fix these things.
Conclusion
Don’t get me wrong, Linux is great. I really don’t need to say this when Linux is the clear leader in basically every other market outside of desktop. This includes mobile, set-top boxes, IoT devices, and servers. Even Microsoft’s Azure cloud runs on Linux. Linux is robust as hell. But for desktop, the GUI side of Linux seems to requires some love, and that’s not something I’m interested in doing. I could just get a System76 computer, or perhaps build a computer with parts known for being Linux friendly, but I’m not interested in spending money to make Linux run better. No operating system is perfect, and Windows has its fair share of issues, but since I’ve reinstalled Windows, I haven’t had to fix anything.
This doesn’t mean I’m done with Linux. Although my daily drivers continue to be Windows on desktop and Android on mobile, Ubuntu still lives in a virtual machine on my desktop, and I have enabled the Windows Subsystem for Linux, which is very exciting. Admittedly I don’t really have a use for it, but it’s still a massive step forward considering Windows’ past. I’ll continue to keep up with Linux. Perhaps I should’ve installed Pop_OS with its robust graphics drivers, or CentOS for its renowned reliability. One thing is for sure, I’ll continue to keep my eye on the open source side of computing.
0 notes
Text
Linux Life Episode 57
Hello folks and welcome to my ongoing Linux journey. Or if you are new welcome to the madhouse as an ex Windows guy who moved to Linux I catalogue my experiences and all the bumps in the road that go with it.
Well it’s been over a eighteen months since I started this blog and now I would say I am now a Linux convert. Sure it has not been without its moments and at times I have struggled to keep the project going as I hit brick walls.
However I have definitely become a lot more patient of the quirks of Linux. Things which would have previously had me running to the hills I have managed to get around.
If I had the Xeon at the beginning of this journey I don’t think I would have stuck with it. Having to find the drivers for the network card and getting the AMD Vulkan stuff working would have broken me in the early part of this project.
However as I started on much more workable machines such as my Samsung i7 laptop and the i7 3770K desktop and had managed to find a set of distributions I was happy with. So when the Xeon came along I knew what I could do to get it working and where I could find answers if really stuck. I am much more willing to go diving into config files or even heaven forbid use the terminal if necessary.
That really proves how far I have came as when I first came across opening the terminal felt as if I had to do something that was so backwards but over time I learned to appreciate it.
While still not a total terminal convert who uses things like the i3 tiling manager. I have definitely learned to appreciate it for sorting various problems and I no longer fear it like I used to.
I have learned how to get around driver issues and now I can normally get my distro up and running again if my video card has issues which i would never have been able to get my brain around.
I however admit if I didn’t use Arch and had these problems with something Debian based and had to search all over the internet to find repos I would not have been as successful.
One thing I will say about the AUR most of the things you want are easily available. You may notice I say most as yes I have had to build some things from source packages or certain AUR packages just would not work. However 95% of the time the thing I require is available and installation is a few clicks away.
Also because the Arch system has to build several things from source a lot of the libraries to build source code packages when I download them such as the Previous emulator. Normally I just have to unarchive, move to the archive and make. Most of the required file headers or dependencies are available.
Even if they are not normally its not difficult to find them somewhere in the repos or the AUR.
Now I admit many would say I am not a complete Linux convert as I still have things like Adobe Photoshop installed on my Linux machine. Yes that is quite correct I do use Photoshop CS6 with Wine but this is more of a convenience thing as I found GIMP didn’t quite do things the way I wanted it to and it was just easier for me overall to use Photoshop as that was my background.
I also occasionally play Windows games using Lutris or Proton. This is only because there is no Linux native version available. So is that cheating I don’t know.
I also used Wine to run XM6g which was a Sharp X68000 emulator but that’s only because I could not the RetroArch libretro core version to work. Trust me I tried to get to work in RetroArch but sadly it just would not play ball no matter what I did.
So yes I do use Wine for a few things but to be honest the amount of the programs I have is very small.
If I am honest I sometimes try things in Wine just to see if they will run but nine times out of ten I don’t bother unless I really need something specific.
Now is the question ... Could I go back to Windows on a daily basis. The simple answer is I don’t think I could. Sure I could use it if I had to say for a company as I don’t have a choice what they use. However as a personal daily driver I now find Windows incredibly slow and cumbersome.
Yes on the Xeon I do have a Windows 10 installation dual boot setup with EndeavourOS but to be honest I have only went into it when I could not get the Wi-Fi working in Linux. However once I got that working I think I have opened Windows once since to write up a flash drive using Transmac only because I could not get it to write what I wanted to USB when I ran it through Wine.
So is my journey at an end... Well no actually as I am always finding things in the Linux world that I am interested in. So don’t panic dear reader I struggled to begin with regarding things I could write about but lately I seem to find something of interest.
Be it emulation, be it something like a new video editor, a new tool or just some new program I have never heard of. So it normally doesn’t take long to find a topic to write about.
However I am always open to suggestion if you would like me to examine any particular topic. Admittedly if it has something to do with programming I may decline. This is because I don’t really program any more.
I admit if I could get a program like Wine that could run OSX programs I would definitely try it. I believe there was a program called Darling which was trying to do that but I have not checked it in months. It as far as I know can run terminal type Mac apps due to Darwin (MAC OS Kernel) being open source but graphical ones are much harder as of course that is heading into grey areas such as using the Graphite/Metal (?) system which as far as I know is closed source.
I truly would run Final Cut Pro X on my Linux box through it if I could. Now yes you can get QEMU to run Mac OS X stuff but it would be much simpler if you could use a Wine like program to do so.
Anyway that’s enough waffle for this episode so until next time...Take care.
#linux life#waffle#qemu#intel xeon w3550#intel i7 3770k#darwin#macos#windows 10#darling#emulation#lutris
0 notes
Text
Week 4 Something Awesome (Setting up programs/tools and the environment) - Dual boot Windows and Kali Linux
Attempt NO.1
I followed this guide to try to dual boot Windows and Kali Linux:
https://www.youtube.com/watch?time_continue=24&v=gn_MzndTESo
What was required:
Windows laptop
4GB USB (Can be more but not less)
Kali Linux ISO ( Kali Linux iso file: https://www.kali.org/downloads/ )
Rufus ( Rufus Tool: https://rufus.ie/en_IE.html )
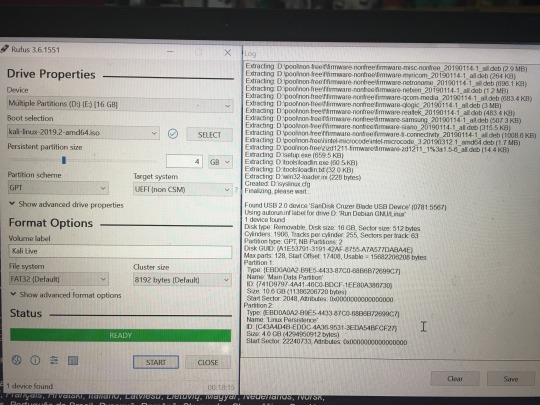
I installed the Kali Linux ISO image (took an hour, maybe because I have a slow network) on my laptop running Windows and also installed Rufus. Rufus is a program that allows the creation of a bootable USB and writes an image in dd mode if it is an option. Apparently, from this website, the commentator who is one of the contributors said that the option for an ISO image to be in written in dd mode it needs to be ISOhybrid.
https://github.com/pbatard/rufus/issues/1148
When I pressed start on Rufus after selecting kali-linux-2019.2-amd64 for boot selection and selecting 4GB partition,

Rufus did not prompt for DD image mode or ISO image mode like this:

This means my Kali image is not ISOhybrid. Rufus went on to format my USB drive and this took about 50mins. After it has completed formatting I forced shut down my laptop with my USB still inserted. I turned it on and interrupted normal startup by pressing enter as written on the loading screen. I got into Startup Interrupt Menu and pressed f12 to get into Boot Menu. Once I was in I selected USB HDD: SanDisk Cruzer Blade and pressed enter. It reloaded the screen page I was on; nothing has changed. I was still in Boot Menu. I selected USB HDD: SanDisk Cruzer Blade again and pressed enter. Same thing. I tried again a few times and it would not boot from USB HDD: SanDisk Cruzer Blade
I did further research and found out about UEFI/EFI configuration, secure boot option and boot mode. https://neosmart.net/wiki/boot-usb-drive/
Since I left the partition scheme as MBR and target system as BIOS or UEFI I can leave my laptop’s boot mode UEFI as it is. I went into Thinkpad setup and went to the security tab and disabled secure boot. Then went into Boot Menu and selected USB HDD: SanDisk Cruzer Blade and pressed enter. This time it booted from it. I ran Kali installer (not in live mode). I selected start installer.
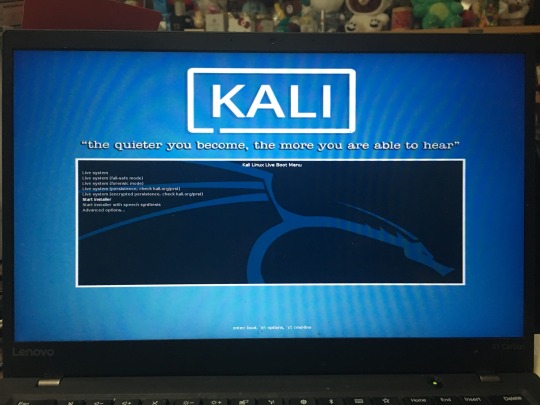
Then I follow the steps of set up by selecting the correct choices.


On the fifth step, it says there is a problem reading data from the CD-ROM.
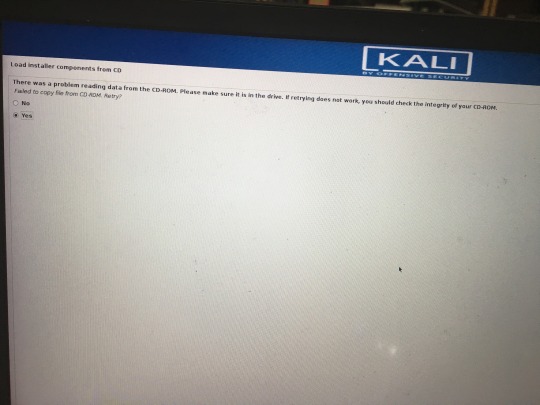
I selected yes to retry multiple times but the problem is still there. After choosing no, it takes me to the Debian installer main menu.
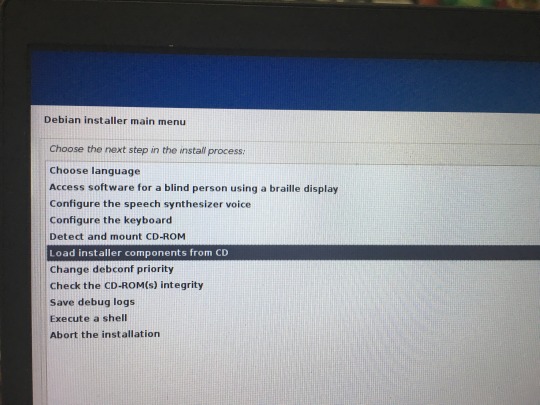
I saw that there is an option for CD-ROM(s) integrity check and decided to choose and see what the result is.

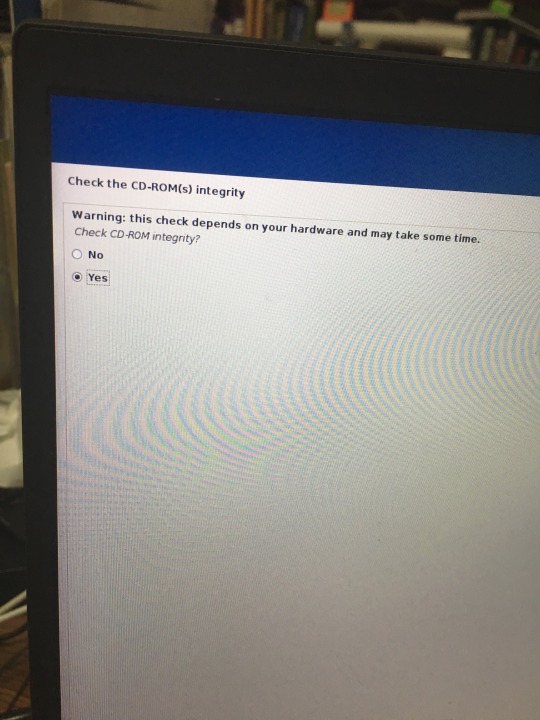
The result was negative, there was no mounted CD-ROM. I could not understand the problem. Why do I need a CD-ROM?? What is the problem? I used software (Rufus) to create a bootable USB and it is of Kali image and why is it not working as it should as shown in the video. My conclusion was it’s because it was not written in DD Image (disk image) mode. I did have another attempt (ATTEMPT NO.2) before I reached that conclusion. I thought it had something to do with the partition scheme (wild guess) and I was wrong. My attempt NO.2 with Rufus and installation:
It was also unsuccessful, unfortunately...
0 notes
Text
Apple products and software are superb especially Apple computers which are used in most businesses and celebrities and top people. Apple’s computer are so popular and so viral and everyone wants to have one. Out of every two Youtubers at least one of them use Mac and that’s the same with other popular people. Not only Apple computers are so popular but also Apple’s software and particularly Apple’s Mac operating system. Most users who would like to have a Mac are most likely due to its operating system which is macOS. Now if you like obtaining macOS, the only way to catch Apple’s operating system is to typically pick up a Mac from Apple Store. That’s the same for everyone doesn’t matters whether you’re a Windows or Linux user. Let’s see how to Install macOS Mojave On PC – Hackintosh.
While picking a Mac is only the typical way but also it’s more comfortable and supported way to do it. But as everyone knows, Apple’s product aren’t cheap and they aren’t expensive either, means they are extremely expensive. Every time Apple launches a new product, they rise up the price to all-time high that most heavy Apple users and non-Apple users also can’t afford. This is the only solid problem every single Apple and non Apple user has.
Though Apple knows about this, despite that, they continue to raise up the prices and they ignore those things. With that though, Apple doesn’t care and it’s getting more and more difficult to buy a Mac and even though those who have bought now for a while, Apple is cutting support for its older Macs. If you’ve an older Mac which is now in the unsupported list of macOS, here’s how to install macOS Catalina on unsupported Mac.
How to Install macOS Catalina on Unsupported Mac
With these much problems that are for Mac users, Windows users might not even think of getting Mac or MacOS somehow. But that’s not true. With all those problems, there’s still some workaround in the underground to make it work. That is install macOS Mojave on Windows. We’ll head to how to Install macOS Mojave On PC – Hackintosh.
How to Install macOS Mojave on VMware
How to Install macOS Mojave on VirtualBox
That’s right. You can install macOS Mojave on PC or on Windows PC and there are various ways to do it. Back then, I’ve described three solid and working ways to install macOS Mojave and other versions on Windows PC. Those are the only possible ways to adapt it and they are still working but there are some things to consider and accept before. They are accepting the risk if you’re installing it via Hackintosh as Dual Boot macOS & Windows.
macOS Mojave is an amazing constant OS. It’s super fast and super useful that you could do a 10 min task in half of that time, or maybe even less than that. Including it, Mojave is definitely not an ignorable update and everyone talks about.
Not to rush, I’ll briefly break down the most highlighted features of macOS Mojave and describe what’s new in it. The top most demanded feature that almost every Mac user asked for in macOS High Sierra but Apple delayed it until macOS Mojave. In this update, Apple poped out the demand features and some ease for use that were as Dark Mode. Just move to how to Install macOS Mojave On PC – Hackintosh.
Related: How to Dual Boot macOS Catalina with Windows 10
It’s been really an enormous update because Apple has made most of the features of users and particularly Dark Mode. There’s nothing more pleasing at night when your screen is dark not due to low brightness but due to its dark background. Particularly, developers that spends most of their time building apps and coding day and night. So when its dark at night even though lights are on, it still distracting and inconvenient when the screen is spreading bright light even though you’ve turn the brightness level to the lowest. That’s where Dark Mode comes in. It turns automatically from light into dark when it’s night. Means, it’s dynamic and changes according to the time.
There are more features except this, I’ll name some. They are Dynamic Desktop, Stacks, Screenshot Markup, Screenshot Utility, Improved App Store and more. However, here’s how to Install macOS Mojave On PC – Hackintosh.
Install macOS Catalina on VMware on Windows PC
Install macOS Catalina on VirtualBox on Windows PC
How to Install macOS Mojave On PC – Hackintosh
How to Install macOS Mojave on PC – Hackintosh
Installing a Mac operating system on Apple’s Mac computer is certainly easy because they are supported by each other but installing Mac operating system on another computer is definitely pretty difficult. Because they are different and are made for different softwares and operating system so obviously we need to do more than typically a Mac user would do to install macOS on Mac. That’s how it is like if you’ve installed macOS Mojave on VMware or VirtualBox, you know how easy or difficult it is to accomplish. But not to worry, it’s isn’t extremely difficult and it’s not even very difficult as well.
Before stepping for the installation, check the compatibility of your system’s CPU, Memory, GPU and Motherboard. What I mean by compatibility is that make sure it has enough resources to install and run Mojave without interruption. To be noted, there’s no particular compatibility list or information which should define whether your system is compatible or not. The primary and basic supported hardware is a minimum Dual Core CPU 2nd Gen, with Nvidia Graphics Card. When you’ve these, you can start with how to Install macOS Mojave on PC – Hackintosh.
How to Install macOS High Sierra on VMware on Windows PC
How to Install macOS High Sierra on VirtualBox on Windows PC
Step One – Create Bootable USB Installer for macOS Mojave on Windows
Going ahead, we need to create bootable USB installer for macOS Mojave. Creating a bootable USB for macOS Mojave can be done in various ways. One of those methods is to do via Unibeast. You can also do it via Clover Bootloader but it’s a little bit complicated. Instead, Unibeast way is the very simple and straightforward way. I’ve shown it step by step in the tutorial below. Here’s how to do it.
How to Create macOS Mojave Bootable USB Installer
The bootable USB process is so important that if anything is missed or done wrong, it may lead to unsuccessful installation or even corrupt your system so take care. Now step to the next procedure of how to Install macOS Mojave On PC – Hackintosh.
Step Two – Setting up BIOS Settings
When the macOS Mojave bootable USB flash drive created and also the required EFI files have been copied to USB. We are ready to install macOS Mojave but before it, there’s a little thing more to do. That is setting up the BIOS settings for the particular installation.
Restart your PC. Press delete key or another key which is the BIOS key. Head to the BIOS and from the menu, navigate to the Save and Exit tab. Now from the option select Load Optimized Defaults then click Yes.
Yes
Again from Save and Exit page click on Save & Exit Setup and click Yes option.
Yes
The system will restart so after restart head to the BIOS tab from the menu.
In this step, step down to the Fast Boot and Disable it. Then set the mouse speed to 2x.
Next, change the Windows 8/10 Features to other OS.
At last, make sure that the Storage Boot Option Control Option control is set to Legacy and the Other PCI devices to UEFI. It should look like my one.
Go to Peripherals set the Initial Display Output to PCI 1 slot then click on Intel Platform Trust Technology, disable this. Now select the USB Configuration and from there, set XHCI Hand-off to Enabled.
#gallery-0-21 { margin: auto; } #gallery-0-21 .gallery-item { float: left; margin-top: 10px; text-align: center; width: 50%; } #gallery-0-21 img { border: 2px solid #cfcfcf; } #gallery-0-21 .gallery-caption { margin-left: 0; } /* see gallery_shortcode() in wp-includes/media.php */
In Peripherals, click in the Sata And RST Configuration then set the SATA mode selection to AHCl.
#gallery-0-22 { margin: auto; } #gallery-0-22 .gallery-item { float: left; margin-top: 10px; text-align: center; width: 50%; } #gallery-0-22 img { border: 2px solid #cfcfcf; } #gallery-0-22 .gallery-caption { margin-left: 0; } /* see gallery_shortcode() in wp-includes/media.php */
Go to the Chipset tab set VT-d to Disabled then move to Save and Edit tab, click on Save and Exit Setup then click Yes.
#gallery-0-23 { margin: auto; } #gallery-0-23 .gallery-item { float: left; margin-top: 10px; text-align: center; width: 50%; } #gallery-0-23 img { border: 2px solid #cfcfcf; } #gallery-0-23 .gallery-caption { margin-left: 0; } /* see gallery_shortcode() in wp-includes/media.php */
Now your system will reboot. On the first screen, press F12 key to enter to boot menu. On the boot menu select the Bootable USB flash drive. Now select the third option which is UEFI: HPv232w PMAP, Partition 1.
Select your USB
Step Three – Configure Boot Options
The welcome screen is on the window, so go to the options section.
Select Option
In the options window, in front of Boot Args type (-v nv_disable=1). This will disable the Nvidia graphics card, don’t worry, we will enable the graphics later on. When it’s done, Return to the previous window.
type (-v nv_disable=1)
Now select boot macOS installed from installed MacOS Mojave and press Enter to boot.
Select Boot
Step Four – Erase The Appropriate Disk
Now select your language and Continue. Then select Disk Utility and click on Continue.
Select Disk Utility
In this window, select show all devices. Then select your hard drive or SSD on which you want to install macOS Mojave on then press the Erase button. Name the drive and click Erase.
#gallery-0-24 { margin: auto; } #gallery-0-24 .gallery-item { float: left; margin-top: 10px; text-align: center; width: 50%; } #gallery-0-24 img { border: 2px solid #cfcfcf; } #gallery-0-24 .gallery-caption { margin-left: 0; } /* see gallery_shortcode() in wp-includes/media.php */
When it’s finished, click on Done and close Disk Utility.
Done
Step Five – How to Install macOS Mojave On PC – Hackintosh
The Disk Utility screen will appear. So select Install Mac OS and click on Continue.
Install macOS
Click on continue
Continue
Click on Agree click on Agree from the top.
Then Select Hackintosh drive and click on Install.
Hackintosh HD
Once it’s installed, it will reboot. On the boot, press F12 and select the USB flash drive which is UEFI: Hpv232w PMAP, Partition 1 and press Enter to boot.
Select your USB
When this welcome window appeared, head to the options tab and in front of Boot Args type (-v nv_disable=1). When done, select boot macOS installed from installed MacOS Mojave and press Enter to boot.
#gallery-0-25 { margin: auto; } #gallery-0-25 .gallery-item { float: left; margin-top: 10px; text-align: center; width: 50%; } #gallery-0-25 img { border: 2px solid #cfcfcf; } #gallery-0-25 .gallery-caption { margin-left: 0; } /* see gallery_shortcode() in wp-includes/media.php */
That done, select the second Apple icon which is Boot Install From Macintosh HD. We choose this because we’ve installed macOS.
The macOS is now installing on your PC so wait. It takes 10-15 minutes.
Installing
Now your system will restart. Now, Press F12 to enter in your boot menu. Once again Select a USB flash drive. Once the welcome screen is there, go to Options tab and press Enter. Then Type -v no need to disable the Nvidia drivers and press Enter key, and then press Skip key.
This time select the Boot macOS from Macintosh HD and press Enter.
Hackintosh HD
The welcome screen shows the macOS has been successfully installed so select your country and click on Continue.
Continue
Select your keyboard layout and click on continue.
Then Select my computer does not connect to the internet and Continue.
Continue
Now click Continue to Data and Privacy.
On the next page, select Don’t transfer any information now and then click Continue.
Click Agree and Continue.
It’s time to create a computer account so type in your name then type the account name and type your password then click Continue.
Here is the Express setting Just click continue. Then select the theme light or dark then Continue.
Continue
The setting up your account and entire Mac will take a moment to start so simply wait.
Congrats running macOS Mojave on your PC. Just chill around and there’s nothing more remained.
macOS Mojave
We’ve ended up with Mojave perfectly running without any problem. Your boy is waiting and you can use ask it to do everything you want. For the post-installation, you can install the Multibeast. Once installed, you can use Wi-Fi, update it, and do much more. You can also install macOS Catalina this way or any other Mac operating system.
We’re pleased to say that that’s all. After a huge series of steps, we’re now completely free and ready to use. That was how to Install macOS Mojave On PC – Hackintosh. Hope it worked for you and you have no problem but in terms of using it, you might be a little confused but with the time, it will be fine.
How to Install macOS Mojave On PC - Hackintosh #Geekrar #Howto #Install #macOS #Mojave #PC Apple products and software are superb especially Apple computers which are used in most businesses and celebrities and top people.
#Hackintosh#How to Install#How to Install macOS Mojave On PC - Hackintosh#Install macOS Mojave#Install macOS Mojave On PC#Install macOS Mojave On PC - Hackintosh
0 notes
Last Seen Blogs