#decoupage glass jars
Text
Variety of Spices in Glass Dispensers
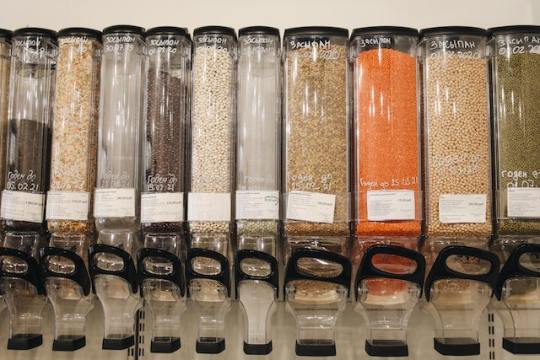
When your values are clear to you, making decisions becomes easier.
See more...
#clear glass jars#glass jars#how to clean glass jars#glass#clear glass cookie jars#glass jar#best easiest ways to clean glass jars#how to paint a glass jar#recycled glass jars#fillers for glass jars#sealing clear glass#tinted glass jars#glass jars crafts#paint glass jar#how to dye glass jars#how to tint glass jars#store food glass jars#decoupage glass jars#sea glass#15 awesome fillers for glass jars#how to clean glass#painting a glass jar
2 notes
·
View notes
Text
Ways To Be A Garbage Witch
Look everyone, in These Trying Times we can't always afford things so we gotta make do with what we got. So here's some hot tips to help you become a garbage witch:
Save and use apple seeds, orange seeds, peach pits, cherry pits, etc. to use in your spells.
Make a spirit board/pendulum board out of an empty cardboard box.
Make drawstring pouches out of old clothes.
Use bag strings for binding magic or use them in small drawstring bags.
Shoelaces and drawstrings from old pajamas or sweatpants are fine for knot magic or turning into drawstrings for pouches.
Save glass jars for spell jars.
Study carrion animals, animals that eat garbage, fungus, and the process of decomposition in general. Learn about the importance of biodiversity, and the hazards of oversterilization.
But also study proper sanitation methods, and be aware of biohazards. Don't go living in a house fulla mold or fish through people's garbage for... uhhh... ummm... taglocks. Don't store chicken bones so they'll rot.
If you have a compost bin, write anything you want to "decompose" out of your life on a banana peel. Put the banana peel in the bin.
Learn how to repair broken stuff. (But also learn what you really shouldn't repair for yourself - EG, microwaves - lest you meet with a horrible fate.)
Make charms/talismans by cutting out pictures of things that correspond with your intent and decoupaging them onto wood, chipboard, or layered cardboard.
Make paper mache diety art/statues out of newspaper.
Learn more about crafting with scraps, packaging materials, old magazines, etc. (There's many videos on YouTube!)
#witchcraft#garbage witchcraft#garbage witch#witchblr#witch tips#spellcraft#spellwork#spellcrafting#baby witch tips#beginner witch tips#budget witchcraft#budget witchery
4K notes
·
View notes
Text
what i Did get at goodwill,,,petty,,,consolation purchases,,,,there were also like a dozen skirts that were perfectly my style but a few sizes too small,,,agonies upon agonies, i got a little analog alarm clock which’ll be good for waking me up i really need one i oversleep so often something about the phone makes me real easy to be like well good night part two no matter what sound i have it on, so i think the tactile approach might help plus do to endless amounts of moves i no longer had any clocks and now i do again, it matches me stuff, its gold with a pink face, fetch, i got a rather large glass jar with a bunny on it i think i might hold my gel pens in? some crafting supply will go in it, maybe beads? i dont have enough beads to justify like a super organized sorting style, i say beads cause i scored a pack of pony beads at the goodwill hehe, and a large wallet thats pink and black, it has cats on it, thatll be nice for a neutral wallet when i need to have more in it, i just have a little claires one and then my stuff floats loose in whatever purse i have and a tea party coloring book that was already colored in a bit, i plan to decoupage my tea boxes so thisll be nice, finally a hello kitty mug, it somewhat soothe the other stuff i didnt get,, if i passed the mug up maybe i could have gotten to the other stuff in time,,,,,two paths,,,,a mug is vastly more useful tho
5 notes
·
View notes
Text
DIY or Die-Trying? Fun and Easy Design Projects You Can Tackle This Weekend
Ready to ditch the couch this weekend and inject some fresh energy into your home? Skip the shopping sprees and get your hands dirty with some fun and easy DIY design projects! Don't worry, no demolition hammers or engineering degrees required. Just a sprinkle of creativity, a dash of resourcefulness, and a healthy dose of "I can do this!" attitude.
Project #1: Master of Makeovers:
Give old furniture a new lease on life: Transform that dusty dresser with a coat of bold paint, swap out tired drawer pulls for funky knobs, or decoupage it with colorful patterned paper.
Upcycle forgotten treasures: Turn vintage suitcases into chic side tables, old ladders into plant stands, or mason jars into hanging lamps. The possibilities are endless!
Repurpose everyday items: Create a magazine rack from old crates, a coat rack from driftwood, or a whimsical headboard from recycled pallets. Embrace the "waste not, want not" spirit!
Project #2: Tex-Tastic Transformation:
Craft custom throw pillows: Grab some colorful fabric scraps, a sewing machine (or needle and thread, for the brave!), and whip up unique pillowcases to add pops of personality to your sofa or bed.
Go wild with wall hangings: Macrame a boho-chic dreamcatcher, weave a tapestry from yarn scraps, or create a gallery wall of framed fabric swatches. Let your inner artist shine!
Refresh lampshades: Ditch the boring store-bought ones! Cover them with patterned fabric, paint them with geometric designs, or even embellish them with buttons or sequins. Get creative!
Project #3: Green Thumb Magic:
Build your own herb garden: Repurpose an old ladder, a vintage cabinet, or even a wooden pallet into a vertical herb haven. Fresh herbs, happy home!
Create miniature terrariums: Find some cute glass containers, gather moss, soil, and tiny succulents, and build your own little green worlds. Perfect for adding a touch of nature to your desk or bookshelf.
Get crafty with plants: Paint terracotta pots with fun designs, macrame plant hangers, or make adorable plant covers from recycled materials. Your greenery will thank you!
Bonus Tip: Don't be afraid to get messy! DIY projects are all about letting go and having fun. Embrace the imperfections, learn from your mistakes, and most importantly, celebrate your own creativity.
So, this weekend, put down the phone, grab your toolbox (or just scissors and glue!), and get crafting! You might surprise yourself with what you can achieve. Remember, DIY is not about perfection, it's about making your space your own. And trust me, there's nothing more satisfying than seeing your own little creation come to life and add a touch of personal magic to your home.
Now go forth, DIY warriors! Let your creativity flow and transform your space into a masterpiece of your own making. And hey, if all else fails, there's always pizza delivery and Netflix as a backup plan.
0 notes
Link
Check out this listing I just added to my Poshmark closet: SOLD - MC Courtly Check cookie jar glass canister.
0 notes
Text
Peanut Butter Jar Hacks: Unleash Its Potential!

A peanut butter jar typically contains a spread made from ground peanuts. It is a staple in many household pantries for its versatile use in recipes and snacks.
Peanut butter is a popular and nutritious food item enjoyed by many around the world. It's packed with protein and healthy fats, making it an excellent choice for athletes and anyone looking for a satisfying snack or meal component. The creamy or chunky texture of peanut butter appeals to different preferences, and it's often used in sandwiches, smoothies, baking, or simply scooped straight from the jar.
The jar itself is usually made of glass or plastic with a screw-top lid to keep the contents fresh. With its long shelf life and beloved taste, a jar of peanut butter is a convenient option for quick meals or emerging chefs experimenting with new flavors in the kitchen.
Unveiling Peanut Butter Jar Hacks
Empty peanut butter jars need not meet their end in the recycling bin or trash can. Transform them into sustainable storage solutions for a variety of items. Whether it's organizing nuts, bolts, and screws in the garage or storing homemade jams and dressings in the kitchen, these jars offer a perfect reusable option to keep items neatly contained.
For those with a flair for creativity, crafting with empty peanut butter jars unlocks a treasure trove of possibilities. Use them to create personalized snow globes, lanterns for fairy lights, or even as pots for small plants. The clear glass offers a perfect canvas for paint or decoupage, allowing for a customized touch to any crafting project.
Lastly, don't overlook the potential in repurposing jars into innovative kitchen tools. With a few modifications, a jar can easily become a makeshift shaker for powdered spices or a holder for a homemade salad dressing mixer. Such in-house tools and gadgets provide practical solutions that are both eco-friendly and budget-conscious.
Sustainable Storage Solutions
Organizing small items with peanut butter jar lids can be a game-changer for anyone keen on maintaining a tidy space. Use the lids to contain items such as screws, nails, or paperclips, turning a mundane item into an invaluable organizational tool.
For storing leftovers, repurposing glass peanut butter jars offers a secure and sustainable way to keep food fresh. The air-tight seal of the glass jars ensures that leftovers stay free from contaminants and prevents leaks, proving to be superior over plastic alternatives.
Item
Jar Label
Use Case
Grains
Rice, Quinoa
Bulk Shopping
Nuts/Seeds
Almonds, Chia Seeds
Snack Storage
Spices
Cumin, Paprika
Seasoning Accessibility
Pre-labeled jars become an efficient companion for bulk shopping, allowing for easy identification and refill. By bringing these jars to the store, shoppers can reduce packaging waste and streamline their pantry organization.
Crafting With Peanut Butter Jars
Transform your empty peanut butter jars into beautiful homemade candle holders. Simply clean out any residue, and with a touch of creativity, customize the exterior. One could use paints or decoupage techniques to create unique patterns. Once decorated, place a tea light or votive candle inside the jar. The glass will emit a warm, inviting glow, perfect for a cozy night in.
For plant lovers, an empty peanut butter jar presents an excellent opportunity to craft a mini DIY terrarium. Fill the bottom with rocks or pebbles for drainage, followed by a layer of activated charcoal to keep water fresh, and finally, add a mix of potting soil and tiny plants. Remember to water sparingly and place your terrarium in a spot with plenty of indirect sunlight.
Revamp your pantry organization by repurposing peanut butter jars into customizable pantry containers. These jars are perfect for storing a variety of dry goods like spices, baking ingredients, or snacks. With a bit of chalkboard paint or labels, you can easily identify each jar's contents. Their transparent nature also allows you to keep track of quantities at a glance, making meal prep and grocery shopping more efficient.
Credit: www.reddit.com
Kitchen Innovations And Hacks
Kitchen innovations often come from everyday items used in creative ways. Take the humble peanut butter jar, for instance, which can be repurposed to shake up homemade salad dressings with ease. Simply combine your favorite oil, vinegar, and seasonings, secure the lid, and shake vigorously for a perfectly emulsified dressing every time.
Moreover, those jars serve as excellent containers for storing homemade nut milks and spreads. Their airtight seals keep contents fresh, while clear glass allows for easy identification of the contents inside.
Ever find yourself needing a rolling pin but none is in sight? A peanut butter jar can come to the rescue. By filling the jar with cold water or leaving it empty, you can build a makeshift rolling pin that flattens dough for your culinary creations. Simply rolling it over pie crusts or cookie dough does the job nicely.
https://www.youtube.com/watch?v=v7wwjuUyt5U
Conclusion
Wrapping up our jar journey, peanut butter remains a staple. Its versatility, health benefits, and irresistible taste keep it on our shelves. Remember, choosing the right jar can enhance your experience. Whether you're a creamy devotee or a chunky enthusiast, let's spread the joy one scoop at a time.
Keep dipping into the delicious world of peanut butter jars!
Read the full article
0 notes
Text
Home Decoration Techniques Using Candle Stick Holders
New Post has been published on https://votivecandleholder.com/home-decoration-techniques-using-candle-stick-holders
Home Decoration Techniques Using Candle Stick Holders
Decorating your home with candle stick holders brings a touch of magic and ambiance to any space. These versatile and charming decorative elements have the power to transform your environment into a haven of warmth and tranquility. Candle holders come in various shapes, sizes, and materials, allowing you to find the perfect match for your decor style.
Moreover, taper candle holders can be used to accentuate specific features or focal points in your home, such as a dining table centerpiece or a mantelpiece display.
Table of Contents
1 Candle Stick Holder Decorations
2 Relaxing Ambiance with Natural Candle Stick Holders
2.1 Vintage candle stick holders
3 Timeless Charm of Classic Candle Holders
3.1 Gold candle stick holders
4 Crafting Personalized Charm with DIY Candle Holders
4.1 Glass candle stick holders
5 Cozy Ambiance with Candle Holders in Unique Areas
5.1 Pillar candlestick holders
5.2 Candlestick Holders Suppliers
Candle Stick Holder Decorations
Their versatility allows you to play with different arrangements, mix and match styles, and experiment with candle sizes and colors to achieve the desired atmosphere. From mixing and matching styles to incorporating them into unexpected spaces, this blog will help you discover how candle holders can truly transform your home.
Relaxing Ambiance with Natural Candle Stick Holders
When it comes to adding a touch of nature’s beauty to your home decor, nothing beats the charm of natural candleholders. The beauty of wood, stone, and shells has a calming and soothing feel that can instantly elevate any space.
Vintage candle stick holders
Incorporating natural candle stick holders can add an extra touch of charm to your home. Vintage brass candlestick holders also have a timeless and rustic feel that never goes out of style. Displaying natural candle holders can be as simple as using driftwood branches, river stones, or seashells to create a beautiful centerpiece adding a cozy touch to any room. The organic textures of these stick candle holders can create a relaxed and inviting vibe, making any space feel like a cozy retreat.
Timeless Charm of Classic Candle Holders
There’s something undeniably timeless about classic taper candle holders that exude elegance and sophistication. Whether it’s the rich gleam of brass, the delicate sparkle of crystal, or the intricate details of wrought iron designs, these traditional candle holders can elevate any space.
Gold candle stick holders
To create a cohesive and elegant atmosphere, consider pairing candle holders with matching accessories. If you have gold candle stick holders, complement them with golden accents like vases or picture frames. If you prefer a sleek and modern look, opt for black candle stick holders and pair them with minimalist decor. And if you want to add a touch of glamour, crystal candle stick holders can be paired with mirrored or metallic accents.
Crafting Personalized Charm with DIY Candle Holders
Making your own candle holders is a fantastic way to add a personal touch to your home decor. Plus, it’s a fun and rewarding craft project! Transform mason jars, wine bottles, or even recycled materials into stunning candle stick holders. Paint them in vibrant colors or elegant metallics, etch intricate designs for a touch of sophistication, or experiment with decoupage using patterned paper or fabric.
Glass candle stick holders
For vintage enthusiasts, consider repurposing old teacups or antique vases as taper candle holders. If you love the sleek look, glass candle stick holders can be adorned with minimalist designs or kept simple for understated elegance. Tall stick candle holders can be crafted from repurposed candlesticks or creatively stacked materials for a unique statement piece.
Cozy Ambiance with Candle Holders in Unique Areas
From the bathroom to the outdoor patio and even the staircase, there are countless opportunities to infuse a cozy and inviting ambiance using stick candle holders. In the bathroom, imagine candle holders adorning the edges of your bathtub, casting a soft, flickering glow as you indulge in a relaxing soak. Out on the patio, glass candle stick holders can be placed strategically on tables or hung from hooks, creating a warm and magical atmosphere for evening gatherings or romantic dinners.
Pillar candlestick holders
When it comes to the staircase, consider placing candleholders on the steps or lining the railing. As you ascend or descend, the gentle glow will illuminate your path and add a touch of whimsy to this often-overlooked space. So, break free from the conventional and let candle stick holders shine their light in unexpected places.
Candlestick Holders Suppliers
target
ikea
pottery barn
amazon
Finally
Incorporating candle holders into your home decor not only enhances the visual appeal but also creates a soothing and intimate environment that invites relaxation and creates cherished memories. While embracing creativity, it’s crucial to prioritize safety. When using candle stick holders in unusual locations, ensure they are stable, securely positioned, and away from any flammable materials. Also, consider using flameless candles or LED alternatives to minimize fire risks while still enjoying the cozy ambiance. So, embrace the charm of stick candle holders and let their warm glow bring a touch of enchantment to your living spaces.
0 notes
Text
Handmade Home
Creating handmade table decor for your home can add a personal touch and unique style to your space. Here are a few ideas for handmade table decor:
HERE HANDCRAFT PRODUCT AVAILABLE
Centerpiece with Natural Elements: Gather natural elements like flowers, branches, or pinecones and arrange them in a decorative vase or bowl. You can also incorporate candles fairy lights for an added ambiance.
Painted Mason Jars: Take plain mason jars and paint them in your desired colors or patterns. These can be used as vases for fresh or artificial flowers, or you can place tea lights inside them for a cozy glow.
Fabric Placem and Napkins: Sew or stitch fabric placemats and napkins in coordinating colors or patterns. Choose fabrics that complement your home's decor and add a pop of color to your table setting.
Hand-Stamped Table Runner: Purchase a plain table runner and use fabric paint or stamps create unique designs. You can use stencils or create your own patterns to make it personalized.
DIY Coasters: Make your own coasters using materials like cork, ceramic tiles, or wooden discs. Decorate them with paint, decoupage, or even photos to match your home's style.
Upcycled Bottle Vases: Repurpose glass bottles by cleaning them thoroughly and painting them in various colors or wrapping them with twine or lace. These can be used as vases or candle holders.
Embroidered or Monogrammed Cloth Napkins: Add a personal touch to your table setting by embroidering or monogramming cloth napkins. Use colorful threads and different stitching techniques to create unique designs.
Origami Paper Decorations: Create origami paper decorations like cranes, flowers, or geometric shapes. These can be placed on the table as individual accents or strung together to make a garland.
Remember, the possibilities are endless when it comes to handmade table decor. Feel free to experiment with different materials, colors, and styles to create a look that reflects your personal taste and enhances the ambiance of your home.
0 notes
Text
All You Need To Know About Homemade Varnish For Acrylic Paintings
Varnishing acrylic paintings is essential. Varnish protects your artwork from UV radiation and dust.
It also adds a luster to the painting, making it seem even more impressive and bringing out the beautiful colors.
Varnish comes in gloss, satin and matte finishes. People love the glossy look of gloss varnish, but you can choose a different finish.
Mixing any of these varnishes can be done to create the desired finish. However, it may take some experimentation.
We want to make it clear that you should not photograph your painting after it has been varnished. Photography will be difficult if the varnish shines in the sunlight.
Painting An Acrylic Painting
Before varnishing the artwork, make sure it is dry. The varnish will run on the canvas if it becomes too wet.
This is not the best way to achieve your desired outcome. You should also ensure that your surface is free of dirt, grime, and any other undesirable elements, such as lint.
Varnishing should be done in a separate glass container or plastic cup.
When you are painting, don't use the same jar that you used to dip your paintbrush!
This is because paint splatters will be everywhere on the inside, outside, and lip of the jar. If they get onto your varnish or your varnishing brush, these will stick to your painting.
How To Make Varnish At Your Home
You can create a basic varnish suitable for children's crafts.
Varnish can't be made at home. However, varnish purchased from an art shop can sometimes be quite expensive. It is more economical for you and your wallet.
Steps
Place the furniture. Cover the work surface with newspaper or other covering to preserve it.
A two-thirds glue-to-one-third water ratio is recommended. The exact amount required will depend on the size of your creative creation.
Put two-thirds of the cup of PVA glue in a bowl.
Add one-third of the water.
Combine them well.
Apply to the craft object. When dry, the varnish will be transparent. The varnish will protect artwork, decoupage and sketches as well as ornamental parts that are part of a craft project. Use a large artist's brush to apply the PVA glue varnish.
Your homemade varnish is ready.
Varnish Protects Acrylic Paintings And Enhances Their Quality
Acrylics can become very flat and difficult to penetrate after drying. There may be uneven areas of shine or matte due to the use of retarders, paints, or other media.
Varnishes make colors brighter and more vivid by uniformizing the surface of the paint.
However, depending on what the artist wanted, some pieces might lose their character if they are coated with the same varnish. Artists make the final decision.
A final varnish layer is another benefit. It seals the porous acrylic painting, keeping debris from adhering.
Is Dry Acrylic Paint Porous?
After drying acrylic paints are strong and water-resistant. After drying , acrylic paints become more durable and water-resistant. However, small pores in the paint can cause dirt and dust accumulation over time.
Even if you clean and dust your artwork regularly, dirt can still get on the surface of the paint and cause permanent damage. If you hang the artwork without glass, it will also discolor over time. Sealer protects the paint surface and makes it easier to clean.
Varnish is also UV protected, which prevents paint from yellowing or fading.
Varnishing Tip
These are some things to remember when varnishing your paintings.
Timing:
Allow acrylic paint to dry fully for at least a day before you apply the isolation layer (optional). Then, wait another day before varnishing.
If the acrylic paint has a thick layer, such as impasto, it is a good idea to wait for a few weeks before applying the varnish or insulating layer.
Temperature:
Ideal temperatures should range from 65 to 75 degrees Fahrenheit and humidity between 50 and 75 percent.
If there is too much humidity, or too low temperature, moisture can get trapped between varnish and paint layers. This can lead to whiteness or opacity.
Application:
Acrylic varnishes can be applied by spraying or brushing. Be aware of foaming, uneven coverage, particles escaping from the applicator, etc.
Let them dry flat on a clean surface, free from leaves or dust.
The Advantages Of Varnishing Acrylic Paintings
The varnish layer provides UV protection, which prevents the pigments from fading.
Varnish can easily clean dirt and dust, but they are not trapped in the acrylic layer.
Many artist varnishes can be removed with an ammonia solution. You can use ammonia to remove a stubborn stain or to reapply varnish if it yellows over time.
Varnishes can be used to bring out the shine and bring together the whole painting.
Varnished artwork is more resistant against shipping damage and handling.
Final Verdict
It is easy to make acrylic paint waterproof. I recommend that you practice varnishing small paintings and those that have not turned out well.
You'll be able to varnish more and discover what works for you.
As long as you apply a uniform coat of varnish to your work and let it dry between each application, there is nothing to be concerned about. Good luck with your work!
You might like this article and want to join our community via this Newsletter. I'm always willing to offer something more to those who are interested. We'll see you from the other side!
Article Source: https://www.sanford-artedventures.com/all-you-need-to-know-about-homemade-varnish-for-acrylic-paintings-n18.html
#scottfisher #homeinnovation #sanfordartedventures #powertool #diylife
0 notes
Text
It’s all about home décor
I believe every lady has a hidden passion inside her when it comes to home décor. Decorating their home gives them a sense of completeness. Whether they want to renovate their bedroom or add a touch of class to their living room, they do it with great enthusiasm. So, to keep their enthusiasm alive and provide them with great options, Rustic illusions, a pioneer in the name of home décor offers a range of products that offer a so-called Glam look to your house. The rustic illusion's product range is authentic, unique, and a mix of contemporary and traditional.

The most popular products of rustic illusions are their handcrafted bedsheets and dupattas. Apart from this, they also offer a wide collection of cushion covers and curtains in beautiful prints. One of the interesting facts about this home furnishing brand is that its collection is optimal for all weather types. Even the work done by artisans truly represents our rich cultural heritage. If we talk about rustic illusions bedding collections, they offer a range of premium quality bedsheets, dohars, quilts, curtains, etc. They also offer a range of kids’ collections such as baby quilts and cushion cover sets. Undoubtedly, comfort is the first preference of every mother, and the mulmul quilt offered by them is purely made from mulmul fabric and that too without any chemicals, thus making it more skin-friendly, breathable, and comforting for the baby.
India is a country of festivals, and we Indians celebrate every festival with great enthusiasm. And the first thing we do is decorate our house. Rustic illusions offer a variety of festive décor candles that add a touch of elegance to your house. These candles are completely organic, eco-friendly, cruelty-free, and most important hand poured with blends of aroma oils. You will find a great variety of crystal and glass jars and candles when you visit their site. If you are a resident of Faridabad or NCR, you can even make a visit to their showroom of home décor in Faridabad. There you can experience the rich collection of various home décor products offered by them.
The range of stylish design wall plates offered by them makes your wallet go crazy. These wall plates add a touch of intrinsic worth to your walls, thus making them look classy. These beautiful décor plates are made from toughened glass and decoupage craft is mostly seen imprinted on these plates. So, if you are looking forward to revamping your wall, opting for these designer plates is a must.
Not only this, even the ceramic collection rustic illusions offer has a blend of authenticity attached to it. They offer a variety of handcrafted coffee mug sets, dip bowl sets, ceramic platters, beer mugs, etc. for a perfect table setting.
Their huge collection of home decorative products will make you go crazy as every product offered by them has its own unique story to tell. And the best part is that they have both options of online and offline availability of their products. So, what are you waiting for? Go ahead and give your home a new look with rustic illusions products.
#Home decorative items#online decorative items#Home decor stores#Home design items#Aesthetic home decor#stylish home decor items online#colorful home decor ideas 2022#best quality home furnishing products in faridabad#Home furnishing products in Faridabad#floral cushion covers online india#ikat print bedsheet
0 notes
Text
Clear Glass Jars on White Wooden Shelf
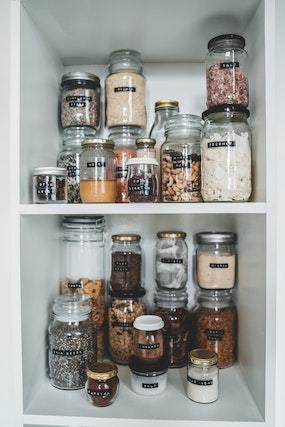
For every complex problem there is an answer that is clear, simple, and wrong. See more...
#clear glass jars#glass jars#how to clean glass jars#glass#clear glass cookie jars#glass jar#best easiest ways to clean glass jars#how to paint a glass jar#recycled glass jars#fillers for glass jars#sealing clear glass#tinted glass jars#glass jars crafts#paint glass jar#how to dye glass jars#how to tint glass jars#store food glass jars#decoupage glass jars#sea glass#15 awesome fillers for glass jars#how to clean glass#painting a glass jar
2 notes
·
View notes
Text
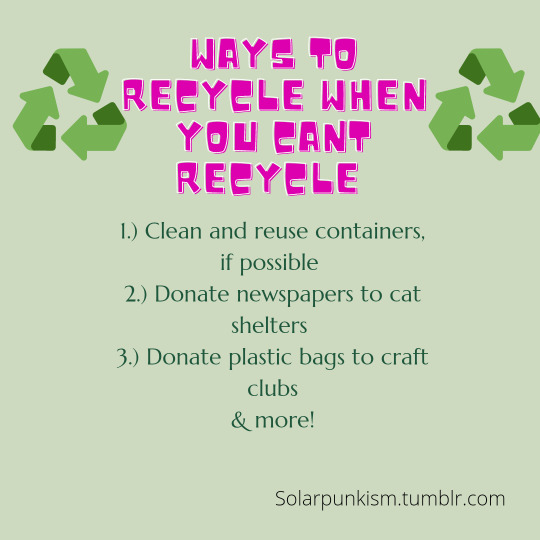
While the easy answer to cleaning up the earth may be “Just recycle!” unfortunately, it is not that simple. Many areas do not have recycling plants available or nearby. In my own neighborhood, to be part of the recycling route, you have to pay a monthly subscription, which not everyone can afford.
Because of this, I have found myself becoming increasingly creative in the ways that I reduce waste. Below are some of my most practical tips.
1.) Containers!
Containers are very easy to reuse--whether its a glass jam jar upcycled into a trendy coffee cup, or an old mayo jar being reused as a craft supply holder, containers are my favorite reusable item. I have washed out plastic ice cream tubs and used them as flour/sugar containers and as planters. Tin cans become cute pencil holders and planters with a coat of exterior paint or a ribbon. I have used vitamin/pill bottles as bathroom organizers for Q-Tips, tweezers, and make up brushes. Cutting a milk jug in half and covering the exterior with a colorful cloth makes a handy sock/underwear organizer. The possibilities are endless!
2.) Paper Goods!
Instead of throwing away paper, look for ways to reuse and donate! Many cat shelters use newspapers for their litter box liners and are glad to take the newspapers off your hands. There are DIY tutorials online about how to make a pet mat with newspapers and fabric, also a great item to donate to shelters! Make sure to call and check with the shelter to see if they need these items before beginning any project, though. Paper can also be reused to make fire starters, beads, decoupage material, and paper mâché. You can shred it and use it as small pet bedding, as well.
3.) Plastic Bags!
It is incredibly sobering to see so many photos of plastic bags in landfills, in oceans, and around the necks of our wildlife. Easy to make and easy to throw away, plastic bags are easily a castaway product that is easier to use and not think about. After seeing my own plastic bag usage, I realized I needed to make a change. I cut plastic bags into loops, connect, and roll them into balls of “Plarn” (plastic yarn). I have been crocheting the plarn into containers and reusable grocery totes. While the prep work is a bit time consuming, making plarn is still a lot of fun, and its the perfect fidget task for me while I watch movies.
4.) Clothes!
Clothes are one of the slower biodegradable items, with the plastics of common day production making breaking down difficult. Instead of tossing out a shirt with a rip in it, or a pair of shorts with a stain, look for ways to repair it first. Sewing a flower over a stain, or using a cute stitch to seam up a tear is a great way to add character and longer life to your clothes. If clothes no longer fit or are too damaged to repair, many thrift stores (or craft clubs!) will accept them. I like to donate clothes to smaller, personally owned thrift shops before large chain shops, but any type of donating keeps clothes out of landfills! If there are no thrift shops that accept donations, churches, benefit clubs, and homeless shelters often accept items into their closets so they can give them to people who need it directly. Sometimes food kitchens will collect clothes so when visitors get a free meal, they can also get a free shirt if they need one.
5.) Electronics!
Electronics are easier to donate, if recycling is not possible, with many pick up locations by large stores or busy areas. If there are no pick up/drop off electronic places, local high schools, trade schools and the like will also accept electronics (working or not) for the students to tinker with. Women’s shelters and assisted living centers also accept (working) electronics, even if they are older. Many occupants need devices or tech related items to help them apply for jobs or learn new skills, and often these places don’t have enough to go around. Depending on what electronic you are trying to dispose of, you could use the frame (like a computer frame) as a cute planter or quirky garden decor, or paint it into an artistic piece.
These are just a few of the tips I have picked up along the way! Happy reusing and recycling, SolarPunks! Let me know what you have reused or how you have recycled it.
#eco friendly#ecology#mother earth#happy planet#solarpunk#solarpunkism#recycle#reuse and recycle#green living#good vibes#hippie stuff
102 notes
·
View notes
Text
51 Activities To Do With Pre-schoolers That Will Keep Them Creatively Engaged
51 Activities To Do With Pre-schoolers
51 Activities to do with pre-schoolers
Are you looking forward for some fun activities to do with pre-schoolers so that you can help them grow better, smarter and keep them engaged?
Here we bring you some of the activities to organize:
51 Activities to do with pre-schoolers
Create a Bubble Painting: For this idea, make your kid paint a bubble sheet and then draw paintings on cardboard or a t – shirt.
Craft a Story Together: Help your child to craft a story through imaginations.
Create a Marble Painting: Help your preschooler to create paintings on a metal box or a shoe box with marbles and poster paint.
Cook Together: Cooking offers many choices from baking to teaching how to butter a slice of bread and cut or peal a fruit without knife. Be ready for the mess but happy faces.
Draw Pictures on the Walls: Give your kids some coloured but washable chalks and let them draw their imaginations on the wall. Kids love this one :)!
Family Tree: Help them making a family tree on a sheet of paper or on a computer using templates and let them go back to as many generations as possible.
Leaf Hunt: Pick an outdoor green area and collect leaves, fill them up in different containers and hand over to your kids and ask them to match the leaves they have with those which are growing on the plants.
Travel Alphabet: Play the game while you are travelling, especially long trips. Ask your kids to spot the letters that you give them and then the kid who spots the maximum of these wins. You can play several rounds of these.
Car Racing Track: Use a colored tape to make roads on the floor along with signals and stop signs and some special zones for the parking.
Hand made stuffs: Ask them to draw on a plain muslin cloth and colour with fabric pens and then you can bring their creation to life by cutting and making handmade stuffies of these.
Swimming games: Take them swimming and play find the coin by placing a coin in the bottom of the pool or just throw the ball game is fun too.
Room Cleaning Race: Get a timer for this activity, sit back and let your kid do the work. Give them small cleaning challenges Reward later for all the hard work.
Bowling Track: Use a wooden board on a flat surface. For bowling pins, use pencil erasers or fat crayon stubs and marble or a ping pong ball for the bowling ball. Keep scoring and have fun.
Hold a Car Wash: A perfect way to cool off on a hot day. Just park the car in the drive way and let your kids give it a good scrub with water and sponges.
Life Size Selfie: Making a life size portrait is a beautiful way to express. It helps kids to explore who they are and what they would like to become. Activities to do with pre-schoolers
20 Indoor Activities For Kids On A Rainy Day
16. My Turn, My Task: Divide groups in tow or more teams and start a relay game by keeping things ready on a table and dividing them amongst the players.
17. Spinning Top: Take your kids down to 90’s and let them play with spinning tops which are popularly known as ‘Lattu’ then.
18. Picnic: Take your kids to a picnic and enjoy fun activities outdoor.
19. Play UNO: UNO is one of the most famous card game which is played by people of all ages. Help your kids with the rules and teach them how to play.
20. Fly a Kite: A traditional Indian game which is liked by all. Help your kids in learning how to fly a kite.
21. DIY Paper Bracelet: It is a 2 for 1 activity because it involves painting poppy abstract shapes with watercolours and then cut it into strips and fold them in to wearable bracelet.
22. DIY Tie – Dye Art: Transform the salad spinner in the carnival style spin art machine. Fill the squeeze bottles with washable paint.
23. Window Art: Give your kids some coloured transparent sheets and let them cut different shapes and stick them to the wall.
24. Foam Paint: The 3 ingredient recipe is both art and science. Use paintable foam which hardens overnight into puffed master pieces.
25. Musical Chair: The best game to play with a group. Do not forget to reward. Best game to improve the listening skill and discern between sound and silence.
26. Sock Puppets Show: Let your kids make hand puppets with socks and put up a show with other kids.
27. Information Game: Preschoolers must know few basic personal information when heading into preschool. Help them learn full names, address and contact numbers. Use small cards and ask your kid to arrange it.
28. Notice Seasons: Share details of the seasons with your kids as it is an important subject.
29.Sensory Toys: It is an important and a messy learning technique. Use Play Doh for the help.
30. Grocery Shopping: Take your kids out for grocery shopping and teach them about various names of fruits and vegetables.
31. Funny Face Flip Book: DIY Funny Face Flip Book is not only fun to put together but it keeps kids creatively entertained for an entire afternoon. Use markers for sketching and clip the cards.
pic credit: Activities to do with pre-schoolers
32. Plan a treasure hunt: Go the old fashioned way. Hide goodies in different corners of the house. Give them clues when they reach a particular point to reach to the next.
33. Fireworks in a Glass: Use food colouring, olive oil and water mix to create a mesmerising result.
34. Gardening: Teach your kids about soil, water and plants and help them plant more trees and seeds.
35. Play Hide and Seek: In this idea, hide an object and give instructions to the kids to lead them to the hidden object.
36. Freeze Dance: Play the music, ask your kids to dance. Stop the music and let your kids freeze with funny faces and fun poses.
37. Indoor Obstacle Course: Push your furniture aside and practice motor skills like running, jumping and hopping without breaking anything.
38. Scavenger Hunt: Use patterns, colours and letters and hunt around the house.
39. Yoga for Kids: A perfect activity to increase their stamina, concentration and growth.
How To Introduce Principles Of Yoga To Kids: Yamas For Kids
40. Ice Cube Sorting and Pattern Making: Mix art, math and fine motor skills. Watch this video to know more.
pic credit: Activities to do with pre-schoolers
41. Playdough: Playing with Playdough your preschooler will learn to use their imagination and have an open-ended playtime.
42. Collage: Provide few items and let your kid arrange and re arrange to make a collage.
43. Music: Fix a time of the day and play music to which you and your kids can dance to. It’s great exercise and bonding.
44. Build a House of Cups: Help kids in making a house with the help of paper cups.
45. Go on a Walking Tour of the City: Take a tour of the city and help your kid learn the names of the areas and also the famous places.
46. Do a Puzzle: Play puzzle games like jigsaw puzzles to enable your kids gain fine motor skills. Puzzle games teaches patience. Use puzzle games having pegs to make it easy for little hands to use.
47. Crunch Snack: A delicious snack which you can make with your kids and always leave it out in various occasions. For example, you can prepare a reindeer crunch snack for Christmas Eve’s.
48. Drive a Train: Enjoy a rail ride in your city’s park for an outing with your kid. You can also visit National Rail Museum in Chanakyapuri in Delhi where a train ride around the place will serve as a cherry on the cake.
49. Spark Creativity: Hang out with your little ones to see, touch and understand the wider world of handicrafts, our country prides in. You can visit The Handicrafts Museum in Delhi, Delhi Haat or Chaukidhani in Mumbai to see and experience the impressive culture, embroidery, weaving and pottery.
50. Learn Phonics Basics: It is one of the most wonderful gifts you can give to your kids. Getting informed about the basics of phonics will prepare your kids for reading readiness and spelling.
51. Try Science Experiments: You might get visions of a chemistry lab while talking about a science experiment and the explosions related to it but now you need not fear of it. Try the basic volcano experiment. Your preschoolers can enjoy simple science experiments that don’t require much of an effort yet are jam packed with fun learning opportunities.
DIY Decoupage Happiness Jar: A Perfect Gift For Christmas
Hope this list has given you many ideas to keep them busy. Use these ideas and watch your kids grow smart and sharp.
The post 51 Activities To Do With Pre-schoolers That Will Keep Them Creatively Engaged appeared first on Maa of All Blogs.
51 Activities To Do With Pre-schoolers That Will Keep Them Creatively Engaged published first on https://bestbabyinc.tumblr.com
2 notes
·
View notes
Link
Check out this listing I just added to my Poshmark closet: SOLD - MC Morning Glory cookie jar glass canister.
0 notes
Photo

This Mason jar tealight candle holder is hand painted with White glass paint and decoupaged with a Red Tropical Macaw Parrot high quality napkin. Great gift idea for anyone who loves Parrots.
Use the mason jar to store extra tealights or use it as a money savings jar, no one would think of looking in a candle jar for your hidden money!
This candle jar is full of charm and will accommodate all types of home décor.
Simply add this piece to your dining room table or fireplace mantle and it will definitely be an eye catcher.
0 notes
Photo

Craftreat decoupage papers are multi-surface and multi-functional. It can be used gifts wrapping paper, and decoupage on furniture, wooden tray, Glasses, Plates, Bottles, vases, Mason jars, Wallets, and a lot more.
0 notes
Last Seen Blogs

rafacaz4lisam2k4
Sammir The Bear

cannibaltranssexual
the building of a new body (the othering of himself)

hanaasbananas
There is no magic but what we make for ourselves

gorgongrrlfriend
𝖛 𝖊 𝖘 𝖕 𝖊 𝖗

kopii
( ・ิω・ิ)👍