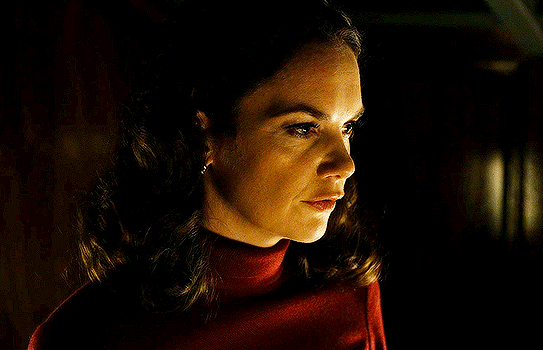
#just found this screencaps on my laptop
Text
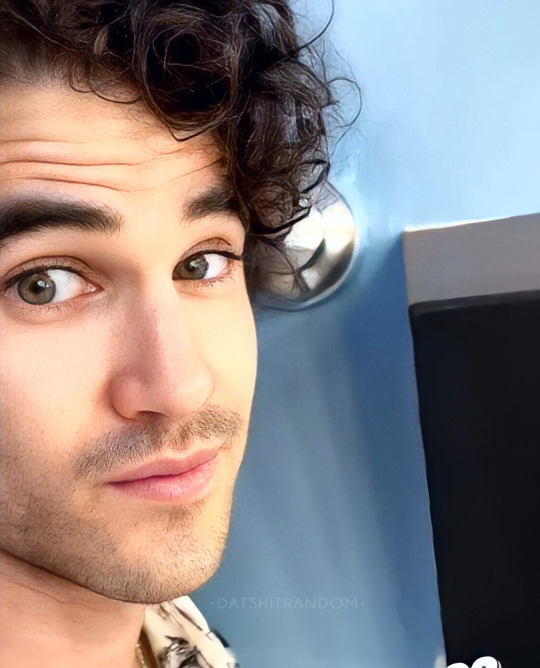
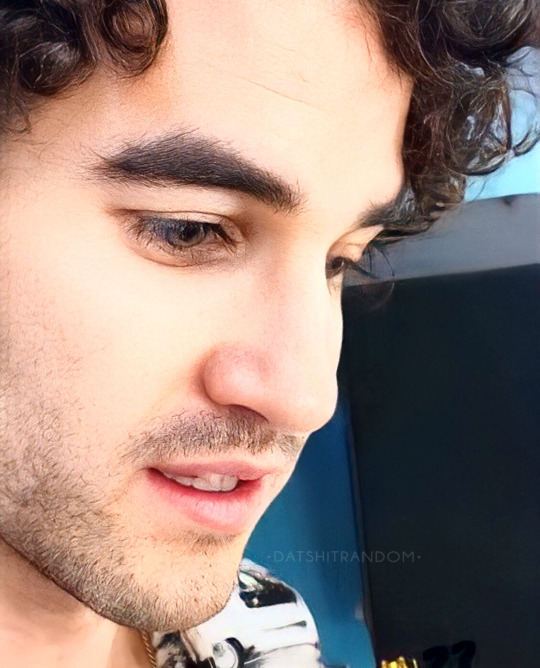
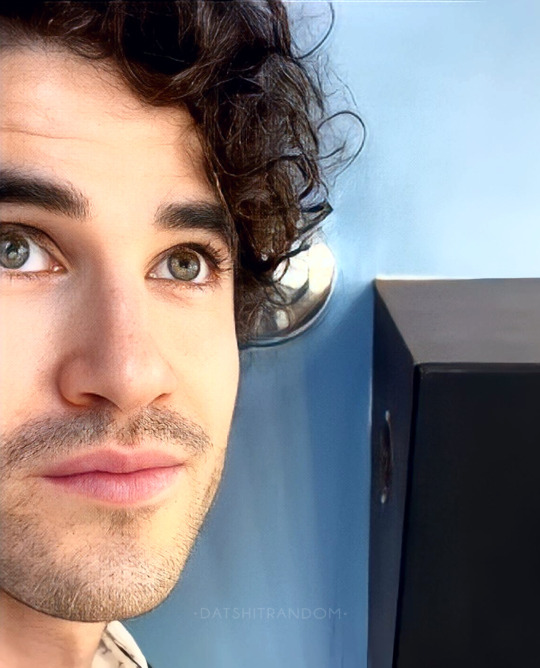
Darren Criss | American Buffalo Instagram Takeover | July 3rd, 2022
#just found this screencaps on my laptop#while cleaning out my storage#and I just 🫠🫠🫠#darren criss#ab ig takeover#pretty eyes#pretty eyebrows#pretty eyelashes#pretty lips#pretty side profile#pretty pretty pretty#menedit#mensource#eyeporn#please do not repost
81 notes
·
View notes
Text
Honestly aziraphale and crowleys relationship in good omens reminds me of the funniest glitch in a video game I’ve ever experienced
It was my fav game of all time. Black and white by lionhead studios. In this game you play as a god and the mechanic of the game has basically to win over villagers so they worship you and you can expand your influence across the world
However you can only perform miracles around villages that already worship you. So to win over the other villages you need help. That’s where the creature comes in. Creatures are literally furries you can teach to perform miracles. They start at 10ft tall and can get to a max height of 110ft
I always picked the tiger and would teach him healing miracles and how to make flocks of doves appear and I would let him lose and he would win over villages without me lifting a finger. Also because he was taught to be good he changed from an orange tiger to a pink one with purple stripes that sparkled everywhere he went
There were other gods in this game with their own creatures. One of these gods was called Lethys and his creature was the ugliest wolf you’ve ever seen. Massive teeth and claws, barely any fur, flies followed him everywhere, permanent snarl, he would spend his days setting villages on fire
Anyways one day I was minding my own business and I see the wolf coming into my territory. This was extremely bizarre because he never came to my territory, he stuck to his own and would only pick fights with my creature and chase him off if we went near lethys territory. I’m curious but expecting the usual fight
But no. here comes this 50ft horrifying abomination of a wolf booking it into my territory and in front of ALL MY VILLAGERS and the face of GOD (me) he kissed my big pink tiger my sole companion and most loyal follower square on the lips. I can still the exaggerated kissing sound effect like it was yesterday. Imagine how the villagers must’ve felt to see this
This was the funniest shit I’d ever seen in my life. I have put so many hours into this game and never seen anything like this. there was one friendly creature in the game which is why the action exists, but to see this from the creature of the god who wanted me dead so bad had me buckled. I think the ai for lethys creature and the good one on the island got mixed up or something lmao
They played on the beach and did cartwheels and then it never happened again. Probably the happiest day of the wolfs life I’m pretty sure his god set him on fire for sport. I think about this often. Love truly can bloom on the battlefield. So when gods just spectating in good omens I’m like I get it. It is really is just that funny
#longest post ever but honestly. too funny#I probably still have screencaps on my old laptop#just found out about read notes on mobile. nice
34 notes
·
View notes
Text
xf rewatch: pilot
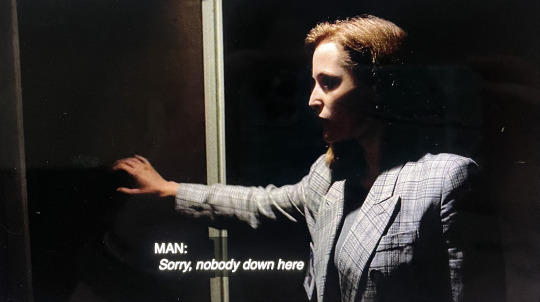
("Man")
This is a photo of my laptop screen. It feels oddly appropriate that Conventional Methods won't allow me to take a fucking screencap of this 30-year-old show to make a stupid tumblr post about it, but those are the times we live in, corporate overreach, erosion of data privacy, technological advances being cynically co-opted by those with selfish interests, etc.
Anyway. It seems insane to me that I have never done a deliberate rewatch of the entirety of XF from start to finish. Ironically one reason I was dragging my feet on this was I'm so sick of the pilot. And yet, I enjoyed the effort to watch it with fresh eyes, imagining I was some regular jabroni just coming across this while flipping channels in 1993. It is interesting to me that it's the procedural-ness that sucks you in, the ordinariness of the world, the deliberate banality of the setting into which extraordinary things are methodically introduced, and you (and Scully) are asked: well? How do you reconcile this? How do you explain it?
Scully starts on this ground level, and Mulder meets her there. She's braced for this legendary basement kook and ready to parry a barrage of propaganda and dig in about how aliens aren't real, but he's got a chemical formula up on a screen and he's like: so what is this? Well, it was found on all the bodies. He lures her in not by telling her a bunch of crazy stories (ok, he does a bit of that too) but by presenting her with facts and asking her to explain them. He shoves her along a few times (if it's not human, what is it?), but it really struck me on this viewing how she's the one trying to get him to tell her what he thinks, whereas he is determined to let her foot her way along the path to get there on her own, without being influenced (or vexed into kneejerk opposition) by his "theories." Scully doesn't get drawn in because she wants to prove Mulder wrong, OR right. It's sort of beautiful that once she's got the scent, it's not about Mulder at all, though he is certainly right there with her, as both a guide and an antagonist. Scully's drawn in by her own investigative instincts and her own determination that, you know, the answers are there. You just have to know where to look.
And then when they're making headway and their motel gets burned down with all the evidence inside it, Mulder doesn't have to rant paranoiacally that someone's working against them; Scully's right there fighting it with him and seeing what he's seeing. And by the time Blevins is scornfully hairsplitting her findings to make Mulder look bad, their alliance is cemented, because they've done it together, she's been in his shoes and in his head with him, on the trail, and the trail led somewhere pretty weird, and she doesn't know all the way what to make of that yet but, one thing is certain: they've got him all wrong, this Spooky Mulder.
I would like to watch a TV show of that. And so, I shall. (Again)
65 notes
·
View notes
Text

In a different time line a person sits down at their desk and pulls out their laptop. They click around their computer until they found their way onto a old forum post. They ready their hands and began to type.
ONLINE: INKEDTRUTHSEEKER888
Subject: [FULLY LOST] 1980's Weird Kids Cartoon
Written By InkedTruthseeker888 on 2/10 10:20am
Does anyone remember Adventures in Drowsy Town?
i've been recently rummaging through some old boxes in my childhood home when i found some strange child pictures of a show called, Adventures in Drowsy Town...Does anyone remember this show?
This forum is dedicated to screencaps, videos, clips,childhood drawings and testimonies of others who have witnessed this piece of lost media
if anyone has any information please don't hesitate to come forward and join the search for a little piece of childhood that we all seem have forgotten.
//OOC Hey, so you know when i said i was taking a break? On my fandom blog yeah! So i made a new blog for this little au. I did! I just didn't want the whole ADIDT to be on my fandom blog since i wanna do stuff with my other fandoms
My fandom blog is @the-wizards-fandom-library for all my other fandoms//
//OOC: I also wrote a fanfic based on this au as well if you want to read it
Adventures in Drowsy Town (824 words) by The_Idiosyncratic_Cat_Boy_Wizard1010
Chapters: 4/?
Fandom: Hatchetfield Universe - Team StarKid
Rating: Mature
Warnings: Graphic Depictions Of Violence//
#fandom#hatchetfield#fandom blog#hatchetverse#lords in black#the lords in black#hatchetvers#hatchetblr#adventures in drowsytown#adventures in drowsytown au
18 notes
·
View notes
Text

HOW TO USE SMART OBJECTS ! (photopea version). . . okay so I was talking to a friend one day walking them through photoediting without opening my laptop and I found my next tutorial to be SMART OBJECTS and how to use them! This tutorial will cover what is a smart object, how to edit one, and how to make one. Credit to fleursource for the icon border template used in this tutorial AND on my icons in the indie at this time.
Let’s start with what a smart object is and by doing so, going to google the definition: A smart object is the ultimate non-destructive layer in Photoshop. So that means that you can use them in a way that won’t mess with your whole image / can easily be taken out and redo. Like how on filters you can click the little eye and it is as if that sharpening didn’t happen.
As always, if you have a tutorial request, need help with something, or anything else my ask box is always open. Please LIKE / REBLOG / COMMENT on this post if you find it helpful. Reblogging this post shares it to others that might be struggling with smart objects as well.

So I open up my ICON PSD (not sure if this originally had a smart object or if I did a conversion myself). Changed the labeling on the psd a bit to show you what I am looking at ( THIS IS A SMART OBJECT ) is the important layer. Under it has smart filters such as sharpening used which as long as I make my icons with the same smart object? There will be no need to sharpen every single icon layer as I go.
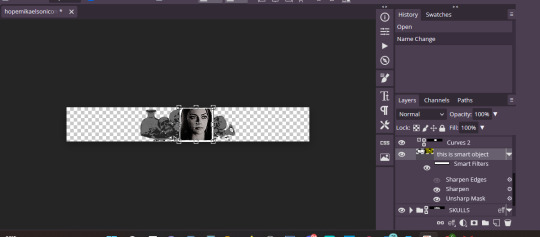
So above the words smart filters is an image layer with a box around it. Click that little mini box.
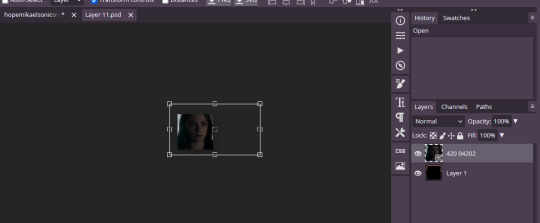
So this tab pops up for me. This is an UNEDITED version of my icons table. We are going to drag / drop / position a new screencap (made by me) onto this template.
Okay so this is what this looks like now. This is simple and easy can be done but say I want to increase the brightness of my image or color correct JUST this screencap but don’t want to mess with a bunch of layer masks that clip to my layer below or anything. Great, you can do that. Just edit your image as needed.
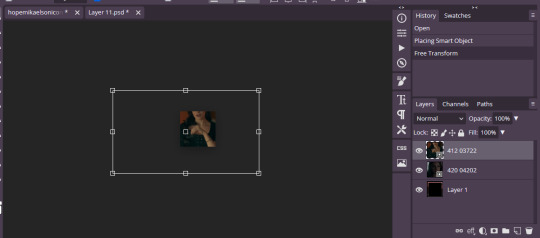
So then it looks like this edited up. I didn’t do much of anything this time around but still the picture / idea is now made. Now if you were to exit from this without saving the progress will be gone. So go to FILE > SAVE ( SMART OBJECT ).

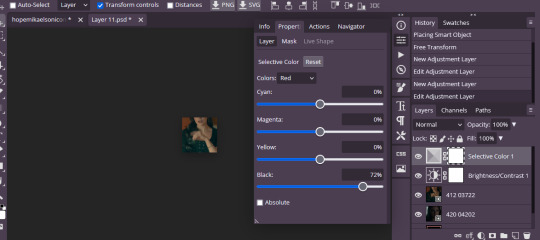
This gif shows you what I just did. Now, I had a layer mask color adjustment layer that I had to delete on this cap hence why my image is suddenly really BRIGHT. But my coloring is there in place now and everything like that.

This is what my layer section looks like. So now that we covered how to use said doc let me show you how to quickly turn any shape into a smart object that can be edited.
So I lay down the shape that I want. Rasterize that layer by clicking right and then going to RASTERIZE. Then click left and go to CONVERT TO SMART OBJECT.

And when converted this is JUST the smart object layer that I can go ahead and edit away to fit my needs or fit into a template.
139 notes
·
View notes
Text
Sooo I was tagged by @nanomooselet (sempai noticed me ( ͡° ͜ʖ ͡°) no but really woooow a person with so much such cool trigun meta knows I exist? I’m literally starstruck)
But I’m stupid and I don’t know who to tag in return :( I’m not even sure I know how to see who I’m mutuals with? I’m a technological granny that’s all anyone needs to know about me lol
But the questions are actually different:
Last song: Not Found by Buck-Tick. That’s a great song, I kinda forgot existed and actually expected to listen to Mudai (which means “No name”, so, it’s not that weird to confuse the two).
Favorite color: green. Deep moss green is the best, but any hue is great.
Currently watching: ugggh. Thanks to my husband I watch ongoings now ( >___>) they are suddenly really good. Everybody knows Dungeon Meshi, I think. It’s already a cult classic as a manga and Trigger continues to make history. I’ve juuust finished Frieren and Apothecary Diaries, Bucchigiri and Warumono San no kyuujitsu, Yubisaki to renren and Majyo to Yajyu. Have started Yoru no kagame wa oyogenai (PLEASE WATCH IT. JUST FOR THE CINEMATOGRAPHY ALONE! PS - god I love the way anime of this new decade uses “camera movement” and colors. Tengoku daimakyo and Chainsawman are probably the best examples here, but this slice of life/music dramedy already looks amazing) and Shyuumatsu no train wa doko e iku (this is boringly simple in the art department in general but the promise and the visualization of the surreal parts is really good, I’m hooked!). Gmg. I do watch movies as well, like, Poor things and Aliza Frankenstein are extremely good. Dune is very beautiful. Mami Wata is a black and white gem of a movie. But I think I should shut up already.
Sweet/savory/spicy: savory I guess? However I’m not a native English speaker and had to google for some time as I’ve previously considered savory not a taste, but… a feel? Dunno.
Relationship status: married. As for friendship, it’s mostly online as most my beautiful ladies live far away ~_~
Current obsession: Trigun. And. Like. Really. It is an OBSESSION. I love all the characters, I literally fall asleep and wake up with them on my mind. I’ve made myself a felted Vash toy. I’ve watched Stampede twice (don’t look at the number of things I watch. Without my husband I can’t finish shit. But this! I’ve screencapped every second of it it seems. I’ve read manga in English and Japanese (and sometimes badly translated to Russian for the lulz - there’s so much swearing it’s basically a different story). I’ve committed two art pieces for the first time in my life. I’ve put art on my walls and my laptop. And I even returned to reading fan fiction after almost a decade of staying away from ao3 (no shade here, I just never loved anything as much as to need any additional materials. Except for Hannibal. But that show was too perfect and didn’t need anything but deep analytics on the symbolism). Hmh. I want to plug “Becoming Eden” by Lenipes here. It’s so good it has become a fourth trigun “canon” for me.
Last thing I googled: how does savory taste lol
Hehe. That’s so long. I guess I just wanted to vent a bit?
Who can I tag? @6wings-manyeyes @esotericbird
Sorry to bother you. No pressure and all that~ just a little tag game to get to know mutuals better.
#tag game#who should I tag though#I was so pleased to be tagged!#I really wish I could talk to more trigun people#and anime people#and tumblr people in general#I used to know ppl here thrugh#fiction podcasts#those a great#aaaargh#I want someone who loves trigun AND wolf 359#these two are so so soooooo cool#and somehow give off similar vibes ???#dunno#trigun#wolf359
3 notes
·
View notes
Note
Can we have a gif tutorial? and a tutorial on how you capture the vids? please
I think there are better specific tutorials out there than I can write myself (this is a really good one for beginners), but I can give a general rundown of my process! And some tips/tricks I’ve found useful.
First off, I mostly use paid software which may limit how much use you can get out of this. The only thing really specific to my process though is Photoshop. I think it’s worth the subscription if you really want to get into gif making. There are tutorials and resources out there for other programs, but there are a lot more resources that are catered to PS. I have a subscription so I’m using the latest version, but any version that supports video timelines should be alright. (Btw I won’t go into how to get PS without a sub, but other tutorials out there might!)
Get the Vid
People will tell you "always use 1080p" and yes you should look for the highest quality first, but as someone who often gifs more obscure stuff, let me say do not let it stop you if you can’t find 1080p. Gif what your heart wants to gif.
The first place I will look for vids is through t*rr*nts. I won’t detail that here, but if you want to do this, you need to get a vpn. I use NordVPN and they will occasionally have some really good deals. But whatever you get, make sure it has some kind of "kill switch" option that should always be enabled when you're downloading.
My next option when I can’t find a download is PlayOn. This is a reasonably priced paid service that lets you download episodes from streaming services you are subscribed to. It supports most major streaming services. I’ve found the app version (PlayOn Cloud) easier to use, and it’s pretty self-explanatory, just make sure you set your settings to HD downloads. Also the recording quality will depend on the streaming service, I find it’s a bit hit and miss.
Lately, I’ve been having a difficult time with PlayOn because all the Spanish programs are defaulting to subtitles and I haven’t found an easy way to turn that off. As a last resort, I screen record. Again the quality will vary here. This is another thing I use a paid version of to avoid watermarks. There’s a lot of different programs out there, but you’ll need to find something that works with sites like netflix and doesn’t block the screen record. I’m using iTop Screen Recorder.
Finally, for Youtube vids, there are tons of free options for downloading directly, the tutorial I linked has one!
Clip the Vid
This is a divisive step, but what I've personally found the easiest is to clip the scenes I want to gif in a separate program first. (Some other tutorials, like the one I linked, will have directions for using screencaps instead.) I use Movavi, but there are tons of different video editors out there. You can clip directly in photoshop, but I find it easier to clip down the scenes beforehand so I can load in multiple gifs at a time.
The downside of this method is when it comes to loading the vids into photoshop, it’s going to use more cpu and a lot of scratch disk space, so hopefully you have a laptop that can keep up. There’s also an annoying issue with photoshop where if it crashes, these temp files won’t get deleted and will eat up all your disk space. Occasionally you have to go into your AppData folder (something like C:\Users\<your user>\AppData\Local\Temp) and delete any files that look like “Photoshop Temp...”. But that disclaimer out of the way, this method saves me more time in the long run. :)
I typically find that I can fit at most ~3 seconds into a gif and keep it under the 10 MB limit. So I’ll clip a video down to a bunch of 3 second bites. I will then export as one big video file and I have a process for making a bunch of gifs at once. But tbh it’s a bit convoluted, so for the purpose of this rundown, let’s assume you have cut a single clip to make one gif from the video. Make sure you export the video with the highest possible quality so you don't lose any quality in this step! In Movavi, this would be Export > Advanced > And then drag the “Quality” slider all the way up.
Load into a gif
In photoshop:
1. Select File > Open, and open your vid
(If you hadn’t already clipped a scene, you could do it here now, but will assume you already have the couple seconds you want to gif.)
2. Use the crop tool to crop if desired.

3. Resize by going to Image > Resize Image. For most gif sets, I will set the width to 540px and let the height be determined accordingly. The most important thing here is that the chain link symbol stays selected to maintain aspect ratio when changing the width or height. You can also play with the Resample options. I have mine set to Bicubic (smooth gradients).
4. Occasionally, especially with lower quality vids, you may get a couple pixel line on one of the edges. Check for this and crop it out and redo the resize steps if needed. Make sure when you are done your file is still 540px. (This is not referring to the transparent line around the entire edge that most gifs will get in the resize step. This transparent line will be handled in a later step.)
5. I use the action from this post for making my gifs. Save this action and open in photoshop.
6. With your gif video file selected, in the Actions panel, select “* timeline to frames w/o sharpen” under the new action you just loaded, and then click the Play button to run the action.
7. Wait for the Action to complete. At this point, you could save and you already have a working gif!
Note: This action will set the frames to 0.05 seconds per frame which I find to usually be a good speed for gifs. But the timeline is where you can adjust if needed. This is also where you may need to end up deleting some frames from the beginning/end if your gif size ends up being too large.
Sharpen
You can go in and play around with smart sharpen, and other tutorials will give you some help with that, but this is another thing I’ve found most useful to just use an action for! My fave I’ve found is this one here. It has two different sharpening actions, basic and hd. I tend to choose hd if I have a higher quality vid but I find it doesn’t always work as well on lower quality vids. This is also a good time to mention to save often!!! It’s hard to undo an action, so you’re better off reopening the file if you decide you don’t like the action you chose.
Here’s my gif with the hd sharpening action applied:

Color
I am really going to breeze over this step. I think there are a lot better tutorials out there for coloring. I will say that Levels, Curves, and Exposure will get you a long way! And I think they’re relatively easy to get the hang of. Selective Color is another adjustment I’m fond of, whenever I need to tone down or highlight certain colors. These can all be found under Layer > New Adjustment Layer.
Here is my gif after tinkering with these adjustment layers a bit:
Besides finding some good coloring tutorials, I find it really useful to search for coloring PSDs! I don’t recommend just slapping a psd on top of your gif without other adjustments, but I like to sometimes use them as a jumping off point, or just as a learning tool to see what different adjustment layers will do.
Export
Once you’re happy with how your gif looks, go to File > Export > Save For Web. Here you will need to make sure your gif is under 10 MB, or go back and delete some frames if it isn’t. You can also play around with the export settings to try and get the best quality. These are the settings I usually go with:
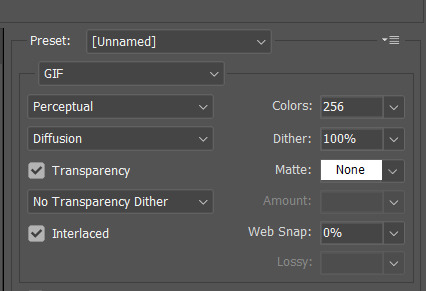
An important setting here is “Matte: None”. This will get rid of that transparent line around the border of the gif that I mentioned earlier, for a cleaner looking gif.
After you hit Save, that’s it! You’ve got a gif. Hopefully you found some of this useful. And if you have any questions, feel free to ask!
#intended to just give a quick rundown and some tips but this got long#and kinda did become a tutorial#i don't think i'm the best teacher#but hopefully there's something of use in there for someone#resources
21 notes
·
View notes
Text
just found this screencap on my laptop. rip hummels-turn may your blog rest in weirdness
3 notes
·
View notes
Note
13, 19, 26 and 42!
Oooh omg okay I love these questions we're getting into process and organization this is fantastic thank you
13. Where or from whom did you learn how to gif?
When I first started, I think I had found some tutorial somewhere that I was using and I wasn't having a great time of it lol. But then @itstruthtime linked me to this tutorial and it pretty much changed my life tbh. 20/10, would recommend to anyone who wants to learn to gif. Of course there are lots of other little tutorials and various tips and tricks I've picked up along the way, but as for the basics, it's that tutorial. And also just like, I would like to make a point to shout out Cim in general who has been very patient and helpful and encouraging as I've been learning things, and is always happy to kindly let me know when I have been doing things I didn't even realize were wrong, like always posting my gifsets as text posts instead of image posts lmao.
19. What is your giffing process like?
Well, it's basically like the tutorial I linked in the last question. I plan out my concept, including scenes and any text that will need to go with each gif, and I usually just write that down in a notepad file that I don't even save. Then I check to see if I have screencaps of the scenes I want to use - sometimes I'll end up finding a different scene to use that way as well, but if I don't already have the scene I want screencapped and I don't find an alternative, then that's my next step (screencapping my beloathed). Then it's loading all the frames in and converting them to a smart object with the gif action I have. And then the fun begins!
Usually I start with a curves layer and maybe levels just to get the brightness right, and then I start playing around with hue/saturation and selective colour to adjust the colouring. About a month ago I realized that you can actually adjust the hue/saturation of individual colours rather than the whole image at once so uh... thanks for Cim for helping me come to that realization lmao. The option was literally right there I just didn't look so WHOOPS. Once I have the colouring right I move on to any typography that needs to be added, which is basically just a process of cycling through a million fonts until I find one or two that feel right, picking colours and setting styles, switching it screen or vivid light or exclusion or whatever else makes it look the best. I do all of that on just one gif, and then I usually drag those layers over to the other gifs as a base and just tweak them until everything looks like it goes together well.
Then I export them all to gifs and load them into a post draft, and this is the point where I usually realize that I forgot to set them to loop so they just play once or stop, or I didn't adjust the end of the timeline so it just goes white and the typography is there without an image behind it for a moment lol. So then I go back and fix that and save the gifset as a draft. I take a look at the post there to see how it looks all together, and I also look at it on my phone (I've realized that some of my gifsets are probably too saturated because for some reason everything looks so much less saturated on my laptop than on my phone, so this is an important step). And then it's just a matter of tweaking things until it looks good in both places!
26. How many un-posted sets are in your drafts right now?
I've answered this already, and the answer remains: none. I'm too impatient for that lol. If I had anything in my drafts, you would know because I would be making posts complaining about it (see: 1, 2, 3, 4)
42. How is your gif folder organized? Is it organized at all?
Yes it's very organized!!
Okay so first in my main gif folder I have a folder for everything I've posted, a folder for templates and just other useful things to come back to, a folder my things I make for my own blog (basically just my header I guess lol), and a folder for things I make for the KurtbastianArchive blog. And then any other folders are just for gifsets that I am working on at the moment. You can see in this screenshot that I'm planning an alignment gifset (like an alignment chart of Glee characters) and a Kurtbastian gifset with Mr. Brightside lyrics... I have not touched either in a long time lmao so they won't be happening anytime soon.
And then within the posted folder, I have a folder dedicated to each gifset I've ever posted. I have sort of standard naming conventions, where I generally start with the character or ship it's about, and will also include if it's for a specific event or a specific person usually, and then some other detail to describe it (which, as you can see, is usually a song name lol).
And then inside each of those folders, I have the PSD and the GIF file for each gif in the set :)
I also have a really organized file structure set up for my screencaps! Each episode gets it's own folder, and then within the folder there are subfolders for specific scenes. That way once I screencap a scene, I don't have to do it again, I can just come back and reuse the same screencaps. I usually try to screencap a whole scene at a time rather than just the specific moment that I plan to use for exactly that reason.
3 notes
·
View notes
Text

# HOPECRUX : ind. priv. sel. mat. portrayal of SHEZ of FIRE EMBLEM WARRIORS THREE HOPES . heavy in themes of FATE AS A CYCLE , HEROES OF HUMBLE ORIGINS , FINDING YOUR OWN MEANING & BELONGING , FOUND FAMILY , & more. as guided by SILAS ( 21 , est , she/her. )

RULES:
i am iconless for the moment. i likely will be until i can get my hands on caps from the game. my laptop’s capacity is limited in terms of screencapping capability and storage, and i’m not really able to screencap things on my own. as such, i’ll be iconless for a good while, but if any of my partners want to use icons, that’s perfectly okay with me !!
i write male!shez. i will be using resources of the male protagonist, reblogging images/art of the male protagonist, etc.
i am extremely headcanon based. since the game has now released and we’re getting more information about shez, i will likely pick and choose what i want to incorporate into my portrayal of him and what i want to discard. i’m still extremely headcanon based regardless, and i may become canon divergent depending on what we find out about shez.
i will tag spoilers for about a month after release. i’ll be using the tag three hopes spoilers //, but after july 24th i will not be tagging spoilers any longer, as most people will have had time to either see playthroughs of the game or play at least one route for themselves.
psd credits. psd is PAPER ANGEL by SOMRESOURCES for my banner, i made my current border, and my icon psd is PARIS HOLDS THE KEY by SOMRESOURCES.
plotting. if you wanna plot something, feel free to shoot me a message either in IMs or over discord if you have it, which mutuals can always ask for !! i’m always open to plotting or just shooting the shit about characters or ideas, and i love getting to know people, since it makes writing a lot easier and a lot more fun !!
misc. for any scenarios in which it’s unspecified, i default to the azure gleam route, as those are the characters i like and am most familiar with. when interacting with characters outside of them, i’ll likely set them as allies with shez as a part of their party.
asks to threads. if you wanna reblog an ask to make it a thread, go for it !! that’s probably the easiest way to get the ball rolling in terms of writing together because i admittedly suck at plotting sometimes.
3 notes
·
View notes
Text
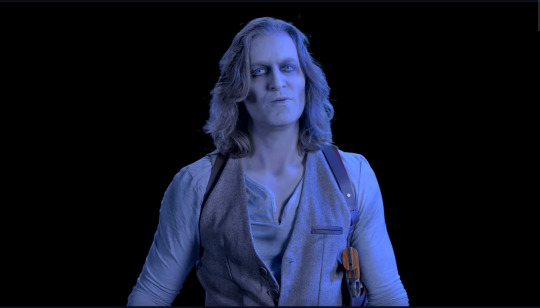
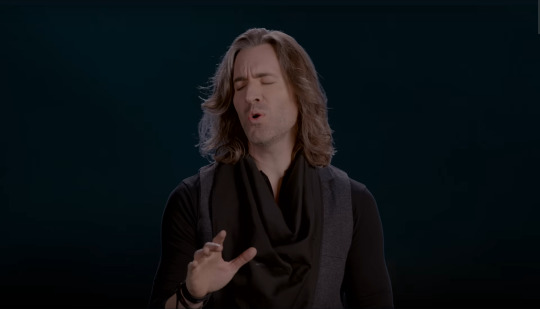
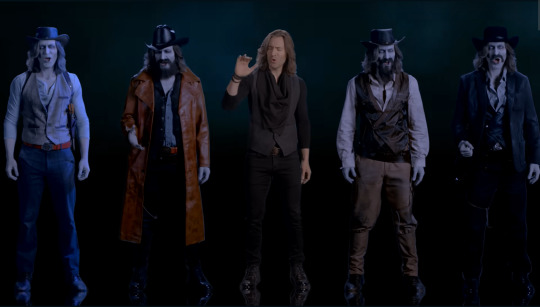
Voiceplay-adjacent Visuals: Ghost Riders In The Sky
Geoff's Halloween video for 2022 (uploaded on the 2nd of October) was a cover of the song Ghost Riders In The Sky, written by Stan Jones (who also wrote Saddle Up), and performed by many artists since, such as Marty Robbins and Johnny Cash. As Geoff himself said in the description, Geoff had been getting "MORE than a few requests for this song" over the past few months prior, and honestly, with it being both a "spooky" song and a country/Western song, it practically had his name written all over it. And well, Geoff certainly delivered, as always, and I have a decent few things to talk about here, so let's go!

Not actually talking about the Cowboy Geoffs just yet, but of course I gotta point out the cool way that they flash in and out of shot right at the start of the video, like a sort of teaser of what you're gonna get from the rest of the video.

And doubly of course, I must show my love for this very cool logo for the cover/video, which apparently Geoff designed himself or something? Seriously this freaking slaps 👌
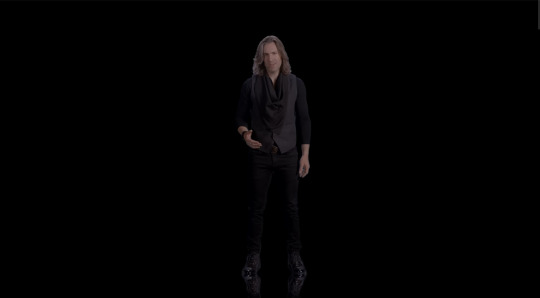
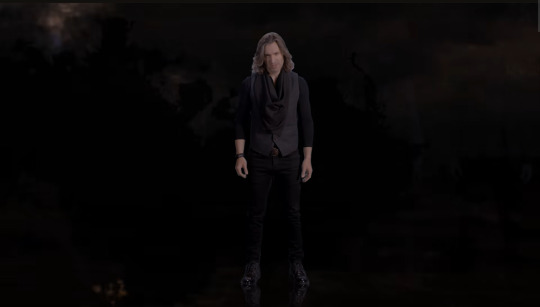
I'm guessing that Lead Geoff's fairly simple black/grey outfit is meant to help the Cowboy Geoffs stand out more in comparison/contrast, but also goddamn this guy wears black a lot 😂😅
(Also oh my god he's not wearing anything on his left wrist! A very rare occurrence for sure! 😝)

Shoutout to Rick Underwood once again for the ghostly makeup! (He's also credited in the description as "beard wrangler" 😆)
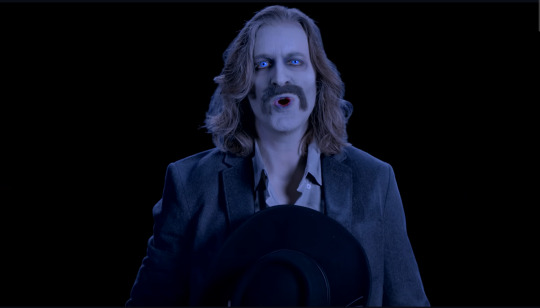
There have been at least two (maybe three) reaction videos I've watched which have compared the Cowboy Geoffs to the Night King and/or his army from Game Of Thrones. It's the eyes, mostly
Right, now time for individual shots! I'm gonna mess with the chronological order of screencaps here just a tiny bit, just so I can do a straightforward left-to-right introduction:
Geoff credits his "backing vocals" in this one, but apparently the credits aren't in respoective order of their positioning in the video. I found out which Cowboy Geoff is which from comments (Patrons of Geoff I'm assuming) on a reaction video. So anyway, this is Jeff!
(For once Lead Geoff (or just Geoff for this one) isn't actually the one with the least amount of facial hair (Geoff has a bit of a 5 'o' clock shadow in this video)).
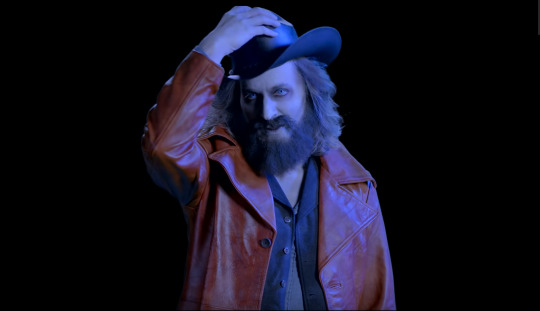
...This one is Daryl (love the red-brown coat, very nice) (Yes, Daryl (the Patrons helped name him I believe?)).

...This one is Goff (notice that he takes off his hat with his left hand? He's a leftie! (for this video at least))
...And finally we have Jeoph. This isn't the first time Geoff has had 4 Backup Geoffs helping him out in a video (e.g. see Ain't No Sunshine), but this was the first video that the 4th/extra Backup Geoff was officially given a name 😄
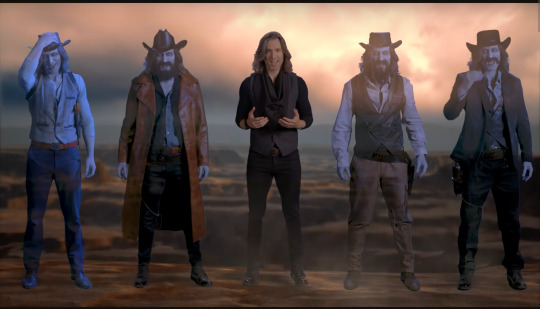
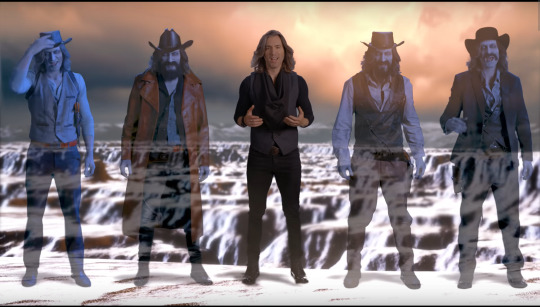
No prizes for guessing who got credited with lighting design (and 3D renders!) for this one, but regardless, shoutout to Eli!
Love the translucent/ghostly effect on the Cowboy Geoffs, very neat!
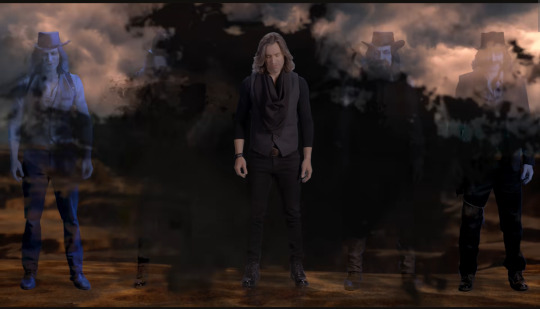
Geoff could have kept the Cowboy Geoffs on screen for the whole time, but instead they disappear along with the background landscape at the end of the first chorus, and then they fade back into shot after the first line of the second verse, about 4 or 5 seconds later. I vibe with it! It's creative, it's interesting, it encourages you to keep paying attention to the video!
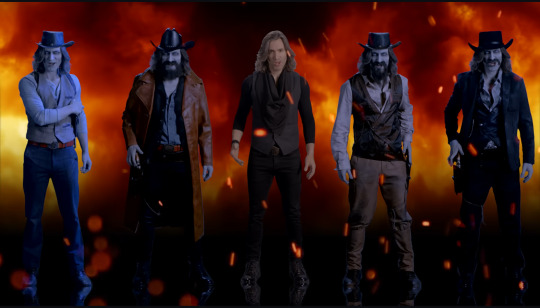
And this of course was very cool!
(Also notice how as well as Goff being left-handed, Jeff's gun holster thing is on the side of his vest, under his left arm, rather than on his belt! Details!!!!)
(Super big aspect ratio for this video too btw, like it nearly takes up the full height of my laptop screen! (Gotta have enough space to get good full-body shots of all 5 of them I suppose))

This man has such a stranglehold over me that even just seeing him whistling in this (on my first-time watch of it) had me doing a short intake of breath! How is he allowed to be this good at so many things? 😅
(Also a little jealous because not only can I not raise one eyebrow independently of the other, but I also can't whistle!!! (I can't click/snap my fingers either, but that one I've learned how to do a "cheat" version that's more like a one-handed clap))
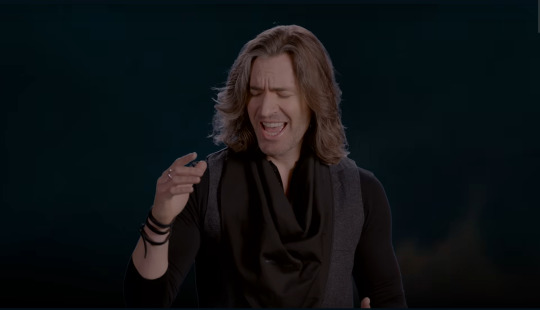
I've said it before and I'll say it again: I love it when Geoff gets to belt out a line or two in a song! Especially when you can actually see him putting full effort into it!

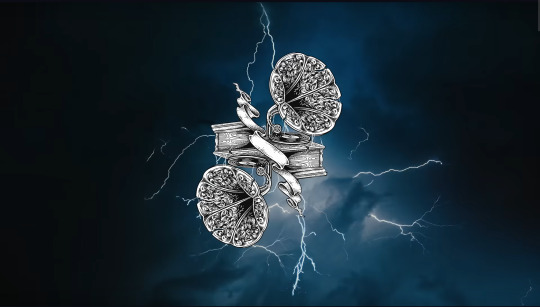
Very cool! (Also this video is the second usage of the gramophone logo on Geoff's channel; the first was on Rains Of Castamere, but I forgot to mention it ^^;)
Also also I can't help but give a shoutout to the audio panning effect right at the end, with the sound of hoofbeats that move from the left ear of your headphones to the right, as if you're really listening to horses running by you. It might be one of my favourite clever sound effect things ever tbh.
Geoff doesn't upload full-length covers as often as Voiceplay does (totally understandable btw), but when he does, it's always an absolute treat! Currently (i.e. as of the 21st of February), I only have a few Geoff videos left to talk about (some of his 2023 uploads!), but I'm quite excited for them, so stay tuned!
1 note
·
View note
Text
Some things I’m going to do today:
1. Check out some ambient sound websites and apps for chill writing time. I know I found one once that had starship sounds, which would be perfect considering my current writing projects. Hopefully I’ll find something like it again.
2. Search YouTube for good medium-length (10-15 mins) videos to listen to while I do non-writing things. I’m thinking video essays or lore would be best. Maybe something about roleplaying games?
3. Write out a reference guide for screenplay format for my writing binder. Maybe I should do one for audio script and stage play, too, just for fun.
4. Write the ficlet I have in mind for Store Trek.
Seems like a small list, but I know any one of those could take me all day if I let it. Good news? Looks like Tumblr is refusing to work on my laptop now, so I probably won’t lose my day to the reading and the posting. I have some clips and screencaps in the queue, so you’ll see those later.
0 notes
Note
Hi, I was looking at your giffing tutorial and went to try the kmplayer to get my screencaps, but ctrl g got be a different popup, and when I tried googling a lil, I couldn't find different commands to pull up that pop up. i found a similar one, but it wasn't the same and wasn't working. I was hoping you could clarify for me? Thanks!
hey! you might be using 64x bit or an updated version, in which case just left click or tap the mouse with both fingers (depending on what kind of laptop you use). you can then click the option for screencapping, which will appear in a pop up list. hope this helps!
0 notes
Text
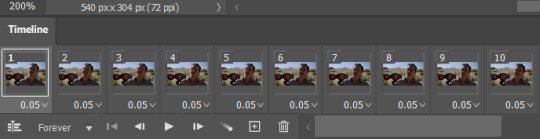
the problems (because it seems tacky to put them in the post but tumblr is in the end my diary and i need to Complain)
i did not standardize the coloring initially. like a Clown. ive never done a ‘same scene’ before (except tor dancing but i didn’t color that, just did contrast stuff) and i stopped to do other things in between all four. and then. when i realized this, like a fool, i went back to try and get them looking the same but trying to edit the smart objects that contained my adjustment layers was so much pain that i just got it as close as i could and gave up. thats why the brightness is wrong in gif four 🙃🙃🙃🙃
i changed an export setting (dithering) to noise instead of diffusion to help with the banding (i learned it was called that after significant amounts of increasingly stupid-sounding googling) behind khatha & dome in 1 & 3. and it did help, actually it just didn’t get rid of it entirely. so. hngh. i think it (the noise filter) looks ok generally but im gonna swap back to diffusion after this
looking at this now, i think gif 2 is missing some frames from the scene. i know gif 3 is missing one cause i deleted it manually but 2 is too short in comparison to the others & gun’s movement cuts off too abruptly. AUGH
oh. and attempting to upload this set to tumblr initially bluescreened my laptop LMAO. i have been kind of worried about that (obsessive saving is ur friend) but kept getting surprised by my years-old school laptop that’s literally falling apart’s ability to hold on in the face of photoshop heating it so bad it burned my upper thigh a little. but it didn’t crash in the middle of anything, just while i was trying to make the draft, so all is well (?)
i have some more screencaps saved up but i’m not sure what i want to do next. probably the next one is more junes, but i also have a khathadome parallel thingie. in any case i have to sleep. and then work. so patience for all of us. (im Fixated right now i dont have any)
oh also i want to do something with the eclipse. it would make me very happy to make a gif of my boy of all time aye but i haven’t yet found any 1080p. maybe there just isn’t any? ill still do it but my quality is usually ??? enough as is
#the last time i used photoshop i was in high school#i am stringing together tutorials like a red tape conspiracy and crying a whole lot#its not an exact science#ro’s ps adventures#rowan chatter
0 notes
Photo
Hello! As requested, here is a tutorial on how I make my gifs. I would like to preface this by saying there are many ways to make gifs, and there’s no right or wrong answer imo. This is just how I personally go about doing so!
I will be using PS CC 2017, but as long as you have the video timeline option, it shouldn’t matter too much; on any version of PS, you should be able to adapt anything I mention here! You will also need some kind of screen recording software. I’ll talk a little more about that under the cut.
To start, you need the source material you will be making the gifs from! I get mine from snahp(.)it (avoiding links so tumblr hopefully doesn’t banish this from the tags lmao) and I always opt for either 1080p or 2160p. Not all laptops will support 2160p as it’s 4K, but either works great! You just want your gifs to be the best quality possible.
Next is where the screen recording comes in. I don’t use the screencapping method to make my gifs (where you use a program to cap a clip and then load those caps into a stack in PS). This isn’t for any particular reason… it’s just how my friends, (who very kindly taught me to gif), had always done it, so it’s now how I do it too. Personally, I find the quality to be just as good as the screencapping method, and have never noticed a difference between the two.
As I have a PC, I use the software built into it for screen-recording. If you go here: theverge(.)com/2020/4/21/21222533/record-screen-pc-windows-laptop-xbox-game-bar-how-to – you can see how to use the XBOX screenrecorder to record from files you have d*wnloaded. This also works on some streaming sites, but I think it depends on what browser you use. Personally, I recommend Firefox, as that seems to bypass a lot of the blocking and ads that occur when trying to do this sort of thing.
For MAC users, I have been told handbrake works well, as it converts MKV files to MP4, which can then be used to make gifs. You only need to convert part of the file to MP4 depending on how much you want to gif, and this also bypasses the screenrecording stage, as you can edit MP4 clips on Quicktime. I am told you can split them into smaller clips by going to edit > trim and it saves the new clip!
I have also used anyvideoconverter for small clips, but I can’t say what it does to the quality of your video, or how big of a file it lets you put in! With the XBOX screenrecorder, it doesn’t matter what type of video files you get, as the recording will save to MP4 anyway.
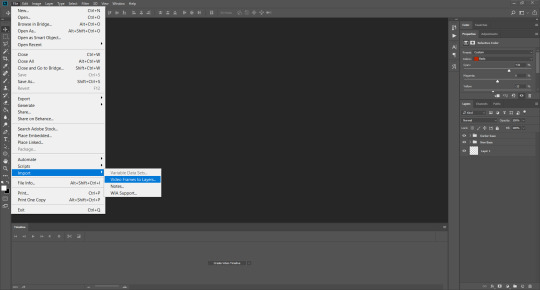
LOADING YOUR FRAMES
Now, go ahead and record whatever clips you want to gif. Make sure you have the video timeline open, by going to window > timeline. Then, go to file > import > video frames to layers.
Next, select and open your clip from where it has saved (with the XBOX recorder, it saves in video > captures). You should see a little window pop up, where you can move the sliders back and forth to clip your recording to whichever part(s) you specifically want to gif. I recommend trying not to load a lot of frames into photoshop at once, but I would be a hypocrite to say that, since I do it a lot lmao. Just be patient if you do!
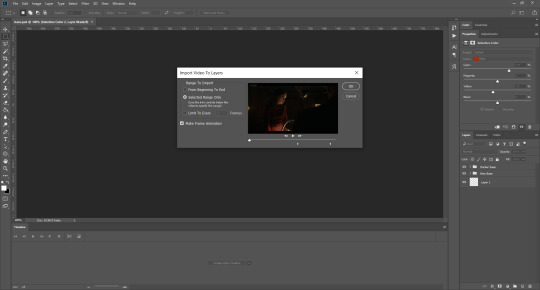
Once you have chosen the length, click okay. Never, EVER, I repeat NEVER click the button that says “limit to every __ frames”. This really ruins the flow and quality of your gif—it’s better to have shorter, but smoother gifs, I promise. And with tumblr’s new 10 MB limit, it shouldn’t be a problem anyway!
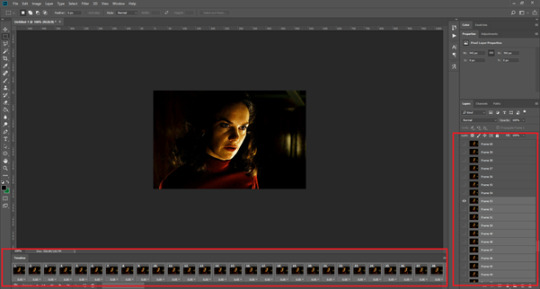
Then, your frames should open up. What we want to do is make them into a smart object, so we can edit all the layers at the same time. To do this, click the small button in the left-hand corner. ALWAYS click this first. If you don’t, it will only convert the first frame to a smart object and the gif won’t work.
Give it a second to sort itself out, then, on the right-hand side, select all your frames at once using the shift key.
Then, go to filter > convert for smart filters. This might take a minute. Don’t click anything else in case PS gets angry lmao, just leave it for a second and it’ll do its thing. The more frames you have, the longer it takes! Now we have our gif, but it needs to be cropped, sharpened and coloured!
CROPPING
You want to start by selecting the rectangular marquee tool on the left-hand side, then drag it across by clicking and highlighting the area you would like to crop your gif to, like so:
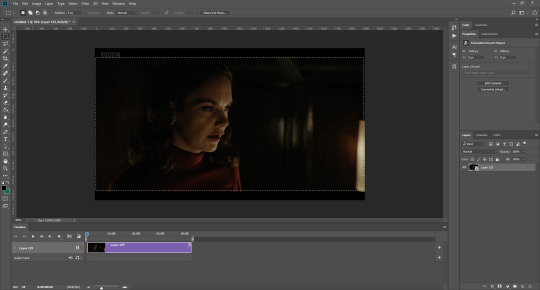
What I tend to do is select everything inside the black lines you sometimes get around your gif (this depends on what file you d*wnload), and also the tiniest bit inside the sides. This is because I’ve found if you crop it right up to the edge, you get a tiny bit of transparency on the sides of your gifs, which I’d rather avoid.
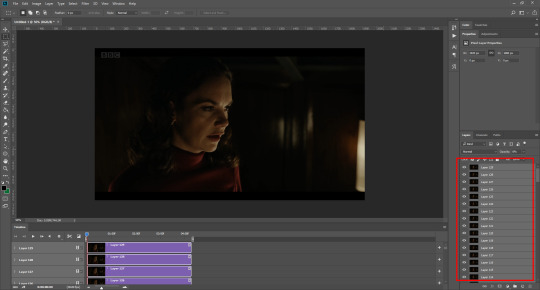
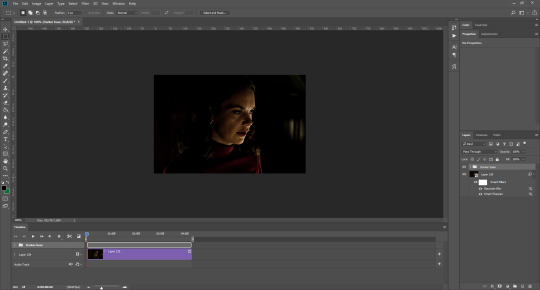
Once you have your desired selection, go to image > crop. Now, the dimensions for tumblr are 540px width, so all your gifs have to be that width. However, the length is up to you. I really like big gifs, so sometimes I even make a full square, or even longer. It’s entirely up to you, and what kind of set you want to make.
For the purposes of this gif, I will stick to what I usually go for, 540px by 350 px. This will mean you’ll have to crop some width off, but that’s okay, since Marisa isn’t central anyway. The cropping is always trial and error for me, as sometimes people move out of the frame within in the gif. The best thing to do is just try it, and then move the slider in the timeline window at the bottom to see if the person stays inside the gif, and if not, adjust accordingly.
Next, go to image > image size:
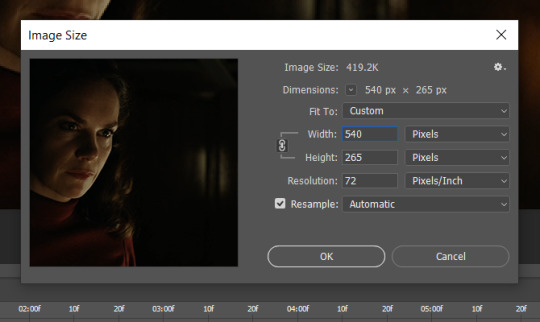
In this box, if I put the width as 540, the gif is a smaller height than I want, as it keeps to the dimensions of the gif when you load it into PS. That’s okay, just put the height you want instead, and we’ll crop off the excess.
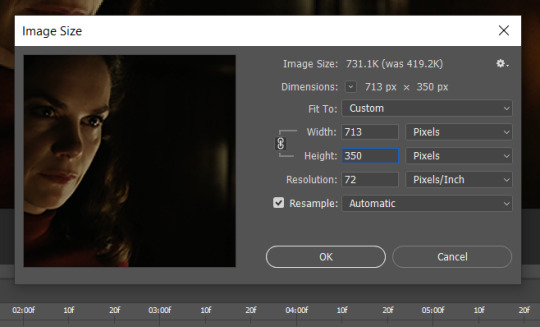
Then click OK. Using the rectangular marquee tool again, we need to remove the excess width. Part of the reason I like this version of PS is that it tells you the width of your selection as you do it, but you can always use the ruler as a guide, and check the size of your image by going to image > image size again.
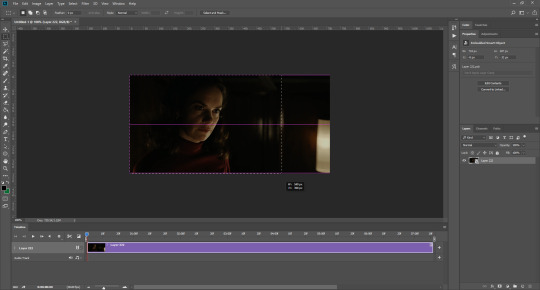
Again, use image > crop, and your gif should now be the correct size!
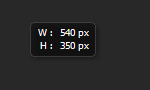
You can also use the crop tool in the timeline window to crop the length of your gif:
However, I tend to wait until later on to do this (which will be explained further down!)
SHARPENING
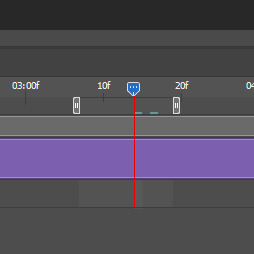
Next you want to go to filter > sharpen > smart sharpen.
These are my settings. However, 0.4px is very sharp, too much so, but that’s easily fixed.
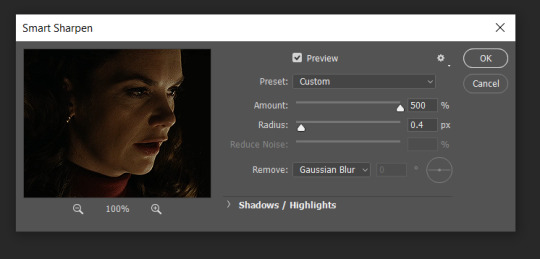
Go to filter > blur > Gaussian blur and then set it to 1.0.
Now on the right-hand side, we need to reduce the blur, so double click the little adjustment button, and change the opacity of the blur. I usually go for 20-30%!
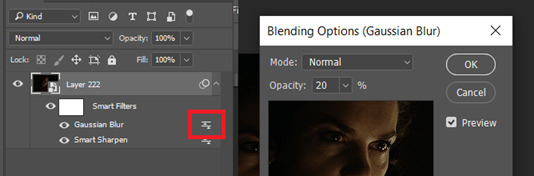
Then click OK, and that’s your sharpening done!
COLOURING
I picked this scene on purpose as it’s dark, so good for showing how to colour a gif. I have a base psd which consists of some very basic adjustments, but it mostly exists so I don’t forget what adjustment layers I like to use. I adjust them every time I make a gif, essentially colouring each gif from scratch.
In this case, the psd actually makes it darker. So, what I will do is turn each layer off, and adjust as I go. A lot of people say using lots of adjustment layers ruins the quality of your gif… I have never found this to be true, as long as you are gentle with them. If you whack the brightness right up to the top, it’s going to ruin your gif no matter if you use 1 adjustment layer or 100. I would just say use your common sense, and adjust a little at a time!
I start with a simple black to white gradient map set to soft light, because I think it helps you see depth once you add some brightness to it. I usually do this on about 10%, or more if needed. It’s probably unnecessary, I just like how it looks!

Then, I move onto using curves and levels. This is where things can diverge depending on who you’re colouring. If this person is white, it doesn’t matter too much. If they’re not white, you don’t want to white wash them. My best advice is to play around with it. By adding vibrance and other (usually the red) selective colour settings later, you can ensure you don’t change the person’s skin tone from what it originally was. You can also use layer masks at varying opacities (various shades of grey), on your curves and levels, to remove some brightening so that you’re not changing anyone’s skin colour. Just brighten slowly and check in with yourself honestly about how your gif looks.
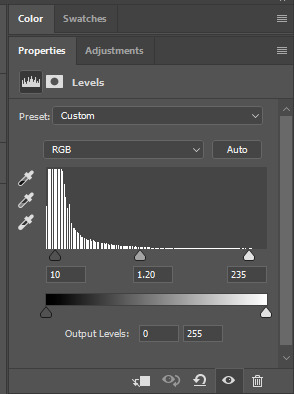
Some people don’t like using levels, or curves. It’s completely up to you. I tend to use both because levels are good for bringing depth, even if not brightening (though I like to use them for that as well).
One thing you can do is use the white point of the gif to make PS adjust the curves itself, however I like to drag the sliders myself and see what it looks like. Just make sure it’s not too bright, as we will be using further layers to brighten more, after.

Next is levels. The slider on the left controls the black point, the one in the middle controls the midtones, and the one on the right controls the white points. The black brings depth, the midtones adjust the overall brightness, and the white points produce stronger highlights. Again, you’ll get a feel for how this works as you practice. Just don’t use the white point excessively, especially if your characters are not white.
Then I add vibrance (+20!), because we’ve removed a lot of it when lightening the gif. Next is exposure, which I find brings out the highlight and shadow areas more effectively:

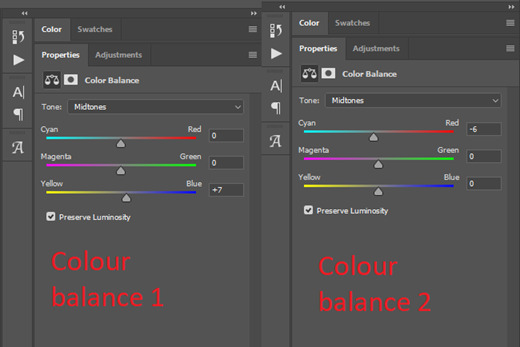
Then colour balance! This helps with scenes that might be a certain colour, i.e. too blue, too green, too red, etc. Moving the sliders in the opposite direction of the colour your gif is will counteract it. The best thing to do when accounting for different colours, is to make a new layer every time you change colour, so that you don’t get confused. I always add a new layer for colour balance and selective colour if I want to change more than one thing. So one for red, one for yellow, one for pink, etc.
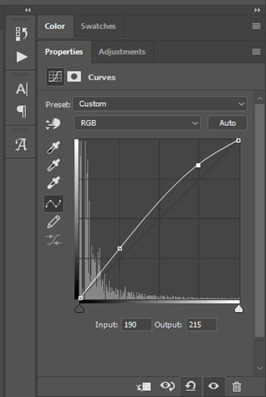
A layer of brightness just to make the gif pop, and because the scene is extra dark, I added a very gentle extra curves layer:
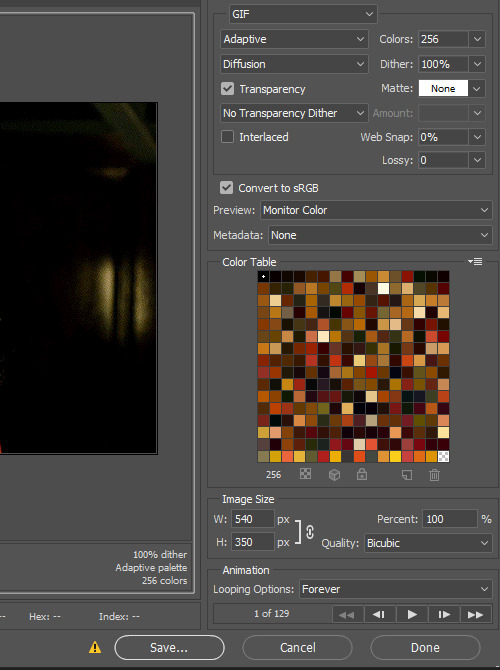
SAVING YOUR GIF
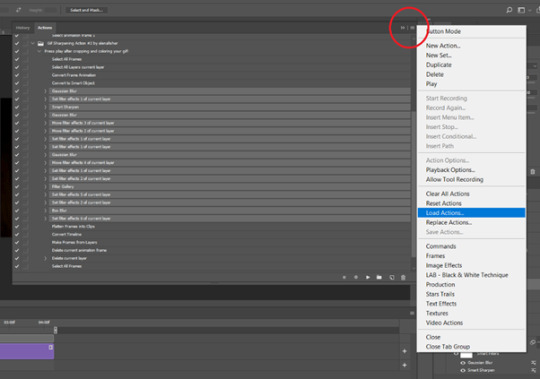
Time to save the gif. You can go ahead and file > export > save for web (legacy) now, but then you’ll have to reopen the gif to reset the frame rate from 0.07, to 0.05. Instead of doing that, I use a modified action. The original was made by the very talented @elenafisher! So I do not take credit for that at all. You can find the original here: elenafisher(.)tumblr(.)com/post/190817437374/gif-sharpening-action-2-preview-download and in my resources tag. Please reblog it if you’re going to use this!
To use an action, first make sure you have actions turned on in window > actions. To load in your action, go to the little lines circled, and then load the action from your downloads:
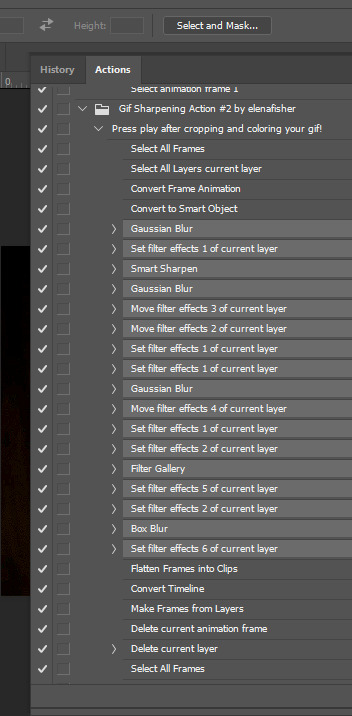
Obviously if you don’t want to sharpen your gifs yourself, you can use the action as it is, and it will give you a beautiful glowing effect. If you’d just like to use it to flatten your gif into frames like I do, make sure to take out all the items I have highlighted:
Until it looks like this!
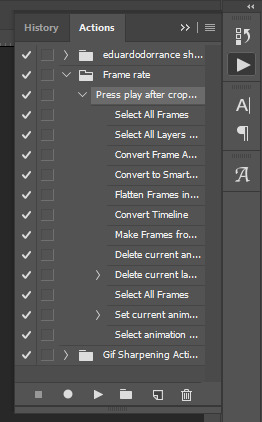
Make sure you have the layer under the file name highlighted, and then click the play button at the bottom! (If you get a screen saying select all frames cannot be found, don’t worry, just click continue!) You can delete the layer that does that if you want, I just keep it in case I realise I’ve forgotten to do something, because you can click cancel and edit your gif before you flatten it. Of course you can undo the steps to get back to the smart object version of your gif, it just takes longer!
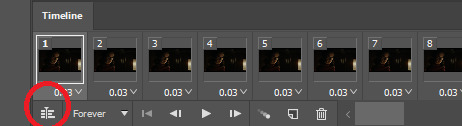
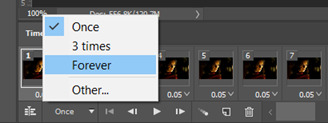
And now your gif is in frames and set to 0.05 already, so you don’t have to change the speed! All you need to do now before saving is change the gif cycle to “forever” in the bottom left-hand corner:
Then to save the gif go to file > export > save for web (legacy). Sometimes, the gif is bigger than the tumblr 10MB limit. You’ll be able to see this in the bottom left-hand corner of the gif save settings. If this is the case, I like to preview the gif, to see whether it would be best to cut frames off of the beginning or the end, or both. When you’ve decided, you can select the frames at the bottom, and in the right-hand side panel, and delete them both using the little bins/trash icons.
I keep checking and deleting frames until I get the gif under 10 MB! Just don’t delete frames from the middle, as then you’ll have the same issue as if you selected “every other frame” when making the gif: it won’t flow!
Lastly, these are my save settings:
So that’s it! That’s how I make all my gifs. Blending I do when the gifs are in the grouped, smart filter stage, whereas text I add on during the framing section above! Really hope this is helpful, please feel free to ask any questions you may have! 💖
#gif tutorial#tutorial*#completeresources#yeahps#chaoticresources#allresources#mikesmom#usergeo#userava#usertix#usersmile#usertom#if you'd like me to cover anything more advanced just shout#i wanted to show how i add text too but tumblr wouldn't let me add any more pics#but people can let me know if that's something you'd want!
504 notes
·
View notes
Photo
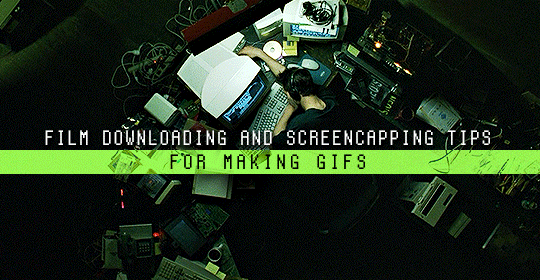
Finding high quality film/tv rips, saving the large files, and screencapping them are half the battle for gifmakers when setting out to make a gifset. Here’s a little guide on this process, including my advice on
Where to download stuff
Where to store your movies/shows
Screencapping programs
Making gifs as HQ as possible, including tips for picking out what to download when you have multiple options (not all 1080p rips of the same movie or tv episode are the same quality and I explain why)
Why screencaps of 4k movies can look weird and washed out and how to fix that
and more
✨ You can find my gifmaking 101 tutorial here and the rest of my tutorials here.
Where can I download movies and shows?
First off, I prefer direct downloading rather than torrenting stuff because it’s faster and with torrenting, there’s more of a risk. Other people downloading the same torrent can see your IP address. This means movie studios can find out you’re downloading their content and can send you a warning letter. The download speed also varies depending on how many other people are seeding it. I would only do it if it’s your only option and you have a VPN or something.
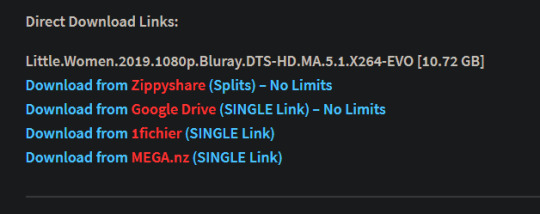
This is THE best guide for pirating I’ve ever seen. I use it for finding sites for books, music, you name it. The part of the guide you’d want to look at is where it says Direct Downloads Link (DDL) sites. My favorite place is Snahp. These ddl sites will have links to their movie/tv rips that are typically hosted on one of these two sites: google drive or mega.nz. You can download stuff from both of those sites for free, but with mega, they have a 5GB file download limit unless you have a premium account. I personally pay the $5 a month membership for mega because it’s worth it imo. You can buy a subscription through the mega app found on the iphone app store (so you’re billed through apple and it’s less scary than giving a random site your credit card info lmao) and as for androids I think mega has an app on there too.
So basically, if you go to http://snahp.it, they’ll have rips for different movies and shows.
You click on the movie title and it’ll take you to a page where they have links for the video which they have uploaded on a variety of sites (including mega).
How do I make my gifs as HQ as possible?
It’s best to gif things that are 1080p. And usually the higher the file size, the better. A really important thing to note is that not all 1080p bluray rips are the same. The piracy groups that rip these files take uncompressed .mkv rips from discs that are anywhere from 10gb to like 50gb, and then run that through video converters to compress the file down so that they’re 2-8gb. Sometimes when that happens, the video quality goes down a LOT. The same goes for TV episodes. One rip could be 800mb, the other could be 3gb and both could claim to be “1080p” but the quality would be NOTICEABLY different. Your best bet is to always pick the rip with the highest file size.
I’ll show you an example with this scene from You’ve Got Mail.

I downloaded 2 different 1080p rip versions of the film. Both claim to be 1080p, but one is 2.41 GB and the other is 9.75 GB. After taking screencaps, it’s obvious that there’s a BIG difference in quality.
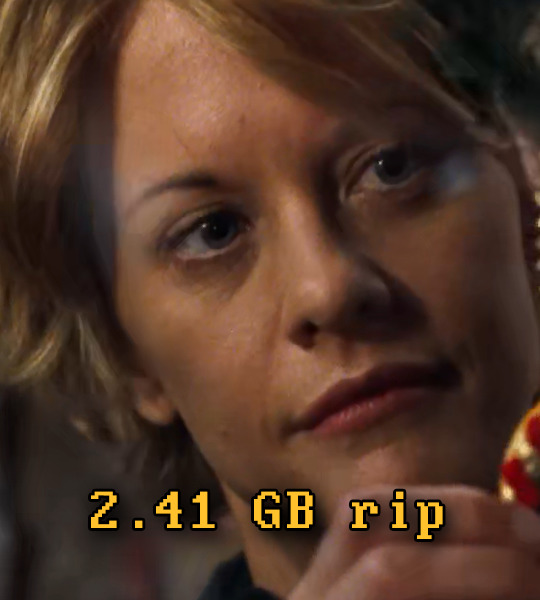
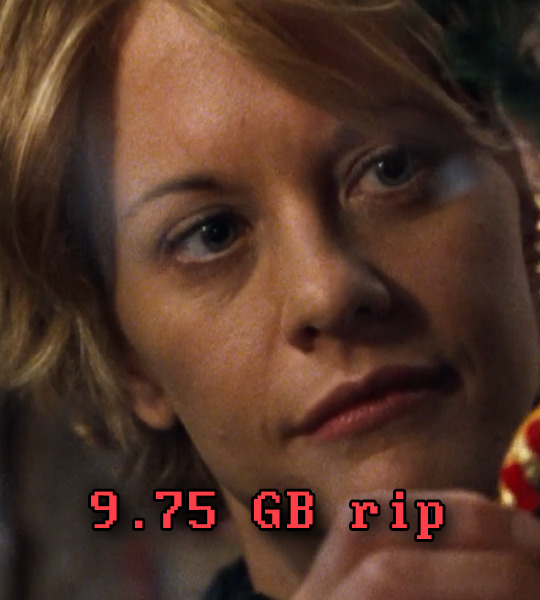
(these pictures are best viewed on desktop tumblr)
When it comes to Blu-ray rips, download remux versions of films and shows if possible. Remux means .mkv files that are uncompressed and straight from a Blu-Ray disc. Giffing remux rips cuts down on the possibility of seeing pixel-y effects a LOT in my experience. It’ll take a bit longer to download than typical 1080p rips but it’s worth it imo.
For TV episodes, if you can’t find a Blu-Ray rip, uploads with the word AMZN in it are usually the highest quality and your best bet (unless you see another upload that’s higher in file size - again: always try to pick the highest file size). 'AMZN’ means they’re from a person that ripped the episode from Amazon Prime Video.
Also, even better than 1080p is 4k (2160p). I only really recommend this though if you know you’re going to gif something up close and crop it a lot - like if it’s a big 540x540px close-up gif of a person. You’ll REALLY see the difference if it’s a 1080p vs 4k rip in that situation. I usually don’t bother with giffing 4k files unless it’s the case above because my laptop lags when taking 4k screencaps and it takes longer to load them into photoshop (4k screencaps are usually about 60mb each!)
⭐️ Another thing that’s important is making sure that when you actually make your gifs, you set them to the correct speed (.05 for movies and most shows, and .04 sometimes for reality tv and live broadcasts). Here’s my gif speed guide. Having the right gif speed is really important for making a gifset HQ. You don’t want it to look too slow or too fast.
What’s your favorite video player to take screenshots with?
MPV player, hands down. And I’ve tried a TON of programs over the years. I’ve tried KMPlayer and found that it added duplicate frames (and even missing frames) which is horrible, and I’ve tried GomPlayer which is.....I’m just gonna say it, I’m not the biggest fan of it. It’s a little overly complicated in my opinion and it has ads. If you like these programs, more power to you! Use whatever you’re comfortable using. I just like MPV the most because it doesn’t have ads, it’s simple, you can take sequential screencaps with a keyboard shortcut, and it can play 4k movies.
Screencaps I take of 4k 2160p movies look so dull and washed out, like the colors aren’t right. Why is that?
That’s because your computer can’t handle HDR 4k video files. It probably can handle SDR 4k video files, but unfortunately, 99% of 4k rips out there are HDR.

[picture source]
Now, HDR displays just fine on computers that have 4k-HDR capabilities, but most older computers don’t have this ability. Having said that, MPV - the video player I mentioned above can take a 4K-HDR video and fix the colors/lighting in real time so it displays correctly AND take screenshots of it with the fixed colors. If you have an older version of MPV, make sure you download the newest update for this. In my general gifmaking tutorial, there’s a portion on how to install this program on macs. I also just made a video tutorial on how to install it on pcs here!
High quality TV and Movie rips can take up a LOT of space on my computer. Where do you store your files?
I store them on external hard drives. External hard drives are like flash drives but they have a MUCH higher storage capacity. You just plug them into your computer via a usb cord when you need access to the files and it’s that easy. I have two of these Seagate 4TB hard drives in different colors so I can easily pick out whichever one I need. I have silver for my movies (because it makes me think of “silver screen” lmao and it’s easier for me to remember) and then I just have a blue for shows. Now, external hard drives of this size can be $$$$ but it’s worth it imo. Look out for when they’re on sale.
What’s the size limit for gifs now?
It’s 10mb! It used to be 3mb and then last year Tumblr upped it to 5mb. Some gifs initially had distortion because of Tumblr’s switch from the .gif to .gifv format, but they’ve fixed the problem AND increased the upload limit to 10mb. Just make sure not to add any lossy to a gif.
Lossy is basically a grain you can add to a gif to lower the file size down. Gifmakers (including myself) used to use this as a trick to get the file size down under 3mb. However, since the .gifv update on Tumblr, any gifs with Lossy added will look distorted like it’s a gif made on a phone app or something.
_________________________________
That’s it for this guide! Again, feel free to check out my other tutorials on photoshop, how to center subtitles, download hq movie trailers, and more ✌️
UPDATE 6/23/20 ⚠️
I’ve gotten an ask about this problem 3 times since I’ve uploaded this tutorial, so I thought I’d add this in. If you are experiencing duplicate and/or missing frames in mpv, it is a glitch with the latest version of mpv. download an older version like 0.29.0. this happened to me on my mac and downloading an older version fixed the problem.
2K notes
·
View notes
Last Seen Blogs
thetreefairy
the tree fairy

terrifictrauma
Terrific Trauma

aceknuckles
Acerelli Knucklerossa
unalunacincosoles
1 luna 5 soles

snowbunnies-going-black
Snowbunnies going Black