#lol i wanna color this but at the rate i'm going at it'll be finished in either a week or in 3 years so uh. guess we'll see how it goes :DDD
Text
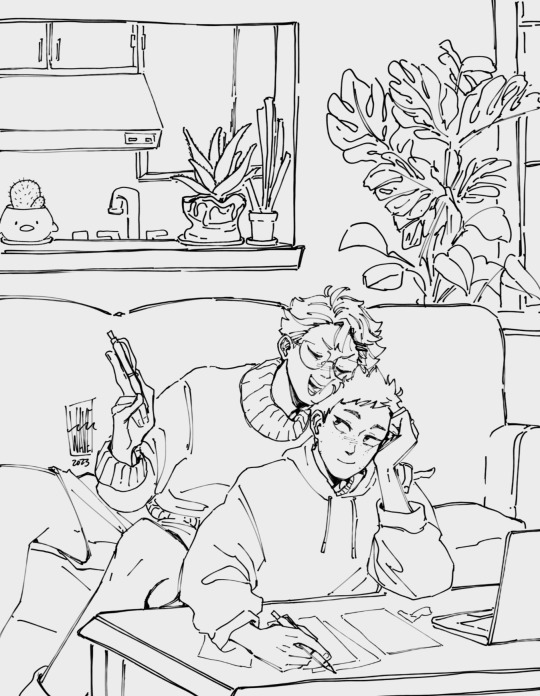
06.10.23 happy birthday iwa-chan!! sorry for inflicting paperwork on you for your bday but at least you have oikawa to help (coughdistractcough) you 🥰
#haikyuu!!#iwaoi#iwaizumi hajime#oikawa tooru#haikyuu#hq#mine#my art#wip#lol i wanna color this but at the rate i'm going at it'll be finished in either a week or in 3 years so uh. guess we'll see how it goes :DDD#still can't believe it's already been half a year since i started this...#(absolutely not looking at the wips that have been sitting in my wip folder for years)#i'm not exaggerating literal years.....#but ANYWAYS yeah i specifically am inflicting tax paperwork on them bc its what i was procrastinating on when i started this#but you can imagine it's whatever kind of paperwork or homework or whatever tedious suffering you want :D#love is stored in the “i hate this thing SO MUCH but i hate it slightly less when i'm with you”
1K notes
·
View notes
Text
Masks and Remaking Kandi Blah Blah
this is my THIRD time writing this post up
Soooo let's talk about that briefly. Why would you remake kandi?
Maybe the string is wearing thin. Maybe you don't like a color you used, or the type of beads or string you used. Regardless of, the general consensus is that remaking kandi you were traded for a reason beyond changing the string to renew it isn't a good idea. Obviously kandi is ever-changing, and this idea might change. Who knows?
Once you've decided you wanna go through with the remaking process, you've gotta disassemble it. I'd suggest starting from the bottom or top and just cutting the string, taking off the affected beads, and cut again. I'd advise going slow so you don't lose any beads. If you're also like me and have really bad vision-- hello y'all-- I'd suggest sorting apart colors you get confused. Otherwise you're gonna be shining a flashlight in your bag of beads for an hour wondering 'is this black? or dark blue?' Plot twist: it's neither and it's dark purple.
Today I'm gonna be using a modified version of this pattern by T3TR1S, with the old mask pictured below. Never too late to start on Halloween preperations, right?
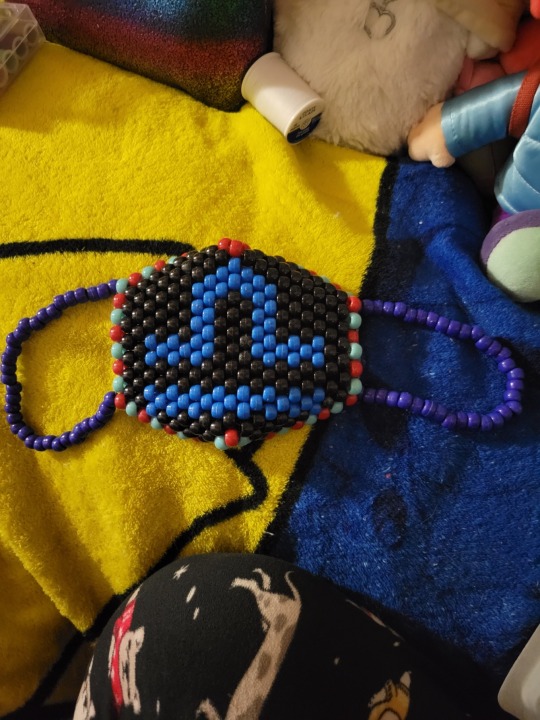
[Image ID: An uncropped photo of a kandi mask. It's 21 wide by 14 tall. The straps are a dark blue. The mask is black with a red and light blue alternating border, and the mask has a libra sign on it in a more cerulean color. End ID]
look i felt too lazy to crop that last night.
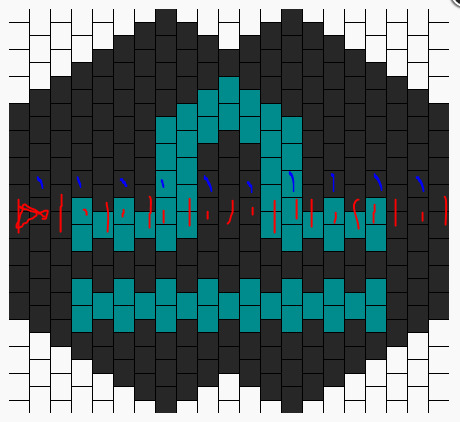
Regardless of the pattern you decide to use, it's gonna look something like this when you enlargen it/click on it.

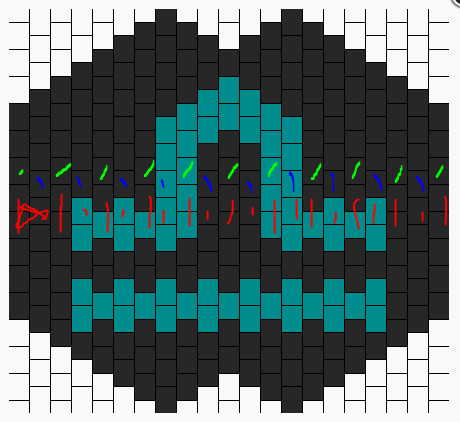
[Image ID: A picture, once again 21 high by 14 wide, of the patten for the mask above. This is the unmodified version. It lacks the red and light blue border, and the sign on it is more of a darker teal color. End ID]
There's no numbers though, right? If you recall from one of my multi-stitch tutorials, this is because masks can be started from a few different places and can be finished in a couple of ways that're all similar. Having numbers would likely get confusing.
First, you're gonna be chosing a place to start your mask. I personally like to pick somewhere around the middle of the pattern. You need to start your mask from one of the straight sides, and there has to be at least two beads to start off with. For instance, starting from the two beads at the bottom of the left side would work, but using the very last bead-- only one of them-- wouldn't. This is because of how brick stitch-- or more commonly called peyote stitch-- works, which will be explained shortly. AKA, right now.
First, you're gonna wanna grab some string. I suggest about two arm's length is good for now. Take that, and fold the two ends together like so--
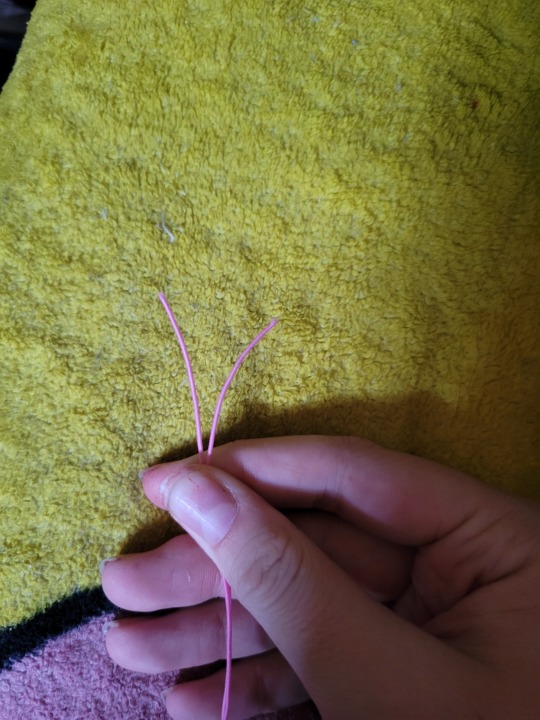
[Image ID: a picture of me holding a piece of pink string. It's folded together, and the two ends of the string are pressed together. End ID]
This is why we need where we're starting to have two beads, because that's how we start peyote stitch! I'm not going to go too much into detail on that here, because I plan on writing something on peyote stitch anyway.
Follow your pattern across whatever row you chose. It should be a straight-shot across-- there shouldn't be any weird curving or anything yet. You're gonna put on those two beads, then the one bead depicted in the middle of those two. Like this--

[Image ID: A picture of the same mask pattern from before-- but with red marks depicting the two starting beads, and the one after. End ID.]
This picture shows where I'm starting my mask-- the two beads on the end then the one bead. You're gonna put the two beads on the string-- one per end of string you're holding together-- then you're gonna put your strings together and put the one bead through BOTH of the strings.
For this, I'm gonna end my row with two beads-- great! You... might not though. I think that's possible? Regardless, it makes everything a bit harder. At the end of your row, I highly suggest taping an end of your string down after pulling it tight, and taking the other end of your string and beginning building. You'd start building by putting on an end bead (a bead above/below where you ended, respectively) and going through the next bead that's sticking up (or the last two beads you put on). I'd build that for a row or two, and then build with the OTHER string for a row or two. From there, you can just keep going til the points, which I'll show how to handle shortly.
If you're gonna end with two beads-- great! Finish up that row, putting on the next two beads, then the one bead, then the two beads. Follow the pattern you have on hand for color changes, and make sure to keep track of which string is the TOP part of your row, or the BOTTOM part. Otherwise, you might end up with colors in the wrong place.
When you're done with that row, if you have two beads, congrats! You can tie that off using some square knots. Welcome to the building of the actual mask! The entire way this works is through putting a bead on, and going through the next one sticking up... for now. There's weird ways to starting new rows that I'll unfortunately have to cover. Look at your pattern.
[Image ID: A picture of the mask pattern, with red marks all along the first row. The next row is marked in blue. End ID]
In this picture, I've shown my first row. The blue marks will be representing my next row, building upwards. Building downwards would be the same thing, just toward the bottom of the pattern. In other words, the next row is depicted as the next raised beads near your last row.
[Image ID: A picture of the mask pattern from before. The third row of the pattern is highlighted in lime green. End ID]
Here, I've taken the liberty of highlighting the third row for you! But once you get to the end of that third row, you're probably wondering how to put that end bead on. This is the unfortunate part...
There's a couple of different methods to this. This is Vicky's old tutorial on masks, which could be useful and worth it to follow instead of this if this doesn't make sense.
I learned using iHeartRaves' video. You know, the one with people complaining in the comments about this part in particular? I spent about an hour figuring out how to do this, but I think I have the hang of it by now. So, here we go.
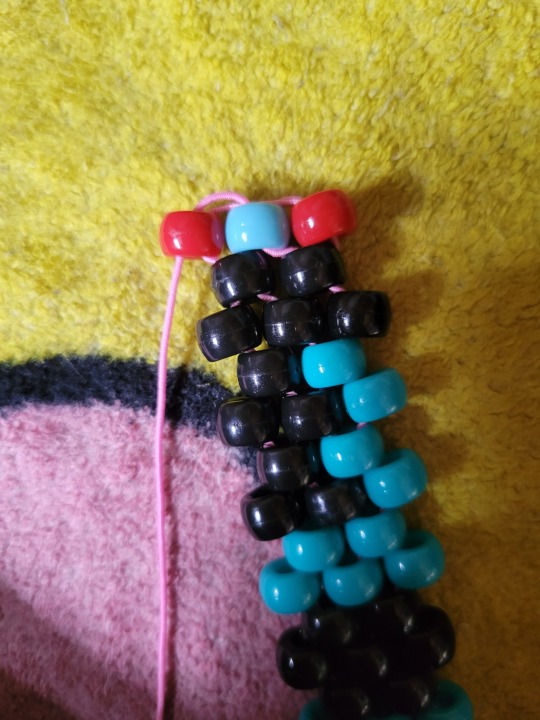
You're gonna put a bead on your string, the bead should be in the color of the last bead on that third row. For me, in the original pattern, it'd be black. For my modified version, it'll be red.
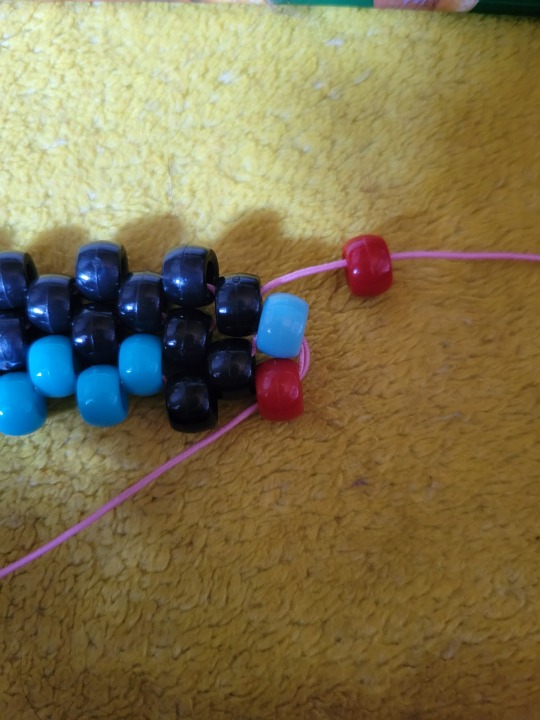
[Image ID: A photo of my mask progress. There's a red bead hanging on the pink string I'm working with to build upwards. There's a blue bead and a red bead below where the red bead will go. End ID]
You see that red bead to the side there? Below the light blue one? Stick your string through the top of that, like so.
[Image ID: A picture of my mask work in progress. The pink string from before is going through the top of the rightmost-- or the bottom if the mask is looked at horizontally-- red bead. The string is coming from the bottom of the bead, and the new red bead we put on the string is posistioned next to the light blue bead in it's rightful place. End ID]
If you pull tight (and you should!) the bead will move to the top of those side beads. You can use your fingers to move it and hold it in it's proper place.
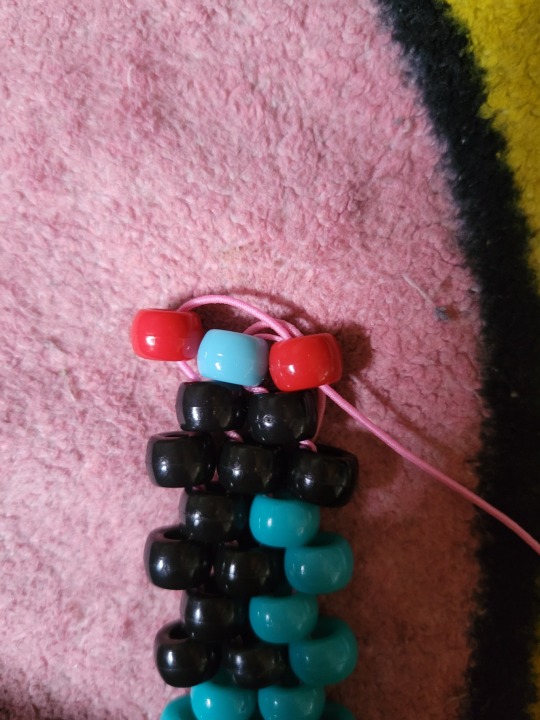
Now, take your string and go through the bottom of that light blue bead, like so...
[Image ID: A picture of my mask WIP. The pink string was pulled through the bottom of the light blue bead, and is coming out of the top of it. End ID]
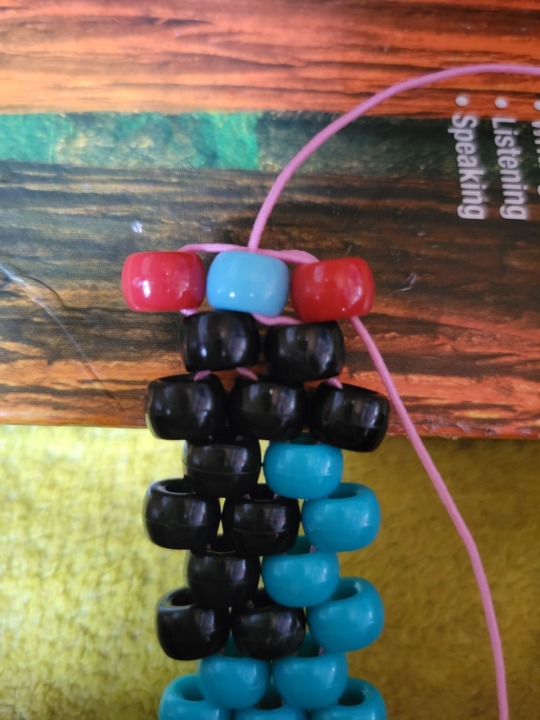
That part might be a bit hard. Don't be afraid to move stuff around to get it in there, you can tighten it up and put the new red bead back in place after you get it through. From there, you put your string through the top of the new red bead, like so!
[Image ID: Another mask WIP picture. The pink bead is going through the top of the new red bead, and is coming out from the bottom of it. End ID]
From there, start row 4! Your new red bead should be secure now. Everytime you come back to this side, you'll need to do that. It'll always be the same process. Put new bead on string, put string through top of bead two beads down, put string through underside of bead one bead down, put string through top of new bead.
On the other side of your mask, you can just continue building by putting the end bead on, and going through the last bead you put on. Though I suggest pulling the string for the last bead really tight, this'll keep everything together better.
Keep following your pattern until you get to the spikes part around here--
--okay only 10 images allowed per post. fuck you tumblr. at ANY rate...
There's a part of your pattern where it doesn't go straight up anymore. It drops off and starts to make a spike. Vicky explains what to do about this pretty well here. But, even then, here's some text instructions. When you finish that row, and there's no bead to put above it to start another row, just shove your string through the last bead you put on. This'll start the spike shape. You'll just keep doing that as you go through to carry the spike higher and higher.
As you go, the spike will break off into two smaller spikes. This is fine-- just focus on one spike, building on that until it's finished. After you put that last bead on, take your string and weave it towards the middle of your mask so you can start the other spike, tie it off tight a few times, and start on the other spike. I hope that makes sense-- I swear I'd have pictures if it wasn't for tumblr's image limit. (actually you might be better off watching Vicky's video from here, I'm not gonna lie. If you wanna learn to tie off the mask and tie together the spikes from her, here's a timestamp for that.)
If you're still here, I'm sorry lol. But let's keep going! Build until the spikes and complete those on the top, then build on the bottom and make those. When you're done, you should have a shape resembling the pattern you're following.
okay ive been here for, about 4 hours. ill be back tomorrow (but in one second for you :) )
it's the next day, let's talk about lacing up masks!
You're gonna want a small piece of string, doesn't have to be that long at all. You're gonna thread that through the bead in the middle of the spikes. For me, on the top, it's the black bead above the top of the libra sign. Even it out so the two ends of string are together and they're mostly equal. Then, you're gonna take the string on the left and put it through the right bead that's one up. The left string goes through the right bead one up. Then you take the left one, go one up to the right. Left one goes one up to the right. Right string goes through the left point, left string goes through the right point.
Pull that together! It should lace up into something a lot like this (photo by sarasunshine on KandiPatterns). See how her mask comes together at the top in a kinda point? That's what we're aiming for. Pull that tight and tie it off. Do the same to your bottom spikes.
We're at the final stretch! Specifically it's time for mask straps. This one is also hard to explain, so I'm gonna link you to the point in Vicky's video where she adds straps. In addition, she only laces her masks twice, while I do mine thrice. There isn't much different between the two, it depends on how you feel.
Straps. I'd highly suggest more stretchy fabric cord for this rather than clear elastic or something not so stretchy. I used all my fabric cord on this, so I'm gonna use this weird jelly glitter string I found? I genuinely have no idea where it came from. I do my straps in the same way Vicky does, and I think she can explain it better than I because she isn't limited to 10 images per post. Though, I will suggest you be careful, it's really easy to use too many beads, or to make the straps too tight or too loose. imo, i like to have a LOT of room on my string (seriously, i only used about 22 beads) because I move the beads around so they aren't on the back of my ears. by the time i'm done tying on my string, the straps are usually half string and half beads.
Just follow how Vicky does it, fiddle with it a bit, it's ultimately up to personal preference about how you'd like to do it.
okay that's all i've gotta say uhhh i should have something up on putting fabric in them for actual use soonish. go forth and make stuff.
#kandi guide#kandi tutorial#kandi mask#kandicore#scenecore#best of luck to y'all tumblr's image limit kills me once again
21 notes
·
View notes
Last Seen Blogs

hapfish
hapfish

daisies-and-chai
i love every glittering facet.

ssydneysosweets
Sydney So Sweet
toyboxcomix
Toys In Action

sukhyecouple
Keun Suk♥Shin Hye International Fanclub