
kandi-tutorials
kandi guide + tutorials
ive been seeing people in the kandi tag lately with questions i can totally answer, but i dont wanna screw with my main. run by @celestialAlt on Kandi Patterns.
My Kofi! Don't want to deal with fees? My paypal is @celestialAlt.
If any of my links/info are outdated, please inform me. And please send me pictures of your kandi! I'd love to see it all.
33 posts
Don't wanna be here? Send us removal request.
Last Seen Blogs

st4rryyaeris
Gisele's oc hotspot!!

nervoushottee
I wanna feel it.

omoshiro1
オモシロ1

syriee100
Morena. Sy 👑

celerydays
celery days
Text
side shop! check it out if you'd be interested :)
hi! in the midst of us spraining a tendon or something (hand hurty) and donating blood and doing math (ugh) we've launched a Big Cartel shop!
right now the only thing on there is more of a one-on-one requesting experience. so you can order a moodboard, or multiple things, and i'll check with you as we go and if you're ultimately not happy, you'll get a refund. the benefits to this are: it's more personalized, and requests there will be done faster than ones here. but don't worry! i'll still do ones here too. they may just be added to a queue instead.
also i'll have physical items in the future too once i figure out more about shipping and such!
also pfp is a work in progress, i just pulled that from a collage of transgender stickers
4 notes
·
View notes
Text
hi! i have set up a goal on my ko-fi for more kandi supplies so i can keep this blog running. i'm not exactly making money at the moment due to disability, and the minimum donation amount is a dollar, so anything really helps!
dont want to do that? i have a shop coming (hopefully) soon! i just need to figure out how tf to calculate shipping costs (and find a scale)
#donations#kofi#kandi#kandicore#scenecore#scene#kandi kid#not a tutorial#you're not obligated to but it helps
2 notes
·
View notes
Text
Kandi Collection
video showing my kandi collection! also hi, that's me. i finally have the means to film, even if the video quality is kinda bad. i thought firstly i'd show my current kandi collection! it's mostly singles, but i'm hoping this inspires someone or someone enjoys it.
youtube
also working on captioning it :)
#kandi#kandi tour#kandi collection#kandicore#scenecore#not a tutorial#youtube#video#Youtube#whenever it decides to process to HD#SD is available though
2 notes
·
View notes
Text
I like creatology! The cheap beads Walmart carries are good too. In addition, I've had success with anything from BeadTin. Usually, I use beads from either Michael's or Walmart. Walmart is cheaper, though the beads are smaller. I haven't had a bead from Michael's snap on me before
I've been having no luck anywhere, and keep getting ignored 😭
Do any of yall have specific bead brands you use for kandi? My beads keep snapping in half and falling off
15 notes
·
View notes
Text
hello! i've been doing kandi for a while, i thought i could try to give some advice.
i'm under the assumption that this is a peyote pattern, yeah? if not, the advice is still pretty universal. taking the pattern (either on PC screenshot or through a printout) and crossing it out as you go is a REALLY good idea.
if it's a multi-stitch pattern, then there's an option on kandi patterns to display row numbers on top of the original pattern. that could really help, i know it helps me!
if it's a peyote pattern, i know the hardest part for me is changing rows. No matter what, looking at more tutorial videos is always something I'll suggest. Try to follow multiple videos! And if you need help beyond that DM me and I'll try my best to offer more advice/one-on-one help.
my summary is this: watch more videos, cross out stuff as you go along (cross out a bead once you put it on, don't put on a few then cross it out, that increases the chance of mistakes)
this is a learning process! it's really hard, and it's certainly one of the more challenging art forms (in my experience). it took me years to learn how to do the things i do, and i'm still learning. every piece you do, no matter how messed up, is practice! and it's getting you experience, which is always good.
keep it up, i'm confident that you've got this! it's better to keep trying and learning than to stop trying at all :)
♥️🧡💛💚💙💜
update: im learning how to read patterns but im still really struggling so im holding off on posting stuff until i can get one that i feel ive made one that isnt too messed up. sorry!
my current struggle is that i always somehow miss a column or misplace a bead and sometimes both.
im printing them out and crossing them out as i go but i might go back and go through more tutorials again.
any advice would be super appreciated though! again im super sorry for not posting even though ive been making stuff. i'm just not proud of it.
♥️🧡💛💚💙💜
4 notes
·
View notes
Text
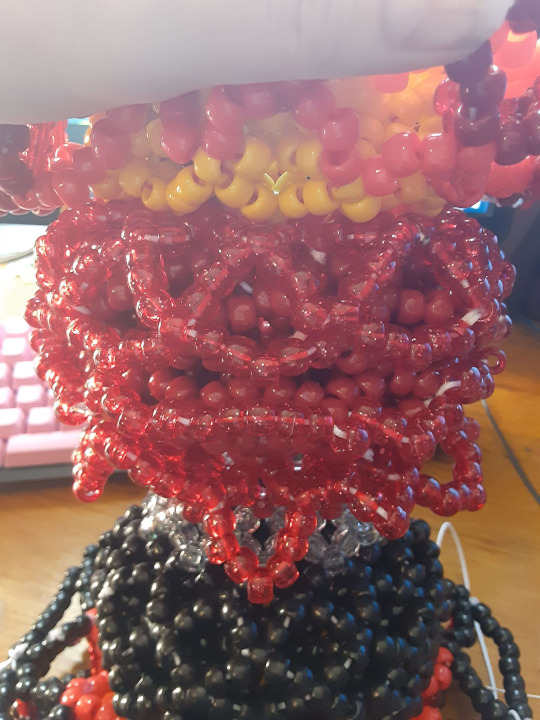
Hourglass
oh yeah. it's time
rough estimate of materials here. this is a VERY BIG project and I ran out of some supplies (like string, so I changed the amount from 100yds to 300 just to be safe)
i highly suggest setting a timer for two hours so you can remember to eat and such, especially if you're prone to hyper-focus like i am.
also, if you want more pictures of this, i have a bunch of them on my ko-fi. they're absolutely free to view. if you're stuck, DM me or send me an ask, or check there!
you know this video??
i saw it and went 'oh my god i need to have it'
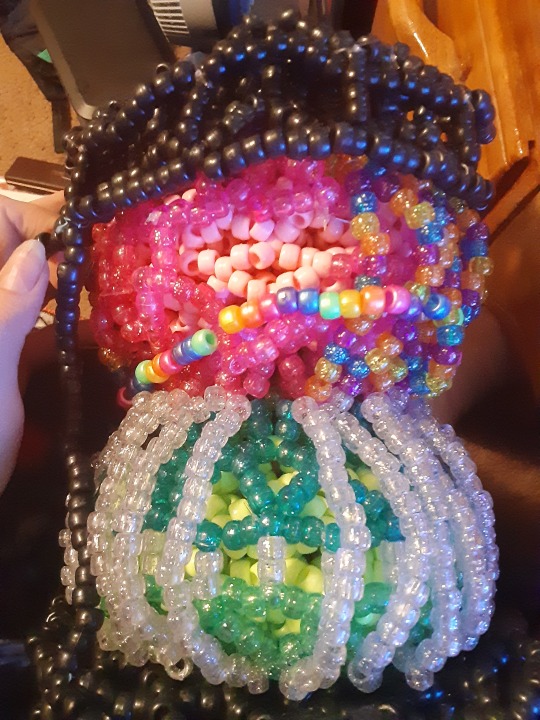
and now it looks a bit like this
im making another one for my boyfriend for christmas. better to go big than go home, right? so, while i was doing that, i decided to do a write-up on it. but first..
design creds go to ghostinthecrowd on tiktok. their linktree is right here, so you can buy them a coffee or check out their instagram. they also have a BLM carrd linked. i 100% suggest their page if you're looking for any big projects.
now... this hourglass took me about a month of on/off work. this is a hefty project. it sizes about forearm length, and its probably 5ish inches wide. this would make a great centerpiece for decoration, or an amazing trade! anyone who receives this is sure to be over the moon about it!
pre-emptive warning: this post isn't going to contain many pictures. im writing this assuming that you have basic kandi knowledge (ufo cuffs, carousel cuffs, x bases). if you don't, or this is your first project, i admire your determination! ill link various tutorials for things next to what i'm doing so you can follow along too! my first project was an x-base, and i'm not going to tell people to do something easy if they're that determined. i think you've got this.
in addition, i made this a bit out-of-order. if my pictures look like i jumped ahead, or didn't finish a part, don't stress out about it.
without further ado...
hourglass!! time!!!
hold ur horses. first. compare with these pictures as you go to see if ur doing it right. it should look roughly like these when ur done (i say roughly, because i assume youre using diferent colors). also, as you go, im gonna reference my hourglass pictures a LOT. reference those as you go

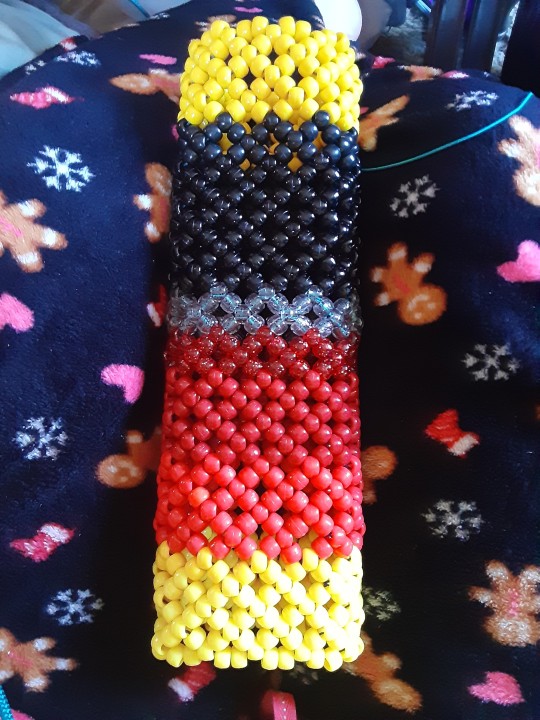
i started by putting 33 beads on a string. whatever you go with, i'd suggest that it fits around the bottom of your forearm, near your elbow, if you want to wear it. if not, just go with 33 honestly. the amount you go with has to be a multiple of three. (33,36,39,42, etc). this color will be the top of your cuff, that's in a carousel cuff style, and we need two Xes. (x-base tutorials here, and here, and here). don't finish it off after you have two Xes, after that we're just changing colors. at the end, actually, we'll have 14 Xes (thats a LOT of Xes).
change colors to the first main color of your hourglass. mine was green. now it's red. make 4 Xes from that.
change colors to the sparkly bead you'll use in the future. mine was a sparkly green. make one X from that.
change colors to the second sparkly bead you'll use, this one was pink. make one X from that.
change colors to the second color of your hourglass, mine was just a light pink. make 4 Xes from that
change colors back to the color of the carousel cuff, or the color that you first used. in the pictures, it's black. make 2 Xes. finish and tie off.
Carousel Time Pt. 1
carousel cuff tutorials here and here. if you don't know how to make them, watch that, then come back here. if you know how to make them, still read through this. it's a carousel, yes, but it's a bit different.
we're doing this with two columns! that's right baby, this is multi-layered. for reference, here's pictures of it when done.
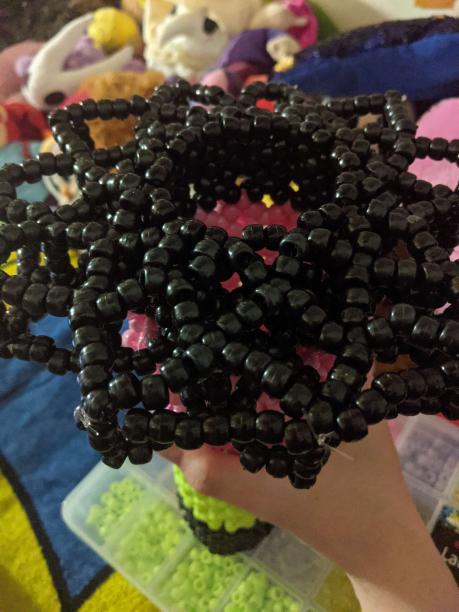
you know when you make ufo cuffs, and you start by making those Xes? like you have spikes, then you bring them down a bit to make, like, 3d Xes? we're starting by doing that. ufo tutorials here and here.
3d x example
through connector beads (the middle of the xes on the x base), string 5 beads, and go through the connector to the side of it. do this all the way around and you'll get nice spikes. go through the middle bead on those spikes, string 2 beads, and go through the connector below. i do not know any better way to describe this, honest to god.
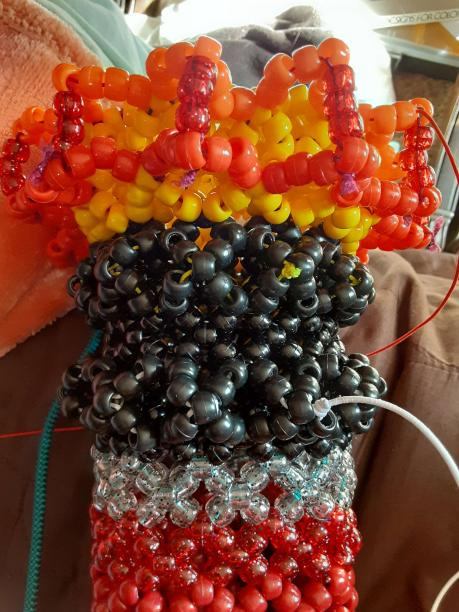
go through that first black connector bead, right below the yellow. make more yellow spikes. bring it up by going through the same connectors as before. beading needles help a lot here. actually, i'd call them necessary. don't have one? a bent paperclip works perfectly. just straighten it out and make a loop at a end so it works as one. pliers are good for that.

those r some sick xes. lets make them sharper. stick ur string through one of the points sticking up in the middle of a 3d x, string 7 beads on, and go to the next middle. do this all the way around on the top and bottom. it might look kind of wonky, just keep rolling with it. when ur done, your spikes should look like those red ones on the bottom
columns! the ones described in carousel cuff videos. this is what makes a carousel cuff a carousel cuff. on the point that's sticking out (or the fourth bead) put a string through it. put both of the ends together, put on three beads, put both ends through the bead on the opposite spike, left string through left side, right to right. do two square knots, and do this all the way around.
also, a tip. make sure your strings dont cross when putting on beads. they have to stay parallel otherwise itll be jankey.
do this same thing to the bottom of your cuff. itll look something like this when done

there's more, though! through that fourth bead, string through, add 9 beads, and string through the next spike. do this to the top and bottom, all the way around. make more columns of three on the 5th bead. it'll look like this when done (ignore the black, thicker portion. we'll get to that later)

do this to the bottom, too. connect the points with 8 beads on the top and bottom of both carousels. for the 8 beads, dont pull the string that tightly. it keeps it from being stiff, it looks better if you just pull it together.

i do not know why the image is pasting sideways. just turn your phone or find the correct version on my ko-fi.
the middle. this is the main bulk of the cuff. start by making spikes of 5 beads that go through the first connector bead near the top. make Xes there.

make another row of Xes through the bottom connector bead, going upward.
and in the place where you made the spikes for the bottom-- string through there and make more spikes that'll go up into the bottom of the top Xes. spikes picture below...

it's a tight fit-- that's ok. that's part of what makes this project look really bulky. it might look kinda scuffed but keep going, that's normal.

do that all the way around, making three Xes
i do not know when i will hit the image limit; however, i am horrified to find out so i refuse to count my images
at this point, it's really connecting everything. that was the hardest part (to understand at least). put your string through the center of an X on the top, string 5 beads, and make a spike going to the next X center. do this all the way around...

and bring it down like this
make spikes on the bottom and bring them up, and then we're done with this section!

cool. do this again on the lower half
string through the last red connector bead, closest to the yellow part. add 5, go to the next one. do this all the way around, and bring it up to make a 3D X to the connectors vertical and right above it.

make another row right below it, stringing through the connectors you used to bring down the top spikes. bring it down to the connector vertically below the one you just strung through
once again, no fucking idea why it's sideways ._.
go through the bead you were using to bring it down-- it's the same connectors you were just using. pick one, go through it, do more spikes of 5. bring that last one down to the connector vertically below the one you were using to make spikes.
also, dont worry about it looking weird. itll be buried later anyway, it doesnt have to look great.

make spikes of 5, bring them down. make spikes of 5 on the bottom, bring them up.

ok. we're 3/4 of the way there. this is the final stretch!
go through the center of one of the upper layers of Xes. it doesn't matter if you do the top or the bottom. put one bead on, and string around and through that same center bead from before. string 5 to the next point. string one, go around. repeat all the way around on the top and bottom. pull this part REALLY tight. tie off at the end, snip. do the other side.

this is where i say good luck if you chose to use thick string.
go through the connector where the first spikes, closest to the yellow, started. it's on the base on the cuff, right about here
as you can see, add 5 beads and go through the next connector. do this all the way around. go to the other side and go through the last solid connectors and do the same thing: 5 all the way around.
on the top, string three through a spike, go to the bead sticking out below it, string 3 more, go to the next top spike. here's an illustration demonstrating this.

the purple line is the bead to go through. that one is the one that was put on top of a solid red spike. the blue lines are the three strung beads. thee green are the spikes you're moving through on the top, and the yellow-green is the rest of the top spike. do this all around the top.
do this on the bottom too, except stringing through the third bead in the straight string of 5. 3, string, 3, spike.

make these columns of two using the same method to make the carousel cuff columns. make one, skip two, make another. do this all the way around.
this might sound complicated so bear with me: thread through the same beads you were using for the top of the shiny red spikes, and make more spikes of 5.

if this doesn't make sense, PM me or send me an ask.
do that all the way around.
UPDATE: ok i ran outta supplies. and i kinda can't buy more at the moment, money's tight. so we're pictureless now! i'll try my best to be clear and consise.
After making those five, connect them down to the next section by stringing through that solid black bead on the base, stringing 2, going through the center of the 5 from before, and stringing 2 again. Do this all the way around.
This is essentially doing the same thing that we did on the top. From the black connectors on the base near the very top, string 5 all around. From there, string 7 around. Start stringing those parts together and making bars. Here's pictures of what it should roughly look like


For the side parts where they connect the top carousel to the bottom, pick a bead on the lower side of the carousel, connecting to a bar, and bead it going all the way down. original video used wire for this, but it was too hard for me to work with and i used non-stretchy cord instead. It should connect down at another bead connecting to a bar on the other side.
The rest from here is flare. I liked stringing through some beads toward the top of the clear, sparkly overlay and just stringing down. That's the clear sparkles/rainbow sparkles you see in the photo. After, I decided to make a single that I just threw on there (The pearl rainbow in the middle in the photo).
Get creative! Maybe add something that's really 'you'. Special charms or small perlers come to mind.
...
Hoo. Okay. That's it. I originally wanted to make this for my boyfriend for Christmas, and this post is going out mid-March. I seriously hope this isn't gibberish. Depending on how I feel down the line (likely years from now) I might make this tutorial into a video.
DM me or send me asks for questions. I'll try my best to get to your question ASAP. and as always, pictures of your kandi are always welcome in my inbox, i'll be sure to post them :)
best of luck, you got this.
#long post#like REALLY long#kandi hourglass#tutorial#kandi tutorial#scenecore#scene#kandi#buy me a kofi if you're feeling nice :) but no pressure ofc#also i'm thinking about expanding this blog into more than kandi#obv i still love kandi but that hourglass burnt me tf out and i have other neat hobbies!#idk it's a thought#hourglass#3d art#art
11 notes
·
View notes
Text
Hourglass prep/update
hi! work is progressing steadily on the hourglass. i had a month or two long leave of absence due to my health. as i work on the last couple of parts of it, i wanted to post this in advance so those who might be wanting to do it can prepare properly
also these numbers are rounded up
overall, im predicting this project taking 300ish yards of string (which is a lot more than you realize), 2000 black beads, 2000 red, 1000 sparkly red, 1000 sparkly clear, and i want to say 2000-3000 yellow beads.
so 2000 of your first main color, 2000 of your second. 1000 of the sparkly version of your first color, and 1000 of your second. for the carousel parts, i want to say they'll be 3000 or so
also, wire is helpful for the bars on the sides, but it isn't 100% necessary
im rounding up by a lot because i had times where i nearly ran out and had to improvise. and that kinda sucks lol. so always order more than you think you'll need
anyway, hourglass Soon(tm). and if you want more updates, or want to support me, i have a ko-fi here.
also, side advice, really take this project in bits and pieces so you don't burn out as bad as i did. i made the mistake of doing half of the project in one sitting, and on a bad health day. make better choices than i have lol
#kandi hourglass#it's getting it's own tag#update#not a tutorial#kandi#scenecore#ill likely link this as the first post people should see when they click on the hourglass tutorial. its a helpful post
2 notes
·
View notes
Text
self-bump because im really happy with this :)
Notion Template designed for Systems
hi! i wanted a notion template for system journaling and such and didn't see one. so i made one!
it's entirely free (pay what you want) and it contains a system-wide journal, journals for different members, links to different system accounts, embeds you can fill in, a nebula theme and different themes for different members, system-wide mood tracker and journal prompts, member-specific journals and mood trackers and book trackers, and room to add more as you wish! it also includes crisis links and some system resources! i hope you all enjoy :)
2 notes
·
View notes
Text
Hourglass Update
hi! the hourglass post is going swimmingly. kinda. i planned on being done today (NYE) but unfortunately i just ran outta time. it should be out within the next few days. if you're eager to see progress, i have progress pictures on my ko-fi for free viewing :)
have a happy new year's eve everyone!
1 note
·
View note
Text

Raver’s Fantasy - Submitted by @meowstic-seer-of-the-future
#BE11FF #0401EE #19FEE7 #1AF815 #FA35FF
713 notes
·
View notes
Text
Beadtin
no im not sponsored
im currently writing a really big post on the hourglass, and i honestly anticipate that it'll take about a month or so to finish. me, not even have applied for disability yet, is interested in saving the most money possible.
so beadtin's nice. keep in mind that im located in california so things where you are might be different compared to me.
beads r listed here, elastic cord is here.
i ordered, like, some odd 6000 beads for the aforementioned hourglass. the red opaque beads are a bit darker in-person, as are the yellow ones. remember, though, that i've got a mild color deficiency due to my epilepsy (according to my eye doctor, it's my epilepsy, at least). it's likely that the difference isn't that bad. i can't really tell the difference between these yellow ones, and the creatology yellow ones. so take and leave what you will from that.
it's $2.79 for 500 beads, which is really good! and it does seem to be 500, honestly. i've seen one broken one in one of the bags (clear with black spots) but i haven't noticed any others. that could be because i am not looking hard enough though. regardless, you can't really beat $2.79.
shipping, for me, was at a minimum of $8.99. at first glance, this seems really excessive for their cheapest shipping option (at least, with the order i had. prices may be lower if you order less, or higher if more). free economy shipping is for orders $100+, it seems. despite being basic standard service, it seems my package was listed as 2 day delivery. i did get it after two business days of it shipping! i don't know if that's how it usually works, or if i just got lucky.
for someone without amazon prime, and who also looked at some of the websites listed under the shop links on kandipatterns, i think beadtin was the best option to go with. the beads seem to be of good quality, they arrived really quickly, and getting them here was cheaper than anywhere else, i think.
8 notes
·
View notes
Text
Patterns I've made (UNDER CONSTRUCTION)
Exactly what it sounds like. Stuff I've made patterns from, either by hand visually or from a Perler Pattern generator.
OFF Logo
(66 black, 118 red, 28 white, perler pattern) (Wayback Machine link)
Her Imperious Condescension (Homestuck)
this one is fucking gigantic. i warned you.
(Top left) (WM Link) (295 dark grey, 62 yellow, 44 orange, 243 black, 23 red, 17 white, 78 light grey, 48 darker fuchsia (cranapple, maybe?)
(Bottom left) (WM Link) (1351 black, 320 dark grey, 66 light grey, 8 dark fuchsia, 15 yellow, 64 of a lighter fuchsia (maybe red fruit punch), 122 of a medium grey (maybe pewter)
2 notes
·
View notes
Text
How does KandiPatterns work?
supplemental post while i'm throwing shit around and doing things. this post is made with pc in mind, though the point of this post is to highlight how to do things on the site and such. many things here will likely apply to mobile, but a post on that might follow in the future. depends on how my phone wants to work
If you're going to be making kandi, your main hub for activity is likely going to be KandiPatterns. You open it and see this:

(ID: A image of Kandi Patterns' homepage. I will describe what it looks like shortly. End ID)
The bar in the top middle is the search bar. You type something, and you can click the green magnification glass to the right to search in different categories. You can search for patterns, photos, users, forum posts, and posts made by the creator of the website, Crumpet.
Looking for Patterns
If you want to go straight into looking for patterns, you can scroll to get the newest ones that were published. These are patterns that, generally, received a high amount of votes by website users in little time. If you want to look for specific pattern types, or themes, you want the circular buttons right below the blue header. They're ordered as such: characters, animals, misc., simple, and food. There's also a holiday category that's available here or by going to the blue bar and hovering over patterns, then going down to 'Holiday Patterns". For ease of access, I'm going to go to simple patterns.
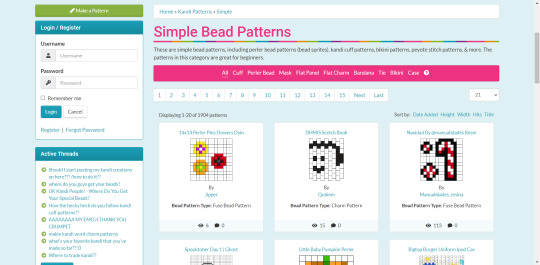
(Image ID: A screenshot from Kandi Patterns of their simple patterns category. The patterns are organized in grid form, with a candy cane being on the far right and some flowers on the left. There's a pattern creator in green on the left, below it is a login box, and below that is recent fourm posts. Above the patterns is a bar for page number, and above that is a bar for selecting pattern type for filtering. End ID)
Simple patterns are easiest to start with. From here, unless you're looking for everything, you likely want to use the filters. You can sort by date added, height, width, hits, and title in the area above the candy cane pattern. You can select how many patterns should show per page using the drop-down menu above that. To the left is what page number you're on, and above that is the pattern type filters.
All is all pattern types. Cuffs filter out everything except multi or peyote stitch patterns that are intended to be cuffs. Perler Beads sort for Perler patterns (which can also be used for cross-stitch!), Masks are peyote patterns with lacing at the top and bottom and straps so it functions as a mask (not a medical one or one suitable for protecting against illness! You need to sew fabric in them for that). Then it's flat panels, which are really big peyote patterns. Flat charms are smaller peyote patterns, bandanas are peyote patterns in triangle shapes made to be a bandana. Ties are peyote patterns made to be ties. Bikini patterns are a bit complicated-- they're also peyote patterns. Cases are usually for phones, but sometimes you find coin purses and such in here too.
To go back to the home page, hit the home icon on the blue bar next to 'Pattern maker'. To post photos, make sure you're logged in and go to the pink button in the 'Photos' drop-down.
Profiles
If you haven't, make an account. It's really useful. You can edit your account by hitting the 'Edit profile' button in your bio. You can add other social media here, set gender and a set of pronouns, set your bio, change your profile picture, and more here! Make sure you save using the blue button at the bottom, below where you enter your country. On your profile, at the top, you can set a status. It never disappears, and anyone who can see your profile sees it. The date and time you set it also shows under it

(Image ID: A picture of Kandi Patterns' website. To the left is my profile picture, my user, my online status in green, the date I was last online, my gender and pronouns, and how many views my profile has. To the right at the top is my status, below that is the date and time it was posted. Below that is my bio. End ID)
The status is available outside of profile editing at the top right.
Patterns, Generally
With an account, you can now vote on patterns! And make them! And edit ones you find and want to make, but they're too small so you need to make them bigger! Or vice versa.
Voting is done, on the home page, with the big pink button saying 'VOTE NOW' on the left near the top! It's above the green 'Pattern Maker' button. Scrolling down, you see patterns up for vote. Blue button is a vote, meaning you want it to be approved so it shows up on the regular website (and isn't eventually drowned out and lost). The orange button is for reporting, which is usually for stolen work or inappropriate designs (usually NSFW stuff).
In the same place as before, you can vote by date added and number of votes. If you don't know what to make, maybe try looking here! Especially under stuff that has hundreds of votes and is old.
Using the green button, you enter the pattern maker. Using that is detailed here.
Editing patterns is a matter of finding one you need to edit, first. This can be in the voting section or a published pattern. For voting, the 'Copy to Pattern Maker' button is under the pattern. For a published one, it's under the pattern and it's the far right blue button, right above the description of the pattern.
For published patterns, there's a different look than unpublished. For published ones, under them, you can favorite them, print the pattern, make it a PDF, or copy it to the pattern maker. Under that, there's a box detailing the person who made it, a description set by them, the date it was published, how many hits (clicks) it has, how many beads of whatever color it uses, and the size of it. You can add tags to it below that, and you can comment at the bottom. You can click on the pattern to enlarge it, and on multi cuffs, add guide numbers. I highly suggest learning your wrist size and what you prefer cuffs to be, it's a major help. This can be done through experimentation with singles and small cuffs, mostly small cuffs. The number you care about is width. Experiment and find out what works!
For patterns up for voting, the page looks different. At the top is the name and the person who made it. Below is the pattern. Right below that is the button to copy it to the pattern maker, and below that is a button to add guide numbers to multi cuff patterns. Below that is the bead count and colors, and below that is the link to the pattern maker. Easy enough?
Closing
That's really it. At the very top of the home page, to the left, are links to your favorites and 'stuff'. In the user menu, there's a whole buncha buttons for things like editing your profile or looking at pending friend requests (which, the button for that is also at the top right of the page, if you have any). Below that is a list of active forum threads, and below that is a randomly chosen pattern.
That's really it. Feel free to send questions to my ask box. I know that it might seem like a lot, but it isn't once you explore and get into the swing of things.
Looking for help uploading pictures? Check my index, whenever I make that
Looking for help with the pattern maker? That should be right here.
Need anything else? Send me an ask and I'll take a look at it!
7 notes
·
View notes
Text
I think I'm settled in. We're slowly gonna pick up steam again. I can't foresee any life-changing events this time. So, we should actually be good to go.
I'm gonna make a carrd with more details about... me, I suppose. And I'm going to change up the blog theme a bit. So standby for changes!
#kandi#not a tutorial#life updates#exciting. finally happy to be settled down for the most part#in addition im gonna open commissions for stuff and a ko-fi cause thats my best bet for work rn that i can actually do
3 notes
·
View notes
Note
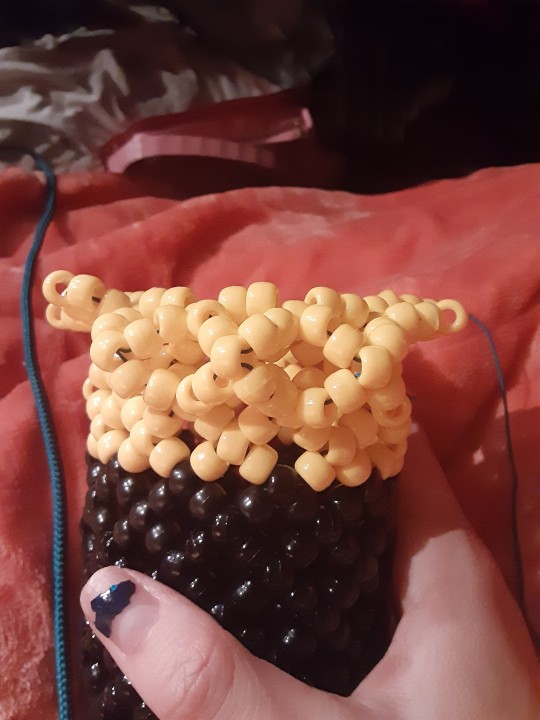
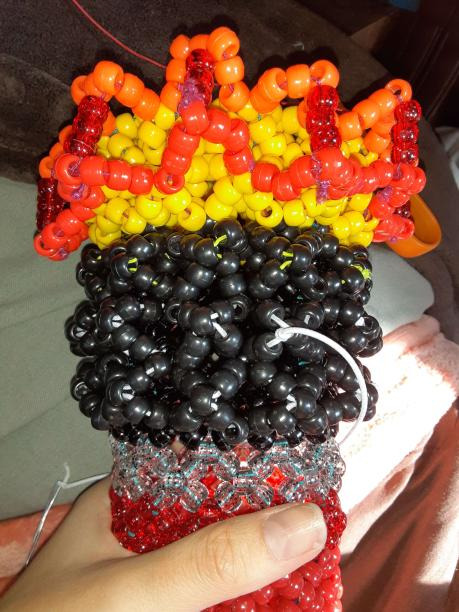
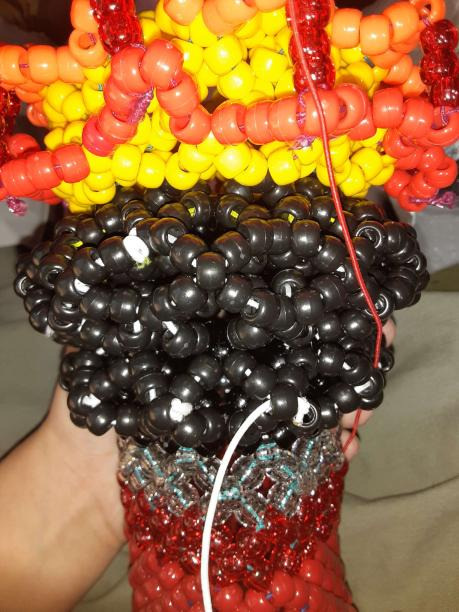
I tried following this tutorial but everything kept loosening up and it doesn’t help that the person who made it used beads the same color. How can I stop this from happening?
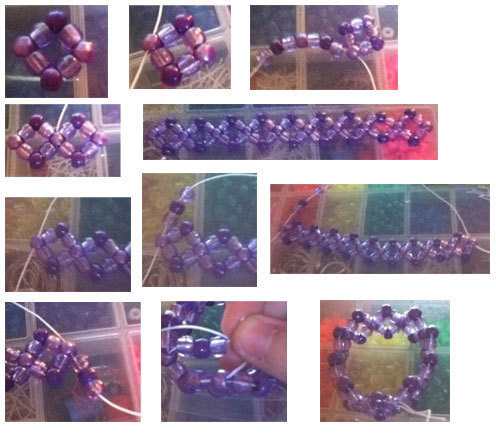
here's written instructions for how i did this
i put 3 beads of color a (darker blue) on my string, then 1 bead of color b (light blue) on my string. then 3 more pieces of color a, and 1 more of color b making for 6 beads total. pull tight and tie. string your string through one of the middle beads that's color a.
put 7 beads, alternating between color a and color b on your string. i positioned my circle of beads like the one in the picture, with my string coming out of the bottom bead. after stringing the new beads, i strung through the end of the bead my string wasn't coming out of. so if my string was coming from the right, i strung through the left of it, and vice versa
pull tight and tie off like a regular cuff (insert string through hole of circle between where string is coming out and bead next to it. nestle it in that crack, put tail end of string through new loop a couple of times, pull tight. i find it helpful to use my teeth to help do it since i try to keep the string tight the entire time)
string your string through your beads so it's coming out the bead opposite the one it's currently in (aka the bead colored a in the middle of the group of three bead a's on the other side)
continue in this manner until crown is desired length (in photo it's 9 circles before they finish it off. finishing it off adds one more circle)
once you have your 9 circles or however many you have, add three beads and string through one of those colored a's beads on the other side in the middle of the group of three. it'll be the one not connected to anything. pull and let the whole thing come together. add the last three in aba pattern, string through the same middle bead as before. tie off tightly
i think a big part of making sure it isnt loose is being sure to tie off and pull tight when you do so after every circle. i didnt make this, im just interpreting the picture into written instructions, so i hope that this is accurate. i think ill come back to fix this and actually make it when i have more spoons, but for now, i hope this at least kinda helps!
7 notes
·
View notes
Text
it's been a really long year

[Image ID: A picture of two different Perler projects. The one on the left is half of a person coming out of an orange portal, and the one on the right is the other half going into a blue portal. End ID]
You're looking at the first project I've made in about a year. It's... iffy. I'm rusty.
I'm waiting on going to college until I have somewhere to live away from home and I can afford it. So... a while. Probably a few years from now. I graduated and now I work at a grocery store.
Oh, a bunch of other life stuff happened. Like the last 5 months have just been bad. But it's better now, I hope.
I'm hoping to slowly get back into the swing of things. I'm happy that people found use in this blog, even during my absence.
Next post will probably be about how the website works. That should come at some point this week, seeing as it's something easier to make.
It's good to be back though.
edit: i have none of my supplies anymore. i had to move out fast for reasons people might be able to surmise. i dont know when ill be able to get more, but im essentially starting from rock bottom again. im officially declaring an indefinite hiatus, though i was certainly already on one. im gonna try to get new supplies but that's hard.
4 notes
·
View notes
Text
Big Perler Projects
I am, like, still hot off the coattails of finishing my first major project.
Okay so, as mentioned, I just planned and did a huge Perler project. About 20 boards worth. I like to get stupidly ambitious and see what I can do. Of course, through doing this, I learned some things that might benefit others? Maybe?
Firstly, I do suggest having the boards to do the project. This seems really obvious; but honestly, 20 boards is a lot. Like, my project's about 34 inches long, I think (86.36 centimeters). I feel lucky I had room for it on my wall. But I digress, it's well worth it.
I own about 6 boards, two of mine are a bit warped due to sibling shenanigans. So I did my project in pieces, and just took things that happened as they came. My project, after melting, doesn't really fit together. It looks mostly fine from afar, but once you get a bit closer, the mismelted beads and the gaps between panels are much more noticable.
For someone who doesn't really care that much, and just wants a nice piece of art, it isn't that bad! But it's kinda been bugging me here-and-there. Something to consider.
In addition, with fitting pieces together, I do suggest ironing all your pieces and tacking them together on the wall. Trying to melt them together yielded nothing but frustration for me. Speaking of the devil, by the way...
This hurt! Like, really bad! I worked all of labor day monday, and STILL didn't get to iron it. I worked from 10 in the morning to 11:30 at night, and I just barely finished taping and forming the panels. My back was in constant agony. Like, more agony than usual. This obviously poses a problem for some people. Standing when doing it is an option I guess, but even then, it isn't a flawless solution! I wouldn't be able to do it. My neck felt worse.
My cats couldn't come in my room at all either. You can imagine how they felt about that.
It isn't really all bad, though. I absolutely adore having this thing on my wall now (I might post it to kandipatterns later, idk). It was a long and strenous process, yeah, but I learned a lot! I think it's like love, kinda sucks but it's worth going through so you can learn from it. Making it in fragments kinda helped, I don't know how I'd get it to college otherwise, honestly. It hurt, a lot, but it really was worth it imho.
also please make sure you have enough room on a hard surface to iron it. uh. i had to iron my stuff in my kitchen on the floor. not an experience i'd recommend.
#perler#fuse beads#hama beads#artkal beads#kandi#now if u excuse me im gonna scroll through studyblr to either procrastinate or get motivated. who knows?
4 notes
·
View notes