#ps ask
Note
hi, your latest edit for thgweek24 is absulutely stunning and i thought if i can ask if you can make a tutorial about the ripped gifs/paper effect? if not, that's okay! have a nice day <3
RIPPED PAPER EFFECT TUTORIAL
hi! thank u :D (thgweek set referenced)
below the cut are the steps that i took to create this effect. this tutorial is very screenshot heavy and assumes some basic knowledge of photoshop and giffing.
i do my best to try and explain my process so hopefully this is helpful! if you have any questions, please don't hesitate to ask.
STEP 1: Choose and arrange your two gifs
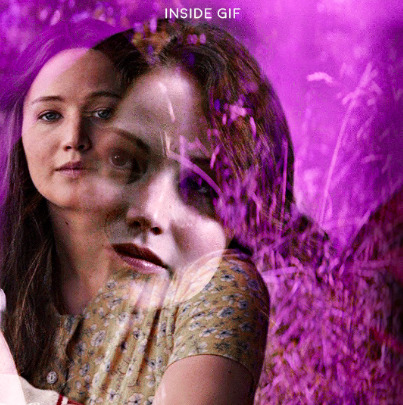
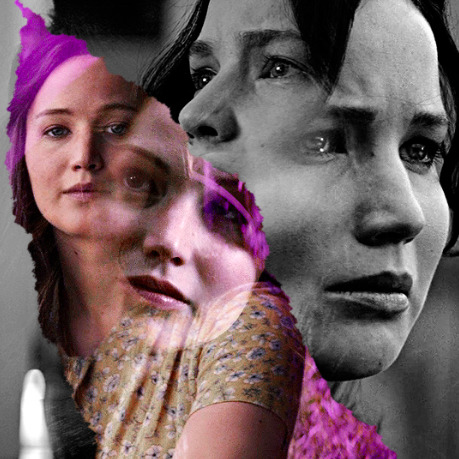
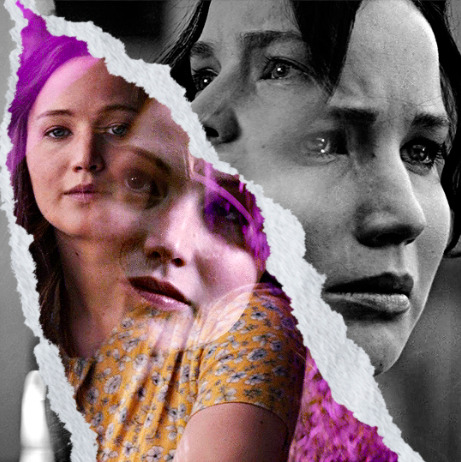
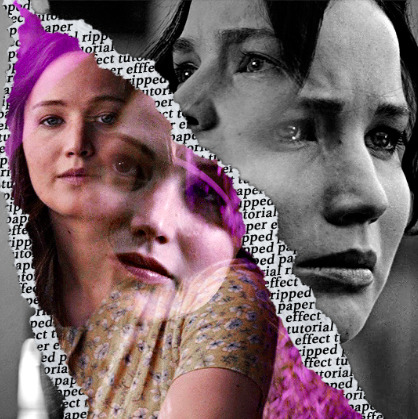
with this specific use of the ripped paper effect, there's one gif on the "outside" of the rip and one on the "inside." in this example, the outside is the b&w and the inside gif is the colored:
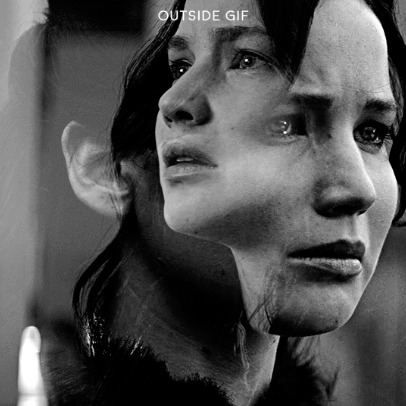
for me, the outside gif determined the positioning of the inside gif and the position/direction of the rip. as can be seen, outside gif has a lot of space on the left. therefore, i knew i was going to position the subject of the inside gif more on the right so i could create the rip without hiding too much of the b&w gif.
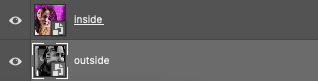
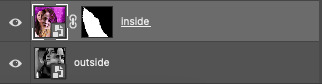
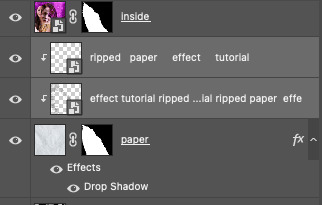
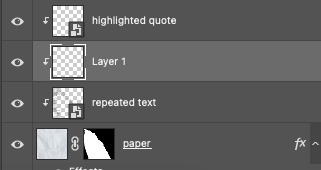
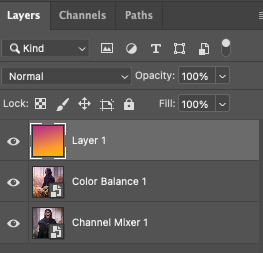
next, you want to arrange the inside gif on TOP of the outside gif. your layers panel should look like this:
STEP 2: Creating the ripped effect
here comes the fun part! in order to create this effect, you're going to need torn paper brushes. here and here are some packs you can download (w credit to owner).
next, create a layer mask on your inside gif. you're going to use the brush of your choosing as an ERASER. then, you can play around with the size and angle of the eraser to create the look you want. this is what the gif and the layers panel now look like:
STEP 3: Adding the paper
in order to add the paper around the edges of the inside gif (where the text goes), you now need to download a paper texture. i found mine on google by searching "paper texture png."
place the paper png IN BETWEEN your outside and your inside gif. this is what everything should look like:
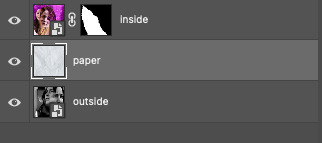
now, similarly to what you did in the previous step with the inside gif, you are going to create a layer mask on the paper layer. using an torn paper brush as an eraser, you will erase the paper, creating the shape you want.
be sure to leave enough room for whatever text you want to be on the paper. also, i suggest making the rips of the paper different from the rips of the inside gif so it looks more organic.
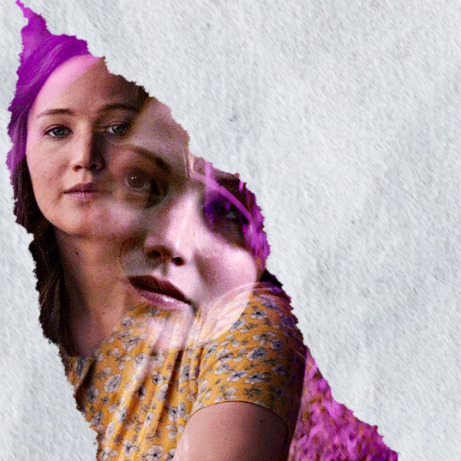
here is what my gif looks like after erasing the paper:
optional: add a drop shadow on the paper layer (right click -> blending options... -> drop shadow)
STEP 4: Adding the text
first, you want to identify the space where you will have room to place your full quote within the paper. if there are no spaces, you can always use your brush/eraser to modify the layer masks.

next, add a layer on top of the paper layer (and below the inside gif). select the text tool and start typing your repeated text!
because you can see which text is hidden by the inside gif and what is on top of the paper, a shortcut i use is the "tab" button and only type words that will be seen.
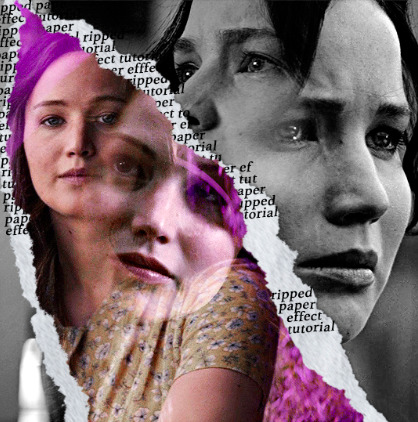
type the repeated words around the quote you want highlighted:
now, in order to contain the text within the paper, convert the text layers into smart objects. then, create a clipping mask on both layers (right click –> create clipping mask). this is what your layer panels should look like:
with that, your gif should now look something like this, with the text contained inside the paper:
STEP 5: Highlighting the quote
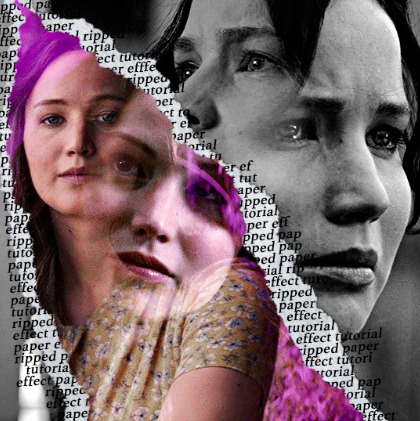
as you can see, it just looked like a bunch of words. so, in order to highlight the quote you carved out in the previous step, add a new layer below the layer of the quote you want highlighted:
now, use a round brush (softness around 10-15% and opacity at 70-80%) with the color of your choice to highlight the words you want.
and there you have it!
i hope that this made sense and was helpful! if you have any questions or clarifications, please don't hesitate to ask :)
143 notes
·
View notes
Note
hello! just wondering if you know of a tutorial for the lines going through gifs? and getting them all to match up? like in these sets /post/714978685858496512 and /post/733101286452559872 also are they overlays or how did you make them? thank you in advance!
hey! so, i've attempted to show you with a little tutorial on how i made lines like the ones here and here, i've not seen one around myself and decided to try this out one day and it didn't go too badly so, i hope this makes sense and helps.
so, i'll be explaining and showing you how i did the lines on these gifs:
now, firstly i'm going to assume you know the basics and can create/colour etc a gif, you'll need your base gif ready to go. in this example i've flattened them to frames, but you can do this in timeline as well.
step one: add a new layer on top of the gif/smart object, and set up your brush ready. i personally have used 2px brush, 100px hardness, 100px smoothing and 75% flow;

the flow is the main thing i think that is more down to personal preference, it affects how the line draws/moves and will be down to a little bit of trial and error - i've added below how the lines look at difference levels of flow (no other setting from the above has changed just the flow)

step two: decide where you want your lines to link, i've always done from the centre of the gif but you could want your lines to meet up 100px from the left at the top and exit the gif 100px from the right at the bottom. no matter what, the best thing to do here is to add guides to your gifs. as i'm just going straight from the centre to the centre for every gif i add a guideline at 270px

step three: i recommend testing this all out on a separate canvas first to play around and see how you want your line to look etc, but when you're ready you're good to go. start from when the guideline is and draw your line until where you want it to end, the best way to show you this is on video so i've screen recorded the whole process.
youtube
it's honestly pretty straight forward, so i hope this all makes sense, and just have fun with it, i love messing around and drawing 30 versions of the same line until i'm happy with it!!
ALSO, in case you were wondering about the final gif in the wheel of time set, the moving line, that was simply an overlay from this video that i set to screen so the black background disappeared leaving just the line (i stretched/rotated/moved it around get it to start and end where i wanted it to! i just played around with the line thickness when drawing my lines to match as best i could with the line in the overlay!
#ask#anonymous#ps ask#quirkyresources#usernik#userhella#uservalentina#userrobin#userannalise#userrainbow#usershreyu#alielook#useralison#userives#useryoshi#ps help#ps tutorial#chaoticresources#dailyresources#hisources
217 notes
·
View notes
Note
hello drea! i love your gifsets! i was curious how you did the crossword puzzle overlay in your new little mermaid gifset? thank you so much!!
hiiii thank you 🥹<3
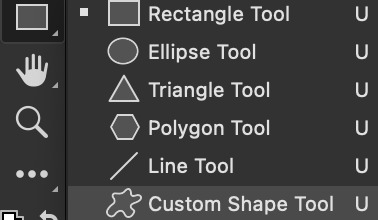
grab the rectangle tool, looks like this. this is to create the outline/square for the text
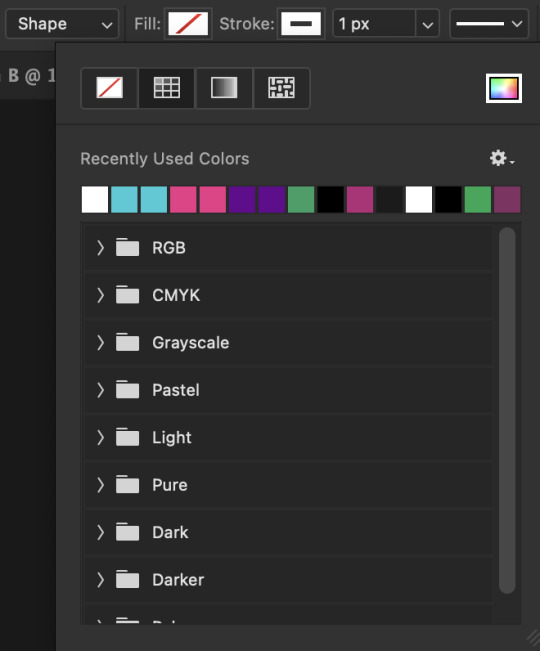
click the canvas for this to pop up. the size of the square is up to you, but i used 20px

make sure your fill is on transparent, and the stroke is not (could be white or whatever color u desire) and that it's at 1px
now you can use the text tool to do the first letter of your word and just center it to fit inside the little square like this
duplicate the layers to the spot over to get the squares to connect, change the letter and you just keep doing that until you get your full word! this is how mine looks after finishing the text and centering it.

select those layers and group it. then use free transform to rotate the group 90° clockwise to have this new text vertical. place it however you want, adjust your text (you'll have to rotate the text to get it straight again) and you're done! here's my final gif after doing that and adding drop shadow to the text to make it more readable

lmk if u have any other questions! 💜
3 notes
·
View notes
Note
Hello! I saw you said you might know how to not let gif turn into mp4 in the tags of one of your posts. Would you mind sharing how with us? It's totally fine if not. Have a nice day!
OH HI! sure I won't mind sharing this.
so, in this engineering tumblr post, they stated a few things about how tumblr decided to turn gifs into mp4 and one of the things they stated is:
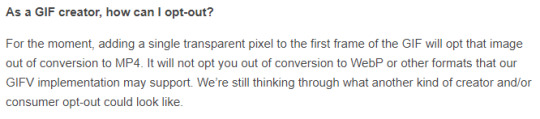
as in "adding a single transparent pixel to the first frame of the GIF" you just need to select a single pixel and make it transparent. and how you do that?
when saving for web, right on your color table, you can select the least popular color on your gif and press this button:
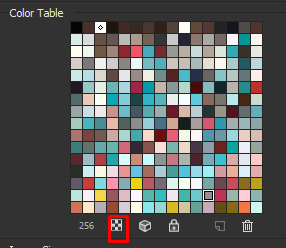
you will notice that half of the color square selected is transparent and that's it. (careful, play your gif many times as possible to see if you didn't lose any popular color or else your gif will have just a bunch of transparent space)
or you can draw a single pixel into the image on a brand new layer, just zoom the hell into your frame and select a single pixel square, then you paint it with a bright color that's not on your actual color table.
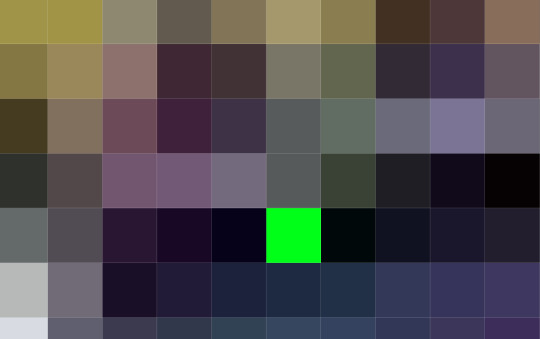
then you can save for web and make that color transparent. (but I find this one very tricky and idk why sometimes photoshop just don't recognise the color I chose :(
38 notes
·
View notes
Note
Omg what sharpening settings / tutorial did you use for those GIFs of The Next Prince?!? They're so silly and beautiful I could cry!!
Hi Nonnie. Thank you!
I am so basic when it comes to sharpening. The New Prince file was in 4k so I didn't have to sharpen all that much. This is my basic sharpening go to for everything
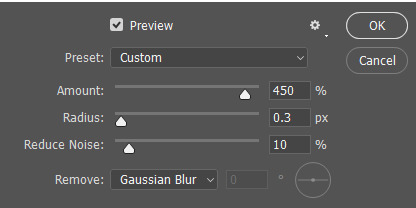
filter > sharpen > smart sharpen with these settings:

while this is okay, I just like them extra crispy. so again,
2. filter > sharpen > smart sharpen now this settings

I will move the amount from 3-12 whichever looks good
and that's it. Hope this helps!
7 notes
·
View notes
Note
How do you do the shiny and transparent text on your gifs?
hello! i assume you mean like this?
i'm going to be talking about how to do this in photoshop 2022.
basically, I just change the blending mode of the text. so when you add text, the blending mode is automatically on normal. this means that it'll just be a solid colour.

then, i just change it to Difference (or Exclusion but I like Difference more bc it has better contrast).

and voila, transparent-like text:

you can change the colour of the text to get different colour effects. You can change the colour when you actually put the text first on the gif, like this:

or, what I like to do is double click on the text layer in your layers tab, going into layer style and add a gradient (the gradient can be just one colour). and then you can also mess around with the blending modes of that. like this:

when i do this, i leave the text as white from the initial text colour settings.

these are the settings i used for the gradient on that one:

I personally like the second one bc the text is much clearer but it depends on what else your doing to the gif. like you can add an outline to make the text stand out more. there's lots of ways to do text on gifs.
I used this tutorial to help me figure this out. it's probably better than how i just described it lmao
there's other cool ways to make text colourful and transparent like this.
i hope this was helpful!! let me know if you have any other questions or if anything wasn't clear!
3 notes
·
View notes
Note
How'd you make the lines in gifs so thick?
Hi! Basically I 'Smart Sharpen' my gif first and then add a 'Minimum' layer to get thick lines. Also it depends on the art style as well, like in the pokemon anime they tend to use thick outlines on characters.
Here are the settings I use:
Fliter->Sharpen->Smart Sharpen
Filter->Other->Minimum.
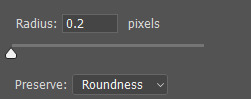
Hope this helps!
2 notes
·
View notes
Note
Omg! I love all of the gifs you create! You're one of my favorite blogs 🫶 I'm just starting out at gif making. If you don't mind, can you share some tips and tricks on gif making?
hello! aah thank you so much. i really appreciate it 💗 i’m not sure if i’m good with this but i tried to summarize some points under the cut!
1. downloading videos/movies/shows
• always and try downloading files that are high quality. meaning it should be at least 720p or 1080p. but always aim to download 1080p videos haha!
2. sharpening
• there’s a lot of sharpening techniques and tutorials out there. i started with downloading sharpening actions and learning from other blogs on how to manually sharpen your gifs depends on how you want it to look like. when it comes to my gifs, i always try to not over sharpen it.
3. coloring
• again, depends on your liking. you can start with playing around adjustment layers like curves, selective color, levels, and hue/saturation (my top 4!). my main tip is to not overdo it and do not white wash your gifs!
4. save settings/exporting
• adjust your color reduction algorithm or dither algorithm. these settings are going to be up to your personal preference. mine is selective-diffusion. when saving gifs, always try to keep it under 10mb or else your gif won’t work.
5. tagging your gifsets
• very important!! give those gifs the exposure they deserve! look through gifsets from your fandom and find what the edit tag is. if unsure, try checking out the gifs from your fav blogs and check out the tags they use. some content creators also track their user tags so that their followers/mutuals can tag them in their gifsets.
other tips:
• after posting your gifset, make sure you check if your post is showing up in the tags or in your dashboard. it happened to me a lot of times already (dumblr is a bitch lol) but idk the real fix aside from just posting it again and avoid using prohibited tags. you can check out this post for some info about it as well.
• dimensions: 1 gif per row: 540px width | 2 gifs per row: 268px, 268px width | 3 gifs per row: 177px, 178px, 177px width
i hope this helps, if you have more questions feel free to ask! 💃
4 notes
·
View notes
Note
what clear sharp settings do u use? for ur gifs, sorry my english is not good
Hi!
I usually use smart sharpen to sharpen my gifs (filter > sharpen > smart sharpen) with these settings:
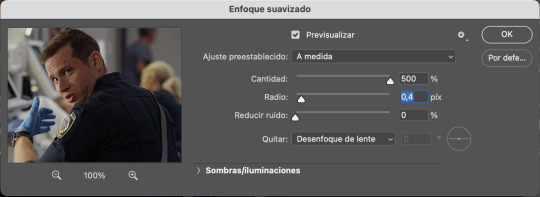
I hope this is helpful 🌼
2 notes
·
View notes
Note
Hi, how are you? what psds is your favorite for editing icons?
hi! i use a psds of my own making that you can find here.
and you find all of my psds here
1 note
·
View note
Text
because sometimes there are invisible tests and invisible rules and you're just supposed to ... know the rule. someone you thought of as a friend asks you for book recommendations, so you give her a list of like 30 books, each with a brief blurb and why you like it. later, you find out she screenshotted the list and send it out to a group chat with the note: what an absolute freak can you believe this. you saw the responses: emojis where people are rolling over laughing. too much and obsessive and actually kind of creepy in the comments. you thought you'd been doing the right thing. she'd asked, right? an invisible rule: this is what happens when you get too excited.
you aren't supposed to laugh at your own jokes, so you don't, but then you're too serious. you're not supposed to be too loud, but then people say you're too quiet. you aren't supposed to get passionate about things, but then you're shy, boring. you aren't supposed to talk too much, but then people are mad when you're not good at replying.
you fold yourself into a prettier paper crane. since you never know what is "selfish" and what is "charity," you give yourself over, fully. you'd rather be empty and over-generous - you'd rather eat your own boundaries than have even one person believe that you're mean. since you don't know what the thing is that will make them hate you, you simply scrub yourself clean of any form of roughness. if you are perfect and smiling and funny, they can love you. if you are always there for them and never admit what's happening and never mention your past and never make them uncomfortable - you can make up for it. you can earn it.
don't fuck up. they're all testing you, always. they're tolerating you. whatever secret club happened, over a summer somewhere - during some activity you didn't get to attend - everyone else just... figured it out. like they got some kind of award or examination that allowed them to know how-to-be-normal. how to fit. and for the rest of your life, you've been playing catch-up. you've been trying to prove that - haha! you get it! that the joke they're telling, the people they are, the manual they got- yeah, you've totally read it.
if you can just divide yourself in two - the lovable one, and the one that is you - you can do this. you can walk the line. they can laugh and accept you. if you are always-balanced, never burdensome, a delight to have in class, champagne and glittering and never gawky or florescent or god-forbid cringe: you can get away with it.
you stare at your therapist, whom you can make jokes with, and who laughs at your jokes, because you are so fucking good at people-pleasing. you smile at her, and she asks you how you're doing, and you automatically say i'm good, thanks, how are you? while the answer swims somewhere in your little lizard brain:
how long have you been doing this now? mastering the art of your body and mind like you're piloting a puppet. has it worked? what do you mean that all you feel is... just exhausted. pick yourself up, the tightrope has no net. after all, you're cheating, somehow, but nobody seems to know you actually flunked the test. it's working!
aren't you happy yet?
#almost wrote the champagne line as ''effervescent'' but legit could not write it without saying ''effervescent like a snail''#ah tumblr...#writeblr#warm up#idk . having trouble writing rn#ps i don't like to talk about it . it is my medical information. but before you ask. yes this is about being on the spectrum#i really don't like when ppl make my writing about how im [whatever ID]. i want it to ring true for the people who it rings true for#i don't want it to be like ''awwwww look at this person!!! she's the EXCEPTION!!! :)" .....#no.... not really.....#idk something gross happens whenever i admit to certain conditions and i turn into like inspiration p*rnography#like yes they actually let us use keyboards these days#furthermore i just... dont feel comfortable talking about this part of me. i had too bad of a childhood. adhd is one thing...#this one im like. still coming to terms with. which is like. my own journey.#idk. just please be kind. some things are more private than others. this one feels private to me.#i do not know how to help others w/this . and i do not know how to help myself. i will talk about it if im ever ready. idk if that will#actually ever happen#ty in advance i love u im kissing you we are kissing somewhere on the spectrum
46K notes
·
View notes
Note
I would love if you could give some tips on making blended gifs with two dominant colors - for example your friends cheesecake set. I would love to make like that but I have no idea were I’m going wrong
friends cheesecake set
hi!! blending is honestly so hard to give tips on bc it's so dependent on the scenes but i can try! below, i link some tutorials that i have used and try to explain the methods i personally use :)
btw this is very image heavy with gifs as visuals to try and explain my processes!
the tips i give assume you have basic giffing knowledge and at least some knowledge and experiencing of both blending and coloring. if you have any questions on anything i explain, please don't hesitate to come ask!
firstly, here are some very very helpful general blending tutorials that i have used in the past: this one and this one go pretty in depth (both by the lovely @yenvengerberg.
secondly, here are some coloring/color manipulation tutorials that i love:
general color manipulation (different methods) again by @yenvengerberg
manipulating the background by @fionagallaqher
coloring gifs for rainbow sets! by @rhodeys
now, as for combining the two techniques, i use trial and error. again, both blending and coloring are very fickle and the methods can change based on the scene i'm using.
there are two ways that i blend gifs with two dominant colors:
color the gifs separately and then blend
or blend the gifs together and then color the whole gif
first method: color first and then blend —
i usually use this method for gifs with little movement and where the colors can be easily manipulated (see the coloring tutorials i referenced above).
an easy way to tell what colors are dominant in a gif, go to the hue/saturation adjustment and turn saturation all the way up to 100.
for instance, this gif of anakin has little movement and i can see the background has hints of blue.
this gif will be easy to manually color on its own, seeing as i can use selective color and brushes to color the background. here is the same gif but now i have colored the background, and i used the method outlined in this tutorial:

NOW, moving onto the second gif. the second gif/scene i chose also has little movement and a background that can be easily manipulated:

using the same method as the first gif, i'll now color this padme gif on its own.
TIME TO BLEND!!! after converting the two gifs to smart object and putting one on top of the other, i set the top object to screen. for this example, i put the padme gif on top of the anakin one. this is what the blended gif and my layers panel looks like:


now, i'll create a layer mask on the padme gif and get rid of any parts i do not want or expose any areas of the anakin gif i want to see.
next, as you can see, the left side of padme's face is purple and pretty transparent. so in order to make it more visible, i will add a blank layer in between the two smart object and use a black brush to paint the areas i want to see (see this tutorial!!)
and here is the final blended gif:

now, you can totally stop here, but for me, it's pretty purple-heavy and i'd like to see some more orange. so i simply take an orange brush and color some areas i'd like to add more orange, and then set the layer's blending mode to color.
and HERE IS THE FINAL PRODUCT!
second method: blend first and then color —
i usually use this method when at least one of the gifs/scenes i want to use has colors or a background that is difficult to manipulate. or sometimes i do this because i just don't know what i want my coloring to look like and blending first gifs me a better sense of the whole gif.
there are two different ways you can blend first and then color. using the brush tool or the gradient tool.
brush tool:
using the brush tool is the best method when there is little movement and when you have distinct subjects to color around.
for instance, this gif of rhaenyra. while there is little movement, the background is a similar tone to her skin so it would be difficult for me to use selective color.
i could possibly use a brush to color the background, but i do not know how that will blend with my other gif and i don't know what coloring will work best overall. this is why i want to blend first!

and now for my second gif. similarly to the rhaenyra shot, the background of this alicent shot has very similar tone to alicent's skin color, so selective color would not work:
TIME TO BLEND!! i do the same thing as the last method (placing one smart object on top of the other) and this is what it looks like:

following the same steps as last time, i erase what i don't want and paint over areas i want to be more visible. this is what i came up with:
because there is that orange light on the left hand side of the gif (on rhaenyra's side), i decided to play into that and go with orange as one of the colors. sometimes the color scheme i go with depends on the colors i find in the gif bc that's just easiest!
now is when i use a brush to color the background! i color the left side with an orange brush and set the blending mode to 'color':

for the second color, the background on alicent's side is kind of neutral so i'm going to pick any color i want! i decide to go with green bc that is her color lol, and i do the same method, coloring with a green brush and setting the blend more to 'color'.
this is what i came up with:

you can totally stop here, but i like adding colors to the bottom, orange on the right and green on the left, so it kind of ties it all together.
HERE IS THE FINAL PRODUCT! (notice how in the bottom left corner, there is some hints of green. similarly for hints of orange in the right corner)

gradient tool:
another tool i use is the gradient tool (not to be confused by an adjustment layer).
this tool is really good for blended gifs that have lots of movement or where there are subjects that are difficult to draw around with a brush.
for example, this blended gif of yennefer has lots of movement so the brush tool may not be the best method.
here is where the gradient tool comes in! i add a new layer and draw a gradient in the direction i want. this is what my gif and layer panel looks like:
next, i change the blending mode. this heavily depends on the scene and also what looks good to your eye, but i usually alternate between 'overlay', 'soft light', or 'color'.
for this gif i chose 'overlay' and this is what it looks like:

again, you can stop here...BUT i want to go back in and intensify the pink/purple color at the top in the white areas. to do this, i am going to use a large soft brush and paint areas, setting the layer's blending mode to 'color.'
HERE IS THE FINAL PRODUCT:

and those are my methods!! if you made it this far, thank you for reading and following along. i hope that this was at least somewhat helpful and huge shout out to @yenvengerberg who's coloring and blending tutorials basically taught me everything i know.
if you still have any questions at all pls feel free to hope in my inbox :D
#ps ask#ask#anon#userabs#usermorgan#tuserheidi#useraish#rogerhealey#usershreyu#userkosmos#angelblr#tuserabbie#userelio#*tutorial
135 notes
·
View notes
Note
Hi!
I sent this ask to the UserGif blog and they directed me to you. I was wondering how you created this black widow layout set:
https://www.tumblr.com/usergif/709701351905624064/black-widow-2021-dir-cate-shortland-insp
The layout is so cool and creative, I love it so much.
Thanks in advance!
hey! first off, thank you so much i really appreciate it.
now i will attempt to explain it, but i am never the best at these things so if you have any questions, feel free to ask! (all this is assuming everyone has a basic knowledge of gifmaking etc.) we're going to recreate a gif from my original set here.
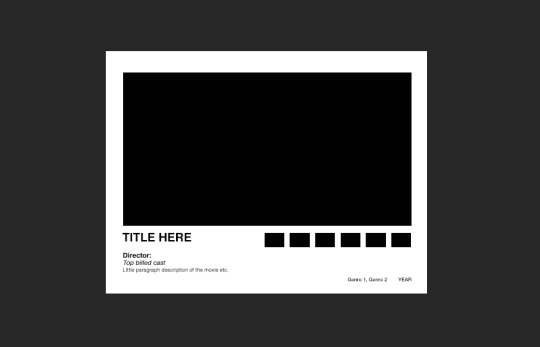
FIRSTLY, you need your basic layout, now i used the rectangle shape tool to create the space for the big gif, and the little palette boxes, and fill them black so you can see them easily and move them around until i'm happy with the layout. and then move onto my text, the posters i was originally inspired by on etsy no longer seem to be there but the font i used which i *think* is what was used on those (as i wanted to get as close to my insp source as possible) is Nimbus Sans L for the title in bold, and Nimbus Sans Rounded for the rest (semi bold for the director and the genre/date and italic for the starring actors) and once i perfected the layout, and added a white layer for the background i saved that as a psd for future use. (make sure you're in timeline mode, and that the frame rate of this canvas is 23.976 fps - as that'll stop any issues when creating the whole gif.)
from here, you're free to gif make your first gif as normal, colouring it and putting it all together in a smart object so then you're ready to just paste it into this canvas, clipping it over the big rectangle, resizing as needed and then sharpening. (if you're unsure about clipping masks - this gifset relies on them - there's a handy tutorial here!)
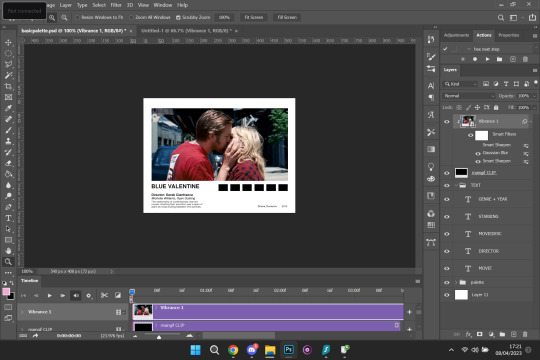
so, here's how it looks with the main gif in place, and i've filled in my movie details for the film i've picked (i try to keep my layers as organised as possible so i recommend labelling things so you know exactly which text layer is which) i put all the text layers in a folder, and make a folder for all the palette rectangle boxes too.
next is the fun bit, or at least it is for me (personally i like to zoom in for this bit) but it's time to colour pick for the palette. before you do this make a new layer for each palette and clip one to each of the palette boxes like below.

like i said, i like to zoom in for this, but select the eyedropper tool, and start picking your colours, i try to do it in a gradient, usually starting with either the brightest or darkest colour etc. for this gif i want to go from browny red to blue. once you pick your first colour, go to the layer clipped to the rectangle you want that colour and fill it with your colour. keep repeating this process until all your colours are picked and you're happy with your palette.

and here is what you're left with. so now, just do what you'd usually do when saving your gifs, i personally put everything back into frames, so i can save with a timing of 0.05. and then repeat for each gif until you've got a beautiful gifset that you love!


i hope this made sense, and is easy enough to follow! sorry if it's a bit rambling and ridiculous, me and explaining things are not compatible.
#ps ask#quirkyresources#usernik#userhella#uservalentina#userrobin#userannalise#userrainbow#usershreyu#alielook#useralison#userives#useryoshi#ask#anonymous#ps help#ps tutorial#chaoticresources#dailyresources#hisources
219 notes
·
View notes
Note
hi! again. I'm referring to the first gif in the Your Wednesday emoji set. It would be fantastic if You could create a tutorial for all of us beginners on how you combined the gif and the picture in such a cool way. Whether or not You create the tutorial, I am grateful that You took the time to respond to my request. Best wishes. :)
honestly, it's really easy! you don't even need much experience to do this, hopefully my explanation helps you out <3
ok so have your gif sharpened and colored. i did a really basic coloring for my wednesday set, which was just setting a gradient map layer after doing basic layers.
now for the photo, i'm gonna use a still from ariana's mv and use this site to make it transparent. you can also do this in photoshop using this method but im rly lazy sdjfhsjkdf. so drag this photo onto your canvas, sharpen and color it (make it sure its a smart object.) i now have this:
right click (or double click) on your photo to open up blending options, then go to drop shadow. here are my settings to create that outline of the photo:


and that's pretty much it! add your texts and whatever else and ur done :') lmk if u have any questions!
13 notes
·
View notes
Note
hey hope you’re doing well! just wondering what font you use for subtitles/text on kdrama gifs? it looks lovely
oh hi, i'm doing great thanks for asking! I use Arial Rounded MT Bold for subs 💜
2 notes
·
View notes
Note
Hi, hello! Say, do you have a tutorial for the transition in your before and after gifset? It's great!
Here you go ☺️☺️
5 notes
·
View notes
Last Seen Blogs

musicofseinfeld-blog
SEINFELD JAMS
hemolymphe
ima
musicofseinfeld-blog
SEINFELD JAMS
musicofseinfeld-blog
SEINFELD JAMS
wlwraptor
Someday I'll Fly Through The Sky And Come See You