#sims 3 tips and tricks
Note
I can't remember if you have posts about your picture taking process but I'm really curious how did you get a lot like Prosper Room so crowded and look so lively. Do you pose everyone or do you just get them there and leave them be?
I would love it, if you have time and motivation of course, if you showed us your process for setting a scene and taking pics. I never did those in any sims game tbh and I always love seeing behind the scenes things.
Love you and your work to bits!! ❤️ ❤️
I don't think I have made any posts about my picture-making process because prior to today I don't think anybody has ever asked! But I really appreciate you sending me this ask and your lovely comments. Thank you so much!
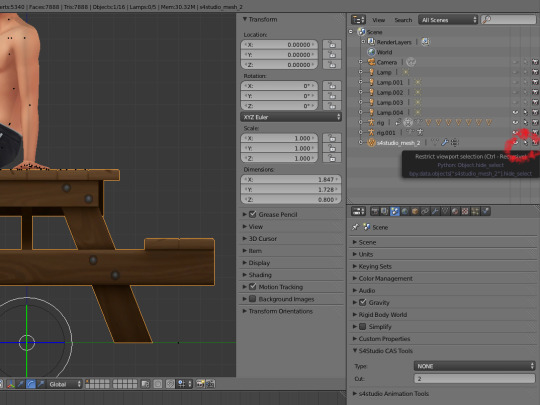
For these particular scenes I have 16 Sims in the active family. (I did originally have 20 as stated here but my game kept freezing.) For anyone reading who may be unfamiliar with this process, I add the Sims to the household by clicking on my active Sim and then selecting NRaas>Master controller>Household> Add Sim. I then filter by age and gender so I have a decent cross section of Sims, and enable testing cheats so I can teleport each Sim to the active lot, in this case the Prosper Room. I have a decent gaming rig and can usually add 20 Sims to a lot before my game starts to protest, but as mentioned in an earlier post I had to reduce the number of household Sims in this case to 16, I suspect because the Prosper Room already contains a number of service Sims.
Once all the Sims have been teleported to the lot, I then set about dressing them. This can be a laborious process but I usually have a couple of Sims in the household who have a dozen outfits in their inventories for this very purpose. It is then a simple process using Nraas to transfer one of those outfits to another Sim in the household. I click on my active Sim and then choose NRaas>Master controller>Intermediate>Transfer clothing. A box will then appear as shown below asking for details of the 'Destination Sim' and I then choose 'current lot.'
A list of Sims will then appear of the same age and gender and I just choose the one I want to transfer the outfit to. You can also choose them all if you want!
Now, for my current Prosper Room scenes, I placed meals on all the tables using Nraas Debug enabler: Nraas> Debug enabler>Options sim> make food. (Again, quite a laborious process, because I like there to be a good variety of dishes!) I then instructed the majority of my Sims to sit at the tables and start eating the meals placed in front of them, as seen in the below pic.
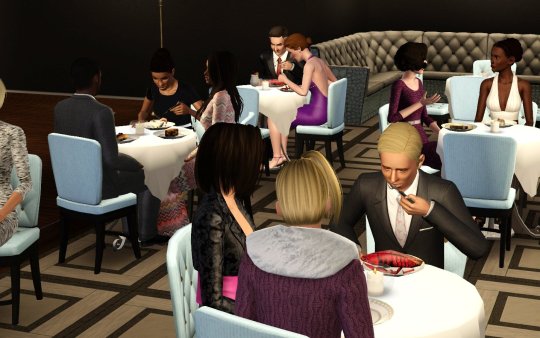
Once they have finished eating, I can make them stay in their seats by having them converse with each other (which is probably the best way of making the scene 'lively') or by using Nraas animator: Nraas>Animator> Animation by category> Play Specific Idle>Seated Idles>a_chairdining_idle sigh_x. The wonderful thing about using Animator is that you can direct Sims where to look, too. (I know you can do that using pose player add-ons if you choose to pose your Sims instead, but if you use Animator the Sims continue looking until you cancel the animation).
I tried to illustrate my answer by using more screenshots but I kept getting warnings that I'd exceeded my character limit, so if anyone reading this needs more clarification of my process please don't hesitate to ask! Thanks again for the wonderful question @oasislandingresident!
86 notes
·
View notes
Text
Some tips for The Sims 3 Buy/Build
Install LazyDuchess’ Smooth Patch to alleviate lag, esp in Buy/Build and CAS.
Keep your CC merged and organized, esp your patterns, this will also alleviate a lotta lag across all modes.
When building on community lots, or any lot rlly, avoid going to the edit world menu, and just put testingcheats enabled into the cheat window, then shift+click the ground of the lot to enter Buy/Build mode. This makes leaving it to save a lot easier, with less “preparing” screens to possibly get hung up in.
Lower your settings, you don’t need any adjacent lots loaded, and you certainly don’t need super water on either. You can always switch these back on when you’re done.
While you’re at it, remove your HQ mod, and turn off your Reshade/Gshade preset, or at least turn off your depth shaders. I only ever turn on my depth shaders when I’m taking screenshots for better fps while playing. The DoF shader esp requires a lotta resources your game could be using to simulate all those 78 townie sims instead.
Save as… vs Save, I Save as… at least every third save. It’s also just good habit to keep backups.
When using the CASt tool, set down everything you plan to CASt first, then switch to a category like the wall tool to avoid eventual lag and drag when using it a lot. Love yourself. You don’t have to suffer using CASt tool in an overpopulated category like misc deco.
Utilize the clone option through testing cheats to duplicate already CASted objects, it’ll keep your design just like the dropper tool, but it’s a lot less time consuming, I promise.
Don’t be afraid to use the swatch save tool for objects you use often, esp community lot objects, as it helps to keep your aesthetic consistent. I also keep all of my favorite streetlamps, benches, and public trash bins etc in a convenient custom collection folder to speed up the process of doing multiple lots in one sitting. These handy tools are there, use them.
The issue with custom counters. They mess up sometimes, if you can’t recolor it suddenly, here’s how to fix that. Now if you can’t place down a cupboard suddenly, even though nothing’s in the way, and you’ve got moveobjects on activated, try putting it on the wall a tile over, and then try adding it to your desired spot again. Lastly if you set down counters or cupboards at a corner, and it messes up the textures, but you can still recolor it, you could do what the video I linked above does, or you could simply pull out the CASt tool, and switch it back to any of its original swatches and click the check, then feel free to recolor it as you want.
Railings will also do the “can’t recolor” trick too, but this is a simple fix, just delete it, and replace it, and you’re good.
“Oh no, I switched between buy and build mode, and now my catalogue won’t load, and I can’t click on anything at all!” Don’t panic, hit F2 and/or F3 on your keyboard, these are shortcuts for switching between them, and if you’re lucky it’ll load properly again. Should you get the bug where you load a category and it’s somehow empty, don’t fret, just click on a different category and this should fix it. Then if you get the bug where all the objects you put down disappear suddenly, sorry your game is haunted. Call an exorcist, or just reload, they might reappear if you do.
Tbh, if you run into any kind of major bugs, it’s likely a sign to either save immediately or just restart your game. These only ever show up when you’ve been at it a while ( at least for me ), therefore starting fresh wouldn’t hurt. Probably also wouldn’t hurt to check whether you might’ve installed something the game didn’t agree with by running Dashboard, or put it through the ol’ Save Cleaner.
Honorable Mention: Keep an eye on the texture sizes and poly counts of objects. I know it’s tempting to build these ultra hyperrealistic lots with clutter at every inch, but unless you’re just doing it for screenshots, or for your story, or using it very sparingly, it is not by any means recommended purely for gameplay. This is just the truth when it comes to any Sims game. You don’t want lag, or max memory crashes, or save errors? The Sims 3 is a 32bit game, that’s almost old enough to drive, be easy on it.
428 notes
·
View notes
Text
TS3 Tips and Tricks: How to Get Tons of Sims at Venues
I saw a forum thread recently from someone asking how to boost crowds at venues. Briefly, here are some tips and tricks that I learned:
Have lots of "party animal" sims in town
Sims with the party animal trait show up the most at Late Night venues, so it helps to populate your town with them.
Have many large roomie households consisting of "singles" in your world (like 6-8 sims).
The reason why you want to do this is that households are called to a lot, not individual sims. When a household is called, the game will always try to call as many sims that are available.
So, for instance, if a dive bar calls an 8-sim household named "Party Crashers", and four of them are at home at the time, those four will show up. If the bar then calls a 6-sim household called "Living Single" and three of the roommates are available, those three will show up. Now, imagine that a third household is called, and four members show up. That's 11 sims right there!
Get the idea? I have had as many as 20 sims show up using this method.
Don't build too many venues and parks, especially if you have a low population town.
I think this is pretty common sense advice. Obviously, if you only have around 30 sims in your town, you won't see a lot of packed venues if you build tons of venues.
Only visit hotspots
The game deliberately turns venues into cold spots so that everyone in town shows up at the hotspot. So, if you keep visiting coldspots, it will always seem as if every place is empty.
That's all there is to it. I have heard people say that you need mods and such to have packed venues, but I've never had such a hard time with this issue as to need them.
9 notes
·
View notes
Note
hi, your posts are stunning im literally always blown away by how beautiful they are! i’m sorry if you’ve already answered this in the past but do you have any tips / advice on how to edit? thank you <3
Tysm butter 🫶🏽🫶🏽 here’s a few editing tricks I use in every single photo :)
First, the overlay blend mode. It’s a must in my editing process, it helps u enhance/manipulate lightning depending on the environment! It also works as highlighting things which is great if u want to give something a more stereoscopic effect (in this case sims, because lighting does not reflect on them unless u use relight) U can see in the photo below, same lighting, but enhanced with overlay.
Second, vignette. I personally draw the vignette myself especially when the lightning is coming from one way and it’s dark on the other side, but using the Vignette feature in photo editing apps makes u focus on the character and less on the background.
Third, shadows. This applies to both sims and objects. Grab a blue/brown color + multiply blend mode, or a pitch black color and contour your sims’ face and clothes. It doesn’t have to be overly complicated, even a little nose shadow is fine.

Lastly, curves. This is a feature that exists in every editing apps. I never not use this, it gives a nice finishing touch to my posts as it is used for correcting colors, controlling contrast & brighten/darken photos without deep frying them.

These four steps might seem simple but it can drastically change your photo 😃 I also saw a good advice post from @acuar-io so I’ll link it here just in case anyone is interested for more.
531 notes
·
View notes
Text
How to Create a Structured Navigation Page on Tumblr: A Step-by-Step Guide
Introduction
Creating a navigation page helps moots stay up today on your posts, especially stories or series on your Simblr. Below are the steps I used to help me organize and create my navigation system!
What Does "Mobile-Friendly" Mean?
A mobile-friendly navigation page keeps users within their Tumblr app while they explore your links. This ensures a smooth user experience for those primarily using Tumblr on mobile devices. To achieve this:
- Use links that are generated within the Tumblr app or dashboard viewer.
- Avoid using direct URL links from a web browser, as they may redirect mobile users from the Tumblr app.
- You can test the links yourself on the Tumblr app to make sure they open correctly without redirecting out of the app.
Step 1: Planning Your Content
Before creating your page, plan the content and sections you want to include. Think about categories like:
Household stories
Series updates
Character profiles
FAQs
Gameplay guides
Mods and CC (Custom Content)
Step 2: Pinning Your Main Navigation Post
To ensure that your navigation is the first thing visitors see, you can pin a post on your Tumblr blog. Here's the process:
Write Your Navigation Post: Create a post with all your navigation links and information. This post will serve as the main guide for visitors to your blog.
Pin the Post:
- Open your Tumblr dashboard.
- Navigate to the post you want to pin.
- On the top right of the post, click the "..." (more) button.
- From the dropdown menu, select "Pin this post to the top of your blog".
Set Pin Duration: Decide how long you want the post pinned.
Check Your Blog: Visit your Tumblr blog to ensure the post is pinned at the top.
By pinning your main navigation post, you make it easy for followers and visitors to understand how to explore and enjoy your content right from the start.
Step 3: Organize Your Tags
Establish a tagging system that works for you and be consistent. For example here are some of mine:
Use #the[lastname]household for family-specific posts.
Tag seasonal stories with #fall1, #winter1, etc.
Create special tags for FAQs, such as #askkaityb for questions.
Step 4: Create Hyperlinks
Transform tags into clickable links that lead to filtered content:
- Write out your tags in your blogs search bar
- Click a tag, the page should change to all your post with that tag. you're going to copy the URL and hyperlink that to your navigation post
(for example here what mine looks like: https://www.tumblr.com/pleasanttaleswithkaityb/tagged/pleasantview%20legacy)
- Repeat for each tag you plan to use.
Step 5: Design and Layout
Make your navigation page visually appealing:
Use headers to denote different sections.
Consider adding icons or images for visual interest.
Keep the layout clean and readable.
Step 6: Publish and Promote
Once you’re happy with the page:
Make sure to publish or reblog your new navigation page in a post to inform your followers.
Step 7: Maintenance
Regularly check your navigation page to reflect new content and ensure all links work. Now, anytime you tag a post with your hashtags, that link's thread will automatically be updated!
Tips:
Keep your audience in mind. Use clear, descriptive titles for your links.
Update your navigation page regularly as you add new content.
Encourage feedback. Ask your followers if they find the navigation page helpful.
Feel free to customize this guide to match your blog's specifics and needs. Let me know if y'all have found any of your own tips & tricks for creating your navigation system! Happy simming!
@bambiwhims - Hope this helps :3
#new simblr#simblr#simblr help#how to organize#tagging system#ask kaity b#kaity b answers#kaity b resources
227 notes
·
View notes
Note
your post about ReLight is really interesting! I wanted to try it out but I understand nothing lol would you share some tips/tricks/little tutorial for dumbs like me on how to use it/setup for The Sims?
Hi anon!
It's not a massively involved shader, it's really simple, so a full tutorial would probably be a little over the top. Using it in TS4 is no different to using it in any other game.
The first thing I'd do is look at the preprocessor definition section at the bottom of the shader settings and change number of lights to 4 and hit enter. It'll reload and then you'll have 4 different lights to play with.
For the settings at the top, you want Use Smooth Normals turned on, and then all the boxes under Shadows ticked. For Shadow Mode you'll get the best quality with Trace All selected, and Ultra for Shadow Quality, but you can play around with these if your performance suffers (bear in mind I'm using a 980ti and hotsampling to larger resolutions and I'm fine with those settings).
Leave Shadow Sharpness at its default unless you want to go for a specific look, and you can keep Z Thickness at default too. You can play around with Z Thickness if shadows look like they're starting or ending in weird places. They're never going to be 100% accurate anyway, but you can sometimes coax them into not being truly awful.
One of the most important settings is down at the bottom: Visualize Light Position. Turn this on and it'll show you a round dot where your lights are positioned. This is really useful for lining them up exactly where you want them. Then, when you're done, you can turn them off (although they will disappear when you close the ReShade menu anyway, but this setting is useful for people like me who sometimes keep the ReShade menu open when taking screenshots so I can keep tweaking).
You'll see 4 sections that each start with a checkbox that says Active. Those are your 4 lights. Tick the ones you want to use. Then you can start moving them.
Next to Position there are 3 boxes, and they each represent respectively: left-right, up-down, backwards-forwards. Play around sliding each of them and see where your dot of light goes. You'll quickly get the hang of how to move the lights around using those position numbers.
Below that is Tint. It's easiest to click on the box of colour and colour pick than it is to manually change the RGB numbers. This controls the colour of your light.
Below that is Intensity. I think by default the lights are set up at the maximum level of 1.00 but that's super super bright, so bring that down considerably. You can use this to fine tune exactly how much illumination you want once you've set up the position.
And that's really it. You can use the lights to add more accurate light fall-off and shadows from in-game light sources like lamps, streetlights, windows, etc. You can also use it to just brighten a character's face a bit more for a clearer picture. Or you can really go to town and add completely fake and dramatic lights. It's up to you.
If you find that 4 lights isn't enough, you can't add more without editing the actual shader code. However, you can just duplicate the shader, so then you can have 8 lights, or 12, or 16, however many times you duplicate it.
To duplicate ReLight, create a copy of the shader in your shader folder, and give it a unique name (for example, qUINT_ReLight2.fx). Then, open it up in a text editor (I use Notepad++) and scroll all the way down to the bottom. You'll see a section that says
technique qUINT_ReLight
edit that so it matches the name you gave your copy, so in this case
technique qUINT_ReLight2
Then you can use them both alongside each other. I do start to experience a performance impact when using a second version, so bear that in mind.
I'm sure the better option would be to edit the shader code to add the ability for more lights directly in the first shader, but you'd need to be semi-knowledgeable about what to change. You're not often going to need more than 4 anyway, so it's overkill.
113 notes
·
View notes
Text
The Sims 3: How to Make your Sims not Ugly! Tips and Tricks for Pudding Face
youtube
Someone suggested a long time ago that I show how I make my sims, so here it is! In this video I basically just go over my personal process of making sims that look more realistic compared to the base game sims. Sliders, facial ratios, cc, and everything else can affect your sims' appearance.
♡ RESOURCES ♡
Download the face sliders I used in this video
Master controller integration (requires Master Controller)
Nosemasks Pack
Blush
Enjoy!
#tutorials#resources#ts3 help#the sims 3#ts3#ts3 tutorial#sims 3 tutorial#s3 tutorial#sims tutorial#ts3 video#Youtube
90 notes
·
View notes
Text

Decided to give the server a little pick me up and do some updates on it.
So, here is:
Pleasantview, a place to make new friends, hangout, share your creativity, show off your sims/builds, learn some new things AND express your love (or hatred) for the sims.
- 18+ ONLY!
- Server challenges (anyone can join).
- Blender tips and tricks.
- MUDAE! make enemies with people for stealing the card you want.
- Helpful resources for photoshop, blender, posing and sims.
- Lurkers are welcome.
Open to anyone, this is a safe space for all <3
Join here
25 notes
·
View notes
Photo

Bakie's The Sims 4 Custom Content:
💦Animated - Waterwheel Pack💦
In this series I will show you all the Custom Content I made for The Sims 4.
I will show you where to find it in game, how it looks, but also some tips and tricks on using this item in game.
- -Animated - Waterwheel Pack- -
With this pack you get 3 different animated waterwheels in 9 different variations.
It also has some extra objects to make everything to look even better.
For more info, some nice example scenes and the download link, take a look at the video + description!
>>>>> CLICK HERE FOR THE VIDEO + DOWNLOAD <<<<
For more videos from this Bakie’s The Sims 4 Custom Content Series, click the Bakie’s CC link in the Side bar or take a look at my Bakie's The Sims 4 Custom Content Series on YouTube.
>>> If you want to support my work, take a look at my Patreon page <<<
#BakieGaming#ts4cc#s4cc#Animated#Waterwheel#Pack#ModsPack#VFX#Unlocked#TheSims4#Sims4#MaxisMatch#MaxisMatchCC#bts4cc#Cottage Living#Get Together#Sims 4 Custom Content#Sims 4 cc#Custom Content#Sims4CustomContent#CustomContent#TheSims4CC#Bakie#YouTube
255 notes
·
View notes
Note
I really want to start my own legacy challenge and post it here! But idk how to make it look as pretty and as good as you, do you have any tips?
Nonny, first and foremost, thank you! 🥰
While I am usually very happy with the way my posts look now, it wasn’t always that way, and I think the biggest part of this is the process. If you go back and look at my early story posts (and even before that, to my first builds that I posted here) you’ll see that the style and techniques I used then are very different than what I do now.
All too often I find simblrs (and creators in general) will delete or redo their early work. As a perfectionist myself I totally get and share that instinct, but simultaneously I think that looking back helps remind me that it takes practice and discovery that’s still ongoing. I’ll try to help with a few tips I’ve learned along the way, but I truly don’t think there’s any better answer than trial and error!
1. Camera tips and tricks:
First and foremost, always take your photos in tab mode. Even if it’s just gameplay shots, this allows you to get creative with angles and go closer/further away for those detail shots or sweeping landscape ones. On that note, don’t be afraid to take the same photo from multiple angles so that you can look back at them and choose the best one.
Something I read very early on that helped me was to zoom in as close as possible to the shot that you want, and then back away using the S key rather than zoom out. Likewise, avoid zooming in and out and then in again in tab mode, as it can cause distortion in the background. However, there are also times when that distant background looks great, so this is just a good place to start that you can play around with over time. And have fun! Get those detail shots and low angles and things that might not seem like the most obvious shot but somehow work really well.
2. Take time on the details:
Now this is an overarching one because I mean all the details, from the world, to the builds, to interior decorating, to sim details, to their outfits. Now you may only enjoy a handful of these, and by no means do you have to jump in with all of them at once. For me, I really enjoy interior decorating so I put a lot of energy into my sets, that way when I go to take photos the backdrop work is already done. I really try to ensure that the backgrounds of photos are never empty (which is sometimes just clever angles) so this goes a long way to making a post look good and gives the viewer lots of little cues about the sims in the scene.
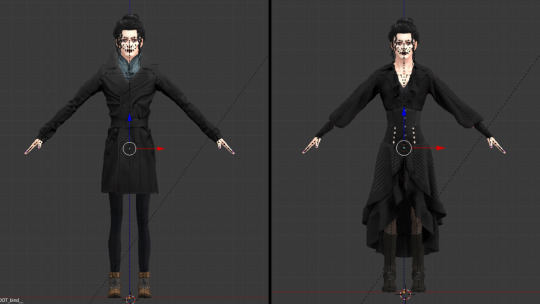
Likewise, I spend a lot of time on sims outfits. Usually this is in tangent with their personality and where they are in their story, but you’ll also notice small things like characters will not always be wearing shoes at home or an apron/hat will be taken off at an appropriate point in the scene. Small details like this ground a character in their setting and help relate your writing and/or unwritten details to the viewer.
3. Editing:
This is one that I think is really mutable to your personal tastes and goals. I’ve seen some simmers really go above and beyond with unique templates or text while others (ahem, me) will just brighten up or increase the contrast of a shot. I know others will often use photoshop for more detailed editing, but I stick with an online service just to make the brightness and colors pop. Even still, those few extra steps can really balance out the in-game lighting or make a photo even more pleasing to look at, so I really recommend finding something you like if aesthetics are important to you.
4. All the extra things:
Simmers, I think you already know where I’m going with this. Sometimes this game isn’t exactly the most pleasing to look at, so things like lighting mods, swre, or reshade really help you as a creator and can take your screens to the next level. As I’m sure y’all know by now I fought the reshade train for a long time, and even still I can see how this process can be over involved or overwhelming; however I won’t deny that the addition of it to my game is by far the biggest step I’ve taken to making my photos look as good as they currently do, and it has saved me a lot of time on manually editing. But I do not think it’s by any means necessary, and lighting mods are a good place to start for these in-game enhancers.
5. Trust the process
Yes, I’m ending this ramble by reiterating the point I stated at the beginning. I cannot stress enough that it takes time and practice to find your style and the techniques that work for you. I would really encourage you to go back to this post compared to recent ones and look at how different the camera angles and ideas behind the shots are. Changing is okay! Find what you’re really excited about in your images (which for me, y’all may be able to tell from the beginning, was the outfits and set design) and really enjoy that process. It comes through in the images, I promise!
Most of all, don’t feel like you have to perfect your visuals before you start posting here. Community feedback and just the joy of engaging can be such a motivator to continue, and quite honestly, if there is a place to grow your style and content as you go it’s here. People are so willing to help and answer questions as you encounter new roadblocks or ideas, and so starting that network and gathering that inspiration is pivotal to making your content look the way you want it to.
I know that I for one hope you post your legacy, Nonny! I always love seeing new people come aboard and I hope this could be helpful to you 💕
34 notes
·
View notes
Photo
Hello! I made this list of tips for Twitter months ago, chickened out of sharing it because I didn’t want folk to think I was acting like some kind of authority on posing, and then eventually posted it last night.
Anyway, I had a couple of requests to post it here as well, and as Twitter really made a hatchet job of my thread I thought having everything together in one post might be helpful.
I’ve kept the same cover image with the missing word typo because it’s stupid and amuses me. May useful? May not useful!
This list assumes you know the basics of posing already. If you’ve never posed before and are looking to learn, then I can’t recommend the @katverse series of tutorials enough - start here.
These are just little tricks which I wish I’d known sooner!
1. ALWAYS move Sims via their root point, never the orange dot! If the orange dot is moved, they won't be in the right place when you put the poses in game. If you do move the dot, change to Object Mode, click on the orange dot, hit Alt+R & then Alt+G.

2. The side menu is really useful for selecting points on the face, such as the eyes. To bring the menu up, press A to select all points then hit I & select either Location or LocRot - I don't think it really matters unless you're saving now, in which case you want LocRot.

3. Need to reset a point? Right click on the point so that it turns blue, then hit Alt+R. Need to select multiple points? Hold shift while right-clicking points. Need to reset the whole rig? Hit A until all points turn blue, then Alt+R.
4. You can also copy and paste certain points or entire poses by selecting the point(s) first, then hitting Ctl+C, then Ctl+V to paste. Please only use this knowledge for good, not evil - no stealing people's poses, adjusting them slightly, and then paywalling them (it happens).
5. I recommend working on expressions when the face is viewed straight on, in either 1, 3, 4, or +1 view. This helps you avoid any unnatural twists. For a natural expression, remember to move eyelids, squints, and eyebrows as well as the mouth! If I’ve already posed the Sim and need to adjust their expression, or have just straight up forgotten to do it, then I copy the head point (right click so the point goes blue, CTL+C) and twist ONLY the head so that it’s straight on in one of these views. Then I just paste the point back again when finished (right click, CTL+V).

6. With the mouth, I like to lift the corners (either right click & drag if asymmetrical, or raise both via the translate tool - you can always drag later) & then use the rotate tool to give a softer curve. Remember to always open the mouth with the jaw point, not the mouth. Oh - and don’t forget how raising, stretching, or lowering the lips can alter an expression! But don’t stretch too far, remember how real mouths are shaped.
7. Fingers! Those bastards. On all my base rigs, I have the W, X, and Y points locked on ALL finger joints so they don't squiggle all over the place. You can unlock them on the 0 joints if you want to spread the fingers etc. once in position. You can also lock the jaw point in the same way - this means you can open the mouth whatever position the head is in, and not get a weird crossed look. I recommend saving base rigs with all these points pre-locked so that you don't have to go through them every time. Sometimes I’ll lock the eyelid rotation and knee rotation, too.
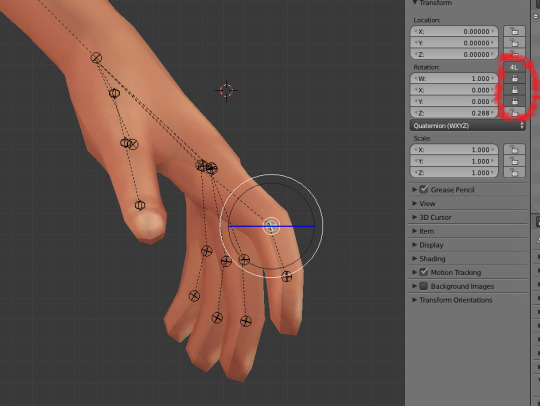
8. It's a good idea to view your pose from every position before finalising it, as you can catch weird angles/clipping that way. Hold down the mouse wheel to move freely. Use 1, 3, 4, and +1 views to make sure feet etc. are flush with the ground line.
9. If you're working with custom rigs/ objects/accessories, it's helpful to restrict selection so you don't accidentally move them (also very annoying if you keep clicking on them instead of the rig). Right click the mesh so it gets an orange outline, then click that arrow. You can also use the eye to hide things like rigs/objects/accessories, which is useful if you’re making poses using big objects such as cars or horses who are in the goddamn way.
10. Custom rigs! I love custom rigs! I REALLY recommend making these if you’re creating poses for your own Sims/story. They completely eliminate clipping because you’re able to make the poses SPECIFICALLY for that Sims’ body shape/clothing/hairstyle. Expressions can change wildly depending on the Sim the pose is used on, so making them for your specific Sim means you know it will look right for them. I have a folder of saved bases for all my story Sims with various outfits and hairstyles - and naked versions hehehee. If you're making poses for others to use, the default rig is best - and remember to leave a lil gap between hands etc. to account for different clothes, body shapes etc. I recommend this tutorial if you wanna make custom rigs.
If I’m sharing story poses that featured my beloved vampire (and most do), I have to copy all poses from the custom rigs and paste them onto default rigs before sharing them because he’s a skinny lil disaster with a feminine body preset and his poses would NOT work for the majority - there’d be too much clipping.
11. When moving one part of the body, you’re really moving the whole body. Use pelvis, spine, neck & head points to create a natural curve - you only want to move each one a lil bit. Remember that bodies lean, twist, slouch. You can put a lot of emotion into the bend of a spine. Putting the entire twist &/or bend into one point makes things look a little weird. Move the neck joint THEN the head joint for head turns - start that movement right down the spine if the Sim is really twisting to look at something!
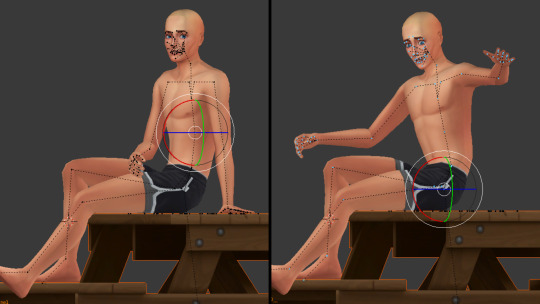
12. Clavicles. Don’t overlook them because arm movement starts here! You can move the forearm a certain amount without it starting to look weird, but if your Sim is reaching up/forward/backwards then you want to start that stretch/rotation in the clavicle point.
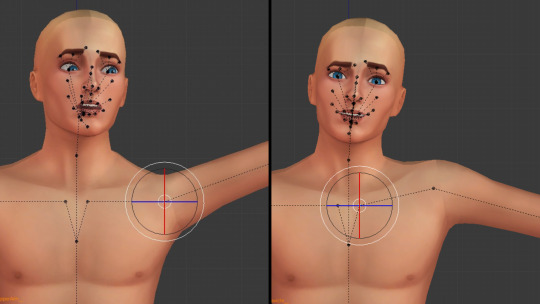
13. There are other things you can do to help with posing, like using helper rigs or setting up IK targets, but I didn’t get on with them - they’re a different learning curve. It’s all about what works best for you! This is just my personal list of things I've found useful.
Anyway, that's it. I am extremely mediocre, I make lots of mistakes all the time, I am most definitely still learning, there are MUCH better posemakers than me out there, and probably better ways of working; but learning all the points mentioned here has definitely helped me along the way. Enjoy posing!
364 notes
·
View notes
Text

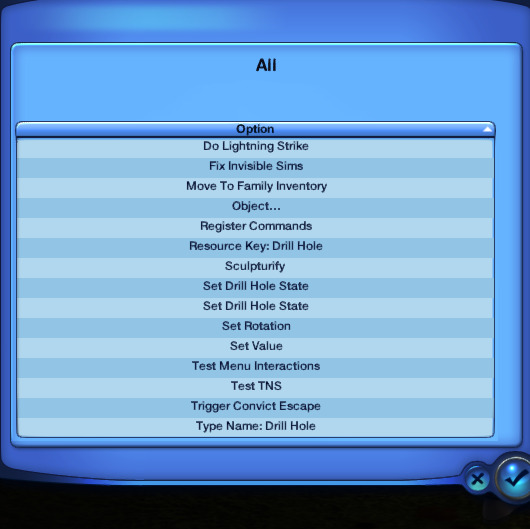
So everytime I put a debug object in my game like the 'drill hole', above, (which I used in my last story post) I like to check out the debug menu to see what options are available. The drill hole had a number of interesting options, but the one that intrigued me the most was 'trigger convict escape.' (below) What?? So I clicked on it but all I got was a debug script error.
My curiosity was piqued however so I did some Googling. And found this:
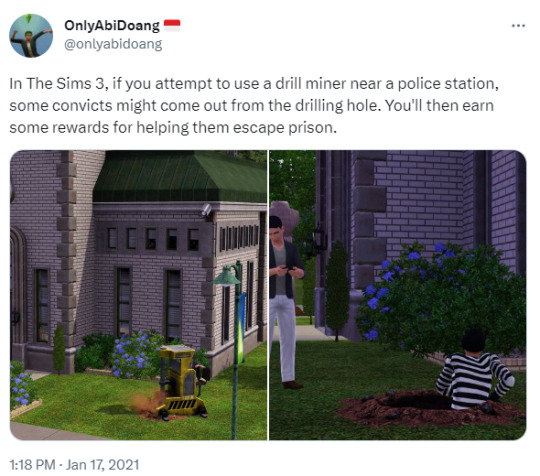
I must have gotten the script error because I was not near a police station, but I thought it was so cool I had to share! And sorry if I was late to the party and every Simmer but me was aware of this option, lol!
203 notes
·
View notes
Text
Fun trick using EA's Alien Eyes Modifier Slider, located in Eyes/Global. You can adjust the wing tip on eyeliners. This will also minimize the upper eyelid depending on how much you use it, but there's a slider to adjust that as well ( EA's Eye Socket Slider I believe it's called ).
While you're at it, download my all time favorite eyeliner set.
237 notes
·
View notes
Text
Amazing Tutorial on YouTube for Creating Custom Sims 3 TV Channels
I had to share this video, because it has one of the best tutorials to date of how to create your own custom channels to Sims 3 TV. Keep in mind that the process is a little complex. However, I have the sneaking suspicion that once you do this a couple of times, it gets easier to remember all the different steps.
youtube
1 note
·
View note
Text

La Revista oficial de Los Sims
The Official Magazine of The Sims (Previously Official Magazine of The Sims 2) was a Spanish magazine, bimonthly and with a national circulation, dedicated solely and exclusively to the Sim world (SimCity, The Sims, MySims, SimAnimals and Spore.). The first issue went on sale on December 30, 2005, and 33 issues were released. The last one, on March 30, 2012. It included a CD full of official content and Community creations, as well as gifts such as notebooks, pendants or Sims-style stickers.
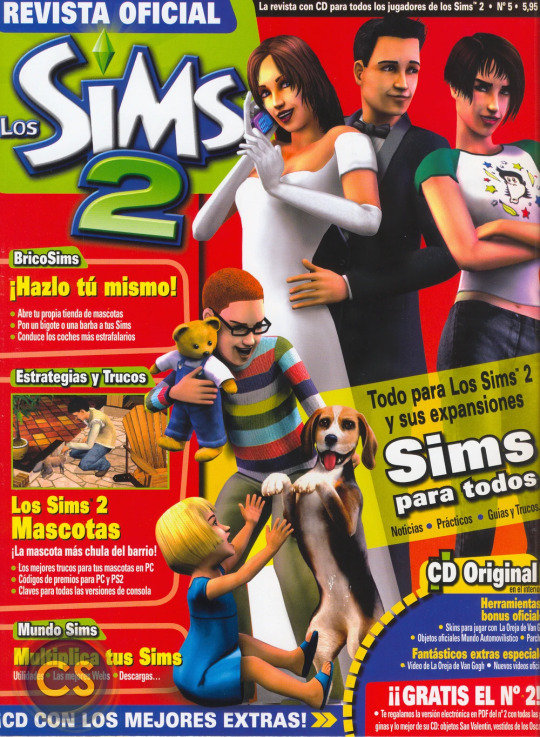
Issue 5
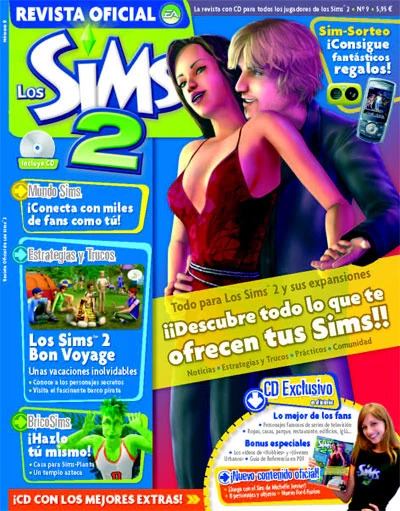
Issue 9
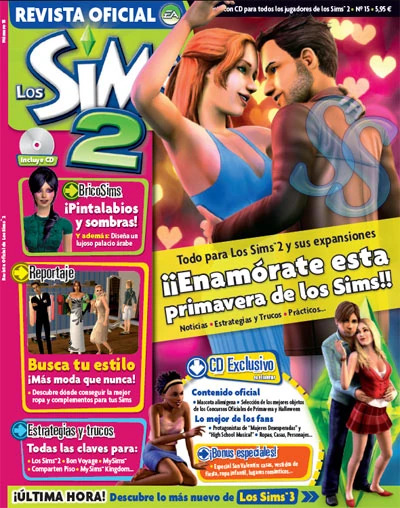
Issue 15
I can't make out exactly what is written, but as I understand at that moment The Sims 3 was released. I remember my pirated Sims 2 disc, which for some reason had screenshots from Sims 3 and had this same couple on the cover.
The magazine is divided into 12 sections, which briefly explain the current events of the past two months, tell the news of each add-on and even patches. The community column contains reader letters, from tips on how to make your Sim happy, to various fan-made content. The issues also contained strategies: all kinds of tricks, interesting curiosities and hidden and not hidden strategies with tables and lists with information from the EA devs.
The magazine ran contests giving away expansions and games from The Sims saga, as well as t-shirts, mugs, watches…
Source: Simspedia ES
P.S. I believe there was official magazines in other countries? At least I met some The Sims magazines on Polish and German.
#sims#the sims#the sims 2#sims 2#ts2#video games#game magazine#retro magazines#video game aesthetic#retro gaming#gaming#games stuff
42 notes
·
View notes
Text
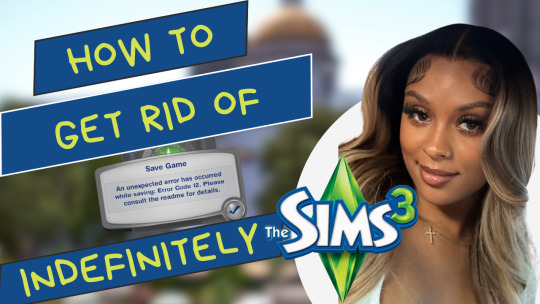
Just uploaded my tips and tricks for Error 12! I used to look everywhere for answers on how to fix it and I put together a list of things I did and I haven’t had error 12 in almost a year now!
Don’t forget to like, comment, subscribe for more sims 3 content 💚✨
https://youtu.be/kroNabPZLFQ?si=QIq7t26Unvq_pt7z
19 notes
·
View notes
Last Seen Blogs

tuaperfeita-blog1
Tua Perfeita!

ravioliette12-blog
some art stuff
herspiderbite
b i t c h c a k e s


mysoretimes
Malnad Today