#artist tips
Text
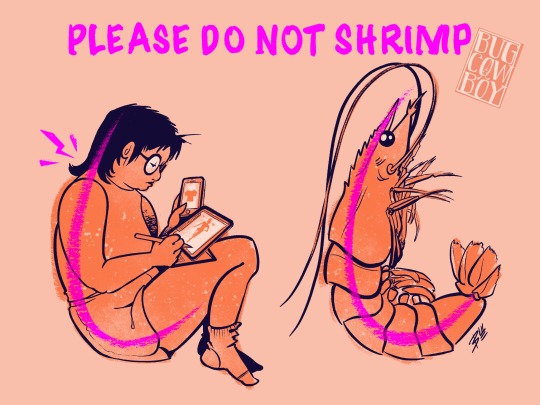
DEAR ARTISTS, PLEASE READ THIS POST I STUMBLED ACROSS
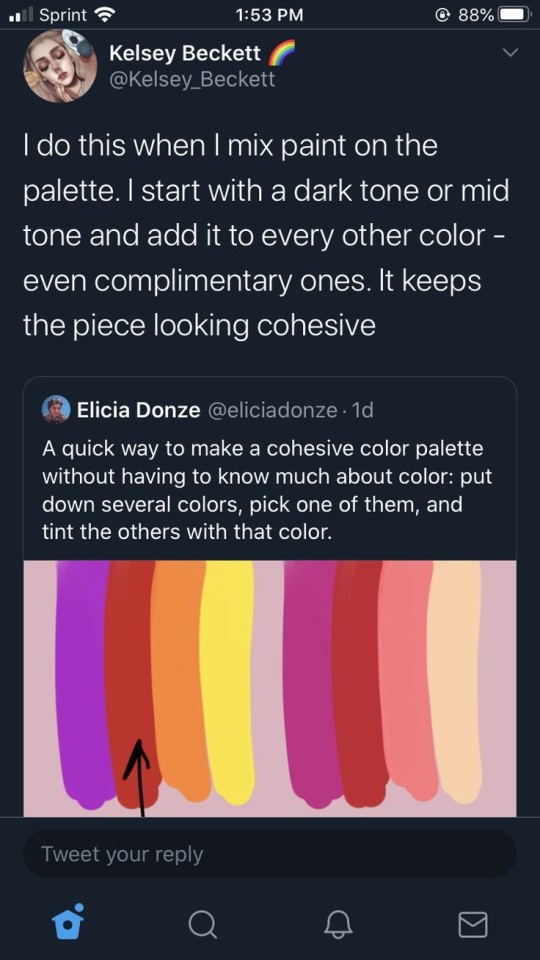
IF YOU ARE NOT DOING THIS ALREADY, YOU SHOULD TRY IT
I even tested it out myself, it works great
#art#artist tips#artist tip#digital art#colors#color pallete tips#color pallete#art tip#art tips#drawing tip#drawing tips#digital art tips#digital art tip
61K notes
·
View notes
Text
I have decided. Not only will I pirate any product that uses Gen A/I (you use mine for free, I use yours for free), I will also put it on my Resume under "Concept Designs and Illustrations".
You DID use my art.
It's only fair.
No worries, you will get a LOOOT of exposure! <3
Cheers! dra

376 notes
·
View notes
Text
idk who needs to hear this but if you're a writer looking for a webcomic artist and the best offer you can come up with is a 50/50 split "after gaining revenue", then that's literally asking for free work just with extra steps.
like first of all (and i'm sure people are gonna fight me on this) writing a webcomic and drawing a webcomic is not a 50/50 split, a scene that took you a half hour to write will take them hours to draw so it's literally more like 30/70
but also even IF your comic gains revenue, it's still not gonna pay for that labor, there are comic projects out there that have been going on for upwards of 10 years and beyond who are still maybe only making like $30/month on their patreon... and you only wanna pay them $15 of that?
please just consider writing a novel or short stories, or doing tabletop campaigns, or pitching scripts to comic publishers, or learning to draw yourself (even if you're bad at it! webcomics are allowed to grow and evolve in their art!), or doing RP, or doing anything that will get your ideas and stories out there without being at the expense of a whole ass other human being doing the brunt of the labor for free
no matter how dedicated you are to an idea or how convinced you are that it's truly a unique one that's worth working on, none of that will pay for the labor and time and efforts of people who you're asking to work for free to make your dream a reality. They have their own dreams that they're working on too.
#sorry i know this is very curt but i see this all the time#pls just be aware of what you're asking for if you're looking for a webcomic artist#i know you prolly really like reading webcomics but there's so much that goes into them that a lot of ppl don't realize#you're asking a LOT for someone to just love your own idea enough to work on it for free#sorry but most of us already have our own babies that we love and care for#self post#rant post#artist tips#writer tips#writing tips#hot take
425 notes
·
View notes
Text
I don't know who needs to hear this, but as a painting student I suggest:
Dish soap and boiling water is WAY better than terpentine or paint solvent to fix dried out brushes.
------------------------
Put the brushes in a cup.
Pour a dish soap.
Pour a boiling water to the level it doesn't reach the wooden part.
Leave them to soak and soften
Try to separate the hair on two parts, then on smaller and smaller parts.
At the end, carefully try to scratch off the paint and "break" the hair by carefully pushing it over a surface and moving (like over your palm). If you can't, repeat the previous steps.
------------------------
Works even with dried out oil paints. Stronger fluid doesn't mean better.
Tho in harder cases you'd have to repeat the steps a few times to restore the brush fully.
So if you can't afford new brushes, don't throw the old away. Even if they seem helpless, there is a hope for them to be like new.
#painting#oil painting#acrilic painting#paint brushes#art supplies#painting supplies#art#art tips#art tip#drawing tips#artist tips#drawing tip#reference#art reference#drawing reference#artists on tumblr#no gatekeeping#fuck gatekeeping
799 notes
·
View notes
Text
taking some extra anatomy classes this year, here are some of my notes in case they could help someone. should be updated every weekend (aside from october 28th and november 4th which are free days) with the following lesson's notes. (further explanations at the end)
anyway. here goes:
SCENE 0-1: LEARNING HOW TO LOOK/OBSERVE
when drawing, we each more or less have our own methods when approaching certain subjects, with multiple tools at our disposal in order to achieve the desired results.
but generally, when drawing a model (or most things from life, actually) we can in some sort of way define a general order as to when to draw what:
Looking / Observing
Blocking In
Correcting
Details
for today i’ll focus on the first one of the list, looking / observing.
the existing nuance between “seeing” and “looking” exists in the sense that “seeing” is more passive than “looking”. when you say “i can see a cat”, you aren’t paying too much attention to the cat. but when you say “i am looking at a cat’, you are actively paying attention to the cat and what they’re doing.
(given the class is in French, the nuance was similar, using the words “voir” and “regarder”. but due to French not having a close equivalent to “watch” i cannot make more parallels about this, as my knowledge of English and French-to-English translation is still fairly limited)
when looking at a subject, the primary objective should be to understand what you’re looking at. you can look at a subject (or the world as a whole) under multiple filters: values, hues, proportions, in 2D or 3D, and so on. you need to define how you want to look at a subject following these filters of vision. what do you want to look at first? what do you want the viewer to look at first? this is important to define before you put your tool to your support.
generally when drawing from life, it’s a bit reckless to rush to draw the model without actually observing them a minimum. you should take the time to observe, you are allowed to take your time to observe. no amount of limited time should paralyze you from examining the model the best you can before you put your tool to use.
getting this more precise vision of your model can give you a better vision of their body, which is often hidden under detail. when drawing them, you should ask yourself “how is the model posing?”
why look/observe? (probably like the most given piece of advice by pros and art youtubers who aren’t pros but still get called pros cause they have 1 million subscribers on youtube)
this question is very easily asked but also very easily answered:
to know how and what you’re going to draw
to time yourself correctly and have a good time management (drawing a pose in 2 minutes is completely different to drawing a 10 minutes one), thus,
to avoid rushing to draw the subject. as said previously, take your time. start slow, but stay accurate to the model. (teacher compared it to a musician rehearsing a piece, first slowly, then speeding it up progressively as he gets to know the piece itself better and better. unfortunately as someone who is as farthest from a musician as can be, i cannot honestly attest to if this is accurate).
but really, there is actually no such thing as a “finished” drawing. a graphite drawing could always have color added afterwards, a painting could always get more and more detailed. a piece is “finished” only when you deem it is finished. the French Académie des Beaux Arts didn’t like the Impressionists because to them, what the impressionists were doing were half assed jobs, since the idea of “transmitting a vague feeling, or an emotion through a specific style of very visible strokes” was absolute fuckery to them. speaking of,
to transmit an emotion, or a feeling through the posing of the model. the more technical and controlled the strokes will be, the finer the wanted sensation will be felt by the viewer. this also ties in the physical aspect of the model. ideally, in order to achieve this, you can try posing the same way the model does. it may be a bit awkward but it works (depending on your learning type, of course.)
to understand how the whole “body system” works. “i know the rules of the human body, therefore i make little to no mistakes.”
adding a whole context to the pose helps: adding a situation in which the pose could work in gives some meaning to your drawing, as well as helping you remember it better. it also adds a narrative element to your drawing(s), which are absolutely always a plus. (memorization is also an important tool!)
now let me play devil’s advocate and ask: why not look/observe?
well, uh, there are two reasons my teach told us:
to let your instinct and imagination go wild and free, trust your gut and have fun!!
and, tying back,
to let yourself be surprised by what you’ve done.
form synthesis (or just different types of approaches to draw form)
when drawing a model, there’s a few things that can be mentioned:
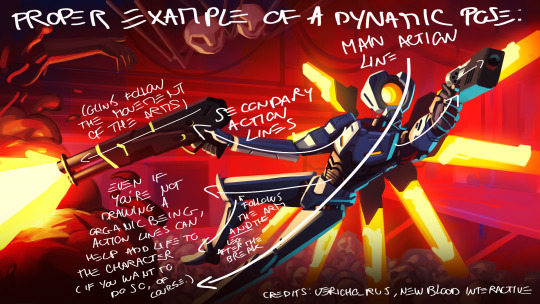
multiple types of lines exist with different purposes within the drawing: the action line(s), structural lines, and contour lines.
action lines define the overall movement of the pose. the principal one is the one you see when giving a better look at how dynamic the pose is. the secondary ones are the ones you can find in secondary rhythms when examining the pose a little longer.

(here's a better example, actually:)
structural lines are pretty much the “stickman skeleton” you sometimes see in certain how to draw books (specifically the more advanced manga themed ones).

contour lines surround the form in a way as to draw all of the outer body without using inside shapes or lines. (it is also the basis for the Bargue method which will be slightly discussed below. there unfortunately won’t be any talk about cross-contour lines, as it hasn’t been talked about in class (yet?))

generally, lines take either an I shape, a C shape or an S shape. (teach said it’s preferable to mostly use I and C type lines when drawing live models. probably due to the fact that S shapes are much trickier to use “effectively” within a piece (effectively not meaning much in this context, if nothing at all. again, have fun.)). using these lines tell a lot about the model and the pose, telling a sort of dynamic storytelling which varies depending on what type of line you choose to represent your model.
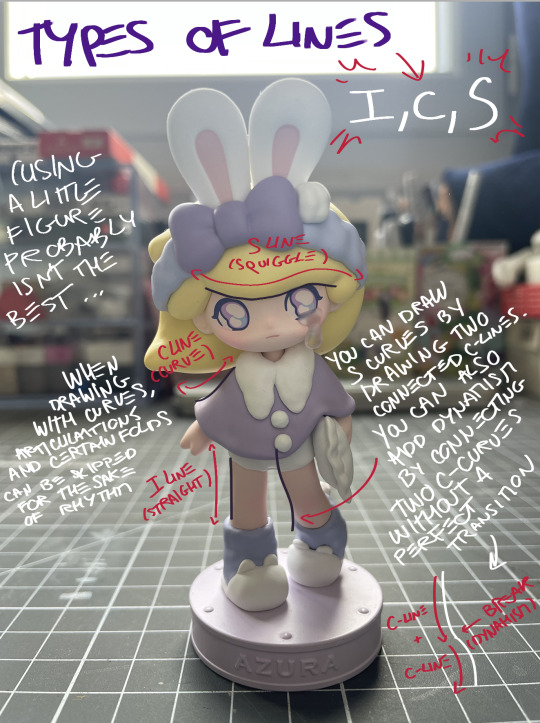
we can mostly talk about 2D shapes when three or more points have been linked by lines. sometimes, lines can skip articulations for the sake of dynamism. shapes should be thought about in their entirety, the difficulty that can be encountered usually being remaining vague but accurate with your form.
now, a quick word about:
the Bargue method (or, the fuck do you mean the Americans used it in art schools before us, Bargue was literally born in Paris, i fucking hate the Académie des Beaux-Arts)
the Bargue method is probably fairly well known among certain art schools or artistic communities. if i do recall correctly; it originated with Bargue noticing the low level of the students of the Académie des Beaux-Arts de Paris (or some other place basing itself solely on academic style art and paintings located in the city of Paris in the country of France on the continent of Europe) and devising a simple way to learn how to draw accurately from life (or plaster casts, depending on what you prefer). it solely based itself on straight, contour lines, forming a base around which to slowly add details to. apparently, a lot of art schools in america base their teaching of life drawing on this method, but given i do not feel like getting over $200k in debt without even mentioning living and travel costs, i cannot say if that is actually true.
here's an example of it:

it’s pretty much basing yourself on simplifications of the form to attain absolute accuracy. no curves here to distract you, only straights. somehow, when pulled off correctly, it gives a very neat impression of realism.
anyway, that’s all i wrote down. hope teach won’t see this anytime soon, and hope this kinda helped a little bit. next week’s notes should be about blocking in shapes, so we’re starting to be a little more concrete with the actual drawing process.
these classes were taught by Mr Francis Buchet at a class given at the Académie de la Grande Chaumière, so most of the things i’m saying here are taken from him and his class. if you live in/close to Paris and are interested in learning artistic anatomy, i suggest you look up where he is giving public classes, since they’re infinitely more engaging than these notes. his instagram is be linked below. (hoping he doesn’t get mad at me for sharing these notes… in any case i will use my own example sheets to avoid getting in any more trouble.)
and, may i remind you: these notes are only here to showcase one approach among many others, so they don’t mean much in the grand scheme of things. i myself am in absolutely no way a professional, so please, take all of this with a grain of salt (or a spoonful, even). draw how you enjoy drawing, and find happiness in the way you want to draw.
Francis Buchet's instagram: x
so, seeyou next weekend! (or earlier, if i draw something i want to show here.)
#artist tips#art tutorial#art tips#art help#drawing tips#literally no one asked but why not#that was something i've wanted to do for a while tbh#god i hope that doesn't sound pretentious#next time i'll try to show more examples since this one seems a little bit bare#first four classes will be about drawing theory so it might take a little while before we get to actual anatomy :(#so it's gonna be a little bit boring for the first while :((#really sorry about this#next ones should be a little more concrete so. yea#i apologize if this sounds abit confusing; it's the first time i try to make a “tutorial” or anything like that for art#will also try to find a spot to put my own drawings i did while attending the class to show the stuff we do there#in any case#hope this helps someone!
242 notes
·
View notes
Note
Hello! Nice to meet you. Been following this blog for a while and I've become a big fan of your work~♡
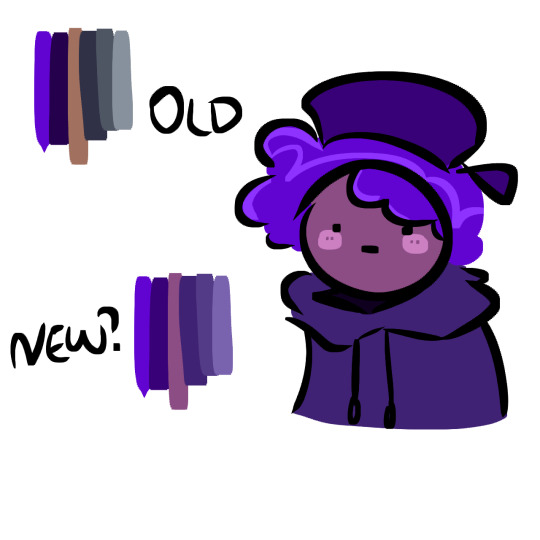
So, about this question here, could you elaborate a bit more about using references and "editing" the colour palettes? Also, what is colour dropping?
As a (not digital) painter I also often struggle a lot with finding the right colour scheme to make what I want. I think that's partly why I have trouble finding inspiration too.
color dropping is using the eyedropping tool on an image and taking the colors from it directly!

so basically i find a picture i like the vibes of/think it could be pretty and just edit the color. I draw with photoshop so I edit the colors with it as well! i use the curves tool usually and just mess with it until im happy! above is an axample.
first image is the original then i color edited it, then i used the color dropping tool on photoshop (pictured in the top right corner) to create the palette then i usually edit the colors a bit more!
generally when i color pick i start w the lightest then go darker! this isnt what i do every time, this has gotten me to the point of being intuitive enough with colors that I can pick my own now, but I think its a great way to learn abt colors digitally!
#color tutorial#color#artist help#artist tutorial#artist tips#pixel art color theory#digital art#digital art help#pixel art#reference#art reference#art tips
523 notes
·
View notes
Text
Drew this to facilitate class discussion on ergonomics for digital illustration, but y’all can have it too.
Honestly this is mostly a note to self.
124 notes
·
View notes
Text
My tiny go-to drawing tips I use personally
- Ears are as long as the BOTTOM OF THE NOSE and THE EYEBROWS. The ears come BETWEEN THOSE. Give or take facial proportions.
- Fat and skin folds. It folds over bones, it piles over itself. All positions affect this. Huge huge benefit to all your anatomy is to learn to draw fat according to gravity. The human body has way more folds than you might initially think, adds just a touch of realness to put a few here and there
- There's different eyelid shapes and they can easily be drawn on by just a few lines above or next to the eye.
- Soft parts you might not think about but do squish: noses, cheeks, anything around the eyes (The appearance of eyes is affected by squish!), ears, necks, the fat under the jawline (even on thin people there's a layer that can and will double chin-ify itself), LIPS and MOUTHS, arms, back of the neck, WRISTS
- Hands are probably bigger than you think. The average human palm w/ the fingers spread can reach the size of the whole face. Hand is damn near as long as one's face, from chin to forehead.
- Nose! Bridge! Scrunches! Remember SCRUNCHES
- The chin can in fact come as far front as the nose. Some noses may be longer and pointier, some chins may be more protruding.
- There's usually if not always a small dent under the lower lip, right between it and the chin. Especially so for bigger lips!
- Hair isn't as heavy as you might think (Except things depending on texture such as locs!!), and will drape and stick to fabric or skin easily
271 notes
·
View notes
Text
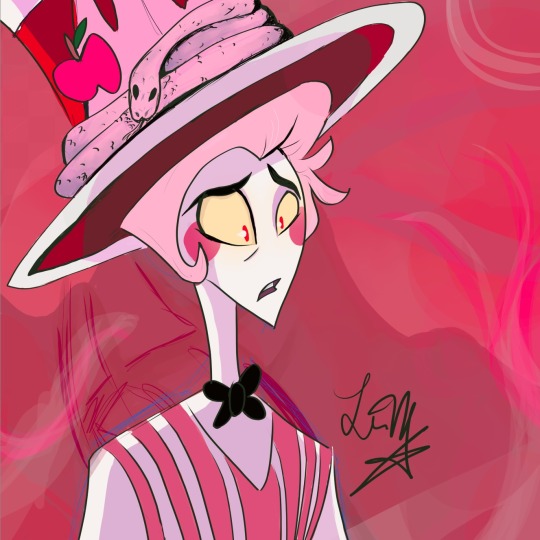
He's my silly pookus <3
Hey.
Read light-bringer v v v
#LOOK AT THAT HAT#click for better quality#artwork#art tag#illustration#art#digital art#my art#artists on tumblr#hazbin art#hazbin fanart#hazbin hotel art#hazbin hotel fanart#hazbinhotel#hazbin hotel fandom#Lucifer#hazbin lucifer#lucifer magne#lucifer morningstar#hazbin hotel lucifer#lucifer and lilith#lucifer hazbin#lucifer hazbin hotel#dad beat dad#radioapple#vivziepop#vivzieverse#artist tips#writer#writeblr
31 notes
·
View notes
Text
Artist advice!!
mirror your art when you are in the sketch stage, then use the warp tool to correct it!
This has helped me everytime when the sketch felt off. Hope this helps! ✨
120 notes
·
View notes
Text
Don't get discouraged if you see pretty sketchbooks online.
My sketchbooks are pages and pages of me having no idea what I'm doing and doing EXACTLY that as badly as possible, in ballpoint pen, caffeine, and neon markers.
If your sketchbook looks like you chewed on it, you did it right. <3
395 notes
·
View notes
Note


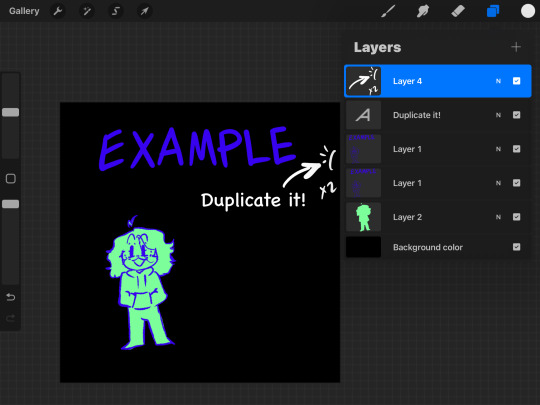


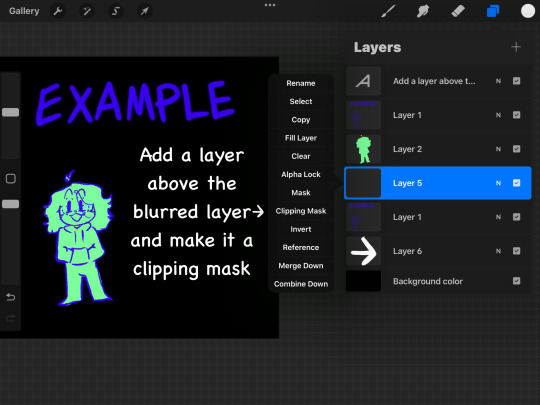
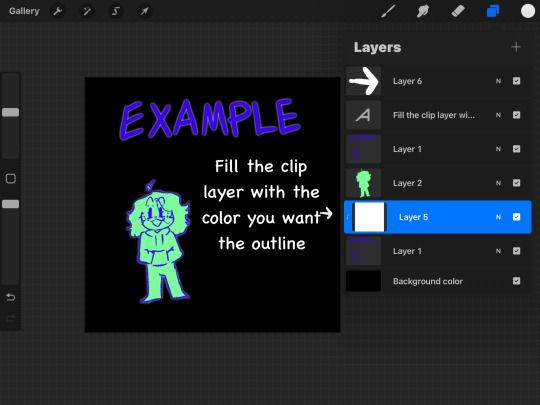

(Keep in mind you have to duplicate and merge down this layer a good amount of times)
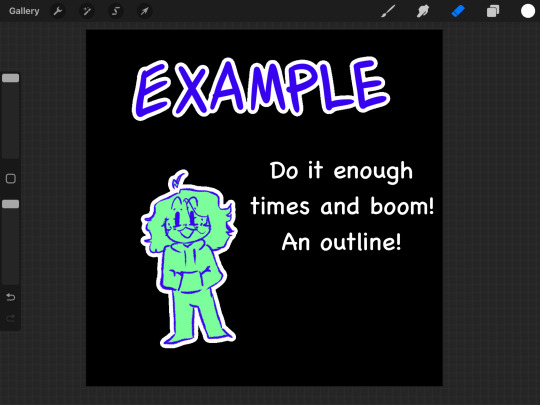
And that’s how I do it!
(Imma post a quick vid of me doing it in case this makes no sense :))
OMG.OMG.OMG!!!!! LETSS GOOO! Thank you so much purple :DDD this is wonderful! I know there’s a few different ways to do it but yours sounds easygoing ❤️💖🦇 thank you so much 😊 🥰💕🌸
125 notes
·
View notes
Text
a tip for beginner artists!
woah this post isn't a drawing?!?! yeah, i thought i'd just share this nugget of info i was reminded of today that might be helpful!
if you're wanting to get some advice from another artist, the most important thing (in my opinion) is specificity. if you're just commenting on an artist's video asking "what's some advice for beginner artists?" you're probably only gonna get a generic response like "practice" or "use reference."
because if the person you're asking has nothing to go off, its hard to give anything more applicable. If you want a more worthwhile answer, consider asking something more particular, like "how do you make your lineart look clean" or "how do you make shading that smooth?"
overall, getting advice from people who make/analyse a lot of art is one of the most important things for improving. so as difficult as it might be, showing your art to people and asking what they think of certain parts is really helpful.
118 notes
·
View notes
Text
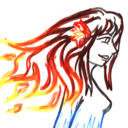
whenever i see people make art of poc and it Does have the correct lighter palm color, it still doesn't look right and i think it's because people always draw a hard line of separation between the main skin tone and the hand one. like it needs to be very evenly blended or else it just kind of looks like kind of uncanny valley
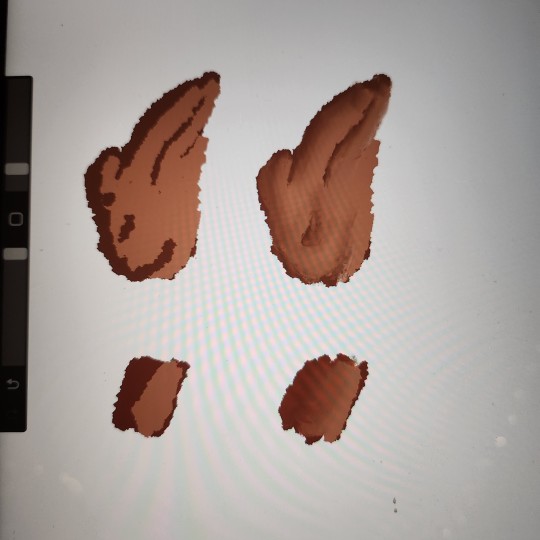
a bad drawing but it illustrated my point. no human has sharp color lines on their body. even moles or birthmarks would be depicted kind of fuzzy so skin tones should be treated the same
#sort of a psa for artists#and also a recommendation: always use references#art#artist#poc#people of color#digital art#procreate#tutorial#drawing tutorial#tip#artist tips#im black btw im literally looking at the shades blend on my hand#tag for when i write posts
57 notes
·
View notes
Note
hello! i admire you sm and youre one of my biggest inspirations!
and as a beginner pixel artist i was wondering if you had any advice or tips? thank you
aw this is super sweet!
and honestly, my biggest advice is to download a program and just try making pixel art. start with a small canvas (125px by 125px is good for starting landscapes) and just draw something you're interested in! once you hit a barrier, like color choice, you can start googling specific tutorials! thats how i learned and it was rly fun! you can also start by following tutorials too, theres a lot on lospec.com !
192 notes
·
View notes
Text
youtube
25 notes
·
View notes
Last Seen Blogs
angelsaxis
thique privilege
i-rita-sois-blog
i.rita.ções
siren-dragon
So many Fandoms So little time.

bobaloca12
unspoken words

here-2suffer
Not Suffering Enough